

Craftsman 14637635 Owner’s Manual

Owner's Manual
T
3/4 Horsepower (continuous duty)
500 C.F.M.
3450 R.P.IVl. (no load R.P.IVl.)
PORTABLE DUST COLLECTOR
WITH WALL MOUNT OPTION
Model No.
37635
®
C US
226002
CAUTION:
FOR YOUR OWN SAFETY; Read
and follow all of the Safety and
Operating Instructions before
Operating this Dust Collector.
Sears Brands Management Corporation, Hoffrnan Estates, IL 60179 U.S.A.
www.craftsman.com
Customer Helpline
1-855 -758-0015
Please have your Model No.
and Serial No. available.
EspaSol pg. 21
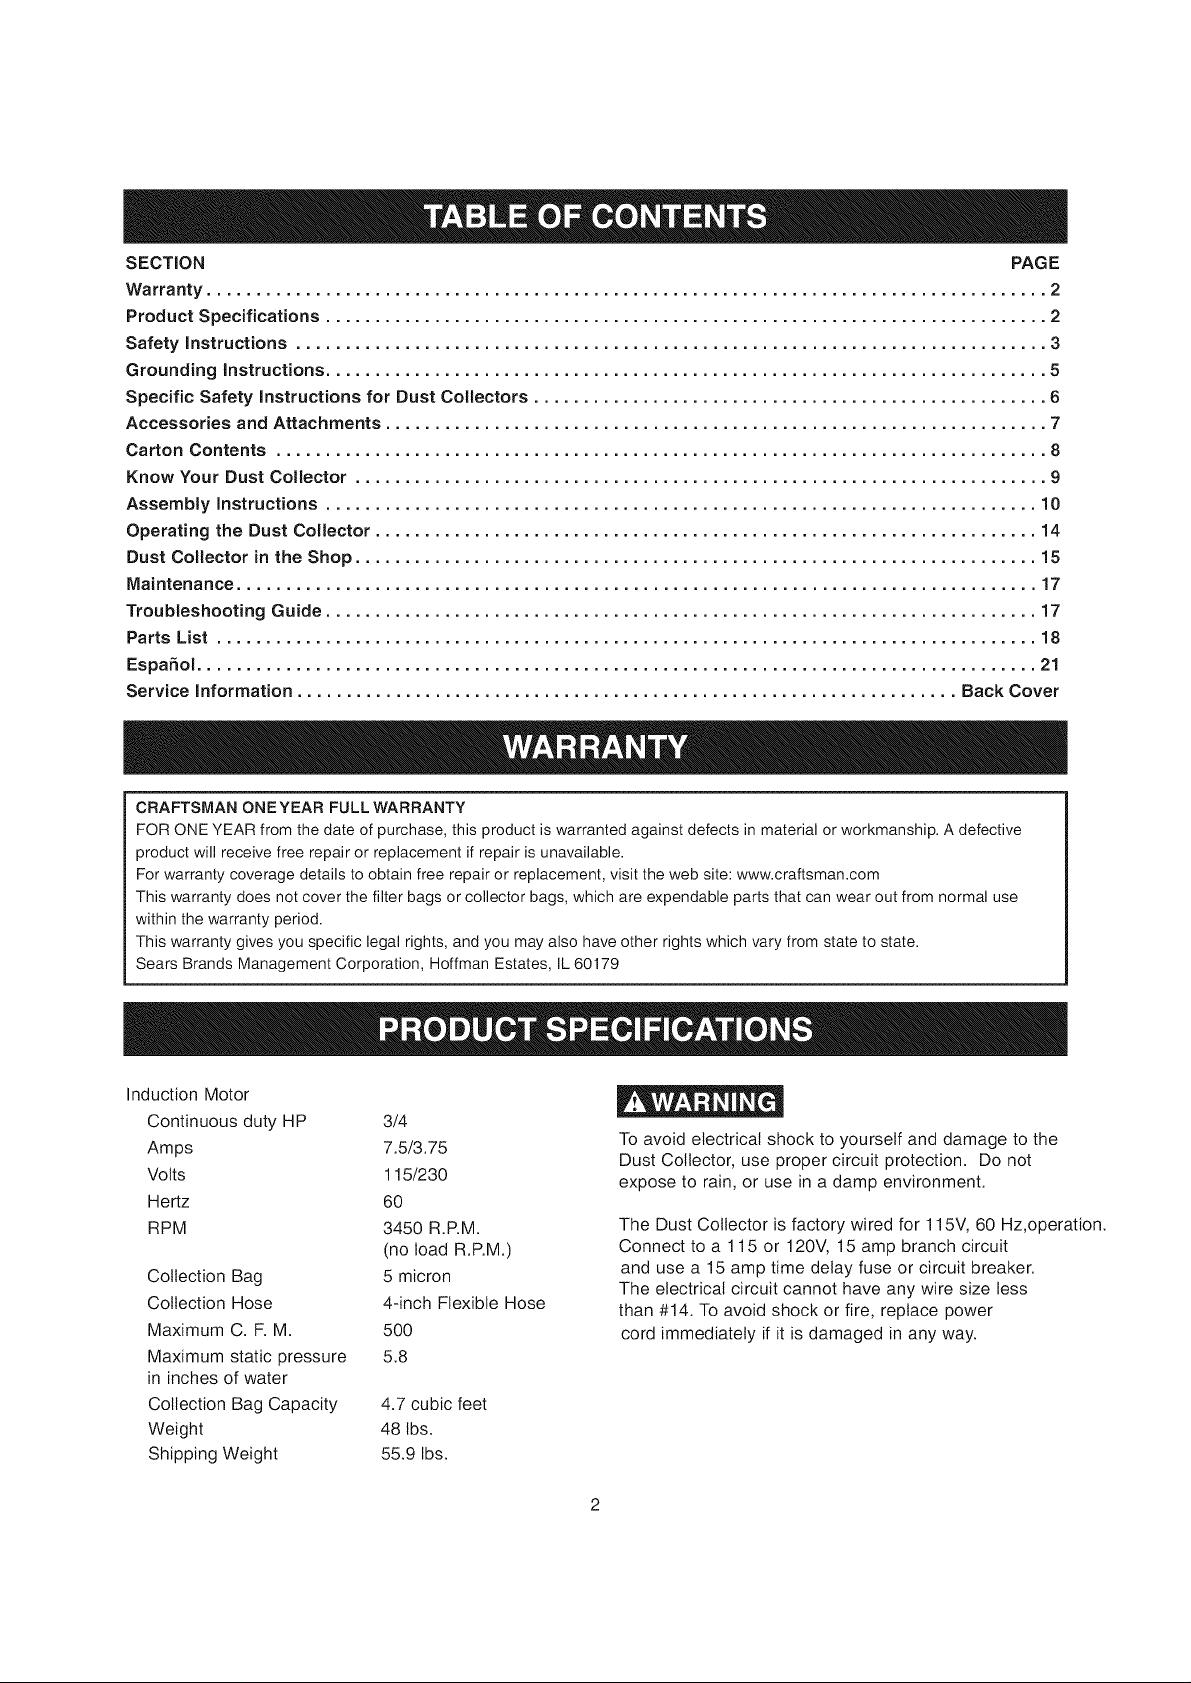
SECTION PAGE
Warranty ..................................................................................... 2
Product Specifications ......................................................................... 2
Safety Instructions ............................................................................ 3
Grounding Instructions ......................................................................... 5
Specific Safety Instructions for Dust Collectors .................................................... 6
Accessories and Attachments ................................................................... 7
Carton Contents .............................................................................. 8
Know Your Dust Collector ...................................................................... 9
Assembly Instructions ........................................................................ 10
Operating the Dust Collector ................................................................... 14
Dust Collector in the Shop ..................................................................... 15
Maintenance ................................................................................. 17
Troubleshooting Guide ........................................................................ 17
Parts List ................................................................................... 18
Espa5ol ..................................................................................... 21
Service Information ................................................................... Back Cover
CRAFTSMAN ONEYEAR FULL WARRANTY
FOR ONE YEAR from the date of purchase, this product is warranted against defects in material or workmanship. A defective
product will receive free repair or replacement if repair is unavailable.
For warranty coverage details to obtain free repair or replacement, visit the web site: www.craftsman.com
This warranty does not cover the filter bags or collector bags, which are expendable parts that can wear out from normal use
within the warranty period.
This warranty gives you specific legal rights, and you may also have other rights which vary from state to state.
Sears Brands Management Corporation, Hoffman Estates, IL 60179
Induction Motor
Continuous duty HP
Amps
Volts
Hertz
RPM
Collection Bag
Collection Hose
Maximum C. R M.
Maximum static pressure
in inches of water
Collection Bag Capacity
Weight
Shipping Weight
3/4
7.5/3.75
115/230
60
3450 R.P.M.
(no load R.RM.)
5 micron
4-inch Flexible Hose
50O
5.8
4.7 cubic feet
48 Ibs.
55.9 Ibs.
To avoid electrical shock to yourself and damage to the
Dust Collector, use proper circuit protection. Do not
expose to rain, or use in a damp environment.
The Dust Collector is factory wired for 115V, 60 Hz,operation.
Connect to a 115 or 120V, 15 amp branch circuit
and use a 15 amp time delay fuse or circuit breaker.
The electrical circuit cannot have any wire size less
than #14. To avoid shock or fire, replace power
cord immediately if it is damaged in any way.
GENERAL SAFETY INSTRUCTIONS
Operating a Dust Collector can be dangerous if safety
and common sense are ignored. The operator must be
familiar with the operation of the tool. Read this manual
to understand this Dust Collector. DO NOT operate this
Dust Collector if you do not fully understand the limita-
tions of this toot. DO NOT modify this Dust Collector in
any way. REMEMBER: Your personal safety is your
responsibility.
BEFORE USING THE DUST COLLECTOR
To avoid serious injury and damage to the tool, read
and follow all of the Safety and Operating Instructions
before operating the Dust Collector.
1.
Some dust created by using power tools contains
chemicals known to the State of California to cause
cancer, birth defects, or other reproductive harm.
Some examples of these chemicals are:
,, Lead from lead-based paints.
• Crystalline silica from bricks, cement, and other
masonry products.
• Arsenic and chromium from chemically treated
lumber.
Your risk from these exposures varies, depending
on how often you do this type of work. To reduce
your exposure to these chemicals: work in a well-
ventilated area, and work with approved safety
equipment, such as those dust masks that are spe-
cially designed to filter out microscopic particles.
2.
READ the entire Owner's Manual. LEARN how to
use the toot for its intended applications.
3.
GROUND ALL TOOLS. If the tool is supplied with a
3-prong plug, it must be plugged into a 3-contact
electrical receptacle. The 3rd prong is used to
ground the tool and provide protection against
accidental electric shock. DO NOT remove the 3rd
prong. See Grounding Instructions.
4.
AVOID A DANGEROUS WORKING ENVIRON-
MENT. DO NOT use electrical tools in a damp
environment or expose them to rain.
5.
DO NOT use electrical tools in the presence of
flammable liquids or gasses.
6.
ALWAYS keep the work area clean, welt lit, and
organized. DO NOT work in an environment with
floor surfaces that are slippery from debris, grease,
and wax.
7.
KEEP VISITORS AND CHILDREN AWAY. DO NOT
permit people to be in the immediate work area,
especially when the electrical tool is operating.
8.
DO NOT FORCE THE TOOL to perform an opera-
tion for which it was not designed. It wilt do a safer
and higher quality job by only performing operations
for which the tool was intended.
9. WEAR PROPER CLOTHING. DO NOT wear loose
clothing, gloves, neckties, or jewelry. These items
can get caught in the machine during operations
and putt the operator into the moving parts. The
user must wear a protective cover on their hair, if
the hair is long, to prevent it from contacting any
moving parts.
10. ALWAYS WEAR EYE PROTECTION. Any power
tool can throw debris into the eyes during opera-
tions, which could cause severe and permanent
eye damage. Everyday eyeglasses are NOT safety
glasses. ALWAYS wear Safety Goggles (that
comply with ANSI standard Z87.1) when operating
power tools. Safety Goggles are available at Sears
Retail Stores.
11.
ALWAYS WEAR HEARING PROTECTION.
Plain cotton is not an acceptable protective device.
Hearing equipment should comply with ANSI $3.19
Standards.
12.
ALWAYS UNPLUG THE TOOL FROM THE ELEC-
TRICAL RECEPTACLE when making adjustments,
changing parts or performing any maintenance.
13.
KEEP PROTECTIVE GUARDS IN PLACE AND IN
WORKING ORDER.
14.
AVOID ACCIDENTAL STARTING. Make sure that
the power switch is in the "OFF" position before
plugging in the power cord to the electrical
receptacle.
15. REMOVE ALL MAINTENANCE TOOLS from the
immediate area prior to turning the tool "ON".
16. USE ONLY RECOMMENDED ACCESSORIES.
Use of incorrect or improper accessories could
cause serious injury to the operator and cause
damage to the tool. If in doubt, check the instruction
manual that comes with that particular accessory.
17. NEVER LEAVE A RUNNING TOOL UNATTENDED.
Turn the power switch to the "OFF" position. DO
NOT leave the toot until it has come to a complete
stop.
18.
DO NOT STAND ON A TOOL. Serious injury could
result if the toot tips over or you accidentally contact
the tool.
19.
DO NOT store anything above or near the tool where
anyone might try to stand on the toot to reach it.
20.MAINTAINYOURBALANCE.DONOTextend
yourselfoverthetool.Wearoilresistantrubbersoled
shoes.Keepfloorclearofdebris,grease,andwax.
21.MAiNTAiNTOOLSWiTHCARE.Alwayskeeptools
cleanandingoodworkingorder.Keepallblades
andtootbitssharp.
22.EACHANDEVERYTIME,CHECKFORDAM-
AGEDPARTSPRIORTOUSINGTHETOOL.
Carefullycheckallguardstoseethattheyoperate
properly,arenotdamaged,andperformtheir
intendedfunctions.Checkforalignment,bindingor
breakingofmovingparts.Aguardorotherpartthat
isdamagedshouldbeimmediatelyrepairedor
replaced.
23.CHILDPROOFTHEWORKSHOPAREAbyremov-
ingswitchkeys,unpluggingtoolsfromtheelectrical
receptacles, and using padlocks.
24. DO NOT OPERATE TOOL IF UNDER THE INFLU-
ENCE OF DRUGS OR ALCOHOL.
25. SECURE ALL WORK. Use clamps or jigs to secure
the workpiece. This is safer than attempting to hold
the workpiece with your hands.
26. STAY ALERT, WATCH WHAT YOU ARE DOING,
AND USE COMMON SENSE WHEN OPERATING
A POWER TOOL. DO NOT USE A TOOL WHILE
TIRED OR UNDER THE iNFLUENCE OF DRUGS,
ALCOHOL, OR MEDICATION. A moment of
inattention while operating power tools may result
in serious personal injury.
27. ALWAYS WEAR A DUST MASK TO PREVENT
INHALING DANGEROUS DUST OR AIRBORNE
PARTICLES, including wood dust, crystalline silica
dust and asbestos dust. Direct particles away from
face and body. Always operate toot in well ventilat-
ed area and provide for proper dust removal. Use
dust collection system wherever possible. Exposure
to the dust may cause serious and permanent
respiratory or other injury, including silicosis (a
serious tung disease), cancer, and death. Avoid
breathing the dust, and avoid prolonged contact
with dust. Allowing dust to get into your mouth or
eyes, or lay on your skin may promote absorption
of harmful material. Always use properly fitting
NIOSH/OSHA approved respiratory protection
appropriate for the dust exposure, and wash
exposed areas with soap and water.
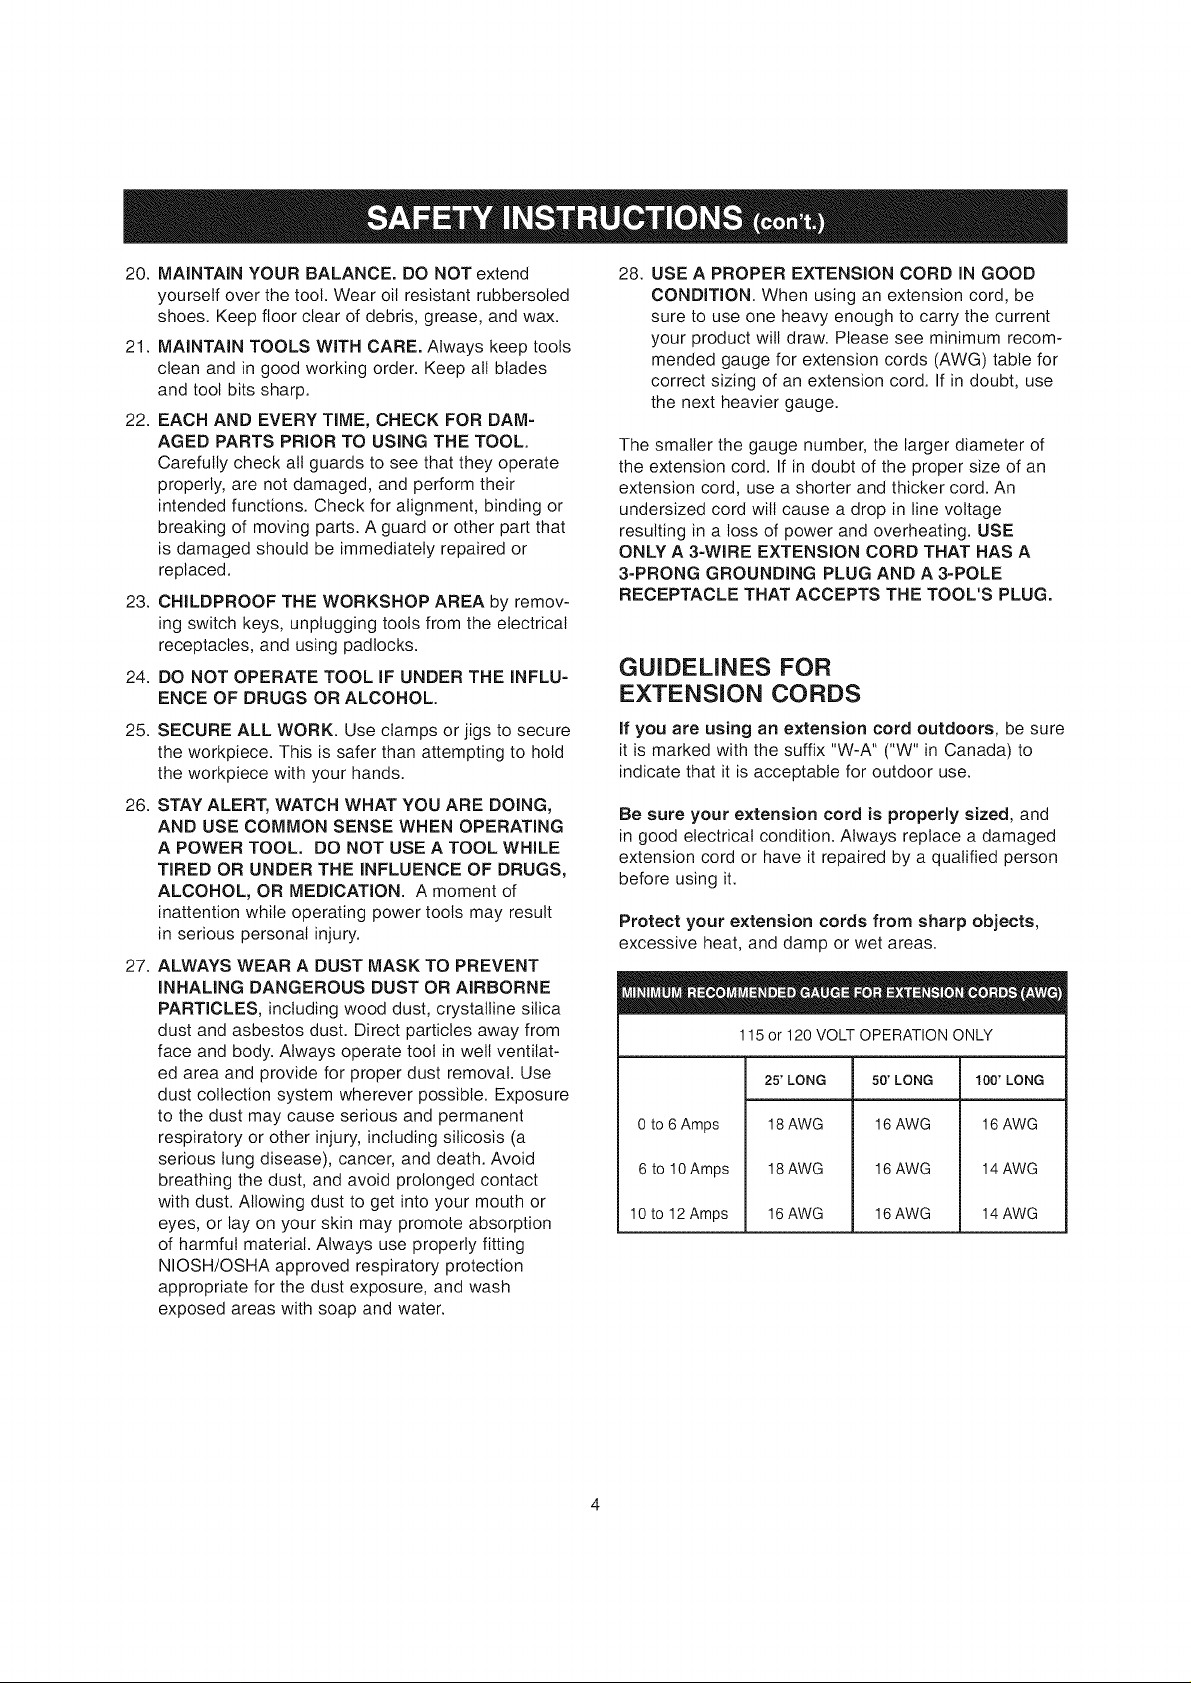
28. USE A PROPER EXTENSION CORD IN GOOD
CONDiTiON. When using an extension cord, be
sure to use one heavy enough to carry the current
your product will draw. Please see minimum recom-
mended gauge for extension cords (AWG) table for
correct sizing of an extension cord. If in doubt, use
the next heavier gauge.
The smaller the gauge number, the larger diameter of
the extension cord. If in doubt of the proper size of an
extension cord, use a shorter and thicker cord. An
undersized cord will cause a drop in line voltage
resulting in a loss of power and overheating. USE
ONLY A 3-WIRE EXTENSION CORD THAT HAS A
3-PRONG GROUNDING PLUG AND A 3-POLE
RECEPTACLE THAT ACCEPTS THE TOOL'S PLUG.
GUIDELINES FOR
EXTENSION CORDS
If you are using an extension cord outdoors, be sure
it is marked with the suffix "W-A" ("W" in Canada) to
indicate that it is acceptable for outdoor use.
Be sure your extension cord is properly sized, and
in good electrical condition. Always replace a damaged
extension cord or have it repaired by a qualified person
before using it.
Protect your extension cords from sharp objects,
excessive heat, and damp or wet areas.
115 or 120 VOLT OPERATION ONLY
25' LONG 50' LONG 100' LONG
0 to 6 Amps
6 to 10 Amps
10 to 12 Amps
18AWG
18AWG
16AWG
16 AWG
16 AWG
16 AWG
16 AWG
14 AWG
14 AWG
THIS TOOL MUST BE GROUNDED WHILE IN USE TO
PROTECT THE OPERATOR FROM ELECTRIC SHOCK.
IN THE EVENT OF A MALFUNCTION OR BREAK-
DOWN, grounding provides the path of least resistance
for electric current and reduces the risk of electric
shock. This tool is equipped with an electric cord that
has an equipment-grounding conductor and a ground-
ing plug. The plug MUST be plugged into a matching
electrical receptacle that is properly installed and
grounded in accordance with ALL local codes and
ordinances.
DO NOT MODIFY THE PLUG PROVIDED. If it will not
fit the electrical receptacle, have the proper electrical
receptacle installed by a qualified electrician.
IMPROPER ELECTRICAL CONNECTION of the equip-
ment-grounding conductor can result in risk of electric
shock. The conductor with the green insulation (with or
without yellow stripes) is the equipment-grounding
conductor. DO NOT connect the equipment-grounding
conductor to a live terminal.
CHECK with a qualified electrician or service personnel
if you do not completely understand the grounding
instructions, or if you are not sure the toot is properly
grounded.
The motor supplied with your Dust Collector is a dual
voltage 115/230 volt, single-phase motor. It is shipped
wired for 115 or 120-volt application. Never connect
the green wire to a live terminal. See OPERATING DUST
COLLECTOR section for directions on changing motor
voltage.
USE ONLY A 3-WIRE EXTENSION CORD THAT HAS
A 3-PRONG GROUNDING PLUG AND A 3-POLE
RECEPTACLE THAT ACCEPTS THE TOOL'S PLUG.
REPLACE A DAMAGED OR WORN CORD IMMEDI-
ATELY.
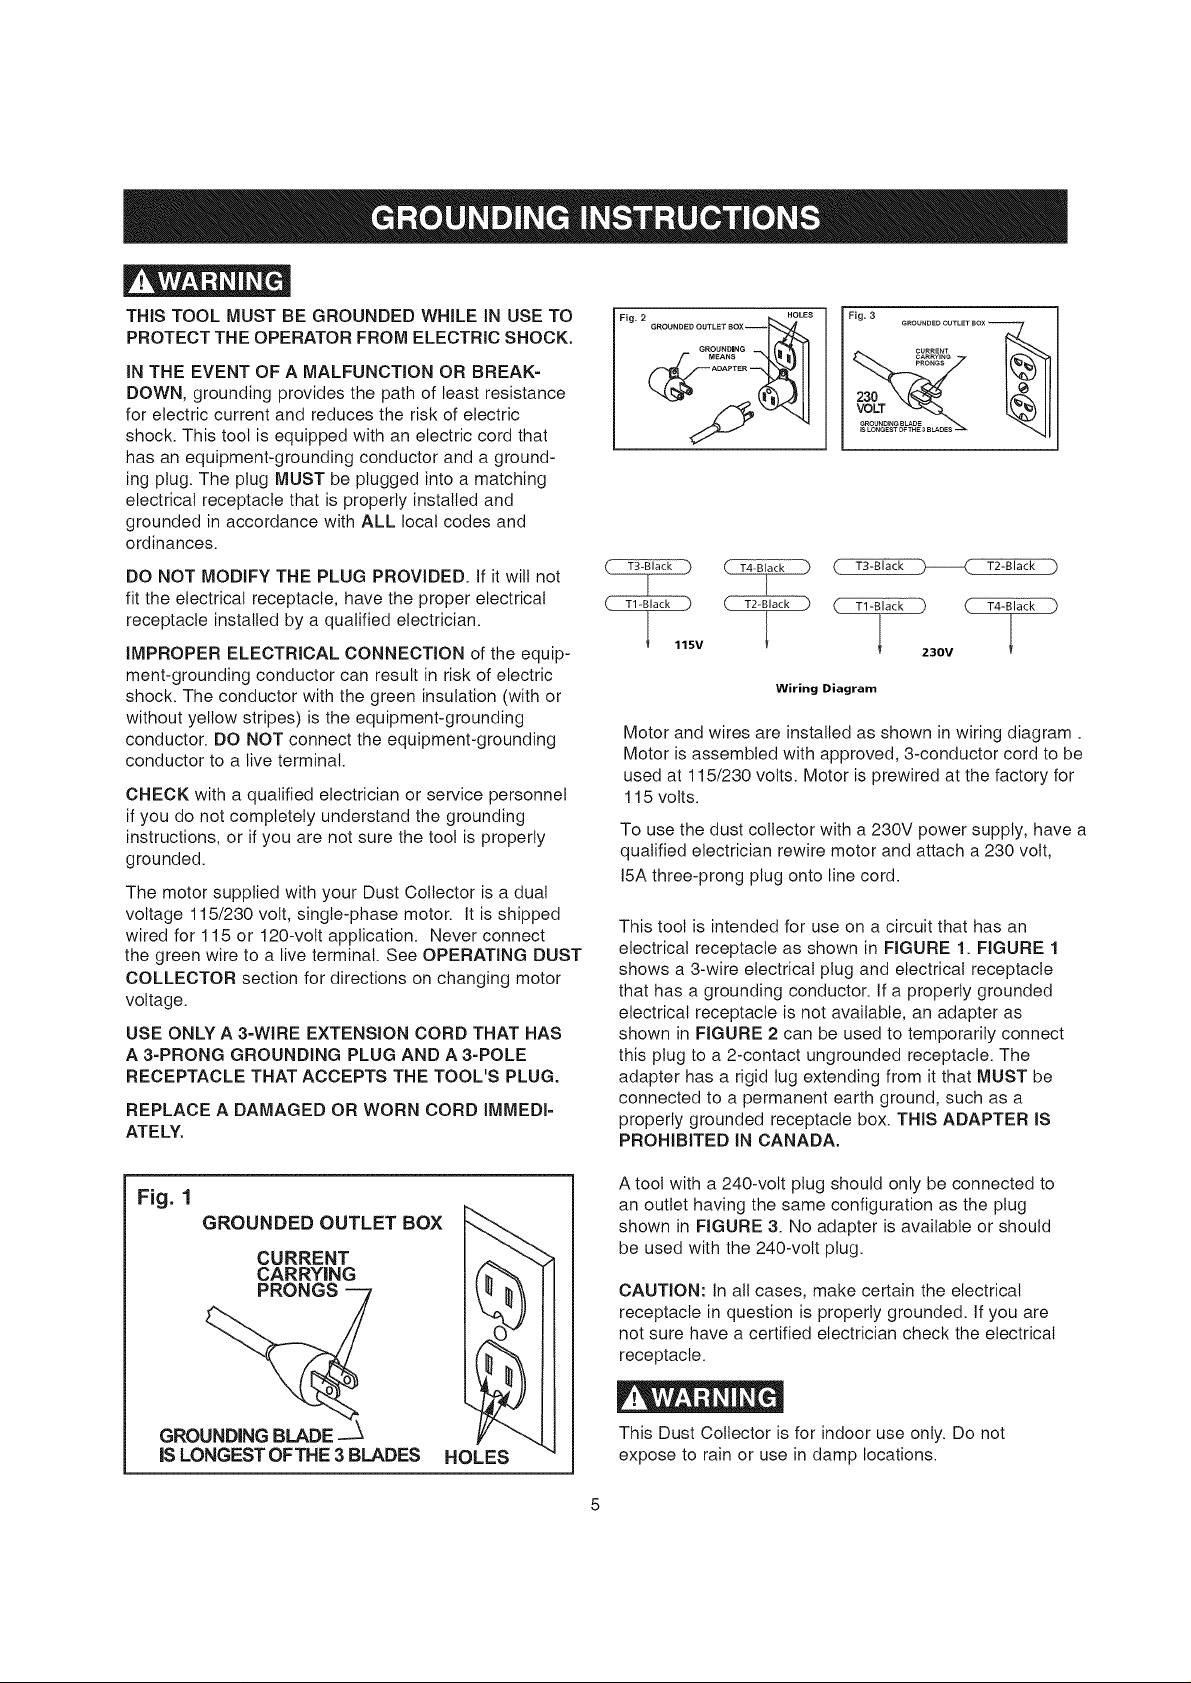
Fig 2 HOLES
• GROUNDED OUTLET BOX--
GROUNDING
(___MEANS
( T3-Black )------( T2-Black )
( TI-Black ") (" T4-Black )
1 230v 1
Wiring Diagram
Motor and wires are installed as shown in wiring diagram.
Motor is assembled with approved, 3-conductor cord to be
used at 115/230 volts. Motor is prewired at the factory for
115 volts.
To use the dust collector with a 230V power supply, have a
qualified electrician rewire motor and attach a 230 volt,
15Athree-prong plug onto line cord.
This tool is intended for use on a circuit that has an
electrical receptacle as shown in FIGURE 1. FIGURE 1
shows a 3-wire electrical plug and electrical receptacle
that has a grounding conductor. If a properly grounded
electrical receptacle is not available, an adapter as
shown in FIGURE 2 can be used to temporarily connect
this plug to a 2-contact ungrounded receptacle. The
adapter has a rigid lug extending from it that MUST be
connected to a permanent earth ground, such as a
properly grounded receptacle box. THIS ADAPTER IS
PROHIBITED IN CANADA.
Fig. 1
GROUNDED OUTLET BOX I_
CURRENT I ._
CARRYING I(_,_ II
GROUNDING BLADE --_ _"'J_ I
IS LONGEST OFTHE 3 BLADES HOLE"-S "
i _,_
A tool with a 240-volt plug should only be connected to
an outlet having the same configuration as the plug
shown in FIGURE 3. No adapter is available or should
be used with the 240-vott plug.
CAUTION: In all cases, make certain the electrical
receptacle in question is properly grounded. If you are
not sure have a certified electrician check the electrical
receptacle.
This Dust Collector is for indoor use only. Do not
expose to rain or use in damp locations.
SPECIFIC SAFETY INSTRUCTIONS
FOR DUST COLLECTORS
The operation of any Dust Collector can result in debris
being thrown into your eyes, which can result in severe
eye damage. ALWAYS Wear Safety Goggles (that com-
ply with ANSI standard Z87.1) when operating the Dust
Collector. Safety Goggles are available at Sears Retail
Stores. Keep your thumbs and fingers away from intake
ports.
Basic precautions should always be followed when using
your dust collector. To reduce the risk of injury, electrical
shock or fire, comply with the safety rules listed below:
1. READ and understand the instruction manual
before operating the dust collector.
2. DO NOT OPERATE THIS MACHINE until it is
assembled and installed according to the instruc-
tions.
12.
USE only as described in this manual. USE acces-
sories only recommended by Sears.
13.
DO NOT pull the dust collector by the power cord.
NEVER allow the power cord to come in contact
with sharp edges, hot surfaces, oil or grease.
14.
DO NOT unplug the dust collector by pulling on the
power cord. ALWAYS grasp the plug, not the cord.
15.
DO NOT handle the plug or dust collector with wet
hands.
16.
REPLACE a damaged cord immediately. DO NOT
use a damaged cord or plug. If the dust collector is
not operating properly, or has been damaged, left
outdoors or has been in contact with water, return it
to a Sears Service Center.
17.
DO NOT use the dust collector as a toy. DO NOT
use near or around children.
3. OBTAIN ADVICE FROM YOUR SUPERVISOR,
instructor, or another qualified person if you are not
familiar with the operation of this machine.
4,
DO NOT leave the dust collector plugged into the
electrical outlet. Unplug dust collector from the out-
let when not in use and before servicing, changing
bags, unclogging and cleaning.
5. ALWAYS turn the power switch "OFF" before
unplugging the dust collector.
6. TO REDUCE THE RISK OF ELECTRICAL
SHOCK, do not use outdoors. Do not expose to
rain. Store indoors. Use only for dry pick up.
7,
FOLLOW all electrical and safety codes, including
the National Electric Code (NEC) and the Occu-
pational Safety and Health Regulations (OSHA). All
electrical connections and wiring should be made
by qualified personnel only.
8. DO NOT handle the plug or dust collector with wet
hands.
9,
DO NOT use the dust collector to pick up flam-
mable or combustible liquids, such as gasoline.
NEVER use the dust collector near any flammable
or combustible liquids.
10. USE the dust collector to pick up wood materials
only. DO NOT use the dust collector to pick up
metal shavings, metal dust, or parts.
18.
DO NOT insert fingers or foreign objects into the
dust intake port. Keep hair, loose clothing, fingers,
and all body parts away from openings and moving
parts of the dust collector.
19.
DO NOT use the dust collector without the dust
collection bag in place and properly secured.
20.
ALWAYS use safety gates or caps to cover dust
ports when the dust collector is not in use or
mounted to a supporting surface for storage.
21.
PERIODICALLY INSPECT dust bag for any cuts,
rips or tears. NEVER operate the dust collector with
a damaged bag or vacuum hose.
22.
The dust collector is designed for home use or light
commercial duty ONLY.
23.
CONNECT dust collector to a properly grounded
outlet only. See grounding instructions.
24.
ADDITIONAL INFORMATION regarding the safe
and proper operation of this product is available
from the National Safety Council, 1121 Spring Lake
Drive, Itasca, IL 60143-3201 in the Accident Pre-
vention Manual for Industrial Operation and also in
the Safety Data Sheets provided by the NSC.
Please also refer to the American National Stand-
ards Institute ANSI 01.1 Safety Requirements for
Woodworking Machinery and the U.S. Department
of Labor OSHA 1910.213 Regulations.
11. NEVER use the dust collector to dissipate fumes or
smoke. NEVER pick up anything that is burning or
smoking, such as cigarettes, matches or hot ashes.
25.
SAVE THESE INSTRUCTIONS. Refer to them
frequently and use them to instruct other users.

AVAILABLE ACCESSORIES
Visit your Sears Hardware Department or see the Sears
Power and Hand Tool Catalog for accessories.
Sears may recommend other accessories not listed in
this manual.
See your nearest Sears Hardware Department or Sears
Power and Hand Tool Catalog for other accessories.
Do not use any accessory unless you have completely
read the Owner's Manual for that accessory.
r lw;l--i ii [€-i
Use only accessories recommended for this Dust
Collector. Using other accessories may cause serious
injury and cause damage to the Dust Collector.
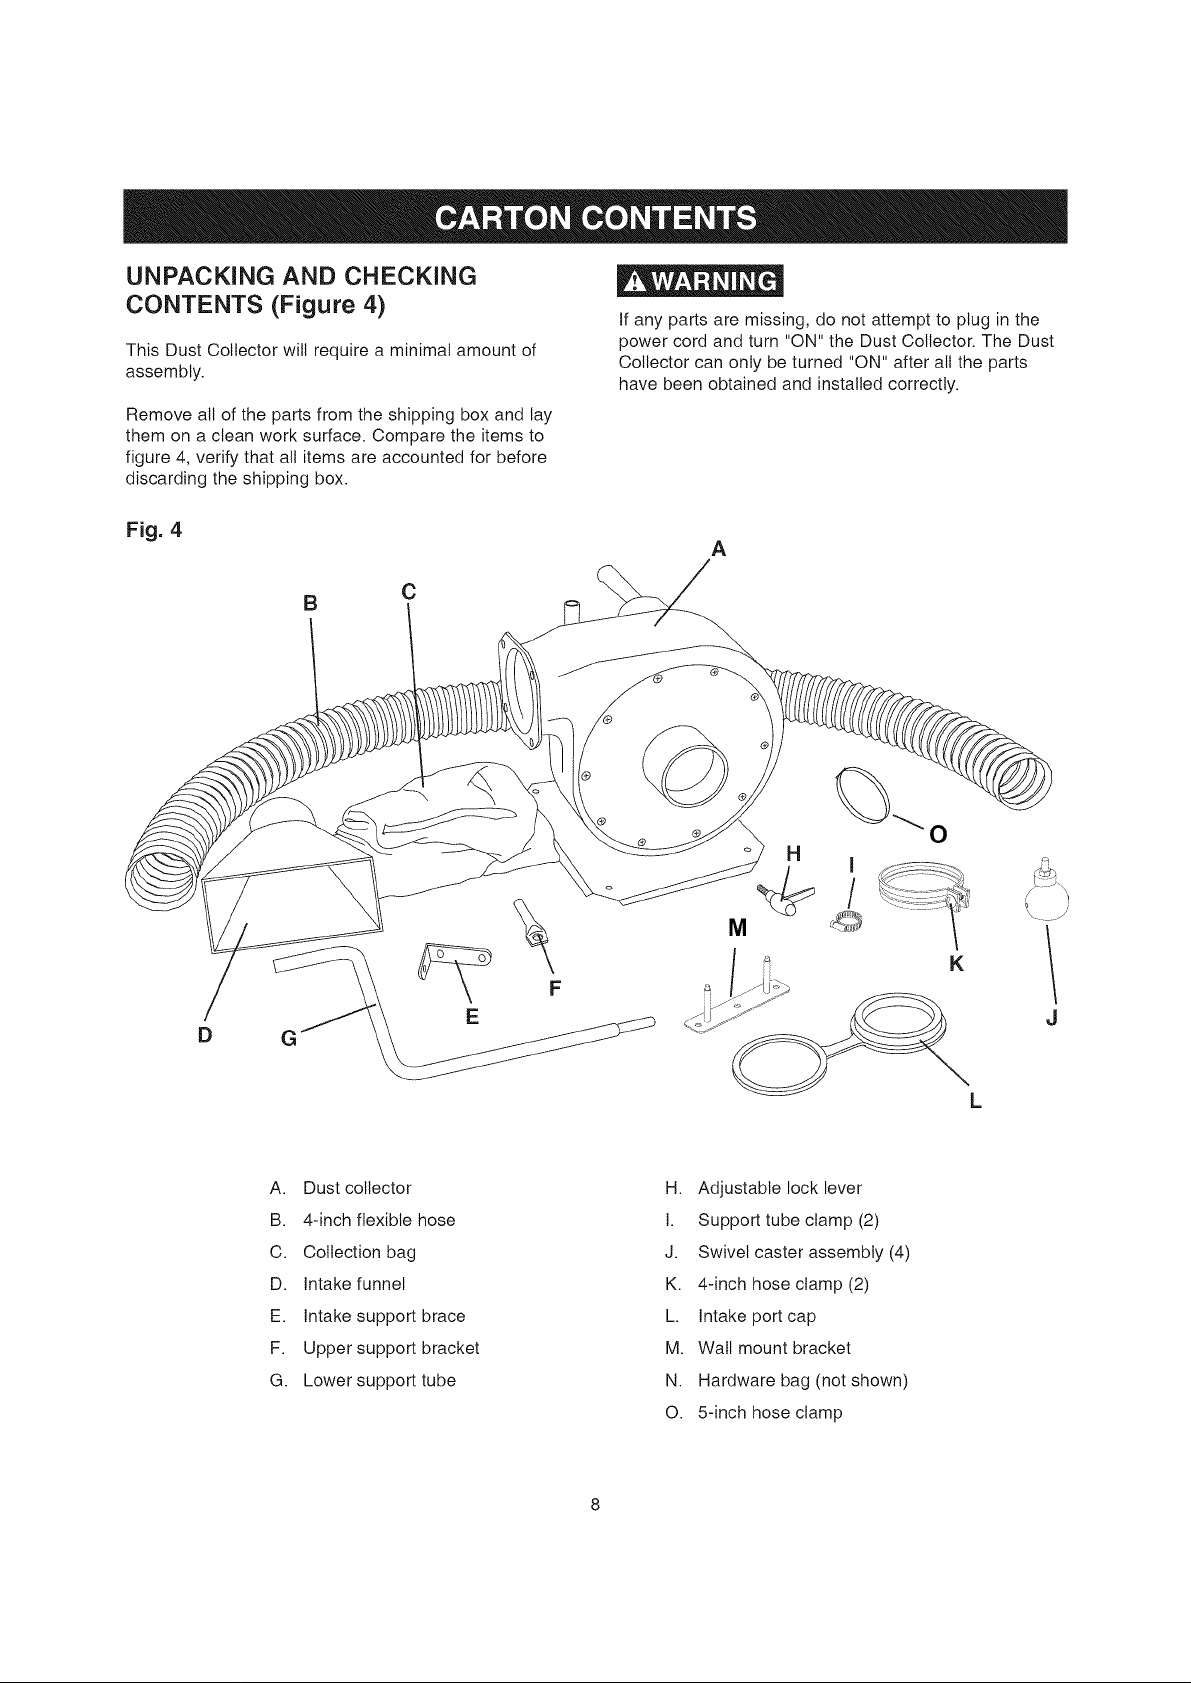
UNPACKING AND CHECKING
CONTENTS (Figure 4)
This Dust Collector will require a minimal amount of
assembly.
Remove all of the parts from the shipping box and lay
them on a clean work surface. Compare the items to
figure 4, verify that all items are accounted for before
discarding the shipping box.
If any parts are missing, do not attempt to plug in the
power cord and turn "ON" the Dust Collector. The Dust
Collector can only be turned "ON" after all the parts
have been obtained and installed correctly.
Fig. 4
D G
A
B
C
O
H
I
/
K
F
E
L
A. Dust collector
B. 4-inch flexible hose
C. Collection bag
D. Intake funnel
E. Intake support brace
F. Upper support bracket
G. Lower support tube
H. Adjustable lock lever
I. Support tube clamp (2)
J. Swivel caster assembly (4)
K. 4-inch hose clamp (2)
L. Intake port cap
M. Wall mount bracket
N. Hardware bag (not shown)
O. 5-inch hose clamp
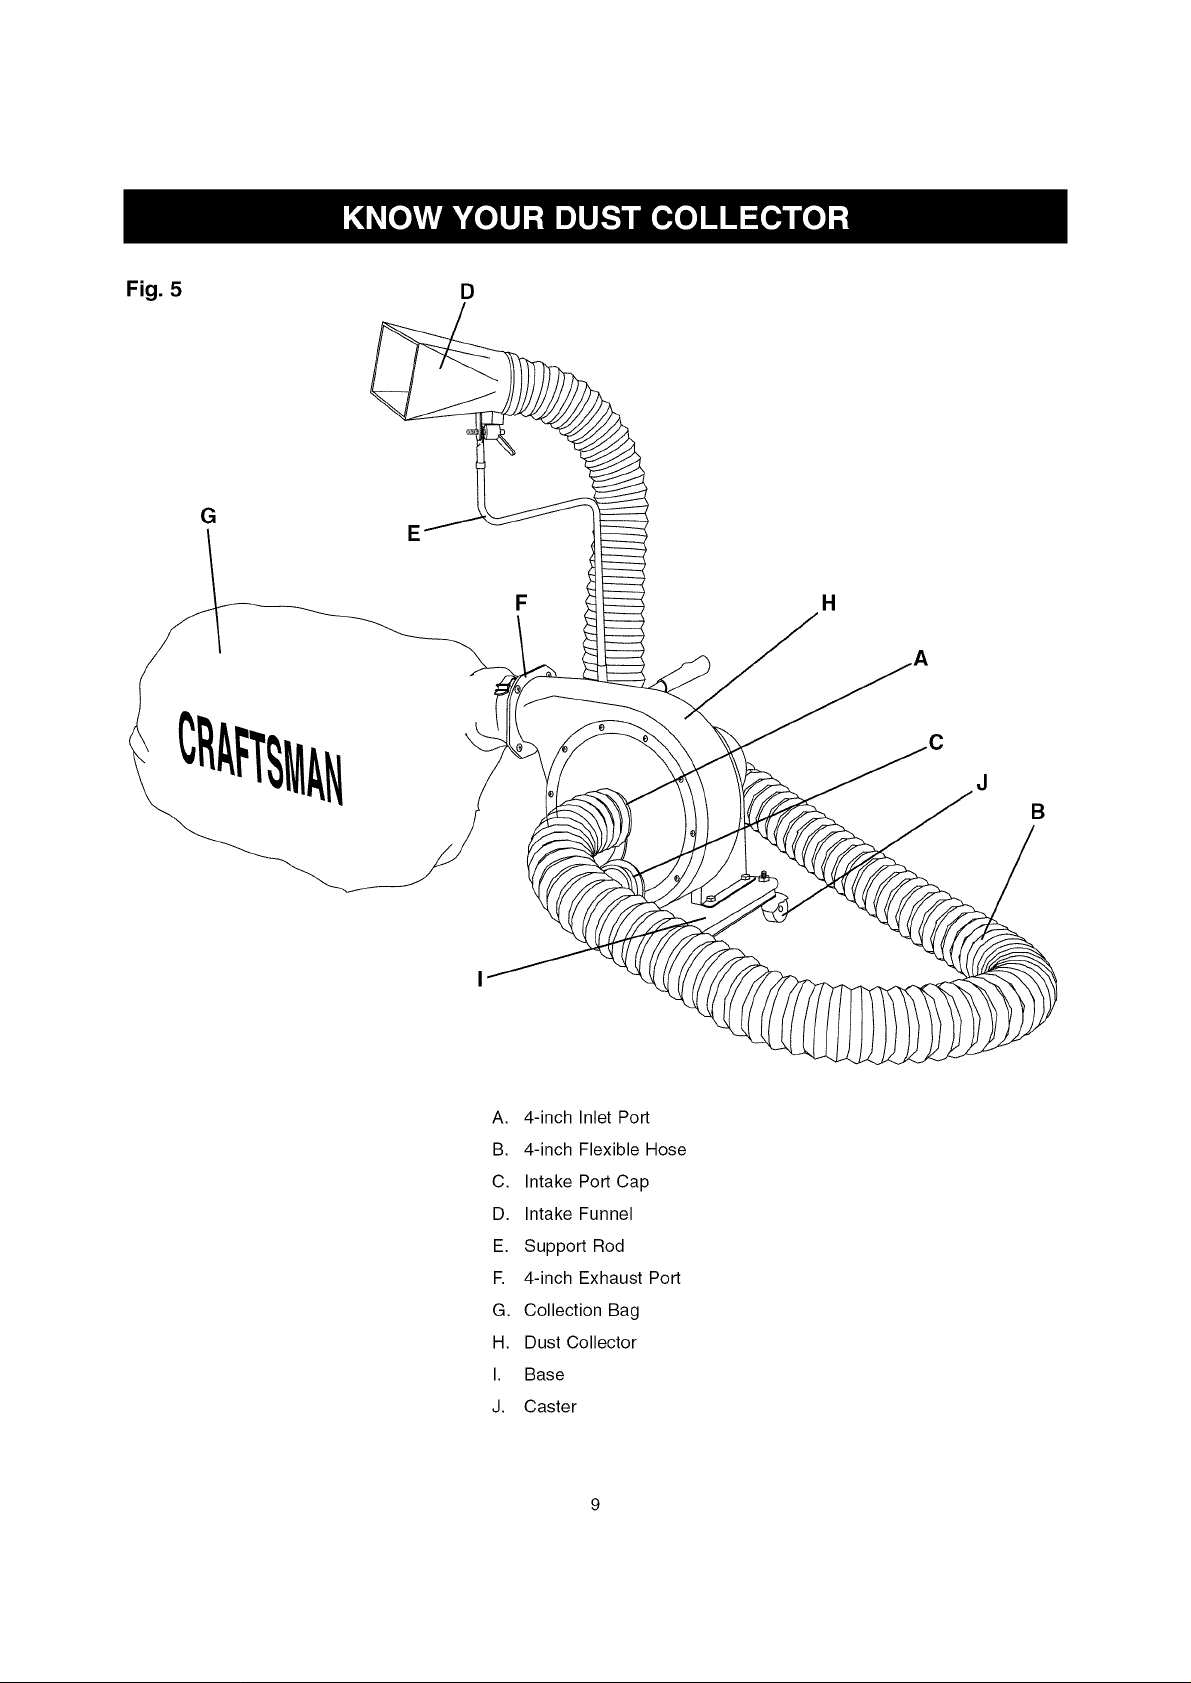
Fig. 5
D
G
F H
B
A. 4-inch Inlet Port
B. 4-inch Flexible Hose
C. Intake Port Cap
D. Intake Funnel
E. Support Rod
E 4-inch Exhaust Port
G. Collection Bag
H. Dust Collector
I. Base
J. Caster
r!_lvltl:1:1 _11_[c11
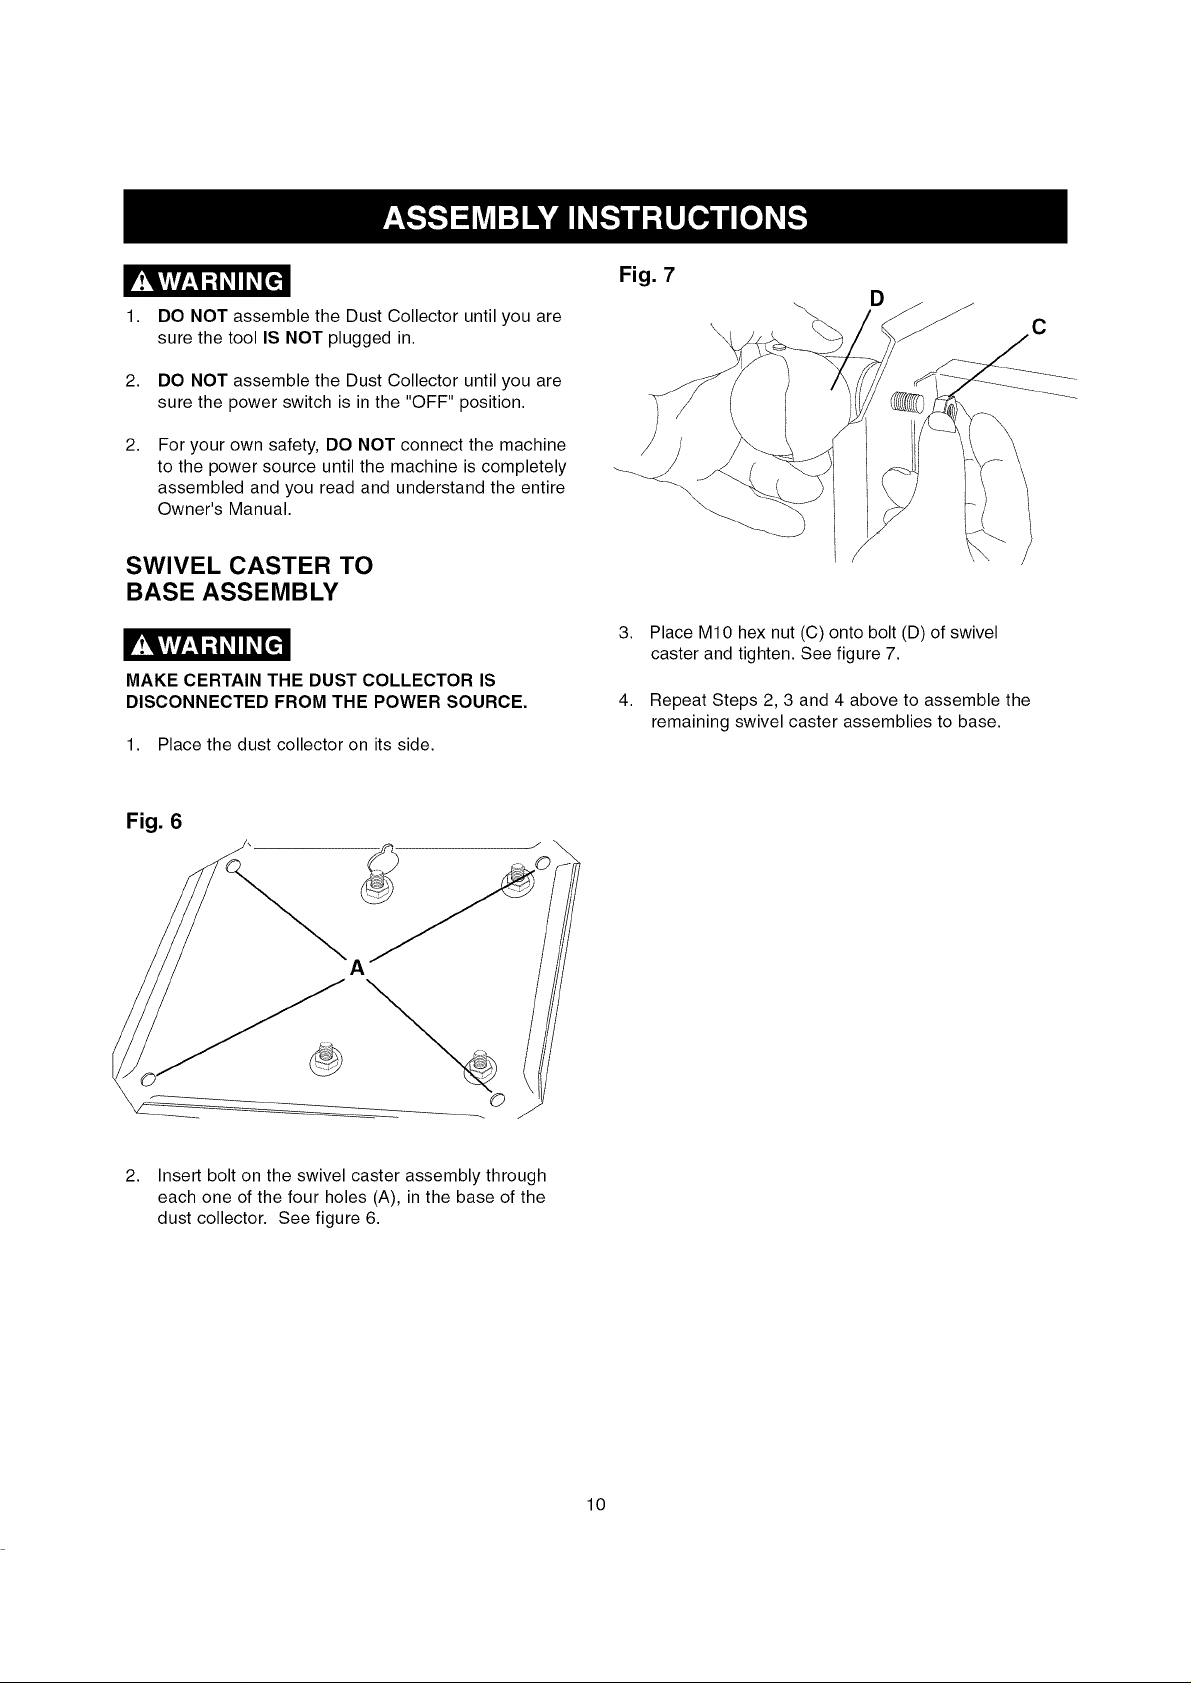
1. DO NOT assemble the Dust Collector until you are
sure the tool IS NOT plugged in.
2. DO NOT assemble the Dust Collector until you are
sure the power switch is in the "OFF" position.
2,
For your own safety, DO NOT connect the machine
to the power source until the machine is completely
assembled and you read and understand the entire
Owner's Manual.
SWIVEL CASTER TO
BASE ASSEMBLY
_r!lvltl:1:1 _II_[c11
MAKE CERTAIN THE DUST COLLECTOR IS
DISCONNECTED FROM THE POWER SOURCE.
1. Place the dust collector on its side.
Fig. 6
Fig. 7
3,
Place M10 hex nut (C) onto bolt (D) of swivel
caster and tighten. See figure 7.
4,
Repeat Steps 2, 3 and 4 above to assemble the
remaining swivel caster assemblies to base.
C
A
2. Insert bolt on the swivel caster assembly through
each one of the four holes (A), in the base of the
dust collector. See figure 6.
10

SUPPORT TUBE ASSEMBLY
iNTAKE FUNNEL ASSEMBLY
MAKE CERTAIN THE DUST COLLECTOR IS
DISCONNECTED FROM THE POWER SOURCE.
Fig. 8
A
1. Place support tube clamp (A) over lower support
tube holder (B). See figure 8.
Fig. 9
MAKE CERTAIN THE DUST COLLECTOR IS
DISCONNECTED FROM THE POWER SOURCE.
Fig. 10
A
B
1. Align the two holes in the intake support brace (A)
with the two holes in the intake funnel (B).
See figure 10.
2. Insert two M8 x 20 button head carriage bolts
through the inside of the intake funnel and intake
support brace.
\
2. Insert the lower support tube (C) into the lower
support tube holder and tighten support tube clamp.
See figure 9.
3. Place support tube clamp over top of lower support tube.
3. Place a M8 flange hex nut onto the button
head carriage bolts and tighten securely.
11
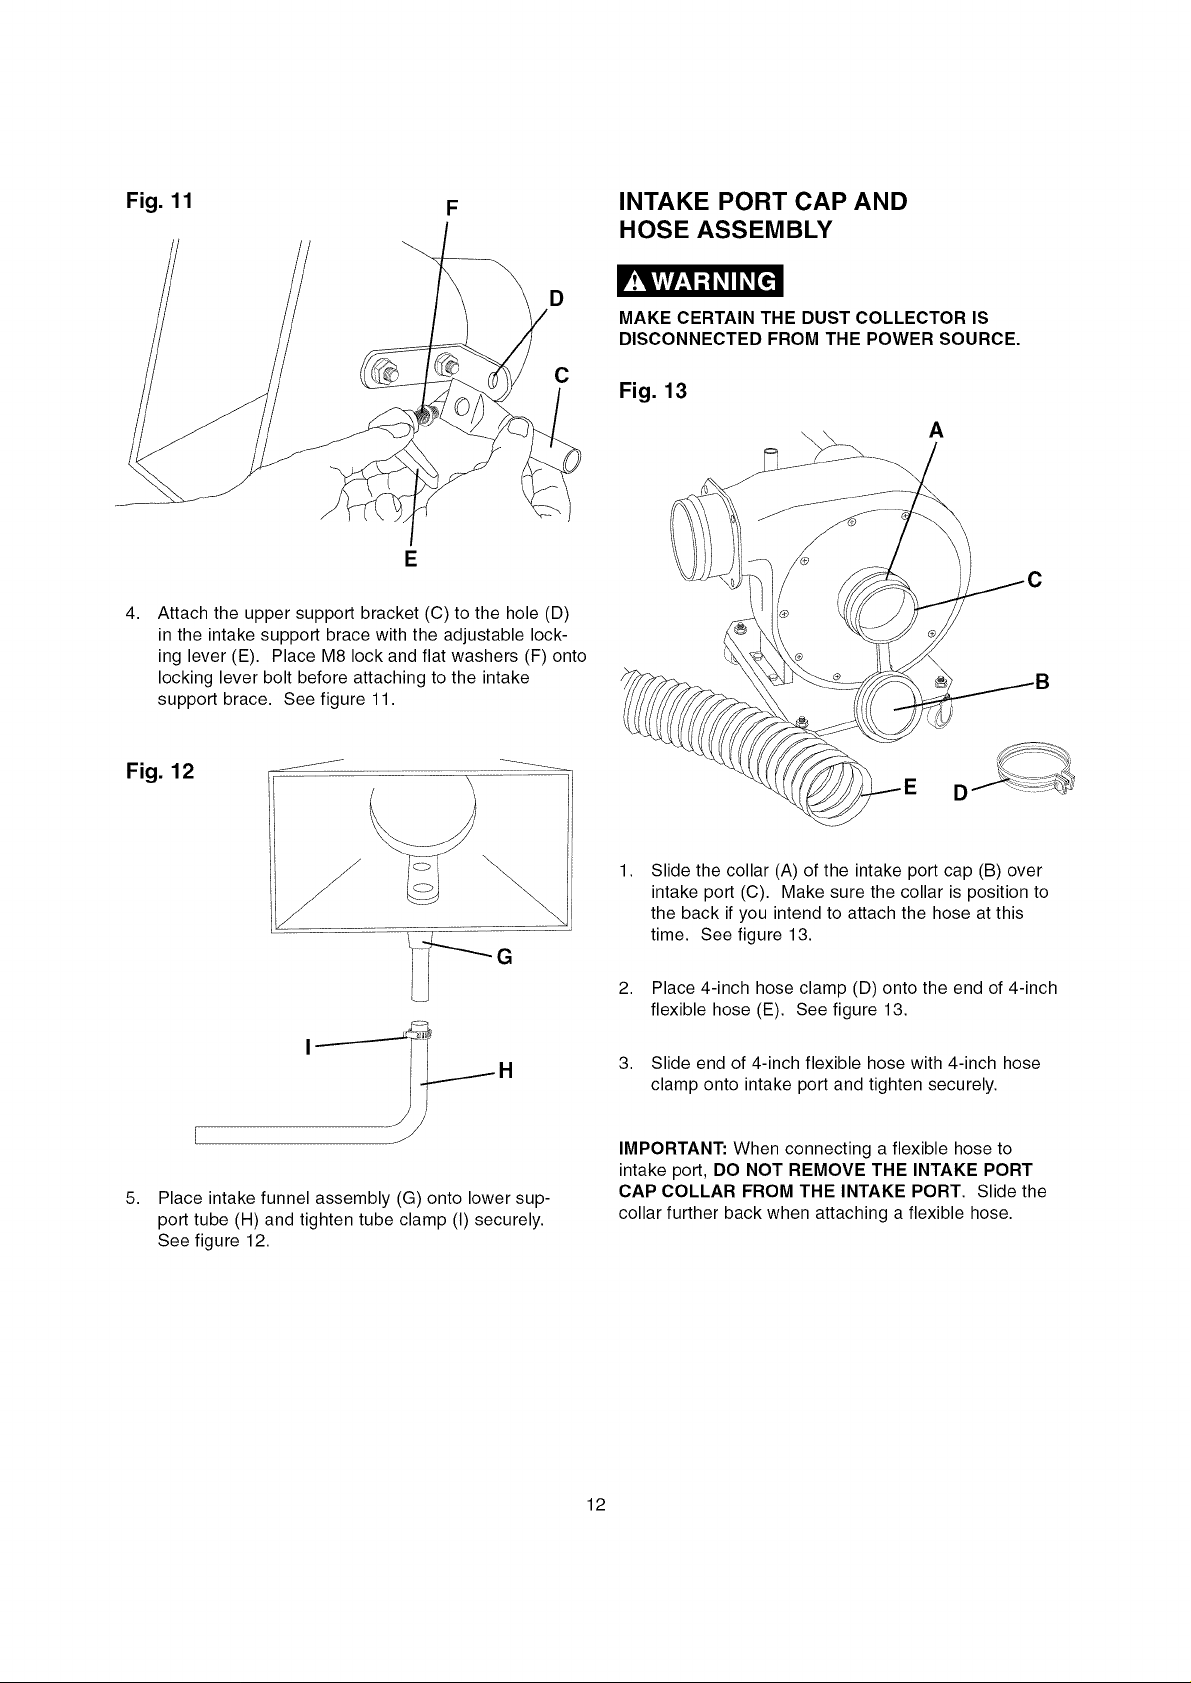
Fig. 11 F
INTAKE PORT CAP AND
HOSE ASSEMBLY
E
4,
Attach the upper support bracket (C) to the hole (D)
in the intake support brace with the adjustable lock-
ing lever (E). Place M8 lock and flat washers (F) onto
locking lever bolt before attaching to the intake
support brace. See figure 11.
Fig. 12 ........................
D
r!lw_,l..i t t [€.!
MAKE CERTAIN THE DUST COLLECTOR IS
DISCONNECTED FROM THE POWER SOURCE.
C
Fig. 13
A
5,
Place intake funnel assembly (G) onto lower sup-
port tube (H) and tighten tube clamp (I) securely.
See figure 12.
..-..-H
1,
Slide the collar (A) of the intake port cap (B) over
intake port (C). Make sure the collar is position to
the back if you intend to attach the hose at this
time. See figure 13.
2. Place 4-inch hose clamp (D) onto the end of 4-inch
flexible hose (E). See figure 13.
3. Slide end of 4-inch flexible hose with 4-inch hose
clamp onto intake port and tighten securely.
IMPORTANT: When connecting a flexible hose to
intake port, DO NOT REMOVE THE INTAKE PORT
CAP COLLAR FROM THE INTAKE PORT. Slide the
collar further back when attaching a flexible hose.
12
 Loading...