

Craftsman 113236150 Owner’s Manual

Ii Future Reference
_AIRS
MODEL O.
113.236150
Serial
Number
Model and serial number may be
found attached to the rightside of
arm housing.
You should record both model
and serial number ina safe place
for future use.
i ii llllINNI ' II ................
FOR YOUR
SAFETY:
Read ALL
iNSTRUCTIONS
carefully
16 INCH RIABLE
SPEED SCROLL SAW
, assembly
• operating
repair parts
........... , ......... J _ ........................
Sold by SEARS, ROEBUCK AND CO., Chicago, IL. 60684 U.S.A.
Part No_SP5641

Safer
SCROLL SAW
Scroll Saw fails due to a defect in material or work-
RETURNING:THE CRAFTSMAN SCROLL SAW TO THE
E CENTER/DEPARTMENT IN THE UNITED
':IS USED IN THE UNITED STATES.
'ights which vary from state to state.
IL: 60195
Safety is a combination of common sense, staying alert
and knowing how your scroll saw works. Read this man,
ual to understand this saw.
_Safety Signal Words
DANGER: means ifthe safety information is not followed
someone will be seriously;injured or killed.
WARNING: means if the-safety information isnot fol-
lowed someone could be seriously injured orkilled.
CAUTION: means ifthe safety information is not followed
someone might be injured.
Before Using The Saw
the following steps are: corn pleted.
Assembly and alignment (See pages 7-12)
Learn the:;:::useand function of the speed control ON-
OFF knob, bevel: lock knob, blade holders, blade sup,
port, hold down, tension knob, and blade guard. (See
pages14:16)
• Review and Understand at! safety instructions and
operating procedures in this manual.
• Review of the maintenance:meth0ds for this saWi:(See
page 20)
" Read the WARNING tabeJ!Seiow,found_n t_eba_eof
the saw.
, WARNING
To Avoid Injury from Unexpected Saw Movement:
• Turn saw off and unplug cord before moving the saw.
• Put the saw on a firm level surface where there is
plentyof room for handling and properly supporting the
workpiece.
• Support the saw so the table is level and the saw does
not rock.
= Boltthe sawto the work surface ifit tends to slip, walk,
or slide during operations like cutting long heavy
boards, or when using an auxiliary table.
o NEVER STAND ON TOOL. Serious injury could occur
if the tool tips or you accidentally hitthe cuttingtool. Do
not store anything above or near the tool where any-
one might stand on the too! to reach them.
To Avoid Injury or Death from Electrical Shock:
° GROUND THE SAW, This saw has an approved 3 con-
ductor cord and a 3-prong grounding type plug. Use
only:3-wire, grounded outlets rated 120 volts, 15
amperes (amps), The green conductor in the cord is
the grounding wire. :To avoid electrocution, NEVER
connect the green wire to a live terminal.
• Make sure your fingers do not touch the plug's metal
prongswhen plugging or unpluggingthe saw.
Before Each Use:
InsPect your saw,
DISCONNECT THE SAW. To avoid injury from accidental
starting, unplug the saw, turn the switch off and lock out
the switch before changing the setup, removing covers,
guards or blade.
CHECK DAMAGED PARTS. Check for:
- Alignment of moving parts.
• Bindingof movingparts.
• Broken parts.
• Stable mounting.
° Any other conditions that may affect the way the saw
works.
If any part is missing, bent or broken in any way, or an_
When Installing or Moving The Saw
dry indoor _place, prote=_edfrom rain:i Keep work area parts before using the saw again.
well lighted.
electrical parts don't work properly, turn the saw off aria
unplug the saw. REPLACE damaged, missing or failed

Maintain Tools with Care, Keep the saw clean
for best and safest performance. Follow instruc-
ns for lubricating.
move adjusting keys and wrenches from tool before
turning it on.
To avoid injury from jams, slips or thrown pieces:
• Choose the right size and style blade for the material
and the type of cutting you plan to do.
• Use Only Recommended Accessories.
(See page 21). Consult this owners manual for recom-
mended accessories. Follow the instructions that come
with the accessories. The use of improper accesso-
ries may cause risk of injury to person.
• Make sure the blade teeth point downward, toward
the table.
• Make sure the blade tension is properly adjusted.
, Make sure the bevel lock knob is tight and no parts
have excessive play.
• To avoid accidental blade contact, minimize blade
breakage and provide maximum blade support, always
adjust the work and blade guard to just clear the work-
piece.
• Keep Work Area Clean. Cluttered areas and benches
invite accidents. Floor must not be slippery.
To avoid burns or other fire damage, never use the saw
._nearflammable liquids, vapors or gases.
!tan Ahead to Protect Your Eyes, Hands,
Face and Ears
, Know Your Saw. Read and understand the owners
manual and labels affixed to the tool. Learn it's appli-
cation and limitations as well as the specific potential
hazards peculiar to this tool.
° To avoid injury from accidental contact with moving
parts, don't do layout, assembly, or setup work on the
saw whi;_eany parts are moving.
• Avoid Accidental Starting. Make sure switch is
"OFF" before plugging saw into a power outlet.
Plan Your Work.
• Use The Right Tool. Don't force tool or attachment to
do a job it was not designed to do.
• Use this scroll saw to cut only wood, wood-like prod-
ucts, plastics and non-ferrous metals.
CAUTION: This saw is NOT designed for cutting fer-
rous metals like iron or steel. When cutting non-fer-
rous metals (brass, copper and aluminum, etc.),
metal shavings can react with wood dust and start a
fire. To avoid this:
°Remove all traces of wood dust from on and
round the saw.
Remove all metal shavings from on or around the
I saw before sawing woo d again,
Dress for safety.
Any power saw can throw foreign objects into the eyes.
This can cause permanent eye damage. Wear salety
goggles (not glasses) that comply with ANS! Z87.1
(shown on package). Everyday eyeglasses have only
impact resistant lenses. They are not safety glasses.
Safety goggles are available at Sears Retail Stores.
Glasses or goggles not in compliance with ANSI
Z87.1 could seriously hurt you when they break.
• Do not wear loose clothing, gloves, neckties or jewelry
(rings, wristwatches). They can get caught and draw
you into moving parts.
° Wear nonslip footwear.
• Tie back long hair.
• Roll long sleeves above the elbow.
° Noise levels vary widely. To avoid possible hearing
damage, wear ear plugs or muffs when using saw for
hours at a time.
° For dusty operations, wear a dust mask along with the
safety goggles.
Inspect Your Workpieceo
Make sure there are no nails orforeign objects in the part
of the workpiece to be cut.
Use Extra Caution with Large, Very Small or Awkward
Workpieces:
• Never use this too! to finish pieces too small to hold by
hand.
° Use extra supports (tables, saw horses, blocks, etc.)
for any workpieces large enough to tip when not held
down to the table top.
° Never use another person as a substitute for a table
extension, or as additional support for a workpiece or
to help feed, support or pull the workpiece.
• When cutting irregularly shaped workpieces, plan your
work so it will not pinch the blade. A piece of molding,
for example, must lay flat or be held by a fixture or jig
that will not let it twist, rock or slip while being cu_.
° Properly support round material such as dowel rods or
tubingJhey have a tendency to roll during a cut, caus-
ing the blade to "bite". To avoid this, always use "V"
block.
• Cut on!y one workpiece at a time.
• Clear everything except the workpiece and related
support devices of_the table before turning the saw on.
WEAR YOUR
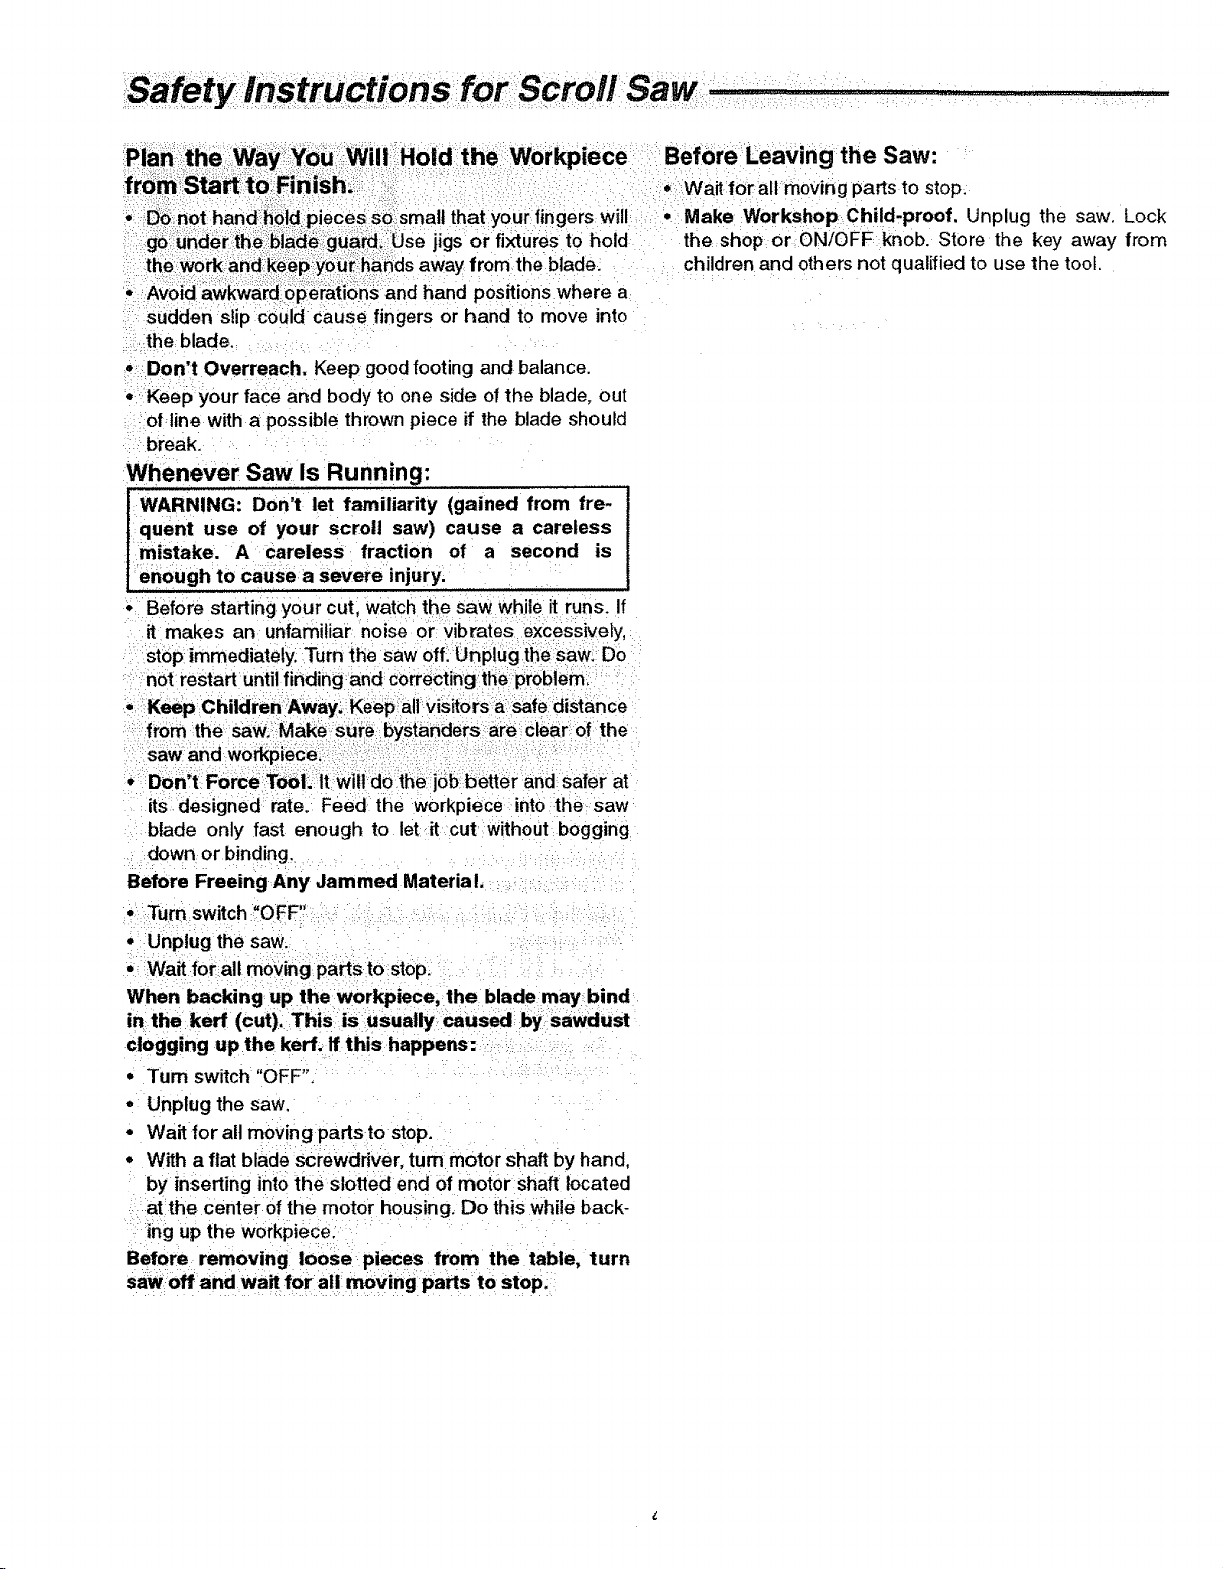
Y_U Wilti Holld the Workpiece Before Leaving the Saw:
in'i_h,:,_: ' ° Waitforall rnovingparts to stop.
•Donot handhc
sudden slip €_i
ithe blade.
o_:Don,t Overreach. Keep good footing and balance.
° Keep your face and body to one side of the blade, out
oftine with a possible thrown piece if the blade should
break.
:l:pieces s_:ismall thatyour:fingers will...... Make Workshop Child-proof. Unplug the saw. Lock
i_gula_.:iOse jigs or fixtures to :hold the shop or ONIOFF knob. Store the key away from
ipyo_r_hands away from the blade: children and others not qualified to use the toot.
;_e_ati_ns and hand positions where a
d cause fingers or hand to move into
Whenever Saw Is Running:
WARNING: Don't let familiarity (gained from fre-
quent use of your scroll saw) cause a careless
mistake. A careless fraction of a second is
enough to cause a Severe injury,
• Before starting your cut, watCh the saw while it runs. If
it makes an unfamiliar noise or Vibrates excessively,
stop' immediately Turn the saw off:Unplug the:saw:_Do
not restart untilfindingand correctin gthe problem,
• Keep Children Away. Keep;all:visitors a:saf edistance
i from :the saW.:Make,sure bystanders are:clear of the
saw and wo_tSieCei:i :
• Don-t;ForCe::T_l::it better and safer at
its designed rate. Feed the workpiece intothe saw
blade only fast enough to let ,it cut without:bogging
down or binding.=
Before Freeing Any Jammed Materia !,
• Turn switch"OFF"
• Unplug the saw.
• : Waitfor all moving parts to:stop.
When backing up the workpiece, the blade may bind
in the kerf (cut),This iiS usually caused by Sawdust
clogging up the kerr. If this happens:
• Turn switch "OFF".
• Unplug the saw.
° Wait forall moving padsto stop.
- With a flat blade screwdriver, turn motor shaft by hand,
by inserting into the slotted end of motor shaft located
at the center of the motor housing. Do this while back-
ing up the workpiece:
Before removing loose pieces from the table, turn
sawoff and wait foraU moving parts to stop:
Motors, Specifications and Electricat Requirements , ....
This machine is equipped:witha var able speed motor_ It
_ired for operation on 120V, 60Hz, alternating current.
CAUTION: A direct current motor is used in thisj
saw. Changes to the internal wiring will create a fire I
hazard and may also create a shock hazard. ]
For replacement motor and control board, refer to parts
list in this manual.
Connecting To Power Supply Outlet
If power cord is worn or cut, or damaged in any way,
have it replaced immediately.
WARNING: if not properly grounded, this power tool
can cause an electrical shock, particularly when
used in damp locations close to plumbing. If an
electrical shock occurs there is potential of a sec-
ondary hazard, such as your hands contacting the
saw blade.
If you are not sure that your outlet, as pictured below, is
properly grounded, have it checked by a qualified electri-
cian.
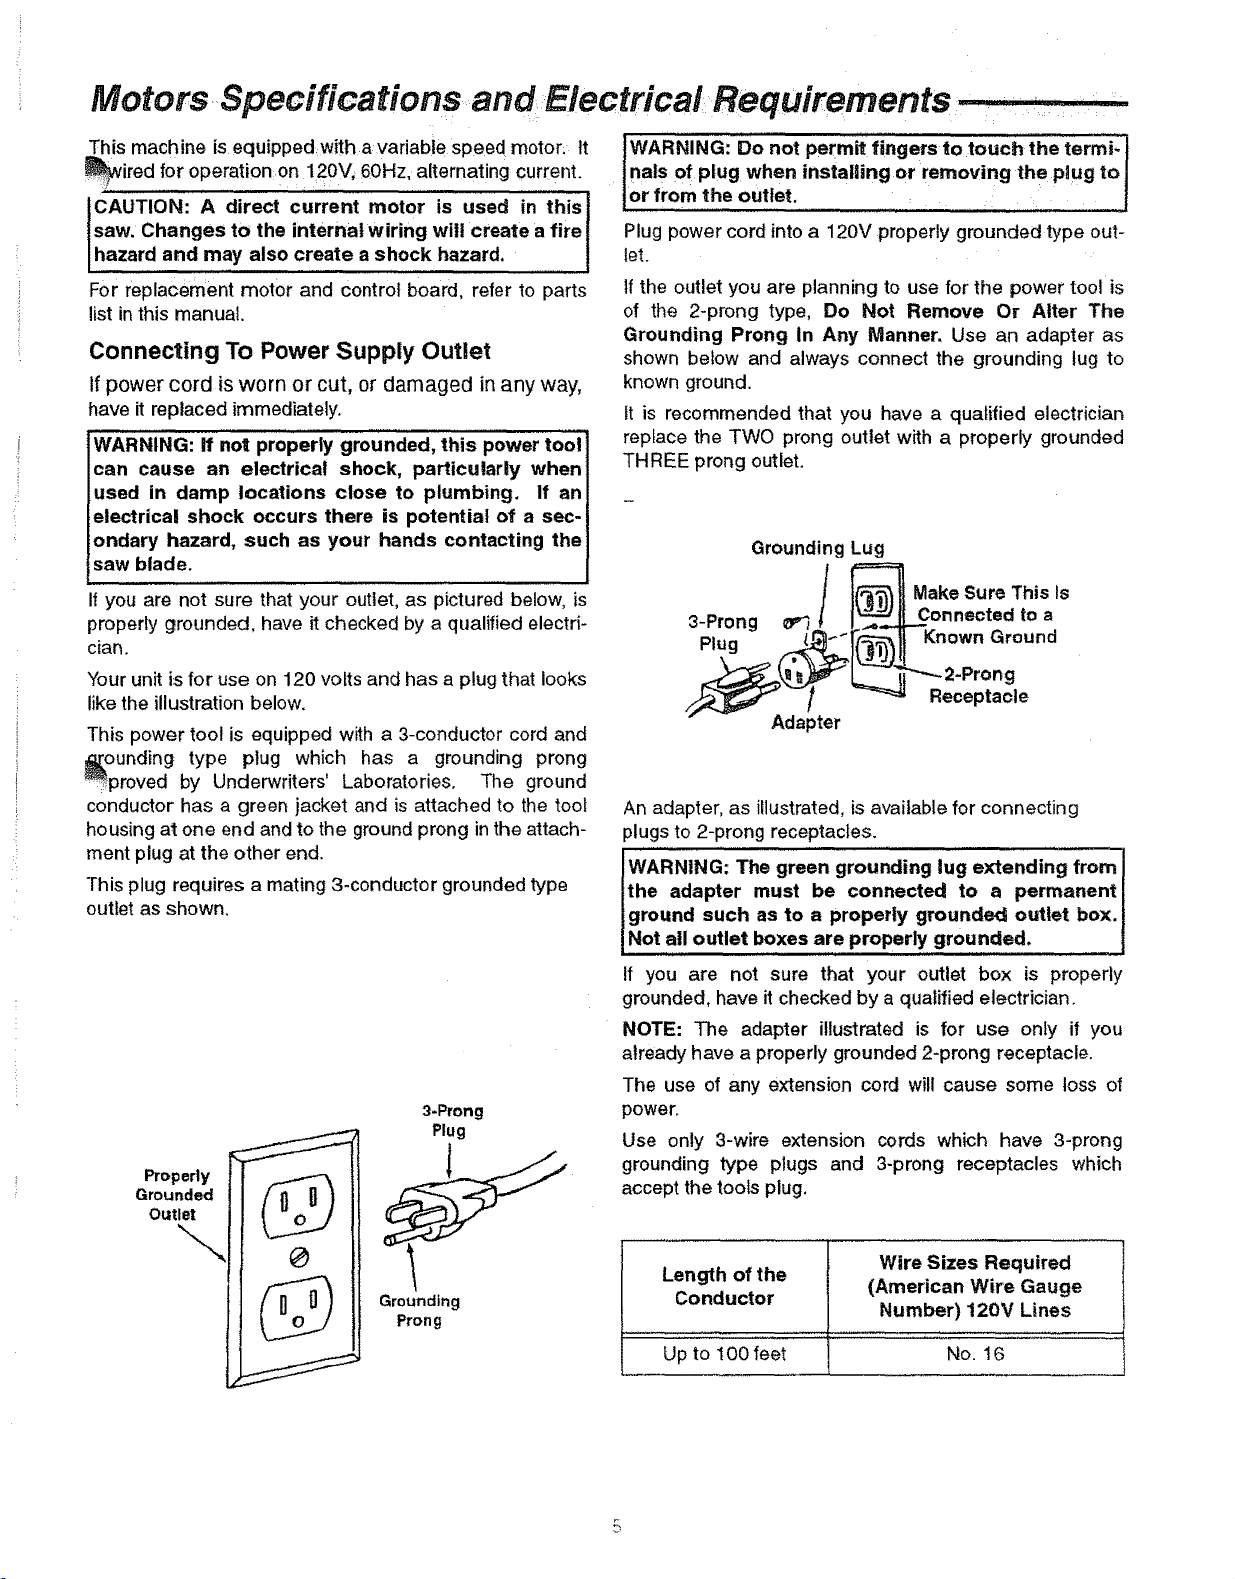
Your unitis for use on 120 volts and has a plug that looks
like the illustration below.
This power tool is equipped with a 3-conductor cord and
_[ounding type plug which has a grounding prong
_v
._proved by Underwriters' Laboratories. The ground
conductor has a green jacket and is attached to the tool
housing at one end and to the ground prong in the attach-
ment plug at the other end.
This plug requires a mating 3-conductor grounded type
outlet as shown.
3-Prong
Plug
Properly
Grounded
Outlet
--..,
0
U
Grounding
Prong
WARNING: Do not permit fingers to touch the termi-
nals of plug when installing or removing the plug to
or from the outlet.
Plug power cord into a 120V properly grounded type out-
let.
Ifthe outlet you are planning to use for the power tool is
of the 2-prong type, Do Not Remove Or Alter The
Grounding Prong In Any Manner. Use an adapter as
shown below and always connect the grounding tug to
known ground.
It is recommended that you have a qualified electrician
replace the TWO prong outlet with a properly grounded
THREE prong outlet.
Grounding Lug
Make Sure This Is
3-Prong _ Connected to a
Plug Known Ground
,g
Receptacle
Adapter
An adapter, as illustrated, is available for connecting
plugs to 2-prong receptacles.
The
the adapter must be connected to a permanent
ground such as to a properly grounded outlet box.
IWARNING: green grounding lug extending from
Not all outlet boxes are properly grounded.
If you are not sure that your outlet box is properly
grounded, have it checked by a qualified electrician.
NOTE: The adapter illustrated is for use only if you
already have a properly grounded 2-prong receptacle.
The use of any extension cord will cause some loss of
power.
Use only 3-wire extension cords which have 3-prong
grounding type plugs and 3-prong receptacles which
accept the tools plug.
Wire Sizes Required
Length of the (American Wire Gauge
Conductor
Up to 100 feet No. 16
Number) 120V Lines

Ke_:::; th_!s|ot::c_t!iby :th_ibiade:_ = ::!: :::::=:: 5,:Blade Tooth Set:-::the distance:that the edge of th_
2.:LeadlngEdge:_!_= ...... g ............. p .................: : _. ....... ........... : )
:/::.puShed:intotheibiade:first: : : ::::the:b!ade_::: ::::::::::_:!_,: ::: .....
.... 0fthework 6 Trailing Edge;:; the work iece ed e last cut b the
3_:Sawbtm:fe Path:,- the area : : p ..... y ..... ..... ......... .......P g . y
toward the sawbiade edge:;::: :i:Sawblade. : ,
:4-1:Bevel' -:the blllty'.....to slantthetable to make ........angie cuts. 7 , Wor:kp:iece :- the item :onWhichthe cutting operation is
:: angle cuttir_goperati0nl through the face:of the being performed.
board.
work' _:_wh:iCh is: : : saWblade tOothisb_ni (orset Outward fromthes,det
-::Contents
W_rranty Information.... ........................... ...................... 2
ety Instructions for Scroll Saws :...... i.. ..:i ::..:.. 2
Motor Specs and Electrical Requirements .................. :. 5
Glossary of Terms for Woodworking .................... .....:..:6
Unpacking and Checking Contents ............................... 6
Assembly and Alignment ............................................... 7
Setting Table for Horizontal or Bevel Cutting ..........8
Aligning the Bevel Indicator .................................... 8
Removing and Installing Blades ....................... ..,._..:.._10
Adjusting Work Hold-Down Foot. ...................... .,.L.... 12
Dust Blower .................................................................. 12
Blade Guard: ...................................... :......................... 12
Mounting the Scroll Saw ............................................. 13
Getting to Know Your Scroll Saw................................. 14
Operation .................................................................... 17
Maintenance ................................................................ 20
Wiring Diagram ........................................................... 2I
Troubleshooting ........................................................... 21
Service Information ....................................... Back Cover
i ....
Speed Control/On-OFF Knob ............................... 15
Choice of Blade and Speed .................................. 16
Making Interior Cuts ............................................. 19
Recommended Accessories ....................................... 21
Repair Parts ................................................................ 22
Unpacking and Checking Contents ........
Tools Needed
::j_ COMBINATION
MEDIUM STANDARD SCREWDRIVER
WARNING: For your own safety never connect plug
to power sou rce outlet until all assembly iStepsare
complete, and you have read and understand the
safety and operating instructions.
IMPORTANT: Never lift this saw by the arm which hotds
the blade or damage will occur to your saw.
Separate all parts from packaging materials and check
each item with illustration and "Table of Loose Parts".
Make certain all items are accounted for before discard-
ing any packaging material.
If any parts are missing, do not attempt to assemble the
Scroll Saw, plug in the power cordor turn the switch on
until the missing parts are obtained and installed cor-
rectly.
MEDIUM PHILLIPS SCREWDRIVER
Table of Loose Parts Qty
A 16" Scroll Saw (Completely Assembled) ............. 1
B Owner's Manual .................................................. 1
C Loose Parts Bag containing:
Blade ................................................................... 1
Hex "T" Handle Wrench ...................................... 1
"L" Shaped Blade Change Rod ........................... 1
NOTE: Hardware to mount thisscroll saw to a bench or
leg set isNOT supplied. See mounting instructionsfor
recommended hardware size.
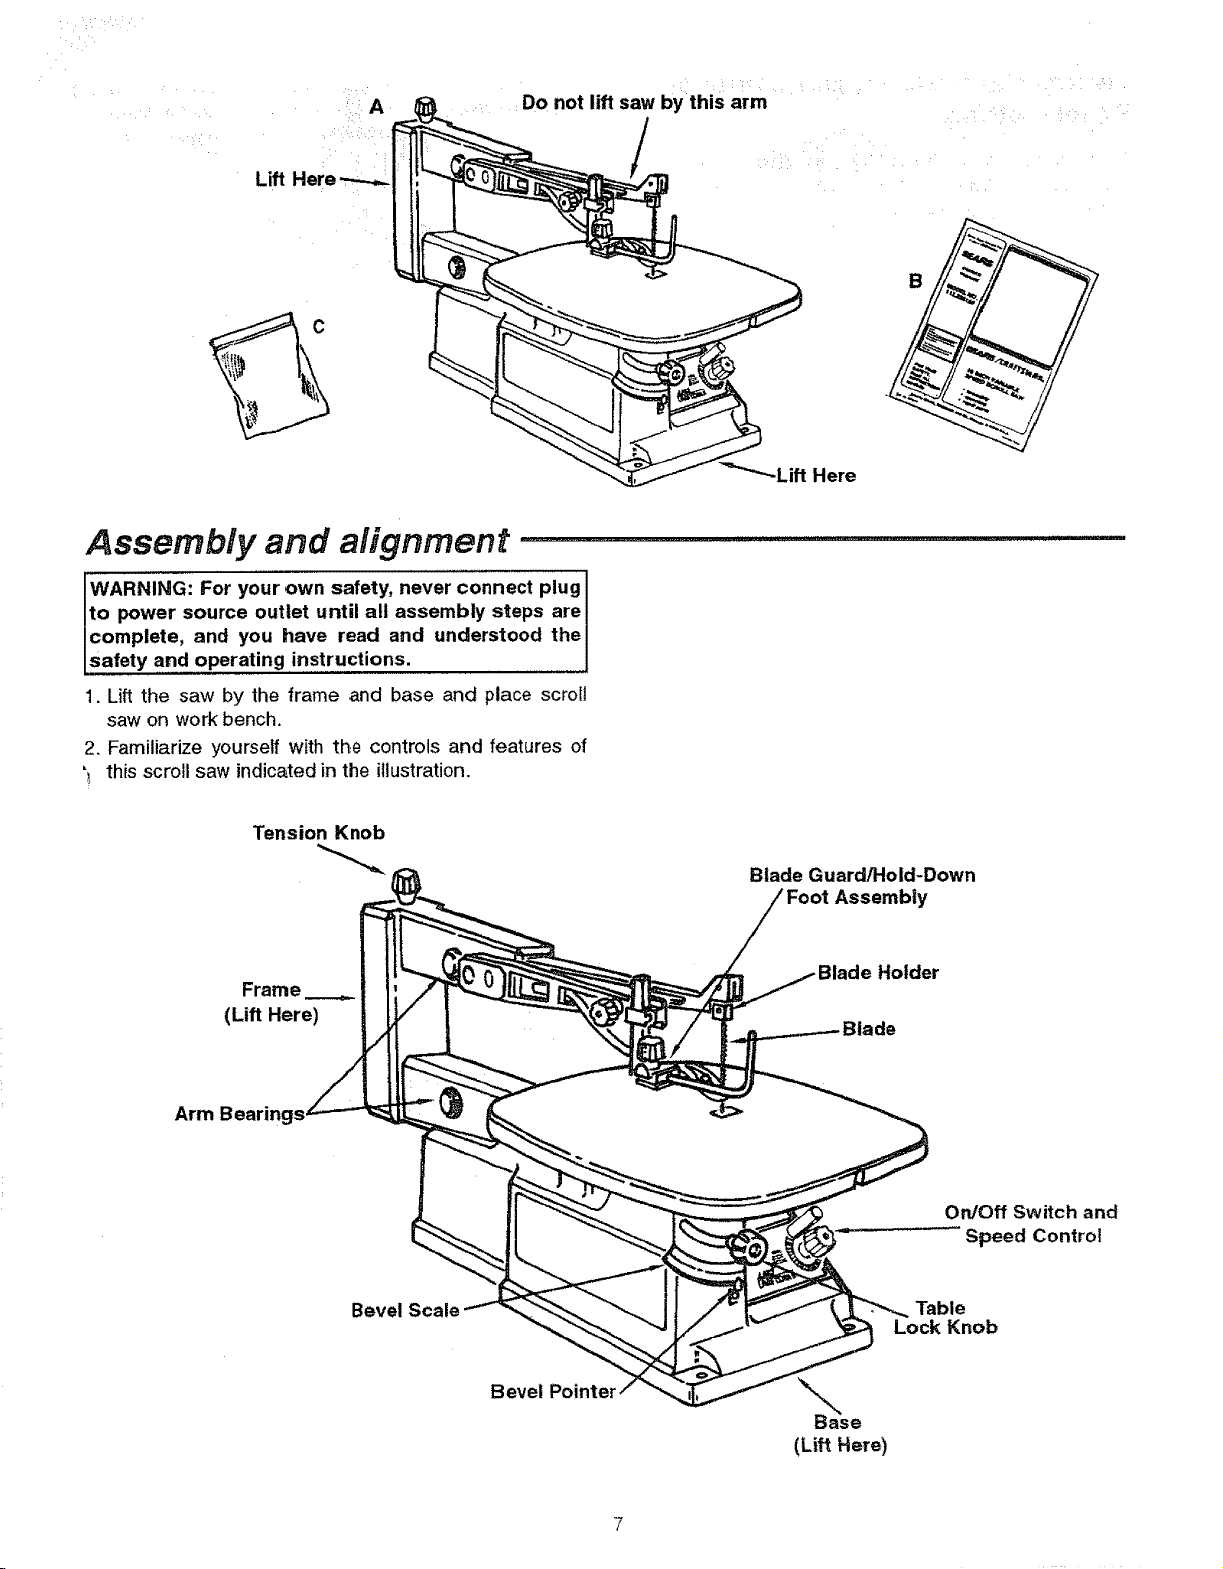
Do not lift saw by this arm
Lift
C
Here
Assembly and alignment ...............................................
WARNING: For your own safety, never connect plug
to power source outlet until all assembly steps are
complete, and you have read and understood the
safety and operating instructions.
1. Lift the saw by the frame and base and place scrolt
saw on work bench.
2. Familiarize yourself with the controls and features of
'_ this scroll saw indicated in the illustration.
Tension Knob
Frame
(Lift Here)
Arm Bearings _
Bevel
Blade Guard/Hold-Down
Assembly
Holder
de
On/Off Switch and
Speed Control
Table
Lock Knob
Bevel
Base
(Lift Here)
ng
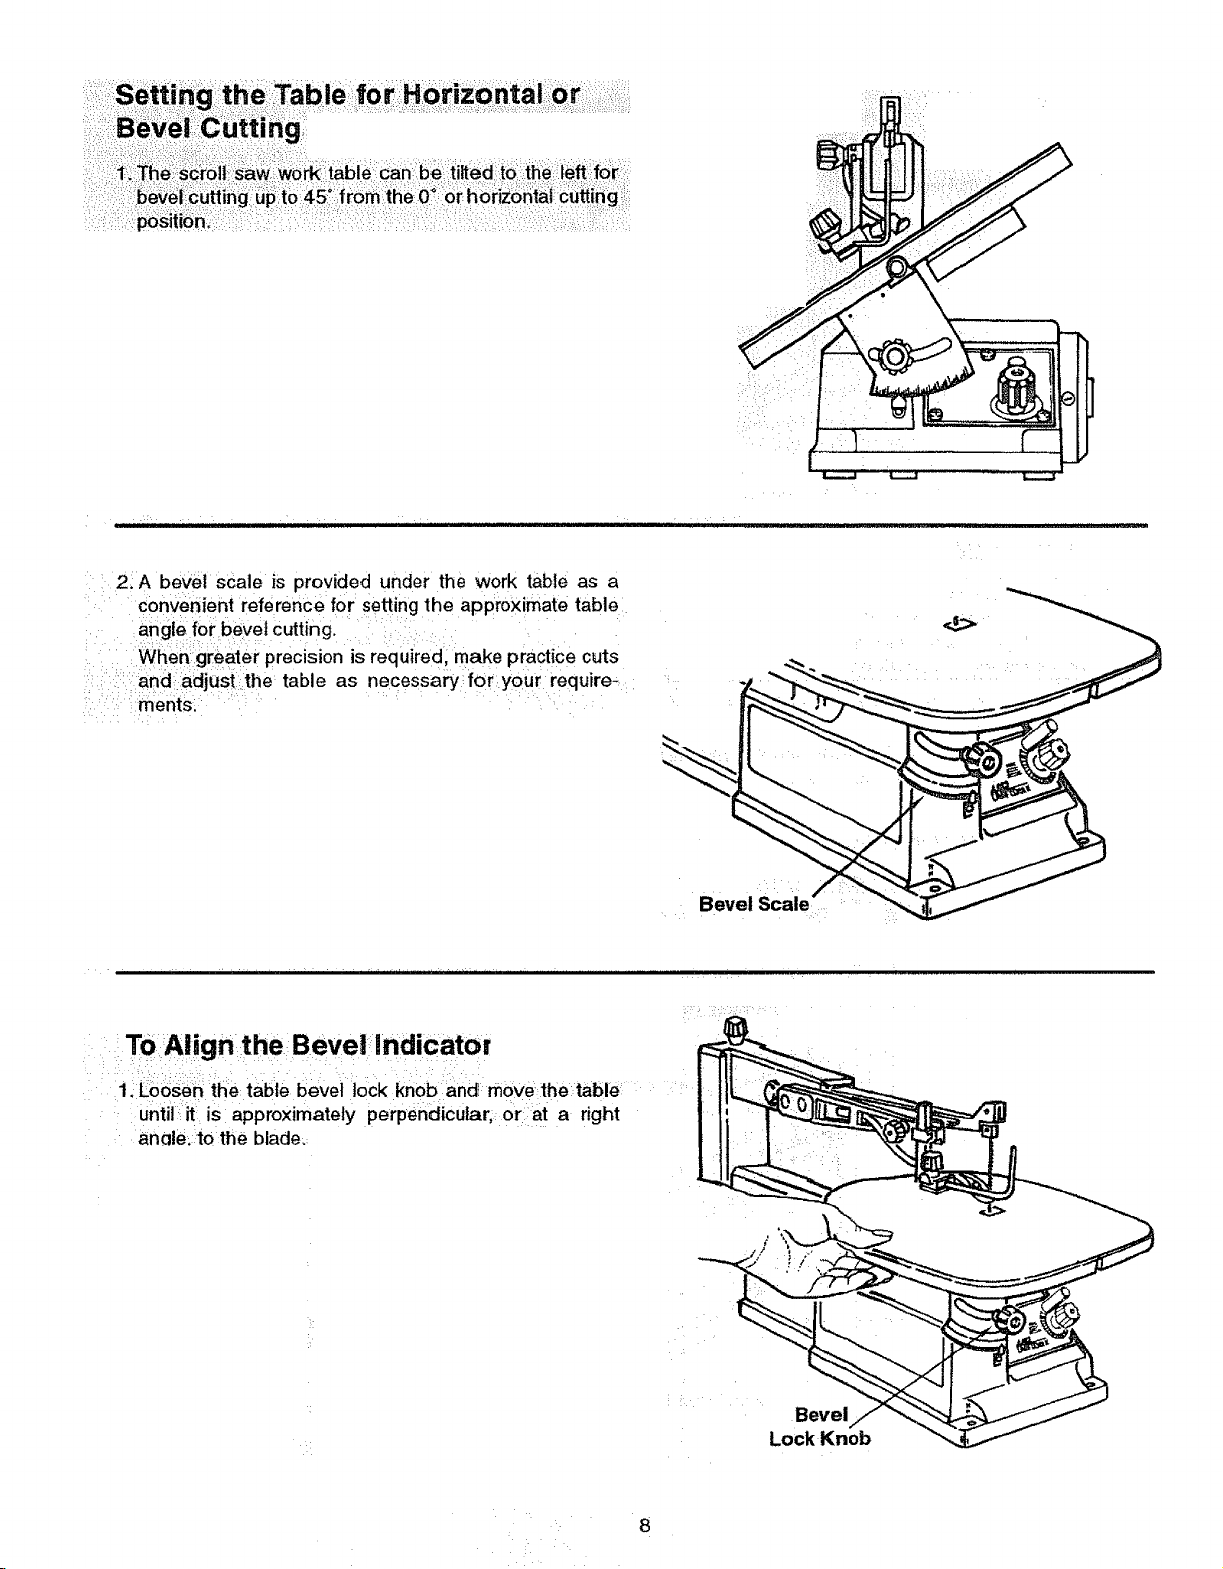
2. A bevel scale is provided under the work table as a
convenient reference for setting the approximate table
angle for bevel cutting.
When greater precision is requiredl make practice cuts
and :adjust the table as necessary:for your require-
: .... ments.
ToAlign the Bevel indiCator
11Lo_n_ttle table bevei lock knob an_ move,the:table ::
until iti is approximately perpehdicutar;_ Or:iat a right
anale:to the blade,:
L¸
• J
Bevel
Lock Knob
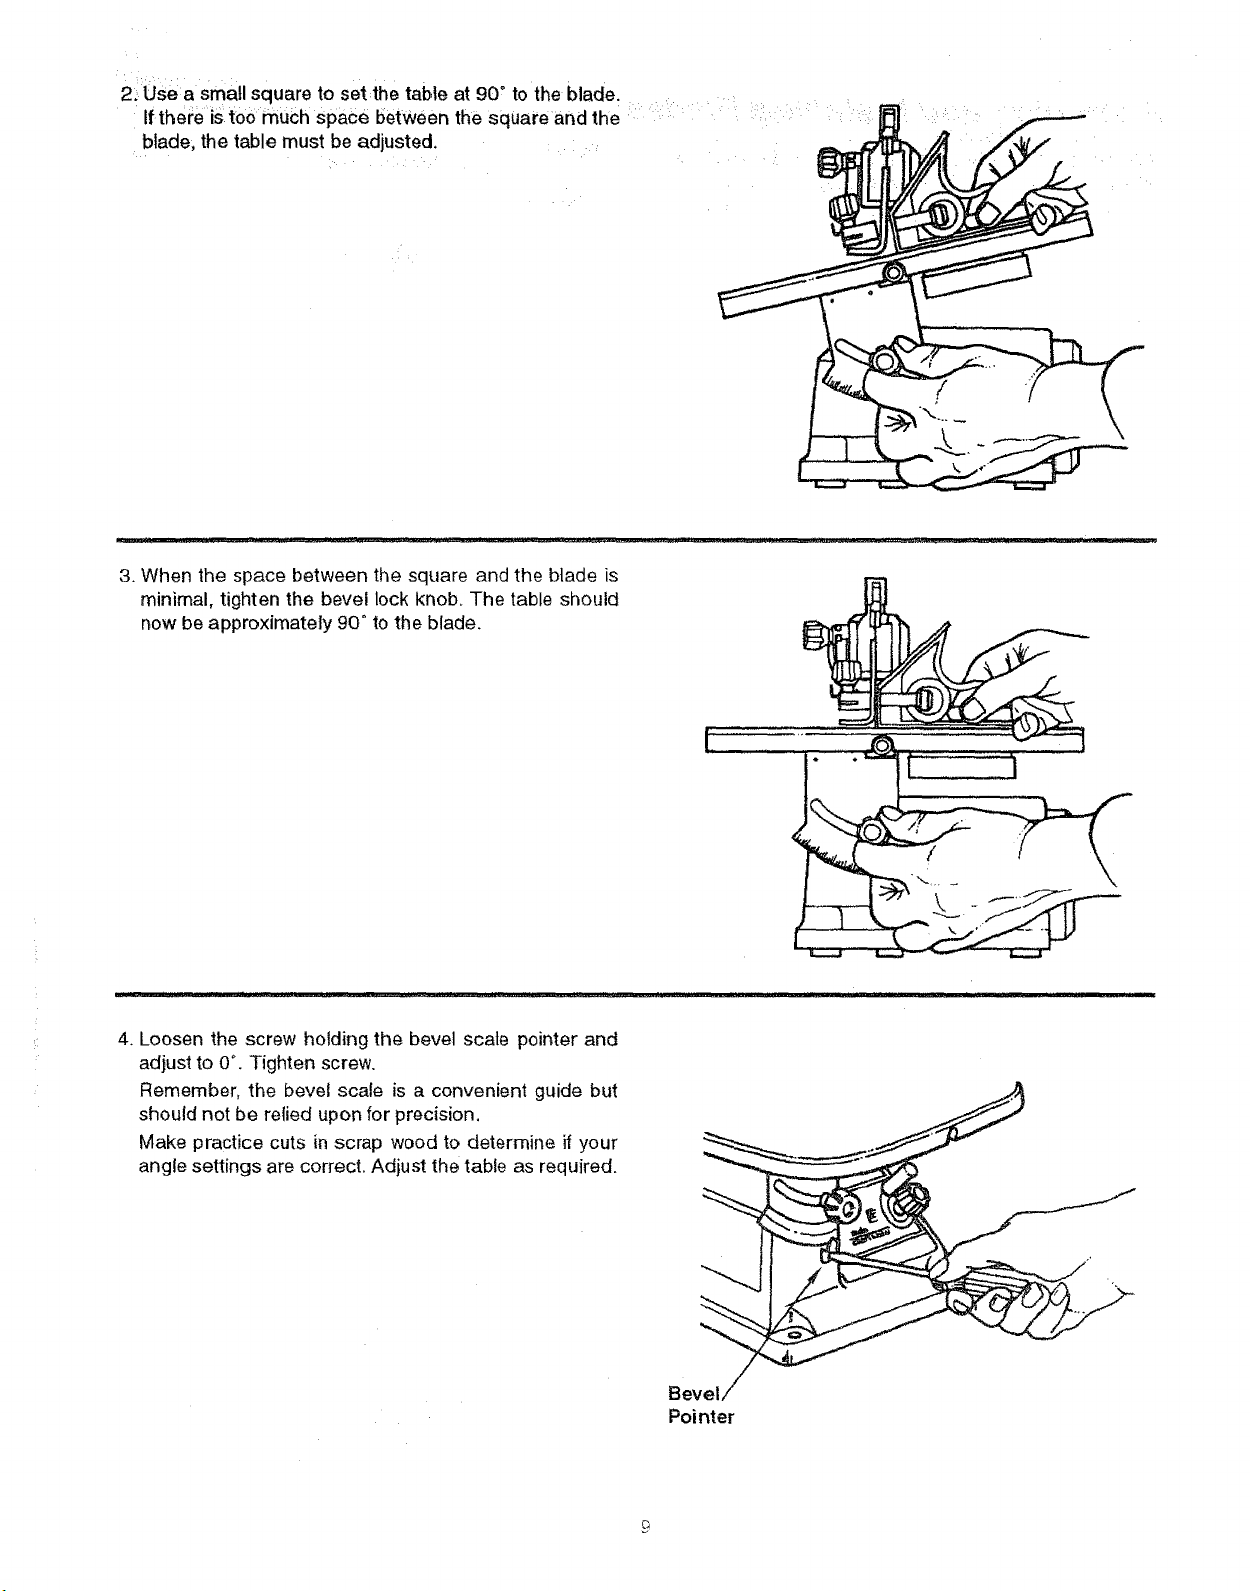
2_Use a small square to set the table at 90" to the blade.
If there is too much space between the square and the
blade, the table must be adjusted.
3. When the space between the square and the blade is
minimal, tighten the bevel lock knob, The table should
now be approximately 90° to the blade,
4. Loosen the screw holding the bevel scale pointer and
adjust to 0°. Tighten screw.
Remember, the bevel scale is a convenient guide but
should not be relied upon for precision,
Make practice cuts in scrap wood to determine if your
angle settings are correct. Adjust the table as required.
.......
Bevel
Pointer
 Loading...