

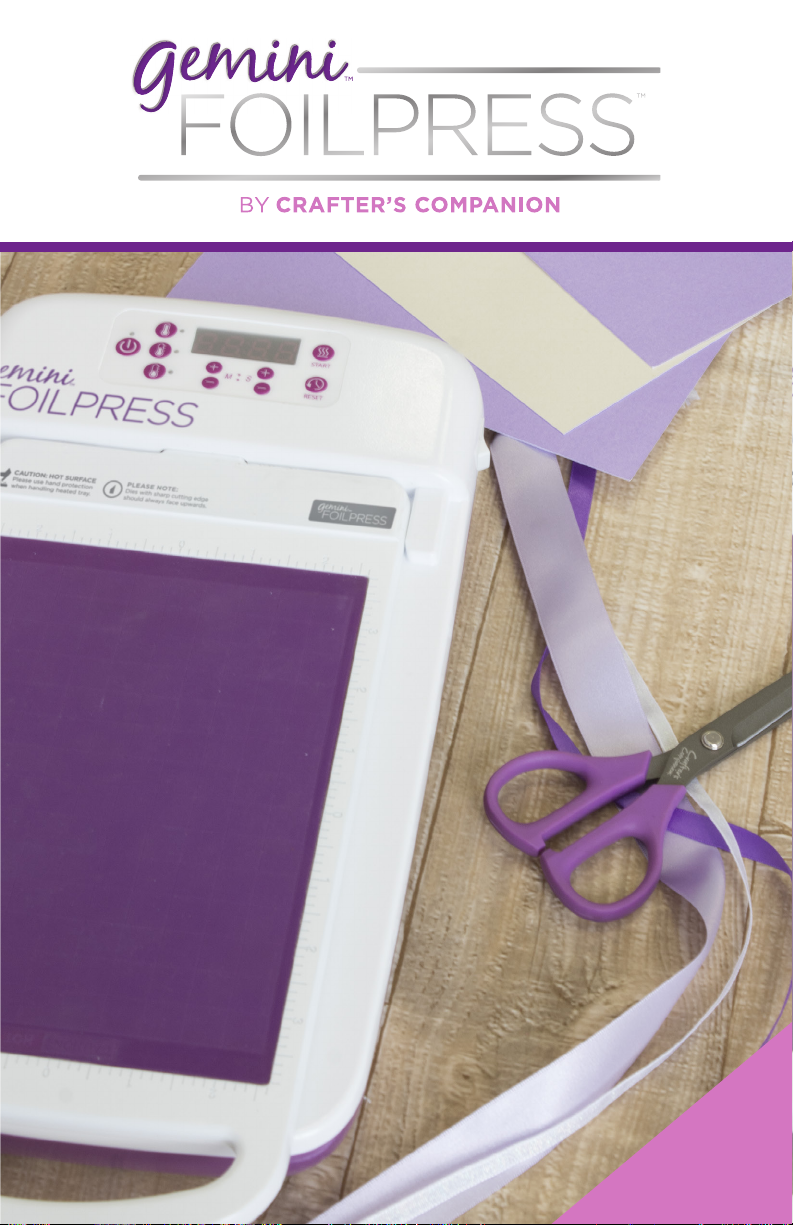
Crafter's Companion Gemini Foilpress User Manual
USER
GUIDE
*Please Note: This matrix is meant as a guideline
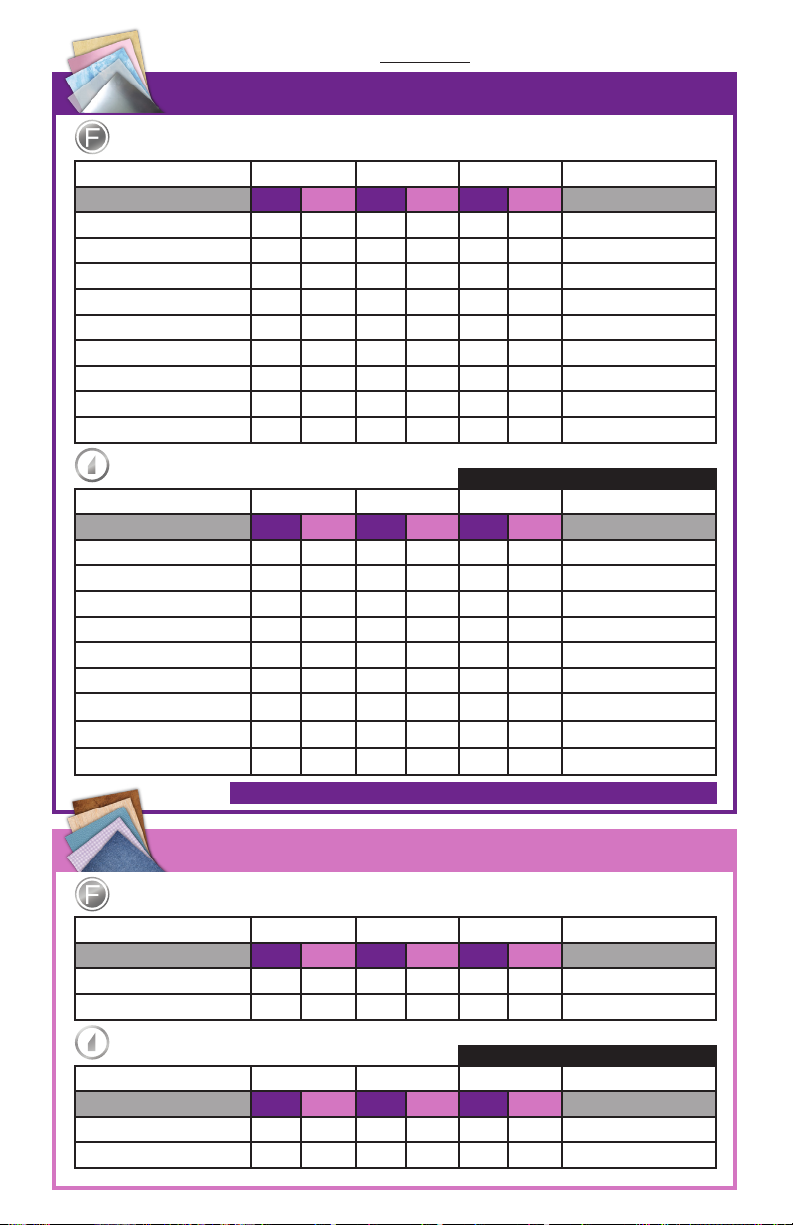
MATERIAL MATRIX
PAPERCRAFT FOIL ROLLS
FOIL STAMP DIES
Material Small Die Medium Die Large Die Additional Shims
TEMP TIME TEMP TIME TEMP TIME
300 gsm Cardstock Low 00:10 Low 00:15 Low 00:30
350 gsm Cardstock Low 00:10 Low 00:15 Low 00:30
300 gsm Pearlescent Card Low 00:10 Low 00:15 Low 00:30
135 gsm Vellum Low 00:20 Low 00:30 Low 00:45 300gsm card shim
250 gsm Mirror Card Low 00:20 Low 00:20 Low 00:30
0.15mm Acetate Sheet Low 00:10 Low 00:15 Low 00:30
PU Leather Low 00:05 Low 00:10 Low 00:15
Fabric (Cotton) Low 00:20 Low 00:30 Low 01:00 300gsm card shim
Satin Ribbon Low 00:05 Low 00:10 N/A N /A
FOIL STAMP 'N CUT DIES
Material Small Die Medium Die Large Die Additional Shims
TEMP TIME TEMP TIME TEMP TIME
300 gsm Cardstock Low 00:20 Low 00:45 Low 01:00
350 gsm Cardstock Low 00:15 Low 00:30 Low 00:45
300 gsm Pearlescent Card Low 00:15 Low 00:30 Low 00:45
135 gsm Vellum Low 00:15 Low 00:30 Low 00:45 300gsm card shim
250 gsm Mirror Card Low 00:15 Low 00:45 Low 01:00
0.15mm Acetate Sheet N/A N/A N /A N /A N/A N /A
PU Leather Low 00:10 Low 00:20 Low N/A
Fabric (Cotton) Low 00:45 Low 01:30 N /A N/A
Satin Ribbon Low 00:10 N/A N /A N/A N /A
*Cutting these materials requires an additional metal shim (included with Gemini Junior)
Note: Use included metal shim when cutting
Gemini Jr. metal shim
*
Gemini Jr. metal shim
*
Gemini Jr. metal shim
*
MULTI-SURFACE FOIL ROLLS
FOIL STAMP DIES
Material Small Die Medium Die Large Die Additional Shims
TEMP TIME TEMP TIME TEMP TIME
PU Leather High 00:15 High 00:25 High 00:45
Fabric (Cotton) High 00:30 High 00:45 High 01:00 300gsm card shim
FOIL STAMP 'N CUT DIES
Material Small Die Medium Die Large Die Additional Shims
TEMP TIME TEMP TIME TEMP TIME
PU Leather High 00:20 High 00:25 High 00:30
Fabric (Cotton) High 00:30 High 01:30 High 01:30 300gsm card shim
Note: Use included metal shim when cutting
ENGLISH
USER GUIDE
Congratulations on your purchase of the Gemini FoilPress™ hot foiling machine! The
innovative FoilPress™ applies professional-looking foiling to thick card, chipboard,
vinyl, fabric, leather, faux leather, vellum, and much more. The FoilPress™ must be
used exclusively with the Gemini brand die-cutting and embossing machines. It comes
with an included Foiling Platform perfectly sized to fit into the Gemini Junior™.
Try the FoilPress™ with your card-making, scrapbooking, home décor projects and
other hobbies.
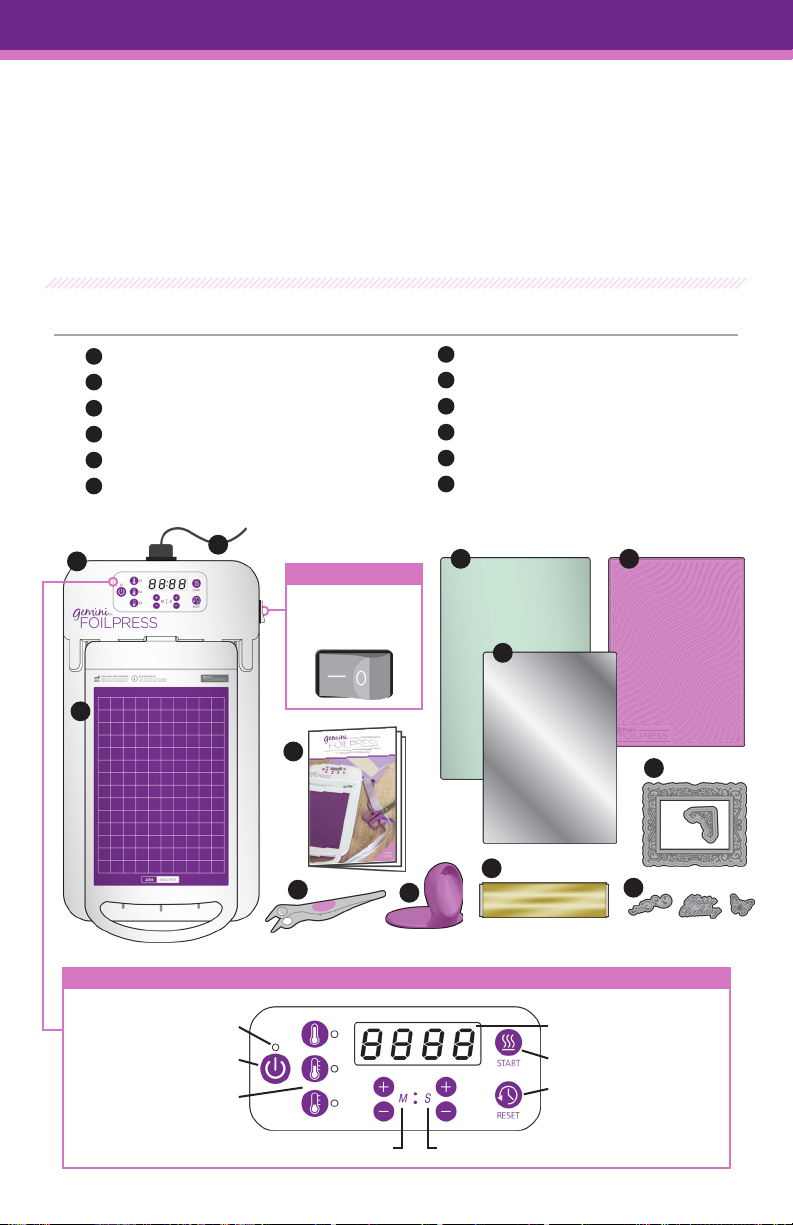
IN THE BOX
7
1
• FoilPress™ Base Station
2
• Foiling Platform
3
• Top Plate
4
• Metal Shim
5
• Silicone Cooling Mat
6
• Magnetic Tweezers
• Silicone Finger Grips
8
• x1 Roll of Gold Foil
9
• x2 Foil Stamp ‘N Cut™ Dies
10
• x3 Foil Stamp Dies
11
• Instruction Manual
12
• Power Cord
1
12
2
PROGRAMMABLE CONTROL PANEL
Indicator Lights
Power Button
Temperature
Settings
ON/OFF SWITCH
Note: Main power
switch is located
on side of unit
11
6
3 5
4
8
7
9
10
LCD Display
Countdown Start
Reset Heating
Time
Heat Time Settings (Seconds)Heat Time Settings (Minutes)
Pg.1 | ENG-1

A NOTE ABOUT HEAT & PRESSURE
The FoilPress™ uses heat to achieve professional-looking results. Exercise caution at
all times. Intended for use only for ages 14+.
• ALWAYS USE THE PROVIDED TWEEZERS WHEN HANDLING HEATED FOIL
STAMP DIES AND FOIL.
• ALWAYS use the Silicone Finger Grips when handling the Foiling Platform, Top
Plate or other heated elements. Use the Silicone Cooling Mat to protect work
surfaces from heated elements.
NOTE: The Gemini Foilpress™ is equipped with safety sensors to prevent accidental
overheating. If the display shows COOL, then the Foiling Platform must be put aside to cool
off and avoid overheating. Use the Silicone Finger Grips to carefully remove the Foiling
Platform from the Base Station and place on the Silicone Cooling Mat to cool off. After three
minutes the display will clear and the Foiling Platform can be returned to the Base Station
to be heated again.
OPERATING YOUR GEMINI FOILPRESS™
Place the Gemini Foilpress™ Base Station on a dry, level surface.
Connect the power plug to the back of the machine. Switch the main power switch on
the side of the Base Station to 'ON'.
When ready to operate, press the POWER button on the Control Panel to turn unit on.
Select the temperature you want ( low / medum / high) using the temperature
settings on the Control Panel.
NOTE: When you are finished using the Geimni Foilpress™, remember to switch off both the
POWER button at the top of the machine, and the On/Off Switch at the side of the machine.
GETTING STARTED WITH HOT FOIL
• As noted above, ensure the Gemini FoilPress™ is plugged in and turned on
prior to use.
• Connect the Foiling Platform to the Base Station.
• Select your heat setting based on the Material Matrix chart.
• Press the temperature button on the Base Station. The red light will turn on
and a sound will beep.
• The red light will turn green and another beep will sound when the Foiling
Platform has reached the required temperature (approx. 2 – 3 minutes).
• Follow the instructions below for use.
NOTE: The machine will auto shut-off when unused for over 25 minutes.
Pg.2 | ENG-2

HOT FOILING WITH FOIL STAMP DIES
1. Make sure the FoilPress™ is pre-heated and set the timer based on the selected
material. Use the Material Matrix chart.
2. Place the Foil Stamp Die facing upwards on the purple non-slip surface of
Foiling Platform, using the tweezers to reposition if needed, cover with Top
Plate and press START on the Base.
3. Trim foil to size needed to cover the Foil Stamp Die and, when the indicator
light has turned green and a beep has sounded, remove the Foiling Platform
and place foil with COLOURED SIDE DOWN on top of the Foil Stamp Die.
4. Place selected material face-down on top of the foil and carefully place the Top
Plate on top.
5. Use the Silicone Finger Grips and grasp by only the handle to carefully remove
the Foiling Platform with Top Plate from the Base (careful not to touch the
underside of the Foiling Platform) and offer to the opening of the Gemini
Junior™ machine. It will pass through the machine the same as with any other
sandwich.
6. The material is now foiled and debossed! Using the Silicone Finger Grips
remove the Top Plate and use the tweezers to carefully lift the material from
the Foiling Platform.
HOT FOILING WITH THIN METAL DIES
Use the versatile Gemini FoilPress™ with your favourite thin metal dies for more foiling
options!
To Hot Foil with thin metal dies, follow the instructions for “Hot Foiling with Foil
Stamp Dies” (Steps 1-6), but substitute the Foil Stamp Die with your thin metal die.
TIP: To avoid damaging the purple non-slip surface, always place cutting dies with the
cutting edge up.
HOT FOILING WITH FOIL STAMP ‘N CUT™ DIES
TIP: To avoid damaging the purple non-slip surface, always place cutting dies with the
cutting edge up.
1. Make sure the FoilPress™ is pre-heated and set the timer based on the selected
material, use the chart below.
2. Place the FoilPress™ Metal Shim on the Foiling Platform, place the Foil Stamp
‘N Cut™ Die on the Metal Shim (using the Magnetic Tweezers to reposition if
needed), followed by the Top Plate and press START on the Base.
3. Trim foil to size needed to cover the Foil Stamp ‘N Cut™ Die and, when the
indicator light has turned green and a beep has sounded, remove the Top Plate,
place foil with COLOURED SIDE DOWN on top of the Foil Stamp ‘N Cut Die.
4. Place selected material face-down on top of the foil, carefully place the Gemini
Junior™ Metal Shim on top of the material, followed by the Top Plate on top of
the Metal Shim.
5. Use the Silicone Finger Grips and grasp by only the handle to carefully remove
the Foiling Plat-form with Top Plate from the Base (careful not to touch the
underside of the Foiling Platform) and offer to the opening of the Gemini
Pg.3 | ENG-3

Junior™ machine. It will pass through the machine the same as with any other
sandwich.
6. The material is now foiled and cut! Using the Silicone Finger Grips remove the
Top Plate and Metal Shim (CAUTION: HOT!), then use the tweezers to carefully
lift the foiled and cut material from the Foiling Platform.
FAQ
Which way do I put the foil in? – Coloured side down
What foil should I use? – Only use Gemini FoilPress™ Foil Rolls with FoilPress™ (sold
separately).
How do I store the foil? – Store your foil somewhere dry and safe to avoid creases and to
keep the low and hot temp foils separate for ease of use.
How do I differentiate between Gemini Papercraft Foil and Gemini Multi-Surface Foil? –
Papercraft Foil has a white core and Multi-Surface Foil has a brown core.
Can the Foil be used more than once? – No, but you can use leftover scraps of foil at any
size, and you can also try foiling in layers with different colours over each other for dramatic
effect.
How long does the machine take to heat up? – From initial cool state to Low-Temp: 3.5
minutes (this is the setting for most applications). From initial cool state to Medium-Temp:
4.5 minutes. From initial cool state to High-Temp: 5.5 minutes. Between Temperature
Settings: Approximately 1 minute. From Low-Temp to High-Temp: Approximately 1 minute.
HINTS & TIPS
As good foiling results require the right temperature – when your heating plate
becomes too hot for the setting, the FoilPress™ has sensors to detect this. It will flash
the word COOL where the timer is. When this happens you will need to remove the
plate and place on the Silicone Cooling Mat and allow it to cool down. When the
timer displays 00:00 instead of COOL you can insert the plate to be used again. This
will occur if you move from high to low temperature settings.
• For best results – allow your dies to cool down on the Silicone Cooling Mat
before each use.
• When removing your FoilPress™ Foiling Platform please always ensure it is
placed on the Silicone Cooling Mat to avoid damage.
• Always use the Magnetic Tweezers to pick up or move your FoilPress™ stamp
dies.
• Do not directly touch the purple non-slip surface of the Foiling Platform during
the heating process or whenever heated.
• Remember the FoilPress™ Machine is not a toy and not suitable for children.
Please store out of the reach of children.
• Do not submerge any part of the FoilPress™ Machine in water or liquid.
• Never leave your FoilPress™ Machine unattended when in use. Only move or
pack away the machine after cooling down, and always unplug when not in use.
Pg.4 | ENG-4

GENERAL SAFETY WARNINGS
• Observe all warnings and instructions that are marked on the product or
provided with it. This appliance is intended only for domestic use as described
and in accordance with the instruction manual. Always follow basic safety
precautions when using this product.
• Read and understand all instructions in the documentation that comes with
the Gemini FoilPress™ Machine to reduce risk of injury from burns or electrical
shock.
• Do not install or use this product near water or when you are wet. Do not
immerse this item in water. Install the product securely on a stable surface
when using or storing.
• Install the product in a protected location where no one can step on or trip
over the power cord and the power cord cannot be damaged. Do not allow the
power cord to become wet, tangled or within reach of children.
• This machine operates at high temperature. The machine uses metal plates for
some of its applications, these plates also conduct heat and also become very
hot. When using the machine for these applications always use the tools and
accessories provided with the machine to avoid burns or bodily damage.
• Never leave a FoilPress™ machine unattended when in operation or cooling
down. Do not place your fingers or other parts of your body onto the purple
non-slip surface whilst the machine is on or in use – or while cooling down, as
this may cause bodily injury.
• Disconnect electrical power before cleaning and storage. There are no user
serviceable parts inside the machine. Refer servicing to a qualified person.
Always unplug the machine when not in use. When removing from the wall
socket pull the plug and not the cord.
• This machine is not a toy and is not intended for use by children, persons with
reduced physical, sensory and mental capabilities or persons under the age of
14 years unless supervised by a responsible and capable adult.
• Do not attempt to carry out any repairs on the machine, all repairs must be
done by a qualified person as directed by the manufacturer. Do not use this
machine for any other purpose other than it’s intended use.
Pg.5 | ENG-5
FRENCH
MODE D’EMPLOI
Félicitations pour votre achat de la machine à dorure à chaud Gemini FoilPress™!
La technologie innovante FoilPress™ permet d’appliquer une pellicule d’apparence
professionnelle au papier cartonné épais, au carton gris, au vinyle, au tissu, au cuir,
au faux cuir, au papier vélin et à bien plus encore. La FoilPress™ doit être utilisée
exclusivement avec les machines de découpage à l’emporte-pièce et les gaufreuses
de la marque Gemini. Elle est livrée avec une plateforme d’application de papier
métallique parfaitement adaptée à la Gemini Junior.
Essayez la FoilPress™ pour vos projets de création de cartes, de collimage, de
décoration intérieure et autres passe-temps.
CONTENU DE LA BOÎTE
1 7
• Station de base de la FoilPress™
2 8
• Plateforme d’application
de papier métallique
3
• Plaque supérieure
4 10
• Cale métallique
5
• Napperon de refroidissement
en silicone
6
• Pincette magnétique
• Prises à doigts en silicone
• x1 rouleau de feuille d’or
9
• x2 matrices d’estampage et
découpe Stamp ’N Cut en aluminium
• x3 matrices d’estampage
en aluminium
11
• Manuel d’instructions
12
• Cordon d’alimentation
1
12
2
PANNEAU DE CONTRÔLE PROGRAMMABLE
Indicateur lumineux
Bouton d’Alimentation
Paramètres de
Température
Paramètres de temps de chauffage
Pg.6 | FRA-1
MARCHE/ARRÊT
Remarque: le
commutateur
d’alimentation
principal est à
l’arrière de l’appareil.
11
6
(minutes)
3 5
4
8
7
Écran LCD
Démarrage du compte
à rebours
Réinitialiser le temps
de chauffage
Paramètres de temps de chauffage
(secondes)
9
10

REMARQUE À PROPOS DE LA CHALEUR ET DE LA PRESSION
La FoilPress™ utilise la chaleur pour obtenir des résultats professionnels. Faire preuve
de prudence en tout temps. Destinée à être utilisée uniquement par les personnes
âgées de 14 ans et plus.
• TOUJOURS UTILISER LES PINCETTES FOURNIES LORS DE LA
MANIPULATION DE MATRICES D’ESTAMPAGE ET DE FEUILLES
CHAUFFANTES.
• TOUJOURS utiliser les poignées en silicone pour manipuler la plateforme
d’application de papier métallique, la plaque supérieure ou tout autre élément
chauffant. Utiliser le napperon de refroidissement en silicone pour protéger les
surfaces de travail des éléments chauffants.
REMARQUE: La Gemini FoilPress™ est équipée de capteurs de sécurité pour éviter toute
surchauffe accidentelle. Si l’écran affiche COOL (Refroidir), la plateforme d’application de
papier métallique doit être mise de côté pour refroidir et éviter tout risque de surchauffe.
Utiliser les poignées en silicone pour retirer délicatement la plateforme d’application de
papier métallique de la station de base et la placer sur le napperon de refroidissement
en silicone pour la refroidir. Après trois minutes, l’affichage disparaîtra et la plateforme
d’application de papier métallique pourra être retournée à la base afin d’être chauffée de
nouveau.
UTILISATION DE VOTRE GEMINI FOILPRESS™
Placer la station de base Gemini FoilPress™ sur une surface sèche et plane.
Brancher le cordon d’alimentation au dos de la machine. Mettre l’interrupteur principal
situé sur le côté de la station de base sur la position « ON » (ACTIVÉ).
Lorsque vous êtes prêt à l’utiliser, appuyer sur le bouton d’ALIMENTATION situé sur le
panneau de commande pour mettre l’appareil en marche.
Sélectionner la température souhaitée (faible/moyenne/élevée) en utilisant les
paramètres de température du panneau de commande.
REMARQUE: Lorsque vous avez fini d’utiliser la Gemini FoilPress™, ne pas oublier de mettre
la machine hors tension en appuyant sur le bouton d’ALIMENTATION en haut de l’appareil et
sur l’interrupteur Marche/Arrêt situé sur le côté de l’appareil.
DÉMARRER LA DORURE À CHAUD
• Comme indiqué ci-dessus, s’assurer que la Gemini FoilPress™ est branchée et
mise sous ten-sion avant de l’utiliser.
• Connecter la plateforme d’application de papier métallique à la station de base.
• Sélectionner le réglage de chaleur en fonction du tableau de la matrice de
matériau ci dessous.
• Appuyer sur le bouton de température situé sur la Station de base. Le voyant
rouge s’allume et un signal sonore retentit.
• Le voyant rouge devient vert et un autre signal sonore retentit lorsque la
plateforme d’application de papier métallique aura atteint la température
requise (environ 2 à 3 minutes).
• Suivre les instructions ci-dessous pour utiliser l’appareil.
REMARQUE: L’appareil se mettra hors tension automatiquement s’il n’est pas utilisé pendant plus de 25 minutes.
Pg.7 | FRA-2

DORURE À CHAUD AVEC MATRICES
D’ESTAMPAGE EN ALUMINIUM
1. S’assurer que la FoilPress™ est préchauffée et régler la minuterie en fonction du
matériau sé-lectionné. Utiliser le tableau de la matrice de matériaux ci-dessous.
2. Placer la matrice d’estampage en aluminium vers le haut sur la surface
violette antidérapante de la plateforme d’application de papier métallique, en
utilisant les pincettes pour reposition-ner si nécessaire, couvrir avec la plaque
supérieure et appuyer sur le bouton START (Démar-rer) situé sur la base.
3. Découper la feuille en fonction de la taille requise pour recouvrir la matrice
d’estampage en aluminium et, lorsque le voyant passe au vert et qu’un signal
sonore retentit, retirer la plate-forme d’application de papier métallique et
placer la feuille avec le CÔTÉ COLORÉ VERS LE BAS sur le dessus de la
matrice d’estampage en aluminium.
4. Placer le matériau sélectionné, face vers le bas, sur le dessus de la feuille et
placer soigneu-sement la plaque supérieure sur le dessus.
5. Utiliser les poignées en silicone et saisir uniquement avec la poignée pour
soigneusement re-tirer la plateforme d’application de papier métallique avec
la plaque supérieure de la base (veiller à ne pas toucher la face inférieure de la
plateforme d’application de papier métallique) et offrir à la mise sous tension
de la machine Gemini Junior. Il passera dans la machine comme avec tout autre
sandwich.
6. Le matériau est maintenant matelassé et gaufré! En utilisant les poignées
en silicone, retirer la plaque supérieure et utiliser les pincettes pour soulever
délicatement le matériau de la plateforme d’application de papier métallique.
MACHINE À DORURE AVEC MATRICES EN MÉTAL MINCE
Utiliser la Gemini FoilPress™ polyvalente avec vos matrices en métal mince préférées
pour plus d’options de dorure!
Pour effectuer la dorure à chaud avec les matrices d’estampage et découpe Foil
Stamp ’N Cut en aluminium, suivre les instructions pour la dorure à chaud avec
les matrices d’estampage en aluminium (étapes 1 à 6), mais remplacer la matrice
d’estampage en aluminium par la matrice d’estampage et découpe Foil Stamp ’N Cut.
CONSEIL: Pour éviter d’endommager la surface antidérapante violette, toujours placer les
matrices de découpe avec le tranchant vers le haut.
DORURE À CHAUD AVEC MATRICES D’ESTAMPAGE
ET DÉCOUPE FOIL STAMP ’N CUT
CONSEIL: Pour éviter d’endommager la surface antidérapante violette, toujours placer les
matrices de découpe avec le tranchant vers le haut.
1. Veiller à ce que la FoilPress™ soit préchauffée et régler la minuterie en fonction
du matériau sélec-tionné, utiliser le tableau ci-dessous.
2. Placer la cale en métal FoilPress™ sur la plateforme d’application de papier
métallique, placer la matrice d’estampage et découpe Foil Cut ’N Stamp en
aluminium sur la cale en métal (en utilisant la pincette pour la repositionner
si nécessaire), puis sur la plaque supérieure et appuyer sur le bouton START
(Démarrer) situé sur la base.
3. Découper la feuille à la taille requise pour recouvrir la matrice d’estampage et
de découpe Foil Cut ’N Stamp en aluminium, et lorsque le voyant passe au vert
Pg.8 | FRA-3
 Loading...