

CPS CP228 SMART User Manual

B
WALKIE TALKIE
USER MANUA
CP228
SMART
USINESS
L

1. GENERAL INFORMATION
1.1【Introduction】
The CP228 SMART Business Walkie Talkie combines quality and versatility Into a compact,
light and portable two-way radio with state-of-the-art design and easy-to-use features.
1.2【Key Features】
53CTCSS and 104 DCS
Volume setting (1–16)
ENGLISH
S.Q. Level control with 5 steps
Voice Operated Transmission ( VOX )
Dual Watch ( DW )
Key Lock
Battery Saving
0.5Watt High Power Speaker Output
3.7V 1100mAh Li-Polymer Battery pack
Channel Scan―Scans for acvity across different communicaons channels
Monitor funcon―Enables monitoring for weak radio signals
Busy Channel Lockout―Prevents the radio from listening to or transmitting over its channels
RSSI―Receiving signal strength indicaon
Battery Level Indicator
Beep sound Setting for using key Tones.
Power Output setting H:L
Roger Tone Setting, for transmitting end Tones.
Standby indicator setting
Intelligent ear-microphone adjustment
Reset setting
1.3【Accessories】
CB28 Li-Polymer Battery pack
CWC18 (S) Charging adapter including Micro-USB cable
Owner’s manual
1.4【Optional Accessories】
External speaker / microphone
CS28 Rapid Charger (4 Slots)
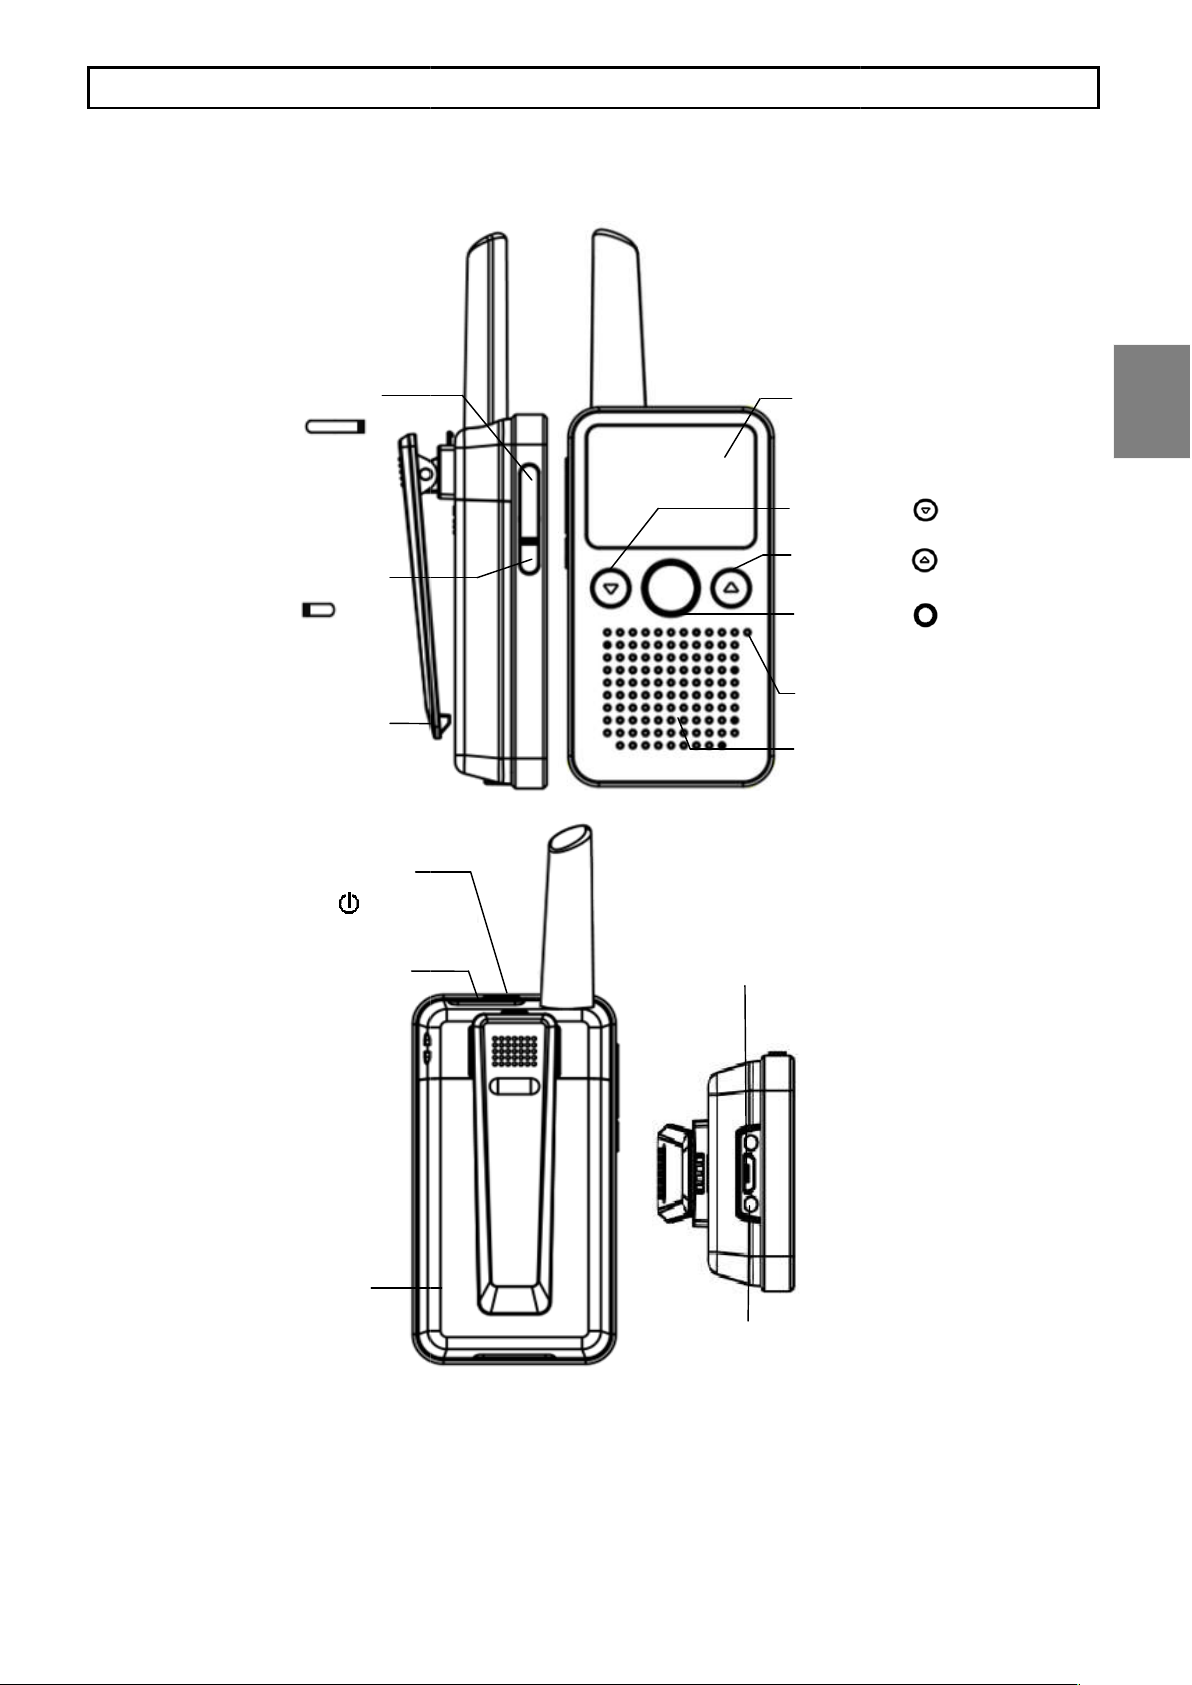
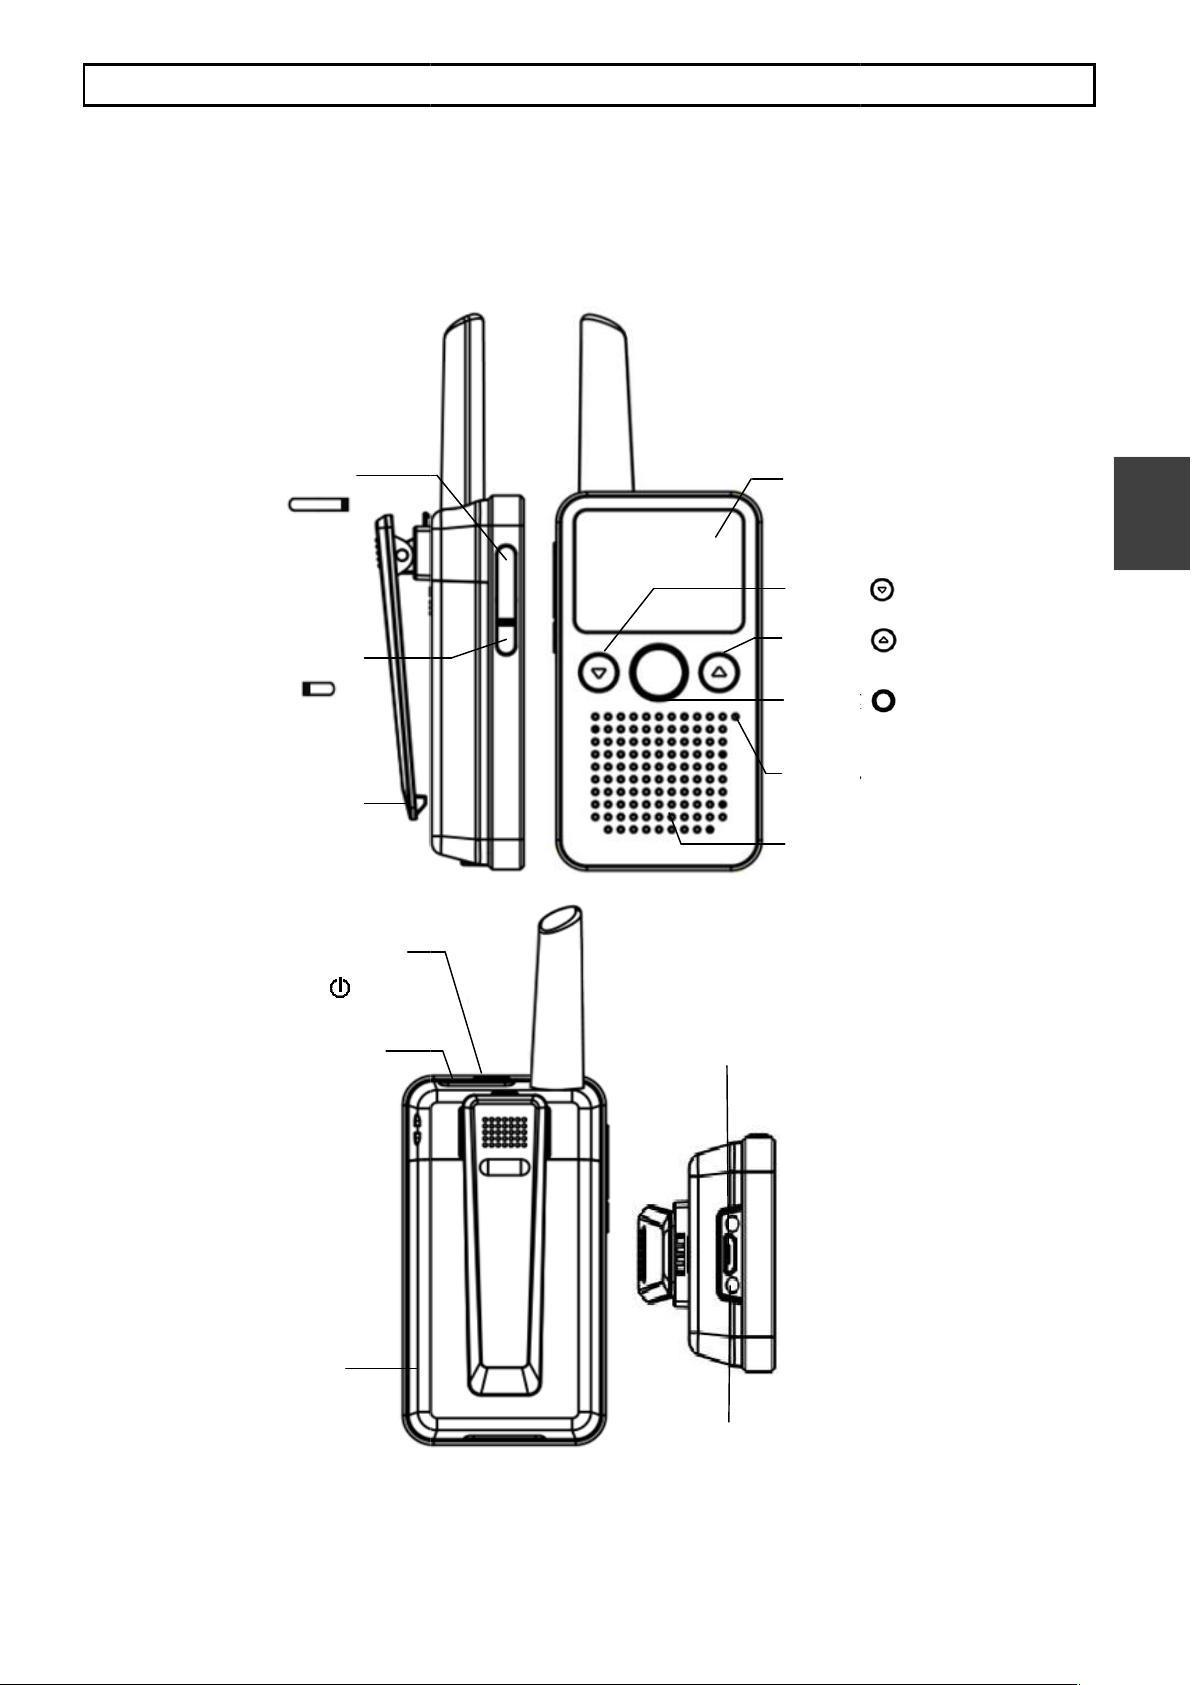
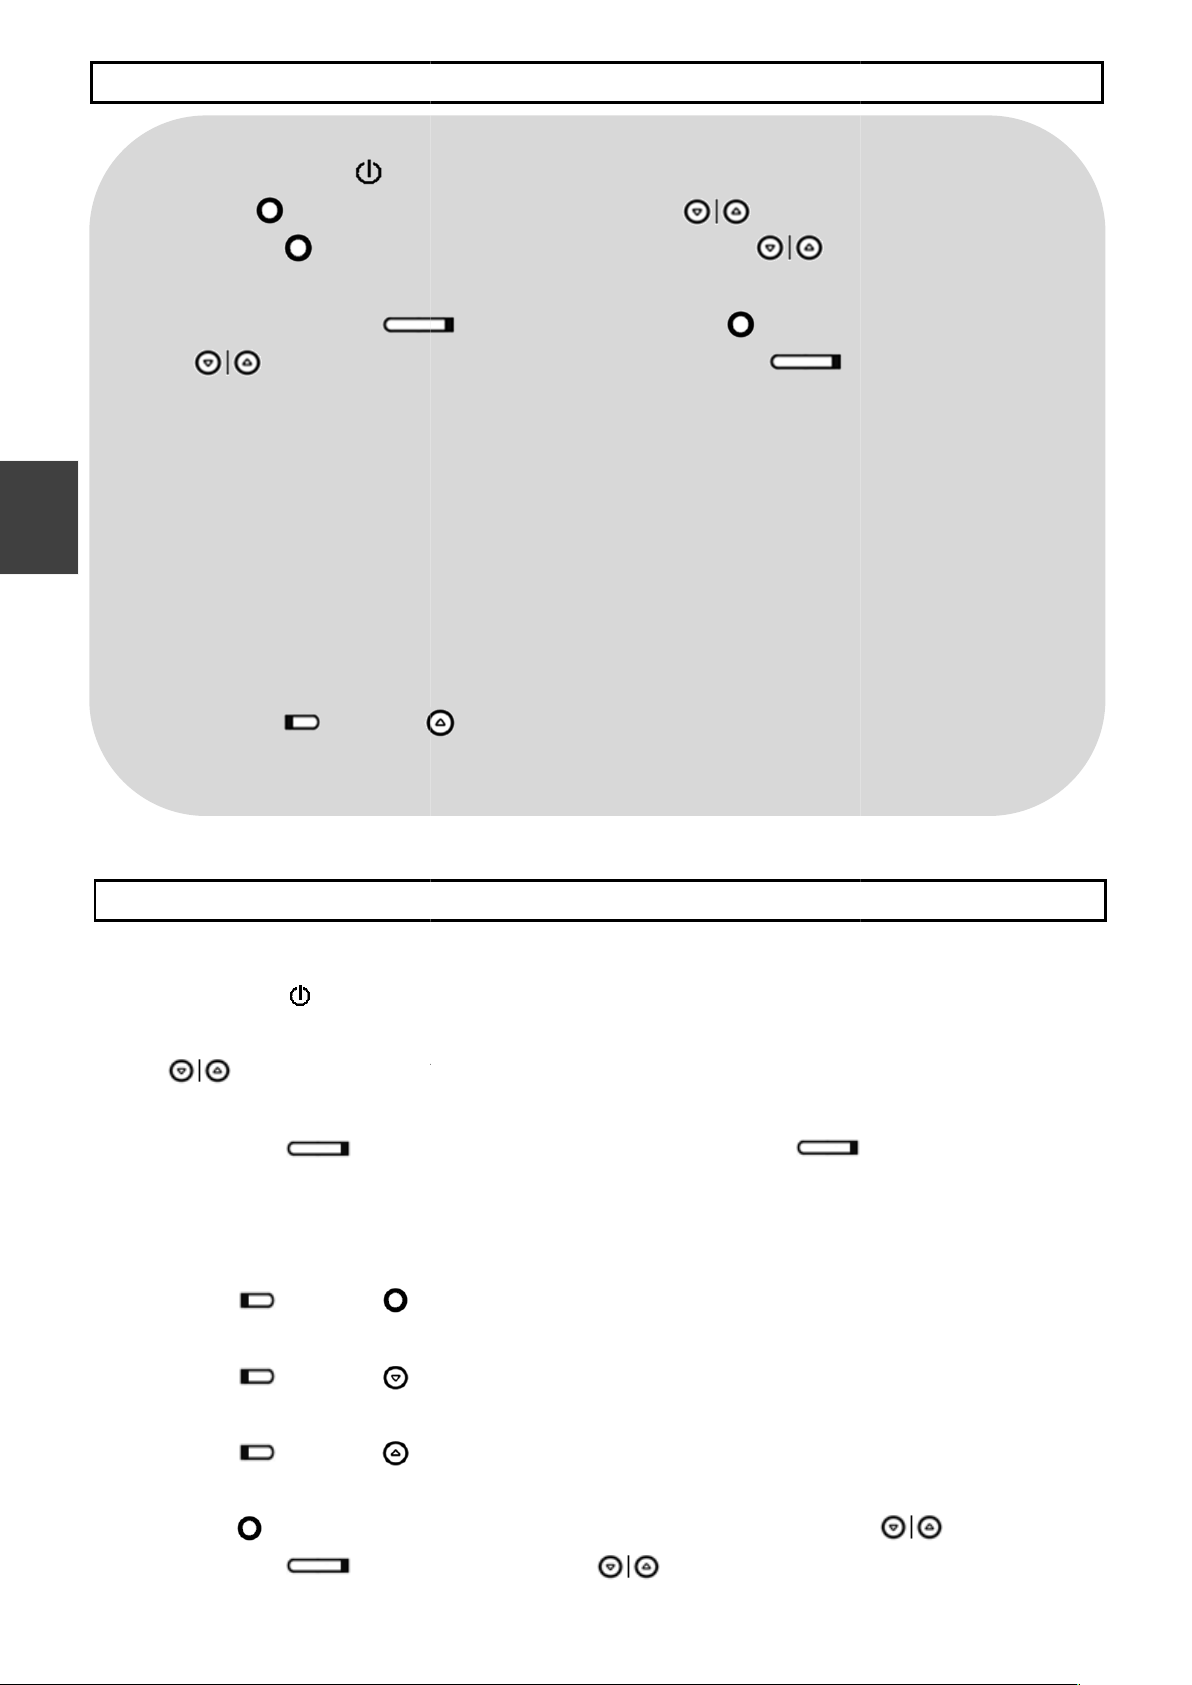
Key
Power Switch
Down Key
LCD Display
Up Key
Menu Key
Microphone
Loud Speaker
2. CONTROLS AND INDICATORS
PTT
Function key
Belt Clip
ENGLISH
External Speaker
/Mic.Cap
Battery pack
USB jack
Charging Contact
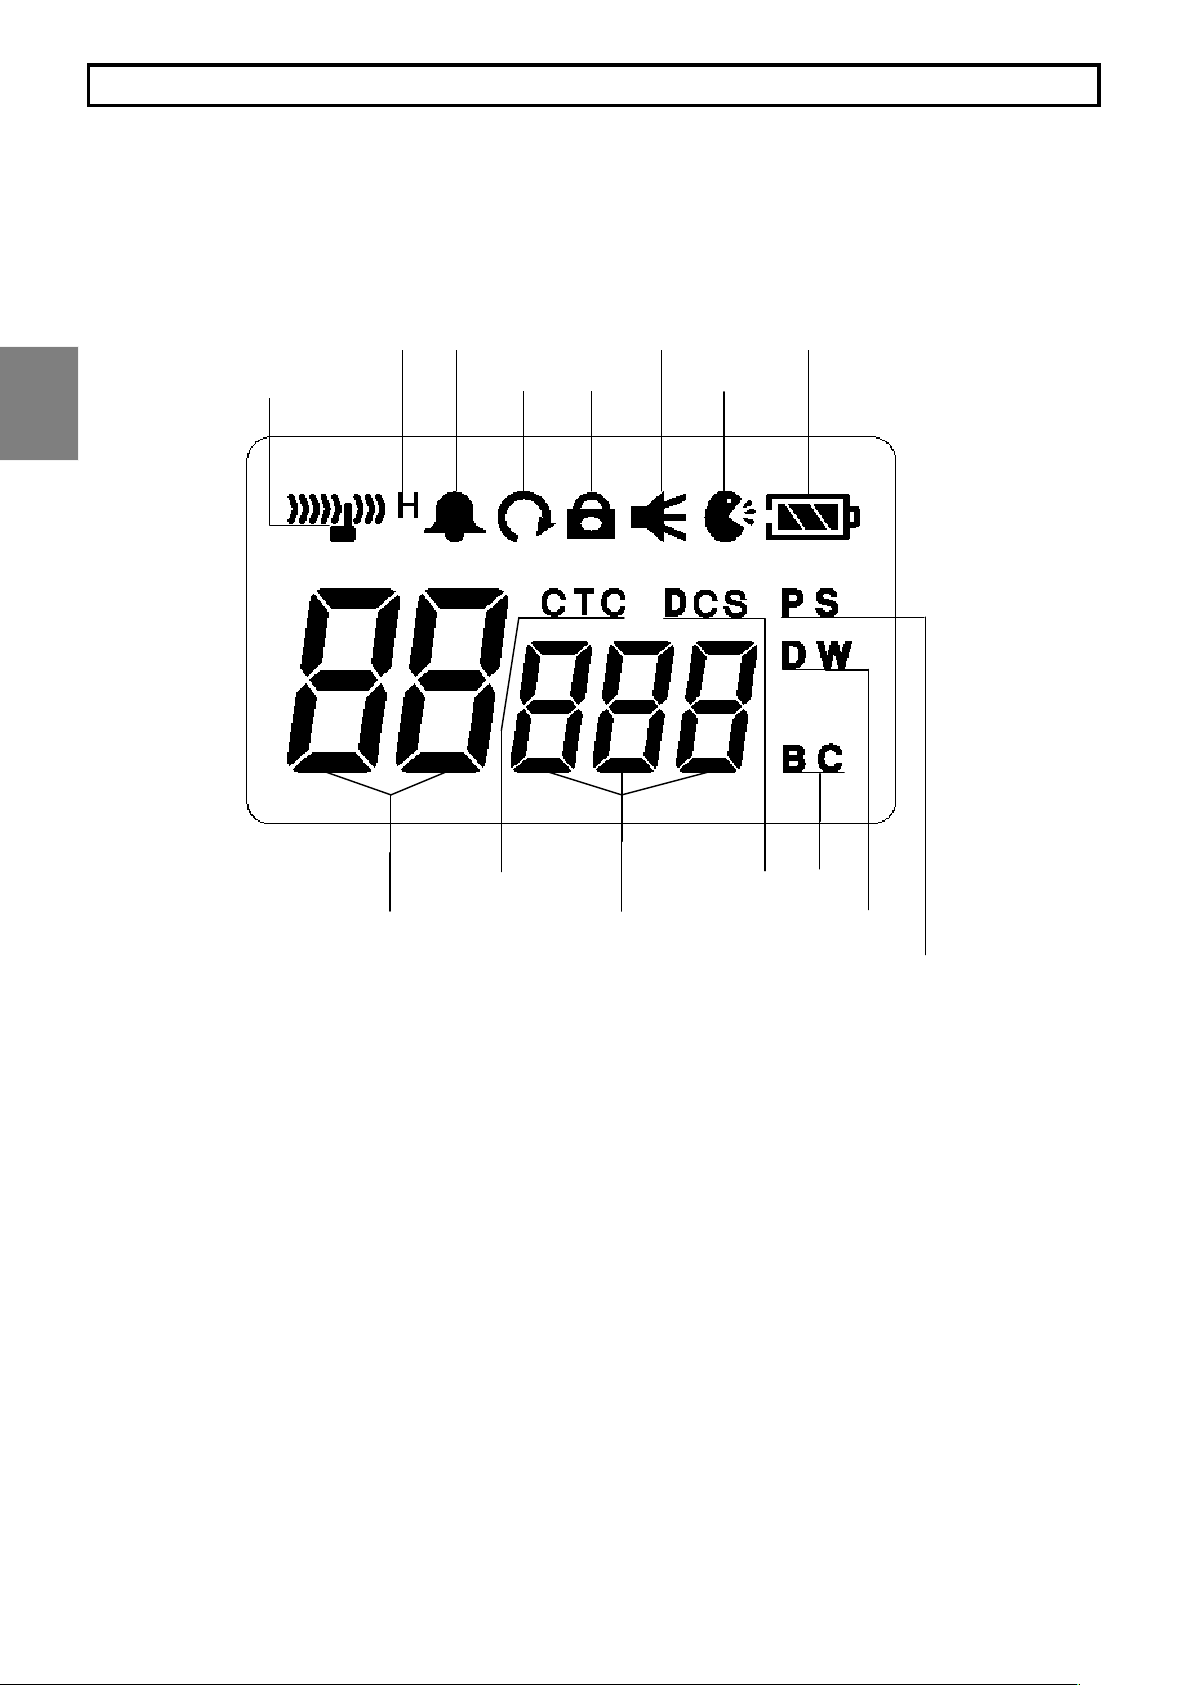
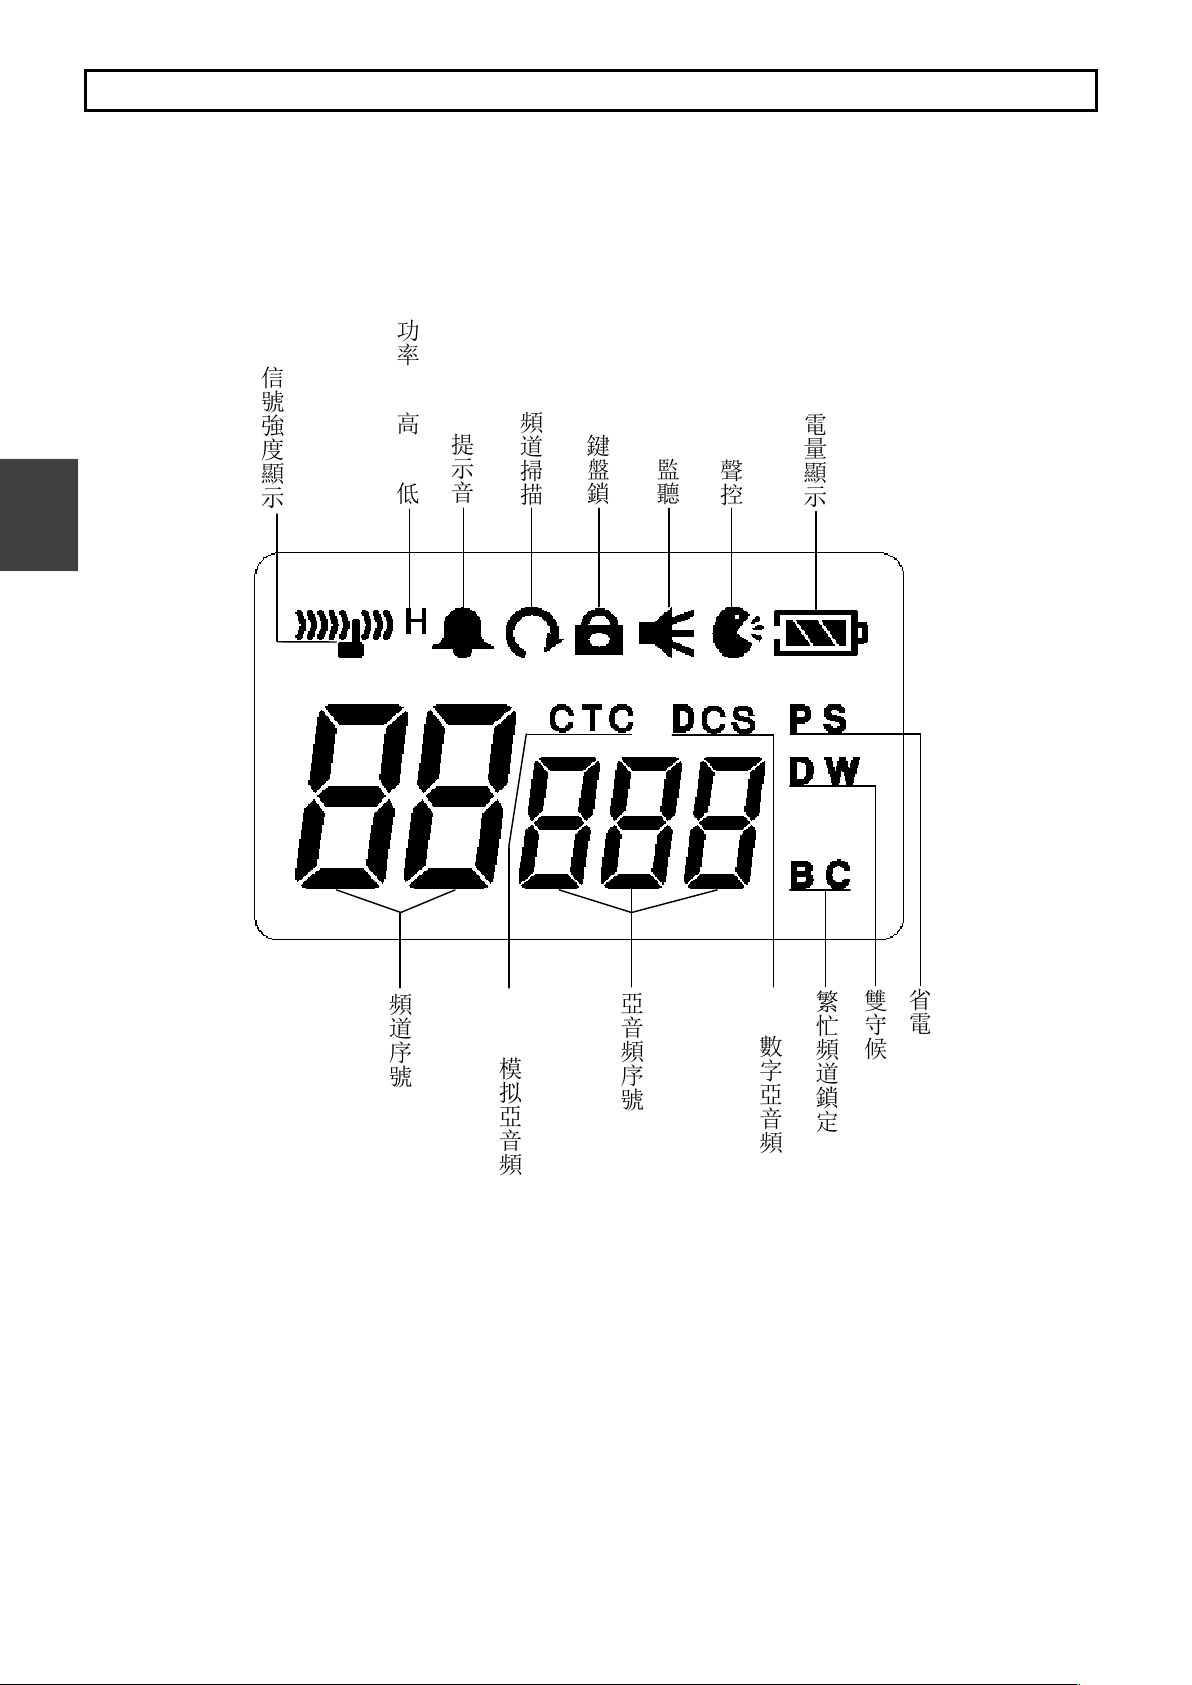
Beep Sound
Scan
Monitor
Battery condition
Channel number
CTCSS/DCS number
CTCSS
DCS
BCLO
Power Saving
Dual Watch
RSSI
2. CONTROLS AND INDICATORS
ENGLISH
RF Power ( H/L )
lock
Connect the USB cable to the USB jack of the unit and the
f the USB cable to the
Plug the AC adaptor into a standard electrical outlet
3.5 hours for full charging
Connect the USB cable to the USB jack of the unit and the
other end of the USB cable to the USB
3.5 hours for full charging
standard electrical outlet
Insert the Walkie Talkie into the charging tray for
2.5 hours for full charging
harging Using USB, charging completed will display "FULL" symbol.
Using Rapid charger will show green light.
key longer than 2 sec. to enter Menu mode, press
〕
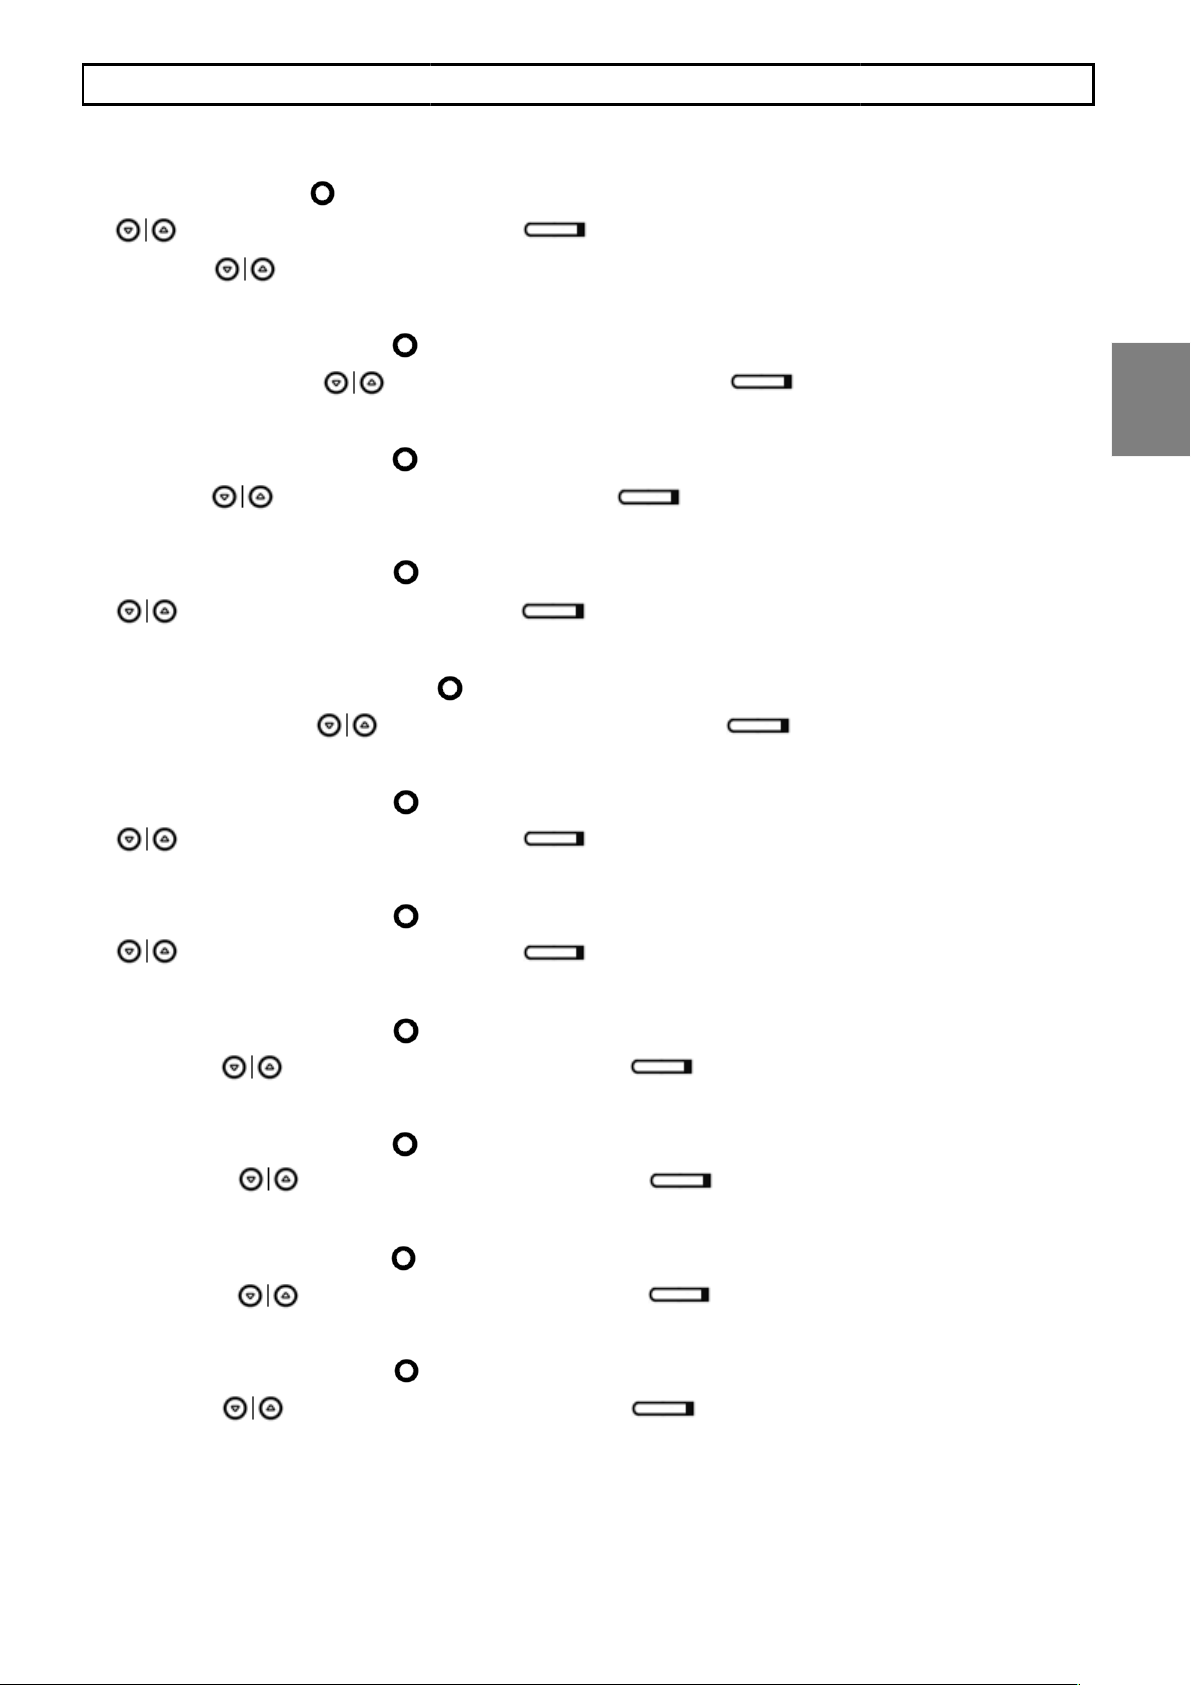
If no operation, 10 seconds will automatically exit the menu setting.
BLIGHT SET
CH 1-20
CTCSS /
OFF / CH
OFF / ON
OFF / 1-3
OFF / ON
SQL 1-5
OFF / LOW / HI
OFF / 1-2
HI / LOW
OFF / ON
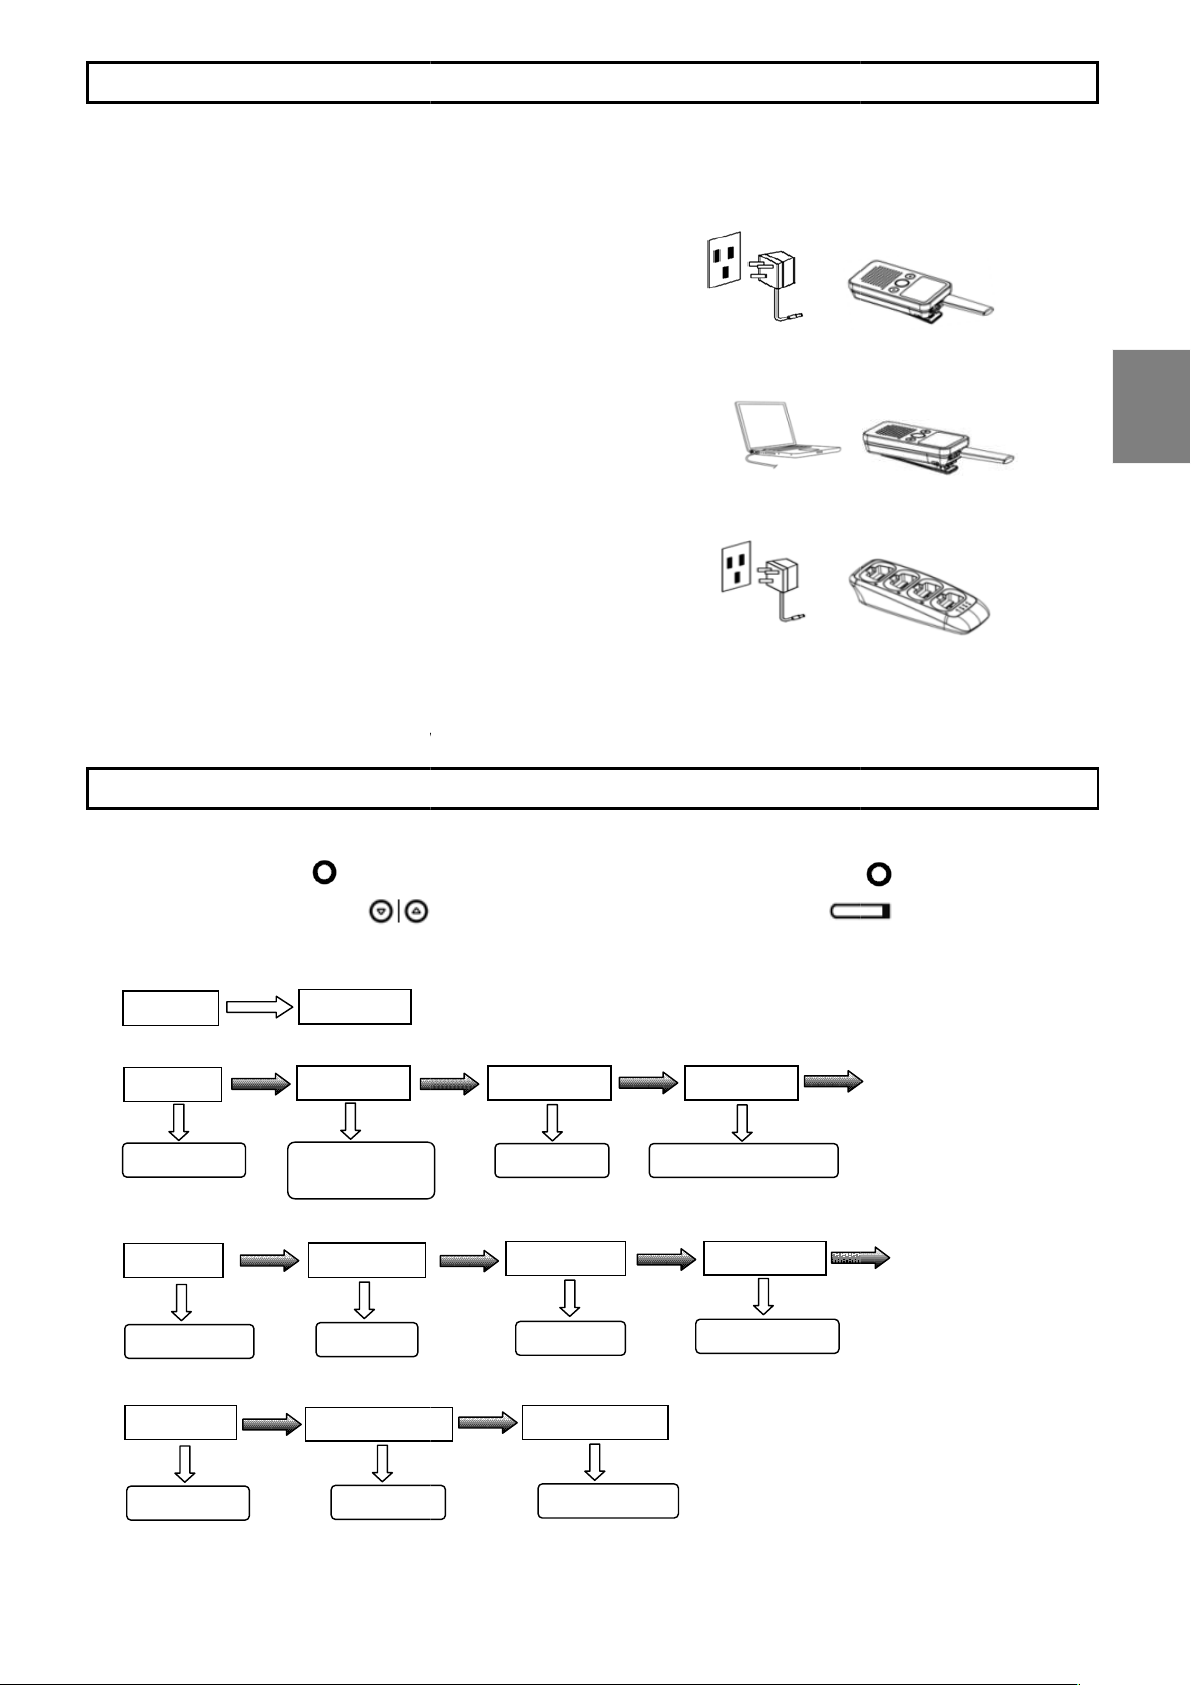
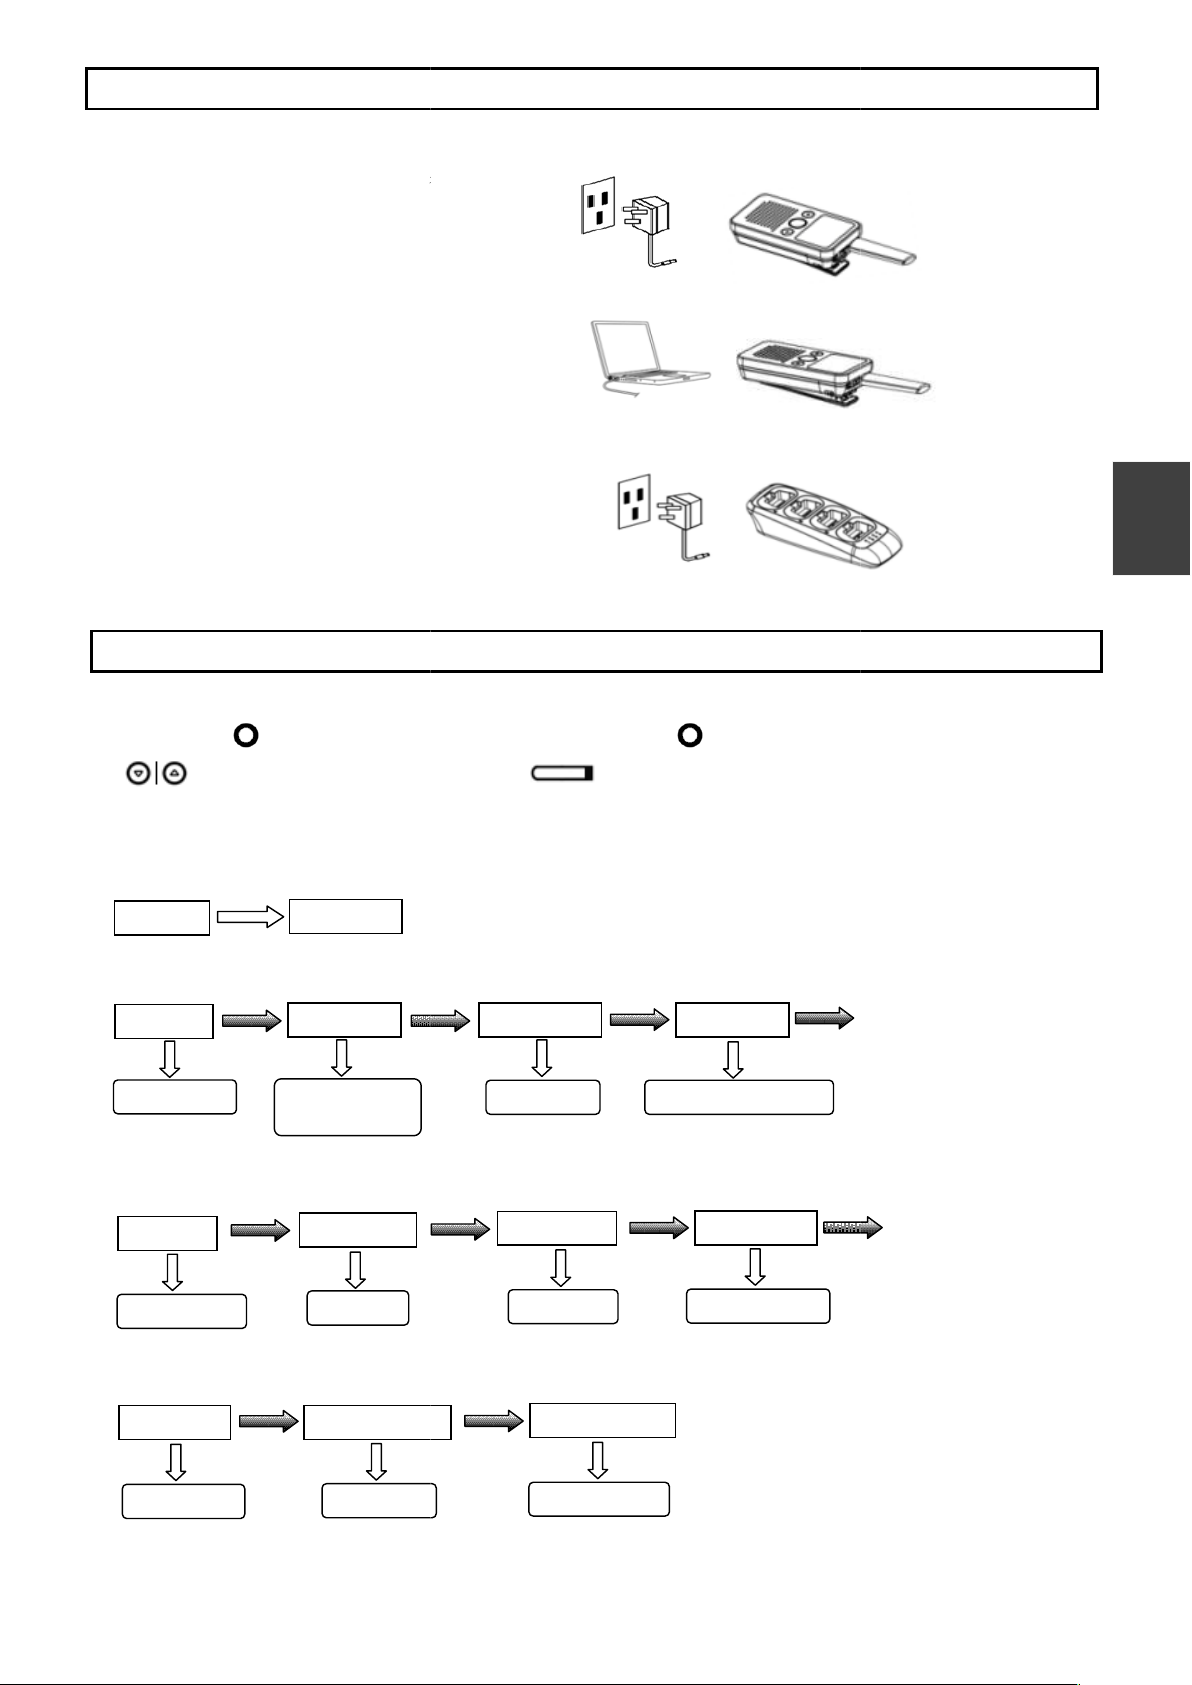
3. CHARGING THE BATTERY
3.1【Charging】
1.
other end o
2.
3. It will take 3 Or
1.
2. It will take 3 -
Or
1. Plug the AC adaptor into a
2.
charging. It will take 2 –
3.2【Charging Status】
1. C
2.
4. MENU SETTING
AC adaptor.
port of computer .
.
ENGLISH
4.1【Menu Setting】
Press and hold the〔 〕
desired menu and press〔
key to select the function then press〔
VOL SET
STEP 1-16
CH SET
TONE SET
SQL SET VOX SET
DCS EDIT
DW SET
BEEP SET
BCLO SET
POWER SET
ROG SET
RESET SET
〕key to choose
〕key to save it.
〕
〕
key and the screen will display CTC off , press
CTCSS/DCS ( CTCSS 1
to complete this setting or to press
〕
at any time to complete this setting.
at the side and
Lock, the unit can only be allowed to adjust volume or transmit and receive.
To turn the radio on or off, press and hold the power on
〔
key while speaking at about 5cm from the microphone
Listen for activity on the selected channel.
key simultaneously to select MONITOR ON / OFF.
key simultaneously to select SCAN ON / OFF
key simultaneously to select Key Lock ON / OFF
CHANNEL SETTING BRIEF NOTE
Power out
VOX
Dual
Beep Sound
Back
Reset
Busy
Roger
Squelch Level
key to select your
again to have the
at the same time to LOCK /UNLOCK the unit,
Voice Activated Transmission
key to select your
5.
Press and hold the〔
Press and hold the〔
ENGLISH
Press〔 〕
Press〔 〕key
bL on ................................
key on the top of the unit.
key until the letter CH is blinking, press〔
the number of Channel.
desired
functions , press〔
key
SL001 ...............................
Uo off ...............................
dc off ................................
bP on ...............................
bc on ................................
Po Hi ........................................
Rgoff ................................
– 53, DCS 1 – 104 )
Beep Tone
light blinking
〔 〕
〔 〕key
〕key to select
other
press〔 〕
rS off ................................
Press〔 〕key
after
〔 〕key
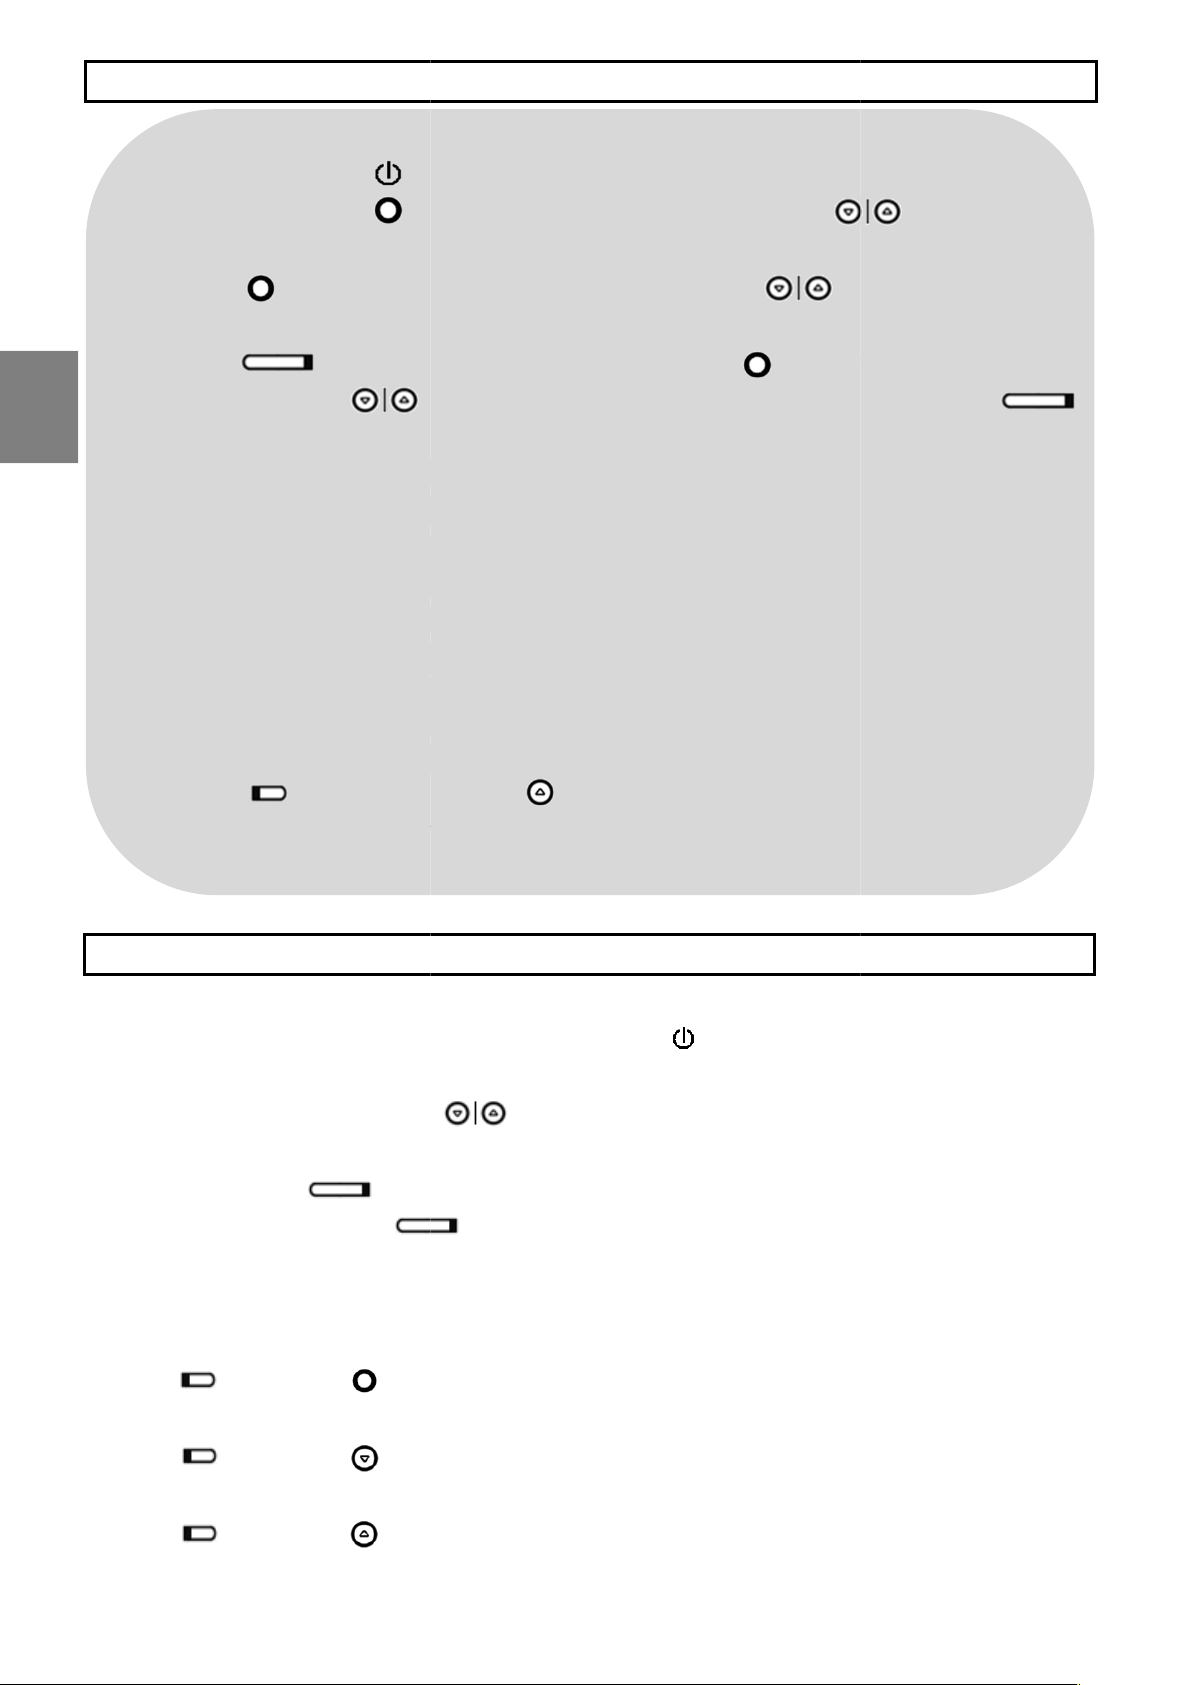
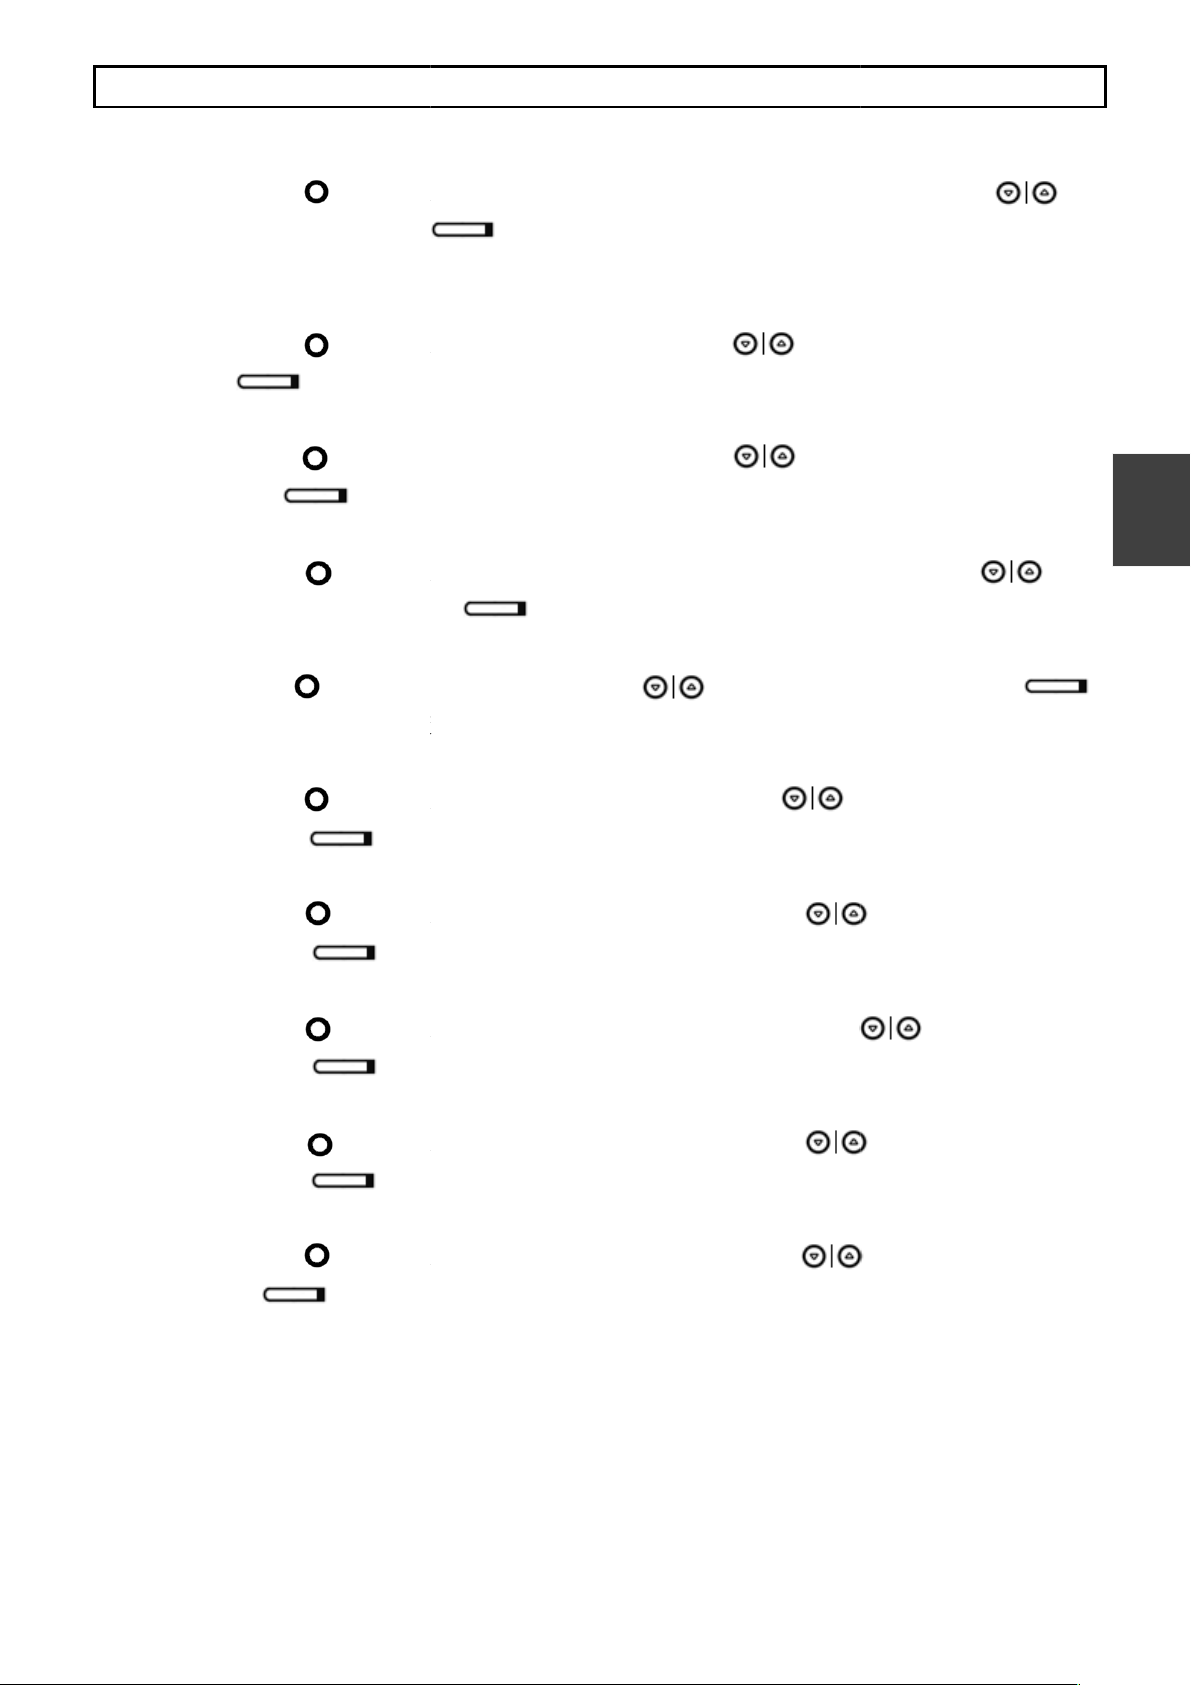
6. OPERATION
6.1 【Power On / Off】
6.2 【Volume】
Adjust the volume level by using
〕key (16 steps, default 8)
6.3 【Transmission】
Press and hold the〔 〕
transmission. Release the〔
〕key to return to standby mode.
6.4 【Reception】
〔 〕key .
for
6.5 【Monitor】
Press〔 〕key and〔 〕
6.6 【Scan】
Press〔 〕key and〔 〕
6.7 【Key Lock】
Press〔 〕key and〔 〕
key until “** CH” is blinking, to select the channel number
key and confirm It by pressing
〕
key and confirm it by pressing
〕
key and confirm it by pressing
VOX Voice Operated Transmission
〕
key and confirm it by pressing
key and confirm It by pressin
〕
key and confirm it by pressing
〕
key and confirm it by pressing
〕
key and confirm it by pressing
〕
key and confirm it by pressing
〕
key and confirm it by pressing
〕
key and confirm it by pressi
Select (2) for clearing all setting except the selectedchannel number and CTCSS/
DCS. It is recommended not to usethis function unless and until it is necessary to do so.
mic adjustmen
When plug in ear microphone, the device will automatically reset the volume to comfort level
( originally set by factory or by user whichever the lower )
key . To select channel qui
king,to select VOX Hi/Low/OFF by
elect DW
elect on/oFF by pressing
o select on/oFF by pressing
Roger
nking, to select Stand By Light on/oFF
key. To select (1) for factory
6. OPERATION
6.8 【Channel Selection】
Press and hold the〔 〕
〔 〕
hold the 〔 〕key.
6.9 【CTCSS / DCS】
During setting, to press the〔
number by pressing〔 〕
6.10【Squelch Level】
During setting, to press the〔
pressing〔 〕
6.11【
During setting, to press the〔
〔 〕
6.12【DW Dual Watch】
During setting, to press and the〔
numberby pressing〔 〕
6.13【Beep Sound】
〔 〕
ckly, press and
〔 〕key.
〔 〕key. .
】
key until “Vo*** ” is blin
〔 〕key.
〕key until “dc***” is blinking, to s
g〔 〕key.
by pressing
channel
ENGLISH
During setting, to press the〔
〔 〕
6.14【BCLO】
During setting, to press the〔
〔 〕
6.15【Power Selection】
During setting, to press the〔
pressing 〔 〕
6.16【Roger Tone】
During setting, to press the〔
by pressing〔 〕
6.17【Stand By Light 】
During setting, to press the〔
by Pressing〔 〕
6.18【RESET】
During setting, to press the〔
key until “bP***” is blinking, to s
〔 〕Key.
key until “bc***” is blinking, t
〔 〕Key.
〔 〕Key.
key until “RG***” is blinking, to select
〔 〕key.
key until “bL***” is bli
〔 〕key.
Tone oFF/1-3
- 2 by
Pressing 〔 〕
default,
ng〔 〕
6.19【Intelligent ear-
t】

1. 概述
1.1【概述】
CP228
智能商用對講機、設計優良、線條美觀時尚、性能良好、簡單易用。
1.2【功能描述】
內置 53 個單音 CTCSS 及 104 個 DCS 數字私線組合 DCS(CTCSS 及 DCS)
音量調較(16 級)
5 級選擇靜噪水平
聲控發射功能,可無需按動 PTT 而以講話聲音進行聲控發射(VOX)
雙頻守候功能(DW)
鍵盤鎖功能
CHINESE
省電功能
0.5W 音頻功率輸出
3.7V 1100mAh 鋰高分子電池
頻道掃描
監聽功能,能在微弱的接收訊號進行監聽功能
繁忙信道鎖定
接收訊號強弱顯示(RSSI)
電量狀態顯示
聲響選擇
兩檔發射功率可選,高/低
發射結束提示鈴音選擇,用於提示通話結束
待機提示選擇
智能耳機調較
出廠復位設置或復位最後一次有效接收狀態
(有效信道和亞音頻),用於選單誤操作復位
1.3【配件】
CB28 鋰高分子電池
USB 充電線及 CWC18 (S)電源適配器
說明書
1.4【另購配件】
耳機麥克風
CS28 快速充電座(適用於四部對講機同時進行充電)
鍵
池組
單鍵
麥克風
顯示屏
USB
2. 控制鍵及顯示說明
PTT 鍵
功能
機 夾
電源開關鍵
外置揚聲器
麥克風介面
電
LCD
下鍵
上鍵
選
揚聲器
充電接口
充電座觸點
CHINESE
鍵盤鎖
提示音
聲控
頻道掃描
信號強度顯示
低
監聽
電量顯示
2. 控制鍵及顯示說明
CHINESE
RF
功率
H :
高
L :
頻道序號
CTCSS
模拟亞音頻
VOX
亞音頻序號
DCS
繁忙頻道鎖定
數字亞音頻
省電
雙守候
及充電器
及電腦
插頭插入充電座並將電源適配器接入
“FULL”
秒可進入功能選擇
按下
3. 充電
BLIGHT SET
CH 1-20
CTCSS /
OFF / CH
OFF / ON
OFF / 1-3
--
OFF / ON
鍵可進入所需功能選擇
若無按鍵操作
SQL 1-5
OFF / LOW / HI
OFF / 1-2
HI / LOW
OFF / ON
3.1【充電】
1. 將 USB 線連接對講機
2. 把 AC 插頭接上 AC 電源
3. 充電時間: 3-3.5 小時
或
1. 將 USB 線連接對講機
2. 充電時間: 3-3.5 小時
或
1. 將 DC
2. 對講機放入充電座進行充電
充電時間: 2-2.5 小時
3.2【充電狀態】
以 USB 充電,完成後會顯示
4. 功能選擇
4.1【功能選擇】
持續按下〔 〕鍵 2
USB 插口
AC 電源
符號,以充電座充電, 完成後會亮起綠燈.
,繼續按下〔 〕
CHINESE
,然後按
〔 〕鍵選擇所需功能,
出選單畫面。
--音量--
VOL SET
--頻道--
--雙頻守候--
--提示音--
CH SET
DW SET
ROG SET
--級--
STEP 1-16
--副頻--
TONE SET
DCS EDIT
--按鍵聲響--
BEEP SET
--待機提示
機側〔 〕鍵確認。
--靜噪--
SQL SET VOX SET
--繁忙鎖定--
BCLO SET
--重定復位--
RESET SET
,10 秒後將自動退
--聲控發射--
--功率--
POWER SET
鍵開機
LCD
LCD
。
鍵揀選需要的設定
.................................
....................
.................................
................................
.................................
.........................................
.................................
...................
.................................
以調較音量及對講
開機或關機
共有
鍵對距離麥克風
以便接收訊號
〕
〕
〕
“** CH”
確認
鍵揀選通話頻道
鍵揀選副頻道
鍵跳至以下顯示並以
〕
可以把該機上鎖或開鎖
〔
頻道會不停地調上
雙守候掃描
繁忙頻道鎖
5. 簡易調頻方法
先在機頂長按〔 〕
長按〔 〕鍵,直至
再輕按〔 〕鍵,
(CTCSS 1–53,DCS 1-104)
此時可按下機側〔
〔 〕
SL001
Uo off ............
CHINESE
dc off
bP on
bc on
Po Hi
Rgoff
bL on ..............
rS off
將機側〔 〕鍵與〔
。
屏幕數字閃動,再按〔 〕
屏幕會出現 CTC oFF, 再按〔 〕
〕鍵完成調頻或可再按〔 〕
,任何時候皆可按下機側〔
靜噪靈敏度
聲控發射
提示音
功率
提示鈴音
背光週期閃動
復位
〕鍵同時按下,
。
鍵完成設定。
,當上鎖後,
此機衹可
6. 一般操作
6.1 【開機/關機】
持續按下電源〔 〕鍵
6.2 【音量調較】
按〔 〕鍵調較音量(
6.3 【發射】
持續按下機側〔 〕
6.4 【接收】
對講機處於待機模式,
6.5 【監聽功能】
同時按下〔 〕鍵及〔
6.6 【掃描】
。
。
16 級, 出廠預設為 8 級)。
。
鍵可選擇開或關閉監聽功能。
5cm 講話,鬆開機側〔
〕鍵恢復接收狀態。
同時按下〔 〕鍵及〔
6.7 【鍵盤鎖】
同時按下〔 〕鍵及〔
6.8 【頻道選擇】
持續按下〔 〕鍵進入
需頻道,再按〔 〕鍵
鍵可選擇開或關掃描功能。
鍵可選擇開或關鍵盤鎖。
頻道選擇模式,頻道號碼將會閃動,按
。當持續按〔 〕鍵時,
〕鍵選擇所
/調下。
/
進入
)
進入
出廠
“Vo***”
確認
進入
然後按下
“bP***”
出廠
進入
確認
進入
確認
進入
確認
待機閃燈提示選擇
進入
確認
亞音頻復位功能
進入
。
將恢復最近一次有效接收的頻道和亞音頻設置值
復位操作是當用戶誤操作系統功能
非特殊情況不建議進行復位操作
將自動調較之合適音量
亞音頻設置模式
收發雙方需選用相同的頻道
鍵選擇
鍵選擇開
顯示閃動
關聲響
〕
以出廠值或用戶自選之最低值為標準
6. 一般操作
6.9 【CTCSS / DCS 模擬亞音頻
於調頻時, 按下〔 〕鍵
鍵選擇所需副頻,然後按下〔
CTCSS / DCS 代碼才能互相通話
6.10【靜噪水平】
於調頻時, 按下〔 〕鍵
能,按下〔 〕鍵確認(
6.11【VOX 聲控發射】
於調頻時, 按下〔 〕鍵進入
能,然後按下〔 〕鍵
6.12【DW 雙守候功能】
於調頻時, 按下〔 〕鍵
鍵開/關雙守候功能,
6.13【按鍵聲響】
於調頻時, 按下〔 〕鍵進入
鍵確認,用於按鍵音設置(
數字亞音頻設置】
“CTC/DCS***”模擬亞音頻/數字
〕鍵確認 (如開啟此功能,
。
“SL***”靜噪水平模式,按〔 〕
預設為 1)。
聲控發射模式,按〔 〕
。
“dc***”雙守候模式,“DW”將於 LCD
〔 〕鍵確認。
聲響模式,按〔 〕鍵選擇開/
預設為“開”)。
,按〔 〕
、
1-5 級別靜噪功
/關聲控發射功
,按〔 〕
功能,按下〔 〕
CHINESE
6.14【BCLO 繁忙頻道鎖定】
於調頻時, 按下〔 〕鍵
道鎖定功能,按〔 〕鍵
“bc***”繁忙頻道鎖定模式,按〔
。
鍵選擇開/關繁忙頻
6.15【高低功率選擇】
於調頻時, 按下〔 〕鍵
/低功率 L,按下〔 〕鍵
6.16【發射結束提示音選擇】
於調頻時, 按下〔 〕鍵
提示音類別,按〔 〕鍵
6.17【BLIGHT
於調頻時, 按下〔 〕鍵
提示功能,按下〔 〕鍵
6.18【出廠復位與頻道&
於調頻時, 按下〔 〕鍵
類別,按下〔 〕鍵確認
“Po***”可選擇高低發射功率,按〔
(出廠預設為“低功率 L”)。
“RG***”可選擇發射結束時提示音,按〔
。(出廠關閉發射提示音)。
】
“bL***”可選擇待機閃燈提示,按〔
。
“rS***”可選擇系统復位方式,按〔
選擇 oFF 表示不做復位操作。
】
〕鍵選擇高功率 H
〕鍵選擇 1-3
〕鍵開/關待機閃燈
〕鍵選擇 1-2 復位
注: 1. 將恢復出廠設置
2.
復位,
6.19【智能耳機調較功能】
當插入耳機時,
選單時,可進行
。
(
)
 Loading...