

CPI GRYPHON Operation And Service Manual
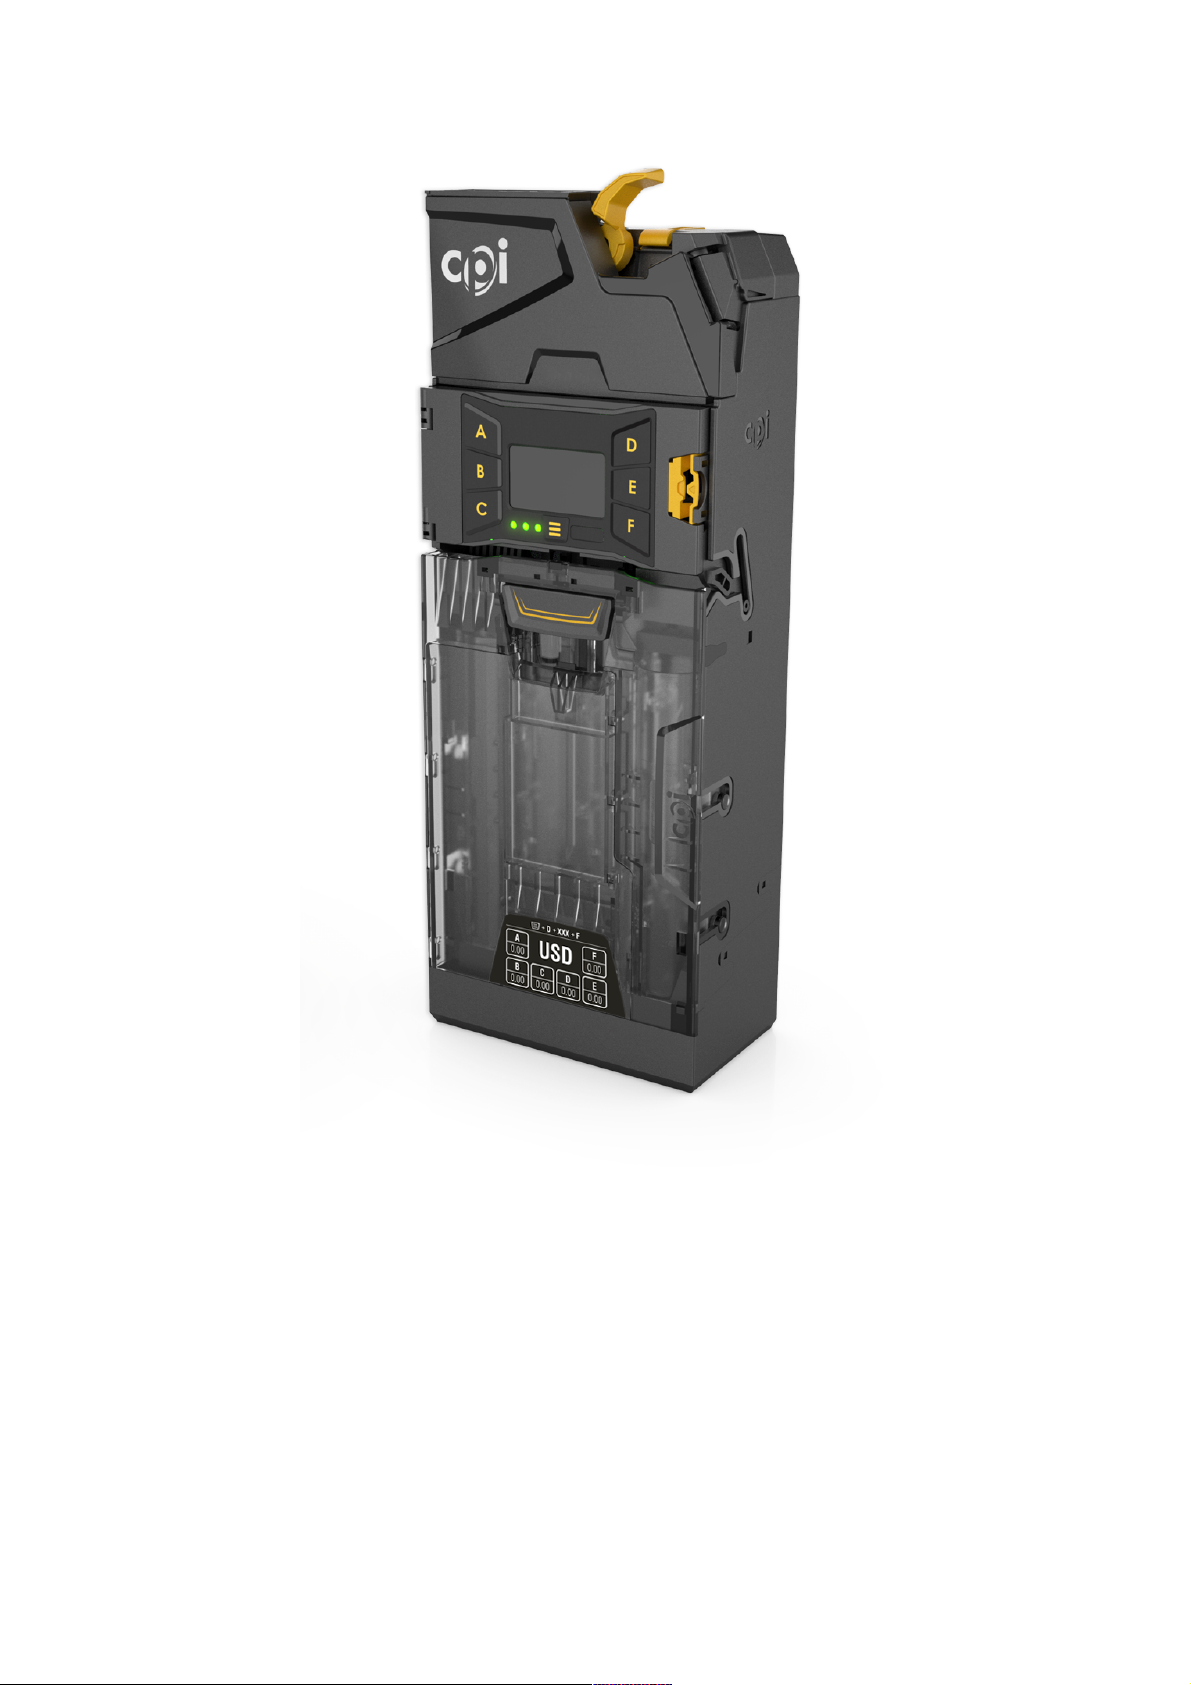
GRYPHON
OPERATION AND SERVICE GUIDE

GRYPHON OPERATION AND SERVICE GUIDE
2

GRYPHON OPERATION AND SERVICE GUIDE
GENERAL INFORMATION
Overview
This Operation and Service Guide contains important information on installing, operating,
and maintaining the Gryphon Coin Changer. Gryphon takes currency at high acceptance
rates and provides a superior level of resistance against specific types of fraud.
Features
• In-field configurable coin cassette
• Six auto-replenishing coin tubes
• $1 coin payout
• LCD Display panel with instant status updates
• Patented coin inventory recognition
• MDB interface
• Ability to manage coin inventory to minimum levels
Interface
Gryphon operates in machines that support the MDB interface. MDB is a serial
communication interface standard that developed into vending equipment since 1996. It
allows for multiple devices to be added to a single connection on the vending machine
control board, by linking one device to another parallel to the main MDB harness.
Specifications
The operating voltage of Gryphon coin manager is listed on the label of each product. The
label is located on the left side of the device. It must not be used with any power source
other than that indicated.
Restrictions
Please consult your CPI sales representative; CPI authorized distributor, or
cranepi.com/support for a list of compatible Vending Machines.
Safety
• The coin changer PCBs are fitted with components that can be damaged by
electrostatic discharge. Please observe proper handling procedure for components
exposed to the risk of electrostatic discharge.
• Do not use the coin changer if the device or connecting cables are damaged.
• Turn off power to the vending machine before you remove or clean the coin changer.
• Contact CPI if you wish to alter the construction of the device to a greater extent than
that described in this manual.
• If the device is no longer required, please dispose of it correctly.
3
GRYPHON OPERATION AND SERVICE GUIDE
INSTALLATION
Please note that a single page installation guide for the Gryphon can also be found on our
website.
Unpacking the Coin Changer
Unpack the Coin Changer and immediately inspect it for damage. If the unit is damaged,
return it to its original carton along with packing materials.
Notify the delivering carrier of damages and request immediate inspection. Send a letter of
intent to file a claim to the delivering carrier within 72 hours from the time of delivery. Send a
copy of the letter to the shipper.
Only the consignee (the person or company receiving the Coin Changer) can file a claim
against the carrier for concealed damages.
Retain the original carton and packing materials for future use in shipping or transporting the
Coin Changer.
Mounting
The Gryphon was designed for ease of mounting onto existing studs provided by Original
Equipment Manufacturers (OEMs). Some machines may require brackets or faceplates to
mount the unit. Refer to your machine operation manual or contact your distributor/OEM for
more model-specific mounting information.
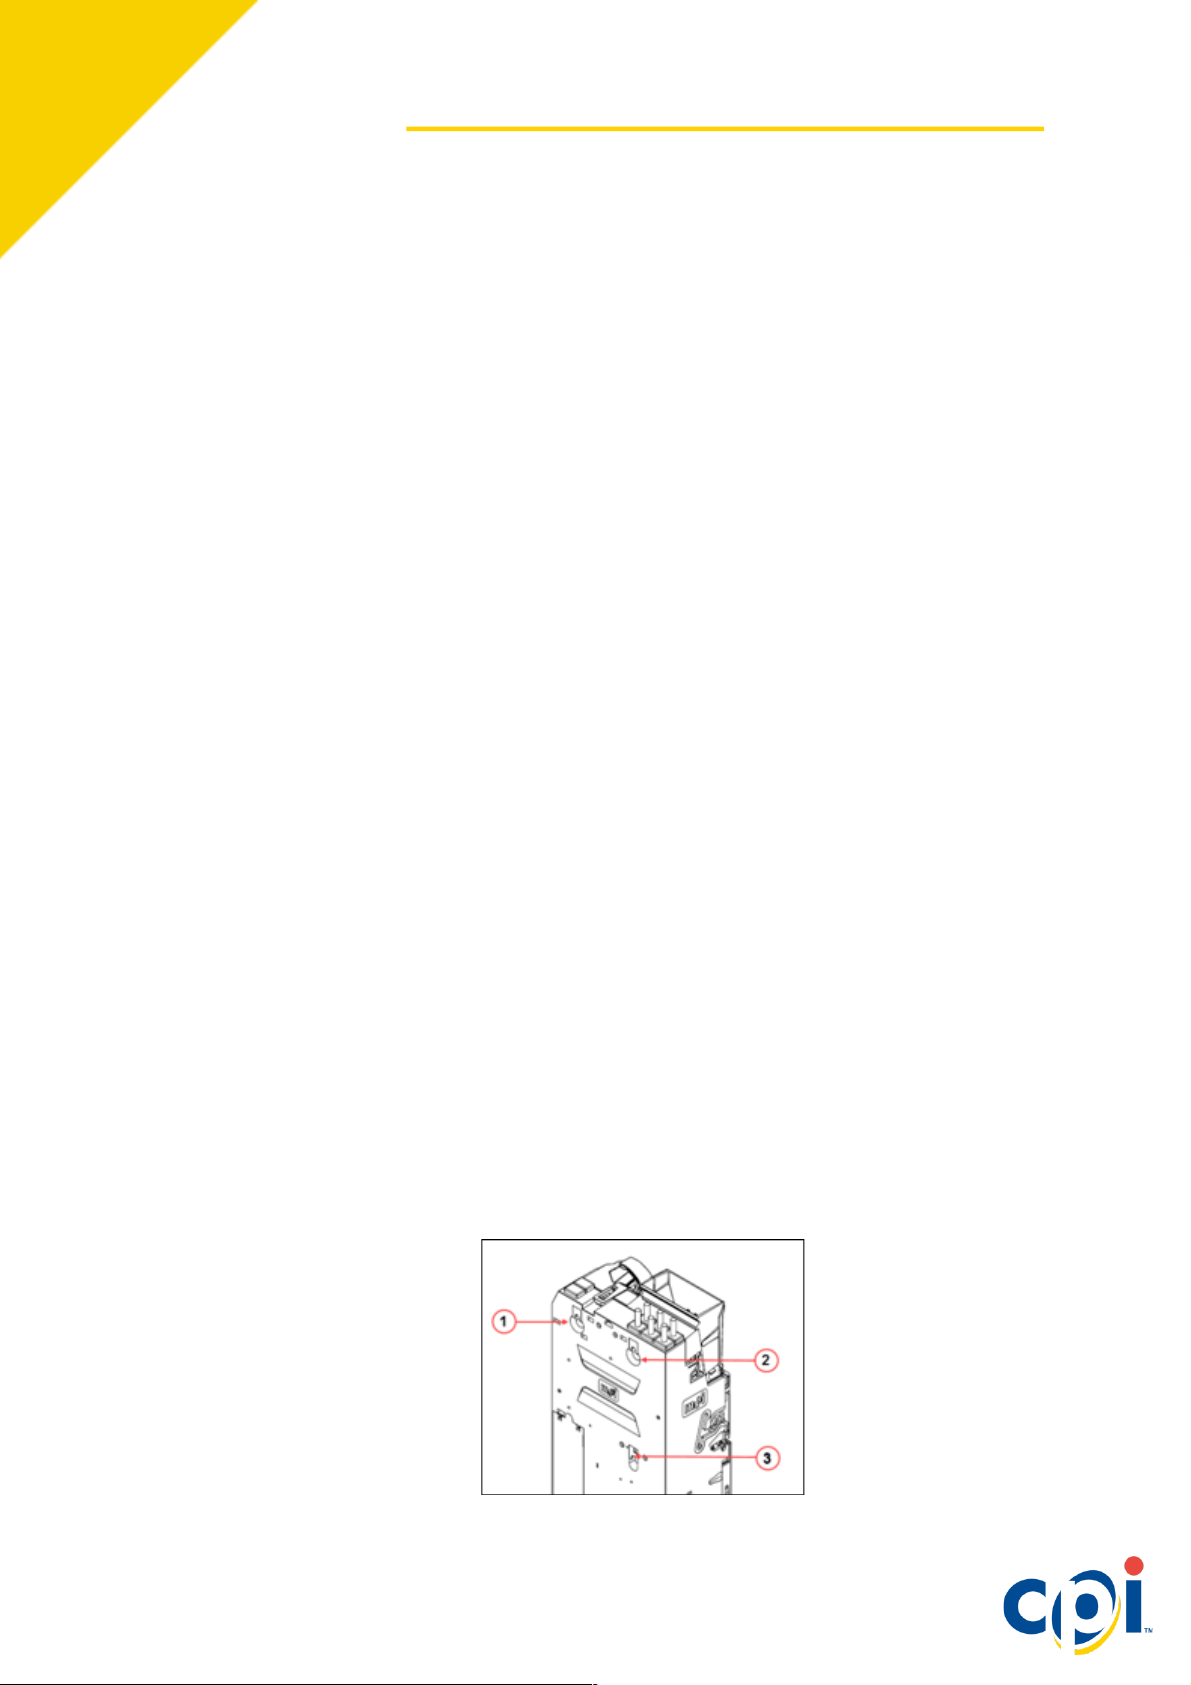
1. Turn off the power to the vending machine.
2. Push and hold the yellow button on the top right of the coin manager and tilt the
assembly forward to access the mounting holes. You do not have to remove the
cassette.
3. Hang the Gryphon on the vending machine’s mounting studs.
4. The lower mount (3) can be difficult to see through the device. Hanging the Gryphon
on the top two studs first will help you locate the lower mount.
4

GRYPHON OPERATION AND SERVICE GUIDE
5. Tighten screws if necessary, being careful not to over-tighten, and close the acceptor
assembly. The lower mount is difficult to access with a large screw driver.
6. Remove the cassette. Lift it by the handle and pull towards you.
7. Fill the cassette with coins, ensuring the coins are inserted into the proper tubes.
8. Return the filled cassette to the Gryphon and insure it is properly seated.
9. Connect the MDB Cable.
a. If you have a bill acceptor, connect the MDB harness from the Gryphon to the
bill acceptor’s “Y Connector”.
10. Tuck any excess cabling inside the vending machine, ensuring that the cables do not
interfere with the Vending Machine or Gryphon’s operation.
11. Restore power to the vending machine.
5
GRYPHON OPERATION AND SERVICE GUIDE
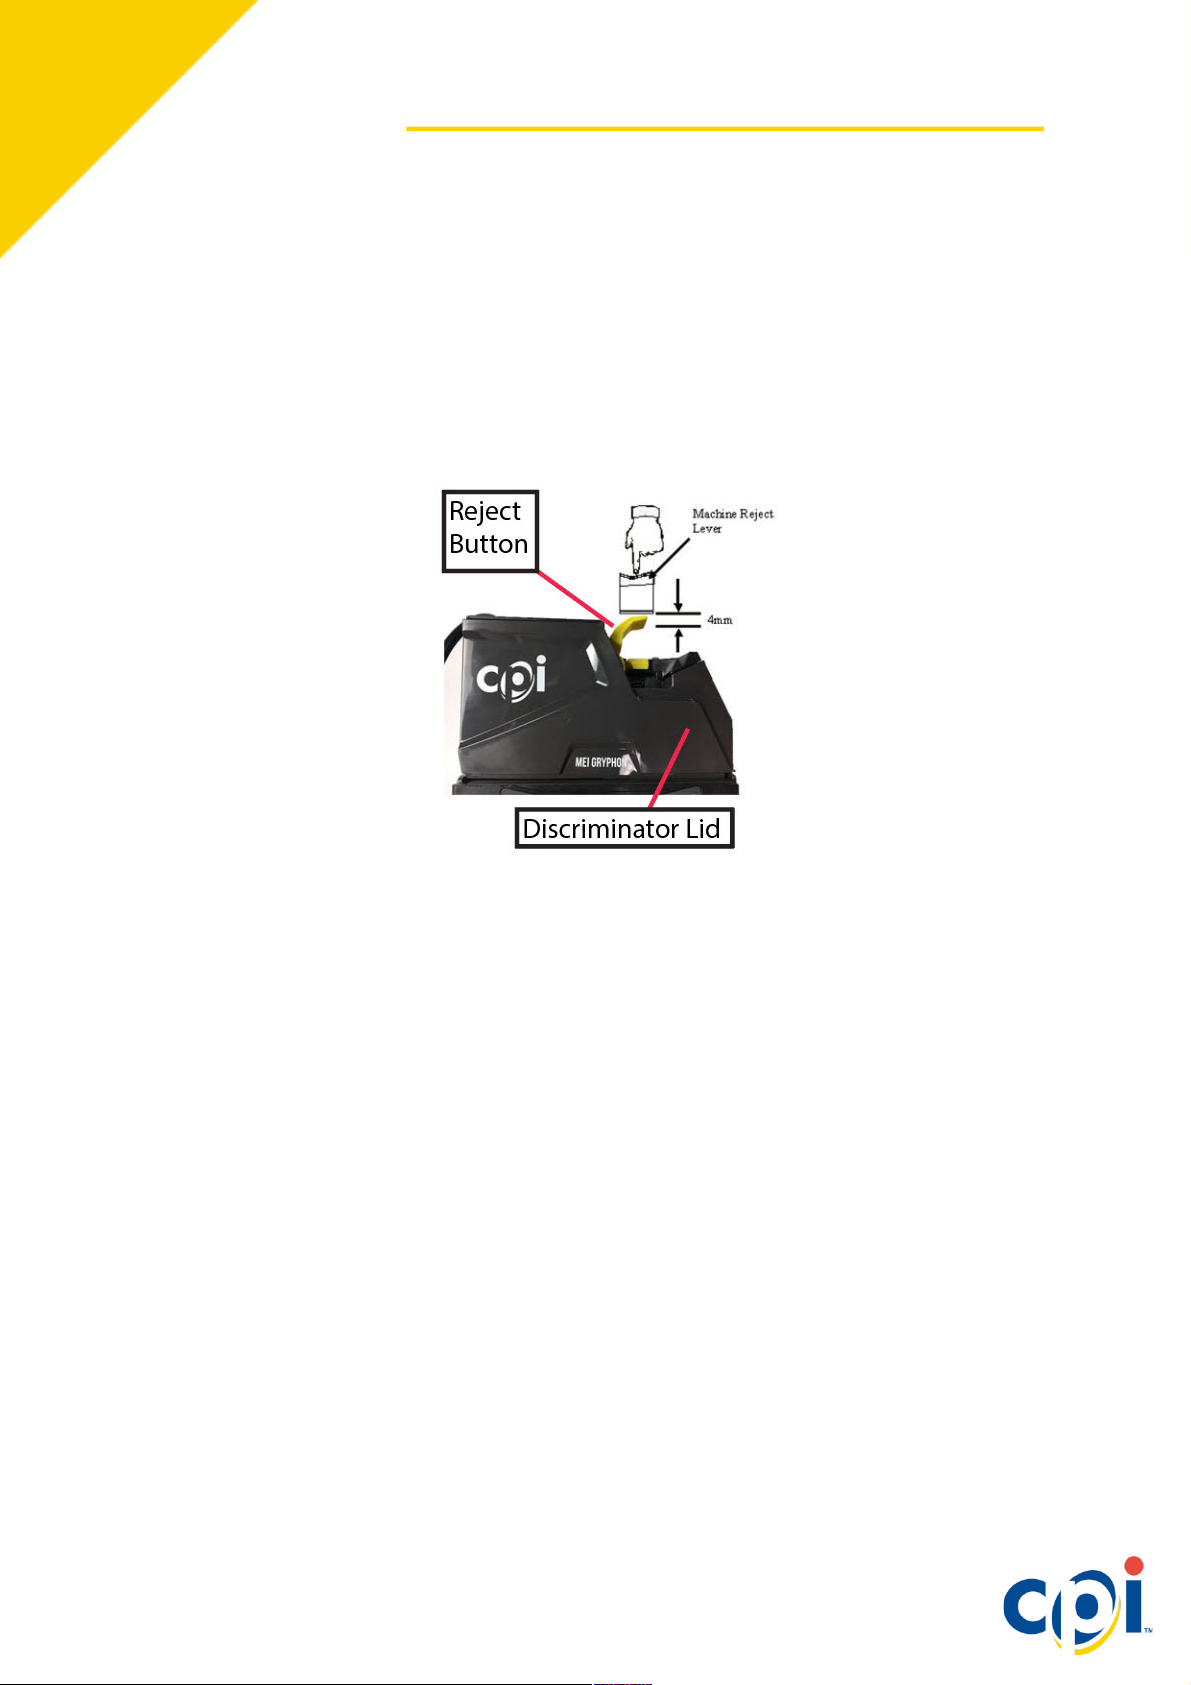
Alignment
After installation, ensure that there is a small gap (2-4mm) between the lever on the vending
machine and the return lever on the coin manager.
• Depress the coin return lever on the machine door, confirm that it fully opens the
accepter lid on the coin manager and then returns smoothly, without holding the door
open.
• Check the alignment of the coin input chute and the cashbox. Insert some coins to
ensure that they enter the cashbox and exit into the return cup.
• Ensure that the coin chute does not rest on or open the Acceptor assembly lid.
• Align, adjust and test as necessary to ensure coins are properly routed before
continuing.
6

GRYPHON OPERATION AND SERVICE GUIDE
INITIAL POWER UP
The coin manager will power up and check the number of coins in each tube. If any tubes
are empty, the coin manager will tell you which tubes need coins. You should fill all tubes
with a minimum of three coins per tube.
Once the cassette is filled with coins, the manager will measure the tubes and display the
total amount of change.
Cassette Setup
It’s easy to customize Gryphon’s cassette. Use one of the many stock configurations or
create your own. There are two methods to configure the cassette. Please note: the cassette
must be empty before proceeding.
Cassette Code
If you are changing the full cassette, press
1. Enter the code located on the front of the cassette (e.g. AAB)
2. Press SAVE. If the code is not recognized, follow the Custom Cassette steps below.
3. When prompted, press start to CALIBRATE
The coin manager will now check tube capacity and display the amount of change in the
tubes.
Creating Custom Cassette
Follow these steps, if the code is not recognized or to change individual tubes. Press º,
CASSETTE, then:
1. Select CUSTOM
2. Use the MMI to choose the tube (A – F) you’d like to edit.
3. Scroll through the coin list and select your coin.
4. Press SAVE to program the tube
5. When all tubes have been programmed, press º
6. When prompted, press START to calibrate
The coin manager will now check tube capacity and display the amount of change in the
tubes.
º,
ASSETTE
C
, then:
7
GRYPHON OPERATION AND SERVICE GUIDE
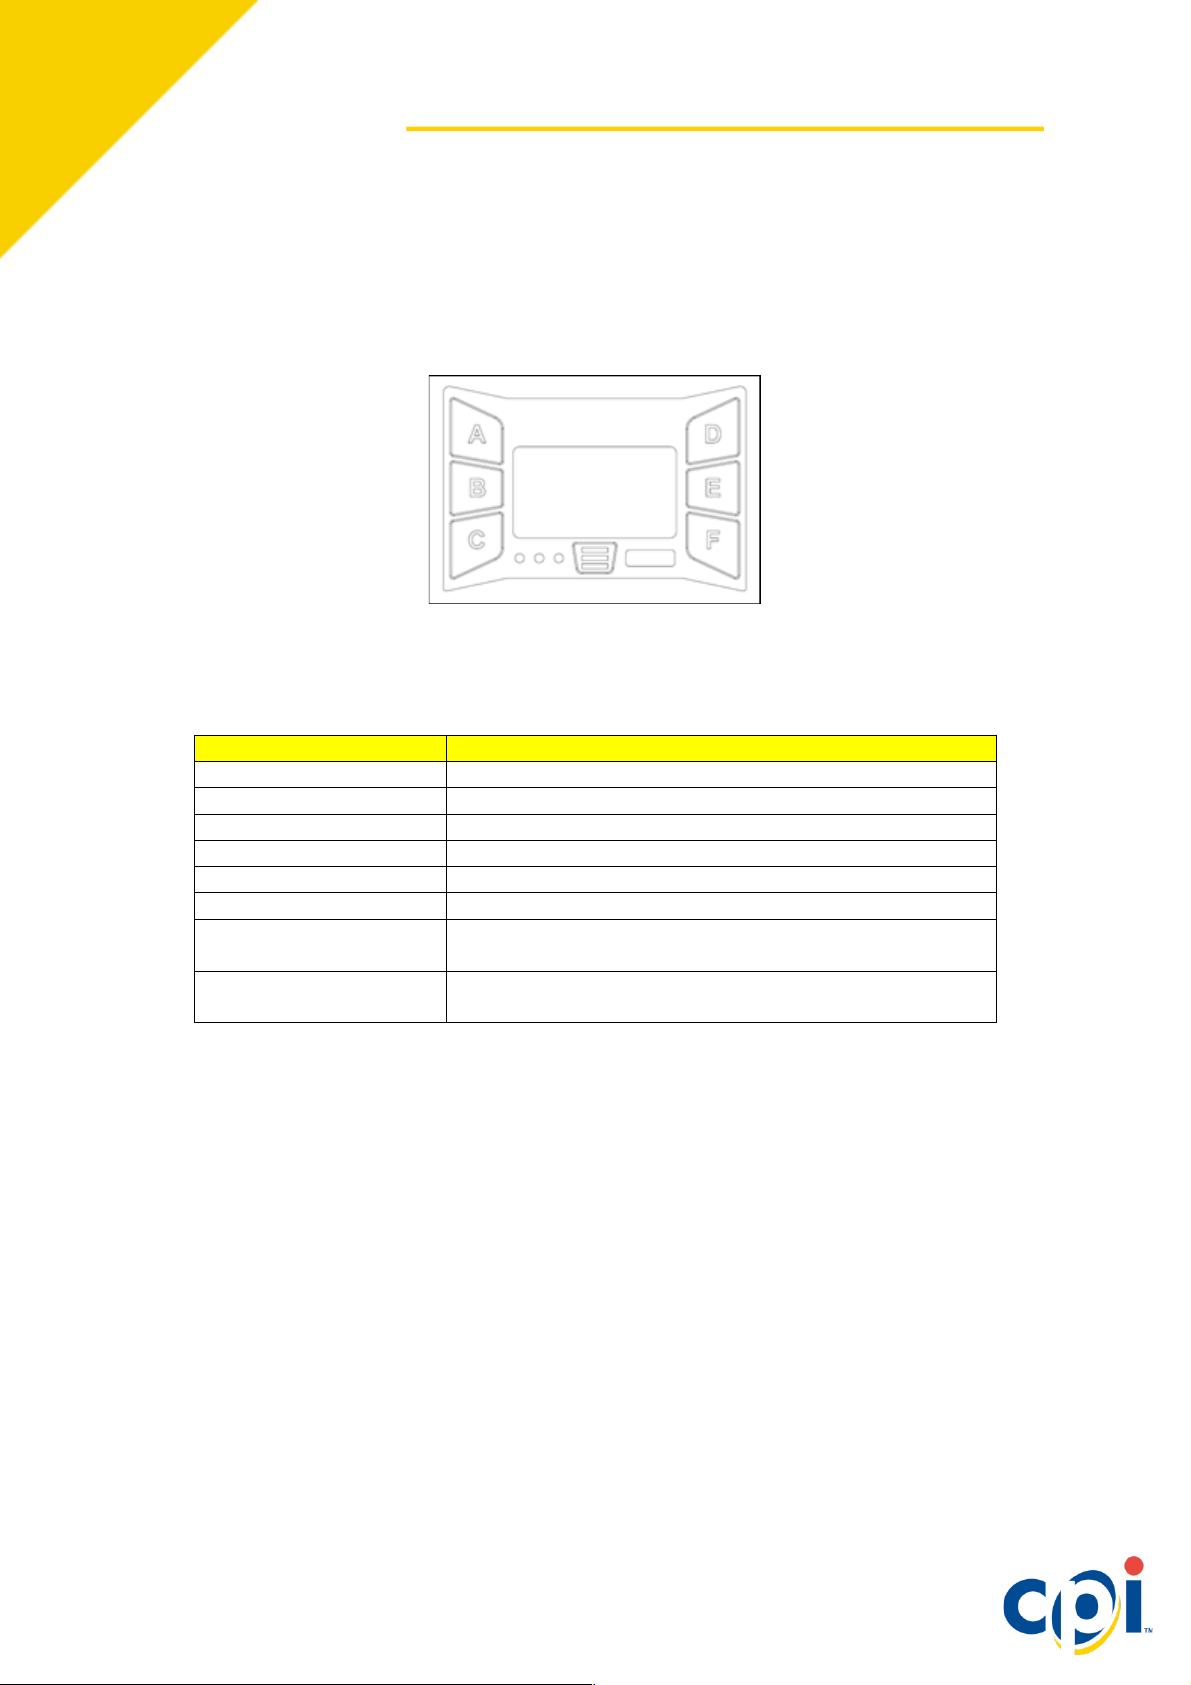
Navigation
Key
Scroll Up
D
Scroll Down
E
Move Left
A
Move Right
B
Next Page
F
Previous Page
C
Display previous menu
level
Press º
Return to the home
screen
Hold º for three seconds
THE MMI
Gryphon’s MMI Screen has been designed with the end-user in mind. Gryphon will guide
you through the initial setup and configuration using the MMI screen.
The MMI Interface updates its interface as needed in each section. Always use the onscreen guidance, but when in doubt, this chart lists general sub-menu navigation tips.
8
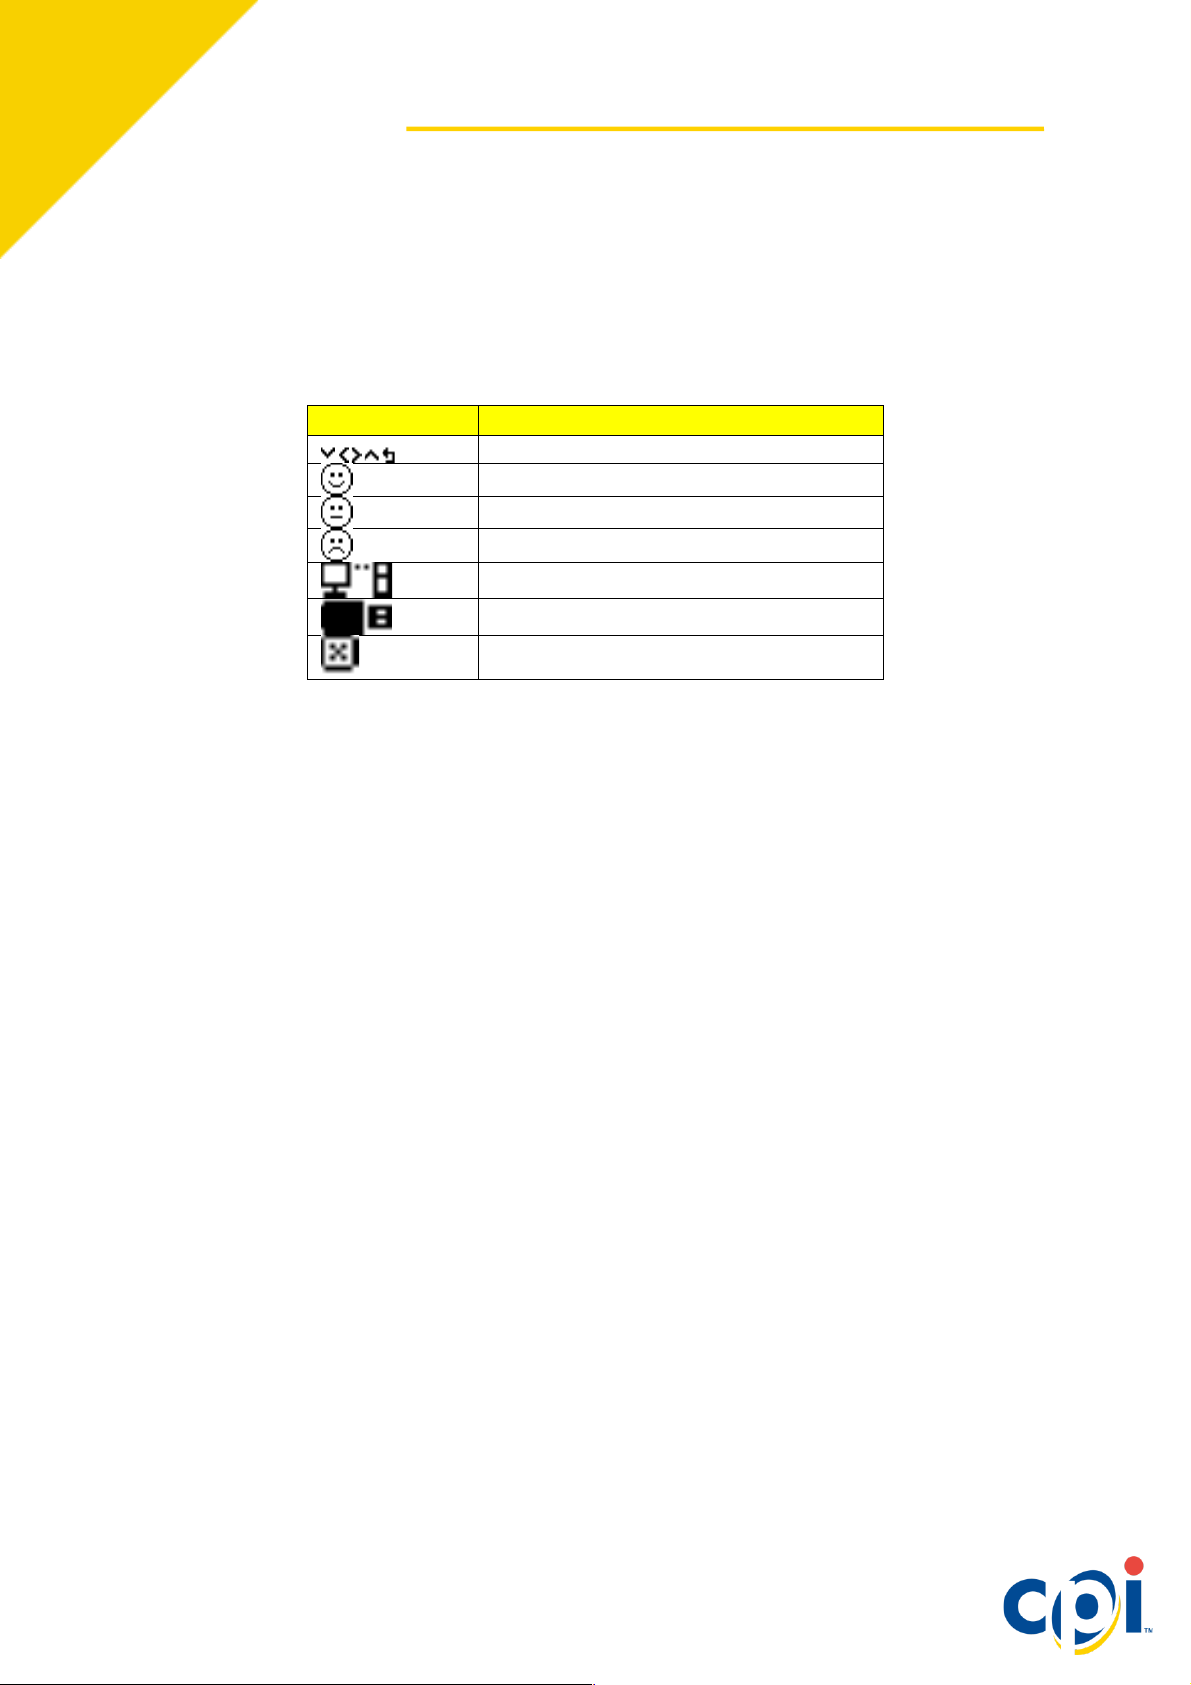
GRYPHON OPERATION AND SERVICE GUIDE
Navigation
Key
Menu Navigation
Gryphon is OK
Gryphon requires assistance
Gryphon requires replacing
Connected via USB to PC
Connected to USB
Error
Service Indicators
During coin manager programming or normal operation, icons may be shown on the display.
These icons will indicate if the coin manager requires any attention or will assist you in
selecting a particular program mode.
9

GRYPHON OPERATION AND SERVICE GUIDE
MMI MENUS
The resting MMI screen will display a smiling face, the word “OK” and the amount of coins
currently in the cassette. If there are errors, the face will change to a frown and a message
indicating the error will appear. The LED will also change accordingly to yellow or red, see
page 16 for LED details.
Audit Menu
Press the MENU KEY (º) twice in quick succession (with the cassette in) to quickly display
audit information. Each section will display for three seconds before showing the amount of
change in each tube.
An audit can also be performed via the Micro-USB slot on the front of the device, under the
coin reject lever with an accompanying USB drive and USB to Micro-USB dongle.
Main Menu
Press the MENU KEY (º) once to display the menu options. The default options on the home
menu are Par, Coin Set, Cassette and Setup, though this may vary depending on the
configuration you’ve requested. Each menu has several sub menus. The following section
will detail each option and its use:
Par
Use this menu to initiate a par. Initiating a par will dispense coins in excess of the set par
level, or request insertion of coins below par.
Starting float
• Snapshot – View or change the current par levels
o By value: Set the target value. Use the D and E buttons to increment the
selected decimal. Use the A and B buttons to change decimals.
o By levels: View the current par levels. Press Save and Adjust to update the
levels in the cassette by denomination.
• Next – Initiates a par
o Skip: Retain the number of coins in the cassette, and adjust levels by adding
coins
o Start: Initiate a par. Follow the commands on screen to par.
Coin Set
Use this menu to select a coin set, or to enable or disable specific denominations.
• Coins: Enable or disable denominations
• Coin Set ID: View the current coin set ID
• Coin Counts: Displays the current number of coins in each tube. Press the A-F buttons to
dispense a coin.
10

GRYPHON OPERATION AND SERVICE GUIDE
Cassette
See the Cassette Setup section in the Initial Power up section on page 7.
Setup Menu
The options in the Setup Menu enable the end user to alter and monitor the functions of the
Gryphon.
Par
Par to Level allows you to set the level of each coin, so that once the desired level is
reached, additional coins will be sent to the cash box. The default Par level is completely full
tubes. Changing the Par setting to Par to Value sets the default to $50. Any coins in excess
of $50 will be deposited in the cashbox.
• Par Mode: Adjust the type of Par the machine uses to manage coins
o Level – Sets the fill level for each coin. Coins above that level are sent to the
cash-box.
o Value – Sets the fill level to a total cassette value. Once the value is achieved,
coins are sent to the cash-box. Gryphon dynamically alters the individual coin
levels to minimize the need for manual refills.
o Auto – Gryphon determines the optimal par level for your machine based on
actual coin usage.
• Target Value: Sets the cassette threshold for Par to Value. Anything in excess of this
number will be routed to the cash-box.
• Target Levels: Sets the levels for Par to Level. Coins above each set level will be
sent to the cash-box.
• Snapshot: See the Snapshot section in the Par menu above.
Change Management
• Change cassette: Enter the code listed on the front of the new cassette. If there is no
code listed, click EDIT to scroll through possible configurations.
o Tube fill level: Select either Fill to Max, a completely full coin tube, or Fill to
Float, which will fill to the pre-selected par level.
o Payout mix: Allows you to prefer large coins or small coins in the payout mix.
§ Large coins will return fewer coins.
§ Small coins is designed to keep the lowest value coins out of the cash
box.
Machine Options
• MDB Level: This feature has been introduced to cope with machines and changers
that are older Level 2 versions to increase the backward compatibility of the changer.
The default is Level 3. Only use Level 2 if the vending machine cannot operate at
Level 3. This setting should not be changed under normal operation.
11

GRYPHON OPERATION AND SERVICE GUIDE
• Coin Counts: Some machines coin count themselves and only use the changer
counts if they differ by more than two coins. The 0 to 4 transition in TRC mode can
resynchronize these machines to the same counts as the changer.
o TRC 0004: Zeroes coin counts below a level of four.
o CF1234: Reports the exact number of coins.
• Float Coins: Turn Float on or off
• Coin Scaling: Should be set to 5 for US and Canada. This setting should not be
changed under normal operation.
• Decimal Point 1: This setting should not be changed under normal operation.
• Decimal Point 2 This setting should not be changed under normal operation.
• Country: Update the country by using the MDB country code specification.. It does
not indicate what coin set is in the product and is typically only used for audit
purposes to track which country a changer is in and should not be changed under
normal operation.
Coin Config
• Coin setup: Set the acceptance rate for each coin in the coin set.
• Channel setup: Acceptance parameters for an individual channel can be set, for
example, you can change the US .10 coin from high acceptance to high security.
• Exchange rate 2 to 1: Set the exchange rate between two countries. The operator
must set and maintain the exchange rates as they fluctuate.
Audit Config
The selections in this section allow you to log information about the vending machine where
the Gryphon is installed. This information will be captured in the audit files received from the
Gryphon.
• Machine ID: Set Machine ID, if you’d like to change it from the serial number. This ID
will appear in DEX readings.
• Asset number: Set the Asset number.
• Date & time: Set the current date and time, note that the Gryphon will reset the date
and time whenever power is removed.
• Reset Audit: Reset all the information in this section, or reset the interims.
General
• Calibrate Tubes: Ensure the cassette is empty, then press start to calibrate the
tubes.
• Currency Accepted: Select “Only One” currency, to accept the standard currency in
your country or select “All” to accept all forms of currency.
• Clean-me level: Gryphon displays a “Clean Me” message once the acceptance rate
drops below 50%. This section allows you to customize that acceptance rate.
• Start menu options: Customize the menu options listed on the home screen. Select
an option to disable, and then enable a new option in that spot.
12

GRYPHON OPERATION AND SERVICE GUIDE
• Inventory keys A - F: The default setting allows the user to quickly dispense coins
from the A - F: tubes by pressing the corresponding MMI button. This section allows
you to disable that function.
• Settings: Save the current settings or restore the original settings.
• Display contrast: Adjust the contrast of the MMI display. Press Up to increase
contrast and Down to decrease contrast.
• Idle Screen amount: Set the information displayed on the idle screen. Select
between:
o Inventory – Displays the full amount of money in the cassette, including the
Safe Coins. Safe coins are the minimum number of coins that need to be in
the tubes to continue normal operation.
o Payable – Displays the total amount of money in the cassette, minus the Safe
Coins
o Cashbox – Displays the amount routed to the cashbox
o Nothing – No information displayed
Error Log
Select View to scroll through a list of recent errors, select reset to erase the error log.
Test
• Auto self-tests: Runs an automated test of all motor functions and displays pass/fail
results.
• Manual self-tests: Allows you to test specific functions of the Gryphon. Scroll to
select the test, then click start to perform the test.
• Gates: Test Gryphon’s routing mechanisms by selecting All Gates, or choose a
specific gate to test. Opening the MMI will not interrupt the test, and will allow you to
view the performance of the gate as it operates.
• Info: Quickly review information about the Gryphon, including current cassette
information and firmware versions.
Language
Scroll to select your preferred language.
13

GRYPHON OPERATION AND SERVICE GUIDE
CHANGE MANAGEMENT
Introduction
The Gryphon has many features that allow the product to be called a change manager
rather than a change giver. In addition to the high capacity six tube cassette, these features
enable the Gryphon to more effectively manage the operation of the unit and to optimize the
float levels of the machine and the change payout. These features provide an opportunity for
the operator to optimize vend revenue by minimizing the amount of time the unit operates in
exact change mode.
Float to Level
What is Float to Level?
Each tube can be filled to a specific level, after which the coins are routed to the cash box.
This is the traditional float style, also known as Par. To set this up, enter the total number of
coins of that type that you want to store in the changer. This level applies to all tubes holding
the same type of coin. For example, if the level was 30, and the coins were stored in three
tubes, there will be ten coins in each tube.
Float to Value
What is Float to Value?
This feature gives the customer a simple set up and improved audit process. They use this if
they want $32.25 in the tubes but want the changer to compute and dynamically alter the
ratio of coins in the tubes and give the best mix of coins ready for change.
How does it work?
The Gryphon continually computes coin levels for each tube based upon whether tubes are
naturally replenished or depleted and how often the tube is used for change. It will
dynamically adjust the mix of coins to make best use of the coins it most typically
encounters, adjusting to your consumer pool.
It will always try and have at least seven coins in any tube to ensure the exact change
indicator is kept off and will continue to add more coins to the tubes until the overall value for
the entire cassette matches the target value set by the customer.
For example, if your customer base tends to use quarters, the Gryphon will adjust the mix of
coins to compensate for quarter-heavy traffic.
Will it work immediately?
Yes. However, the initial mix of coins in the tubes may not be optimal.
14

GRYPHON OPERATION AND SERVICE GUIDE
Auto-Float
What is Auto-Float?
Auto-float operates with the optimal amount of money in the tubes needed to ensure the
exact change light is rarely lit and that change is available for vends. Generally this reduces
the float levels in day-to-day operation.
How does it work?
It tracks incoming and outgoing coins as well as bills from peripherals to determine the
optimal amount of change needed to maintain operation, averaged over a period of time,
allowing for fluctuations in customer traffic.
Will it work immediately?
Yes. However, it requires some time to gather information on how the tubes are being used.
During this time, it will run the tubes at their maximum level to ensure there is always enough
change.
• The consumer will not notice a difference.
• Auto-float will ask for a number of coins inserted to meet the auto float level. Any
coins inserted once the float level has been achieved will be routed to the cash box –
no overfill is possible.
• If a coin tube has more coins in it than is required by the auto float, the tube will
dispense coins until the correct level is reached.
• The float level will change depending on the ratio of coins accepted and coins
dispensed.
• Auto float only manages coins to cash box; it will stop routing to the cash box if they
are needed to keep the exact change light off.
• Float Up and Float Down do not operate in auto float mode.
Snapshot Float
What is Snapshot Float?
When this function is chosen, it takes a "snapshot" of the current cassette and uses that
data to set the float settings.
How Does it work?
The snapshot feature allows the operator to manually fill the coin cassette tubes to a
predetermined level or value and then save it as the operational float settings.
Will it work immediately?
Yes. The snapshot feature is only available when the unit is set to ‘Float to Level’ or ‘Float
to Value’.
15
 Loading...