

CP EBDSPIR-DD-LV Product Manual
Overview
The EBDSPIR-DD-LV PIR (passive infrared) presence
detector provides automatic control of low voltage loads
including lighting and BMS systems with optional manual
control.
Output Channel 1 comprises a relay capable of simple on/
off switching, while Output Channel 2 provides dimmable
control of either DALI or DSI type ballasts.
Functioning as a presence detector, the unit can turn lights
on when a room is occupied and off when the room is
empty. Optional settings allow lights to be turned off in
response to ambient daylight, or to implement a maintained
illuminance (daylight harvesting) system.
The flexibility of having two channels and two switch inputs
allows the following example scenarios:
Dim an outside row of luminaires whilst internal fittings
are switched
Provide absence detection for two separate channels
Maintained illuminance system with manual up/down
controls
All functionality is fully programmable using an IR handset.
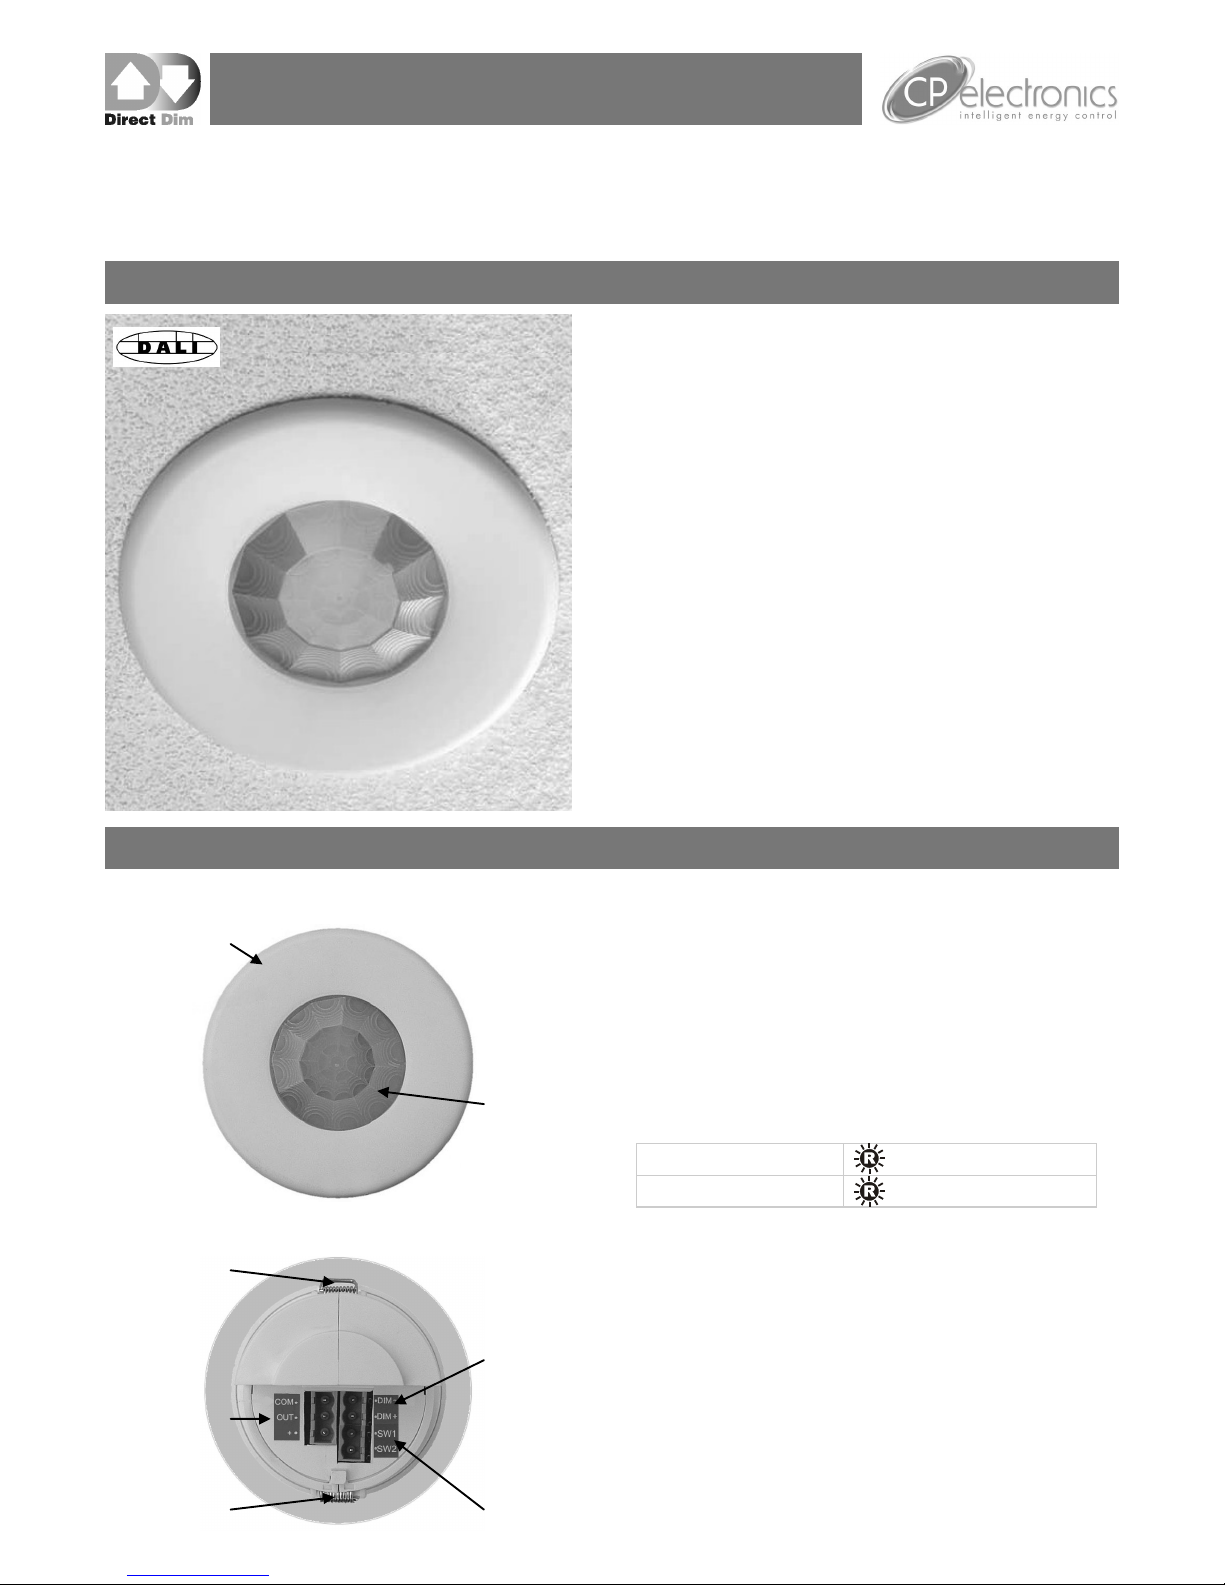
Features
Back features
Ceiling PIR presence detector - DALI / DSI 12-24V AC/DC
EBDSPIR-DD-LV
Product Guide
Retaining Spring
Retaining Spring
Power Input
& Switched
Output Connector
(Channel 1)
Dimmable
Control Output
Connector
(Channel 2)
Switch Input
Connector
PIR Sensor
Detects movement within the unit’s detection range,
allowing load control in response to changes in occupancy.
IR Receiver
Receives control and programming commands from an
IR (infrared) handset.
Light Level Sensor
Measures the overall light level in the detection area
Status LEDs
The LED flashes Red to indicate the following:
Power Input & Switched Output Connector (Channel 1)
Used to connect power to the unit and to connect a
switched load.
Dimmable Control Output Connector (Channel 2)
Used to connect DSI/DALI controllable ballasts and
transformers for dimmable loads.
Switch Input Connector
Two input terminals can be used to manually override the
dimming levels and override the lights on or off.
Walk Test LED active
when movement is detected
Valid setting received
Front features
Sensor Lens
which covers...
PIR Sensor
IR Receiver
Light Level Sensor
Status LEDs
Mounting Bezel
2
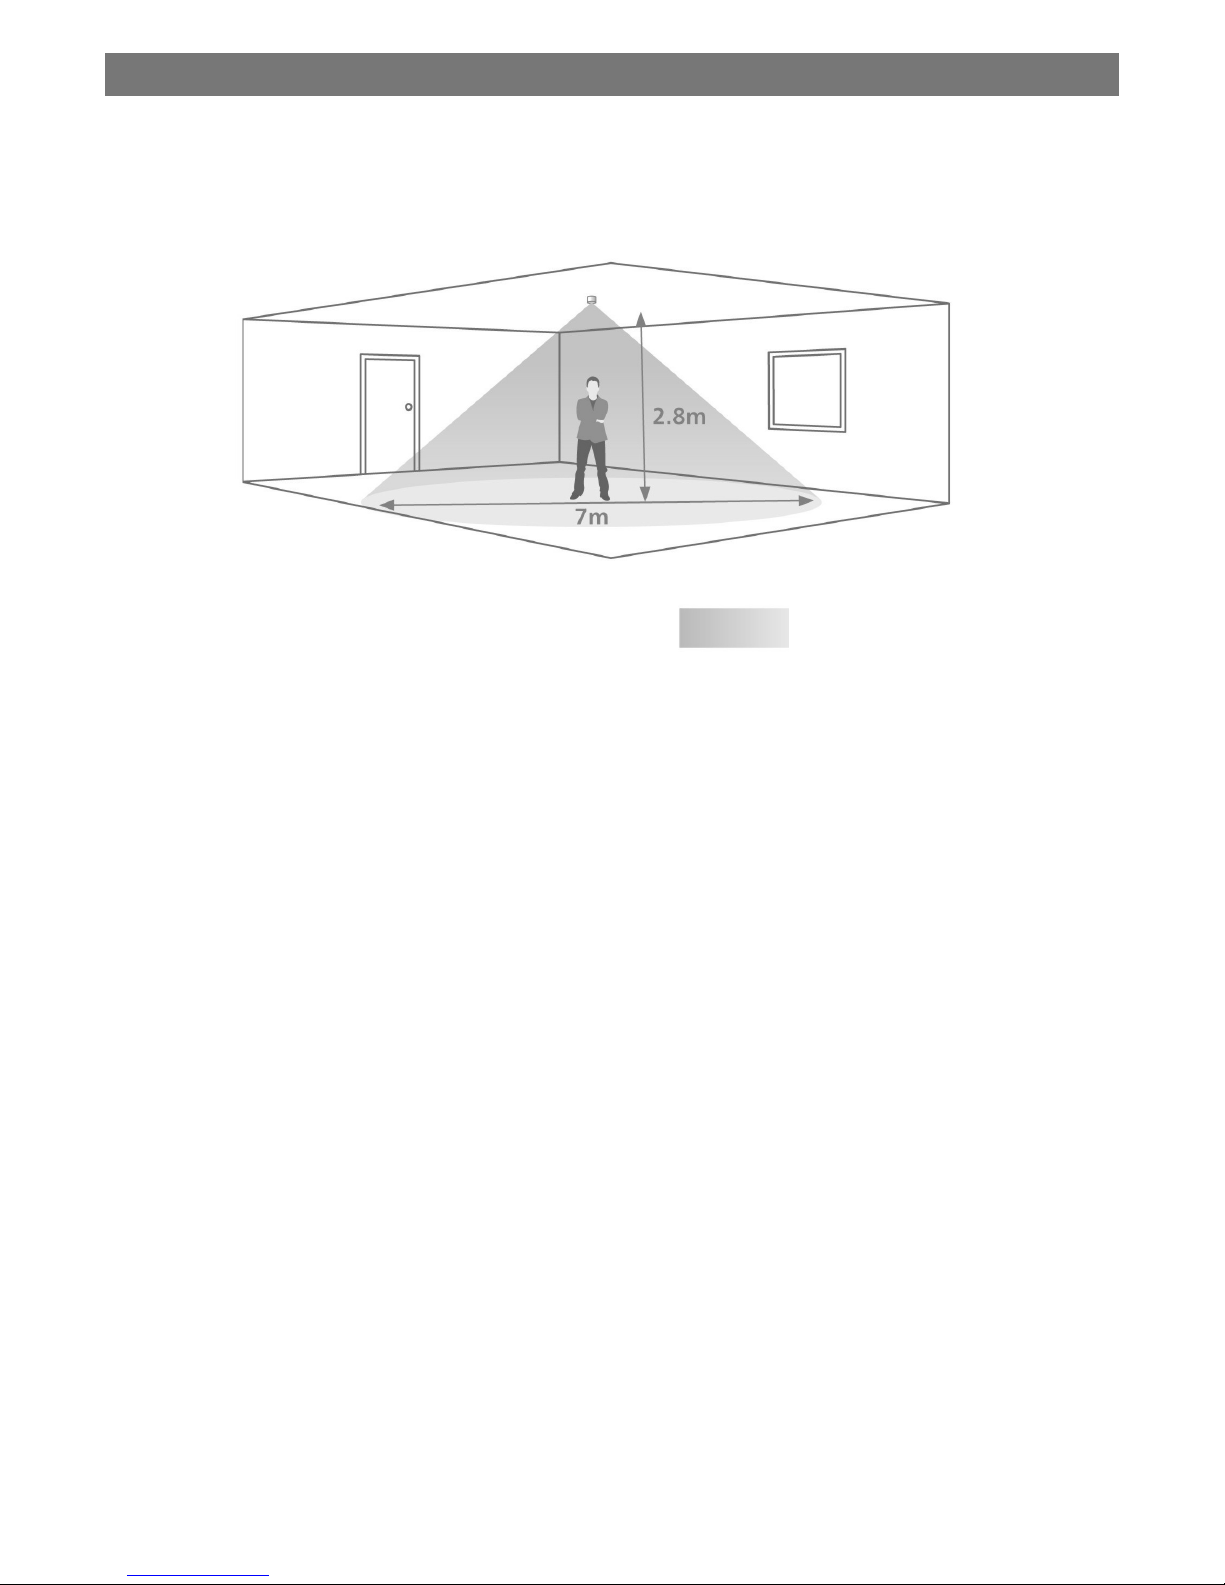
Detection diagram
Area of lower sensitivity Area of high sensitivity
3
Choosing a Suitable Location
The EBDSPIR-DD-LV is designed to be ceiling mounted and must satisfy the following criteria:
Avoid positioning the unit where direct sunlight may enter the sensor element.
Do not site the sensor within 1m of any lighting, forced air heating or ventilation.
Do not fix the sensor to an unstable or vibrating surface.
Installation
Detection Mode
The Detection Mode for both output Channels 1 and 2 can be set to behave in Presence or Absence mode:
Presence When movement is detected the load will automatically turn on. When the area is no longer occupied the
load will automatically switch off after an adjustable time period.
Absence The load is manually switched on. When the area is no longer occupied the load will automatically switch
off after the adjustable time period has elapsed.
In either case, sensitivity to movement of the PIR sensor can be adjusted using the Sensitivity parameter.
HINT: To assist in setting the Sensitivity, turn on the Walk Test LED which will flash red when movement is detected.
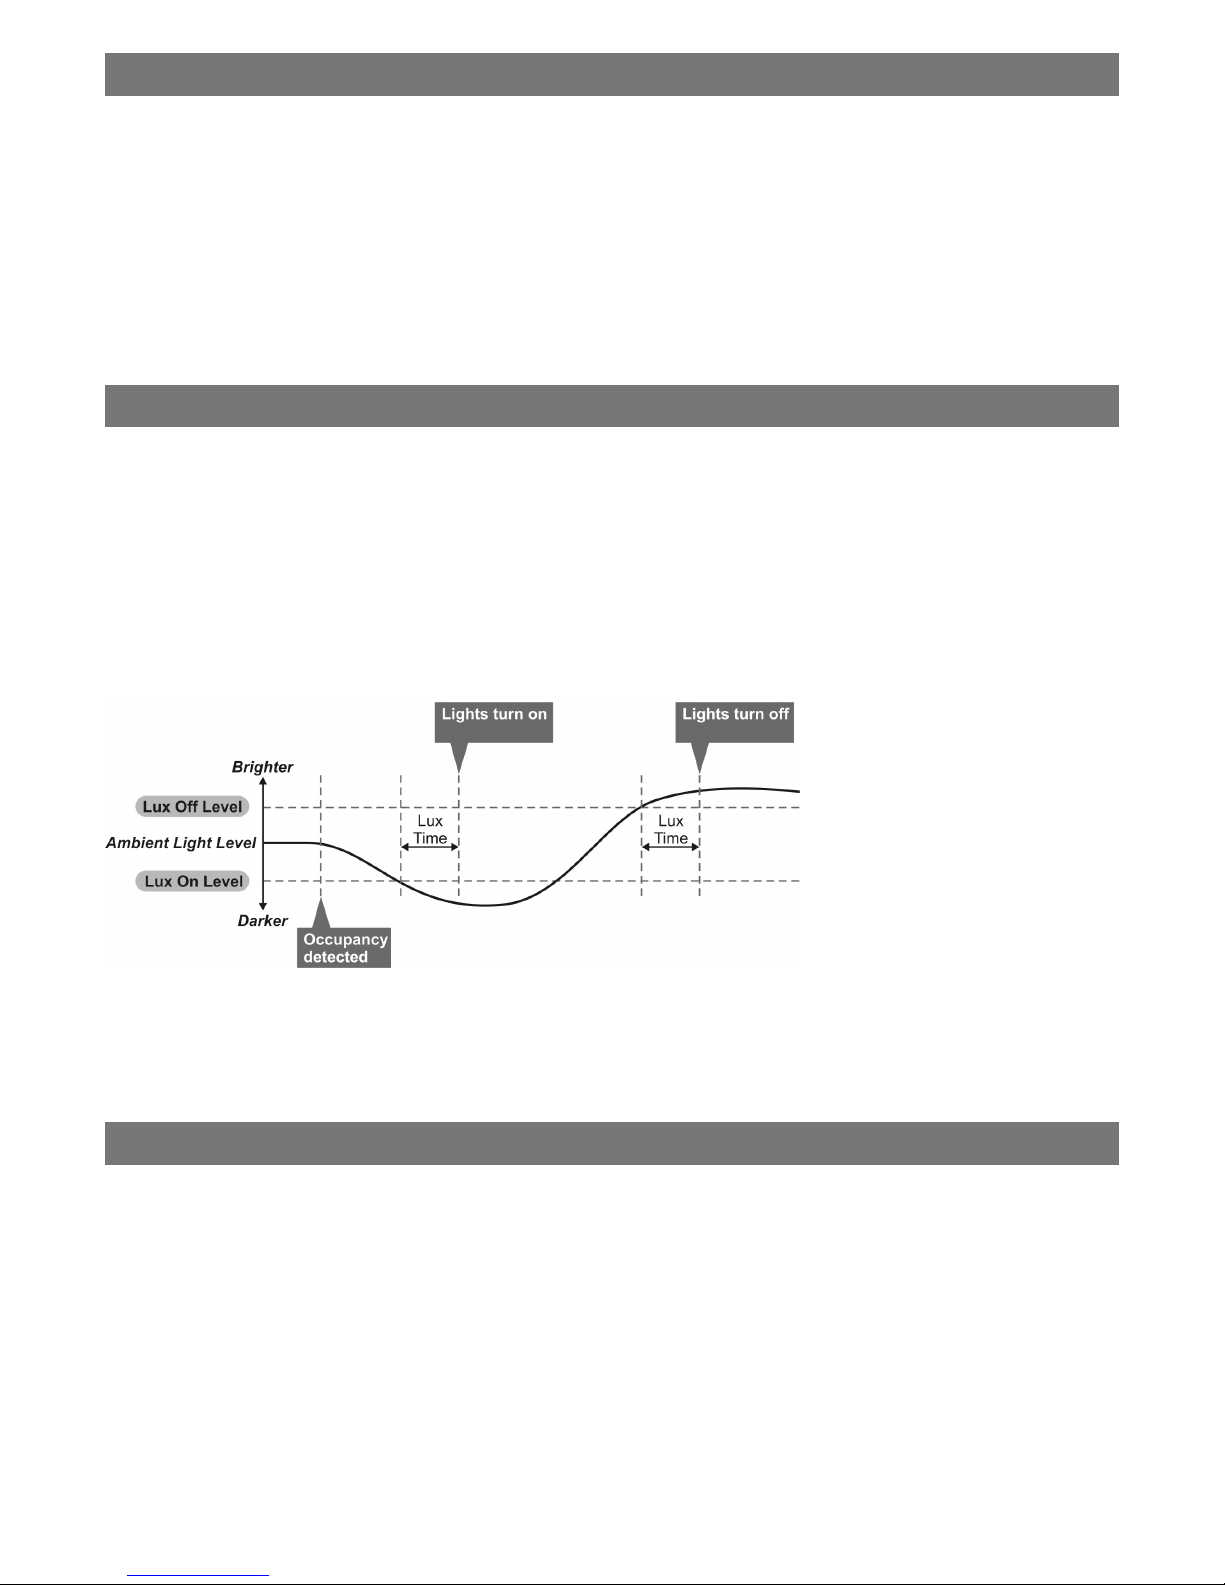
Switch Level On/Off
Occupancy detection can be made dependant on the ambient light level using the Lux On Level and Lux Off Level
parameters.
Maintained Illuminance (daylight harvesting)
The detector measures the overall light level in the detection area and calculates the correct output for the luminaires, to
achieve a preset lux level (maintained illuminance or daylight harvesting).
Sensor functionality
Overview
It is a requirement of many fluorescent lamp manufacturers to have the lamps on at maximum output for a period of time
to guarantee lamp life (refer to the manufacturer’s datasheet for details). As this EBDSPIR-DD-LV is able to dim the
lamps using DALI/DSI, the product provides a facility to disable this for a given period of time.
Operation
By setting the “Burn in” parameter, you can select a time during which the lamps are not allowed to deviate from
maximum output. The unit counts the time, and even remembers how long has elapsed in the event of a power failure.
To cancel the burn in function, simply select a time of 0. Note that when the lamps are changed, the burn in time should
be set again.
Burn-in
4
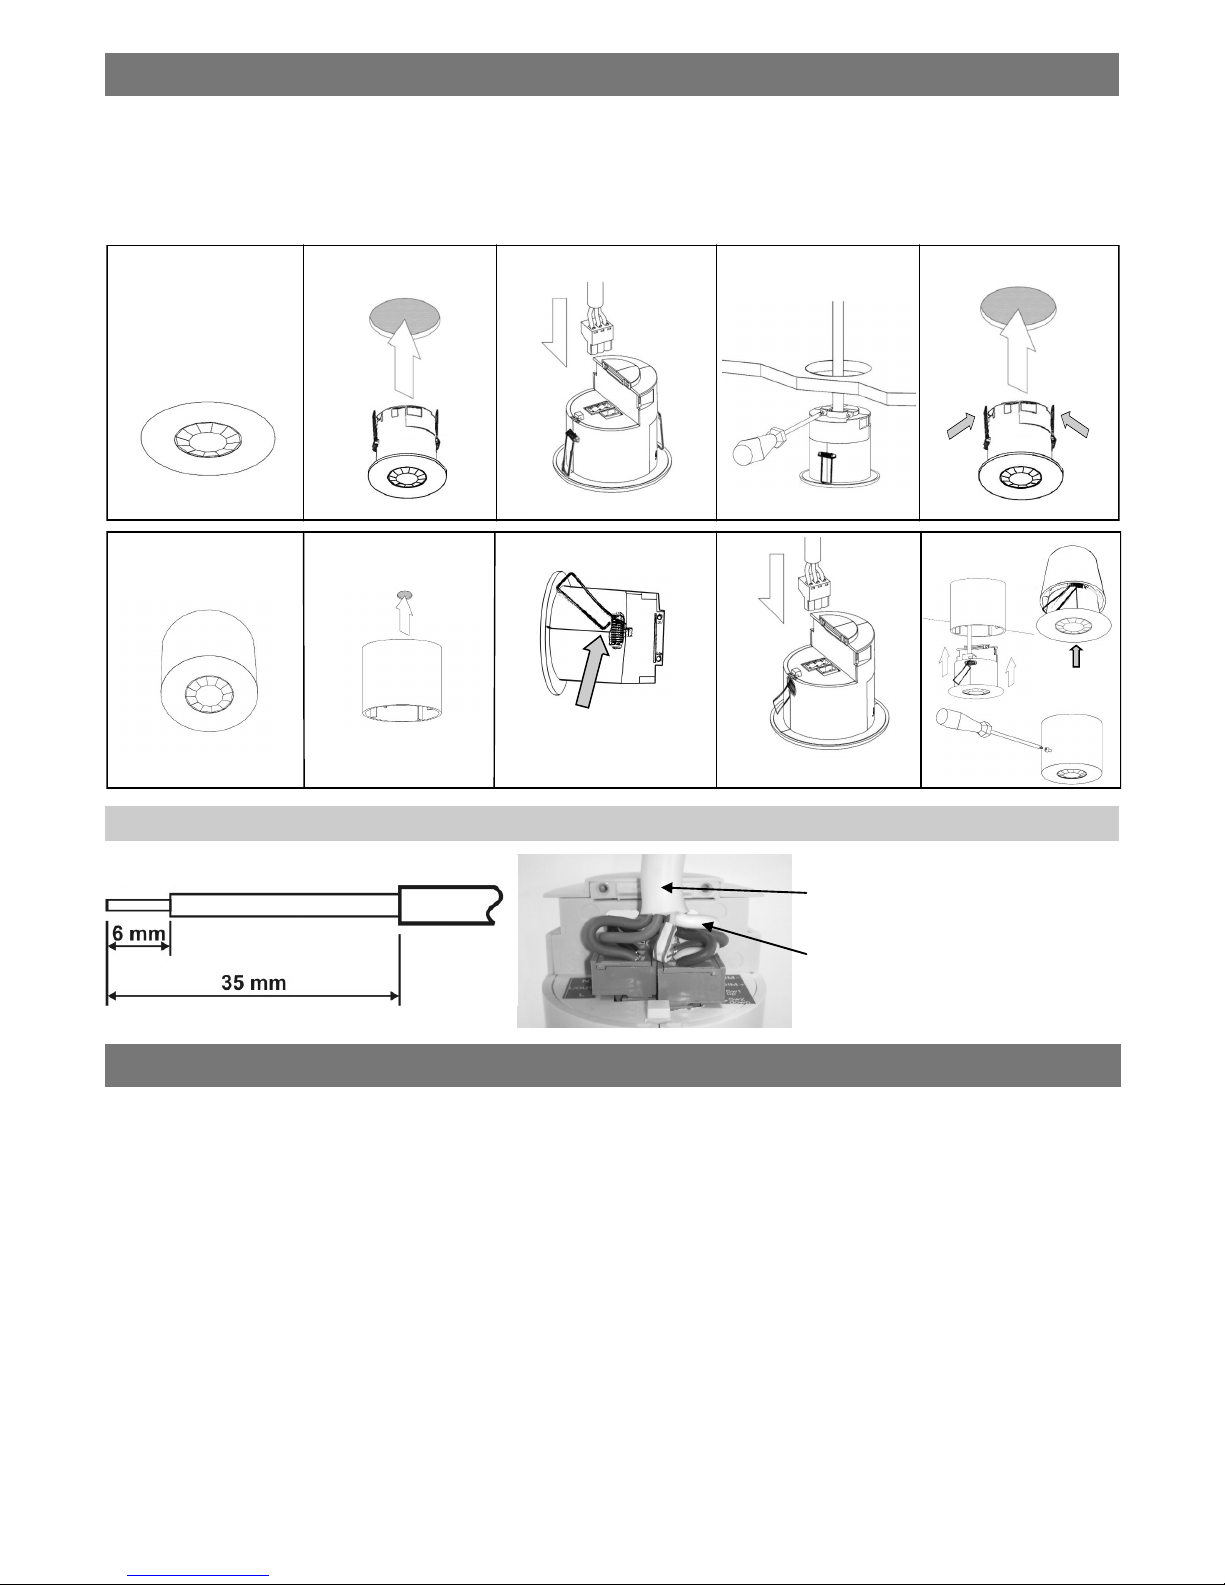
Installation
The EBDSPIR-DD-LV is designed to be mounted using either:
Flush fixing, or
Surface fixing, using the optional Surface Mounting Box (part no. DBB).
Both methods are illustrated below.
The UNLCDHS has the ability to read back the settings stored in a device.
To read back individual parameters
Navigate to the parameter and press the ‘R’ (Read) button whilst pointing at the device. The handset will click
when the parameter has been read back, the device will flash its LED, and the value will be shown against the
parameter in the menu.
To read back all of the parameters in a menu
Press and hold the ‘R’ (Read) button for more than 1 second.
The handset will click every time a parameter is received
The device will show multiple flashes of its LED
All of the values will be shown against the parameters in the menu.
The individual parameters may be edited and then saved as a ‘Macro’.
Notes
If a parameter(s) has been missed because of a communication error, the missing value(s) is replaced by dashes.
When reading back, the Channel 1 relay (where fitted) will temporarily be switched off, and will return to it’s normal
state 2 seconds after the read back has been completed.
Readback function (UNLCDHS handset only)
Flush Fixing
Surface Fixing
1 2 3
2 3
4
1
Hole Ø64mm
Warning - be careful
bending springs when
mounting unit.
4
Pull out spring tab and rotate
spring arm as shown
50mm or 60mm fixing centres
Important
Ensure that the cables are formed as shown
before affixing the cable clamp. The clamp
MUST clamp the outer sheath(s) only.
Bend cores as shown.
Wire stripping details
 Loading...