

Page 1
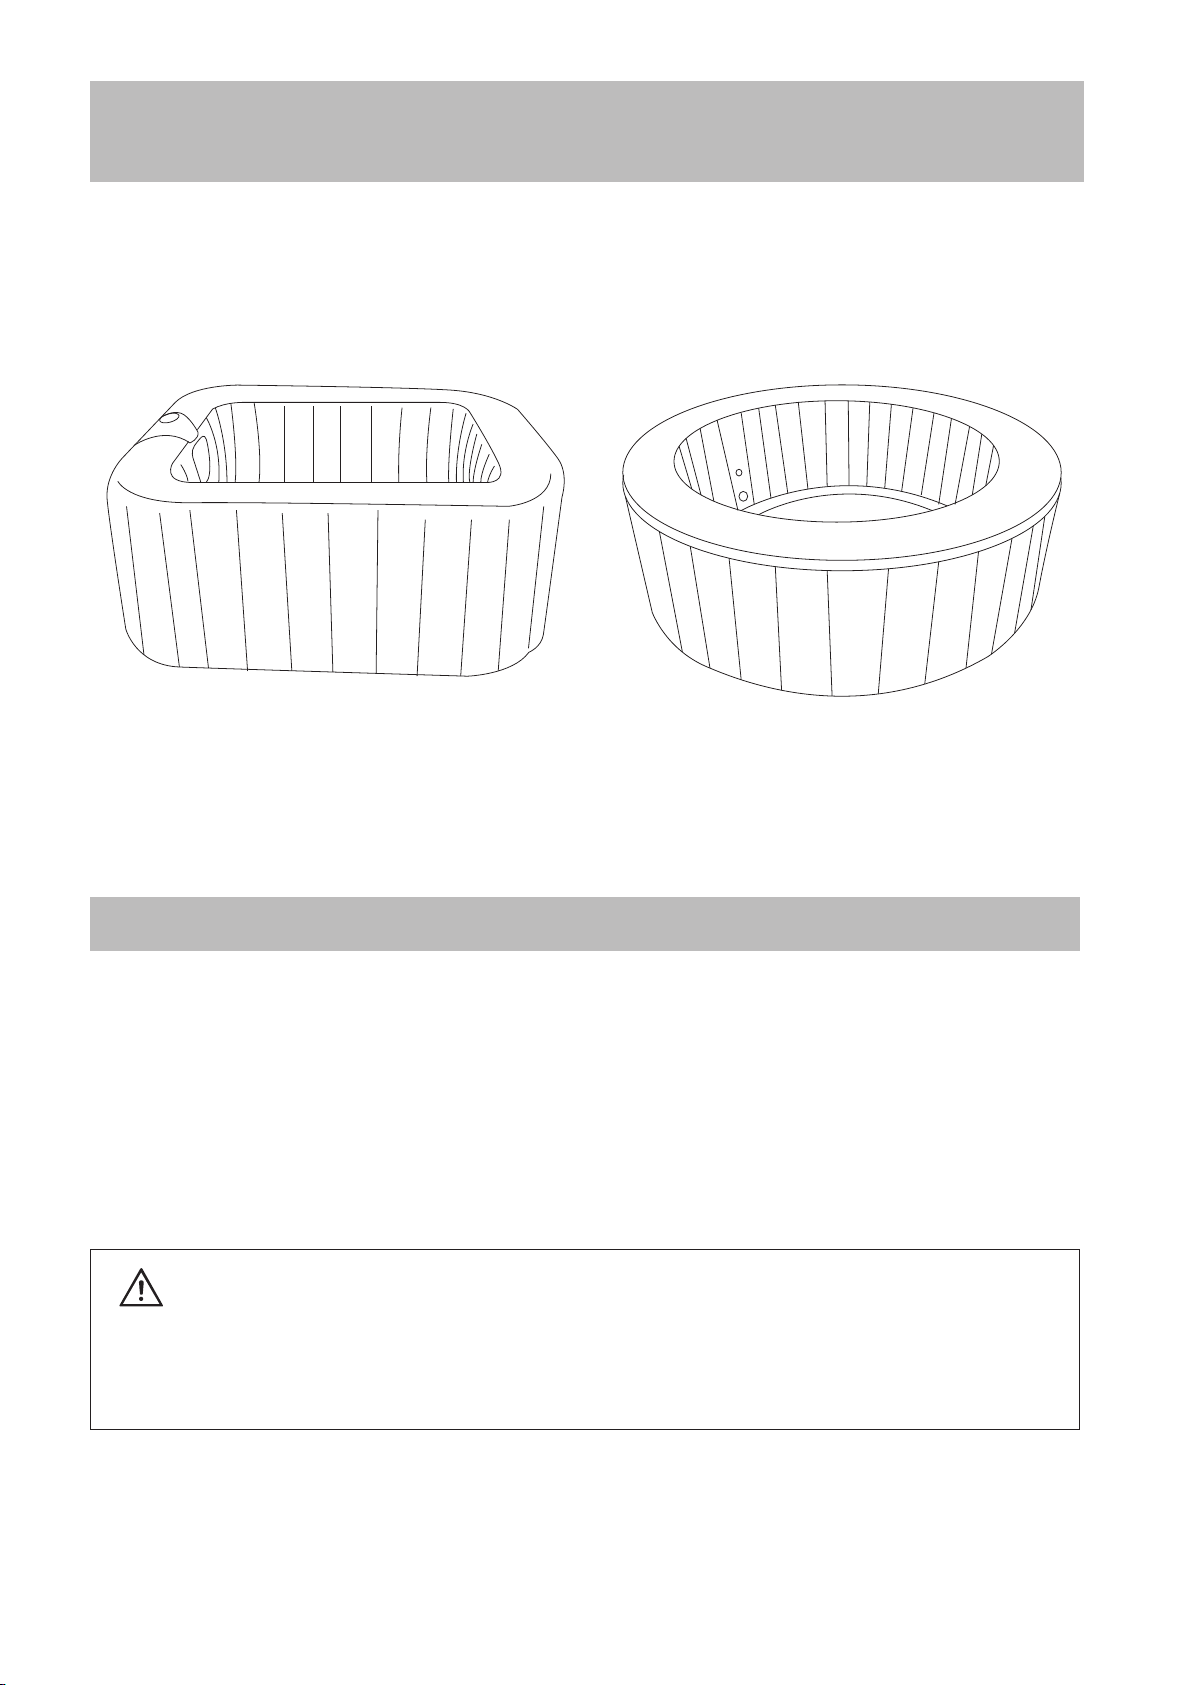
Inflatable Spa Assembly Guide
INTRODUCTION
Thank you for purchasing this Inflatable Hot Tub!
We hope you will enjoy your Spa for many years to come!
To ensure your personal safety during installation and to get the most out of your investment, please read this
entire manual before beginning the installation process. If you feel that this process is too difficult to do on your
own, we advise that you seek assistance from a local building or home improvement contractor.
WARNING:
Improper assembly and operation can result in severe personal injury as well as
product failure not covered by warranty. Please follow all instructions carefully or
contact technical support for assistance.
Page 2

INFLATABLE SPA ASSEMBLY GUIDE
IMPORTANT SAFETY INSTRUCTIONS
WARNING1:
WARNING2:
WARNING3:
WARNING4:
WARNING5:
WARNING6:
WARNING7:
WARNING8:
WARNING9:
WARNING10:
WARNING11:
WARNING12:
WARNING13:
WARNING14:
WARNING15:
WARNING16:
WARNING17:
WARNING18:
WARNING19:
WARNING20:
WARNING21:
WARNING22:
WARNING23:
The appliance should be supplied power through a GFCI-equipped outlet with a rated tripping
current not exceeding 30 mA.
Electric installations should fulfill the requirements of local standards. Grounded appliances must be
permanently connected to fixed wiring.
If the power supply cord is damaged, it must be replaced by the manufacturer or its service agent or a
similarly qualified person in order to avoid a hazard. Replace damaged cord immediately.
Parts containing live current, except parts supplied with extra-low safety voltage not exceeding 12 V,
must be inaccessible to a person in the bath.
To reduce the risk of electric shock, do not use an extension cord to connect unit to electric supply;
provide a properly located receptacle.
Parts incorporating electrical components, except for remote control devices, must be located or
fixed so that they cannot fall into the bath.
To avoid electric shock, do not use the spa when it is raining.
Never operate the spa if the suction fittings are broken or missing. Never replace a suction fitting
with one rated less than the flow rate marked on the original suction fitting.
To reduce the risk of injury, do not permit children to use this product unless they are closely
supervised at all times.
Water attracts children. Always have the spa locked with its cover on after each use.
When the jet function is going to be used, make sure the cover of spa is opened first.
Do not switch on if there is any possibility that the water in the spa is frozen.
Risk of electric shock. Never operate any electrical appliance when in the spa or when your body is
wet. Never place any electric appliance, such as a light, telephone, radio, or television, within 5 feet
(1.5m) of a spa.
Pets should be kept away from spa to avoid damage and injury.
Risk of electric shock. Install spa at least 5 feet (1.5m) from all metal surfaces. As an alternative, a
Spa may be installed within 5 feet of metal surfaces if each metal surface is permanently connected
by a minimum 8-guage solid copper conductor to the wire connector on the terminal box that is
provided for this purpose.
Risk of accidental drowning. Extreme caution must be exercised to prevent unauthorized access by
children. To avoid accidents, ensure that children cannot use this spa unless they are supervised at
all times.
During pregnancy, soaking in hot water may cause damage to the unborn fetus. Limit use to 10
minutes at a time while pregnant.
The use of alcohol, drugs, or medication before or during the spa use may lead to
unconsciousness with the possibility of drowning.
Obese persons and persons with a history of heart disease, low or high blood pressure,
circulatory system problems, or diabetes should consult a physician before they use a spa.
Persons using medication should consult a physician before using a spa since some medication
may induce drowsiness while other medication may affect heart rate, blood pressure, and
circulation. The water in a spa should never exceed 40°C (104°F). Water temperature between
38°C (100°F) and 40°C (104°F). Are considered safe for a healthy adult. Lower water
temperatures are recommended for young children and when spa use exceeds 10 minutes. Since
high water temperature has a high potential for causing fatal damage during the early months of
pregnancy, pregnant or possibly pregnant women should limit spa water temperature to 38°C
(100°F).
To reduce the risk of injury, never fill spa with water hotter than 40°C (104°F).
The use of alcohol, drugs, or medication can greatly increase the risk of fatal hyperthermia.
Hyperthermia occurs when the internal temperature of the body reaches a level several degrees
above the normal body temperature of 37°C (98.6°F). The symptoms of hyperthermia include an
increase in the internal temperature of the body, dizziness, lethargy, drowsiness, and fainting, The
effects of hyperthermia include failure to perceive heat; failure to recognize the need to exit the spa;
unawareness of impending hazard; fatal damage in pregnant women;
physical inability to exit the spa; and unconsciousness resulting in the danger of drowning.
Prolonged immersion in a spa may be injurious to your health.
1
Page 3
INFLATABLE SPA ASSEMBLY GUIDE
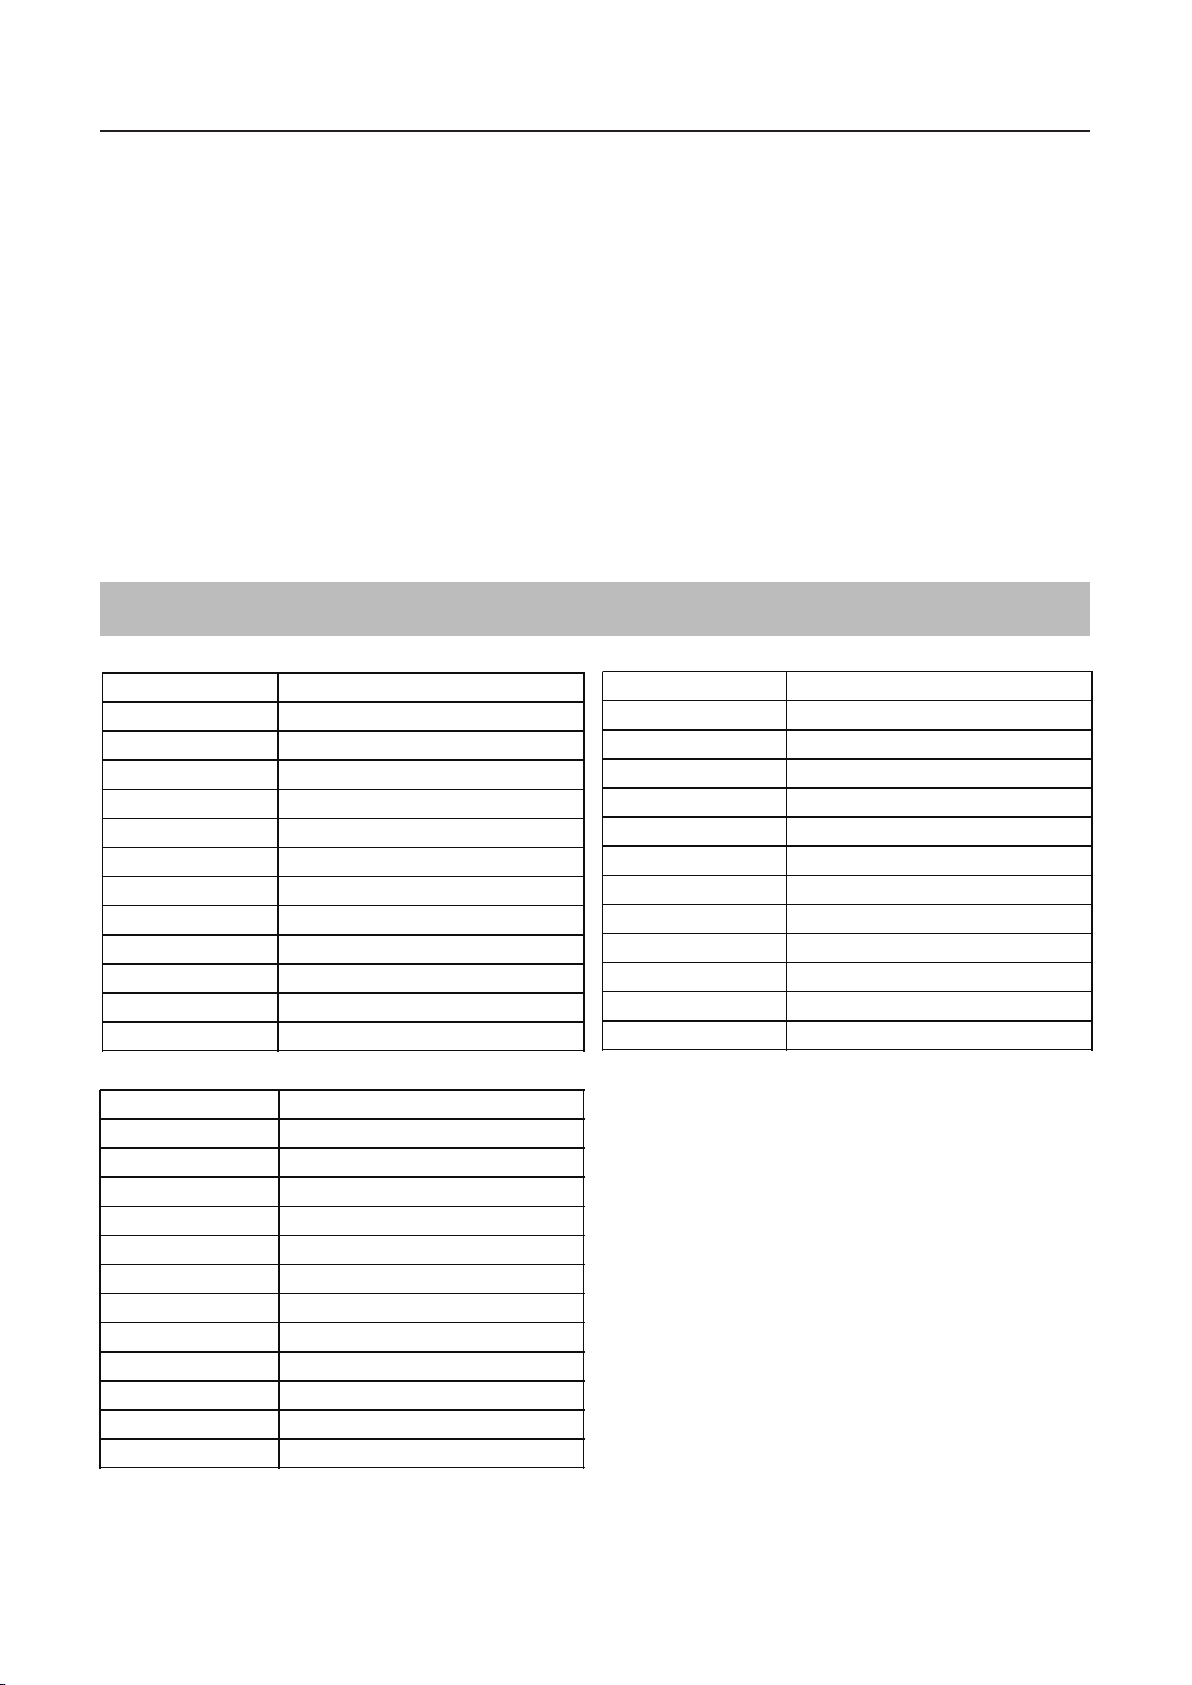
Number of people
4
External diameter
1.80 m /71 "
Filter
110 -120 V/35 W 1880 L/ 420 gal/H
Internal diamenter
1.60 m /63 "
Number of air jets
140 * φ3 mm
color
water capacity
600 L/158 Gal
Top cover
Laminated PVC
CAUTION 1:
CAUTION 2:
CAUTION 3:
CAUTION 4:
CAUTION 5:
CAUTION 6:
CAUTION 7:
CAUTION 8:
To avoid damage to the pump, the spa must never be operated unless the spa is filled with water.
Immediately leave spa if uncomfortable or sleepy.
Place only on surface that can withstand the floor loading requirement of your spa.
The spa should not be setup or
Never add water to chemicals. Always adding chemicals to water may result in a hazardous chemical
spray.
In order to avoid a hazard due to inadvertent resetting of the thermal cutout, this appliance must not be
supplied through an external switching device, such as a timer, or connected to a circuit that is regularly
switched on and off by the utility.
THIS APPLIANCE CAN BE USED BY CHILDREN AGED FROM 8 YEARS
AND ABOVE AND PERSONS WITH REDUCED PHYSICAL, SENSORY OR MENTAL
OF EXPERIENCE AND KNOWLEDGE IF THEY HAVE BEEN
GIVEN SUPERVISION OR INSTRUCTION CONCERNING USE OF THE APPLIANCE IN
A
SAFE WAY AND UNDERSTAND THE HAZARDS INVOLVED. CHILDREN SHALL
NOT PLAY WITH THE APPLIANCE. CLEANING AND USER MAINTENANCE SHALL
NOT BE MADE BY CHILDREN WITHOUT SUPERVISION.
The spa should not be setup or left out in temperatures lower than 4°C (40°F).When using the heating
function, it is recommended to pour warm water (Never exceed 40°C (104°F))and close the lid,turn
off the bubble function.The heating rate is about1℃- 2℃(1 .8°F-3.6°F) per hour.
APPLICABLE MODELS
Model PH050017
color Blue & White
water capacity 800 L/211 Gal
Internal diamenter 1.40 m /55 "
Height 0.65 m /25 .6"
Number of air jets 120 * φ3 mm
Heating device
Bubble 600 W /0.81 HP
Cable length 3.3 m
Top cover Laminated PVC
1200 W/1 .22 HP
left out in temperature lower than 4°C (40°F).
Model
color
Number of people 6
water capacity 1000 L/264 Gal
External diameter 2 .08 m/82 "
Height 0.65 m/25 .6 "
Heating device
Bubble 600 W /0.81 HP
Cable length 3.3 m
Filter 110 -120 V/35 W 1880 L/ 420 gal/H
Top cover Laminated PVC
CAPABILITIES OR LACK
PH050018
Blue & White
1200 W/1 .22 HP
Model
Number of people 4
External diameter 1.50 m /59 "
Internal diamenter 1.10 m/ 43 "
Height 0.65 m /25 .6"
Number of air jets 120 * φ3 mm
Heating device
Bubble 600 W/0 .81 HP
Cable length 3.3 m
Filter 110 -120 V/35 W 1880 L/420 gal/H
PH050013
Blue & White
1200 W/1 .22 HP
2
Page 4
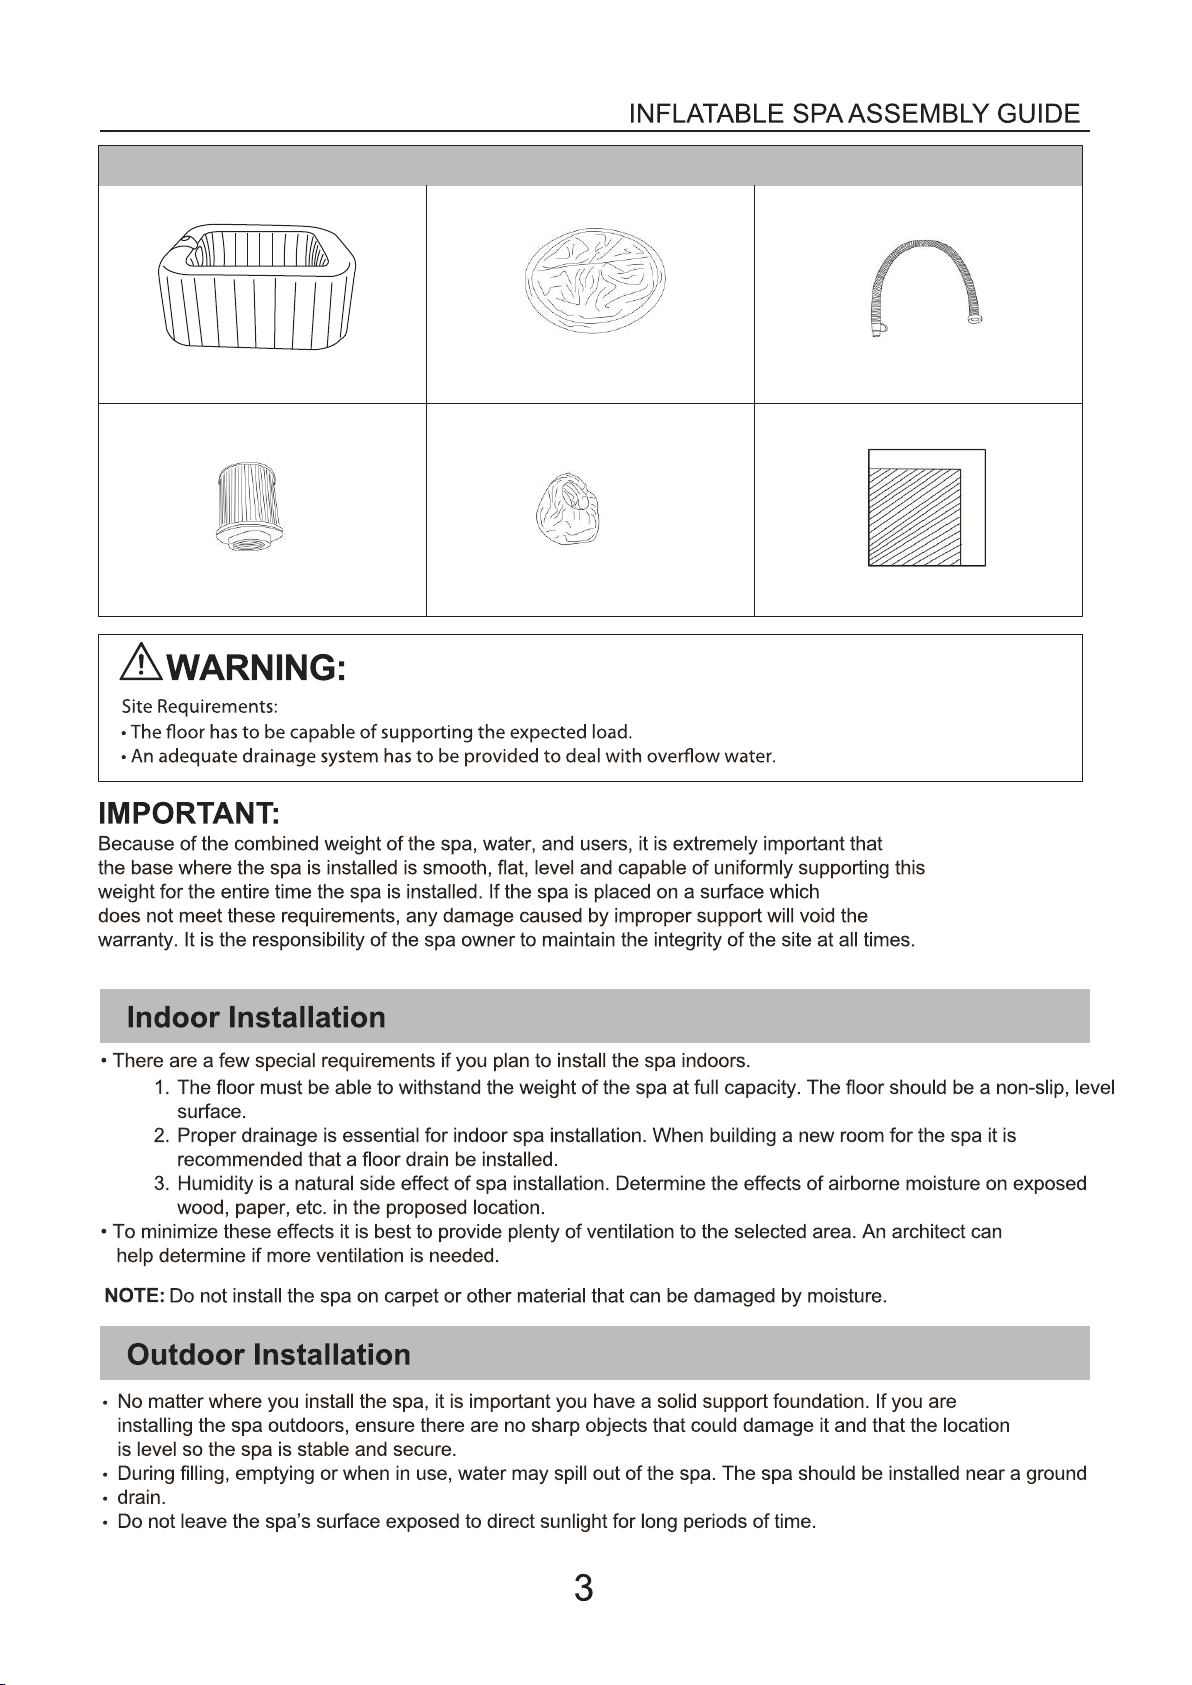
Parts List
A B C
D
Spa pool
Filter cartridge
Clip-on Top Cover
E F
Filter cartridge cover Repair kit
Inflation hose
Page 5
ASSEMBLY
INFLATABLE SPA ASSEMBLY GUIDE
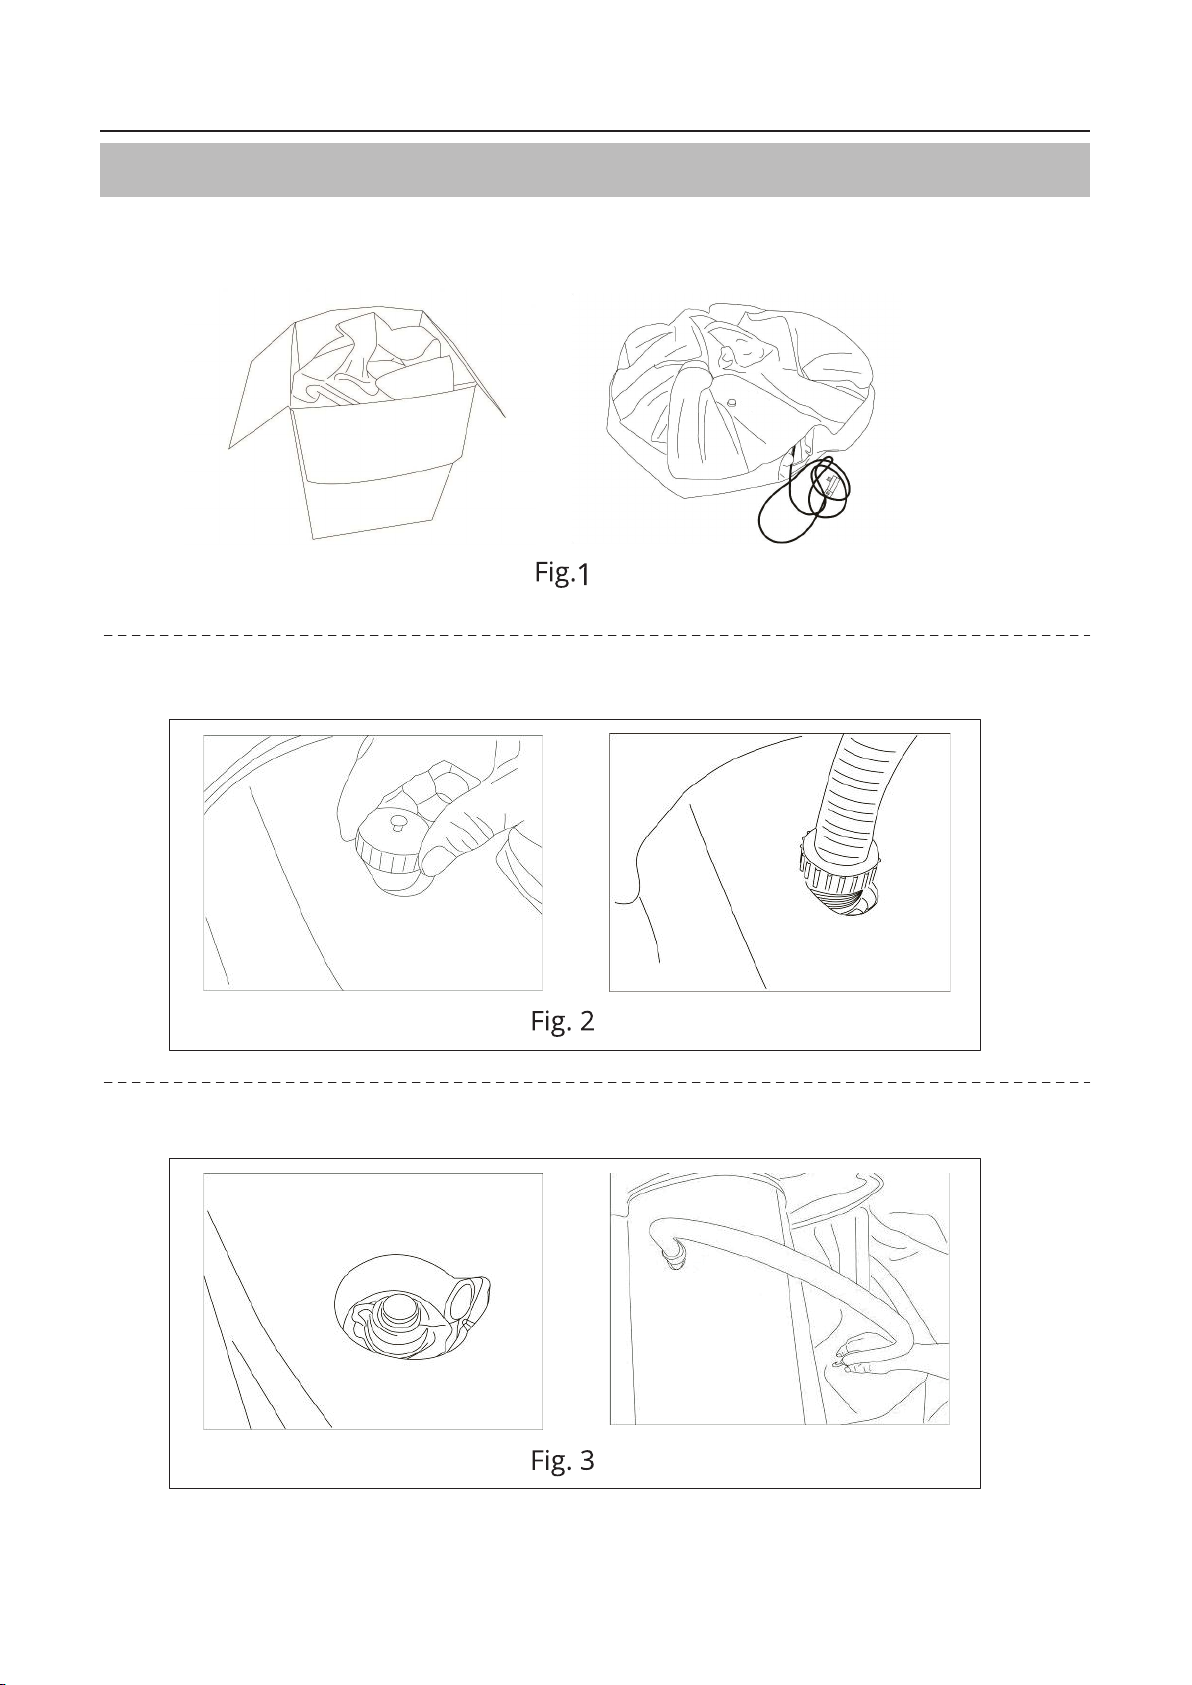
Step1:
Step2:
Unfold the spa from the packaging. Spread the spa and cover.
Make sure both are right side up (Fig. 1).
Open the air outlet on the spa. Screw one end of the inflation hose into it (Fig. 2).
Step3:
Open the air valve on the spa. Connect the other end of inflation hose into the valve (Fig. 3).
4
Page 6
INFLATABLE SPA ASSEMBLY GUIDE
Step4:
Step5:
Step6:
Step7:
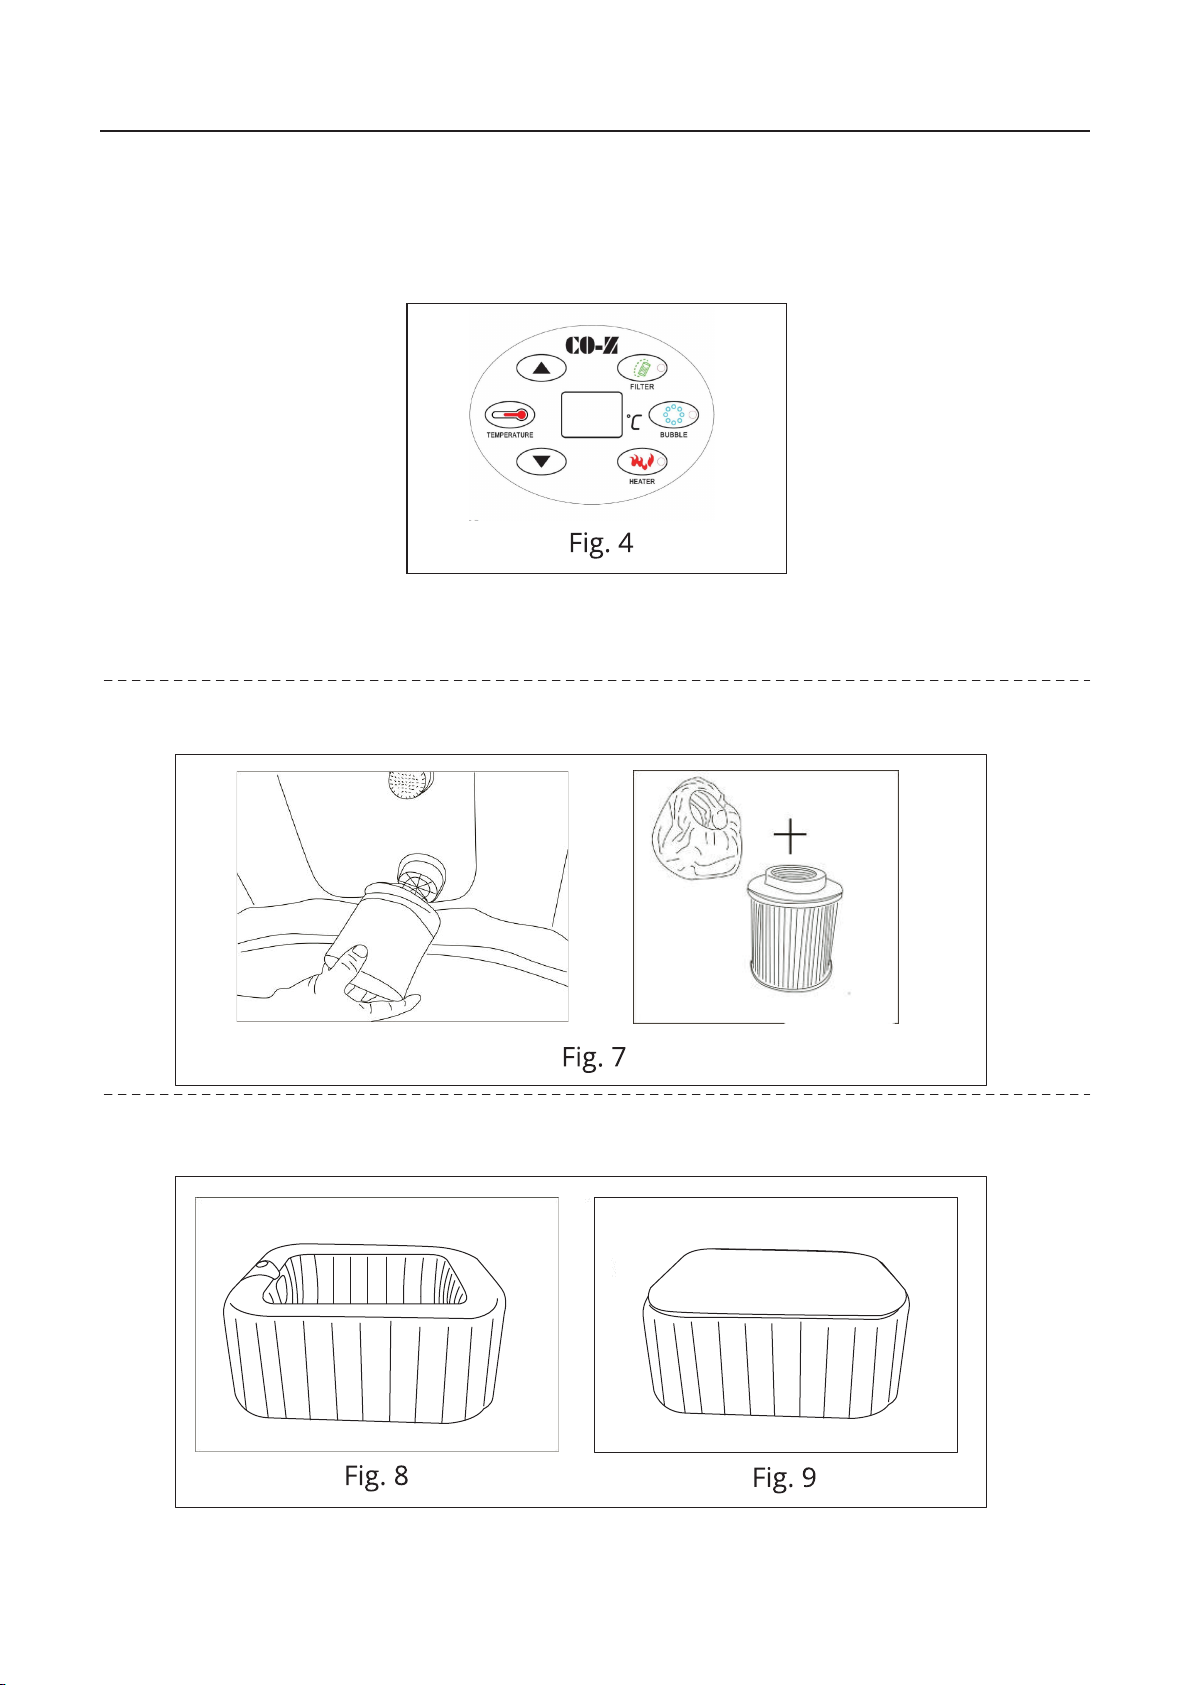
Inflate the spa tub by pressing the BUBBLE button. When the spa is properly inflated, press the BUBBLE
button to shut off the bubbles.
Attention 1: Do not over inflate.
Attention 2: To inflate spa while filled with water, you must put on the Jets for 2-3 minutes by pressing the
BUBBLE button first, and then operate according to step 2-6.
Remove the inflation hose and screw the valve tight.
Remove the inflation hose from the air outlet and screw the valve cap tight.
Screw the filter cartridge onto the two water inlets (there are two inlets on the spa wall )
on the spa wall by turning it clockwise (Fig. 7).
Step8:
Step9:
Fill the spa using a garden hose to fill to the water level printed on the spa wall (Fig. 8).
Place the cover onto the spa, double lock with safety locking keys (Fig. 9).
5
Page 7
INFLATABLE SPA ASSEMBLY GUIDE
OPERATION
Before using, ensure the water in the spa matches the water line printed on the spa wall.
Never dry-run the power pack as such type of operation will void the warranty.
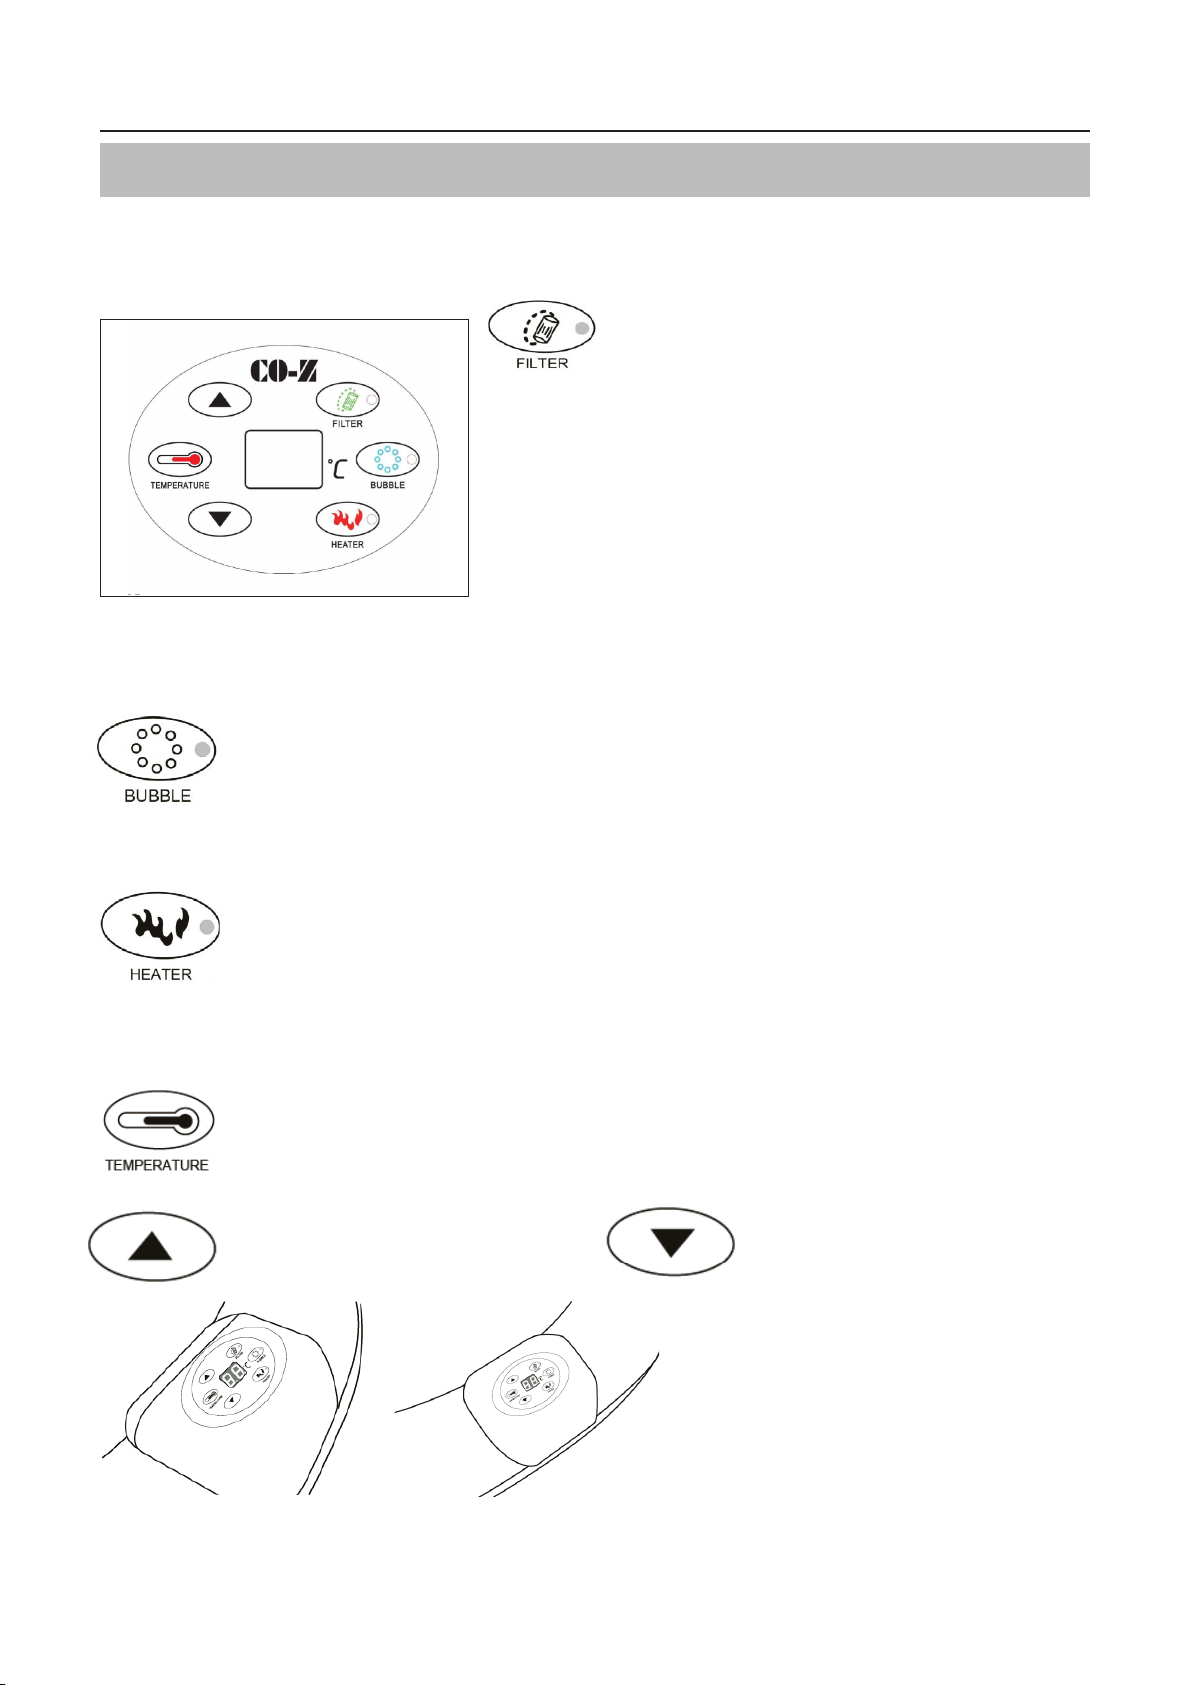
Control Panel
When the FILTER PUMP has worked for 168 hours, the letters ‘FC’
will appear on the display screen, accompanied by a warning tone. At
that time, the indicator lamp for the FILTER key will be on, but the
filter pump will not be in operation. The indicator lamp for the
HEATER key will be off, and the heating system will not work. Only by
pressing the FILTER key again can its indicator lamp on the control
panel (Left) be turned off. At that time, the letters ‘FC’ on the display
screen will disappear and so will the warning tone. Actual water
temperature will be displayed. All keys return to normal working
status.
‘FC’ and the warning tone are to remind the user to clean or replace the filter element.
Press the “FILTER” key after replacing a new filter element to restart the system.
BUBBLE Key Press this key and the air pump will start working and the red indicator lamp will be on.
The Bubble system will stop automatically after 20 minutes of continuous operation. To restart
bubble, wait 10 minutes and then press the BUBBLE key again. Do not restart bubble before waiting
10 minutes. When the bubble have been on for 20 minutes and have stopped, the function cannot
be started again within 10 minutes.
HEATER Key - On/Off key for the heating system. Press this key and the heating system will start
working and the red indicator lamp will be on. Press again and the heating system will stop and the
indicator will turn off. When the heating system is turned on, the red indicator lamp of the FILTER
key will also be on and the filter pump will start working as well. This is a normal occurrence required
by the design. When the preset temperature has been reached, the heating system will stop
working, but the heating indicator light will not turn off. The filter pump will continue to operate, with
the indicator light on. When the water falls 2°C below the preset temperature, the heating system will
begin to automatically heat the water back up to selected temperature.
FILTER Key - On/Off key for the filtration system. Press
this key, and the filter pump will start working and the red
indicator lamp will be on. Press again and the pump will
stop working and the lamp will be off.
TEMPERATURE Key – Key for setting temperature. Press this key and the numbers on the display
screen will start flashing, then the keys for increasing or decreasing temperature can be pressed to
set the temperature. When desired settings are entered, press the TEMPERATURE Key again to
confirm. Default temperature is 104°F, and temperature can be set in the range of 68-108°F.
UP Key - Increases spa temperature. DOWN Key - Decreases spa temperature.
• Base of the controller is made of
environmentally-friendly polyurethane material
that is soft and comfortable.
• Surface of the base can be washed.
• The controller is chrome-plated, which meets
ROHS standards.
• Surface films are glued to the controller with
marine glue.
6
Page 8
INFLATABLE SPA ASSEMBLY GUIDE
1. Filling Hot Tub with Water
•
Water should be filled to a position between minimum and
maximum water line . If lower, heating may not be fully effective. If higher,
water may spill over the basin during use.
2. Water Treatment
Water in the basin should be filtered at fixed times regularly. It is not
•
suggested to filter the water at all times.
•
Water in the basin should be treated with chemical agents periodically. However, chemical agents with calcium
ions must not be used. If chemical agents with calcium ions are used for water treatment, it is very likely that
calcium scale will form on the walls of water basin and inner heating pipes.
Water scales will directly damage the inner electrical components inside the control cabinet and further affect the
service life of control cabinet.
•
If the filtration system has worked for 168 hours, the system will emit a warning tone to remind the user to clean
or replace the filter element.
3. Hot Tub Care
•
Drain off the water inside the water basin completely and wipe off droplets of water on the walls. After
that, lay aside the spa for 24 hours, exhaust the air and fold. If it is Winter, please fold the spa indoors.
Theoutside temperature in Winter is very low and materials may become hard, in that case, folding the
materials may result in breakage. Put the spa inside the packing case after folding it well and then put the
case in a shaded place to avoid direct sunlight.
MAINTENANCE
1. Maintaining Spa Water
•
Clean your filter cartridge at least once every time it has worked continuously for 72- 120 hours. The filter
cartridge should be replaced at least once a month depending on use.
•
Change water every few days or use appropriate pool chemicals. All spas require the use of pool
chemicals. Please consult your local pool supply retailer for more information about chemical
maintenance. Pay close attention to the chemical manufacturer’s instructions. Spa damage resulting from
misuse of chemicals and mismanagement of spa water is not covered by the warranty.
•
Water balance; we recommend you maintain the spa water pH between 7.2 and 7.8, total alkalinity
between 80 and 120ppm, and free chlorine between 3 to 5ppm.
•
Purchase a test kit to test your water chemistry before each use of the spa, no less than once per week. Low
pH will damage to the spa and pump. Damage resulting from chemical imbalance is not covered by the
warranty.
•
Water sanitation is the responsibility of the spa owner, achieved through the regular and periodic (daily, if
necessary) addition of an approved sanitizer. The sanitizer will chemically control bacteria and viruses
present in the fill water or introduced during use of the spa.
2. Cleaning the Filter Cartridge
Make sure to unplug the power pack from the electrical receptacle before the following actions.
•
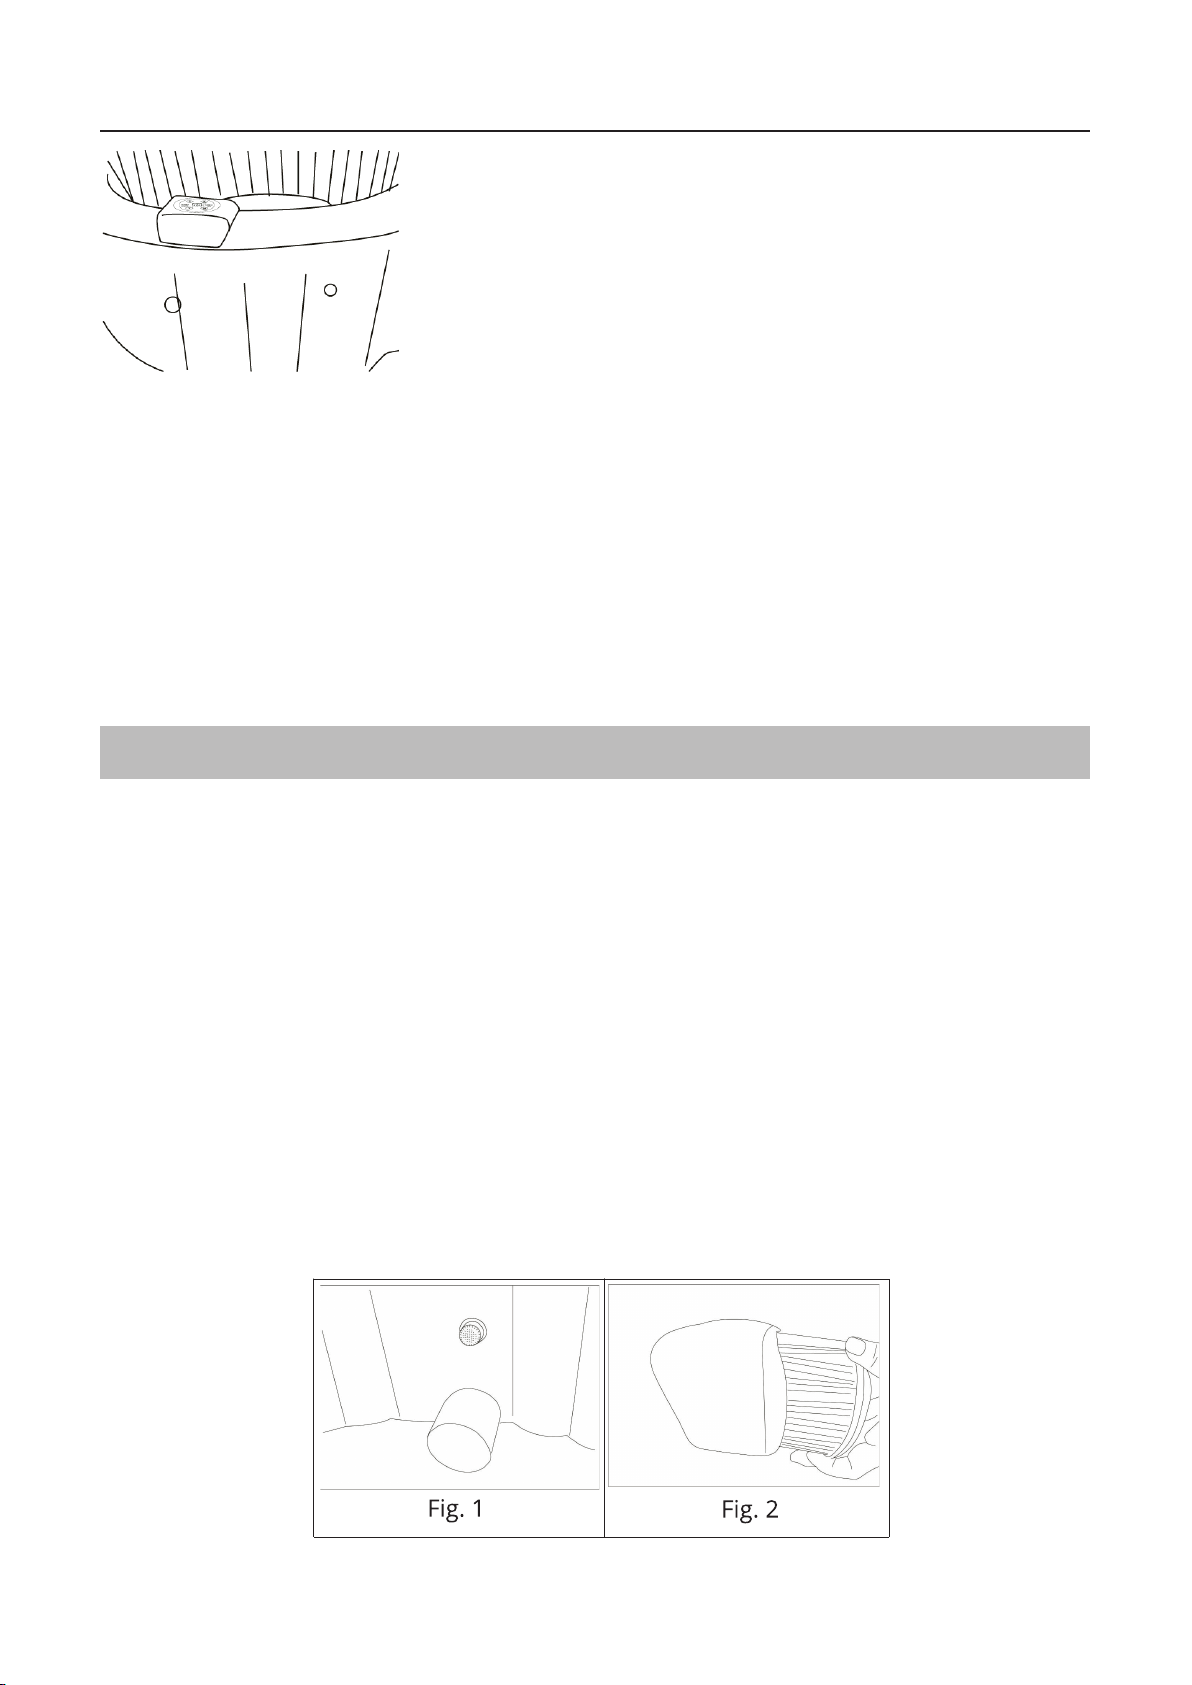
Unscrew the filter cartridge by turning counterclockwise (Fig 1).
•
Remove the filter cartridge cover (Fig. 2).
7
Page 9
INFLATABLE SPA ASSEMBLY GUIDE
•
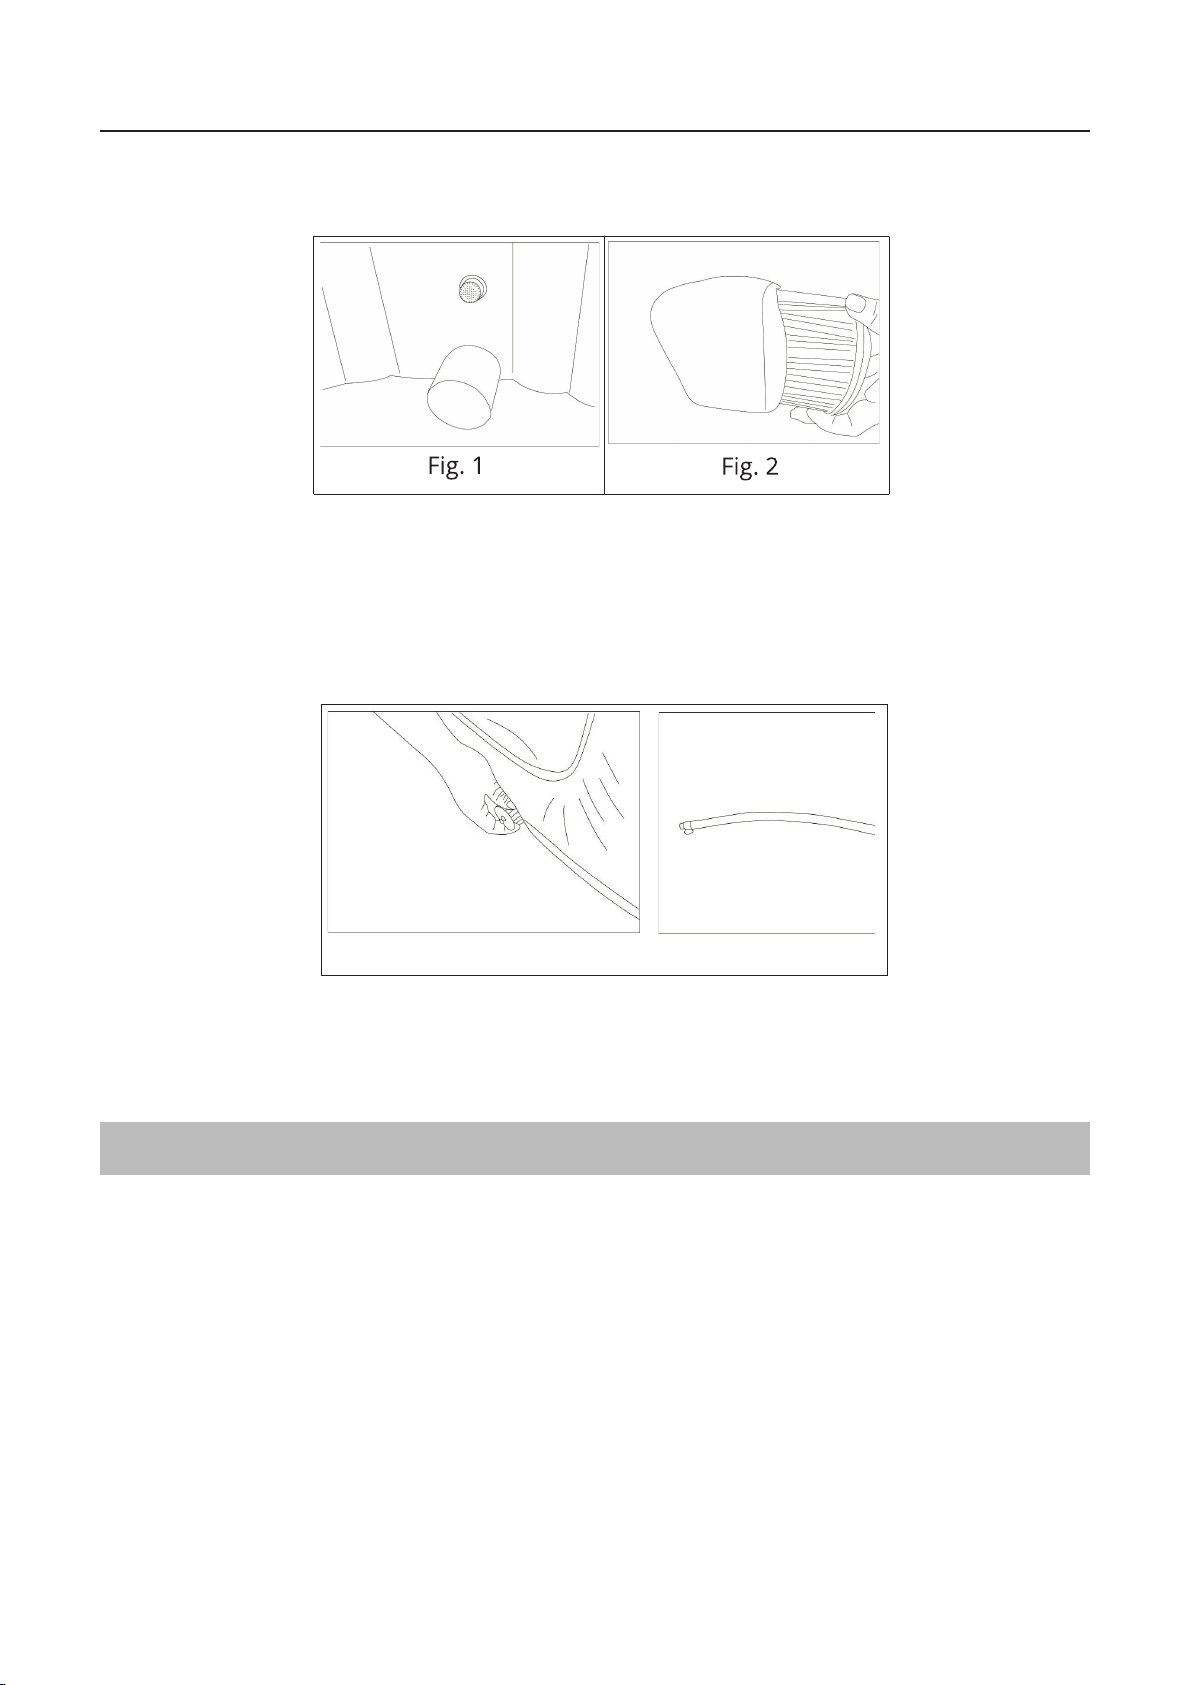
The filter cartridge can be rinsed off with a garden hose and reused. However, if the filter cartridge remainssoiled
and discolored the filter cartridge should be replaced (Fig.3).
•
Re-apply filter cartridge cover and attach the filter cartridge to the water inlet by turning clockwise (Fig.4).
3.Drainage
•
Make sure to unplug the power pack from the electrical receptacle.
•
Put the plastic plug into the outlet in the inner wall of the spa.
•
Open the outlet in the outer wall of the spa. Screw one end of inflation hose into it.
•
Pull the plastic plug off from the outlet in the inner wall of the spa, then the water will flow out (Fig. 5).
•
When there is no water in the spa, you must put on the jet function for at least 5 minutes by pressing the
BUBBLE button to drain the water in the air pipeline.
•
When drainage is finished, remove the inflation hose and screw the nut tight.
Fig. 5
4. Cleaning the Spa
•
Detergent residues and dissolved solids from bathing suits and chemicals will gradually accumulate in the spa’s
water.
•
To clean the spa, use soap and water then rinse.
Note: do not use hard brushes or abrasive cleaners.
REPAIR AND STORAGE
1. Spa Repair
•
If the spa is torn or punctured, use the provided repair patch.
•
Dry the area to be repaired.
•
Apply the glue in the accessory bag to the repair patch and then attach it onto the damaged area.
•
Smooth the surface to remove any air bubbles. A secure unnoticeable repair can usually be made.
2. Spa Storage
•
Make sure all water is drained from the spa and control box. This is essential to extend the life of the spa. We
recommend the use of a wet/dry vacuum to blow out or suck up water from the spa pipes and pump lines.
•
Remove the filter cartridge.
•
It is recommended you store the spa in its original package in a warm dry place.
Note: Plastic becomes brittle and susceptible to breakage when exposed to subzero temperatures.
Freezing can severely damage the spa. Improper winterization of your spa may void your warranty.
8
Page 10
INFLATABLE SPA ASSEMBLY GUIDE
TROUBLESHOOTING
Here are some helpful tips to help you to diagnose and rectify some common sources of trouble.
g
g
g
if
i
if
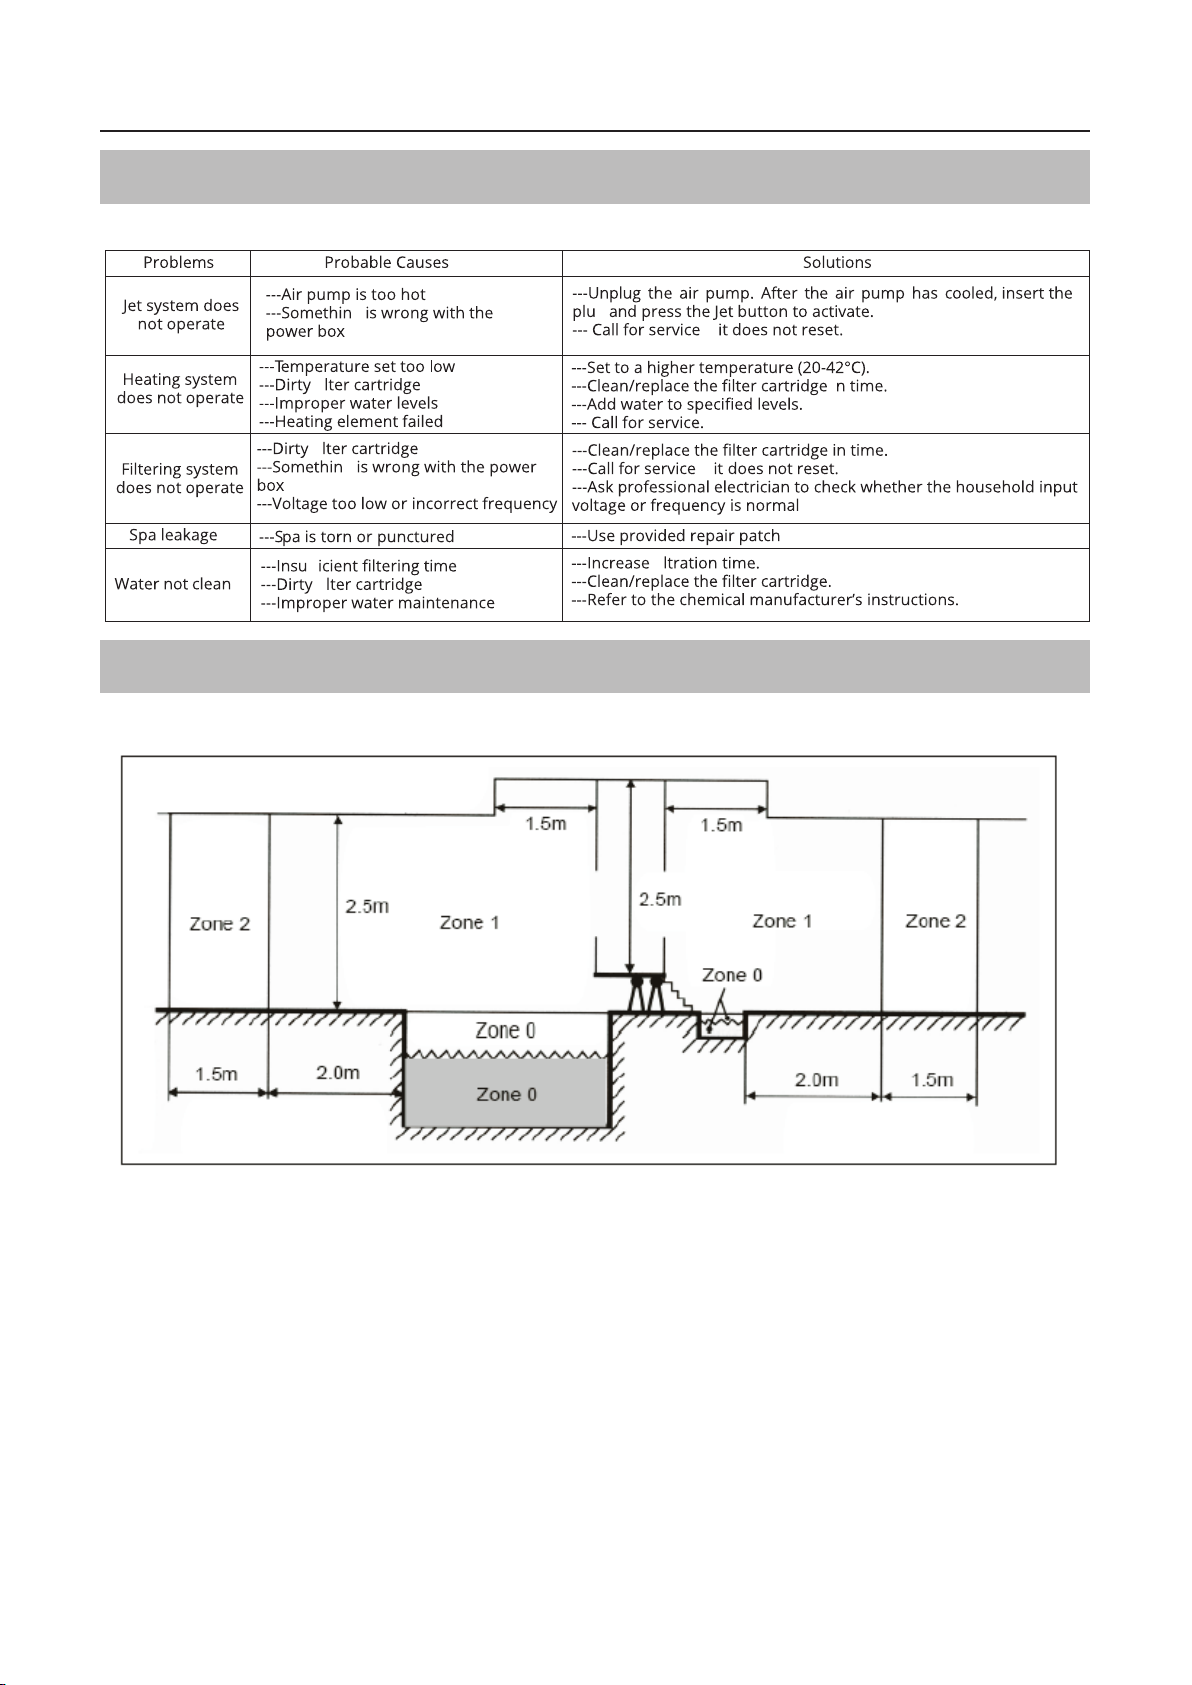
ELECTRICAL PROTECTION LEVEL
Warning: Protection levels vary based on the Zone spa is placed in. See the below scheme:
Above figure: Zone dimensions of swimming pools and paddling pools
Note: The measured zone dimensions are not limited by walls and fixed partitions.
•
A permanent grounded bond consisting of a minimum 8-guage solid copper conductive wire is required
between spa control panel grounding terminal and any metal surface located in Zone 1.
•
No metal surfaces or outside electrical devices may be present within Zone 0 for any reason.
•
All bonded connections must be fully-conductive and grounded.
•
Electrical equipment shall have at least the following degrees of protection:
•
Junction boxes shall not be installed in Zones 0 and 1.
•
In Zones 0 and 1, no switches, lights or any other electrical components shall be present.
•
The transformer must be located outside Zone 1.
9
Page 11
INFLATABLE SPA ASSEMBLY GUIDE
TROUBLESHOOTING
We decline liability for any damage or accident derived from any use of this product
which is not in conformity with the instructions contained in this booklet.
Please consult a licensed electrician for further electrical installation guidelines,
or in placement scenarios not specifically mentioned in this manual.
•
A permanent grounded bond consisting of a minimum 8-guage solid copper conductive wire is required
between spa control panel grounding terminal and any metal surface located in Zone 1.
•
No metal surfaces or outside electrical devices may be present within Zone 0 for any reason.
•
All bonded connections must be fully-conductive and grounded.
•
Electrical equipment shall have at least the following degrees of protection:
CORRECT DISPOSAL OF THIS PRODUCT
This marking indicates that this product should not be disposed with other
household wastes throughout the EU. To prevent possible harm to the
environment or human health from uncontrolled waste disposal, recycle it
responsibly to promote the sustainable reuse of material resources. To
return your used device, please use the return and collection systems or
contact the retailer where the product was purchased. They can take this
product for environmental safe recycling.
(Read this entire manual before operation)
10
 Loading...