

Page 1

COX MODELS
14 +
INSTRUCTION
MANUAL
Assemble Only With Adult Supervision
Please read through this instruction booklet
to THOROUGHLY familiarize yourself with
the assembly and ight characteristics of
this airplane prior to assembly. Please
inspect all parts carefully before starting
assembly! If any parts are missing, broken or
defective, or if you have any questions
about the assembly or ying of this airplane,
please call us at (217) 398-8970 and we’ll be
glad to help.
Entire Contents © 2010 Hobbico® Inc. Printed in China COXA6501MNL
Page 2
2 SKY RANGER
FCC Requirement
This device complies with part 15 of the FCC rules. Operation is
subject to the following two conditions.
(1) This device may not cause harmful interference.
(2) This device must accept any interference received, including
interference that may cause undesired operation.
NOTE: THE MANUFACTURER IS NOT RESPONSIBLE FOR ANY RADIO
OR TV INTERFERENCE CAUSED BY UNAUTHORIZED MODIFICATIONS
TO THIS EQUIPMENT. SUCH MODIFICATIONS COULD VOID THE USER’S
AUTHORITY TO OPERATE THE EQUIPMENT.
Precautions
Your Sky Ranger should not be considered a toy, but rather a
sophisticated, working model that functions very much like a full-size
airplane. Because of its performance capabilities, the Sky Ranger, if
not assembled and operated correctly, could possibly cause injury
to yourself or spectators and damage to property.
1. Operate the plane according to these instructions. DO NOT
alter or modify the model. If you make any modi cations, you
void your warranty.
2. Test the operation of the model before each ight to ensure
that all equipment is operating properly and that the model
remains structurally sound.
3. Fly on calm days (with wind speeds less than 5mph) and in
large open areas free of trees, people, buildings, or any other
obstacles.
4. If you are in need of assistance from an experienced pilot,
we suggest contacting your local R/C flying club. If you’re
not a member of an R/C club, your local hobby shop has
information about clubs in your area whose membership
includes experienced pilots. You can also contact the
National Academy of Model Aeronautics (AMA) which has
over 2,500 chartered clubs across the country. Instructor
training programs and insured newcomer training are
available through any of these clubs.
Contact the AMA at the following address or toll-free phone number:
www.modelaircraft.org
Academy of Model Aeronautics
5151 East Memorial Drive Ph. (800) 435-9262
Muncie, IN 47302-9252 Fax (765) 741-0057
Page 3
COX MODELS 3
The R/C model hobby becomes more and more enjoyable as your
experience grows. Your chances for success and graduation to
higher levels are very good if you take your time and follow the
ying instructions carefully and completely. We hope you enjoy
ying your Sky Ranger.
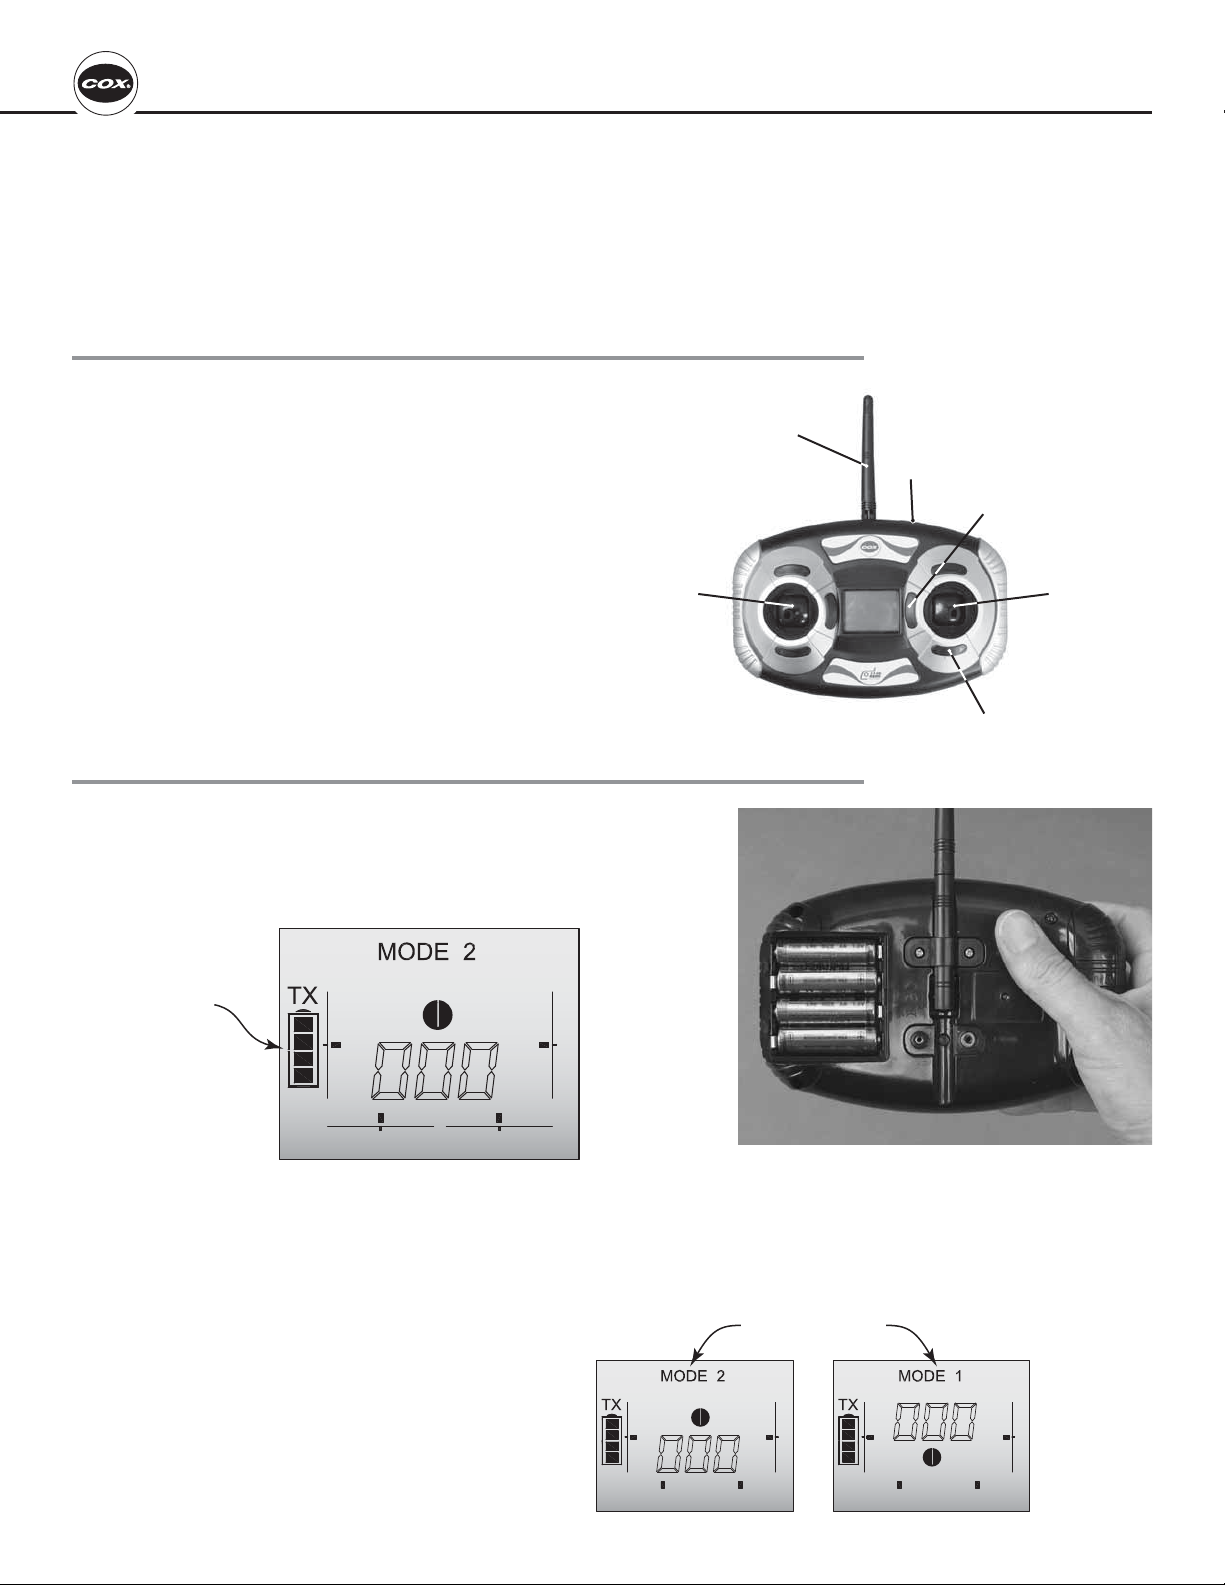
Glossary
❍ Lithium Polymer (LiPo) Battery: Rechargeable
battery which is used to power the airplane. LiPo
batteries are lighter and smaller than most other
types of rechargeable batteries.
❍ Transmitter (TX): This is the hand-held unit that
sends the signal to the control unit, or RX.
❍ Rudder: Controls turning yaw.
❍ Elevator: Controls pitch.
Throttle
Control
Stick
Antenna
Install The Transmitter Batteries
Remove the battery compartment cover from the back of the
transmitter. Install four fresh AA batteries according to the “+” and
“–” polarity markings imprinted into the battery compartment.
Replace the cover.
Battery
Level
Icon
Mode 2 Shown
On/O Switch
Elevator Trim
Elevator/
Rudder
Control
Stick
Rudder Trim
Turn on the power switch on the transmitter and observe the battery
icon in the status display. When the battery icon is blinking, the
batteries are too low and should be replaced. Four squares inside
the battery icon indicate that the batteries are at full power.
Also note the ying mode in the status
display and make sure your transmitter
is con gured in the desired mode. Mode
2 is most commonly used in the U.S.
Flying Mode
Page 4
4 SKY RANGER
Transmitter Cautions
● Do not use rechargeable (NiCd) batteries.
● Do not mix old and new batteries.
● Do not mix alkaline, standard (carbon-zinc) or rechargeable
(NiCd) batteries.
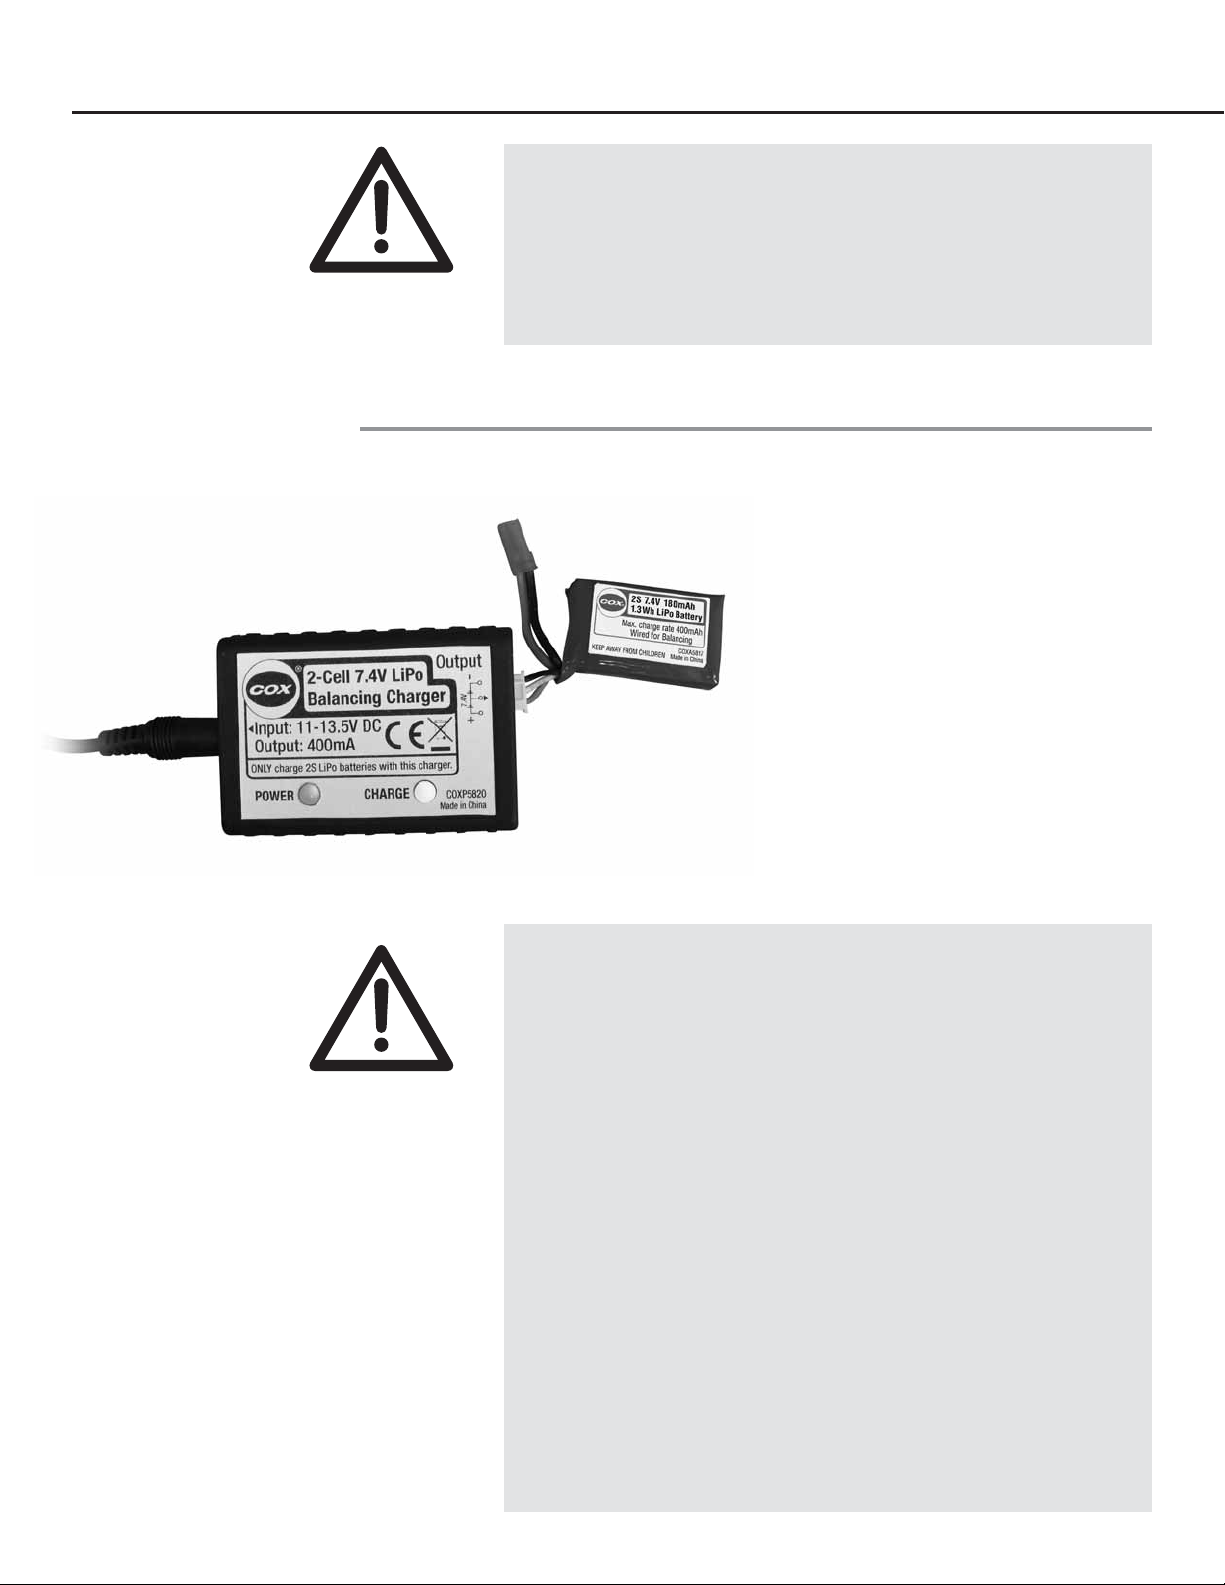
Charging the On Board LiPo Battery
Connect the AC adapter to the charger. Plug the adapter into a 110V
AC wall outlet. The red power LED will illuminate. Plug the white
balance connector on the battery into the port on the charger.
When connected, the charger will automatically begin
to charge and the green charge LED will
illuminate. A fully depleted battery may
From AC
Adapter
take as long as 1 hour to charge completely.
Partially discharged batteries will take less
time to charge.
The charger will terminate charge when the battery has reached
its capacity. The green charge LED will go o when this happens.
You can now disconnect the battery from the charger as it is
ready for ight.
After each ight, remove the battery from the airplane and allow
it to cool before recharging.
IMPORTANT! NEVER LEAVE A CHARGING BATTERY UNATTENDED!
WARNING!! Failure to follow all instructions could cause
permanent damage to the battery and its surroundings, and
cause bodily harm!
● ONLY use the included charger to charge the LiPo battery.
● ALWAYS charge in a reproof location.
● NEVER allow battery temperature to exceed 150°F [65°C].
● NEVER disassemble or modify pack wiring in any way or
puncture cells.
● NEVER place on combustible materials or leave unattended
during charge or discharge.
● DO NOT leave the battery connected to the Sky Ranger for an
extended period of time. This can cause permanent damage
to the battery.
● ALWAYS KEEP OUT OF REACH OF CHILDREN.
● DO NOT leave the battery unattended while charging.
Page 5
COX MODELS 5
Battery Charging Precautions
1. Always remove the battery from your Sky Ranger before
charging.
2. Do not leave a charging battery unattended! Unplug the
battery if it gets warm, even if the green charge LED has not
gone out.
3. Do not use a different charger to charge the Sky Ranger
flying battery.
WARNING: Misuse or malfunction may overheat the battery and
charger, resulting in personal injury or damage to surroundings.
Battery Recycling
ATTENTION: The product you have purchased is powered by a
rechargeable battery. At the end of the battery’s useful life, under
various state and local laws, it may be illegal to dispose of this
battery into the municipal waste system. Check with your local
solid waste o cials for details in your area for recycling options or
proper disposal.
WARNING: This product contains a chemical known to the State
of California to cause cancer.
Page 6

6 SKY RANGER
Assembling the Sky Ranger
Insert the plastic tab at the forward end of the wing into
the fuselage as shown.
Press the aft end of the wing down into position and use
the included 26mm screw to secure the wing in place.
Do not over tighten the screw.
Insert the landing gear into the slot behind the battery
compartment. Be sure the gear is pressed into the slot
completely.
Install the nose gear into the slot in front of the battery
compartment.
Press the propeller onto the propeller base attached to
the motor shaft. Press rmly until it clicks into place. If
the propeller does not easily snap into place, rotate the
propeller slightly to align the splines on the base.
Page 7

COX MODELS 7
Recon gure the Mode of the Transmitter
Unless you are ying in a country where Mode 1 is
prevalent, there is no reason to change the mode. If you
have decided to operate your airplane in Mode 1, perform
the following procedure to recon gure the transmitter.
Use a #1 Phillips screwdriver to loosen the (2) antenna
mounting screws.
Rotate the antenna upward until it is vertical.
Rotate the antenna 180°, allowing it to be folded down
the other way.
Fold the antenna back down into the other side. Reinstall
and tighten the (2) mounting screws.
Now your transmitter has been recon gured to operate
in Mode 1 and you will be holding the transmitter 180°
(seemingly upside down) from when it was set up in
Mode 2. The control sticks will operate the airplane
accordingly. The rest of the instructions illustrate the
transmitter con gured in Mode 2.
Page 8

8 SKY RANGER
Set Up the Transmitter
With the power switch on the transmitter turned on,
press the trim buttons as necessary to center the trim
indicators in the status display.
Trim Indicators
Select the desired skill mode by pressing inward onto
the elevator/rudder control stick. If this is your rst time
ying the Sky Ranger, select the Low Rate mode. This will
provide reduced control throws to lessen the chance of
over-control for your rst ights. As you become pro cient
ying the Sky Ranger, experiment with the high rate
setting at a safe altitude.
Skill Mode
Indicator
High Rate
Low Rate
Be certain the transmitter antenna is in its vertical
position and that the power switch on the transmitter
has been turned on. Note: Unless performing the “Binding”
procedure described on page 9, never allow the battery to
be connected to the Sky Ranger without the transmitter
turned on. This means you should always turn on the
transmitter rst before installing the battery into the
model, and always turn o the transmitter rst before
removing the battery from the Sky Ranger.
Page 9

COX MODELS 9
Also be certain the throttle control stick is fully down
so the propeller will not rotate when you connect the
battery. Note: If you inadvertently connect the battery
with the transmitter o , or with the transmitter on but the
throttle stick not all the way down, the propeller should
not turn until you turn on the transmitter or move the
throttle stick all the way down.
Bind The Airplane To The Transmitter
When the receiver is able to read signals from the transmitter, the
two are said to be “bound.” Until the receiver in the airplane is
programmed to read the transmitter’s signals, the airplane cannot
be controlled. Follow the procedure below to bind the receiver to
the transmitter:
1. Disconnect the LiPo battery from the airplane.
2. Turn on the transmitter. Lower the throttle control stick all
the way down. Adjust the throttle trim tab until the throttle
trim indicator is centered and the throttle position indicator
reads “000.”
3. Turn o the transmitter.
4. Connect the LiPo battery to the airplane. Turn on the transmitter
while pressing inward on the throttle control stick until you hear
the servos activate. If you have the wing o , you will also see
the red LED on the receiver illuminate. This indicates that the
receiver is reading signals from the transmitter—this should
happen within a few seconds.
If it doesn’t work the rst time, disconnect the LiPo battery from
the airplane and turn o the transmitter. Repeat the binding
procedure again by reconnecting the LiPo battery and turning on
the transmitter with the throttle stick depressed.
The receiver is now “bound” to the transmitter and the plane is
ready to y.
Page 10

10 SKY RANGER
First Flight
Turn the transmitter power switch to the ON position.
Rotate the battery door clip until it points to the aft end
of the plane.
Remove the battery door by lifting the rear of the door
upward and slide it out from under the forward clip.
Connect the battery to the plane and insert the battery
into the battery compartment. The motor is now
considered live. Keep clear of the propeller in case of
accidental start-up.
Replace the battery door by hooking the forward clip
onto the battery door and pressing the door down into
position. Secure the door by rotating the aft battery
door clip.
Page 11

COX MODELS 11
Check the Control Directions
Test the control surfaces to become familiar with their operation.
Point the propeller away from you when doing this in case of
accidental start-up.
When the right control stick is moved down, the elevator
will move up.
When the right control stick is moved to the left, the
rudder will move to the left.
When the left control stick is in the down position, the
propeller will not rotate. To test the operation of the
motor, be sure to have a rm grasp of the airplane with
your hands clear of the rotational arc of the propeller.
Be sure to point the propeller away from people or
obstructions.
Page 12

12 SKY RANGER
Adjusting the Control Trims
Elevator Trim
1. Before making your rst ight, use the trim buttons
Rudder
Trim
to center the elevator and rudder. Adjust the trim as
necessary using the trim buttons until the control surfaces
are inline as shown.
2. If additional trim is required beyond what the trim
buttons are capable of making, the clevises can be
disconnected from the control horns and threaded
forward or aft on the pushrods. This will allow the control
surfaces to be centered with the trim buttons at or near
the center position.
Do not make your rst ight with any of the trim buttons
set at their maximum position. Mechanically trim the
control surfaces as necessary if this is the case.
Page 13

COX MODELS 13
Choose a Good Flying Site
The Sky Ranger should be own outside only when the wind speed
is 5 mph [8km/h] or less. If own in stronger winds, the plane may
be very di cult to control or may be blown downwind and not have
enough power to get back. If the wind is calm or very light, the Sky
Ranger will be responsive and precise. Also, nd an area clear of
trees, power lines and other structures. A ying eld for R/C planes
is best. Don’t y around groups of people, especially children. Flying
indoors, such as in a gymnasium, is possible but only recommended
for pilots with su cient experience with the Sky Ranger.
Flight
Although the Sky Ranger is small, it will provide the same level of control
and thus require the same amount of skill as a comparable larger R/C
model. Because of this, typical takeo , ight, and landing routines for
larger models should also be practiced with the Sky Ranger.
Taxiing
Before the model is ready for takeo , it must rst be set up to roll
straight ahead. Place the plane on a smooth surface and stand behind
the model. Advance the throttle just enough to allow the model
to roll. If the model does not roll straight ahead, carefully twist the
nose wheel wire slightly until it does. Note: Crosswinds may a ect
the direction the model rolls, so this test should be done in calm
conditions, or with the model facing directly into the wind.
Ta ke o
Always takeo directly into the wind. Taking o into the wind will
help the model roll straight and also reduces ground speed for
takeo . When ready, gradually advance the throttle to accelerate
the model to ying speed. Gain as much speed as your ying site
will practically allow before gently applying up elevator lifting the
model into the air. Be smooth on the elevator stick, allowing the
model to establish a gentle climb to a safe altitude before making
the rst turn (away from yourself). Do not “yank” back the elevator
stick forcing the plane into too steep of a climb. This could cause
the model to quit ying and stall.
Trimming the Sky Ranger
As soon as you have reached altitude, be prepared to trim the
model for straight and level ight. A plane that is not properly
trimmed will be di cult to y at best and could also result in a
crash. Level the plane with the elevator stick and slowly release
the elevator stick toward the neutral position. If the Sky Ranger
pitches upward, use the elevator stick to regain control and add a
few “clicks” of down elevator trim (pressing UP on the elevator trim
Page 14

14 SKY RANGER
button). If the Sky Ranger pitches down, regain control and add
a few clicks of up elevator (pressing DOWN on the elevator trim
button). Continue doing this until the Sky Ranger can be put into
level ight and it can maintain level ight with the elevator stick
in the neutral position. Add left or right rudder trim in the same
manner you did with the elevator to correct any tendency for the
plane to deviate from straight ight.
Flight
Take it easy with the Sky Ranger for the rst few ights, gradually
getting acquainted with it as you gain con dence. Adjust the trims
to maintain straight and level ight. After ying around for a while,
and while still at a safe altitude with plenty remaining battery charge,
practice slow ight and execute practice landing approaches by
reducing the throttle to see how the model handles at slower
speeds. Add power to see how it climbs as well. Mind your battery
charge, but use this rst ight to become familiar with your model
before landing. Typical ight time will be approximately 5-1/2 to
7-1/2 minutes.
Base
Leg
Final
Approach
Downwind Leg
WIND
Landing
To initiate a landing approach, lower the throttle while on the
downwind leg. Allow the nose of the model to pitch downward
slightly as you begin to gradually bleed o altitude. Continue to lose
altitude, but maintain airspeed by keeping the nose
down as you turn onto the base leg. Make your nal
turn toward the landing site (into the wind) keeping
the nose down to maintain airspeed and control. Level
the attitude when the model reaches the runway
threshold, modulating the throttle as necessary to
maintain your glide path and airspeed. If you are going
to overshoot, smoothly advance the throttle (always
ready on the right rudder to counteract torque) and
climb out to make another attempt. When you’re ready
to make your landing and the model is about a foot
or so o the ground, smoothly increase up elevator
until it gently touches down.
CAUTION
If, during a rough landing, the propeller on the Sky Ranger should
become jammed and cannot rotate with the throttle in the
run position, the battery and airplane electronics could become
damaged. Immediately lower the throttle to stop the motor.
Page 15

COX MODELS 15
After the Flight
Disconnect and remove the battery from the airplane. Then, switch
the transmitter o . Allow the battery to cool before recharging.
Check the airplane over to make sure nothing has come loose or
may be damaged.
Repairs
Even the best R/C pilots in the world damage their airplanes every
now and then. In the unfortunate event that you damage your
airplane, repairs are fairly simple to make yourself. If there are any
cracks in the wing or fuselage, apply 6-minute epoxy, or CA glue
to the broken areas and hold them together with clear packaging
tape. Let the glue harden, then carefully remove the tape.
Replacement Parts List
Replacement parts for the Sky Ranger are available using
the order numbers in the Replacement Parts List that
follows. The fastest, most economical service can be
provided by your hobby dealer or mail-order company.
To locate a hobby dealer, visit the Hobbico web site at www.
hobbico.com. Choose “Where to Buy” at the bottom of the
menu on the left side of the page. Follow the instructions
provided on the page to locate a U.S., Canadian or
International dealer.
Parts may also be ordered directly from Hobby Services
by calling (217) 398-0007, or fax at (217) 398-7721, but full
retail prices and shipping and handling charges will apply.
Illinois and Nevada residents will also be charged sales tax.
If ordering via fax, include a Visa® or MasterCard® number
and expiration date for payment.
Mail parts orders and payments by personal check to:
Hobby Services
3002 N. Apollo Drive, Suite 1
Champaign, IL 61822
Replacement Parts List
Stock No. Description
COXA5814
COXA5815
COXA5817
COXA5822
COXA5823
COXA5824
COXG5816
COXJ5801
COXL5818
COXP5820
COXP5821
COXQ5819
Landing Gear Sky Ranger EP
Hardware Set Sky Ranger EP
LiPo Battery 2S 7.4V 180mAh Sky Ranger
Wing Sky Ranger EP
Tail Set Sky Ranger EP
Fuselage Sky Ranger EP
Motor Sky Ranger EP
2.4GHz Transmitter Cox Micro Series
Receiver Set Sky Ranger EP
LiPo 2S Balancing Charger
AC Power Supply for Balance Charger
Prop/Spinner Set Sky Ranger EP
Be certain to specify the order number exactly as listed in the
Replacement Parts List. Payment by credit card or personal
check only; no C.O.D.
If additional assistance is required for any reason, contact
Product Support by telephone at (217) 398-8970, or by e-mail at
productsupport@hobbico.com.
Page 16

16 SKY RANGER
Warranty
Hobbico® Inc. guarantees this kit to be
free from defects in both material and
workmanship at the date of purchase. This
warranty does not cover any component
parts damaged by use or modi cation.
In no case shall Hobbico’s liability exceed
the original cost of the purchased kit.
Further, Hobbico, Inc. reserves the right to
change or modify this warranty without
notice. In that Hobbico, Inc. has no control
over the nal assembly or material used
for nal assembly, no liability shall be
assumed nor accepted for any damage
resulting from the use by the user of the
nal user-assembled product. By the act
of using the user-assembled product,
the user accepts all resulting liability. If
the buyer is not prepared to accept the
liability associated with the use of this
product, the buyer is advised to return
this kit immediately in new and unused
condition to the place of purchase. To
make a warranty claim send the defective
part or item to Hobby Services at the
address below:
Hobby Services
3002 N. Apollo Dr. Suite 1
Champaign IL 61822 USA
Include a letter stating your name,
return shipping address, as much
contact information as possible (daytime
telephone number, fax number, e-mail
address), a detailed description of
the problem and a photocopy of the
purchase receipt. Upon receipt of the
package, the problem will be evaluated
as quickly as possible.
Troubleshooting
PROBLEM
The transmitter does not turn on when the switch is moved to the
ON position.
CAUSE/SOLUTION
The AA batteries in the transmitter are exhausted. Replace with
new AA batteries.
The AA batteries in the transmitter are installed incorrectly. Reinstall
the batteries correctly as described on page 3.
PROBLEM
The Battery Status on the transmitter indicates the transmitter
batteries are depleted or the transmitter emits a constant beeping.
CAUSE/SOLUTION
The AA batteries in the transmitter are low. Replace with new
AA batteries.
PROBLEM
The plane control surfaces or throttle do not respond to control
stick inputs from the transmitter.
CAUSE/SOLUTION
The LiPo battery is depleted. Charge the battery.
The LiPo battery is not properly connected to the airplane. Disconnect
the battery and reconnect it, ensuring it is fully engaged in the
connector in the correct orientation.
The transmitter has become “unbound” with the airplane (the
transmitter and airplane can no longer communicate with each
other). Follow the binding procedure on page 9.
COXA6501
For any other problems not addressed here, please contact
Product Support. (217) 398-8970
coxmodels.com
 Loading...