

Page 1

VoiceManager User Guide
Release 2.0
Page 2

Page 3

Table of Contents
© 2014 by Cox Communications.
All rights reserved. No part of this document may be reproduced or transmitted in any form or by any means, electronic,
mechanical, photocopying, recording, or otherwise, without prior written permission of Cox Communications.
i
Page 4

Page 5

Table of Contents
Table of Contents
Table of Contents ........................................................................................................................... i
Getting Started with Cox Business VoiceManager .................................................................... 1
First-Time Users ........................................................................................................................ 1
Logging into MyAccount .......................................................................................................... 1
Accessing the Web Portal ........................................................................................................ 2
VoiceManager Features ................................................................................................................ 3
Anonymous Call Rejection ....................................................................................................... 3
Automatic Callback ................................................................................................................... 4
Barge-In Exempt ........................................................................................................................ 5
Call Forwarding Busy .............................................................................................................. 11
Call Forwarding No Answer .................................................................................................... 12
Call Forwarding Not Reachable ............................................................................................. 13
Call Forwarding Remote Access............................................................................................ 14
Call Forwarding Selective ....................................................................................................... 15
Call Forwarding........................................................................................................................ 16
Call Hold ................................................................................................................................... 19
Call History ............................................................................................................................... 20
Call Notify ................................................................................................................................. 21
Call Park and Directed Call Park ............................................................................................ 23
Call Park Retrieve .................................................................................................................... 25
Call Pickup ............................................................................................................................... 26
Call Return ................................................................................................................................ 28
Call Transfer ............................................................................................................................. 29
Call Waiting .............................................................................................................................. 31
Calling Line ID .......................................................................................................................... 32
Calling Line ID Blocking per Call ........................................................................................... 33
Calling Line ID Delivery — Internal ........................................................................................ 34
Calling Line ID Delivery – External ........................................................................................ 35
Calling Name Delivery ............................................................................................................. 36
Calling Name Retrieval ............................................................................................................ 37
Calling Number Delivery ......................................................................................................... 38
Contact List .............................................................................................................................. 39
Custom Ringback .................................................................................................................... 40
Directed Call Park .................................................................................................................... 43
i
Page 6

Table of Contents
Directed Call Pickup ................................................................................................................ 44
Directed Call Pickup with Barge In ........................................................................................ 45
Do Not Disturb ......................................................................................................................... 46
Extension Dialing..................................................................................................................... 47
Group Directory ....................................................................................................................... 48
Hoteling .................................................................................................................................... 49
Hunting & Series Completion ................................................................................................. 50
Incoming Calling Plan (User) .................................................................................................. 54
Instant Group Call.................................................................................................................... 56
Last Number Redial ................................................................................................................. 59
Multi-Location Extension Dialing ........................................................................................... 60
Monitored Users ...................................................................................................................... 61
Music On Hold - User .............................................................................................................. 62
N-Way Conferencing ............................................................................................................... 64
Outgoing Calling Plan ............................................................................................................. 65
Outlook® Integration ................................................................................................................ 67
Personal Phone List ................................................................................................................ 68
Personal Status Manager ........................................................................................................ 69
Priority Alert ............................................................................................................................. 72
Privacy Settings ....................................................................................................................... 74
Push to Talk ............................................................................................................................. 76
Remote Office .......................................................................................................................... 78
Schedules ................................................................................................................................. 79
Selective Call Acceptance ...................................................................................................... 81
Selective Call Rejection .......................................................................................................... 82
Sequential Ring........................................................................................................................ 83
Simultaneous Ring Personal .................................................................................................. 87
Speed Dial ................................................................................................................................ 90
Speed Dial 8 ............................................................................................................................. 91
Speed Dial 100 ......................................................................................................................... 92
Standard Voice Mail ................................................................................................................ 93
Three-Way Calling/Consultation Hold/Call Transfer ............................................................ 96
Time Schedule (Personal and Holiday) ................................................................................. 97
Toll Restriction......................................................................................................................... 98
Trunk Group ............................................................................................................................. 99
Unified Messaging ................................................................................................................. 100
ii
Page 7

Table of Contents
User Profile & Feature Settings ............................................................................................ 101
Virtual Number Service ......................................................................................................... 105
VoiceManager Toolbar .......................................................................................................... 106
Voice Portal ............................................................................................................................ 107
Appendix A ...................................................................................................................................... i
Feature Access Codes ............................................................................................................... i
Index ............................................................................................................................................. vii
iii
Page 8

Page 9

Getting Started
Getting Started with Cox Business VoiceManager
First-Time Users
As a first time user to the Cox Business VoiceManager application, you will receive a welcome
email from myaccount@coxbusiness.com before your installation date. The email will contain
your username and password.
Logging into MyAccount
Figure 1 shows a sample welcome email that new VoiceManager customers receive. The link
that is highlighted should be used to access VoiceManager MyAccount.
Figure 1. Welcome Email (sample)
Complete the following steps to log onto VoiceManager MyAccount.
1. Click the embedded link in the email to complete the registration process. You should see
the phrase, “Congratulations; you have successfully activated your account.”
2. Click Go to Login Page.
3. Complete the personalized Secret Question and Answer. (Note: The answer must be 5-
20 characters in length.)
4. Complete the Contact options and preferences information.
5. Click the Save button.
VoiceManager MyAccount User Guide 1
Page 10
Getting Started
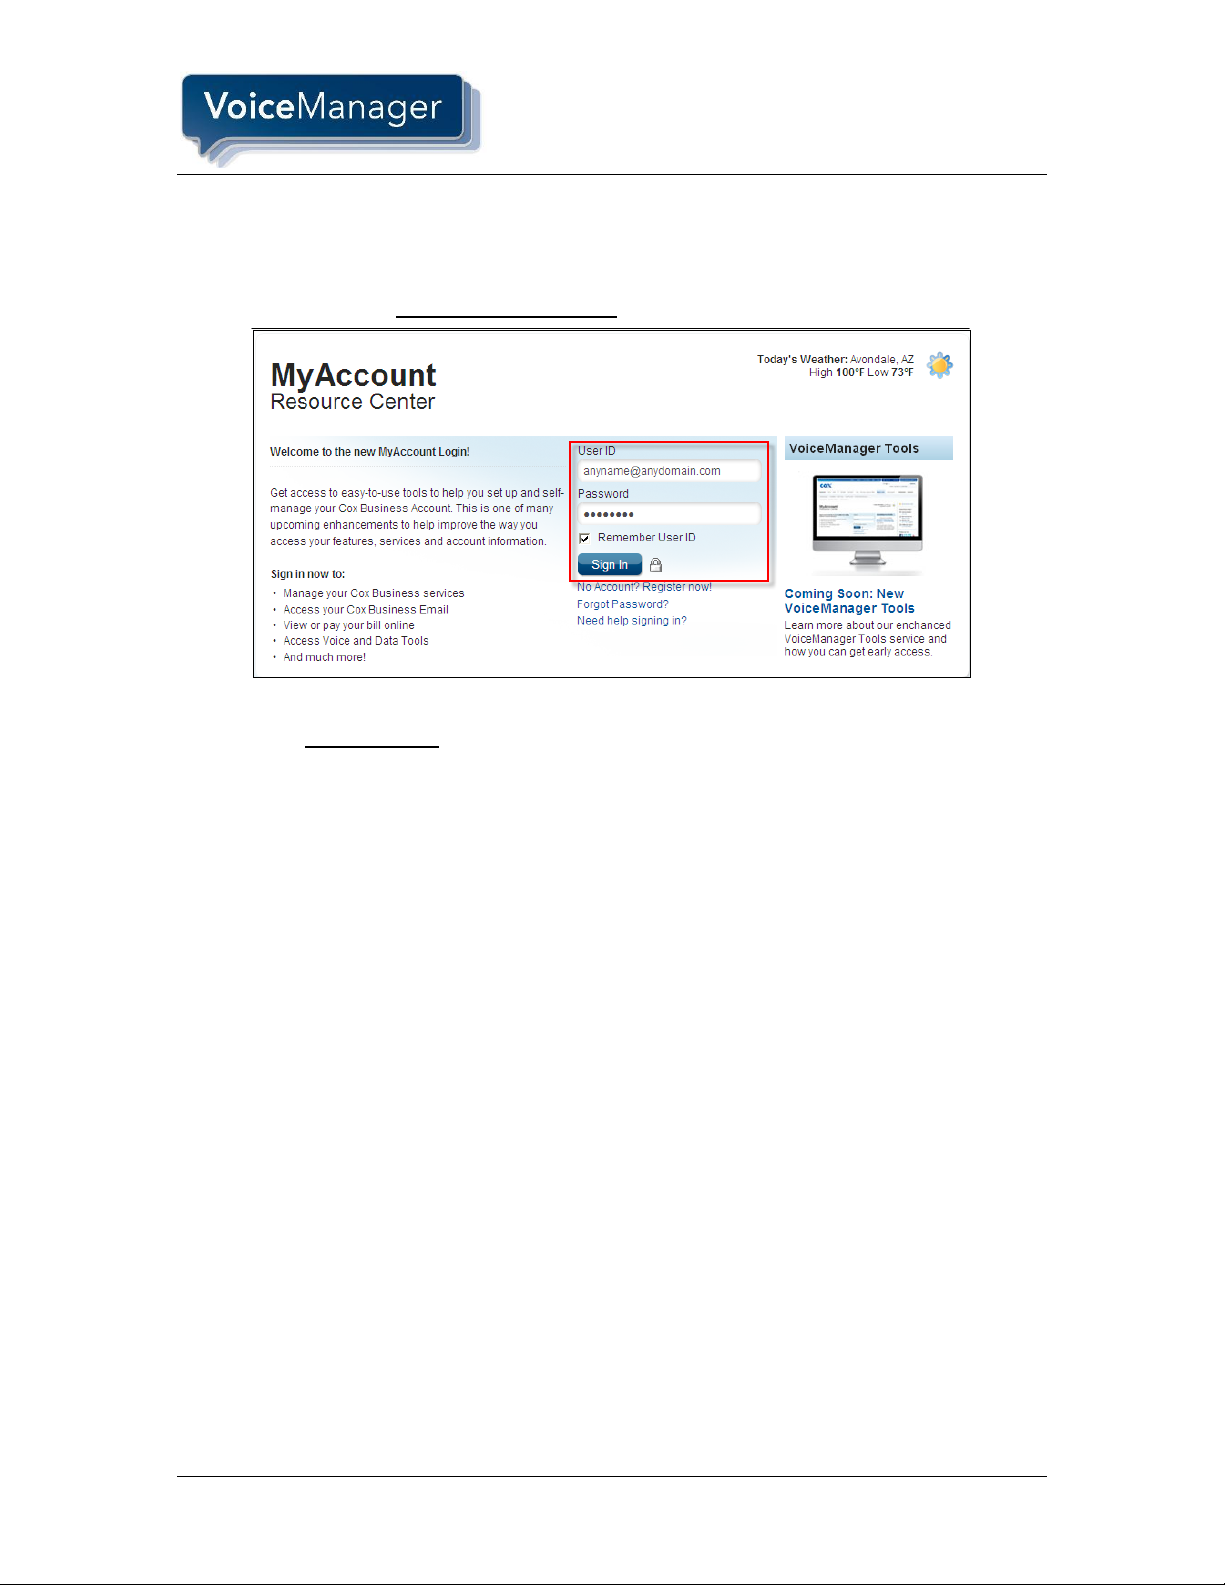
Accessing the Web Portal
You can access the VoiceManager Web Portal in MyAccount through a graphical user interface
(GUI).
Figure 2. MyAccount Login Page
Use the following steps to access the VoiceManager Web Portal.
1. Enter www.cox.com in your web browser to open the Cox Business home page.
2. Click MyAccount in the Business options at the top of the screen.
3. Enter the login name that has been assigned to you in the Username field. (Note: Your
login name/email address has been set up with Administrator privileges.)
4. Enter your Password in the corresponding field. (Note: All first-time users are prompted
to change their password.)
5. Click Go to view your online profile information and associated accounts.
2 VoiceManager MyAccount User Guide
Page 11

VoiceManager Features
VoiceManager Features
This section provides steps to help you activate, enable and manage your VoiceManager features
on your phone and online. Descriptions and benefits are provided where available.
Anonymous Call Rejection
This feature has been combined with others to create Call Acceptance & Rejection.
VoiceManager User Guide 3
Page 12

VoiceManager Features
Turn On Automatic Callback
1. Log in to VoiceManager
MyAccount.
2. Click the VoiceManager
Tools menu in the left
navigation bar.
3. Click the Call Settings
tab.
4. Under the Dial/Redial
section, click the
Automatic Callback link.
5. Choose the On radio
button.
6. Click the Save button.
Result: A message indicates
your Automatic Callback
settings were updated.
Automatic Callback
Feature Description
Automatic Callback provides notification when a busy line within a group becomes available.
This feature is available with the VoiceManager Enhanced and Unlimited packages and IP
Centrex service.
Solution
Save time wasted on busy signals and redials. Automatic Callback redials the last number called
as soon as it becomes available and connects instantly!
Setup
4 VoiceManager MyAccount User Guide
Page 13

VoiceManager Features
Barge-In Exempt
1. Log in to VoiceManager
MyAccount.
2. Click the VoiceManager
Tools menu in the left
navigation bar.
3. Click the Advanced Call
Settings tab.
4. Under the Team Calling
section, click the Barge-In
Exempt link.
5. Click the ON radio button
to block anyone with
Directed Call Pickup with
Barge-In from
conferencing in on your
calls. Clicking the Off radio
button will allow barge-ins.
6. Click the Save button.
Result: A message indicates
the Barge-In Exempt settings
were updated successfully.
Barge-In Exempt
Feature Description
Barge-In Exempt allows you to block users who have the Directed Call Pickup with barge-in
feature from intruding on your active calls. This feature is available with IP Centrex service.
Solution
Maintain your privacy on a phone call without possibility of interruption from callers with barge-in
capability. Barge-In Exempt conveniently turns on or off with the click of a button.
Setup
VoiceManager MyAccount User Guide 5
Page 14
VoiceManager Features
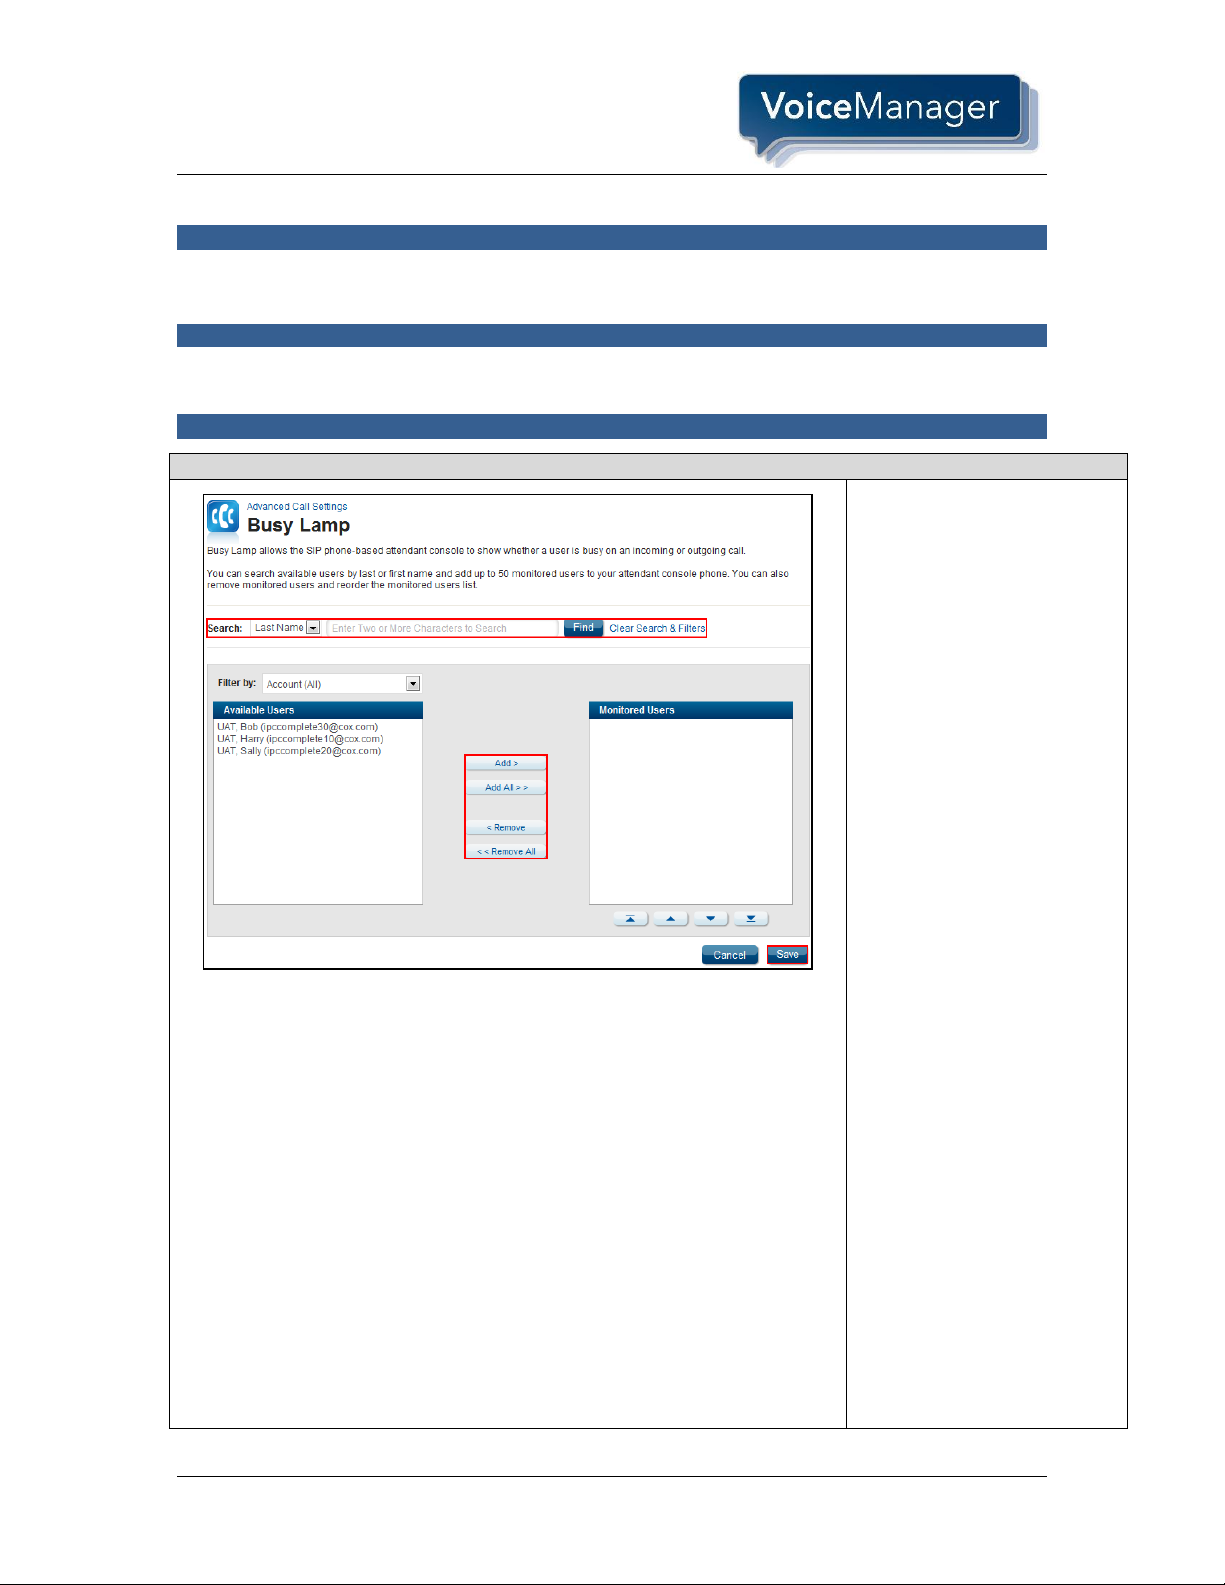
Designate Monitored Users
1. Log in to VoiceManager
MyAccount.
2. Click the VoiceManager
Tools menu in the left
navigation bar.
3. Click the Advanced Call
Settings tab.
4. Under the Team Calling
section, click the Busy
Lamp link.
5. Click the user or users
listed in the Available
Users list you want to
designate as a
Monitored User.
Monitored Users are those
individuals whose phone
activity can be monitored by
others through the shared
call appearance feature
available on the IP Phones
and Receptionist Console
Software.
6. Click the Add or Add All
button to move one or all
to the Monitored Users
list.
7. Likewise, click the
Remove or Remove All
button to remove users
from the Monitored
Users list and return
them to Available
Users.
Busy Lamp
Feature Description
Busy Lamp works with the IP Phone to enable seeing when designated users are engaged in a
telephone call. It is available with IP Centrex service.
Solution
Improve productivity with this advanced monitoring capability. Calls can be answered and routed
in record time, ensuring customer’s needs are met quickly!
Setup
6 VoiceManager MyAccount User Guide
Page 15

VoiceManager Features
8. To find a user that is not
in the Available Users
list, click the Search
drop-down menu.
9. Click either the Last
Name or First Name
option.
10. Enter the name in the
Search field.
11. Click the Find button.
12. Once the list is
complete, click the Save
button.
VoiceManager MyAccount User Guide 7
Page 16

VoiceManager Features
Turn On Call Acceptance and Rejection
1. Log in to VoiceManager
MyAccount.
2. Click the VoiceManager
Tools menu in the left
navigation bar.
3. Click the Call Settings
tab.
4. Under the Call
Acceptance section,
click the Call
Acceptance and
Rejection link.
5. Click the Add Selective
Call Acceptance Rule
link.
6. Enter an explanation for
the rule in the
Description field.
7. Select the type of phone
number to apply the
rule to in the When
Receiving Calls From
drop-down menu.
8. Define how to treat the
call by clicking the
Accept Call or Do Not
Accept Call radio
button.
9. Select when to apply the
rule by choosing an
option in the During
Regular Schedule and
Schedule drop-down
Call Acceptance and Rejection
Feature Description
Call Acceptance and Rejection provides the ability to receive and reject calls that meet
specified conditions. Rejected calls hear an announcement that the customer cannot be reached
at the moment. Call Acceptance and Rejection is available with the VoiceManager Enhanced and
Unlimited packages and IP Centrex service.
Solution
Call Acceptance and Rejection helps manage incoming calls by authorizing whether or not to
answer them. Create time range rules to determine whether a call is accepted or rejected. Avoid
harassing phone calls and block those that prevent focusing on business or customers with the
Call Acceptance and Rejection feature.
Setup
8 VoiceManager MyAccount User Guide
Page 17

VoiceManager Features
menus.
10. Create separate
Acceptance or Rejection
rules if both a Regular
and Holiday schedule is
desired.
See
Setting Up Schedules
for instructions on how to
create and edit a schedule.
11. Click the Save and
Return button.
Create a Selective Call
Rejection rule by clicking the
Add Selective Call Rejection
link in step 5 and repeating
steps 6-10.
VoiceManager MyAccount User Guide 9
Page 18

VoiceManager Features
Call Forwarding Always
This feature has been combined with others to create Call Forwarding.
10 VoiceManager MyAccount User Guide
Page 19

VoiceManager Features
Call Forwarding Busy
This feature has been combined with others to create Call Forwarding.
VoiceManager MyAccount User Guide 11
Page 20

VoiceManager Features
Call Forwarding No Answer
This feature has been combined with others to create Call Forwarding.
12 VoiceManager MyAccount User Guide
Page 21

VoiceManager Features
Call Forwarding Not Reachable
This feature has been combined with others to create Call Forwarding.
VoiceManager MyAccount User Guide 13
Page 22

VoiceManager Features
Call Forwarding Remote Access
This feature has been combined with others to create Call Forwarding.
14 VoiceManager MyAccount User Guide
Page 23

VoiceManager Features
Call Forwarding Selective
This feature has been combined with others to create Call Forwarding.
VoiceManager MyAccount User Guide 15
Page 24
VoiceManager Features
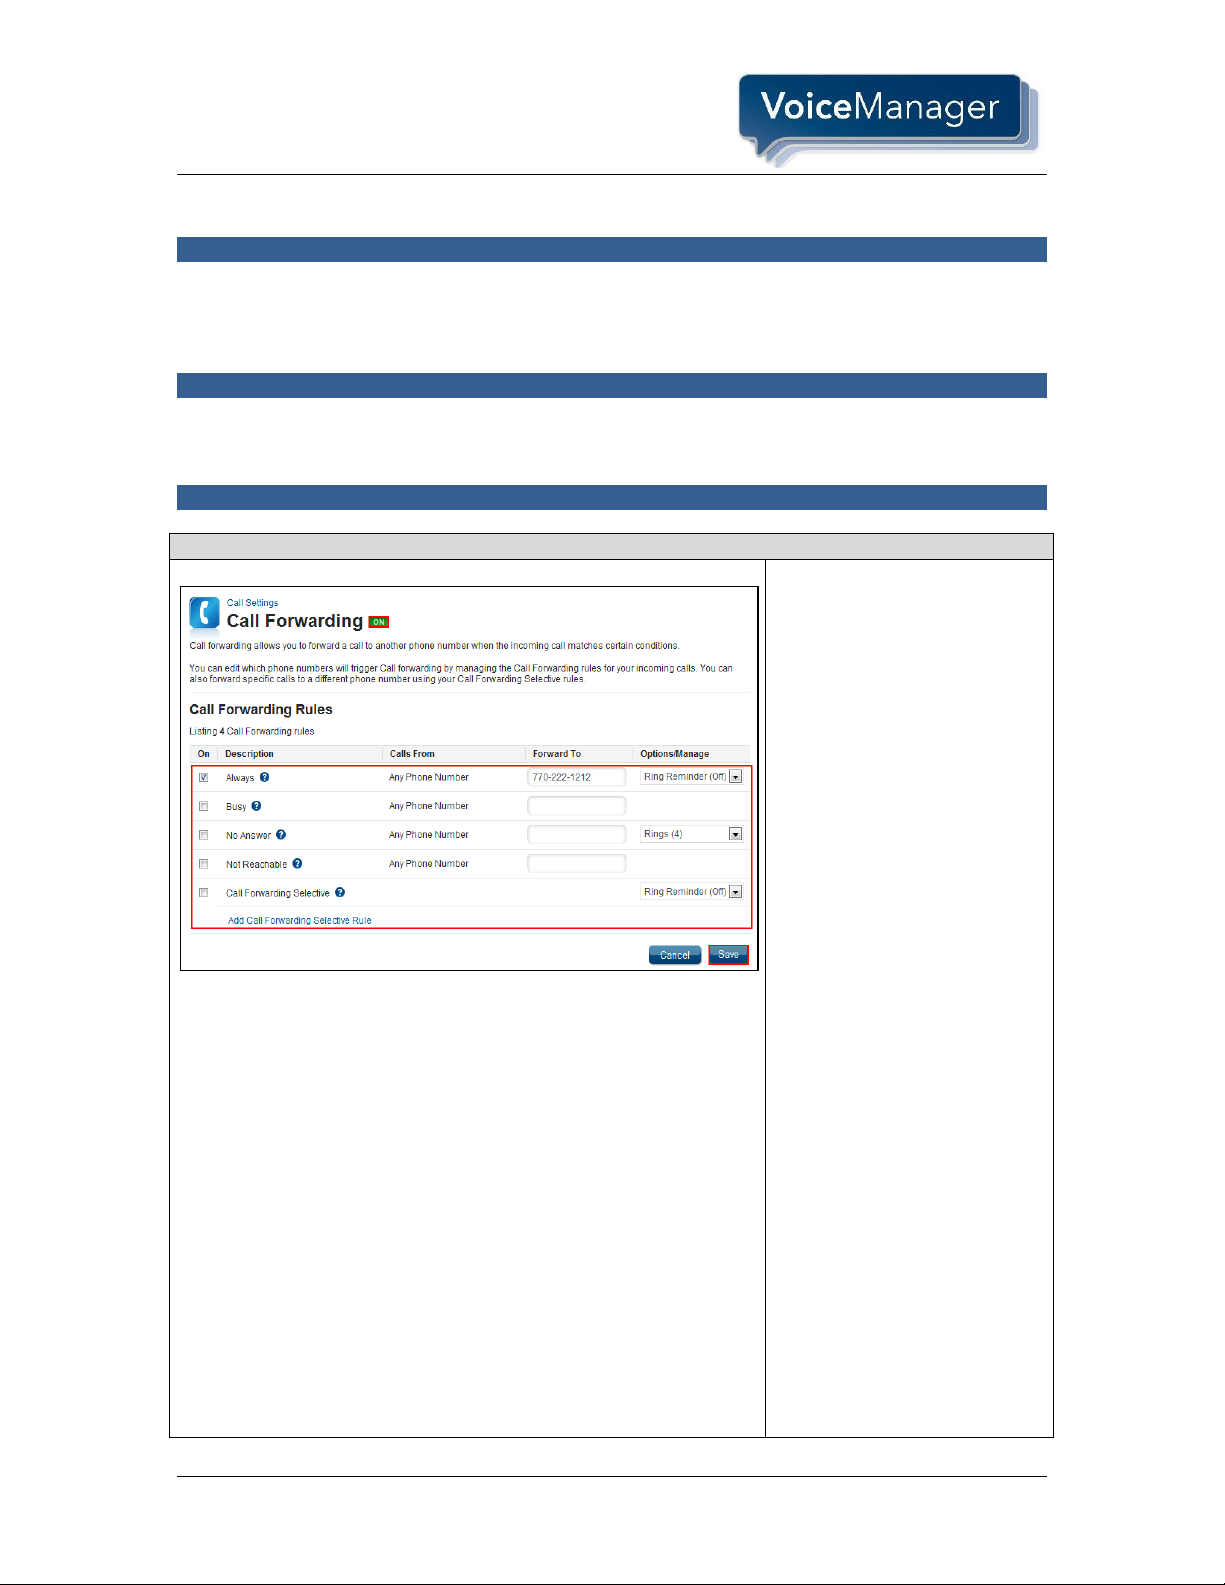
Turn On Call Forwarding
1. Log in to VoiceManager
MyAccount.
2. Click the VoiceManager
Tools menu in the left
navigation bar.
3. Click the Call Settings
tab.
4. Under the Call
Forwarding section, click
the Call Forwarding link.
Click the Always checkbox to
forward all incoming calls to a
different phone number.
1. Click the On checkbox to
the left of Always.
2. In the Forward To
column, enter the
telephone number to
which calls should be
forwarded.
3. From the Options /
Manage column, click the
drop-down menu to
specify if a Ring
Reminder will or will not
send an alert of an
incoming forwarded call.
4. Click the Save button.
Click the Busy checkbox to
forward all incoming calls to a
different phone number when
your primary phone is busy.
1. Click the On checkbox to
the left of Busy.
Call Forwarding
Feature Description
Call Forwarding feature options define how calls are managed in different situations and are
available in all VoiceManager packages and with IP Centrex. Call Forwarding Selective is only
available with VoiceManager Enhanced and Unlimited packages. .
Solution
Call Forwarding is an important feature that can be used for disaster recovery and business
continuity. Empower employees with advanced call forwarding capabilities, ensuring they can
always be reached.
Setup
16 VoiceManager MyAccount User Guide
Page 25
2. In the Forward To
column, enter the
telephone number to
which calls should be
forwarded.
3. Click the Save button.
Click the No Answer
checkbox to forward calls
when unavailable to answer
the phone.
1. Click the On checkbox to
the left of No Answer.
2. In the Forward To
column, enter the
telephone number to
which calls should be
forwarded.
3. From the Options /
Manage column, click the
drop-down menu to
specify the number of
Rings that should occur
before calls are
forwarded.
4. Click the Save button.
Click the Not Reachable
checkbox to forward incoming
calls when not accessible.
1. Click the On checkbox to
the left of Not
Reachable.
2. In the Forward To
column, enter the
telephone number to
which calls should be
forwarded.
3. Click Save.
Click the Call Forwarding
Selective checkbox to
forward specified calls to a
different phone number.
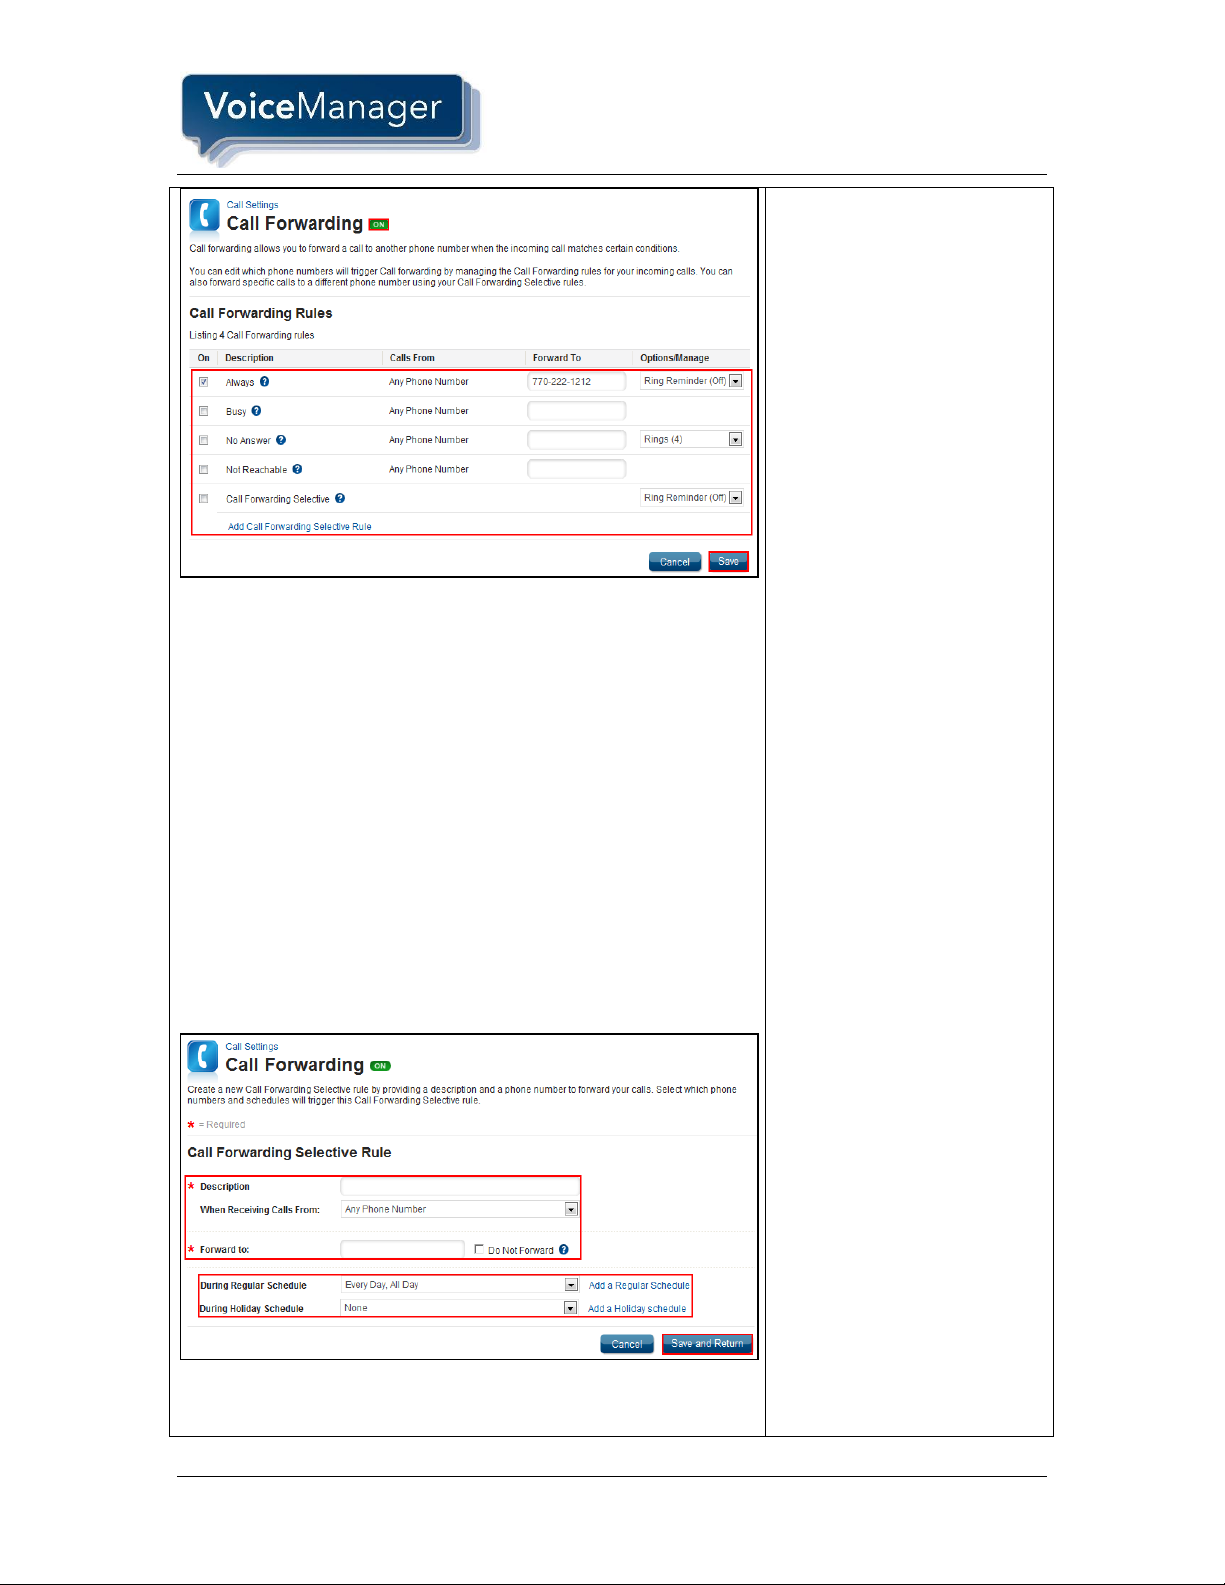
1. Click the On checkbox to
the left of Call
Forwarding Selective.
2. Click the Ring Reminder
drop-down menu and
select Ring Reminder
Off or Ring Reminder
On.
3. Click the Add Call
VoiceManager MyAccount User Guide 17
VoiceManager Features
Page 26

VoiceManager Features
Forwarding Selective
Rule link.
4. Enter an explanation for
the rule in the
Description field.
5. Click the When
Receiving Calls From
drop-down menu to select
the type of phone number
to which to apply the rule.
6. Enter the phone number
to which calls should be
forwarded in the Forward
to field, or Click the Do
Not Forward checkbox.
7. Click the During Regular
Schedule and During
Holiday Schedule drop-
down menus to select
when to apply the rule.
8. To create additional
schedules, click the Add
a Regular Schedule and
Add a Holiday Schedule
links.
Create separate Call
Forwarding Rules if both a
Regular and Holiday
Schedule are desired. See
Setting Up Schedules for
instructions on how to create
and edit a schedule.
1. Click the Save and
Return button.
2. To make changes to an
existing Call Forwarding
Selective Rule, click the
checkbox next to the
named rule.
3. Click either the Edit or
Delete link to make
changes to or remove an
existing rule.
4. Click the Save and
Return button.
18 VoiceManager MyAccount User Guide
Page 27
VoiceManager Features
Call Hold
No setup is required for this feature.
1. Click the flash button or
the switch hook.
2. Press *22.
3. Make a second call.
Note: To toggle between
calls, flash the phone and
press *22#.
Call Hold
Feature Description
Call Hold allows you to dial a feature access code to hold and retrieve calls. You can make
another call while the first call is held and can toggle between active and held calls. Call Hold is
available with IP Centrex service.
Solution
Provide excellent service with flexible features that enable employees to hold and retrieve calls
quickly, ensuring availability for important issues. Call Hold enables handling calls of a more
urgent nature while affording opportunities to discuss call-back times for those that are not.
Setup
VoiceManager MyAccount User Guide 19
Page 28
VoiceManager Features
Call History
1. Log in to Voice Manager
MyAccount.
2. Click the VoiceManager
Tools menu in the left
navigation bar.
3. In the Getting Started
with VoiceManager box,
under the Download
Toolbar heading, click
the VoiceManager
Toolbar Download link.
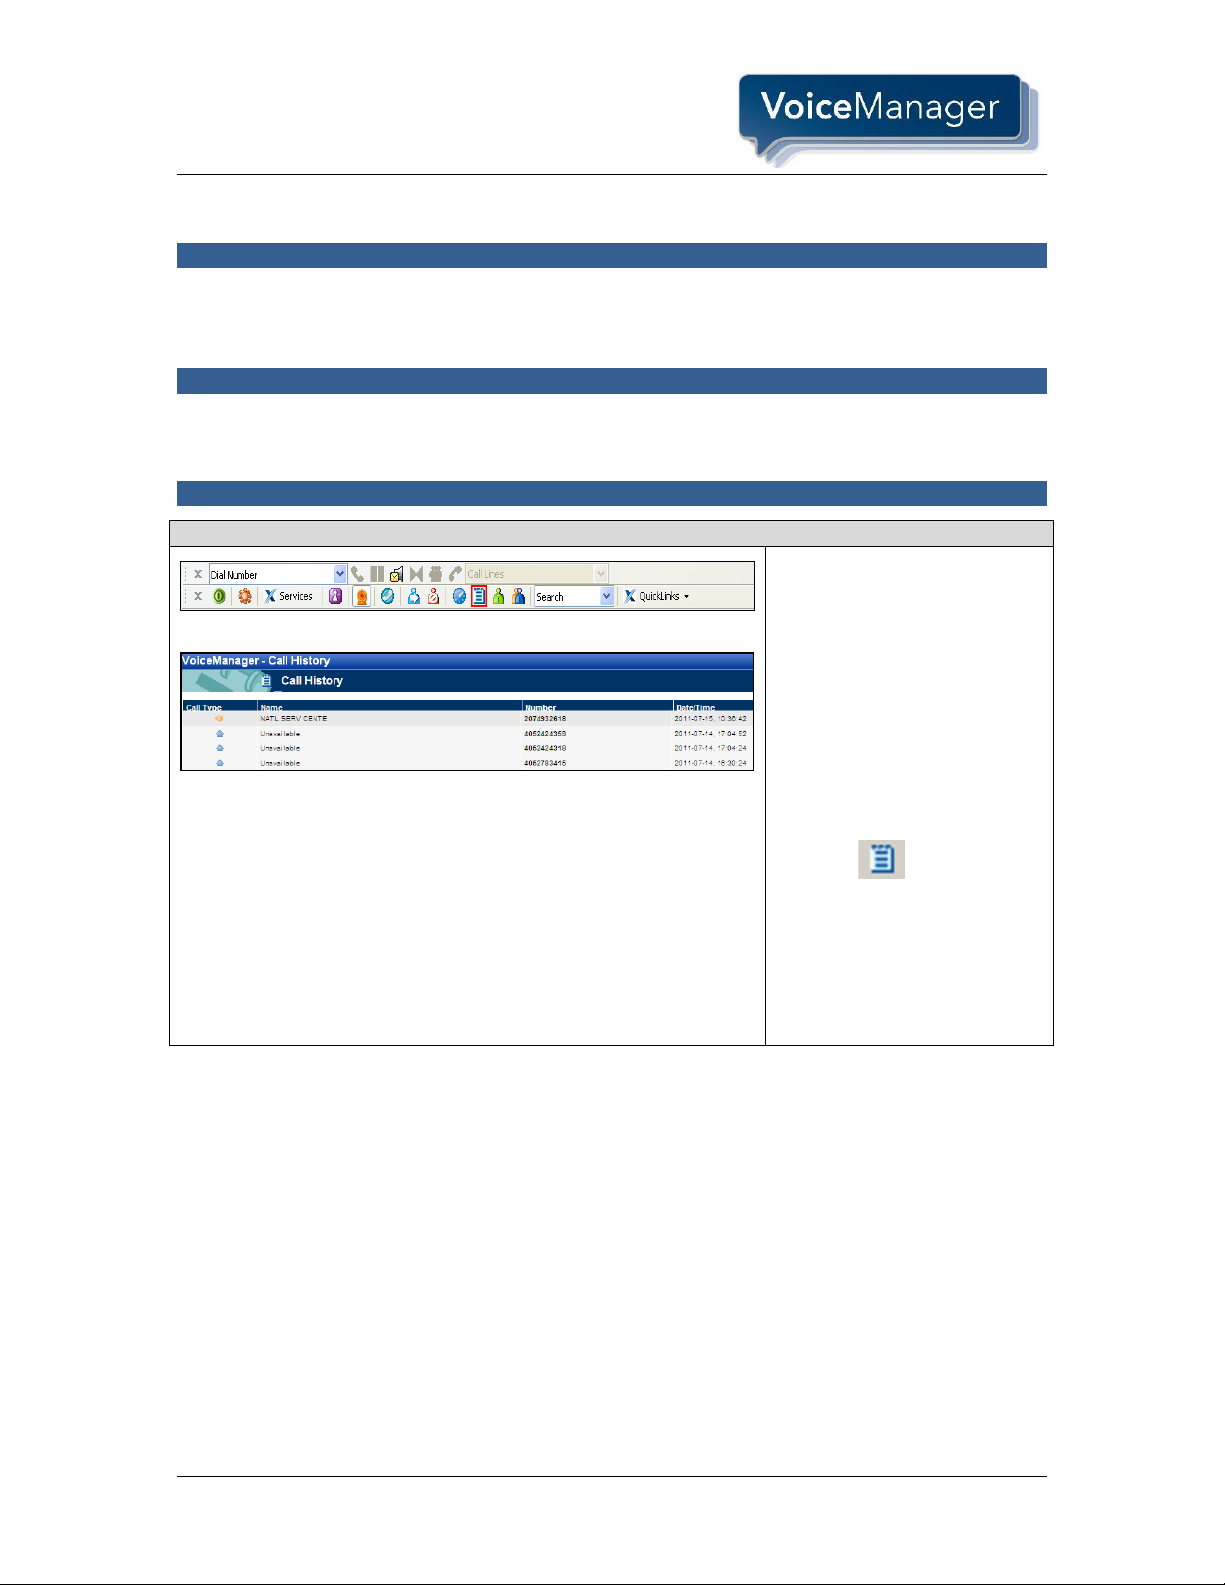
4. Click the Call History
Icon on the
VoiceManager Toolbar to
open the Call History Log.
5. Click the desired number
link.
Result: The call is initiated.
Call History
Feature Description
Call History allows you to view telephone numbers from calls you have missed, received, and
dialed. When you click any of the tabs, the Name, Number, and Date/Time of the call appears.
You may call the number by clicking the link of the telephone number.
Solution
Increase productivity by capturing contacts and business – even when you miss the calls. Call
History enables the access of contact information instantly on a recent call dialed, received, or
missed, as well as redialing with the click of a mouse.
Setup
20 VoiceManager MyAccount User Guide
Page 29
Call Notify
Add Call Notify Rule
1. Log in to VoiceManager
MyAccount.
2. Click the VoiceManager
Tools menu in the left
navigation bar.
3. Click the Call Settings
tab.
4. Under the Call
Forwarding section, click
the Call Notify link.
5. Enter a valid email
address in the Send All
Notification Emails to
field.
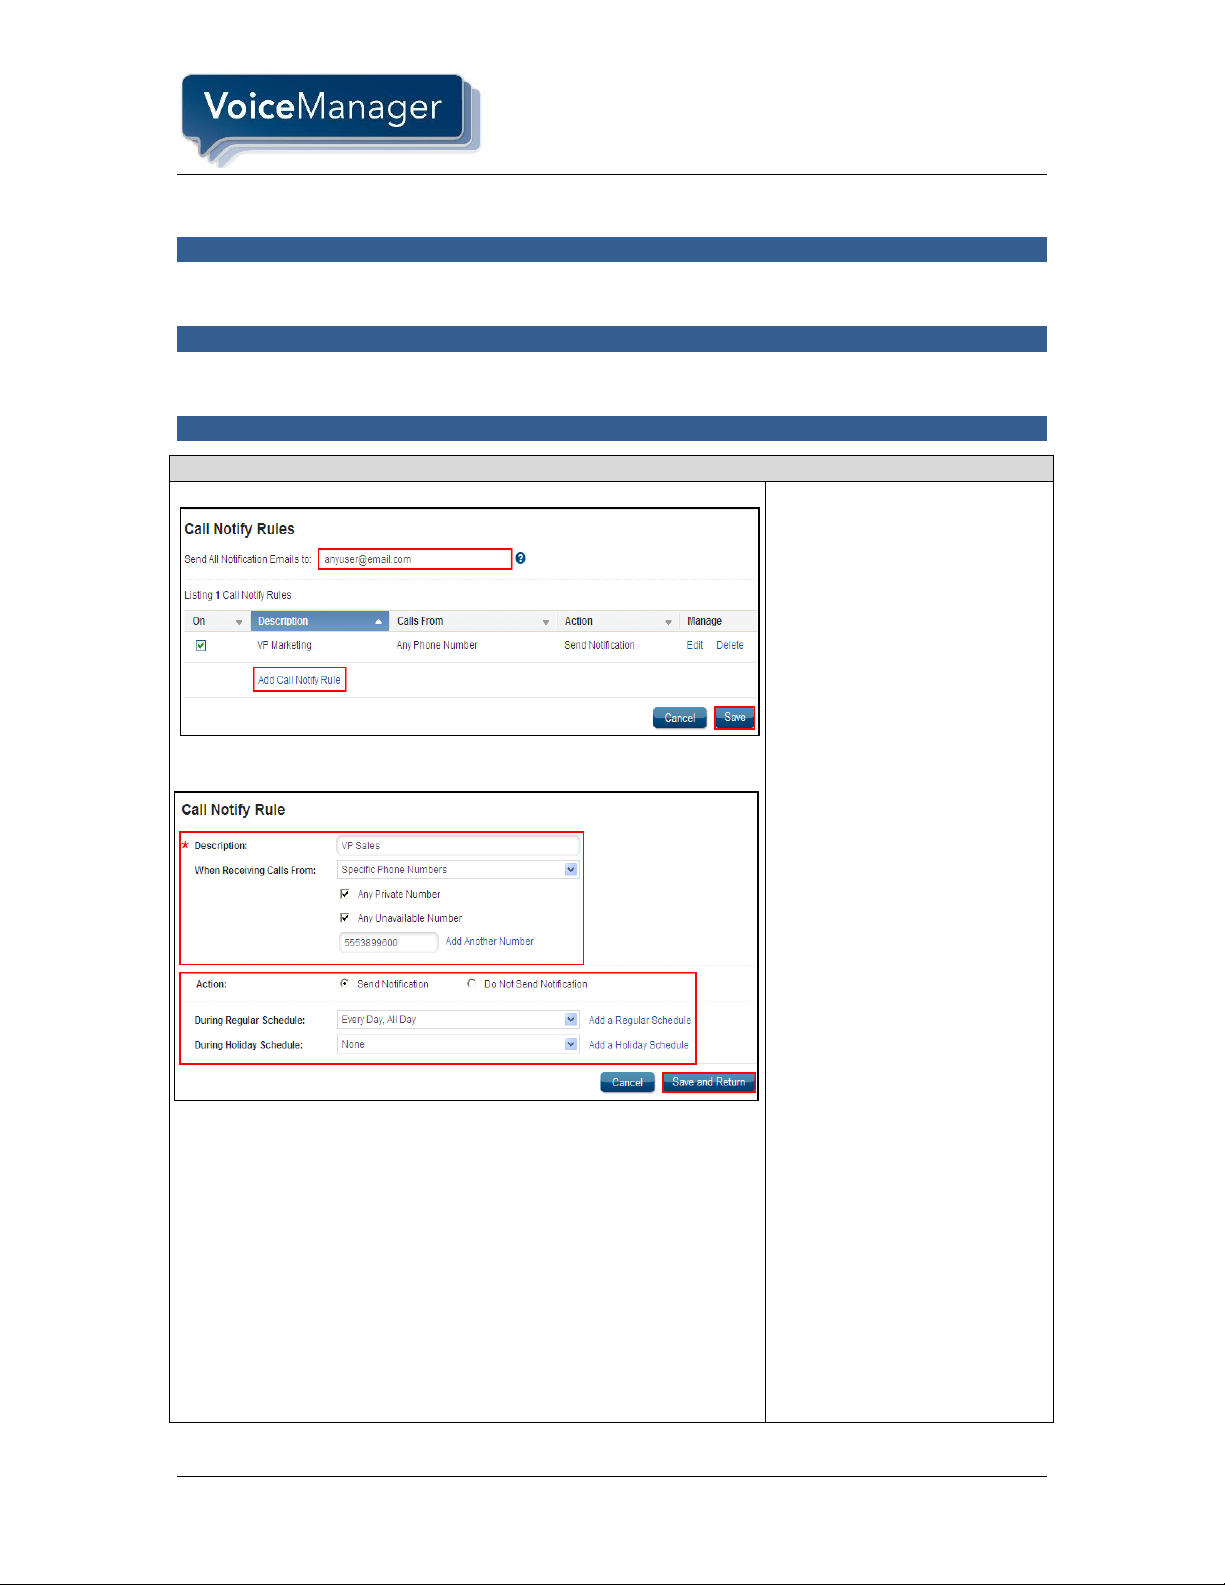
6. Click the Add Call Notify
Rule link.
7. Enter a name for the rule
in the Description field.
8. Click the When
Receiving Calls From
drop down menu.
9. Click the phone number
type to which the rule
applies. The options are
Any Phone Number or
Specific Phone
Numbers.
10. Click the checkbox for
Specific Phone
Numbers.
11. Click the type of phone
number – Any Private
Number or Any
Unavailable Number and
enter that number. You
may add more numbers
when you click the Add
Another Number link
Feature Description
Call Notify allows you to specify conditions for incoming calls that trigger email notification. It is
available with all VoiceManager packages and IP Centrex service.
Solution
Stay connected anywhere you have email access! Call Notify generates an email notification to
your inbox when specified calls are received.
Setup
VoiceManager MyAccount User Guide 21
VoiceManager Features
Page 30

VoiceManager Features
and repeat up to 12
times.
12. Click the Send
Notification radio button
to activate an email alert
or select Do Not Send
Notification to deactivate
this feature.
13. Click the During Regular
Schedule and During
Holiday Schedule drop
down menus and select
the option to define when
the rule applies.
14. Click the Add a Regular
Schedule or Add a
Holiday Schedule link to
create a new rule.
Create separate Call Notify
Rules if both a Regular and
a Holiday Schedule are
desired.
See Add a Schedule Setup
for detailed instructions.
15. Click the Save and
Return button.
22 VoiceManager MyAccount User Guide
Page 31

VoiceManager Features
Edit/Add a Call Park Group
12. Log in to VoiceManager
MyAccount.
13. Click the VoiceManager
Tools menu in the left
navigation bar.
14. Click the Call Settings
tab.
15. Under the Holds and
Transfers section, click
the Call Park link.
16. Click Edit or Delete to
change or remove an
existing Call Park Group.
Click Add Call Park
Group to create a new
group.
17. Enter a description in the
Group Name field.
18. Click on names from the
Available Users list.
19. Click the Add or Add All
button to move one or all
to the Assigned Users
list.
20. Likewise, click the
Remove or Remove All
button to remove users
from the Assigned Users
list and return them to
Available Users.
21. To find a user that is not
in the Available Users
list, click the Search
drop-down menu.
Call Park and Directed Call Park
Feature Description
Call Park allows you to hold a call for an extended period of time, then retrieve it from any
extension within your group. Directed Call Park enables a user to hold a call by a specific
extension number and pick up from any in-group extension. Both features are available with the
VoiceManager Enhanced and Unlimited packages and IP Centrex service.
Solution
Provide excellent service with flexible features that enable employees to hold and retrieve calls
from any phone in the facility! Call Park allows you to answer a call and place it on hold at
another extension in your group in order to assure customer’s needs are met quickly and
efficiently.
Setup
VoiceManager MyAccount User Guide 23
Page 32

VoiceManager Features
22. Click either the Last
Name or First Name
option.
23. Enter the name in the
Search field.
24. Click the Find button.
25. Once the list is complete,
click the Save and
Return button.
Result: A message indicates
the Call Park Group was
added.
Call Park Settings
1. Enter a Recall Time
value between 30 and
600 seconds to set the
amount of time a parked
call waits before being
redirected back to the
original extension.
2. Click the Display drop-
down menu to set the
amount of time a parked
call that is not retrieved
displays on the phone
before it is automatically
released.
3. Click the Enable Parked
Destination
Announcement
checkbox to announce a
call that is parked or
waiting.
4. Click the Save button.
Directed Call Park
No setup is required for this feature.
To Park a Call on a Different
Extension:
1. Press *68#.
2. Enter the extension
where the call is parked
followed by the # sign.
24 VoiceManager MyAccount User Guide
Page 33

VoiceManager Features
Call Park Retrieve
No setup is required for this feature.
1. Press *88#.
2. Dial the extension where
the call is parked.
3. Press #.
4. If the call is parked on the
extension retrieving the
call, simply press #.
Call Park Retrieve
Feature Description
Call Park Retrieve allows you to pick up a parked call from your phone by dialing an access
code. Call Park Retrieve is available with the VoiceManager Enhanced and Unlimited packages
and IP Centrex service.
Solution
Provide excellent service with flexible features that enable employees to park and retrieve calls
quickly, ensuring prompt customer service. Call Park Retrieve enables handling calls for others
as well as mobility within an office, promoting the efficiency of a team effort and maximizing
productivity.
Setup
VoiceManager MyAccount User Guide 25
Page 34

VoiceManager Features
Edit/Add a Call Pickup Group
1. Log in to VoiceManager
MyAccount.
2. Click the VoiceManager
Tools menu in the left
navigation bar.
3. Click the Advanced Call
Settings tab.
4. Under the Team Calling
section, click the Call
Pickup link.
5. Click the Add Call
Pickup Group link.
6. In the Group Name field,
enter a name for those
who can answer calls for
each other.
7. To add users to a group,
click on names from the
Available Users list.
8. Click the Add or Add All
button to move one or all
to the Assigned Users
list.
9. Likewise, click the
Remove or Remove All
button to remove users
from the Assigned Users
list and return them to
Available Users.
10. To find a user that is not
in the Available Users
list, click the Search
drop-down menu.
11. Click either the Last
Name or First Name
option.
12. Enter the name in the
Search field.
13. Click the Find button.
Call Pickup
Feature Description
Call Pickup enables answering any line ringing within a Call Pickup Group. It is available with the
VoiceManager Enhanced and Unlimited packages and IP Centrex service.
Solution
Provide excellent customer service by enabling employees to answer any line within their Call
Pickup Group.
Setup
26 VoiceManager MyAccount User Guide
Page 35

VoiceManager Features
14. Click the Save and
Return button to
complete the process.
Result: A message indicates
your Call Pickup Group was
added. It will now be available
in the My Call Pickup Group
section.
VoiceManager MyAccount User Guide 27
Page 36

VoiceManager Features
Call Return
No setup is required for this feature.
1. Click the flash button or the
switch hook.
2. Press *69.
Result: You will either
connect with your previous
caller, or, if not available, you
will receive an error message.
Call Return
Feature Description
Call Return allows you to call the last party that called, whether or not the call was answered. To
call back the last party that called, just dial the call return feature access code (see your Feature
Access Code page). If the calling number is not available, you receive an error message. Call
Return is available with all VoiceManager packages and IP Centrex service.
Solution
Enhance productivity and customer service by creating a climate of follow-up. Connect with
clients, even after missing a call the first time, and build customer loyalty and business.
Setup
28 VoiceManager MyAccount User Guide
Page 37

Call Transfer
Call Transfer Settings
Call Transfer Recall:
Use this type of transfer to
reconnect to the transferring
party after a pre-defined
number of rings.
1. Log in to VoiceManager
MyAccount.
2. Click the VoiceManager
Tools menu in the left
navigation bar.
3. Click the Call Settings
tab.
4. Under the Holds and
Transfers section, click
the Call Transfer link.
5. Select the On radio
button to activate the Call
Transfer Recall feature.
6. From the Number of
Rings Before Recall
drop-down menu, select
the number of times the
phone should ring before
it is reconnected to the
transferring party.
Busy Camp:
Use this type of transfer to
place the caller on hold for a
pre-defined time until the line
becomes available.
1. Select the On radio
button to activate the
Busy Camp feature.
2. Enter the number of
seconds – 30 to 600 - the
caller should hold until
the line becomes
available in the Busy
Camp Duration field.
Feature Description
Call Transfer manages how transferred calls are directed. It is available with all VoiceManager
packages and IP Centrex service.
Solution
Ensure customers receive speedy service by routing calls quickly and efficiently. The Call
Transfer feature facilitates call management and direction.
Setup
VoiceManager MyAccount User Guide 29
VoiceManager Features
Page 38

VoiceManager Features
Redirect Unannounced
Transfers:
Use this type of transfer to
prevent unannounced calls.
1. Select the On radio
button to Redirect
Unannounced
Transfers.
Redirect Announced
Transfers:
Use this type of transfer to
prevent announced calls.
1. Select the On radio
button to Redirect
Announced Transfers.
2. Click the Save button.
30 VoiceManager MyAccount User Guide
Page 39

VoiceManager Features
Activate Call Waiting
1. Log in to VoiceManager
MyAccount.
2. Click the VoiceManager
Tools menu in the left
navigation bar.
3. Click the Call Settings
tab.
4. Under the Call Receiving
section, click the Call
Waiting link.
5. Select the On or Off radio
button to activate or
deactivate the Call
Waiting feature.
6. Click the Save button.
Result: A message indicates
your Call Waiting settings
saved successfully.
Note: To make an
uninterrupted call, Press *70#
from your phone. The Call
Waiting service turns back
on after the next outgoing
call.
Call Waiting
Feature Description
Call Waiting notifies you of an incoming call while on the phone by sounding two short bursts
allowing you to ignore the incoming call, or place the first call on hold and answer the second.
Call Waiting is available with all VoiceManager packages and IP Centrex service.
Solution
Increase productivity and enhance customer service by notifying employees when an additional
call is waiting with the VoiceManager Call Waiting feature.
Setup
VoiceManager MyAccount User Guide 31
Page 40

VoiceManager Features
Turn On Calling Line ID
1. Log in to VoiceManager
MyAccount.
2. Click the VoiceManager
Tools menu in the left
navigation bar.
3. Click the Call Settings
tab.
4. Under the Call
Acceptance section,
click Calling Line ID link.
5. Click the On or Off radio
button to activate or
deactivate the following
Calling Line ID functions:
o External Line ID
Displays the name and
number of callers outside the
group.
o Internal Line ID
Displays the name and
number for callers inside the
group.
o Name Retrieval
Searches for the name of an
anonymous incoming caller
through an external database.
o Line ID Blocking
Omits personal identity when
placing outgoing calls.
6. Click the Save button.
Calling Line ID
Feature Description
Calling Line ID provides the option to display or block the name and number for callers inside
and outside a group. This feature is available with all VoiceManager packages and IP Centex
service.
Solution
Control and protect personal identity. The Calling Line ID feature controls the information that
displays on the phone for incoming and outgoing calls. Maintain privacy by blocking phone
identification when making external calls.
Setup
32 VoiceManager MyAccount User Guide
Page 41

VoiceManager Features
Calling Line ID Blocking per Call
This feature has been combined with others to create Calling Line ID.
VoiceManager MyAccount User Guide 33
Page 42

VoiceManager Features
Calling Line ID Delivery — Internal
This feature has been combined with others to create Calling Line ID.
34 VoiceManager MyAccount User Guide
Page 43

VoiceManager Features
Calling Line ID Delivery – External
This feature has been combined with others to create Calling Line ID.
VoiceManager MyAccount User Guide 35
Page 44

VoiceManager Features
Calling Name Delivery
1. Log in to VoiceManager
MyAccount.
2. Click the VoiceManager
Tools menu in the left
navigation bar.
3. Click the Call Settings
tab.
4. Under the Call
Acceptance section,
click Calling Line ID link.
5. Click the On or Off radio
button to activate or
deactivate the following
Calling Line ID functions:
External Line ID
Displays the name and
number of callers outside the
group.
Internal Line ID
Displays the name and
number for callers inside the
group.
Name Retrieval
Searches for the name of an
anonymous incoming caller
through an external database.
6. Click the Save button.
Result: A message indicates
the Calling Line ID settings
saved successfully.
Calling Name Delivery
Feature Description
Calling Name Delivery is activated through Calling Line ID, and displays the calling line name
and number for callers from inside your group or enterprise (Internal) and / or callers from outside
your group or enterprise (External). Calling Name Delivery is available with all VoiceManager
packages and IP Centrex service.
Solution
Control your phone schedule time by identifying the name of a caller based upon unique
information access, then manage the call as appropriate.
Setup
36 VoiceManager MyAccount User Guide
Page 45

VoiceManager Features
Calling Name Retrieval
1. Log in to VoiceManager
MyAccount.
2. Click the VoiceManager
Tools menu in the left
navigation bar.
3. Click the Call Settings
tab.
4. Under the Call
Acceptance section, click
Calling Line ID link.
Click the On or Off radio
button to activate or
deactivate the Calling Line
ID function Name
Retrieval.
Name Retrieval searches for
the name of an anonymous
incoming caller through an
external database.
5. Click the Save button.
Result: A message indicates
the Calling Line ID settings
saved successfully.
Calling Name Retrieval
Feature Description
Calling Name Retrieval is activated through Calling Line ID, and enables you to identify a
caller’s name using information from a source other than the Cox Network, such as your Outlook
folder or Smart Phone. Calling Name Retrieval is available with all VoiceManager packages and
IP Centrex service.
Solution
Control your phone schedule time by identifying the name of a caller based upon unique
information access, then manage the call as appropriate.
Setup
VoiceManager MyAccount User Guide 37
Page 46

VoiceManager Features
Calling Number Delivery
1. Log in to VoiceManager
MyAccount.
2. Click the VoiceManager
Tools menu in the left
navigation bar.
3. Click the Call Settings
tab.
4. Under the Call
Acceptance section,
click Calling Line ID link.
5. Click the On or Off radio
button to activate or
deactivate the following
Calling Line ID functions:
External Line ID
Displays the name and
number of callers outside the
group.
Internal Line ID
Displays the name and
number for callers inside the
group.
Name Retrieval
Searches for the name of an
anonymous incoming caller
through an external database.
6. Click the Save button.
Result: A message indicates
the Calling Line ID settings
saved successfully.
Calling Number Delivery
Feature Description
Calling Number Delivery is activated through Calling Line ID, and enables you to see a caller's
telephone number and name when they are trying to reach you. Calling Number Delivery is
available with all VoiceManager packages and IP Centrex service.
Solution
Identify an incoming call’s telephone number to prioritize and determine if you want to answer the
call.
Setup
38 VoiceManager MyAccount User Guide
Page 47

VoiceManager Features
Add/Edit Contacts
1. Log in to VoiceManager
MyAccount.
2. Click the VoiceManager
Tools menu in the left
navigation bar.
3. Click the Applications
tab.
4. Under the VoiceManager
Toolbar section, click the
Contact List link.
5. To import a contact list
from a saved file, click the
Import Contact List link.
6. To add contacts one at a
time as a User click the
Add Personal Contact
link.
7. Administrators, click the
Add Common Contact
link to add contacts one
by one.
8. Enter the Name of the
contact in the field
provided.
9. Enter the associated
Phone Number.
10. Click the Save button.
Result: A message indicates
your contact added
successfully.
Contact List
Feature Description
Contact List allows customization and management of a personal contact list. This feature is
available with all VoiceManager packages and IP Centrex service.
Solution
Make fast work of managing business contacts! Quickly and easily personalize and manage a
contact list using the Contact List feature. Administrators can also manage the Common Contact
List that is accessible to all employees.
Setup
VoiceManager MyAccount User Guide 39
Page 48

VoiceManager Features
Group and Personal Ringback Rules
1. Log in to VoiceManager
MyAccount.
2. Click the VoiceManager
Tools menu in the left
navigation bar.
3. Click the Call Settings
tab.
4. Under the Call Receiving
section, click the Custom
Ringback link.
Group Ringback:
5. Click one of the Action
radio buttons to select
whether or not to play a
Group Ringback.
6. If you choose Play
Ringback, click Select
Audio to upload a
custom audio file.
7. Click Browse to find the
file.
8. Click your file name to
select it.
9. Click the checkbox to
accept the disclaimer.
10. Click the Continue
button.
Personal Ringback:
11. To engage an existing
rule, click the On
checkbox next to the
Ringback Rule.
12. Click Save.
13. To create a new ringback
selection, click the Add
Custom Ringback Rule
Custom Ringback
Feature Description
Custom Ringback allows a selected and / or uploaded ringback to play to callers based on a
phone number list or a specific time during the day or week. Custom Ringback is available as an
a la carte feature with any VoiceManager package or IP Centrex service.
Solution
Deliver optimal customer service by providing a customized message or ring tone to specific
customers.
Setup
40 VoiceManager MyAccount User Guide
Page 49

link.
14. Enter a name for this
group in the Description
field.
15. Click the When
Receiving Calls From
drop-down menu to select
the phone numbers
covered by this rule.
16. Click the Play Ringback
or Do Not Play
Ringback, depending
upon preference.
17. Click the drop-down
menu for During Regular
Schedule or During
Holiday Schedule to
select when the rule
applies.
18. Click Add a Regular
Schedule or Add a
Holiday Schedule to
create a time detailed
schedule and event.
Create separate Custom
Ringback Rules if both a
Regular and Holiday
Schedule are desired.
19. Enter a name for the new
regular or holiday
schedule in the Schedule
Name space.
20. Click the radio button for
Group or Personal to
indicate who will have
access to this rule.
21. In the Event Name
space, type what this rule
will be called.
22. Enter the Start Time by
clicking the calendar link
and the start date.
23. Enter the start time in the
four digit format, hh:mm,
in the space.
24. Click the drop-down
menu; select AM or PM.
25. If the rule applies more
than specified hours, click
the All Day checkbox.
VoiceManager MyAccount User Guide 41
VoiceManager Features
Page 50

VoiceManager Features
26. For the End Time, repeat
steps #18-20.
27. Click the Recurs dropdown menu and select
how often the rule
applies.
28. Click the Save button.
29. To change an existing
rule, click the Edit link
next to the rule.
30. Make all necessary
changes and click the
Save button.
42 VoiceManager MyAccount User Guide
Page 51

VoiceManager Features
Directed Call Park
This feature has been combined with Call Park.
VoiceManager MyAccount User Guide 43
Page 52

VoiceManager Features
Directed Call Pickup
This feature has been combined with others to create Directed Call Pickup Including Barge-In.
44 VoiceManager MyAccount User Guide
Page 53

VoiceManager Features
Directed Call Pickup
No setup is required for this feature.
1. From your phone, press
Flash or switch hook.
2. Press *97# and the
extension number of the
call you want to answer.
3. Press the # sign.
Directed Call Pickup with Barge-In
No setup is required for this feature.
1. . From your phone, press
Flash or switch hook.
2. Press *33# and then the
specific extension
number of the call you
want to pick up.
3. Press the # sign.
Directed Call Pickup with Barge In
Feature Description
Directed Call Pickup allows you to answer a call ringing to a specific extension within the call
pick-up group. Directed Call Pickup with Barge-In enables you to automatically conference in to
an existing call that has been answered within the call pickup group. These features are available
with the VoiceManager Enhanced and Unlimited packages and IP Centrex service.
Note: A Call Pickup Group and a Call Pickup Group with Barge-In is defined by the Group
Administrator.
1.
Solution
Maintain business priorities and choose to answer specific incoming calls to ensure faster
handling time and service. Add convenience by answering an incoming call ringing on a different
phone without leaving your desk. Also, join a call in progress to monitor the quality of the
communication and provide coaching or support.
Setup
VoiceManager MyAccount User Guide 45
Page 54

VoiceManager Features
Turn On Do Not Disturb
1. Log in to VoiceManager
MyAccount.
2. Click the VoiceManager
Tools menu in the left
navigation bar.
3. Click the Call Settings
tab.
4. Under the Call
Acceptance section,
click the Do Not Disturb
link.
5. Click the On radio button
to activate the Do Not
Disturb feature and send
calls directly to voicemail.
When Do Not Disturb is
turned on, a Ring
Reminder option
appears.
6. Click the Ring Reminder
radio button On or Off to
activate or deactivate a
short ring when a call is
sent to voicemail.
7. Click the Save button.
Result: A message indicates
your Do Not Disturb setting
was saved.
Do Not Disturb
Feature Description
Do Not Disturb can send calls directly to voicemail without ringing the primary phone. It is
available with the VoiceManager Enhanced and Unlimited packages and IP Centrex service.
Solution
Increase productivity by minimizing interruptions. Do Not Disturb eliminates ringing by redirecting
calls to voice mail.
Setup
46 VoiceManager MyAccount User Guide
Page 55

VoiceManager Features
Extension Dialing
Extension Dialing is set up with service installation and defaults to four-digit dialing – the last
four digits of the phone number. Customers may request up to six-digit dialing.
Extension Dialing
Feature Description
Extension Dialing allows you to reach any other user within the VoiceManager group by dialing
an internal extension. This feature is automatic with all VoiceManager packages and IP Centrex
service.
Solution
Save time and reach others in the company by using a convenient, abbreviated dialing plan.
Setup
VoiceManager MyAccount User Guide 47
Page 56

VoiceManager Features
Group Directory
1. Log in to VoiceManager
MyAccount.
2. Click the VoiceManager
Tools menu in the left
navigation bar.
3. Click the User & System
Management tab.
4. Under the Utilities section,
click the Group Directory
link.
5. Click the Search dropdown menu and select the
type of information by which
to find a contact: Last
Name, First Name, Phone
Number, Extension or
Email Address.
6. Enter the appropriate
contact information in the
adjacent field.
7. Click the Find button.
8. Click the desired contact
from the options listed.
9. Repeat steps #5-8 until the
Group Directory is
complete.
10. Click the Filter by dropdown menu to select an
account-specific directory.
11. Click the Export button to
transfer the Group Directory
to an Excel file.
12. Click Back to return to the
previous menu.
Group Directory
Feature Description
Group Directory allows you to create multiple contact lists containing names, phone numbers,
extensions, emails and account numbers. Group Directory is available with all VoiceManager
packages and IP Centrex service.
Solution
Manage contacts quickly and efficiently with Group Directory. Maximize productivity by reducing
the time spent looking for customer information.
Setup
48 VoiceManager MyAccount User Guide
Page 57

VoiceManager Features
Hoteling enables you to place and receive calls that display as your office phone number when
visiting other companies that use VoiceManager. The Hoteling feature is available with IP Centrex
service.
Activate
Activate Hosting:
1. Log in to VoiceManager
MyAccount.
2. Click the VoiceManager
Tools menu in the left
navigation bar.
3. Click the Advanced Call
Settings tab.
4. Under the Remote
Calling section, click the
Hoteling link.
5. Select the Hoteling Host
On radio button to
activate the feature.
Once the host phone is
activated, you can assign
yourself as a Hoteling Guest
to the phone temporarily.
Activate Guesting:
1. Scroll to the Guesting
section and expand the
Host pull-down menu.
2. Select a host from the list.
3. Click the Save button.
Hoteling
Feature Description
Solution
Enjoy complete mobility when visiting other company locations by making and receiving calls that
appear as your own business phone number.
Setup
VoiceManager MyAccount User Guide 49
Page 58

VoiceManager Features
Create / Edit a Hunt Group or Series Completion Rule
1. Log in to VoiceManager
MyAccount.
2. Click the VoiceManager
Tools menu in the left
navigation bar.
3. Click the Advanced Call
Settings tab.
4. Under the Team Calling
section, click the Hunting
and Series Completion
link.
5. To create a Hunt Group
rule, click the Add Hunt
Group or Series
Completion Rule link.
Note: the number of licenses
or allowable groups is listed
in the feature description
above the link.
6. Click the Rule Type radio
button for Hunt Group.
7. Click the Show General
Hunt Group Rule
Settings link.
8. Enter a descriptive title in
the Hunt Group Name
field.
9. Click the radio button to
select Directory Number
Hunt or Pilot Number
Hunt.
10. In a Pilot Number Hunt,
click the Phone Number
drop-down menu and
select the phone number
provided by the customer
Hunting & Series Completion
Feature Description
Hunting & Series Completion facilitates routing customer calls to a team of users. Directory and
Pilot Number Hunt are available as a la carte features in the VoiceManager Essential package; all
are included in the VoiceManager Enhanced and Unlimited packages and IP Centrex service.
Solution
Never miss a customer call! Hunting and Series Completion facilitates routing calls to a team of
employees. Routing can be customized based on the order phones ring, the number of rings at
each extension before advancing calls to the next available user, and the treatment for any call
that cannot be answered.
Setup
50 VoiceManager MyAccount User Guide
Page 59

service representative. In
a Directory Number Hunt,
the Hunt Group
Extension automatically
matches the last four
digits of the CSR
provided phone number.
In both, the number can
be edited.
11. Click the Account dropdown menu and select
the account to which to
add the rule.
12. Click the Time Zone
drop-down menu to select
the timing to apply to the
rule.
13. Click the Rollover Order
to select how
unanswered calls forward
to members of the group.
14. Click the Yes or No radio
buttons to Allow Call
Waiting.
15. For No Answer Settings,
click the Roll Over After
checkbox.
16. Click the drop-down
menu to select the
desired number of ringsfrom 1 – 20, or click the
After checkbox and enter
the number of seconds
to wait before forwarding
the call.
17. Click the adjacent dropdown menu to select
Forward to Cox
VoiceMail or Forward to
another number.
18. If clicking Forward to
Cox VoiceMail, enter *55
then the phone number
attached to the voicemail.
19. If clicking Forward to,
enter another number in
the field provided.
20. Click the Show Hunt
Group Users link to add
or edit users in a group.
21. Click on names from the
VoiceManager MyAccount User Guide 51
VoiceManager Features
Page 60

VoiceManager Features
Available Users list.
22. Click the Add or Add All
button to move one or all
to the Assigned Users
list.
23. Likewise, click the
Remove or Remove All
button to remove users
from the Assigned Users
list and return them to
Available Users.
24. To find a user that is not
in the Available Users
list, click the Search
drop-down menu.
25. Click either the Last
Name or First Name
option.
26. Enter the name in the
Search field.
27. Click the Find button.
28. Click the Save and
Continue button.
29. To change or cancel an
existing rule, click the
Edit or Delete link next to
the rule.
30. Click the Save and
Continue button.
31. Click the checkbox next
to the Hunt Group or
Series Completion Rule
to activate the feature.
32. To create a Series
Completion Rule, follow
steps #1-5 under Create /
Edit a Hunt Group,
selecting the radio button
for Series Completion in
step 5.
33. Enter a descriptive title in
the Series Name field.
34. Click the drop-down
menu next to Search,
selecting Last Name or
First Name, and enter
the name in the field
provided.
35. Click names in Available
Users, then click Add or
52 VoiceManager MyAccount User Guide
Page 61

VoiceManager Features
Add All, depending on
the users selected.
36. To remove users from a
group, click Remove or
Remove All to move
users back to Available
Users list.
37. Click the Save and
Continue button to return
to the previous screen.
38. Click the checkbox next
to the Series
Completion Rule to
activate the feature.
39. Click the Save button.
VoiceManager MyAccount User Guide 53
Page 62

VoiceManager Features
Define an Incoming Calling Plan for an Account
Incoming Calling Plan by
Account:
1. Log in to VoiceManager
MyAccount.
2. Click the VoiceManager
Tools menu in the left
navigation bar.
3. Click the User & System
Management tab.
4. Under the Call Access
section, click the
Incoming Calling Plan
link.
5. Click the Inside Group
checkbox to the right of
the account name to
establish the account can
accept incoming calls from
members inside the group
only.
6. Click the Outside Group
drop-down menu to select
when members of an
account can receive and
transfer calls from others.
The options are: Never,
All Transfer, and Allow
Always.
7. Click the Collect Calls
checkbox to define
whether members of the
account can accept
incoming collect calls.
8. Click the Save button.
Result: A message indicates
the Incoming Calling Plan
saved successfully.
Incoming Calling Plan (User)
Feature Description
Incoming Calling Plan allows you to manage the way incoming calls are received by groups or
accounts. Incoming Calling Plan is included in all VoiceManager packages and IP Centrex
service.
Solution
Maximize efficiency by managing the way incoming calls are received by employees with
Incoming Calling Plan settings.
Setup
54 VoiceManager MyAccount User Guide
Page 63

VoiceManager Features
Define an Incoming Calling Plan for a User
Incoming Calling Plan By
User:
1. Follow steps 1-4 from
Incoming Calling Plan
for an Account.
2. Scroll to the Incoming
Calling Plan by User
section and click the Show
Users link to view the list
of users.
3. Locate a specific user by
entering values in the
Search fields, or view all
users.
4. Click the Edit link to the
right of the user you want
to modify.
5. Follow steps 5-7 of the
Incoming Calling Plan
for an Account for the
user.
6. Click the Save and
Return button.
Result: A message displays
that the Incoming Calling
Plan was saved.
VoiceManager MyAccount User Guide 55
Page 64

VoiceManager Features
Create an Instant Group Call Group
1. Log in to VoiceManager
MyAccount.
2. Click the VoiceManager
Tools menu in the left
navigation bar.
3. Click the Advanced Call
Settings tab.
4. Under the Team Calling
section, click the Instant
Group Call link.
5. To create or add a group,
click the Add Instant
Group Call Group link.
6. Enter a description in the
Instant Group Name
field.
7. Click the appropriate
radio button to choose
whether to Dial by
Telephone Number,
Extension, or both
Telephone Number and
Extension.
8. Click the Phone Number
drop-down menu to select
the number for the group.
The Extension automatically
matches the last four digits of
the phone number, but you
can edit it to any four-digit
number.
The Instant Group ID is
populated based on phone
number and extension.
9. Click the Time Zone
drop-down menu and
Instant Group Call
Feature Description
Instant Group Call allows creation and management of groups of users that can be called
simultaneously for a conference call. Instant Group Call is available with the IP Centrex service
and as an a la carte feature with all VoiceManager packages.
Solution
Easily create and manage groups of users that can be called simultaneously for a conference
call. Instant Group Call can also be combined with the Push-to-Talk feature to deliver Intercom
functionality for IP Centrex Customers.
Setup
56 VoiceManager MyAccount User Guide
Page 65

select the correct time.
10. Click the checkbox if you
would like to Enable
Maximum Call Time for
Unanswered Call and
enter a maximum number
of minutes.
11. Click the Add Another
Number link and enter up
to 20 phone numbers for
an Instant Group Call.
12. Click the Clear or
Remove link to delete
phone numbers from the
list.
If you select an Account from
the drop-down menu,
Account Administrators can
also manage this Instant
Group Call group and it will
follow the Account Settings
for the Incoming Calling
Plan. If no account is
selected, only the Profile
Owner can manage this
Instant Group Call group
and it will follow the Group
Settings for the Incoming
Calling Plan.
13. Click the Incoming
Calling Plan drop-down
menu and select Custom
Settings or Group
Settings.
Choose Custom Settings to
customize the Incoming
Calling Plan for this Instant
Group Call group; otherwise,
choose the Group Settings.
14. Click the Save and
Return button to save
your changes and return
to the previous screen.
Result: A message Indicates
your Instant Group Call
added successfully.
VoiceManager MyAccount User Guide 57
VoiceManager Features
Page 66

VoiceManager Features
Activate, Edit, Delete an Instant Group Call Group
1. Log in to VoiceManager
MyAccount.
2. Click the VoiceManager
Tools menu in the left
navigation bar.
3. Click the Advanced Call
Settings tab.
4. Under the Team Calling
section, click the Instant
Group Call link.
5. Select the On check box
next to the Instant Group
Call group you want to
activate.
6. Click the Edit or Delete
link to change or remove
an existing group.
7. Click the Save button.
58 VoiceManager MyAccount User Guide
Page 67

VoiceManager Features
Last Number Redial
No setup is required for this feature.
1. Click the flash button or
the switch hook.
2. Press #66.
Last Number Redial
Feature Description
Last Number Redial allows you to redial the last number you called by clicking the "Redial"
button on your Personal Call Manager or by dialing the feature access code. Last Number Redial
is available with all VoiceManager packages and IP Centrex service.
Solution
Save valuable time having to remember or look up the last number you called!
Setup
VoiceManager MyAccount User Guide 59
Page 68

VoiceManager Features
Multi-Location Extension Dialing
No setup configuration is required.
Multi-Location Extension Dialing
Feature Description
Multi-Location Extension Dialing allows VoiceManager customers with locations in different
Cox Business markets in the same city or state, or in different states, to dial between locations
using a 4-digit extension dialing without incurring any local or long distance usage charges. This
feature is available with all VoiceManager packages and IP Centrex service.
Solution
Save time and money, and reach others in the company by using a convenient, abbreviated
dialing plan.
Setup
60 VoiceManager MyAccount User Guide
Page 69

Monitored Users
Create Monitored Users List
1. Log in to VoiceManager
MyAccount.
2. Click the VoiceManager
Tools menu in the left
navigation bar.
3. Click the Applications
tab.
4. Under the Enhanced
Receptionist Console
section, click the
Monitored Users link.
5. Click on names from the
Available Users list.
6. Click the Add or Add All
button to move one or all
to the Monitored Users
list.
7. Likewise, click the
Remove or Remove All
button to remove users
from the Monitored
Users list and return
them to Available Users.
8. To find a user that is not
in the Available Users
list, click the Search
drop-down menu.
9. Click either the Last
Name or First Name
option.
10. Enter the name in the
Search field.
11. Click the Find button.
12. Once the list is finished,
click the Save button.
Feature Description
Monitored Users is enabled through the Receptionist Console software. It is a convenient way to
view users’ call status availability from a desktop and streamline processes and call routing for
the receptionist. This feature is available with the VoiceManager IP Centrex service.
Solution
Maximize call center efficiency and productivity with this simple desktop tool for the receptionist.
Quick call reception and routing equals enhanced customer service!
Setup
VoiceManager MyAccount User Guide 61
VoiceManager Features
Page 70

VoiceManager Features
Music On Hold Personal Settings
1. Log in to VoiceManager
MyAccount.
2. Click the VoiceManager
Tools menu in the left
navigation bar.
3. Click the Call Settings
tab.
4. Under the Holds and
Transfers section, click
the Music On
5. Click the On checkbox to
activate Music On Hold.
6. Selecting Off overrides
any group setting already
selected and deactivates
the feature.
7. Select the Music Type -
Group-Defined Music or
Custom.
Group-Defined Music is set
for the entire organization.
Custom enables uploading
an audio file that will replace
the Group-Defined audio.
8. Click the Select Audio or
Change Audio link to
change a custom wave
file.
9. Click Browse to find the
desired audio file...
10. Click the checkbox to
accept the disclaimer.
11. Click the Continue
button.
12. Click the Internal Calls
checkbox for music to
Music On Hold - User
Feature Description
Music On Hold plays music for callers on hold and is available with the VoiceManager Enhanced
and Unlimited packages and IP Centrex service. This feature can be used with Call Park, Call
Waiting, Call Hold, and Busy Camp.
Solution
Make customers’ hold time more pleasant. Use music or messages to inform or entertain
customers while they wait.
Setup
62 VoiceManager MyAccount User Guide
Page 71

VoiceManager Features
play for Internal Calls.
13. Click the System Default
or Custom radio button
for music choice.
14. For Custom music,
repeat steps #7-10.
15. Click the Save and
Return button.
Music On Hold Rules (Administrators)
1. Click the Edit or Delete
link to manage Music on
Hold options for the entire
profile or specific
accounts
2. Select the On or Off
checkbox to activate or
deactivate Music On
Hold.
3. If the feature is On,
choose when the music
will play – Call Hold, Call
Park, Busy Camp.
4. Select the Music Type –
System Default Music or
Custom.
5. Click the Select Audio or
Change Audio link to
change a custom wave
file.
6. Click Browse to find the
desired audio file.
7. Click the checkbox to
accept the disclaimer.
8. Click the Continue
button.
9. Click the Internal Calls
checkbox for music to
play for Internal Calls.
10. Click the System Default
or Custom radio button
for music choice.
11. For Custom music,
repeat steps #7-10.
12. Click the Save and
Return button.
VoiceManager MyAccount User Guide 63
Page 72

VoiceManager Features
N-Way Conferencing
No setup is required for this feature.
1. Dial the first party you
want to conference.
2. When the person answers,
click Conference to place
that person on hold.
3. Dial another number to
conference.
4. When that person
answers, click Conference
to connect that call.
5. Click Conference to place
the parties on hold.
6. Repeat steps #3-5 to add
a maximum of 15 people
to the call.
N-Way Conferencing
Feature Description
N-Way Conferencing allows a user to conduct teleconference calls for a maximum of 15
telephone numbers without the need for any special configuration. This feature is available with
IP Centrex service.
Solution
Reduce meeting and travel costs by conducting business via teleconferencing. Increase
productivity by getting the right people together in real-time to make decisions quicker. Add the
flexibility of having a conference call anytime, anywhere to conduct business.
Setup
64 VoiceManager MyAccount User Guide
Page 73

VoiceManager Features
Outgoing Calling Plan by Account
1. Log in to VoiceManager
MyAccount.
2. Click the VoiceManager
Tools menu in the left
navigation bar.
3. Click the User & System
Management tab.
4. Under the Call Access
section, click the
Outgoing Calling Plan
link.
5. Click the checkboxes
from the columns listed to
define a call plan for an
Account.
6. Click the Save button.
Outgoing Calling Plan
Feature Description
Outgoing Calling Plan allows you to manage outgoing or transferred calls by groups or
accounts. These settings can be customized and are included in all VoiceManager packages and
IP Centrex service.
Solution
Outgoing call settings maximize productivity in the workplace by providing a means of managing
how calls are made and transferred.
Setup
VoiceManager MyAccount User Guide 65
Page 74

VoiceManager Features
Outgoing Calling Plan by User
1. Log in to VoiceManager
MyAccount.
2. Click the VoiceManager
Tools menu in the left
navigation bar.
3. Click the User & System
Management tab.
4. Under the Call Access
section, click the
Outgoing Calling Plan
link.
5. Under the Outgoing
Calling Plan By User
section, click the Show
Users drop-down menu.
6. Locate an employee from
the User Name list, or
Search by entering a first
name, last name, phone
number, or email address
in the drop down space
provided to edit an
existing call plan.
7. Click the Edit link.
8. Clilck the Outgoing
Calling Plan checkboxes
to select or deselect the
call types listed.
9. Click the Save and
Return button.
66 VoiceManager MyAccount User Guide
Page 75

VoiceManager Features
Turn On Outlook Integration
1. Log in to VoiceManager
MyAccount.
2. Click the VoiceManager
Tools menu in the left
navigation bar.
3. Click the Applications
tab.
4. Under the VoiceManager
Toolbar section, click the
Outlook Integration link.
5. Click the Outlook
Integration On radio
button to enable the
feature.
6. Click the Retrieve
Contacts From dropdown menu to select the
contact list to reference
when making calls: All
Contacts Folders -
VoiceManager Toolbar
and Outlook Contacts, or
Default Contacts Folder
– VoiceManager Toolbar
only.
7. Click the Save button.
Outlook® Integration
Feature Description
Outlook Integration enables the use of personal contact lists with the VoiceManager Toolbar,
Receptionist Console, and Personal and Group directories. Outlook Integration is available with
all VoiceManager packages and IP Centrex service.
Solution
Save time and return calls more quickly with click-to-call functionality enabled through contacts
available from your Outlook directories.
Setup
VoiceManager MyAccount User Guide 67
Page 76

VoiceManager Features
Add / Edit Contacts
1. Log in to VoiceManager
MyAccount.
2. Click the VoiceManager
Tools menu in the left
navigation bar.
3. Click the Applications
tab.
4. Under the VoiceManager
Toolbar section, click the
Contact List link.
5. To import a contact list
from a saved file, click the
Import Contact List link.
6. To add contacts one at a
time as a User click the
Add Personal Contact
link.
7. Administrators, click the
Add Common Contact
link to add contacts one
by one.
8. Enter the Name of the
contact in the field
provided.
9. Enter the associated
Phone Number.
10. Click the Save button.
Result: A message indicates
your contact added
successfully.
Personal Phone List
Feature Description
Personal Phone List allows a user to conduct teleconference calls for a maximum of 15
telephone numbers without the need for any special configuration. Personal Phone List is
available with all VoiceManager packages and IP Centrex service.
Solution
Reduce meeting and travel costs by conducting business via teleconferencing. Increase
productivity by getting the right people together in real-time to make decisions quicker. Add the
flexibility of having a conference call anytime, anywhere to conduct business.
Setup
68 VoiceManager MyAccount User Guide
Page 77

VoiceManager Features
Set Your Status Setting
1. Log in to VoiceManager
MyAccount.
2. Click the VoiceManager
Tools menu in the left
navigation bar.
3. Click the Applications
tab.
4. Under the VoiceManager
Toolbar section, click the
Personal Status
Manager link.
5. Under the Set Your
Status section, click the
Current Status drop
down menu and select
accessibility.
Setting the status to None
maintains normal call
management.
6. Click the Save button.
Personal Status Manager
Feature Description
Personal Status Manager enables one-click routing management of incoming calls. It is
available with all VoiceManager packages and IP Centrex service.
Solution
One click and you are on the go! Maximize productivity and customer service by choosing from
four pre-set options to receive calls anywhere, anytime.
Setup
VoiceManager MyAccount User Guide 69
Page 78

VoiceManager Features
Status Settings – Available (In Office)
1. Under Status Settings,
click the Show Setting
link for Available (In
Office).
2. In the Simultaneously
Ring field, enter a phone
number to ring with the
primary line.
3. Click the If My Line Is
Busy drop-down menu
and select where calls
should go if line is busy.
4. Click Forward to Cox
Voicemail or Forward to
Other and enter a phone
number in the field
provided.
5. Click the If I Don’t
Answer drop-down menu
and select where calls
should route.
6. Click Forward to Cox
Voicemail or Forward to
Other and enter a phone
number in the field
provided.
7. Click the Save button.
Status Settings – Available (Out of Office)
1. Under Status Settings,
click the Show Setting
link for Available (Out of
Office).
2. Click the When a Call Is
Received drop-down
menu and select where
calls should route.
3. Click Forward to Cox
Voicemail or Forward to
Other and enter a phone
number in the field
provided.
4. Enter an Email address in
the Send Notification
Emails to field to receive
an alert of a missed call.
5. Click the Save button.
70 VoiceManager MyAccount User Guide
Page 79

VoiceManager Features
Status Settings – Busy
1. Under Status Settings,
click the Show Setting
link for Busy.
2. Click the When a Call Is
Received drop-down
menu and select where
calls should route.
3. Click Forward to Cox
Voicemail or Forward to
Cox Voicemail except
from specific phone
numbers.
4. If selecting Forward to
Cox Voicemail except
from specific phone
numbers, enter up to
three phone numbers,
then enter the phone
number to ring when
those numbers call.
5. Click the Save button.
Status Settings – Unavailable
1. Under Status Settings,
click the Show Setting
link for Unavailable.
2. Click the When a Call Is
Received drop-down
menu and select where
calls should route.
3. Click Forward to Cox
Voicemail or Forward to
Cox Voicemail except
from specific phone
numbers.
4. If selecting Forward to
Cox Voicemail except
from specific phone
numbers, enter up to
three phone numbers,
then enter the phone
number to ring when
those numbers call.
5. Click the Save button.
VoiceManager MyAccount User Guide 71
Page 80

VoiceManager Features
Turn On Priority Alert
1. Log in to VoiceManager
MyAccount.
2. Click the VoiceManager
Tools menu in the left
navigation bar.
3. Click the Call Settings
tab.
4. Under the Call Receiving
section, click the Priority
Alert link.
5. Click the On checkbox
next to a Priority Alert
Rule from your list.
6. Click the Save button.
7. Click the Add Priority
Alert link to create a new
rule.
8. Enter an explanation for
the rule in the
Description field.
9. Select the type of phone
number to apply the rule
to in the When
Receiving Calls From
drop-down menu.
10. Click the Use Priority
Alert or Do Not Use
Priority Alert radio
button to define how to
treat the call.
11. Select when to apply the
rule by clicking an option
in the During Regular
Schedule and During
Holiday Schedule drop-
down menus.
Priority Alert
Feature Description
Priority Alert allows selection of a different ring type for certain incoming calls, such as a specific
person, or a call from inside or outside a group. This feature is available with VoiceManager
Enhanced and Unlimited packages and IP Centrex service.
Solution
Increase customer satisfaction while making sure to answer the most important calls first. The
Priority Alert feature allows you to identify specific callers with a distinctive ring based on creating
distinctive alert rules.
Setup
72 VoiceManager MyAccount User Guide
Page 81

VoiceManager Features
Create separate Priority
Alert Rules if both a Regular
and a Holiday Schedule are
desired.
See Setting Up Schedules for
instructions on how to create
and edit a schedule.
12. Click the Save and
Return button.
Edit / Create a Priority Alert Rule
1. Follow steps #1-4 from
Turn On Priority Alert.
2. Click the Edit link to
make changes to an
existing rule, or the Add
Priority Alert link to
create a new rule.
3. Enter an explanation for
the rule in the
Description field.
4. Select the type of phone
number you want to apply
the rule to in the When
Reciving Calls From
drop-down menu.
5. Define how you want to
treat the call by selecting
the Use Priority Alert or
Do Not Use Priority
Alert radio button.
6. Select when you want the
rule to apply by choosing
an option in the During
Regular Schedule and
During Holiday
Schedule drop-down
menus.
See Setting Up Schedules
for instructions on how to
create and edit a schedule.
7. Click the Save and
Return button.
VoiceManager MyAccount User Guide 73
Page 82

VoiceManager Features
Privacy Settings
1. Log in to VoiceManager
MyAccount.
2. Click the VoiceManager
Tools menu in the left
navigation bar.
3. Click the User & System
Management tab.
4. Under the User
Management section,
click the Privacy
Settings link.
5. Click the Group
Directory drop-down
menu to select either
Hide My name and
Number or Show My
Name and Number.
6. Click the Auto Attendant
drop-down menu to select
either Exclude Me from
Extension Dialing,
Exclude Me From Name
Dialing, Exclude Me
from Extension and
Name Dialing or Include
Me in Extension and
Name Dialing.
7. Click the Phone Status
drop-down menu to select
Hide My Status or Show
My Status
8. To select who can
monitor your phone
status, click on names
from the Available Users
list.
9. Click the Add or Add All
button to move one or all
Privacy Settings
Feature Description
Privacy Settings allow you to restrict access to your phone status and personal visibility. Privacy
Settings is available with all VoiceManager packages and IP Centrex.
Solution
Define specific individuals who are allowed to reach you so that you can manage businesssensitive and personal-related issues. Maximize productivity and prevent phone interruptions,
remaining focused on your projects.
Setup
74 VoiceManager MyAccount User Guide
Page 83

VoiceManager Features
to the Assigned Users
list.
10. Likewise, click the
Remove or Remove All
button to remove users
from the Assigned Users
list and return them to
Available Users.
11. To find a user that is not
in the Available Users
list, click the Search
drop-down menu.
12. Click either the Last
Name or First Name
option.
13. Enter the name in the
Search field.
14. Click the Find button.
15. Once the exceptions list
is complete, click the
Save button.
VoiceManager MyAccount User Guide 75
Page 84

VoiceManager Features
Push to Talk Settings
1. Log in to VoiceManager
MyAccount.
2. Click the VoiceManager
Tools menu in the left
navigation bar.
3. Click the Call Settings
tab.
4. Under the Call Receiving
section, click the Push to
Talk link.
5. Click the On checkbox to
enable the Auto Answer
feature and hear the
caller’s voice over the
intercom.
6. Click the Off checkbox to
manually answer a Push
to Talk call without using
the intercom.
7. Click the Outgoing
Connection Type dropdown menu and select
One-Way or Two-Way
communication.
One-Way Connection - only
the caller can talk and be
heard.
Two-Way Connection - both
parties can talk and be heard.
8. Choose who to Allow
Calls From by clicking
the drop-down menu and
selecting Only the
Assigned Users or
Everyone except the
Assigned Users.
9. Click the Save button.
Push to Talk
Feature Description
Push to Talk provides user-to-user intercom service across an enterprise. This service may be
used in conjunction with Instant Call Group to emulate key system intercom functionality. It is only
available with the IP Centrex service and requires an IP Centrex phone.
Solution
Communicate easily with intercom-like functionality. Push to Talk can be used between members
of a team with the Instant Group Call feature so that you can broadcast messages across multiple
phones simultaneously to increase productivity and streamline communication.
Setup
76 VoiceManager MyAccount User Guide
Page 85

VoiceManager Features
Push to Talk Assigned Users List
10. Click the Search dropdown menu.
11. Click either the Last
Name or First Name
option.
12. Enter the name in the
Search field.
13. Click the Find button.
14. Alternately, click on
names from the
Available Users list.
15. Click the Add or Add All
button to move one or all
to the Assigned Users
list.
16. Likewise, click the
Remove or Remove All
button to remove users
from the Assigned Users
list and return them to
Available Users.
17. Click the Save button to
store settings.
Result: A message indicates
the Push to Talk settings
updated successfully.
VoiceManager MyAccount User Guide 77
Page 86

VoiceManager Features
Turn on Remote Office
1. Log in to VoiceManager
MyAccount.
2. Click the VoiceManager
Tools menu in the left
navigation bar.
3. Click the Advanced Call
Settings tab.
4. Under the Remote
Calling section, click the
Remote Office link.
5. Click the Remote Office
On radio button to
activate the feature.
6. Enter a phone number in
the Remote Phone
Number field where you
can be reached.
7. Click the Save button.
Result: A message indicates
the Remote Office settings
were updated successfully.
Remote Office
Feature Description
Remote Office allows you to associate a remote phone number with your primary business
number. Make and receive calls as if from the office! Your business number displays to called
parties and your business will be billed for your phone activity. This feature is available a la carte
with the VoiceManager Essential package, and included with the Enhanced and Unlimited
packages and IP Centrex service.
Solution
Maximize your time and expand your business; place and answer business calls from any
location!
Setup
78 VoiceManager MyAccount User Guide
Page 87

Schedules
Create a Schedule/Event
Schedules organize time(s)
for call management. You
need to create a schedule
before you add an event.
Examples of commonly used
schedules are: Weekend
Hours, After Hours, and
Evenings.
1. Log in to VoiceManager
MyAccount.
2. Click the VoiceManager
Tools menu in the left
navigation bar.
3. Click the User &
Management System
tab.
4. Under the User
Management section,
click Schedules.
5. Click the Add
Schedule/Event link.
6. Enter a description in the
Schedule Name field.
7. Select the Type –
Regular or Holiday.
Create separate schedules
for an event if both a Regular
and Holiday Schedule are
desired.
8. Select the Access –
Group or Personal.
9. Enter a description in the
Event Name field.
10. Enter a Start Time for the
date and time of the
Feature Description
Schedules allow you to configure timeframes that define how incoming calls will be managed.
Once schedules are created, they appear as an option available for selection on other feature
setting pages, such as Sequential Ring, Auto Attendant, and Call Notify. This feature is available
with all VoiceManager packages or IP Centrex service.
Solution
VoiceManager services provide time and holiday schedules to customize incoming call
management based on a preconfigured calendar. They are created as events based on holidays,
date, day of week, time of day, and recurring pattern options.
Setup
VoiceManager MyAccount User Guide 79
VoiceManager Features
Page 88

VoiceManager Features
event.
11. Enter an End Time for
the date and time of the
event.
12. Choose if and when the
Event Recurs.
13. Click the Save or Save &
Add Another button.
Result: A message indicates
your Schedule and Event
were added.
80 VoiceManager MyAccount User Guide
Page 89

VoiceManager Features
Selective Call Acceptance
This feature has been combined with others to create Call Acceptance & Rejection.
VoiceManager MyAccount User Guide 81
Page 90

VoiceManager Features
Selective Call Rejection
This feature has been combined with others to create Call Acceptance & Rejection.
82 VoiceManager MyAccount User Guide
Page 91

Sequential Ring
Create a Sequential Ring List
1. Log in to VoiceManager
MyAccount.
2. Click the VoiceManager
Tools menu in the left
navigation bar.
3. Click the Call Settings
tab.
4. Under the Call
Forwarding section, click
the Sequential Ring link.
5. Click the Ring My Phone
Number First check box
to ring your phone
number before routing
calls to the next phone
number in the list.
6. Click the Skip to Next
Number if Busy check
box to ring the next
number in the list if a
number is busy.
7. Click the Allow Caller to
Skip Sequence check
box for call to advance to
the first available number
in the list.
You may choose to route
all or only selective
incoming calls to your
Sequential Ring List. To
route only selective calls,
you must add rules that
will determine when calls
are routed.
Feature Description
Sequential Ring acts as a find-me-follow-me feature that rings up to five numbers in a
customized sequence when an incoming call matches specified conditions. Sequential Ring is
available as an a la carte feature with the VoiceManager Essential package, an option with the
Enhanced and Unlimited packages, and is included in IP Centrex service.
Solution
Provide enhanced service and stay connected when away from the office!
Setup
VoiceManager MyAccount User Guide 83
VoiceManager Features
Page 92

VoiceManager Features
Define Routing of Calls
8. Click the Add Another
Number link. You can
enter up to 5 numbers.
9. Enter the Phone Number
to which calls should be
routed.
10. Choose Yes or No from
the Answer
Confirmation drop-down
menu.
11. Click the Rings dropdown menu to select the
number of rings before
the call is forwarded to
the next number.
12. Click Clear or Remove to
delete any number from
your list.
13. Click the Save button to
complete your list.
14. To activate Sequential
Ring, you must have at
least one Sequential
Ring Rule turned On.
15. Click the Save button.
84 VoiceManager MyAccount User Guide
Page 93

Add/Edit Sequential Ring Rule
1. Click the Edit or Add
Sequential Ring Rule
link to change or add a
new Sequential Ring
Rule.
2. Enter a Description for
the rule in the field
provided.
3. Click the When
Receiving Calls From
drop-down menu.
4. Click the phone number to
which the rule applies.
The options are Any
Phone Number or
Specific Phone
Numbers.
5. If you select Specific
Phone Numbers, click
the type of phone number
(Any Private Number or
Any Unavailable
Number) and enter the
number.
6. Click the Call Sequential
Ring List or Do Not Call
Sequential Ring List
check box to activate or
deactivate this feature.
7. Click the During Regular
Schedule or During
Holiday Schedule drop-
down menus.
8. Click the schedule for
when the Sequential
Ring Rule should apply.
9. Add a new schedule by
clicking the Add a
Regular Schedule or
Add a Holiday Schedule
link and entering the
required information.
10. Create separate
Sequential Ring Rules if
both a Regular and a
Holiday Schedule are
desired.
VoiceManager MyAccount User Guide 85
VoiceManager Features
Page 94

VoiceManager Features
See Setting Up Schedules
for detailed instructions.
11. Click Save and Return.
86 VoiceManager MyAccount User Guide
Page 95

Simultaneous Ring Personal
Simultaneous Ring List Options
1. Log in to VoiceManager
MyAccount.
2. Click the VoiceManager
Tools menu in the left
navigation bar.
3. Click the Call Settings
tab.
4. Under the Call
Forwarding section, click
the Simultaneous Ring
link.
5. Click the Off checkbox to
disable the
Simultaneous Ring
feature.
6. Click the Always On
check box to turn
Simultaneous Ring on
all the time.
7. Enter up to ten Phone
Numbers that will ring at
the same time.
8. Click the Yes or No dropdown menu for the
Answer Confirmation
action for each phone
number.
9. Click the Add Another
Number link to add a
phone number tothe list.
10. Click Remove to delete a
phone number from the
list.
11. Click On With
Simultaneous Ring
Rules to enable feature
when a specific rule is
Feature Description
Simultaneous Ring enables selecting up to ten other phone numbers that will ring at the same
time for incoming calls. It may also be activated or updated using the VoiceManager Toolbar
which is downloadable from the Applications tab. Simultaneous Ring is available with the
VoiceManager Enhanced and Unlimited packages and IP Centrex service.
Solution
Maximize customer service and streamline all phone numbers into one so that incoming calls ring
multiple phones to ensure you are reached!
Setup
VoiceManager MyAccount User Guide 87
VoiceManager Features
Page 96

VoiceManager Features
selected.
12. Click the Do Not Call My
List If I Am On a Call
check box to disable the
feature when on a call.
13. Click the Save button.
Add/Edit Simultaneous Ring Rule
1. Follow steps #1-4 of
Simultaneous Ring List
Options.
2. Click the checkbox next
to an existing rule to
activate the feature.
3. Click the Edit or Delete
link to change or remove
a rule.
4. Click the Add
Simultaneous Ring Rule
link to create a new rule.
5. Enter a rule name in the
Description field.
6. Clickthe When
Receiving Calls From
drop-down menu.
7. Click the phone number
to which the rule applies..
The options are Any
Phone Number or
Specific Phone
Numbers.
8. If you select Specific
Phone Numbers, click
the type of phone number
(Any Private Number or
Any Unavailable
Number) and enter the
number.
9. Click the Call
Simultaneous Ring List
or Do Not Call
Simultaneous Ring List
check box to activate or
deactivate this feature.
10. Click the drop-down
menu for During Regular
Schedule or During
Holiday Schedule to
select when the rule
applies.
11. Create a new schedule
88 VoiceManager MyAccount User Guide
Page 97

VoiceManager Features
by clicking the Add a
Regular Schedule or
Add a Holiday Schedule
link.
12. Create separate
Simultaneous Ring
Rules if both a Regular
and a Holiday Schedule
are desired.
See Setting Up Schedules
for detailed instructions.
13. Click the Save and
Return button.
Result: A message indicates
your Simultaneous Ring
Rule settings were saved
successfully.
VoiceManager MyAccount User Guide 89
Page 98

VoiceManager Features
Speed Dial Rules
To turn on the Speed Dial
feature, at least one Speed
Dial Rule must exist.
1. Log in to VoiceManager
MyAccount.
2. Click the VoiceManager
Tools menu in the left
navigation bar.
3. Click the Call Settings
tab.
4. Under the Dial / Redial
heading, click the Speed
Dial link.
5. Click the Add Speed Dial
Rule link.
6. Click the Speed Code
drop-down menu to assign
a code to a Phone
Number.
7. Enter the Phone Number
to attach to the Speed
Code.
8. Enter a name in the
Description field for the
speed dial party.
9. Click the Save button.
10. Click the Edit or Delete
link to modify an existing
rule.
Result: A message indicates
the Speed Dial Rule was
added, edited, or deleted.
Speed Dial numbers may be
accessed using a code or the
VoiceManager Toolbar.
Speed Dial
Feature Description
Speed Dial offers two options that allow making calls using speed codes. Speed Dial 8 provides
single-digit dialing for up to eight (8) frequently called phone numbers and is available with all
VoiceManager packages and IP Centrex service. Speed Dial 100 provides two-digit dialing for up
to 100 frequently called phone numbers and is available with the VoiceManager Enhanced and
Unlimited packages and IP Centrex service.
Solution
Save time wasted looking up names and phone numbers! VoiceManager can create customized
lists of one or two-digit codes to call the most frequently dialed numbers.
Setup
90 VoiceManager MyAccount User Guide
Page 99

VoiceManager Features
Speed Dial 8
This feature has been combined with Speed Dial.
VoiceManager MyAccount User Guide 91
Page 100

VoiceManager Features
Speed Dial 100
This feature has been combined with Speed Dial.
92 VoiceManager MyAccount User Guide
 Loading...