

covington TP-46 Instructions Manual
HOW TO ADJUST THE FLOW OF FERTILIZER
Set the bolt that the upper end of the knocker’s arm rests against, so that the vibrator pan will move
back about 3/16 or 1/4 of an inch. This will be enough motion to make the fertilizer work its way over
the pan, and then adjust the gate at front end of pan up or down to give the amount you wish per acre.
(Gate open approximately 1/4” will give you 450 lbs. per acre.)
DIFFERENT PLATES WILL PLANT DIFFERENT KINDS OF SEED
The plates we furnish, can be used for planting all kinds of seed such as corn, sorghum, peas and
beans. Chemically delinted cotton seed can be planted perfectly with the large peanut plate; peas and
beans can also be planted with the same plate. Other plates are available for purchase.
DRILLING ATTACHMENTS FOR VERY SMALL SEED
We make an attachment to be used in the regular cotton seed can for drilling very small seeds such
as cabbage, turnips, collards, etc. When this attachment is wanted, we can furnish it, and will send
along with it directions on how to use. This attachment will drill small seed as perfectly as can be done
with any regular garden drilling planter.
USE OF SPROCKETS EXPLAINED
You will notice in all the tables of distances that the sprockets work in pairs, for example 12” x 6”.
Each figure represents the number of teeth on the sprocket, and the first figure, or sprocket, is always
the driving or pulling sprocket, and the second figure is the driven or pulled sprocket. So don’t forget
this.
Visit our website - www.covingtonplanter.com
to download the parts manual, spacing chart and seed plate suggestion list
Model TP-46
Instructions For Attaching Covington
Model TP-46 Planter To Cultivator Frame
We furnish with the planter two opening shovels, 7” x 10”, and four listing points, 2 1/2” x 6”.
Attach the two shovels to your opening shanks and the four listing points to your four listing
shanks.
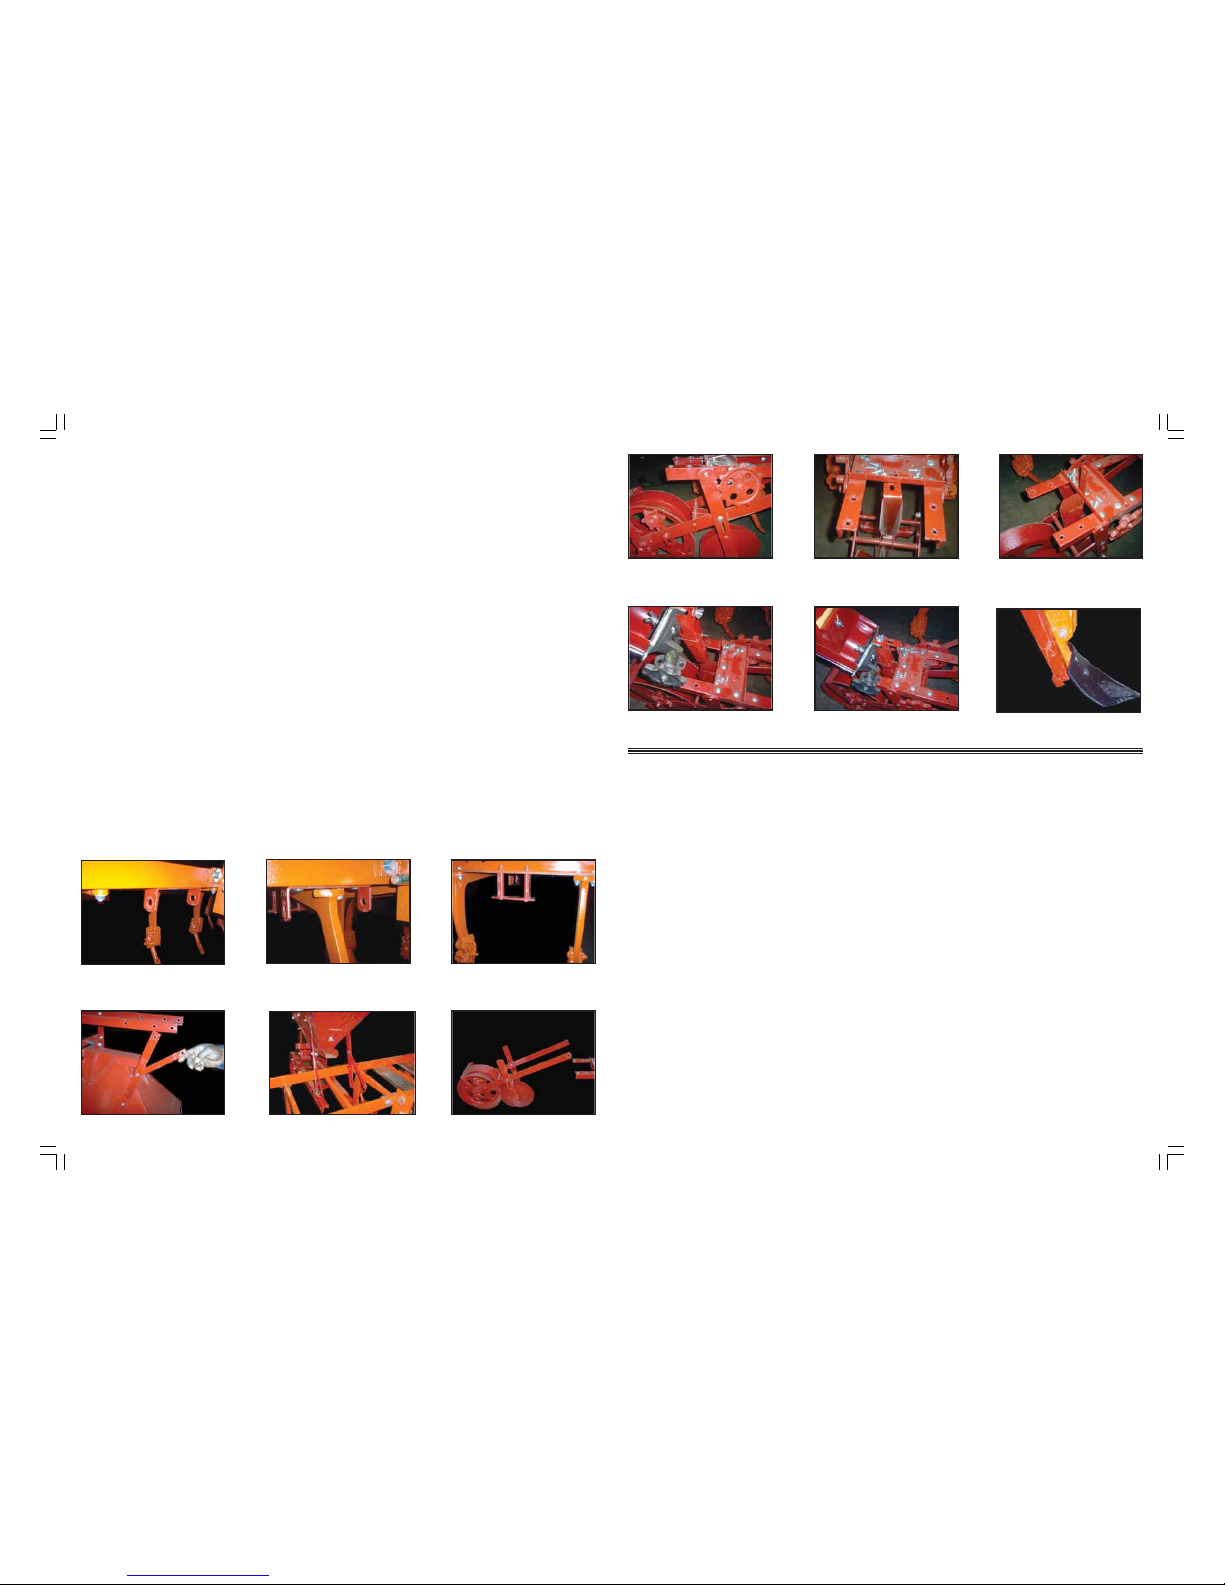
Remove the pull yokes on the front end of the planter frame and bolt these to the under side of the front
bar of the cultivator frame. (See pic. #1) You will already have decided what distance apart you want your
rows and set your pull yokes accordingly. Next bolt the opening shank through the two center holes of the
yoke.(See pic. #2) Then attach the rear left yoke to rear frame of the cultivator. The rear left yokes are tied
to the planter. (See pic. #3)
Now remove the lower front brace bolts and swing the braces forward. (Bottom only - (See pic. #4).Slide
the planter on the rear left yoke and secure to the front pull yoke. (See pic. #5) Now pull under the presser
wheel frame and bolt ends to main planter frame and under the upright front braces from the fertilizer box
and then bolt the ends of the opening disc bars to the rear ends of the main planter frame. (See pic. #6 &
pic. #7).Now install the main seed spout just above the opening disc and attach upper end of spout to the
frame along with the tilt bracket anchor. (See pic. #8 & pic. #9 ).
Install the grain attachment with the (4) four carriage bolts on the rear planter frame. When installing
attachment, sit small grain spout down into the main seed spout. (See pic. #10 & pic. #11).
Now take the double fertilizer spout and slip them astride of the opening shanks and fasten the lower end
against the opening shovels and the fertilizer spout yoke that is on the upper shovel bolt. (See pic. #12).
Now put the four listing shanks on each side of the planter so that they will be (10) ten inches apart from
the center of the points.
Picture #7 Picture #8 Picture #9
Picture #10 Picture #11 Picture #12
Picture #1 Picture #2 Picture #3
Picture #4 Picture #5 Picture #6
HOW TO MAKE ADJUSTMENTS
If you want to plant below a level, let the opening shovel shank down and set plow more on its points,
and then set listing points to fill in furrow to suit. If you wish to plant on a level or above the level, set
opening plow to run shallow, or flat and set the listing tines wider apart and to run deeper, or use longer
points or plows to raise list to height you wish.
You regulate the depth of covering by making adjustments up and down the slots in the frame holding
the disc openers. The covering is done by the presser-drive wheels, and there will be no dragging or
chocking.
MAKE ALL ROWS THREE FEET
A row 3 feet wide is about right for all crops, such as cotton, corn, peanuts, peas, beans, etc. By
adopting a standard width row, you do not have to buy so many sizes of plows, and you have less adjusting
to make with your cultivator and tractor.
FERTILIZER IN TWO STREAMS
As the fertilizer is distributed the flow is split in two streams about five inches apart, and the seeds are
always planted exactly in the center of these two streams. As the seeds are not in contact with the fertilizer
there will be no risk of damaging or killing the seed before they germinate, and further, as there is not
fertilizer directly under the seed there will no injury to the tap roots of the plants. You get better stands.
Your plants will be more vigorous and will grow off faster, enabling you to give the plants quicker and
better cultivation at the first operation and thereby helping to better destroy the first weeds and grass, and
save you most or all the expensive hoe work later on. The U.S. Dept. of Agriculture claims that the yields
of all crops will be largely increased by so dividing the fertilizer into two streams as is done by all our
present types of planters.
 Loading...