

Page 1

Kangaroo
TM
Feeding Tube with IRIS Technology,
Console and Accessories
User Manual
Page 2

Table of Contents
Section I: System Overview
Safety and Cautions ................................................................. 2
System Components ................................................................. 3
Section II: Assembly and Initial Administrator Use
Assembling System Parts ......................................................... 9
Initial Use ............................................................................... 10
Section III: Setting Up and Using the Kangaroo
Feeding Tube with IRIS Technology for Placement
Set Up and Use ...................................................................... 13
Reconnecting ......................................................................... 17
Section IV: Cleaning, Charging, and Storage
General Console, Interface Cable and Power Cord
Cleaning Directions ............................................................... 19
Battery and Storage .............................................................. 20
Section V: User Interface Features
On Screen Keyboard .............................................................. 22
Logging In and Automatic Log-Out ...................................... 23
Main Menu ............................................................................. 24
Procedure ............................................................................... 25
Options for Viewing Patient Folders and Files ..................... 26
Exporting Images to USB Flash Drive .................................... 27
Opening Images from USB Flash Drive ................................. 28
Rename Images ...................................................................... 29
Delete Images ......................................................................... 29
Viewing Captured Images ..................................................... 30
Annotating Images ................................................................ 31
Operator and Reviewer Settings ........................................... 32
Administrator Settings ........................................................... 33
Changing Date, Time, Formatting, Language,
and Device Settings ................................................................ 34
Adding and Editing Users ...................................................... 35
Creating and Editing Encryption Password .......................... 36
Icon Glossary ........................................................................... 37
Section VI: Additional Kangaroo Feeding Tube with
IRIS TechnologyInformation
Order Information ................................................................. 39
Troubleshooting ..................................................................... 40
Definition of Symbols ............................................................ 41
Warranty ................................................................................. 42
Specifications .......................................................................... 43
MRI Safety Information ......................................................... 43
Maintenance and Safety ........................................................ 44
Electronic Specification Tables .........................................45-49
Page 3

Section I: System Overview
Page 4

Kangaroo™ Console | 2
Safety and Cautions
Safety notice
This section summarizes information basic to the safe operation of the equipment
described in this manual. All safety precautions and operating instructions should be
read and understood before installation, operation, maintenance, or repair of this device.
Consult with Covidien-trained personnel before attempting to operate this equipment.
Always follow product labeling and manufacturer’s recommendations. If in doubt as to
how to proceed in any situation, contact your Covidien representative.
Note: For Enteral Fluids Only
Description
The Kangaroo™ feeding tube with IRIS technology is a single use device with a camera
embedded in the distal end to aid in placement. The tube is made of radiopaque
polyurethane material and features a Hydromer™* coated tip.
For use with ENFit™* Connection System.
Indications
The Kangaroo feeding tube with IRIS technology utilizes a video stream to aid a trained
user during placement into the stomach or small bowel for the administration of nutrition,
fluids, and medications by the naso-enteric route for patients aged 18 years and older
who have an intact gastrointestinal tract, but are physically unable to manage nutritional
intake through normal mastication and deglutition.
A trained user, as defined per facility protocol or determined by clinical privileging, should
read the Kangaroo Feeding Tube with IRIS Technology User Manual, Instructions for Use
and review the training program provided. Facility protocol for insertion of any feeding
tube should also be followed. Placement of the tip of the device into the small bowel
should only be attempted by clinicians with expertise in small bowel placement.
Prior to commencing administration, confirm correct tube placement per
institutionalprotocol.
Actions
• Acts as a conduit for food, fluids, and medications to a patient’s stomach or smallbowel.
• Avoid administration of light sensitive medications while the tube is connected to the
interface cable.
Contraindications
• Use caution with patients who have anomalies or diseases of the nose, throat,
oresophagus.
• The use of this product is contraindicated in patients with known sensitivities or
allergies to its components.
Warnings
• Coughing or any other symptom of respiratory distress would likely indicate that the
device had been misplaced in the trachea. If this is suspected, remove the tube and
stylet and reinsert.
• At any point during the procedure if continuous resistance is felt the device
should be withdrawn and then reinserted. The operator should discontinue all
attempts at placement after repetitive unsuccessful attempts (such as 5 or more) at
deviceplacement.
• The presence of an endotracheal device tends to guide the feeding tube into the trachea.
Should the feeding tube and stylet (if stylet is used) enter the tracheobrochial tree
during tube placement, damage to the lung or esophagus could occur. If any resistance
is felt during placement, remove the tube and stylet and reinsert. Coughing or any
other symptom of respiratory distress would likely
indicate that the device had been misplaced in the
trachea. Misplacement of tubes into the lungs resulting
in pneumothorax has been reported in neurologically
impaired patients and those with endotracheal tubes in
place. The operator should discontinue all attempts at
placement after repetitive unsuccessful attempts (such
as 5 or more) at device placement.
• This device should only be inserted by a trained user.
• The feeding tube is a disposable device intended for
single use. Do notreuse.
• Maintaining the patient in a High-Fowlers or SemiFowlers position may reduce regurgitation or aspiration.
If using this position, do not lean patientforward.
• The stylet must be removed prior to a patientMRI.
• No modification of this equipment is allowed.
• Do not use this device near flammableanesthetics or in
oxygen rich environments.
• The Kangaroo feeding tube with IRIS technology is
intended for enteral feeding, fluids and medication
administration, but has the potential to misconnect with
small bore connectors of other healthcare applications.
This nasogastric feeding tube should not be used with
connectors from other healthcare applications. The
feeding tube is specifically for the purpose of enteral
fluids. The insufflation device is for use with the viewing
system for connection with the feeding tube during
placement, and is to be disconnected from the feeding
tube after placement. Please avoid connection of these
devices to devices of other applications and ensure
that the tubing is appropriately connected in order to
provide enteral nutrition to the patient.
• Additional components or equipment connected to
medical electrical equipment must comply with the
respective IEC or ISO standards. All configurations
shall comply with the requirement for medical
electrical systems (see clause 16 of IEC 60601-1 Ed
3.1). If the operator connects additional components
or equipment to the medical electrical equipment, the
operator configures a medical system, and it is the
operator’s responsibility that the system complies with
the requirements for medical electrical systems. If in
doubt, consult your local representative or the technical
servicedepartment.
• When light is emitted from tube tip, do not point directly
at eye.
• To minimize heat exposure of tissue, the Kangaroo
feeding tube with IRIS technology should be
disconnected from the interface cable after the
placement is complete.
Precautions
• This device is not intended for diagnosis. Consult the
appropriate service for diagnostic evaluation if there is
concern regarding an image observed duringplacement.
Section I: System Overview
• The user should be aware of patients who have
photosensitivity due to administered medications or
other conditions since the device exposes internal
tissues to light.
• Do not autoclave.
• Feeding tubes should be flushed frequently to prevent
clogging. Suggested flushing schedule:
a) before and after each feeding
b) before and after administering medication
c) once every four hours during continuous feeding or
between intermittentfeedings
d) each time the feeding set is disconnected
e) each time the feeding container is filled/changed
f) each time the pump is stopped
• Use only water to flush. Do not use solutions containing
meat tenderizer to flush or open a clogged feeding tube.
• Tube replacement may be considered at four (4) week
intervals to ensure optimum tube patency.
• Use a Kangaroo™ enteral feeding pump for accuracy
and control of nutritional formula delivery. Infusion
pumps that deliver in excess of 40 psi should not be
used as excessive pressure is capable of causing tubes
and pump sets to balloon and/or rupture. Consult pump
manufacturer’s specifications andrecommendations.
• Administration of medications should be guided by
hospital policy. Many liquid preparations contain
Sorbitol which tends to interact with enteral formulas
and clog the feeding tube. Thoroughly crush tablets,
excluding enteric tablets which should never be crushed;
however, always consult with your pharmacist regarding
which tablets should be crushed for feeding tube
administration.
• The device generates light, the user should be aware of
patients who have taken light sensitive medications or
who may have photosensitivity.
• Images from the camera going to the console may
be lost or temporarily suspended during placement
if performed near sources of electromagnetic energy
such as RFID, diathermy equipment or hand-held
metaldetectors.
Adverse events
Pneumothorax, intestinal perforation, and aspiration
pneumonia have been reported during the use of this type
of device.
Page 5
Kangaroo™ Console | 3
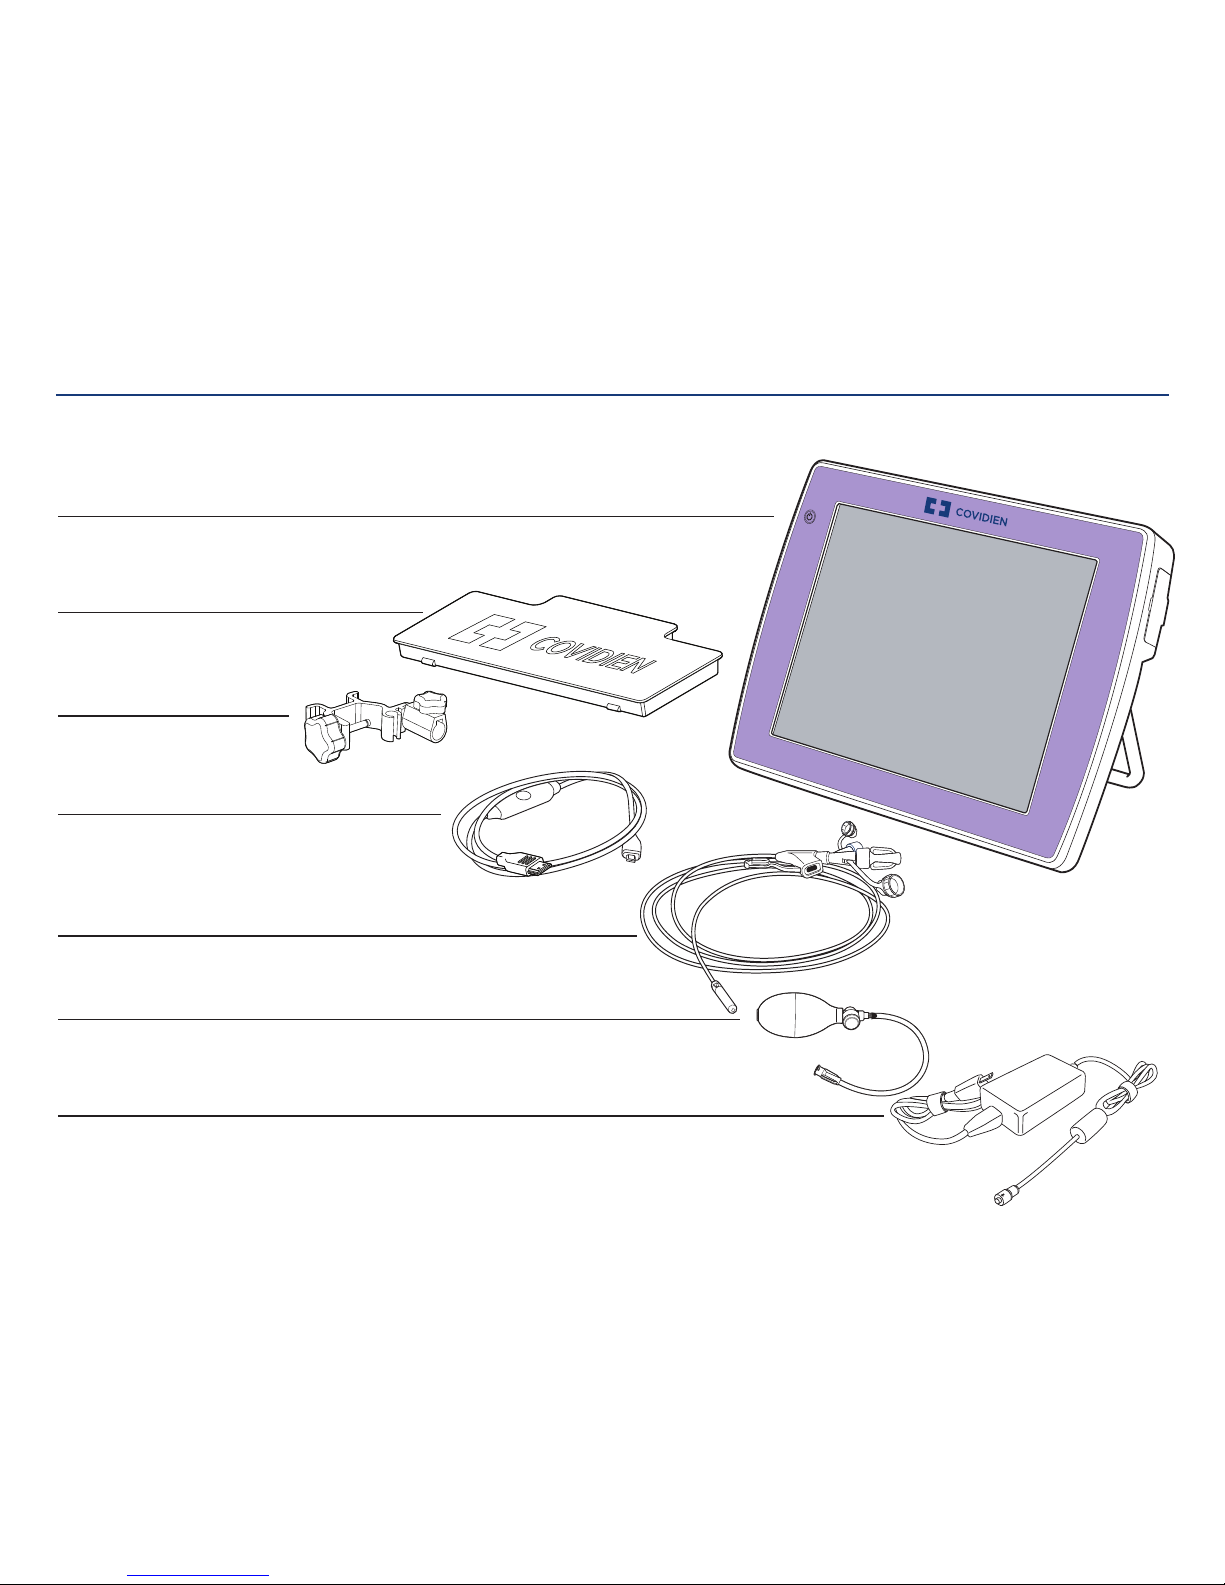
The Kangaroo feeding tube with IRIS technology is supplied in a semi-ready-to-use state.
Console with touch screen interface
Mounting clamp
Interface cable
Kangaroo feeding tube with IRIS technology and stylet
Detachable power adapter
Rechargeable battery
Insufflation device (packaged separately)
Optional accessories (see section regarding optional accessories):
Battery charging station, mounting cart, and carrying case.
Section I: System Overview
System Components
Page 6

Kangaroo™ Console | 4
Kangaroo Feeding Tube with IRIS Technology and Stylet (single use devices):
The Kangaroo feeding tube with IRIS technology and stylet is a single use device with a camera embedded in the distal end to aid in placement. The tube is made of radiopaque polyurethane
material and features a Hydromer coated tip.
Insufflation device (single use device):
The insufflation device is to aid in feeding tube placement.
The insufflation device is connected to the feeding tube through the side port.
Section I: System Overview
Port for interface cable
Feeding port
Stylet
Side port
Camera
Feeding eyelet
cm marks
Insufflation bulb
Pressure relief valve
Insufflation connector
Insufflation connector
Side port
Page 7

Kangaroo™ Console | 5
Interface cable:
The interface cable is a re-usable cable that connects the console to the tube.
Mounting clamp:
The mounting clamp is used to attach the console to a pole, if desired.
For detailed instructions, refer to the assembly section.
Power adapter:
The power adapter is supplied with four AC power cord options. Plug the power
adapter into the console to charge the battery.
It is important to choose the appropriate AC power cord for your region.
The interface cable has a push-button used to capture images of theprocedure.
Connects to feeding tube
Connects to console
Image capture button
Section I: System Overview
Page 8
Kangaroo™ Console | 6
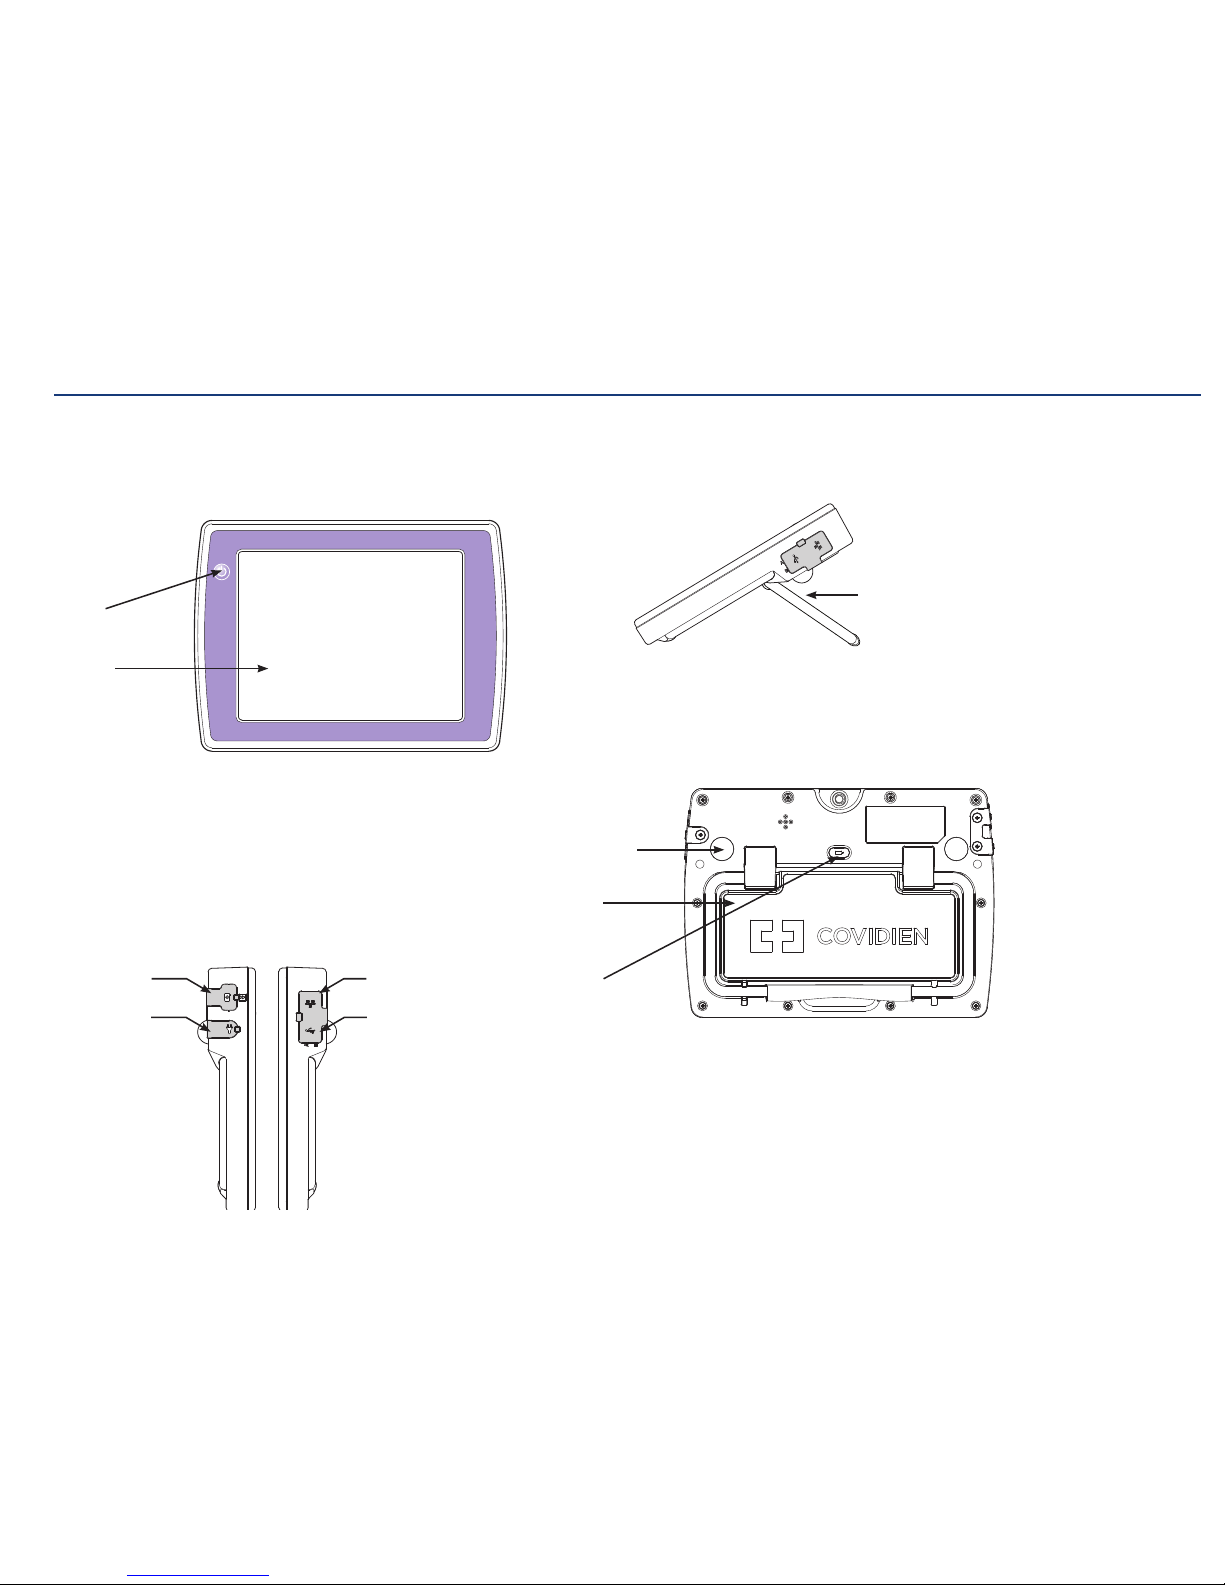
Console and battery:
The console has a full-color touch screen that displays a real time image as the
feeding tube travels through the patient during the placement procedure. Images can
be captured, stored, and annotated on the console.
Power
On/Off
Rechargeable
battery
Rubber
console feet
Touch
screen
Kickstand
for use on
flat surface
Battery
release
button
Ethernet port
(non-functional)
Interface
cable port
USB ports
Power cord
connector
Section I: System Overview
Mounting clamp:
The mounting clamp can be attached to the back of the console and is easily
removable. For information on attaching, using, and removing the mounting clamp,
see section regarding assembly.
Image capture:
The console has security features to help protect the information from being accessed
by other people. The device requires a login name and password to use the system.
Stored images can be exported as .bmp or .jpg files onto a USB flash drive and added
to a patient’s file. Images are password-protected for security and privacy purposes.
The USB ports are also used for software updates to the system.
Kickstand:
The console can be used on a tabletop or mounted on a pole or cart. A built-in
kickstand props the console up at an ideal viewing angle when on a flatsurface.
Rechargeable battery:
A replaceable, rechargeable Li-Ion battery is included. The console recharges when
the power adapter is plugged in to an AC outlet, or by using the battery charger
(optional accessory).
Page 9
Kangaroo™ Console | 7
Console user interface:
The console has a color-display touch screen with step-by-step prompts to guide you
through setup andoperation.
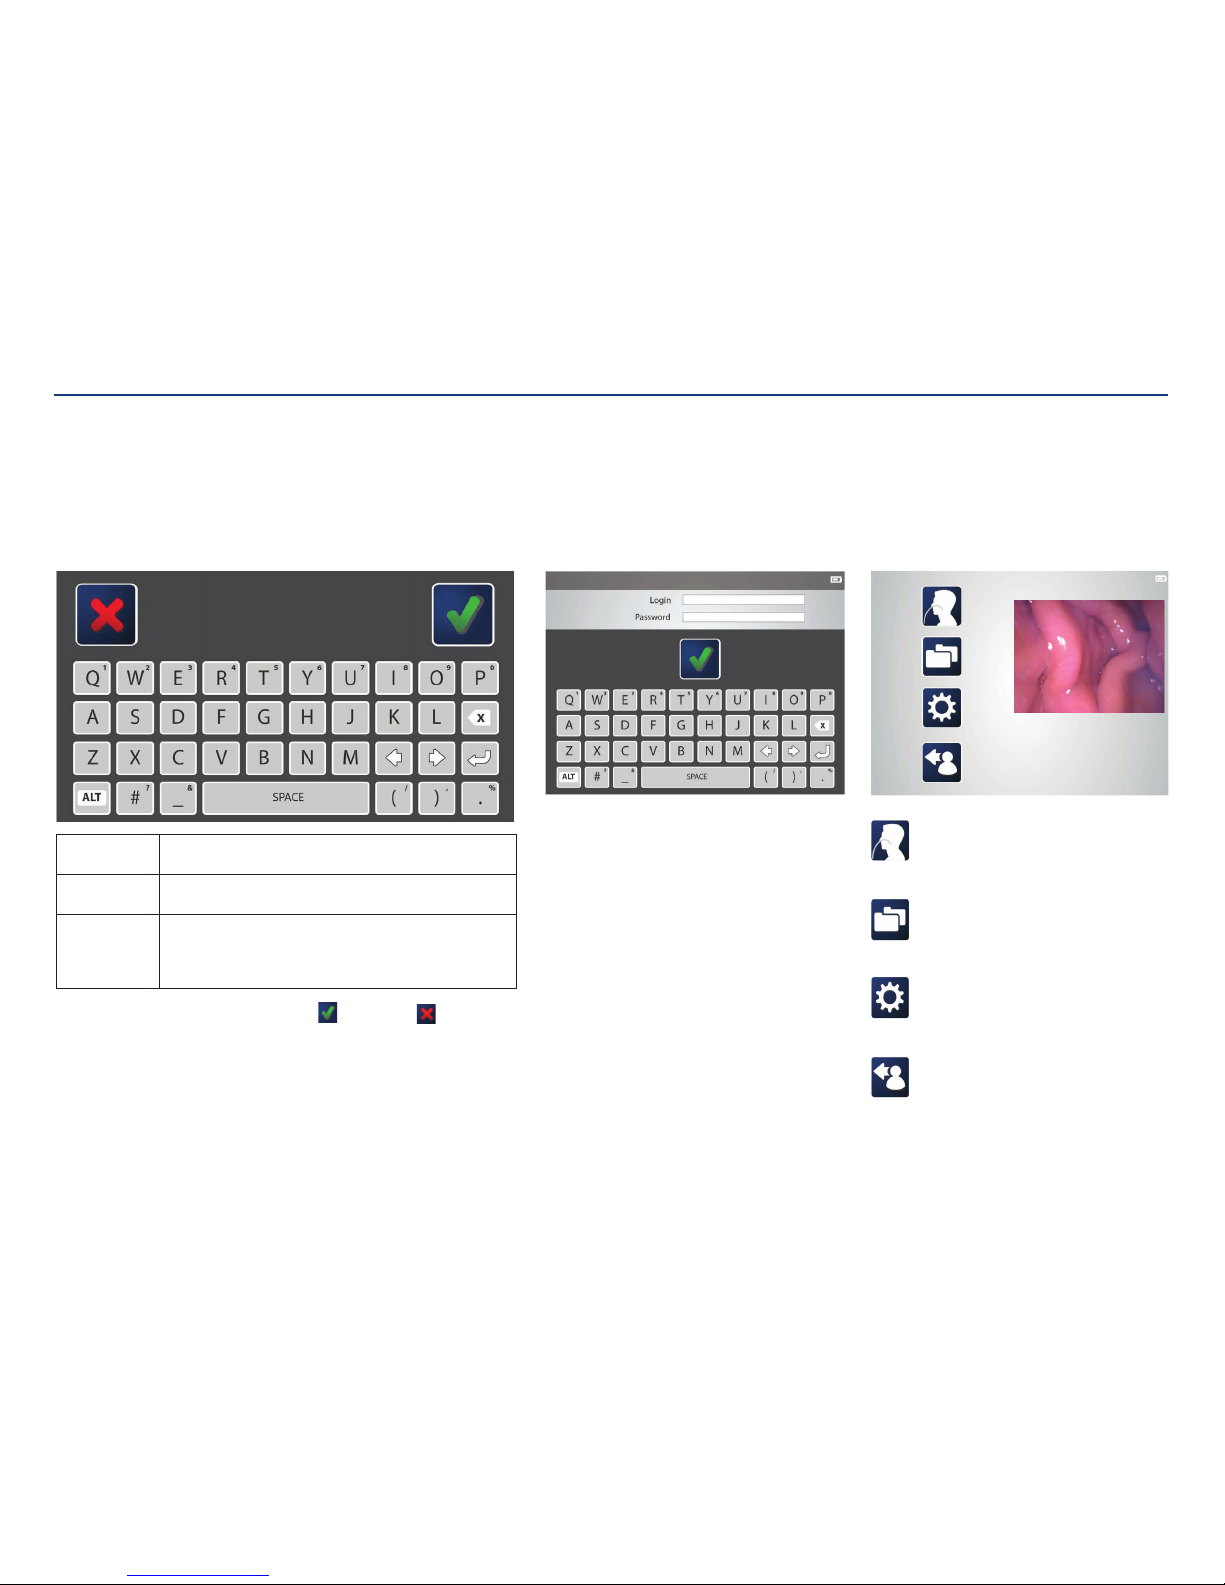
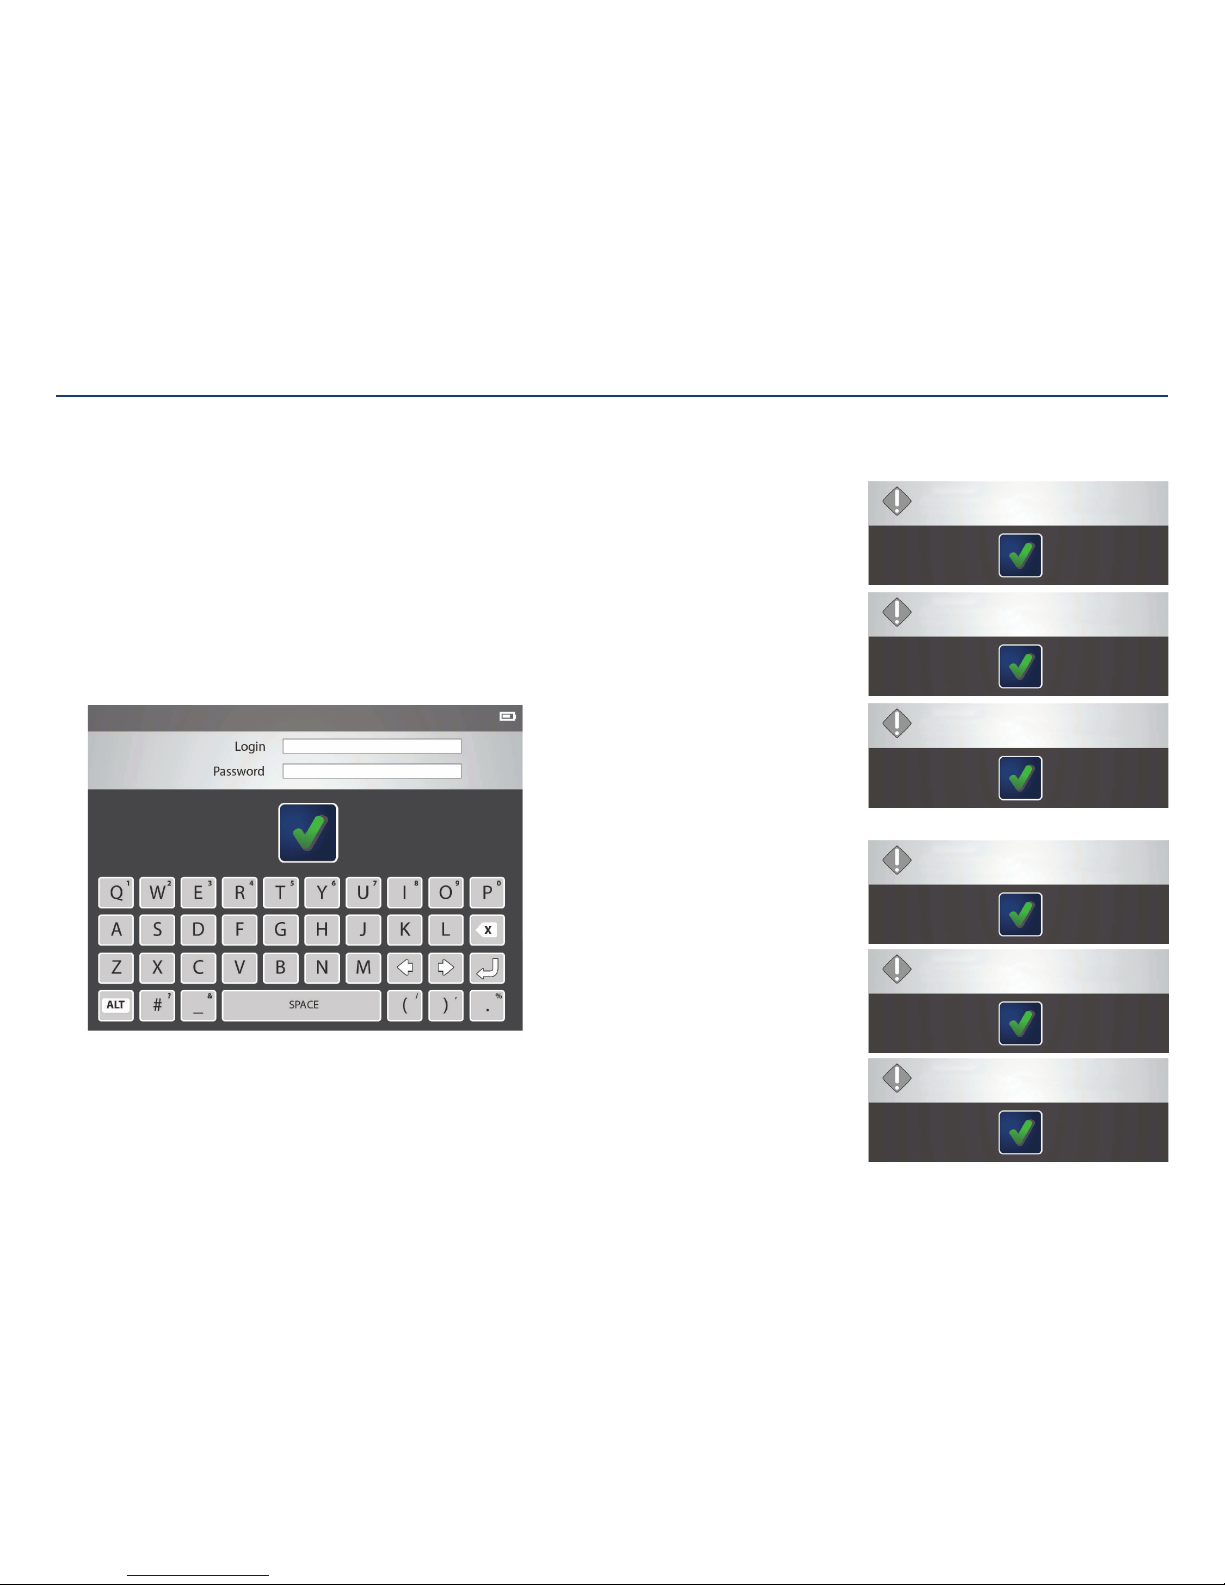
On screen keyboard:
An on screen keyboard will appear when typing is necessary. Use the keyboard to
enter text, such as a login name, patient information, or to annotate images.
To enter text: Tap a text field (such as a login name or password) and then use
the on screen keyboard to type.
To edit text: Tap the text field and use the arrow keys to navigate to desired
text location.
To enter
numbers or
secondary
symbols:
Press the ALT key. Tap the key(s) that contains the desired
number or symbol (displayed in the upper, right corner). When
finished, press the ALT key again.
When finished typing, press the check mark icon
to save or the to cancel and
return to the previousscreen.
Procedure:
Use the procedure feature to launch
the functional flow for entering patient
information and procedure activities.
Folders menu:
The folders menu launches the data browser
of patient folders. Each folder contains images
captured during theprocedure.
Settings menu:
The settings menu provides links to modify
language, date/time, file formats, passwords,
device options, and usersettings.
Log out:
Clicking the log out icon ends thesession.
Section I: System Overview
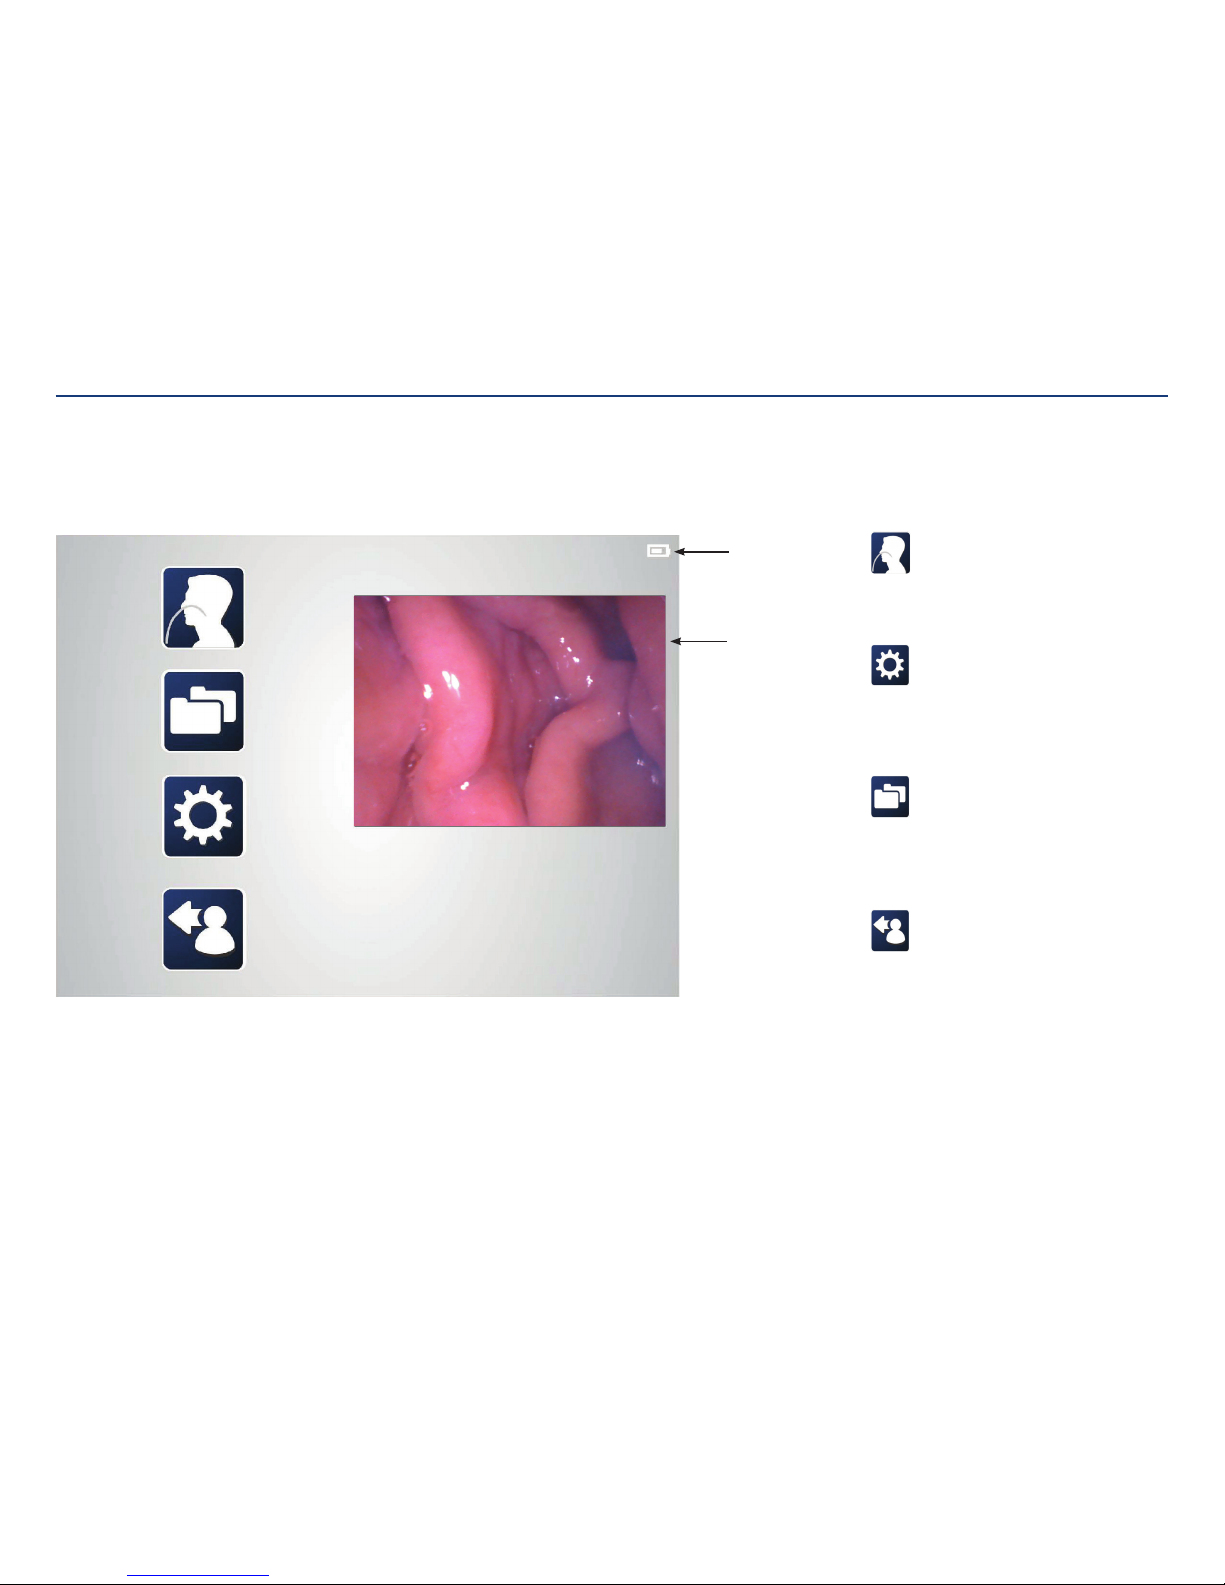
Main menu:
The main menu provides links to log out, settings, file
management, and procedure initiation. Clicking any of
these icons brings you to thosescreens.
System login:
After the initial set up, users will be prompted for a
login name and password to access the system. First
time users should receive their login information from
an administrator. After logging in, the screen will show
the main menu.
Page 10

Section II: Assembly and Initial Administrator Use
Page 11

Kangaroo™ Console | 9
Section II: Assembly and Initial Administrator Use
Assembling System Parts
Attach battery:
The battery provided is both removable and rechargeable. To place it into the console, align it with the space on the
back, then lightly press it in.
Attach mounting clamp (optional):
The console can be attached to a vertical pole using the mounting clamp, included with the systemcomponents.
Attach the clamp to the console by aligning the hole on the pole clamp with the mounting hole on the back of the
console. Use a 3/8” - 16 bolt to fasten together.
Attach the mounting clamp to a pole by fitting it in between. Then, tighten the knob so that the clamp and console
are securely attached.
Connecting power adapter:
The removable power adapter connects to the console to charge the battery.
To connect, arrow on power adapter should be facing up (same side asscreen).
To disconnect, grasp cord by the locking sleeve and pull away from console.
Page 12
Kangaroo™ Console | 10
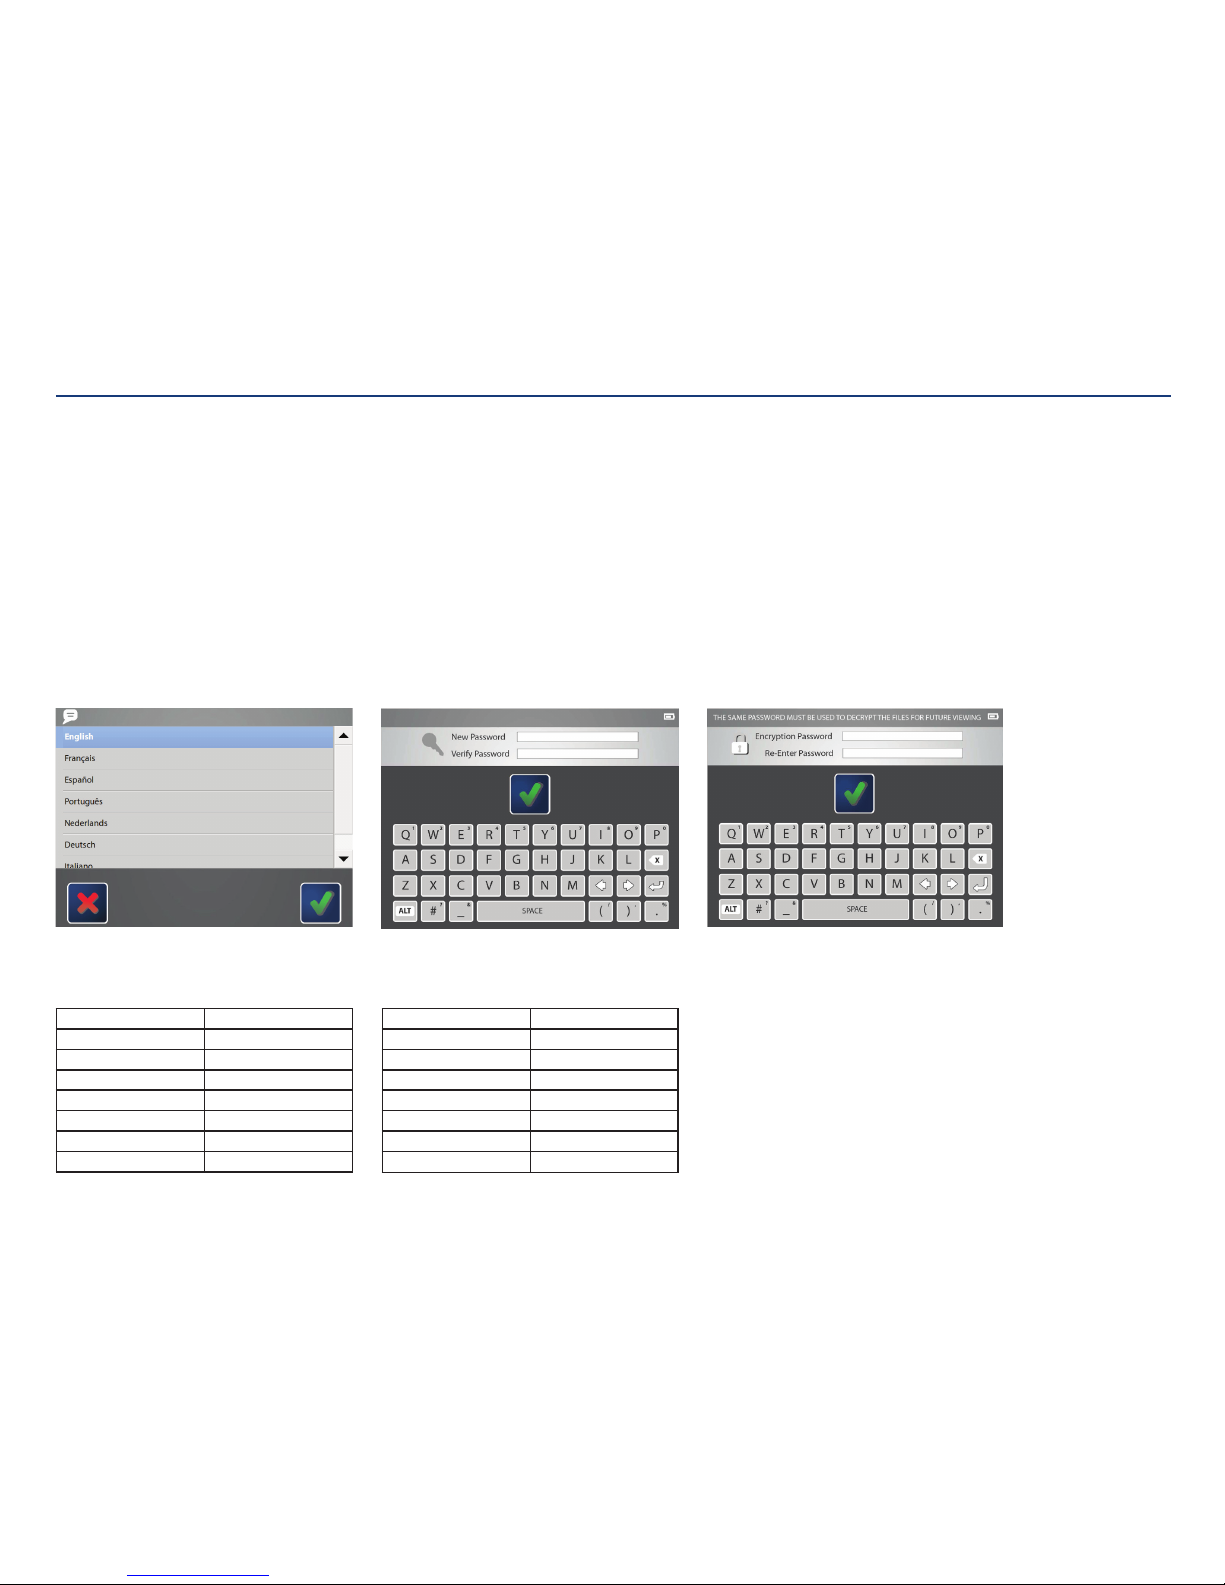
Choose language:
Choose the language for the console interface.
Initial Administrator Use
When the console is powered on for the first time, or after being reset to factory settings, the administrator account needs to set up the console settings.
This administrator login name is “ADMINISTRATOR” when English is selected.
If another language is selected, see table below.
Administrator password:
Create a password that will be used only for the system
administrator account. Use the on screen keyboard to
enter the password into the text fields. The password
must be between 8 and 12 characters. Password can
include uppercase letters, numbers, and symbols.
This administrator login name is “ADMINISTRATOR”.
Other administrator accounts can be created in
addition to this.
Encryption password:
The password created will be needed to open any files
exported from this console. The same password will be
used for any files exported.
Tap on the first text field to enter the desired password.
Then, re-enter the password in the text field below.
When satisfied, touch the check mark to save
thechanges.
Note: The password is case-sensitive and will be in all
upper-case.
Section II: Assembly and Initial Administrator Use
Language Administrator Login
English ADMINISTRATOR
Français ADMINISTRATEUR
Español ADM INISTRADOR
Português ADMINISTRADOR
Nederlands BEHEERDER
Deutsch ADMINISTRATOR
Italiano AMMINISTRATORE
Language Administrator Login
Dansk ADMINISTRATOR
Suomi PÄÄ KÄYT TÄ JÄ
Norsk ADMINISTRATOR
Polski ADMINISTRATOR
Русский АДМИНИСТРАТОР
Svenska ADMINISTRATÖR
日本語 カンリシャ
Page 13

Kangaroo™ Console | 11
Initial Administrator Use
When the console is powered on for the first time, or after being reset to factory
settings, the administrator account needs to set up the console settings. A settings
menu will appear once the language preference, administrator password and
encryption password have been set.
Settings menu:
Tap on the icons at the bottom of the screen to make changes to the date/time,
language, file format, device, and users.
It is recommended that the current time and date is set prior to use. New user logins
and passwords should be added at this point.
Section II: Assembly and Initial Administrator Use
Back:
Return to previous screen.
Time and date:
Set or change the time and date.
Language:
Change the preferred language.
Format:
Choose the preferred image type (.jpg or .bmp) for export.
Edit the way the time and date are written on the patient files and images.
Device:
Erase patient data, update software, or reset console back to
factorysettings.
Password:
Change the login password.
Passwords must be reset after 90 days.
User groups:
Create logins and passwords for operators and reviewers.
Change login names and/or passwords for other users.
Encryption password:
Create password to decrypt and open exported files.
Page 14

Section III: Setting Up and Using the Kangaroo Feeding Tube with IRIS Technology for Placement
Page 15
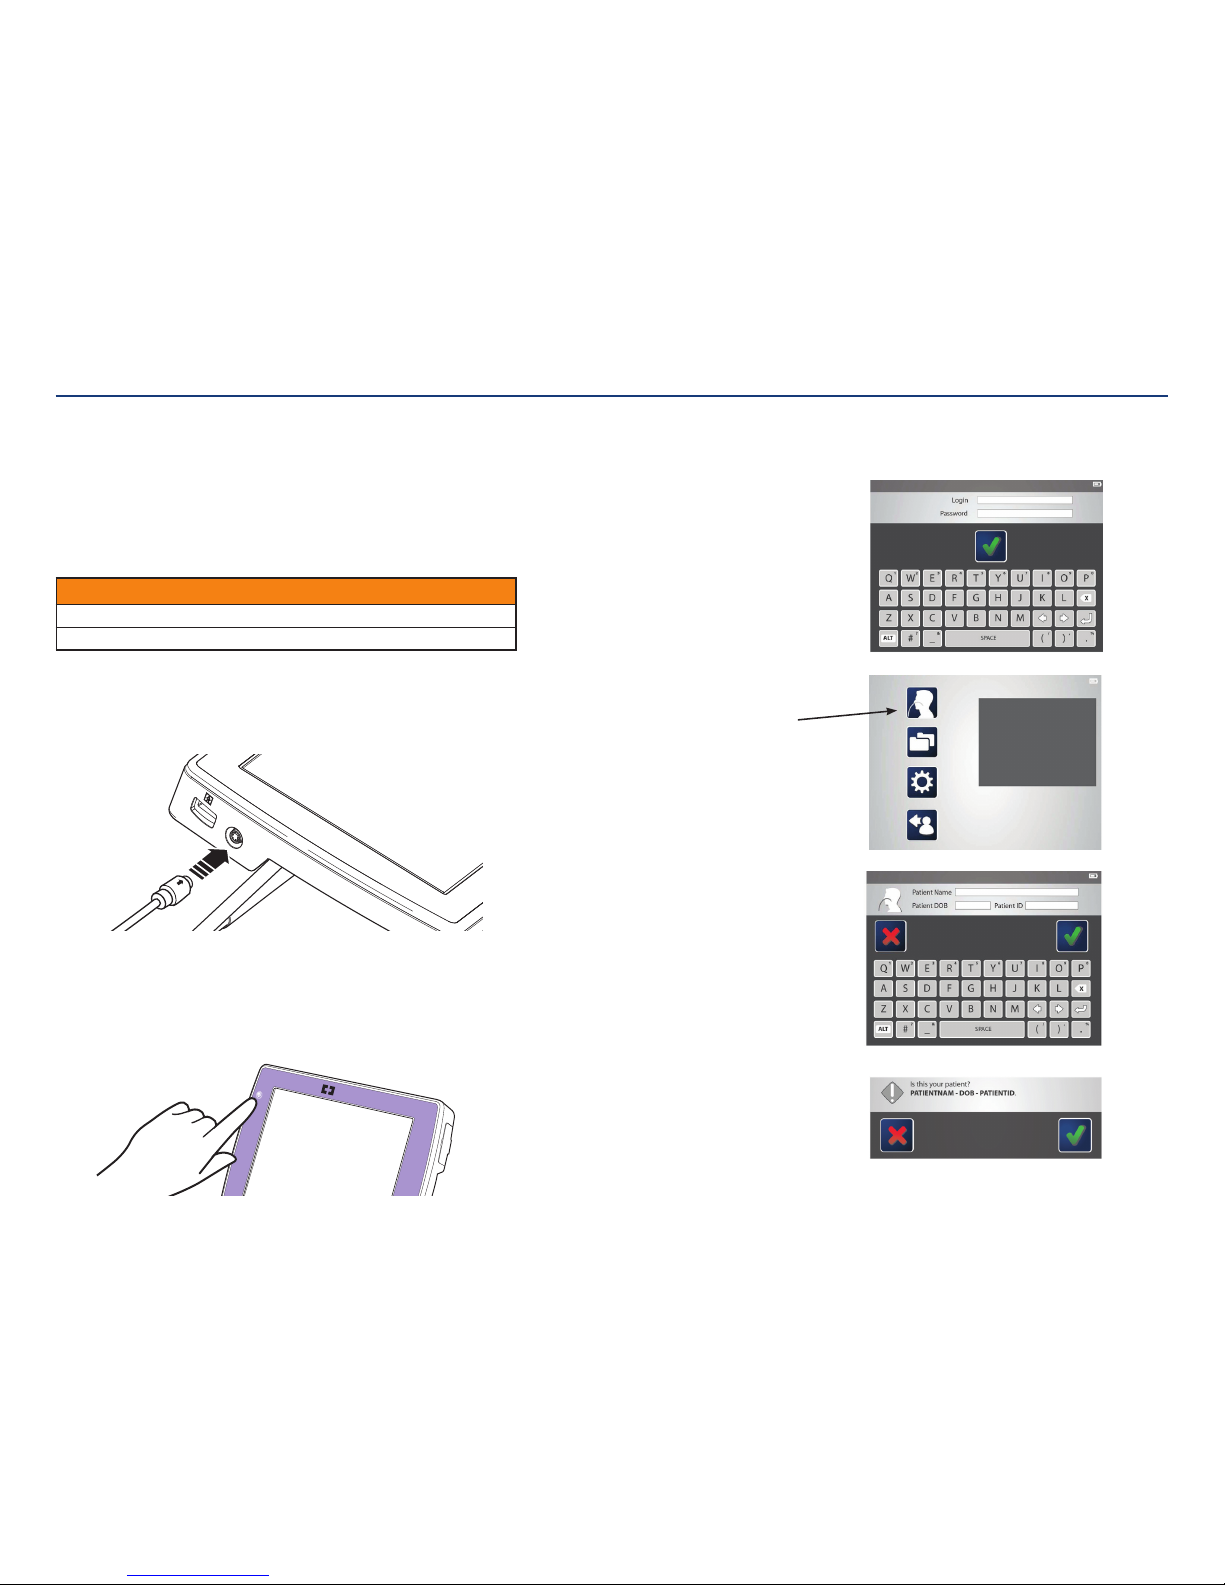
Kangaroo™ Console | 13
Set Up and Use
1. Read all warnings and precautions prior to tube insertion.
2. Explain procedure to the conscious patient. Prepare supplies (ENFit™*
syringe, feeding tube water, wipes, and stethoscope).
Position console in a direct line of sight. Console can be pole mounted, propped on
bedside table, or handheld.
CAUTION
Do not place console on patient’s bed during procedure.
Check battery life of console. If low, connect console to AC power outlet.
3. Plug in the power cable (if necessary).
If desired, connect the power cord to the console. To connect, arrow on power
adapter should be facing up (same side as screen).
4. Power the console on.
Press the power button. The system should start up shortly after and display a
loginscreen.
Note: After a period of inactivity (no user input to the console), the console will
automatically log the user out. This log-out will not occur during aprocedure.
COVIDIEN
5. Enter login, password, and patient information.
The system will request a login name and password. After
typing, tap the check mark to proceed to the mainmenu.
Note: First time users need to have an administrator set
up a login name and password prior to use.
The main menu will appear.
Tap on the procedure icon to begin the
placementprocedure.
Follow the screen commands to enter the patient
information. When complete, tap the check mark
toproceed.
The system will ask for confirmation that the
information is entered correctly. If yes, tap the check
mark. If not, tap the red “x” to go back and re-enter
theinformation.
Section III: Setting Up and Using the Kangaroo Feeding Tube with IRIS Technology for Placement
Page 16
Kangaroo™ Console | 14
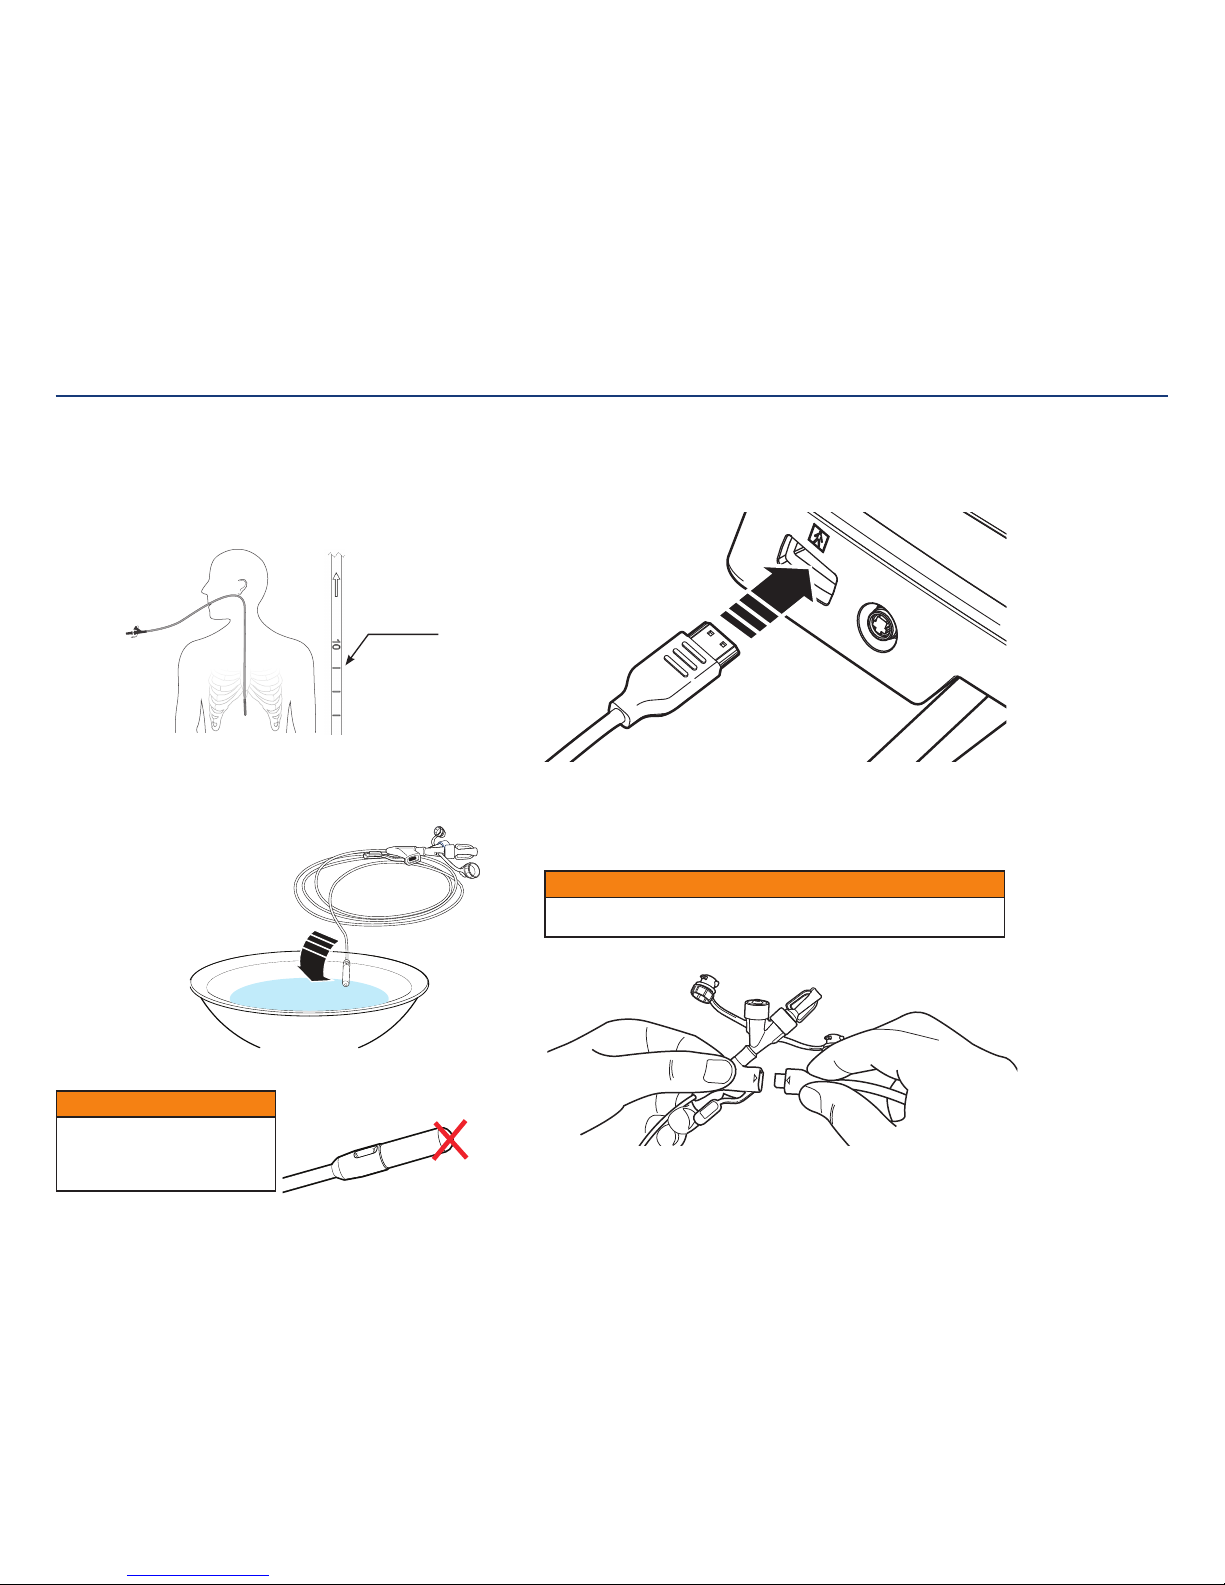
8. Connect interface cable to console.
After entering patient information, the console will request a feeding tube to
beattached.
Start by connecting the larger end of the interface cable to the console.
9. Connect interface cable to feeding tube.
A screen on the console will request that a feeding tube be attached. Connect the
smaller end of the interface cable to the feeding tube. Once the feeding tube and
interface cable are connected to the console, a live feed from the camera will display
on the screen.
CAUTION
Allow enough slack so that there is no stress on the tube or console. Strain on the
tube or console could cause droppage, breakage, or discomfort to thepatient.
CAUTION
If applying lubricant, do not put
lubricant on or near the camera-side
of the feeding tube. The camera vision
may become blocked orblurred.
6. Position patient and estimate feeding tube length.
Position patient in accordance with facility protocol for feeding tubeplacement.
To estimate insertion depth, use the tube to measure the distance from the tip of the
patient’s nose to the earlobe and from the earlobe to the xiphoid process for gastric
placement. Add approximately 10 (ten) inches (25 cm) for intestinal placement.
Spontaneous transpyloric passage of the tip often occurs within 24 to 48 hours.
7. Activate Hydromer coating.
Use water to activate the Hydromer coating on the Kangaroo feeding tube with IRIS
technology. Submerge tip for about 5 seconds to activate the Hydromer coating.
Avoid applying additional
lubricant to tip
Section III: Setting Up and Using the Kangaroo Feeding Tube with IRIS Technology for Placement
cm marks
Page 17
Kangaroo™ Console | 15
10. Choose the most patent nare.
Choose the most patent nare and insert the feeding tube with the stylet.
Direct the feeding tube posteriorly, aiming the tip parallel to the nasal
septum and superior surface of the hard palate. Advance the tube to the
nasopharynx, allowing the tip to seek its own passage. Once in place, do not
manipulate or pull the stylet back and forth within the feeding tube. When
the tube has reached the oropharnyx, encourage the patient to swallow.
Giving sips of cool or room temperature water may assist the passage of
thetube.
11. Using the insufflation device.
The insufflation device is for use during placement of the Kangaroo feeding
tube with IRIS technology to assist in the identification of anatomical
landmarks. Slight distension of the anatomy around the camera’s viewing
area can aid the visualization of the esophagus and the gastro-intestinal
surfaces. Air may be needed for improved viewing of anatomical landmarks
when tube tip insertion has progressed beyond the 25-35 cm mark. Additional
air may be needed when advanced beyond the esophagogastric (E-G)
junction. The volume of air needed for visualization will vary due to the
amount of air expelled naturally by the patient during the procedure as well
as the distribution of air in the GI tract. Do not administer more air than is
necessary for visualization. However, it should be expected that excess air will
be expelled naturally from the patient during and after insufflation.
To use the insufflation device, connect the insufflation ENFit™* connector to
the side port of the Kangaroo feeding tube with IRIS technology. The feeding
port should be closed off during tube insertion, either by maintaining the
stylet hub in the feeding port or by connecting the cap to the feeding port. At
the discretion of the clinician, air can be delivered through the feeding tube
during the placement by manually squeezing the insufflation bulb, which
provides approximately 30mL per hand squeeze. Monitor the patient’s level of
tolerance and visual signs of abdominal distention. At any time, the clinician
may press the black button on the insufflation device to release excess air. At
the end of the placement, the insufflation device should be disconnected from
the feeding tube and the side port should be closed. Alternatively, a syringe
can be used to conduct air insufflation.
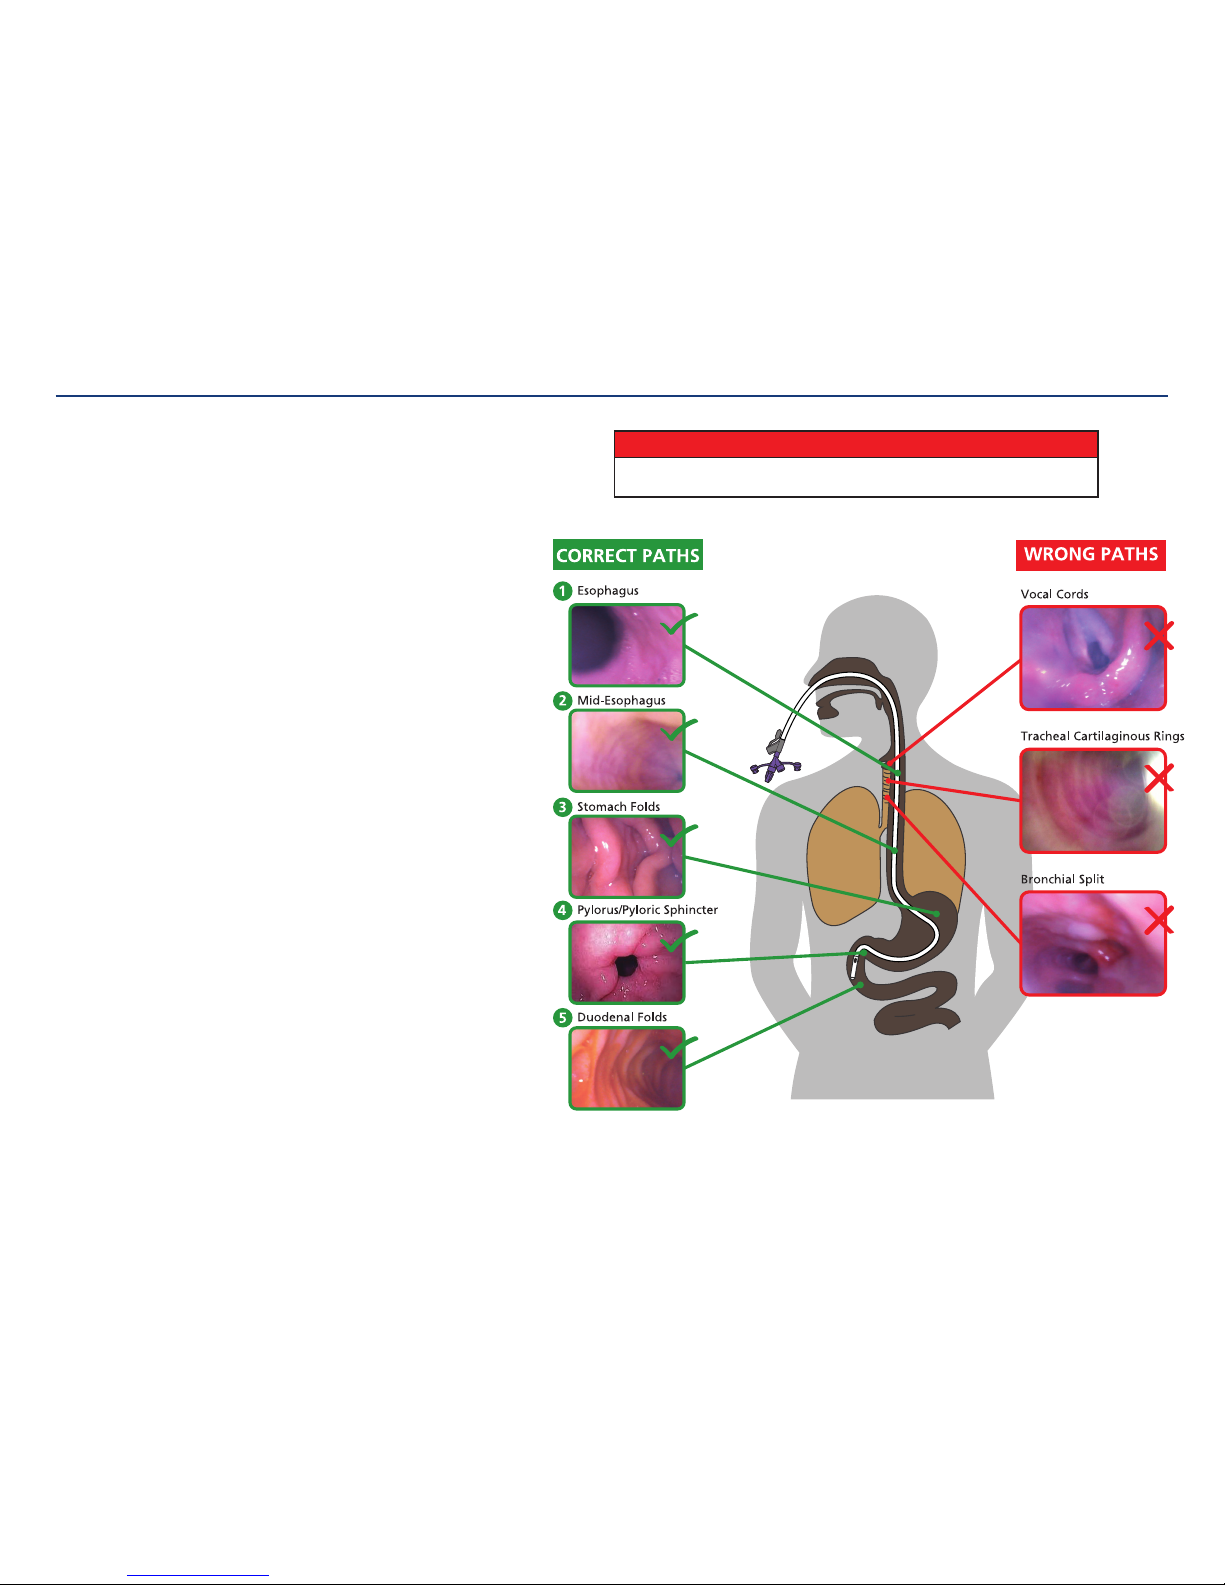
12. Using console for placement.
While inserting the Kangaroo feeding tube with IRIS technology, utilize the
console screen to correctly identify anatomical markers during placement (see
path images at right).
WARNING
Images of anatomical markers are for reference only. Refer to Kangaroo feeding tube
with IRIS technology system training. Only a trained professional should use thesystem.
Section III: Setting Up and Using the Kangaroo Feeding Tube with IRIS Technology for Placement
Page 18
Kangaroo™ Console | 16
16. Confirm placement.
Confirm feeding tube position per institutional protocol. Supportive
confirmation includes auscultation of the upper left quadrant during
injection of air using a syringe and aspiration of gastric contents. If stylet
is used, placement confirmation may be confirmed with a stylet secured
within the tube. These tubes are equipped with a radiopaque material for
facilitating radiological (X-ray or fluoroscopic) confirmation.
If there is uncertainty of the tube’s distal location after institutional
placement verification methods have been performed, confirmation by
X-ray should beconsidered.
Stylet must be removed before commencement of enteral nutrition
delivery.Safely dispose of all supplies according to the policy of your
facility. The interface cable is re-usable, do not dispose.
CAUTION
Disconnect the feeding tube from the interface cable prior to feedings.
17. View captured images.
In the main menu, tap the folder menu icon. The folder menu will appear,
displaying patient folders. Patient folders are named using their name,
date of birth, and ID number. Thepatient folder holds all images captured
during theprocedure.
Double tap the desired patient folder to view a list of images
storedwithin.
Double tapping on one of the images will display it on the screen.
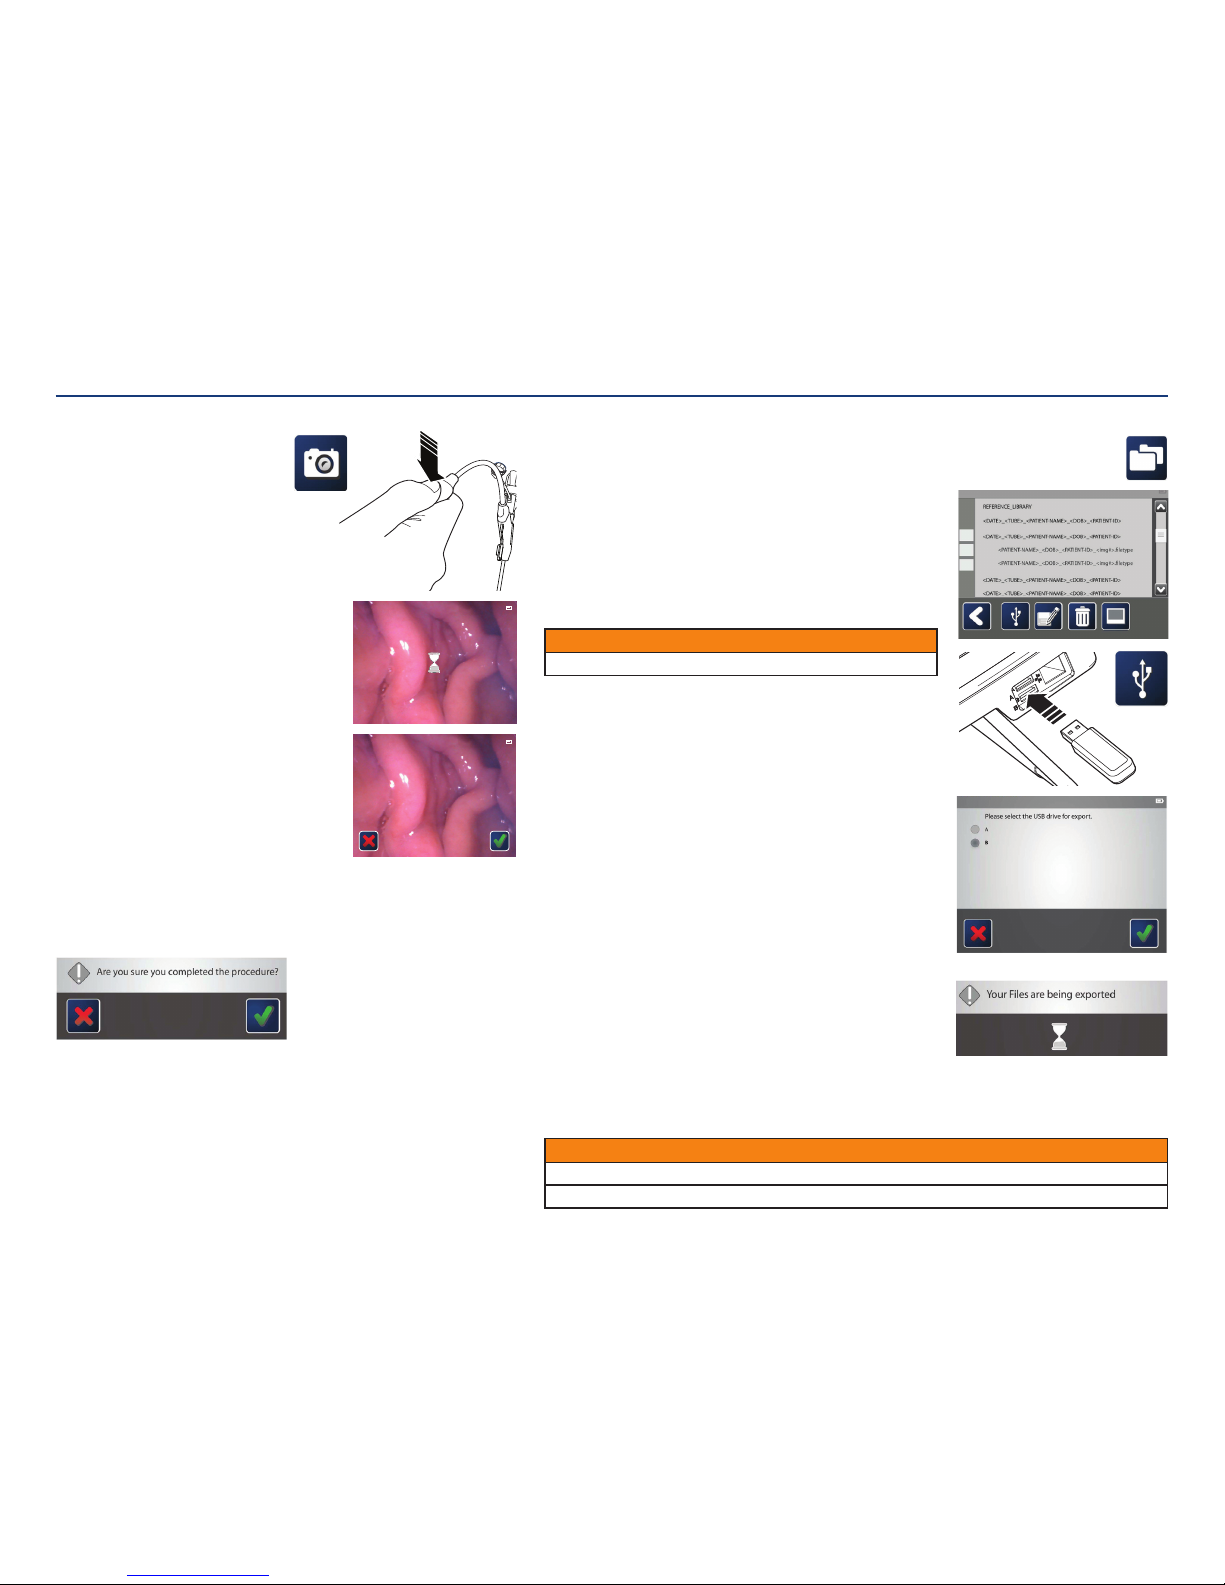
18. Export images to USB.
Images can be exported to a USB flash drive and opened on
anothercomputer.
Plug the USB flash drive into the port on the side of the console.
Then, tap the box on the left of the image(s) to be exported. Tapping the
box at the left of the folder selects allimages.
Tap the USB icon.
A pop-up screen will ask which USB port the USB flash drive is plugged
into. Confirm the appropriate drive and press the check mark.
If only one USB is connected, the console will highlight that option.
For privacy purposes, a password has been created by an administrator.
The password will be required in order to view the images on computer.
Note: Passwords are in full upper-case. When using a computer, be sure
to use all upper-case letters.
After the files are exported, disconnect the USB flash drive.
Use WinZip™* or 7-Zip to open the files. It is considered best practice to
decrypt and open the files as soon as possible so that a password is no
longer required.
13. Capture images.
The system offers two ways to capture
an image: using the interface cable or
theconsole.
To capture an image using the
interfacecable:
• Press the button on the interface cable
once to freeze the image during procedure
– Once the image is frozen, it can be
saved or discarded.
• To save the image, click the button on the interface
cable once. An hourglass will appear on the screen
while the system is saving the image.
– To discard the image, click the button on the
interface cable twice. Once the image has
been discarded, the live feed will reappear on
theconsole.
To capture an image using the console:
• Tapping on the camera icon on the display screen to
freeze the image.
– Once the image is frozen, it can be saved or
discarded.
• Tapping the screen once while the image is frozen
will cause the Cancel and Complete icons
toappear.
– Tap on the Done/Complete icon to save the image.
An hourglass will appear on the screen while the
system is saving the image.
• Tap on the Cancel icon to discard the image. Once the image has been discarded,
the live feed will reappear on the console.
14. Ending procedure.
When the procedure is complete and the feeding tube has been placed properly, tap
the green check mark.
A window will pop up requesting confirmation that the procedure is complete. If so,
tap the green check mark again.
Disconnect the interface cable from the feeding tube and cover the electronicport.
Should the operator forget to end the procedure the system will automatically shut
down after 120 minutes of the tube being powered on.
15. MR Information Card.
The MR information card provided within the instructions supplied with the Kangaroo
feeding tube with IRIS technology is to be filled out and removed. The card is to be
carried by the patient.
CAUTION
Passwords are case-sensitive. Use upper-case letters when entering the password on the computer.
Verify USB devices used with this equipment are free of software viruses and other malicious software.
Section III: Setting Up and Using the Kangaroo Feeding Tube with IRIS Technology for Placement
or
11:11:11 PATI ENT- NAM E-U P-TO -THI RTY- CHA RAC TER S 11-11-2 011 PAT IENT -ID -XX XX
11:11:11 PATI ENT- NAM E-U P-TO -THI RTY- CHA RAC TER S 11-11-2 011 PAT IENT -ID -XX XX
Page 19
Kangaroo™ Console | 17
Reconnecting
Reconnecting the console and interface cable to the Kangaroo Feeding Tube
with IRIS Technology:
A console used to place a feeding tube will retain the memory of which patient is
associated to that tube. By re-connecting to the same feeding tube, the console will
recognize it and ask for confirmation that the patient data iscorrect.
Note: Only the console used during the placement procedure will recognize the
feeding tube and associated patient information. If a different console is connected to
a pre-placed tube, entering the patient’s information is required.
Power on and reconnect:
Power console on and enter login name and password.
Connect console to interface cable.
Connect interface cable to pre-placed Kangaroo feeding tube with IRIS technology.
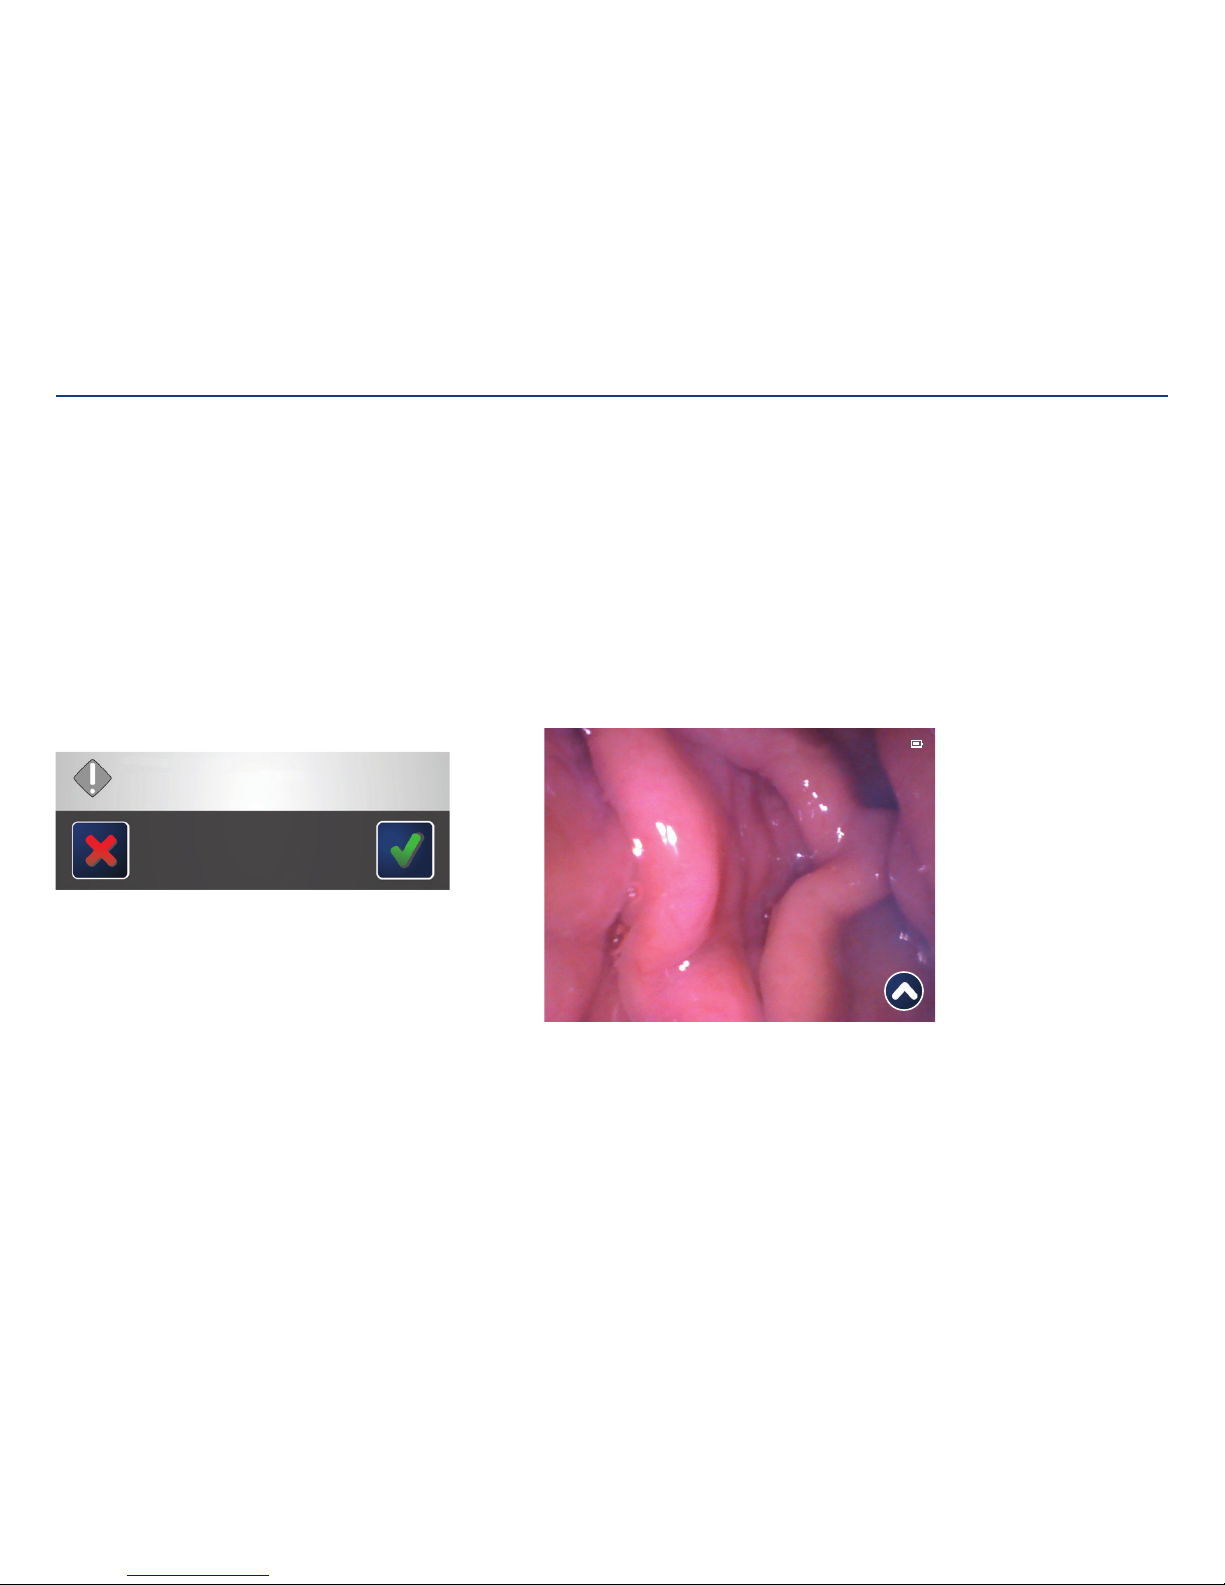
You have just connected a feeding tube placed on the
following patient: PATIENTNAME - DOB - PATIENTID.
Is this your patient?
Confirm patient information:
A screen will pop up with the recognized patient information. Tap the check mark to
confirm the information is correct.
If the information is incorrect, tap the “x” to go back to the main menuscreen.
Section III: Setting Up and Using the Kangaroo Feeding Tube with IRIS Technology for Placement
Focus on procedure screen:
The console will display the procedure screen with a live-feed from the camera on the
end of the enteral feeding tube.
11:11:11 PATIE NT-N AME -UP -TO-T HIR TY- CHAR ACT ERS 11-11-20 11 PATI ENT- ID- XXX X
Page 20

Section IV: Cleaning, Charging, and Storage
Page 21
Kangaroo™ Console | 19
General Console, Interface Cable, and Power Cord Cleaning Directions
Cleaning should be performed as needed.
Cleaning of the console, interface cable and power cord must be performed
as follows:
Use mild detergent for general cleaning.
If necessary, the device may be cleaned with a 0.5% bleach mixture, or Clorox™*
germicidal wipes. However, repeated cleaning with this solution can damage the
materials.
Isopropyl alcohol, applied with a damp (not wet) cotton swab, may be used for
cleaning difficult-to-reach areas, however, it should be used sparingly because
repeated cleaning may damage the device housing.
Do not use strong cleaners such as Spray-Nine™*, Phisohex™*, Hibiclens™*, or
Vesta-Syde™* because damage to the device housing canresult.
Directions for cleaning console:
• Refer to general cleaning directions above before starting.
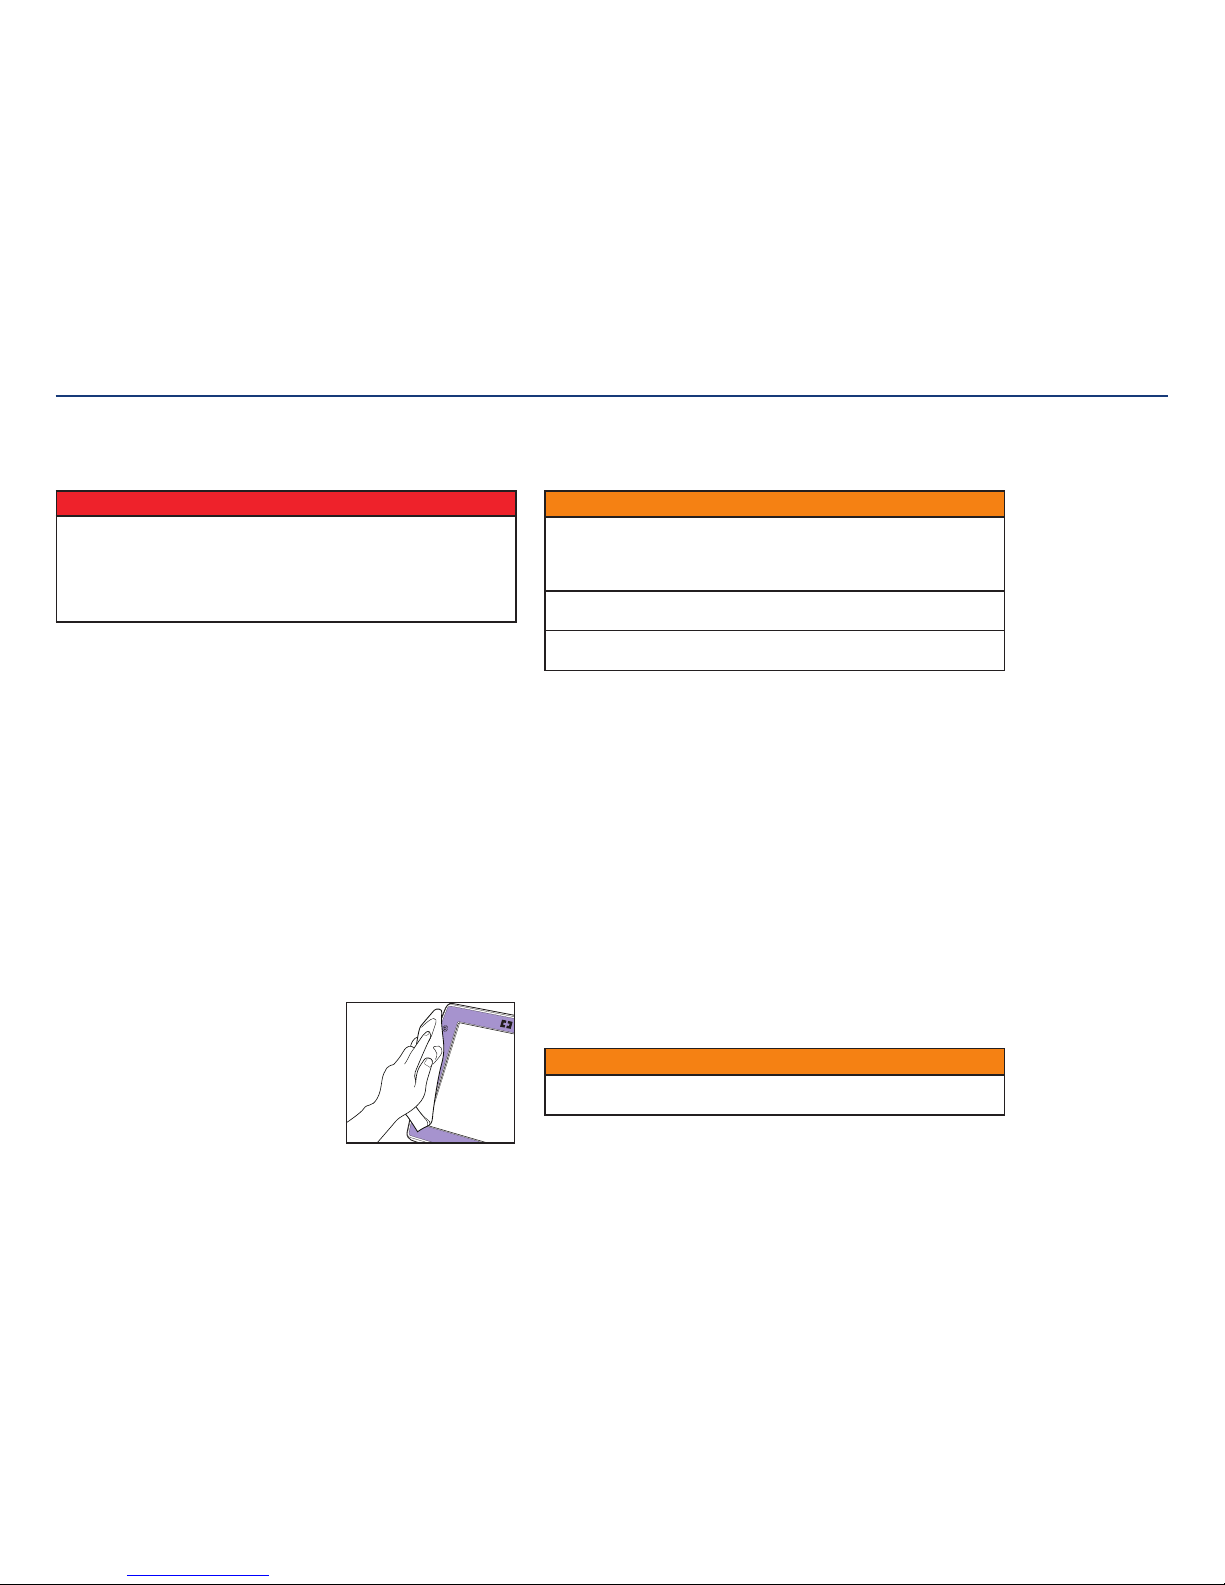
• Clean outside surface with a damp (not wet) cloth or sponge and keep console in
upright position as much as possible.
• Avoid excess moisture near mounting clamparea.
• Do not allow cleaning solution to enter the vertical
vents in the housing, underneath thehandle.
CAUTION
Failure to follow the cleaning procedures described herein could result in hazard
to users. As with any AC powered electrical device, care must be taken to prevent
liquid from entering the console to avoid electrical shock hazard, fire hazard, or
damage to electrical components.
Disconnect console from AC power source before cleaning. After cleaning, do not
connect to AC power source until console and power cord are thoroughly dry.
Do not immerse console or power cord in water or other cleaning solution; clean
using a damp (not wet) cloth or sponge.
CAUTION
Avoid exposing power cord to excess moisture, as this can lead to an electrical
shock or fire hazard.
WARNING
If any of the follow events occur, do not use the console or power cord until it has
been properly cleaned and serviced by personnel trained in servicing these devices:
• wetting of the console’s power cord or leakage into the interior duringcleaning.
• spillage of large amounts of liquids onto the console exterior, or any spillage onto
the power cord.
COVIDIEN
Directions for cleaning power cord:
• Unless soiling is observed, the power cord should not be cleaned.
• Refer to general cleaning directions above before starting.
• If cleaning of the power cord is necessary, unplug from outlet and wipe the exterior
surfaces of the wall plug with a cloth dampened with isopropylalcohol.
Directions for cleaning interface cable:
• Refer to general cleaning directions to the left before starting.
• Disconnect the interface cable from the console and feeding tube.
• Close the port covers on both ends of the interface cable.
• Avoid exposing interface cable to excess moisture.
• Do not allow cleaning solution to enter the port cover areas or pool in the
area near the button.
• Do not open port covers or connect to console or feeding tube until the
interface cable is thoroughly dry.
Section IV: Cleaning, Charging, and Storage
Page 22
Kangaroo™ Console | 20
Battery and Storage
Charging:
Between uses the console with the battery should be plugged into AC power to keep
it at full charge. Charging stations and extra batteries are optional accessories. When
using a charging station, refer to the instructions for use provided in the charging
station packaging.
Battery:
The console has a replaceable rechargeable battery. It is also recommended that the
battery charge be “topped off” before battery-only operation is utilized. The battery
pack will charge continuously whenever the device is plugged into a wall outlet,
including during normal use of the device with AC power.
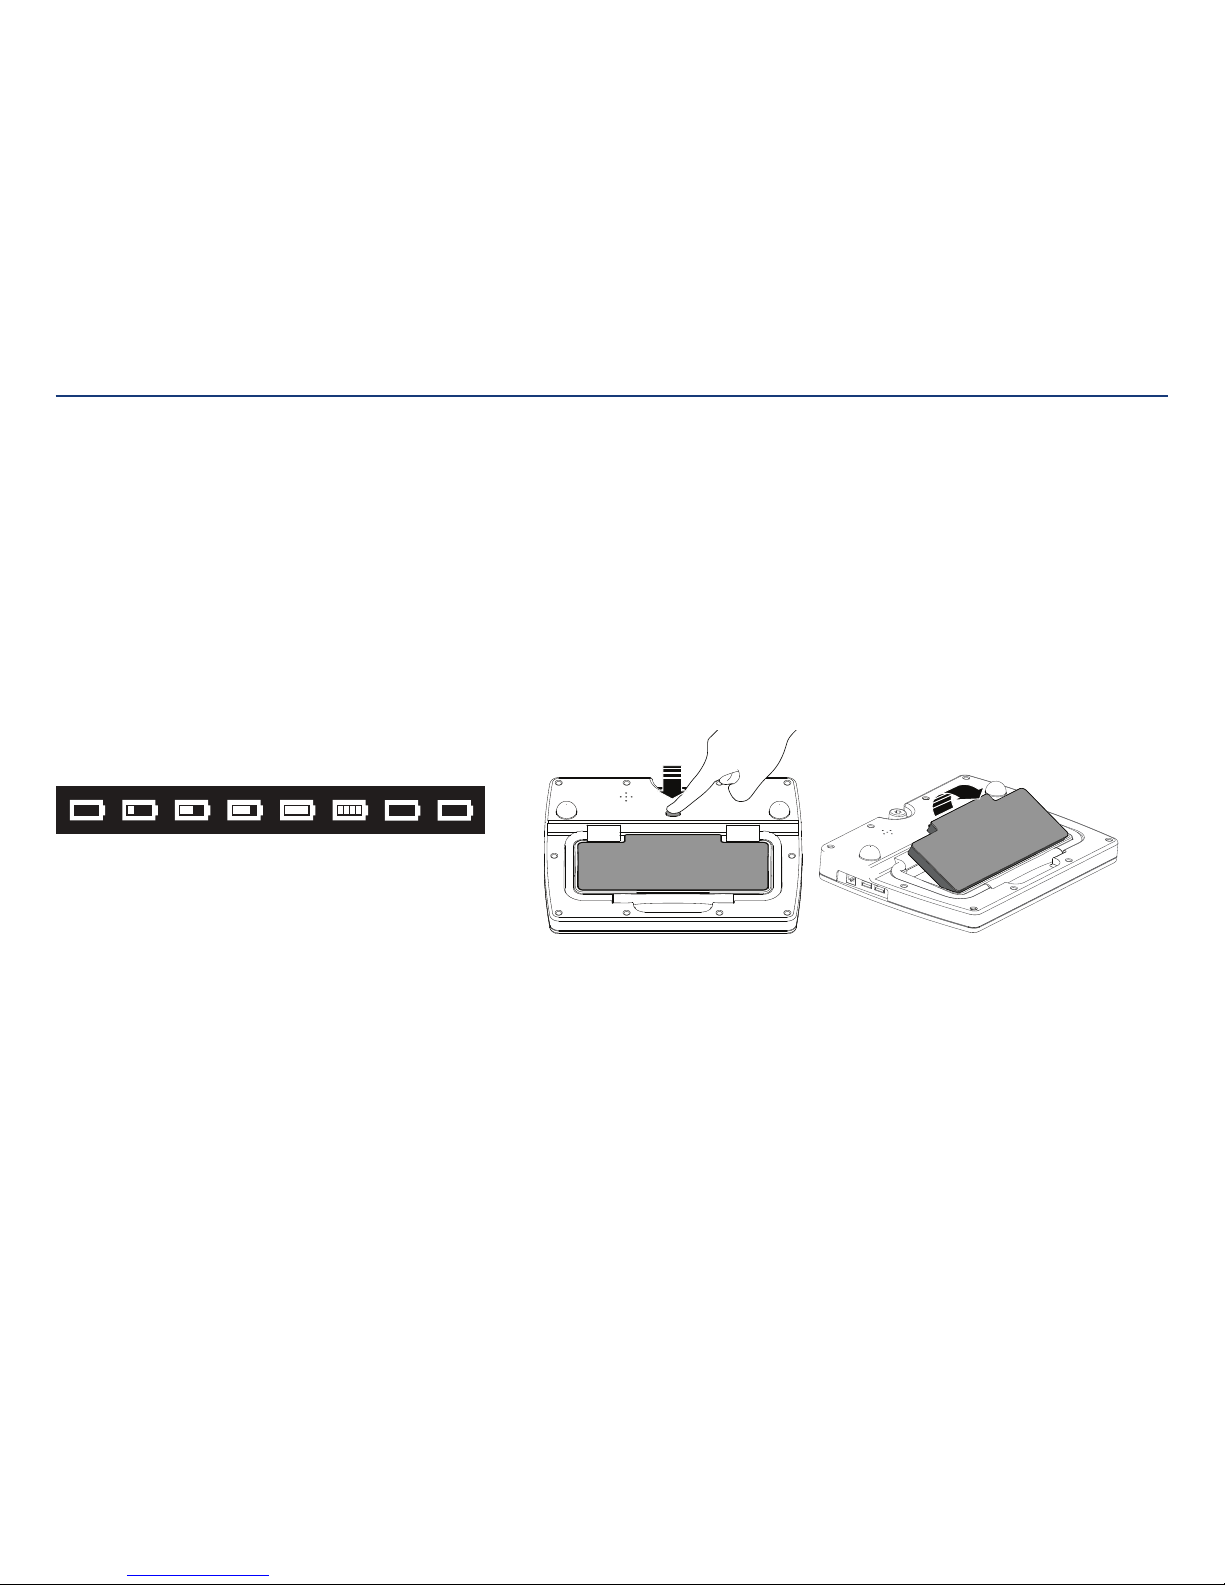
Battery level indicator:
In the upper right corner of the screen is a battery icon.
This icon changes to reflect the amount of battery life remaining until recharging
is needed. The icon will also show when the console is connected to an AC
poweroutlet.
X ?
Left to right the symbols show 1) <10% 2) 10%-25% 3) 26%-50% 4) 51%-75%
5) 76%-100% 6) charging, 7) communication error, 8) missing battery.
When the console battery has 10% capacity left a low battery warning screen will
appear. Tap the check mark and connect the console to an AC outlet using the
removable power cord.
If the battery is very low, a warning screen will appear and the console will shut off.
Plug the console in to charge the battery.
Storage requirements:
Store in environments of 0°C to +50°C and relative humidity of 15% to 85%
(non-condensing).
Section IV: Cleaning, Charging, and Storage
Store the console away from direct sunlight, heat sources, and dust; in particular, do
not expose the console to direct sunlight for long periods of time. Remove battery
from console to preserve longevity. When using the mounting clamp, the console
must be removed from the pole prior to removing thebattery.
Removing the battery:
The battery can be easily removed, and replaced if necessary, by the user.
When the console is not in use for extended periods of time, removing the battery and
storing separately can help maintain the battery’s longevity.
Press the battery release button to pop one side of the battery out. Then, lift the
battery off the console and place in proper storage.
Do not attempt to remove the battery while the console is attached to apole.
Page 23

Section V: User Interface Features
Page 24
Kangaroo™ Console | 22
On Screen Keyboard
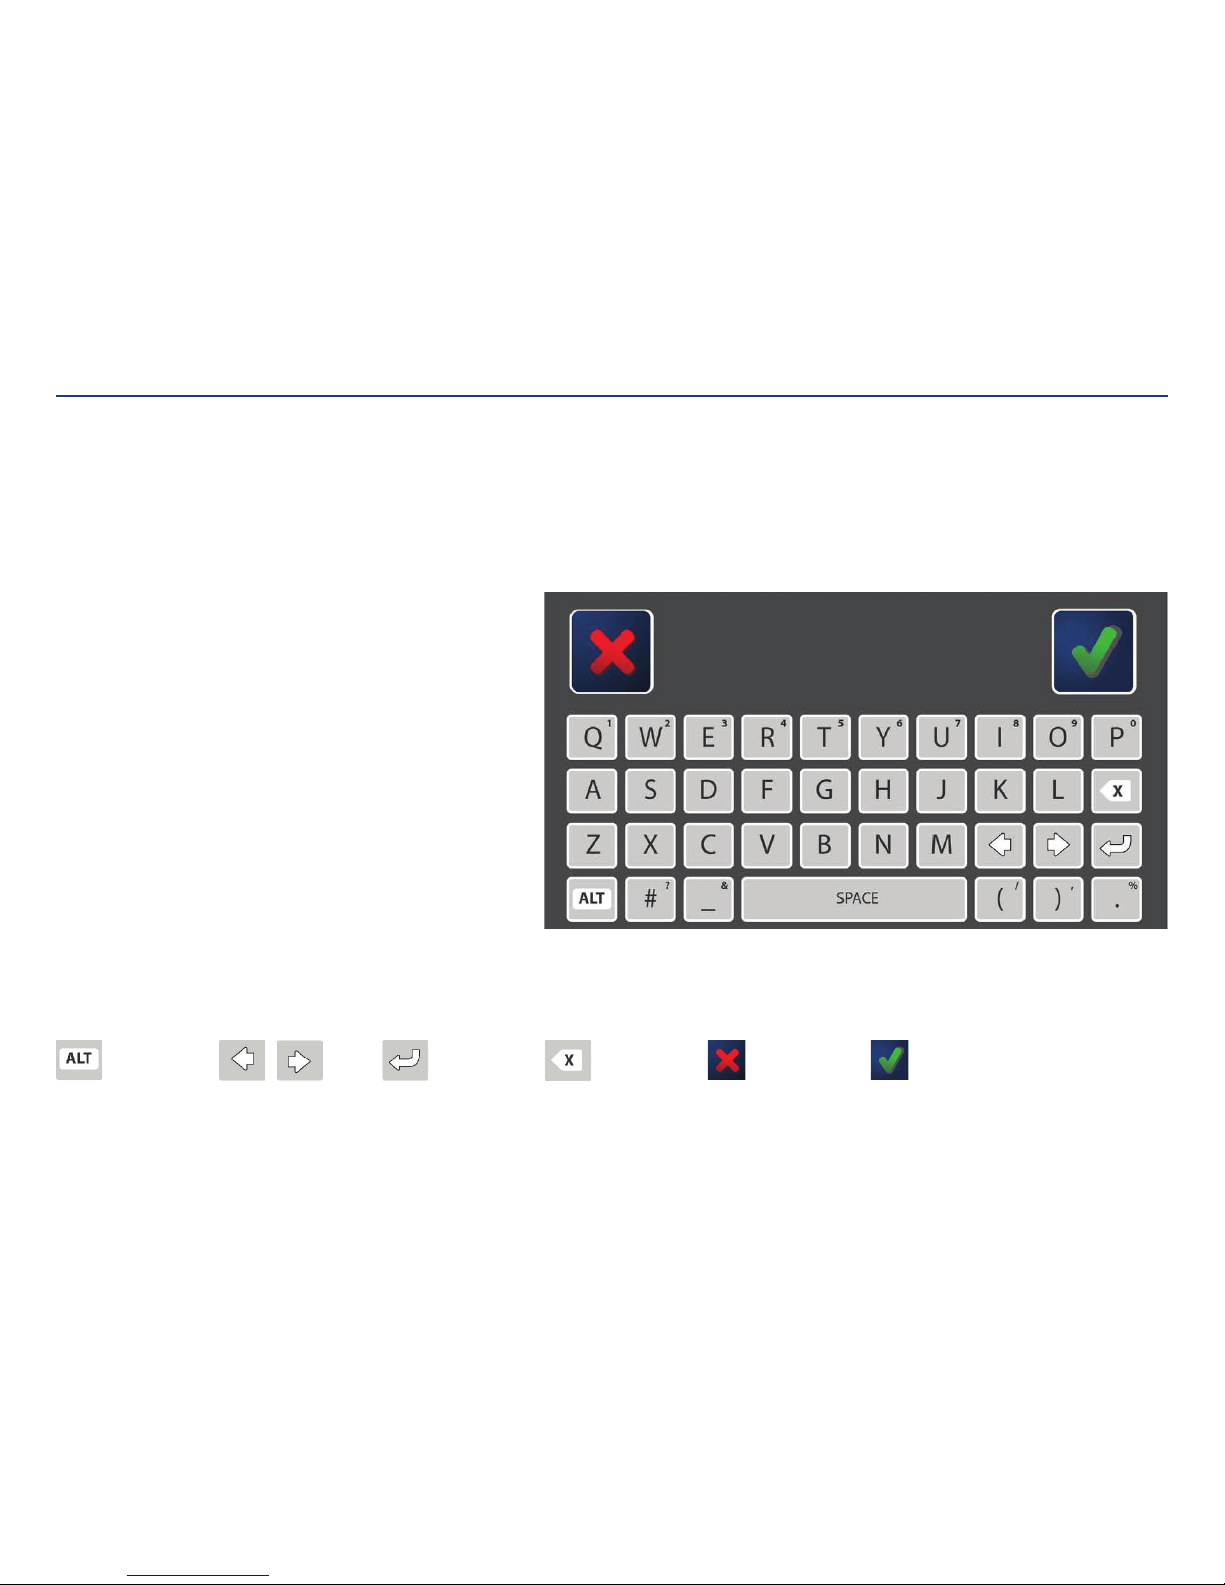
The on screen keyboard will be displayed when typing is necessary.
Use the keyboard to enter text, such as a login name, or to annotate images.
How to use the keyboard:
To enter text:
Tap a text field, such as a login name or password. Then, tap on the letters on the
keyboard to type. Text will always be written in uppercase.
To edit text:
Tap the text field and use the arrow keys to navigate to the desired textlocation.
To enter numbers or secondary symbols:
Press and release the ALT key. Tap the key(s) that contains the desired letter, number,
or symbol (displayed in the upper right corner of the key). Press and release the ALT
key again to return to main keyboard.
For example, to enter a login name of “64USER” press ALT, then 6, 4, then ALT again,
followed by U, S, E, R.
Note: For keyboards that include a top row of dedicated number keys, use of the ALT
key is not required for entering numbers.
Accept changes or cancel:
Tapping the check mark or “x” icons will either accept the entered text or cancel any
changes and return to previous screen.
ALT key:
Enables alternate letter,
symbol, or number keys.
Arrow keys:
Moves cursor left
orright.
“X” icon:
Cancels any changes
made and returns to
previous screen.
Check mark icon:
Accepts changes
made and advances to
nextscreen.
Return:
Moves cursor to next
text field.
Delete text:
Deletes previously
written text, letter
byletter.
Section V: User Interface Features
Page 25
Kangaroo™ Console | 23
Logging In and Automatic Log-Out
The console can only be used by approved individuals. A login name and password
isrequired.
New users:
Only an administrator can set up a new user account.
Note: The original administrator login name is “ADMINISTRATOR”, but other
administrator accounts may be added.
Return users:
Using the on screen keyboard, enter the login name and password. Tap the check
mark to confirm.
Automatic log-out:
After a certain period of inactivity (where there is no user input to the console), the
console will automatically log the user out. This inactivity time period is 5 minutes for
operators and reviewers, and 10 minutes for administrators.
The automatic log-out will not occur during the procedure.
Section V: User Interface Features
Wrong password for administrator account:
If a password for an administrator account is entered
incorrectly, the system will allow up to five attempts.
After the fifth try, the console is reset to factory
settings. All patient and user information will belost.
Wrong password for reviewer or
operatoraccount:
If a password is entered incorrectly, the system allows a
user to attempt to login up to five times.
After the fifth attempt, the user’s account is locked.
To unlock the account, an administrator must reset the
password from the settings menu.
The system could not validate username or password.
Make sure you r username is cor rect and typ e your password ag ain.
Invalid credentials.
You have X more at tempts befor e this account will b e locked out.
The User is l ocked out.
The system could not validate username or password.
Make sure you r username is cor rect and typ e your password ag ain.
Invalid credentials.
You have X more at tempts befor e the console will b e reset.
The Conso le is going to be res et to factory d efaults.
Page 26
Kangaroo™ Console | 24
Battery level
indicator
Log out:
Clicking the log out icon ends the session.
Settings menu:
The settings menu provides links
to modify language, date/time, file
formats, passwords, device options, and
usersettings.
Folders menu:
The folders menu launches the data
browser of patient folders. Each folder
contains images captured during
theprocedure.
Procedure:
Use the procedure feature to launch
the functional flow for entering patient
information and procedure activities.
Main Menu
The main menu provides links to log out, settings, file management, and procedure Initiation. Clicking any of these
icons brings you to those screens.
Section V: User Interface Features
Live feed from
nasogastric
tubecamera
Page 27
Kangaroo™ Console | 25
11:11:11 PATIENT-NAME-UP-TO-THIRTY-CHARACTERS 11-11-2011 PATIENT-ID-XXXX
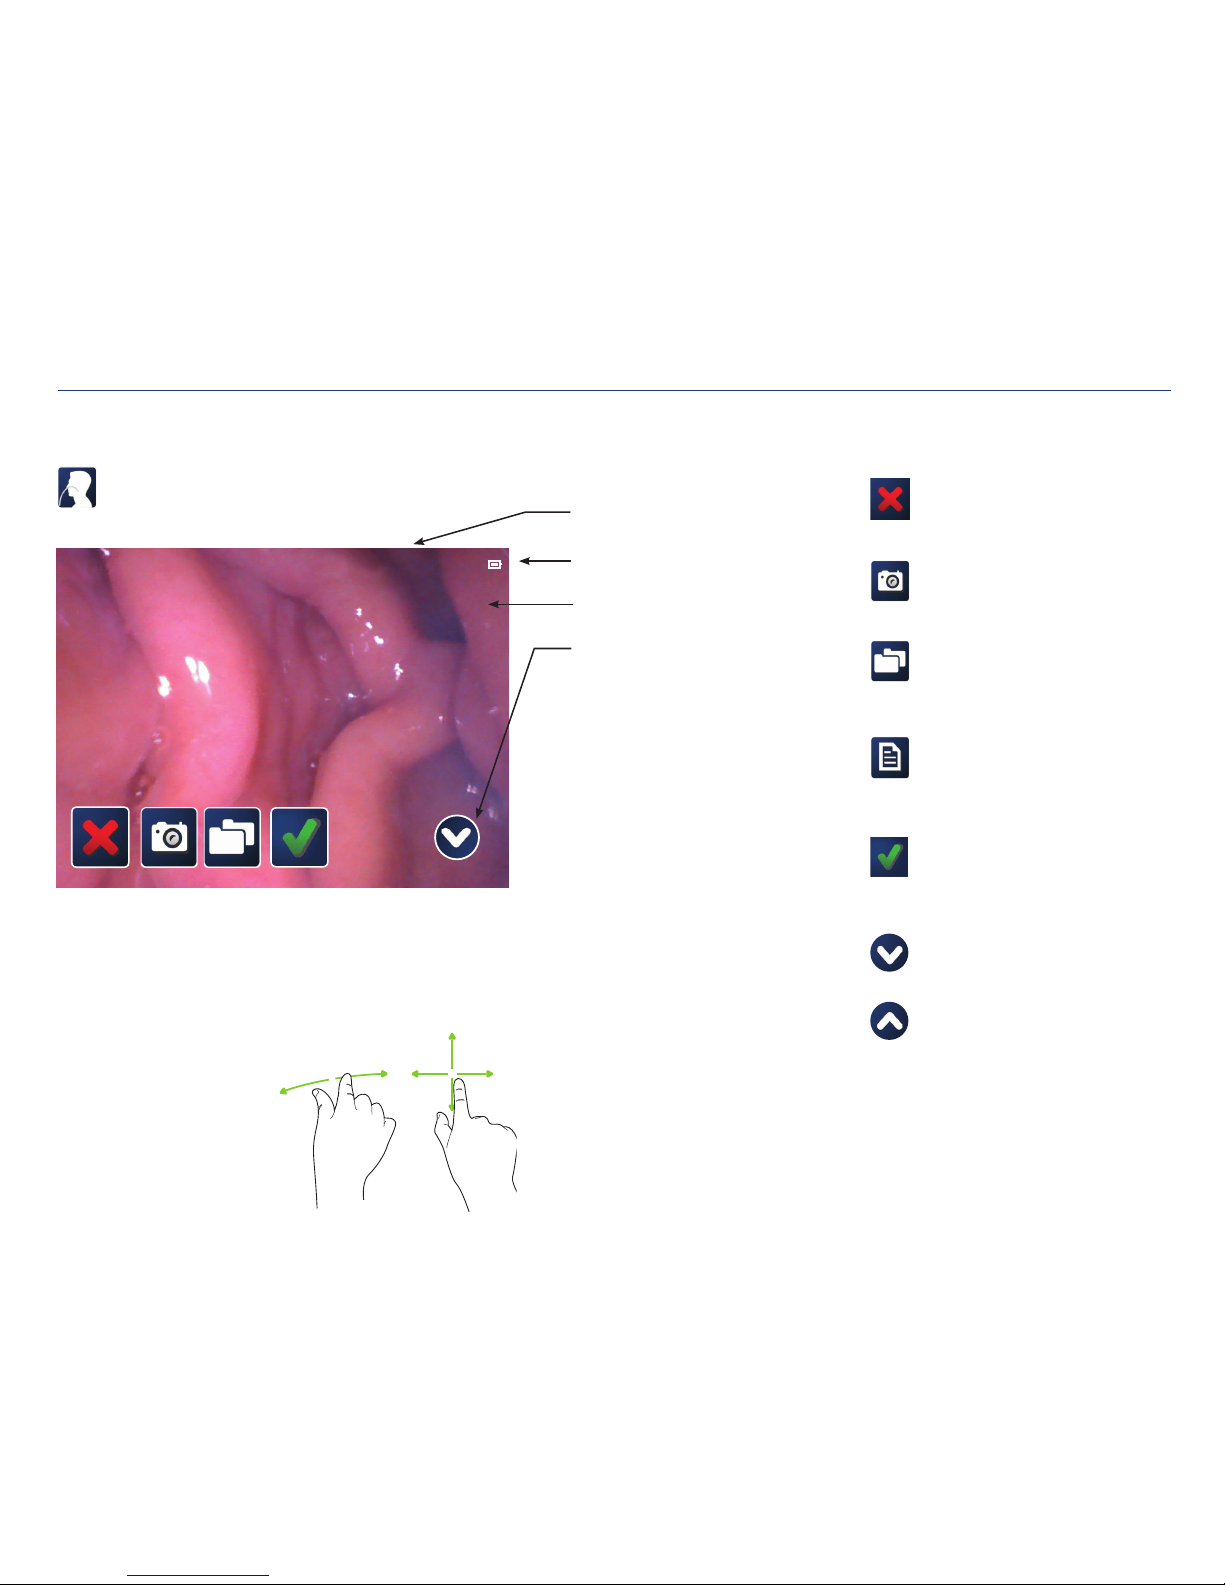
Procedure
Use the Procedure feature to launch the functional flow for entering patient
information and procedure activities.
Zooming in/out,
panning the image:
While touching the screen with two fingers, slide the fingers away from each other to
zoom in.
Pan the screen by touching with one finger and dragging along the screen.
To zoom out, touch the screen with two fingers and slide them towards each other.
Battery level indicator
Patient and procedure information
Icon tray
Live feed from feeding tube camera
Cancel:
Cancel procedure. System will request
cancellation confirmation.
Capture image:
Tap on the camera to capture an image from
the live feed.
Patient folders:
Displays all patient folders. Each folder
contains images captured during the
placement procedure.
Patient file:
Icon appears after capturing an image.
Tapping this icon opens patient’s folder to
show images.
Done/Complete:
When placement is complete, tapping on the
check mark ends the placement procedure.
System will request completion confirmation.
Hide icon tray:
Hides icon tray.
Show icon tray:
Show icon tray on screen.
Section V: User Interface Features
Page 28
Kangaroo™ Console | 26
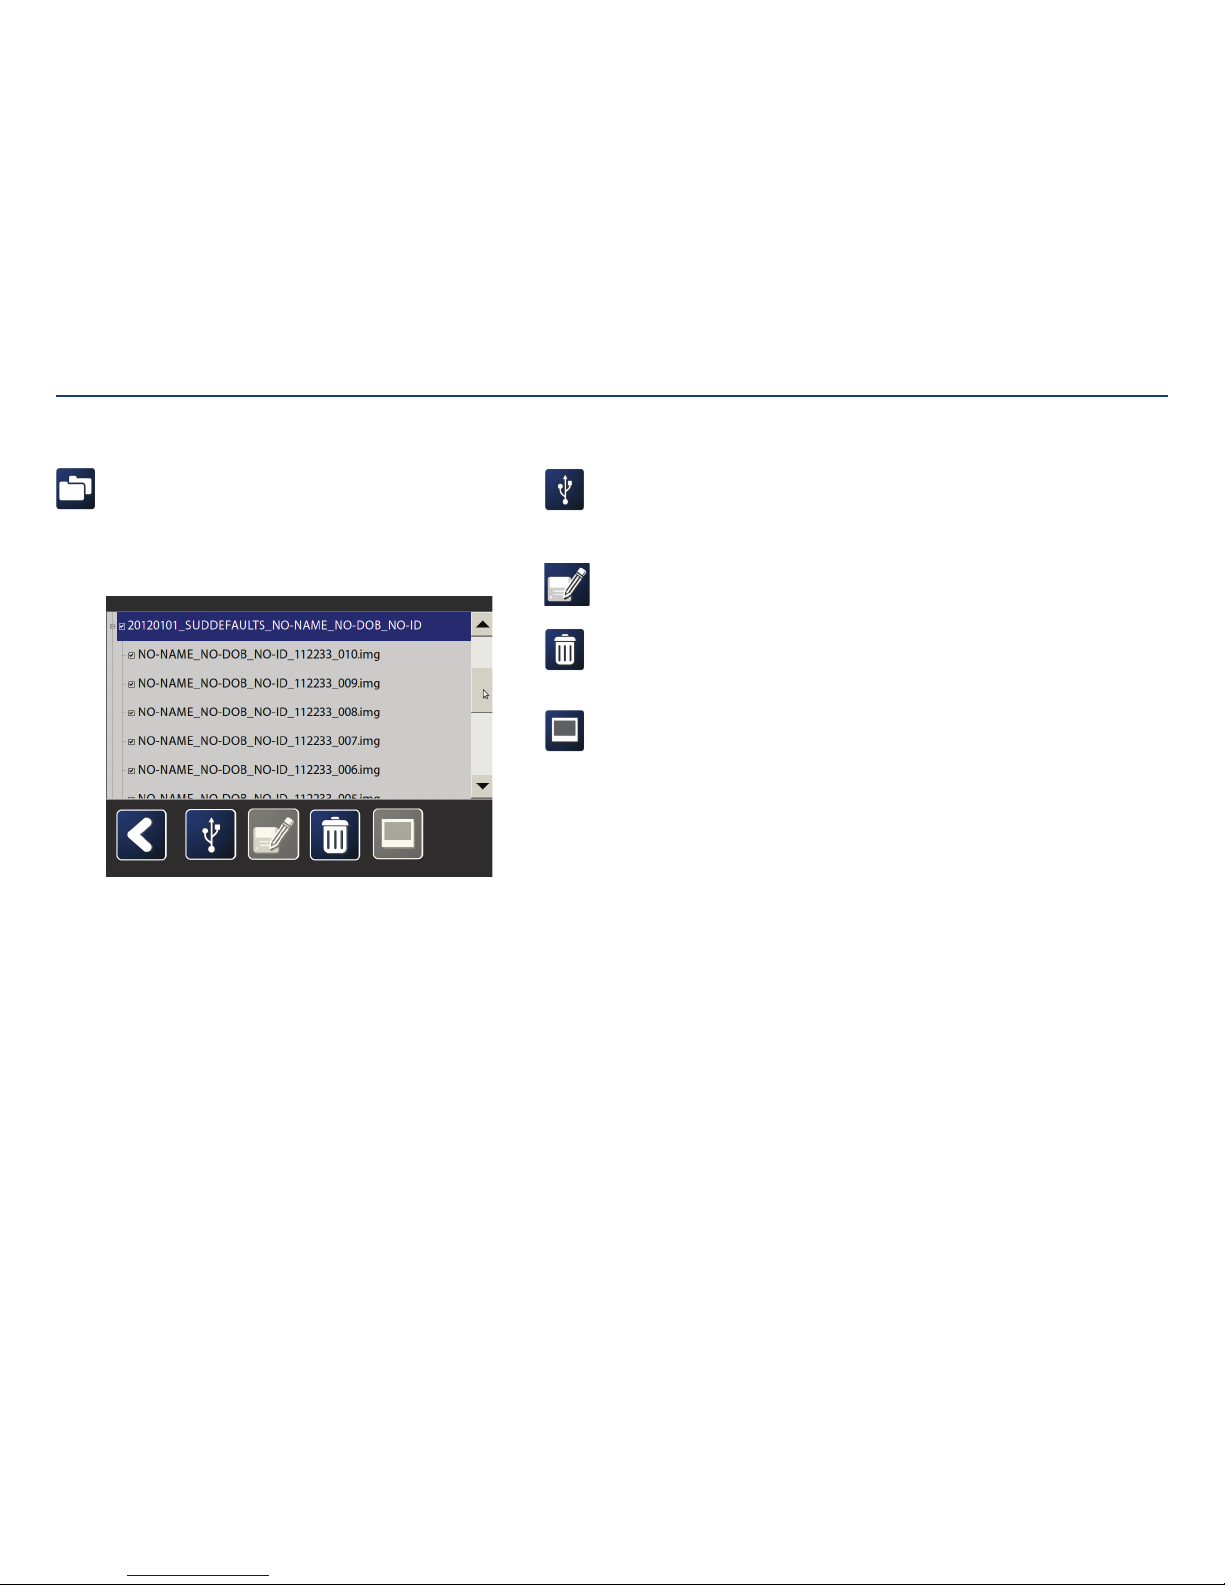
Patient folders and files:
Patient folders are auto-titled with the procedure date, feeding tube number,
patient name, date of birth and patient identification. Select a patient folder
to view by tapping twice on it. All images are listed below the patient folder.
Images can be viewed, exported, annotated, or deleted.
Note: Screens shown below show sample data as an example.
Options for Viewing Patient Folders and Files
Save to USB:
Export image(s) to USB flash drive. Exported
images are password protected to ensure
patient privacy.
Rename image:
Rename a portion of the image.
Delete image(s):
Delete one or more images from the
patientfolder.
View image:
View image in full screen.
Section V: User Interface Features
Page 29
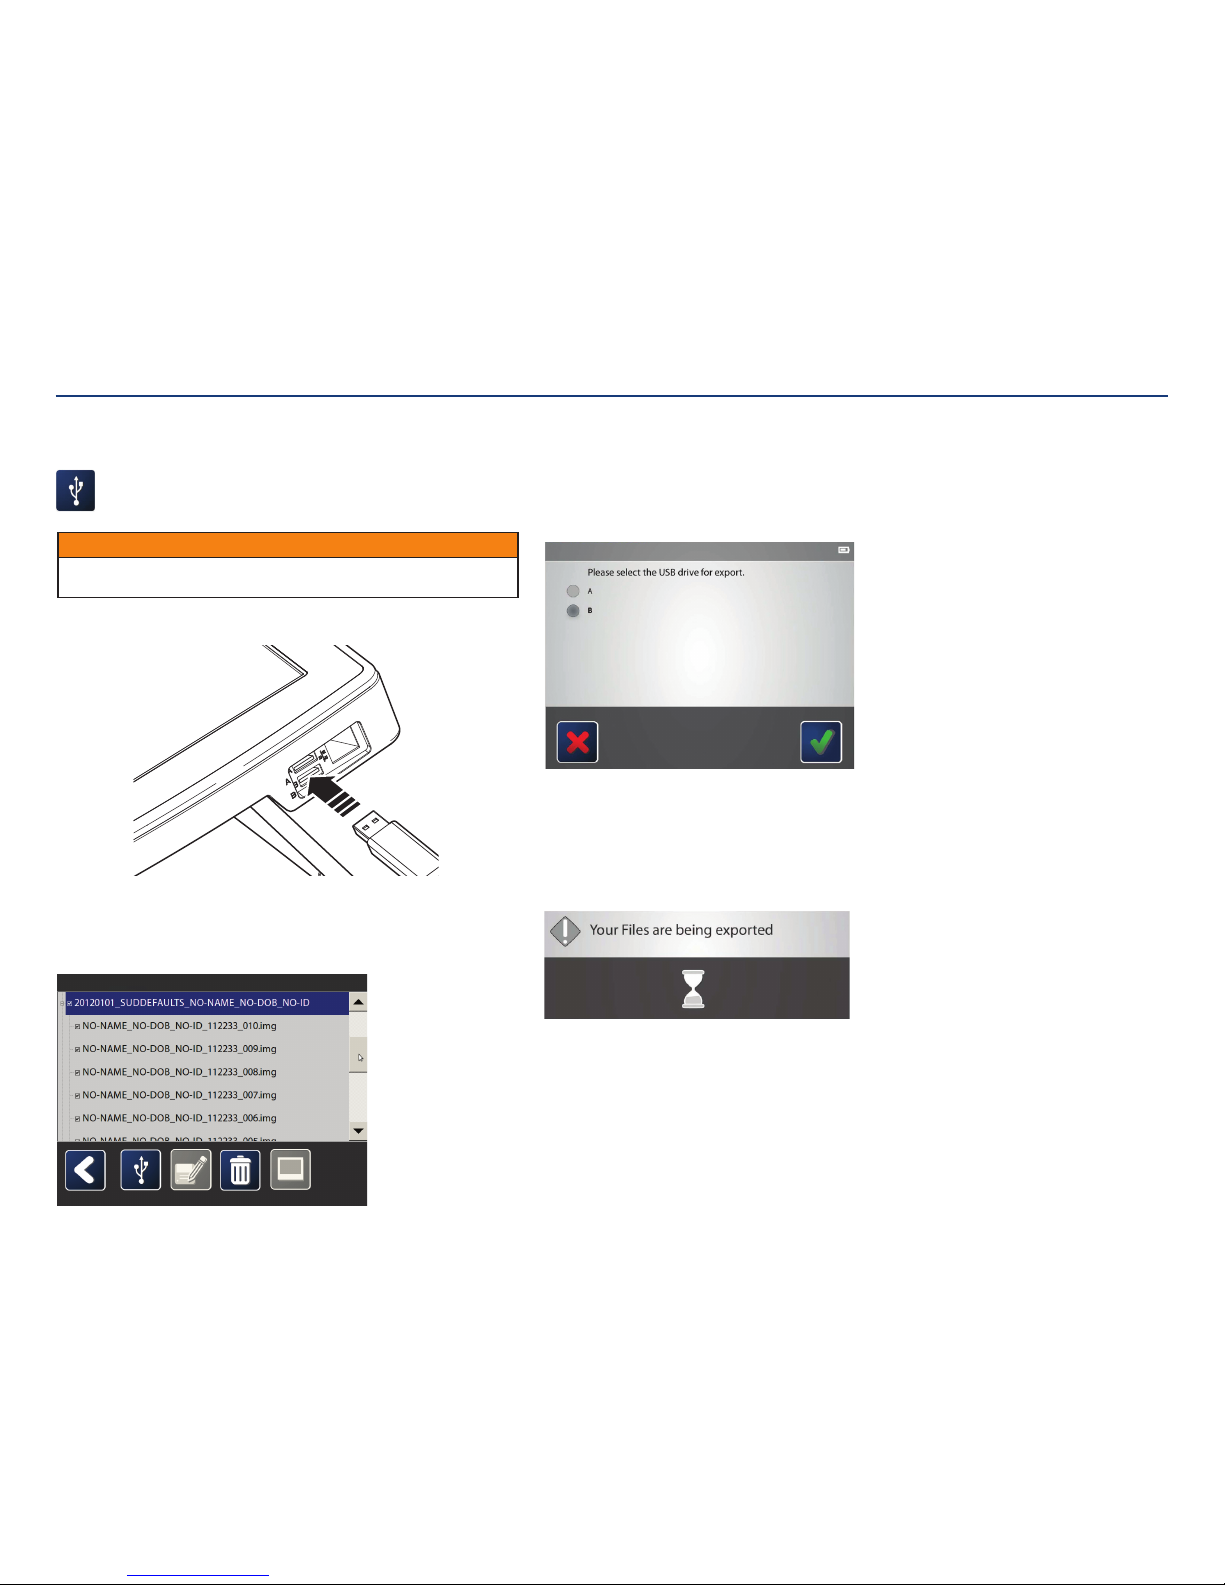
Kangaroo™ Console | 27
Save to USB:
Images can be exported to a USB flash drive and opened on
anothercomputer.
Start by plugging the USB flash drive into the port on the side of the console.
Then, tap the box on the left of the image(s) to be exported. Tapping the box at the
left of the folder selects all images. Images can only be exported from one patient
folder at a time.
Tap the USB icon. A screen will pop up asking which USB port to save to. Confirm and
tap the check mark.
For privacy purposes, a password has been created by an administrator.
The password will be required to view the images on another computer.
Note: Passwords are in full upper-case. When using a computer, be sure to use
upper-case letters.
After the files are exported, disconnect the USB flash drive.
Exporting Images to USB Flash Drive
Section V: User Interface Features
CAUTION
Verify USB devices used with this equipment are free of software viruses and other
malicious software.
Page 30

Kangaroo™ Console | 28
Opening Images from USB Flash Drive
Opening on a computer:
Images exported from the console can be opened on a computer and saved into
a patient folder. The console will encrypt all files using a Zip file format before
exporting them onto a USB drive. To open the images on a computer, the correct
password must be entered.
Extracting and decoding files:
There are multiple Zip encoders/decoders. Use whichever the facility protocol states.
Instructions for WinZip are shown here as an example.
First, start by opening WinZip.
Note: If the file is opened from WinZip without being extracted, it has not been
decrypted. You will have to reenter the encryption password to open it again later.
Select the file, then click the “Extract” icon.
Next, choose the directory for the extracted folder. Then, click the “Extract”button.
Enter the password, making sure to only use uppercase letters. The images should
then be decrypted and able to be opened.
Section V: User Interface Features
Page 31
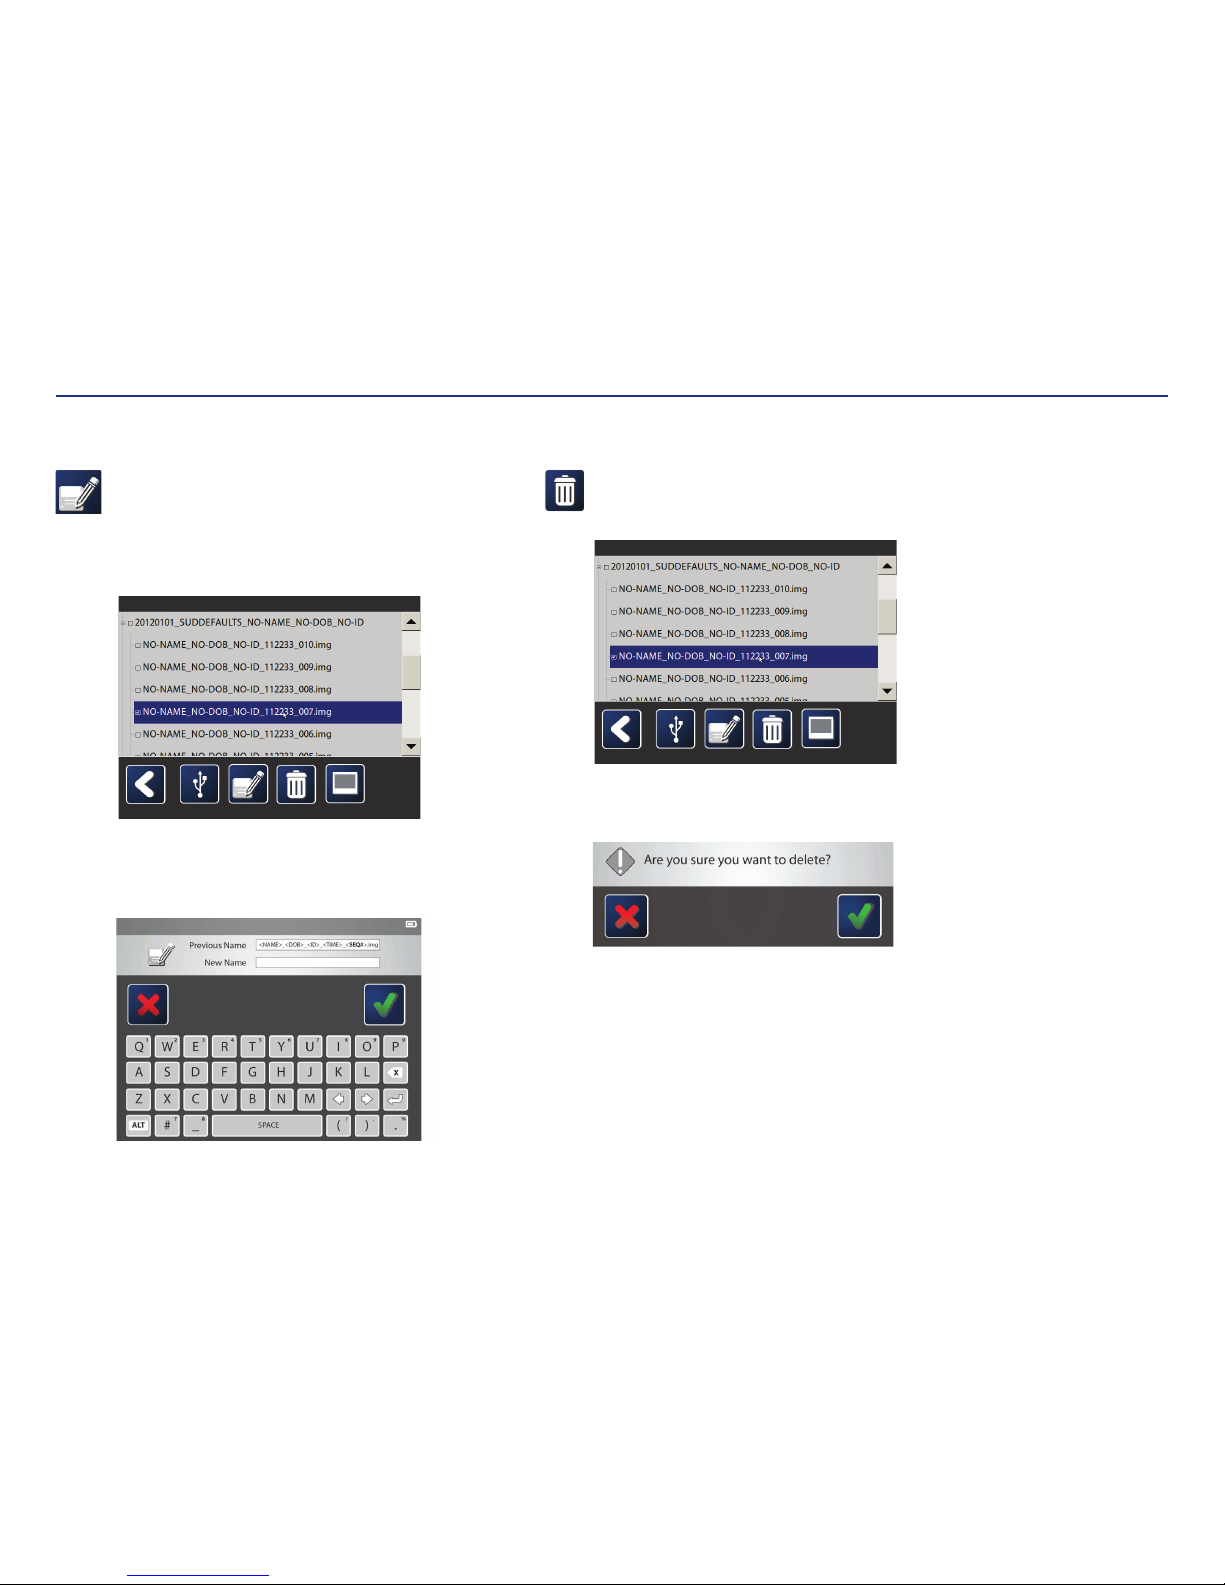
Kangaroo™ Console | 29
Delete image(s):
Select one or more images to delete by tapping on the boxes to the left.
Then, tap the delete icon.
The system will require confirmation before deleting.
Tap the check mark toconfirm.
Renaming an image:
Captured images are automatically titled with the patient’s name, date of
birth, identification number, and an image number. The image numbers
are created sequentially as they are captured.
When renaming an image, only the portion with the image number can
bechanged.
Select the image to rename by tapping on it, then tapping on the rename
image icon. A screen will pop up. Using the text field, enter the new name
for the image. Press the check mark whenfinished.
Note: Images can only have letters or numbers in the name;
symbols will not work.
Only one image can be renamed at a time.
Rename Image Delete Image(s)
Section V: User Interface Features
Page 32
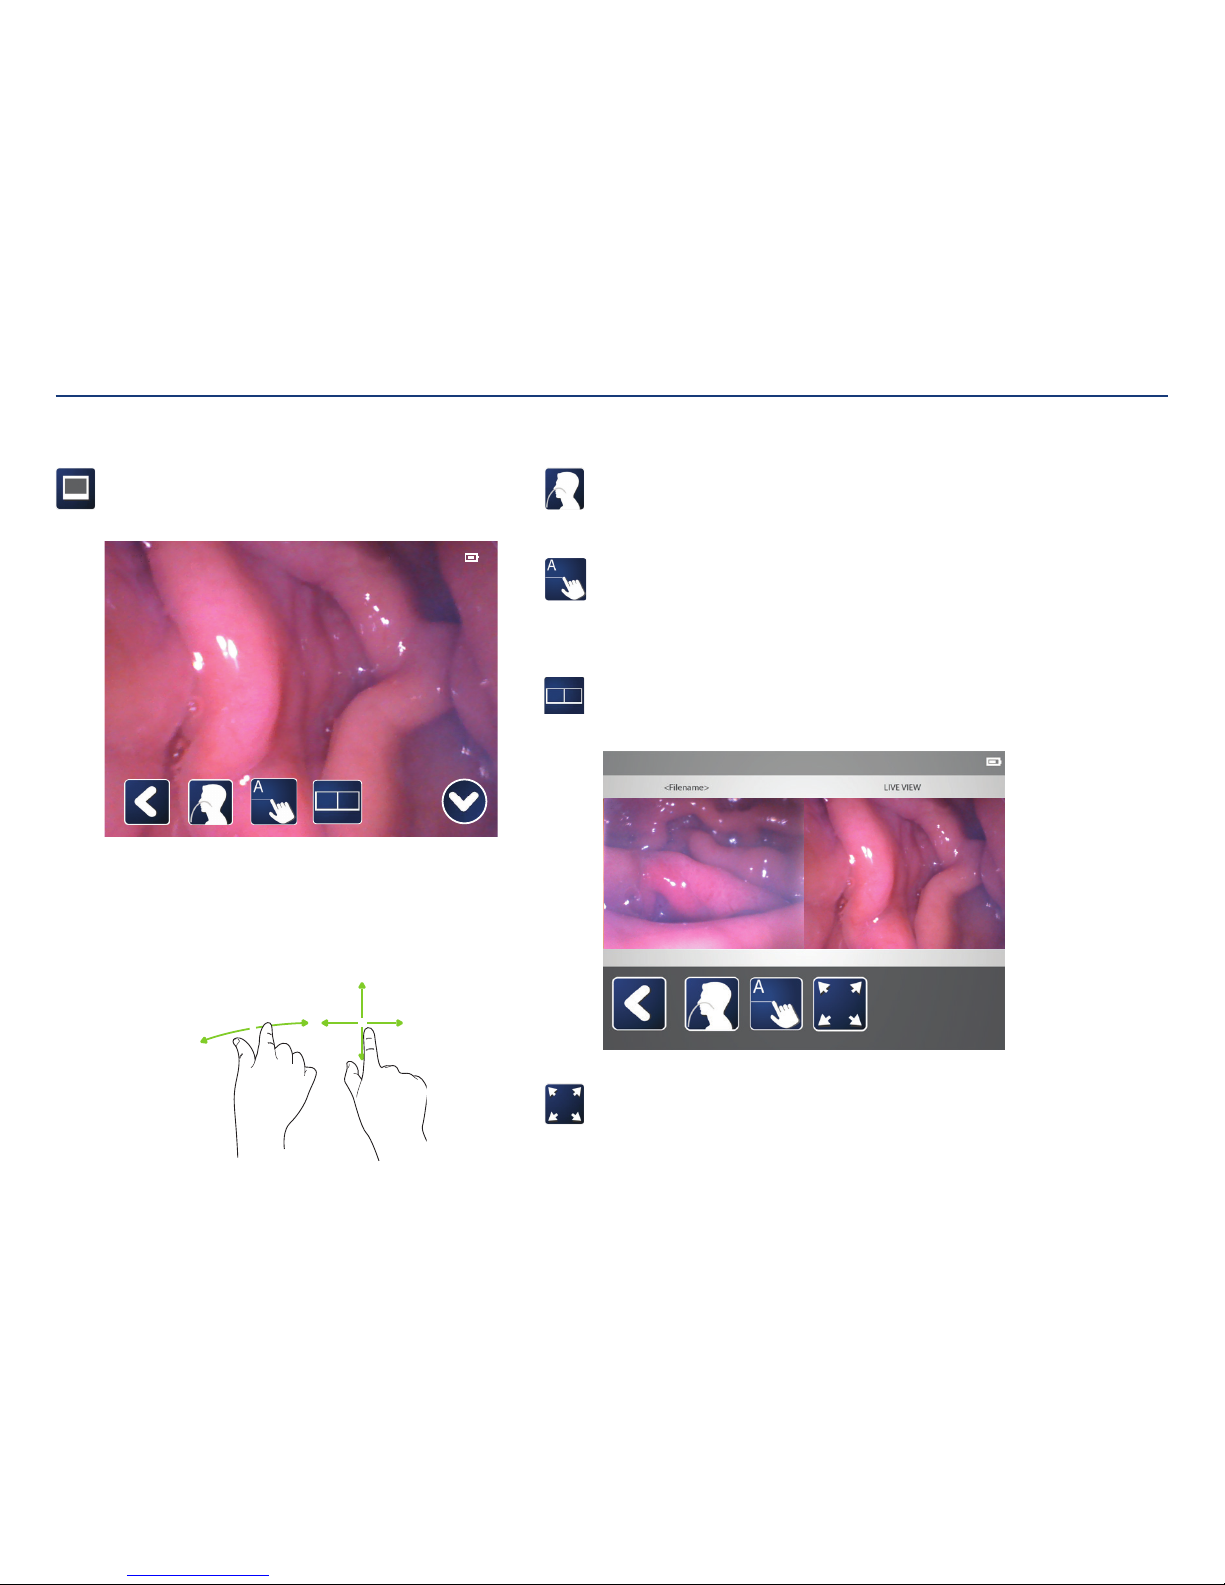
Kangaroo™ Console | 30
View image:
When viewing a captured image there is an option to annotate, view in split
screen, and return to the procedure (live feed from camera).
11:11:11 PATIE NT-N AME -UP -TO-T HIR TY- CHAR ACT ERS 11-11-20 11 PATI ENT- ID- XXXX
Zooming in/out, panning the image:
While touching the screen with two fingers, slide the fingers away from each
other to zoom in.
Pan the screen by touching with one finger and dragging along the screen.
Panning is only active when zoomed in.
To zoom out, touch the screen with two fingers and slide them towards
eachother.
Viewing Captured Images
Procedure:
If not currently in the procedure process, this icon will appear. Tapping this
icon opens the procedure screen.
Annotate image:
Select an image to annotate by clicking the box to the left. Then, tap the
annotation icon.
For detailed information on annotating images, see the annotating
imagessection.
Split view:
Viewing in split screen will show the captured image on the left and the
live view from the camera on the right side.
Full screen view:
To switch to full screen view, tap this icon.
Section V: User Interface Features
Page 33
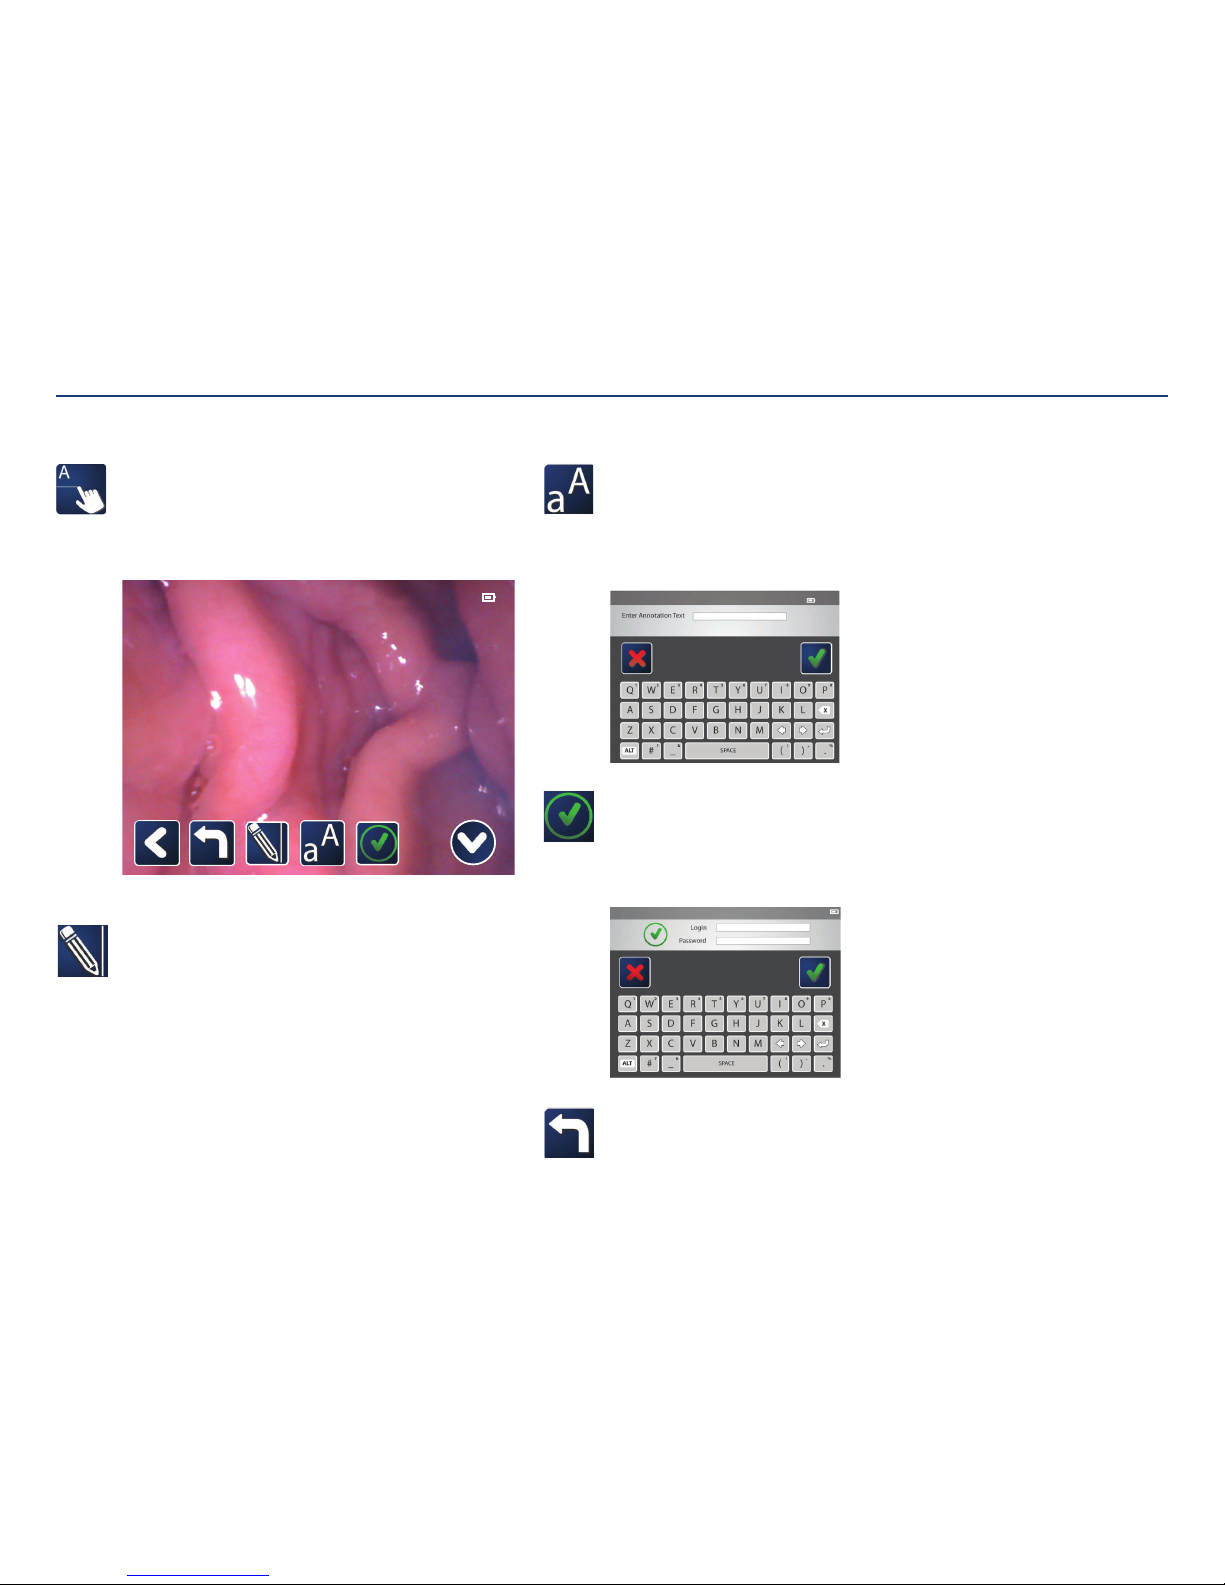
Kangaroo™ Console | 31
Annotating images:
Tap on the annotate icon to bring up a icon tray with annotation options.
Tap the icons to add text, lines, or undo actions. A reviewer can view the
images and confirm that they have reviewed them. Further annotation of
images is not allowed after a still image is reviewed.
Note: Annotation is not possible when image is zoomed in.
11:11:11 PATIE NT-N AME -UP -TO-T HIR TY- CHAR ACT ERS 11-11-20 11 PATI ENT- ID- XXXX
Draw a line on the image:
Tap on the icon. Then, touch the screen where the line should start.
Touch the screen again at the point where the line shouldend.
Annotating Images
Add text to the image:
Select the icon, then tap on the screen where the text should be. A list
of anatomical marker labels will appear. At the bottom of the list is an
option to enter free text. With free text, a keyboard will appear. Enter the
text, then press the check mark. Confirmation will be required to save the
changes.
Review an image (reviewer only):
Reviewing an image places a time stamp with the reviewer’s login name
and the time.
Note: Once a reviewer confirms the review by tapping the checkmark, no
further annotations can be made.
Undo:
Undo up to twenty previous actions. You can “undo” a review in order to
continue making annotations.
Section V: User Interface Features
Page 34
Kangaroo™ Console | 32
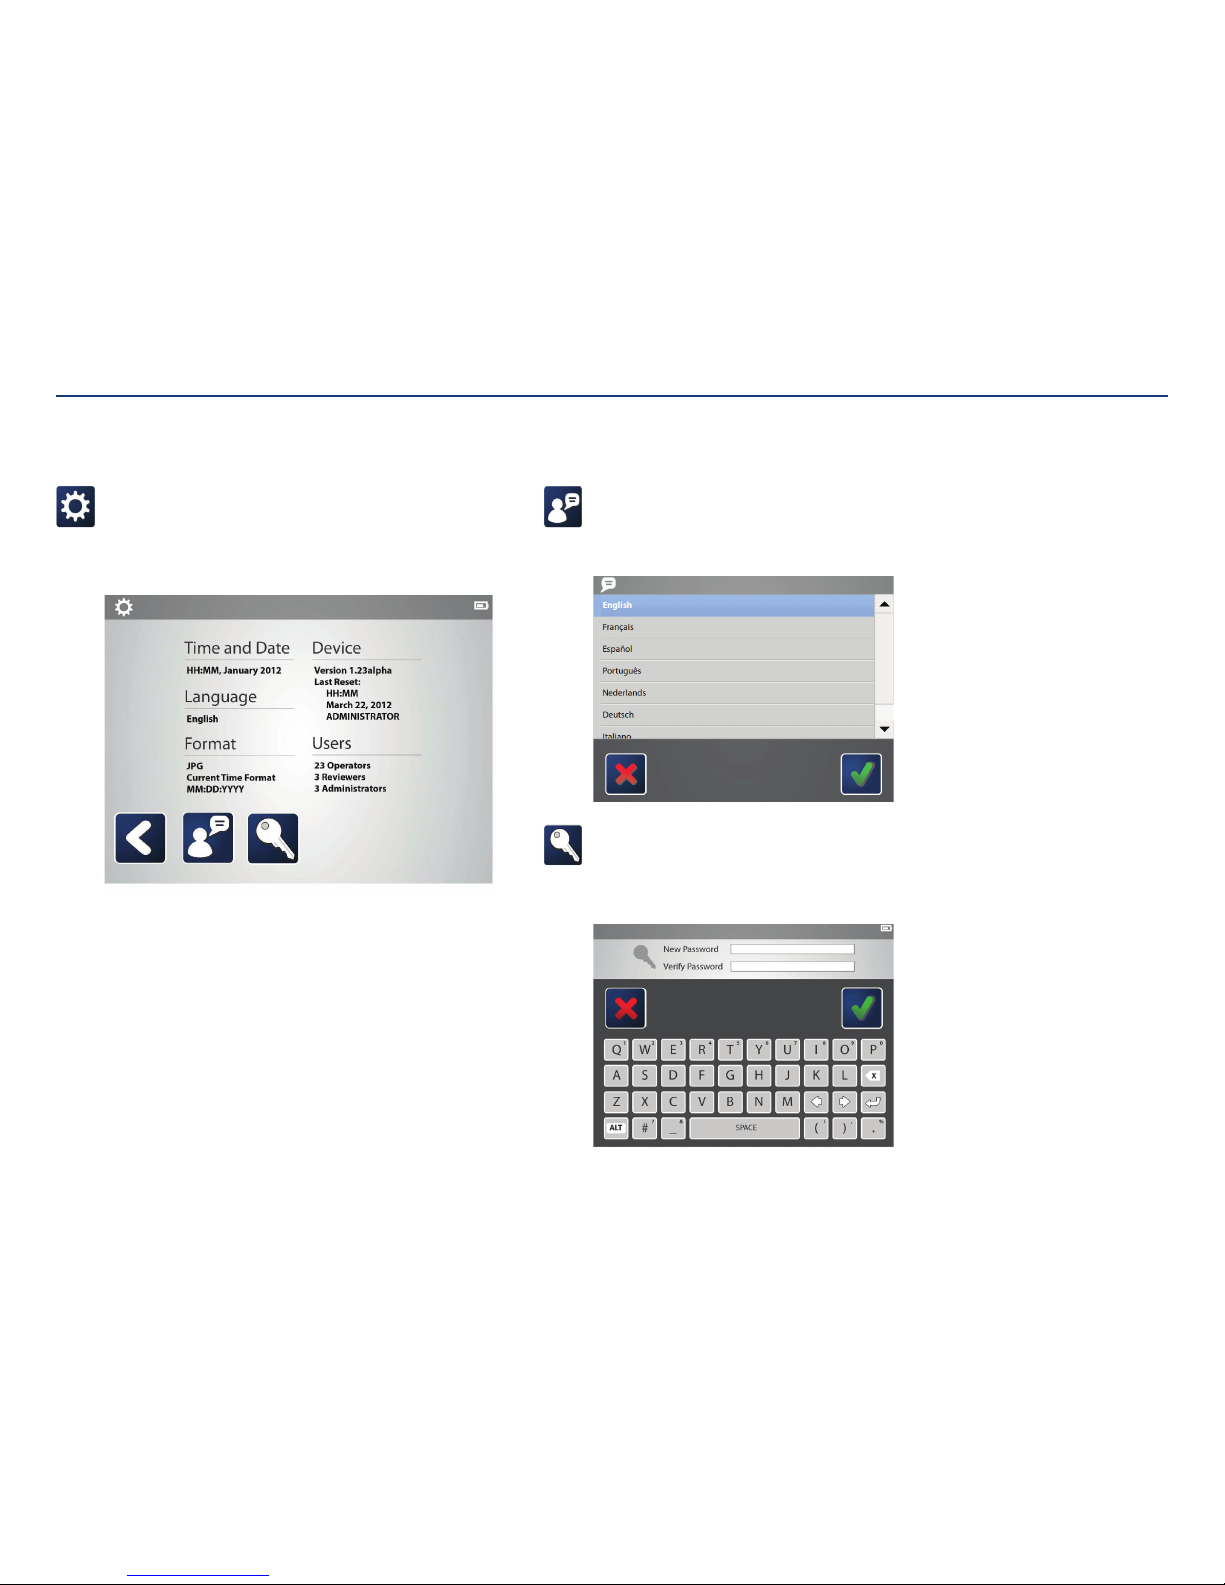
Settings:
Operators and reviewers can change the language preference and their
password from the settings menu.
The current settings for the console are shown on the screen. The Device
Version shown indicates the software version currently on the console.
Operator and Reviewer Settings
Change language:
Tapping on the language icon displays a screen giving optional language
preferences. Tap once on the preferred language, then tap the check mark to
save changes.
Change password:
To change the account password, tap on the key icon. Use the keyboard to
enter a new password, then repeat the password in the second text field.
Tapping the check mark saves the changes.
Section V: User Interface Features
Page 35
Kangaroo™ Console | 33
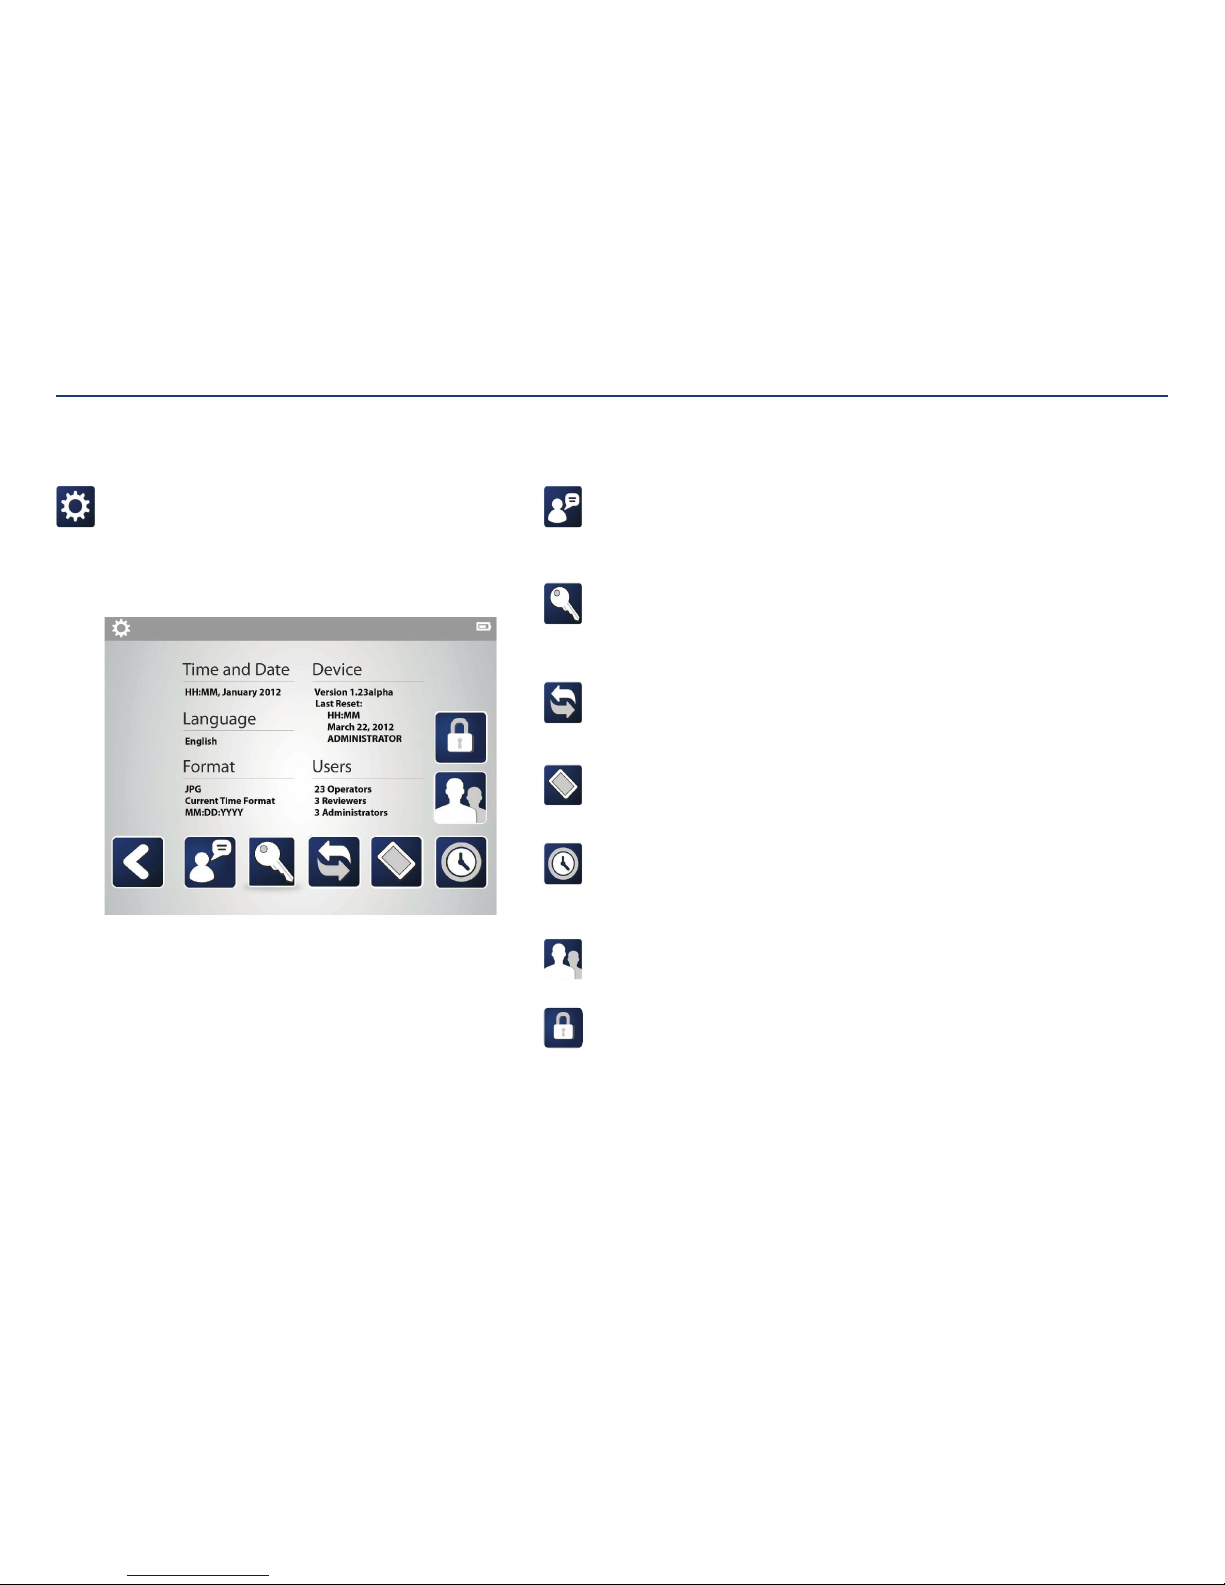
Settings:
Administrators can make changes to the time, date, language, image format,
user information, and update the device.
The current settings for the console are shown on the screen. The Device
Version shown indicates the software version currently on the console.
Administrator Settings
Change language:
Tapping on the language icon displays a screen giving optional language
preferences. Tap once on the preferred language, then tap the check mark to
save changes.
Change password:
To change the account password, tap on the key icon. Use the keyboard to
enter a new password, then repeat the password in the second text field.
Tapping the check mark saves the changes.
Format images:
Choose between exporting images as a .bmp or .jpg. Change the date format
to the preferred order. Edit the way time is displayed duringplacement.
Device:
Erase patient data, update the device software, or reset the device back to
factory settings.
Set or change date and time:
Use the touchscreen to select the time and date. If English language is
currently selected on the console, select preferred time format (24 hours or
12 hours), then tap the check mark to savechanges.
User groups:
Add or change user passwords.
Encryption password:
Change password used to decrypt/open patient images on a computer.
Passwords will be in all uppercase letters and are case sensitive.
Section V: User Interface Features
Page 36
Kangaroo™ Console | 34
Changing Date, Time, Formatting, Language, and Device Settings
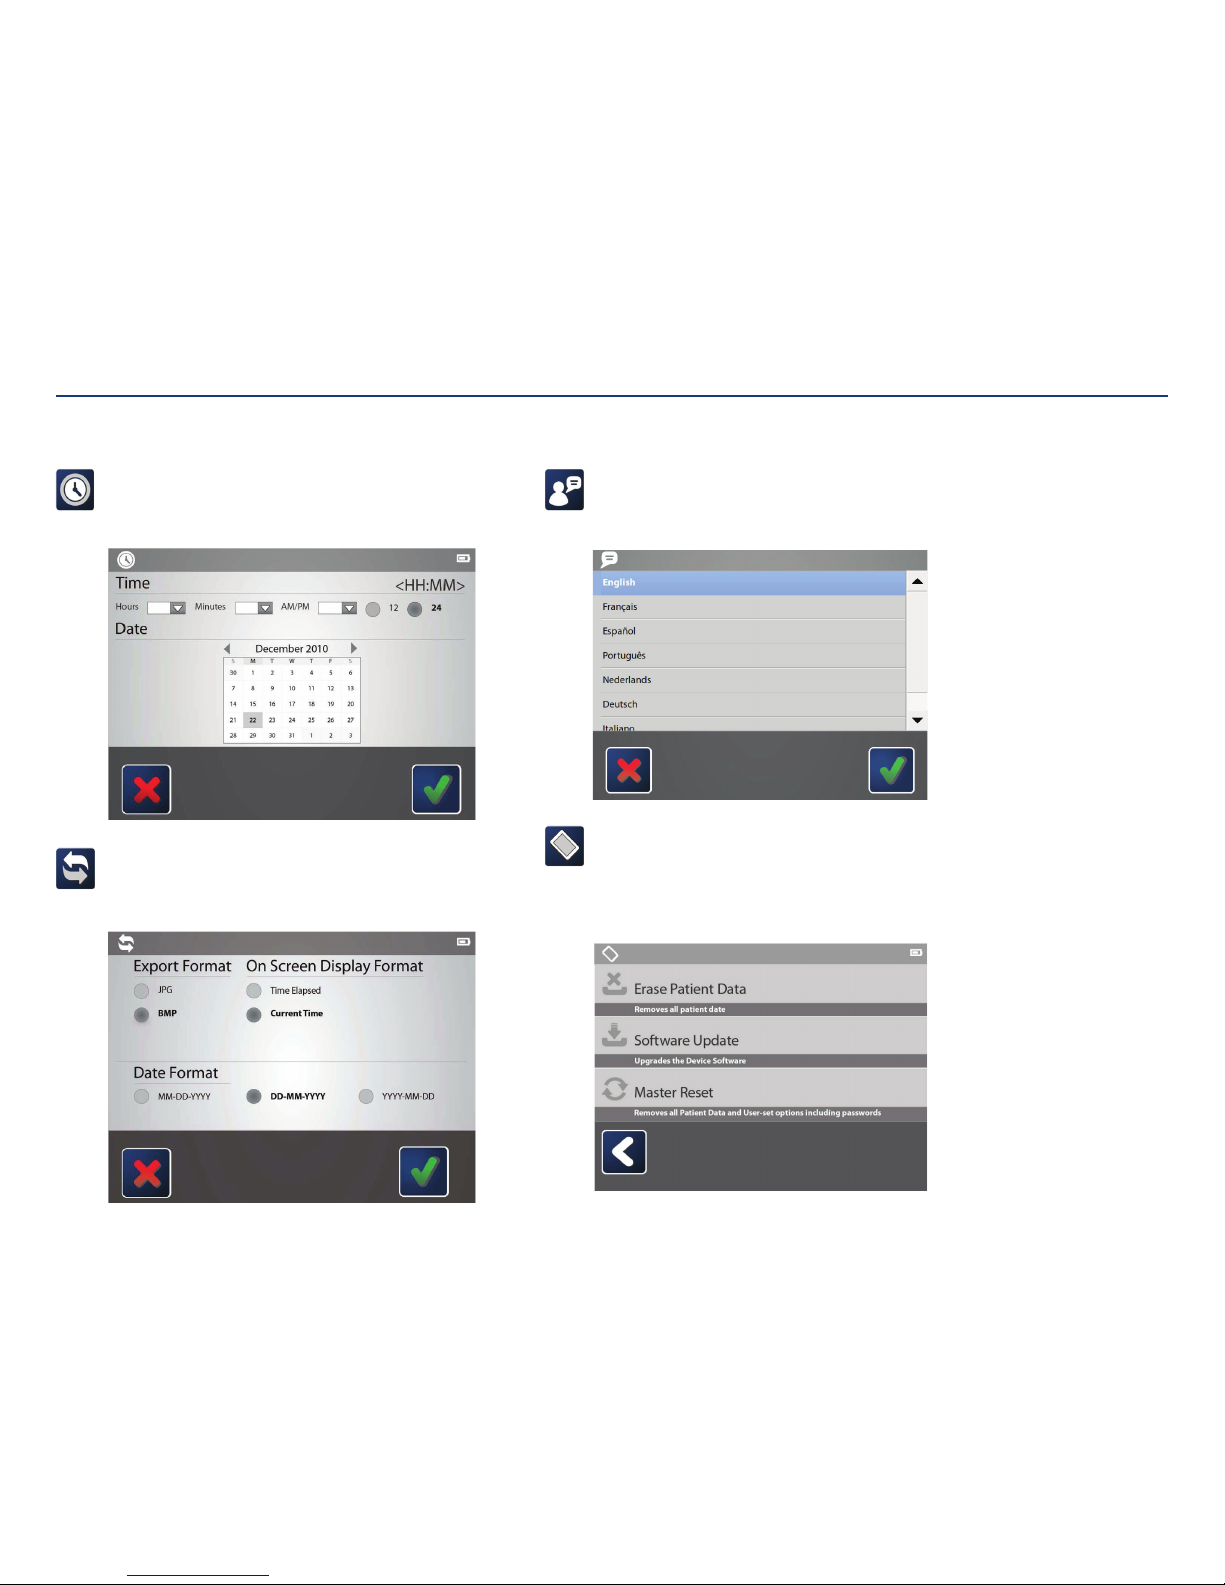
Change language:
Tapping on the language icon displays a screen giving optional language
preferences. Tap once on the preferred language, then tap the check mark to
save changes.
Device:
Tap on the “Erase Patient Data” block to permanently remove all stored
patient information and captured images (recommended if sending console
for maintenance). The “Software Update” upgrades the device to the
latest version. Tapping “Master Reset” removes all data and restores to
factorysettings.
Set or change date and time:
Use the touch screen to select the time and date. If English language is
currently selected on the console, select preferred time format (24 hours or
12 hours), then tap the check mark to savechanges.
Format images:
Choose between exporting images as a .bmp or .jpg. Change the
date format to the preferred order. Edit the way time is displayed
duringplacement.
Section V: User Interface Features
Page 37
Kangaroo™ Console | 35
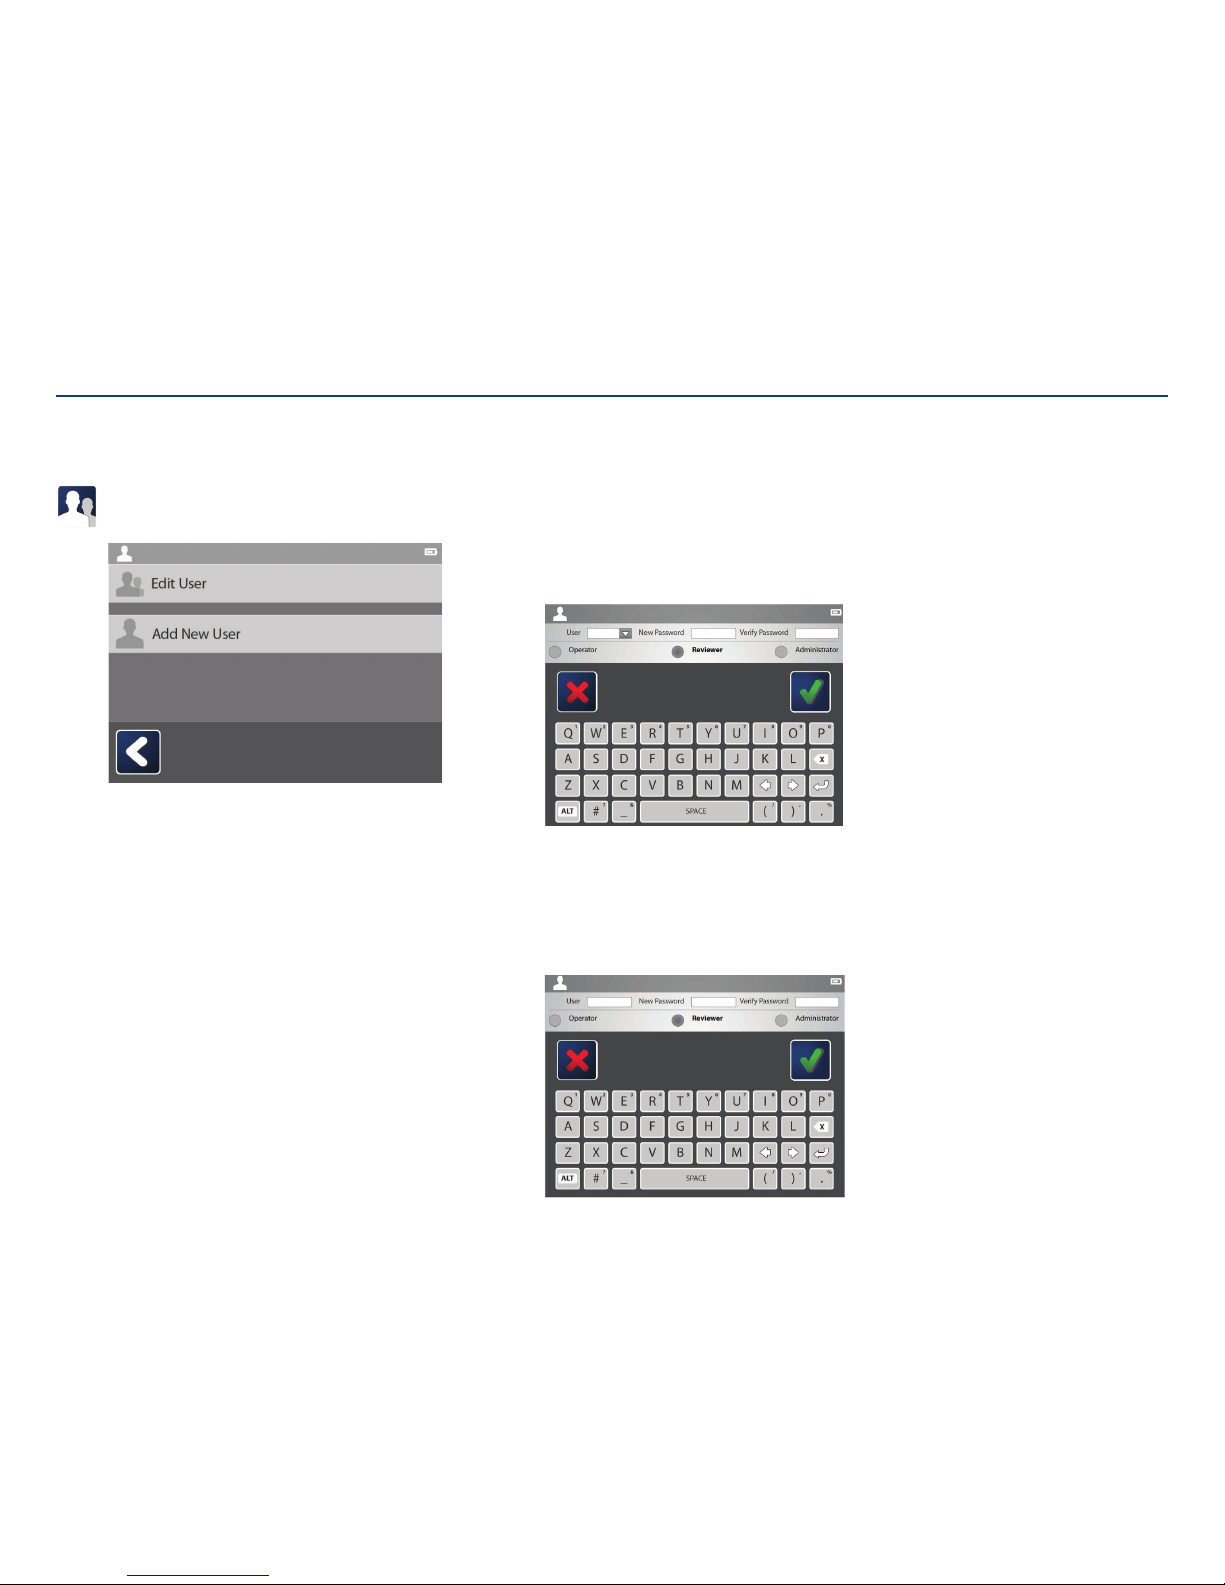
User groups:
Select the user groups icon to add a user or edit a user’sinformation.
Operator:
Can access the system to perform procedures and annotate.
Reviewer:
Can access the system to perform procedures, annotate, and review any
images edited by operators.
Administrator:
Can access any part of the system, perform procedures, annotate, remove
patient information, add or edit users, update the software, and reset the
device to factory settings.
Edit user type/password:
Select a pre-existing user in the top left corner. To change the user’s password, enter
the new password and then verify it by entering it again. Tap the check mark to
savechanges.
To change the user’s control (operator, reviewer, or administrator) simply tap on the
circle next to the desired option. Tapping the check mark will savechanges.
Add user:
Add a user by typing in the login name, desired password, and the user’s control type
(operator, reviewer, or administrator).
Tapping the check mark will save changes.
Note: Login names “ADMINISTRATOR” and “MAINTAINER” are in use, those user
names cannot be duplicated.
Adding and Editing Users
Section V: User Interface Features
Page 38
Kangaroo™ Console | 36
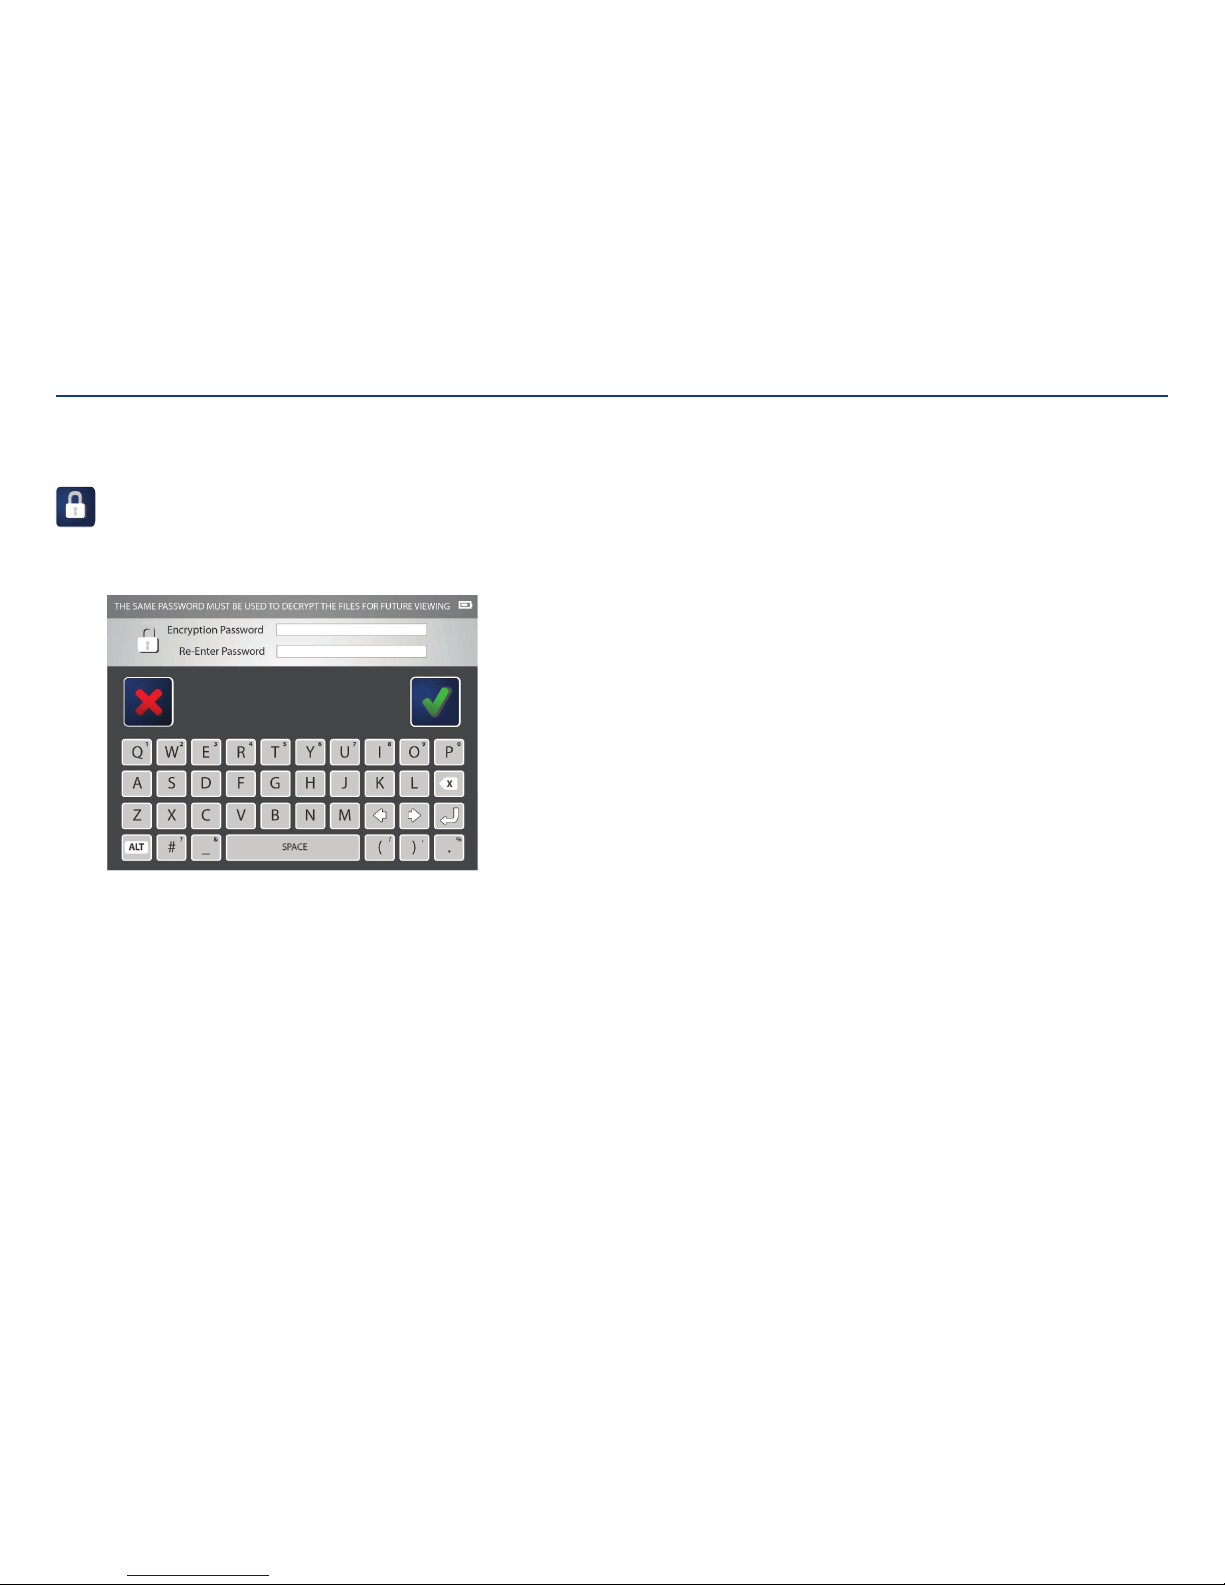
Encryption password:
Select the encryption password icon to edit the password used to open
patient images on a computer. The password created will be needed to open
any files exported from this console. The same password will be used for
any files exported.
Tap on the first text field to enter the desired password. Then, re-enter the
password in the text field below. When satisfied, touch the check mark to
save the changes.
Note: The password is case-sensitive and will be in all upper-case.
Creating and Editing Encryption Password
Section V: User Interface Features
Page 39
Kangaroo™ Console | 37
Section V: User Interface Features
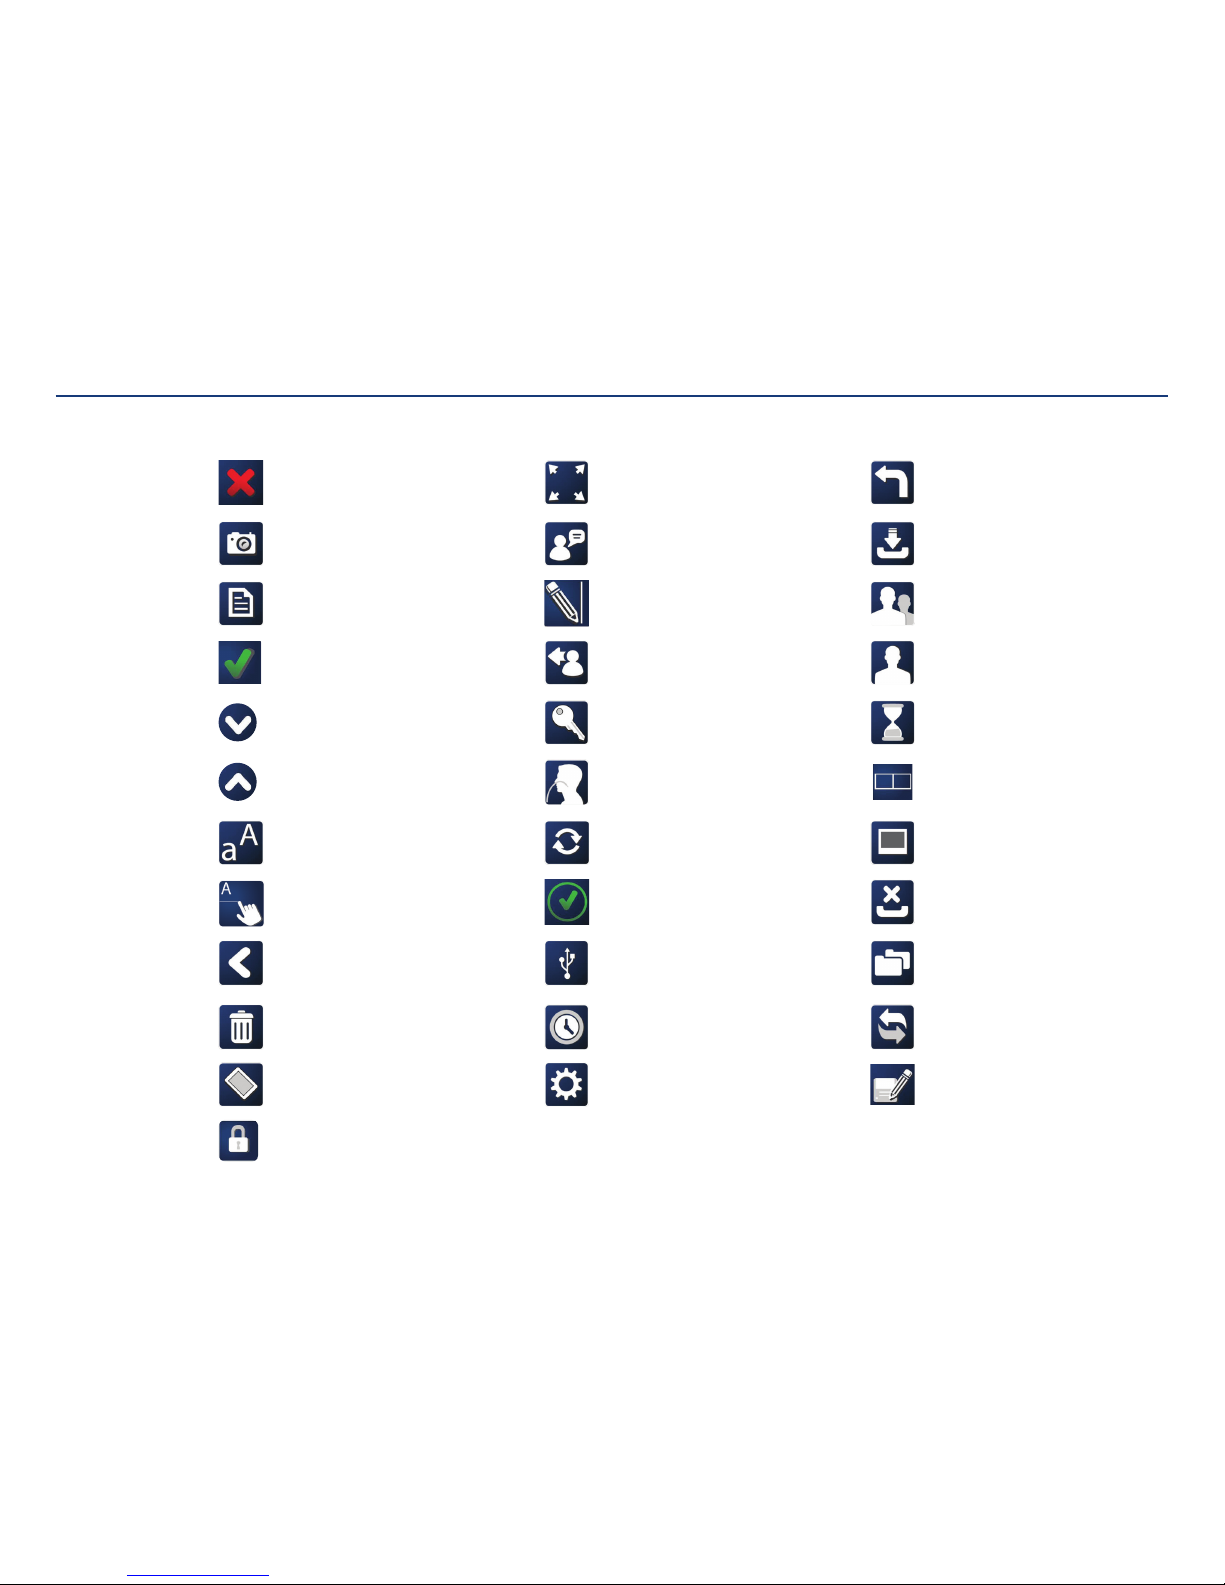
Icon Glossary
Cancel Full screen view Undo action
Take picture
File
Done / Complete
Hide icon tray
Show icon tray
Add text
Annotate image
Return to previous screen
Delete
Device
Encryption password
Language
Draw line
Log out
Password
Procedure
Reset console
Review image
Save to USB flash drive
Set time
Settings
Update software
User groups
User
Wait
Split view
View image
Erase patient data
Folders
Format
Rename
Page 40

Section VI: Additional Kangaroo Feeding Tube with IRIS Technology Information
Page 41
Kangaroo™ Console | 39
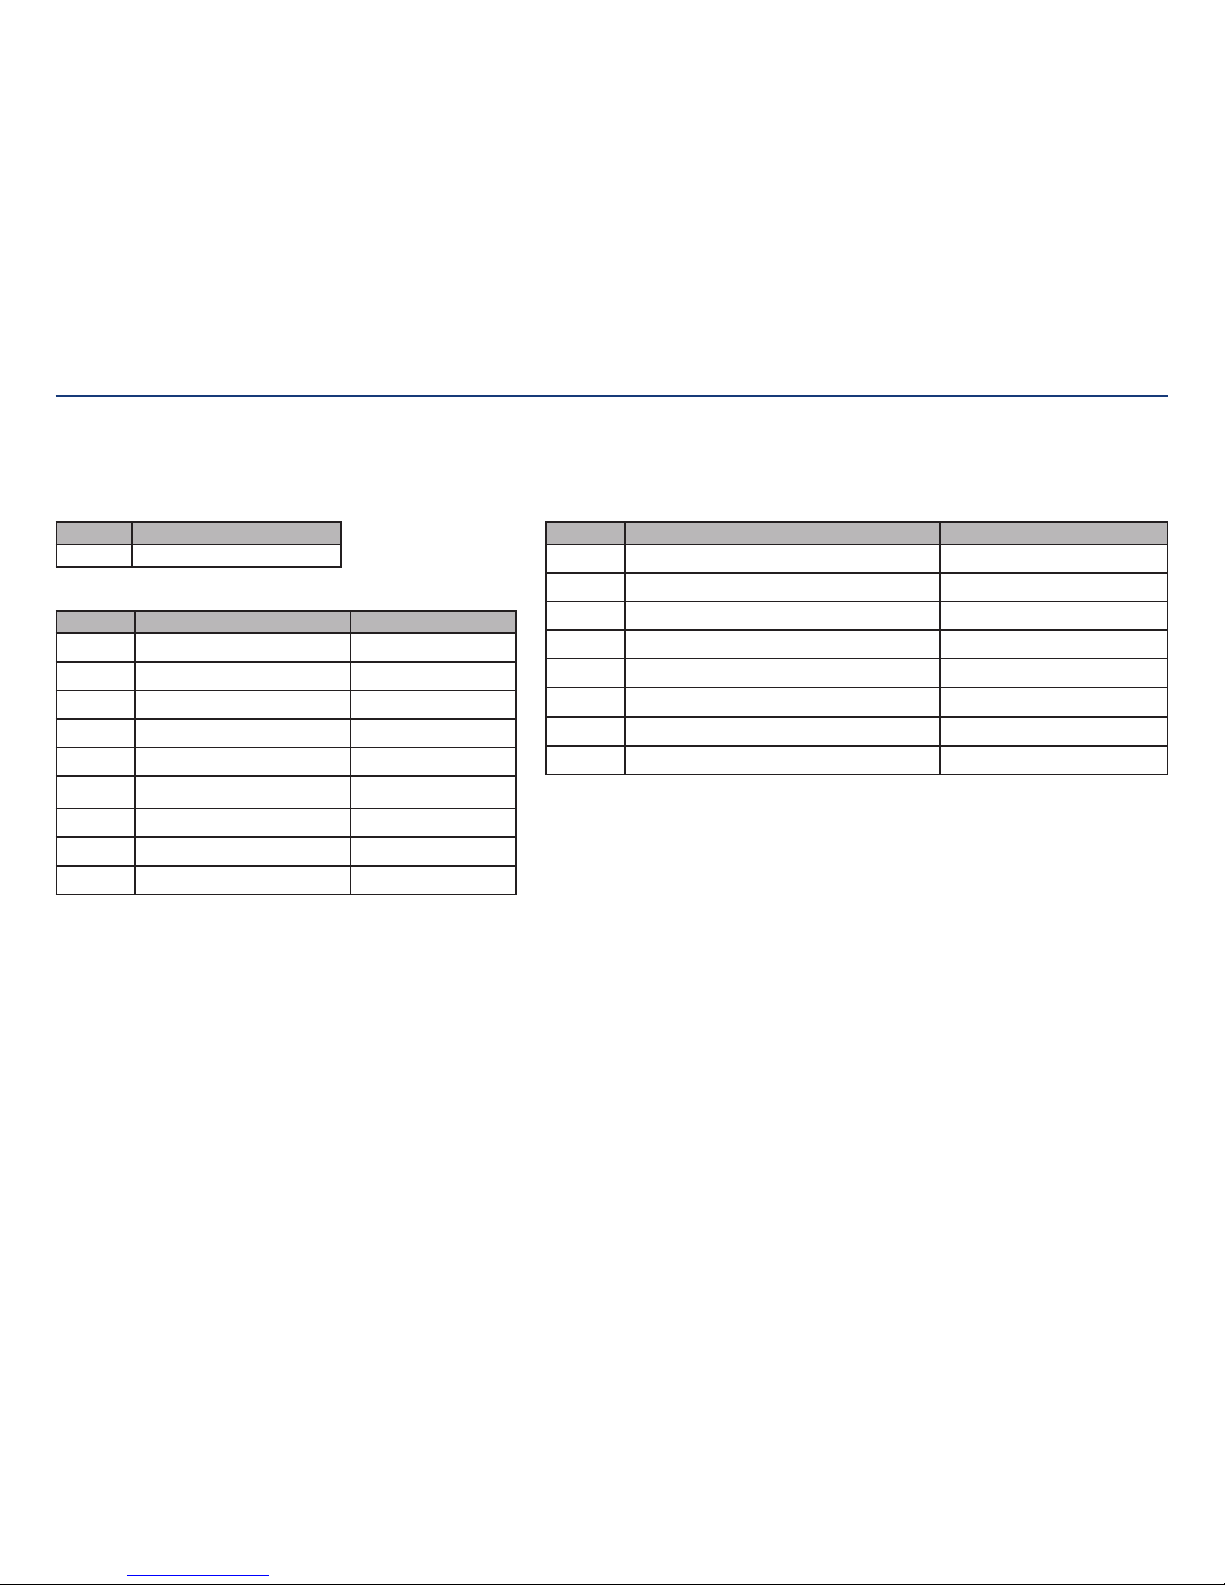
Kangaroo Console:
Item Code Order Information
386100 1 each/case
Kangaroo Feeding Tube with IRIS Technology:
Item Code Product Size Order Information
460836E 8 Fr/Ch (2.7 mm) x 36” (91 cm) 5 each/case
460843E 8 Fr/Ch (2.7 mm) x 43” (109 cm) 5 each/case
460855E 8 Fr/Ch (2.7 mm) x 55” (140 cm) 5 each/case
461036E 10 Fr/Ch (3.3 mm) x 36” (91 cm) 5 each/case
461043E 10 Fr/Ch (3.3 mm) x 43” (109 cm) 5 each/case
461055E 10 Fr/Ch (3.3 mm) x 55” (140 cm) 5 each/case
461236E 12 Fr/Ch (4.0 mm) x 36” (91 cm) 5 each/case
461243E 12 Fr/Ch (4.0 mm) x 43” (109 cm) 5 each/case
461255E 12 Fr/Ch (4.0 mm) x 55” (140 cm) 5 each/case
Kangaroo™ System Accessories for use with Kangaroo Feeding Tube with IRIS Technology:
Item Code Product Descriptor Order Information
388101 Power Adapter 1 each/case
388102 Replacement Battery 1 each/case
388103 Interface Cable 1 each/case
388104 Mounting Clamp 1 each/case
388105E Insufflation Device 5 each/case
388107 Battery Charging Station 1 each/case
388106 Mounting Cart 1 each/case
388108 Carrying Case 1 each/case
Order information - To purchase any of these accessories, contact your Covidien customer service representative.
Accessories for Kangaroo Feeding Tube with IRIS Technology
Section VI: Additional Kangaroo Feeding Tube with IRIS Technology Information
Page 42
Kangaroo™ Console | 40
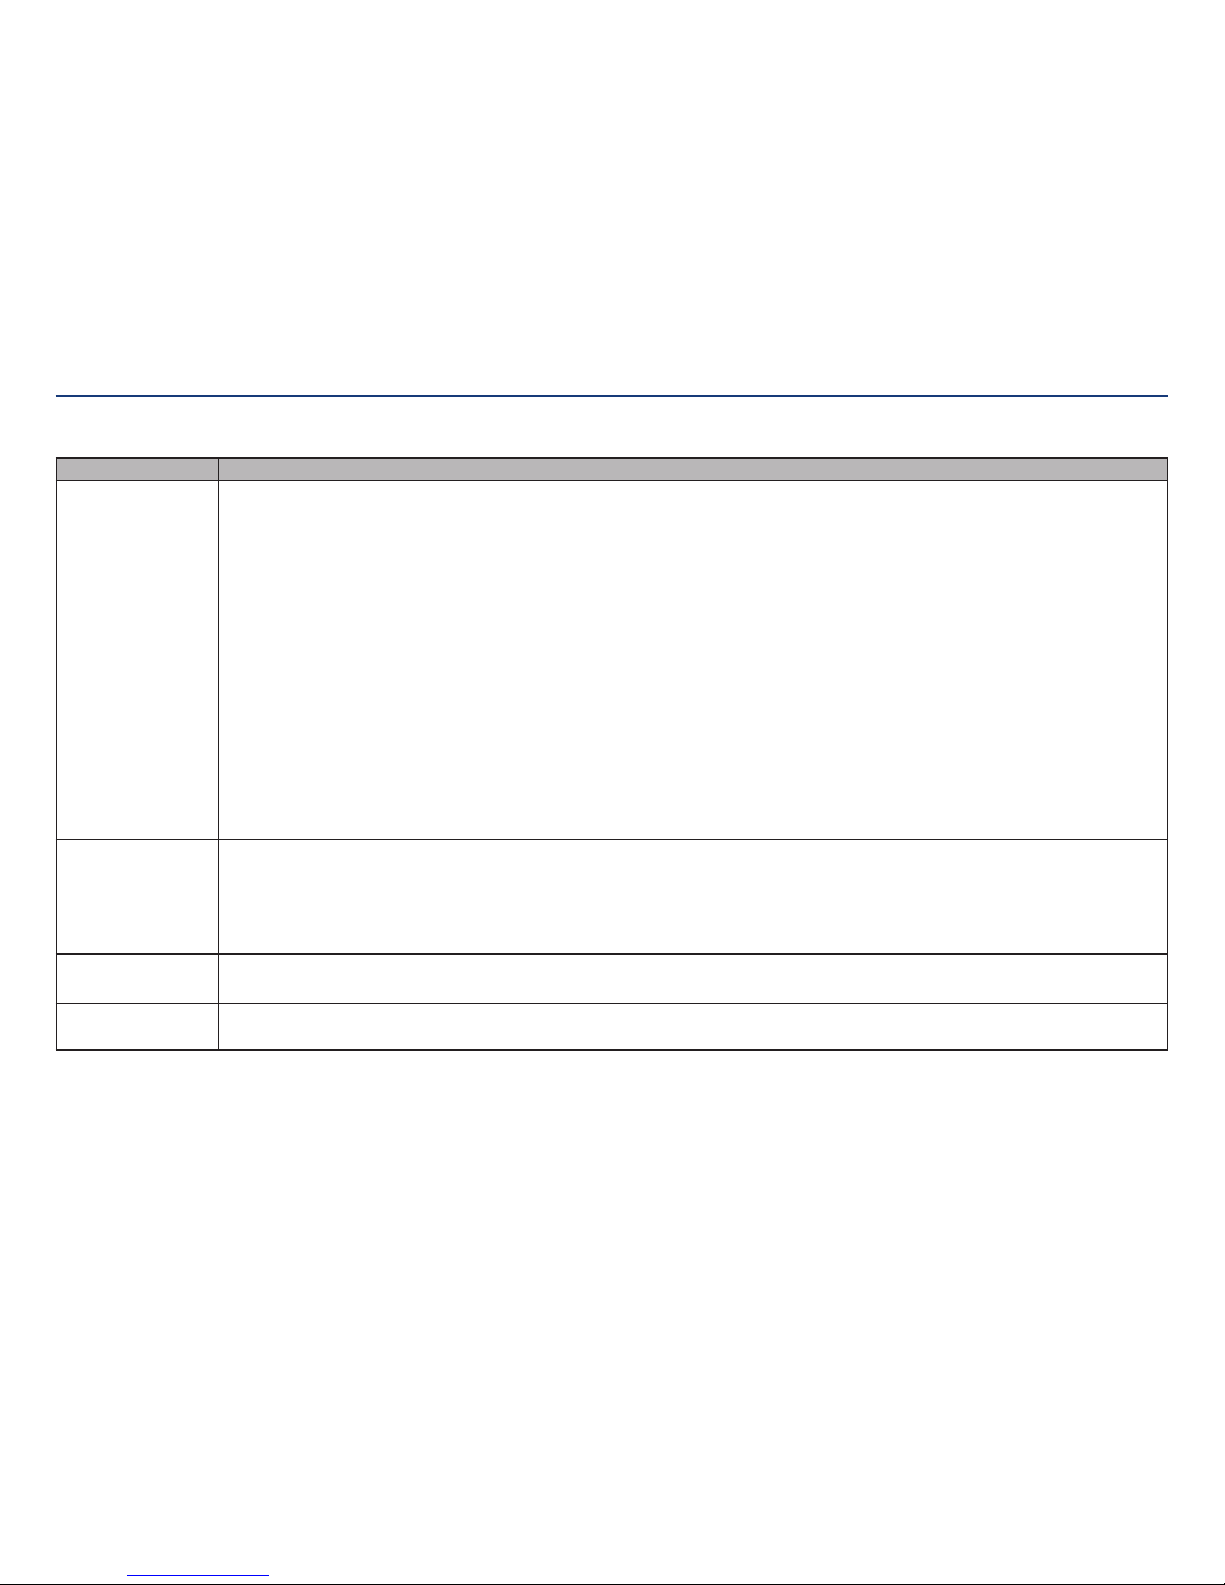
Troubleshooting
Issue Actions
Unable to see images. 1. Read all warnings and precautions prior to tube insertion.
2. Explain procedure to the conscious patient. Prepare supplies —ENFit syringe, feeding tube water, wipes, and stethoscope.
3. Position patient in accordance with facility protocol for feeding tube placement.
4. To estimate insertion depth, use the tube to measure the distance from the tip of the patient’s nose to the earlobe and from the earlobe to the xiphoid process for gastric
placement. Add approximately 10 (ten) inches (25 cm) for intestinal placement. Spontaneous transpyloric passage of the tip often occurs within 24 to 48 hours.
5. Passage of the feeding tube through the nasal passage into the stomach can be facilitated by using a stylet.
6. Activate the Hydromer coating on the tip of the tube by submerging the weight assembly in water for at least 5 seconds.
7. Choose the most patent nare and insert the feeding tube with the stylet (if the stylet is used). Once in place, do not manipulate or pull the stylet back and forth within
the feeding tube. When the tube has reached the oropharynx encourage the patient to swallow. Giving sips of cool or room temperature water may assist the passage of
thetube.
8. Confirm tube position per institutional protocol. Supportive confirmation includes auscultation of the upper left quadrant during injection of air using a syringe and
aspiration of gastric contents. Placement confirmation may be confirmed with a stylet secured within the tube. These tubes are equipped with a radiopaque material for
facilitating radiological (X-ray or fluoroscopic) confirmation.
Warning: If there is uncertainty of the tube’s distal location after institutional placement verification methods have been performed, confirmation by X-ray should
beconsidered.
9. Once the tube position has been confirmed, the stylet is then removed by gentle traction. Tape the tube securely, avoiding pressure on the nares.
10. Disconnect the feeding tube from the interface cable prior to feedings. Enteral feedings may begin by filling the enteral feeding bag, purging the tubing of air, and
connecting it to the feeding tube.
No live feed from
camera
1. Check connections on both sides of the interface cable. Ensure that everything is plugged in correctly and securely.
2. Advance the feeding tube forward or backward a few inches.
3. If feeding tube tip is estimated to be in the stomach or small bowel, try insufflation, then flush tube with water using syringe.
4. If feeding tube is estimated to be located prior to the stomach or small bowel, remove, wipe, and try again.
5. If problem still persists, adhere to blind placement procedure.
Battery dies
duringplacement
Confirm all components are securely and properly connected.
Connect power adapter to console and AC outlet.
Console is
notfunctioning
Press and hold the power button for 10 seconds. The console will shut down. Wait 30 seconds, then press the power button to turn it back on.
If problem persists, check battery level.
Section VI: Additional Kangaroo Feeding Tube with IRIS Technology Information
Page 43
Kangaroo™ Console | 41
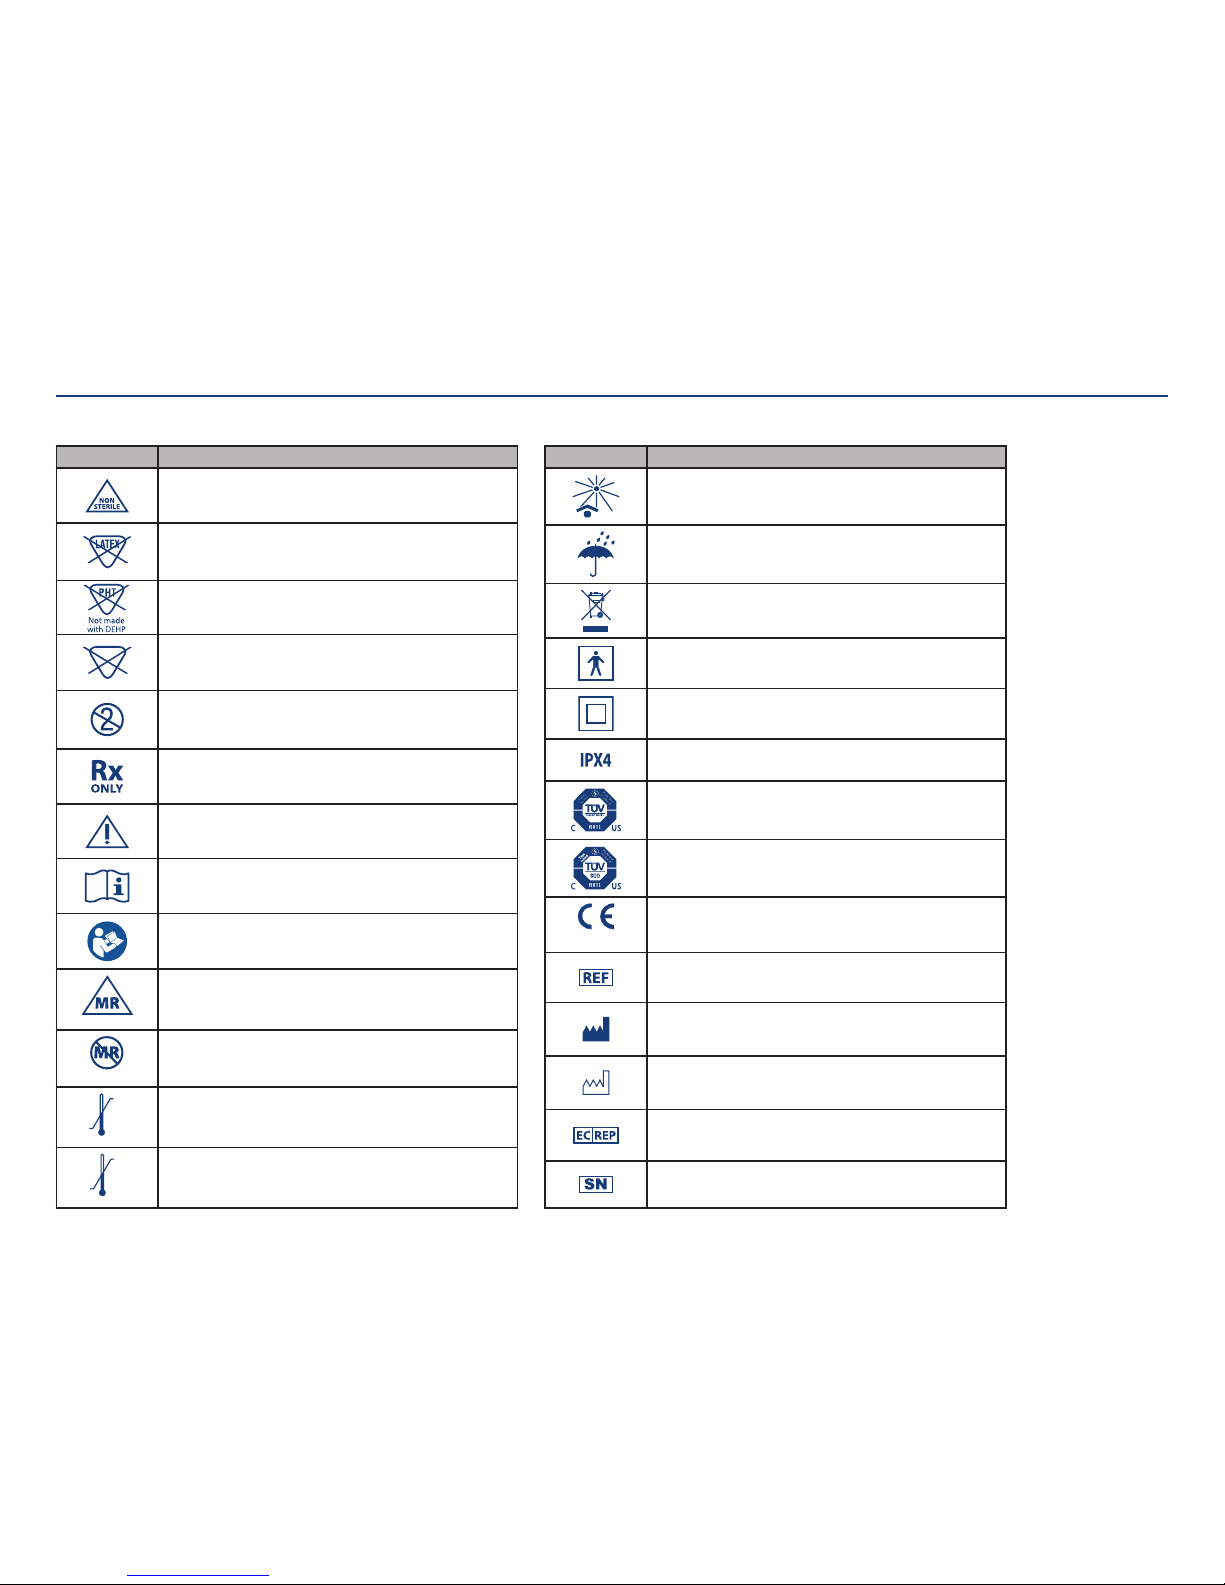
Definition of Symbols
Section VI: Additional Kangaroo Feeding Tube with IRIS Technology Information
Symbol Definition
Keep away from sunlight
Keep Dry
Dispose of as Electrical and Electronic Waste
Type BF protection against electrical shock
Class II Equipment
Protected against splashing water
NRTL test mark performed for compliance; “Safety Tested”
NRTL test mark performed for compliance; “Type Tested”
0123
CE Mark
Catalog number
Manufacturer
Date of manufacture
Authorized representative in the European Community
Serial Number
Symbol Definition
Non-sterile
Not made with natural rubber latex
Not made with Di(2-ethylhexyl)phthalate
Identification of a substance that is not contained or present
within the product or packaging.
Single use only, do not re-use
Federal (USA) law restricts this device
to sale by or on the order of a physician
Caution, consult accompanying documents
Consult instructions for use
Follow instructions for use
MR Conditional
Indicates that the specific device poses no known hazards in
a specified MR environment (specific field strength, spatial
gradient, RF pulse limitations, and specific absorption rate).
MR Unsafe
Indicates the device would be unsafe in any MR environment.
32°F
0°C
122°F
50°C
Store in temperatures between 0°C and 50°C,
15% to 85% (non-condensing)
59°F
15°C
86°F
30°C
Store in temperatures between 15-30°C (59-86°F)
Page 44

Kangaroo™ Console | 42
Limited warranty:
Covidien llc, warrants to the original purchaser (“Customer”) that this product will
be free of defects in materials and workmanship, under normal use, for one (1) year
from the date of original purchase from Covidien or its authorized distributor. If this
product does not operate as warranted above during the applicable warranty period,
Covidien may, at its option and expense, replace the defective part or product with
a comparable part or product, repair the defective part or product, or, if neither
replacement nor repair is reasonably available, refund to Customer the purchase price
for the defective part or product. Dated proof of original purchase will be required.
Covidien does not assume any liability for loss arising from unauthorized repair,
misuse, neglect, or accident.
Warranty
Section VI: Additional Kangaroo Feeding Tube with IRIS Technology Information
Page 45
Kangaroo™ Console | 43
Console dimensions:
29.5 x 21.6 x 4 cm (11.6 x 8.5 x 1.57 in)
Console weight / mass:
4.95 lb / 2.24 kg
Console power:
Use AC adapter for wall outlet usage. Console operates
on 15 VDC, 40 W. Use only Kangaroo feeding tube with
IRIS technology console ACadapter.
AC power adapter:
The power supply is a part of the ME equipment. It is
rated for continuous use.
Input Voltage: 100-240 VAC
Input Frequency: 50-60 Hz
Console battery:
New, fully charged Lithium Ion Battery Pack delivers
approximately four hours of service before needing to
be recharged
Rated Voltage: 11.IV DC
Rated Capacity: 3.7Ah (41.0Wh)
Console image output format:
Bitmap (BMP, uncompressed) or
JPEG (JPG, compressed) file format,
800 x 600 pixel resolution
Operating temperature, humidity andaltitude:
10°C - 40°C, 15-85% R.H. non-condensing
Operating altitude for this system is 2000M orless
Storage and transport
temperature andhumidity:
0°C - 50° C, 15-85% R.H. non-condensing
Type of protection against electrical shock:
Class II, Internally-powered Equipment
Degree of protection against electricalshock:
Type BF
Please ensure device is plugged into an easily
accessible outlet in case of emergency.
Specifications
Section VI: Additional Kangaroo Feeding Tube with IRIS Technology Information
Console degree of protection against ingress
offluids:
IPX4 (in a typical use configuration with all console
port covers closed except for the power cable and
interface cable covers both being open with those
cables plugged in. See page 44 for cover information.)
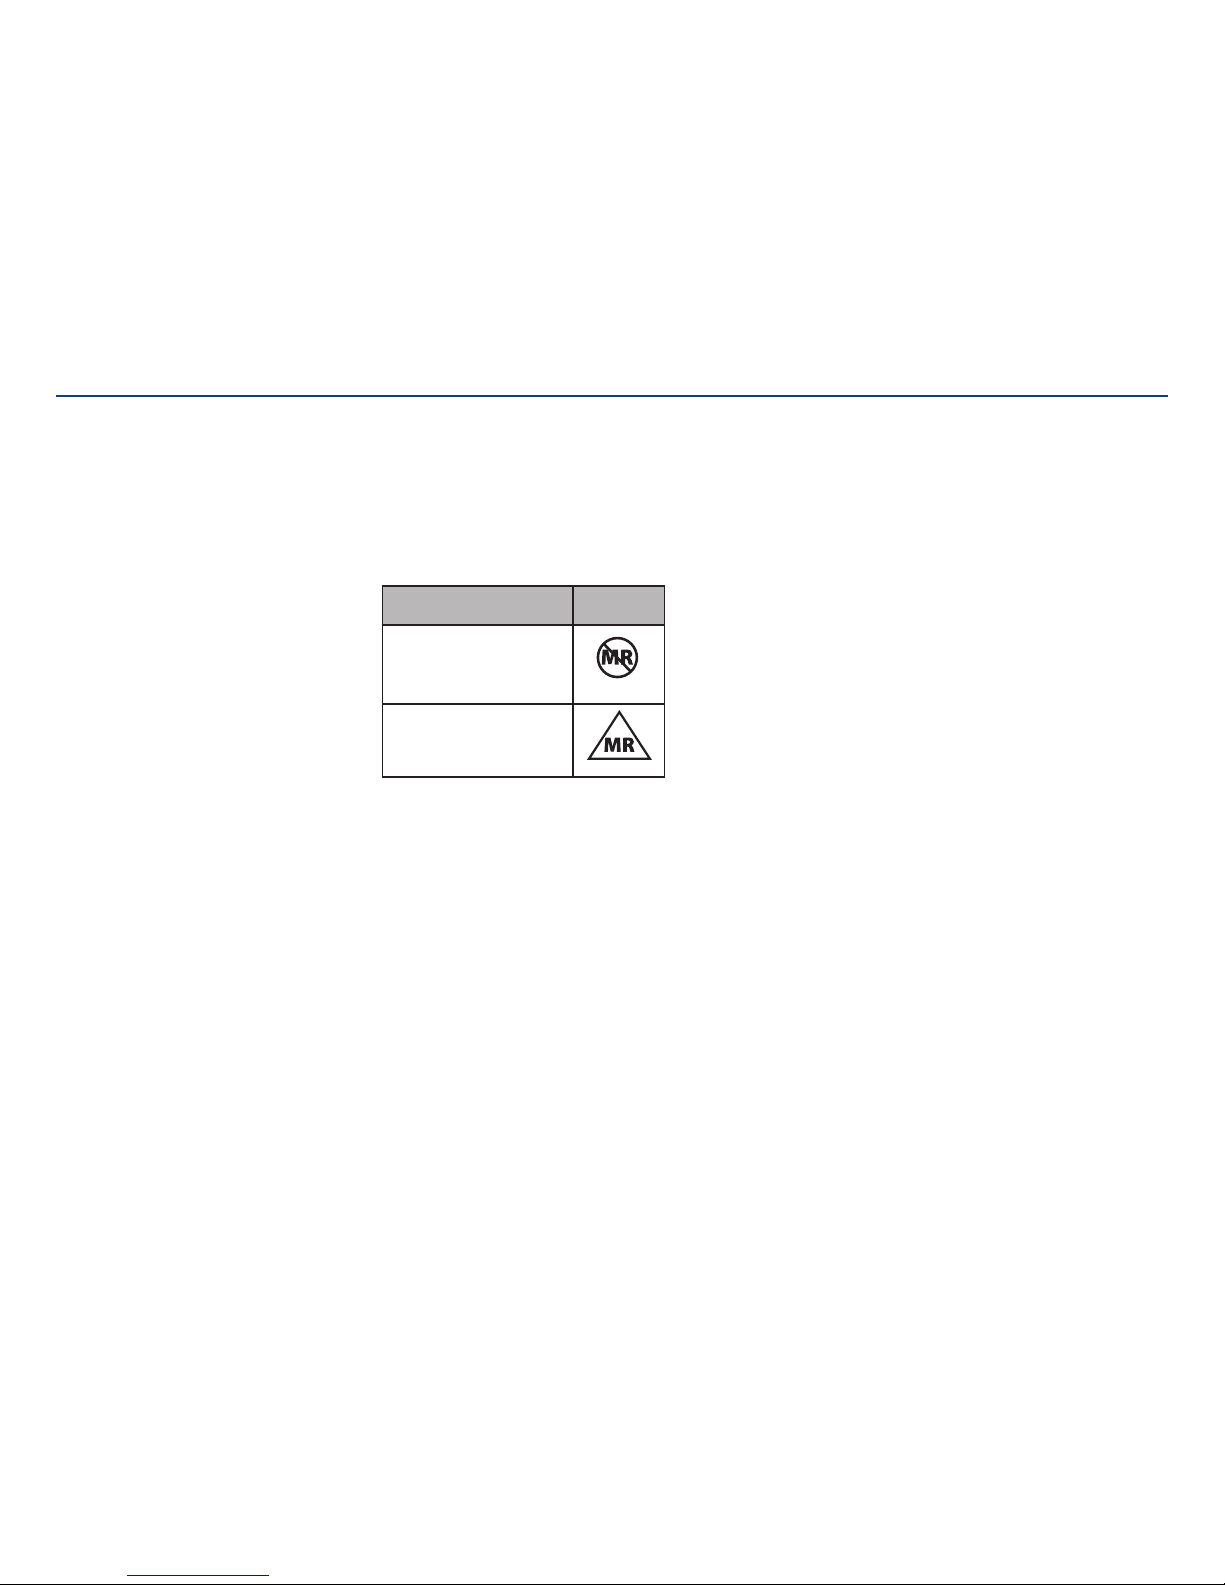
MRI Safety Information:
Items
MRI
Information
Console with power accessories,
interface cable, stylet,
insufflation device, mounting
clamp and carrying case
Kangaroo feeding tube with
IRIS technology
MR Unsafe
MR Conditional
The Kangaroo feeding tube with IRIS technology was
determined to be MR Conditional. Do not bring MR
Unsafe items into the MRI scan room. This includes all
components and accessories of the Kangaroo system
(console, interface cables, stylet, etc.) other than the
Kangaroo feeding tube with IRIS technology.
Non-clinical testing demonstrated that the Kangaroo
feeding tube with IRIS technology is MR Conditional.
A patient with this device can be scanned safely,
immediately following positioning of this feeding tube
under the following MR Scan Conditions:
• Static magnetic field of 1.5 or 3.0 Tesla
• Maximum spatial gradient magnetic field of 3,700gauss/cm (37 T/m)
• Maximum MR system reported, whole-body
averaged specific absorption rate (SAR) of <2 W/kg
(Normal Operating Mode).
MRI-related heating:
Under MR Scan Conditions defined above, the
Kangaroo feeding tube with IRIS technology is
expected to produce a maximum temperature increase
of 1.5°C after 15 minutes of continuous scanning.
These temperature changes will not pose a hazard to a human subject under the
conditions indicated above.
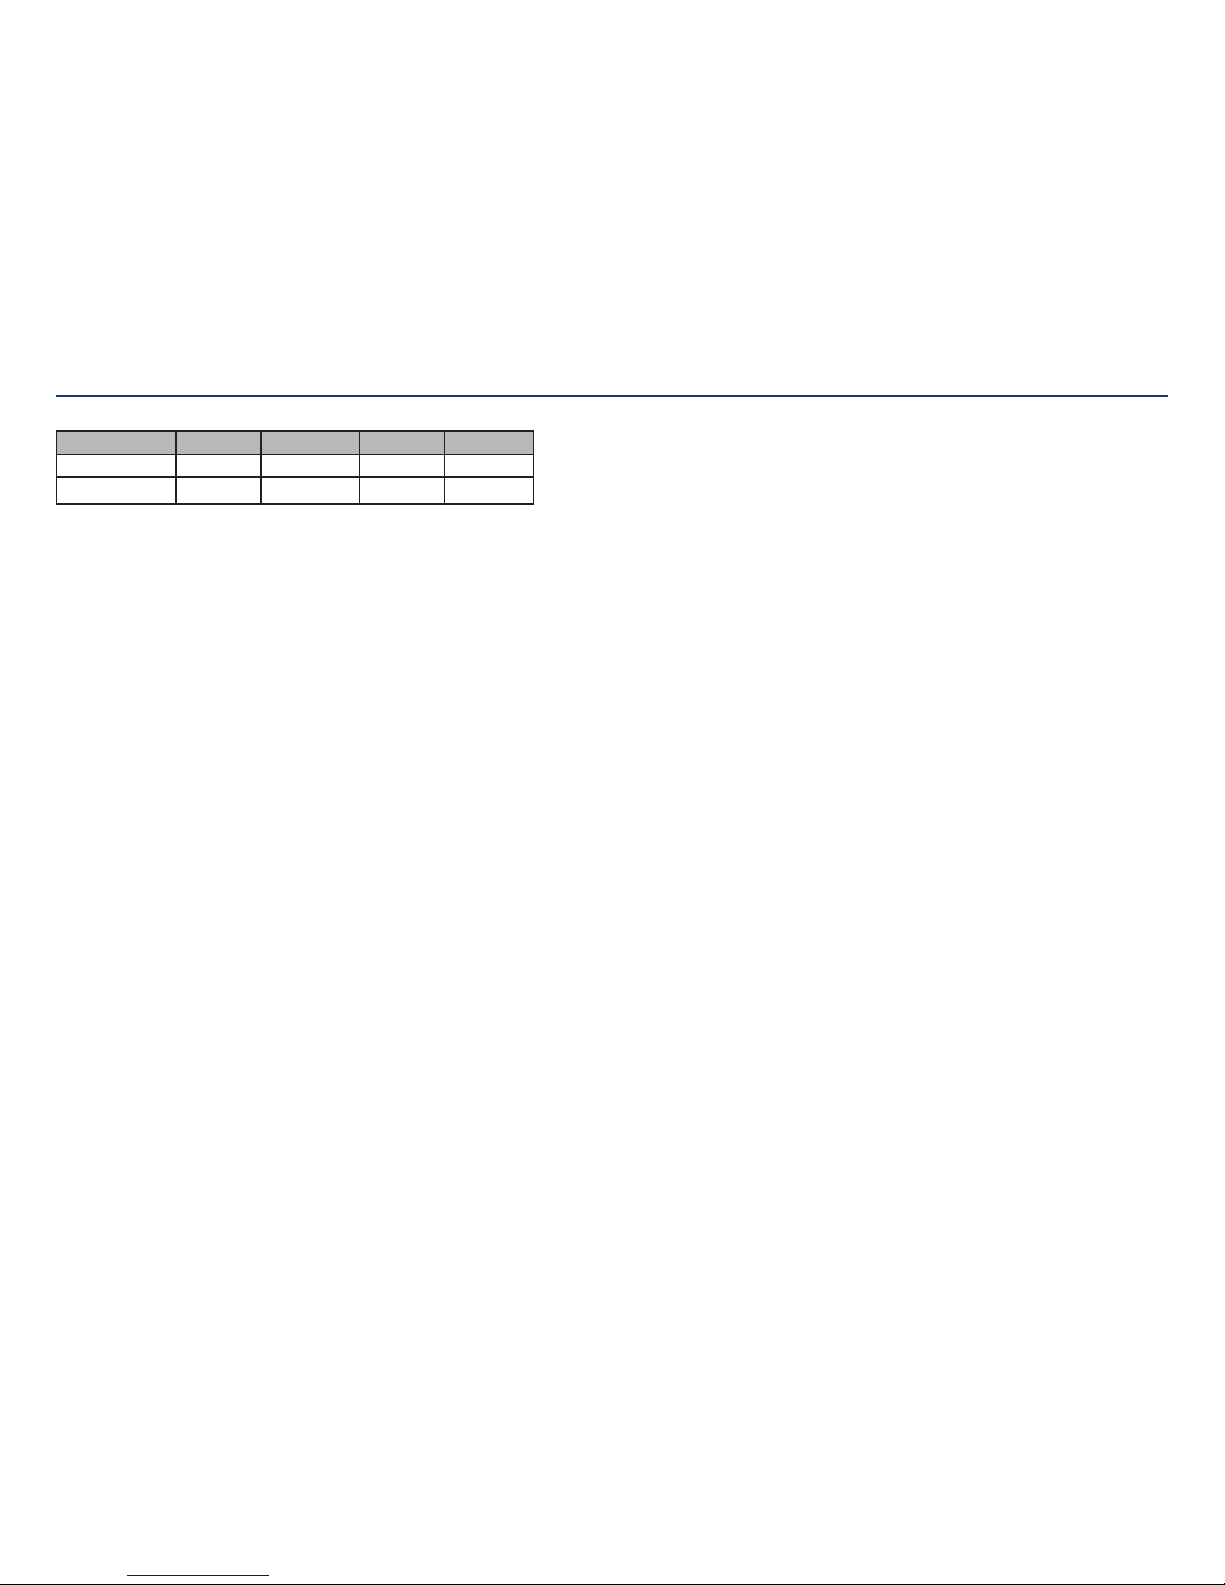
Artifact Information
MR image quality may be compromised if the area of interest is in the exact same
area or relatively close to the position of the Kangaroo feeding tube with IRIS
technology. Therefore, optimization of MR imaging parameters to compensate for the
presence of this device may be necessary. The maximum artifact size (i.e., as seen on
the gradient echo pulse sequence) extends approximately 10-mm relative to the size
and shape of this device.
Additional instructions or information essential to safe use in the MR Environment:
The stylet must be removed from the Kangaroo feeding tube with IRIS technology
prior to permitting the patient to enter the MR system room to undergo an MRI
examination.
Applied part definition:
Per IEC 60601-1 Ed. 3.1, the applied part of this system is the Kangaroo feeding
tube with IRIS technology. The feeding tube with IRIS technology is detachable ME
equipment intended to receive power from the Kangaroo console.
Page 46
Kangaroo™ Console | 44
Section VI: Additional Kangaroo Feeding Tube with IRIS Technology Information
Pulse Sequence T1-SE T1-SE GRE GRE
Signal Void Size 14,10 8-mm21,095-mm
2
12,655 -mm21,916 -mm
2
Plane Orientation Parallel Perpendicular Parallel Perpendicular
USB ports:
The USB ports will support only USB flash drive and USB hard drives. Do not plug any
other device into the USB ports.
Covers on console and tube:
Close the covers on the console ports for the tube, USB, and Ethernet when they are
not in use to protect the console from spills and splashes.
Note: the Ethernet port is currently not enabled.
Close the electronic port on the feeding tube when it is not being used with the
interface cable and console.
Maintenance and safety:
Do not open the console housing, as there are no user-serviceable parts inside.
Opening may affect function of device and voids the warranty. To replace battery, see
Section IV.
The console must be periodically tested to assure proper functioning and safety.
The recommended service interval is at least once per year. To arrange for Covidien
Factory Service in the US, call 1-800-448-0190. In Canada, please contact 1-877-664-
8926. Outside of the US and Canada, please contact your local Customer Service for
more information.
Page 47
Kangaroo™ Console | 45
Electrical Safety
The Kangaroo feeding tube with IRIS technology has been built and tested according IEC 60601 Ed. 3.1 2012, ANSI/AAMI ES 60601-1:2005/(R)2012, CAN/CSA C22.2 No. 60601-1-08, IEC 60601-1-6:2013, IEC
60601-1-2 Ed. 3.1:2015 Standards.
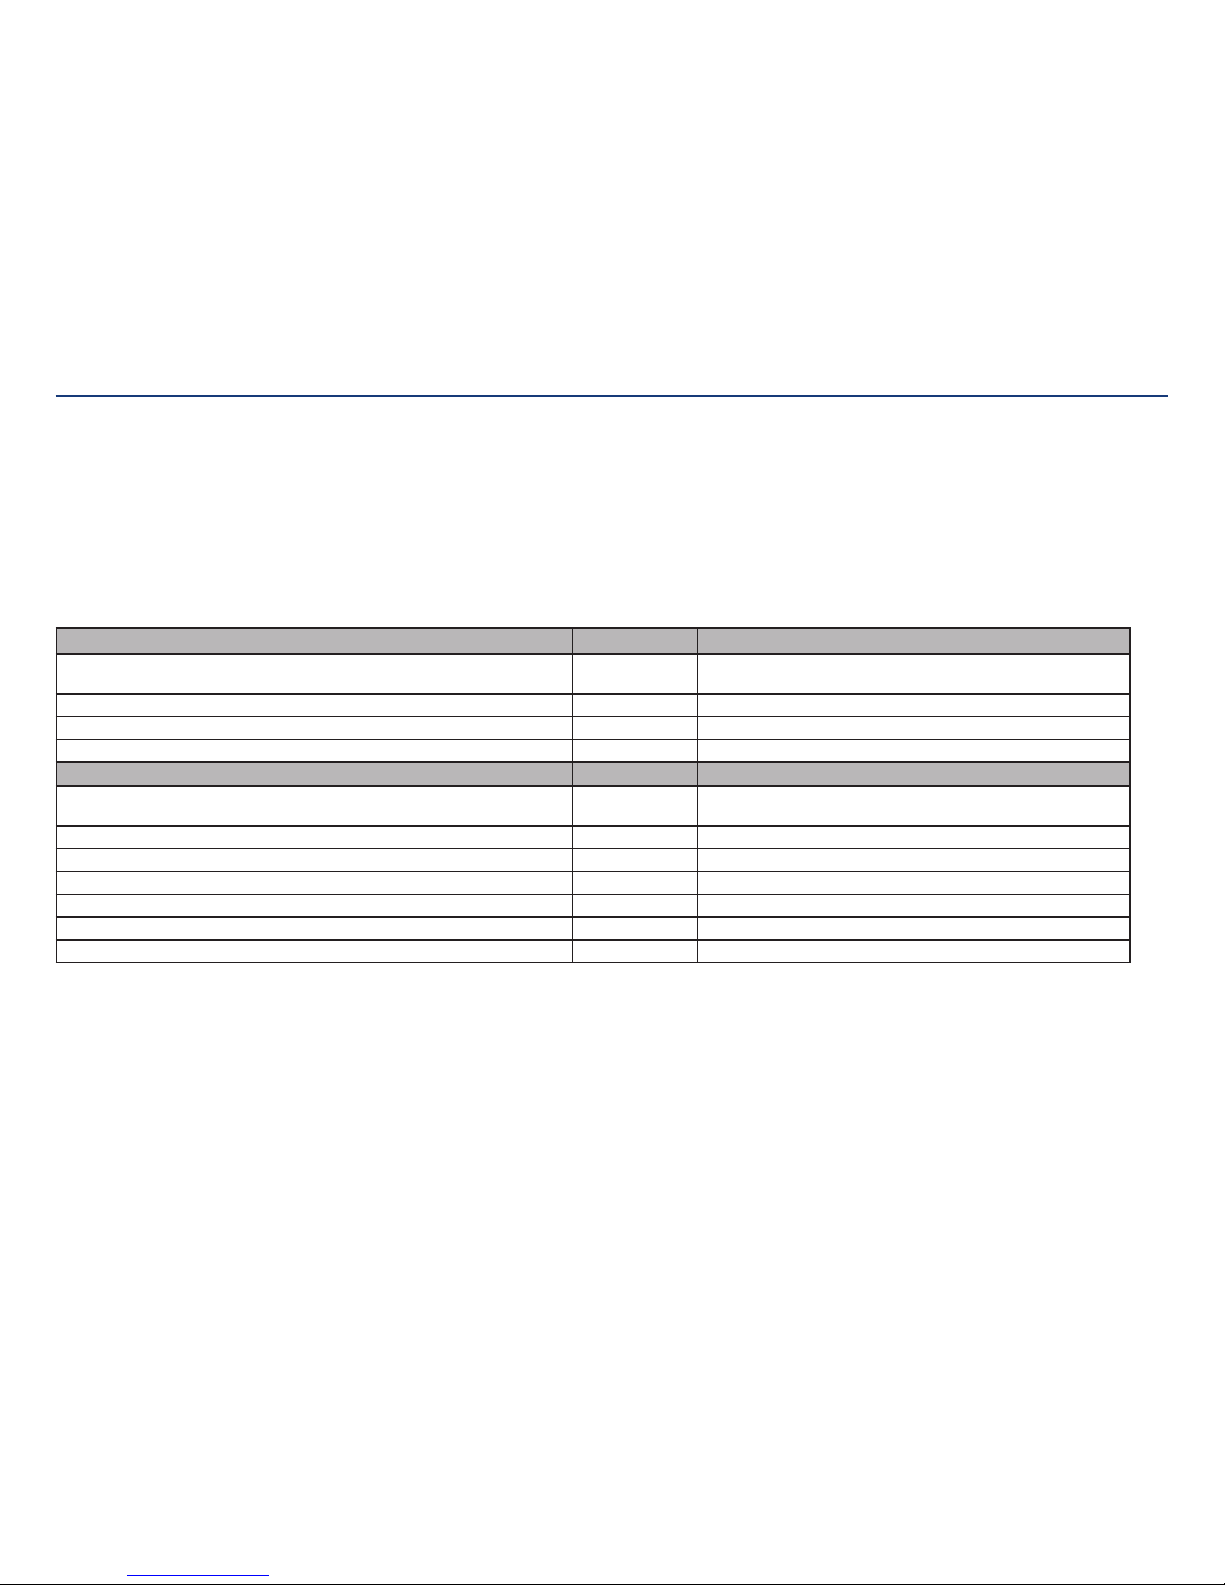
The Kangaroo feeding tube with IRIS technology, when used with the console as a system is intended for use in the electromagnetic environment specified below. The user should assure that it is used in such
an environment.
Electromagnetic Conformity Declaration.
Specifications
Section VI: Additional Kangaroo Feeding Tube with IRIS Technology Information
For any questions please contact Covidien Customer Service at 1-800-962-9888, or your local sales representative.
Emissions Tests Compliance Electromagnetic Environment - Guidance
RF emissions (CISPR 11:2015) Group 1 See guidance comments for emissions tests in the tables on the following
pages.
RF emissions (CISPR 11:2015) Class A
Harmonic emissions (EN 60601-3-2:2014) Class A
Voltage Fluctuations / flicker emissions (EN61000-3-3:2013) Complies
Immunity Tests Compliance Electromagnetic Environment - Guidance
Radiated Disturbance Immunity (EN60601-1-2:2015 / IEC 61000-4-3:2010) Complies See guidance comments for immunity tests in the tables on the following
pages.
Conducted Disturbance Immunity (EN60601-1-2:2015 / IEC 61000-4-6:2013) Complies
Power Frequency Magnetic Field Immunity (EN60601-1-2:2015 / IEC 61000-4-8:2009) Complies
Voltage Dips and Sags Immunity (EN60601-1-2:2015 / IEC 61000-4-11:2004) Complies
Electrical Fast Transient / Bursts Immunity (EN60601-1-2:2015 / IEC 61000-4-4:2012) Complies
Electrostatic Discharge Immunity (EN60601-1-2:2015 / IEC 61000-4-2:2008) Complies
Surge Immunity (EN60601-1-2:2015 / IEC 61000-4-5:2014) Complies
Page 48
Kangaroo™ Console | 46
Section VI: Additional Kangaroo Feeding Tube with IRIS Technology Information
Guidance and manufacturer’s declaration – electromagnetic emission
The Kangaroo feeding tube with IRIS technology, when used with the console as a system is intended for use in the electromagnetic environment specified below. The customer or the user should assure
that it is used in such an environment.
Emission test Compliance Electromagnetic environment - guidance
RF emissions
CISPR 11
Group 1
The Kangaroo feeding tube with IRIS technology, when used
with the console as a system uses RF energy only for its internal
function. Therefore, its RF emissions are very low and are not
likely to cause any interference in nearby electronic equipment.
RF emission
CISPR 11
Class A
The Kangaroo feeding tube with IRIS technology, when used with
the console as a system is suitable for use in all establishments
other than domestic and those directly connected to a low
voltage power supply network which supplies buildings used for
domestic purposes.
Harmonic emissions
IEC 61000-3-2
Class A
Voltage fluctuations/
flicker emissions
IEC 61000-3-3
Complies
Page 49
Kangaroo™ Console | 47
Section VI: Additional Kangaroo Feeding Tube with IRIS Technology Information
Guidance and manufacturer’s declaration – electromagnetic immunity
The Kangaroo feeding tube with IRIS technology, when used with the console as a system is intended for use in the electromagnetic environment specified below. The customer or the user should assure that it
is used in such an environment.
Immunity test IEC 60601 test level Compliance level Electromagnet environment - guidance
Electrostatic discharge (ESD)
IEC 61000-4-2
±8 kV contact
±15 kV air
±8 kV contact
±15 kV air
Floors should be wood, concrete, or ceramic tile. If floors are
covered with synthetic material, the relative humidity should be
at least 30%.
Electrical fast transient/burst
IEC 61000-4-4
±2 kV for power supply lines
1kV for signal line
±2 kV for power supply lines
1kV for signal line
Mains power quality should be that of a typical commercial or
hospital environment.
Surge
IEC 61000-4-5
±1 kV differential mode ±1 kV differential mode Mains power quality should be that of a typical commercial or
hospital environment.
Voltage dips, short interruptions and
voltage variations on power supply
input lines
IEC 61000-4-11
0% U
T
(100% dip in UT) for 0.5 cycle (50/60 Hz)
0% U
T
(100% dip in UT) for 1 cycle (50/60 Hz)
70% U
T
(30% dip in UT) for 30 cycles (60 Hz)
70% U
T
(30% dip in UT) for 25 cycles (50 Hz)
0% U
T
(70% interruption in UT) for 250 cycles (50 Hz)
0% U
T
(70% interruption in UT) for 300 cycles (60 Hz)
0% U
T
(100% dip in U
T
) for 0.5 cycle (50/60 Hz)
0% U
T
(100% dip in U
T
) for 1 cycle (50/60 Hz)
70% U
T
(30% dip in U
T
) for 30 cycles (60 Hz)
70% U
T
(30% dip in U
T
) for 25 cycles (50 Hz)
0% U
T
(70% interruption in U
T
) for 250 cycles (50 Hz)
0% U
T
(70% interruption in U
T
) for 300 cycles (60 Hz)
Mains power quality should be that of a typical commercial or
hospital environment. If the user of the Kangaroo feeding tube
with IRIS technology, when used with the console as a system
requires continued operation during power mains interruptions,
it is recommended that it be powered from an uninterruptable
power supply or battery.
Power frequency (50/60Hz)
magnetic field
IEC 61000-4-8
30A/min 30A/min Mains power quality should be that of a typical commercial or
hospital environment.
NOTE U
T
is the a.c. mains voltage prior to application of the test level.
Page 50
Kangaroo™ Console | 48
Section VI: Additional Kangaroo Feeding Tube with IRIS Technology Information
Guidance and manufacturer’s declaration – electromagnetic immunity
The Kangaroo feeding tube with IRIS technology, when used with the console as a system is intended for use in the electromagnetic environment specified below. The customer or the user
should assure that it is used in such an environment.
Immunity test IEC 60601 test level Compliance level Electromagnet environment - guidance
Conducted RF
IEC 61000-4-6
Radiated RF
IEC 61000-4-3
3 Vrms
150 kHz to 80 MHz
3 V/m
80 MHz to 2.7 GHz
3 Vrms
3 V/m
Portable and mobile RF communications equipment should be used no closer
to any part of the Kangaroo feeding tube with IRIS technology, when used with
the console as a system, including cables, than the recommended separation
distance calculated from the equation applicable to the frequency transmitter.
Recommended separation distance
d = [ 3.5 / V 1 ] √P
d = [ 3.5 / E 1 ] √P 80 MHz to 800 MHz
d = [ 7.0 / E 1] √P 800 MHz to 2.7 GHz
Where P is the maximum output power rating of the transmitter in watts (W)
according to the transmitter manufacturer and d is the recommended separation
distances in meters (m).
Field strengths from fixed RF transmitters, as determined by an electronic site
survey,
a
should be less than the compliance level in each frequency range.
b
Interference may occur in the vicinity of equipment marked with the following
symbol:
NOTE 1 At 80 MHz and 800 MHz, the higher frequency applies.
NOTE 2 These guidelines may not apply in all situations. Electromagnetic propagation is affected by absorption and reflection from structures, objects, and people.
a) Field strengths from fixed transmitters, such as base stations for radio (cellular/cordless) telephones and land mobile radios, amateur radio, AM and FM radio broadcast, and TV broadcast
cannot be predicted theoretically with accuracy. To assess the electromagnetic environment due to fixed RF transmitters, an electromagnetic site survey should be considered. If the measured
field strength in the location in which the Kangaroo feeding tube with IRIS technology, when used with the console as a system is used exceeds the applicable RF compliance level above, the
Kangaroo feeding tube with IRIS technology, when used with the console as a system should be observed to verify normal operation. If abnormal performance is observed, additional measures
may be necessary, such as reorienting or relocating the Kangaroo feeding tube with IRIS technology, when used with the console as a system.
b) Over the frequency range 150 kHz to 80 MHz, field strengths should be less than 3 V/m.
Page 51
Kangaroo™ Console | 49
Section VI: Additional Kangaroo Feeding Tube with IRIS Technology Information
Recommended separation distances between portable and mobile RF communications equipment and the Kangaroo feeding tube with
IRIS technology, when used with the console as a system
The Kangaroo feeding tube with IRIS technology, when used with the console as a system is intended for use in an electromagnetic environment in which radiated
RF disturbances are controlled. The customer or user can help prevent electromagnetic interference by maintaining a minimum distance between portable and mobile
RF communications equipment (transmitters) and the Kangaroo feeding tube with IRIS technology, when used with the console as a system as recommended below,
according to the maximum output power of the communications equipment.
Rated maximum output power
of transmitter (W)
Separation distance according to frequency of transmitter (m)
150 kHz to 80 MHz
d = [ 3.5 / V 1 ] √P
80 MHz to 800 MHz
d = [ 3.5 / E 1 ] √P
800 MHz to 2.7 GHz
d = [ 7.0 / E 1] √P
0.01 0.12 0.12 0.23
0.1 0.37 0.37 0.74
1 1.17 1.17 2.33
10 3.69 3.69 7.38
100 11.67 11.67 23.33
For transmitters rated at a maximum output power not listed above, the recommended separation distance d in meters (m) can be estimated using the equation
applicable to the frequency of the transmitter, where P is the maximum output power rating of the transmitter in watts (W) according to the transmitter manufacturer.
NOTE 1 At 80 MHz and 800 MHz, the separation distance for the higher range applies.
NOTE 2 These guidelines may not apply in all situations. Electromagnetic propagation is affected by absorption and reflection from structures, objects, and people.
Page 52
MR Unsafe
MR Unsafe – an item that is known to
pose hazards in all MR environments.
Temperature
limitations
Keep
dry
Manual No. HP109758
COVIDIEN, COVIDIEN with logo, and Covidien logo
are U.S. and internationally registered trademarks of
Covidien AG.
ENFit is a federally registered trademark in multiple
jurisdictions throughout the world. Used with
permission.
Hydromer is a trademark of Hydromer, Inc. and is used
under license.
™* are trademarks of their respective owner.
Other brands are trademarks of a Covidien company.
© 2012 Covidien.
Covidien llc, 15 Hampshire Street,
Mansfield, MA 02048 USA.
Covidien Ireland Limited, IDA Business &
Technology Park, Tullamore.
www.covidien.com [T] 1-800-962-9888
REV 04/2017
32°F
0°C
122°F
50°C
Follow instructions for
use. Symbol appears blue
on device.
0123
X4
The following symbols are applicable to
the Kangaroo console.
 Loading...