

Page 1
USER MANUAL
Multi-Format HDBT Switcher - SB3M-A110 & SB3M-B110
1723 W. 4th Street Tempe Arizona 85281
P: 800.638.6104 | F: 480.966.6728 | E: sales@covid.com | www.covid.com
Page 2

USER MANUAL
Contents
Introduction .................................................................................................................................2
Package Contents ........................................................................................................................2
Key Features ............................................................................................................................... 2
Panel Description ......................................................................................................................... 3
Connection and Installation ...........................................................................................................4
Technical Specifications ................................................................................................................4
Web Server Introduction ............................................................................................................... 5-6
AV Controls .................................................................................................................................7
Embedded or External Audio .....................................................................................................7
Switching Modes .....................................................................................................................8
Manual Mode: .........................................................................................................................8
Hybrid Mode: ..........................................................................................................................8
Auto Mode .............................................................................................................................. 9
Priority: ..................................................................................................................................9
Input/Output Config ...................................................................................................................... 10
Input Config ............................................................................................................................. 10
Input Priority ...........................................................................................................................10
Output Config ..........................................................................................................................11
EDID Management .......................................................................................................................11
EDID settings and Functions (advanced) .....................................................................................11-12
Rs232 Config .............................................................................................................................. 13
Rs232 Preset .........................................................................................................................13
System ....................................................................................................................................... 14
Network Settings ..................................................................................................................... 15
TCP Protocol ........................................................................................................................... 15
Product Name .........................................................................................................................15-16
Output Video Mute ....................................................................................................................... 16
Factory Resetting the Unit ............................................................................................................16
RS232 Command Routing and Table ..............................................................................................17-19
Supported VGA Resolutions ..........................................................................................................20
Connection Diagrams ...................................................................................................................21
Preparing a RS232 Cable .............................................................................................................22-24
Safety Information ........................................................................................................................ 24
Warranty ....................................................................................................................................25
Multi-Format HDBT Switcher - SB3M-A110 & SB3M-B110
1723 W. 4th Street Tempe Arizona 85281
P: 800.638.6104 | F: 480.966.6728 | E: sales@covid.com | www.covid.com
Page 1
Page 3
USER MANUAL
Introduction
The SB3M is a multi-format A/V switch with (1) HDMI, (1) VGA, (1) Display Port and, (1) 3.5mm analog stereo
audio input; With a HDBase-T Class B (70M) transmitter as the output. It is packed with features to make this
small package as flexible as possible to fit your specific requirements. The SB3M supports multiple switching
modes, has a built in independent audio embedder, user programmable front panel button, IR pass through,
robust RS-232 control options, Input Talley, close contact switching, and a built in webserver to help you quickly
configure and troubleshoot your system.
Package Contents
• 1 × SB3M-A110 100m or SB3M-B110 70m Switching HDBase-T Transmitter
• 1 × 24V 1A locking DC power adapter
• 2 × Wall/desk mounting brackets
• 2 × 5 position 3.5mm Female terminal block headers
Key Features
• Transmit Audio/Video/Control up to 100m (328ft. )(SB3M-B110) or 70m (230ft.) (SB3M-B110) over one
Cat 6/Cat 6A/Cat 7 cable
• Support VGA with WUXGA resolution
• Support HDMI 4K x 2K @30Hz
• Support DP1.2 with 4K@30Hz
• Support Auto/Manual/Hybrid/Priority switching
• Support EDID management
• Support field FW upgrade
• Support web server
• HDCP 1.4 compliant
• Lan for local control and web server access
• Control switching through button/Rs232/contact closure or web server
• Support for Simple Rs232 Room Control (Input Detection, No Signal, Button Hold)
• Independent audio input
• Remotely or locally powered Via HDBase-T port PoH, POC
• Status LED for all connections on front
Multi-Format HDBT Switcher - SB3M-A110 & SB3M-B110
1723 W. 4th Street Tempe Arizona 85281
P: 800.638.6104 | F: 480.966.6728 | E: sales@covid.com | www.covid.com
Page 2
Page 4

USER MANUAL
Panel Description
Front Panel
1. PWR: Red LED is Solid when the unit has power.
2. HDMI: Green LED is solid when the content is passing with HDCP. LED will flash when the content passing
is without HDCP.
3. Link: Green LED is flashing when the HDBase-T cable is connected but there is no video signal, LED is solid
when there is video present.
4. D: Green LED is solid when the Display Port input is selected; LED is flashing when a signal is present but
not selected, LED is off when no input signal is detected.
5. H: Green LED is solid when the HDMI Port input is selected; LED is flashing when a signal is present but
not selected, LED is off when no input signal is detected.
6. V: Green LED is solid when the VGA Port input is selected; LED is flashing when a signal is present but not
selected, LED is off when no input signal is detected.
7. IR Emitter: IR emitter port.
8. IR Sensor: IR sensor port.
9. SELECT: Button for switching input signals.
Rear Panel
1 2 3 4 5 6 7 8
1. Power: 24V DC Power
2. HDBT Out: HDBT output
3. DP: Display Port input
4. HDMI: HDMI input
5. VGA: VGA input
6. AUD: Independent audio input
7. LAN: Lan for local control or web serve access
8. 3.5mm Terminal Blocks: RS232, Contact Closure, and LED Talley indicators
Multi-Format HDBT Switcher - SB3M-A110 & SB3M-B110
1723 W. 4th Street Tempe Arizona 85281
P: 800.638.6104 | F: 480.966.6728 | E: sales@covid.com | www.covid.com
Page 3
Page 5

USER MANUAL
Connection and Installation
Technical Specifications
Video
HDMI Compliance HDMI 1.4a, 3D, 4K
VGA Compliance VESA
DP Compliance DP 1.2
HDCP Compliant HDCP 1.4
Distance Up to 70m
Max Resolution Up to 4K x 2K@30Hz
Connectors
Connectors (1) HDMI Input, (1) VGA Input, (1) Display Port Input, (1) 3.5mm TRS
Stereo Line level Input, (1) Shielded RJ45 HDBase-T Output, (1) Shielded
RJ45 LAN connection.
Control
Control Control RS232, IP, IR, Contact Closure
Mechanical
Dimensions 7.5 x 4.1 x 1.2 in. (L/W/H) [190 x103 x 29 mm (L/W/H)]
Net Weight 1.4lds [635g]
Package Size 9.5 x 7.1 x 2.8 in. (L/W/H) [240 x 180 x70mm (L/W/H)]
Gross Weight 1.94lbs [880g]
Power
Power Supply 24V 1A DC
Power Consumption 12W
Environmental
Operation Temperature 14~131°F [-10~55°C]
Storage Temperature -4~185° [-20~85°C]
Relative Humidity 5~95% RH [no condensation]
Multi-Format HDBT Switcher - SB3M-A110 & SB3M-B110
1723 W. 4th Street Tempe Arizona 85281
P: 800.638.6104 | F: 480.966.6728 | E: sales@covid.com | www.covid.com
Page 4
Page 6

USER MANUAL
Web Server Introduction
The SB3M has a built in webserver to give you the ability to setup, troubleshoot, and control your system. To
access the webserver all you need to do is type in the IP address of the unit into your preferred web browser
and the log in screen will appear.
By default the SB3M will have the IP address of 192.168.2.175 which can be changed either through the
webserver itself or through the Rs232 port using the supplied commands.
To access the product web server if your network IP configuration differs from the default, or the product will
not be on a network, you can directly connect a computer LAN port to the SB3M’s LAN port with a straight
RJ45 cable. After making the connection you will need to access your network connection properties of the PC
and revise the settings to a static IP that is on the same subnet as below. Once done, you will be able to open
a web browser and enter the 192.168.2.175 to access to the web server.
If your SB3M will be connected to a local area network, please update the System settings in the SB3M
webserver system tab to match your local network. For example if the Lan IP is set as 192.168.88.xxx, then
please revise the product to 192.168.88.1xx. Once the IP is set, then you will be able to access the device
from any PC in the same network.
Multi-Format HDBT Switcher - SB3M-A110 & SB3M-B110
1723 W. 4th Street Tempe Arizona 85281
P: 800.638.6104 | F: 480.966.6728 | E: sales@covid.com | www.covid.com
Page 5
Page 7

USER MANUAL
When you type in the IP address the log in page will come up. You will use the following credentials to gain
access to the unit.
User ID: avadmin
Password: covid
The user ID and password cannot be changed, and is only there to help keep unknowing persons from
changing settings.
The login page will also show you the following;
Product Name: <Name>
This can be changed by the installer or administrator to help identify the location of the switch where you have
many products connected to your network. You can edit the setting from the system tab.
IP Address: 192.168.2.175
This is to help system admins know they were directed to the correct IP in case of typo or auto complete
errors in the browser.
Model: SB3M
This will help you identify the product you are controlling.
Multi-Format HDBT Switcher - SB3M-A110 & SB3M-B110
1723 W. 4th Street Tempe Arizona 85281
P: 800.638.6104 | F: 480.966.6728 | E: sales@covid.com | www.covid.com
Page 6
Page 8
USER MANUAL
AV Controls
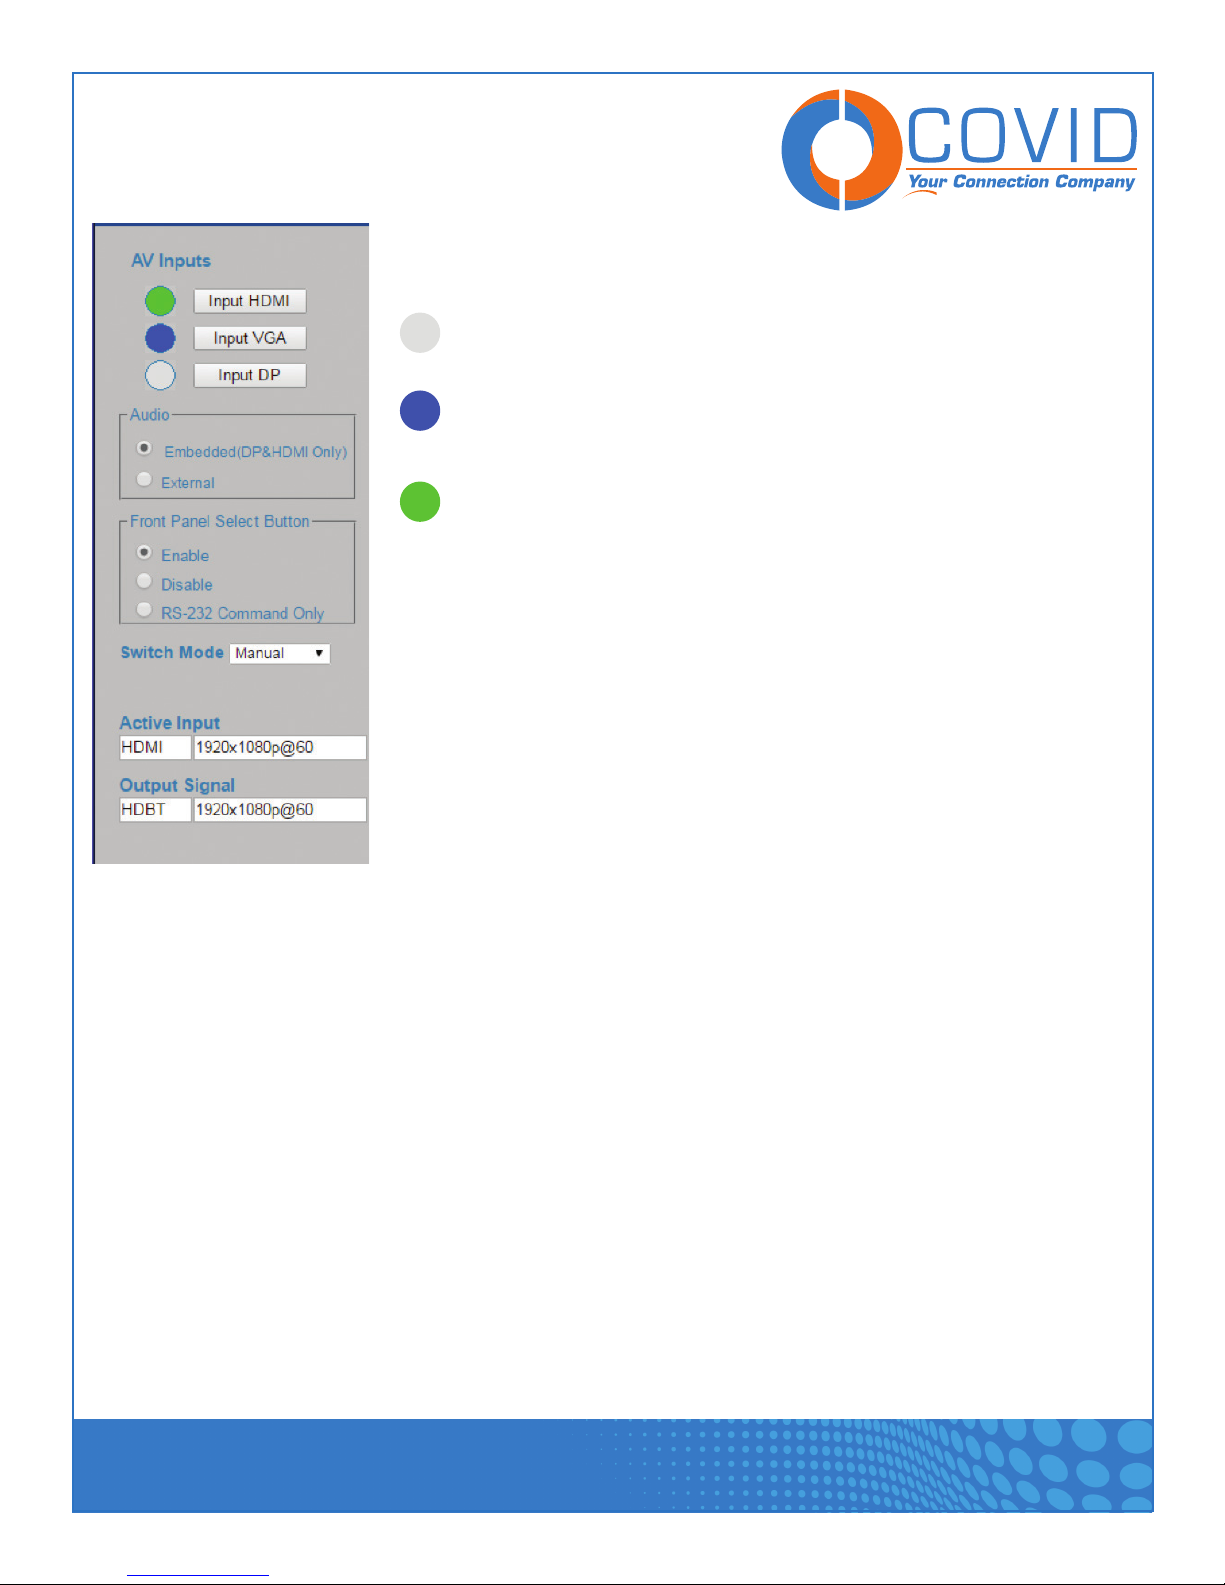
AV Inputs –You can select the button to switch to any input directly, the
indicator to the left of the button will tell you the status for the input.
A gray indicator means that no signal is detected.
A blue indicator means that a signal is detected, but it is not the
active source.
A green indicator means that a signal is detected and that it is the
active source.
Audio – Select to use the Embedded audio (HDMI and DP only), or to use the
external inserted audio.
Front Panel Selection Button – Make your selection to control how you wish the
front panel button to behave. Please see section on the front panel button for
further help.
Switch Mode Selection – Select which switching mode you wish the switch to
use. See section on switching modes for further help.
The Active Input and Output fields will tell you which source and what resolutions are moving thru the system.
Embedded or External Audio
For audio the SB3M is equipped with an independent audio embedder that is capable of taking stereo line
level audio thru its 3.5mm TRS phone jack input located between the VGA and LAN ports. When audio is inserted into this jack, it then may be selected for embedding. The SB3M can either use the existing embedded
audio (on HDMI or Display Port only) or you can choose to insert your own audio stream to be converted and
sent thru the HDBase-T link to the receiver. When you are using the VGA input the unit will always default to
the external audio setting as there is no embedded audio carried with the VGA video signal. The audio settings can be accessed thru the webserver, or by Rs232 commands.
Front Panel Button
The front panel button can be programed to behave in three different ways. It can be Enabled, Disabled, or
set to Rs232 Mode.
Multi-Format HDBT Switcher - SB3M-A110 & SB3M-B110
1723 W. 4th Street Tempe Arizona 85281
P: 800.638.6104 | F: 480.966.6728 | E: sales@covid.com | www.covid.com
Page 7
Page 9

USER MANUAL
In the Enabled button mode, the front panel Selection button will change the selected source if pressed. If the
button is pressed and held for 3-5 seconds the SB3M will send a user programed string out thru both the
local Rs232 port and the HDBase-T receiver’s Rs232 port.
When the unit is set to disabled mode the front panel selection button will do nothing when pressed. This
mode was intended to be used to prevent accidental switching or unwanted tampering to the system. When
thinking about disabling the font panel button please be aware that you will need to have an automatic mode
setup or be connected to the unit thru the webserver, a contact closure switch, or RS-232 control setup to
provide switching control.
The last mode for the selection button is the Rs232 mode. When the unit is set to this mode the button will
not switch the inputs but rather send the user programed Rs232 command out to both the local Rs232 port
and the HDBase-T receiver’s Rs232 port.
The front button on the SB3M can be changed thru the webserver or by connecting to the RS-232 port and
sending the appropriate switch mode change command strings using terminal software. The RS-232 command string table can be found later in this manual.
Switching Modes
The SB3M has four switching modes available to help customize a unique solution to your specific needs. The
switching modes on the SB3M can be setup and changed by connecting to the RS-232 port and sending the
appropriate command using the Covid configuration utility software. You can also use terminal software and
send the correct RS-232 command string.
Manual Mode: In this mode the SB3Mwill not auto-switch at all. Even if the currently active input is
disconnected, the SB3M will not switch. The only way to initiate a switch is by using the button on the front
interface, RS232 commands, or by Contact closure button.
Hybrid Mode: In this mode, the SB3M will auto switch to the first connected active source. From then
on, the SB3M will only switch by using the button on the front interface, RS232 commands, or by Contact
closure button. If the currently active source is disconnected, the SB3M will then auto-switches to another
active source input.
Multi-Format HDBT Switcher - SB3M-A110 & SB3M-B110
1723 W. 4th Street Tempe Arizona 85281
P: 800.638.6104 | F: 480.966.6728 | E: sales@covid.com | www.covid.com
Page 8
Page 10

USER MANUAL
Auto Mode: (Default) In this mode the SB3M will switch automatically to any new source, So whenever a
new input is connected, the SB3M will auto-switch to that input. If the active input is disconnected, the SB3M
will switch to another active input. The front interface button and RS232 switching commands can also still
be used in this mode for manual override.
Priority: In this mode the user assigns a hierarchy for the inputs to the SB3M. When an input that is
assigned a higher priority is connected the SB3M will auto-switch to it. If an input with a lower priority is connected, the SB3M does nothing. When the highest priority input is disconnected, the SB3Mswitches to the
next highest priority connected. The front interface button and RS232 switching commands can still be used;
however, if a higher priority input is connected after manually switching, the SB3M switches to the higher
priority input still. The port hierarchy can be set on the Input/Output Config Tab.
Multi-Format HDBT Switcher - SB3M-A110 & SB3M-B110
1723 W. 4th Street Tempe Arizona 85281
P: 800.638.6104 | F: 480.966.6728 | E: sales@covid.com | www.covid.com
Page 9
Page 11

USER MANUAL
Input/Output Config
In the Input/Output Config Tab you will find details about your connections, Resolutions, HDCP status, and link
information. It will also give you details on the health of your HDBase-T links
Input Config – in this section the switch will give you information on the active input signal.
Active and Signal Type – Will display input and whether it is HDMI, VGA, or Display Port.
Hot Plug – Will tell you if the unit detects a hot pin.
HDCP State – Will tell you whether the source content is encrypted with HDCP.
Support HDCP check box - When the check is present the SB3M will request HDCP content and be
compatible with HDCP. If the check is removed the SB3M will request non-HDCP content, and not be
a compliant device. This will cause a HDCP source to not work in your system.
Resolution, Color Space, and Color Depth – This will tell you the format of the incoming signal.
Input Priority – This will allow you to set the input port hierarchy for the priority switching mode.
For further information please see the switching modes section under AV controls.
1723 W. 4th Street Tempe Arizona 85281
P: 800.638.6104 | F: 480.966.6728 | E: sales@covid.com | www.covid.com
Page 10
Page 12

USER MANUAL
Output Config – Will allow you to see detailed information about the HDBase-T connection status.
Signal Type – This will always be HDBT as your output is HDBase-T
Link State – Displays weather the unit is linked with a receiver.
HDCP State – Displays whether the connection is currently supporting HDCP.
Resolution, Color Space, and Color Depth – This will tell you the format of the incoming signal.
Cable Length – Will tell you the estimated cable length based off of electrical properties and
signal strength.
Cable Channel (X) – Will tell you whether each pair if your category cable has passed link testing and is
making connection.
EDID Management
Follow Output – EDID from Display
Pre-Define – Internal Preloaded EDID
EDID Settings and Functions (advanced)
The typical user will not have to do anything with the EDID settings in the SB3M if it’s working out of the box.
The internal and external EDID is an option for the user to consider in case there are some needs to solve an
incompatibility issue in the system.
Multi-Format HDBT Switcher - SB3M-A110 & SB3M-B110
1723 W. 4th Street Tempe Arizona 85281
P: 800.638.6104 | F: 480.966.6728 | E: sales@covid.com | www.covid.com
Page 11
Page 13

USER MANUAL
The EDID modes on the SB3M can be setup and changed thru the EDID management page on the webserver.
Since the SB3M is a multi-format input device, there is some changing that needs to be done with the EDID
information to help the SB3M send the best picture to the HDBase-T output port. For example when a VGA
source is connected to the input of the SB3M, the source should see the VGA EDID and not the HDMI or
Display Port EDID information in order to output the correct video format and resolution. For this to happen,
the internal pre-stored VGA EDID is sent to the source. If the EDID mode is changed to External for the VGA
input, the SB3M will capture the EDID from the display and modify (remove the HDMI digital information)
and pass the modified EDID to the source. For the ideal situation, the source will output the signal correctly
with the EDID that was modified by the SB3M. From our experience this is not 100% effective, there are a
vast amount of displays and some do not support the EDID modification and can cause compatibility issues
between the display EDID and the source. The source will then not be able to output the signal with the EDID
that was modified.
The external (live) EDID is the EDID information that is captured from the display through the HDMI output
port. This EDID will change based on what Display device is connected to the SB3M.
The internal (stored) EDID has been pre-loaded to the VGA, DP and HDMI ports in case there is a
compatibility issue with the display EDID for the connected sources. This EDID will always be stored in
memory for use. The factory default for the input ports is set with external EDID.
Multi-Format HDBT Switcher - SB3M-A110 & SB3M-B110
1723 W. 4th Street Tempe Arizona 85281
P: 800.638.6104 | F: 480.966.6728 | E: sales@covid.com | www.covid.com
Page 12
Page 14

USER MANUAL
Rs232 Config
Rs232 – This is the Local Rs232 port settings for the SB3M. The settings should match the connected
device.
HDBT Rs232 – This is the settings for the Rs232 port at the HDBase-T receiver. This should match the
connected device.
Rs232 Preset
The SB3M has some simple built in automation features for Rs232 control for attached devices. The unit can
be setup so that when the unit detects a signal it will automatically send out a Rs232 command string after
a user set time period. The unit can also be set so that when all signals are removed it will send a second
command at a user set time period after the detection of signal removal. This is so that you can control a
simple display and send power up and or power off commands thru the system. The Rs232 Preset cannot
send codes to itself, meaning you cannot use one of the Rs232 codes from the control table to control the
SB3M from this screen. They are for external control only.
Input detected – When an active signal is detected, the unit will send the Rs232 command at the preset
timing.
Multi-Format HDBT Switcher - SB3M-A110 & SB3M-B110
1723 W. 4th Street Tempe Arizona 85281
P: 800.638.6104 | F: 480.966.6728 | E: sales@covid.com | www.covid.com
Page 13
Page 15

USER MANUAL
No input detected – When no active signal is present, it will send the Rs232 command at the preset timing.
Select button command – When the button is in the Enabled mode you Press and hold the button for 3-5
second to send the preset command. If the Button is set to Rs232 mode the command is sent in place of the
switch command, holding is not necessary. Please note that this command will not be sent if the button has
been disabled.
To set the preset RS232 codes fill in all necessary information and then click the program button to program
the code to the unit. If you do not click the program button the codes will not be stored into the memory.
System
In the System tab you can modify IP settings hardware and software version information. You can also apply a
unique product name to help you identify it on the network.
Multi-Format HDBT Switcher - SB3M-A110 & SB3M-B110
1723 W. 4th Street Tempe Arizona 85281
P: 800.638.6104 | F: 480.966.6728 | E: sales@covid.com | www.covid.com
Page 14
Page 16

USER MANUAL
Network Settings
The SB3M network connection by default is set to a specified IP address (also known as a static IP address).
When set to static you must specify an IP address in IP address and a subnet mask in Subnet mask.
Alternatively, you may select to obtain your Internet Protocol version 4 (IPv4) address from a Dynamic Host
Configuration Protocol (DHCP) server. If you select this option it may be harder for you to find your SB3M on
the network to access webserver control. The device may also change IPv4 addresses from time to time.
For help deciding what is right for you please contact your local network administrator.
To configure IPv4 for static addressing (Default), Click Static Use the following IP address, and in IP address,
Subnet mask, and Default gateway, types the IP address, subnet mask, and default gateway addresses.
To configure IPv4 for dynamic addressing, Click Dynamic (DHCP), and your SB3M will obtain an IP address
automatically.
For changes to any network settings to take effect you must apply the changes by clicking on the “Apply”
button.
TCP Protocol
The SB3M supports TCP client and Server relationships for control. By default the SB3M is set to the server
setting using Port 1001. If you change the settings please keep note of them as if needed you will need to
recall them if new firmware is needed. This connection is used to control the unit as well as to administrate
firmware updates thru the Ethernet port thru bootloader software on a PC. You can also use other software
to control the SB3M by setting up a TCP link. The commands for the TCP control are the same as used for
RS232.
Product Name
The SB3M has a place for you to give your switch a unique name. This was intended to help you identify the
unit in a larger system. For example you have a school network with four lecture halls that all have SB3M
HDBase-T switches that all tie into a central matrix for distribution. You can name the unit say, “Lecture Hall
A Podium”. Now when you access the unit thru the webserver it will remind you of which unit you are changing
settings on. This name will appear on both the log in page and the header.
Multi-Format HDBT Switcher - SB3M-A110 & SB3M-B110
1723 W. 4th Street Tempe Arizona 85281
P: 800.638.6104 | F: 480.966.6728 | E: sales@covid.com | www.covid.com
Page 15
Page 17

USER MANUAL
Output Video Mute
The Video output of the SB3M can be muted if needed to allow presenters to work on their source device
without it being visible to the output. The mute feature will temporarily disable the video from the HDBase-T
output port of the SB3M. The Output mute feature can be accessed through the webserver, or sending the
appropriate command strings using Rs232 terminal software or a RS-232 controller. During the mute the
Audio will remain unaffected. During a Mute all of the input status indicators with a source connected will
blink. When the mute is turned off the active source will return to a solid state.
Factory Resetting The Unit
To reset the unit to factory defaults you will press and hold the front panel selection button for about 30 seconds, until you see all three LED’s (D, H, V) blink in unison two times then come on solid. When this happens
let go of the button. The unit has now been restored to factory defaults.
Multi-Format HDBT Switcher - SB3M-A110 & SB3M-B110
1723 W. 4th Street Tempe Arizona 85281
P: 800.638.6104 | F: 480.966.6728 | E: sales@covid.com | www.covid.com
Page 16
Page 18

USER MANUAL
Rs232 Command Routing
One way to communicate with the SB3M is to use the RS232 port on the device. In order to begin using the
RS232 port, you must have software that can emulate a serial terminal. We recommend using the utility
Hercules by HW-group because of how user-friendly it is compared to other options. Follow this link for more
information about the software and where you can download it:
http://www.hw-group.com/products/hercules/index_en.html
Once you have a serial terminal, you will also need to find which COM port on your computer you will be using
to send the commands over. The best way to discover this is to go into device manager on Windows and
expand the drop down list named PORTS. If using a USB-to-serial converter, the COM port assigned to the
device will also show up in the PORTS list.
In your serial terminal software, adjust the settings so that the port being used matches your desired port.
Baud rate, data size, parity, and stop bit size, must also be set accordingly. The default setting for the SB3M
is 9600 8N1 or: a baud rate of 9600, data size of 8 bits, no parity, and a stop bit of 1. If these settings are
ever changed, make sure the serial terminal’s settings reflect the changes.
The RS232 table in this manual contains all of the commands that the SB3M understands. They can be used
to switch signals, configure the device, or query system state. The characters “>” and “?” are used as the
starting characters for commands and queries, respectively. All RS232 codes must end with a carriage
return. Depending on your serial terminal, this can be appended to your string using “<cr>”, hexadecimal
0x0D, or specifying in your terminals setting to auto append the carriage return.
A special kind of command is the pass-through command. The SB3M supports a feature to take the
incoming string on its RS232 port and send it to the receiver without taking any action itself from the
command, effectively passing the command through the device. To accomplish this, special syntax must be
used. A typical pass-through command would look like “>PTC:RSR’command<cr>”. The first part, “>PTC:”,
is what tells the SB3M to pass the following information through. What follows the colon is the argument
that describes where the command must be passed to. In our example string, it passes it to the RS232
port on the receiver. Finally, the apostrophe character is used as a delimiter between the SB3M’s command
and the command you are trying to pass-through, in this case, just the string “command”.
Multi-Format HDBT Switcher - SB3M-A110 & SB3M-B110
1723 W. 4th Street Tempe Arizona 85281
P: 800.638.6104 | F: 480.966.6728 | E: sales@covid.com | www.covid.com
Page 17
Page 19

USER MANUAL
Rs232 Command Table
Multi-Format HDBT Switcher - SB3M-A110 & SB3M-B110
1723 W. 4th Street Tempe Arizona 85281
P: 800.638.6104 | F: 480.966.6728 | E: sales@covid.com | www.covid.com
Page 18
Page 20

USER MANUAL
Note: The default baud rate 9600
Multi-Format HDBT Switcher - SB3M-A110 & SB3M-B110
1723 W. 4th Street Tempe Arizona 85281
P: 800.638.6104 | F: 480.966.6728 | E: sales@covid.com | www.covid.com
Page 19
Page 21

USER MANUAL
Resoluon
480p 720 x 480 31.5 60 27.027
576p 720 x 576 31.25 50 27
720p 1280 x 720 37.5 50 74.25
720p 1280 x 720 44.955 59.94 74.176
720p 1280 x 720 45 60 74.25
1080i 1920 x 1080 28.125 50 74.25
1080i 1920 x 1080 33.716 59.94 74.176
1080i 1920 x 1080 33.75 60 74.25
1080p 1920 x 1080 28.125 25 74.25
1080p 1920 x 1080 33.716 29.97 74.176
1080p 1920 x 1080 33.75 30 74.25
1080p 1920 x 1080 56.25 50 148.5
1080p 1920 x 1080 67.433 59.94 148.352
1080p 1920 x 1080 67.5 60 148.5
VGA
VGA
VGA
SVGA 800 x 600 35.156 56.25 36
SVGA 800 x 600 37.879 60.317 40
SVGA 800 x 600 48.077 72.188 50
SVGA 800 x 600 46.875 75 49.5
SVGA 800 x 600 53.674 85.061 56.25
XGA
XGA
XGA
XGA 1024 x 768 68.677 84.997 94.5
WXGA 1280 x 800 49.702 59.81 83.499
SXGA 1280 x 1024 63.981 60.02 108
SXGA 1280 x 1024 79.976 75.025 135
SXGA 1280 x 1024 91.146 85.024 157.5
UXGA 1600 x 1200 75 60 162
XGA+ 1152 x 864 67.5 75 108
WXGA+ 1440 x 900 55.935 59.888 106.5
WXGA+ 1440 x 900 55.469 59.902 88.75
WUXGA1 1920 x 1200 74.038 59.95 154
H acve x V acve
640 x 480
640 x 480
640 x 480
1024 x 768
1024 x 768
1024 x 768
Refresh Rates
H (kHz) V (Hz)
37.861 72.809 31.5
37.5 75 31.5
43.269 85.008 36
48.363 60.004 65
56.476 70.069 75
60.023 75.029 78.75
Pixel Clock
(MHz)
Supported VGA
Resolutions
Note: The VGA input on the SB3M-110
does not have a built in scaler, it is a
converter only. This means whatever
resolution you insert will be sent to the
monitor. Please check that your target
resolution is supported by both the
switch and your desired display.
Multi-Format HDBT Switcher - SB3M-A110 & SB3M-B110
1723 W. 4th Street Tempe Arizona 85281
P: 800.638.6104 | F: 480.966.6728 | E: sales@covid.com | www.covid.com
Page 20
Page 22

USER MANUAL
Connection Diagrams
Note:
V : VGA Input LV: LED indicator for VGA
D : DP Input LD: LED indicator for DP
H : HDMI Input LH: LED indicator for HDMI
TX: Rs232 Tx
RX: Rs232 Rx
GND: Ground
IR Emitter
IR Sensor
Multi-Format HDBT Switcher - SB3M-A110 & SB3M-B110
1723 W. 4th Street Tempe Arizona 85281
P: 800.638.6104 | F: 480.966.6728 | E: sales@covid.com | www.covid.com
Page 21
Page 23

USER MANUAL
Preparing a RS232 Cable
What you will need:
• Two conductor cables with ground
• Wire strippers
• Screwdriver (flat head)
• 3.5mm captive screw connector
• Heat gun and heat shrink (optional)
• Multimeter (optional)
Start by stripping the outer jacket of the cable back by about 1 inch like what is shown in Step 1. Once the
outer jacket is removed, you can optionally add heat shrink around the conductors and over the exposed drain
wire like in the picture of step 2. Next, strip the ends of the conductors back about 3/16” in order to make
good contact inside of the captive screw connector. The final step is to attach the captive screw connector to
the end of the cable according to the pinout. The SB3M uses a five position terminal block, but uses the same
positions for the Tx, Rx, and GND pins (see following image).
Multi-Format HDBT Switcher - SB3M-A110 & SB3M-B110
1723 W. 4th Street Tempe Arizona 85281
P: 800.638.6104 | F: 480.966.6728 | E: sales@covid.com | www.covid.com
Page 22
Page 24

USER MANUAL
SB3M Terminal Block
If you do not know which conductor to use for each pin, use a multimeter to determine how the cable was
built and then compare it with the image below of the male and female DB9 connectors. The conductors that
are connected to the pins with the labels Tx, Rx, and shield should be connected to their respective positions
on the terminal block. A word of caution, the pinout used in these images is for connecting the SB3M to a
RS232 DTE device. If you are connecting to a DCE device, simply switch the Tx and Rx pins on one end of the
cable.
Multi-Format HDBT Switcher - SB3M-A110 & SB3M-B110
1723 W. 4th Street Tempe Arizona 85281
P: 800.638.6104 | F: 480.966.6728 | E: sales@covid.com | www.covid.com
Page 23
Page 25

USER MANUAL
!
!
If you are connecting the SB3M to another Covid device with RS232 communications, the cable must be
appropriately pinned out. In order for the devices to communicate, the Tx and Rx pins must be switched on
only one end of the connector. The image below demonstrates how this can be done with two terminal block
connectors.
Safety Information
To reduce the risk of electric shock, do not expose this product to rain or moisture.
Do not modify the power supply. Doing so will void the warranty and safety features, and may
result in personal harm.
!
If the power supply does not fit into your local power socket, seek professional assistance.
This equipment should be installed near the socket outlet and the device should be easily
accessible in the case it requires disconnection.
Multi-Format HDBT Switcher - SB3M-A110 & SB3M-B110
1723 W. 4th Street Tempe Arizona 85281
P: 800.638.6104 | F: 480.966.6728 | E: sales@covid.com | www.covid.com
Page 24
Page 26

USER MANUAL
Warranty
Parts and labor warranty time is three year and from the date of original shipment. This warranty shall be
void if a serial number has been removed from the product.
Upon determination of a legitimate defect covered by this warranty and at COVID’s sole discretion, user
should bear the transport cost during the warranty.
If product is out of warranty then repair charge is required. Out of warranty repairs will only be made after
cost has been approved by Customers and proper financial arrangements are made. Customer must cover
round trip shipment expenses.
Multi-Format HDBT Switcher - SB3M-A110 & SB3M-B110
1723 W. 4th Street Tempe Arizona 85281
P: 800.638.6104 | F: 480.966.6728 | E: sales@covid.com | www.covid.com
Page 25
 Loading...