

Page 1
1
Brite Star –
http://www.starweb.com.au/index.html
12 Mega Pixel + Hi Definition Video with Audio
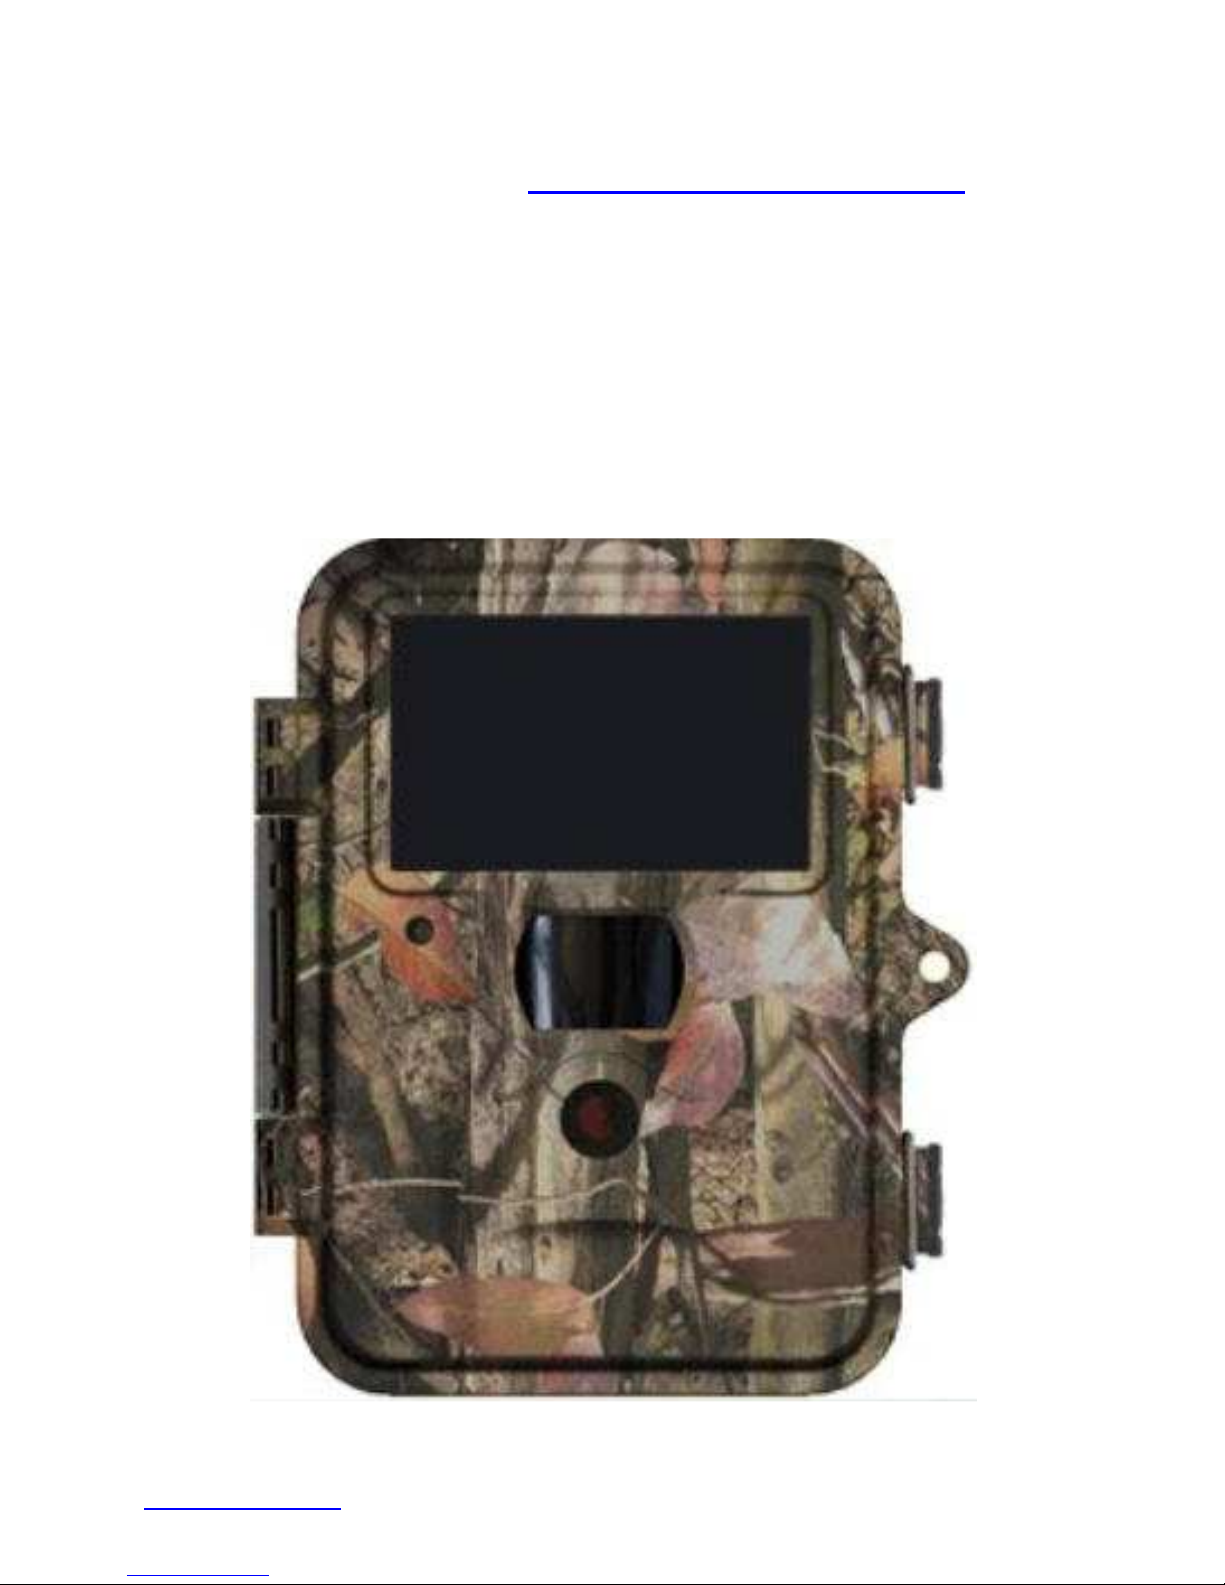
Covert Black Ops Digital Trail Camera
User’s Manual
www.starweb.com.au Covert Security & Wildlife Monitoring T.C. - User Manual March.2013
Page 2

1 About the Covert Trail
Camera
1.1 General Description
3
2 Setting Up The Camera
2.1 Installing the Batteries
4
2.2 Loading the SD
-
card 5
2.3 Power Button
5
2.4 Manually Capture Images & Record Video
5
2.5 Default Settings
6
2.6 LCD Live Video View
7
3 User Pro
gramming
7
3.1 The Programming Buttons
8
3.2 Set Date & Time
8
3.3 Format
- SD card
8
4 Advanced Programming
8
4.1
9
4.2
9
4.3 Photo Burst
9
4.4 Video Size
9
3.7 Video Length
10
3.8 Video S
ound
10
5
10
5.1
PIR Sensitivity
10
5.2 T
rigger Interval
10
5.3 Time Lapse
10
5.4 Start Stop (scheduled recording)
11
6 Systems Options
11
5 Time Stamp
10
6.1 Flash Range
11
6.2 Password
11
6.3 Language
11
6.4 Beep
11
6.5 Overwri
te 11
7 View Photos & Videos on SD card
12
8 Mount Camera/ Anti theft box
13
9 Battery Life
14
10 Warranty
14
11 Trouble shooting
15
CONTENTS
Page
2
Camera Modes
Photo Size
– capture multiple images
PIR Sensor
www.starweb.com.au Covert Security & Wildlife Monitoring T.C. - User Manual March.2013
Page 3

3
1 About the 100% Covert Trail Camera
1.1 General Description
An automated camera system specifically designed for Covert Surveillance & professional
Wildlife Monitoring. Records Super quality 12 mega pixel images & full colour High
Definition video with audio during daylight. At night the target area is illuminated by an array
of 940nm infra red leds (light emitting diodes). Totally covert, invisible to humans & animals.
Great for monitoring normally light shy nocturnal species which can be alarmed by other
trail cameras. Built in LCD screen allows you to view images/ video in the field & provides a
simple user interface with on screen menus for easy programming. USB cable enables
transfer of data from the SD card to laptop in the field.
Operates as both a Motion Activated & a Time Lapse Camera
Motion - activation: A PIR (passive infra red) sensor on the front of the camera detects
movement of passing animals, humans & vehicles, just like an outdoor security sensor light.
This movement triggers the camera which records images & video. PIR sensitivity has three
settings Low Medium & High to suit varying size & distance to targets.
Time- Lapse: The camera automatically triggers at a preset interval from once every 5
seconds to once every 8 hours. With each trigger the camera records still images and or
video. Time lapse is ideal for conducting habitat studies of large areas of pasture,
determining game movement & observation of animals at water holes & dams. Motion
activation can be switched On or Off when operating in Time Lapse mode.
Scheduled - Operation: Allows you to program the camera to operate only during a
specified period. The camera switches On each day at the user specified Start Time &
shuts down at the user specified End time.
Battery Type:
Powered is provided by 12 AA alkaline or NiMH rechargeable batteries. Do not mix battery
types; replace all 12 batteries as a complete set. Avoid cheap batteries which may leak.
SD Card Requirements:
Quality class 10 SDHC cards of 4 ~16GB capacity recommended, maximum size 32 GB.
Loading port for the SD card is located on the underside of the front panel, accessible when
the case is open. Do not use standard speed SD cards. Make sure the “lock” on the SD
card is in the OFF position (write protect OFF) Store SD cards in their plastic case to avoid
contamination from dirt & dust.
Cammo Housing:
Easily concealed & weather resistant. Camera is not submersible & should be protected
against direct exposure to driving rain, extreme weather, vibration & shock.
www.starweb.com.au Covert Security & Wildlife Monitoring T.C. - User Manual March.2013
Page 4
4
2 SETTING UP THE CAMERA
2.1 Installing the Batteries
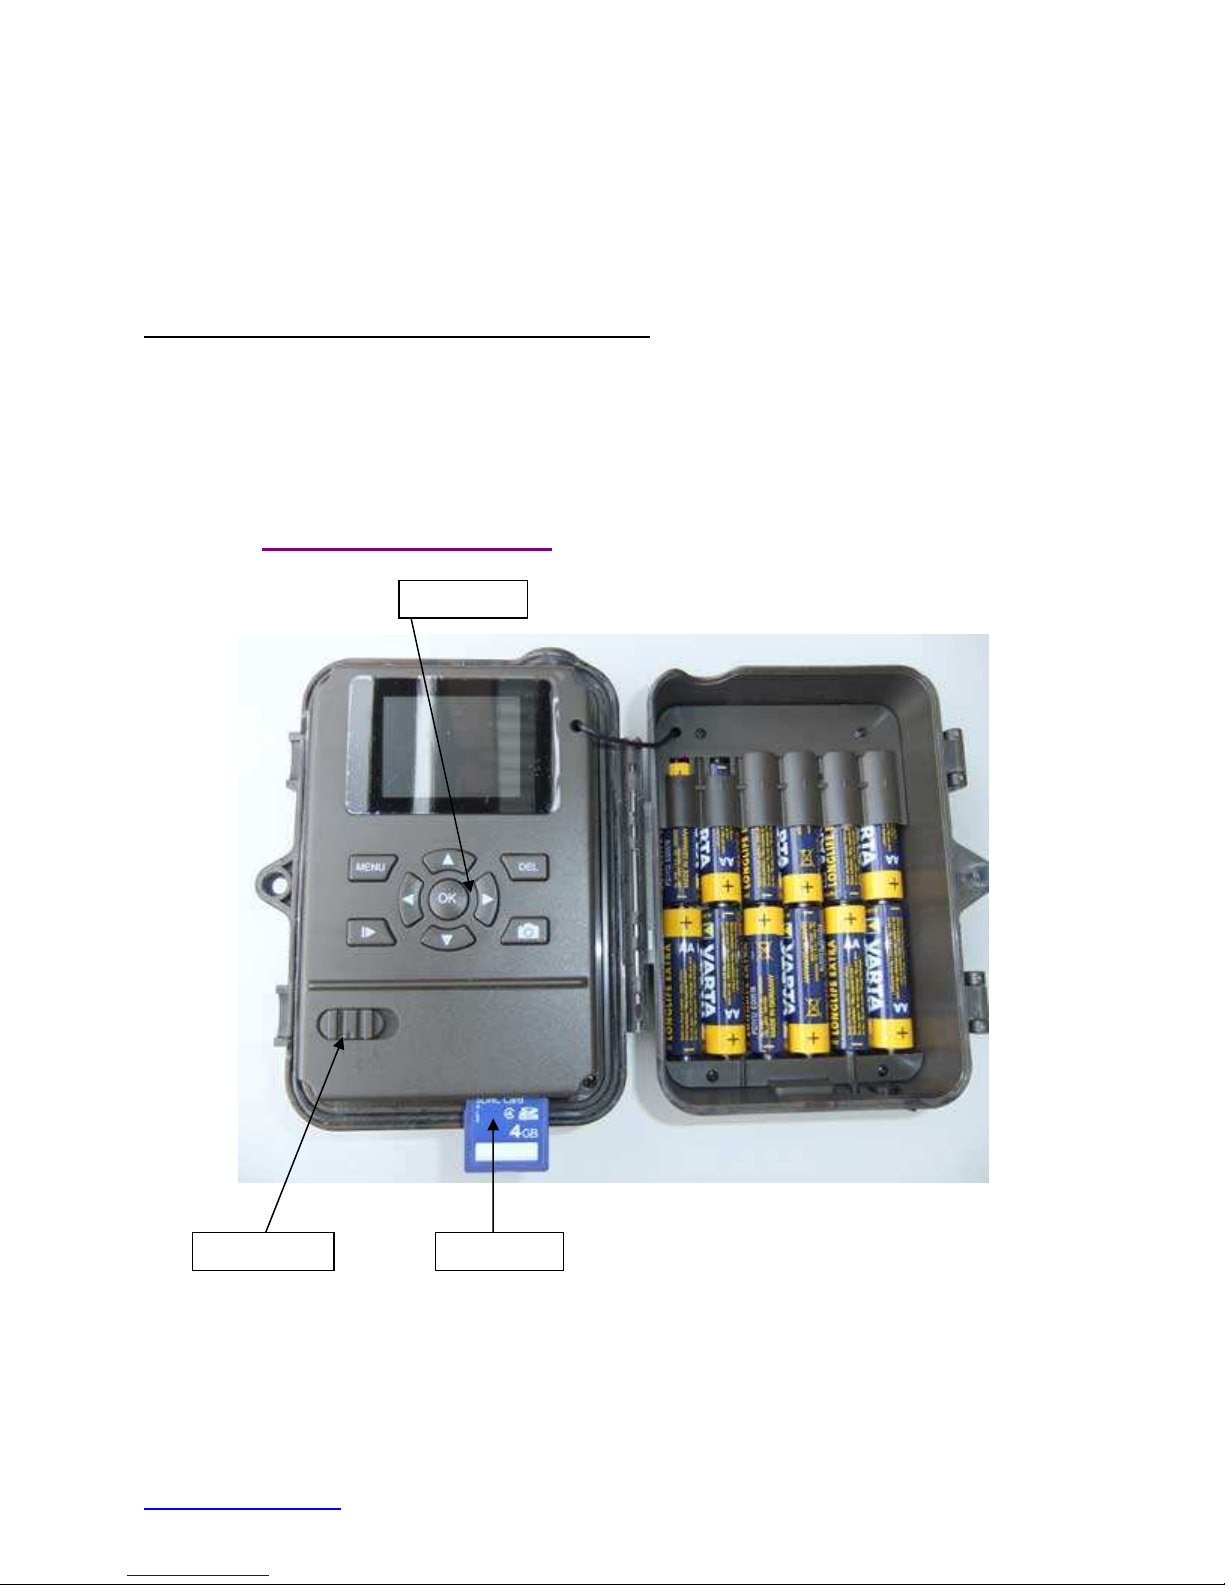
Use high quality AA Alkaline or rechargeable 2500mA capacity Ni MH batteries.
LITHIUM BATTERIES SHOULD NOT BE USED. Replace the batteries as a complete set
of 12, do not mix & match brands of battery or different battery types.
Load 12 AA batteries, new or fully charged, into the battery tray as shown in figure 2. Follow
the
+ -
symbols on the battery compartment when installing the batteries.
Battery state of charge is indicated by the Battery Status icon. When the batteries are flat, a
red indicator led on the front panel will flash for a short time & the camera will automatically
shut down. Refer Battery Life page 14.
Hot Keys
Power Button SD card slot
Figure 2: Display Screen Controls SD Card & Batteries
www.starweb.com.au Covert Security & Wildlife Monitoring T.C. - User Manual March.2013
Page 5

5
2.2 Loading the SD-card
Camera uses SDHC grade cards of 4 to 32GB capacity. Standard speed SD cards or micro
SD cards fitted in SD card adapters should NOT BE USED.
THE POWER BUTTON MUST BE IN THE OFF POSITION BEFORE REMOVING OR
INSTALLING THE SD CARD
With the SD card label facing out insert the card into the slot on the underside of the front
panel, push card into the carrier until it clicks into place.
be formatted in the camera prior to use; this will erase any old data on the card.
It is recommended that SD cards
2.3 Power Button
Power button is a slide switch with three positions (
1. OFF Camera is OFF safe to remove/ install SD card or batteries
2. SETUP LCD display visible – access menu options/ view photos/ take snapshot
3. ON Camera is ON & operational - ready to record
Slide the Power Button to the centre SET UP position. The camera will power up & beep 3
times, the LCD screen will come on with the Live Video View visible.
If no SD-card is present or the loaded card is write protected the camera will emit an audible
warning beep then shut down. Slide the Power Button to the left, OFF position & install a
new SD Card before powering the camera up again.
left to right
):
2.4 Manually take a Snapshot or record video
The camera can also be used to take still images or record video. Slide the Power
button to the SETUP position.
Press camera icon button; If the camera is in photo mode a single image is recorded
with each button press. In video mode video press the button to start recording, press the
button again to end video recording.
www.starweb.com.au Covert Security & Wildlife Monitoring T.C. - User Manual March.2013
Page 6

Group
Parameter name
Default
Optional
settings
CAM
Photo
5
M Pixel
1 Photo
720P
5
Seconds
On
PIR
Normal
1 Minute
Off
Off
SYS
01/01/2013
On
12m
Off
English
On
Off
-
-
2.5 Default Settings
Your Brite Star Trail Camera will be delivered pre programmed with factory Default
Settings; it requires an SD card, set of batteries, the date/ time set & it is ready for use.
Highly versatile the camera has many user programmable features which allow you to
customize its performance to match your specific applications. The various User
Programmable Options are grouped under three categories: CAM – PIR – SYS.
Default Settings & options are listed in the following chart.
6
Camera Mode
Photo Size
Photo Burst
Video Size
Video Length
Video Sound
PIR Sensitivity
Trigger Interval
Time Lapse
Start Stop (scheduled)
Start Time
Stop Time
Clock
Time Stamp
Flash Range
Password
Language
Beep
Overwrite
Format
Default Set
Video- Photo+Video
12 - 8 or 3 MP
2 or 3 photos
1080P, WVGA,QVGA
1-60 seconds
Off
High, Low, OFF
5 sec to 60 min.
On = 5 sec. to 8 hours
On
(00:00 – 23:59)
(00:00 – 23:59)
On
Reset
Off
6 m
On
Off
On
Enter to format
Enter to reset
www.starweb.com.au Covert Security & Wildlife Monitoring T.C. - User Manual March.2013
Page 7
7
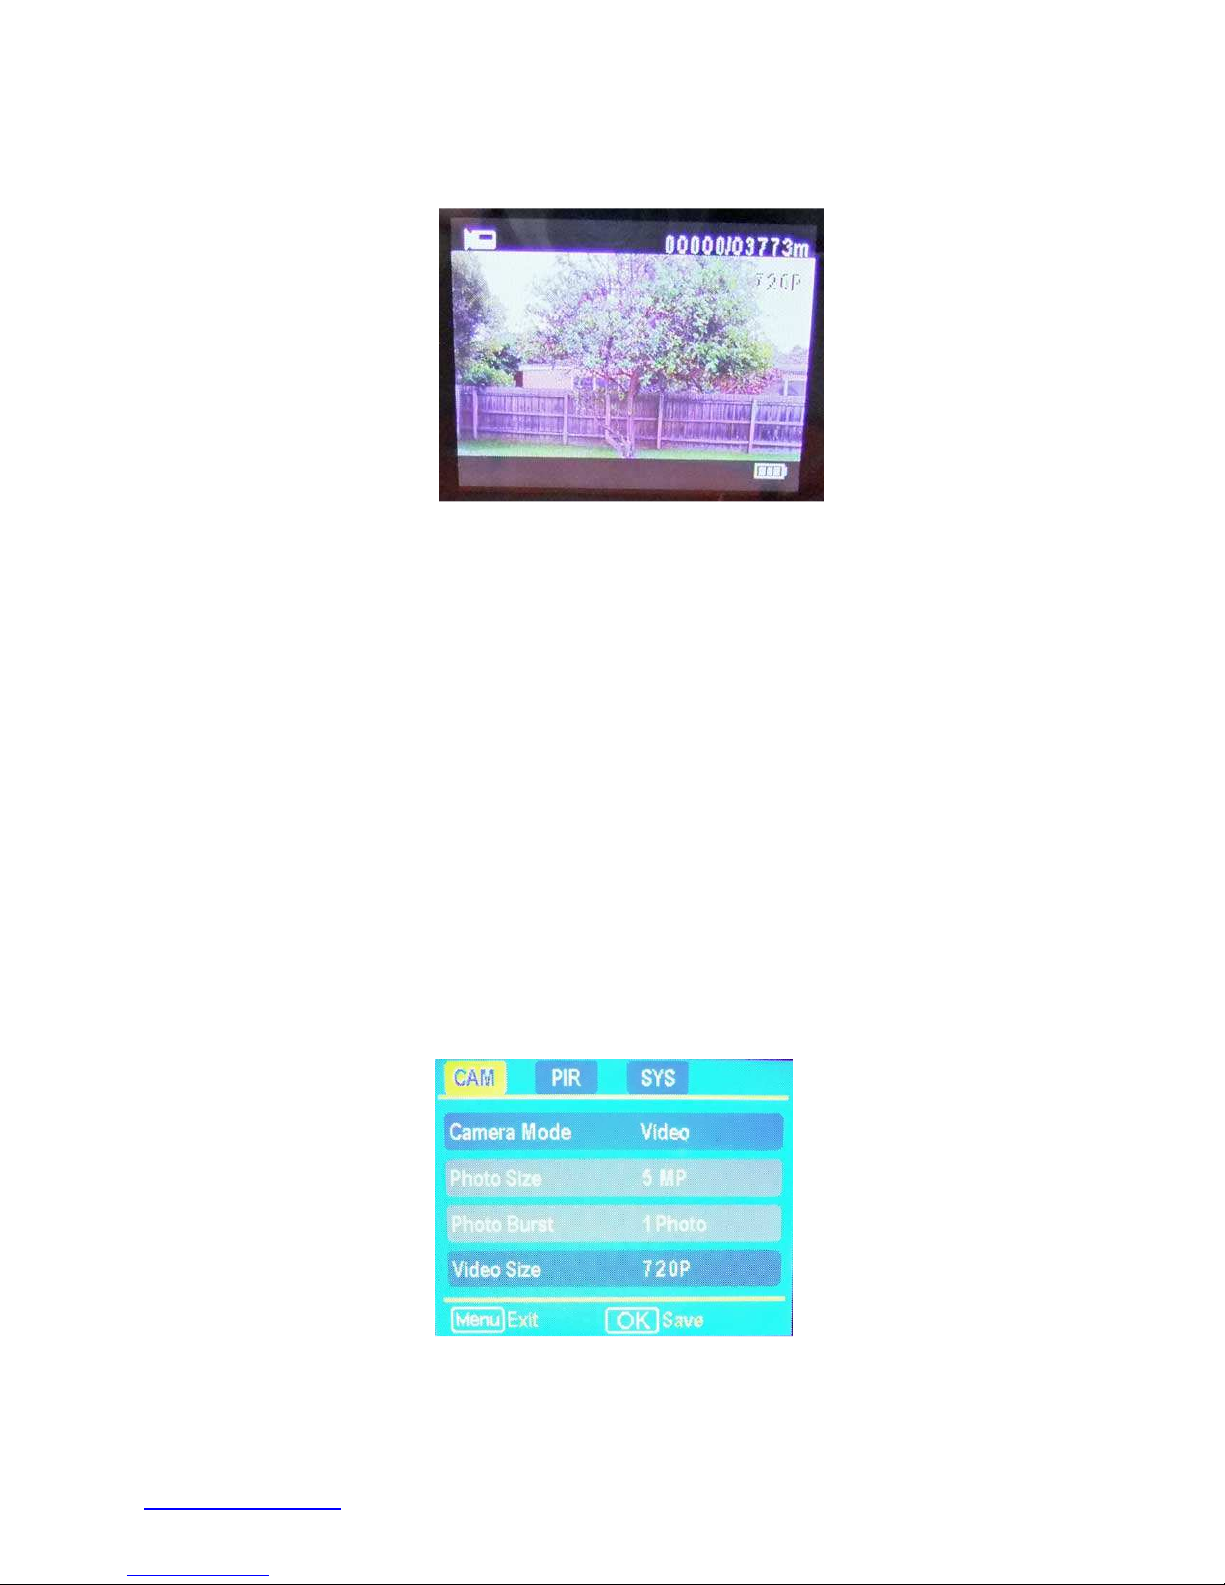
2.6 LCD Live Video View Screen
Figure 3: LCD Live Video View Screen
In Set Up mode the live video scene will be visible on the LCD screen with the following
system information superimposed on the image.
Camera Mode – top left hand corner - photo or video icon
Storage Use – top right hand corner - recorded images remaining card capacity
Image Quality – Image or Video quality setting
Battery Status –bottom right corner – icon indicates remaining battery charge
3 User Programming
With the camera in Set Up mode press the MENU button. The Main Menu Screen below
will be displayed.
www.starweb.com.au Covert Security & Wildlife Monitoring T.C. - User Manual March.2013
Figure 4: Main Menu Screen
Page 8

8
3.1 Programming Buttons
On the Main Menu screen use the ▲ ▼ to select & highlight an option, use ◄ ► to edit the
option. Then press the OK button to save the change before selecting the next option.
3.2 Set date & Time
The date format is month/day/year, the time format is 24 hour: minute: second.
With the camera in Set Up mode press the MENU button. The Main Menu Screen will be
displayed.
• Press ► button twice to highlight SYS option
• Press ▼to highlight Set Clock option
• Press OK button to display the Set Clock Screen
• Use the ► to select item, press ▲ or ▼ to change the value
• With correct date & time entered press OK to accept the changes
Press the MENU button to return to the live view screen.
3.3 Formatting - SD Card
With the camera in Set Up mode press the MENU button. The Main Menu Screen will be
displayed.
Press ► button twice to highlight SYS option
Press ▼ until the Format option is highlighted
Press OK button
On the Format screen use the ► to highlight Yes press OK button
“Please Wait” is displayed while card formatting is carried out.
Camera automatically returns to the live view screen.
www.starweb.com.au Covert Security & Wildlife Monitoring T.C. - User Manual March.2013
Page 9

9
4 Advanced Programming
Edit settings & operating parameters to tailor the camera specifically to meet a variety of
specialised applications. Programming is carried out using the Main Menu Screen.
With the camera in Set Up mode press the MENU button.
Default settings & options are shown on the chart (refer page 6.) On the Main Menu screen
use the ▲ ▼ ◄ ► to select & change the menu option displayed on the screen. Then
press the OK button to save the change before editing the next option.
4.1 CAMERA MODES
Camera mode settings determine how the camera records when triggered. There are 3
modes.
1. Video - records video only
2. Photo + Video - records still images followed by video
3. Photo - records photos only
Photo + Video mode is recommended mainly for daytime applications.
4.2 Photo Size
Sets the image quality for still photos.
1. 12 MP - maximum quality
2. 8 MP - high quality
3. 5 MP - medium quality
4. 3 MP - standard quality
4.3 Photo Burst
Sets the number of photos recorded each time the camera triggers. 1 ~ 3 images
4.4 Video Size
Sets the quality of full motion video.
1. 1080P - maximum quality
2. 720P - high quality
3. WVGA - medium quality
4. QVGA - standard quality
www.starweb.com.au Covert Security & Wildlife Monitoring T.C. - User Manual March.2013
Page 10

10
4.5 Video Length
Defines the duration (length) of each video sequence; range is 1 to 60 seconds.
4.4 Video Sound
Record video with audio; option Audio On or Audio Off
5 PIR Sensor
A PIR (passive infra red) sensor on the front of the camera detects movement of animals,
humans & vehicles as they pass within detection range. PIR sensitivity has three settings
Low - Medium & High to suit varying size & distance to targets. High is suitable for harder
to detect distant targets, Normal is a good choice for general wildlife monitoring &
surveillance, Low is suitable for monitoring small animals at close range on cleared
ground. To minimise annoying false triggering, the camera must be securely mounted with
no movement, branches & shrubs which may blow around infront of the camera sensor
should be trimmed
5.1 PIR Sensitivity
Sets motion detection sensitivity; options are High Normal Low & Off. Off is used in
conjunction with Time lapse mode.
5.2 Trigger Interval
A programmable delay following each camera trigger during which time the PIR is disabled
to prevent repeated triggering by the same moving object & allow adequate time for data to
be written to the SDHC card. Recommended Trigger Interval is 60 seconds.
DO NOT SET TRIGGER INTERVAL TO 0 Seconds.
5.3 Time Lapse
Camera automatically records images or video at a predefined interval from 5 seconds to 8
hours. Great for long duration survey work; conducting wildlife surveys on water holes &
dams, accurately determine animal numbers & movements, record months of activity at a
single location. Make a Time Lapse video of construction & other projects.
www.starweb.com.au Covert Security & Wildlife Monitoring T.C. - User Manual March.2013
Page 11

11
5.4 Start Stop
Allows you program the camera to function at night only, at daytime only or for a specific
time each day which may be as short as several minutes if required. Camera commences
operation each day at the Start Time & shuts down at the End Time.
6 System Options
6.1 Time Stamp
Superimpose a Time/ Date watermark on images. Options Time Stamp On or Off.
6.3 Flash Range
Sets the light output level of the covert Infra Red illuminator, there are two settings: 6
meters or 12 meters.
6.4 Password
Program a unique password to prevent unauthorised access.
6.4 Language
Factory set to English
6.5 Beep
Disable the audible Beep, options Beep On or Off.
6.5 Overwrite
With overwrite On the camera has endless storage. New data is written over existing data.
Options are Overwrite On or Off.
www.starweb.com.au Covert Security & Wildlife Monitoring T.C. - User Manual March.2013
Page 12

12
6.5 Format
Formats the SDHC card refer Format the SD Card 3.3 page 8.
6.6 Default Set
Resets all camera options back to the Safe Factory Default settings, refer default settings
2.5 page 6. Recommended if you are having problems following re programming.
7.0 View photo/ videos on the SD card
Slide the Power button to the SETUP position. Press ▌► button, the first photo is
displayed on the LCD screen.
Press to start playing the video clip. Press again to stop playing & return to playback
mode.
Press ▲ or ▼ to view the previous or next image.
7.1 Delete Photo or Video
Press ▌► button use
select Yes to delete or No to exit. Deleted files cannot be restored.
▲ or ▼ to view the image/ video. Press the DEL button, use ◄ ► to
7.2 File Attributes
Image & video files are saved with a unique numerical file name. Image files have a .JPG
suffix & video files have a .AVI suffix.
7.3 Firmware
Camera is supplied with Firmware which is subject to international copyright.
www.starweb.com.au Covert Security & Wildlife Monitoring T.C. - User Manual March.2013
Page 13
13
8 Mounting the Camera
Camera must be securely & rigidly mounted to avoid false motion triggers. Do not position
the camera where it may be subject to damage from passing stock or animals, is directly
exposed for long periods to extremes of weather or in low lying areas subject to flooding.
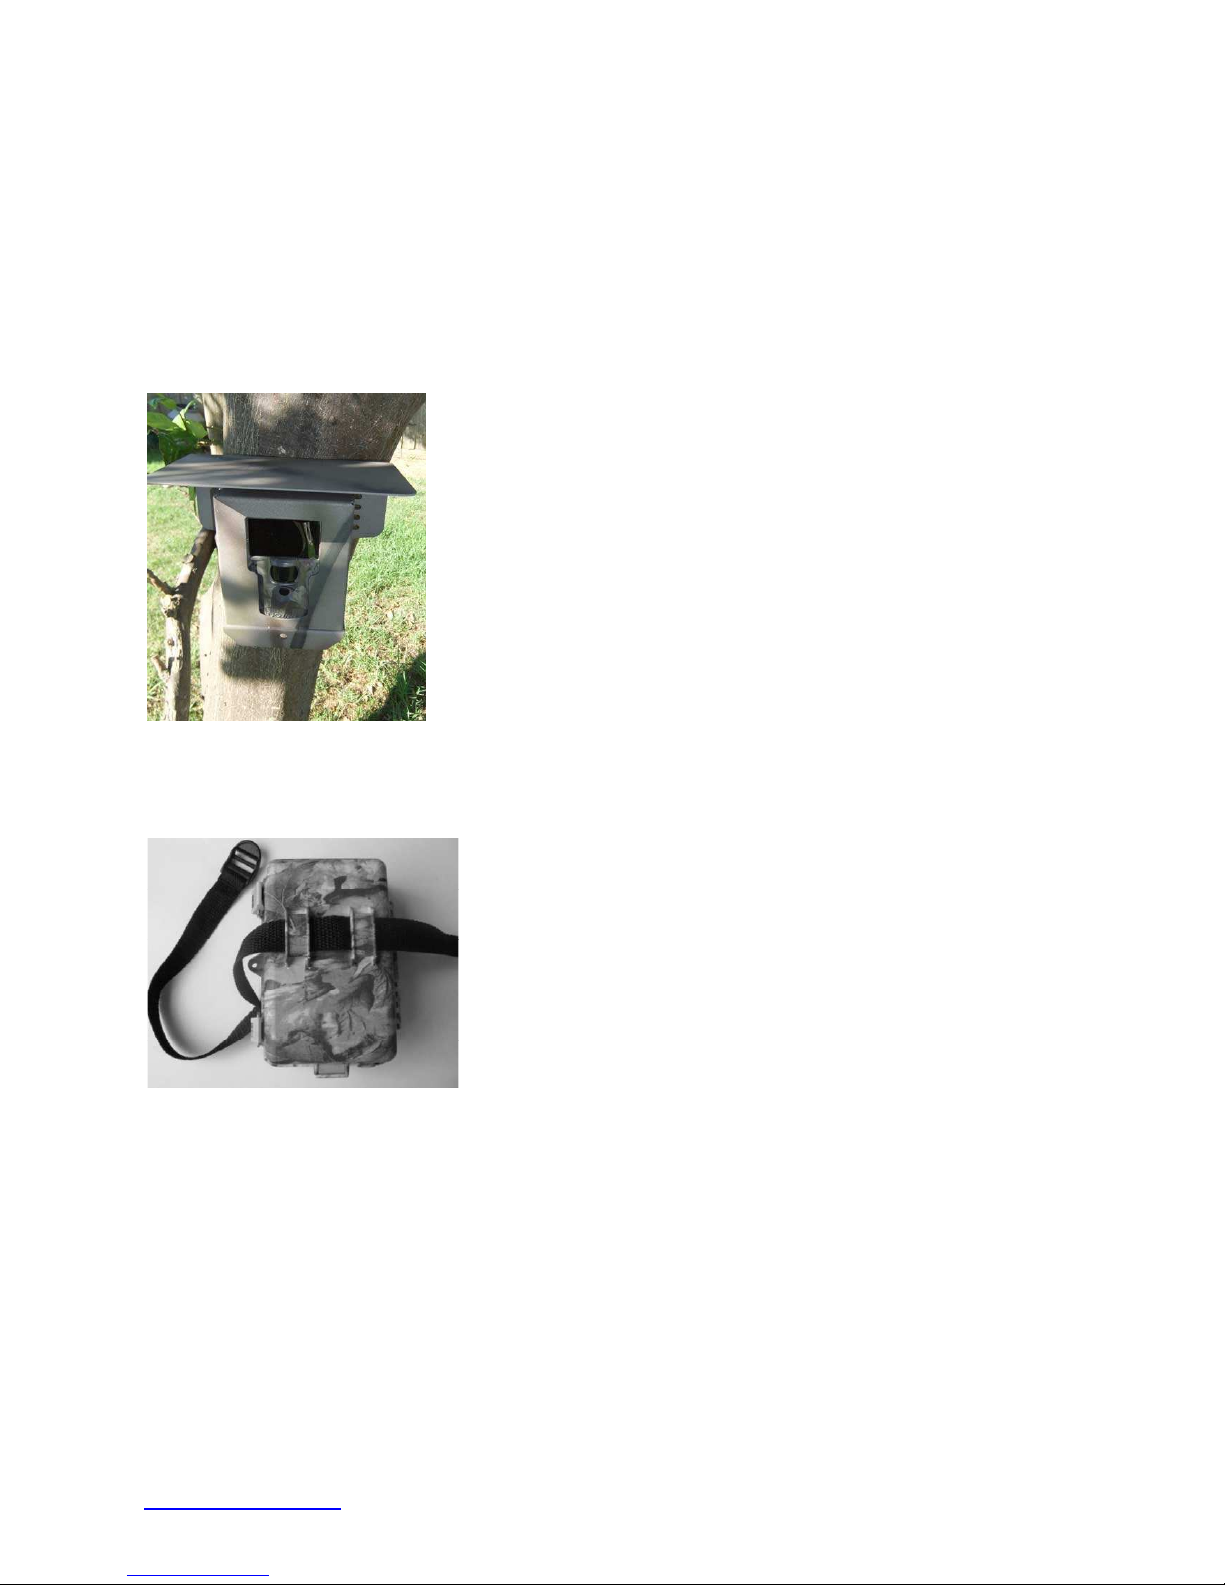
For added protection we recommend using the Anti Theft Box with Weather Shield.
On farms & buildings mount the camera under the eaves.
Camera mounting will vary from one application to the next &
is left to the ingenuity of the user.
Monitoring nocturnal species requires additional care when
setting up. Be aware that infra red light will reflect off wet
grass & shrubs, smooth tree trunks (especially gum trees) &
may degrade image quality at night.
As a rule it is better to mount the camera high & angle it down
towards the target area than to mount it close to the ground
looking up. To avoid image wash out, position the camera so
that there are not large areas of sky visible in the image & so
that it does not face directly into the rising or setting sun.
Figure 5 Anti Theft Box with Weather Shield
For short term applications the camera can be mounted by
using the belt supplied fed through the two loops on the
back of the camera. There is also provision for using a
lockable Python Cable or elastic strap.
Figure 6: Fixing the
The camera may be concealed amongst common debris or even inside objects such an old
rusty drum with suitable small viewing holes or logs. For daytime applications only the
camera lens & PIR sensor require a clear view of the target area. For nighttime applications
the rectangular Infra Red illuminator window will also require a clear view of the target area.
camera
with belt
www.starweb.com.au Covert Security & Wildlife Monitoring T.C. - User Manual March.2013
Page 14

14
9 Battery Life
Trail cameras consume very little power in standby mode. A single set of batteries can last
for several months in low traffic areas where the camera receives a small number of
triggers. Battery life is determined by, SD card, the number of photos & the duration of video
that the camera records. Recording at night places heavier demand on the batteries as the
camera’s Infra Red Illuminator is ON. Temperature effects battery life, a particular brand of
batteries will last longer during summer than they will during the colder winter months.
You can maximise battery life by:
• Using high quality Alkaline batteries
• Using high capacity NiMH rechargeable batteries
• Recharging NiMH batteries as soon as practical following use
• Never store NiMH batteries in a discharged state
• Always replace all 12 batteries at the same time
• Never mix different brands or types of batteries
• Avoid cheap bulk batteries
• Record only short segments of video
• Minimise false triggers by ensuring proper camera set up
• Select a lower quality video or image quality
• Use a quality SDHC sd card
10 Warranty
Manufacturer provides a 12 month warranty against manufacturing defects. Your camera is
tested prior to shipment; pre delivery test images are on record with this distributor.
It is the user’s responsibility to ensure that their cameras are adequately protected when
used in harsh environments or exposed to extremes of weather.
No warranty applies to:-
• Damage or corrosion resulting from leaking batteries
• Inspect door seal & ensure that it is clean. Do not lubricate the seal
• Electronic failure resulting from ingress of moisture. Do not open the camera if it is
wet or raining.
• Do not force a damaged or hard to load SD card into the camera
• Loss of data resulting from SD card or system failures
• Damage from shock or misuse
• Cameras that have been opened or modified
• Avoid touching the black cover of the illuminator, the curved lens of the PIR sensor &
the circular window infront of the camera lens. If necessary they can be cleaned with
a soft tissue moistened with optical glass cleaner.
www.starweb.com.au Covert Security & Wildlife Monitoring T.C. - User Manual March.2013
Page 15

15
PROBLEM
CHECKLIST
•
•
•
•
•
•
11 Trouble - Shooting
It is not uncommon for users to accidentally re program their camera with conflicting
instructions which can result in unusual or erratic camera behavior.
If you are having problems of this nature we recommend the following procedure prior to
contacting us.
Install a new set of 12 x AA alkaline batteries & SDHC card (making sure that the card is not
locked). Move the camera’s Power button to the SET UP position, press the MENU button &
scroll across to highlight “SYS”. Scroll down & select the “FORMAT” option, follow the
instructions & format the SD card. Using the same procedure, this time select “DEFAULT
SET” & reprogram the camera to its default settings.
Re-test your camera, refer to the table below & if you require additional help email
[email protected] for further assistance.
Camera will not enter SETUP mode
Camera takes pictures all day
Poor Image Quality
Washed out daytime images
Water inside housing
Power switch not in SETUP position
• SD Card not loaded
• SD Card write protected
• Batteries flat
Time lapse mode ON
• Interval set to 0 delay
Dirty lens window
Camera angled to high sun in picture
Battery flat or discharged
www.starweb.com.au Covert Security & Wildlife Monitoring T.C. - User Manual March.2013
Page 16

16
www.starweb.com.au Covert Security & Wildlife Monitoring T.C. - User Manual March.2013
 Loading...