

Page 1
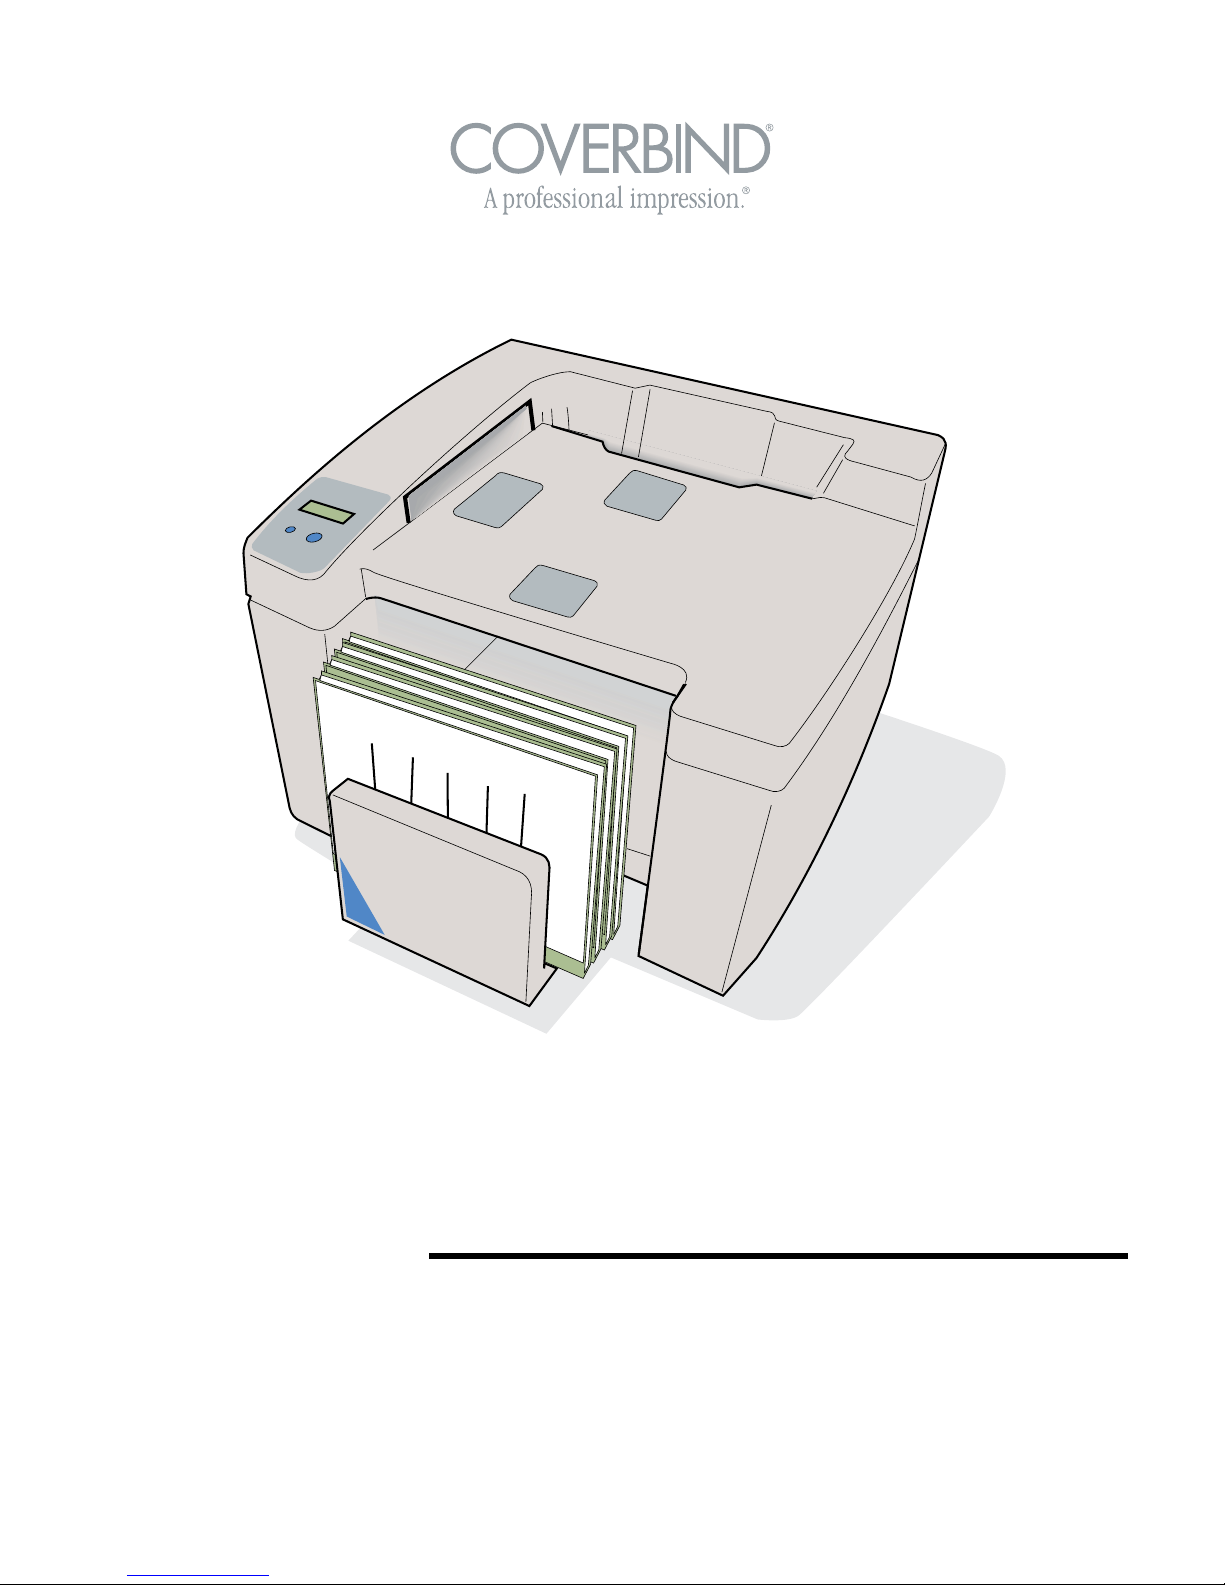
COVERBIND 101 DFS
Document Finishing System
Operator’s Manual
Part No. 2K542 B
April 2008
Page 2

Contents
Safety instructions ...............................................
1.
Installation ...........................................................
2.
Description ..........................................................
3.
How to use the Coverbind 101 DFS ....................
4.
User settings .......................................................
5.
5.2 - How to select the speed of binding .............
6.
Troubleshooting ...................................................
7.
Clearing and emptying .........................................
8.
How to make the most of your binding machine ...
9.
Specifications .....................................................
10.
Index and addresses ...........................................
5.1 - How to select the language ..........................
3
5
6
7
9
9
10
11
12
13
14
16
2
Page 3
1. Safety Instructions
Please read these safety notes carefully before using this product.
The equipment and recommended supplies have been designed and tested to meet strict safety
requirements. These include safety agency approval, and compliance to established environmental
standards. Please read the following instructions carefully before operating the equipment and refer
to them as needed to ensure the continued safe operation of your equipment.
Store the manual in the holder at the rear of the binding machine.
In order to guarantee perfect binding of your documents, only Coverbind original covers can be used
with this machine.
Safety Instructions
Always follow the safety instructions below when using the machine.
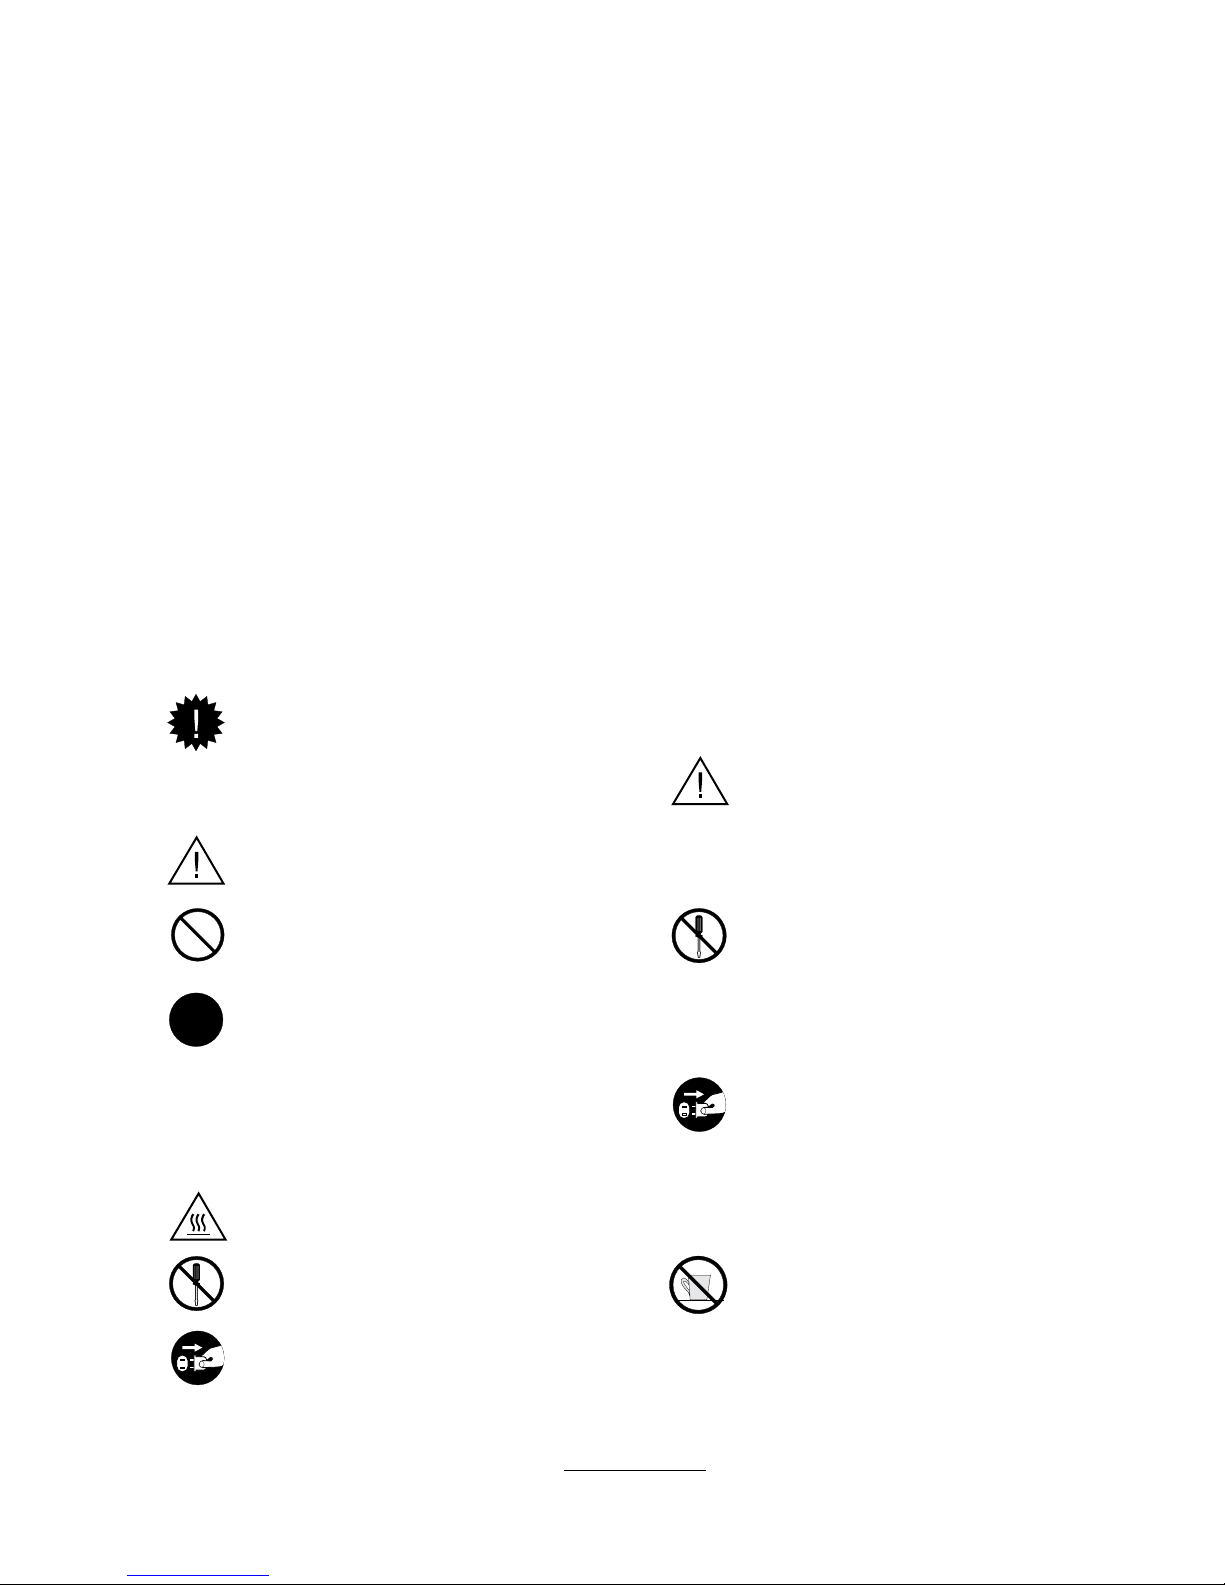
Symbols: Warnings:
Examples:
The “Important Symbol” means that if
you do not follow these instructions, the
paper feed can go wrong, the covers
can be damaged, or the result can be
unsatisfactory in some other way.
This WARNING alerts users to areas of the
equipment where there is the possibility of
personal injury.
The “Prohibited symbol” denotes actions
that you are not allowed to do.
The “Mandatory symbol” denotes actions
that you must do.
This WARNING alerts users to areas of
the equipment where there are heated
surfaces, which should not be touched.
Prohibited. Do not dismantle.
Mandatory. Disconnect the mains cable.
The machine must be connected to a power supply
that complies with the specifications in section 9 of
this manual.
The mains cable must not be damaged,
destroyed, or modified in any way. Do not
put heavy objects on the mains cable.
Do not remove any covers or screws on the
machine, other than those described in this
manual. There is high voltage in some parts
inside the machine. Contact with these
parts can cause a severe electric shock. If
the machine needs adjusting or repairing,
ask your service representative for help.
If the machine appears to be damaged,
stops functioning, starts smoking, or smells
peculiar, immediately disconnect the mains
cable from the wall socket. Do not continue
to use the machine in this condition.
Contact your service representative.
Do not put any metal objects or objects
containing liquids (e.g. vases, flower pots,
coffee mugs, etc.) on the machine. If the
liquid contents are spilt into the machine,
there will be a risk of fire and electric
shock.
3
Page 4
Electrical Supply
This equipment shall be operated from the type of electrical supply indicated on the equipment‘s data plate
label. If you are not sure that your electrical supply meets the requirements, please consult your local power
company for advice.
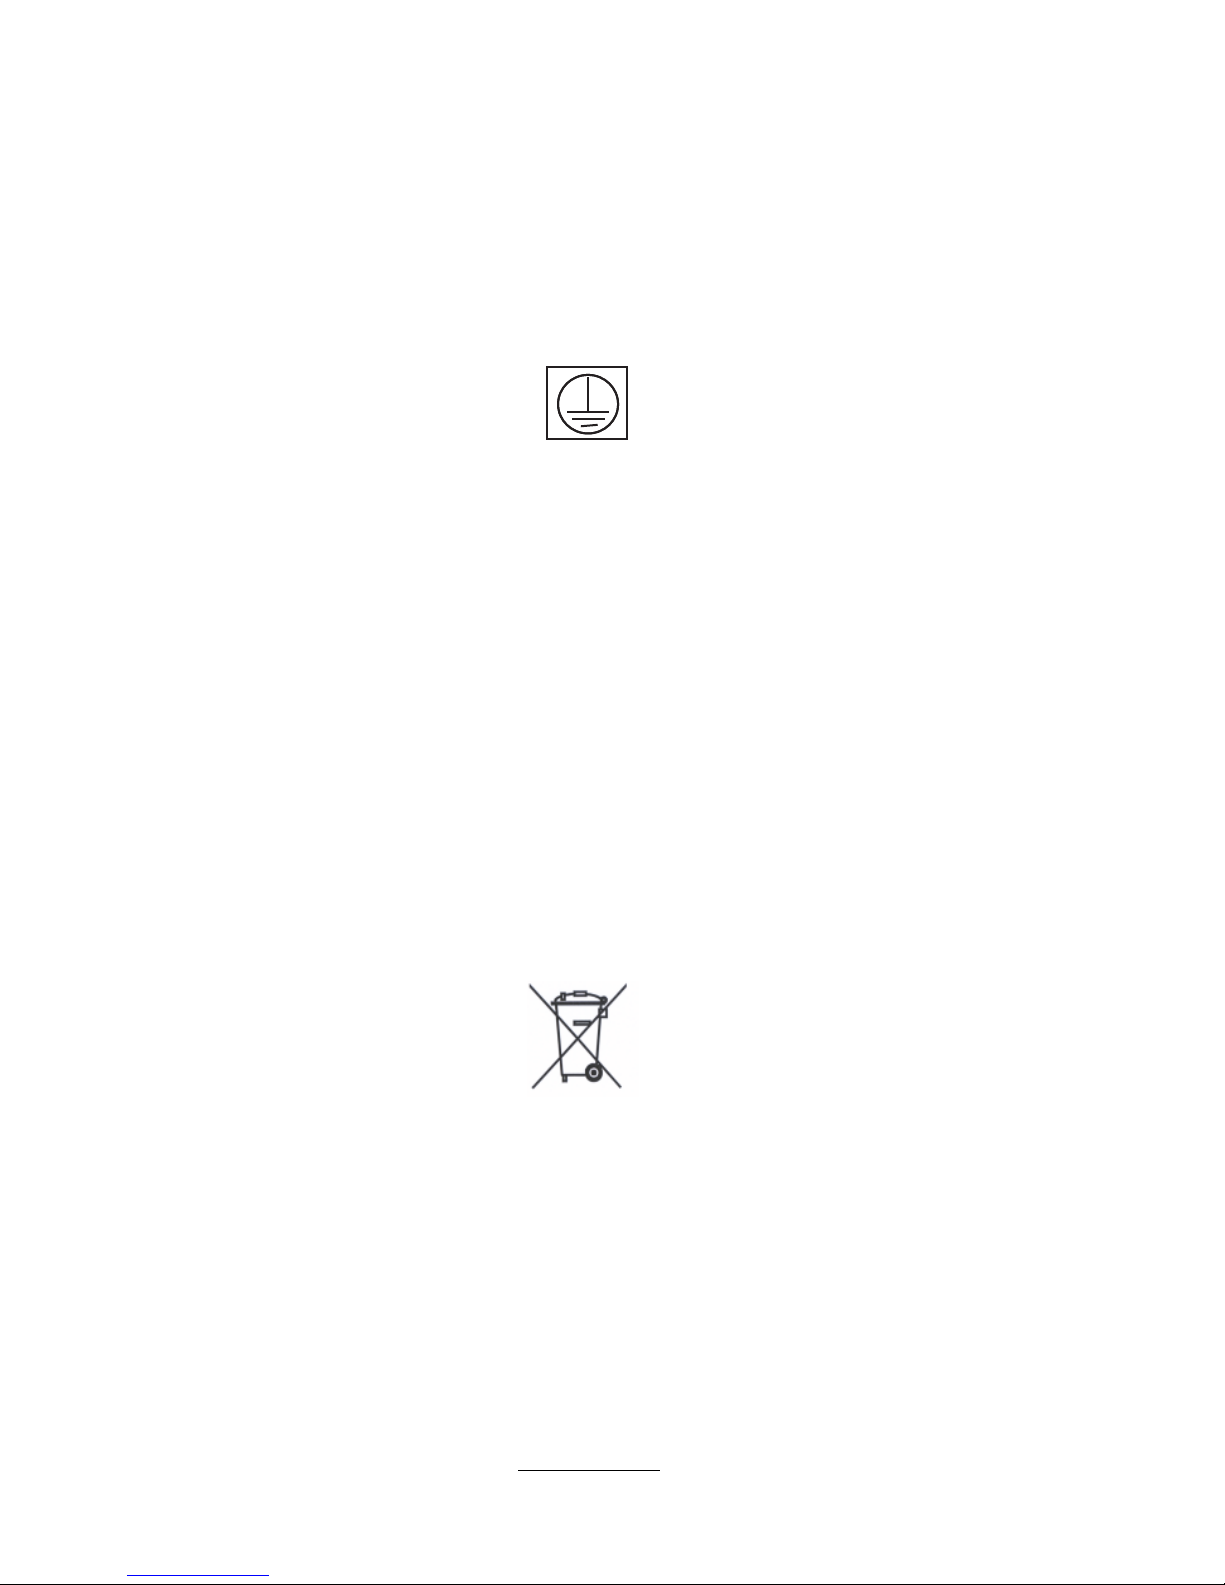
WARNING
This product must be connected to a protective earth circuit.
This equipment is supplied with a plug that has a protective earth connection. This plug will fit only into an
earthed electrical outlet. This is a safety feature. To avoid risk of electric shock, contact your electrician to
replace the electrical outlet if you are unable to insert the plug into it. Never use an earthed adapter plug to
connect the product to an electrical outlet that lacks an earth connection terminal.
Use an outlet that contains surge surpression or ground fault protection. For added protection during a lightning
storm, or when the binder is left unattended and unused for long periods of time, unplug it from the wall
socket.
Product Recycling and Disposal
European Union
Disposal Information
Application of this symbol on your equipment is conrmation that you must dispose of
this equipment in compliance with agreed national Procedures.
In accordance with European legislation end of life electrical and electronic equipment
subject to disposal must be managed within agreed procedures.
Prior to disposal please contact your local dealer or Coverbind representative for end
of life take back information.
Other Countries
Please contact your local waste authorities and request disposal information.
4
Page 5
2. Installation
MEASURE DOCUMENT
SEE PICTURE 1
101DFS
art.no 2K514
v1.2008
Operator Manuals
& Quick Guides
Mutiples Languages:
%&6t%/,t'*/
'3"t(#3t/-%
/03t135t48&
Holder for Operator’s Manual
and Quick Guide
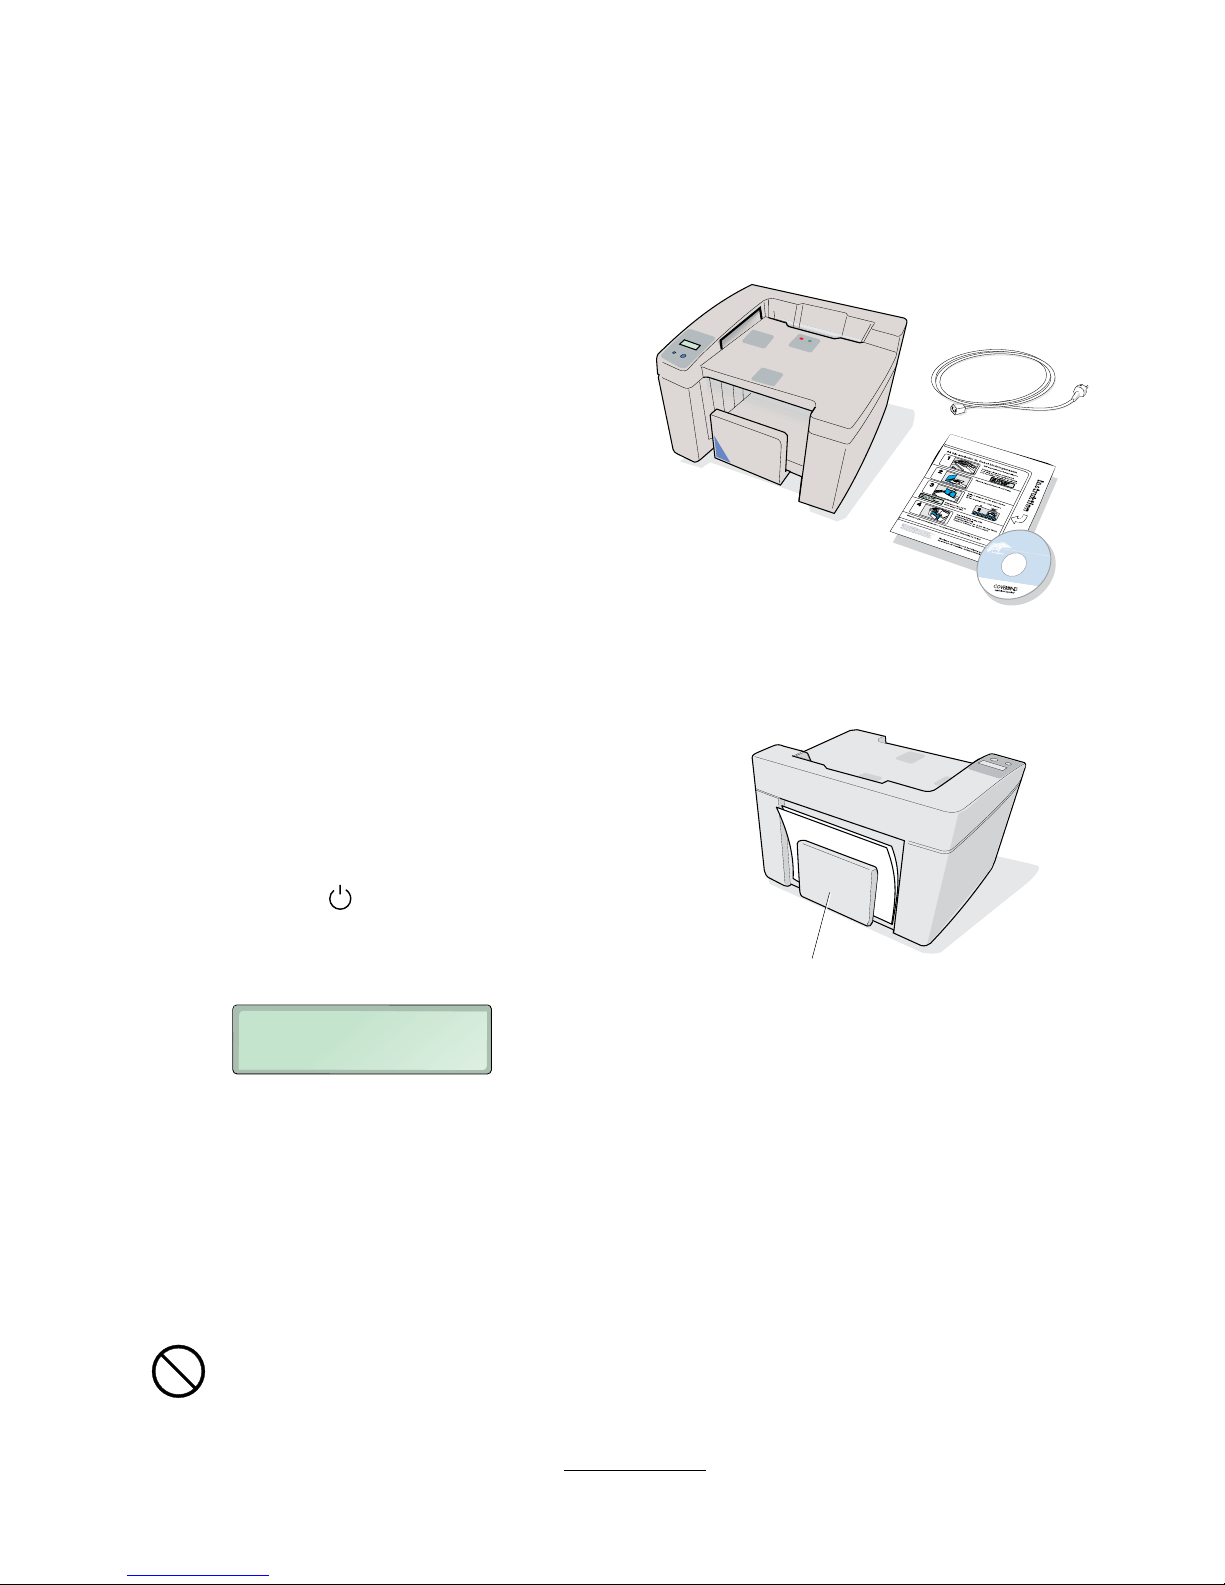
Besides the binding machine, the packaging should contain the following:
• Quick Guide
• Operator’s Manual on CD (also for download
on www.coverbind.com)
• Mains cable
Preparations
1. Check that the items listed above are all
included.
2. Remove the Coverbind 101 DFS from the
packaging materials as described in the
instructions printed on the outside of the box.
3. Place the machine on a stable surface
with sufcient free area as work space.
Recommended surface height is ~ 20 inches.
This height will ensure the most comfortable
working position when loading documents.
Remove transport protection.
4. Plug the mains cable rst into the machine and
then into the wall outlet.
5. Press the control on the machine marked with
the symbol
6. Check that the Coverbind 101 DFS starts and
that the following message is shown on the
display:
To change language, see section 5.1.
7. After you have read the Operator’s Manual and
understand how to use the product, place the
Manual and Quick Guide in the holder at the
rear of the machine.
Your Coverbind 101 DFS is now ready for use.
Do not place the binder in an enclosure such as a cabinet without proper ventilation.
Do not stack the binder on top of or below, other electronic devices.
Do not overload wall outlets or extension cords, as this can result in a risk of re or electrical shock.
5
Page 6
3. Description
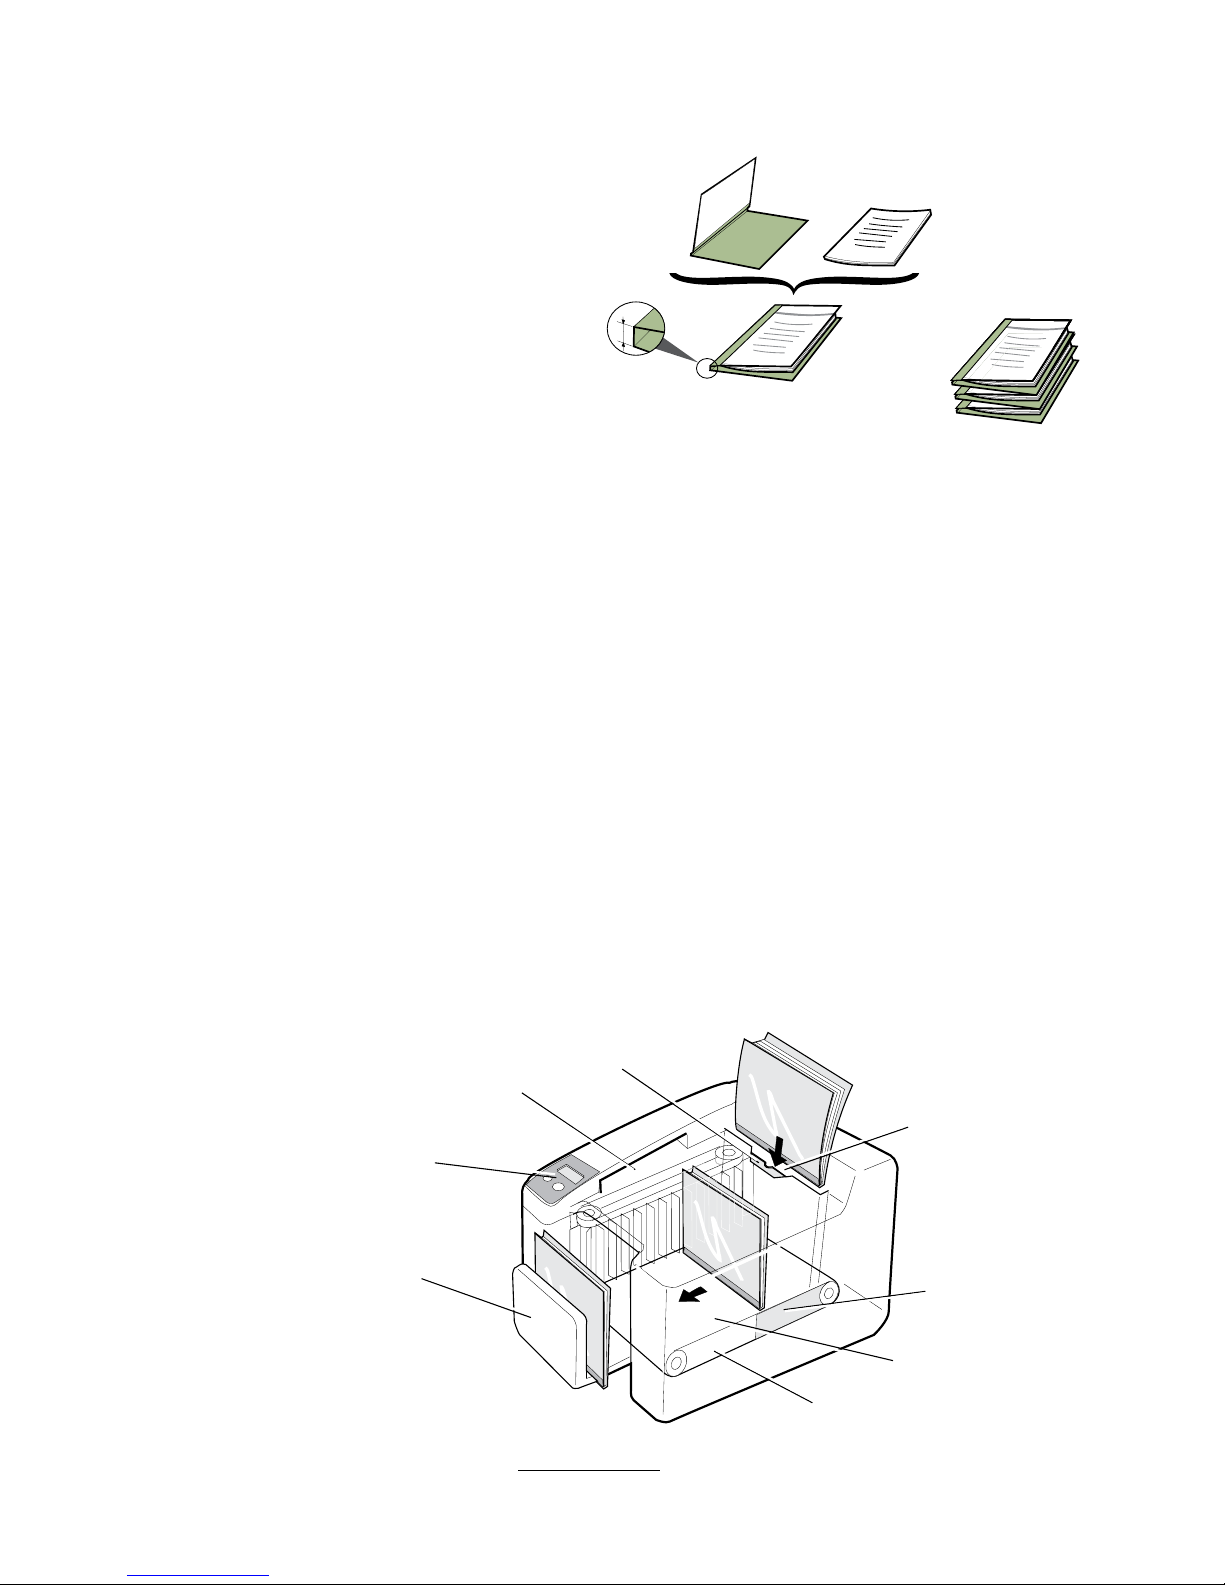
Cover
Set
Batch
Document
Spine
width
Output tray
Input bay
Jam clearance door
Heating zone
Binding unit
Cooling
zone
Display
Cover selector
Terminology
In this manual and in the Quick Guide, the Coverbind
cover is referred to as cover and the set of papers
is referred to as the set. When the set is put into the
cover, this is referred to as a document.
When a number of documents are piled on each other,
this is referred to as a batch.
The machine consists of ve main parts: Cover selector, Display, Input
bay, Binding unit, and Output tray.
Cover Selector
The cover selector comprises a slot into which you
insert the set of papers to be bound, short side first.
A sensor measures the thickness of the set and the
recommended type of cover is then shown on the
display.
Display
The display shows what is happening in the machine.
A number of user functions can be selected using the
two control-buttons on the panel. (See also section 5
“User settings”.)
Input bay
Insert the set of papers into the selected cover. This is
now called a document (cover with a set of papers).
Now load the document into the input bay with the
spine downwards as shown on the label.
If the binding machine stops for some reason, the
jam clearance door in the input bay can be pushed
aside and the document removed. (See also section 7
“Clearing and emptying”.)
Binding unit
The document is first jogged and then transported into
a heating zone where the glue in the cover melts. Then
the document passes through a cooling zone, and the
glue binds the pages together in the cover.
Output tray
The output tray moves outwards as the finished
documents are fed into it. An audible signal is heard
when the output bay is nearly full. A message is also
shown on the display which alerts the user to remove
the document from the output tray.
6
Page 7
4. How to use the Coverbind 101DFS
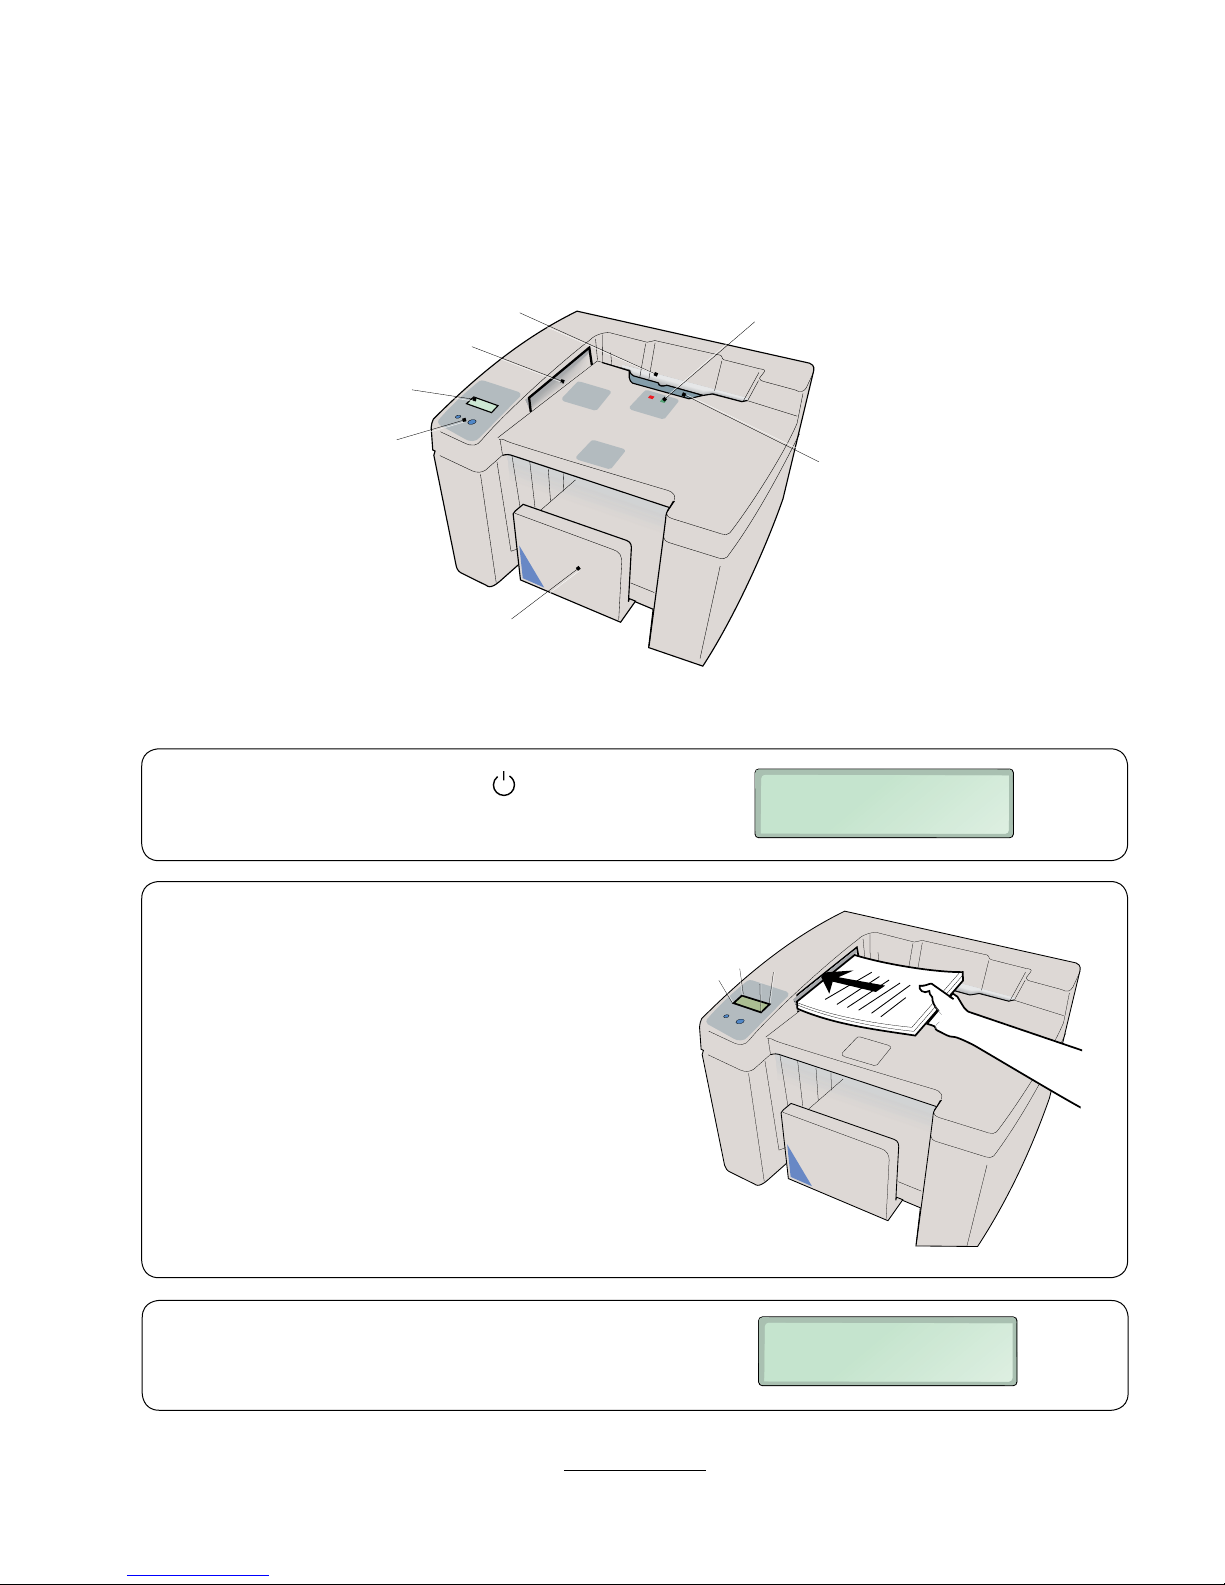
Input bay
Cover selector
Display
Control buttons
Indicator lights
Output tray
Jam clearance door
MEASURE DOCUMENT
SEE PICTURE 1
USE COVER 1/16"
SEE PICTURE 2
Following are the most important parts of the machine that you should be familiar with. The four (4)
steps to complete a binding, are also shown on the labels located on the top of the machine.
Start the machine by pressing on
1.
The display asks you to measure the thickness of
the set.
Measure the thickness of the set of papers to be
2.
bound, by inserting the short side of the set into
the cover selector.
The recommended cover size (spine width) is
3.
shown on the display.
.
7
Page 8
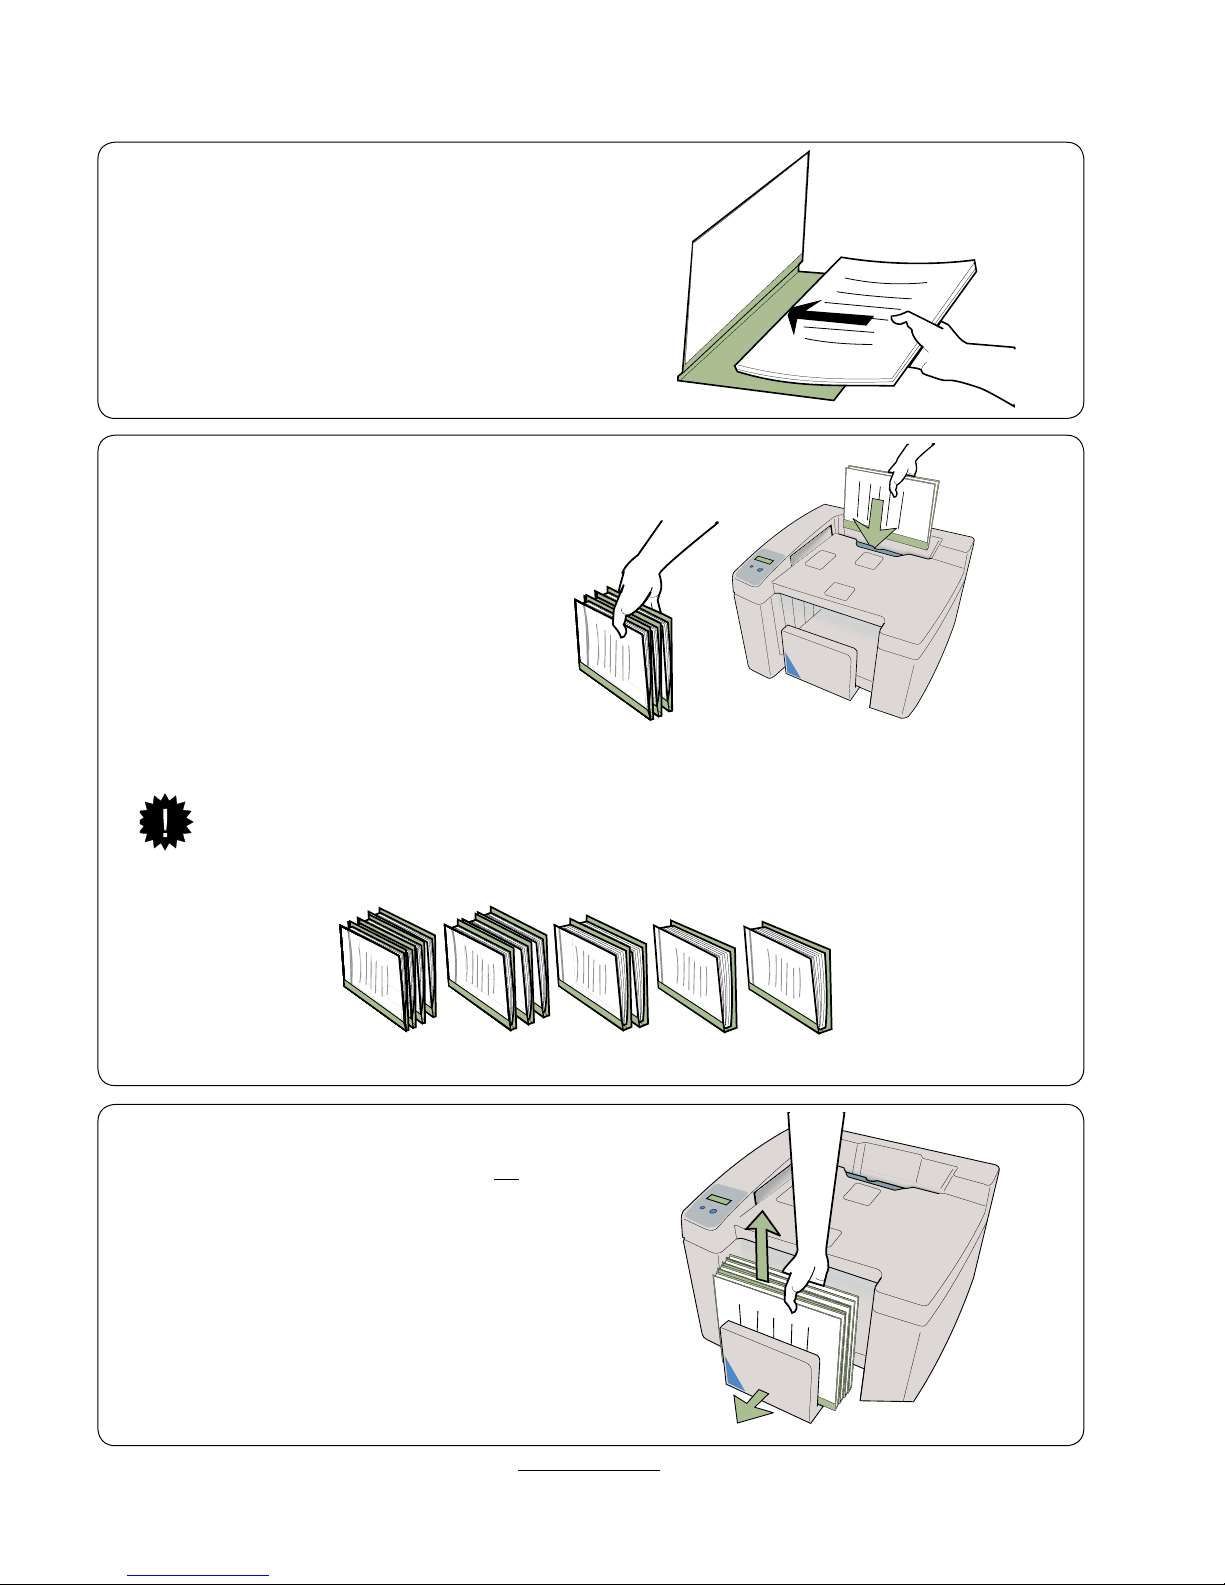
Load the set of the papers in the selected cover.
Max. Max. Max. Max. Max.
4 x 1/16” 3 x 1/8” 2 x 1/4” 1 x 3/8” 1 x 1/2”
4.
Documents (cover and set) can always be loaded
5.
into the machine for binding when the indicator light
is green. Documents can be loaded one by one or
in batches.
The machine conrms that a document has
been loaded by switching the indicator light
from green to red. As soon as the indicator
light is green again, the next document
or batch can be loaded. The machine
automatically switches to the energy saving
mode after 90 minutes.
When a batch of documents is loaded into the machine, the number of
documents in the batch should be limited as shown below.
Exceeding these numbers may compromise the strength of the bind, or cause
the machine to stop.
6.
Remove the bound documents from the output tray.
They are ready to be used. Note that full binding
strength is achieved only when the documents have
cooled down to room temperature.
By default setting, the normal processing time
is approx. 3 minutes for the rst document. The
continuous binding capacity is up to 30 documents
per minute
NOTE! Depending on the type of paper used,
the speed of binding can be increased by +33%
(see section 5.2 “How to select the speed of
binding”).
8
Page 9
5. User settings
MEASURE DOCUMENT
SEE PICTURE 1
RESTART
> 2 s
CUSTOM SETTINGS
BACK ENTER
RESTART
1 x
ENGLISH
SELECT MORE
RESTART
> 1 x
ENGLISH
SELECT MORE
RESTART
2 x
SPEED NORMAL
SELECT MORE
RESTART
CUSTOM SETTINGS
BACK ENTER
RESTART
1 x
MEASURE DOCUMENT
SEE PICTURE 1
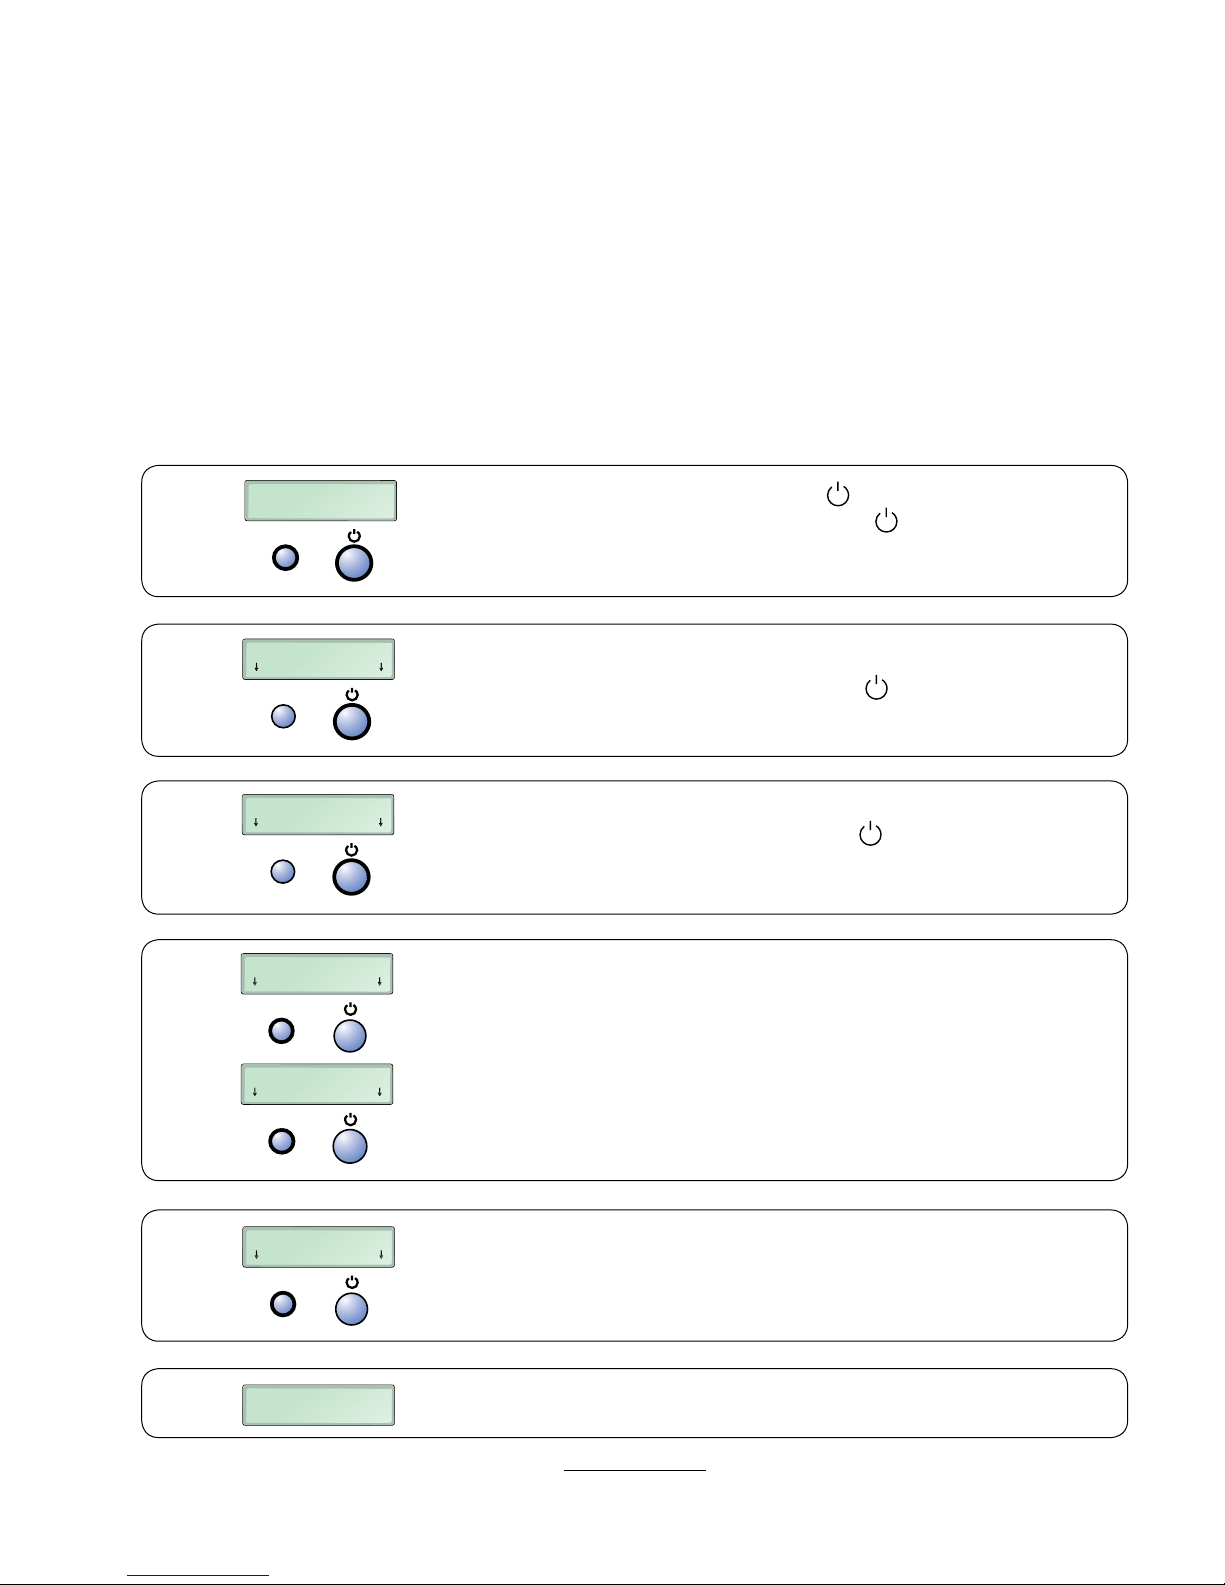
The user can change two parameters in User Settings.
5.1 How to select the language
The default language setting for your Coverbind 101 DFS is English. Other languages can be selected as
follows:
Note that the English language is always used in the “User Settings” mode.
1.
2.
3.
4.
Start the machine by pressing on
Press and hold down the RESTART and
.
control for at least
2 seconds. The temporary functions of these two controls are
now shown on the lower line of the display.
Press the control below Enter (i.e. the
Press the control below More (i.e. the
control) once.
control) repeatedly
until the desired language is shown on the display.
Press the control below Select (i.e. the RESTART control) twice.
5.
6.
When satised with the settings, press the control below
Back (i.e. the RESTART control) once.
The desired language has now been selected.
9
Page 10
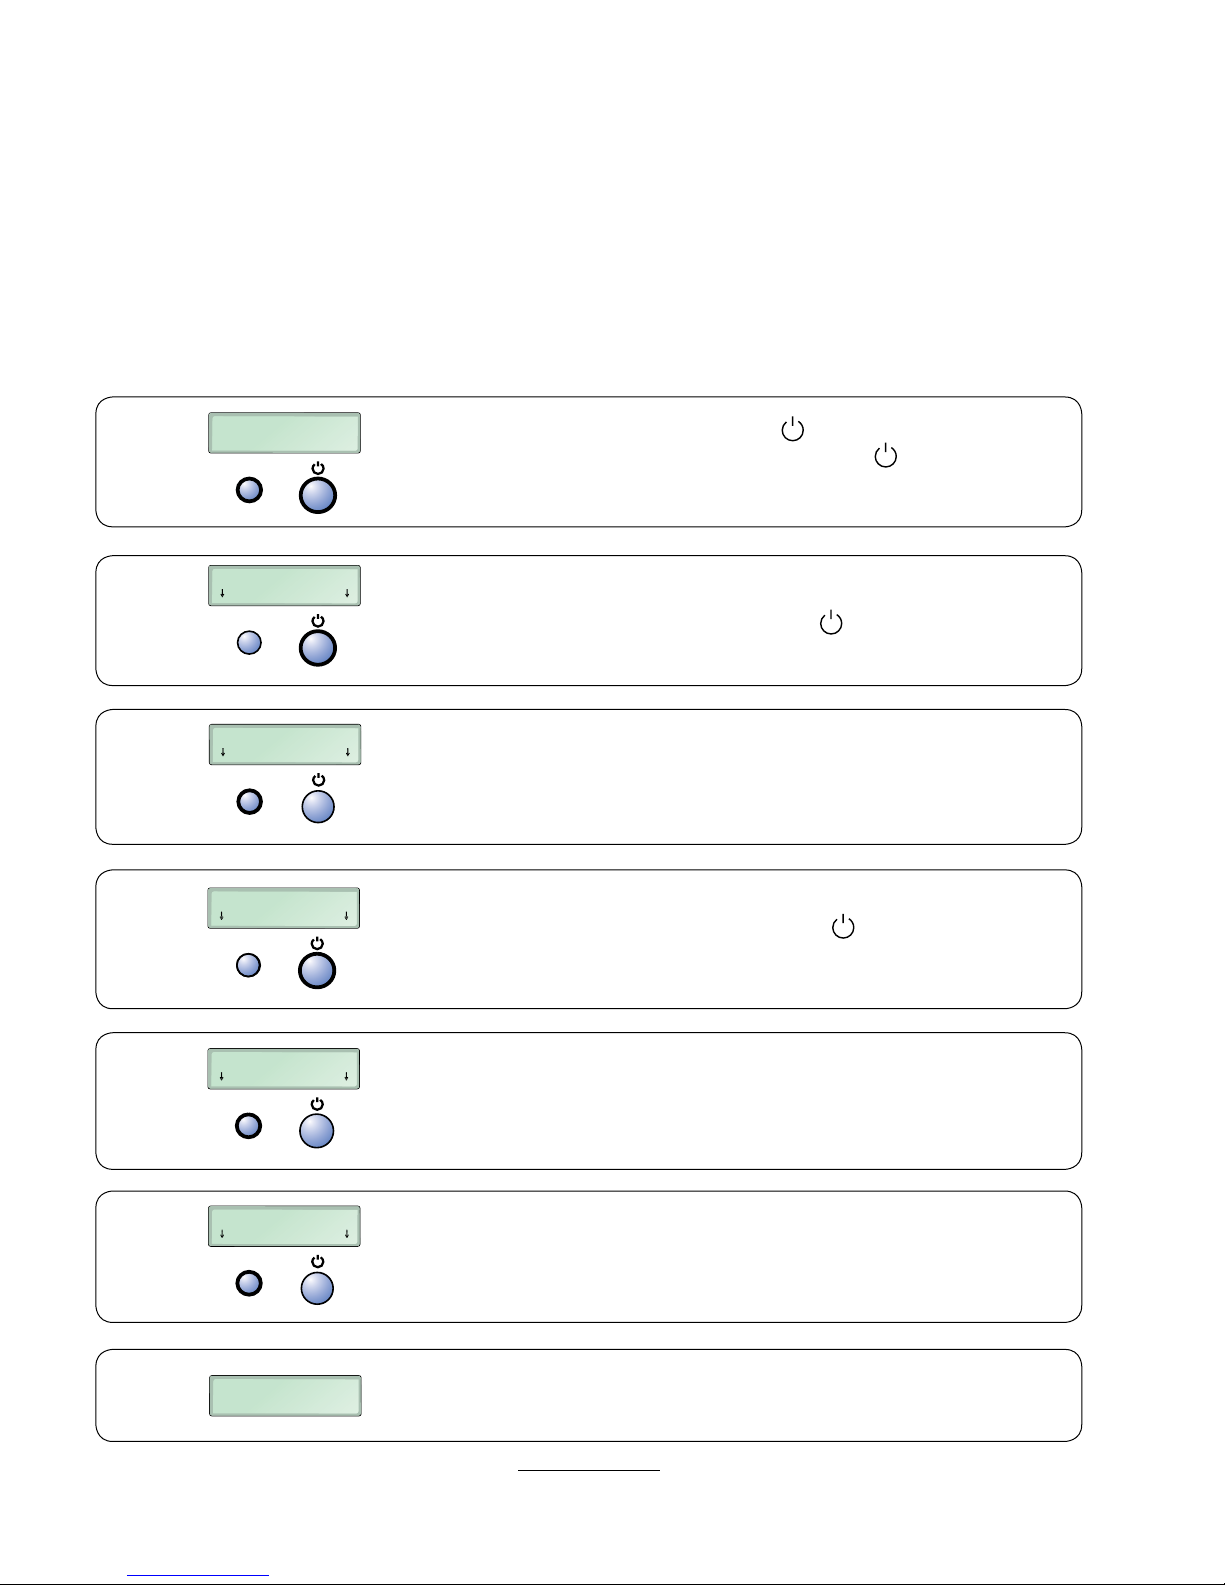
5.2 How to select the speed of binding
MEASURE DOCUMENT
SEE PICTURE 1
RESTART
> 2 s
CUSTOM SETTINGS
BACK ENTER
RESTART
1 x
ENGLISH
SELECT MORE
RESTART
1 x
SPEED NORMAL
SELECT MORE
RESTART
1 x
SPEED HIGH
SELECT MORE
RESTART
1 x
CUSTOM SETTINGS
BACK ENTER
RESTART
1 x
MEASURE DOCUMENT
SEE PICTURE 1
H
The default speed setting for your Coverbind 101 DFS is NORMAL
HIGH speed setting should ONLY be used to bind standard non-coated office copy/print paper.
NORMAL speed CAN be used to bind the above mentioned paper types, but MUST be used for coated and
other special paper types to achieve optimum binding strength. Special types may be heavy compressed, extrasmooth or thicker than usual paper
Select the speed of binding as follows:
Note that the English language is always used in the “User Settings” mode.
1.
2.
3.
4.
Start the machine by pressing on
Press and hold down the RESTART and
.
controls for
at least 2 seconds. The temporary functions of these two
controls are now shown on the lower line of the display.
Press the control below Enter (i.e. the
control) once.
Press the control below Select (i.e. the RESTART control) once.
Press the control below More (i.e. the
control) once, to
display the alternative speed of binding.
5.
6.
7.
Press the control below Select (i.e. the RESTART control) once,
to select the displayed speed of binding.
For details on productivity/capacity please see section 9
“Specications”.
When satised with the settings, press the control below
Back (i.e. the RESTART control) once.
The desired speed of binding has now been selected. When/
if HIGH speed has been selected a symbol ( H ) will appear
in lower right corner of the display.
10
Page 11
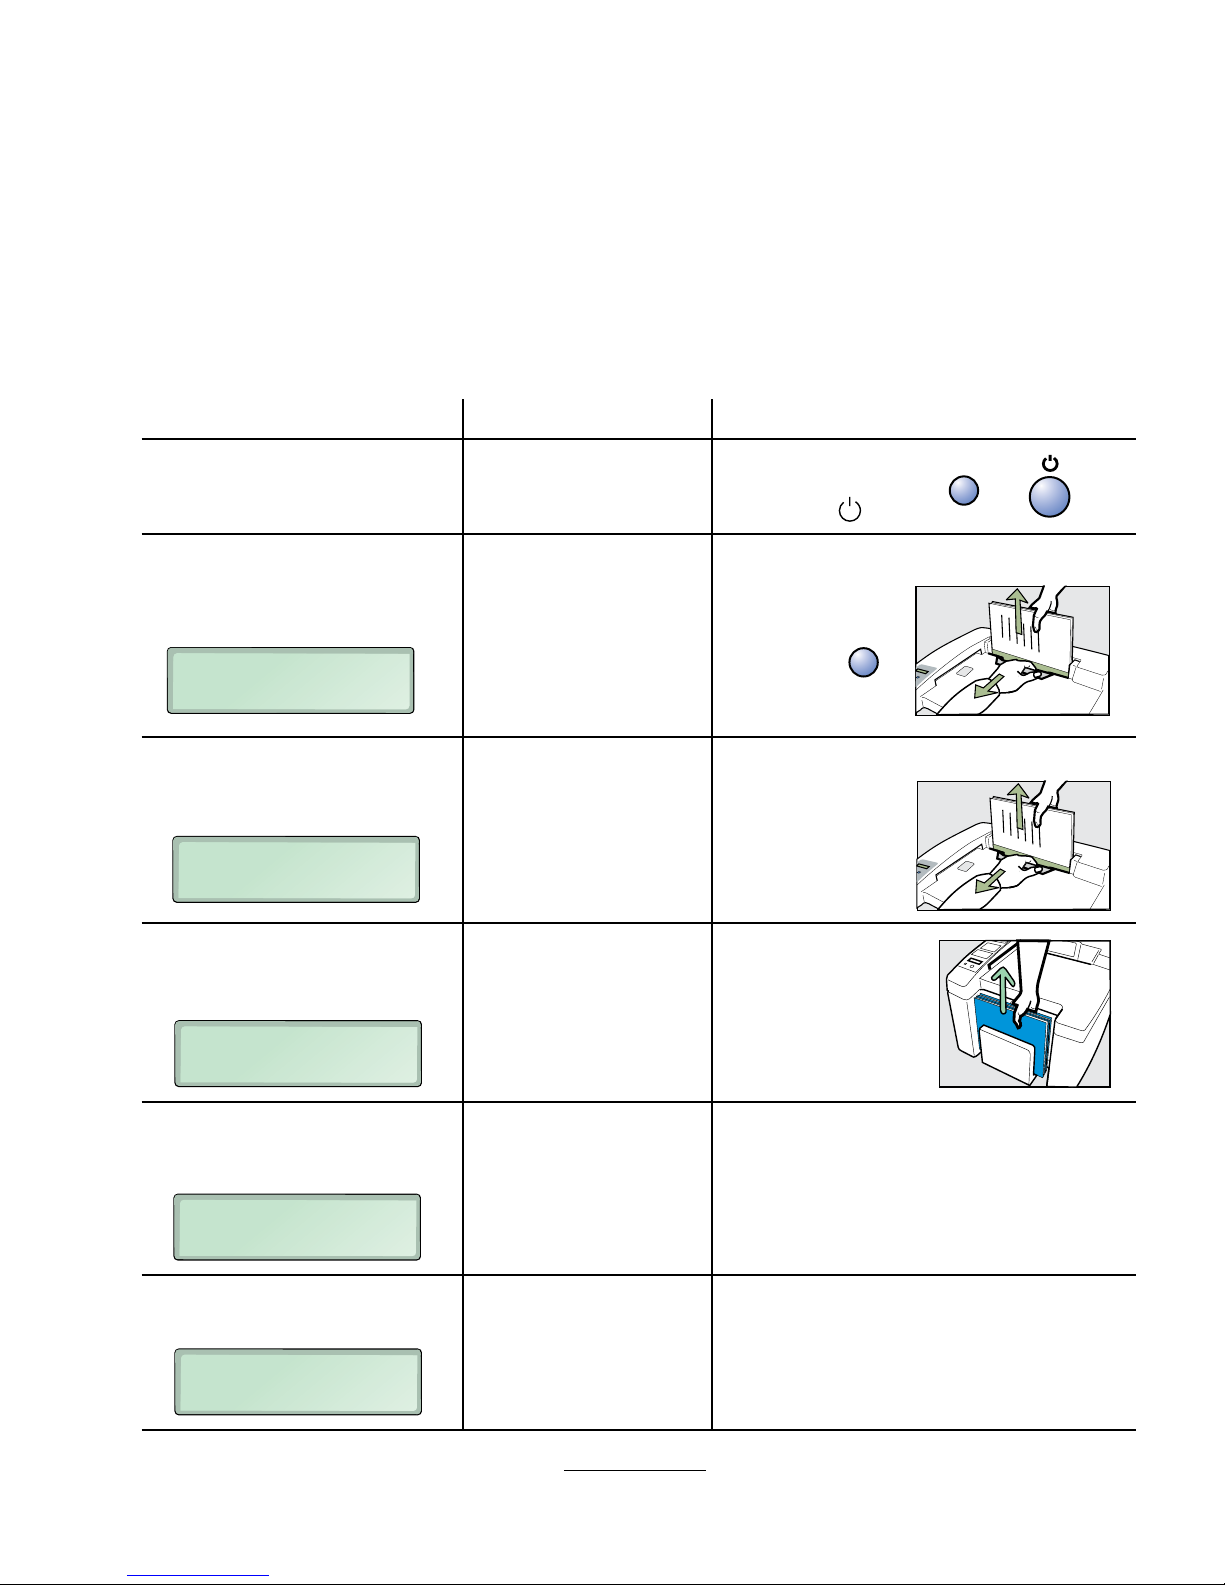
6. Troubleshooting
INPUT JAM
REMOVE DOC
RESTART
DO NOT INSERT
REMOVE DOC
ALMOST FULL
EMPTY TRAY
OUTPUT TRAY FULL
EMPTY TRAY
BINDER FAULT
CALL SERVICE
RESTART
Use these instructions to solve the most common operating problems with your Coverbind
101 DFS binding machine:
NOTE! In order to guarantee perfect binding of your documents, correct speed of binding (see section 5.2) must be
selected and only Coverbind original covers must be used. Other types of covers or incorrect usage of the machine
can cause poor binding results or the machine may stop working, in which case an authorised service may be
required.
Symptom: Cause: Action:
The machine will not start.
No text on display.
Red indicator light blinks.
Buzzer alarm.
Red indicator light illuminates
more than 3 sec.
Buzzer alarm.
Red indicator light illuminates
more than 3 sec.
Buzzer alarm (twice).
No power supply.
Machine switched off.
Document not in
contact with oor of
input bay.
Too many documents
in the batch or
document too thick.
Too many documents
in the same batch.
Output tray nearly full.
Check the mains
connection. Press
RESTART or
Remove document by pulling back the jam
clearance door.
Check the thickness
and quantity.
Press
RESTART.
Load the
document again.
Remove the documents by pulling back the
jam clearance door.
Load documents
again with fewer
documents
in each batch.
Remove documents
from the output tray
before loading more
documents in the
machine.
.
Red indicator light illuminates.
Buzzer alarm.
Machine stops.
Machine stops.
Other error codes, e.g.:
Output tray full. Remove documents from output tray. The
machine then automatically continues
binding the documents that are already
loaded.
Contact an authorised Coverbind partner.
See also section 7 “Clearing and Emptying”
about how to remove unbound documents
from the machine.
11
Page 12
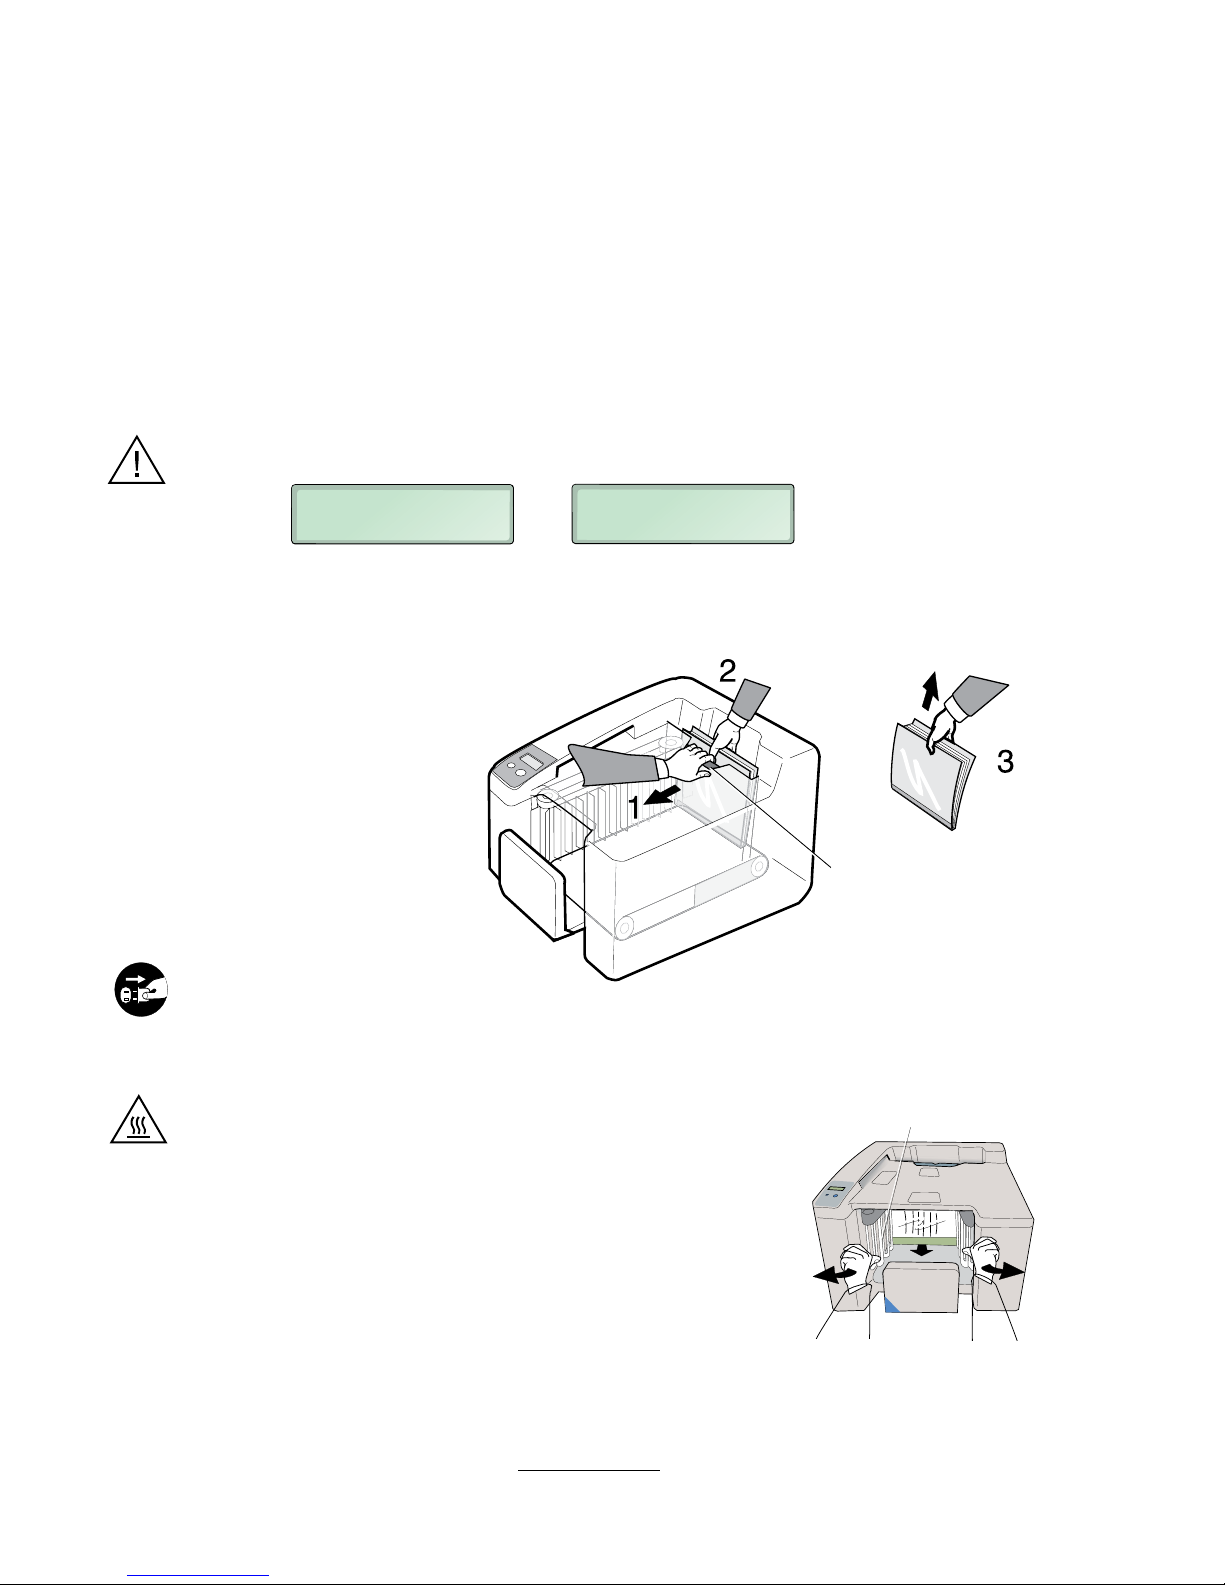
7. Clearing and emptying
Driver
Jam clearance
door
INPUT JAM
REMOVE DOC
DO NOT INSERT
REMOVE DOC
If there is a mains power failure or if the binding machine stops functioning for some other reason, documents
in input bay area and other unbound documents can be removed as described below. If there are unnished
documents in the machine when the power supply is restored, the machine will automatically move them forward
to the output tray. They can then be re-loaded and bound.
If the binding machine breaks down, any documents should be cleared and removed from the machine before
it is sent for service.
Clearing
If the display shows or remove all documents
from the input bay.
To facilitate removal of the documents, the machine is equipped with a jam clearance door.
Pull back the jam clearance door with one hand (1). Firmly grip the document(s) in the input bay
with the other hand (2) and lift them out of the machine (3).
The binding machine should then automatically
return to the normal position. However,
if it does not, press the RESTART control.
Emptying
The binding machine only needs to be emptied manually in exceptional cases (e.g. if the machine
breaks down or if there is an extended power failure).
Disconnect the mains cable before emptying the machine.
Wait for a while until the heating zone in the machine has
cooled down.
Stand in front of the machine and hold both hands in the
output tray, as shown in the gure below. Turn the outermost
drivers on both sides outward using your thumbs so that the
document is manually fed one step forward. This operation
may require some force. The drivers are designed to withstand
such force. Repeat the procedure to transport the remaining
documents forward until the binding machine is empty.
12
Page 13
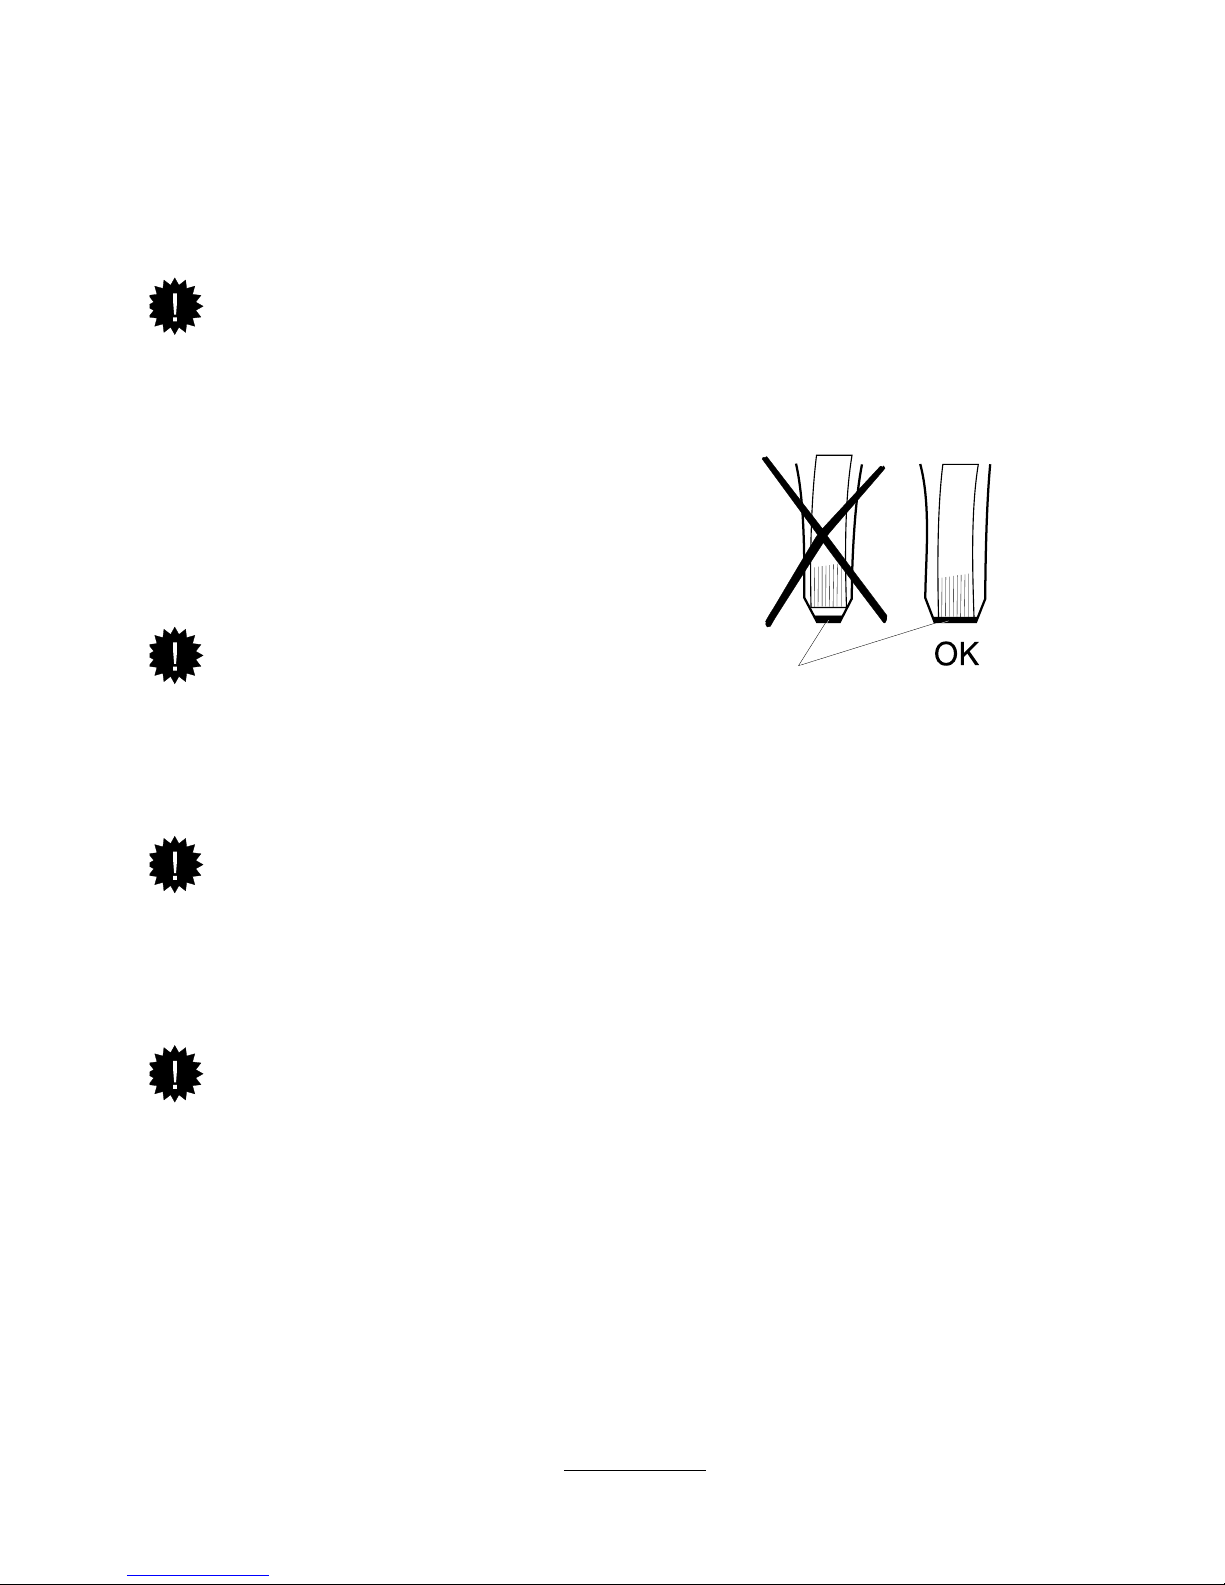
8. How to make the most of your binding machine
Glue
Avoid loose pages!
Always use the cover selector to ensure you have the correct spine width and thus avoid
Tip:
loose pages.
If there are too many pages in a cover, the strip of glue will be insufcient for all the pages.
Do not pull out pages!
Allow the document to cool down. When the document is removed from the machine, it
Tip:
has cooled sufciently to handled and read, but do not test the strength of the binding
immediately. A document with only a few pages reaches full strength after a few minutes.
But a thicker document will require longer time to cool down and attain maximum strength,
especially if the set of papers comes directly from a copying machine or printer.
Check that the paper you are using is suitable for binding!
When using coated, heavy compressed, extra-smooth or thicker than usual paper, we
Tip:
recommend that you rst make a test binding to check that the strength of the bind is good
enough. The strength of some special types of paper is very similar to ordinary copy paper
whereas other types have characteristics that may reduce the strength of the binding. Using
special paper for one or two pages in a document will usually not cause any problems.
Even jogging!
Always use the collating function on your copier/printer. On many copier/printers the sheets
Tip:
can be collated into sets and delivered in a special output tray. For binding, it is always positive
to select the collating function. Normally the copier/printer jogs every sheet it collates. If the
standard output tray of the copier/printer is used, static electricity in each sheet of paper
may make it very difcult for the binding machine to jog the paper set properly. Such paper
set could result in poor binding strength.
13
Page 14

9. Specications
General
Output capacity
Paper size
Spine width and
capacity
Jogging
The Coverbind 101 DFS is a semi-automatic high-speed thermal binding machine that
only accept usage of Coverbind DFS document covers.
Up to 30 documents can be bound per minute depending on the spine width and
the speed setting. The number of documents that can be loaded in the machine
simultaneously is shown in the table below and depends on the spine width. The
corresponding output speed is stated at the bottom line of the table as covers per
minute.
Spine width
Load qty
Speed HIGH
Speed NORMAL
Letter size, 8.5x11”
The table below shows approximately how many sheets of 20lbs paper the covers can
hold for each spine thickness.
1/16”
1-15
The sheets of paper in the set are automatically jogged on three sides during the
binding process.
1/16”
max 4 pcs.
30/min
22/min
1/8”
16-30
1/8”
max 3 pcs.
22/min
16/min
1/4”
31-60
1/4”
max 2 pcs.
15/min
11/min
3/8”
61-90
3/8”
max 1 pcs.
7/min
5/min
1/2”
91-120
1/2”
max 1 pcs.
7/min
5/min
Output tray capacity
Binding temperature
Warm-up time
Energy-saver mode
Voltage
Power consumption
Environment
Dimensions
8 – 50 documents depending on the spine width.
330°F±10°F
2-3 minutes depending on the ambient temperature and local variations in the power
supply voltage.
90 minutes after last document is bound.
115 VAC +/- 10%
stand-by
binding
power saver
heating up
Temperature 50 - 95°F, humidity 15 - 90% RH.
Length
Width
Input height
Total height
137 W
140 W
7 W
630 W
18,5”
20”
13”
14”
mean value
mean value
Weight
62 lbs
14
Page 15

10. Index
A
Addresses 15
B
Batch 6
Binding temperature 14
Binding unit 6
Buzzer 11
C
Clearing 12
Compartment 5
Copying paper 13
Cover 6
Cover selector 6
D
Description 6
Dimensions 14
Display 6
Documents 6
Driver 12
E
Emptying 12
Example 3
I
Index 15
Input bay 6
Installation 5
J
Jam clearance door 6
Jogging 14
L
Language 9
Lights 11
Loose pages 13
O
Operator’s Manual 5
Other error codes 11
Output tray 6
P
Paper size 14
Power consumption 14
Power failure 12
Processing time 8
Paper Quality 10,13
Q
Quick Guide 5
R
Restart 9
S
Safety Instructions 3
Set of paper 6
Sorting function 13
Specications 14
Speed of binding 10
Spine width 6
Symbols 3
T
Terminology 6
Test binding 13
Thermal binding machine 14
Tips 13
Troubleshooting 11
U
Unbound documents 12
User settings 9
V
Voltage 14
15
W
Warm-up time 14
Warnings 3
Page 16
FCC Declaration
This equipment has been tested and found to comply with the limits for a Class B digital device,
pursuant to part 15 of the FCC Rules. These limits are designed to provide reasonable protection
against harmful interference in a residential installation. This equipment generates, uses and can
radiate radio frequency energy and, if not installed and used in accordance with the instructions, may
cause harmful interference to radio communications. However, there is no guarantee that interference
will not occur in a particular installation. If this equipment does cause harmful interference to radio
or television reception, which can be determined by turning the equipment off and on, the user is
encouraged to try to correct the interference by one or more of the following measures:
– Reorient or relocate the receiving antenna.
– Increase the separation between the equipment and receiver.
– Connect the equipment into an outlet on a circuit different from that to which the receiver is connected.
– Consult the dealer or an experienced radio/TV technician for help.
Warning
This Class “B” digital apparatus complies with Canadian ICES-003.
Cet appareil numérique de la classe “B” est conforme à la norme NMB-003 du Canada.
16
Page 17
COVERBIND CORPORATION
3200 Corporate Drive
Wilmington, NC 28405
Phone: (910) 799-4116
Tollfree: (800) 366-6060
Fax: (910) 799-3935
www.coverbind.com
17
 Loading...