

Page 1
INSTALLATION MANUAL TABLE OF CONTENTS 1
Revision 3
2019/02/18
C.A. 213631
Page 2

2 TABLE OF CONTENTS USER MANUAL
TABLE OF CONTENTS
TABLE OF CONTENTS ............................................................................................................................................. 2
CONGRATULATIONS ON THE PURCHASE OF YOUR NEW COVANA COVER.................................................. 3
SAFETY ...................................................................................................................................................................... 4
Safety information ................................................................................................................................................... 4
Avoiding the risk of electrocution ............................................................................................................................ 5
LABELING ................................................................................................................................................................. 7
GLOSSARY ..............................................................................................................................................................10
QUICK START-UP INSTRUCTIONS .......................................................................................................................12
Manual lifting procedure .......................................................................................................................................13
USING THE ESCAPE HATCH .................................................................................................................................14
WINTERIZING THE EVOLUTION COVER ..............................................................................................................15
PERIODIC MAINTENANCE TABLE ........................................................................................................................16
TECHNICAL SPECIFICATIONS ..............................................................................................................................17
Side elevation dimensions ....................................................................................................................................17
Frame dimensions and foot print ..........................................................................................................................18
Electrical specifications.........................................................................................................................................20
Operating limitations .............................................................................................................................................20
General specifications ..........................................................................................................................................20
TROUBLESHOOTING .............................................................................................................................................21
WARRANTY ....................................................................................................................... Erreur ! Signet non défini.
APPENDIX ...............................................................................................................................................................26
Washing the Evolution cover ................................................................................................................................27
Post greasing procedure.......................................................................................................................................28
Chain lubrification procedure ................................................................................................................................30
Page 3
USER MANUAL CONGRATULATIONS 3
CONGRATULATIONS ON THE PURCHASE
OF YOUR NEW COVANA COVER
On behalf of Covana, we thank you for choosing our product. Pride, attention to detail and excellent engineering
have resulted in the Covana cover you have chosen. With proper care and attention, your Covana cover will last
many years and offer great performance.
Although our products are constructed to last, we strongly recommend that you register your Covana at the time of
purchase to ensure an adequate follow-up process.
In fact, registering your Covana allows us to quickly reach you in the unlikely event a safety notice was ever to be
issued. Your product and safety are a top priority for us at Covana.
You will receive prompt warranty service in the rare event of a technical issue if you have registered your product
by filling out the registration form. Keep in mind the warranty service can only be provided with your bill of sale as
proof of purchase and the work must be provided by a certified technician. If you were to ever experience an
unfortunate occurrence, your product registration will allow us to access necessary information in a timely manner.
Start to experience the benefits of registering your Covana at www.covana.com/warranty.html.
Please take a few minutes to read all the instructions before you use your new Covana cover. This user manual will
help you understand the fundamentals of your cover so you will get the most from your Covana cover for many
years.
For service and advice, do not hesitate to call your Covana local authorized dealer.
Page 4
4 SAFETY USER MANUAL
SAFETY
IMPORTANT SAFETY INSTRUCTIONS
SAVE THESE SAFETY INSTRUCTIONS AND
REVIEW THEM REGULARLY.
READ AND FOLLOW ALL INSTRUCTIONS
Safety information
The Covana cover was designed, tested and certified
to be installed over a swim spa and under important
installation instructions issued by Covana. Any other
type of usage will void the warranty and product
certification.
The extra load maximum weight provided in the
specification section of this manual is a provision for
environmental outcomes, such as a small amount of
leftover snow or damp leaves that temporarily
accumulate on the cover and evenly distributed on the
surface of the cover.
The Covana cover was not designed to support any
additional load or people walking or standing on its lid.
Failure to observe this instruction will void the cover’s
warranty and nullify its certification.
The power safety cover meets ASTM F1346-91
requirements.
DANGER
To reduce the risk of injury, do not allow
children to use this product unless they are
supervised at all times.
Failure to follow all the instructions may result
in injury or even death.
Do not allow people to climb or walk on the
cover at anytime.
Do not allow children to have access to the
Covana cover without supervision.
Inspect the cover periodically. It should raise
smoothly and evenly. Contact your Covana
dealer if any unusual sound is heard during
use.
Never operate the Covana cover until all
people and objects are out of the spa.
WARNING
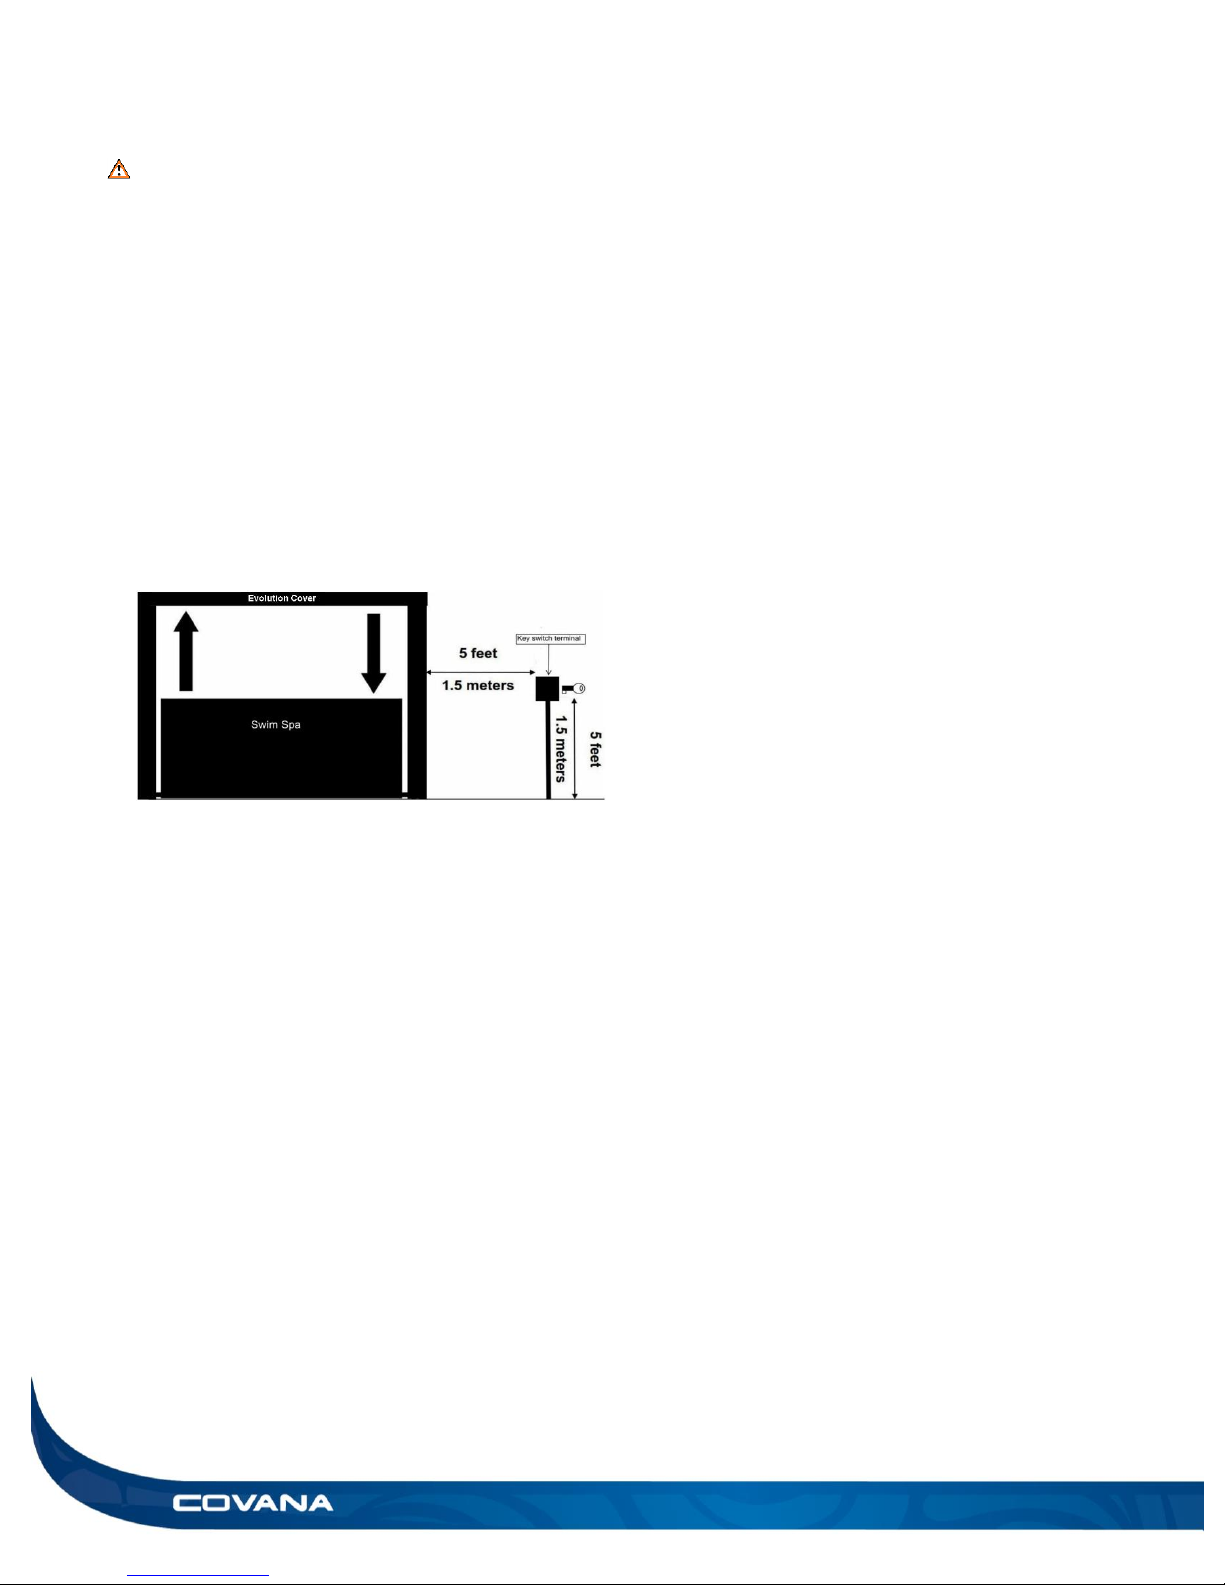
Be sure to keep the key switch and the key
out of the reach of children.
Do not put any type of fabric or plastic sheet,
such as a tarpaulin, on the Covana cover.
This could overheat the cover and result in
the deformation or delamination of the cover.
Inspect the cover periodically. It should raise
smoothly and evenly. Contact your Covana
dealer if any unusual mechanical sound is
heard during use.
Never use any type of pressure washer or
buffer to clean any surface of the Covana
cover. This could result in premature wear or
damage.
DO
Remove the control key after operating the
Covana cover. Store the key in a secure
location when not in use. Users must bring
the control key in the swim spa with them to
prevent the unauthorized operation of the
cover.
Never leave the key in the key switch.
Check the cover frequently for signs of
deterioration.
Have any repairs, adjustments or mechanical
work performed by your certified Covana
dealer as soon as possible when you notice
a malfunction.
Close the cover when it is not in use or if the
swim spa is not being monitored.
Covana cover should only be operated by an
adult.
Covana cover is not to be used by persons
(including children) with reduced physical, sensory
or mental capacities, or lack of experience and
knowledge, unless they have been given
supervision or instruction.
Page 5

USER MANUAL SAFETY 5
DO NOT
Operate the unit before all mechanical and
electrical connections have been made.
Step on or stack anything on the Covana
operator cover.
Operate the Covana cover while somebody is
in the hot tub.
Climb, walk or stand on the Covana cover at
any time.
Leave the Covana cover open for more than
12 hours. This could cause the cover to warp
overtime.
Converge or directly reflect sunlight on the
cover. This could cause permanent damage.
Wash the cover with harsh chemicals or
cleaners.
Use a pressure washer to clean any
component of the Covana cover. This could
result in premature wear or damage.
Use an extension cord to connect the Covana
cover to its power source. The cord may not
be properly grounded and the connection is a
shock hazard. An extension cord may cause
a voltage drop, which would cause the motor
to overheat.
CAUTION
Be sure to follow all instructions in this
manual and use only accessories and tools
approved by Covana.
Do not roll the Covana cover onto its side or
slide it on its side. This will damage the siding.
After removing a part, always place it in a safe
place on a clean and level surface to ensure
proper functionality.
All four jacks of the Covana cover must be
properly anchored to the foundation using the
anchoring holes located at the foot of each
jack. The optional non-permanent mounting
plates can be used when anchoring is not
possible, but under strict condition. See Non-
permanent mounting plates installation
section on Installation Manual for further
details.
This product mainly contains steel, plastic,
fiberglass, foam, copper (Cu) and die-cast
aluminum (Al). The gearbox contains oil and
other materials. Please recycle them
properly.
Avoiding the risk of electrocution
ELECTRICAL DANGER
Failure to comply with these instructions may
result in death by electrocution or serious
injury. Disconnect or turn off and secure all
power supplies before starting any
intervention on the Covana cover.
Always have a licensed electrical contractor
perform any electrical maintenance or repairs
on the Covana cover. The wiring must comply
with all applicable local electrical codes and
regulations.
The Covana operator must be connected to a
circuit that is protected by a dedicated ground
fault circuit interrupter (GFCI) that complies
with all applicable local electrical codes and
regulations.
Install the Covana cover in such a way that
drainage directs water away from the
electrical and base mechanical components.
Do not connect any auxiliary components to
the electrical system of the Covana cover
unless they have been approved by Covana.
Replace electrical components with original
components provided or approved by
Covana. Ask your dealer for replacement
parts.
To reduce the risk of electrical shock, replace
a damaged cord immediately. Failure to do so
may result in death or serious personal injury
due to electrocution.
Do not bury the power cords. A buried power
cord may result in death, or serious personal
injury due to electrocution if direct burial-type
cable is not used, or if improper digging
occurs.
WARNING REGARDING DRUG OR
ALCOHOL USE
The use of drugs or alcohol while operating
the Covana cover is strictly prohibited. The
impairment of judgment, vision or hearing
might affect the safety of other people or
result in death.
Page 6
6 SAFETY USER MANUAL
Figure 1
WARNING REGARDING
MODIFICATIONS TO THE COVANA
COVER
Any modifications to the Covana cover, such
as mechanical, electrical or aesthetic
modifications, may cause the cover to
operate in an unwanted or dangerous way.
Furthermore, these modifications are not
permitted and might void the warranty and
certification.
The Covana cover has been designed, tested
and certified for the only purpose of covering
and securing a spa. Any installation that
differs partly or entirely from this purpose
will void the warranty and certification.
Page 7
USER MANUAL LABELING 7
LABELING
WARNING
Removing any labels from the Covana cover will void product certification. All labels should always remain visible.
It is the owners’ responsibility to ensure these labels are always visible and should never be removed.
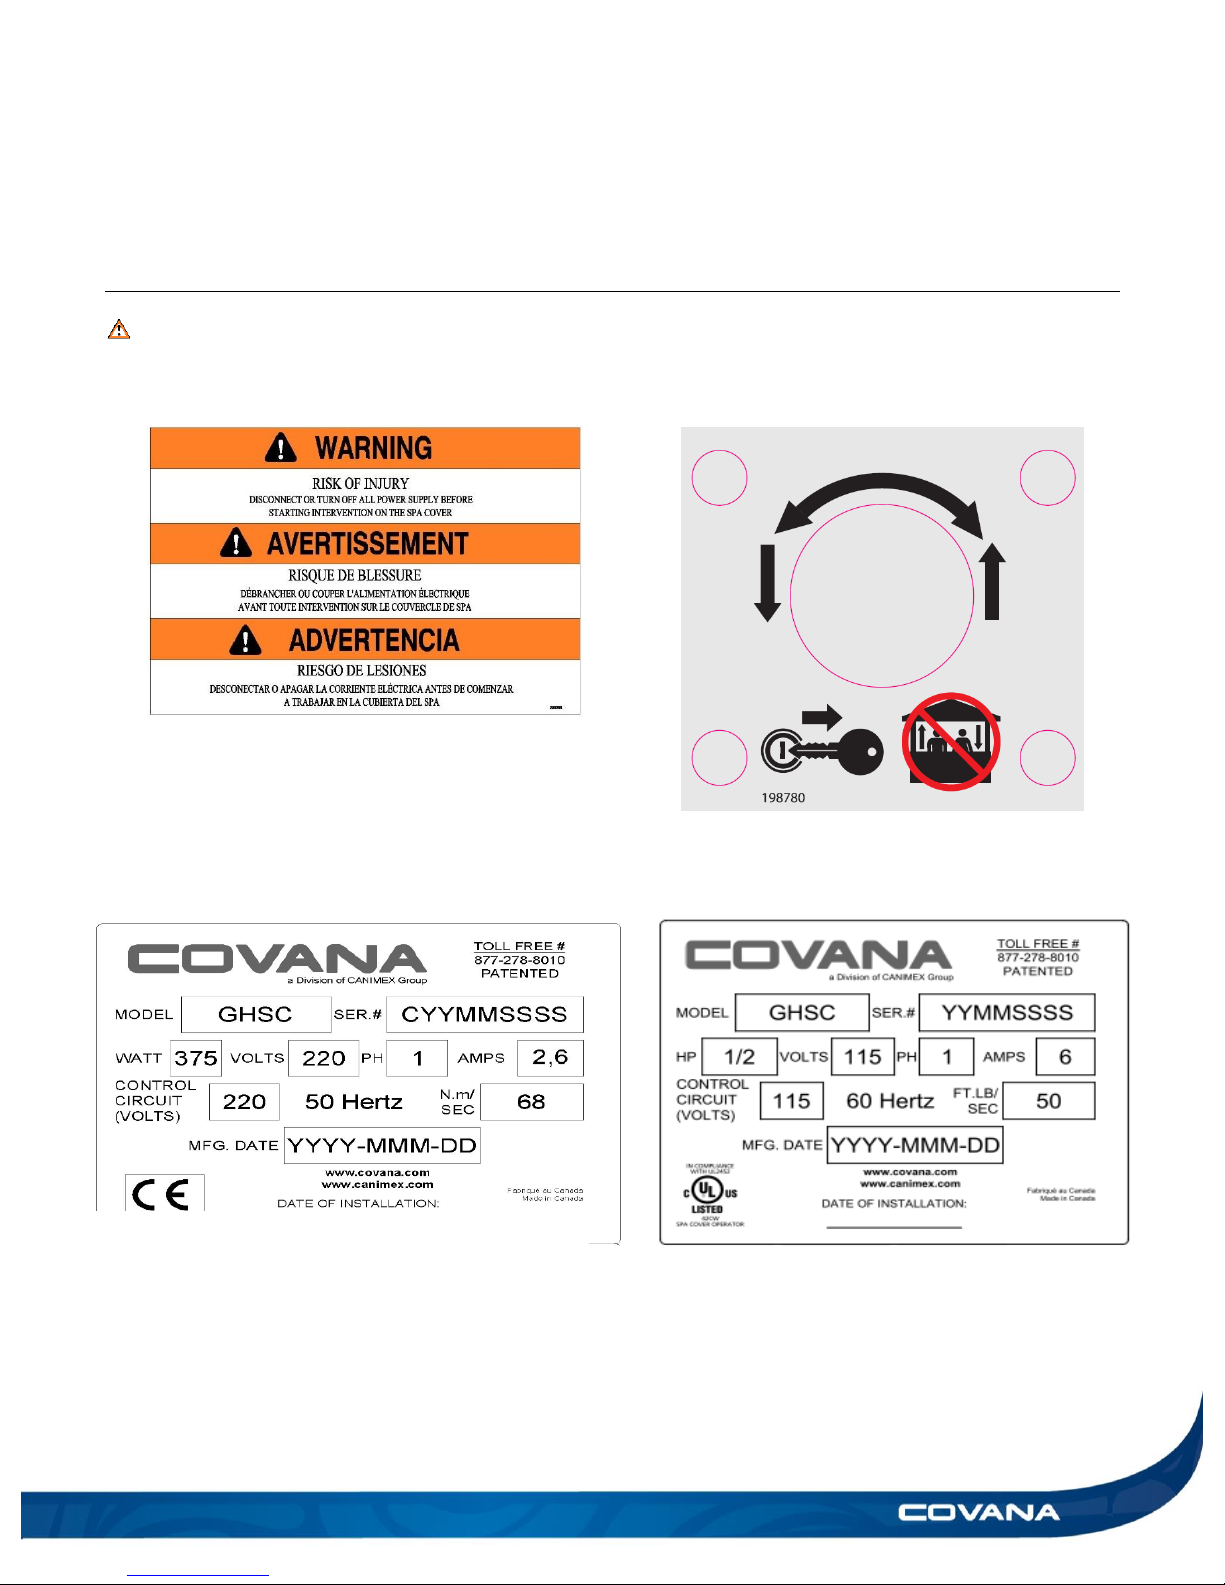
Risk of electrocution warning, located on the
operator unit.
Specification label, located on the operator.
(European model)
Note: This label provides the serial number.
Key operating diagram, located on the key
switch.
Specification label, located on the operator unit.
(North American model)
Note: This label provides the serial number.
Page 8
8 LABELING USER MANUAL
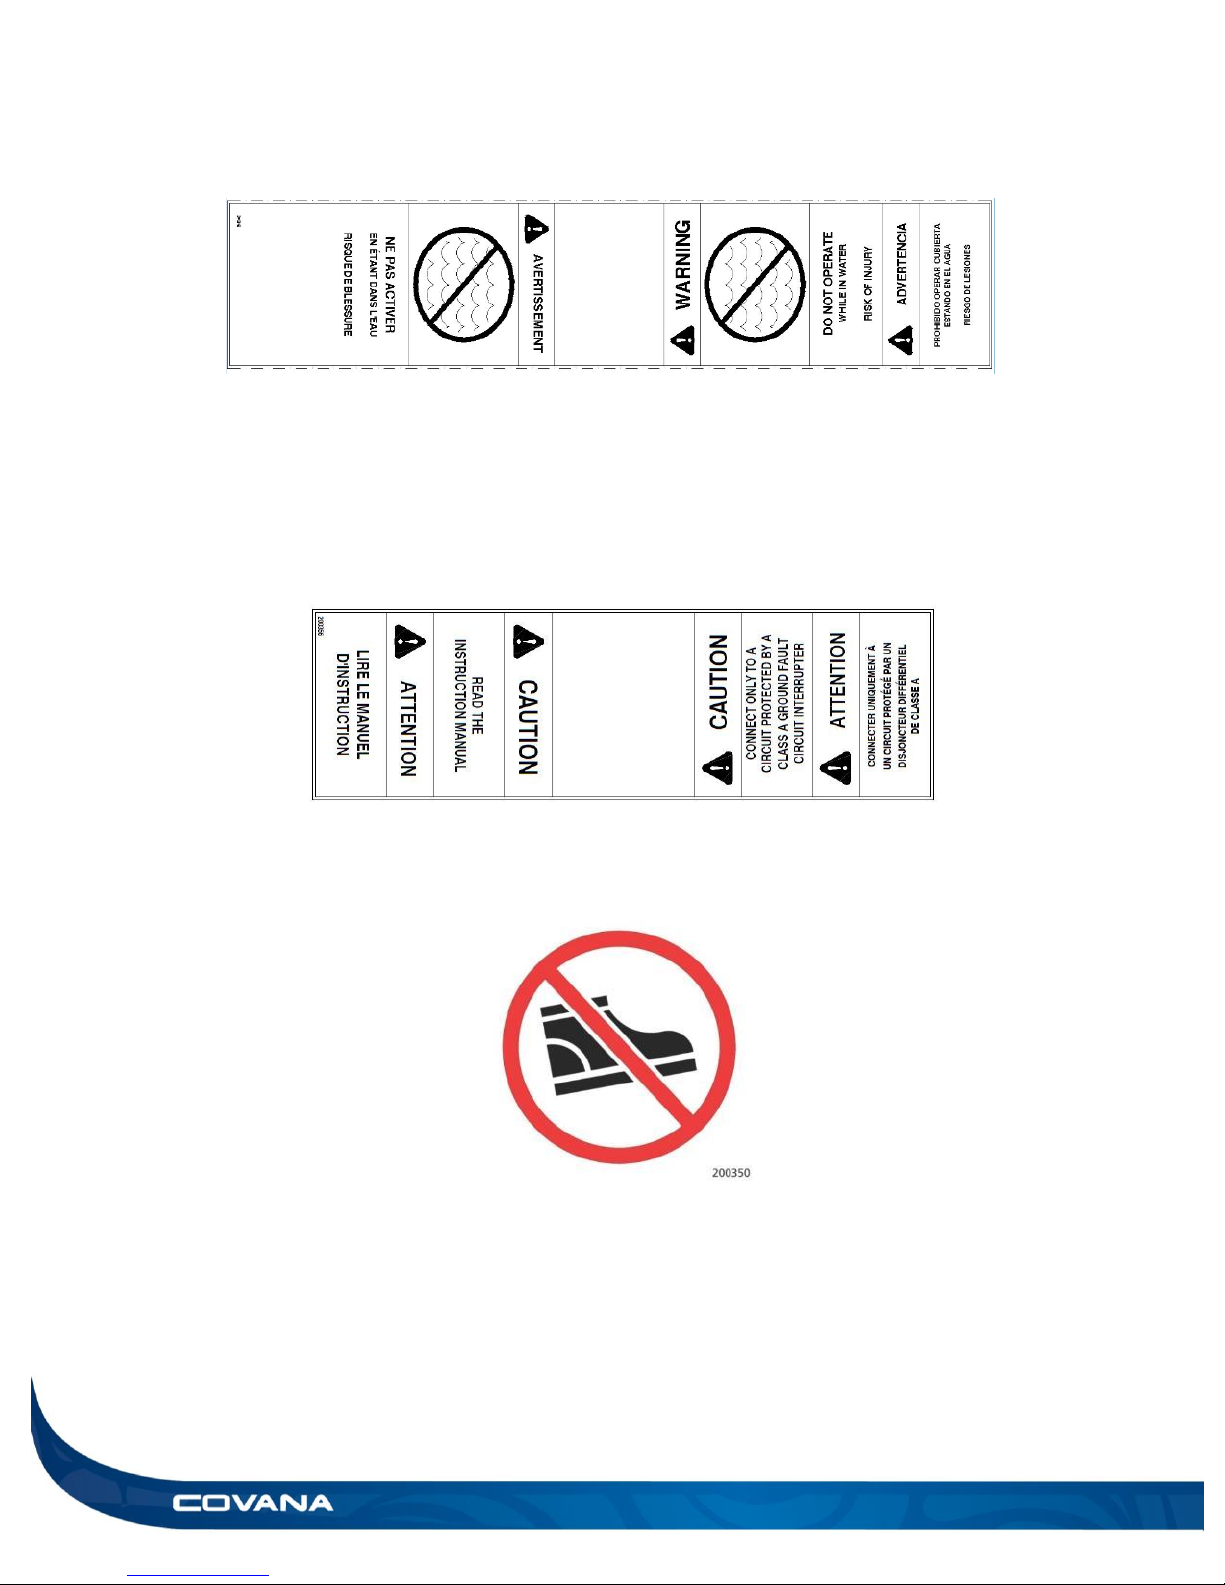
Key switch warning, located on the key switch.
Electrical information, located on the key switch cable.
Do not step symbol, located on top of the operator unit.
Page 9
USER MANUAL LABELING 9
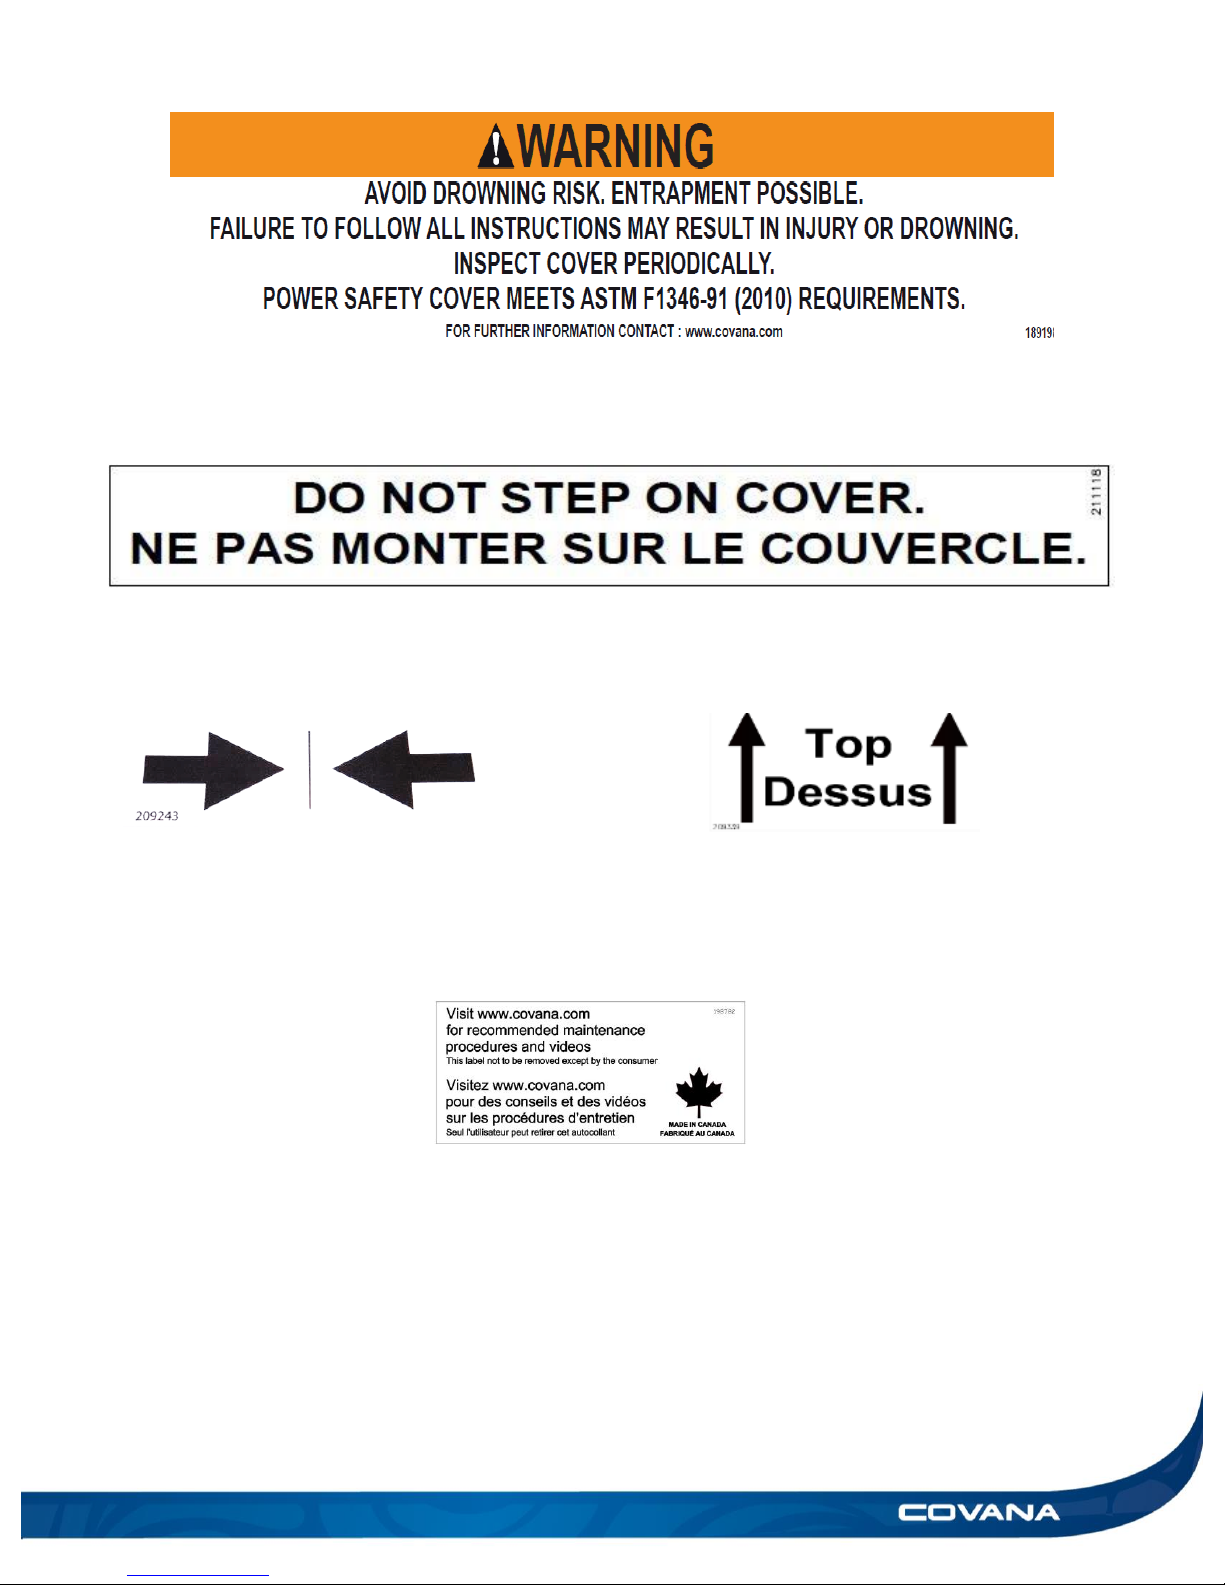
Do not step on cover label, located of end C-Channels of the Covana cover
Drowning risk warning, found on the inside of the Covana cover.
Centre label, located on 94 9/16in (240 cm) C-Channel
(remove after installation)
Top label, located on I-Beams and Escape hatch opening
(Hidden when assembled)
Maintenance information, located
on one of the C-Channels.
Page 10
10 GLOSSARY USER MANUAL
GLOSSARY
Part
Figure
Function
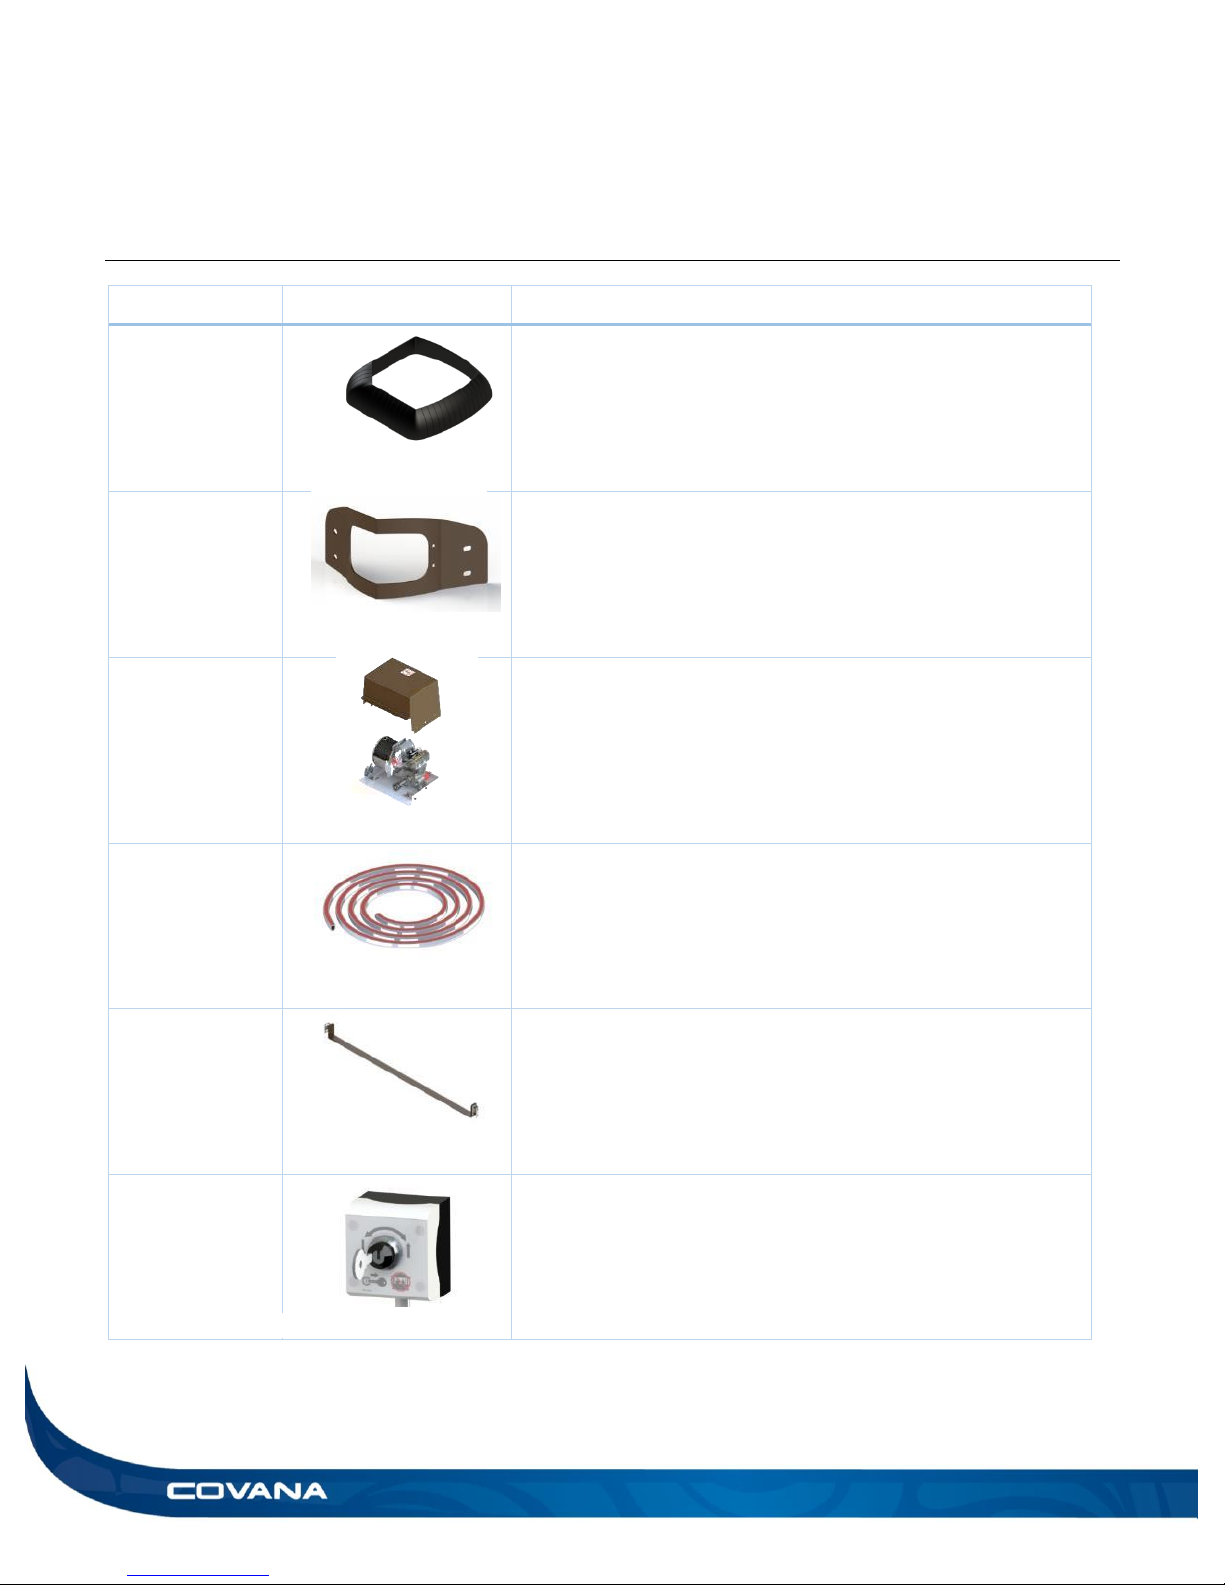
All-weather seal
The all-weather seal will help to protect sleeves from damage
due to weather.
Corner bracket
The corner bracket is the piece that links the cover to the
sleeves.
Operator
The operator powers and controls the lifting mechanism of the
Covana cover.
Contour seal
The contour seal ensures uniform contact between the cover
and the hot tub.
Front frame cutout
The front frame cut-out gets installed under the front step of your
hot tub. It links the two non-motor-side jacks.
Key switch
The key switch is used to operate the Covana cover.
Figure 6
Figure 7
Figure 2
Figure 3
Figure 4
Figure 5
Page 11
USER MANUAL GLOSSARY 11
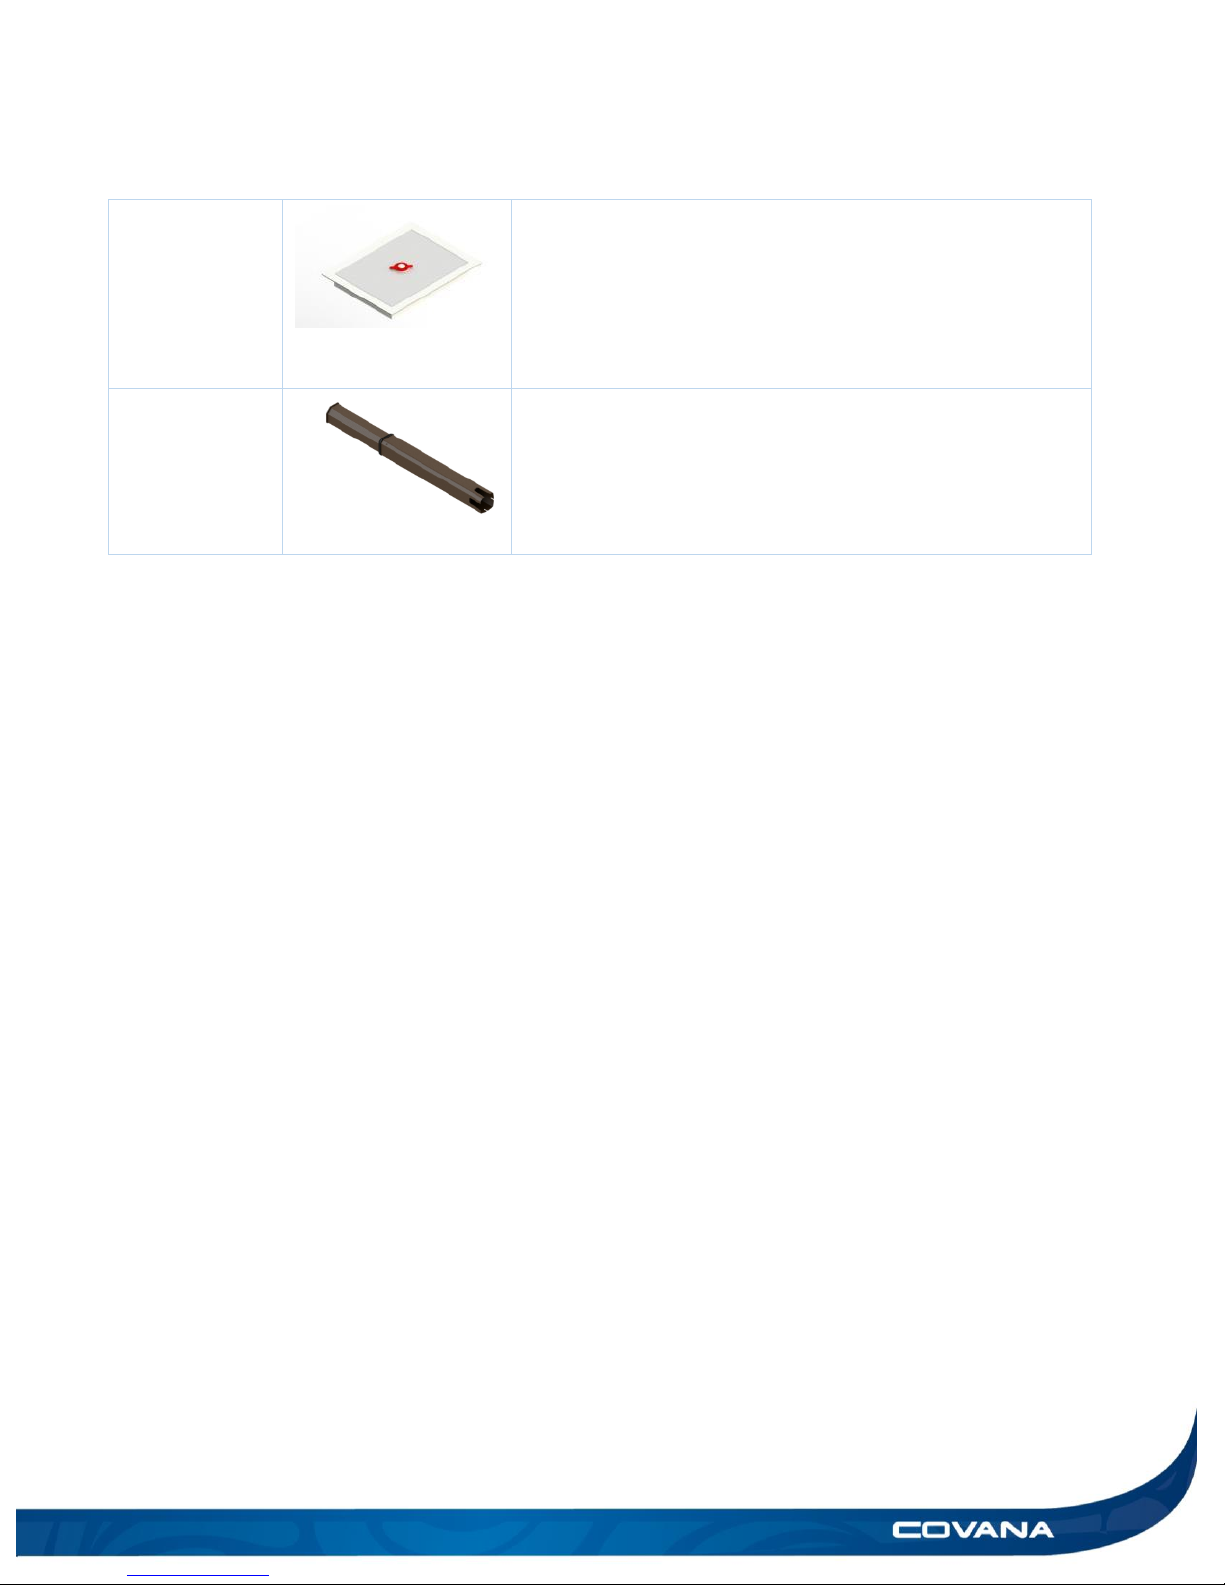
Escape hatch
The escape hatch is a removable panel part of the cover.
Sleeve
The sleeve is an aluminum case for the lifting mechanism.
Figure 8
Figure 9
Page 12

12 QUICK START-UP INSTRUCTIONS USER MANUAL
QUICK START-UP
INSTRUCTIONS
Ensure your Covana cover has been properly
installed by a certified Covana installer, this includes
the location of the cover (Location considerations
section of installation manual), the foundation of the
cover (Foundation preparation section of installation
manual) as well as the electrical installation of the
cover (Electrical hook-up section of installation
manual).
Please read carefully the Safety section of this
manual before operating the Covana cover.
1) Ensure all debris and snow are removed from the
top of the Covana cover before operating.
2) Ensure there is nobody in the spa or near the spa,
when raising or lowing the cover.
3) Ensure there is no obstruction over or around the
Covana cover.
4) The key must be held in the proper position until
fully opened or closed.
5) The Covana cover will automatically stop in both
the fully opened and fully closed position.
6) Turn the key clockwise to raise the cover.
7) Turn the key counterclockwise to lower the cover.
8) The key will automatically return to center/off
position when released.
9) Remove key when finished operating the Covana
cover. Store key in a secure place.
WARNING
Users must bring the control key in the hot tub
with them to prevent any unauthorized
operation of the cover
10) Place the rubber cap back on key switch after
each use.
Important: Keep the cover fully closed when it is not
used.
Page 13
USER MANUAL MANUAL LIFTING PROCEDURE 13
Manual lifting procedure
ELECTRICAL WARNING
Disconnect or turn off and secure all power
supplies before starting any intervention on
the Covana cover.
1) Disconnect or turn off and secure the power
supply.
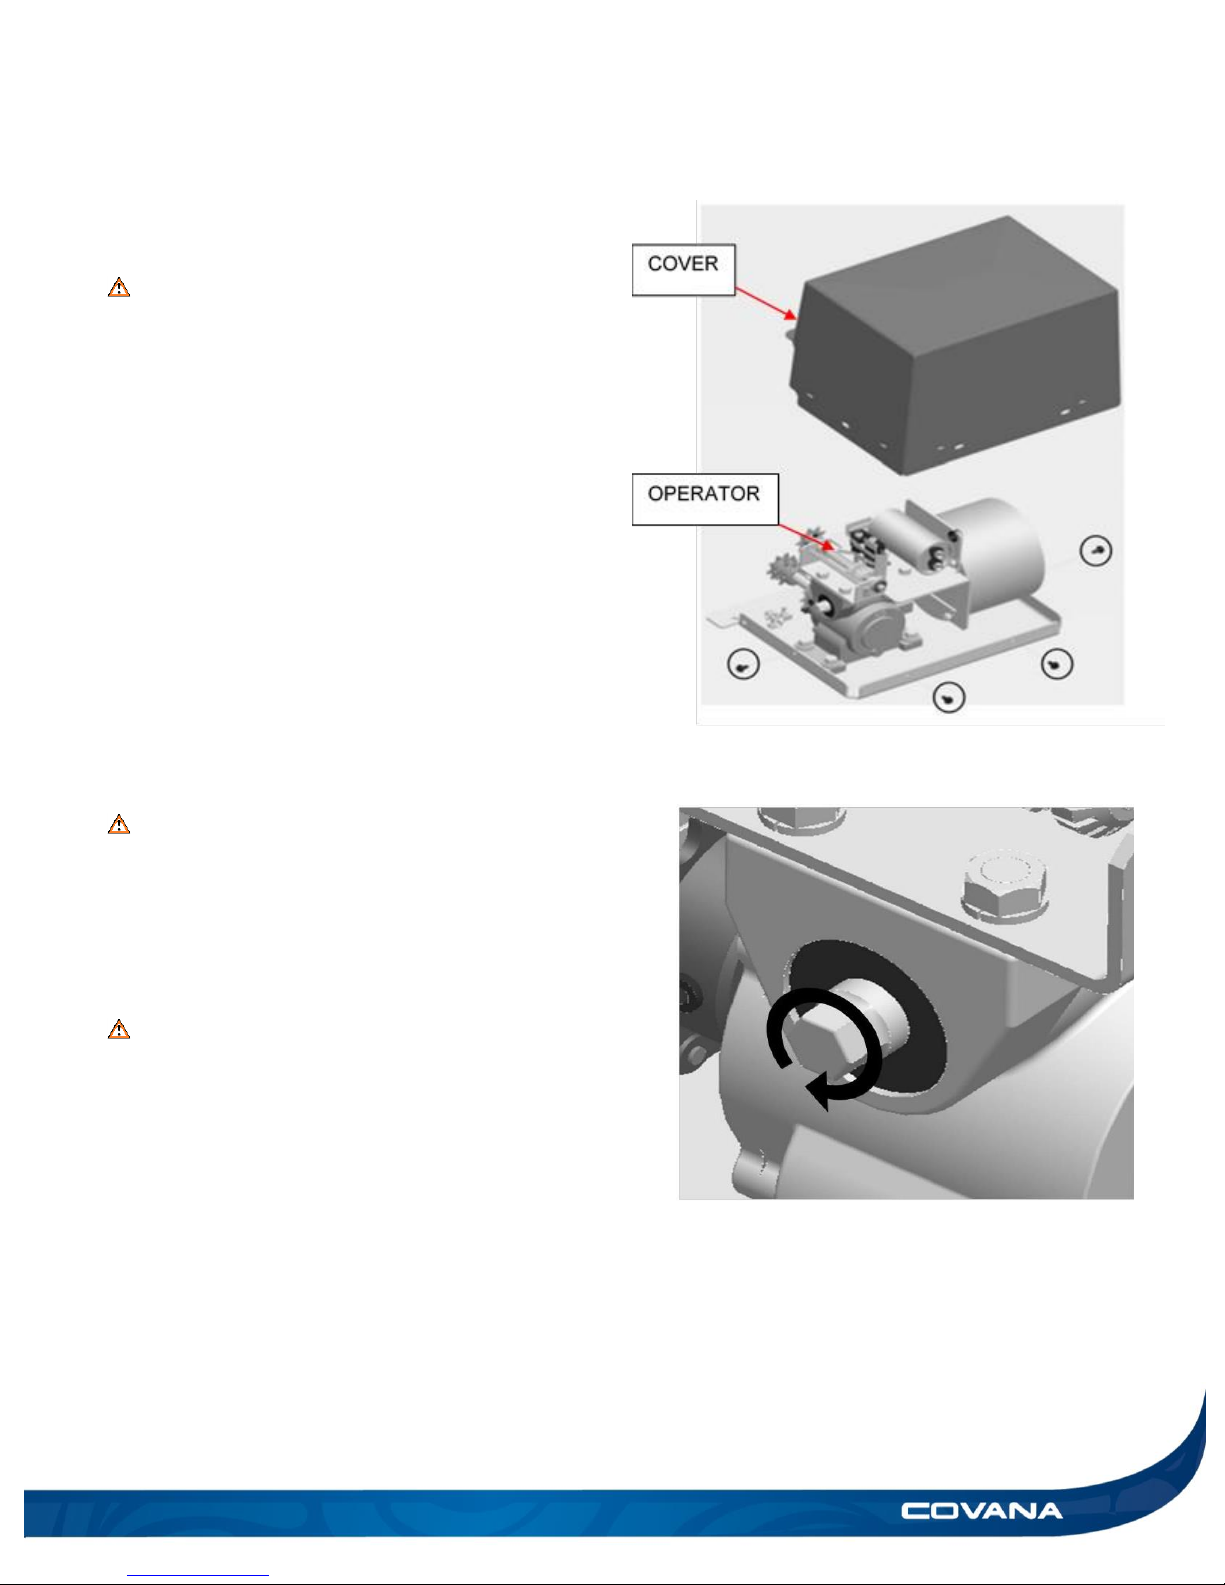
2) Remove the four screws at the bottom of the
operator cover and take the cover off. (Figure
10)
3) Use ½ in. (13 mm) hexagonal socket wrench to
raise or lower the Covana cover by turning the
operator’s input shaft. (Figure 11)
4) Slowly turn the shaft. Stop immediately if higher
tension is felt.
WARNING
Never use a power tool, as this will damage
the unit.
5) Turn the input shaft clockwise to lower the roof
and counter clockwise to raise the roof.
WARNING
Do not exceed the limits of the mechanism.
Failure to respect this guideline could cause
mechanical failure.
6) Reinstall the operator cover with the four
screws. (Figure 10Erreur ! Source du renvoi i
ntrouvable.)
7) Reconnect and turn on the power supply.
Figure 11
Figure 10
Page 14
14 USING THE ESCAPE HATCH USER MANUAL
Figure 12
USING THE
ESCAPE HATCH
From below
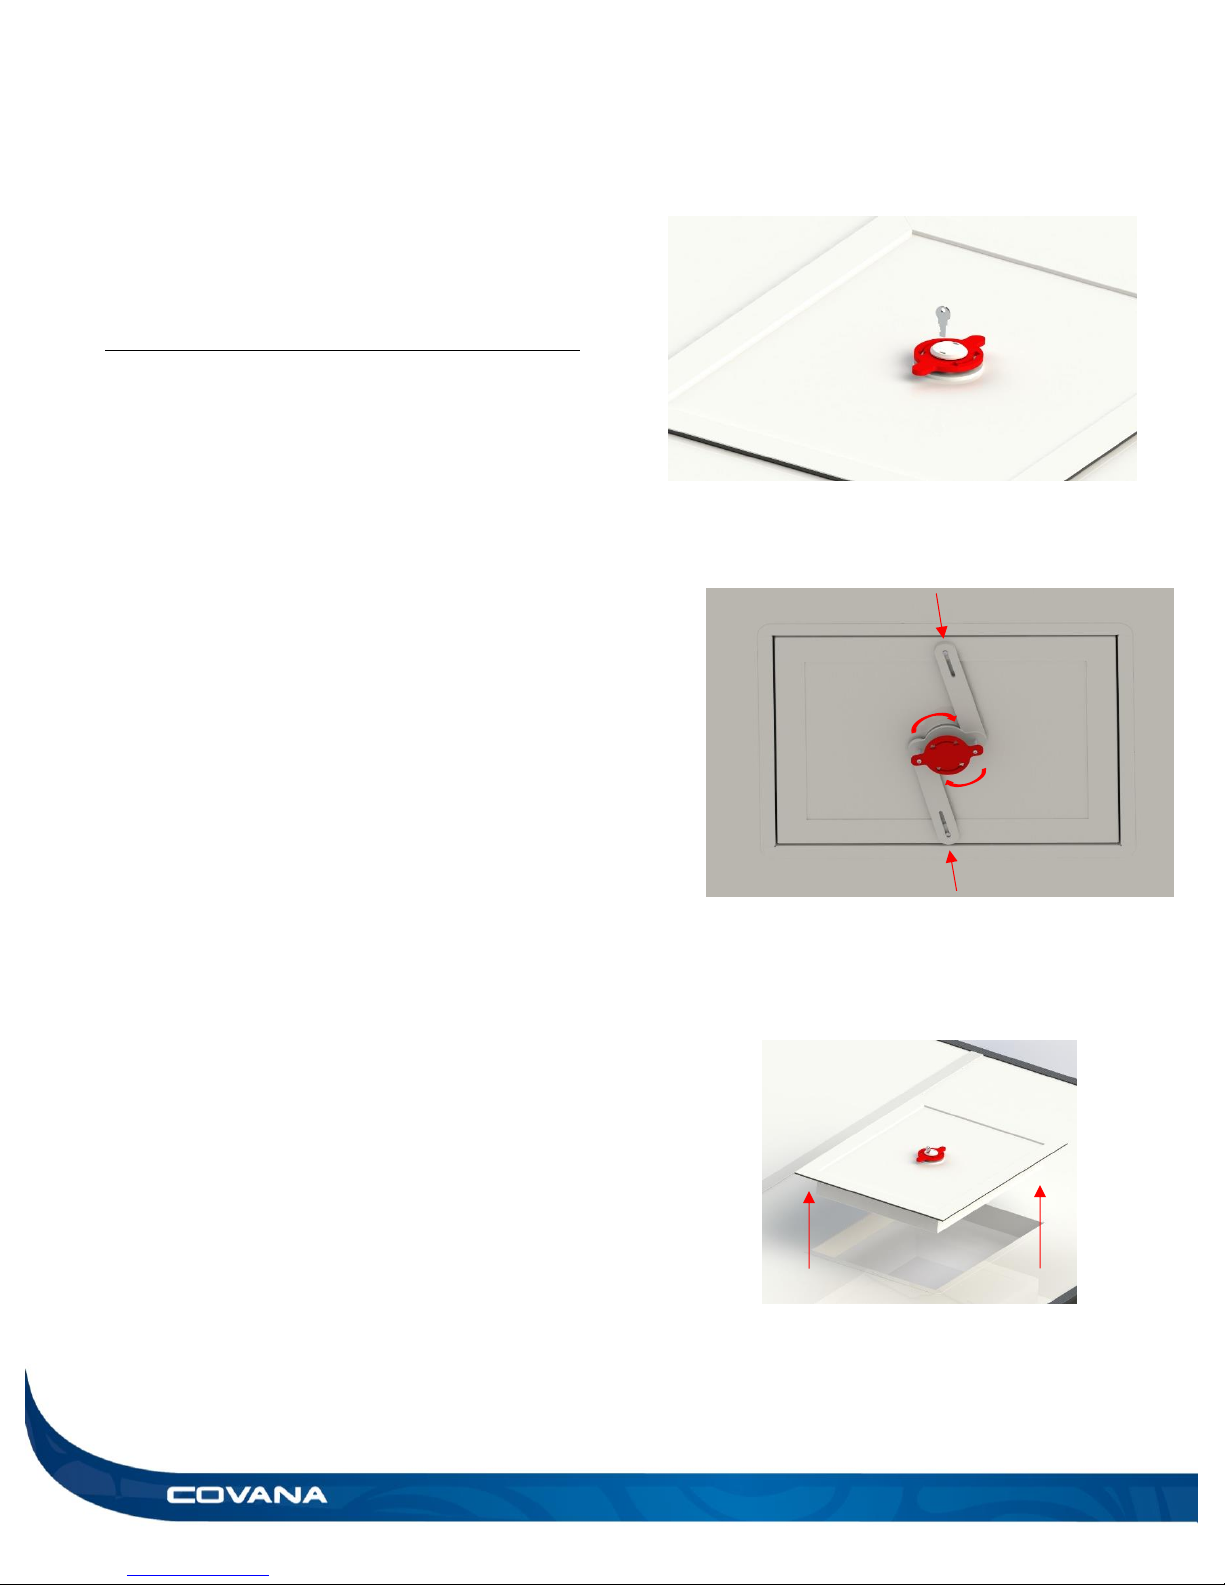
1) Turn the red handle by a quarter turn in either
direction to retract the arms. (Figure 13)
2) Push straight up on the escape hatch and place
to the side.
3) Escape via the hole and call for assistance, if
required.
From above
1) Do not at any point put your weight on the escape
hatch as it may hinder the person trapped below.
2) Use the Covana key inside the slot located in the
white centre part of the handle. (Figure 12)
3) Turn the handle until the key falls down.
4) Continue to turn handle one quarter turn in either
direction.
5) Lift the escape hatch straight up by gripping its
sides and place it to the side. (Figure 14)
6) Assist the person trapped below in by helping
them out of the swim spa via the hole.
Figure 14
Figure 13
Page 15

USER MANUAL WINTERIZING THE EVOLUTION COVER 15
WINTERIZING THE EVOLUTION COVER
If you plan on winterizing your hot tub during the cold season, Covana recommends winterizing the Covana
cover as well. This process prevents any potential aesthetic damage done to your Covana cover during
winter as well as minimizing the risk of freezing water damage to the tub. Ensure to follow these
instructions:
WARNING
These instructions are relevant for anyone who plans to stop using the hot tub for a long period of time
or especially if the temperature goes below 32°F (0°C).
0) Clean the Covana cover completely to remove any dust, greasy residue or any other foreign contaminants
from all surfaces.
1) Prepare the hot tub for closure by following the spa manufacturer's winterization instructions.
2) Completely close the Covana cover on the spa. Ensure the seal touches the whole perimeter of hot tub.
3) Ensure escape hatch is properly seated on the cover and is closed.
4) Remove the power from the Covana cover.
a. This can be done by either shutting off and securing the circuit breaker powering the Covana
cover;
5) Put a tarp or water-tight protection sheet over the Covana cover. Ensure not to infringe any of the hot tub
manufacturers’ guidelines during this step.
- For AC operated model: Also, put a tarp or water-tight protection sheet over the operator unit.
WARNING
Putting any type of fabric or plastic like a tarpaulin during hot weather could damage the Covana cover.
Only use such protection for the winterization procedure and during cold season.
Remove any type of cover or plastic tarpaulin as soon as seasonal temperature are higher than freezing
temperature (32°F or 0°C).
6) For areas with a large seasonal snowfall, remove excessive snow accumulation regularly or after a heavy
snowfall to avoid damage to the Covana cover structure. Do not let the snow accumulate for more than 12 in.
(30cm) on the Covana Cover.
Page 16
16 PERIODIC MAINTENANCE TABLE USER MANUAL
PERIODIC MAINTENANCE TABLE
Your Covana Cover has been designed to provide years of trouble-free enjoyment. As with any appliance, problems
may occasionally occur that require the expertise of a certified Covana service technician. Before calling for service,
please refer to the Troubleshooting section. Always retain your original sales receipt for future reference.
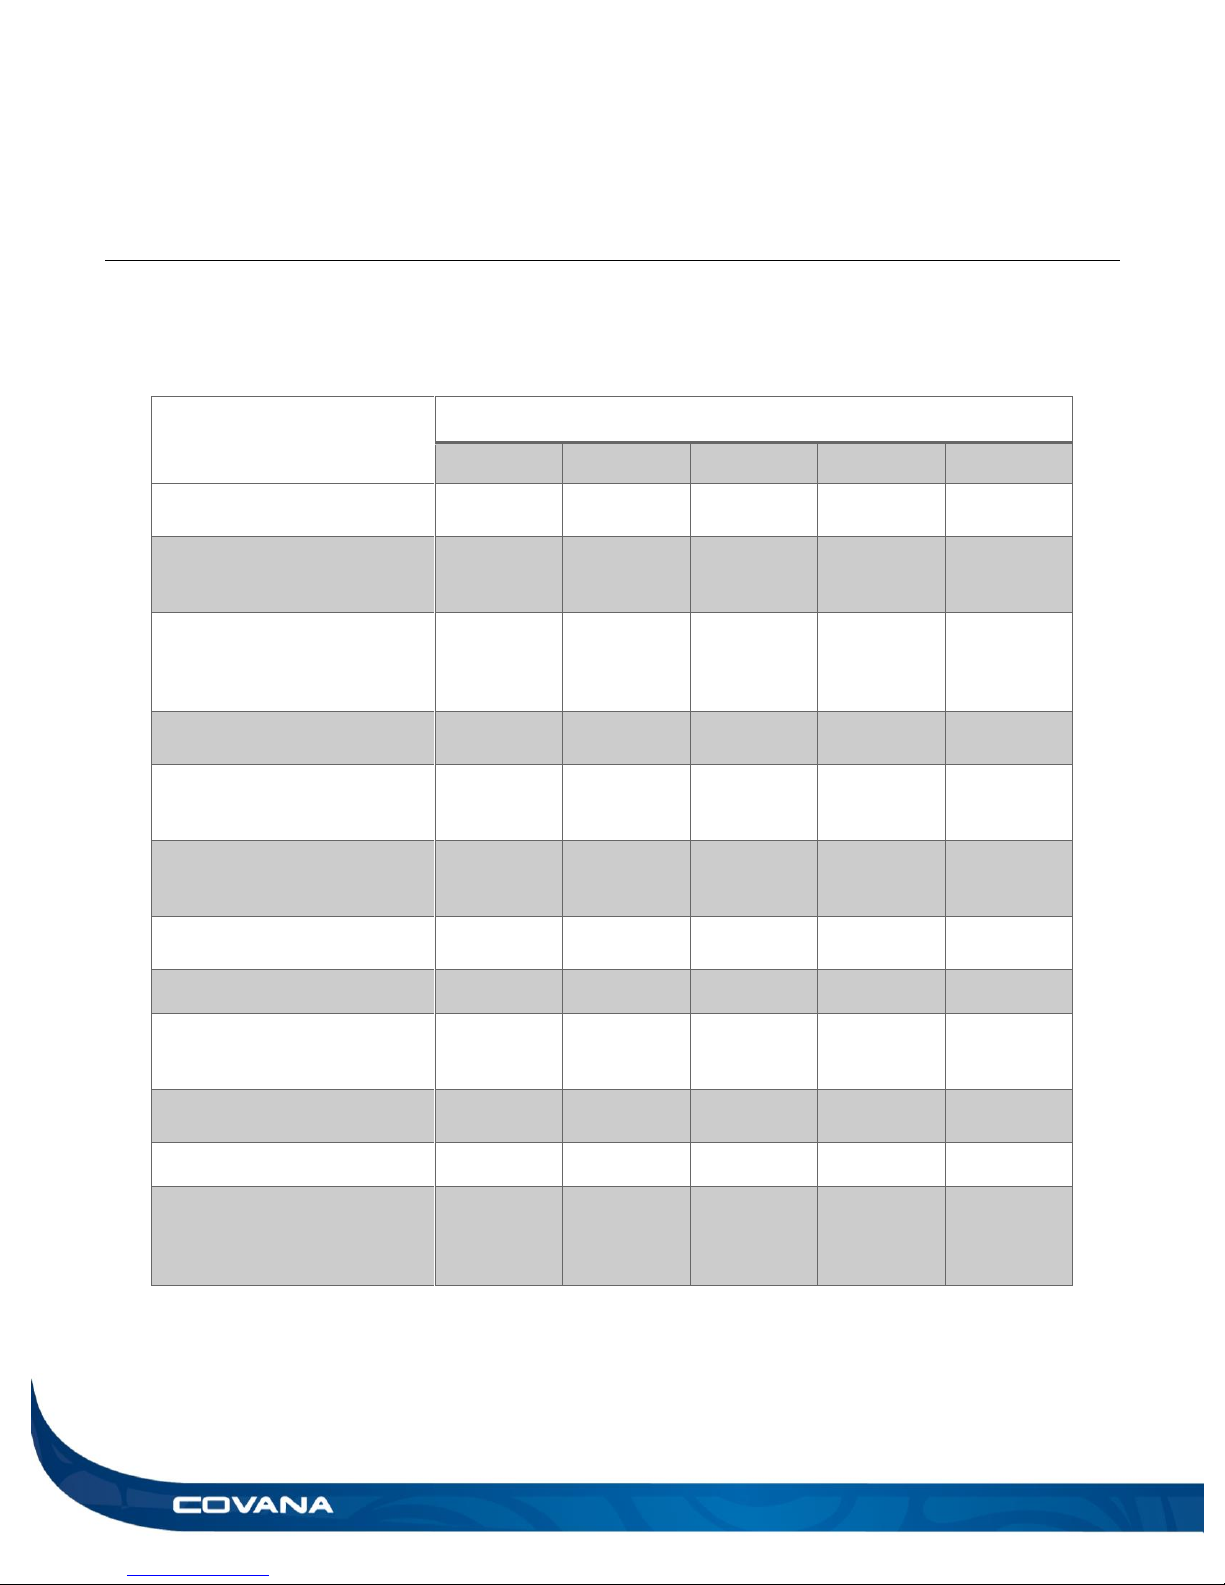
Tasks
Frequency
Each Use
Weekly
3 months
Yearly
As needed
Perform a visual inspection
(debris, snow, ice, etc.)
x
Check that the sleeves are
correctly positioned. (Middle
sleeves are not out of place)
x
Verify all-weather seal are
correctly positioned (in
contact with the outer sleeves
when the cover is closed)
x
Listen for out of ordinary
sounds during operation.
x
Verify the seal around the
Covana cover. (no vapour
leakage)
x
Verify the lifting mechanism
by raising and lowering the
Covana cover.
x
Verify the anchoring of the
Covana cover.
x
Test the GFCI.
x
Verify the chain tension near
the operator and the chain
tensioner. *
x
Lubricate the chain on the
operator side and posts. *
x
Grease the jack assemblies. *
x
Wash the cover with a mild
detergent (i.e. dishwashing
detergent) and water. Rinse
well using only water.
x
*Contact your local dealer
Please call your Covana dealer for any mechanical, electrical or aesthetic maintenance.
Page 17
USER MANUAL TECHNICAL SPECIFICATIONS 17
TECHNICAL SPECIFICATIONS
Side elevation dimensions
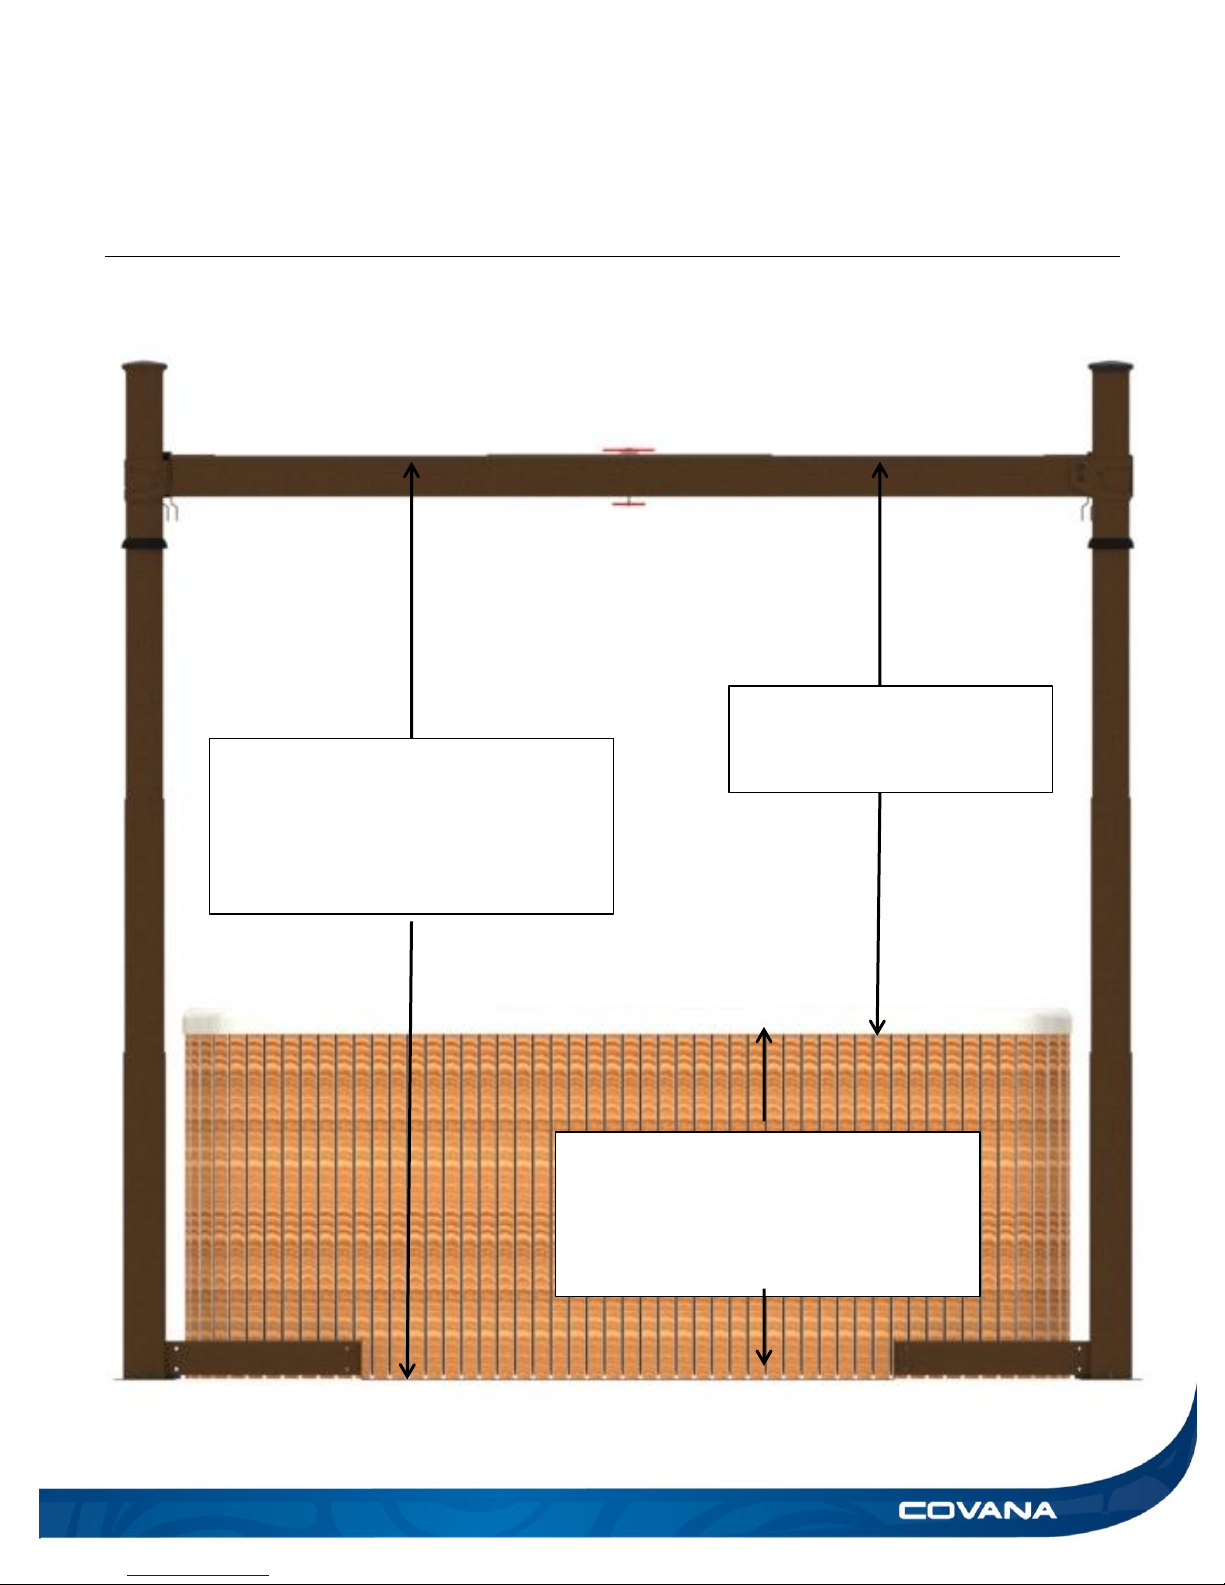
The maximum raised height depends on
the height of the hot tub. Add the hot tub
height to distance the Covana cover
travels to determine the maximum height.
Example :
Hot tub height + Covana travel
(52 in. or 132 cm) = Total height
The maximum distance the
Covana cover travels is 52 in.
(132 cm).
The hot tub must fit within these height
specifications:
Min: 34 in. (86 cm)
Max: 48 in. (122 cm)
Figure 15
Page 18
18 TECHNICAL SPECIFICATIONS USER MANUAL
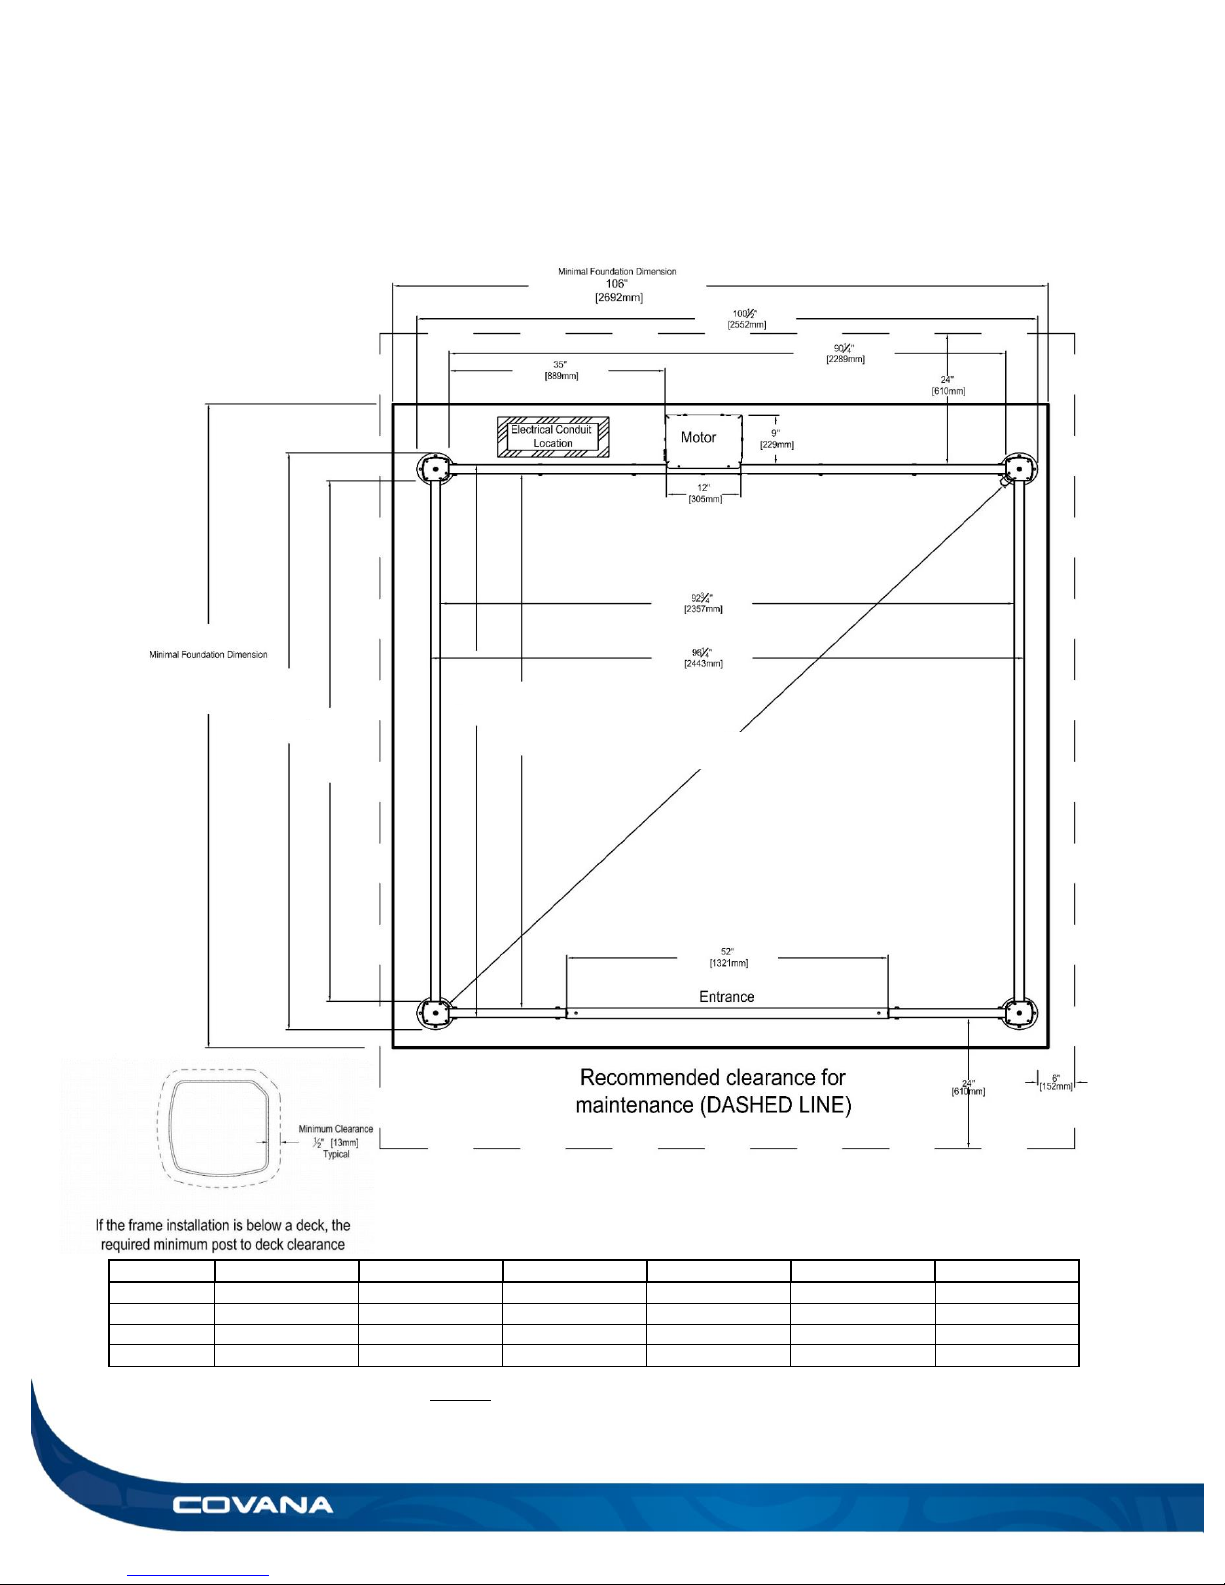
Table 1: Dimensions in accordance to cover length
Frame dimensions and foot print
Cover length
(A)
(B)
(C)
(D)
(E)
(F)
8’
118’’ (2997 mm)
105¾’’ (2685 mm)
95¼'' (2422 mm)
101½'' (2576 mm)
98'' (2490 mm)
131¼'' (3334 mm)
9’
130½’’ (3315 mm)
118¼’’ (3004 mm)
107½’’ (2731 mm)
114’’ (2896 mm)
110½’’ (2807 mm)
140½'' (3569 mm)
10’
142½’’ (3620 mm)
130¼’’ (3308 mm)
119½’’ (3035 mm)
126’’ (3200 mm)
122½’’ (3112 mm)
150'' (3810 mm)
11’
154½’’ (3924 mm)
142¼’’ (3613 mm)
131½’’ (3340 mm)
138’’ (3505 mm)
134½’’ (3416 mm)
159¾'' (4058 mm)
Figure 16
**NOT TO SCALE**
Standard model
(A)
(B)
(C)
(D)
(E)
(F)
Page 19
USER MANUAL TECHNICAL SPECIFICATIONS 19
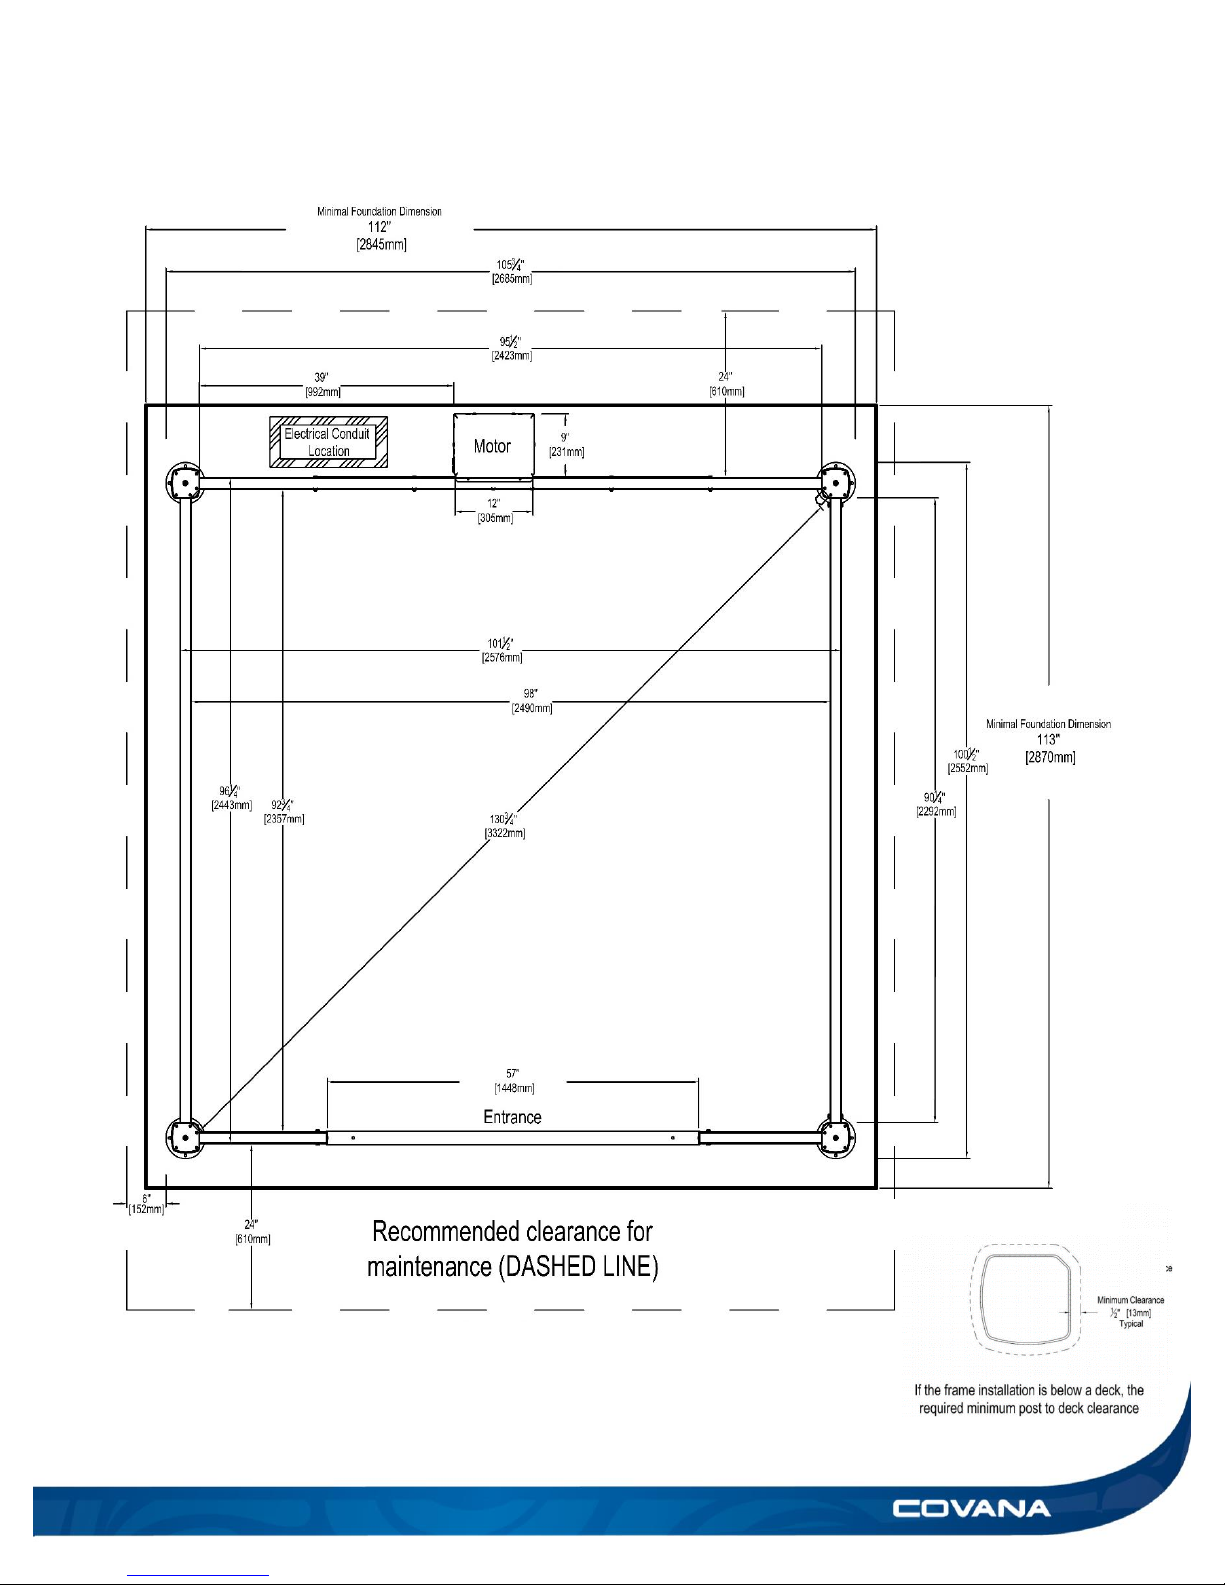
Figure 17
**NOT TO SCALE**
Long side (LS) model (8 feet only)
Page 20
20 TECHNICAL SPECIFICATIONS USER MANUAL
Electrical specifications
The cover requires a dedicated single-phase 115 VAC (North America) or 220 VAC (Europe) hard-wired
power supply.
The cover must be installed in accordance with and comply with all applicable local codes and regulations.
All wiring and connections should be performed by a qualified electrician.
Wires and conduits should be sized according to local codes and regulations.
North American requirements:
Voltage
115 V, 60 Hz (1 hot, 1 neutral, 1 ground)
GFCI
15 A single-pole GFCI (not included)
Current draw
Max 12 A
European requirements:
Voltage
220 V, 50 Hz (1 hot, 1 neutral, 1 ground)
GFCI
10 A single-pole GFCI (not included)
Current draw
Max 6 A
WARNING
Covana does not allow any modifications of the electrical system. Covana reserves the right to void the
warranty if any modifications were done without the specific approval from Covana.
Operating limitations
WARNING
The Covana cover should never be used if the following conditions are reached.
Maximum wind
Gusts of 30 mph (50 km/h) while in the raised position
and 45 mph (70 km/h) when completely lowered on the
hot tub.
Maximum weight on the cover (evenly distributed)
200 lb. (90 kg)
General specifications
Lifting speed
2.5 in./s (6 cm/s)
Total weight
Up to 600 lb. (272 kg)
Length key switch cable
25 ft. (7.6 m)
Page 21
USER MANUAL TROUBLESHOOTING 21
TROUBLESHOOTING
Problem
Probable Causes
Solutions
The Covana cover will
not raise or lower.
(Silent motor and no
movement)
The GFCI is tripped.
The power source is
disconnected.
Reset the GFCI.
Verify that the power source is enabled.
Check the breaker panel.
Verify whether the cables were damaged or
pinched.
The Covana cover will
not raise or lower.
(Motor humming and
some visible
movement)
Posts are frozen.
Debris is caught on
the cover.
Jack assemblies are
jammed.
The motor is
obstructed.
Posts are obstructed.
The debris on the
cover is too heavy.
Power source is
disconnected.
Remove all the debris from top of the
Covana cover.
Verify whether any posts are obstructed.
Use methanol to free ice buildup on posts.
Regrease the post assemblies. *
Verify the relative position of the four posts.
(See Foundation preparation section on
installation manual)
Call your local dealer. *
The lights do not work.
The lighting
assembly is faulty.
The light switch is
faulty.
Verify power source is enable.
Replace the light switch.
Call your local dealer.
Follow the Wire guard reassembly
procedure section in the User manual)
The posts are not
equally positioned.
The post screws
(attached to the outer
shell) have loosen.
The chain skipped
during operation.
A spring pin at the
bottom of a jack is
broken.
Lower the Covana cover completely and
screw the post back in at the correct height.
Verify whether a drive shaft has fallen off.
Lower the cover and replace the chain of the
operator side.
Replace the spring pins by lifting the outer
sleeve, using a punch and a hammer.
The shades are loose,
retract improperly and/
or disconnect from the
brackets.
The shades are
wrinkling or bulging at
the roller.
The internal spring is
not wound enough.
Too much tension in
the internal spring
Holding bracket not
parallels
Consult shades installation manual
Remove the bottom bar and reset the
tension back to ‘’4 turns’’
Make sure the outer sleeves are sitting on
the foot plate, reposition the holding bracket
so the roller shade is moving straight.
Page 22

22 USER MANUAL
The middle sleeve has
gripped and might
have dropped abruptly.
Posts are frozen.
The stopper kit is
broken/missing.
Verify the position of the all-weather seal,
while cover is closed it must be sitting on the
top of the outer sleeve
Check whether the stopper kit is
broken/missing.
Reassemble the sleeves.
The cover raises
unevenly.
The chain is broken.
A spring pin is
broken.
A drive shaft has
fallen off.
Call your local certified dealer Covana dealer
for technical support
The cover raises, but
does not lower.
The cam plate is
missing.
The key switch is
faulty.
Limit switches cannot
move properly.
Certified electrician only opens the operator
and check for faulty up and down limit
switches.
Remove power before performing any
electrical work.
Verify whether there is any corrosion on the
terminals. If yes, clean the terminals.
Open the key switch terminal and check for
faulty switches.
Verify whether any wires are cut/pinched.
The cover lowers, but
does not raise.
The cam plate is
missing.
The key switch is
faulty.
Limit switches cannot
move properly.
Certified electrician only opens the operator
and check for faulty up and down limit
switches.
Remove power before performing any
electrical work.
Verify whether there is any corrosion on the
terminals. If yes, clean the terminals.
Open the key switch terminal and check for
faulty switches.
Verify whether any wires are cut/pinched.
The inner seal turned
black.
The seal has
accumulated mold.
Clean the affected areas with bleach and a
soft brush.
The magnetic plate is
not holding in place
Excessive tension in
the CTS 70.
CTS 70 is stuck in
place
Lift one side of the outer shell, remove the
CTS 70 from the steel frame and grease the
interior surfaces.
Verify that the CTS 70 pulley carrier is able
to travel the length of the CTS 70 without
interfering with any object.
Escape hatch dosen’t
open/close
Mechanism is
jammed
Locking mechanism
is not in position
Remove the escape hatch from the
underside of the cover and clean it to free the
mechanism.
If all previous attempts failed, contact your
local dealer.
Page 23
USER MANUAL WARRANTY 23
WARRANTY
COVANA Limited Manufacturer’s Warranty 2019
This limited warranty is extended solely to the original purchaser of an automated COVANA spa cover that was sold
by an authorized COVANA dealer after February 1st, 2019 and installed for residential recreational use (hereafter
the Product). The warranty starts on the original date of purchase†. Proof of purchase is required to process your
warranty application.
THE WARRANTY OF YOUR COVANA PRODUCT:
THREE (3) YEARS
• Structure The aluminum frame, brackets and telescoping sleeves are warranted against
breakage and deformation.
• Powder Coating Finish: The powder paint on all surfaces are warranted against chipping
and peeling under normal conditions of use.
• Cover The ABS thermoplastic hardtop and the fiber reinforced XPS core thermal element
are warranted against cracking, fracture and abnormal deformation.
• Mechanical The mechanical components such as the motor, gear boxes, chains, drive
shafts and jacks are warranted against malfunctions or premature wear.
ONE (1) YEAR
• Electrical: The electrical components such as the cables and wires, key switch assembly,
limit switches and the LED light system are warranted against malfunctions.
• Other Components: All other components not mentioned above, with the exception of
parts subject to normal wear, are all warranted against manufacturing defects.
COVANA warrants that parts and accessories subject to normal wear such as batteries, seals, roller shades,
screens and key switch barrels cover, are to be free of manufacturing defects for a duration of THREE (3) MONTHS
from the original date of purchase†.
†
Please note: The COVANA warranty is deemed effective no later than 12 months following the date on which the unit was shipped from
COVANA’s factory in Drummondville, Canada.
Page 24

24 WARRANTY USER MANUAL
LIMITED WARRANTY:
This limited warranty covers the following costs against manufacturing defects due to material and/or workmanship:
• The total cost of parts is warranted in accordance to their respective warranty coverage
duration starting from the original date of purchase†.
• The costs of labor associated with the part replacement or repairs covered under this warranty
for ONE (1) YEAR after the original date of purchase†.
• The cost of shipping parts from the COVANA factory to the COVANA authorized dealer for
THREE (3) MONTHS after the original date of purchase†.
COVANA exempts itself from warranting or being found liable for any cosmetic alterations to the Product resulting
from normal surface fading or weathering or the discoloration of the surface due to improper spa water chemistry
or misuse of spa chemicals. COVANA will not be responsible for any damage resulting from overheating caused by
covering or wrapping the Product in any types of fabric or plastic sheet or the result of convergence or reflections
of sunlight on the Product. COVANA is not deemed responsible for failures caused by installations in
unrecommended areas such as an enclosed excessively humid area, flood zones, corrosive environments or
containing other contaminants. This limited warranty does not provide an allocation for travel expenses associated
with any repairs or parts replacement.
PERFORMANCE
In the event of a defect covered by this limited warranty, notify your COVANA dealer as soon as possible to obtain
service, and use all reasonable means to protect the COVANA Product from further damage. Upon proof of
purchase, an authorized dealer will correct the defect subject to the terms and conditions contained in this limited
warranty. The COVANA Product owner is responsible for providing access to the Product in order to perform the
repair.
Any replacement part will retain the remaining portion of the original warranty of the Product. Should you be unable
to obtain service from your authorized dealer, please contact COVANA Customer Service by phone at 1-877-278-
8010.
WARRANTY LIMITATIONS
This limited warranty is voided if COVANA determines that the Product has (i) been subject to alterations, neglect,
misuse, abuse, lack of maintenance or improper adjustment or installation of the equipment which are not in
accordance to guidelines within the installation manual, (ii) been used with equipment that is not covered by this
warranty, (iii) been installed or relocated in such a way that the problems are attributable to the installation or
relocation, (iv) been placed on any support surface other than that recommended in the installation manual, (v) any
damage caused by overloading Product beyond rated capacity, (vi) been subjected to commercial use (vii) failed
as the result of an accident, natural disasters or other cause beyond the control of COVANA such as fire, flood,
extreme winds or lightning.
Always have a licensed electrical contractor perform the installation, any electrical maintenance or repairs on the
Product in order to keep this warranty valid and effective. Partial or totality of the warranty could be voided if any
unauthorized accessories or upgrades are implemented to the Product. The COVANA Product owner accepts
liability for repair work performed by anyone other than the authorized COVANA dealer.
Page 25

USER MANUAL WARRANTY 25
This Limited Warranty takes the place of all other warranties, either expressed or implied. All warranty work must
be performed by an authorized COVANA dealer. The customer may not dismantle the COVANA Product, and any
attempt other than described herein to dismantle systems constitutes a modification or alteration to the COVANA
Product, which may void the applicable warranty. No party other than COVANA is authorized to alter this limited
warranty in any way. Failure to install the COVANA Product according to the installation manual instructions will
void the warranty. COVANA will not be responsible of any consequential damages following installation or repairs
or maintenance performed by the dealer or the consumer. All costs related to the removal and reinstallation of any
surrounding equipment, landscape or any other structure that are not part of the Product is not the responsibility of
COVANA nor the dealer.
COVANA’s only obligation shall be to repair or replace defective parts that do not conform to the warranty. COVANA
shall not be liable for any injury, loss or damage, direct or consequential, arising out of the inability to use the
Product. Before installing and using the Product, the dealer shall determine the suitability of the Product for its
intended use, and the consumer assumes all risks and liability in connection therewith.
REMINDER REGARDING REGISTRATION OF YOUR COVANA UNIT
Please ensure that your dealer has registered your Product with COVANA.
You can also go to COVANA.com to register your Product in the « Warranty Registration » section.
DISCLAIMER AND LEGAL RIGHTS
This limited warranty gives you specific legal rights. You may also have other rights that vary depending on the
country, state or province. COVANA//Canimex Inc.’s liability under this limited warranty, if any, will not exceed the
original amount paid for the defective Product. The foregoing warranty is exclusive and in lieu of all other warranties
of quality, whether written, oral or implied (including any other warranty of merchantability or fitness for purpose).
www.covana.com/warranty.html
01/28/2019
Page 26

26 APPENDIX USER MANUAL
APPENDIX
Page 27

USER MANUAL APPENDIX 27
Washing the Evolution cover
Cleaning the Evolution is an essential part to maintain and keep your cover in running condition. Clean your cover
as needed or when dirt, debris or leaves are present. We also recommend cleaning your cover before and after
winterization.
Tools necessary:
Use a 1% solution of household dish soap. The cleaner is required to have neutral pH (pH range 6.5-7.5).
Soft plastic brush
Sponge
Cloth
The following steps are guidelines to safely and properly clean your Covana cover:
Method:
1) Rinse the Covana cover with water (removing the larger debris).
2) Apply the soap solution, working it across the surface in a scrubbing or circular motion. The surface of the
panels can be cleaned with a sponge, cloth of a soft plastic brush.
3) Quickly rinse very thoroughly to remove all traces of soap; otherwise, a film will build up giving the panel a
dull, dirty appearance.
WARNING
Never use a pressure washer or high pressure to clean the Covana cover. The high pressure might puncture
the fiberglass roof.
Never use harsh detergents that may cause a chemical reaction and permanently damage the surface.
Never use water hotter than 130oF (54oC), this may cause melting of the fiberglass panels.
Never climb on the cover, the roof may collapse.
Do not use abrasive cleaners.
Do not use a cleaner or stain remover that contains chlorinated hydrocarbons or aromatic hydrocarbons.
Page 28
28 APPENDIX USER MANUAL
Figure 20
Figure 18
Post greasing procedure
This unit will require the following greasing
maintenance to ensure peak performance.
The internal jacks require yearly greasing.
Early fall is the best time. Use of “Mobil Epic
EP MOLY Grease” is recommended for cold
and hot climates. Ideally a sprayable grease
or an equivalent low temperature synthetic
grease.
Note: The posts will not lift by unscrewing the post
covers, only the motor can raise or lower the posts.
1) Lower the roof until it is fully closed.
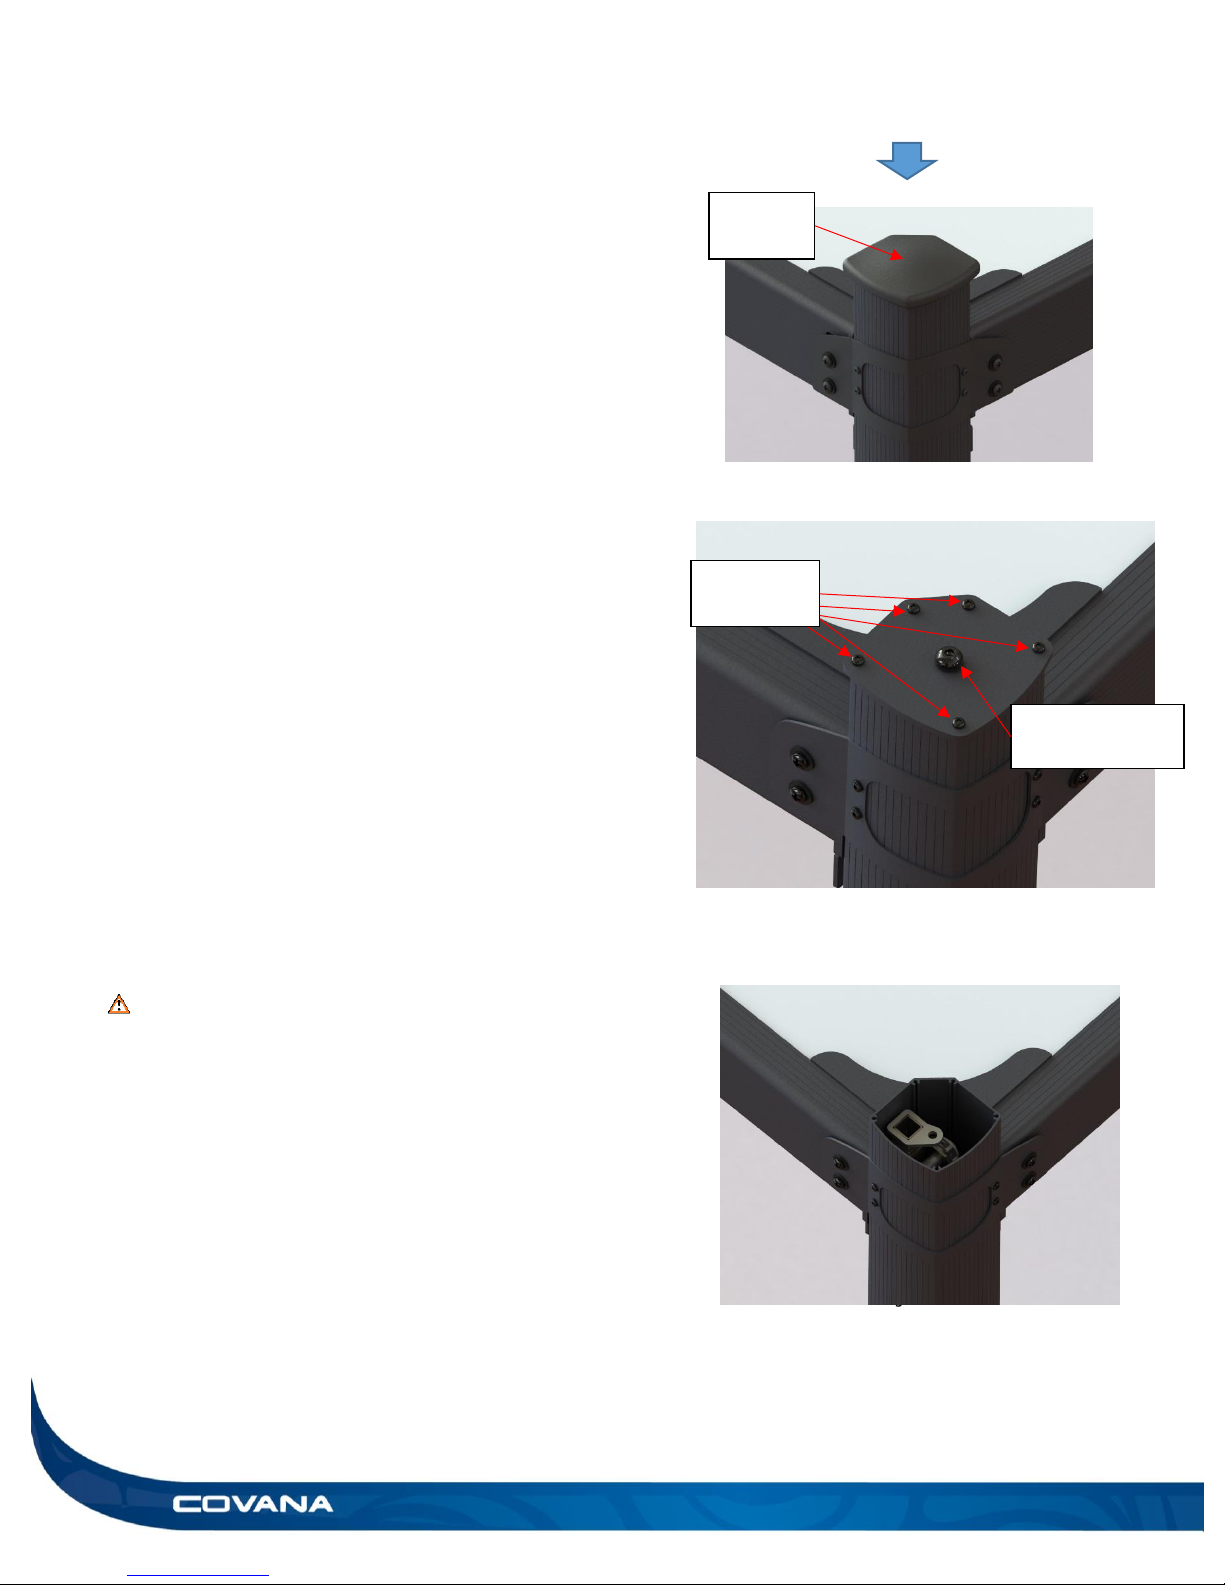
2) Remove rubber cap on top of the post. (Erreur ! S
ource du renvoi introuvable.18)
3) Remove the five #2 Robertson screws on the top
plate of each post. Also remove the hexagonal
7/32’’ (5.5 mm) drive bolt. Place top plates screws
and drive bolt in a safe place. (Figure 19)
4) Repeat steps 2 and 3 for all four posts.
WARNING
Failure to remove all four top plates will result
in important damages to your Covana cover.
5) Turn the key to elevate the system.
6) The four internal jacks will start to elevate but the
roof will stay lowered on the spa. (Figure 20)
Rubber
cap
Hexagonal
7/32’’ (5.5 mm)
Robertson
screw
Figure 19
Page 29
USER MANUAL APPENDIX 29
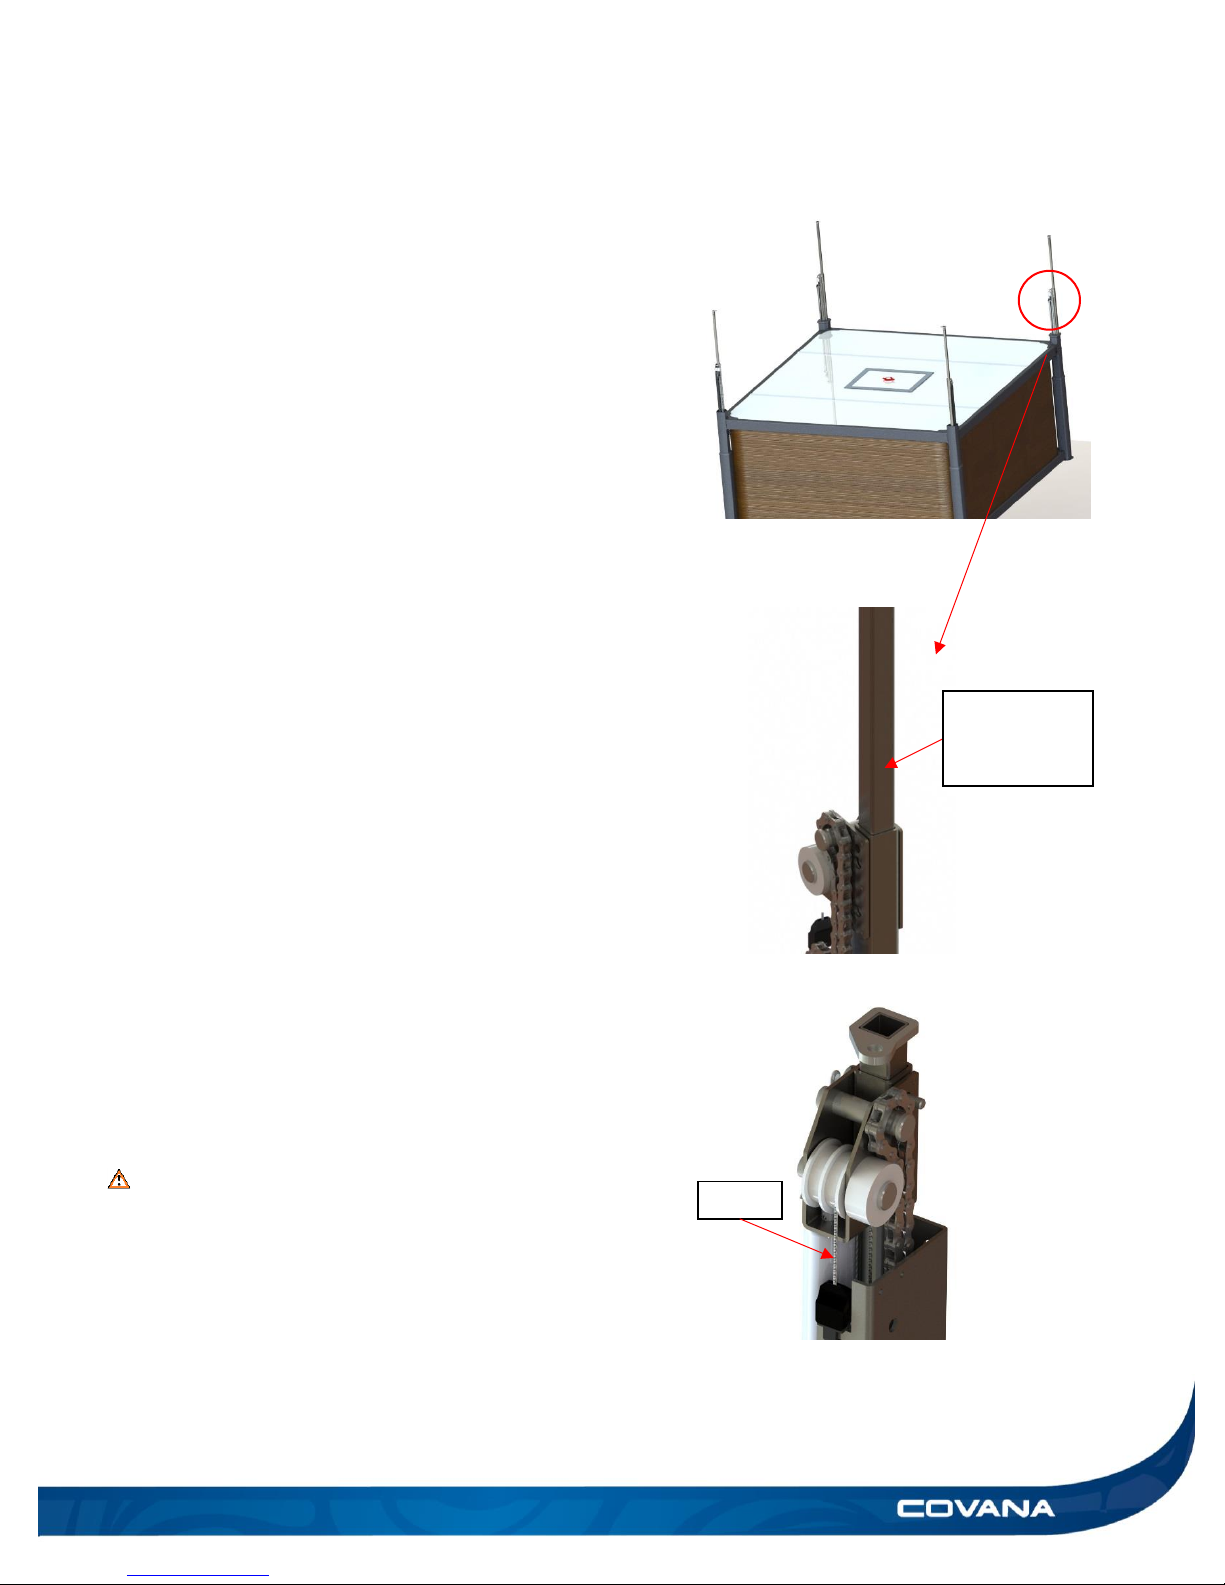
7) Elevate the jacks until the system stops at
maximum limit. (Erreur ! Source du renvoi i
ntrouvable.21)
8) Spray grease on all the sliding parts and
mechanical components for all four jacks. (Figure
22)
9) Inspect the posts cables for signs of fraying. If this
is the case, please call your local Covana dealer
immediately. (Figure 23)
10) Cycle the system up and down and inspect if any
further grease should be applied.
11) Lower the system completely until it stops
automatically.
12) Put top plates back. Screw the five #2 Robertson
screws and the hexagonal 7/32’’ (5.5 mm) drive
bolt on the top plate of the post. (Figure 19)
WARNING
The use of a power tool may break the
screws.
13) Reinstall the rubber cap on top of the post.
(Figure 18)
14) Repeat step 12-13 for all four posts.
Apply grease
on four sides
of the jack.
Figure 22
Figure 21
Cable
Figure 23
Page 30
30 APPENDIX USER MANUAL
Chain lubrification procedure
This procedure will explain the steps for
successfully lubricating the chain on the
operator side and opposite side posts. The
use of “Mobil Epic EP MOLY Grease” is
recommended for cold and hot climates.
Ideally a sprayable grease or an equivalent
low temperature synthetic grease.
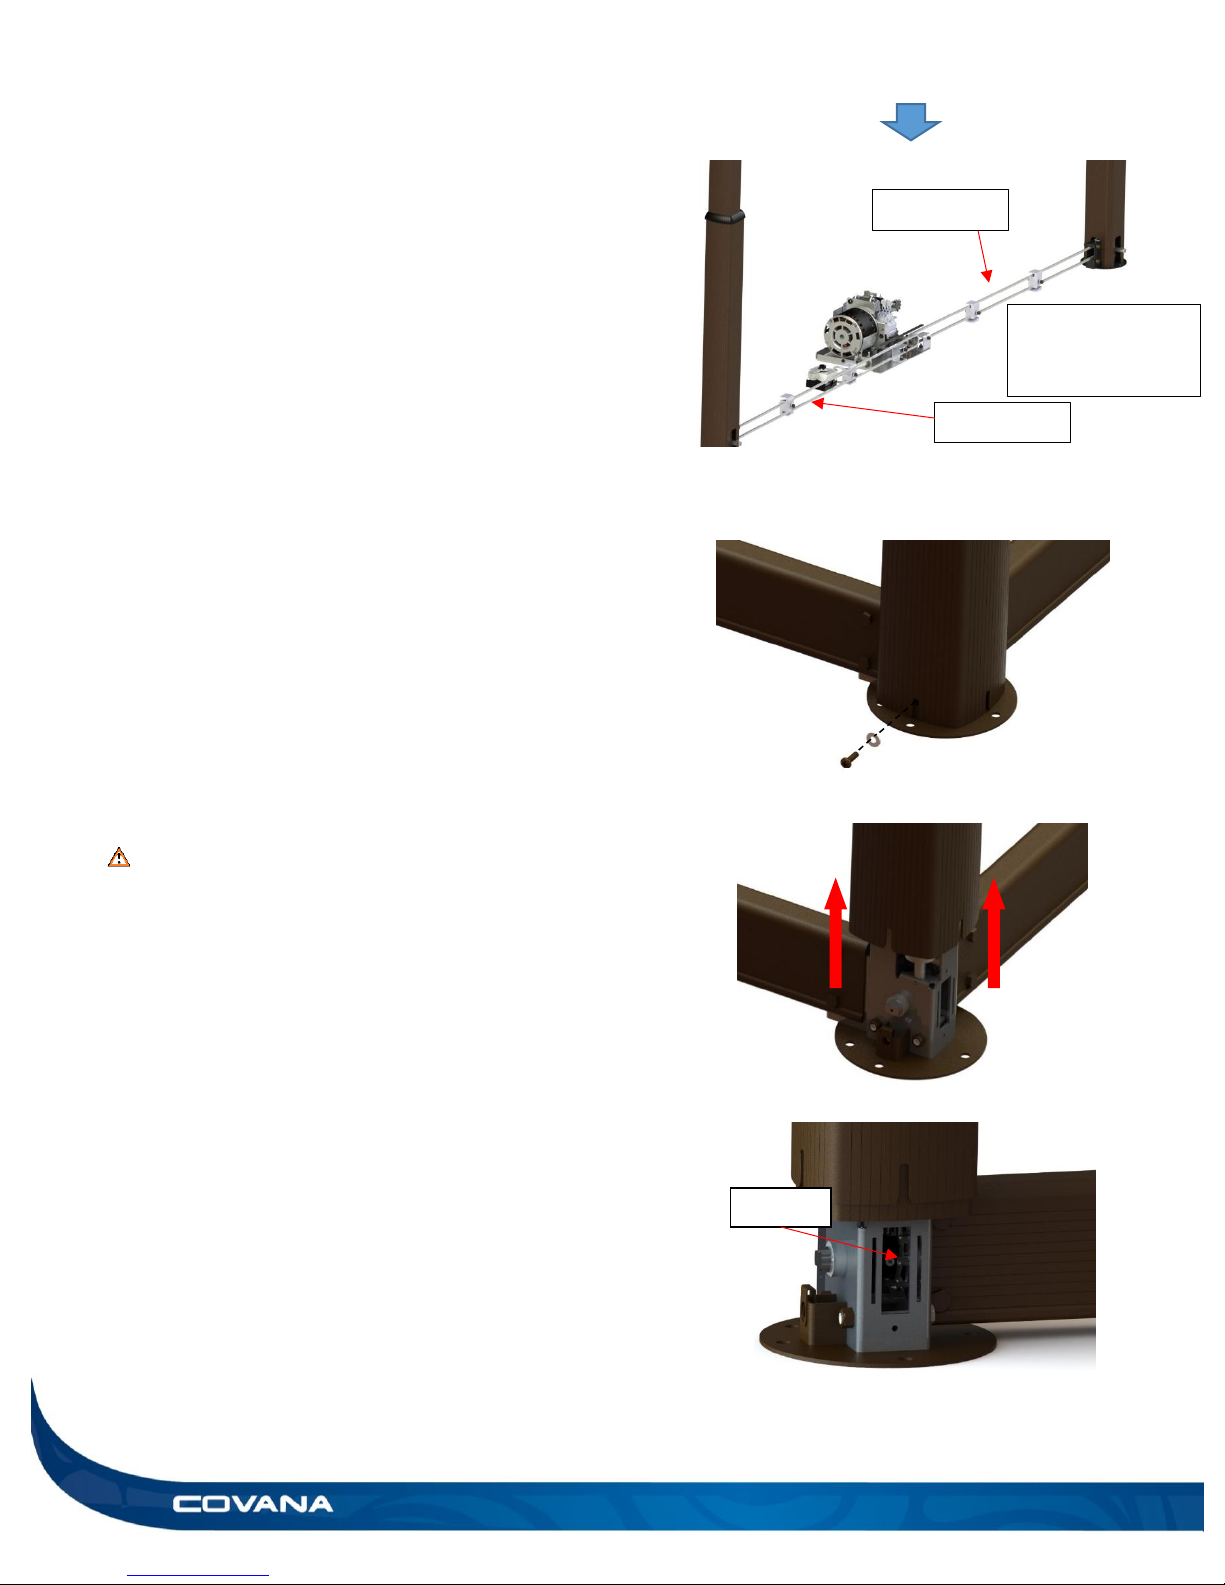
Note: Two separate chains are located on the
operator side posts (left and right). (Figure 24)
1) Remove the lower sleeve M6x 20 mm Phillips
screw. The screw is visible front facing the post.
(Figure 25)
2) Elevate by hand the sleeve and maintain it in
position with a wood block. (Figure 26)
CAUTION
If sleeve drops down, it might cause some
damages.
3) Locate the chain close to the end of the cchannel. An opening allows located the chain.
(Figure 27)
4) Using the grease, spray the chain lightly while
another person cycles the Covana cover up and
down. (Figure 27)
5) Descend the sleeve back into place, ensure the
nylon washer is outside of the sleeve. Screw back
in the Phillips M6 x 20 mm screw. (Figure 25)
6) Repeat step 1 to 5 for the remaining post.
Chain
Figure 25
Figure 26
Left Chain
Right Chain
Figure 24
Note : U-Frame
removed from
picture for clarity
Figure 27
Page 31

USER MANUAL 31
Page 32
32 USER MANUAL
Contact your local dealer for all related service issues.
Made in Canada by Covana, a division of the Canimex group.
www.covana.com
PATENTED
CANADA 2,532,429
US 11/162,557
UK 0515168.3
AUSTRALIA 2006200251
The information in this manual was accurate at the time of print. The manufacturer reserves the right to
change or improve its product without prior notice.
 Loading...