

Count Number Pro Touch Instruction Manual

Count NumberPro Touch
18" Numbering Machine
Instruction Manual
NUMBER PRO
TOUCH
6-2013
AUTOMATIC NUMBERING, PERFORATING, AND
SCORING MACHINE.
Version 1.0
Serial Number ___________________________
Date ___________________________________

INTRO LETTER
Congratulations,
You have purchased the most versatile automatic numbering, perforating, and scoring machine on the
market today. The Number Pro Touch, with its touch screen driven transport promises many years of
smooth easy profitable operation.
Your Number Pro Touch was manufactured at Count’s headquarters in Escondido, California. We are
proud to build quality made in USA equipment and stand behind our machines knowing that the quality
of our product is exceeded only by the staff which supports it.
Thank you for choosing Count.
Sincerely,
David M. Gilbert
President

WARRANTY
Count Machinery Company warrants each Number Pro Touch against defective parts or workmanship
under normal use and service for a period of:
90 days on numbering heads
One year on electrical and Mechanical Parts.
During this time COUNT will either repair or replace any COUNT unit returned (shipping prepaid)
which, after examination by us, is determined to be defective. All freight charges for equipment sent
in for warranty service are the responsibility of the purchaser and must be prepaid. Count will not be
held responsible for any shipping charges. You may request your desired shipping method. If no
method is stated, COUNT will send the item UPS ground. This warranty shall not apply to products
that have been repaired or altered by anyone except for COUNT, or which has been subjected to
misuse, negligence, or accident. Under no circumstances will COUNT be liable for consequential
damages. The user shall determine the suitability of the product for the intended use and the user
assumes all risk and liability whatsoever in connection herewith. For service, ret urn the machine
prepaid with written explanation of services needed to:
The Warnings, Cautions, and Instructions discussed in this instruction manual cannot cover
all possible conditions and situations that may occur. It must be understood by the operator
that common sense and caution are factors which cannot be built into this product, but
must be supplied by the operator.
We strive for continued impr ovements in our equipment line. Therefore, we reserve the right to
change specifications without notice or liability to existing count equipment in the field
Count Machinery Company
2128 Auto Park Way
Escondido, CA 92029
Tel: (760)489-1400- Fax: (760)489-1543
E-mail: info@countmachinery.com

TABLE OF CONTENTS
SPECIFICATIONS……………………………………………………………………………………..……….1a
SAFETY PROCEDURES/CARE & MAINTENANCE.……………………………………….………….1b
COMPONENT IDENTIFICATION…………………………………………………………….……………2
SETTING UP YOUR NUMBER PRO……………………………………………………………………….3
W/ Optional Stand……………………………………………………..………………3
TOUCH SCREEN CONTROLLER ………………….……………………………………….......……….4
Perf Mode..........................……………………………………….…….…..……5
Feeder Mode......................................………………………… .…....…..…6
Number Mode...................………………………………………...…..…………6
Transport Operation…………………………….……………………….……..……7
Programming for Number Mode.………..…………………............…….….8
Saving/Recalling Custom Jobs........................................................9
Batch Counter..........…………………………………………………………...…..10
DELIVERY TRAY ASSEMBLY…………………………………………………………………………..….11
FEED TABLE ASSEMBLY………………………………………………………………………….....…….11
Component Identification…….……………………………………………………11
Adjusting Feed Rails………..……………………………………………….………12
Setting the Automatic Feeder…………………………………………………….13
Fanning the Paper…………………………………………………………………….13
Loading the Feeder…………………………………………………………………..14
Replacing the Feed Wheels………………………………………………….……14
Feeding Notes………………………………………………………………………….14
Replacing the Friction Plate……… ………………………………………..…........................…..15
Checking the Sensor…………………………………….…………………………..15
Numbering Head...............………………………………………………..…........................…..16
Electric Head Parts..…………………………………….…………………………..17
Depressing a Wheel.…………………………………….…………………………..18
Changing the Direction of the Head…..………….…………………………...18
Adjusting the Vertical Bracket...…………………….…………………………..19
Adjusting for a Level Impression..………………….…………………………..19
Tips For Leveling the Head. ... ……………………….…………………………...20
Setting the Repeat Selector....……………………….…………………………..20
Ink Cartridge........................……………………….…………………………...21
Perf Shaft & Strik e Plate………………………………………………………........................…….22
Removing the Per f Shaft to Change Position...........………………………22
ROTARY PERF & SCORE ASSEMBLY…………………………………………………………….….....23
TROUBLESHOOTING………………………………………………………………………………….…..…24

ELECTRICAL REQUIREMENTS AND SPECIFICATIONS
Power Requirement: 110/220V, 50/60 HZ, AC,
Circuit Protection: 3 AMP Circuit Breaker
NOTE: Older buildings, overloaded lines, and bad grounds can affect the operation of
your Number Pro Touch. A dedi ca ted line is best.
OPERATING SPEEDS
MODE TRANSPORT SPEED 8.5x11 Sheet(est) 5 ½” Sheet(est)
(Feet per Sec.)
Perf Mode 2.5 12000 14000
Number Mode 2.0 6500 8500
SPECIFICATIONS
Net Weight: NUMBER PRO……………………………………………..250 lbs
Overall Dimensions: …………………………………………………………………32”Lx27”Wx26”D
Min. Sheet Size: ………………………………………………………………..3”x5”
Max. Sheet Size: …………………………………………………………………18”x20”-24”*
*NOTE: The NUMBER PRO TOUCH is capable of handling many types of applications
above and beyond the standard specifications. It is possible to feed quite a variety of
jobs, from 30” sheets to die cut stocks. However, the performance of the NUMBER PRO
TOUCH on these special applicatio ns is directly related to the experience of the operator.
1a

SAFETY PROCEDURES
BEFORE USE:
• Read through the owner’s manual. Follow instructions CAREFULLY.
• NEVER use in a wet area. Electric shock could occur.
• Use a GROUNDED outlet and a GROUNDED circuit . Do not us e ungr o und ed
equipment on the same circuit.
• Always use a dedicated line. DO NOT use with line splitting surge protector.
DURING USE:
• Keep fingers and hands away from numbering head, perf blades, and rubber rollers.
• Keep cords clear of moving parts.
AFTER USE:
• Turn off machine at the rear panel, then unplug the main power cord. This will
prevent damage to your machine by power/voltage spikes.
• To unplug cords, alwa ys grasp the plug body, never pull on cords to disconnect. Wire
fatigue and possible shock could result from improper disconnect procedures.
BE ALERT! BE CAREFUL!
CARE AND MAINTENANCE
The NUMBER PRO TOUCH is a precision machine. It is very important to keep it free of excessive
dust, dirt and foreign matter. We recommend that you keep the machine covered when not in
use.
BEARINGS: The NUMBER PRO TOUCH uses 2 different style bearings sealed roller bearing and
bronze bushings. Sealed roller bearings are designed to be self lubrica ting, however dirt and
dust can get into them causing clogging and dirt build up. Bronze bushings need to be oiled on a
regular basis. The bronze bushings on this machine are located on the feed drive shaft and on
the small idler pulley's to tension the belts on the non operator side. To oil these bronze
bushings run the machine in feed mode a nd add a few drops of oil just inside the shaft collar that
hold the shaft in place. Also add a few drops to the inside of the machine so both sides of the
bushing gets oil. It is recommended to occasionally oil the sealed roller bearings under heavy
use.
NUMBERING HEADS:
Keep your numbering heads clean with Simple Green and then oil with 3-1 oil. It is suggested to
do this after every use. To clean: Remove numbering head and place it in a small container with
enough solution to just soak the numbering wheels. Stand the head upright so that the solution
does not enter into the electronics. Brush wheels lightly, pat dry or blow dry with a compressor.
Do this periodically to insure clean impressions. DO NOT USE BLANKET WASH!
SENSOR EYE: Clean the sensor area on the strike plate so paper dust does not collect and block
the sensor.
REMOVEABLE SCREWS: When these show signs of wear or stripping, replace as soon as
possible. If these strip or hollow out they can be costly to remove. If you do keep your NUMBER
PRO TOUCH clean and in top condition, it will give you years of service.
1b
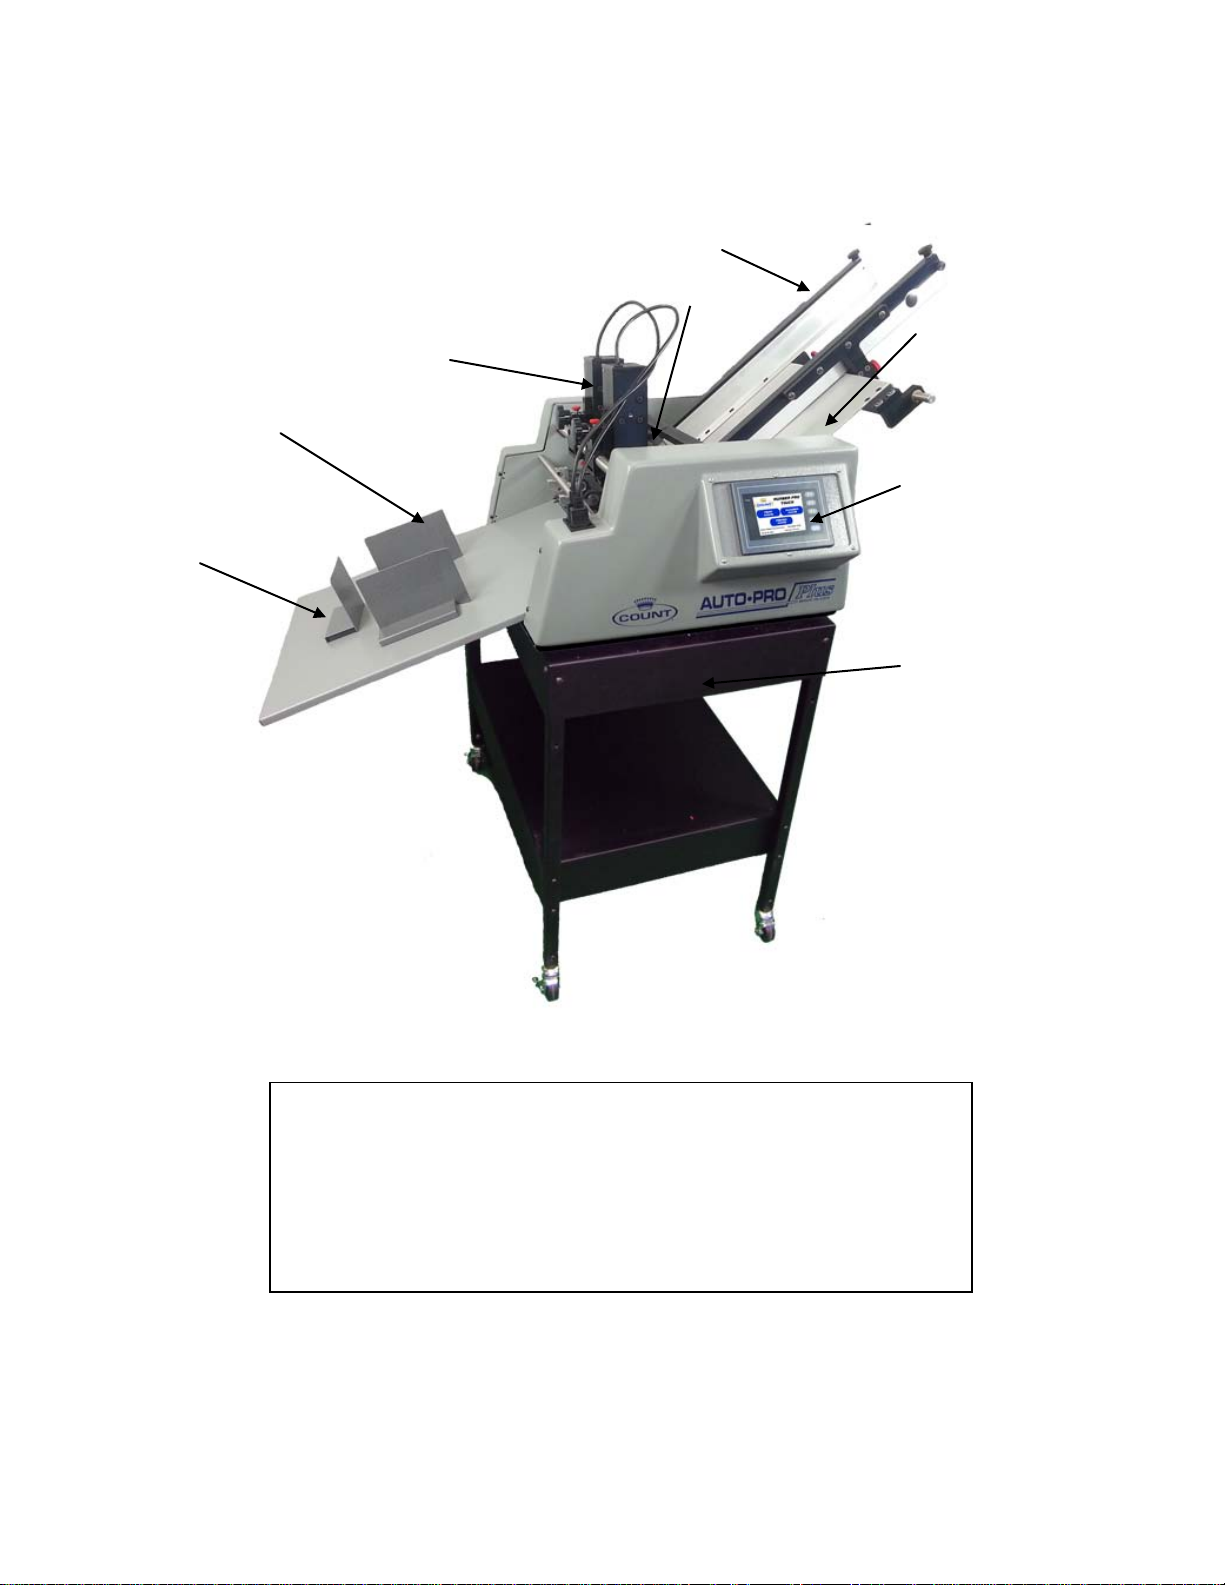
Feed Table Assembly
Touch Screen
Delivery Tray
Machine Stand
Perf and Score Assemblies
Numbering Heads
Paper Stop
Machine Stand Pg. 3
Feed Rail Assembly
COMPONENT IDENTIFICATION
REFERENCES
Touch Screen Pg. 4
Feed Table Assemb l y Pg. 11
Delivery Tray Pg. 11
Numbering Heads Pg. 16
Perf and Score Assem blies Pg. 23
2
SETTING UP YOUR NUMBER PR O
STAND (
1. Open top of box and remove components.
2. Assemble stand. (See Directions)
3. Place machine on stand as shown below.
5. Place delivery tray in front so tray hooks under the steel dowels located directly below
the exit shaft. Locate the magnetic paper stops and position them on the tray.
6. Inspect the remaining parts and place them near the machine where they are easily
accessible.
7. Plug in your machine to any 110-240v outlet.
optional)
3
NUMBER PRO
1 2 3
4
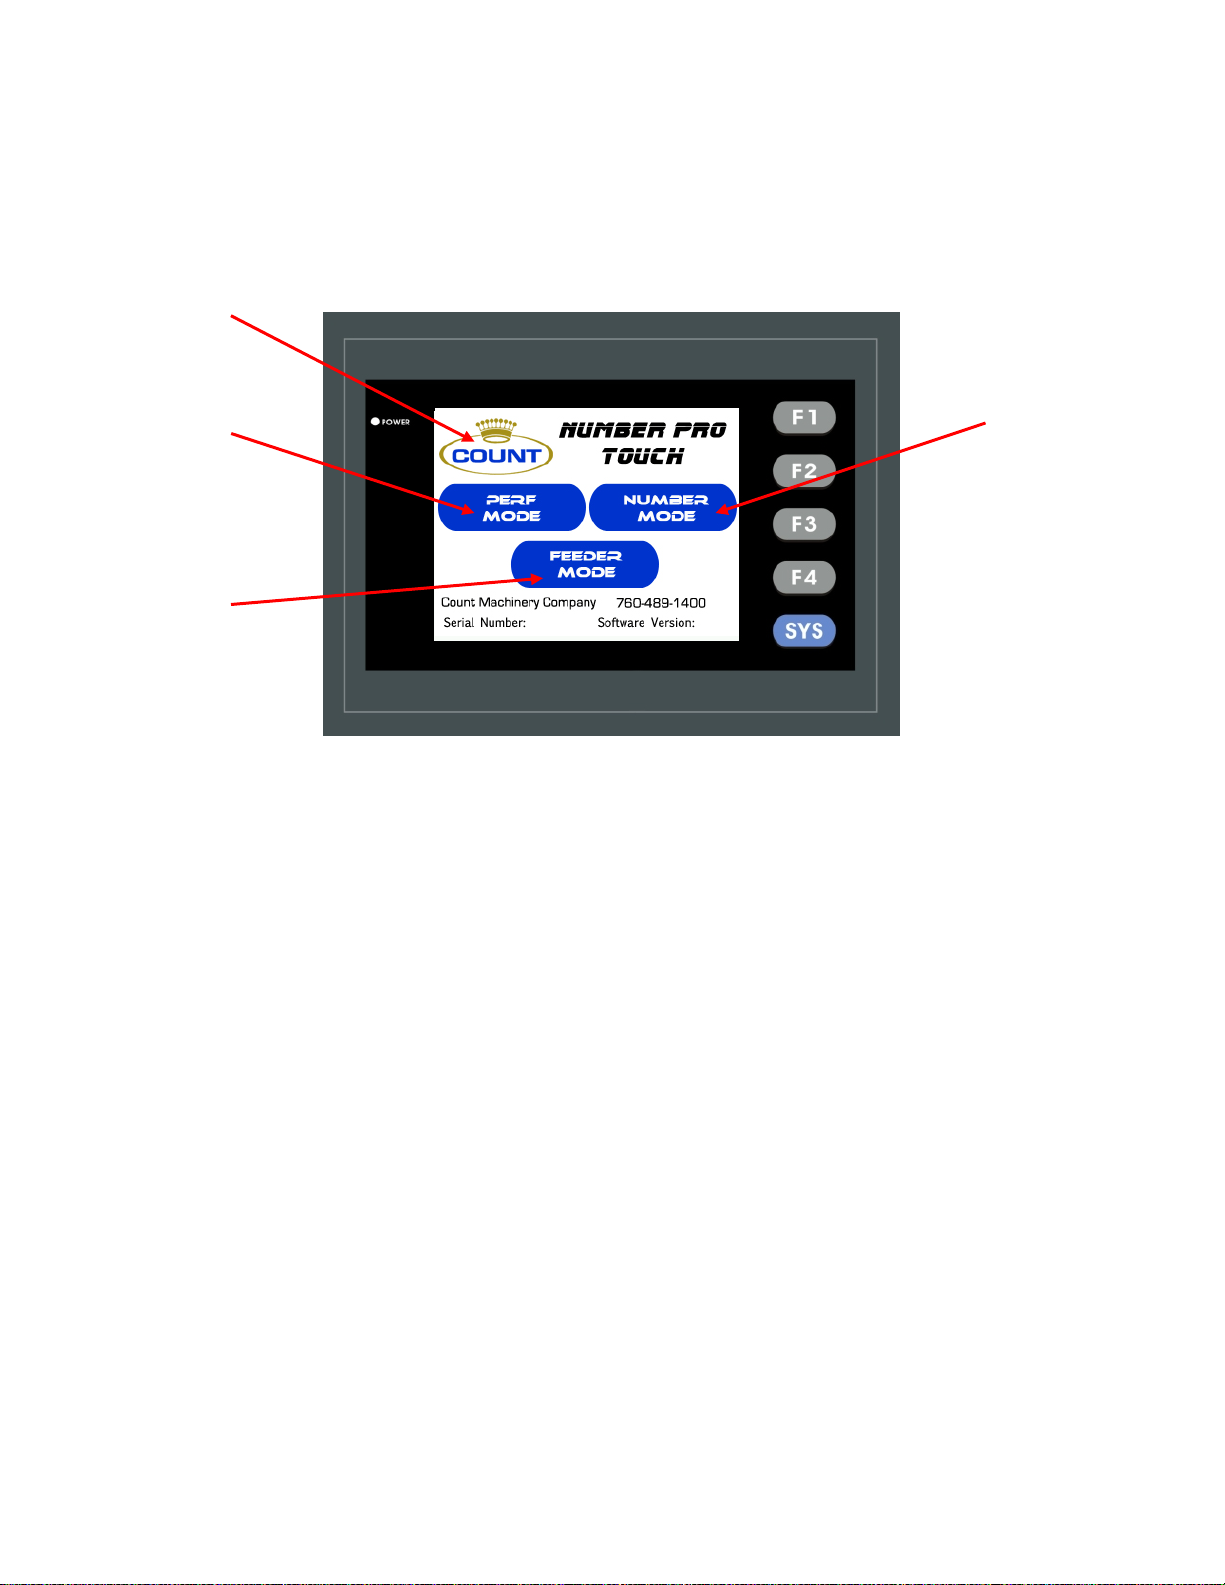
TOUCH SCREEN CONTROLLER
THE TOUCH SCREEN CONSISTS OF FOUR SECTIONS:
1. Count Logo and Service Access
2. Perf Mode
3. Feeder Mode
4. Number mode
* SPECIAL NOTE NONE OF THE F KEYS OR SYS KEY TO THE RIGHT ARE USED.
Touch Screen Operation
When the machine is turned on the display may take up to 7 seconds for the home
screen to display. There is a s creen saver that will turn the display off if the machine is
not touched within 30 minutes. The power light will stay illuminated letting you know
the machine is still on.
Count logo and Service Access
If the logo is pressed a password screen is displayed. This is for factory and ser vice
access only. This Screen is for internal use only. The password is not given out.
4
 Loading...