

Coulter HmX User guide
COULTER® HmX Hematology Analyzer
with Autoloader
ECKMAN
B
OULTER
C
Operator’s Guide
HmX
COULTER
®
HmX
PN 4237521A (June 1999)
COULTER CORPORATION
A Beckman Coulter Company
Miami, Florida 33196-2500 USA

LEGAL NOTICES
READ ALL PRODUCT MANUALS AND CONSULT WITH BECKMAN COULTER-TRAINED PERSONNEL
BEFORE ATTEMPTING TO OPERATE INSTRUMENT.
HAZARDS AND OPERATIONAL PRECAUTIONS AND LIMITATIONS
WARNINGS, CAUTIONS, and IMPORTANTS alert you as follows:
WARNING - Might cause injury.
CAUTION - Might cause damage to the instrument.
IMPORTANT - Might cause misleading results.
CAUTION System integrity might be compromised and operational failures might occur if:
r This equipment is used in a manner other than specified. Operate the instrument as instructed in the Product
Manuals.
r You introduce software that is not authorized by Beckman Coulter into your computer. Only operate your system’s
computer with software authorized by Beckman Coulter.
r You install software that is not an original copyrighted version. Only use software that is an original copyrighted
version to prevent virus contamination.
Beckman Coulter, Inc. urges its customers to comply with all national health and safety standards such as the use of barrier
protection. This may include, but it is not limited to, protective eyewear, gloves, and suitable laboratory attire when
operating or maintaining this or any other automated laboratory analyzer.
WARNING Risk of operator injury if all covers are not secured in place prior to instrument operation or you attempt to
replace a part without carefully reading the replacement instructions. Do not attempt to replace any component until you
carefully read the instructions for replacing the component.
IMPORTANT If you purchased this product from anyone other than Beckman Coulter or an authorized Beckman Coulter
distributor, and, if it is not presently under a Beckman Coulter service maintenance agreement, Beckman Coulter cannot
guarantee that the product is fitted with the most current mandatory engineering revisions or that you will receive the most
current information bulletins concerning the product. If you purchased this product from a third party and would like
further information concerning this topic, call your Beckman Coulter Representative.

Initial Issue, 6/99
Software version 1.0.
REVISION STATUS
This document applies to the latest software listed and higher versions. When a subsequent software version changes the
information in this document, a new issue will be released.
PN 4237521A
iii

REVISION STATUS
iv
PN 4237521A

REVISION STATUS, iii
INTRODUCTION, xi
®
HOW TO USE YOUR COULTER
HmX HEMATOLOGY ANALYZER WITH
AUTOLOADER DOCUMENTATION SET, xi
ABOUT THIS MANUAL, xi
CONVENTIONS, xii
HOT KEYS (SHORTCUTS), xii
1 SYSTEM OVERVIEW, 1-1
1.1 HmX WITH AUTOLOADER MAIN UNIT COMPONENTS, 1-1
1.2 COMPUTER, MONITOR AND KEYBOARD, 1-2
1.3 ACCESS SCREEN, 1-3
1.4 SOFTWARE MENU TREE, 1-4
CONTENTS
1.5 RUN SAMPLES SCREEN OPTIONS, 1-5
Í
Optns:,
1-5
1.6 STATUS LINE, 1-6
2 STARTUP AND CONTROLS, 2-1
2.1 STARTUP, 2-1
2.2 CONTROL RUN, 2-2
Preparation, 2-2
LATEX, 2-2
®
Cycling COULTER 5C
Cell Controls in Primary Mode with Bar-Code Labels, 2-7
Cycling Commercial Cell Controls without Bar-Code Labels, 2-10
Cycling 5C Cell Control in the Secondary Mode, 2-11
COULTER Retic-C™ Cell Control, 2-12
2.3 CONTROL REVIEW OR REPORT, 2-17
LATEX Control Review or Report, 2-17
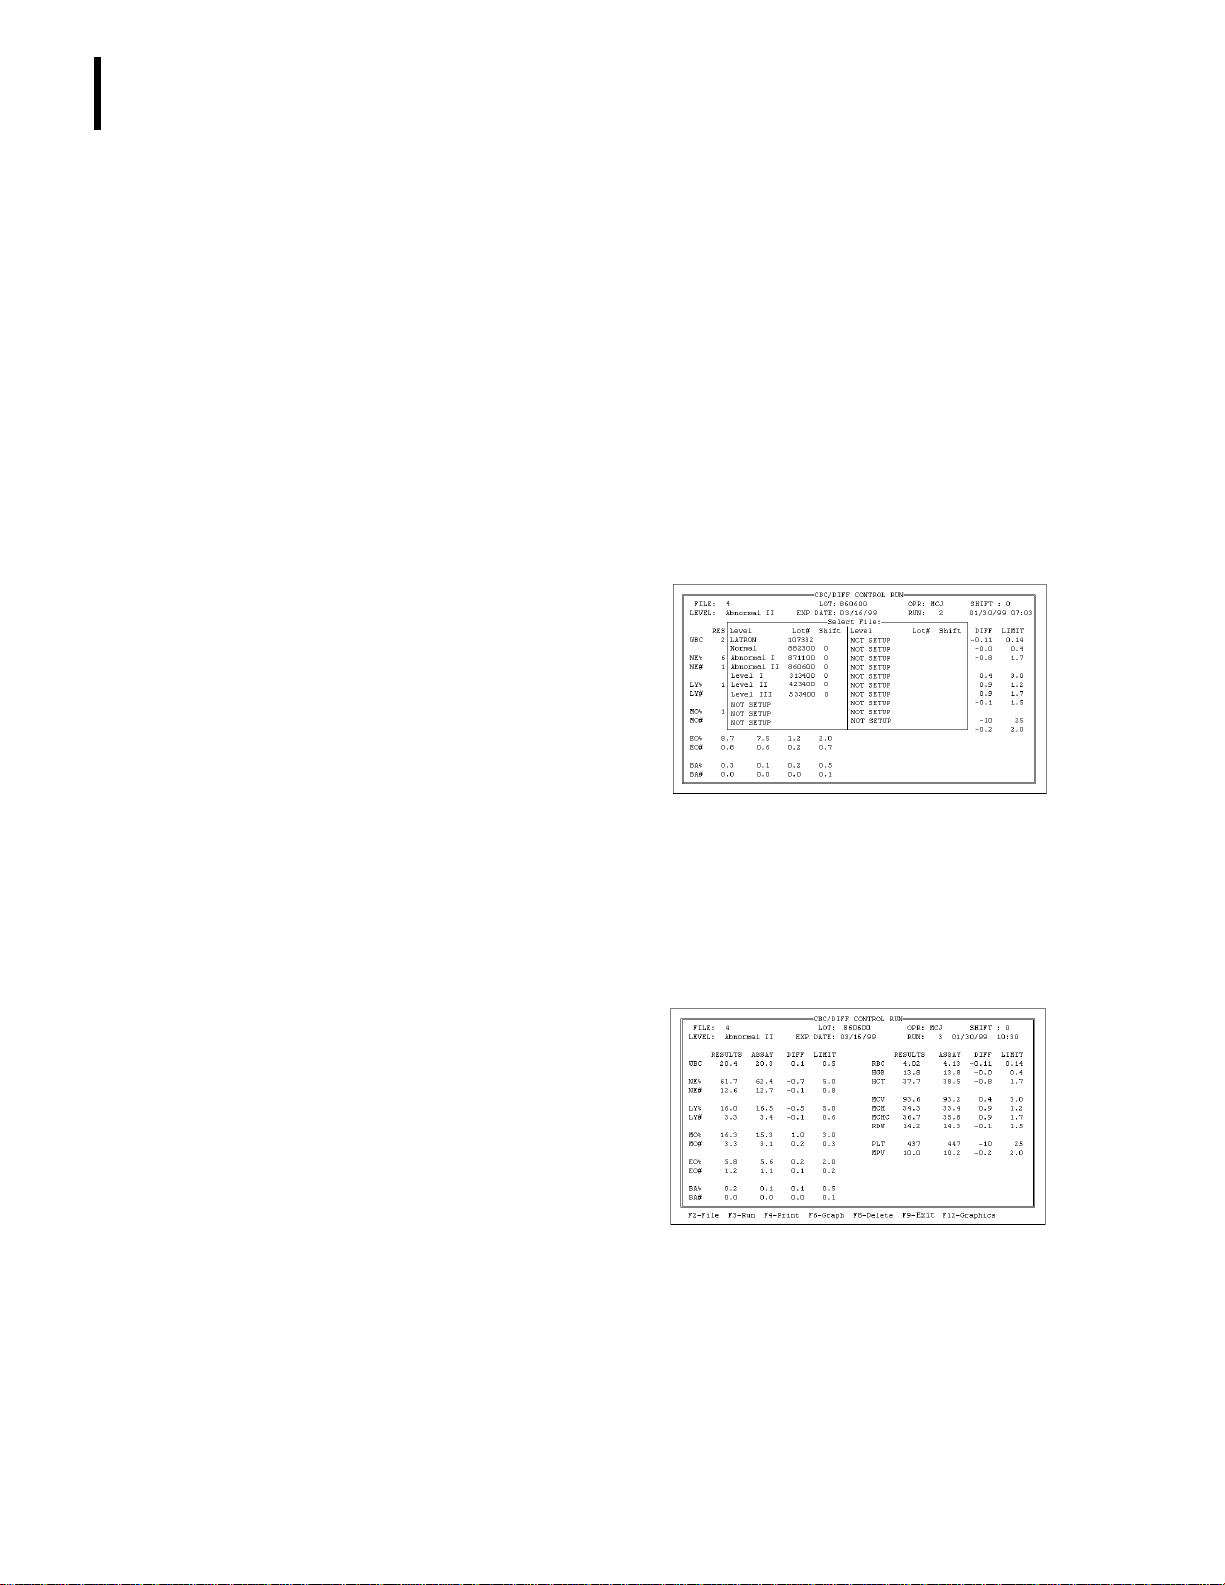
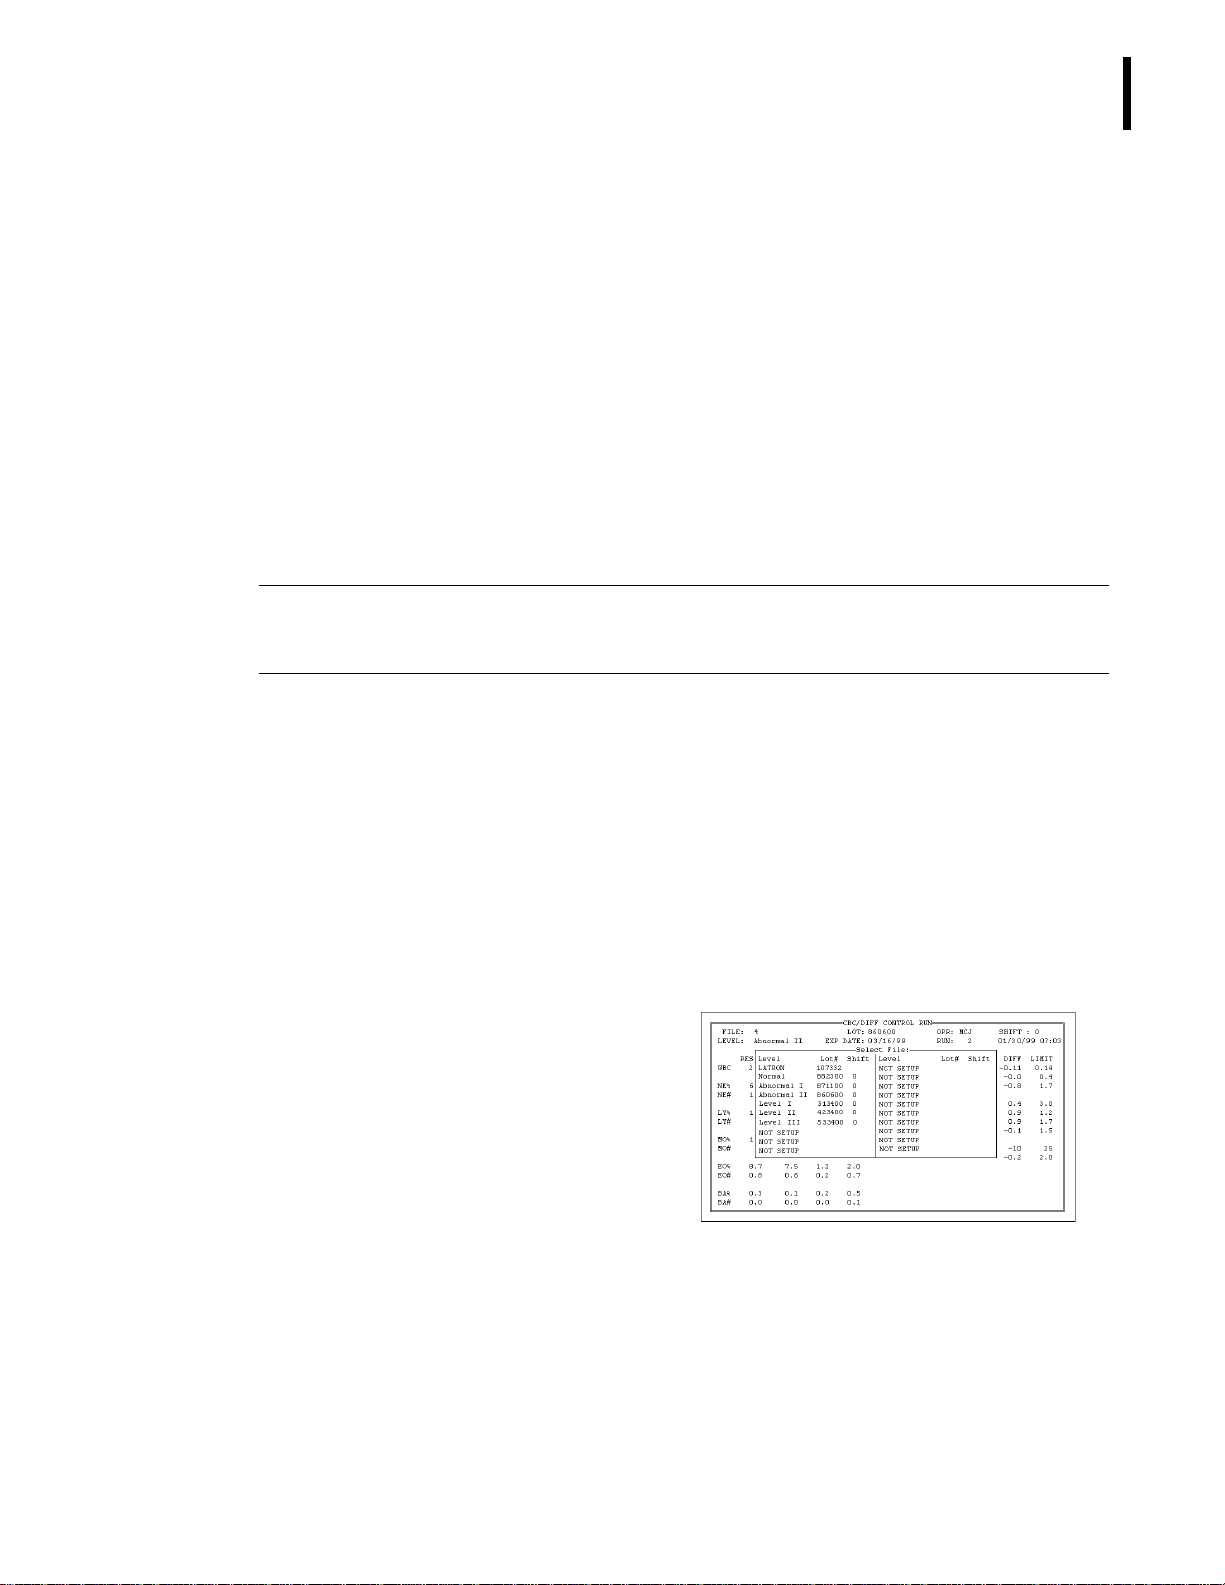
CBC/DIFF Control Review or Report, 2-19
Retic Control Review or Report, 2-20
CBC Control Review or Report, 2-21
2.4 CONTROL GRAPHS, 2-22
2.5 MODE TO MODE, 2-23
PN 4237521A
2.6 XB ANALYSIS, 2-23
XB Theory, 2-23
Target Values, 2-23
Current XB Batch, 2-24
XB Batch Means, 2-24
XB Graphs, 2-25
v

CONTENTS
2.7 IQAP, 2-26
2.8 DIFFERENTIAL COMPARISON PROCEDURE, 2-27
3 SAMPLE ANALYSIS, 3-1
3.1 CBC/DIFF SPECIMEN COLLECTION, 3-1
3.2 CBC/DIFF SPECIMEN STORAGE, 3-1
3.3 BAR-CODE LABELING, 3-2
3.4 CASSETTES, 3-2
Types, 3-2
Loading Tubes, 3-3
3.5 PREASSIGNING THE WORKLIST, 3-3
3.6 SAMPLE INTEGRITY CHECKS, 3-3
3.7 CYCLING SAMPLES IN THE PRIMARY MODE, 3-4
3.8 CYCLING STAT SAMPLES USING THE SECONDARY MODE, 3-7
3.9 CYCLING SAMPLES IN THE SECONDARY MODE, 3-8
3.10 CYCLING SAMPLES IN THE PREDILUTE MODE, 3-10
3.11 CYCLING SAMPLES IN THE RETIC MODE, 3-13
Retic Specimen Collection, 3-13
Retic Specimen Storage, 3-13
Retic Sample Preparation, 3-13
Retic Sample Analysis, 3-15
3.12 WORKLIST, 3-19
Automatic Sequencing Set Up, 3-19
Preassigning the Worklist, 3-20
Status Messages, 3-21
3.13 HOST WORKLIST, 3-23
4 DATA REVIEW, 4-1
4.1 RUN SAMPLES DISPLAY, 4-1
4.2 CBC HISTOGRAMS, 4-2
RBC Distribution Curve, 4-2
Plt Distribution Curve, 4-2
4.3 DIFF SCATTERPLOTS AND HISTOGRAMS, 4-3
DF1, 4-3
DF2, 4-4
DF3, 4-4
VCS Histograms, 4-5
vi
4.4 RETICULOCYTE SCATTERPLOTS, 4-6
DF5, 4-6
DF6, 4-6
PN 4237521A

4.5 PARAMETER CODES, 4-7
Retic Parameter Codes, 4-9
4.6 MESSAGES, 4-9
Condition Messages, 4-11
Suspect Messages, 4-11
Definitive Messages, 4-12
4.7 MICROSCOPIC REVIEW, 4-13
4.8 DATA BASE QUERY, 4-14
Overview, 4-14
Data Base Function, 4-14
Sorting, 4-18
Sort Rules, 4-18
Editing, 4-19
Do Not Edit, 4-19
Edit a Sample, 4-20
Results of Changed Parameters, 4-20
Batch Processing, 4-21
Batch Print, 4-21
Batch Transmit, 4-21
Archive, 4-21
To Archive, 4-22
To Review Archived Files, 4-23
CONTENTS
4.9 WORKLOAD RECORDING, 4-24
Patient Tests Bar Graph, 4-24
Non-Patient Tests Bar Graph, 4-24
5 SHUT DOWN, 5-1
5.1 SHUT DOWN, 5-1
5.2 CLEAN CYCLE, 5-1
5.3 PROLONGED SHUTDOWN PROCEDURE, 5-2
5.4 AUTOPURGE CYCLE, 5-2
6 SET UP, 6-1
6.1 CHAPTER OVERVIEW, 6-1
6.2 CONTROL SET UP, 6-2
CBC/DIFF file, 6-2
Latex file, 6-3
CBC file, 6-4
RETIC file, 6-4
Auto-Stop, 6-4
PN 4237521A
vii

CONTENTS
6.3 SAMPLE ANALYSIS SET UP, 6-6
Action limits, 6-6
XB limits, 6-6
Definitive flag limits, 6-6
High/low flag limits, 6-7
Laboratory Normal Ranges, 6-7
Location list, 6-8
Physician list, 6-8
Display formats, 6-9
Screen Labels, 6-9
Parameter Selection, 6-10
Reporting Units, 6-10
Delete database, 6-11
Delete host spooler, 6-11
Clear printer spooler queue, 6-12
Print options, 6-12
Auto Print Format, 6-12
Ticket Options, 6-13
Spooler Priority, 6-14
Graphics Options, 6-15
Optional Printer, 6-16
6.4 SYSTEM SET UP, 6-17
Shift, 6-17
Reagents, 6-18
Institution, 6-18
Communication def, 6-19
Host Computer Definition, 6-19
IQAP ID#, 6-19
Set Date/Time, 6-20
Supervisor Password, 6-20
Optimize Hard Disk, 6-20
REFERENCES, REFERENCES-1
INDEX, INDEX-1
TRADEMARKS
viii
PN 4237521A

TABLES
1.1 F5 from Run Samples Screen, 1-5
1.2 Status Line Definition, 1-6
2.1 When LATRON™ Control is Out of Limits, 2-6
2.2 When CBC/DIFF Control is Out of Limits, 2-9
2.3 When Retic Control is Out of Limits, 2-16
4.1 Parameter Codes, 4-7
4.2 Retic Parameter Codes, 4-9
4.3 Summary of Flagging Messages, 4-10
4.4 Origin of Abnormal Pop Messages, 4-11
4.5 Definitive Flagging Limits, 4-12
6.1 Control Error Message Status and Action, 6-5
CONTENTS
PN 4237521A
ix

CONTENTS
x
PN 4237521A

INTRODUCTION
This introductory section contains the following topics:
r How to use your COULTER HmX Hematology Analyzer with Autoloader
Documentation set
r About this Manual
r Conventions
r Hot Keys
HOW TO USE YOUR COULTER® HmX HEMATOLOGY ANALYZER WITH AUTOLOADER
DOCUMENTATION SET
Use the
methods it uses, its specifications, and information on installation, safety and software options.
Use the Special Procedures and Troubleshooting Manual to run a calibration, perform
reproducibility and carryover checks, and to clean, replace or adjust a component of the
instrument. The troubleshooting tables appear at the back of the manual.
Reference
manual for in-depth information about what the instrument does, the
Use the
Overview chapter to become familiar with the different parts of your system. Then go through
the detailed step-by-step procedures of start up, running controls and samples, reviewing data
and shutdown.
Use the Host Specifications Manual to locate information about transmission to a host
computer.
Use the Master Index to locate a subject in your documentation set.
See the Documentation page on the back cover of this manual for the contents of each manual.
It can help you to determine quickly which manual contains the information you need.
Operator's Guide
ABOUT THIS MANUAL
Your HmX Hematology Analyzer with Autoloader Operator's Guide provides step-by-step
instructions for the day-to-day running of your instrument.
This information is organized as follows:
s Chapter 1, System Overview
Identifies and defines the function of the system components of the HmX Hematology
Analyzer with Autoloader. Gives an overview of the software menu structure and the
DMS status line.
for the day-to-day running of your instrument. Read the System
PN 4237521A
s Chapter 2, Startup and Controls
Contains step-by step instructions for performing daily start up and quality control
procedures. Includes information on control run, review or report, graphs, X
differential comparison, and mode to mode.
s Chapter 3, Sample Analysis
Contains step-by-step instructions for performing sample analysis in the Primary,
Secondary, Predilute, and Retic modes. Information about using the Worklist and Host
Worklist is also included.
analysis,
B
xi

INTRODUCTION
CONVENTIONS
s Chapter 4, Data Review
s Chapter 5, Shut Down
s Chapter 6, Set Up
CONVENTIONS
This manual uses the following conventions:
r ITALICS indicate screen messages such as RESET THE SYSTEM or Press any key.
r
Contains information about reviewing the data on the Run Samples screen such as
histograms, scatterplots, parameter codes, flags, and messages. Also presents information
on Data Base Query and Workload Recording.
Contains step-by-step instructions for shutting down your system for short or prolonged
periods.
Contains information on how to set up control files, sample analysis options, and system
options.
Bold indicates
t a menu item such as
t a function such as
r The software path to access the needed function or screen appears in a series separated
by double arrow heads. For example, the path to the Reagents set up screen is:
Special Functions
To select a menu item, highlight it then press Ûor press the alphabetic key on the
keyboard that corresponds to the letter displayed in black within the name of the menu item.
r ë indicates a key (such as Û).
r ë ë indicates to press and release the first key listed, then press and release the next
key listed.
r ë+ë indicates to press and hold the first key listed, then press the next key.
HOT KEYS (SHORTCUTS)
É Go to the Access screen. This
is only available when the
Main Menu is displayed.
Ì Print. Ý+Ê Move from the current screen to
Run Samples.
F3 Run.
Set Uptt System Set Uptt Reagents.
tt
Þ+ã Stops instrument beeping and
removes the error message at the
bottom of the screen.
the Error file and back to the
original screen.
xii
Ñ Exit (unless the
F3 Run
window is displayed, then the
function of Ñ is Stop.)
Ò Save and/or return to the
previous screen.
Ý+w Move from the Sample Analysis
screen to the Worklist and back
when a sub-menu or window is
not displayed.
Ý+Ñ Stop cycle.
PN 4237521A
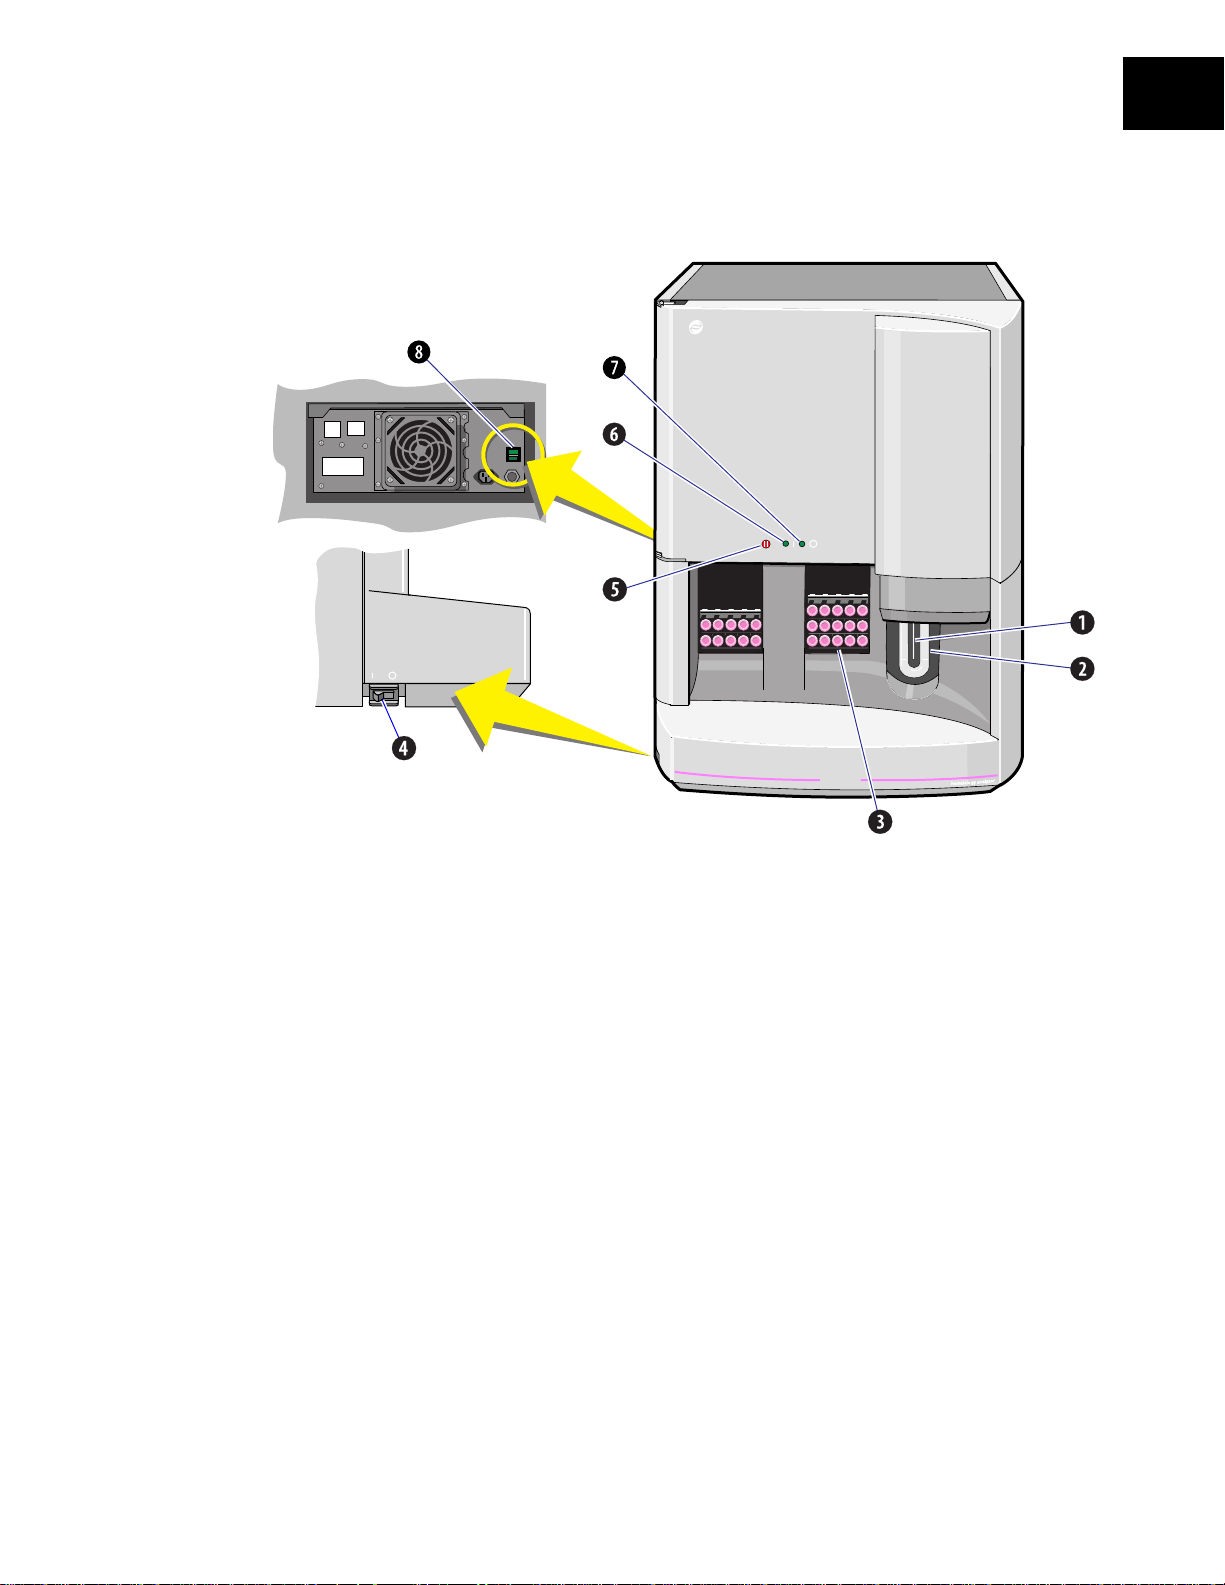
1.1 HmX WITH AUTOLOADER MAIN UNIT COMPONENTS
B
ECKMAN
C
OULTER
POWER
COMPUTER AC
AC INPUT
SYSTEM OVERVIEW
1
1
HmX
Aspirator probe. Use this to aspirate from open vials, predilute specimens, and retic preparations.
b
Sample bar. Press this to start aspiration from an open vial, predilute specimen, or retic
c
preparation.
Loading bay. Load cassettes here.
d
Standby/Reset rocker switch. Use this switch to put the instrument in the standby state or to
e
reset the system (refer to Special Procedures and Troubleshooting manual for reset procedure).
|
The
symbol indicates the ready position and the
Emergency Stop button. Use this button to immediately stop the autoloader mechanism.
f
Ready indicator light. Main power is on and the Standby/Reset rocker switch is in the ready
g
position. Instrument is ready to operate.
Standby indicator light. Main power is on and the Standby/Reset rocker switch is in the standby
h
position. Voltages are applied to a memory location in the analyzer but everything else is powered
down. To return to the ready state, put the Standby/Reset rocker switch in the ready position, |.
Main power On/Off rocker switch. This is located on the back of the instrument.
i
O
symbol indicates the standby position.
COULTER
®
HmX
PN 4237521A
1-1
SYSTEM OVERVIEW
COMPUTER, MONITOR AND KEYBOARD
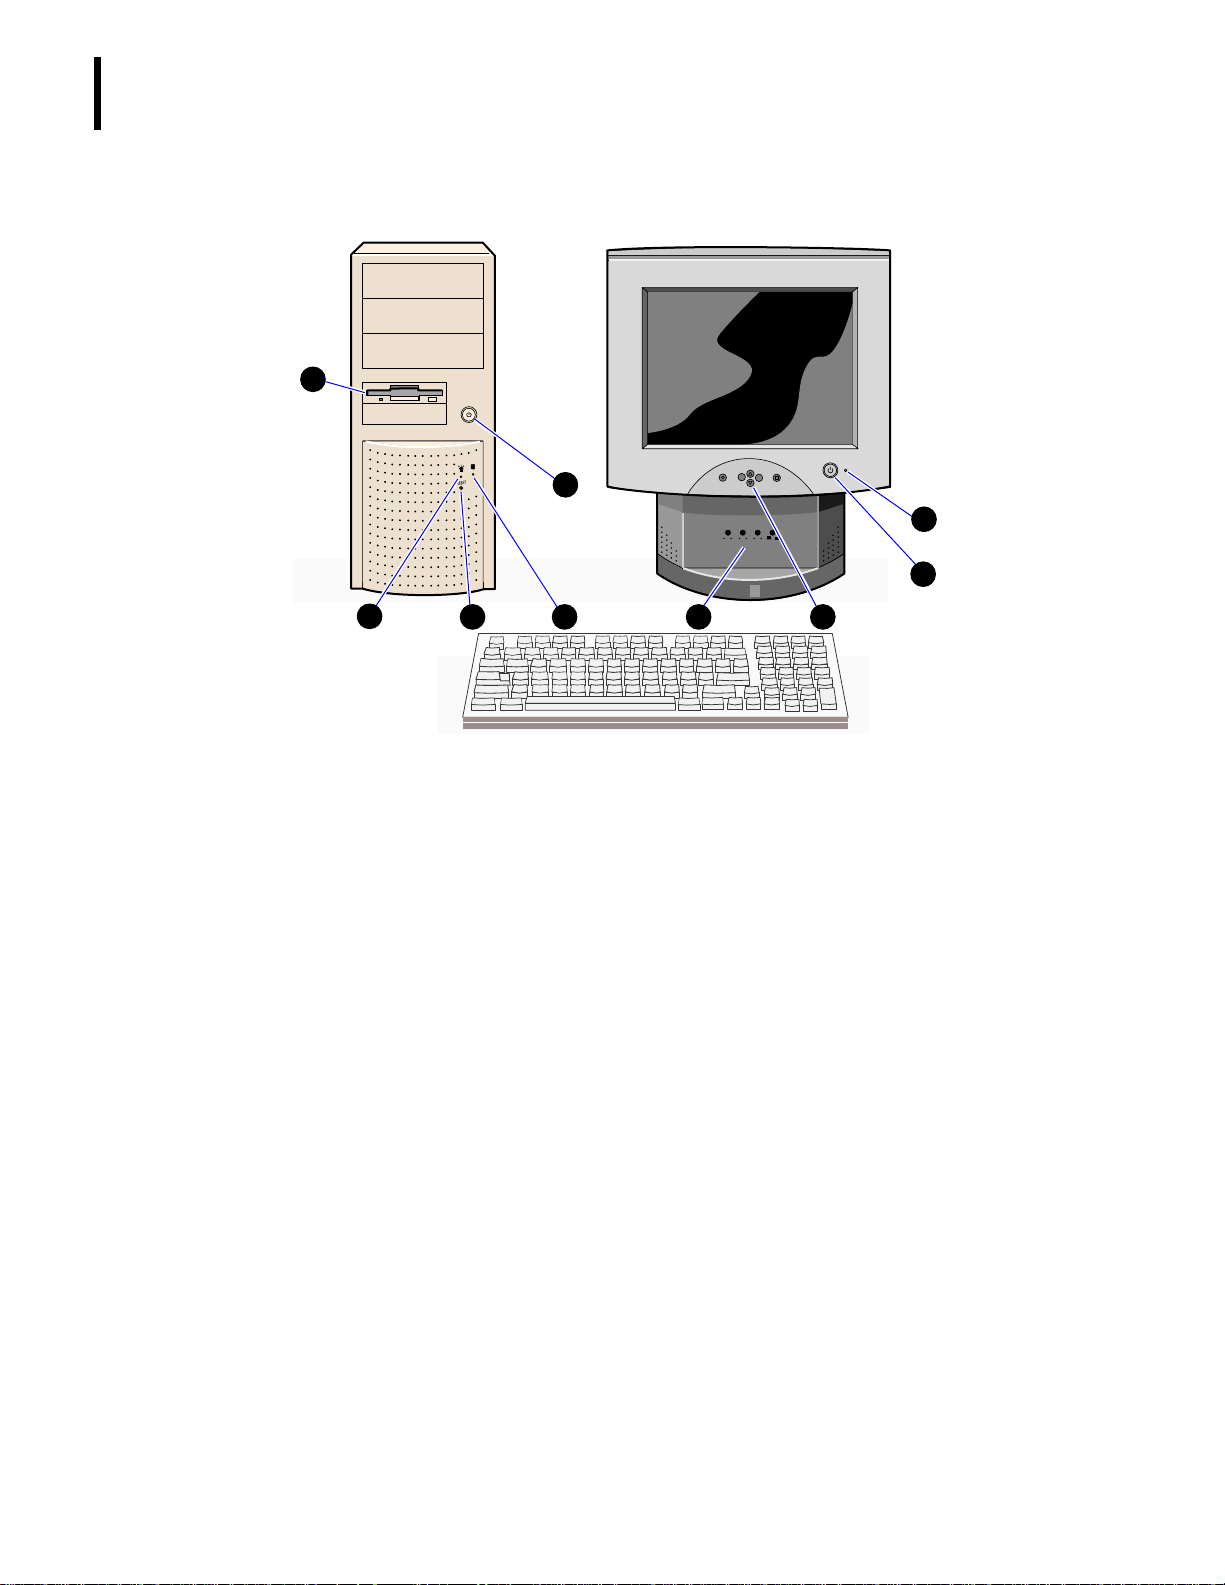
1.2 COMPUTER, MONITOR AND KEYBOARD
9
5
EXIT MENU
+
-
ON/OFF
VOLUME
MAX MIN MAX MINMAX MIN
MICTREEBLEBASS
ON OFF
1
2
8
3467
Note: The design of your computer and monitor may differ from this illustration. If so,
refer to the manufacturer’s documentation for information on controls and indicators.
b
c
d
e
f
g
h
i
Monitor power indicator light. Glows when power is on.
Monitor power On/Off switch.
Monitor menu controls. Not used routinely.
Monitor audio controls. Not used with the HmX Hematology Analyzer.
Computer power On/Off switch.
Hard disk indicator light. Glows when the computer is saving or retrieving data
Computer reset button. Used only in special circumstances. If you reset the computer, you
must also reset the system using the Standby/Reset switch on the main unit before you return
to normal operation.
Computer power indicator light. Glows when power is on.
1-2
j
í
æ
è é
ç
ë
Diskette drive. Used to upload COULTER 5C cell control file data and archive patient sample
results. Indicator light glows when saving or retrieving data.
Spacebar. Toggles options. Press the spacebar to continue when the monitor screen is blank.
Cursor keys move the cursor to highlight menu items, scroll up and down screens, or move to
a field on a screen to enter or edit data.
All other keys. Function is defined on each screen and in individual procedures.
PN 4237521A
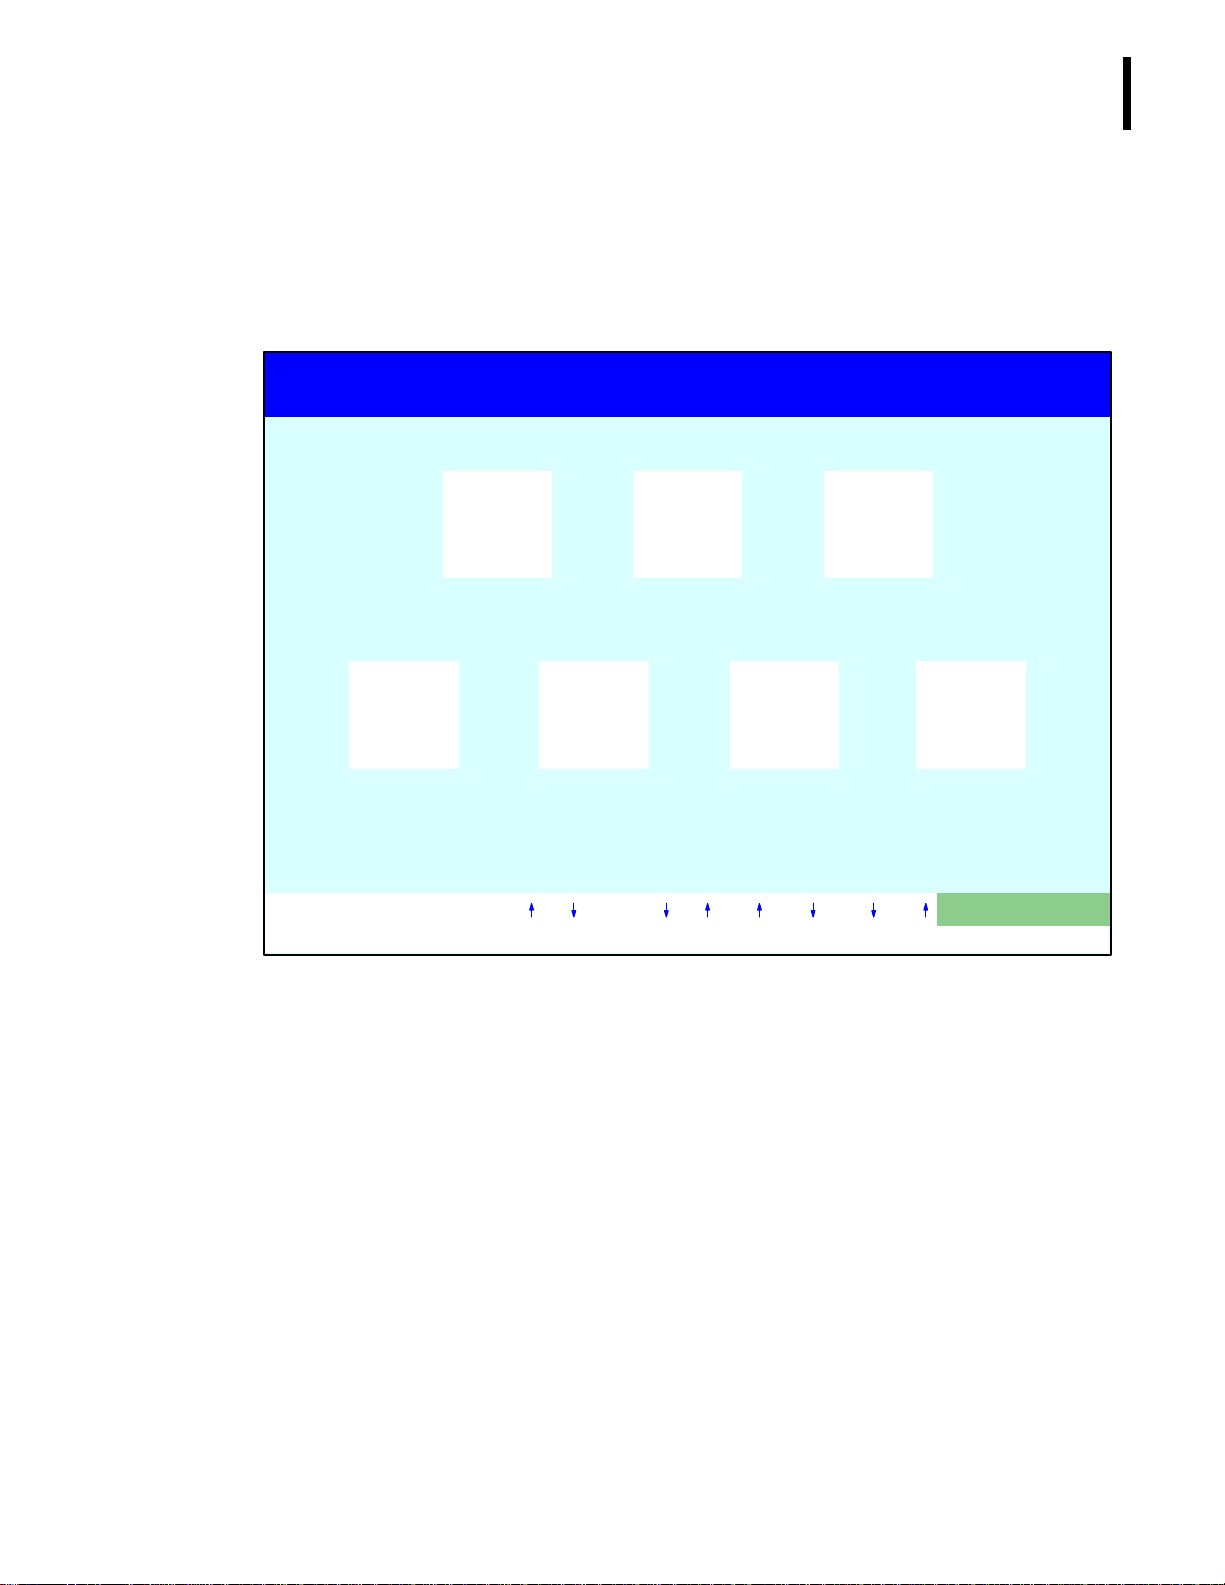
1.3 ACCESS SCREEN
The Access screen provides you with quick access to the most commonly used areas of the
software. It is the first screen to appear after a system reset or power up. If you go to any of
these areas using the Access screen, you will automatically return to the Access screen upon
exit. The Access screen is also available from the Main Menu by using the F1 key.
COULTER(R) HmX HEMATOLOGY ANALYZER
SYSTEM OVERVIEW
ACCESS SCREEN
1
F1
RUN
SAMPLES
F4
DATA BASE
QUERY
This program is protected by U.S. and International laws as described
in the manual. (C) Copyright Beckman Coulter Inc., 1999
02/28/99 10:14 OPR DMS PR HC DB XB WL HWL QC
F5
WORKLIST
F2
RUN
CONTROLS
F6
HOST
WORKLIST
F3
CLEAN
F9
MAIN
MENU
SELECT FUNCTION
PN 4237521A
1-3
SYSTEM OVERVIEW
SOFTWARE MENU TREE
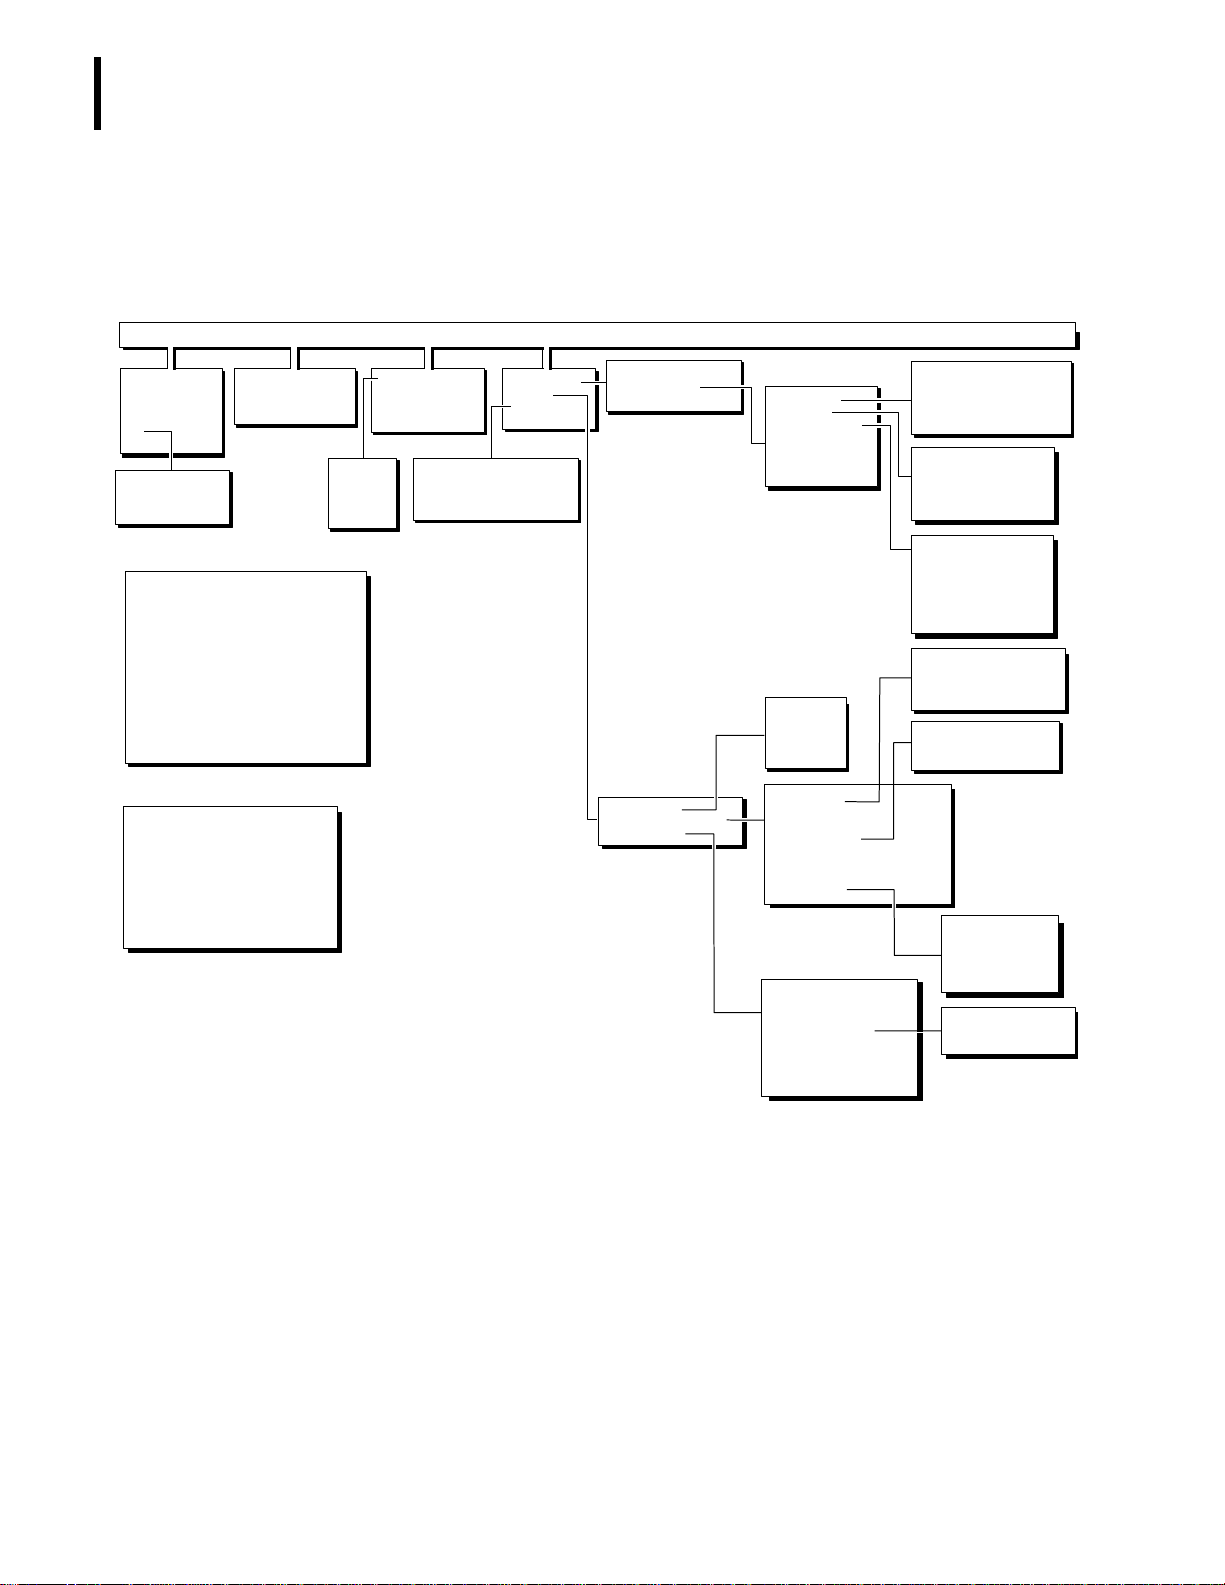
1.4 SOFTWARE MENU TREE
The Main Menu consists of the four items listed across the top of the menu tree:
Sample Analysis, Controls, Diluter Functions, and Special Functions.
Sample Analysis
Run Samples
Data Base Query
Worklist
Host Worklist
XB
Current XB batch
XB batch means
XB graphs
F3 from Run Samples screen
SAMPLE MODE?
F2
F3
F4
F5
F6
F7
F8
F9
DIFF: ON
BLOOD DET: ON
Select to change/ESC to continue
F5 from Run Samples screen
F2 XB: ON N=2 IN
F4 DB: ON
F5 Print: NONE
F6 Host: OFF
F7 Display only: OFF
F8 Operator: OPR
F11 B&W screen print
F12 Color screen print
Control Run
Review or Report
Graphs
START PRIMARY
SECONDARY
PREDILUTE CBC
RETIC
DIFF ON/OFF
PURGE
RINSE
STOP
Controls
Diluent
Lyse
Pak
Cleaner
All
Diluter Functions
Prime Reagents
Start Up
Shut Down
Disinfect
Reproducibility
Carryover
CBC Calibration
Enter Calibration Factors
Special Functions
Diagnostics
Set Up
Calibration
Error File
Workload recording
Operator options
Service options
Control set up
Sample analysis set up
System set up
Fluidic Tests
BSV Tests
Autoloader tests
System Test
Solenoid Test
Drain and Vent
HGB Lamp Adjust
CBC/DIFF file
Latex file
CBC file
RETIC file
Auto-Stop
Action limits
Location list
Physician list
Display formats
Delete database
Delete host spooler
Clear printer spooler queue
Print options
Shift
Reagents
Institution
Communication def
IQAP ID #
Set Date/Time
Supervisor Password
Optimize Hard Disk
Multiple Aperture Zap
Compressor On/Off
Disable Reagent Sensors
Bubble Mix
Clean Needle
Cycle BSV
Blood Detector Test
Probe Wash
BSV Removal
Blood Detector ON/OFF
Autoloader Home
Clear the Bed/
Autoloader Home
Rock the Bed
Right Elevator Up/Down
Left Elevator Up/Down
Autoloader Test Routine
XB limits
Definitive flag limits
High/low flag limits
Laboratory Normal Ranges
Screen Labels
Parameter Selection
Reporting Units
Auto Print Format
Ticket Options
Spooler Priority
Graphics Options
Optional Printer
Host Computer Definition
1-4
PN 4237521A

1.5 RUN SAMPLES SCREEN OPTIONS
Í
Optns:
F2 XB: ON N=2 IN
F4 DB: ON
F5 Print: NONE
F6 Host: OFF
F7 Display only: OFF
F8 Operator: OPR
F11 B&W screen print
F12 Color screen print
SYSTEM OVERVIEW
RUN SAMPLES SCREEN OPTIONS
1
Table 1.1 F5 from Run Samples Screen
F2 XB: ON N=2 IN Turns XB ON and OFF. N is the number of samples stored in the current
batch. Also displays the status of the last completed batch (IN or OUT).
F4 DB: ON Turns the data base ON and OFF. Default setting is ON.
F5 Print: NONE Sets the automatic printing of samples to the graphic printer. Choose
between NONE, NORMALS, ABNORMALS or ALL. Default setting is NONE.
F6 Host: OFF Turns the automatic host transmission ON and OFF. Default setting is OFF.
F7 Display only: OFF If ON, then XB, DB and HOST turn OFF. Default setting is OFF.
F8 Operator: OPR Enter up to three alphanumeric characters for an Operator ID. Default
setting is OPR.
F11 B&W screen print Initiates a large black and white screen print of the current sample.
F12 Color screen print Initiates a large color screen print of the current sample if your printer can
print in color.
Note: After a system reset, these options return to their default settings. Be sure to set them
up again according to your laboratory’s protocol before running patient samples.
Note: Print, Host and Operator can also be set up from the Main Menu using
F5-Options.
PN 4237521A
1-5

SYSTEM OVERVIEW
STATUS LINE
1.6 STATUS LINE
The status line at the bottom of your screen indicates the current operating status of the HmX
Hematology Analyzer with Autoloader.
07/13/99 19:34 OPR DMS PR P2 HC DB XB WL HWL QC
Table 1.2 Status Line Definition
Symbol Refers to
DMS Data
Management
System
PR* Graphics Printer Autoprint is set
HC Host Computer Auto
DB Data Base Store is ON. Store is OFF. Data Base is not
XB X
WL Worklist Preassigned
Analysis XB is ON. XB is OFF. Last completed
B
Connected to
Analyzer.
to ALL,
ABNORMALS,
or NORMALS.
transmission
ON.
entries pending
on Worklist.
Not connected
to Analyzer.
Autoprint is set
to NONE.
Auto
transmission
OFF.
No preassigned
entries on
Worklist.
Red Yellow White
Not
communicating
with Analyzer.
Printer is
off-line, or
printer is out of
paper.
Not connected
to host.
functional.
System stops.
Reset the
system and
rerun last 2
samples.
batch was OUT.
3 consecutive
or 10 total error
messages are in
the status field.
DMS busy or
receiving data.
Printer is
printing.
Sending data to
host computer.
Data Base is
storing data.
N/A Last completed
The Worklist is
full. (300
preassigned
samples)
DMS is OK.
Printer and
DMS are
connected.
Host and DMS
are connected.
Data Base is
OK.
batch was IN.
Worklist is OK.
HWL Host Worklist Preassigned
entries pending
on the Host
Worklist.
QC Quality Control Auto-Stop is
ON.
P2 Additional
Graphics
Printer.
*Changes to MA for manual printing, BA for batch printing and AU for auto-printing.
Autoprint is ON. Autoprint is
No preassigned
entries on Host
Worklist.
Auto-Stop is
OFF.
OFF.
Host Worklist is
full.
Last control run
had an error
message.
Printer is
off-line OR
printer is out of
paper.
1-6
DMS is
receiving
preassigned
samples from
the host
computer.
Receiving a
control run.
Printer is
printing.
Host Worklist is
OK.
Results of last
control run are
OK.
Printer and
DMS are
connected.
PN 4237521A
STARTUP AND CONTROLS
2
2
IMPORTANT
introduces electrical interference which can cause misleading results. Operate the HmX Hematology
Analyzer with Autoloader with all doors and panels closed.
2.1 STARTUP
1. Are Start Up results already displayed as
the result of a Clean cycle?
r If no, go to step 2.
r If yes, go to step 3.
Note: The Clean cycle consists of 30
minutes in Shut Down followed by an
automatic Start Up. See Chapter 5,
Shut Down for more information.
2. To begin Start Up
a. Select
b. Press Û.
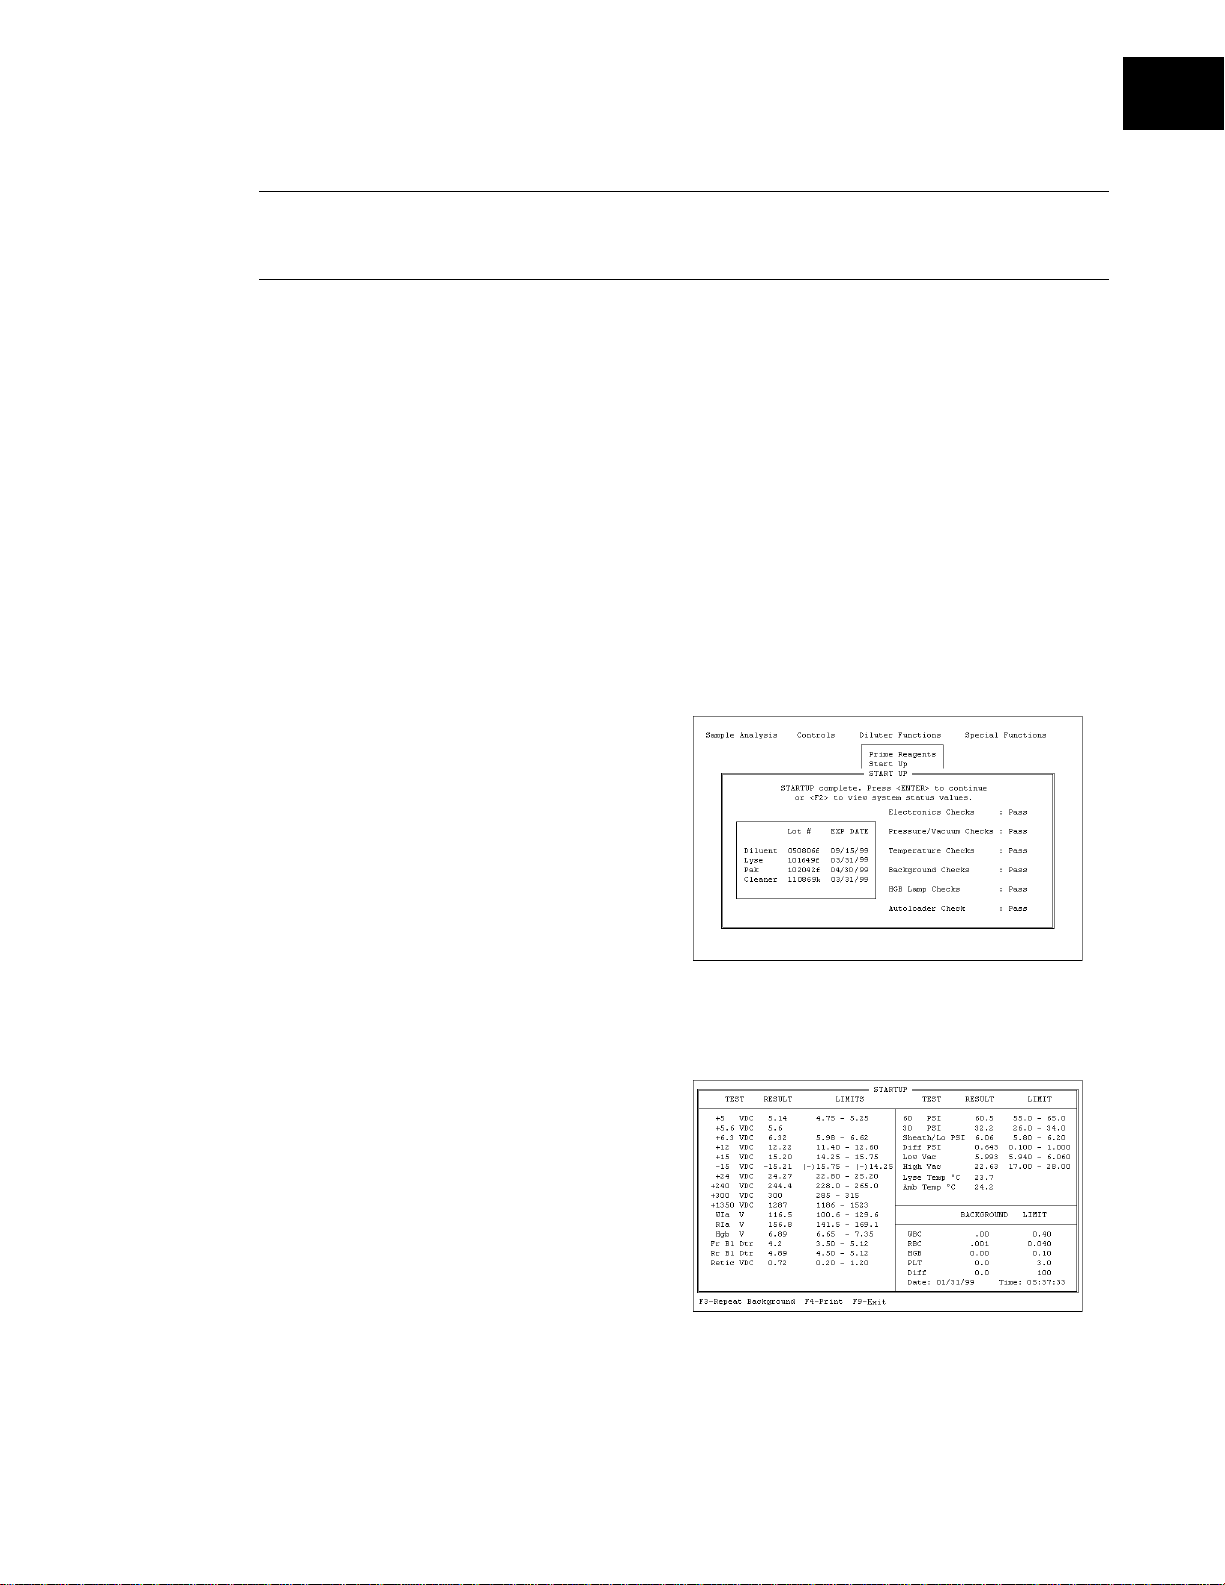
3. Once Start Up is complete, evaluate the
display. Expired reagents and failed
checks appear in red.
Operating the HmX Hematology Analyzer with Autoloader with open doors or panels
Diluter Functions
Start Up.
tt
If the Autoloader Check fails, place a
cassette in the loading bay then select
Special Functions tt Diagnostics tt Operator
Options
Test Routine.
generated during the test, refer to the
Special Procedures and Troubleshooting
manual to continue troubleshooting.
Note: Results print automatically. For
additional printouts, press Ì.
4. Press Ê to view detailed results.
Make sure the Background and other
Start Up results are within limits.
Results outside limits turn red.
r If a background count is red, press
r See the Special Procedures and
tt Autoloader Teststt Autoloader
If there are any errors
Repeat Background.
Ë
Troubleshooting Manual for
additional troubleshooting.
PN 4237521A
2-1
STARTUP AND CONTROLS
CONTROL RUN
2.2 CONTROL RUN
Preparation
Ensure that a control file is set up for each control you intend to run. If you need to set up a
control file, refer to Heading 6.2, Control Set Up.
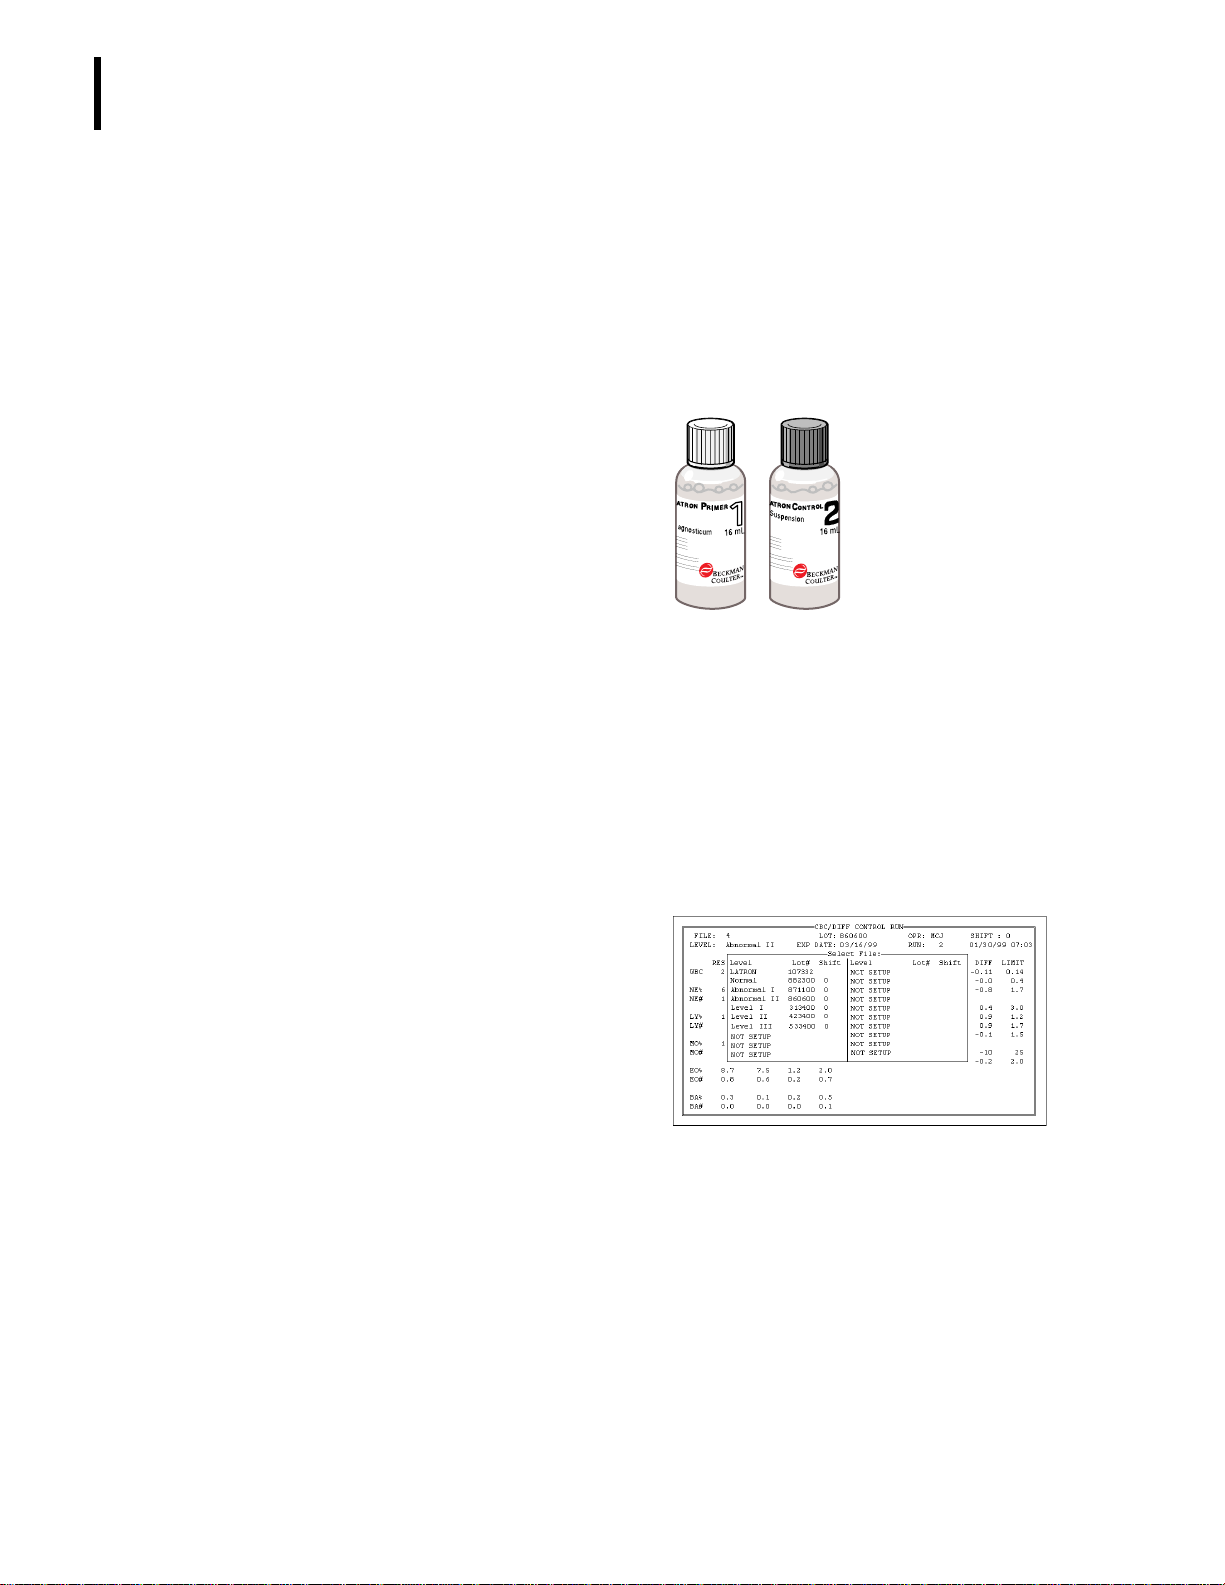
LATEX
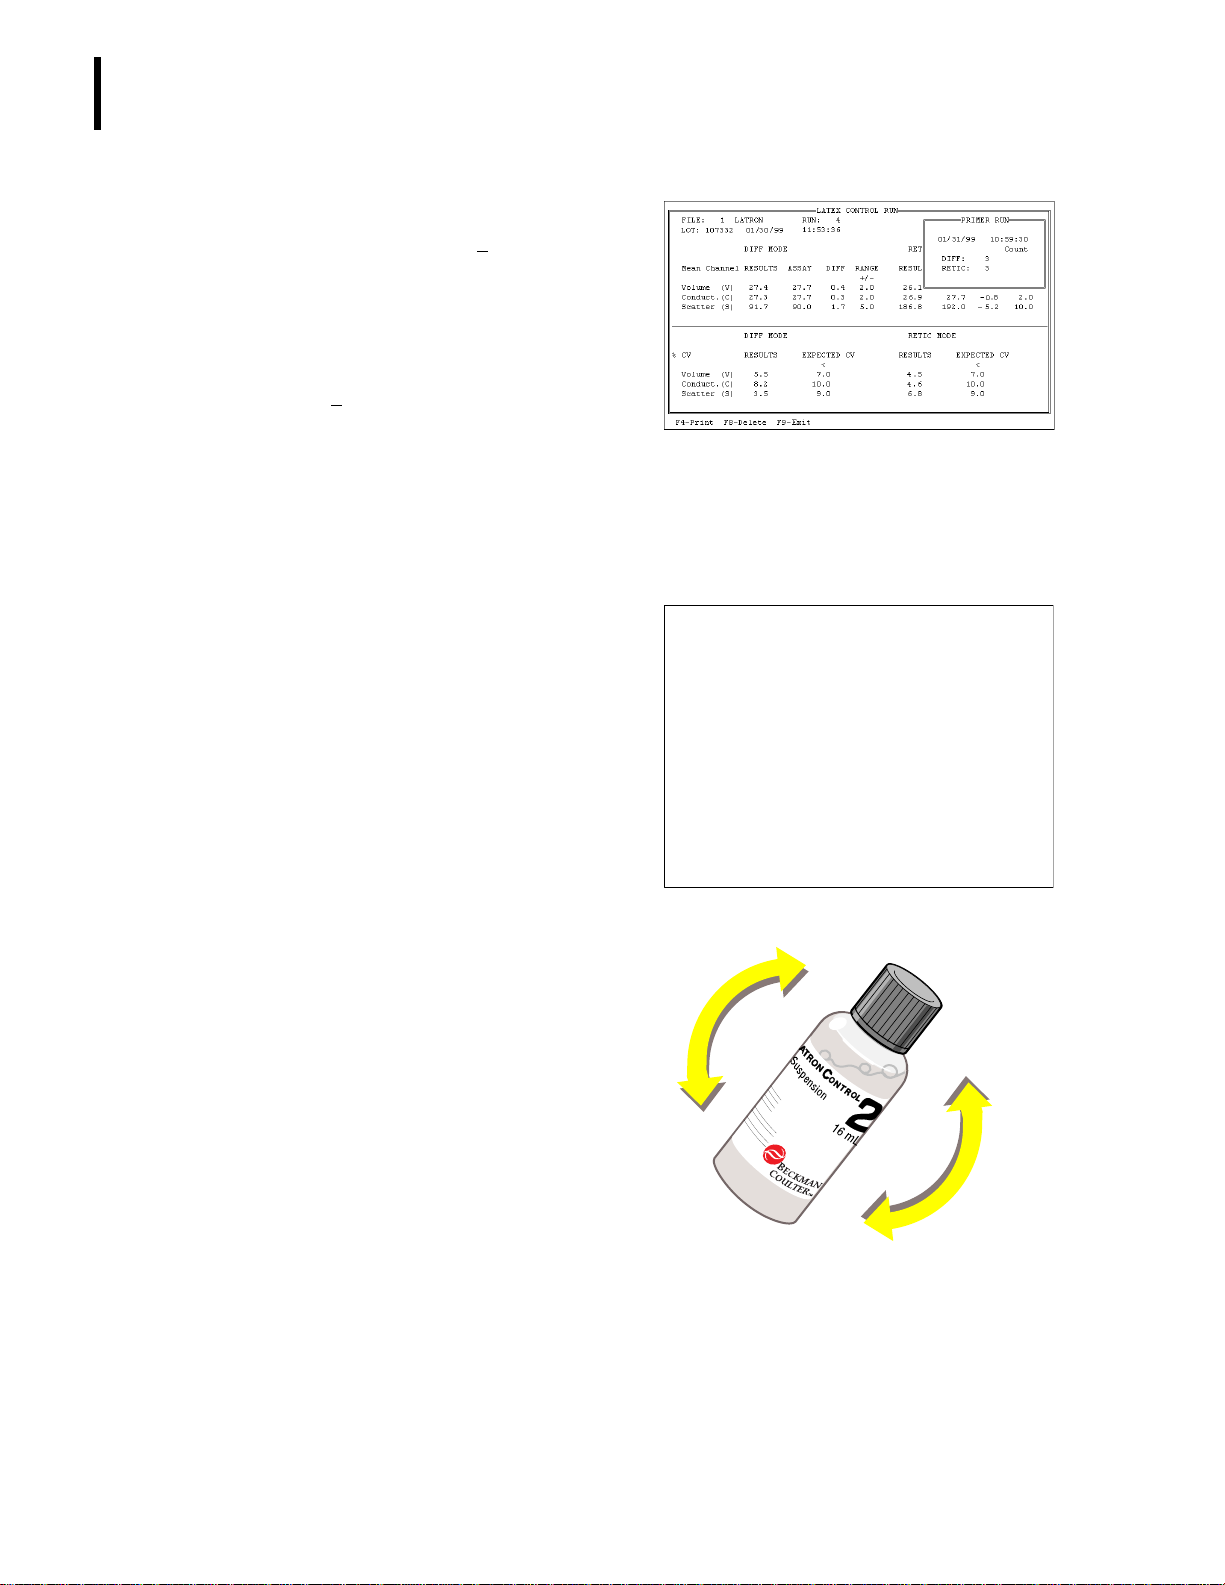
Analyze COULTER LATRON™ primer and
control once each day.
1. Make sure the LATRON primer and
control are within the correct
temperature range. See the package
insert.
a
g
n
o
s
t
i
c
u
m
2. Access the Latex Control Run screen:
screen,
r at the Access
press Ê
RUN CONTROLS
OR
r at the Main Menu, select
Control Run.
Controls
3. If the LATRON file does not appear
a. Press Ê
File.
b. Move the cursor to highlight the
LATRON file.
c. Press Û.
tt
2-2
PN 4237521A
STARTUP AND CONTROLS
CONTROL RUN
2
4. Press Ë Run Ì PRIMER.
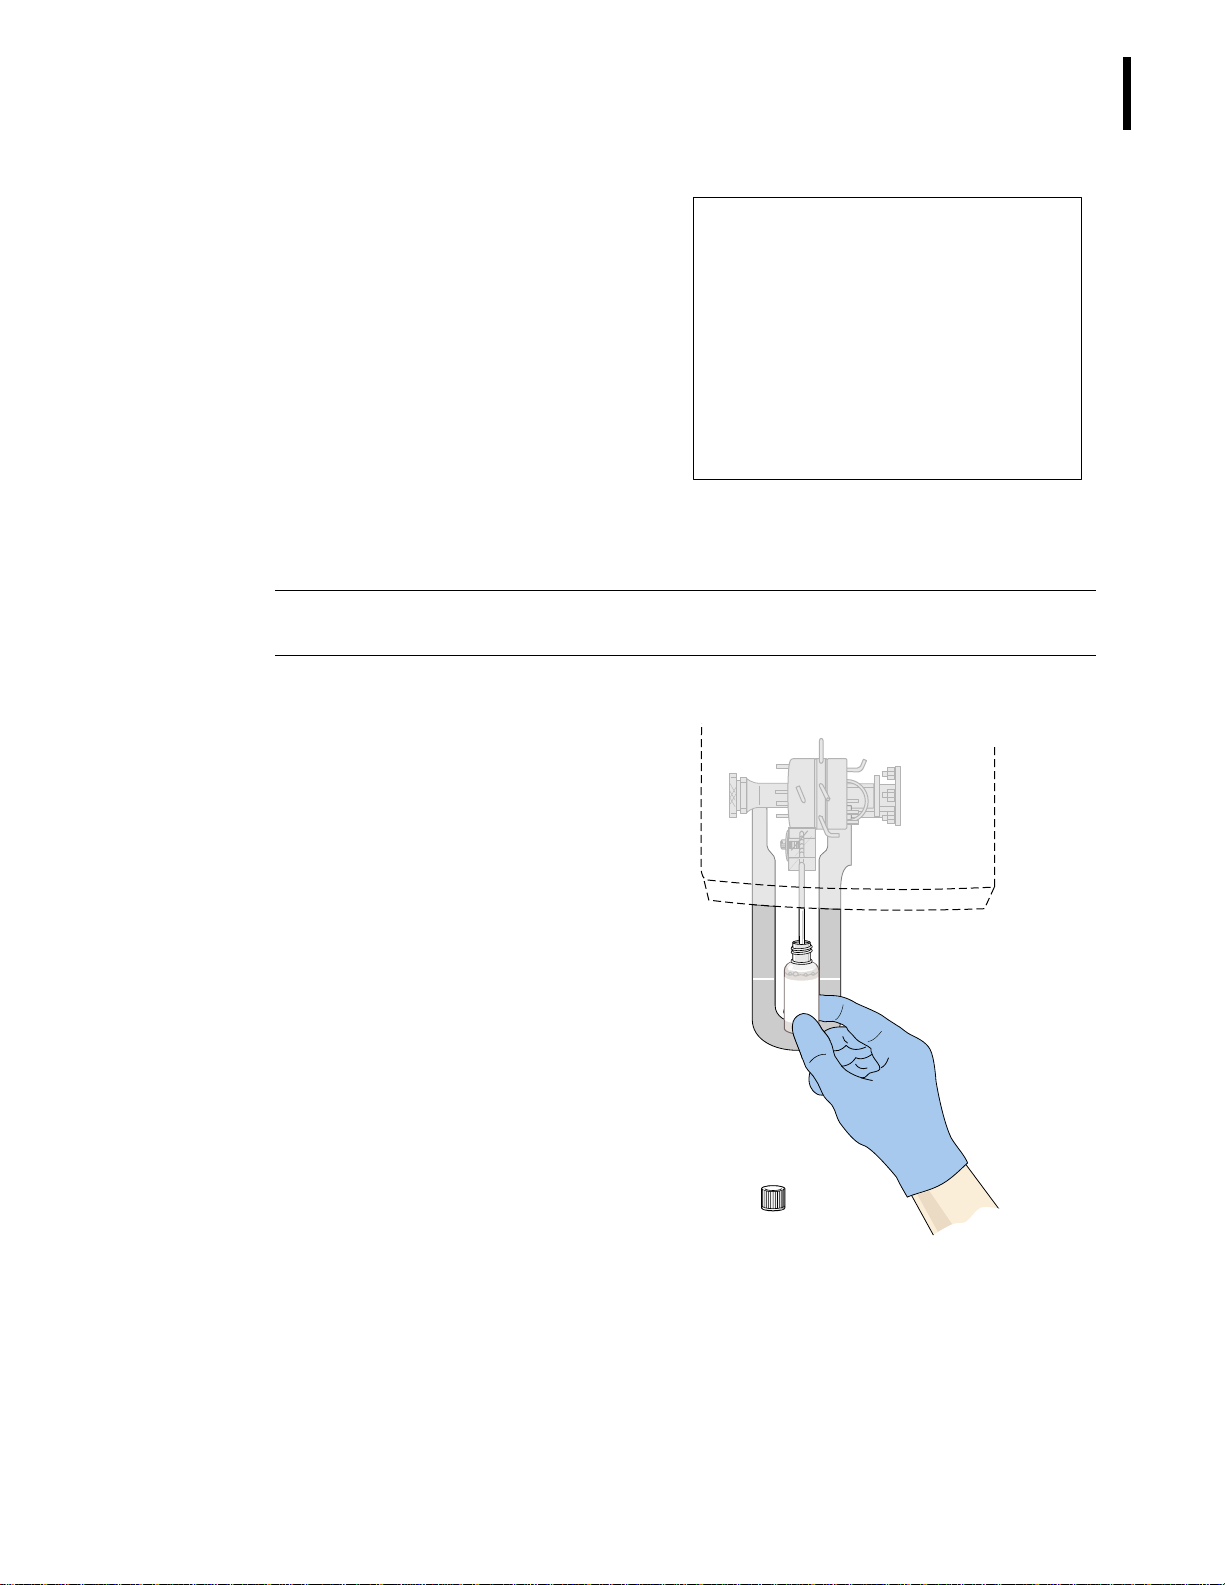
5. Cycle the primer (bottle 1):
IMPORTANT
results. Do not remove the primer bottle until you hear the beep.
a. Immerse the aspirator tip
b. Press and release the sample bar.
Removing the primer bottle before you hear the beep can cause falsely increased primer
completely in the primer.
SAMPLE MODE?
Select to change/ESC to continue
F3 CONTROL (SECONDARY)
F4 PRIMER
F7 PURGE
F8 RINSE
F9 STOP
c. Remove the primer bottle when
you hear the beep.
1
PN 4237521A
2-3
STARTUP AND CONTROLS
CONTROL RUN
6. Evaluate primer results:
a. Are both counts <
500?
r If yes, go to step 7.
r If no, go to step 6b.
b. Cycle a new vial. Make sure it is
free of bubbles. Are both counts
500?
<
r If yes, go to step 7.
r If no, press Ì to print the
screen then call your Beckman
Coulter representative.
7. Press È to remove the Primer Run
window.
8. When SELECT FUNCTION appears on
the status line, press Ë
Ë
CONTROL (SECONDARY)
Run
.
SAMPLE MODE?
F3 CONTROL (SECONDARY)
F4 PRIMER
F7 PURGE
F8 RINSE
F9 STOP
9. Gently mix the control. Invert the bottle
5 to 8 times.
Select to change/ESC to continue
a
g
n
o
s
t
i
c
u
m
2-4
PN 4237521A
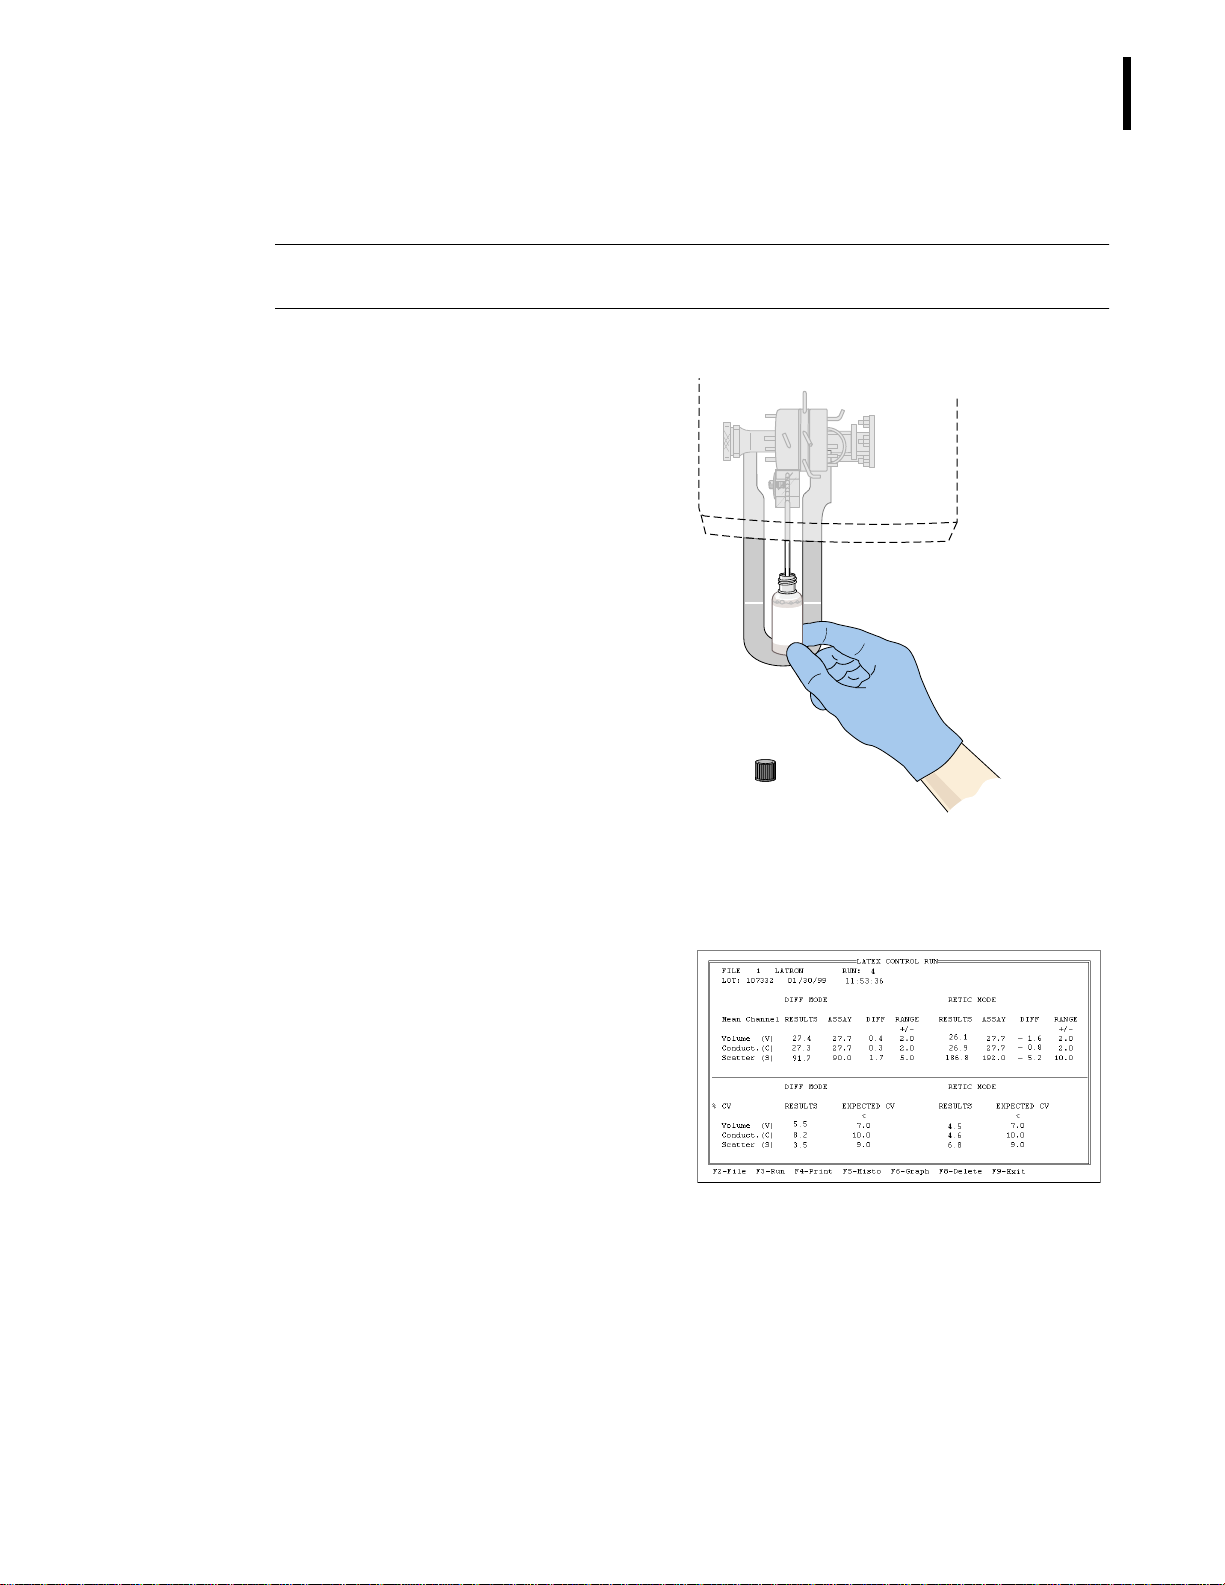
10. Cycle the control (bottle 2):
IMPORTANT
Removing the control bottle before you hear the beep can cause misleading control results.
Do not remove the control bottle until you hear the beep.
a. Immerse the aspirator tip
completely in the control.
b. Press and release the sample bar.
c. Remove the control bottle when
you hear the beep.
2
STARTUP AND CONTROLS
CONTROL RUN
2
11. Check for H (High) or L (Low) beside
the results for both modes.
r If there are no H's or L's, results are
within range.
r If you see an H or L, go to Table
2.1. Follow the troubleshooting
steps until you solve the problem.
12. Optional: Press Ì to print the results
for your logbook.
PN 4237521A
2-5

STARTUP AND CONTROLS
CONTROL RUN
Table 2.1 When LATRON™ Control is Out of Limits
Possibility Action
Assigned value or range is incorrect.
Bubbles in the flow cell or improper vial handling Rerun the primer and then the control.
Control is:
r
contaminated
r
improperly mixed
r
past open-vial expiration date
Plugged flow cell.
Be sure the assigned values and ranges match the
ones on the LATRON control package insert. If in
error, correct them by selecting
Set Up
tt Control Set Up.
Ensure that the aspirator tip is clean and dry. Try a
new vial of LATRON control. Mix gently according to
directions on the package insert. Do not use expired
control.
1.
2.
3.
4.
5.
6.
7. If the problem remains, either:
Ë Run.
Press
Ï PURGE
Press
Ì
Press
primer again.
Press
Press
(SECONDARY).
again.
If the control is still "out," repeat steps 1
through 5
r
r
then call your Beckman Coulter representative
for help.
PRIMER
È .
Ë Run Ë CONTROL
Cycle the LATRON control
.
Perform Shutdown or
Turn the DIFF OFF and run CBCs only
Special Functions
to purge the flow cell
.
Cycle the LATRON
tt
.
2-6
There is an instrument change. Call your Beckman Coulter Representative for help.
PN 4237521A

STARTUP AND CONTROLS
CONTROL RUN
Cycling COULTER 5C® Cell Controls in Primary Mode with Bar-Code Labels
Your HmX Hematology Analyzer with Autoloader is a totally automated, multitasking system.
COULTER 5C cell control, with bar-code labels, is the recommended method of QC. The
instrument recognizes a control by its bar code and automatically assigns the control results
to the correct file. If the bar-code label cannot be read, follow the procedure Cycling
Commercial Cell Controls without Bar-Code Labels.
2
IMPORTANT
and therefore are not evaluated for being IN or OUT of control. Cycle 5C cell control with the DIFF ON.
IMPORTANT
on the package insert to properly warm and mix 5C cell control.
If you cycle 5C cell control with the DIFF OFF, differential results do not post to the control file
Misleading results can occur if 5C cell control is not prepared properly. Follow the procedure
1. Follow the directions on the cell control
package insert for storage, preparation
and mixing.
2. Does SELECT FUNCTION appear at the
lower right corner of the DMS screen?
r If no, go to step 3.
r If yes, continue with this step.
a. Access the Run Samples screen:
r at the Access screen,
press É
RUN SAMPLES
OR
r at the Main Menu, select
Sample Analysis
Run Samples.
tt
b. The instrument automatically
prepares itself for Primary mode,
DIFF ON. Go to step 7.
PN 4237521A
3. Access the Run Samples screen:
r at the Access screen,
press É
RUN SAMPLES
OR
r at the Main Menu, select
4. Press
Analysis
Ë
Run Samples.
tt
Run.
Sample
2-7
STARTUP AND CONTROLS
CONTROL RUN
5. Make sure the DIFF is ON. If it is OFF,
press Î
Note: If
press Ñ
6. Does the top of the
display
DIFF ON/OFF.
SAMPLE MODE? is not displayed,
STOP first.
F3-Run window
PRIMARY: SAMPLE ANALYSIS?
r If yes, press È.
r If no, press Ê
START PRIMARY.
SAMPLE MODE?
START PRIMARY
F2
SECONDARY
F3
PREDILUTE CBC
F4
RETIC
F5
DIFF ON/OFF
F6
PURGE
F7
RINSE
F8
STOP
F9
DIFF: ON
BLOOD DET: ON
Select to change/ESC to continue
PRIMARY: SAMPLE ANALYSIS
START PRIMARY
F2
SECONDARY
F3
PREDILUTE CBC
F4
RETIC
F5
DIFF ON/OFF
F6
PURGE
F7
RINSE
F8
STOP
F9
DIFF: ON
BLOOD DET: ON
Select to change/ESC to continue
7. Mix the control tube according to
package insert directions.
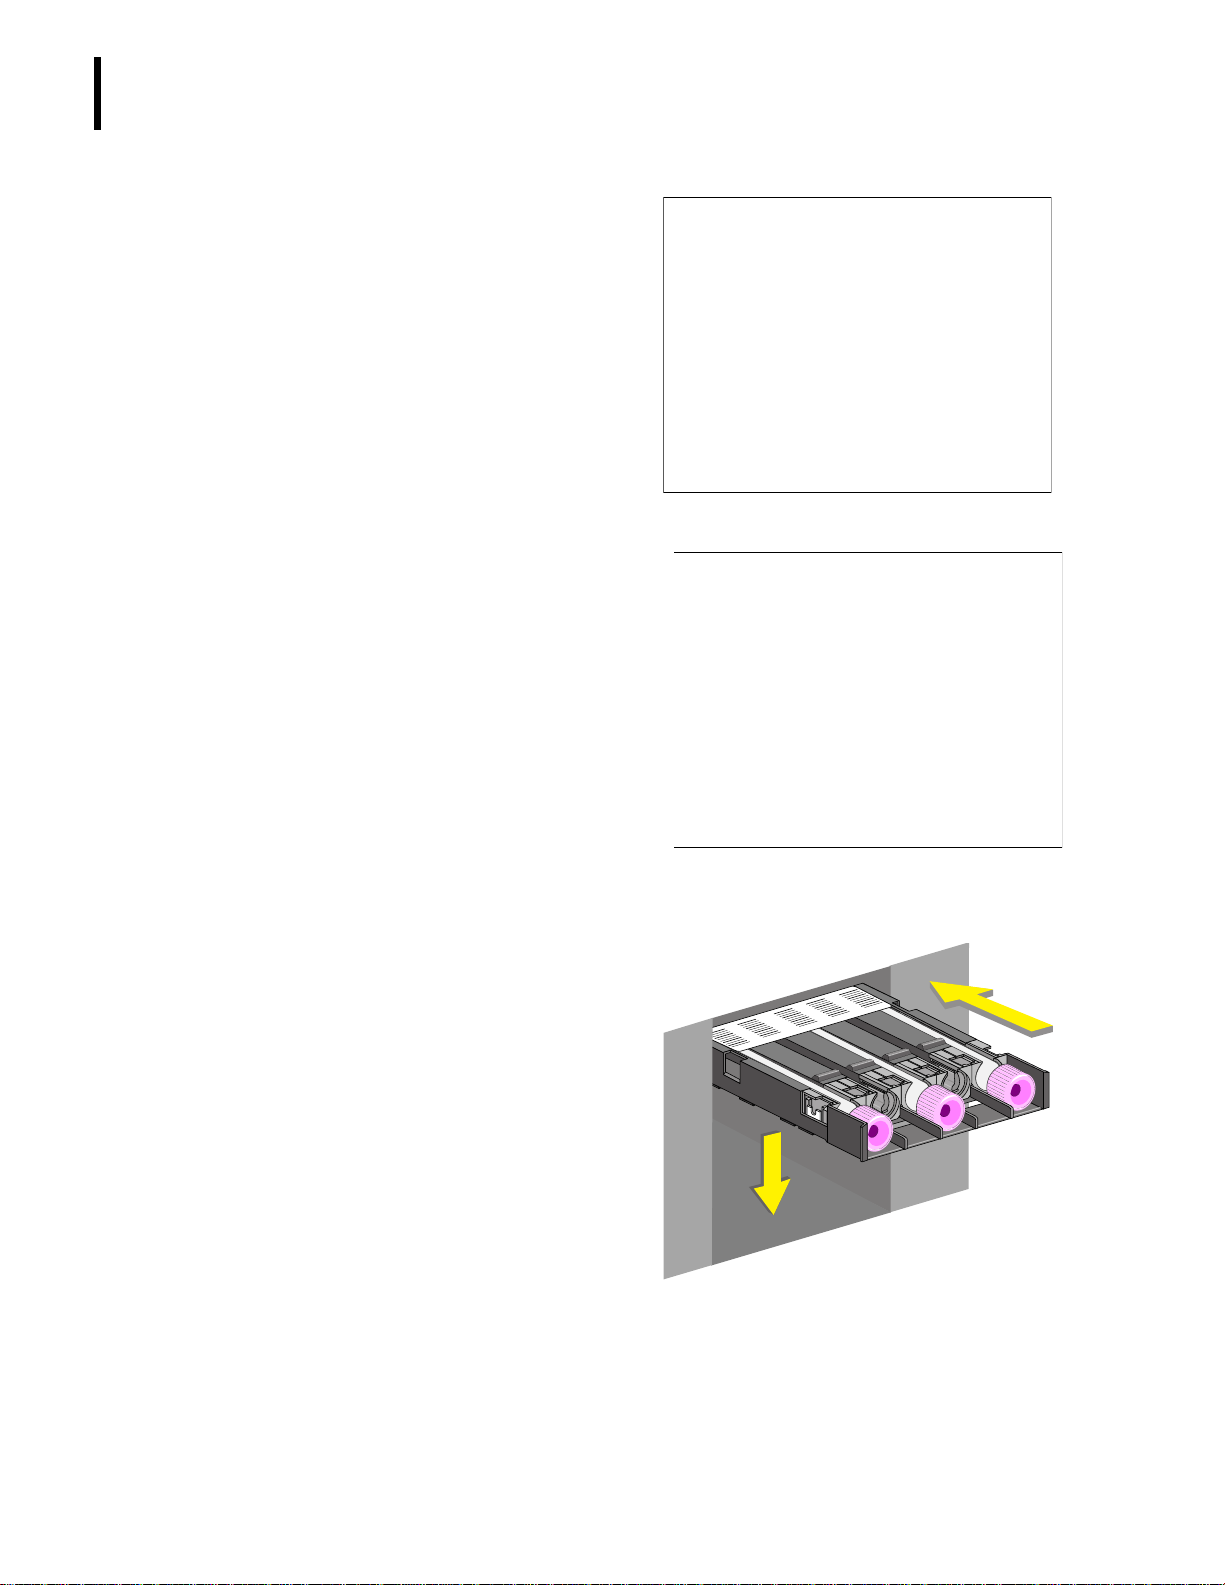
8. Place the control tubes in a cassette.
r Control tubes must be clean and
dry.
r Bar-code labels must be visible
through the top of the cassette.
r Control tubes must fit securely.
r Tube stoppers must not extend
beyond the top of the cassette.
9. Place the cassette in the loading bay.
r Results are placed automatically in
the correct file as long as the
instrument can read the bar code.
r Results do not appear on the Run
Samples screen.
r If any result is out of control, an
error message displays.
2-8
PN 4237521A
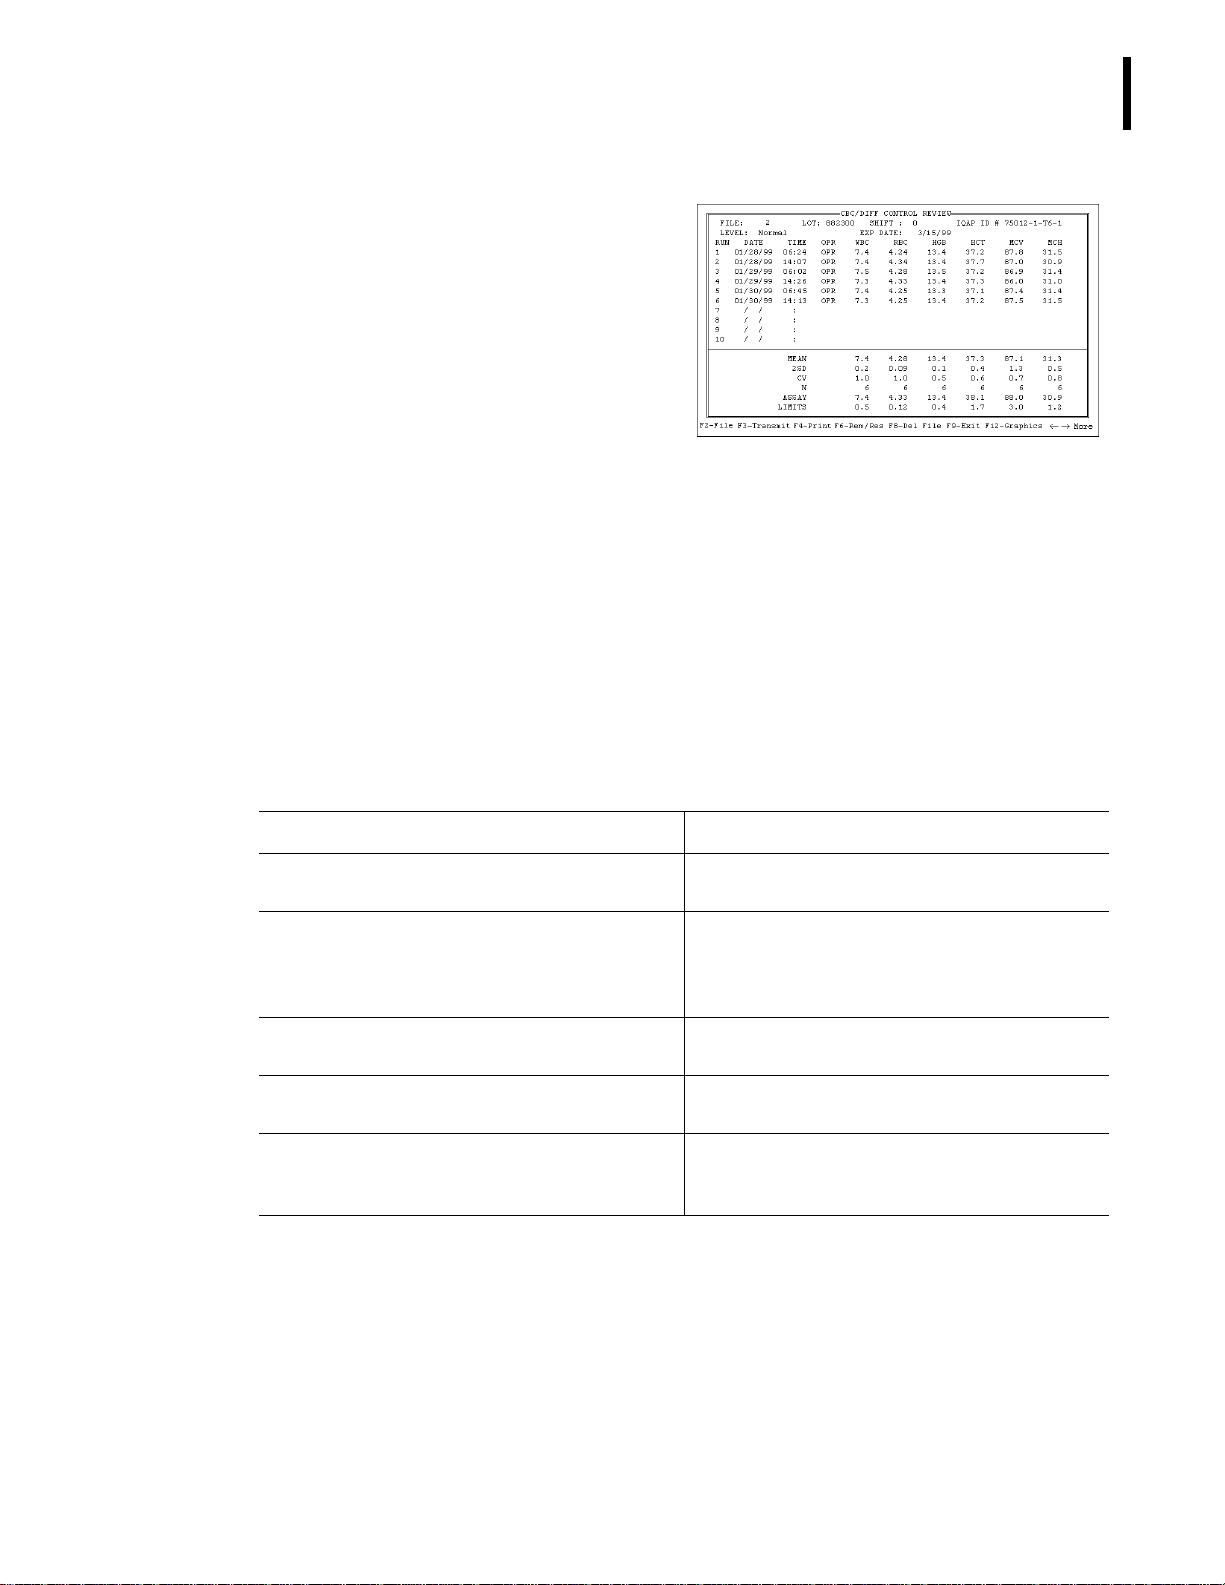
10. Check the results of the controls.
STARTUP AND CONTROLS
CONTROL RUN
2
a. Select
Controls tt Review or Report.
b. Check for H (High) or L (Low)
beside the results.
r
If there are no H's or L's,
results are within range.
r
If you see an H or L, go to
Table 2.2. Follow the
troubleshooting steps until
you solve the problem.
Note: For more information about
Review or Report, see Heading 2.3
c. Use Ê
File to select other files to
review.
11. Optional: To print your last control run,
Controls tt Control Run. Press Ì
select
Print. Use Ê File to select other files to
print.
Table 2.2 When CBC/DIFF Control is Out of Limits
Possibility Action
Improper mixing Follow the instructions on the package insert. Rerun
control.
Control file set up incorrectly Make sure the assigned values and ranges match
those on the control package insert. If in error,
correct them by selecting
Up tt Control Set Up.
Chance (statistical outlier) Rerun the control. If it is still "out," try the next
possibility.
Change in the control Try another vial or level of control. Follow directions
on the package insert for proper handling.
Instrument change Watch for normal sample flow. Call your Beckman
Coulter Representative to help you troubleshoot
abnormal operation.
Special Functions tt Set
PN 4237521A
2-9
STARTUP AND CONTROLS
CONTROL RUN
Cycling Commercial Cell Controls without Bar-Code Labels
1. Follow the directions on the cell control
package insert for storage, preparation
and mixing.
2. Access the appropriate Control Run
screen:
r at the Access screen,
press Ê
OR
RUN CONTROLS
r at the Main Menu, select
Control Run
.
Controls
3. If the correct file does not appear
a. Press Ê
File.
b. Move the cursor to highlight the
correct file.
c. Press Û.
4. Press Ë
Run Ê START PRIMARY.
5. Mix the control tube according to
package insert directions.
6. Load the control tube into a cassette
and place the cassette in the loading bay.
7. Wait until the control results appear.
Check for H (High) or L (Low) beside
the results.
tt
2-10
r If there are no H's or L's, results
are within range. Go to step 8.
r If you see an H or L, finish running
any other levels of control then go
to Table 2.2. Follow the
troubleshooting steps until you
solve the problem.
r Optional: Press Ì to print the
control results.
PN 4237521A
8. To display another level of control:
STARTUP AND CONTROLS
CONTROL RUN
2
a. Press Ê
b. Move the cursor to highlight the
appropriate file.
c. Press Û.
9. Repeat steps 5 through 8 for any
remaining controls.
File.
Cycling 5C Cell Control in the Secondary Mode
5C cell control is assayed only for Primary mode. If you use Secondary mode, your laboratory
must determine its own means and expected ranges for each parameter.
IMPORTANT
checked. To avoid misleading results, ensure complete immersion of the aspirator tip in the sample. Do not
remove the sample until you hear the beep.
1. Follow the directions on the cell control
package insert for storage, preparation
and mixing.
2. Access the appropriate Control Run
screen:
Blood detectors are inactive in Secondary mode. Sample and aspiration integrity are not
r at the Access screen,
press Ê
r at the Main Menu, select
Control Run.
3. If the correct file does not appear
a. Press Ê
b. Move the cursor to highlight the
correct file.
c. Press Û.
4. Press Ë
5. Mix the control tube according to
package insert directions.
RUN CONTROLS
OR
.
File
Run Ë SECONDARY.
Controls
tt
PN 4237521A
2-11
STARTUP AND CONTROLS
CONTROL RUN
6. Cycle the control:
a. Open the tube and immerse the
b. Press and release the sample bar.
c. Remove the tube when you hear
aspirator tip
the beep.
into the sample.
b
7. Check for H (High) or L (Low) beside
the results on the screen.
r If there are no H's or L's, results are
within range.
r If you see an H or L, go to Table
2.2. Follow the troubleshooting
steps until you solve the problem.
8. Optional: press Ì to print the control
results.
9. Use Ê
File to select other files and run
additional levels of control as required.
COULTER Retic-C™ Cell Control
Retic-C cell control is a hematology reference control that monitors Beckman Coulter systems
with reticulocyte technology using VCS (volume, conductivity, and light scatter). Use Retic-C
cell controls, Levels I, II and III, with the COULTER ReticPrep™ Reagent kit.
IMPORTANT
misleading or erroneous results. Perform the pre-prep procedures according to the instructions below.
Modifications to the pre-prep procedures or failure to follow these instructions may lead to
2-12
CAUTION
the system. Perform the pre-prep procedures according to the instructions below.
IMPORTANT
procedure on the package insert to properly warm, mix and prepare Retic-C cell control for analysis.
Running whole blood or control through the aspirator probe while in the Retic mode can damage
Misleading results can occur if Retic-C cell control is not prepared properly. Follow the
PN 4237521A
 Loading...