

Cotell FG1088-IP(2S)SP, Fuego1000 SmartStation FG1088-IP (1S) SP User Manual

FG1088-IP(2S)SP
Hospitality Telephones
User Guide
Fuego1000™ SmartStation™
Desktop IP Telephone
FG1088-IP (2S) SP
2-line IP Guestroom Telephone
FG1088-IP(2S)SP
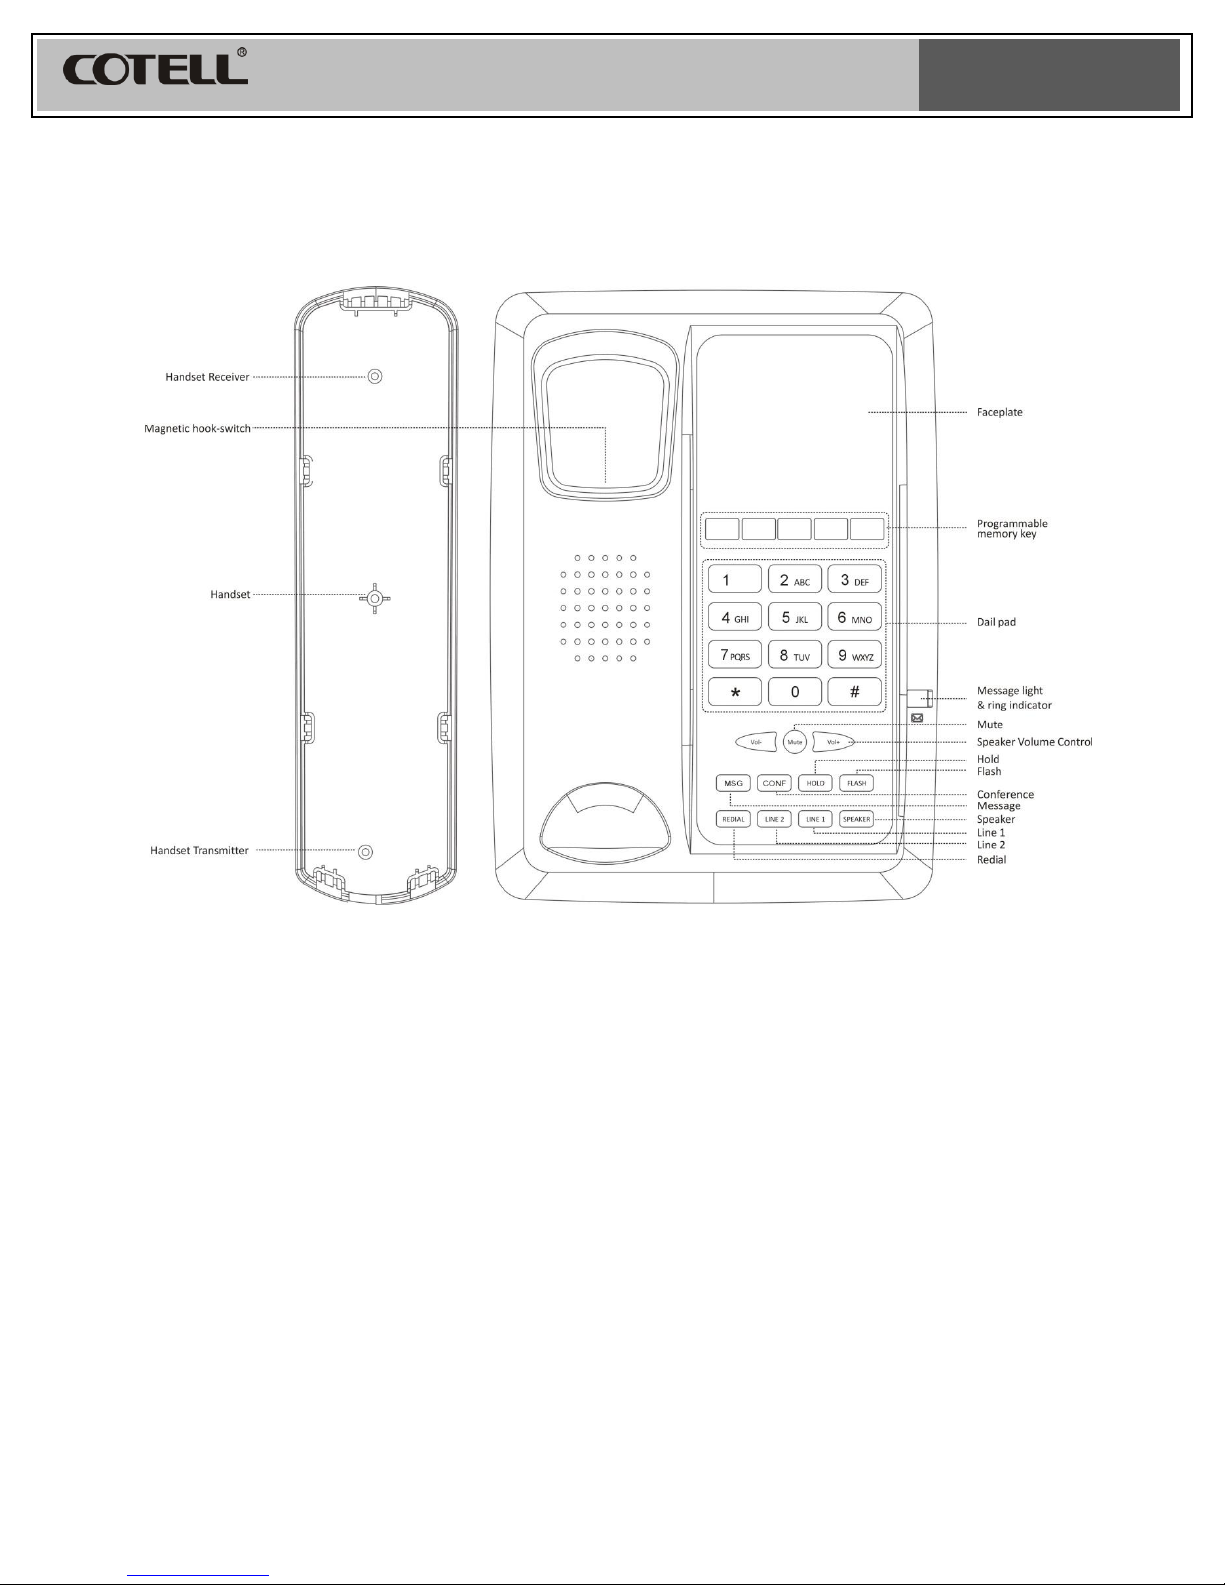
FG1088-IP(2S)SP Face Drawing
Features
Support two SIP account
Support SIP V2 (RFC3261) protocol
Support RFC2833 (RTP Payload for DTMF
Digits, in band/out band DTMF)
Support RFC3264 / 3489 / 3515 (Refer) /
2327 (SDP) / 3581 / 3265 (event
notification) / 3842 (MWI)
Support RTP / NTP / DHCP / TFTP / HTTP
protocols
Supported STUN, DNS, PPPoE, static IP
and DHCP. Refresh DHCP when network
reconnected
Separated outbound proxy, registrar IP and
port
Configurable SIP port
Configurable re-registration time
Inter-digit timeout configurable
Audio codec supported: G.711a, G.711u,
G.723, G.729
Support CNG and VAD (on G.723 and
G.729)
Adjustable jitter buffer
Call hold, call waiting, call transfer
Support 3-way conference call
Last number redial
message notification
volume up/down, mute microphone /
speaker-phone
Allow SIP-Call Log
firmware upgrade through TFTP
web interface configuration with password
configuration backup and restore through
web page
factory default setting restore

FG1088-IP(2S)SP
Installation
1. Unpack the box and check for the following items:
a. Main telephone body c/w base unit
b. Handset
c. Handset cord
d. RJ45 Line cord
e. Power Adaptor (option)
2. Connect the handset to the telephone using the coiled handset cord provided.
3. Connect one end of the line cord to the telephone RJ45 socket and the other end to the
wall telephone outlet.
4. Connect the power adaptor to the phone (option)
5. Install the faceplate (if delivered separately) onto the telephone.
Operation
A. Initiating a Call
Using the handset
1. Lift the handset.
2. Listen to dial tone.
3. Press the desired number on the keypad and wait for a few second or press “#” to dial
out. Press a memory button for auto speed dial.
4. To make another call, press Line 1 or Line 2 button. (Press Line 1 to choose SIP
account 1 to dial. Press Line 2 to choose SIP account 2 to dial)
5. To end the call, place the handset back on the cradle.
Using speakerphone
1. Press speaker button (Line 1 or Line 2). The red LED (Line 1 or Line 2) indicates that the
speaker is active. (Line 1 switch to SIP account 1. Line 2 switch to SIP account 2)
2. Listen to dial tone
3. Press the desired number on the keypad and wait for a few second or press # to dial out.
Press a memory button for autodial.
4. To cut off the call temporarily to make another call, press the flash button.
5. To end the call, press the speakerphone button again. The LED will goes off.
B. Answering a Call
An audible ringing sound and the flashing LED (Line 1 or Line 2) indicates and incoming
call. Line 1 LED flash represents account 1 incoming call. Line 2 LED flash represents
account 2 incoming call.
Using the handset
1. Lift up the handset to answer the call.
2. To end the call, place the handset back on the cradle.

FG1088-IP(2S)SP
Using speakerphone
1. Press the speakerphone, selects Line 1or 2 button to answer the call.
2. To end the call, press the speakerphone button again. The LED will turn off.
C. Redial
Using the handset
1. Lift up the handset, press the REDIAL button to initial a redial call
2. To end the call, place the handset back on the cradle.
Using the speakerphone
1. Press the speakerphone, selects Line 1or 2 button. The red LED (Line 1 or Line 2)
indicates the speakerphone is active, press the REDIAL button to initial a redial call
2. To end the call, press the speakerphone again. The LED will turn off.
D. Speakerphone Volume
1. Adjust the Vol+ or Vol- button to increase or decrease the speakerphone volume.
E. Ringer Volume
1. Flip the Hi-Lo switch below the telephone body to increase or decrease the ring volume.
F. Call Transfer/Flash
Call Transfer
1. Unattended Transfer (Blind Transfer):
Using the handset
1. During conversation using handset (Either account 1 or 2).
2. Press Flash key and dial the third party’s phone number (example: “Flash”+1234)
3. To activate unattended transfer, place the handset back on the cradle.
2. Attended Transfer:
Using the handset
1. The phone is in conversation. ( account 1 or account 2)
2. To activate attended transfer, press “Flash” key and dial the third party’s phone number
followed by pressing # button or wait for a few seconds.
3. If the third party’s phone is answered, place the handset back on the cradle to
complete the transfer operation.
G. Hold
1. During conversation, press the HOLD button will place a call on hold. The opposite party
will hear music.
2. To deactivate the call on hold, press the HOLD button again.

FG1088-IP(2S)SP
H. Mute
1. During conversation, press the MUTE button will disable the opposite party from hearing
your conversation
2. To deactivate Mute, press the MUTE button again.
I. CONF
Two lines in the different Accounts
1. Ensure account 1 and account 2 had register SIP account.
2. Both accounts are in conversation. (account 1 in conversation and account 2 on hold OR
Line 2 in conversation and Line 1 on hold).
3. Press “CONF” button to complete 3-way different accounts conference
Both lines in the same Account
1. During conversation in account 1(or account 2), press flash and dial the third party’s
phone number followed by pressing # button(Flash + 1234 #)
2. If the third party’s phone is answered, press “Flash” again to complete same Account 3-
way conference.
J. Programmable Memory Button
FG1088-IP (2S) SP has up to 10 programmable memory buttons. These buttons can be used to store
commonly dial numbers or codes for activating PABX features.
Storing a number or a code
1. Please go to the phone web for memory button programming.
K. Message Retrieval
FG1088A (1S) SP requires 1 of the 10 memory button to be reserved for message retrieval
button. The mail box number will be programmed into this memory location “Message” or “MSG”.
Set up the “Voice Mail Extension” in the phone Web.
When there is an incoming message, the message indicator will light up.
Retrieve a message using the handset
1. Lift up the handset; press the “Message” or “MSG” button to retrieve the message.
2. Once completed, place the handset back on the cradle
Retrieve a message using the speakerphone
1. Press the speakerphone button, the red LED indicates that the speakerphone is active.
Press the “Message” or “MSG” button to retrieve the message.
2. Once completed, press the speakerphone again. The red LED will turn off.
L. LINE 1 / LINE 2
1. Press the Line 1 button to select SIP account 1 or Press Line 2 button to select SIP
account 2.
FG1088-IP(2S)SP
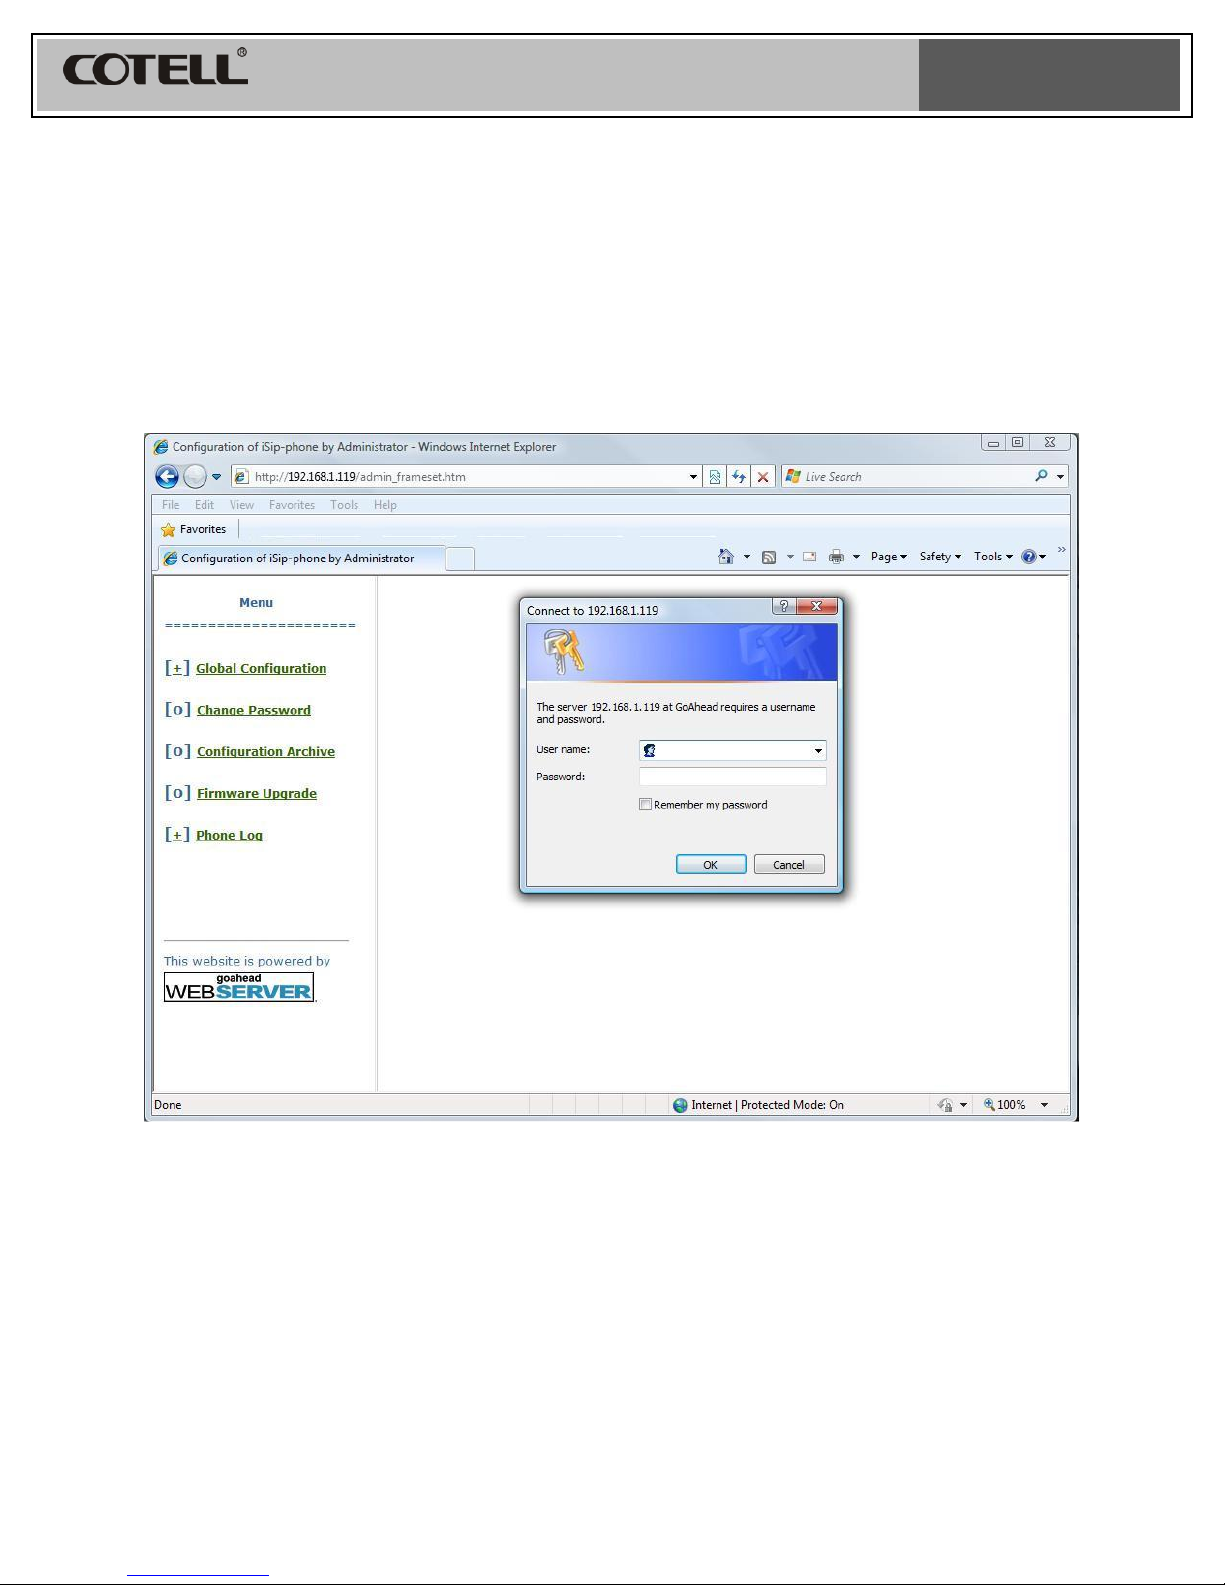
Web Configuration
The IP phone can be remote configure via web. The interface support Internet Explorer and
Mozilla Firefox.
A. Use web interface
Type http://<Phone IP Address>/ on the browser to login.
Login name: admin
Password: 1111
B. User Configure
You can configure Username, Password, Domain Name, Registrar, Registrar Port, Outbound
Proxy, Outbound Proxy Port, and Voice Mail.

FG1088-IP(2S)SP
After finish setting, Press “bottom” to jump to bottom of the webpage, click “Save Configuration”
to save the setting.
C. Call Feature(Speed Dial)
You can configure Speed Dial via web. You can save internal call number or external call
number.

FG1088-IP(2S)SP
D. Phone Media Settings
There are 4 Phone media settings, which include Voice Codec、VAD、CNG and DTMF
Generation. Voice Codec included G.711A、G.711u、G.723.1 and G.729A.VAD and CNG
enable or disable. DTMF Generation included In-band、RFC2833 or both.
 Loading...