

Page 1
Issue Number: Costar 170615
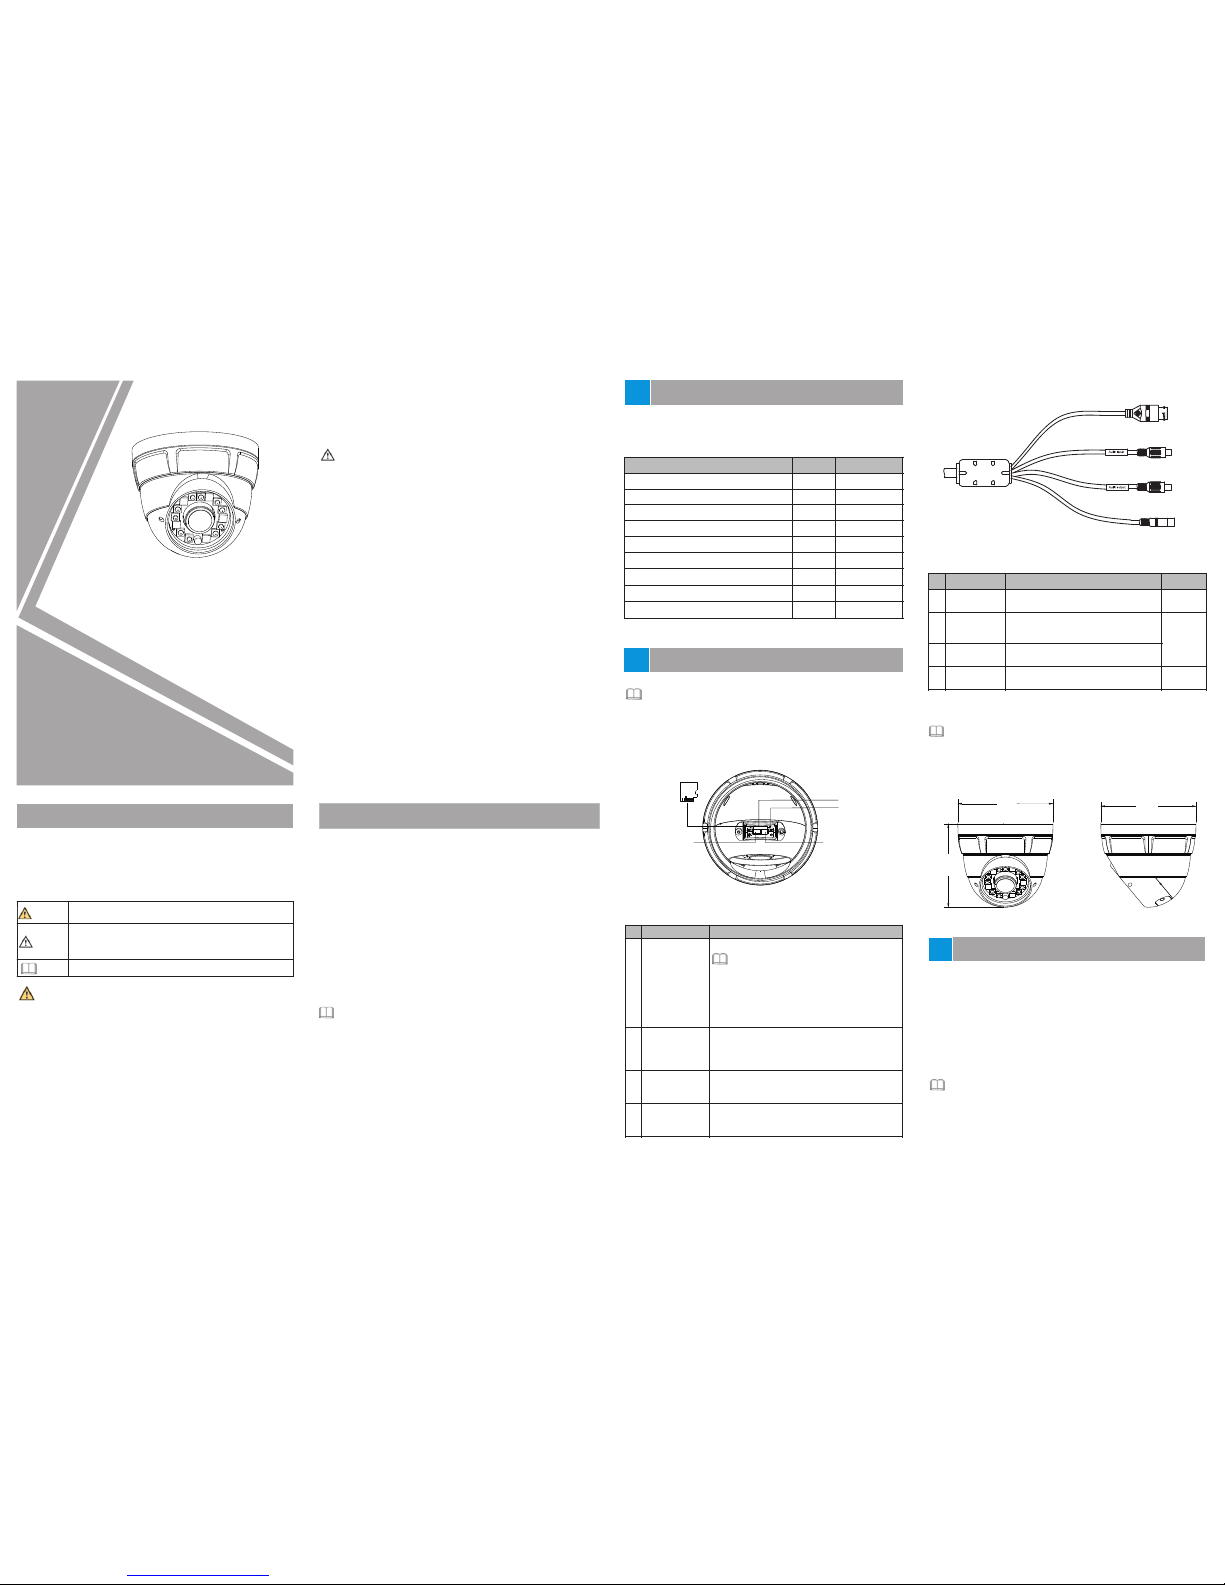
Eyeball Network Camera
Quick Setup Guide
Special An no un cement
For mo re info rmati on, ple ase ref er to CD an d websi te.
Ful ly unde rstan d this do cumen t befor e using t his dev ice, an d
str ictly o bserv e rules i n this do cumen t when us ing thi s devic e. If
you i nstal l this de vice in p ublic p laces , provi de the ti p "You have
ent ered th e area of e lectr onic su rveil lance " in an eye -catc hing
pla ce. Fai lure to c orrec tly use e lectr ical pr oduct s may cau se fire
and s evere i njuri es.
It al erts yo u to mode rate da ngers w hich, i f not
avo ided, m ay caus e minor o r moder ate inj uries .
It al erts yo u to risk s. Negl ect of th ese ris ks may
cau se devi ce dama ge, dat a loss, d evice
per forma nce det erior ation , or unpr edict able re sults .
It pr ovide s addit ional i nform ation .
Str ictly o bserv e insta llati on requ ireme nts whe n insta lling t he
dev ice. The m anufa cture r shall n ot be hel d respo nsibl e for
dev ice dam age cau sed by us ers' no n-con forma nce to th ese
req uirem ents.
Str ictly c onfor m to loca l elect rical s afety s tanda rds and u se
pow er adap ters th at are ma rked wi th the LP S stand ard whe n
ins talli ng and us ing thi s devic e. Othe rwise , this de vice ma y be
dam aged.
Use a ccess ories d elive red wit h this de vice. Th e volta ge must
mee t input v oltag e requi remen ts for th is devi ce.
If th is devi ce is ins talle d in plac es with u nstea dy volt age, gr ound
thi s devic e to disc harge h igh ene rgy suc h as elec trica l surge s in
ord er to pre vent th e power s upply f rom bur ning ou t.
Whe n this de vice is i n use, en sure th at no wat er or any l iquid
flo ws into t he devi ce. If wa ter or li quid un expec tedly f lows in to
the d evice , immed iatel y power o ff the dev ice and d iscon nect al l
cab les (su ch as pow er cabl es and ne twork c ables ) from th is
dev ice.
Do no t focus s trong l ight (s uch as li ghted b ulbs or s unlig ht) on
Avoi d heavy l oads, i ntens ive sha kes, an d soaki ng to pre vent
dam ages du ring tr anspo rtati on and st orage . The warr anty do es
not c over an y devic e damag e that is c aused d uring s econd ary
pac kagin g and tra nspor tatio n after t he orig inal pa ckagi ng is
tak en apar t.
Pro tect th is devi ce from f all-d own and i ntens ive str ikes, k eep the
dev ice awa y from ma gneti c field i nterf erenc e, and do n ot inst all
the d evice i n place s with sh aking s urfac es or und er shoc ks.
Cle an the de vice wi th a soft d ry clot h. For st ubbor n dirt, d ip the
clo th into s light n eutra l clean ser, gen tly wip e the dir t with th e
clo th, and t hen dry t he devi ce.
Do no t jam the v entil ation o penin g. Foll ow the in stall ation
ins truct ions pr ovide d in this d ocume nt when i nstal ling th e devic e.
Kee p the dev ice awa y from he at sour ces suc h as radi ators ,
ele ctric h eater s, or oth er heat e quipm ent.
Kee p the dev ice awa y from mo ist, du sty, extr emely h ot or col d
pla ces, or p laces w ith str ong ele ctric r adiat ion.
If th e devic e is inst alled o utdoo rs, tak e insec t- and mo istur epro of meas ures to a void ci rcuit b oard co rrosi on that c an affec t
mon itori ng.
Rem ove the p ower pl ug if the d evice i s idle fo r a long ti me.
Bef ore unp ackin g, chec k wheth er the fr agile s ticke r is dama ged.
If th e fragi le stic ker is da maged , conta ct cust omer se rvice s or
sal es pers onnel . The manu factu rer sha ll not be h eld res ponsi ble
for a ny arti ficia l damag e of the fr agile s ticke r.
All c omple te prod ucts so ld by the m anufa cture r are del ivere d
alo ng with n amepl ates, and a ccess ories a fter
str ict ins pecti on. The ma nufac turer s hall no t be held r espon sible
for c ounte rfeit p roduc ts.
The m anufa cture r will up date th is manu al acco rding t o produ ct
fun ction e nhanc ement o r chang es and re gular ly upda te the
sof tware a nd hard ware de scrib ed in thi s manua l. Upda te
inf ormat ion wil l be adde d to new ve rsion s of this m anual w ithou t
pri or noti ce.
Thi s manua l may con tain mi sprin ts, tec hnolo gy info rmati on that
is no t accur ate eno ugh, or p roduc t funct ion and o perat ion
des cript ion tha t is slig htly in consi stent w ith the a ctual p roduc t,
the f inal in terpr etati on of com pany is a s a stand ard.
Thi s manua l is only f or refe rence a nd does n ot ensu re that t he
inf ormat ion is to tally c onsis tent wi th the ac tual pr oduct . For
con siste ncy, see th e actua l produ ct.
qui ck setu p guide
Precaut io ns
Ope n the pac kage, c heck th e appea rance o f produ ct for no
obv ious da mage, a nd conf irm the i tem for 1-1 i s
con siste nt.
lis t tab le
Table 1 -1 Pack ing lis t
2.1 D evice P orts
Com ponen t
Qua ntity
Rem ark
Diff erent d evice m ay have d iffer ent por ts and
, ple ase ref er to the .
mul ti-he ad
cab le act ual pro duct
Fig ure 2-1 H ardwa re port s
1
ID
Por t Name
Table 2 -1 Hard ware po rts des cript ion
Eye ball Ne twork C amera
Wate rproo f rubbe r seal
Net work ac cess po rt prot ectiv e cover
Foc using w rench
Gre en swel l plast ic butt on S8*3 0mm
CD- ROM
Qui ck Setu p Guide
1
1
1
1
4
1
1
BNC Vi deo
Sen ds an ana log vid eo sign al. You can
con nect th e camer a to a TV moni tor thr ough
thi s port to v iew the a nalog v ideo.
Des cript ion
NOTE
NOTE
NOTE
thi s devic e. Othe rwise , the ser vice li fe of the i mage se nsor ma y
be sh orten ed.
If th is devi ce is ins talle d in plac es wher e thund er and li ghtni ng
fre quent ly occu r, groun d the dev ice nea rby to di schar ge high
ene rgy suc h as thun der str ikes in o rder to p reven t devic e
dam age.
Whi te self -tapp ing scr ew PA4.0* 35mm
Vide o patch c ord
1
4
Res et butt on
Res tores t he came ra to the f actor y setti ngs
by pr essin g and hol ding th is butt on for mo re
tha n five se conds .
2
SD ca rd
ind icato r
3
SD ca rd slot
Ins tall a SD car d.
4
NOTE
Befo re ins tall a SD ca rd, ver ify the c ard not
in wr ite pro tectio n state .
Befo re remo ve the SD c ard. Ver ify the c ard
not i n write p rotect ion sta te. Oth erwis e, the
dat a may be lo st ,or the S D card ma y be
dam aged.
Ind icate t he card s tatus , the sta tus is
des cribe d as foll ows:
Off: No ca rd is ins erted
On: A SD card is i nsert ed.
Fig ure 2-2 M ulti- head ca ble
1
2
3
4
POWER
Table 2 -2 Mult i-hea d cable d escri ption
2
Net work
acc ess por t
Con nects t o a stand ard Eth ernet
cab le.
Pow er supp ly
(DC 1 2V)
Con nects t o a 12V(- 15%-+ 10% )
dir ect cur rent (D C) powe r suppl y.
1
ID
Cor e
Des cript ion
Rem ark
Aud io inpu t
por t
Con nects t o an exte rnal au dio
dev ice suc h as a spea ker.
Aud io outp ut
por t
Rec eives a n analo g audio s ignal
fro m devic es such a s a sound
pic kup dev ice.
4
3
2.2 C amera D imens ions
Fig ure 2-3 (Uni t:mm)Dim ensio ns
Diff erent d evice m ay have d iffer ent dim ensio ns, ple ase ref er
to th e .act ual pro duct
NOTE
CAUT ION
WARNI NG
WARNI NG
CAUT ION
App lied
for
cam era
wit h audio
fun ction
1
2
3
4
SD card
120
105
120
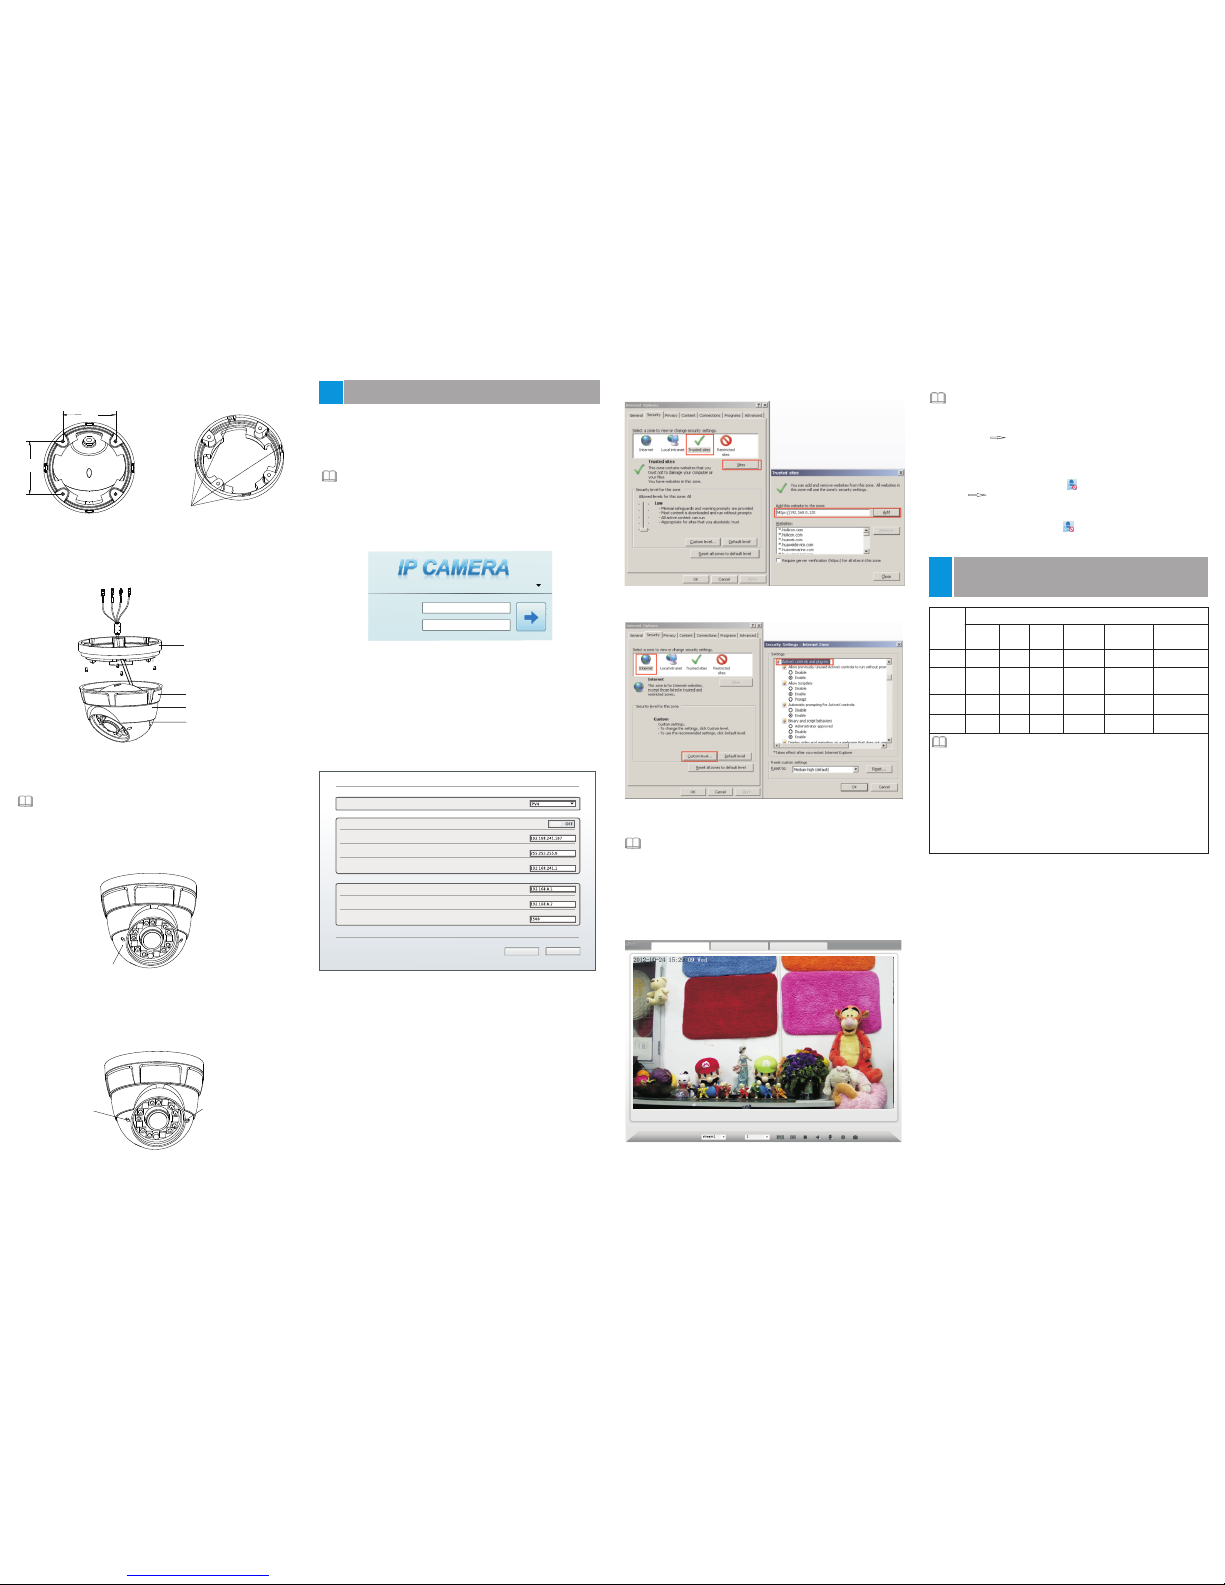
you ca n route c able s from the t op or fro m aside . If you us e the top
rou ting me thod, d rill a ho le in the i nstal latio n surfa ce firs t. If you
use th e asid e routi ng meth od, ple ase cut th e compr essio n ring
outl et, as sh own in fi gure 3 -2, and ro ute the m ulti- head ca ble ou t
from t he side g ap at the b ottom o f the cam era.
NOTE
Ins talla tion St eps:
Ste p 1 Open a pa ckage , take ou t the cam era, un screw t he came ra
com press ion rin g, and di sasse mble th e camer a.
Ste p 2 Posit ionin g the mou nting d imens ions ba se on the
dim ensio ns of the m ounti ng base , drill h oles on t he ceil ing
or wa ll and dr ive the s well pl astic b utton s into th e holes .
The d imens ions of t he moun ting ba se, as sh own in fi gure
3-1 .
Ste p 3 Fix the c amera m ounti ng base t o the cei ling (o r wall) b y
use o f self- tappi ng scre ws.
Ste p 4 Conne ct the mu lti-c onnec tor cab le.
Open Pack ag e Ex aminati on
1
Device St ru ct ure
2
3
Device In st al lation
Page 2
4.3 Browsing Video
To ensure the real-time video can be played properly, you must
perform the following operation when you log in the web for the first time:
Fig ure 4-3 A dding a t ruste d site
Step 2 In the Internet Explorer, choose Tool > Internet Options >
Security > Customer level, and set Download unsigned
ActiveX control and initialize and script ActiveX controls not
marked as safe for scripting under ActiveX controls and
plug-ins to Enable, as shown in figure 4-4.
Ste p 3 Downl oad and i nstal l the pla yer con trol as p rompt ed.
If the r epair t ips dis playe d when i nstal ling th e contr ol , plea se
ign ore the p rompt , and con tinue t he inst allat ion, th e login p age is
dis playe d when th e contr ol is loa ded.
Step 1 the Internet Explorer. Choose Tools > Internet options >
Security > Trusted sites > Sites, in the display dialog box, click
Add, as shown in figure 4-3.
To brow se a real -time v ideo, c lick Li ve Video . The Liv e Video
pag e is disp layed in fi gure 4- 5., as sh own
4.4 Two -way au dio
Par tial ca mera do n ot supp ort two- way au dio, th is sect ion do no t
app ly.
Fig ure 4-5 L ive Vide o
Fig ure 4-4 C onfig uring Ac tiveX c ontro l and plu g-in
Compo nent
Haza rdous S ubsta nce or El ement
Plum bum
(Pb)
Merc ury
(Hg)
Cadm ium
(Cd)
Hexa valen t
Chro mium
(Cr6 +)
Poly bromi nated Bi pheny ls
(PBB )
Stru ctura l
part
Boar d/
circ uit
modu le
Cabl e
conn ector
Acce ssories
○: ind icates t hat the c oncen trati on of the h azard ous sub stanc e in
all h omoge neous s ubsta nces of t he comp onent i s withi n the
lim it speci fied i n SJ/T 1136 3-200 6 Requi remen ts for
Con centr ation L imits fo r Certa in Haz ardou s Subst ances i n
Ele ctron ic Infor matio n Produ cts.
×: indi cates t hat the c oncen trati on of the h azard ous sub stanc e in
at le ast one ho moge neous s ubsta nce of th e compo nent
exce eds the l imit sp ecifi ed in SJ/ T 11363- 2006
Req uirem ents fo r Conce ntrati on Lim its for Ce rtain
Haz ardou s Substa nces i n Electr onic In forma tion Pr oduct s.
×
×
×
×
○
○
○
○
○
○
○
○
○
○
○
○
○
○
○
○
○
○
○
○
Ste p 5 Insta ll the do me shel l, the do me shel l fixed b ase and t he
com press ion rin g on the mo untin g base, a s shown i n figur e
3-3 .
Stream
Camera
Live Vi deo
Play back
Conf igura tion
Poly bromi nated
Diph enyl Et hers
(PBD E)
NOTE
NOTE
NOTE
4.4 .1 Came ra PC
Con necti on:
Ste p 1 Conne ct micr ophon e to audi o input i nterf ace of ca mera.
Ste p 2 Conne ct spea ker to th e PC audi o outpu t inter face.
Ste p 3 Log in ca mera Web , click t o turn on .
4.4 .2 PC
two -way au dio
Cam era
Ste p1 Conn ect mic ropho ne to PC au dio inp ut inte rface .
Ste p2 Conn ect spe aker to c amera a udio ou t inter face.
Ste p3 Log in c amera We b, clic k to turn o n two-w ay audi o.
Ste p 6 Turn the m ain bod y, adjust t he posi tion so t hat the c amera
fac es the mo nitor ed area , then ti ghten t he comp ressi on
rin g and fix t he came ra, as sh own in fi gure 3- 4.
Fig ure 3-4 Ad justi ng came ra
4.1 Login
Step 1 Open the Internet Explorer, enter the IP address of IP camera
(default value: 192.168.0.120) in the address box, and press
Enter. The login page is displayed. as figure 4-1 .
Step 2 Input the user name and password.
shown in
The default user name is admin. The default password is admin.
Change the password when you log in the system for first time to ensure
system security.
You can change the system display language on the login page.
NOTE
Step3 Click Login, the main page is displayed.
Device >
IP
address to log in the
4.2 Modify IP address
Choose Configuration > Local Network, the Local
Network page is displayed.
Enter the IP address in the IP Address box and click Apply as shown
in figure 4-2.
After the success of the IP address setting, please use the new
Web interface.
Fig ure 4-2 L ocal Ne twork
Use r Name
Pas sword
Eng lish
Fig ure 4-1 L ogin
Loca l Netwo rk
IP Prot ocol
DHCP
IP Addre ss
Subn et Mask
Defa ult Gat eway
Pref erred D NS Serv er
Alte rnate D NS Serv er
MTU( 800-1 500)
Refres h
Apply
70
Fig ure 3-1 of Dim ensio ns
mou nting b ase
70
Outlet
Fig ure 3- 2 Cut the c ompre ssion
rin g outle t
Mou nting b ase
Com press ion rin g
Dom e shell f ixed ba se
Dom e shell
Fig ure 3- 3 camer a insta llati on
Tria xial ro tatio n
Foucs
Zoom
Fig ure3-5 A djus ting vi ew angl e and foca l lengt h
NOTE
Adj ust the po sitio n of the ca mera by t riaxi al rota tion: r otati ng
hor izont ally, rot ating u p and dow n, and pe rform ing len s axial
rota tion , and adj ust the ca mera di recti on and l ens ali gnmen t
targ et.
Ste p 7 Adj ust vie w angle a nd foca l lengt h by usin g an adju sting
too l, as sho wn in fig ure 3-5 .
Appendi x:
Hazardo us S ub stance De cl ar ation
5
Quick Con fi gu ration( e. g IE )
4
 Loading...