


New Cosmos PS-7
User Manual
Includes:
Product Manual
Administrator Manual
Pyrolyzer Manual

2
DC-ITD-PS7MAN01.A www.dodtec.com
JAN 2019 815-788-5200
PS-7 Manual
© DOD Technologies, INC
675 Industrial Drive Bldg. A.
Cary, IL 60013
Phone 815.788.5200 • Fax 815.788.5300

3
DC-ITD-PS7MAN01.A www.dodtec.com
JAN 2019 815-788-5200
PS-7 Manual
Table of Contents
Chapter 1 – Introduction ........................................................................................................................................ 5
1.1 Explanation of Symbols .................................................................................................................................................... 5
Chapter 2 – Safety Instructions ............................................................................................................................. 6
Chapter 3 – Contents of This Package .................................................................................................................. 7
3.1 End of Line Filter Use ............................................................................................................................................................ 8
Chapter 4 – System Flow Diagram ........................................................................................................................ 9
Chapter 5 – Description ....................................................................................................................................... 10
5.1 Components on the Main Unit ........................................................................................................................................... 10
5.2 Details of the Key Switch Section ...................................................................................................................................... 12
5.3 Details of the LCD Screen Display ..................................................................................................................................... 13
Chapter 6 – Installation and Wiring ..................................................................................................................... 14
6.1 Installing the Main Unit ...................................................................................................................................................... 15
6.2 Wiring Instructions ............................................................................................................................................................. 16
Chapter 7 – Operation .......................................................................................................................................... 18
7.1 Operation Procedures ......................................................................................................................................................... 18
7.2 Gas Alarm Operating Instructions ..................................................................................................................................... 30
7.3 Trouble Alarm Operating Instructions ............................................................................................................................... 32
7.4 Test Mode Settings and Operating Instructions .............................................................................................................. 33
7.5 Maintenance Mode Settings and Operating Instructions ................................................................................................ 34
Chapter 8 – Maintenance and Inspection ............................................................................................................ 35
Chapter 9 – replacing Consumables.................................................................................................................... 38
9.1 Replacing the Filter Element (FE-1) ................................................................................................................................... 38
9.2 Attach/Replacing the Sensor Unit ..................................................................................................................................... 39
9.3 Replacing the Sampling Unit.............................................................................................................................................. 41
Chapter 10 – Troubleshooting ............................................................................................................................. 44
Chapter 11 – Specifications ................................................................................................................................. 45
Chapter 12 – Warranty ......................................................................................................................................... 46
Chapter 13 – Detection Principles ....................................................................................................................... 46
13.1 Electrochemical Sensor ................................................................................................................................................... 46
13.2 Hot-wire Semiconductor Sensor ..................................................................................................................................... 47
13.3 Galvanic Cell Sensor ......................................................................................................................................................... 47
Chapter 14 – Glossary .......................................................................................................................................... 48
Administrator Manual ........................................................................................................................................... 49
Chapter 1 – Passwords ........................................................................................................................................ 50
1.1 Password Protected Settings ............................................................................................................................................ 50
1.2 Releasing the Password Lock ............................................................................................................................................ 50
Chapter 2 – Changing Settings ............................................................................................................................ 51

4
DC-ITD-PS7MAN01.A www.dodtec.com
JAN 2019 815-788-5200
PS-7 Manual
2.1 Span Adjustment ................................................................................................................................................................ 51
2.2 21Vol% Adjustment ............................................................................................................................................................ 52
2.3 Changing Setting Values .................................................................................................................................................... 53
2.4 Changing the Alarm Settings ............................................................................................................................................. 55
Pyrolyzer Manual .................................................................................................................................................. 57
Chapter 1 – Attach/Replacing the Pyrolyzer ....................................................................................................... 58

5
DC-ITD-PS7MAN01.A www.dodtec.com
JAN 2019 815-788-5200
PS-7 Manual
Chapter 1 – Introduction
Thank you for purchasing the extractive COSMOS Gas Detector Model PS-7.
This Gas Detector is designed to detect the leakage of toxic and combustible gases. It is designed to display
the concentration level of detected gases on the main unit and output that information externally as an
analog signal. When a preset warning level of gas is detected, the warning lamp (ALARM lamp) on the main
unit starts to blink, the external contact output is activated, and the amount of leaking gas is monitored.
The sensor unit and sampling unit used in the Gas Detector can be replaced without the use of tools. Regular
replacement of these components eliminates the need to perform calibration on-site. To ensure correct
operation, read this manual carefully before attempting to install or operate the Gas Detector.
1.1 Explanation of Symbols
This manual uses the following symbols. Their meanings must be understood and observed to ensure safe
operation of the unit.
Danger:
Indicates an impending hazardous situation that, if not avoided, will result in serious
injury or death.
Warning
Indicates a potentially hazardous situation that, if not avoided, could result in serious
injury or death.
Caution
Indicates a potentially hazardous situation that, if not avoided, could result in minor
injury or physical damage.
Note
Indicates operational advice and/or instructions.

6
DC-ITD-PS7MAN01.A www.dodtec.com
JAN 2019 815-788-5200
PS-7 Manual
Chapter 2 – Safety Instructions
Read and understand the following information to ensure that the Gas Detector is used correctly. The Gas
Detector must always be used in accordance with relevant laws and regulations, and all wiring, installation,
and other work associated with the Gas Detector must be performed by qualified personnel.
Warning
• When the Gas Detector detects a gas leak, carry out the procedures stipulated by
your company in response to gas leaks.
• The Gas Detector must be grounded to prevent electric shock.
• The Gas Detector is not explosion-proof. It must be installed in a safe location.
Caution
• Do not disassemble or modify the unit or change its construction or circuitry in
any way. Doing so may impair the unit's performance.
• The Gas Detector is not drip-proof and must be installed in a location free from
spattering water.
• The unit must be used in accordance with prescribed laws and regulations.
• Please turn the power switch located on the front of the base unit OFF when
attaching or removing the main unit. If this is done with the switch left ON, the unit
may become damaged, or give false alarms.

7
DC-ITD-PS7MAN01.A www.dodtec.com
JAN 2019 815-788-5200
PS-7 Manual
Chapter 3 – Contents of This Package
The following components are included with the standard Gas Detector unit. Ensure that all components are
present before attempting to use the unit. Every effort is made to ensure that the unit is packed correctly, but
if any components are damaged or missing, contact your local authorized distributor.
*1 2 sticks are provided with each system.
NOTE:
1. The sensor unit is not bundled with the Gas Detector and must be purchased separately.
2. When it is with DeviceNet unit, the contents are as described in the DeviceNet Unit Instruction manual
IMPORTANT NOTICE - If using the PS-7 for absorbent / corrosive gases such as HCl, HF, Cl2, HBr, etc. You
must remove the internal filter and install #2-800-013 OR #60009 Corrosive Filter at the end of the sample
line.
Teflon FEP sample tubing must be used in conjunction with the corrosive filter when monitoring for corrosive
/ absorbent gases. 1/4 OD x 3/16” ID
See Chart on next page
Description
Quantity
PS-7 Gas Detector
1
Male connector ¼” NPT
2
Filter elements (FE-1, 12 pcs.)
(For MF-50 Filter Unit)
1
Fuse (0.5 A)
1
Mounting screws (M4 8)
2
Stick for Test
2
*
1
Operation Manual
1*2
Operation Manual
1*2

8
DC-ITD-PS7MAN01.A www.dodtec.com
JAN 2019 815-788-5200
PS-7 Manual
3.1 End of Line Filter Use
PN: 780248
PN: 60009
PN: 2-800-013
Use with
Use with:
Use with:
AsH3
BCl3
BCl3
COCl2
Bf3
Bf3
C4F8
Cl2
Cl2
C5F8
DCS
DCS
B2H6
HBr
HBr
H2S
HCl
HCl
H2Se
HF
HF
GeH4
SiCl4
SiCl4
CH4
SiF4
SiF4
IPA
WF6
WF6
CH2F2
POCl3
POCl3
CH4
Hydrazine
Hydrazine
CHF3
NH3
NH3
CO
O3
O3
H2
NF3
PH3
SiH4
O2

9
DC-ITD-PS7MAN01.A www.dodtec.com
JAN 2019 815-788-5200
PS-7 Manual
Chapter 4 – System Flow Diagram
Figure 1 System flow diagram
GAS OUT
Rc 1/4
LCD Display
Maintenance
switch
P
Pump
Sensor
Flow
sensor
MF-50 (Dust filter)
GAS IN
Rc 1/4
GAS IN
Rc 1/4
Controller
F1
ZA1
ZA2
ZC
TA
TC
Power
DC 24V
TB
1st level warning
2nd level warning
Common
Trouble
warning
Warning contact capacity (ZA1orZA2-ZC)
(Rated load: 125 V AC or 30 V DC
0.5-A resistance load)
Trouble output (TA-TC)
(Rated load: 30 V DC 30-mA
resistance load)
Gas alarm contact output
(N/O)
PW
Jack
(4-conductor shielded cable)
+
-
+
-
TB
FS
Sampling Unit
P
N
G
H
E
SW
SW
TR
AL
Key
Analog Output
4 to 20 mA DC
Trouble warning output
(N/C)
CPU Board
Warning
Pay special attention to the polarity of the trouble warning output. As the circuit protection
diodes are internalized, if the polarity is reversed, the trouble warning 1 Pull back
not be output.
Caution
The analog output source is not insulated from the power source. In case it is used in
combination with other types of devices, the analog signal must be isolated from flowing into
the power sources of the other devices.

10
DC-ITD-PS7MAN01.A www.dodtec.com
JAN 2019 815-788-5200
PS-7 Manual
Chapter 5 – Description
5.1 Components on the Main Unit
No.
Description
Function
1
POWER lamp
(Green) Power lamp. Illuminates during regular monitoring
operations.
2
TROUBLE lamp
(Yellow) The lamp blinks when trouble occurs.
3
ALARM lamp
(Red) The lamp blinks when the concentration level of detected
gas exceeds that of the preset alarm level.
4
LCD display
Warning displays, detected gas levels, bar graphs of gas levels,
trouble states, maintenance modes, test mode, flow sign are all
shown on the LCD display.
5
Key switches (inside)
Switches to carry out the various settings.
6
Filter unit (MF-50)
Incorporates a filter element (FE-1) that prevents dust from
entering the gas inlet and tubes leading to the sensor.
7
Operation section cover
Lift up gently to use key switches.
8
Front panel
Contains the main board.
9
Sampling unit
The pump is contained inside the sampling unit.
10
Main body cover
The cover protecting the sensor unit.
11
Latches
Latches to attach the main unit onto the base unit.
12
Locked/unlocked line
A line (mark) to show the return position of the latch.

11
DC-ITD-PS7MAN01.A www.dodtec.com
JAN 2019 815-788-5200
PS-7 Manual
No.
Description
Function
13
Fuse
125 V, 0.5 A
14
Base unit power switch
The power switch for the base unit.
15
Mounting holes
Screw holes (5.5) for wall mounting.
16
Terminal strip
Used to connect external wiring.
17
Main unit power switch
The power switch for the main unit.
18
Maintenance switch
A switch that is set to regular, maintenance mode 1 (MNT1) or
maintenance mode 2 (MNT2).
19
Connector for the pyrolyzer
A connector to provide power to the pyrolyzer when one is being
used. (CDP-7 type).
20
Gas inlet
Aspiration inlet for sampled gas. A filter unit (MF-50) is attached.
21
Gas outlet
Exhaust outlet for sampled gas.
22
Cable entry
A hole for incoming cables.

12
DC-ITD-PS7MAN01.A www.dodtec.com
JAN 2019 815-788-5200
PS-7 Manual
5.2 Details of the Key Switch Section
No.
Description
Display
Function
1
Span adjustment
switch
SPAN
To carry out 21vol% adjustments.
(For the COS-7 oxygen sensor unit.)
2
Zeroing switch
ZERO
To carry out zeroing.
(For the CHS-7 flammable gas sensor unit or CDS-7 toxic gas
sensor unit.)
3
Alarm point set switch
AL
Used to check the values of various alarm settings.
4
Communications
switch
COMM.
Sends sensor unit information to the main unit after initial
start-up, etc.
5
Up/down switch
UP
DOWN
Used to change the values of the test output, etc.
6
Connector to check
analog output
CP
A connector employed specially to check the analog output
from the main unit (4- 20 mA).
7
Test switch
TEST
Used to set to test mode.
8
Special command
switch
(None)
Used to change the values of various settings.
(For administrative use.)

13
DC-ITD-PS7MAN01.A www.dodtec.com
JAN 2019 815-788-5200
PS-7 Manual
5.3 Details of the LCD Screen Display
No.
Meaning
1
Shows the detected gas concentration (with units).
2
Lights when the flow rate is decreasing. (Also, see no. 6 below.)
3
These light when the detected gas concentration exceeds that of the preset alarm level.
4
Lights on when there is sensor trouble, or when a sensor is inserted incorrectly.
5
Lights on when the pyrolyzer is disconnected.
6
Shows the flow rate of the sampling gas.
Fast rotating display: When flowing at normal rate (0.5 L/min).
Slowly rotating display: (Showing that it is clogged) When the load on the pipe is high.
No rotation: (Warning that the flow rate is decreasing) When the flow rate has decreased.
7
Bar graph of gas concentration. One division is 5% of a full-scale value.
When the bar extends to the far right, it is at full scale.
8
Shows the values of various settings. (For administrative use.)
9
Lights while in test mode.
10
Lights while in either maintenance mode 1 (MNT1) or mode 2 (MNT2).

14
DC-ITD-PS7MAN01.A www.dodtec.com
JAN 2019 815-788-5200
PS-7 Manual
Chapter 6 – Installation and Wiring
Warning
• The Gas Detector is not explosion-proof. It must be installed in a safe location.
• When detecting highly adsorbent gases remove the internal filter and install proper
end of line filter (see page 8)
• The sample distance on the PS-7 is 50 feet for non-absorbent gases and 30 feet for
absorbent gases. FEP TEFLON tubing must be used with absorbent gases.
Caution
• The Gas Detector should be installed in a location free from shock and vibration, and
away from sources of high frequencies or magnetism.
• Do not use the gas collector hood when detecting gas concentrations in narrow spaces
such as ducts.
• Do not install the Gas Detector in locations where the temperature may exceed 40°C or
dew condensation or sudden temperature fluctuations may occur.
• The Gas Detector is not drip-proof.
• The pressure difference between the gas inlet/exhaust ports and the ambient
atmosphere must be within 1 kPa. The pressure difference between the inlet port and
exhaust port must be such that the inlet port is a negative pressure of 1 kPa or less.
• Install the Gas Detector vertically. (Inlet port and exhaust port must be in downward
direction.)
• Locate the detector tip (the tip of the gas sampling pipe) to be appropriate for the
specific gravity of the gas to be detected. It must also be placed in a location where the
target gases are likely to accumulate.
Type of gas
Installation height
Heavier than air
Not more than 30 cm above floor level
Equivalent to air
75 to 150 cm above floor level
Lighter than air
Near the ceiling

15
DC-ITD-PS7MAN01.A www.dodtec.com
JAN 2019 815-788-5200
PS-7 Manual
6.1 Installing the Main Unit
1. Determine the installation point and
attach the base unit using two M4 8
screws.
`
2. Run a cable through the cable entry
(the cutout hole near the bottom of
the base unit) and connect to the
terminal board. (Refer to 6.2 Wiring
Instructions.)
3. To attach the sensor unit, refer to 9.2
Attach/Replacing the Sensor Unit. To
attach it after attachment of the base
unit, proceed to step 4.
4. Remove the protective seal before
attaching the main unit.
5. Pull back the latches on both the left
and rights sides of the bottom of the
base unit, and attach the main unit
inserting from the top side first.
6. Push both the latches on the left and
right-hand sides of the base unit
back in until the locked/unlocked line
can be seen
2 Attach in line with the rails
1 Pull the latches on both sides forward

16
DC-ITD-PS7MAN01.A www.dodtec.com
JAN 2019 815-788-5200
PS-7 Manual
NOTE: The protection seal on the base unit is to protect the connector and internal piping when attaching the
base unit. This seal is not necessary after the main unit is attached. Please dispose of it properly in
accordance with company disposal regulations.
If multiple units are to be mounted in a row, ensure that there is enough space between each unit (at least 3
cm on either side is recommended) to allow the main unit to be removed and reattached.
6.2 Wiring Instructions
Terminal Board
Sign
Polarity
Function
TB1
P
+
Power supply (24 V DC)
N
- G +
Gas concentration output (4-20 mA DC)
H
-
E
Ground
TB2
ZA1
Gas alarm contact output (1st level)
(no voltage contact 1a)
Rated load: 125 V AC or 30 V DC, 0.5-A resistance load
ZA2
Gas alarm contact output (2nd level)
(no voltage contact 1a)
Rated load: 125 V AC or 30 V DC, 0.5-A resistance load
ZC
ZA1, ZA2 common
TA
+
Trouble alarm
(Open collector: N/C)
Rated load: 30 V DC, 30-mA resistance load
TC
-
Trouble alarm common
Warning
Be sure to push the latches back as far as they will go. If the latches are not back behind the
locked/ unlocked line, normal gas detection will not be performed.

17
DC-ITD-PS7MAN01.A www.dodtec.com
JAN 2019 815-788-5200
PS-7 Manual
Warning
• Be especially careful regarding the polarity of the trouble alarm (TA: plus, TC:
minus.) as the circuit protection diodes are internalized, if the polarity is reversed,
the trouble warning signal will not be output.
• To avoid electric shock, always disconnect the power supply before performing
any wiring operations.
• Ensure that the unit is properly grounded.
Caution
• Do not lay cables near sources of electrical noise, such as high-capacity
transformers, motors or power supplies.
• Ensure that the cables on the external device side and the gas detector side are
correctly connected.

18
DC-ITD-PS7MAN01.A www.dodtec.com
JAN 2019 815-788-5200
PS-7 Manual
Chapter 7 – Operation
7.1 Operation Procedures
Carry out operations in the following manner. Refer to the items inside each box for more detailed
instructions (listed from the next page)

19
DC-ITD-PS7MAN01.A www.dodtec.com
JAN 2019 815-788-5200
PS-7 Manual
Proceed with operation in the following manner:
1. Verify that the power supply voltage (the voltage between the P and N of the terminal block) is 24 VDC
10%.
2. Switch the base unit power ON.
Warning
• Verify that the power supply voltage is 24 V DC 10%.
• Before operating the Gas Detector, verify that the sensor unit correctly displays the
type of gas to be detected and the full-scale value.
Warning
• Before Turning the power on, check that all connections are correct. Refer to 6.2
Wiring Instructions and the separate delivery specifications if available.

20
DC-ITD-PS7MAN01.A www.dodtec.com
JAN 2019 815-788-5200
PS-7 Manual
3. Analog adjustment in maintenance mode 2
- The analog output of the main unit changes when the maintenance switch is set to 2.
- Adjustment should be carried out based on the following instructions as the analog output also
differs depending on the sensor unit being used. For details regarding maintenance modes, refer
to 7.5 Maintenance Mode Settings and Operating Instruction.
Toxic gas sensor unit: CDS-7
Combustible gas sensor unit: CHS-7
Oxygen sensor unit: COS-7
(Value when at full scale 25vol%)
Oxygen sensor unit: COS-7
(Value when at full scale 50vol%)
*MUST BE ADJUSTED
1. Pull back to open
2. Move knob to the right to set to maintenance
mode 2 (MTN2)
1. Pull back to open
2. Move knob to the right to set to maintenance
mode 2 (MTN2)
Analog adjustment volume for maintenance mode 2
Analog adjustment volume for maintenance mode 2
The tester tests the current range.
G=plus
H=minus
The tester tests the current range.
G=plus
H=minus

21
DC-ITD-PS7MAN01.A www.dodtec.com
JAN 2019 815-788-5200
PS-7 Manual
Measure the analog output (current) of “G” and “H”
on the terminal board TB1 using a tester, etc.
If it falls within the range shown below, go on to
the next step.
If it is not within the range shown below,
use the analog adjustment volume for maintenance
mode 2 to bring it into this range.
Model Type: Adjustment Range:
CDS-7 3.92 – 4.08 mA
CHS-7 3.92 – 4.08 mA
COS-7 17.32 – 17.48 mA
Measure the analog output (current) of “G” and “H”
on the terminal board TB1 using a tester, etc.
Adjust it to within the range of 10.64 to 10.80 mA by
using analog adjustment volume for maintenance
mode 2.
For toxic gas sensor unit: CDS-7
OR
combustible gas sensor unit: CHS-7
Oxygen sensor unit: COS-7
(When full scale value is 50vol%)
Set analog output to 10.7mA as the regular oxygen
concentration is 21%
Oxygen Sensor Unit: COS-7
(When full scale value is 25vol%)
Set analog output to 17.4mA as the regular oxygen
concentration is 21%

22
DC-ITD-PS7MAN01.A www.dodtec.com
JAN 2019 815-788-5200
PS-7 Manual
1. Pull back to open
2. Move knob to center to set to normal mode
1. Pull back to open
2. Move knob to center to set to normal mode
4. If the sensor unit is not attached, refer to 9.2 Attach / Replacing the Sensor Unit, and attach the sensor
unit.
5. Switch the main unit power ON
*Refer to 6.1 installing the main unit:

23
DC-ITD-PS7MAN01.A www.dodtec.com
JAN 2019 815-788-5200
PS-7 Manual
6. Begin self-diagnosis after the front lamp and the LCD screen have been on for over one second.
7. When “Good” is displayed at the bottom right of the LCD screen, it will go into initial power delay mode
(POWER lamp blinks) for 30 seconds. It will then return to normal operation state, and the POWER
lamp will come on. The detected gas concentration will be displayed in the middle of the screen.
POWER lamp (Green)
Blinks (30 Secs) - ON
The TROUBLE lamp (Yellow) will
blink.
Also [SENS] will be displayed at
the top of the LCD screen and Err
on the bottom right
Open the cover on the operation
section of the main body and hold
down the key switch “COMM” for
over one second
When using the main detector for the first time, or when a new sensor unit with
different settings (sensor units for which the target gases and full-scale values, etc.,
are different) has been attached:
When the sensor unit has been replaced, or when a sensor unit with the same settings
(sensor units for which the target gases and full-scale values etc. are the same) has
been attached:

24
DC-ITD-PS7MAN01.A www.dodtec.com
JAN 2019 815-788-5200
PS-7 Manual
8. Check the various setting values
- The values of the various settings can be checked by pressing the up/down switch, “” or “” on
the main unit. The setting values are displayed in the bottom right hand corner of the LCD Screen.
NOTE: They may sometimes be difficult to distinguish due to the types of alphabet letters used.
The values of alarm settings can be checked by pressing the alarm setting switch “AL”.
“AL1 displayed” “AL2 displayed” “Normal” “AL1 displayed” (Repeat)
The percentage of the full-scale value for the current alarm values will be displayed in the bottom right hand
corner of the LCD screen (in units of 1%), and the alarm set value at the current gas concentration is displayed
in the middle of the screen.
LCD Display
Screen
Default value
Explanation of the default value
A1 **
Toxic: CDS-7
Combustible: CHS-7
A1 10
10% of F.S.
Oxygen: COS-7
A1 72
72% of F.S.
A2 **
Toxic: CDS-7
Combustible: CHS-7
A2 20
20% F.S.
Oxygen: COS-7
A2 76
76% of F.S.
LCD Screen
Display
The function to be set
Remarks
Default value
Toxic : CDS-7
Combustible: CHS-7
Oxygen:
COS-7
d1 **
Time delay1
Time delay (secs.) of the gas alarm contact
(1st level)
d1 0
d1 0
d2 **
Time delay2
Time delay (secs.) of the gas alarm contact
(2nd level)
d2 0
d2 0
az
Analog output (base)
(*For our maintenance purposes only)
-
-
as
Analog output (span)
(*For our maintenance purposes only)
-
-
zs *
Zero suppression, or 21vol%
suppression
Displays the percentage of the full-scale
value (rounded to the percent)
zs 5
zs 2
H-H
L-L
H-L
Alarm mode
1st: Upper limit, 2nd: upper limit warning
1st: Lower limit, 2nd: lower limit warning
1st: Upper limit, 2nd: lower limit warning
H-H
L-L
Con *
Pyrolyzer failure alarm
0: Off 1: On
Con 0
Con 0
CG **
Calibrated gas concentration
(*For our maintenance purposes)
CG 40
CG 84
nEt *
The existence of DeviceNet unit
0: Non-existent 1: Existent
nEt 0
nEt 0
F ***
Display offvalue
(*For our maintenance purposes)
-
FL ***
Displays rate of flow
Shows the current rate of flow (mL/min)
-
P ***
Sensor unit output
(*For our maintenance purposes)
-
At *
Auto 21vol% adjustment
0: No 1: Yes
At 1

25
DC-ITD-PS7MAN01.A www.dodtec.com
JAN 2019 815-788-5200
PS-7 Manual
Alarm point setting switch
Up/Down Switch
Center of the
screen
Bottom right of the
screen
9. Verifying the sampling flow rate (Check flow rate)
- Check to see that the flow rotation rate is high, and the TROUBLE lamp (yellow) is off.
- If the flow rotation is high, then it is flowing at the designated rate (0.5 L/min).
NOTE:
Clogged Display
• Slowly rotating flow rate
A “Clogged Display” will be shown when the load on
the pips is high. This could mean:
• The pipes are clogged
• The filter is clogged
• The load is too high
Monitoring of gas concentration will continue even
when the “Clogged Display” is shown.
Warning that flow rate is decreasing
• No Rotation
• FLOW is displayed on the LCD Screen
• TROUBLE lamp (Yellow) blinks
• Trouble warning is activated
When the flow is not at the designated rate, a
warning that the flow rate is decreasing is output.
Rotates Quickly
TROUBLE lamp (yellow) Off
Stops Rotating

26
DC-ITD-PS7MAN01.A www.dodtec.com
JAN 2019 815-788-5200
PS-7 Manual
10. Verifying airtight seal
Disconnect the gas sampling pipe from the gas inlet and block the inlet with
a finger completely.
The flow rotation rate will then slow. By keeping the inlet blocked, it will
eventually stop. Then, check to make sure the TROUBLE lamp (Yellow) is
blinking.
(The warning that the flow rate is decreasing is generally set to a delay time
of 10 seconds)
FLOW will be displayed on the LCD screen.
If the flow rate rotation stops and the TROUBLE lamp (Yellow) does not come
on – please check to ensure the sensor unit is properly attached to the main
unit (Refer to 9.2 Attach / Replacing the Sensor Unit) Also check to ensure
that the latches at the bottom of the base unit are correctly locked back
behind the locked / unlocked line.
When the pipes have been returned to normal, recheck to see that the flow rotation rate is high.
11. Adjusting the Zero/21 vol% setting (Zeroing for the CDS-7, CHS-7, and 21vol% adjustment for the
COS-7)
After power is applied to the main unit, and the appropriate time has passed (depending on the type of
sensor unit), press the appropriate key switch from the below table. Then, be sure to do a
readjustment to increase precision.
Sensor Unit
Initial
adjustment
Readjustment
Zero / 21ol% adjustment key switch
Toxic gas sensor unit
CDS-7
30 minutes after
power ON
24 hours after power
ON
Maintenance mode1 or 2
+ ZERO switch *1
Oxygen sensor unit
COS-7
Maintenance mode1 or 2
+ SPAN switch*2
Combustible gas sensor
unit CHS-7
1 day after power
ON
7 days after power
ON
Maintenance mode1 or 2
+ ZERO switch *1
NOTE: Factors such as the atmosphere of the installation location may cause the Zero/21 vol% setting to take
longer to stabilize (the time until re-adjustment) than the time indicated in the above table.
Block the inlet

27
DC-ITD-PS7MAN01.A www.dodtec.com
JAN 2019 815-788-5200
PS-7 Manual
Zeroing
Toxic Gas Sensor Unit: CDS-7
Combustible Gas Sensor Unit: CHS-7
21vol% Adjustment
Oxygen Sensor Unit: COS-7
1. Set to maintenance mode (MNT1 or MNT2)
Left: Maintenance 1 (MNT1)
Center: Normal Mode
Right: Maintenance 2 (MNT2)
*For details regarding maintenance modes, refer to
7-5 Maintenance Mode Settings and Operating
1. Set to maintenance mode (MNT1 or MNT2)
Left: Maintenance 1 (MNT1)
Center: Normal Mode
Right: Maintenance 2 (MNT2)
*For details regarding maintenance modes, refer to
7-5 Maintenance Mode Settings and Operating
2. Hold down the ZERO Key for over a second.
It is complete when the POWER lamp (Green)
blinks once.
2. Hold down the SPAN Key for over a second.
It is complete when the POWER lamp (Green)
blinks once
3. Set back to normal mode (Center)
3. Set back to normal mode (Center)
Be sure to do a readjustment after the appropriate
time has passed to increase precision.
Poisonous gas sensor unit: After 24 Hours
Flammable gas sensor unit: After 7 Days
Be sure to do a readjustment after the appropriate
time has passed to increased precision.
Oxygen Sensor Unit: After 24 Hours

28
DC-ITD-PS7MAN01.A www.dodtec.com
JAN 2019 815-788-5200
PS-7 Manual
12. Affix the seal showing target gases to be detected in a clearly visible place on the front of the main
body.
Normal operation state
Warning
Zeroing and 21vol% adjustment must be carried out in a clean environment. If they are done
in a gas-filled environment, the correct level of gas concentration detected will not be given.
POWER lamp (Green): On
TROUBLE lamp (Yellow): Off
ALARM lamp (Red): Off
Flow rate: High rotation
Detected gas
concentration level
Seal showing target gases
to be detected

29
DC-ITD-PS7MAN01.A www.dodtec.com
JAN 2019 815-788-5200
PS-7 Manual
Normal Trouble
Gas alarm
(1st stage)
Gas alarm (2nd
stage)
LED
Green light
Yellow blink
Red blink
Red blink
LCD screen
FLOW
SENS
CONV
ALARM1
ALARM1
ALARM2
Alarm contact
(ZA1)
OFF OFF
ON ON
Alarm contact
(ZA2)
OFF OFF OFF
ON
Trouble alarm
(TA)
ON
OFF
ON ON

30
DC-ITD-PS7MAN01.A www.dodtec.com
JAN 2019 815-788-5200
PS-7 Manual
7.2 Gas Alarm Operating Instructions
When the concentration level of detected gas exceeds that of the preset alarm level, the alarm contacts are
activated after a set time delay, the ALARM lamp (red) blinks, and ALARM1 or ALARM2 is displayed on the
LCD screen.
* During the alarm time delay, ALARM1 or ALARM2 blinks on the LCD screen, but the alarm contacts are not
activated, and the ALARM lamp (red) does not blink.
When the concentration of detected gas drops back below the preset alarm level, it will automatically return
to normal.
Gas Alarm (1st Level)
Alarm 1
Gas Alarm (2nd Level)
Alarm 2
*When the 2nd level gas alarm is activated, both the
ALARM1 and ALARM2 will turn on.
○: On : Blinking ●: Off
Alarm level
LCD Screen
POWER
Lamp (Green)
TROUBLE
Lamp
(Yellow)
ALARM
Lamp
(Red)
Remarks
1
Gas alarm (1st level)
ALARM 1
○
●
2
Gas alarm (2nd level)
ALARM 1, ALARM 2
○
●
The ALARM lamp (red) will blink with the gas
alarm (1st level), or gas alarm (2nd level)

31
DC-ITD-PS7MAN01.A www.dodtec.com
JAN 2019 815-788-5200
PS-7 Manual
NOTE: The relationship between 1st level and 2nd level alarm values of each alarm mode is as follows:

32
DC-ITD-PS7MAN01.A www.dodtec.com
JAN 2019 815-788-5200
PS-7 Manual
7.3 Trouble Alarm Operating Instructions
The trouble alarm will be activated in the following situations. (The open collector will be ON in normal mode,
and OFF during trouble or when the power is disconnected.) The TROUBLE lamp (yellow) will blink, and analog
output will drop to below 0.6 mA. When the problem is remedied, the trouble alarm will automatically return to
normal.
1. Decrease in the rate of flow
When the flow is not at the designated rate, it is assumed that it is decreasing. FLOW Is
displayed on the LCD screen, and the flow rate rotation stops. Causes for a decrease in flow
rate can include the clogging of filter elements, the clogging of pipes, the load being too high,
deterioration of the pumps, etc.
2. Sensor trouble
SENS. will be displayed on the LCD screen in the following situations:
• When the base output of the sensor unit has decreased significantly
• When the sensor has been disconnected. (For combustible gas sensor unit: CHS-7.)
3. When a sensor unit has been inserted wrong
The settings, full scale values, and target gases to be detected are recorded in a detector after
its first use. When a sensor unit with different settings information is inserted, this is
determined to have been inserted wrong, and SENS. is displayed on the LCD screen. The
concentration of the detected gases is displayed as: ‘’- - - -”
4. Disconnection of the pyrolyzer
When the pyrolyzer has been disconnected after used, CONV. is displayed on the LCD screen.
5. Disconnection of the power source
When the power source has been cut, all lamps (green, yellow, and red) will turn off, and all
operations will cease.
6. A blown fuse
When a fuse has blown, or is disconnected, the power source becomes cut, and all lamps (green,
yellow, and red) will turn off, and all operations will cease
NOTE: When the trouble alarm is activated while using the oxygen sensor unit COS-7, the analog output is
reduced to less than 0.6 mA. When the host system setting is the lower limit alarm, trouble will occur if the
analog output from the main unit drops to less than 0.6 mA within one second from the time that the lower
limit alarm is not activated. To avoid this, set it so that the lower alarm limit is not activated.
○: On : Blinking ●: Off
Type of trouble
LCD display
POWER
Lamp
(green)
TROUBLE
Lamp
(yellow)
ALARM
Lamp (red)
Remarks
1
Decrease in rate of
flow
FLOW
○ ●
The flow rate rotation is
stopped
2
Sensor trouble
SENS.
○ ●
3
Incorrect insertion of
the sensor unit
SENS.
○ ●
The gas concentration display
shows “- - - -”
4
Pyrolyzer failure
CONV.
○ ●
5
Disconnection of the
power source
(Nothing)
● ● ●
6
Blown fuse
(Nothing)
● ● ●

33
DC-ITD-PS7MAN01.A www.dodtec.com
JAN 2019 815-788-5200
PS-7 Manual
7.4 Test Mode Settings and Operating Instructions
1. Settings
Press the “TEST” key switch on the front of the main unit.
When this is pressed once, it will go into test mode. When it is pressed again, it will return to
normal mode.
*Test mode will automatically be released after 10 minutes.
2. Operating Instructions
TEST is displayed on the LCD screen.
In test mode, the value of the analog output (4-20 mA) can be set to units of 0.16 mA (1% units of
the full-scale value).
The value of the analog output can be changed using the “UP/DOWN” keys.
Can be set with the UP/DOWN
keys.
Press with the stick for test.
When pressed once, it will go into
test mode, when pressed again it
will return to normal.
Caution
The alarm check conducted with the test switch will also activate the gas alarm contacts.
For this reason, if alarm contacts are used for interlocking with external devices, verify that
the interlock be released prior to conducting the alarm test.
Be sure to conduct alarm testing after changing settings in either maintenance mode. (Refer
to 7.5 Maintenance Mode Settings and Operating Instructions.) Also, conduct inspections on
the gas detection devices only after informing those involved.

34
DC-ITD-PS7MAN01.A www.dodtec.com
JAN 2019 815-788-5200
PS-7 Manual
7.5 Maintenance Mode Settings and Operating Instructions
1. Settings
There are two types of maintenance modes. (See the table below for the functions of each)
Set the maintenance switch at the bottom of the from of the main unit to 1 [left], or 2 [right]
Either MNT1 or MNT2 will be displayed on the LCD Screen
Move the maintenance switch to the center position to return to normal mode
Set to maintenance mode.
LEFT: Maintenance Mode 1
CENTER: Normal Mode
RIGHT: Maintenance Mode 2
2. Operating instructions
When on maintenance mode 1, neither the gas alarm contacts, nor the trouble alarm are activated.
When on maintenance mode 2, neither the gas alarm contacts, nor the trouble alarm are activated.
And the analog output will be fixed to either 4.0 mA or 17.4 mA.
In both maintenance modes, the trouble lamp (yellow) blinks, and the concentration value of detected gas is
displayed on the LCD screen.
Alarm contacts
Trouble alarm
Analog output
TROUBLE
Lamp (yellow)
LCD screen
Maintenance mode
1
Not activated
(Fixed OFF)
Not activated
*(Fixed ON)
Output based on the
concentration value
of the detected gas
Blinks
Concentration
value of
detected gas
Maintenance mode
2
Not activated
(Fixed OFF)
Not activated
*(Fixed to ON)
Fixed to 4mA or 17.4
mA.
Blinks
Concentration
value of
detected gas
Caution
*1 In both maintenance mode, the trouble alarm is activated when the power source is
switched off on the main unit. (Trouble alarm: OFF)
*2 The analog signal may change when the power source is switched off on the main unit.
Warning
Be sure to check that it is set to normal mode (center) during regular operations (monitoring
gas concentration.) When regular operations are carried out in maintenance modes 1 or 2,
the alarm contacts and trouble alarms will not work. In maintenance mode 2, the analog
signal will not change from 4 mA.

35
DC-ITD-PS7MAN01.A www.dodtec.com
JAN 2019 815-788-5200
PS-7 Manual
NOTE: Both maintenance modes 1 and 2 function only on the base unit. Even when there is no main unit,
analog output of 4mA is possible on maintenance mode 2, which enables a loop check during setup.
Chapter 8 – Maintenance and Inspection
• The Sensor Modules do not normally require gas calibration to be performed on site. Gas calibration
of the sensor module is performed by New Cosmos at the time the sensor is manufactured.
• The CDS sensors (electrochemical) have a life of 2 or more years depending on the specific sensor.
CDS sensors are labeled with a manufacture date. All CDS sensors must be gas tested or replaced
every 16 months from the manufacture date or 12 months from the install date, whichever comes first.
• CDS sensors also have an “install by date”. If a sensor is installed after the “install by date” monitor
the sensor in maintenance mode 2 (MNT 2) to ensure the sensor is stable and not drifting before
placing the PS-7 in the run position. The actual time for the sensor to stabilize will vary based on the
sensor type. Once stable the sensor is ready to use.
• CHS sensors have a stated service life of 5-7 years based on the type of sensor. The actual life of the
sensor can exceed the stated service life. CHS sensors should be gas tested on an annual basis.
• The following table provides an inspection timetable for various components of the Gas Detector unit.
Periodic inspections refer to inspections that should be performed every twelve months by either the
user or an authorized representative of New Cosmos.
Frequency and Content of Inspections
Content of Inspection
When starting up or
relocating
Periodic inspection
Every 12 months
1. Gas concentration indicator
inspection
○
○
2. Sampling flow rate inspection
○
○
3. Inspection of airtight seal of internal
assembly
○
○
4. Replacement of filter element
Will vary based on sampling condition
5. Pipe line inspection
○
6. Gas testing or replacement of sensor
○
○
7. Loop inspection using Test switch
○
Important

36
DC-ITD-PS7MAN01.A www.dodtec.com
JAN 2019 815-788-5200
PS-7 Manual
1. Gas concentration indicator inspection
Verify that the gas concentration value is indicated on the LCD screen and the unit is functioning
normally.
2. Sampling flow rate inspection (Flow rate inspection)
Check that the flow rate on the LCD screen is rotating quickly. (Refer to 7.1 Operation Procedures (9)).
If the flow rate is rotating slowly or has stopped, check the filter element, and replace if clogged or
dirty. (See 9.1 Replacing the Filter Element.) If it still is not right after replacing the filter element, check
to make sure the pipes are not clogged, or the load is not too high, etc.
3. Inspection of airtight seal
Carry out an inspection of the airtightness of the internal assembly while
referring to 7.1 Operation Procedures (10).
4. Replacement of filter element
Check to ensure the filter elements are not clogged or dirty at least once every 6 months and replace if
necessary. Filter elements can get dirtier easier depending on the surrounding environment. When the
display shows that the filter is clogged (the flow rate is on slow rotation), check the filter element and
change if necessary. (Refer to 9.1 Replacing the Filter Element FE-1)
5. Pipe inspection
Inspect the gas sampling pipe at startup or when the installation has been augmented or relocated. If
the pipe is not correctly connected, it will not be possible to maintain the required sampling flow rate
or to take gas samples from the target location.
6. Attachment and replacement of sensor unit
Install a new sensor unit at startup. CDS and CHS Sensors should be gas tested or replaced at 12
month intrevals. (Refer to 9.2 Attach/Replacing the Sensor Unit on page 39 and 41.)
7. Loop inspection using Test switch
By pressing the “TEST” key switch on the front of the main unit with a long thin tip, such as that of a
ball point pen, the analog output value can be set at will, so please check the host system. When
“TEST” is pressed again, output returns to normal. (Refer to 7.4 Test Mode Settings and Operating
Instructions)

37
DC-ITD-PS7MAN01.A www.dodtec.com
JAN 2019 815-788-5200
PS-7 Manual
Caution
The alarm check conducted with the Test switch will also activate the gas alarm contact. For
this reason, if alarm contacts are used for interlocking with external devices, be sure to check
that the interlock be released prior to conducting the alarm test. Also, be sure to carry out alarm
testing with the test switch after setting in maintenance mode. (Refer to 7.5 Maintenance Mode
Settings and Operating Instructions.)
Relevant personnel should also be notified of the inspection in advance.

38
DC-ITD-PS7MAN01.A www.dodtec.com
JAN 2019 815-788-5200
PS-7 Manual
Chapter 9 – replacing Consumables
• The Gas Detector is designed to allow users to replace consumables.
• Contact your local dealer to purchase consumables, or if further instruction is needed regarding their
installation and replacement.
9.1 Replacing the Filter Element (FE-1)
Use the following procedure to replace the filter element if it becomes dirty or clogged.
White arrow: Rotation Direction to loosen the fastening nut.
Return the filter unit gas intake to its original position and tighten the fastening nut to secure the gas
sampling pipe. DO NOT forget to place the O-Ring beneath the new filter.
Loosen the fastening nut of the filter unit
(MF-50) and remove the gas sampling
pipe.
Main body side of the filter unit
O-ring
Replace with a new filter element (FE-1)
Suction hole in the filter unit
Fastening Unit
Don’t forget the O-Ring!
Rotation direction to tighten the fastening nut

39
DC-ITD-PS7MAN01.A www.dodtec.com
JAN 2019 815-788-5200
PS-7 Manual
9.2 Attach/Replacing the Sensor Unit
1. Turn off the power source to the main unit
2. Pull the two latches at the bottom of the base unit back, and (while they are still pulled back) release
the main unit, pulling from the top.
3. Press back while pushing on the middle of the upper section of the main body cover with your thumb
and remove the cover
Warning
Verify that the detected gas type and the full-scale value of the new sensor unit are the same
as the sensor unit being replaced. Be sure to check that its expiration date has not passed.
(There is no expiration date displayed for the Combustible Gas Sensor Unit CHS-7.)
Caution
• The sensor unit should be gas tested or replaced at 12-month intervals.
• Turn off the power source before carrying out any replacements.
However, when the power switch to the main unit is turned off to replace the sensor unit, the
trouble alarm output (open collector) is also turned off. If alarm contacts are used for
interlocking with external devices, verify that the interlock be released prior to conducting
the alarm test.

40
DC-ITD-PS7MAN01.A www.dodtec.com
JAN 2019 815-788-5200
PS-7 Manual
4. Insert a finger in the gap between the main body and the top of the sensor unit and pull back slightly.
Then grasp the sides of the sensor unit and pull out.
5. Insert the new sensor unit, then reattach the main body cover.
Push in as far as it will go with the palm of your hand
6. Pull back the latches on both the left and right sides of the bottom of the base unit and attach the
main unit.
The axis is here (fulcrum).
Remove by turning.
Warning
If the sensor unit is improperly attached, it will not be made airtight and will fail to detect gas
correctly. Be sure to attach it in as far as it will go.
Pull out grasping the sides
Insert a finger and pull slightly

41
DC-ITD-PS7MAN01.A www.dodtec.com
JAN 2019 815-788-5200
PS-7 Manual
7. Push both the latches on the left, and right-hand sides of the base unit back in until locked/unlocked
line can be seen.
After power is applied to the main unit, and the appropriate time has passed (depending on the type of sensor
unit). Refer to page 26, #11 for proper zero adjustment of the sensor.
NOTE: CDS sensors do contain electrolyte and proper disposal in accordance with local regulations is
required.
9.3 Replacing the Sampling Unit
Locked/unlocked line
Latch
Push both latches back in.
Warning
Be sure to return the latches right back in. If the latches are not behind the locked/unlocked
line, gas detection will not work properly.
Caution
Always turn OFF the power supply before attempting to replace the sampling unit.
However, if the power switch to the main unit is turned off to replace the sampling unit, the
trouble alarm output (open collector) will also turn off. If alarm contacts are used for
interlocking with external devices, verify that the interlock be released prior to replacing the
unit.

42
DC-ITD-PS7MAN01.A www.dodtec.com
JAN 2019 815-788-5200
PS-7 Manual
1. Remove the sensor unit as described in 9.2 Attach/Replacing the Sensor Unit.
2. Press back while pushing on the lower section of the main body cover with both thumbs and remove
the front panel.
3. Remove the two connectors on the back of the front panel
4. Connect the two front panel connectors to the new sampling unit and reattach the front panel. After
inserting the sensor unit, reattach the main body cover.
The axis is here (fulcrum)
Direction to push with thumb
The position to push from. Push the
lower section of the front panel with
both thumbs and remove.
The position to push from.

43
DC-ITD-PS7MAN01.A www.dodtec.com
JAN 2019 815-788-5200
PS-7 Manual
*Be careful not to pinch the cables.
The following is the same as the procedure from step 6 onward in 9.2 Replacing the Sensor Unit.
5. Pull back the latches on both the left and rights sides of the bottom of the base unit, and attach the
main unit inserting from the top side first.
6. Push both the latches on the left, and right-hand sides of the base unit back in until the
locked/unlocked line can be seen
NOTE: Please return used sampling units back to your authorized dealer.
Main body cover
The axis is here
(fulcrum)
The axis is here
(fulcrum).
Front panel
Warning
If used when not inserted properly, the sensor unit will not be airtight, and will therefore not
detect gases properly. Be sure to attach it on as far as it will go
Also, when connecting the sampling unit with the front panel, be careful that the connector
cables are not pinched by the case.
Also, when attaching the front panel onto the sampling unit, be careful that the connector
cables are not pinched by the case.

44
DC-ITD-PS7MAN01.A www.dodtec.com
JAN 2019 815-788-5200
PS-7 Manual
Chapter 10 – Troubleshooting
If a problem occurs, check the following before contacting a service or sales representative.
Problem
Cause
Remedy
Reference
The POWER lamp (green) does not
come on when the power is turned
on
The power switch on the base
unit is turned OFF.
Turn the power switch to the
base unit ON.
7.1 Operation procedures
The power switch on the main
unit is turned OFF.
Turn the power switch to the
main unit ON.
7.1 Operation procedures
Wiring is not properly
connected.
Check wiring and tighten
terminal connections.
6.2 Wiring Instructions
The connector harness is not
connected properly.
Check and reattach the
connector.
9.3 Replacing the Sampling Unit
The fuse has blown.
Replace the fuse.
5 Description
The TROUBLE lamp (yellow) is
blinking
The filter element is clogged.
Replace the filter element.
9.1 Replacing the Filter Element FE-1
Pump is defective.
Replace the pump unit.
9.3 Replacing the Sampling Unit
Gas sampling pipe is blocked.
Remove the blockage.
The connector harness is not
connected properly.
Check and reattach the
connector.
9.3 Replacing the Sampling Unit
A sensor with different setting
has been inserted.
Change the settings on the
main unit or change the
sensor.
7.1 Operation procedures
Defective sensor unit.
Replace the sensor unit.
9.2 Attach/Replacing the Sensor Unit
Sensor unit is not installed.
Install the sensor unit.
9.2 Attach/Replacing the Sensor Unit
The output of the flow sensor
was not stable when power
was turned on.
Turn the power on and leave
for about 30 minutes until it
stabilizes.
7.1 Operation procedures
The “__” indication and the detected
gas concentration value blink
alternately.
It is set to either maintenance
mode 1 or 2.
Set to normal mode (center).
7.5 Maintenance Mode Settings and
Operating Instructions
There is no electrical output from
the alarm contacts.
It is set to either maintenance
mode 1 or 2.
Set to normal mode (center).
7.5 Maintenance Mode Settings and
Operating Instructions
Wiring is not properly
connected.
Check wiring and tighten
terminal connections.
6.2 Wiring Instructions
The analog output won’t change
from 4mA.
The maintenance switch is set
to 2.
Set to normal mode (center).
7.5 Maintenance Mode Settings and
Operating Instructions
Contact your local dealer if none of the above procedures remedy the problem or if the problem is not listed.

45
DC-ITD-PS7MAN01.A www.dodtec.com
JAN 2019 815-788-5200
PS-7 Manual
Chapter 11 – Specifications
Model
PS-7
Principle
Electrochemical sensor, hot-wire semiconductor sensor, galvanic cell sensor
Sampling method
Pump suction type (0.5 L/min, suction flow automatically controlled)
Gas sampling pipe*1
Teflon OD6/ID4 mm, maximum tube length 20 m.
Concentration display
4-digit digital LCD display(incl. units)20-segment bar graph
Alarm settings
As per specifications
Alarm accuracy
• Combustible gas 25% of preset alarm point under identical conditions
• Toxic gas 30% of preset alarm point under identical conditions
• Oxygen deficiency 1 vol% under identical conditions
Response time
• Combustible gas Within 30 secs using test gas concentration 1.6 times that of preset alarm point
• Toxic gas Within 60 sec. using test gas concentration 1.6 times that of preset alarm point
• Oxygen deficiency Within 5 sec. to reach 18 vol% reading (at 20 2C) from an atmosphere
concentration of 10 vol%
(Gas sampling pipe length and communication times not included in any of the above.)
Alarm display
• Gas alarm (1st and 2nd stage)
ALARM lamp (red) blinking: LCD display ALARM1 or ALARM2 is displayed
• Trouble alarm
Decreased rate of flow
TROUBLE lamp (yellow): LCD display FLOW displayed: The flow rate rotation is stopped
Sensor trouble
TROUBLE lamp (yellow) blinking: LCD display SENS. is displayed
The sensor unit is inserted incorrectly
TROUBLE lamp (yellow): LCD screen SENS. is displayed
Pyrolyzer is disconnected
TROUBLE lamp (yellow) blinking: LCD screen CONV. is displayed
External output
• Analog output
4-20mA DC (common negative with power supply)
*Resistance for detecting current to be less than 300Ω including circuit resistance.
• Alarm contacts (1st and 2nd stages)
1a no-voltage contact/auto reset
*Rated load: 125 V AC or 30 V DC, 0.5-A resistance load
• Trouble alarm
Open collector/auto return/auto reset
(Normal close: Normally ON, during trouble OFF, and OFF during shut-off of power supply.
*Rated load: 30 V DC, 30mA resistance load
Activated by decline of flow rate, sensor error, when the sensor unit has been inserted incorrectly, pyrolyzer
is disconnected, power off, or blown fuse.
The analog output is smaller than 0.6 mA, and the gas alarm is not activated.
Applicable cable
Shielded control cable (8 to 11 mm dia.) x2
Cable length
Maximum length not exceeding 500 m
Operating Temp
0-40C (avoid radical temperature fluctuation), 30-85% RH (no dew condensation)
Power requirement
24 V DC 10%
Power consumption
Approximately7 W (Approximately 10 W with convertor attached)
Dimensions
W62 H124 D143 mm (projected portion excluded)
Weight
Approximately 1.0 kg
Installation
Wall mount type

46
DC-ITD-PS7MAN01.A www.dodtec.com
JAN 2019 815-788-5200
PS-7 Manual
*1 Teflon tubing is recommended. However, this may differ if the unit is to be used to detect highly adsorbent
gases. Contact your authorized dealer for information and assistance. For product improvement purposes,
the preceding specifications may be subject to change without notice. Any specifications issued separately
take precedence over those stated above.
Chapter 12 – Warranty
New Cosmos Electric Company Limited, warrants its gas detection products against any defects in materials
and workmanship under normal use and operating conditions, for a period of one year from the date of
purchase. (Except toxic and oxygen sensor unit)
All obligations and liabilities under this product warranty are limited to repairing or replacing at the
manufacturer’s option of the allegedly defective items returned to us, with carrier charges prepaid. All repairs
and replacements are made subject to our factory inspection of the returned items.
No liability is accepted for the consequential damages or reinstallation labor. Defects as defined in the above
shall not include decomposition by chemical reaction (including corrosion).
New Cosmos Electric Company Limited, shall not assume responsibility for contingent liability arising from
alleged failure of any of its products and accessories.
Chapter 13 – Detection Principles
13.1 Electrochemical Sensor
In an electrochemical method, electrolytic reactions are carried out selectively on target composite gases,
and the ensuing electrolytic current is measured by a gas sensor.
The gas sensor consists of three electrodes (active, reference, and counter electrodes), electrolyte, and a
potentiostat circuit. The electrode is a gas permeable membrane (to permeate gas and not electrolyte)
treated with a catalyst. When SiH4 contacts the active electrode, the following reaction occurs on the
electrode:
SiH4+4H2O→H4SiO4+8H++8e− (1)
while the following reaction occurs on the counter electrode:
2O2+8H++8e−→4H2O (2)
and current flows to the external circuit. To make the reaction selective and the generated current
porportional to the concentration of SiH4, the potential of the active electrode is detected by the reference
electrode and, during the electrolysis reaction, the active electrode is maintained at a constant potential by
the potentiostat circuit. (Refer to the following illusration.)

47
DC-ITD-PS7MAN01.A www.dodtec.com
JAN 2019 815-788-5200
PS-7 Manual
13.2 Hot-wire Semiconductor Sensor
In the hot-wire semiconductor method, a semiconductor sensor is designed to measure the change of
electrical conductivity initiated by adsorption of the electrons of combustible gases onto the surface of a
metal oxide semiconductor heated with a platinum filament. When the semiconductor adsorbs these
electrons, the electron concentration increases and the conductivity of the semiconductor rises. As a result,
the temperature of the semiconductor declines, and the resistance of the platinum filament decreases. This
change is measured as a deviation voltage with a Wheatsone bridge.
Figure 9
13.3 Galvanic Cell Sensor
The galvanic cell sensor consists of noble metal (Pt, Ag) electrode, a base metal (Pb) electrode, and
electrolyte. The noble metal electrode contacts the air through a Teflon membrane.
Since a potential difference is produced between the two electrodes, the following reaction occurs when a
load resistor is connected:
Noble metal electrode O2+2H2O+4e−→4OH−

48
DC-ITD-PS7MAN01.A www.dodtec.com
JAN 2019 815-788-5200
PS-7 Manual
Base metal electrode 2Pb→2Pb
2
+
+4e−
As a result, a current proportional to the concentration of oxygen in the air flows from the noble metal
electrode to the base metal electrode through an external circuit. Since the current generated is dependent on
temperature, a thermistor is used to compensate for the atmospheric temperature changes.
Figure 10
NOTE: The galvanic cell sensor gives an output according to the partial pressure of the oxygen in the air (the
oxygen concentration is usually 21vol%.) Therefore, when the atmospheric pressure changes, the partial
pressure of the oxygen will change, and when there is no change in the oxygen concentration (21vol%), this
may effect the output values from the sensor.
Chapter 14 – Glossary
Gas Detector
Detects the gas concentration level, and converts it into an electric signal.
Target Gases for
detection
The target gases for which the gas concentration level is detected, and indications
or warnings are given.
Detection range
The concentration range within which the level of target gases can be detected, and
indications or warnings given.
Alarm delay
The time between when a level of gas concentration higher (or lower) than the
preset alarm values come into contact with the gas detector, and when the alarm
goes off.
Explosion-proof
constructions
Construction to ensure that electrical components do not become an ignition source
and do not ignite surrounding flammable air.
Maintenance
inspection
Inspections conducted to ensure that the instrument is able to continue carrying out
the functions demanded of it.
Part of this terminology list is quoted from gas detection monitor terminology definitions from the Industrial
Gas Detectors Monitor Association.

49
DC-ITD-PS7MAN01.A www.dodtec.com
JAN 2019 815-788-5200
PS-7 Manual
Administrator Manual
• Operate this unit only after reading and fully understanding the content of this manual.
• This Operation Manual was written for administrator use. Instructions for the basic operations of this
unit are provided separately in the standard Operation Manual. Refer to the Operation Manual when
necessary.

50
DC-ITD-PS7MAN01.A www.dodtec.com
JAN 2019 815-788-5200
PS-7 Manual
Chapter 1 – Passwords
Some of the settings on this unit (alarm settings, etc.) are password protected.
This Operation Manual explains the following items:
• Passwords
• Changing settings
1.1 Password Protected Settings
Span Adjustment
Refer to 2.1 Span Adjustment
21vol% adjustment
Refer to 2.2 21Vol% Adjustment
The values of various settings
Refer to 2.3 Changing Setting Values
The values of alarm settings
Refer to 2.4 Changing the Alarm Settings
1.2 Releasing the Password Lock
Press these key switches in the following order.
1. ZERO switch
2. UP switch
3. Special command switch
4. DOWN switch
The password lock is released when the
POWER lamp (green) blinks once.
The password lock is automatically reactivated
10 minutes after it has been released.
Warning
Important tasks, such as changing alarm settings, span adjustment, etc., can be carried out
once the password lock is released. Take the utmost care regarding confidentiality of the
password.

51
DC-ITD-PS7MAN01.A www.dodtec.com
JAN 2019 815-788-5200
PS-7 Manual
Chapter 2 – Changing Settings
2.1 Span Adjustment
Toxic Gas Sensor Unit: CDS-7
Combustible Gas Sensor Unit: CHS-7
1. Set to maintenance mode
(MNT1 or MNT2)
Left: Maintenance 1 (MNT 1)
Center: Normal Mode
Right: Maintenance 2 (MNT 2)
2. Release the password Lock (Refer to 1.2 Releasing the Password Lock
3. Press the SPAN switch.
4. Let the calibration gas through
5. Use the UP/DOWN switch
to adjust the
concentration indication
on the screen to that of
the calibration gas
concentration
6. Once adjustments have been done, press the SPAN switch again. The SPAN indication in the
bottom right of the LCD screen will go off, and the span adjustment will be completed.

52
DC-ITD-PS7MAN01.A www.dodtec.com
JAN 2019 815-788-5200
PS-7 Manual
7. Remove the calibration gas, check that the detected gas concentration is under that of the alarm
value and restore to the normal mode (by switching the maintenance switch to the center).
2.2 21Vol% Adjustment
Oxygen Sensor Unit: COS-7
1. Set to maintenance mode (MNT1 or MNT2).
Left: Maintenance 1 (MNT 1)
Center: Normal Mode
Right: Maintenance 2 (MNT 2)
2. Release the password lock. (Refer to 1-2 Releasing the Password Lock)
3. Press the SPAN Switch
4. Let the calibration gas through
5. Use the UP/DOWN switch to adjust the concentration indication on the screen to that of the
calibration gas concentration.
6. When the adjustment is completed, press the SPAN switch again. The SPAN indication in the
bottom right corner of the LCD screen will then disappear, and the 21vol% adjustment is complete.

53
DC-ITD-PS7MAN01.A www.dodtec.com
JAN 2019 815-788-5200
PS-7 Manual
7. Remove the calibration gas and confirm that no alarm is displayed( ALARM 1 , ALARM 2 is not shown).
Then, restore to the normal mode by switching the maintenance switch to the center.
2.3 Changing Setting Values
Some of the setting values of the unit can be changed. Those that can be changed are listed in the table
below. The method for changing them is explained here.
1. Release the password lock. (Refer to 1.2 Releasing the Password Lock.)
2. Press the UP/DOWN switch (“” or “”)
until the setting you wish to change ( “LCD
Screen Indication” in the table below ) is
displayed at the bottom right of the LCD
displays.
3. Then press the special command switch, and
the setting to be changed ( “LCD Screen
Indication” in the table below ) and “—“ will
flash alternately.
4. Change the value by using the UP/DOWN switches (“” or “”). When you are done, press the
special command switch again, and the alternating display in the bottom right corner of the LCD
display will become constant. The process is now finished.

54
DC-ITD-PS7MAN01.A www.dodtec.com
JAN 2019 815-788-5200
PS-7 Manual
LCD Screen
Indication
The function
to be set
Remarks
Default value
Adjustable
Range
Toxic: CDS-7
Combustible:
CHS-7
Oxygen:
COS-7
Each time the UP switch is pressed, it will move down the table to the next item.
When the DOWN
switch is pressed, it will move up one.
d1 **
Time delay 1
Time delay (secs.) of the gas
alarm contact (1st level)
d1 0
d1 0
0 to 99 sec
d2 **
Time delay 2
Time delay (secs.) of the gas
alarm contact (2nd level)
d2 0
d2 0
0 to 99 sec
az
Analog
output (base)
(*For our maintenance
purposes only)
as
Analog
output (span)
(*For our maintenance
purposes only)
zs *
Zero
suppression,
or 21vol%
suppression
Displays the percentage of the
full-scale value (rounded to the
percent)
zs 5
zs 2
0 to 30%
H-H
L-L
H-L
Alarm mode
1st: upper limit, 2nd : upper
limit warning
1st : lower limit, 2nd : lower
limit warning
1st : upper limit, 2nd: lower
limit warning
H-H
L-L
H-H
L-L
H-L
Con *
Pyroletic
converter
failure alarm
0: Off 1: On
Con 0
Con 0
0 or 1
CG **
Calibration
gas
concentration
(*For our maintenance
purposes only)
CG 40
CG 84
nEt *
The existence
of a
DeviceNet
unit
0: Non-existent 1: Existent
nEt 0
nEt 0
0 or 1
F ***
Display of f
value
Calibration gas type in lower
right of LCD
f value in center of LCD
(Depending on the sensor unit)
FL ***
Displays rate
of flow
Shows the current rate of flow
(mL/min)
(Depending on the rate of flow)
P ***
Sensor unit
output
(*For our maintenance
purposes)
--
At *
Auto 21vol%
adjustment
0: Off 1: On
--
A t 1
0 or 1
Type of sensor unit (Normal
display)
(Depending on the sensor unit)

55
DC-ITD-PS7MAN01.A www.dodtec.com
JAN 2019 815-788-5200
PS-7 Manual
2.4 Changing the Alarm Settings
The values of alarm settings on this unit can be changed. The method for changing them is explained here.
1. Release the password lock. (Refer to 1.2 Releasing the Password Lock.)
2. Press the AL switch until the alarm setting
to be changed is displayed on the LCD
display. (The bottom right of the screen, as in
the table below.) The alarm setting for the
actual gas concentration is displayed in the
middle of the screen, and the percentage of
the full-scale value is displayed in the
bottom right corner
LCD Display
Indication
(Lower right)
Default value
Explanation of the
default value
Adjustable Range
A1 **
Toxic : CDS-7
Comb. : CHS-7
A1 10
10% F.S.
0 to 100% F.S.
Oxygen: COS-7
A2 72
72% F.S.
A2 **
Toxic : CDS-7
Comb. : CHS-7
A2 20
20% F.S.
0 to 100% F.S.
Oxygen: COS-7
A2 76
76% F.S.
* Pressing the AL switch changes to 1st level → 2nd level→ Normal display.
* The A2 value should be greater than the A1 value in any case.
3. Press the special command switch. The
setting to be changed and the “—“ indication
will then flash alternately.
4. Change the value by using the UP/DOWN key “” and””. When you are done, press the special
command switch again, and the alternating display in the lower right corner of the LCD display will
become constant. The process is now finished.
5. When this is finished, press the UP/DOWN switches (“” or””) again to return to the normal
display.
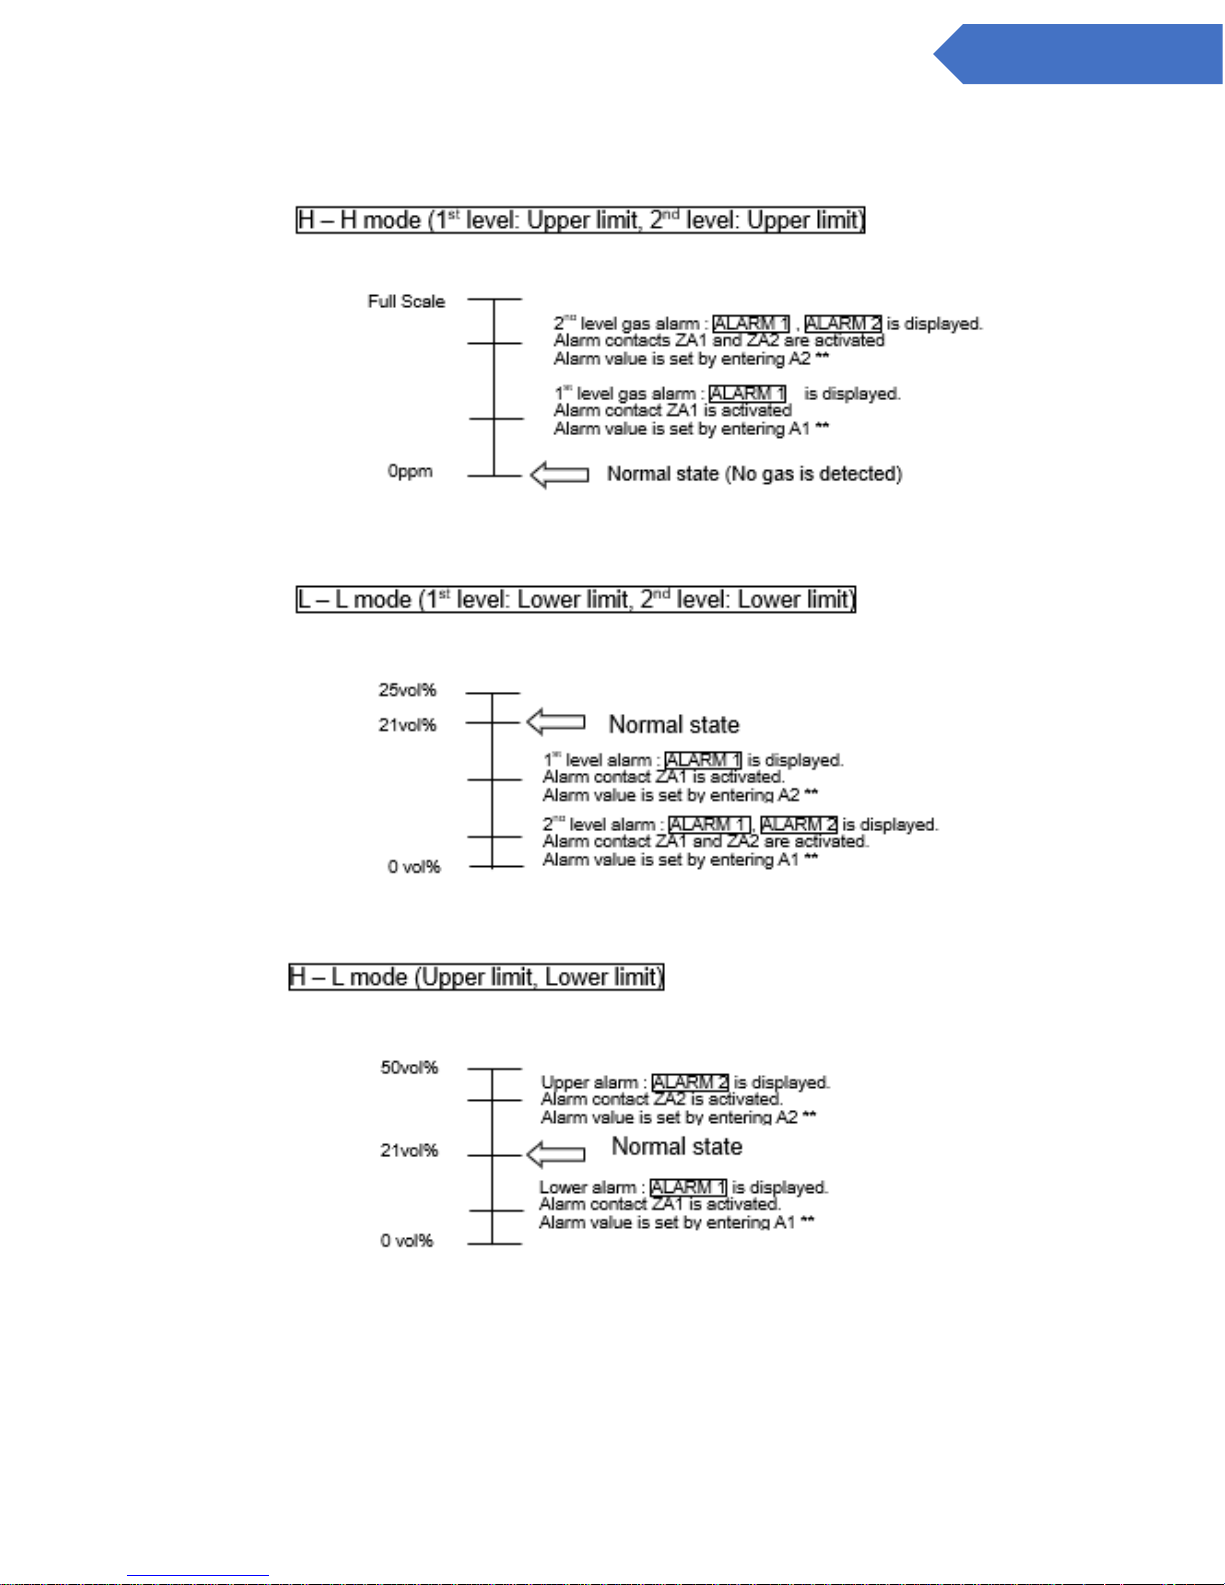
56
DC-ITD-PS7MAN01.A www.dodtec.com
JAN 2019 815-788-5200
PS-7 Manual
NOTE: The relationship between 1st level and 2nd level alarm values of each alarm mode is as follows:
*A2 Value should always be greater than A1 value.

57
DC-ITD-PS7MAN01.A www.dodtec.com
JAN 2019 815-788-5200
PS-7 Manual
Pyrolyzer Manual
• Be sure to store this operation manual in a convenient location and consult it whenever necessary.
• Operate this unit only after reading and fully understanding the content of this manual.
• This Operation Manual was written for the pyrolyzer(option). Instructions for the basic operations of
this unit are provided separately in the standard Operation Manual. Refer to the Operation Manual
when necessary.

58
DC-ITD-PS7MAN01.A www.dodtec.com
JAN 2019 815-788-5200
PS-7 Manual
Chapter 1 – Attach/Replacing the Pyrolyzer
1. Turn off the power source to the main unit
2. Pull the cover lock knob down and release the lock. After pulling it down further below, pull back the
pyrolyzer case cover and remove it.
Notice
• The Sensor Modules do not normally require gas calibration to be performed on
site. Gas calibration of the sensor module is performed by New Cosmos at the
time the sensor is manufactured.
• The CDS sensors (electrochemical) have a life of 2 or more years depending on
the specific sensor. CDS Sensors are labeled with a manufacture date. All CDS
sensors must be gas tested or replaced every 16 months from the manufacture
date or 12 months from the install date, whichever comes first.
• The NF3 CDS sensor is packaged with a pyrolyzer module and both units should
be replaced at the same time. When using a CDS sensor for NF3, both the sensor
and pyrolyzer should be gas tested or replaced after 12 months of use (16 months
from manufacture, whichever comes first). If not replaced at the 12-month date,
both should be replaced after 24 months of use or 30 months from manufacture
date (which ever date comes first).
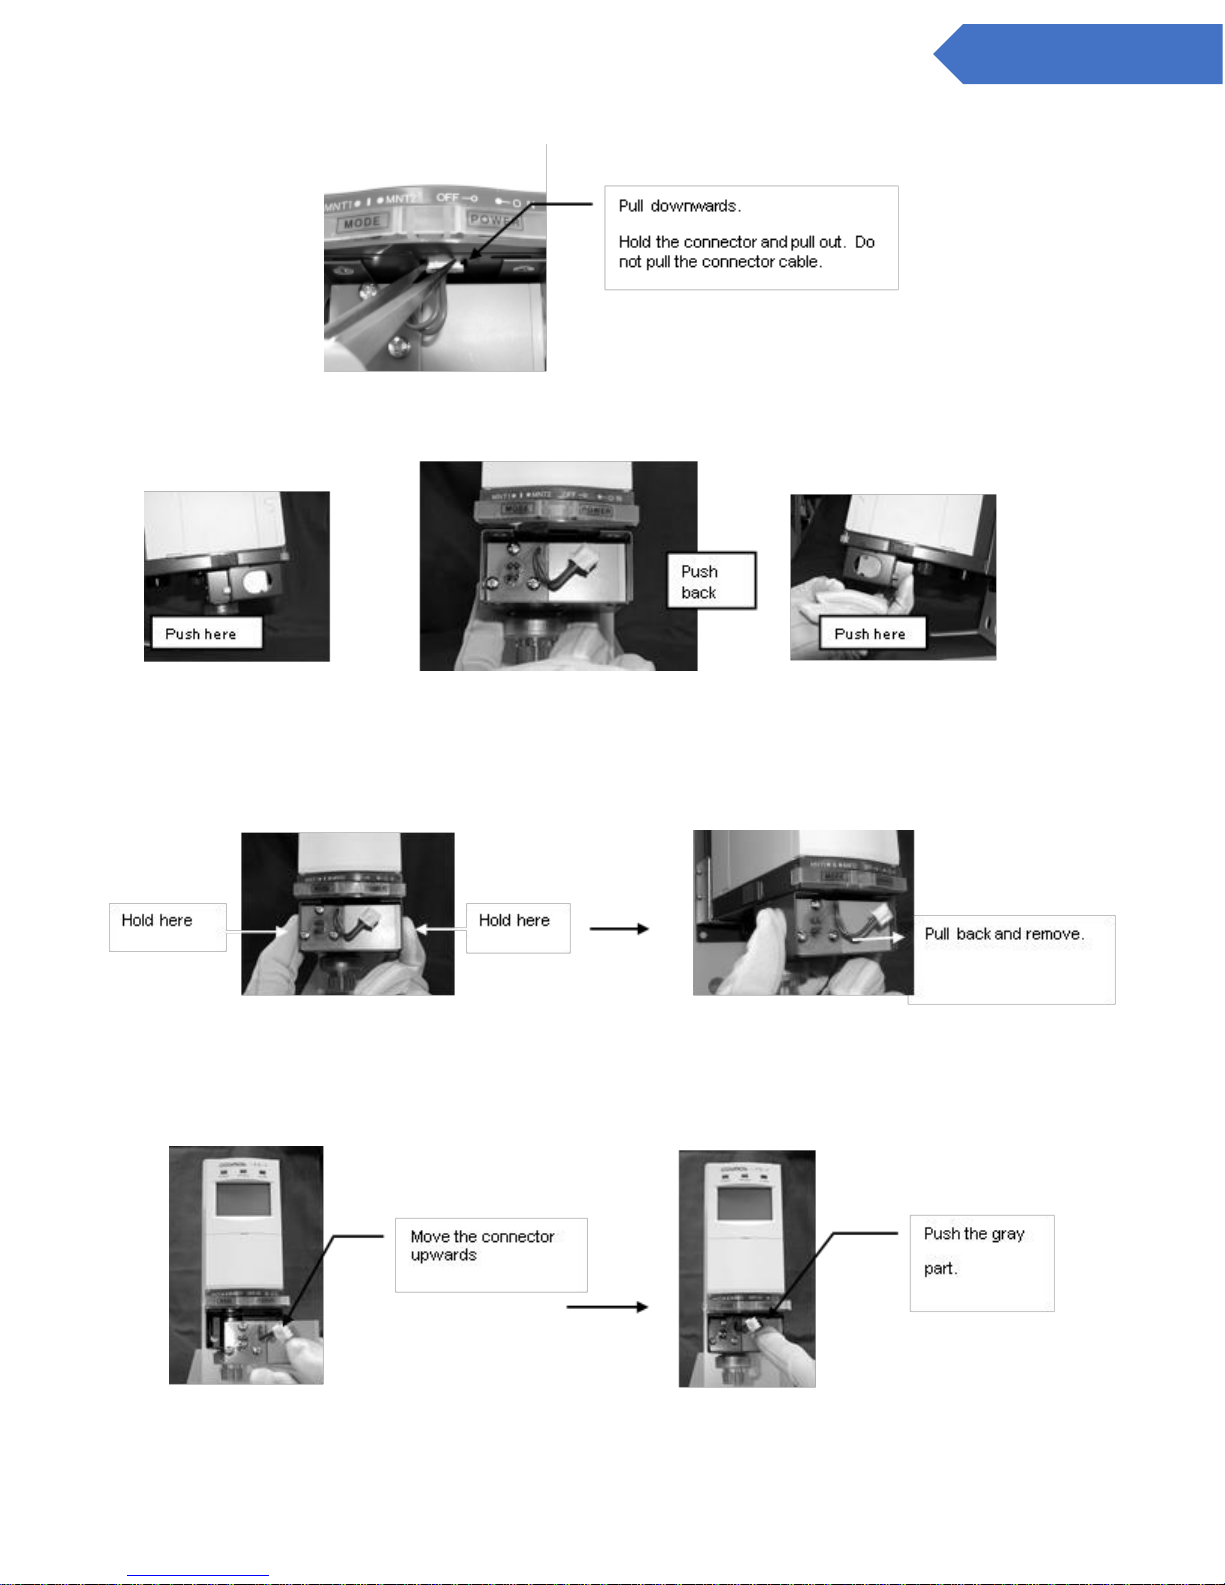
59
DC-ITD-PS7MAN01.A www.dodtec.com
JAN 2019 815-788-5200
PS-7 Manual
3. Removing the old pyrolyzer. Pull out the connector. When it is newly installed and there is no pyrolyzer,
refer to step 6.
4. Push the 2 protrusions behind the pyrolyzer with your forefinger and middle finger.
Left Side Front View Right Side
5. Hold both sides of the pyrolyzer and remove it.
6. Insert the new pyrolyzer. Push the gray part with your finger as shown below and insert it completely.
(Push it in as far as it will go.) Be sure to check that the serial number of the pyrolyzer is equal to the
serial number of the sensor unit.

60
DC-ITD-PS7MAN01.A www.dodtec.com
JAN 2019 815-788-5200
PS-7 Manual
7. Connect the connector of the pyrolyzer.
8. Put the pyrolyzer case cover. Push the cover lock knob upward and lock the pyrolyzer.
9. Switch the main unit power ON. Press the up/ down switch, “” or “” on the main unit and verify
that the pyrolyzer failure alarm is ON.
NOTE: Please return the used sensor units and pyrolyzer to your authorized dealer.
Warning
• Be sure to check that the pyrolyzer failure alarm is set to ON. When regular
operations are carried out at the failure alarm OFF, the failure alarm will not work.
 Loading...