

COSMOGAS NOVADENS 24, NOVADENS 24B, NOVADENS 24C, NOVADENS 24P, NOVADENS 34 Instruction Manual
...Page 1

INSTRUCTION MANUAL FOR INSTALLATION
AND MAINTENANCE OF GAS BOILERS
PLEASE READ THE MANUAL CAREFULLY: IT CONTAINS IMPORTANT INFORMATION
REGARDING SAFETY, INSTALLATION, USE AND MAINTENANCE OF THE APPLIANCE
62403425 - R00 07-12-2007_GB-IE
MODELES:
NOVADENS 24 - 24B
NOVADENS 24C - 24P
NOVADENS 34 - 34B
NOVADENS 34C - 34P
Page 2

2
Table of contents
1 - General safety warnings............................................................................................4
1.1 - National installation legislation ..................................................................................................4
2 - GENERAL INFORMATION .......................................................................................5
2.1 - Introduction ............................................................................................................................... 5
2.2 - Description of models ............................................................................................................... 5
2.3 - Manufacturer ............................................................................................................................5
2.4 - Key to symbols used .................................................................................................................5
3 - MAIN COMPONENTS ...............................................................................................6
4 - Functions of the appliance ........................................................................................ 8
4.1 - Intended use and functions of the appliance .........................................................................10
4.2 - Characteristic curves of heating system’s residual head ........................................................ 11
4.3 - Characteristic curve of the domestic side ............................................................................... 11
5 - INSTALLATION ....................................................................................................... 12
5.1 - Opening the packaging ........................................................................................................... 12
5.2 - Dimensions and clearances for installation ............................................................................. 12
5.3 - Choosing the point of installation ............................................................................................ 12
5.4 - Supply and return .................................................................................................................... 13
5.5 - Radiant panel systems (or low temperature systems) ............................................................ 13
5.6 - Domestic hot and cold water ................................................................................................... 13
5.7 - Gas supply .............................................................................................................................. 13
5.8 - Assembling the appliance ....................................................................................................... 14
5.9 - Gas and water connections .................................................................................................... 14
5.10 - Condensation discharge ....................................................................................................... 15
5.11 - Safety relief valve .................................................................................................................. 15
5.12 - Hydraulic connections for boiler with BWR storage tank ...................................................... 16
5.13 - Softener (on request) ............................................................................................................ 16
5.14 - Electrical connections: overview ........................................................................................... 17
5.14.1 - Connecting the power supply cable ........................................................................................17
5.14.2 - Choosing the room thermostat/time-programmable thermostat ..............................................18
5.14.3 - Connecting the room thermostat/time-programmable thermostat ...........................................18
5.14.4 - Installing the outside temperature sensor (on request) ...........................................................18
5.14.5 - CR04 remote time control (optional) .......................................................................................19
5.14.6 - Installation of the CR04 remote time control on the boiler ......................................................19
5.15 - Connecting the boiler to the B70C type water heater (optional) ........................................... 20
5.15.1 - Prevention against Legionnaires disease ...............................................................................20
5.16 - Connecting the boiler to the BWR C type storage tank ....................................................... 21
5.16.1 - Prevention against Legionnaires disease ...............................................................................21
5.17 - Venting systems .................................................................................................................... 22
5.17.1 - “Split 80/80PP” system (polypropylene) ..................................................................................23
5.17.2 - “Split 80/80PP” system: available accessories ......................................................................24
5.17.3 - “Split 80/80PP” system: installation examples ........................................................................25
5.17.4 - “Coaxial 60/100PP” system (polypropylene) ..........................................................................26
5.17.5 - “Coaxial 60/100 PP” system: available accessories ................................................................27
5.17.6 - “Coaxial 60/100PP” system: installation examples ..............................................................28
6 - OPERATING ...........................................................................................................29
6.1 - Operating ................................................................................................................................ 29
6.1.1 - User instructions ........................................................................................................................29
6.1.2 - Filling of the condensation discharge trap .................................................................................29
6.1.3 - Filling the heating system ..........................................................................................................29
6.1.4 - Filling of the secondary heat exchanger of the domestic hot water ..........................................29
6.2 - General warnings concerning gas supply ............................................................................... 29
6.3 - Gas type indicated for the boiler ............................................................................................. 30
6.4 - Converting the boiler from one gas type to another ................................................................ 30
Page 3

3
Table of contents
6.5 - Start-up ................................................................................................................................... 30
6.5.1 - Auto-purging ..............................................................................................................................30
6.6 - Checking and adjusting the gas supply pressure ................................................................... 30
6.7 - Checking the comburant air pressure ..................................................................................... 31
6.8 - Checking and adjusting CO2 levels ........................................................................................ 32
6.9 - Adjusting the heating capacity ................................................................................................ 33
6.10 - Domestic hot water ow rate adjustment .............................................................................. 33
7 - USE ......................................................................................................................... 34
7.1 - Adjusting the domestic hot water ........................................................................................... 34
7.2 - Adjusting the heating system .................................................................................................. 34
7.3 - Thermostatic adjustment ......................................................................................................... 34
7.4 - Climatic adjustment ................................................................................................................. 34
7.4.1 - Climatic adjustment: on which systems? ...................................................................................34
7.4.2 - Climatic adjustment: precautions when making adjustments ....................................................35
7.4.3 - Climatic adjustment: setting of the parameters .........................................................................35
7.4.4 - Climatic adjustment: adjustments of the various climatic zones ...............................................35
7.4.5 - Climatic adjustment: switching on and off the heating service ..................................................35
7.4.6 - Climatic adjustment with room compensation ...........................................................................35
7.5 - Boiler settings (SWITCHES) ................................................................................................... 37
7.6 - Timings of the various functions .............................................................................................. 37
7.7 - Pumps and switch valve blockage protection ......................................................................... 37
7.8 - Anti-freeze protection .............................................................................................................. 37
7.9 - (Empty) ...................................................................................................................................37
7.10 - Energy Saving ....................................................................................................................... 37
7.11 - “Users’ menu” ........................................................................................................................ 38
7.12 - “Installers’ menu” ................................................................................................................... 39
7.13 - Diagnostics ...........................................................................................................................41
7.13.1 - Diagnostics: “L” lock-outs ........................................................................................................42
8 - MAINTENANCE ...................................................................................................... 45
8.1 - General warnings .................................................................................................................... 45
8.2 - Disassembling the casing and accessing internal components .............................................. 45
8.3 - Cleaning of the condensation collecting trap .......................................................................... 46
8.4 - Cleaning the burner and primary heat exchanger (ue gas side) .......................................... 47
8.5 - Correct positioning of the ignition and ionization electrodes .................................................. 47
8.6 - Secondary heat exchanger for the production of d.h.w. .......................................................... 47
8.7 - Replacement of the pump motor ............................................................................................. 48
8.8 - Checking the expansion tank .................................................................................................. 48
8.9 - Dismantling the 3-way valve ................................................................................................... 49
8.10 - Draining the heating side of the appliance ............................................................................ 50
8.11 - Draining the domestic side of the appliance ......................................................................... 50
8.12 - Forcing .................................................................................................................................. 50
8.13 - Auto-purging .......................................................................................................................... 50
8.14 - Fan ........................................................................................................................................ 50
8.15 - Minimum and maximum output ............................................................................................ 50
8.16 - Checking the ionization current ............................................................................................. 50
8.17 - Water temperature gauging sensor ....................................................................................... 51
8.18 - Outside temperature sensor ................................................................................................. 51
8.19 - Functional wiring diagram ..................................................................................................... 52
8.20 - Multiwire wiring diagram ....................................................................................................... 53
9 - TECHNICAL FEATURES ........................................................................................54
10 - EC COMPLIANCE DECLARATION ......................................................................55
Page 4

4
If you smell gas
Close the gas cock.
Ventilate the room.
Do not use any electrical appliances, telephone
included.
Immediately call a qualied technician or the gas board
from another room or building. If you cannot contact
them, call the Fire Brigade.
If you smell pruducts of the combustion
Switch off the appliance.
Ventilate the room.
Call a qualied technician.
Installation, modications
The installation, setting and modication of the gas
appliance must be carried out by qualied technicians,
in compliance with local and national norms and these
instructions.
Never leave any packaging or replaced parts within
the reach of children.
Seal the setting devices after each setting.
It is compulsory to connect the appliance’s discharge
pipe to a chimeney. Failure to observe this rule may
seriously risk the safety of individuals and animals.
Flue pipes must not be modied in any way.
The user, in accordance with these instructions, must
keep the appliance in satisfactory running order and
ensure reliable, safe operating.
The user is responsible for employing a qualified
technician to carry out maintenance work on the
appliance in compliance with local and national norms
and the matters stated in this manual.
We highly recommend arranging a regular maintenance
contract with a qualied technician
The manufacturer cannot be held responsible for any
damage to people, animals or property caused by
incorrect installation or inadequate maintenance.
Use the switches to disconnect the appliance from the
mains before carrying out any cleaning or maintenance
operations.
Do not obstruct the intake/discharge pipe ends.
Explosive or easily inammable products
Do not store or use explosive or easily inflammable
materials such as paper, solvents, paints, etc..., in the
same room as the boiler.
In the event of a breakdown
In the event of breakdown and/or malfunctioning of the
appliance, disconnect it, do not attempt to repair it or
intervene in any way whatsoever. Contact a qualied
technician. If repairs require parts to be replaced, only
original spares must be used. Failure to observe the above
may compromise the appliance’s safety.
Qualied technicians
Qualied technicians are personnel with specic, technical
1 - GENERAL SAFETY WARNINGS
training in the heating system component sector and with
regards to domestic hot water production for public use,
fuel gas systems and electrical systems. These individuals
must have the legally required qualications.
This booklet forms an integral and essential part of
the product and must be carefully kept by the user,
for any future consultation. Ensure that this booklet is
handed over to the new owners and/or installer if the
appliance should change hands or be moved for any
reason whatsoever.
Any optional extras or kit tted subsequently must be
original Cosmogas spares.
This appliance must only be used for the purpose it has
been expressly designed for: heating water for closed
circuit systems for centrally heating public and private
buildings, producing sanitary and domestic hot water
for civil use.
The man ufacture r cannot be held responsible,
contractually or otherwise, for any damage caused by
incorrect installation or use and for failure to comply
with the manufacturer’s instructions or applicable local
and national legislation.
For safety reasons and to safeguard the environment,
all packaging must be disposed of in special sorted
refuge collection centres.
1.1 - National installation
legislation
The installation must be carried out by a registered
compete nt person and be in accordanc e with the
relevant requirements of the current GAS SAFETY
(Installation and Use) REGULATIONS, the BUILDING
REGULATIONS (Scotland)(Consolidation), the LOCAL
BUILDING REGULATIONS, the current I.E.E. WIRING
REGULATIONS and the bye laws of the LOCAL WATER
UNDERTAKING. Where no specic instruction is given
reference should be made to the relevant BRITISH
STANDARD CODES OF PRACTICE. For Ireland install
in accordance with IS 813 “INSTALLATION OF GAS
APPLIANCES”.
B.S. Codes of Practice
BS 6891 Gas Installation.
BS 5546 Installation of hot water supplies for domestic
purposes.
BS 5449 Part 1 Forced circulation hot water systems.
BS 6798 Installation of gas red hot water boilers.
BS 5440 Part 1 Flues.
BS 5440 Part 2 Ventilation.
BS 7074 Expansion vessels and ancillary equipment for
sealed water systems.
BS 7593 Treatment of water in domestic hot water central
heating systems.
Page 5

5
2 - GENERAL INFORMATION
2.1 - Introduction
Congratulations!
You have effectively purchased
one of the best products on the
market.
Each single part is built, tested
and assembled, with pride, at the
COSMOGAS factories, thereby
guaranteeing optimum quality
control.
Thanks to on-going research
carried out by COSMOGAS, this
product has been conceived and
is considered to be the best in
its class with regards to respect
for the environment, since it falls
within class 5 (less polluting)
envisaged by technical norm EN
297 (and EN 483) and has an
elevated efciency, 4 star as per
EC Directive 92/42/CEE. Great
importance is also given to the
end of the appliance’s useful life.
All its components can easily
be separated into similar and
completely recyclable parts.
2.3 - Manufacturer
COSMOGAS srl
Via L. da Vinci 16
47014 - Meldola (FC) ITALY
Tel. +39 0543 498383
Fax. +39 0543 498393
www.cosmogas.com
info@cosmogas.com
2.4 - Key to symbols
used
CAUTION!!!
Risk of electric shock: failure to observe
th is war ning may co mpro mise the
smooth running of the appliance or cause
serious damage to individuals, animals
or property.
General danger!
Failure to observe this warning may
compromise the smooth running of the
appliance or cause serious damage to
individuals, animals or property.
Operation symbol
Important indication symbol
NOVADENS XXYYYY
“ “ =
Boiler with exchanger sanitary to partial accumulation;
“A” = Boiler for only heating without integrated pump;
“B” = Boiler which can be combined with BWR C series storage tank;
“C” = Boiler for only heating with integrated pump;
“P” = Boiler with exchanger secondary for D.H.W., to plates;
“0834” = Boiler for low temperature central heating systems.
24 = Boiler with maximum input heat of 25 kW
34 = Boiler with maximum input heat of 34.8 kW
Gas-red, condensing, hot water boiler, with sealed combustion chamber
and pre-mix burner, for heating and domestic hot water production.
2.2 - Description of
models
Page 6
6
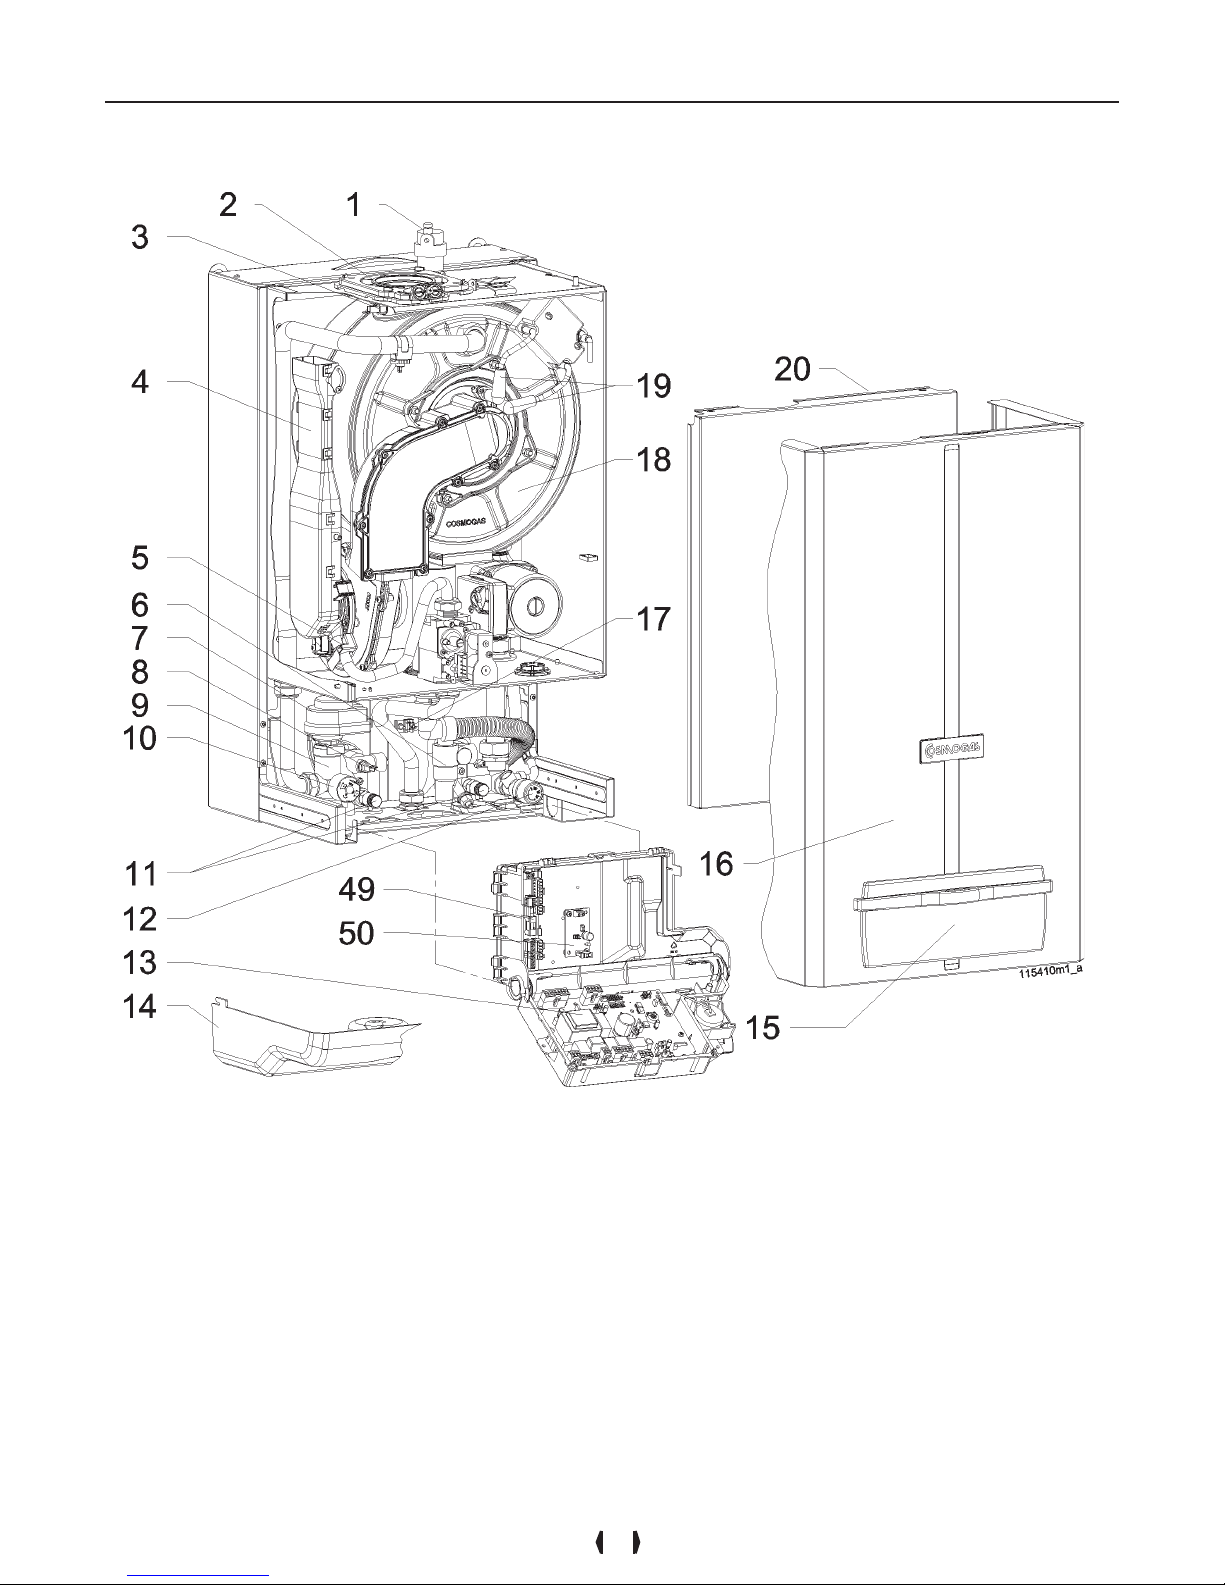
3 - MAIN COMPONENTS
Figure 1 - Internal components of boiler
1 - Automatic air vent
2 - Air intake and ue gas
discharge tting (venting system)
3 - NTC7 ue gas sensor
4 - Air drum
5 - Air/gas mixer
6 - Return unit
7 - 3 way valve
8 - NTC2 d.h.w. outlet sensor
9 - 3 way valve shell
10 - Heating pressure switch
11 - Heating circuit discharge
cock
12 - Safety relief valve
13 - Control board
14 - Lower cover
15 - Door to control box
16 - Casing
17 - NTC3 d.c.w. sensor
18 - Primary heat exchanger
19 - Ignition cables
20 - Door of sealed combustion
chamber
Page 7
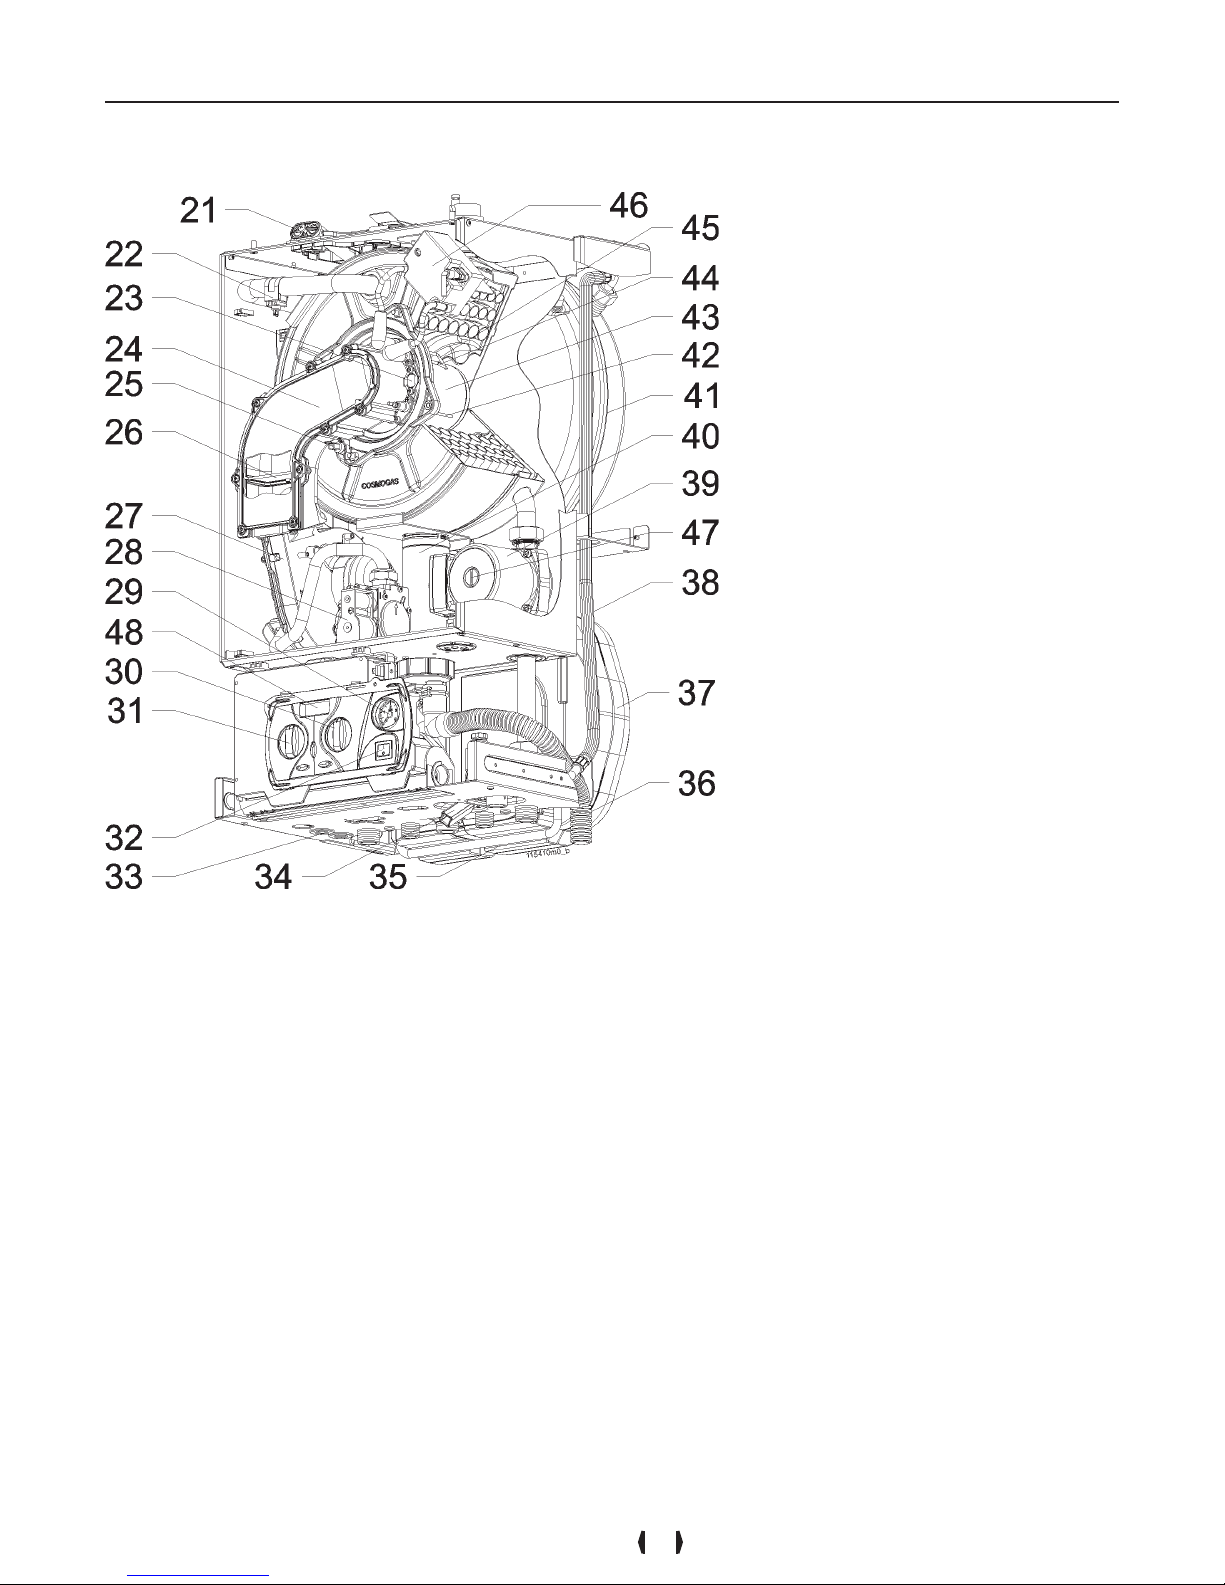
7
3 - MAIN COMPONENTS
Figure 1 - Internal components of boiler
21 - Combustion analysis tap
22 - NTC1 boiler temperature
sensor
23 - Burner window
24 - Air/gas manifold
25 - NTC6 high temperature limit
sensor
26 - Flue gas ow back
prevention valve
27 - Fan
28 - Gas valve
29 - Pressure gauge
30 - Domestic hot water control
31 - Heating control
32 - On/off power switch
33 - Cable clamp
34 - Filling cock
35 - By-pass pipe (optional)
36 - Condensation discharge pipe
37 - Secondary heat exchanger for
domestic hot water
38 - Expansion tank connection pipe
39 - Circulator pump
40 - Condensation discharge trap
41 - Expansion tank
42 - Ionization electrode
43 - Burner
44 - Right ignition electrode
45 - Left ignition electrode
46 - Spark generator
47 - Screw cap for unblocking
pump
48 - Display
49 - Electric connections board
50 - Opentherm interface board
(optional)
Page 8
8
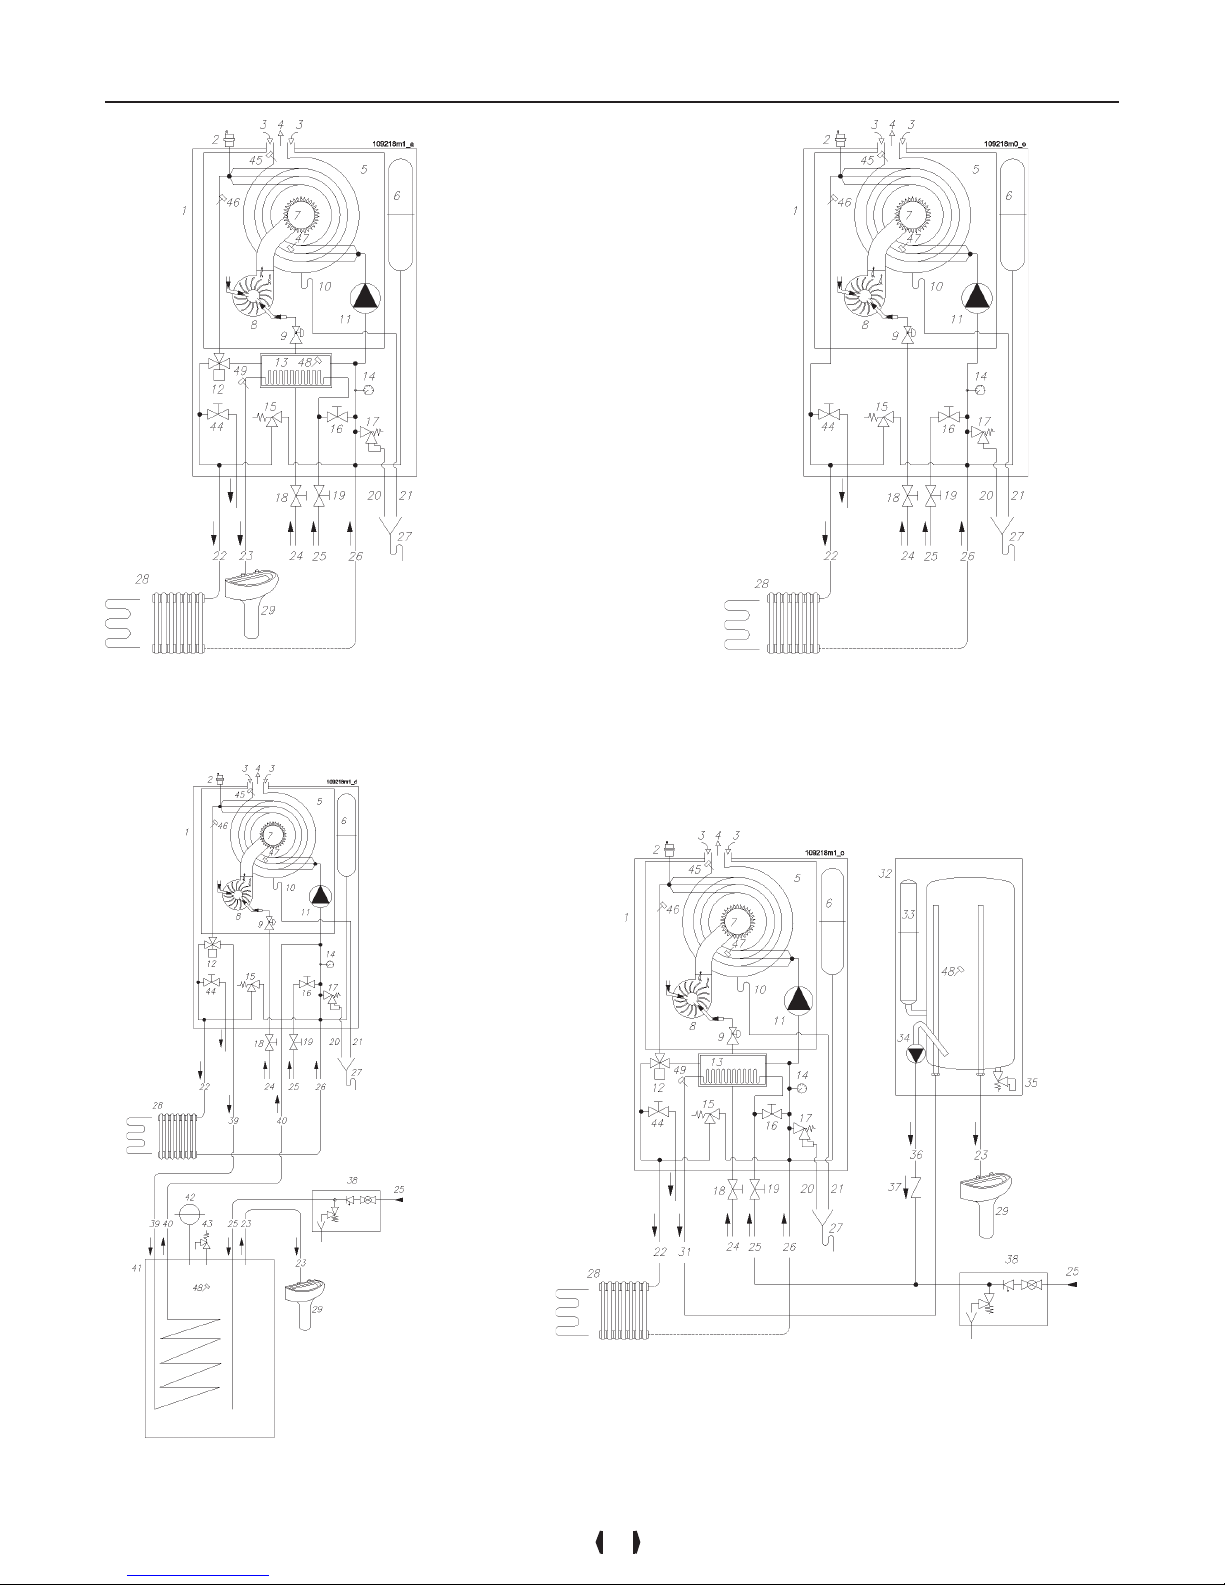
4 - FUNCTIONS OF THE APPLIANCE
Figure 2 - Hydraulic diagram
NOVADENS 24 or 24P
NOVADENS 34 or 34P
Figure 3 - Hydraulic diagram
NOVADENS 24C
NOVADENS 34C
(for settings, see section 5.5)
Figure 5 - Hydraulic diagram
NOVADENS 24 or 24P
NOVADENS 34 or 34P
connected to B70 type storage
tank
(for settings, see section 5.15)
Figure 4 - Hydraulic diagram
NOVADENS 24B
NOVADENS 34B
Page 9

9
Key to gures 2, 3, 4 and 5:
1 = COSMOGAS boiler NOVADENS model
2 = automatic air vent
3 = air intake
4 = ue discharge
5 = sealed combustion chamber
6 = expansion tank
7 = burner
8 = fan
9 = gas valve
10 = condensation discharge trap
11 = circulator pump
12 = 3-way valve
13 = secondary heat exchanger for d.h.w.
14 = pressure gauge
15 = by-pass valve (optional)
16 = lling cock
17 = safety relief valve
18 = gas cock
19 = cold water inlet cock
20 = safety relief valve discharge (optional)
21 = condensation discharge
22 = heating supply pipe
23 = domestic hot water outlet
24 = gas inlet
25 = cold water inlet
26 = heating return pipe
27 = trap funnel (optional)
28 = heating system for radiators or radiant panel-type heating system (to be tted by installer)
29 = domestic hot water system (to be tted by installer)
30 = ------------------
31 = re-circulation supply pipe for water heater loading (to be tted by installer)
32 = B70 type storage tank (optional)
33 = expansion tank
34 = circulator pump
35 = safety rilief valve
36 = re-circulation return pipe for water heater loading (to be tted by installer)
37 = check valve (to be tted by installer)
38 = hydraulic safety unit complying with EN 1487 (to be tted by installer)
39 = water heater lling supply pipe (to be tted by installer)
40 = water heater lling return pipe (to be tted by installer)
41 = BWR type storage tank (optional)
42 = expansion tank
43 = safety relief valve
44 = heating system discharge cock
45 = NTC7 = ue gas sensor
46 = NTC1 = boiler temperature sensor
47 = NTC6 = high temperature limit sensor
48 = NTC3 = domestic cold water sensor/storage tank sensor
49 = NTC2 = domestic hot water outlet sensor
4 - FUNCTIONS OF THE APPLIANCE
Page 10

10
4.1 - Intended use
and functions of the
appliance
This condensation-type gas appliance,
is designed to be used for central
heating and producing domestic hot
water for civil use.
Fit the boiler to the system according
to the most suitable residual curve
head (see gures 6 and 7).
The maximum output heat is always
guaranteed for the production of
domestic hot water since, on each
request, the heating service switches
off.
Follow the specic procedure in
section 9.13 for the adjustment of the
domestic hot water temperature.
Depending on the model chosen, the
following system types can be created:
A- NOVADENS -- ” “. By means of
this boiler, a system can be created
for the production of instant domestic
hot water and a heating system
with heating elements functioning at
temperatures ranging between 30°C
and 80°C. An example of this type of
system is shown in gure 2.
B- NOVADENS -- “B”. By means of
this boiler, a system can be created
for the production of domestic hot
water using a storage tank, BWR or
equivalent model and a heating system
with heating elements functioning at
temperatures ranging between 30°C
and 80°C. An example of this type of
system is shown in gure 4.
C- NOVADENS -- “C”. By means of
this boiler, a system can be created for
the only heating with heating elements
functioning at temperatures ranging
between 30°C and 80°C. An example
of this type of system is shown in gure
3.
In this model is moreover possible to
connect, also after the installation,
en storage tank model BWR lled
up through one external valve to the
boiler.
D- NOVADENS -- “P”. By means of
this boiler, a system can be created
for the production of instant domestic
hot water and a heating system
with heating elements functioning at
temperatures ranging between 30°C
and 80°C. An example of this type of
system is shown in gure 2.
All the boiler versions described
previously can be connected to a
room thermostat for the setting of
the heating. Or, so as to improve
the quality of the heating service,
it is possible to connect an external
temperature sensor (Climatic heat
adjustment) so as to automatically
set the supply temperature in relation
to the external temperature; the
room thermostat, in this case, can
make a compensation of the room
temperature. The room compensation
can be of an ON /OFF type or twostage.
For further information on the Climatic
heat adjustment, refer to section 7.4.
For take advantage of the rendering
characteristics of boiler, it is
advised to connect it to the CR04
cronothermostat, (see chapter
5.14.5), what it will regulate the
temperature of supply to the
radiators in continuous and linear
way, to maintain the temperature
environment planned.
The boiler must be connected to
a heating system and a domestic
hot water supply, with compatible
specications, performance and
power rating.
Before installation, thoroughly ush
the heating and plumbing systems
of any residue or impurities which
might compromise the smooth
running of the boiler.
This boiler is not designed for
outside installation.
Choose a sheltered place where
it is protected from atmospheric
elements including frost.
Refer to gure 9 for minimum
clearance distances for installation
and future maintenance.
4 - FUNCTIONS OF THE APPLIANCE
E- NOVADENS -- “0834”. By means
of this boiler, a system can be created
for the production of instant domestic
hot water and a heating system
with heating elements functioning at
temperatures ranging between 20°C
and 45°C. An example of this type of
system is shown in gure 2.
F- NOVADENS -- “B0834”. By means
of this boiler, a system can be created
for the production of domestic hot
water using a storage tank, BWR or
equivalent model and a heating system
with heating elements functioning at
temperatures ranging between 20°C
and 30°C. An example of this type of
system is shown in gure 4.
G- NOVADENS -- “C0834”. By means
of this boiler, a system can be created
for the only heating with heating
elements functioning at temperatures
ranging between 20°C and 45°C.
An example of this type of system is
shown in gure 3.
In this model is moreover possible to
connect, also after the installation,
en storage tank model BWR lled
up through one external valve to the
boiler.
H- NOVADENS -- “P0834”. By means
of this boiler, a system can be created
for the production of instant domestic
hot water and a heating system
with heating elements functioning at
temperatures ranging between 20°C
and 45°C. An example of this type of
system is shown in gure 2.
In all the boiler versions described
previously, connection of the domestic
hot water service is not indispensable;
if the boiler is required solely for central
heating purposes, it is sufcient to
connect the cold water pipe so as to ll
the heating system and close the tting
of the d.h.w. outlet.
All the NOVADENS -- or NOVADENS
--0834 model boilers, can also be
connected subsequently for the
installation of a B70 C series storage
tank (see gure 5)
Page 11

11
4.2 - Characteristic
curves of heating
system’s residual
head
Each standard boiler is tted with its
own specic circulator pump. The
residual head at the boiler connections
is shown in graph form in gures 6.
On demande, we can supply the boiler
with a 7 m head pump (see g.7).
The diagram comprises 4 curves which
can be selected from the control panel,
in the following manner:
press the button for 12
seconds until parameter is
displayed (the display panel will start
to blinking);
continually press and release the
button in order to scroll
through the list of parameters until
the parameter is displayed;
once the parameter has been
identied, it can be changed using
the or key;
choose the desired value of the
pump speed;
Press the button in order to
conrm the modied data and exit
from the menu;
4.3 - Characteristic
curve of the
domestic side
Every boiler offers certain resistance
to the passage of the domestic water
(see graph ow/pressures of gure
8). The installer or the engineer must
take account of this in order to ensure
the correct domestic water ow to the
utilities.
Figure 6 - Curve of the pump with 6 metres head
Figure 7 - Curve of the pump with 7 metres head
Figure 8 - Curve of the of pressure for the domestic side.
4 - FUNCTIONS OF THE APPLIANCE
Pressure (bar)
Flow (l/min)
Page 12
12
5.1 - Opening the
packaging
The appliance is supplied in a box. Open
it up following the instructions given on
the closing aps.
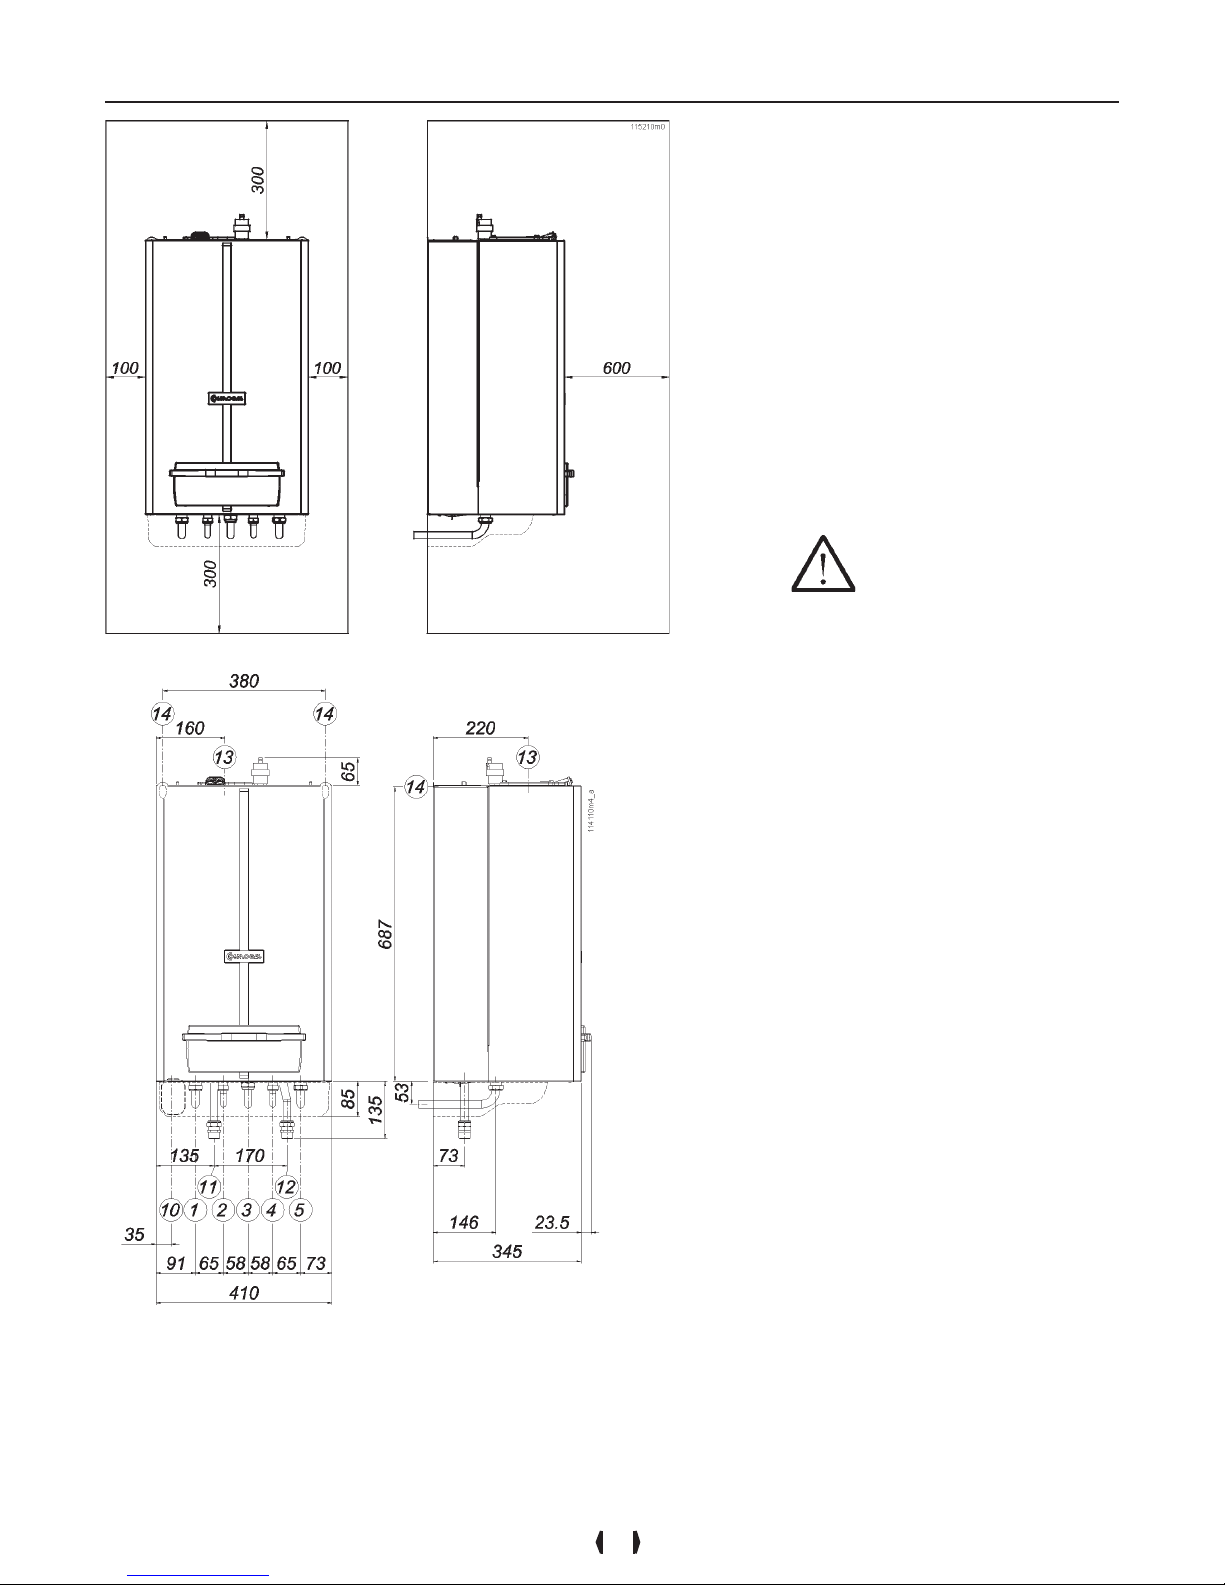
5.2 - Dimensions
and clearances for
installation
Leave an area free around the boiler for
carrying out installation or maintenance
activities, as shown in gure 9.
5.3 - Choosing the
point of installation
CAUTION!!! The boiler must
be installed exclusively on a solid,
vertical wall able to bear its weight.
The appliance must be installed
indoors, or protected from atmospheric
agents including rain, wind, sun and
especially frost.
When choosing the room and position
for installation, account must be taken
of the following factors:
- the connection of ue gas discharge/
air intake pipes;
- the connection of gas supply pipe;
- the connection to the water mains;
- connection of the system to the
central heating;
- the connection to the domestic hot
water system;
- electrical connections;
- the connection of the discharge for
condensation produced by the boiler;
- electrical connection to the room
thermostat;
- possible connection of the safety
relief valve discharge;
- possible connection of the external
temperature sensor;
Figure 9 - Minimum clearance distances
1 = 3/4” (models 24) and
1” (models 34) heating supply
2 = 1/2” domestic hot water
(absent in NOVADENS B and C models)
3 = 3/4” gas
4 = 1/2” domestic cold water
5 = 3/4” (models 24) and 1” (models 34)
heating return
10 = area for power supply cable
11 = BWR supply pipe
(present only on NOVADENS B models)
12 = BWR return pipe
(present only on NOVADENS B models)
14 = positions available for boiler support
5 - INSTALLATION
Figure 10 - Boiler dimensions and ttings’ distances
Page 13
13
5.4 - Supply and
return
CAUTION!!! This boiler is
equipped with a safety relief valve
set at 3 bar. Therefore it must not be
installed with a radiator positioned
at a manometric high higher
than 30 m.
CAUTION!!! COSMOGAS
cannot be held responsible for any
damage caused by incorrect use of
additives in the heating system.
CAUTION!!! The system
downstream from the appliance
must be made of materials which
can withstand temperatures up to
97°C. Otherwise (e.g. plastic piping)
the boiler must be tted with a
device to cut out the pump when
it reaches the maximum permitted
temperature.
Thoroughly wash out the system,
before connecting the heating pipes,
to ush out any deposits (hemp,
radiator casting residue, etc.) which
might damage the appliance. Thorough
ushing is also required when
replacing an appliance.
Figure 10 illustrates the position of the
supply and return pipes.
Install a metallic mesh lter on the
return pipe to prevent any residue
from the system returning to the
boiler.
Do not use the appliance for adding
any type of additive to the system.
5.5 - Radiant
panel systems (or
low temperature
systems)
CAUTION!!! When the boiler
is installed in a low temperature
system, it is indispensable to set
the switch 6 in the ON position (see
chapter 7.5).
By means of this setting, the boiler will
set the temperature towards the supply
of a temperature between 20°C and
45°C. No setting operation from the
control panel (even by means of the
climatic setting) will be able to supply
water at a temperature higher than
45°C.
CAUTION!!! If the boiler
is installed in a radiant panel
heating system with plastic
piping, precautions must be taken
against corrosion caused by water
oxygenation: check that the system
has plastic piping with a permeability
to oxygen of no higher than 0.1 g/m3
at 40°C. If the piping does not comply
with these specications, the radiant
panel circuit must be isolated from the
boiler by a plate heat exchanger.
5.6 - Domestic hot
and cold water
CAUTION!!! If the water
hardness is greater than 25°F, we
recommend installing a softener
with lter (see section 5.13).
Figure 10 illustrates the positioning of
the domestic hot and cold water pipes.
For servicing purposes, install a cutoff cock upstream from the cold water
inlet.
Connection of the domestic hot water
service is not indispensable; if the
boiler is required solely for central
heating purposes, it is sufcient to
connect the cold water pipe so as to
ll the heating system and close the
d.h.w. outlet.
5.7 - Gas supply
CAUTION!!! It is forbidden to
use a different gas to that stated for
the boiler.
CAUTION!!! Check that the
gas type and the pressure of the
gas supplied correspond with those
required for the boiler.
There are two possible situations:
A - the gas type and the supply
pressure match those of the boiler
setting. In this case proceed with
connections;
B - the gas type and the supply
pressure do not match those of the
boiler setting. In this case, the boiler
must be converted to the type of gas
and supply pressure available.
A special conversion kit is available on
request from your salesman or direct
from COSMOGAS.
Before installation, we recommend
thorough ushing of the gas supply
pipe.
An on-off cock must be installed on
the gas supply pipe.
To avoid damaging the gas control
unit of the appliance, carry out a
leak test at a pressure of no greater
than 50 mbar.
If testing of the gas system must
be carried out at a pressure nigher
than 50 mbar, use the cock situated
immediately upstream from the
boiler, to isolate the same from the
system.
Figure 10 shows the position of the
appliance gas tting.
The sections of piping making up
the gas supply system must always
provide sufcient gas to cover the
required maximum.
5 - INSTALLATION
Page 14
14
Figure 12 - Gas and water connections
5.8 - Assembling
the appliance
Refer to gure 11:
place the paper template, provided
with the appliance, against the wall;
ensure that the template is square
with the room;
mark holes for the wall dowel plugs
and the hydraulic ttings;
remove the paper template;
drill the holes “A” and insert the wall
dowel plugs “B”;
carry out the hydraulic and gas
connections for the boiler;
hang the boiler on the dowel plugs
“C”;
carry out the hydraulic connections.
5.9 - Gas and water
connections
The boiler comes supplied with the
standard ttings illustrated in gure 12,
where:
A = heating supply
B = domestic hot water
C = gas inlet
D = domestic cold water
E = gas inlet cock (EN 331
type approved)
F = domestic cold water cock
G = heating return
H = condensation discharge
pipe
5 - INSTALLATION
Figure 11 - Support dowel plugs
Page 15

15
5 - INSTALLATION
Figure 13 - Connection of the discharge safety
valve “A” (pipe “A” is optional) and condensation
discharge “B”
Figure 14 - Trap funnel “F” (on request)
5.10 - Condensation
discharge
The boiler is equipped internally with a trap for
the evacuation of condensation (see gure 1,
detail 40) and so as to prevent the leakage of
combustion products, whose end corresponds
with pipe “B” shown in gure 13. This end
must be conveyed to another smell-control trap
(gure 14, detail “F”) so as to prevent the return
of bad smells in the room (the smell-control trap
“F” is supplied upon request).
In particular, the condensation disposal system
must:
for premises used for dwelling purposes or
ofce purposes with a number of occupants
greater than 10, be connected to the
domestic waste disposal system by means of
an appropriate trap with separation capable
of preventing the pressurization of the system
and preventing the return of bad smells
from the sewer (detail “F” of gure 14). If
the premises for ofce use has a number of
occupants less than 10, before connection
with the domestic waste discharge, it is
advisable to t a condensation neutralizer
(see section 10 for the acidity value of the
condensation and the quantity);
be carried out with a pipe with an internal
diameter equal to or greater than 13 mm;
be installed in such a way so as to avoid the
freezing of the liquid, therefore take care with
any external stretches; discharge into gutters
or rain collectors is forbidden;
present a continual slope towards the point
of discharge; avoid high points, which could
place the pipe under pressure;
5.11 - Safety relief valve
The boiler is protected against overpressure, by
a safety relief valve set at 3 bar (see gure 1,
detail 12).
The safety relief valve discharge must be
connected to pipe “A” (see gure 13) with a
minimum internal diameter of 13 mm; pipe “A”
must then be led to the smell-control trap (detail
“F” of gure 14). This discharge with trap must
provide protection against overpressure in the
event of the valve opening and must indicate to
the user that this intervention has taken place.
Pipe “A” shown in gure 13 and the smellcontrol trap “F” shown in gure 14 are on
request.
CAUTION!!! If the safety relief valve
is not connected to the discharge, opening
of the valve could cause harm to individuals,
animals or property.
Page 16
16
Reference of Figure 17
A = Box tool’s control
B = stirrup of block
C = toward of opening
C = Cover
D = xing screws
E = Cover electrical
connexion board
F = toward of opening “E”
cover
G = Power supply cable
(not included)
H = Room thermostat cable
(not included)
Figure 16 - Softener with lter
5.12 - Hydraulic
connections for
boiler with BWR
storage tank
The NOVADENS -- B or NOVADENS -B0834 model boiler must be connected
to a storage tank for the production of
domestic hot water.
For this purpose, connection ttings to
the storage tank have been provided
for. For the preparation, operate as
follows (refer to gure 15):
mount pipe “F” to tting “A”;
mount pipe “G” to tting “B”;
mount ttings “C” and “D”
respectively to “F” and “G”;
Take care to insert the appropriate
gasket in each coupling.
5.13 - Softener (on
request)
If the boiler is to be installed in a
geographic area where the domestic
water hardness exceeds 25°F (250
mg/l), a softener must be installed on the
cold water supply (see gure 16, detail
“B”), so as to safeguard the appliance
from any blockage in the domestic water
circuit.
In order to facilitate installation, a softener
may be request to COSMOGAS, with a
specic installation kit.
5 - INSTALLATION
A = BWR return pipe
B = BWR supply pipe
C = BWR return tting
D = BWR supply tting
E = gaskets
F = service pipe
G = service pipe
Figure 15 - Hydraulic connections for boiler with BWR type
storage tank
Page 17
17
5.14 - Electrical
connections:
overview
CAUTION!!! The appliance
is only electrically safe when it is
correctly connected to an efciently
earthed system, carried out in
compliance with current safety
standards.
This is an essential safety requirement
which must be checked. If in doubt,
have the electrical system thoroughly
checked by a qualied technician.
Have a qualied technician
check that the electrical system is
adequate for the electric power,
indicated on the rating plate,
required by the boiler.
The boiler must be connected to the
mains electricity by connection using
movable plug. Do not use adapters,
multiple plugs or extensions, etc.
The boiler must be connected to
5 - INSTALLATION
the mains electricity by a threepole electrical cable with double
insulation and a minimum cross
section of 1.5 mm2, resistant to
a minimum temperature of 70°C
(feature T).
To connect the boiler to the mains
electricity, use a bipolar switch with
a contact opening distance of at
least 3mm, near to the appliance, in
compliance with current standards
on the subject.
Respect the polarity between live
and neutral when connecting the
boiler.
Ensure that heating and water
piping is not used as earth plates for
the electric and telephone systems.
This piping is completely unsuitable
for this purpose and, in addition,
could rapidly lead to serious
corrosion damage to the boiler,
piping and radiators.
CAUTION!!! The boiler is
not provided with any protection
against lightening strikes.
5.14.1 - Connecting
the power supply
cable
To connect the electrical power supply
cable, proceed as follows (refer to
gure 17):
use a three-pole cable with double
insulation and a minimum cross
section of 1.5 mm2;
remove the boiler casing following
the instructions given in section 8.2;
to rotate the panel "A" toward the
front of the boiler acting on the
stirrups "B";
remove the screw “D” and open the
cover “E”;
lay the power supply cable “A” as
shown in gure 17;
strip the cable being careful to leave
the earth wire (yellow green) 20 mm
longer than the other two;
connect the yellow green cable to
the earth terminal (terminals “G”);
connect the brown cable to terminal
L1 (terminals “G”);
connect the blue cable to terminal N
(terminals “G”).
CAUTION!!! If the “L1” phase
conductor is inverted with
the neutral “N” conductor,
the boiler will lock-out,
displaying error code E21.
CAUTION!!! If the earthing
system is not efcient,
the boiler will lock-out,
displaying error codes L05,
E42 or E23 (depending
on the entity of the
inefciency).
Figure 17 - Electrical connections
Page 18

18
5 - INSTALLATION
Figure 18 - Correct positioning of the room thermostat/timeprogrammable thermostat
5.14.2 - Choosing
the room
thermostat/timeprogrammable
thermostat
The boiler is designed to function
with any type of room or timeprogrammable thermostat which
has contacts for the boiler cable
connections, and the following
features:
- open/closed (ON/OFF);
- clean (not powered);
- closed when heating is required;
- electrical specications 24Vac, 1A.
5.14.3 - Connecting
the room
thermostat/timeprogrammable
thermostat
Install the room thermostat in a part
of the house where the temperature
is as near to average as possible and
in any event not an area subject to
sudden temperature changes, away
from outside windows or doors (see
gure 18).
To connect the room thermostat cable,
proceed as follows (refer to gure 17):
use a bipolar cable with a minimum
cross section of 1.5 mm2 which
leads from the boiler to the room
thermostat/time-programmable
thermostat;
remove the boiler casing according
to the instructions given in section
8.2;
lay the electrical cable “H” exactly as
shown in gure 17;
get the cable to pass via a free cable
clamp, not used by other wires;
connect the 2 ends of the cable to
the “TA” terminals (see gure 17,
detail “M”).
CAUTION!!!
Si n c e t h e cabl e s of t he r o om
the r m o st a t/ t im e - pr o gr a mm a bl e
thermostat are subject to low safety
voltage (24Vcc), they must run through
ducts different from the 230Vac power
supply cables.
5.14.4 - Installing the
outside temperature
sensor (on request)
Install the outside temperature sensor
outside the house, on a wall facing
NORTH or NORTH-EST, at a height
of between 2 and 2.5 metres from the
ground; on buildings with several oors,
install near the upper half of the second
oor. Do not install the sensor above
doors, windows or ventilation outlets nor
directly under balconies or gutter pipes
Do not plaster the external temperature
sensor. Do not install the sensor on walls
without overhangs, or not protected from
rain.
If the sensor is installed on a wall still
to be plastered, it is necessary to install
it with an adequate shim or remove it
before plastering.
To connect the cable of the outside
temp e r a t ur e s e ns o r, p r o c e ed a s
follows:
lay a bipolar electrical cable with a
minimum section of 1.5mm2 which
leads from the boiler to the external
temperature sensor. The maximum
length permitted is 20 m. For longer
lengths, up to 100 m, it is necessary to
use a shielded cable with an earthed
shield;
CAUTION!!!
Since the cables are subject to low
safety voltage (24Vcc), they must
run through ducts different from the
230Vac power supply cables.
connect the bipolar cable to
terminals SE as shown in gure 17,
detail “F”;
connect the bipolar cable to the ends
of the external temperature sensor.
Set the boiler so that it detects the
outside temperature sensor, as follows:
press down the button for 12
seconds until the display blinking and
shows ;
then press and release the button
several times until the following
parameter appears ;
using the and keys,
change the parameter value
from 00 to 01 or 02 in relation to
the type of climatic heat adjustment
desired (see section 7.4);
press the button repeatedly
until exiting the menu; the display will
no longer ash.
Page 19

19
5 - INSTALLATION
5.14.5 - CR04
remote time control
(optional)
The CR04 time control is a room
thermostat capable of interacting
with the boiler, adjusting the room
temperature in a modulating manner
and not by steps. This device is
really a genuine heat regulator
capable of operating, or otherwise,
with the outside temperature sensor
and therefore of adjusting the room
temperature in an optimum manner. If
the boiler has been factory purchased
without this device, it is rst of all
necessary to t an “Opentherm”
interface board as described in the
following section.
If the boiler has been purchased
inclusive of the remote control, it
means that the “Opentherm” board has
already been installed on the boiler
and it is only necessary to install the
remote control as follows:
Install the CR04 remote control in
a point of the building where the
temperature is as close to that
characteristic of the house and in any
event in an area not subject to sudden
temperature changes, far away from
windows and doors which directly
connect with outdoors (see gure 18).
In order to connect the room
thermostat cable, proceed as follows
(refer to gure 17):
use a bipolar cable with a minimum
cross section of 1.5 mm2 which
leads from the boiler to the CR04
remote control. The cable must
also be protected by means of the
earthing of the protection and the
maximum length permitted is 100
metres;
dismantle the casing and access the
electrical terminal board, following
the specic instructions in section
8.2;
connect the 2 ends of the cable to
the “OT” terminals of the boiler (see
gure 17).
connect the other 2 ends of the
cable to the terminals of the remote
control (follow the instructions on the
remote control).
CAUTION !!!
Since the cables of the remote control
are subject to extremely low security
voltage (24Vcc), they must pass
through ducts differen t from the
230Vac supply cables.
Once the remote control has been
connected, all the room temperature
adjustmen ts and domestic water
tempe rat ure operati ons must be
carried out directly on the same.
Accordingly, remember to closely
follow the instructions contained on
the CR04 remote control.
5.14.6 - Installation
of the CR04 remote
time control on the
boiler
If the boiler has been purchased with
the CR04-type time control, in order
to enable the same it is necessary to
install the “Opentherm” interface board
on the boiler following the instructions
contained on the remote control.
Page 20

20
5.15 - Connecting
the boiler to the
B70C type water
heater (optional)
The boiler can be immediately or
subsequently connected to a B70C
type storage tank manufactured by
Cosmogas.
The water connection must be carried
out as per gure 19.
For the electrical connection, proceed
as follows (refer to gure 21):
disconnect the electricity supply to
the boiler;
access the internal components and
the electrical components of the boiler,
following the specic section 8.2;
move the switch 1 to position “B”
(ON);
Remove the cable from the sonde “17”
of gure 1;
lay the bipolar cable with a minimum
1.5mm2 section which goes from the
boiler to the temperature sensor of
the water heater and connect it on
the boiler to terminals “15” and “16”
(SB);
Figure 19 - Hydraulic connection to B70C storage tank type
1 COSMOGAS boiler
2 B70C type storage tank (on
request)
3 Gas supply
4 d.h.w. supply to water heater (to
be tted by the installer)
5 d.h.w. outlet
6 Cold water
7 Safety relief valve
9 Check valve (to be tted by
installer)
10 Recirculation for storage tank
loading (to be tted by installer)
11 Storage tank loading pump
12 Temperature sensor
13 Hydraulic safety unit (to be tted
by installer)
14 Heating supply
15 Heating return
5 - INSTALLATION
connect the other end of the cable to
the temperature sensor of the water
heater;
insert the probe of the temperature
sensor into the socket “12” as shown
in gure 19.
CAUTION!!! Since the cables
are subject to low safety voltage
(24Vcc), they must run through
ducts different from the 230Vac
pump power supply cable.
connect a three-pole double insulated
electrical cable (Live, Neutral and
Earth), with a minimum cross section
of 1.5m m2 which is resis tant to
a minimum tempera ture of 70°C
(feature T) to terminals “3” and “5” and
to the earth connection, and connect
the other end of the cable directly to
the pump of the storage tank (see
gure 19, detail “11”);
5.15.1 - Prevention
against
Legionnaires
disease
If the boiler is connected to a storage
tank for the preparation of domestic hot
water, a disinfection cycle is envisaged
against Legionnaires bacteria. This
cycle anticipates taking the storage
tank to a temperature of 60°C
(temperature at which said bacteria
die) at least once a week. Therefore,
the water (at certain times) may reach
the user at a higher temperature than
that set on the knob on the specic
control.
The rst time the boiler is started up,
the anti-Legionnaires cycle is also
started after 2 hours of running.
Page 21

21
5.16 - Connecting the
boiler to the BWR C
type storage tank
Only the NOVADENS -- B and
NOVADENS -- B0834 model boilers
can be connected to a BWR type
storage tank.
The water connection must be carried
out as per gure 20.
For the electrical connection, proceed as
follows (refer to gure 21):
disconnect the electricity supply to the
boiler;
access the internal components and
the electrical components of the boiler,
following the specic section 8.2;
move switch 1 to position “B” (ON);
Remove the cable from the sonde “17”
of gure 1;
lay the bipolar cable with a minimum
1.5mm2 section which goes from the
boiler to the temperature sensor of the
storage tank and connect it on the boiler
to terminals “15” and “16” (SB);
connect the other end of the cable to
the temperature sensor of the storage
tank;
insert the probe of the temperature
sensor into the socket of the storage
tank (see gure 20, detail 14).
5.16.1 - Prevention
against Legionnaires
disease
See chapter 5.15.1.
Figure 20 - hydraulic connection to BWR C type storage
tank
1 COSMOGAS boiler
2 3 4 Gas supply
5 6 Connection for lling the heating
system (to be carried out by the
installer)
7 BWR C type storage tank
8 Domestic hot water outlet
9 Cold water inlet
10 Supply and return for storage
tank loading
11 Hydraulic safety unit (to be tted
by installer)
12 Supply pipe to heating system
13 Retur n pipe from heat i n g
system
14 Temperature sensor socket
Figure 21 - Electrical connection to a B70C or BWR C type water heater
5 - INSTALLATION
Page 22

22
5 - INSTALLATION
5.17 - Venting systems
CAUTION!!! All venting systems
must be connected in compliance with
current national and local standards.
CAUTION!!! Under determinate
conditions, the temperature of the
appliance’s ue gases may reach 110°C.
Therefore, use plastic piping capable of
resisting this temperature.
CAUTION!!! This is a
“condensation-type” appliance. In order
to create the ue gas discharge, use
materials in AISI 316L stainless steel or
plastic materials in polypropylene, so as
to avoid corrosion due to the acidity of
the condensation.
Remember that this type of appliance must
have discharge and intake pipes supplied by
the appliance manufacturer.
Any other types of pipe must be approved.
The approved types of ue gas discharge
system are given in the table of technical
features at the end of the manual, under the
heading “type”, and on the boiler rating plate,
again under the heading “type”. The symbols
used to dene the type of discharge system
are as follows(see also g.22):
- C13, coaxial through vertical wall;
- C33, coaxial through the roof;
- C43, separate with discharge in the
chimney, intake through another same
channel;
- C53, separate discharge through roof and
intake through wall, or in two places with
potentially different pressure;
- C63, the boiler can be tted to approved
intake and discharge pipes of another
manufacturer;
- C83, separate with intake through the wall,
or another point, independent of venting for
other appliances, with discharge into the
chimney ue.
During operation, especially in Winter,
again due to high efciency, the boiler may
discharge white smoke. This is a purely
natural phenomenon and not a reason for
concern, as it is steam from the gas fumes
condensing on contact with the outside air.
Figure 22 - Approved discharge/intake systems
Page 23

23
5.17.1 - “Split 80/80PP”
system (polypropylene)
The standard appliance is not supplied with
ttings for connecting ue gas discharge outlets/
air intakes. A special kit is available on request
for connecting the boiler to the “split 80/80PP
system”, to be installed following gure 23.
Fitting “A” can freely turn 360 degrees, thereby
guaranteeing optimum installation versatility.
It is advisable to install AISI 316L type
stainless steel pipes or polypropylene pipes
on the ue gas discharge side, which are more
resistant to the formation of condensation.
Take particular care when installing piping
through a wall to the outside; install the pipes
in sheathing so that they can be easily slipped
out for access during routine maintenance.
Horizontal sections must always be pitched by
at least 2% towards the condensation drainage
system.
The boiler comes supplied with a condensation
collector which must be tted to a discharge
pipe (see
section 5.10).
CAUTION!!! This condensation
drainage system is designed to empty all the
liquid produced by one single appliance. If
installing more than one boiler, each must be
equipped with its own drainage system.
The ue gas discharge/air intake systems can
be extended up to the maximum distance given
in section 9 at the end of the manual. Each
90° elbow has an equivalent loss of 1 metre of
straight pipe. Each 45° elbow has an equivalent
loss of 0.5 m of straight pipe.
CAUTION!!! Mechanically secure the
joints between the different components of
the ue gas discharge and intake pipes with
xing screws or equivalent systems. See
gure 25.
CAUTION!!! During operation, the
temperature of the discharge pipe can exceed
110°C. Insert protective heat insulating
sheathing if it has to pass through walls
which are vulnerable to such temperatures.
CAUTION!!! Leave a minimum gap of
1 metre between the air intake and ue gas
discharge terminals if they are located on the
same wall.
Figure 25 - Fixing the ue gas discharge and air intake
pipes
5 - INSTALLATION
Figure 23 - Installation of “split 80/80 PP” system
Figure 24 - Dimensions
Page 24

24
5 - INSTALLATION
5.17.2 - “Split 80/80PP”
system: available
accessories
Some of the most commonly used accessories for
installing the split system of ue gas discharge/air intake
80/80PP are listed below; a much wider range however
can be found in the special catalogue:
(the number after the code refers to the part in the
following drawings)
62617053 - No. 9 chimney cap draft damper for the
roof
62617244 - No. 12 90° elbow M/F in PP
62617255 - No. 29 ashing for roofs pitched between
15° and 25°
62617236 - No. 11 extension M/F in PP
62617248 - No. 18 anti-extraction clamp for PP
extensions
62617240 - No. 14 exible M/F pipe in PP L=20m
62617241 - No. 16 spacer for exible pipe
62617238 - No. 17 telescopic joint in PP
62617242 - No. 15 T tting in PP
Page 25

25
5 - INSTALLATION
5.17.3 - “Split
80/80PP” system:
installation
examples
Two installation examples can be seen
in gure 26:
- discharge into chimney with collection of
condensation at base of the chimney.
The hor izontal part of the flue gas
discharge side must be pitched towards
the “T” with condensation collection.
The intake must be pitched outward to
prevent rainwater entering.
- discharge directly outside with the
pipes of the boiler with collection of
condensation inside the boiler itself.
The intake must be pitched outward to
prevent rainwater entering.
A separate type flue gas discharge
example can be seen in gure 27 where
the discharge of the ue gases is carried
out with plastic exible pipes, for piping
of technical pits.
All the condensation produced in the
vertical pipe is conveyed inside the
boiler
The intake must be pitched outward to
prevent rainwater entering.
Figure 26 - Installation example “Split 80/80 PP” system
Figure 27 - Installation example “Split 80/80 PP” system
Page 26

26
5.17.4 - “Coaxial
60/100PP” system
(polypropylene)
The standard appliance is not
supplied with ttings for connecting
ue gas discharge outlets/air intakes.
A special kit is available on request
for connecting the boiler to a “coaxial
60/100PP” system, to be installed as
shown in gure 28, where the vertical
discharge is shown on the left under
letter “A” and the horizontal discharge
on the right under letter “B”:
CAUTION!!! Scrupulously
follow the installation steps for the
coaxial pipe as illustrated in gure 26.
In particular, it is necessary to
insert the coaxial pipe “C” inside elbow
“A”;
secure the outer pipe with stainless
steel self-tapping screws “B”.
CAUTION!!! After the above
operations, check that the end of
the discharge/intake faces outwards
with the tolerances shown in gure
31.
Take particular care when installing
piping through a wall to the outside;
install the piping in sheathing so that
it can be easily slipped out for access
during routine maintenance.
Horizontal sections must always be
pitched by at least 2% towards the
boiler.
The ue gas discharge/air intake pipe
can be extended up to the maximum
distance given in the table in section
9 at the end of the manual.
5 - INSTALLATION
Figure 28 - Installation of the vertical coaxial system (A) or
the horizontal coaxial system (B)
A
B
Figure 29 - Pre-installation gures and distances between
holes for coaxial discharge system
Figure 30 - Positioning of the coaxial pipe
Page 27

27
5 - INSTALLATION
5.17.5 - “Coaxial 60/100
PP” system: available
accessories
The following accessories are available, on request,
for installing the ue gas discharge/air intake system
60/100:
(the number after the code refers to the part in the
following drawings)
62617255 - No. 2 ashing for roofs pitched between
15° and 25°
62617234 - No. 1 Coaxial elbow 90° M/F PP
62617252 - No. 6 Coaxial elbow 45° M/F PP
62617231 - No. 7 Coaxial extension L 1m PP
62617250 - No. 3 Coaxial roof end piece PP
62617232 - No. 5 Coaxial wall end piece PP
Page 28

28
5 - INSTALLATION
5.17.6 - “Coaxial
60/100PP” system:
installation
examples
When a coaxial discharge is installed
(see gure 31), whether it is vertical or
horizontal, it is indispensable to slope the
discharge pipe upwards so as to get the
condensation to ow inside the boiler.
Figure 31 - Installation examples for the coaxial pipe
Page 29

29
6.1 - Operating
Before starting the appliance up, it is
necessary to carry out the following.
6 . 1 . 1 - U s e r
instructions
The user must be correctly instructed
on how to operate the appliance, in
particular:
Make sure that the user has the
instruction and users’ manual and all
other documentation included in the
packaging.
Make sure the user is informed of
all the special measures to be taken
for discharging ue gases, and that
these must not be modied.
Inform the user with regards to
adjusting the water pressure in the
system and all necessary measures
for lling and bleeding air.
Correctly inform the user on how to
adjust temperatures, controls/room
thermostats and radiators to save
energy.
6.1. 2 - F illi n g o f
the condensation
discharge trap
The trap is positioned inside the boiler
(see gure 1, detail 40), and must be
lled with water in order to create the
head capable of avoiding the leakage of
the ue gases from the pipe “36” of gure
1. Proceed as follows for this purpose:
disconnect the ue gas discharge
tting from opening “2” as per gure
1;
6 - OPERATING
remove the tube previously
connected and check that there are
no water leakages.
6.2 - General warnings
c o n c e r n i n g g a s
supply
When starting up the boiler for the rst
time, have qualied technicians check
the following:
That the boiler is powered by the
type of fuel it is designed to use.
That the gas supply pressure (with
boiler on and boiler off) is within
the maximum and minimum values
given in the table in section 9 at the
end of the manual.
That the gas supply system is
provided with all the safety devices
and controls required under current
national and local legislation.
That the ue gas discharge terminal
and the air intake terminal are free
from any blockages.
That the condensation discharge
connection is connected.
CAUTION !!! If you smell
gas:
A - Do not use any electrical
appliance, including
telephones or any object
which might cause sparks;
B - Immediately open doors and
windows to produce a current
of air to rapidly clear all gas
from the room;
C - Immediately call, from
another room or from a
neighbour’s house, a qualied
technician or the gas board. If
you cannot contact them, call
the Fire Brigade.
Figure 32 - Bleed screws of
the secondary heat exchanger
from the central opening (ue
gas discharge), slowly pour in
approximately 100 cm3 (a glass full)
of water;
re-connect the ue gas discharge
tting;
6.1.3 - Filling the
heating system
If at the time of switching on the power
to the boiler, FILL appears on the
display, it means that it is necessary
to ll the heating system. Proceed as
follows:
The heating system must only be
lled with clean water from the mains
supply.
CAUTION!!! The addition
of any chemical substance, such
as anti-freeze, must be carried
out according to the product
instructions. These substances
must never be inserted directly into
the boiler.
Open the automatic air vent a
couple of turns (see gure 1, detail
“1”) situated at the top of the boiler.
Open the supply cock located under
the boiler (see gure 1, detail “34”)
and proceed to ll the system and
appliance to about 1.5 bar (FILL
disappears from the display).
Check that there is no water leaking
from the ttings.
Close the supply cock (see gure 1,
detail “34”);
Purging the air from the radiators.
Check the pressure gauge reading
of the boiler once again. If it has
dropped, re-ll again until its reads
1.5 bar
6.1.4 - Filling of the
secondary heat
exchanger of the
domestic hot water
Once the heating circuit has been lled, it
is also necessary to carry out the lling of
the secondary heat exchanger. Proceed
as follows:
connect a rubber tube to the
pressure coupling “A” shown in
gure 32 and take it to the discharge
of a sink or similar;
loosen screw “A” as shown in gure
32 until you hear the air escape and
wait until just water runs out;
tighten screw “A” once again as
shown in gure 32;
A
Page 30

30
Figure 33 - Gas valve
C - Service pressure probe
D - Gas inlet pressure probe
E - CO2 adjusting screws
6.3 - Gas type
indicated for the
boiler
On the front of the boiler there is a
label indicating the type and supply
pressure of gas to be used for the
boiler.
The boiler can have one of the
following two labels:
2H-G20-20mbar
NATURAL GAS
means that the appliance should be
used with gas type H of the second
family (natural gas), at a supply
pressure of 20 mbar.
3P-G31-30mbar
L.P. Gas
means that the appliance should be
used with gas type P (Propane also
known as L.P.Gas) of the third family,
at a xed supply pressure of 30 mbar
6.4 - Converting the
boiler from one gas
type to another
Conversion of the appliance to use
another type of gas must be carried out
by a qualied technician.
If the gas available is not of the type to
be used with the appliance, it must be
converted. Special conversion kits are
available for this purpose.
6.5 - Start-up
Open the gas cock.
Swit ch on el ectri c powe r to the
boiler.
If the display shows code E 21, it
means that the polarity has not been
observed between phase and neutral.
Therefore it is necessary to rotate
them.
Upon start-up, an F is shown for 2
minutes during which the purging
of the plant takes place. If you wish
to by-pass this stage, just press the
keys + and - together until a blinking
F appears. Then press the RESET
button.
Rotate the controls “30” and “31”
shown in figure 1 to the desired
temperature.
The heating service will only start up
when the room thermostat calls for
heating. If an external temperature
sensor is connected, check that the
temperature calculated is higher than
the minimum running temperature
(see section 7.4).
If the pump indicator is illuminated but
the pump (see gure 1 detail “39”) is
not running, try releasing it using the
special screw (remove the screw “47”
shown in gure 1 and turn the screw
underneath).
If the pump indicator is illuminated but
the radiators do not heat up, repeat air
bleeding operations on both the boiler
and the radiators.
6.5.1 - Auto-purging
Each time the power supply to the
appliance is switched on, a procedure
for the auto-purging of the air in the
plant commences, lasting 2 minutes.
The procedure involves the switching on
and off of the pump in order to facilitate
the evacuation of the air. Before starting
the procedure up, ensure that you have
opened the automatic air vent (detail “1”
of gure 1).
6.6 - Checking and
adjusting the gas
supply pressure
The gas supply pressure must match
that given in the table in section 9
at the end of this manual. Check as
follows:
close the gas cock;
access the internal components of
the boiler following the procedure in
section 8.2;
loosen the pressure connection “D”
(see gure 33);
connect a pressure gauge with a
denition of at least 0.1 mbar (1
mmH2O);
open the gas cock;
check that the pressure does not
exceed the value given in the table
in section 9 at the end of the manual
under the heading “Maximum gas
supply pressure;
switch on the boiler and generate
a heating request (turn control “31”
shown in gure 1 to maximum) and
ensure that the room thermostat
calls for heating;
press together the and
keys for more than 10 seconds, the
display will show ;
press the key until the display
shows . Now the boiler will run
for 10 minutes at maximum power;
check that the pressure does not
drop below the values given under
“Minimum gas supply pressures” in
6 - OPERATING
the table in section 9 at the end of
the manual.
If the supply pressure does not fall within
the above values, operate upstream of
the appliance to bring the pressure within
the maximum and minimum range given
in the table.
At the end of the check, close the
pressure connection “D” and checking
for any gas leaks.
Page 31

31
Figure 34 - Comburant air pressure probes
Figure 35 - Checking the comburant
air pressure
6.7 - Checking
the comburant air
pressure
Since the boiler has a factory-set air/
gas ratio, the pressure of the gas at
the burner is controlled indirectly; the
comburant air pressure is checked inside
the boiler and must correspond with that
shown in the table in section 9 under the
item “Comburant air pressure”
To carry out the check, proceed as
follows (refer to gures 34 and 35):
use a differential pressure gauge with
a precision of at least 0.1 mbar (1
mmH2O);
close the gas cock;
open the boiler casing following
section 8.2;
remove plug “B”;
loosen the screw of the pressure
probe “C”;
insert a tube “F” which goes from the
pressure gauge, passing through
the opening of the plug “B”, to the
pressure probe “C” (as in gure 35);
remove the plug “A” from the pressure
probe and connect the differential
pressure gauge;
the connection must be carried out as
in gure 35, scrupulously observing
the polarity of the pressure, shown on
the pressure gauge;
close up the casing “L” as per
gure 40. It is indispensable to have
a reliable measurement;
switch on the boiler;
press keys and together
for more than 10 seconds, until
is displayed;
now the fan is forced to maximum
power, with the burner off, for 10
minutes;
compare the pressure value on the
pressure gauge with the table in
section 9, “Comburant air pressure”;
if the pressure is at a lower value,
check that there are no obstructions in
the comburant air/ue gas discharge
circuit;
press the key to return the boiler
to normal running conditions;
once the check has been carried
out, reassemble everything as it was
originally.
6 - OPERATING
Page 32

32
Figure 36 - Combustion
analysis probes
Figure 37 - Domestic hot
water ow selector switch
A
6 - OPERATING
6.8 - Checking
and adjusting CO2
levels
The levels of CO2 (carbon dioxide)
in the boiler, under normal operating
conditions, and below an altitude of
1,000m, are given in the table in section
9. Different values to those given may
lead to malfunctioning. In order to check
this value, carry out an analysis of the
combustion. Proceed as follows:
connect a combustion analyser
to the special connection on the
discharge tting “B” of gure 36;
generate a heating request or, if this
is not possible, fully open a domestic
hot water tap ;
press together the and
keys for more than 10 seconds, the
display will show ;
press the key until the display
shows (if there is a heating
request) or until is displayed
if a domestic hot water request has
been generated.
Now the boiler will run for 10 minutes
at maximum power.
wait until the level of CO2 stabilizes;
compare the reading with that given
in the table in section 9, headed
“CO2 levels”.
If the reading differs from that in the
table, it must be brought within the range
of the values given in the table in section
9. Proceed as follows:
use a screwdriver on screw “E” (see
gure 33;
turn clockwise in order to reduce the
level of CO2. Turn counter-clockwise
in order to increase the level of CO2;
press the key until the display
shows , or if tested in
domestic mode. Now the boiler will
work for 10 minutes at minimum
power;
Check the CO2 value; it must drop
by 0.5% with respect to the value
obtained at maximum power.
Otherwise, use screw “F” in gure
33 to correct the CO2 value (turn in
a clock-wise direction to increase,
turn in a counter-clockwise direction
to decrease )
Once again check the CO2 at
maximum power and if necessary
carry out a further adjustment.
Once nished, seal the screws “E” and
“F” as in gure 33 with red paint or a
similar system;
press the
button to return
the boiler to normal operatin g
conditions.
CAUTION!!! During this phase,
if the power supplied to the boiler is
much higher than the power absorbed
by the system, the boiler will switch off
in continuation in order to reach the
maximum temperature permitted (45°C
for low temperature systems, 85°C for
radiator systems), or the ue gas safety
thermostat intervenes, and the boiler will
show block L06. This could also occur in
the event that domestic water analysis
is carried out, if the domestic water
pressure is low or the temperature of the
domestic cold water is very high.
In order to avoid this inconvenience, it
is necessary to set the heating output,
to the effective needs of the system, as
indicated in the following section and
analyze the CO2 or the combustion
efciency, setting the forcing mentioned
previously at t- (letter “t” with dash in
middle) or S- (letter “S” with dash in
middle) for domestic water.
Page 33

33
6.9 - Adjusting the
heating capacity
The boiler has been constructed with
an “intelligent” conception of the adjustment of the output heating, in relation to
the effective requirement of the system,
therefore it does not need adjusting.
However, during the bringing onto stream
of the system, the boiler runs for a brief
period at its maximum power.
If one wishes to limit the maximum power
to the effective maximum load necessary
for the system, just operate on the
parameter found on the installers menu
(see section 7.12).
The
parameter can be adjusted
between 1 and 100, corresponding
respe c t i v e l y to the mi n i m u m and
maximum output . Read the correct
parameter on the table on the left.
6 . 1 0 - D ome s t i c
hot water flow rate
adjustment
The quantity of domestic hot water
which can be produced from the
boiler depends on the pressure of the
hydraulic circuit. If the pressure is high,
the water will move too quickly around
the circuit without being heated. It is
therefore advisable to carry out the
following adjustments:
switch on the boiler;
adjust control “30” as shown in gure
1 at 48 - 50 °C;
fully open a hot water cock. In the
event of a mixer cock with single
lever, the position must be on HOT;
wait 5 minutes for the temperature to
stabilize;
if the water temperature is too low,
reduce the water ow using the ow
selector “A” (see gure 37) until
reaching the desired temperature.
Water ow should generally be
regulated according to the values
given in section 9, under the heading
“instant d.h.w. production dt 30°C”.
6 - OPERATING
Tabella per la regolazione della potenza in riscaldamento
BOILER MODEL
Necessary
power (kW)
Page 34

34
7 - USE
7.1 - Adjusting the
domestic hot water
The adjustment of the domestic hot water
temperature (when present) is carried
out by turning the control “30” shown in
gure 1. When the control is touched, the
display “48” shown in gure 1 shows a
blinking
and the temperature which
is being set is shown. The setting eld
within which the domestic hot water can
be set ranges from 45°C to 70°C.
7.2 - Adjusting the
heating system
By means of the para meter
present in the “Installers’ Menu” (see
section 7.12) it is possible to select the
various functioning modes of the heating
service:
- CH = 00 “Thermostatic adjustment”: the
heating supply temperature is adjusted
manually, using control “31” as per gure
1. The opening and closing of the room
thermostat correspondingly shuts down
or starts up the boiler pump so as to
carry out the adjustment of the room
temperature;
- CH = 01 “Cli m a t ic ad j ustment” :
th e heat ing supply temp erat ure is
adjusted automatically by the outside
temperature sensor according to an
algorithm corresponding to gures 38
and 39. The opening and closing of
the room thermostat correspondingly
shuts down or starts up the boiler pump.
When the “Calculated temperature”
drops below the “Minimum heating
temperature”, the heating service ends.
It automatically starts up when the
“Calculated temperature” once again
ri ses above the “Mini mum heating
temperature”;
- CH = 02 “Climatic adjustment with
room compensation”: the heating supply
temperature is adjusted automatically
by the outside temperatu re sensor
according to an algorithm corresponding
to gures 38 and 39. The opening of the
room thermostat reduces the heating
supply temperature by a set value. The
boiler pump always remains working.
When the “Calculated temperature”
drops below the “Minimum heating
temperature”, the heating service ends.
It automatically starts up once again
when the “Calculated temperature” once
again rises above the “Minimum heating
temperature”.
7.3 - Thermostatic
adjustment
At the factory, the boiler is set with the
parameter at 00, or rather the
boiler provides hot water to the heating
system, at a set temperature, set on
control “31” as per figure 1. A room
thermostat, if installed, acts directly on
the internal pump of the boiler in order to
adjust the heating of the rooms.
In order to fully exploit the boiler’s
performances, it is advisable to set the
temperature on control “31” at a value
which is just sufcient so as to obtain
the desired temperature of the rooms.
If the season gets colder, progressively
increase the value of the temperature set
“31”. Proceed in the opposite manner,
when the season gets milder.
Th i s extre mely si mple fu n ction ing
method, is suitable for the following
types of system:
- small systems, with radiators, and
with a room whose temperature is
characteristic of all the other rooms;
- large systems, with radiators, where
each zone is controlled by its own
room thermostat and the boiler pump
is shutdown only when all the room
thermostats are satisfied (see to an
appropriate electrical system).
- large systems with radiant panels
(low temperature), where each zone is
controlled by its own room thermostat
and the boiler pump is shutdown only
when all the room thermostats are
satised (see to an appropriate electrical
system).
CAUTION!!! If the appliance
is installed in a low temperature
system, it is indispensable to follow
the settings indicated in section 5.6.
7 . 4 - C l i m a t i c
adjustment
Via the “Installers’ Menu”, set parameter
at 01. The heating su p p l y
temperature is adjusted automatically
by the outside temperature sensor.
The relationship existing between the
outside temperature and the supply
temperature, corresponds with the line
illustrated in the diagrams shown in
gures 30 and 31. In order to adjust this
line to the various dwellings/climatic
conditions, it is necessary to set all the
adjustment parameters, according to the
subsequent sections.
7 . 4 . 1 - C l i m a t i c
adjustment: on which
systems?
The “Climatic adjustment” is a more
sophisticated and subtle setting of the
“thermostatic adjustment” and it is able to
use the performance of the boiler better
and is suitable for the following types of
systems:
- small systems, with radiators, and
with a room whose temperature is
characteristic of all the other rooms.
The room thermostat takes steps to
make opportune corrections to the room
temperature, switching the boiler pump
on and off.
- large systems, with radiators, where
each zone is controlled by its own
room thermostat and the boiler pump
is shutdown only when all the room
thermostats are satisfied (see to an
appropriate electrical system).
- small systems, with radiant panels
(low temperature), with a room whose
temperature is characteristic of all the
other rooms. The room thermostat takes
steps to make opportune corrections
to the room temperature, switching
the boiler pump on and off. In the
event of use of the time-programmable
thermostat, it is necessary to consider
that the radiant panel systems have an
extremely high thermal inertia, therefore
it is necessary to adapt any advances
of the start up of the heating by also
using the “Reaction” parameter
in order to speed up any “full operations”
situation.
- Iarge systems with radiant panels
(low temperature), where each zone is
controlled by its own room thermostat
and the boiler pump is shutdown only
when all the room thermostats are
satised (see to an appropriate electrical
system).
CAUTION!!! If the appliance
is installed in a low temperatur e
system, it is indispensable to follow
the setting in section 5.6.
Page 35

35
7 - USE
7 . 4 . 2 - C l i m a t i c
a d j u s t m e n t :
precautions when
making adjustments
In order to carry out the correct automatic
setting of the supply temperature, it
is advisable to immediately set the
values suggested further on, for the
setting of the line of figures 30 and
31.Subsequently if these values do not
provide a satisfactory result, proceed
with the appropriate adjustments bearing
in mind that:
- each parameter must be set in small
degrees;
- after each change, wait at least 24
hours in order to see the result;
- the nearer the adjustment line draws
to the real needs of the building, the
more the heating of the building will
be comfortable and the energy saving
high;
- by means of control “31” in gure 1,
it is however possible to carry out the
small corrections “b” shown in gures
30 and 31, that is shift the parallelism of
the line more or less in stages of 1 °C,
up to 10°C.
7 . 4 . 3 - C l i m a t i c
adjustment: setting
of the parameters
By means of the user menu (see section
7.10), set:
- = “The angle of the line”, which
can be adjusted between 0.1 and 5.0.
The suggested starting values are: 0.6
for “low temperature” systems; 1.6 for
high temperature systems;
- = “Minimum heating temperature”,
which can be adjusted between 20°C
and 60°C. The suggested starting values
are: 30°C for “low temperature” systems;
40°C for “high temperature” systems;
- =“Maximum heating temperature”
which can be adjusted between 30°C
an d 80° C. The suggested start ing
values are: 45°C for “low temperature”
systems”; 80°C for “high temperature”
systems.
By means of the installer menu (see
section 7.11), set:
- = “Reaction ” of the sup ply
temperature with respect to the external
temperature changes, which can be
adjusted between 1°C and 10°C. A low
“Reaction” value makes it possible to
have a constant temperature of the
dwelling but slow with regards reaching
full running conditions and in its response
to the external temperature changes. A
high “Reaction” value guarantees the
speed of reaching full running conditions,
but also possible oscillations in the
temperature inside the dwelling. You are
advised to maintain this value between
1 and 2;
-
= “Fix point” is the heating
supply temperature, when the external
temperature is 20°C. It is called “Fix
Point” because it is also the angle fulcrum
of the line. The suggested starting values
are: 33°C for “low temperature” systems
50°C for “high temperature” systems.
7 . 4 . 4 - C l i m a t ic
a d j u s t m e n t :
adjustments of the
v a r i o u s c lima t i c
zones
The values previously suggested are
for dwellings with an average insulation
and for climatic areas where the external
temperature for the calculation of the
heat requirement is -5°C (by means
of these figures, correspondence is
obtained with the diagrams in gures
30 and 31). In the event that the climatic
zone is different, adjust the gradient of
the curve (parameter ), so as to
obtain a supply temperature of 80°C
(45°C in the event of “Low temperature”
systems), when the external temperature
is that of the calculation base for the heat
requirement.
7 . 4 . 5 - C l i m a t ic
a d j u s t m e n t :
switching on and off
the heating service
The climatic adjust men t service is
completely automatic, also with regards
to sw itchin g off at th e end of th e
season and subsequent switching on
at the beginning of the season. The
calculation algorithm envisages that, if
the “Calculated temperature” is lower
than the “Minimum heating temperature”
(parameter ) the heating service
switches off. When the “Calculated
te m perat ure” on ce agai n exceed s
the “Minimum heating temperature”
(parameter ), the heating service
switches back on.
If the heating services switches off or
comes on differently with respect to
requirements, just use control “31” as
per gure 1, in order to raise or lower
the calculated temperature and match
the “Minimum heating temperature” in
advance or on a delayed basis.
7 . 4 . 6 - C l i m a t i c
a d j u st m e n t w i t h
room compensation
By means of the “Installers’ Menu” (see
section 7.11) adjust the parameter
to 02. Everything functions exactly
as in the previous sections relating to
“Climatic adjustment”, with the sole
difference that now the boiler pump
is permanently on. The opening of the
room thermostat contact translates into a
parallel movement downwards of the line
as per gures 30 and 31. The opening of
the room thermostat contact translates
into a parallel movement downwards of
the line as per gures 7.11). The
parameter can adopt values ranging
between 1°C and 20°C. The suggested
values for this parameter are:
- 10 ° C for radi a tor syst e ms (high
temperature)
- 3°C for radiant panel systems (low
temperature).
Values of this parameter which are too
high may translate into instability of the
room temperature. Too low values may
make the action of the room thermostat
uninuential.
C l i ma t ic a dj u s tm e nt w ith ro o m
compensation can be used in all the
cases envisaged by section 7.4.1 with
the advantage that the on-going running
of the pump manages to stabilize and
standardize the room temperatures,
especially in the event that certain loops
of the heating system have hydraulic
elements considerably greater than
others.
Page 36

36
External temperature (°C)
Supply temperature (°C)
Figure 38 - Graphs of the climatic adjustment for high
temperature systems
Figure 39 - Graphs of the climatic adjustment for low
temperature systems
7 - USE
External temperature (°C)
External temperature (°C)
External temperature (°C)
Supply temperature (°C)Supply temperature (°C)
Supply temperature (°C)
OA = Inclination of the line
Ob = Minimum heating
temperature
Oc = Maximum heating
temperature
br = “Fix point” of the angle
fulcrum of the line
b = parallel shift of the
line (possible using the
command on the panel)
OA = Inclination of the line
Ob = Minimum heating
temperature
Oc = Maximum heating
temperature
br = “Set point” of the angle
fulcrum of the line
b = parallel shift of the
line (possible using the
command on the panel)
Page 37

37
7.6 - Timings of the
various functions
In order to protect the life span of
the appliance, improve the comfort
generated, and increase energy saving,
timings have been introduced during the
functioning. These timings are:
- Pos t-circulation pump: each time
th e room thermost at dete rmines a
co nclu sion of the he atin g ser vice,
the pump continues to function for 3
minutes;
- Heating delay: each time the domestic
hot water service nishes, there is a
waiting time of 2 minutes before the reactivation of the heating service;
- Pumps and switch valve blockage
protection: every 24 hours a forcing
of the heating pump, the domestic hot
water pump (if present) and the switch
valve takes place;
- Protection against legionnaires disease;
if the boiler is connected to a storage tank
for the preparation of d.h.w., every seven
days the latter is forced to a temperature
of 60°C so as to carry out disinfection
against legionnaires bacteria.
- Domestic alarm; if the appliance
remains in continual domestic hot water
service for longer than two hours, an “A1”
alarm is generated.
7.5 - Boiler settings (SWITCHES)
With just one control board (detail “13” of gure 1) it is possible to set the appliance in various different architectures. For
this purpose, within the control board a series of electrical switches (see gure 21, detail “A”) is envisaged, identied by the
wording SWITCHES, whose positioning (ON or OFF) determines the type of functioning of the appliance.
CAUTION!!!
Changing these switches could cause the appliance and therefore the system to malfunction. For this reason,
only a professionally qualied technician, who is sensitive to and has in-depth knowledge of the appliance and
the functioning of the system, can change them.
JUMPERS Position Description
1 OFF Appliance with production of instant D.H.W.
ON Appliance with production of D.H.W. via starage tank
2 OFF Appliance with production of instant D.H.W.
ON Position not available for this series of appliances
3 OFF Pressure switch for minimum heating pressure, inhibited
ON Pressure switch for minimum heating pressure, inserted
4 OFF MWL brand fan
ON FIME brand fan
5 OFF Combined boiler, heating and d.h.w.
ON Boiler for just heating
6 OFF Heating service functioning between 30°C and 80°C (low temperature system)
ON Heating service functioning between 20°C and 45°C (high temperature system)
7 OFF Appliance TYPE change service, inhibited
ON Appliance TYPE change service, enabled
8 OFF Position not available for this series of appliances
ON Position not available for this series of appliances
7.9 - (Empty)
7 . 1 0 - E n e r g y
Saving
In order to reduce energy wastage
ge nera ted by the disp lay “48” as
per gure 1, it is possible to switch it
permanently off, with the exception
of when it displays errors or settings.
In order to switch it off, proceed as
follows:
access the “Installers’ Menu” (see
section 7.12);
set the parameter at a value other
than zero, considering that each value
will correspond with a delay in minutes
until the display goes into Energy
Saving mode.
7 - USE
7.7 - Pump s and
switch valve blockage
protection
During the Summer period, the
circulator switches on once a day
for around 15 seconds in order to
avoid any incrustations blocking it.
At the same time, the switch valve is
activated for the same reason.
7.8 - A n t i - f r eeze
protection
CAUTION!!!
So that the anti-freeze protection
is effective, it is necessary to leave
the appliance connected to the
electricity and gas mains and the
two controls “30” and “31” as per
gure 1, turned to the OFF position.
Once the boiler has reached a
temperature of 7°C, the heating pump
automatically comes on (and the
domestic hot water pump if present). If
the temperature falls further under 2°C,
the burner also switches on, so as to
protect the boiler from any problems
deriving from freezing conditions.
If the boiler is not used for a long period
of time (more than a year), we advise
emptying it following the procedures
indicated in sections 8.10 and 8.11.
Page 38

38
7.11 - “Users’
menu”
When entering the “Users’ menu”, the
display “48” as per gure 1, starts to
blink indicating to the user that a change
of mode has taken place. In order to
access the “Users’ menu” just:
press the button for 2 seconds
until the display starts to blinking;
press and release the
button
several times until the parameter
desired is displayed;
by means of the
or keys,
it is possible to change the value of the
parameter.
Press
in order to conrm the
amended data and pass onto the next
parameter.
Once you have reached the end of the
menu, on the last , the display
stops blinking indicating exit from the
menu.
If no key is pressed for more than 60
seconds, one automatically exists the
menu. Any change in the parameters
not conrmed using the button,
will be lost.
It is possible to change or consult the
following parameters in this menu:
7 - USO
Adjustment of the gradient of the line as per gures 38 and 39 (visible only with climatic adjustment
active. See section 7.2).
Adjustment of “Minimum heating temperature”
(visible only with climatic adjustment active. See
section 7.2).
Adjustment of Maximum heating temperature”
(visible only with climatic adjustment active. See
section 7.2).
Adjustment of the parallelism of the line as per
figures 38 and 39 (visible only with climatic
adjustment active. See section 7.2).
Display of calculated heating temperature (if
climatic adjustment active, see section 7.2) or
display of temperature set via the control “31” as
per gure 1.
Display of domestic hot water temperature set via
the control “30” as per gure 1.
Display of last error registered.
Display of last block which occurred.
Setting range: 0,1-5,0
Setting range: see section 7.4.3
Setting range: see section 7.4.3
Only display. The regulation is carried out using the
control “31” as per gure 1. It can adopt values ranging
between -10°C and +10°C
Only display. It can adopt values ranging between 20°C
and 80°C
Only display. It can adopt values ranging between 40°C
and 70°C (see also section 7.1)
Only display. It can adopt the values indicated in section
7.13.2
Only display. It can adopt the values indicated in section
7.13.1
PARAMETER DESCRIPTION INFORMATION ON DISPLAY “48” of gure 1
Page 39

39
7.12 - “Installers’
menu”
CAUTION!!!
Changing these parameters could
cause the boiler and therefore the
system to malfunction. For this
reason, only a technician who
is sensitive to and has in-depth
knowledge of the appliance can
change them.
The boiler’s micro-processor makes
this menu of parameters available
to the technician for the analysis of
the functioning and adjustment of the
appliance to the system.
When entering the “Installers’ Menu”,
the display of the parameters “48” as
per gure 1, blinking to indicate that a
change of mode has occurred.
In order to access the “Installers’
Menu” just:
keep the button pressed
down for 12 seconds until the
parameter is displayed;
continually press and release the
button to scroll through the
list of the parameters;
once the parameter has been
displayed, it can be changed using
the or keys;
press and release the button
in order to conrm the amended
data and pass onto the next
parameter.
once you have reached the end of
the menu, on the last , the
display stops ashing indicating exit
from the menu.
If no key is pressed for more than 60
seconds, one automatically exists the
menu. Any change in the parameters
not conrmed using the button,
will be lost.
It is possible to change or consult the
following parameters in this menu:
7 - USO
Page 40

40
PARAMETER DESCRIPTION INFORMATION ON DISPLAY “48” OF FIGURE 1
Value in °C (cannot be changed)
Value in °C (cannot be changed)
Value in °C (cannot be changed)
Value in °C (cannot be changed) (displayed only if climatic adjustment
is active, as per section 7.2)
Value from 0 to 99 (at 30 it corresponds to a current of 1uA, at 99 it
corresponds to a current of 5.5 uA) (cannot be changed)
Value in °C (cannot be changed)
Value in °C (cannot be changed)
Can be changed in accordance with the instructions indicated in the
gas conversion kit
00 = contact open (heating service off)
01 = contact closed (heating service on)
Value in g/1’/100 (rpm/100) (cannot be changed)
Adjustable according to the instructions of section 6.9
Can be changed: 00 = thermostatic adjustment (see section 7.3); 01
= climatic adjustment (see section 7.4); 02 = climatic adjustment with
room compensation (see section 7.4.6);
Can be changed from 1 to 10 (active only with climatic adjustment).
See section 7.4.3 for its adjustment.
Can be changed from -9 to 65 (active only with climatic adjustment).
See section 7.4.3 for its adjustment.
Can be changed: from 1 to 20 (active only with climatic adjustment
featuring room compensation)
See section 7.4.6 for its adjustment.
Can be changed: 01 = knobs presents; 00 = knobs absent
Can be changed: 00 = display always on; any other value,
corresponds to a delay in the switching off of the display, expressed in
minutes (also see section 7.10)
Can be changed: from 00 to 03 (the correspondence of the speeds of
the pump with the value, can be seen in gures 6)
Boiler and heating supply temperature, gauged by NTC1 sensor
Domestic hot water temperature, gauged by NTC2 sensor
Domestic cold water (or storage
tank) temperature, gauged by
NTC3 sensor
Outside temperature, gauged
by NTC4 sensor
Ionization current gauged
High limit temperature, gauged
by NTC6 sensor
Flue gas temperature, gauged by
NTC7 sensor
Type of basic setting of control
board
Status of room thermostat
contact
Measurement of fan speed
rotation
Power set for heating service
Heating service functioning
mode
Reaction to external
temperature changes
Angle fulcrum of climatic
adjustment line
Reduction of temperature
generated by the opening of the
room thermostat
Boiler knobs’ status
Display “48” as per gure 1
energy saver
Pump speed selector switch,
for just the heating service
7 - USE
Page 41

41
7.13 - Diagnostics
During the routine functioning of the
appliance, the display “48” as per
gure 1, continually shows the operating
status of the appliance, via the following
indications:
7 - USE
PARAMETER DESCRIPTION RIGHT-HAND DISPLAY
Boiler in stand-by mode or pause (no request for heating or
domestic hot water)
Anti-freeze function active
Parameter not available for this boiler model.
CAUTION!!! system pressure too low, ll system (see section
6.1.3)
Domestic hot water service on
Heating service on
Boiler in lock-out mode. To reset it, press the
button. If
the lock-out occurs frequently, contact a professionally qualied
technician.
Boiler fault. Contact a professionally qualied technician
Auto-purging procedure in progress (see section 6.5.1). It will end
within 2 minutes
Anti-Legionnaires disease procedure in progress (see section
5.13.1). It will terminate when the water in the storage tank reaches
a temperature of 60°C.
Boiler temperature (°C)
Boiler temperature (°C)
Boiler temperature (°C)
No display
Domestic hot water temperature (°C)
Heating temperature (°C)
Lock-out code (see section 7.12.1 for decoding).
Error code (see section 7.12.2 for decoding).
Boiler temperature (°C)
Storage tank temperature (°C)
DISPLAY (detail“48” of gure 1)
1 - Parameter display.
2 - Display of values adopted by parameters
3 - Indicator of burner status.
On = burner on;
Blinking = burner off.
4 - Indicator of domestic service status.
On = domestic service active;
Off = domestic service inactive.
5 - Indicator of decimal of displayed value.
6 - Indicator of heating service status.
On = heating active;
Off = heating inactive.
Page 42

42
7.13.1 - Diagnostics: “L” lock-outs
7 - USE
“L”
Code
Lock-out description Controls
Solutions
L01
No ame detected after three
subsequent ignition attempts
Check: Gas supply pressure
(se e section 6. 6 ), spark s
on ignitions electrodes (see
section 8.5); correct pressure
of comburant air (see section
6.7); 220Vac electricity supply
to gas valve; electrical element
of the two coils of the gas valve
0.88 Kohm and 6.59 Kohm
If the supply pressure is incorrect, it is
necessary to take steps upstream from the
appliance in order to restore it; if the comburant
air pressure is incorrect, it is necessary to
take steps on the venting system in order
to eliminate any obstruction; if the current to
the gas valve is not 230Vac it is necessary to
replace the control and command board; if
the electrical element of the gas valve is not
0.88 Kohm and 6.59 Kohm, the valve must
be replaced.
If the burner switches on and
off at the end of the ignition
attem p t , c h e ck : t h a t th e
ionization current is set at a
value greater than 60 (follow
procedure in section 8.8.4).
If the ionization current is not greater than 60,
it is necessary to check the CO2 (see section
6.8) and restore the correct value, check the
ionization electrode and if necessary replace
it, check the integrity of the electrical circuits
wires of the ionization current.
L02
Flame extinguishes three
times
greater than 60, it is necessary to check the
CO2 (see section 6.8) and restore the correct
value, check the ionization electrode and if
necessary replace it, check the integrity of
the electrical circuits wires of the ionization
current.
Check: that the ion iza tio n
current is set at a value greater
than 60 (follow procedure in
section 8.8.4)
If the ionization current is not
L04
Gas valve command relay Replace the command and control board
L07
If the sensor does not comply with the correct
values, replace it;
L08
L03
Boiler temperature over
95°C.
Che c k t h a t th e p u mp i s
working
L05
Safety relay or earth
inefcient
Check the earth ing of the
appliance
If the earth is good, replace the command and
control board
L06
Flue gas sensor over 110°C
Chec k that the el e c t r i cal
ele m e n t o f t he f l u e ga s
sen s or compl i e s with the
graph in section 8.9; check
the efciency of the boiler, it
must be over 96%
If the sensor does not comply with the correct
values, replace it; if the boiler efciency is less
than 96% and the operating parameters are
correct, it is necessary to replace the primary
heat exchanger and place a filter at the
entrance of the heating return connection.
Electrical circuit of flue gas
sensor interrupted
Chec k that the el e c t r i cal
element of the ue gas sensor
complies with the graph in
section 8.19;
Spark generator relay Replace the command and control board
L09
RAM memory Replace the command and control board
L10
E2prom memory damaged Replace the command and control board
L12
E2prom memory damaged Replace the command and control board
L13
Programme error Replace the command and control board
L14
Programme error Replace the command and control board
L15
Programme error Replace the command and control board
L16
Programme error Replace the command and control board
Restore the water circulation or replace the
command and control board
Check: th at the fl u e gas
discharge is appr opr iately
protected from obstructions
caused by gusts of wind.
If the flue gas discharge is positioned on
vertical walls, it is necessary to protect it with a
wind-protection grill; if the ue gas discharge is
positioned above the roof, check that it is not in
a ow-back zone, and that any wind-protection
chimneypot is really effective.
Page 43

43
7 - USE
“L” Code Lock-out description
Controls Solutions
L17
Temperature difference
between NTC1 and NTC6
Chec k that the el e c t r i cal
element of the two sensors
complies with the graph in
section 8.9;
If one of the two or both sensors do not have
the correct values, it is necessary to replace
L18
Programme error
Replace the command and control board
L19
Gas valve: ame sensed for
10 seconds after the closure
of the valve
Replace gas valve
L20
Gas val v e : fl ame sensed
before opening of gas valve.
Replace gas valve
L32
Programme error Replace the command and control board
L33
Fan rotation error Check that it is powered at
300 Vdc.
If the fan is powered, it is necessary to replace
it differently, replace the board.
L45
Heati ng circuit fill ing time
longer than 10 minutes.
Check the pressure switch
setting pressure, FILL must
appear when the pressure
drops below 0.6 bar; check
that there are no water leaks
from the heating system.
If the pressure switch is not correctly set, it
must be replaced; if the system has a leak, it
must be xed.
L46
Fill i n g o f he a t in g c i rc u i t
repeated 16 ti m es in 24
hours
Check the pressure switch
setting pressure, FILL must
appear when the pressure
drops below 0.6 bar, and must
disappear when the pressure
rises above 1.5 bar; check that
there are no water leaks from
the heating system.
If the pressure switch is not correctly set, it
must be replaced; if the system has a leak, it
must be xed.
L25
NTC6 error sensor
Chec k that the el e c t r i cal
element of the sensor complies
with the graph in section 8.9;
If the sensor is not within the correct values,
it is necessary to replace it. Otherwise, it is
necessary to replace the control board.
“E” Code Lock-out description
Controls Solutions
E01
NTC1 boiler tempera t u r e
sensor circuit interrupted.
Check that the electrical element
of the sensor complies with the
graph indicated in section 8.9;
check the electrical connection
cables between the probe and
the command board
If the electrical element of the probe does not
comply, it must be replaced; if the electrical
circuit is damaged, it must be repaired; if the
previous two cases do not apply, replace the
command and control board
E02
NT C2 domes tic hot water
temperature sensor circu it
interrupted.
Check that the electrical element
of the sensor complies with the
graph indicated in section 8.9;
check the electrical connection
cables between the probe and
the command board
If the electrical element of the probe does not
comply, it must be replaced; if the electrical
circuit is damaged, it must be repaired; if the
previous two cases do not apply, replace the
command and control board
E07
NTC3 cold water temperature
sensor circuit interrupted.
Check that the electrical element
of the sensor complies with the
graph indicated in section 8.9;
check the electrical connection
cables between the probe and
the command board
If the electrical element of the probe does not
comply, it must be replaced; if the electrical
circuit is damaged, it must be repaired; if the
previous two cases do not apply, replace the
command and control board
E08
Circuito sensore temperatura
caldaia NTC6, interrotto.
Check that the electrical element
of the sensor complies with the
graph indicated in section 8.9;
check the electrical connection
cables between the probe and
the command board
If the electrical element of the probe does not
comply, it must be replaced; if the electrical
circuit is damaged, it must be repaired; if the
previous two cases do not apply, replace the
command and control board
7.13.2 - Diagnostics: “E” errors
them;
Page 44

44
“E”
Code
Lock-out
description
Controls Solutions
E11
NTC1boiler temperature
sensor circuit short-circuited.
Check that the electrical element
of the sensor complies with the
graph indicated in section 8.17;
check the electrical connection
cables between the probe and
the command board
If the electrical element of the probe does not
comply, it must be replaced; if the electrical
circuit is damaged, it must be repaired; if the
previous two cases do not apply, replace the
command and control board
E12
NTC2 domestic hot water
temperature sensor circuit
short-circuited
Check that the electrical element
of the sensor complies with the
graph indicated in section 8.17;
check the electrical connection
cables between the probe and
the command board
If the electrical element of the probe does not
comply, it must be replaced; if the electrical
circuit is damaged, it must be repaired; if the
previous two cases do not apply, replace the
command and control board
E13
Erroneous temperature reading. Replace the command and control board
E14
Erroneous temperature reading. Replace the command and control board
E15
Erroneous temperature reading. Replace the command and control board
E16
Erroneous temperature reading. Replace the command and control board
E17
NTC3 cold water temperature
sensor circuit short-circuited
Check that the electrical element
of the sensor complies with the
graph indicated in section 8.17;
check the electrical connection
cables between the probe and
the command board
If the electrical element of the probe does not
comply, it must be replaced; if the electrical
circuit is damaged, it must be repaired; if the
previous two cases do not apply, replace the
command and control board
E18
NTC6 boiler temperature
sensor circuit short-circuited
Check that the electrical element
of the sensor complies with the
graph indicated in section 8.17;
check the electrical connection
cables between the probe and
the command board
If the electrical element of the probe does not
comply, it must be replaced; if the electrical
circuit is damaged, it must be repaired; if the
previous two cases do not apply, replace the
command and control board
E19
E2prom memory damaged Replace the command and control board
E20
Flame presence with gas
valve closed
Replace the gas valve
E21
Phase and neutral inverted Invert phase and neutral
E22
Mains frequency other than
50Hz
Check the electrical frequency
of the system.
If the mains frequency is other than 50Hz,
contact the electricity distribution company;
if the mains frequency is 50Hz, replace the
command and control board.
E23
No earth connection Check the correct earthing of
the system.
Restore the correct earthing of the system.
If the earth correction is already sufcient,
replace the command and control board.
E30
Erroneous temperature reading. Replace the command and control board
E31
Erroneous temperature reading. Replace the command and control board
E32
Erroneous temperature reading. Replace the command and control board
E33
Erroneous temperature reading. Replace the command and control board
E42
Programme error or earth
connection insufcient
Check the correct earthing of
the system.
Restore the correct earthing of the system.
If the earth correction is already sufcient,
replace the command and control board.
E50
Boiler TYPE selection error If the selector switches are positioned correct-
ly, replace the comand and control board
Check the JUMPERS selector
switch as per section 7.5.
E51
Reset button pressed too often
in a short period of time
7 - USE
Page 45

45
Figure 41 - Opening the control panel
8 - MAINTENANCE
8.1 - General
warnings
CAUTION!!! Maintenance
operations must only be carried
out on the boiler by qualied
technicians.
CAUTION!!! Before any
maintenance operations, disconnect
the appliance from the electricity
mains, using the appropriate switch
nearby.
CAUTION!!! Before any
maintenance operations, close the
gas cock.
8.2 - Disassembling
t h e c a s i n g a n d
accessing internal
components
In order to disassemble the casing,
proceed as follows (refer to gure 32):
unscrew screws “A”
raise the fastener “C”;
extract the casing outwards “D”;
push tabs “F” downwards and
accompany instrument panel “G”
during its rotation towards the front;
remove screws “H” in order to
access the inside of the box of
electrical connections;
push tabs “E” laterally and extract
the cover for accessing the inside of
the electrical box;
open the fastener “I”;
draw cover “L” out, in order to
access the inside of the combustion
chamber;
Page 46

46
8.3 - Cleaning of
the condensation
collecting trap
In order to correctly clean the
conveying and collection trap for the
condensation produced by combustion,
it is necessary to proceed as follows
(refer to gures 42 and 43):
force the domestic hot water service
as described in section 8.15, with
the aim of lowering the level of liquid
present in the trap “A”;
access the internal components
following section 8.2;
place a waterproof cover “B”, over
the electrical panel, to avoid any
drops of water entering the electrical
system;
loosen spring “C” with a pair of
pliers, pushing in downwards;
draw out the condensation tube “D”
downwards;
unscrew the nut “E”;
pull out trap “A” downwards, taking
care since it is full of condensation
water and during the rotation
outwards it could spill;
open the trap and clean inside;
re-assemble everything, proceeding
in reverse order, taking care that
gasket “F” is replaced in the specic
housing;
restore the level of liquid inside the
trap pouring in 100 cm3 of water (a
glassful) via the ue gas discharge
or opening “H” as per Figure 44.
Figure 42 - Preparation for the extraction of the
condensation collecting trap
Figure 43 - Dismantling the condensation collecting trap
8 - MAINTENANCE
Page 47

47
8 - MAINTENANCE
8.4 - Cleaning the
burner and primary heat
exchanger (ue gas side)
To correctly clean the burner and the heat ex-
changer (ue gas side), proceed as follows:
access the internal components following
instructions in section 8.2;
unscrew bolt “D” as per gure 44;
disconnect the wires from the ignition
sparkplugs and the wire from the detection
plug (see gure 1, details 42, 44 and 45);
disconnect the wire from the safety sensor “F”
as per gure 44;
undo the four nuts “C” as per gure 44;
extract the entire fan and burner unit, detail “A”
as per gure 44;
use a cylindrical brush, with plastic bristles, to
clean the inside of the combustion chamber
(detail “H” of gure 44);
use a vacuum cleaner to remove any unburned
residue from the combustion chamber (detail
“H” of gure 44);
using the same vacuum cleaner, clean
the surfaces of the burner and around the
electrodes;
reassemble the components by proceeding in
reverse order;
open the gas cock;
restore normal electrical power.
check that there are no gas leaks between the
removed joints.
8.5 - Correct positioning
of the ignition and
ionization electrodes
So that the appliance works satisfactorily, it is
indispensable that the electrodes are positioned
correctly (refer to gure 45):
the distance between the ignition electrodes
“A” and “B”, must be between 2,0 and 2,5 mm;
the distance of the ignition electrodes from the
surface area of the burner must be between 5
and 5.5 mm;
the distance of the ionization electrode from
the surface of the burner, must be between 6,0
and 6,5 mm.
8.6 - Secondary heat
exchanger for the
production of d.h.w.
The production of d.h.w. is delegated to the
secondary heat exchanger (detail “37” of gure
1). If this exchanger, over time, is no longer
efcient, it may be necessary to clean or replace
it.
Figure 44 - Dismantling the fan-burner unit
Figure 45 - Positioning of electrodes on burner
Page 48

48
8 - MAINTENANCE
8.7 - Replacement
of the pump motor
If it becomes necessary to replace the
circulator pump, proceed as follows
(refer to gure 49):
empty the water from the heating
circuit, following the procedure
indicated in section 8.10;
access the internal components of
the appliance, following section 8.2;
remove screws “B”;
extract pump “A” outwards;
disconnect the electrical wires from
the pump unit.
8.8 - Checking the
expansion tank
The expansion tank is positioned at the
back of the boiler. In order to check the
pressure or dismantle it, proceed as
follows (refer to gure 50):
dismantle the discharge pipe from
tting “2” as per gure 1;
remove screws “B”;
remove part “C”;
with your hands, turn the expansion
tank “A”, until valve “F” is in an
accessible position;
release the pressure from the
heating circuit following the
procedures in section 8.10;
check the pre-lling pressure of the
expansion tank. It must be 1 bar.
If the pressure is lower, proceed to
reinstate it, letting the water run out
of the heating discharge cock (detail
“11” of gure 1).
If the expansion tank needs to be
replaced, proceed as follows:
empty the heating circuit, following
the procedure indicated in section
8.10;
unscrew nut “E”;
remove the expansion tank, drawing
it out upwards.
Figure 49 - Replacing the pump motor
Figure 50 - Accessing the expansion tank
Page 49

49
8 - MAINTENANCE
8.9 - Dismantling
the 3-way valve
The 3-way valve (detail “F” of gure
52) inverts the ow of water produced
by the primary heat exchanger, to the
heating circuit or the secondary heat
exchanger for the production of d.h.w..
Should it become necessary to replace
it, proceed as follows (refer to gures
51, 52 and 53):
empty the water from the heating
circuit, following the procedure
indicated in section 8.10;
access the internal components of
the appliance, following section 8.2;
disconnect the ttings “A” and “B”;
unscrew screw “C”;
remove spring “E” and extract the
by-pass pipe “D” towards the back
of the appliance;
remove the fork “G”;
extract the servomotor “H”;
unscrew tting “I”;
unscrew screw “L”;
extract the entire block of the 3-way
valve “F” outwards taking care with
the gaskets “M” (see gure 53);
during reassembly, take care with
the positioning of the gaskets “M”.
Figure 51 - Dismantling the supply and return ttings
Figure 52 - Dismantling the 3-way valve servomotor
Figure 53 - Extracting the 3-way valve
Page 50

50
8 - MAINTENANCE
Figure 54 - Heating circuit
discharge cock
8.10 - Draining the
heating side of the
appliance
To empty the boiler from the heating
side, proceed as follows:
turn off the boiler;
allow the water inside to cool by
switching off the room thermostat
and turning control “31” as per
gure 1 to minimum. Wait until the
display “48” as per gure 1 shows a
temperature of at least 40°C;
access the internal components
following the procedure indicated in
section 8.2;
connect a exible rubber hose to the
discharge cock “A” (see gure 54)
and place the other end in a sink
plughole or similar;
open discharge cock “A”;
open the bleeding valves of the
radiators. Begin with the upper
radiators and continue with the
lower ones;
after draining out all the water,
close the radiator bleed valves and
discharge cock “A”;
CAUTION!!! Do not recover
and/or re-use water drained from the
heating circuit for any purpose as it
could be contaminated.
8.11 - Draining the
domestic side of the
appliance
To empty the boiler from the domestic
side, proceed as follows:
close the main domestic cold water
supply cock of the house;
open all the hot and cold water
cocks in the house;
ensure that at least one of these is
at a lower level than the boiler.
8.12 - Forcing
So as to carry out specic checks, dealt
with case by case in the manual, it is
possible to force the functioning of the
appliance.
8.13 - Auto-purging
It is possible to re-set the auto-purging
procedure, by pressing keys and
together for 10 seconds, until the
letter F appears on the display. Then
press .
8.14 - Fan
It is possible to generate the start-up of
just the fan, by pressing keys and
together for 10 seconds, until the
letter F appears on the display. Now the
fan will remain on for 10 minutes. In order
to exit in advance from the forcing of the
fan, press the key.
8.15 - Minimum and
maximum output
It is possible to force the functioning
of the appliance to its minimum or
maximum output, both during the heating
service and during the domestic hot
water service; proceed as follows:
generate a request for the service you
wish to force:
- heating: switch on the room thermostat
and turn control “31” of gure 1 to
maximum;
- domestic hot water: turn control “30” of
gure 1 to maximum and fully open the
hot water tap;
by pressing keys
and
together for more than 10 seconds,
until appears on the display;
press key
until the display
shows:
- for forcing the heating to
minimum output;
- for forcing the heating to
maximum output;
- for forcing the domestic hot
water to minimum output;
- for forcing the domestic hot
water to maximum output;
press the key in order to
restore the boiler to normal running
conditions.
8.16 - Checking the
ionization current
During the checks on the minimum and
maximum output (see section 8.15), the
display shows the letter of the service
checked, t or S and at the same time,
in the second part of the display, shows
the value of the ionization current. At 30
it corresponds to a current of 1 uA, at 99
to a current of 5.5 uA. This value must
always be greater than at least 60.
Page 51

51
8.17 - Water
temperature
gauging sensor
A number of sensors, which gauge
the temperature, are positioned on
the boiler’s heat exchanger. The
electrical resistance existing between
the two contacts of the sensor must
correspond with the values shown in
gure 55.
The temperature sensors are: NTC1;
NTC2, NTC3, NTC5 and NTC6, whose
positioning can be ascertained in
gures 1, 57 and 58.
8.18 - Outside
temperature sensor
An outside temperature sensor can
be connected to the boiler on request
(see sections 7.2 and 7.4). The
electrical resistance existing between
the two contacts of the sensor must
correspond with the values shown in
gure 56.
8 - MAINTENANCE
Figure 55 - Water sensors’ curve
Figure 56 - Outside temperature sensor curve
Page 52

52
8.19 - Functional wiring
diagram
Figure 57 - Functional wiring diagram
CM - Command and control
board
C R - Re mo t e c on t r o l
(optional)
CR0 4 - R em o te co nt ro l
(optional)
EA - Ignition electrode
ER - Detector electrode
F1 - Power supply fuse 1.6A
F2 - Storage tank pump fuse
GS - Spark generator
IG - On/off power switch
IEI - Summer/Winter switch
INT - Opentherm interface
J1 - 6-pole connector
J2 - 4-pole connector
J3 - 12-pole connector
J4 - 4-pole connector
J5 - 16-pole connector
J10 - 10-pole connector
J18 - 8-pole connector
NTC 1 - Boiler temperature
sensor
NT C 2 - D . H .W. o u t let
sensor
NTC 3 - Domestic cold water
inlet sensor or storage tank
sensor
NTC 4 - Outside temperature
sensor (optional)
NTC 6 - High temperature
limit sensor
NTC 7 - Flue gas temperature
sensor
NTC 8 - Return temperature
sensor (optional)
PB - Stora g e ta nk pump
(optional)
PO1 - Circulator pump
PR - Water pressure switch
PS R - Hea ting addi tion al
pump
R1 - Support relay for
external pump (max 100 W)
RAN - Relais for antifreezing
resistance
SB - Storage tank sensor
(optional)
SDC - Connection board
TA1 - Room thermostat bridge
inside the boiler
TA2 - Room thermostat bridge
on remote control (optional)
TAN - no pre s ent in this
model
V3V - 3-way valve
VC - Automatic charge valve
VE - Fan
VG - Gas valve
8 - MAINTENANCE
Page 53

53
8.20 - Multiwire wiring
diagram
Figure 58 - Multi-wire wiring diagram
Key -
see key to gure
57
8 - MAINTENANCE
Page 54

54
9 - TECHNICAL FEATURES
MODEL NOVADENS 24 NOVADENS 34
Country of destination GB-IE GB-IE
Type C13;C33;C43;C53;C63;C83
Category II2H3P II2H3P
EC type certicate (PIN) 0694BR1222 0694BR1222
Nominal input heat “Q”= kW 25,0 34,8
Minimum input heat kW 5,0 8,0
Nominal output heat (80/60) “P” = kW 24,5 34,1
Nominal output heat (50/30) “P” = kW 26,2 36,2
Efciency at nominal output heat (80/60) % 98 98
Efciency at nominal output heat (50/30) % 104 104
Minimum output heat (80/60) kW 4,9 7,8
Minimum output heat (50/30) kW 5,2 8,3
Efciency at minimum output heat (80/60) % 97 97
Efciency at minimum output heat (50/30) % 104 104
Efciency at minimum output heat (37/30) % 108,2 108,2
Certied efciency (92/42/CEE) stars
Chimney loss with burner on (80/60) % 1,5 1,5
Chimney loss with burner off % 0,2 0,2
Casing loss with burner on % 0,5 0,5
Casing loss with burner off % 0,1 0,1
Gas ow rate Natural gas m
3
/h 2,64 3,68
LP Gas Kg/h 1,94 2,70
Gas supply pressure (mbar) Natural gas mbar 20 20
LP Gas mbar 30 30
Minimum gas supply pressure (mbar) Natural gas mbar 15 15
LP Gas mbar 25 25
Maximum gas supply pressure (mbar) Natural gas mbar 27 27
LP Gas mbar 45 45
Comburant air pressure Natural gas mbar 6,6 4,4
LP Gas mbar 6,6 3,8
Water capacity of the primary heat exchanger lt 2 2
Weight of primary heat exchanger kg 11 11
Water capacity of the secondary heat exchanger lt 10 10
Weight of secondary heat exchanger kg 5 5
D.h.w. output heat kW 24,5 34,1
D.h.w. production with semi-accumulation in rst 10 min (dt 30°C) l 125 172
Instant d.h.w production (dt 30°C) l/min 11,7 16,3
Design temperature °C 95 95
Maximum heating temperature °C 80 80
Minimum heating temperature °C 20 20
Maximum heating pressure “PMS” = bar 3 3
Minimum heating pressure bar 1 1
Maximum pressure of domestic hot water circuit bar 7 7
Minimum pressure of domestic hot water circuit bar 0,05 0,05
Capacity of expansion tank lt 10 10
Nominal power supply voltage V 230 230
Nominal power supply frequency Hz 50 50
Absorbed electric power W 105 105
Degree of electrical protection IP 20 IP 20
Flue gas pipes diameter (split) mm 80 or 60 80 or 60
Max. length ue gas pipes (split)(80) m 40 25
Max. length ue gas pipes (split)(60) m 15 10
Flue gas pipes diameter (coaxial) mm 60/100 60/100
Max. length ue gas pipes (coaxial) m 3,7 3,7
Equivalent length of one elbow m 45° elbow = 0.5m, 90° elbow = 1m
CO (0% O2 with natural gas) ppm 10 20
NOx (0% O2 with natural gas) (class 5 EN 483 and EN 297) ppm 9 17
CO2 (%) Natural gas 8,7/9,0 8,7/9,0
LP gas 10/10,5 10/10,5
Maximum ue gas temperature °C 90 90
Flue gas mass ow Kg/h 42,3 59
Head available at discharge Pa 60 60
Maximum condensation ow rate l/h 3,84 5,57
Average degree of acidity of condensation PH 4 4
Boiler weight kg 50 50
Page 55

55
The undersigned company COSMOGAS S.r.L., with registered ofces in Via
L. Da Vinci 16 - 47014 Meldola (FC) ITALY,
DECLARES
under its own exclusive liability that the product:
forming the subject matter of this declaration, is compliant with the model
described in the
type Examination Certicate, with reference to the
table headed “EC type certicate (PIN)” in section 9 and in accordance with
the provisions of the following Directives: Gas Appliances, (90/396/EEC),
Efciencies, (92/42/EEC), Low Voltage, (2006/95/EC), Electromagnetic
Compatibility,
(2004/108/EEC).
(The warranty number matches the serial number)
This declaration is issued in accordance with that established by said
Directives.
Meldola (FC) ITALY, (Date of manufacture).
MANUFACTURE DATE
WARRANTY No
GAS BOILER MODEL
10 - EC COMPLIANCE DECLARATION
Page 56

COSMOGAS s.r.l.
Via L. da Vinci 16 - 47014
MELDOLA (FC) ITALY
info@cosmogas.com
www.cosmogas.com
 Loading...