

Page 1

- 1 -
www.oCOSMO.com
Smart Sound Bar 2.1 User Manual
Dear Valued Customer,
Congratulations on your new Smart Sound Bar 2.1 purchase. Thank you for
your support. This sound bar is built-in Android™. To ensure safety and
many years of trouble free operation of your Sound Bar 2.1, please read the
manual carefully before making any adjustments, and keep them in a safe
place for future references. The Smart Sound Bar 2.1 is a versatile speaker
unit with both digital and analog audio inputs for audio visual sources.
Connect the Smart Sound Bar 2.1 to the audio output of your TV and you can
use the Smart Sound Bar 2.1 to enhance the sound from all sources playing
through your TV. We hope you enjoy your new Smart Sound Bar 2.1.
For technical assistance, please call (855) 662-6766 and select option 3 or
email our tech support group at ocosmoTS@oCOSMO.com.
For all other inquiries, please call (855) 662-6766 and select option 4 or
email our customer service group at ocosmoCS@oCOSMO.com.
We recommend you register your smart Sound Bar 2.1 online at
http://www.oCOSMO.com.
Page 2

- 2 -
www.oCOSMO.com
Smart Sound Bar 2.1 User Manual
Table of Contents
TABLE OF CONTENTS 2
SAFETY INFORMATION 3
SAFETY INSTRUCTIONS 4
PACKAGE CONTENTS 6
OVERVIEWS 6
FRONT & BACK 6
SOUND BAR REMOTE & EXTRAS 7
MOUNTING THE SOUND BAR 12
INSTALLING BATTERIES TO THE REMOTE CONTROL 14
CONNECTION SUGGESTIONS 15
IF YOU HAVE DIGITAL AUDIO WITH YOUR TV 15
IF YOU HAVE ANALOG AUDIO WITH YOUR TV 16
IF YOU HAVE AN AUDIO DEVICE WITH YOUR TV 17
OPERATION 19
HOW DO I CLEAN THE SOUND BAR? 25
TROUBLESHOOTING 26
CALL US IF YOU NEED HELP! 27
SPECIFICATION 28
LIMITED PRODUCT WARRANTY 31
DISCLAIMER, TRADEMARKS, & COPYRIGHT INFORMATION 33
FCC COMPLIANCE STATEMENT 34
Page 3
- 3 -
www.oCOSMO.com
Smart Sound Bar 2.1 User Manual
SAFETY INFORMATION
Electricity is used to perform many useful functions, but it can also cause personal injuries and
property damage if improperly handled. This product has been engineered and manufactured with
the highest priority on safety. However, improper use can result in electric shock and / or fire. In
order to prevent potential danger, please observe the following instructions when installing,
operating and cleaning the product. To ensure your safety and prolong the service life of your
Sound Bar, please read the following precautions carefully before using the product.
1. Read these instructions.
2. Keep these instructions.
3. Heed all warnings.
4. Follow all instructions.
5. Do not use this apparatus near water.
6. Clean only with dry cloth.
7. Do not block any ventilation openings. Install in accordance with the manufacturer’s
instructions.
8. Do not install near any heat sources such as radiators, heat registers, stoves, or other
apparatus (including amplifiers) that produce heat.
9. Do not defeat the safety purpose of the polarized or grounding-type plug. A polarized
plug has two blades with one wider than the other. A grounding type plug has two
blades and a third grounding prong. The wide blade and the third prong are provided for
your safety. If the provided plug does not fit into your outlet, consult an electrician for
replacement of the obsolete outlet.
10. Protect the power cord from being walked on or pinched particularly at the plugs,
convenience receptacles, and the point where they exit from the apparatus.
11. Only use attachments/accessories specified by the manufacturer.
12. Use only with the cart, stand, tripod, bracket, or table specified by the manufacturer, or
sold with the apparatus. When a cart is used, use caution when moving the
cart/apparatus combination to avoid injury from tip-over.
13. Unplug this apparatus during lightening storms or when unused for long periods of time.
14. Refer all servicing to qualified service personnel. Servicing is required when the
apparatus has been damaged in any way, such as power-supply cord or plug is
damaged, liquid has been spilled or objects have fallen into the apparatus, the apparatus
has been exposed to rain or moisture, does not operate normally, or has been dropped.
Page 4

- 4 -
www.oCOSMO.com
Smart Sound Bar 2.1 User Manual
SAFETY INSTRUCTIONS
This product is designed and manufactured to operate within defined design limits, and
misuse may result in electric shock or fire. To prevent the product from being damaged,
the following rules should be observed for the installation, use and maintenance of the
product. Read the following safety instructions before operating the Sound Bar. Keep
these instructions in a safe place for future reference.
To avoid the risk of electric shock or
component damage, switch off the
power before connecting other
components to the SOUND BAR.
Unplug the power cord before
cleaning the SOUND BAR. Please use
the included custom bezel cleaning
cloth for cleaning the bezel of the
SOUND BAR only. Do not use a liquid
or a spray cleaner for cleaning the
product. Do not use abrasive cleaners.
Always use the accessories
recommended by the manufacturer to
insure compatibility.
When moving the SOUND BAR from
an area of low temperature to an area
of high temperature, condensation
may form on the housing. Do not turn
on the SOUND BAR immediately after
this to avoid causing fire, electric
shock or component damage.
Do not place the SOUND BAR on an
unstable cart, stand, or table. If the
SOUND BAR falls, it can injure a
person and cause serious damage to
the appliance.
Any heat source should maintain a
distance of at least 5 feet away from
the SOUND BAR, i.e. radiator, heater,
oven, amplifier etc. Do not install the
product too close to anything that
produces smoke or moisture.
Operating the product close to smoke
or moisture may cause fire or electric
shock.
Never push any object into the
ventilation slots of the SOUND BAR.
Do not place any objects on the top of
the Product. It could short circuit parts
causing a fire or electric shock. Never
spill liquids on the SOUND BAR.
The SOUND BAR should be operated
only from the type of power source
indicated on the label. If you are not
sure of the type of power supplied to
your home, consult your dealer or
local power company.
The power cable must be replaced
when using different voltage from that
specified in the User Manual. For
more information, contact your dealer.
Do not overload power strips and
extension cords. Overloading can
result in fire or electric shock.
The wall socket should be installed
near the equipment and should be
easily accessible.
Only the marked power source can be
used for the product. Any power
source other than the specified one
may cause fire or electric shock.
Do not touch the power cord during
thunderstorms. To avoid electric shock,
avoid handling the power cord during
electrical storms.
Unplug the unit during a lightning
storm or when it will not be used for a
long period of time. This will protect
the SOUND BAR from damage due to
power surges.
Do not attempt to repair or service the
product yourself. Opening or removing
the back cover may expose you to
high voltages, the risk of electric shock,
and other hazards. If repair is required,
please contact your dealer and refer
all servicing to qualified service
personnel.
Keep the product away from moisture.
Do not expose this appliance to rain or
moisture. If water penetrates into the
product, unplug the power cord and
contact your dealer. Continuous use in
Page 5

- 5 -
www.oCOSMO.com
Smart Sound Bar 2.1 User Manual
this case may result in fire or electric
shock.
Do not use the product if any
abnormality occurs. If any smoke or
odor becomes apparent, unplug the
power cord and contact your dealer
immediately. Do not try to repair the
product yourself.
Avoid using dropped or damaged
appliances. If the product is dropped
and the housing is damaged, the
internal components may function
abnormally. Unplug the power cord
immediately and contact your dealer
for repair. Continued use of the
product may cause fire or electric
shock.
Do not install the product in an area
with heavy dust or high humidity.
Operating the product in environments
with heavy dust or high humidity may
cause fire or electric shock.
Hold the power connector when
removing the power cable. Pulling the
power cable itself may damage the
wires inside the cable and cause fire
or electric shocks. When the product
will not be used for an extended
period of time, unplug the power
connector.
To avoid risk of electric shock, do not
touch the connector with wet hands.
Insert batteries in accordance with
instructions while using the remote
control. Incorrect polarities may cause
damage and leakage of the batteries,
operator injury and contamination the
remote control.
If any of the following occurs please
contact the dealer:
o The power connector fails
or frays.
o Liquid sprays or any object
drops into the SOUND
BAR.
o The Sound Bar is exposed
to rain or other moisture.
o The Sound Bar is dropped
or damaged in any way.
o The performance of the
Sound Bar changes
substantially.
Operating environment: Temperature:
5°C ~ 35°C, Humidity: 10% to 75%
non-condensing, Altitude: 0~10,000 ft.
Page 6

- 6 -
www.oCOSMO.com
Smart Sound Bar 2.1 User Manual
Package Contents
Smart Sound Bar x 1
User Manual x 1
Warranty Card x 1
Drywall Anchor with Screw x 2 Sets
3 Head RCA Audio Cable x 1
3.5 mm Mini-jack Cable x 1
Smart Sound Bar Remote Control with AAA battery x 1
Overviews
Front & Back
1. WALL MOUNT BRACKETS – Use these brackets to hang the sound bar on a wall.
2. POWER CABLE – Connect this to a surge protector or wall outlet.
3. COAXIAL SPDIF – Connect your digital audio outputs to this connection for audio. If you
connected to this one, press SOURCE repeatedly until you see COAX on the display.
4. AUX – Connect your analog audio output to this connection for audio. If you connected to this
one, press SOURCE repeatedly until you see AUX on the display.
5. LINE IN (3.5mm) – Connect the headphone out from any device to this connection for audio.
If you connected to this one, press SOURCE repeatedly until you see LINE on the display.
6. HDMI – Connect this HDMI port to the TV to display features for Android™.
7. USB – This port connects to USB accessories supported by Android.
8. SD CARD READER – You can insert SD memory cards to this reader to read its contents
while under Android.
9. POWER – This button turns the Sound Bar on or off.
10. SOURCE – This button selects the sound connection between LINE (3.5 mm mini-jack), COAX
(digital), AUX (analog) and ANDROID.
11. SOUND MODE – This button selects all the sound modes (MOVIE, MUSIC, NEWS, GAMES).
a. MOVIE – This sound mode is made for watching movies.
b. MUSIC – This sound mode is made for listening to music broadcasts.
c. NEWS – This sound mode is made for watching the news.
d. GAMES – This sound mode is made for games such as football, soccer, basketball,
and baseball.
e. USER – This sound mode is to be used when you are using the sound bar’s
features for Android.
12. VOL(–/+) – The (-) touch sensor decreases the volume and the (+) touch sensor increases the
volume.
13. DISPLAY – This screen displays the current status of the sound bar.
Page 7
- 7 -
www.oCOSMO.com
Smart Sound Bar 2.1 User Manual
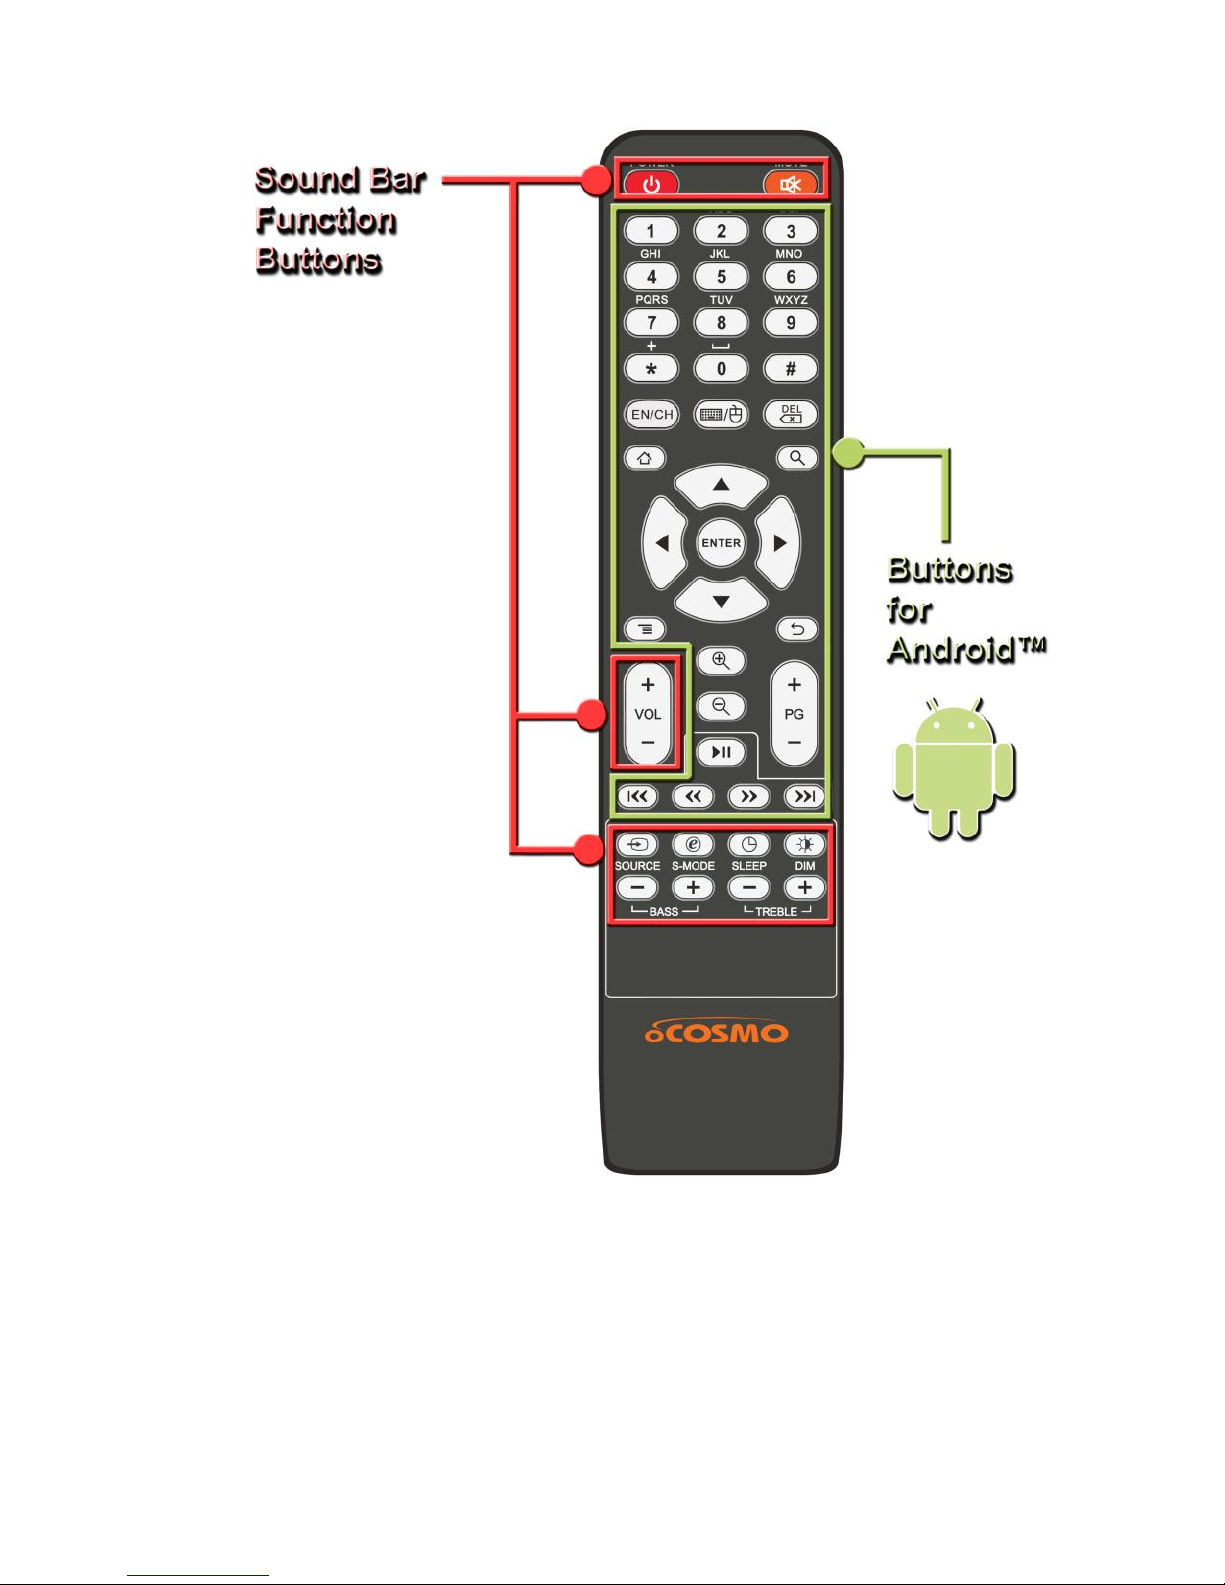
Smart Sound Bar Remote & Extras
PLEASE NOTE:
The Sound Bar remote power button controls both the turning on and turning off function
of the Sound Bar and any oCOSMO TV.
The mute button of the Sound Bar only mutes the sound bar not the oCOSMO TV,
however if you use the oCOSMO TV remote’s mute, it will mute the Sound Bar.
Page 8
- 8 -
www.oCOSMO.com
Smart Sound Bar 2.1 User Manual
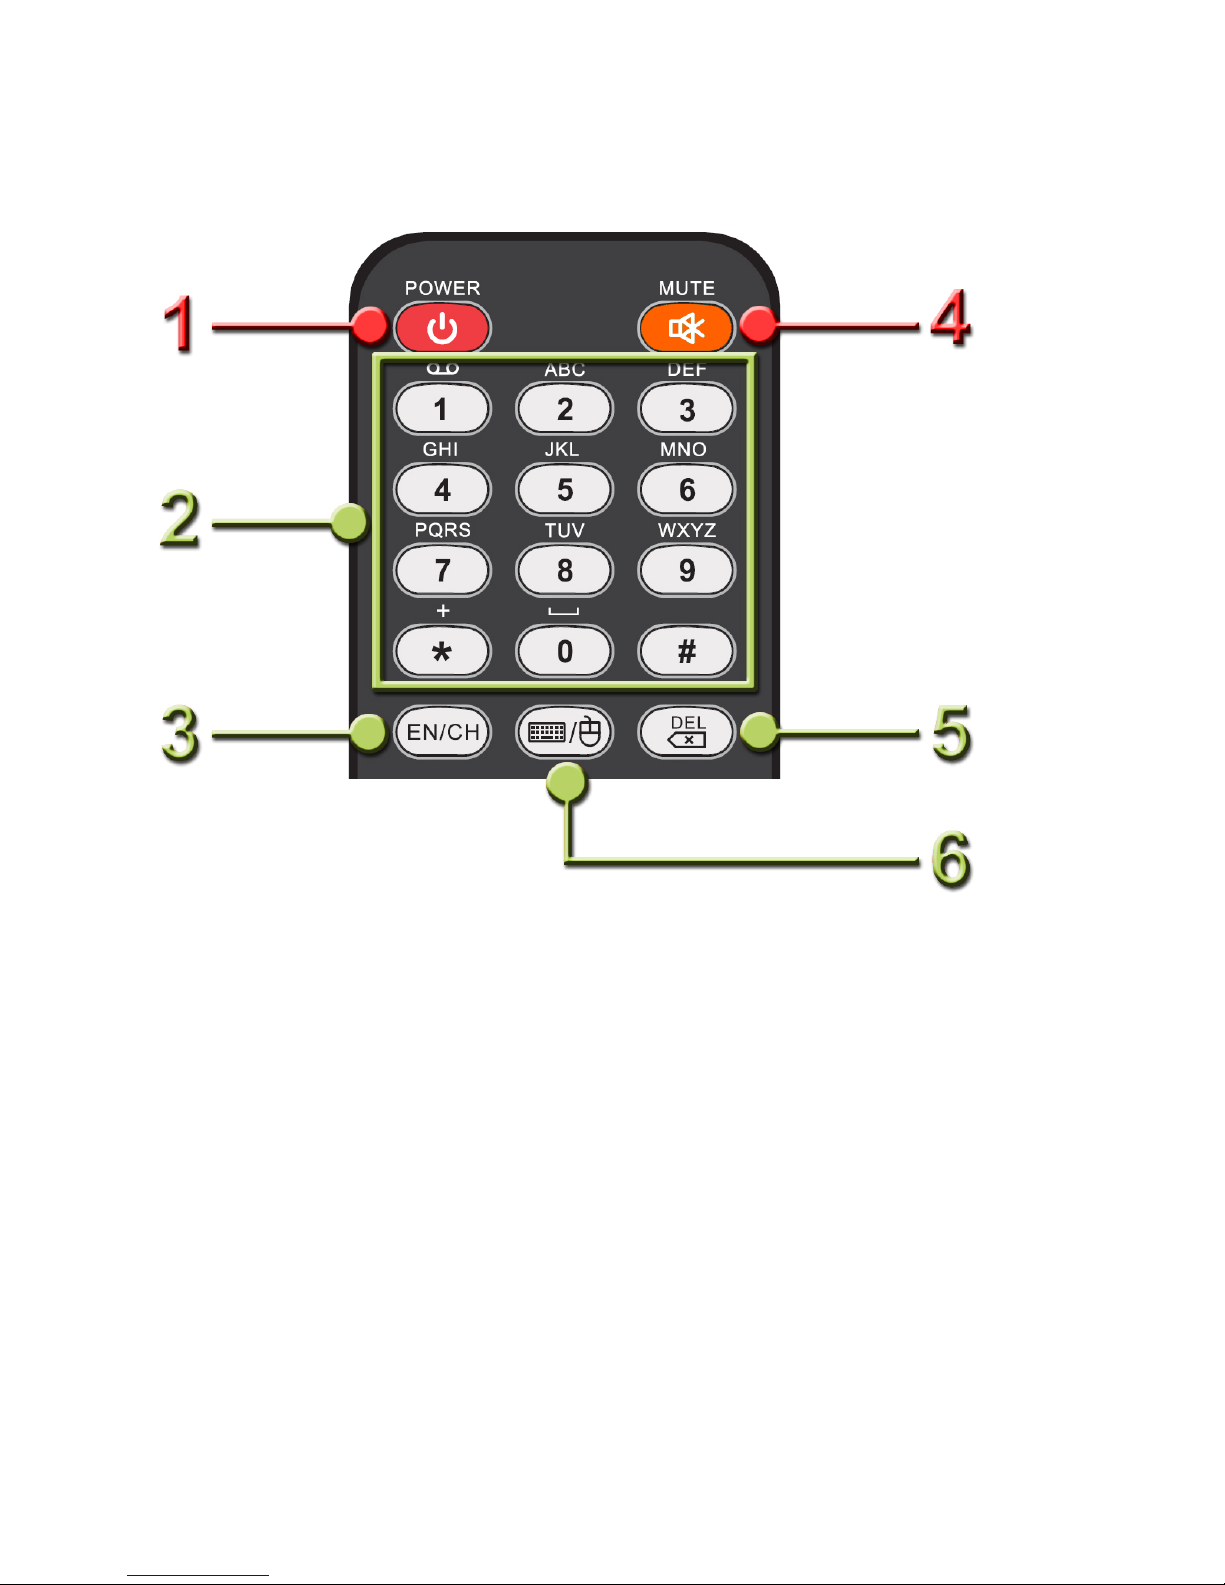
Top of the Remote
1. POWER – This button turns the sound bar on or off.
2. (0-9), *, # – 0 functions as numerical key and space key. 1 functions as the numerical
key and also the punctuation key. Press it repeatedly in order to cycle through all the
punctuation marks. 2 to 9 functions as numerical and alphabetical keys. Press it
repeatedly in order to cycle through the letters labeled. (*) button functions as the * input
key and # functions as the # input key.
3. EN/CH – This button toggles the 0-9 keypad between entering numerical keys and the
alphabetical keys as input.
4. MUTE – This button toggles the mute function of the sound bar.
5. DEL – This button functions as the delete key.
6. KEYBOARD / MOUSE – This button toggles the directional buttons ▲▼◄► between
guiding a mouse pointer or just simple selection tool.
Page 9
- 9 -
www.oCOSMO.com
Smart Sound Bar 2.1 User Manual
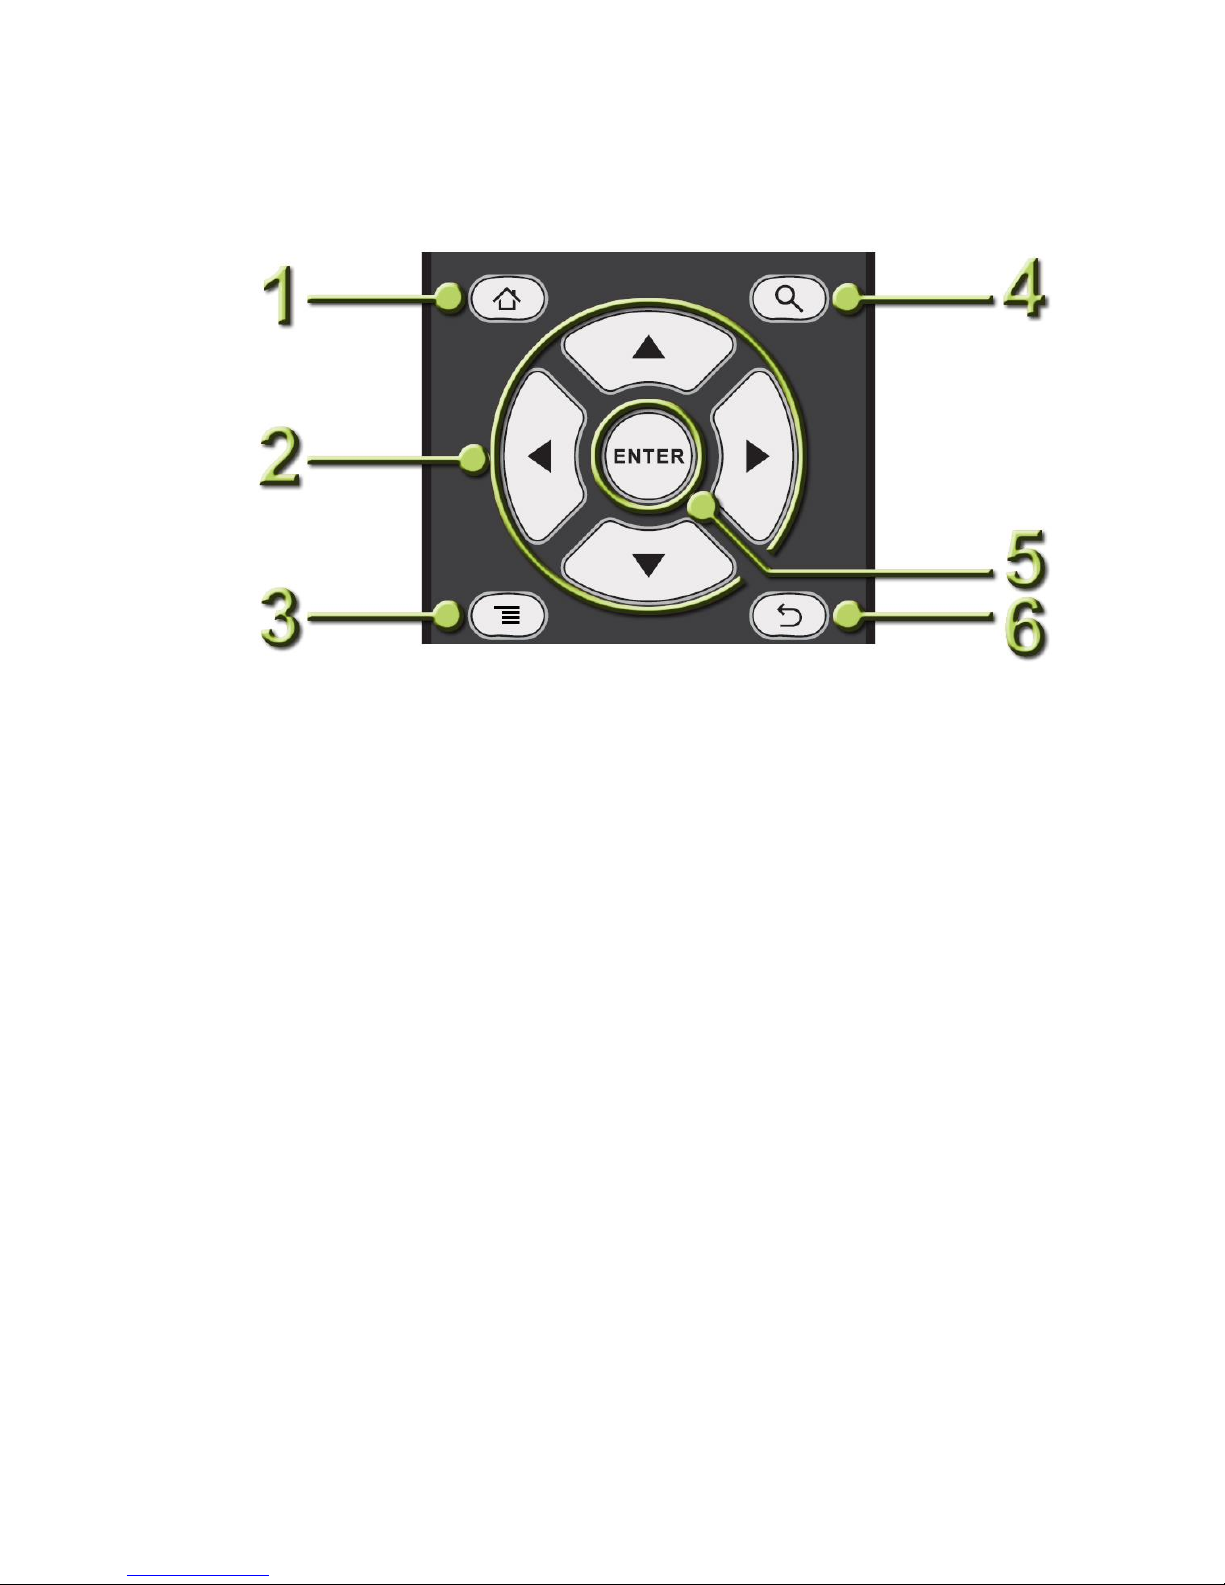
Middle of the Remote
1. HOME – This button brings you back to the home screen.
2. ▲▼◄► – These buttons function as up, down, left, and right selection. When you
press the KEYBOARD/MOUSE button it also functions as moving the mouse pointer.
3. MENU – This button opens the settings menu (if available) of any program you are
currently using.
4. SEARCH – This button is to be used in browsers for searching topics.
5. ENTER – This button functions as the enter / selection tool.
6. BACK – This button functions as the back / return to previous button.
Page 10

- 10 -
www.oCOSMO.com
Smart Sound Bar 2.1 User Manual
Bottom of the Remote
1. ZOOM IN / ZOOM OUT – These buttons zooms in and out for pictures and web pages.
2. VOL(+) / VOL(-) – These buttons increases or decreases the sound bar’s volume.
3. PLAY/PAUSE, REWIND, FAST FORWARD, PREVIOUS CHAPTER, NEXT
CHAPTER – These buttons control the media player under Android.
4. SOURCE – This button switches the sound source from the sound bar between, AUX,
ANDROID, COAX, and LINE.
5. S-MODE – This button selects the sound modes of the sound bar.
6. PG(+) / PG (-) – These buttons function as page up and page down while browsing a
webpage.
7. DIM – This button dims the display on the sound bar.
8. SLEEP – This button toggles the auto turn off feature of the sound bar by a specific
given time. Press the button repeatedly to see the time selection.
9. BASS(+/-) – These buttons increase or decrease the bass effect of the sound bar.
10. Treble (+/-) – These buttons increase or decrease the treble effect of the sound bar.
Page 11

- 11 -
www.oCOSMO.com
Smart Sound Bar 2.1 User Manual
Some oCOSMO HDTV remotes might also have buttons used to control the sound bar. If you
see Power, Source, Mode, Vol (+/-) buttons encircled with the SOUNDBAR word next to it, you
can use them to control the Sound Bar.
1. POWER – This button turns on or off the Sound Bar.
2. SOURCE – This button changes the sound source on the Sound Bar between LINE,COAX
and AUX.
3. MODE – This button changes the sound mode on the Sound Bar.
4. VOL(-) – This button decreases the volume on the Sound Bar.
5. VOL(+) – This button increases the volume on the Sound Bar.
Page 12

- 12 -
www.oCOSMO.com
Smart Sound Bar 2.1 User Manual
Mounting the Sound Bar
To mount the Sound Bar you need to have 520 mm of horizontal space on the wall.
1. Measure the length of 520mm on the wall.
2. With a pencil mark the two entry points where you are going to install the dry wall anchors and
puncture the points with a nail so it is easier for the anchor to be screwed in.
3. With a #2 Phillips screw driver press the anchor tip slightly into the point marked previously on
the drywall. Applying pressure, turn the screw driver until the anchor is flush with the drywall.
Do this for both drywall anchors.
4. Insert the screw into the anchor and use the screw driver to tighten it into the anchor.
5. The drywall anchor will “CLICK” once, when the screw is half way in, in order to indicate that
the anchor is secure. Please continue tightening until the screw has about 1/8th of an inch left.
Page 13

- 13 -
www.oCOSMO.com
Smart Sound Bar 2.1 User Manual
6. Align the mounting brackets on the back of the sound bar to the two screws protruding on the
wall and fit into them, then finally slowly lower the sound bar so that it securely hangs onto the
screws.
Page 14

- 14 -
www.oCOSMO.com
Smart Sound Bar 2.1 User Manual
Installing Batteries to the Remote Control
Please insert two AAA batteries into the remote control. Make sure that you match the
(+) and (-) symbols on the batteries with the (+) and (-) symbols inside the battery
compartment. Afterwards, re-attach the battery cover
Please note:
Only use AAA batteries.
Do not mix new and old batteries. This may result in cracking or leakage that may pose
a fire risk or lead to personal injury.
Inserting the batteries incorrectly may also result in cracking or leakage that may pose a
fire risk or lead to personal injury.
Dispose the batteries in accordance with local laws and regulations.
Keep the batteries away from children and pets.
If the remote control is not used for a long time, remove the batteries.
Keep the remote control away from moisture, sunlight, and high temperatures.
Page 15

- 15 -
www.oCOSMO.com
Smart Sound Bar 2.1 User Manual
Connection Suggestions
If you have digital audio with your TV
1. Grab the included 3 head RCA audio cable and use the black colored RCA plug.
2. Find the SPDIF digital audio coax connection on the back of the TV and connect
one end of the cable to it.
3. Connect the other end of the cable to the back of the Smart Sound Bar’s black
coax connection.
4. Turn on the TV, make sure you output PCM signal to the Smart Sound Bar.
5. Turn on the Smart Sound Bar and press SOURCE the button on the Smart Sound
Bar’s remote repeatedly until you see COAX.
6. Enjoy your Smart Sound Bar!
PLEASE NOTE:
For digital audio, the sound bar only decodes PCM signals. If the sound has
static or the Sound Bar is silent that means the signal is not PCM.
Page 16

- 16 -
www.oCOSMO.com
Smart Sound Bar 2.1 User Manual
If you have analog audio with your TV
1. Grab the included 3 head RCA audio cable and use the red and white colored
RCA plug.
2. Find the analog audio out on the back of the TV and connect one end of the cable
to it matching the colors red to red, and white to white.
3. Connect the other end of the cable to the back of the Sound Bar’s AUX red and
white connection.
4. Turn on the TV, and the Smart Sound Bar.
5. Press the SOURCE button on the Smart Sound Bar’s remote repeatedly until you
see AUX.
6. Enjoy the Smart Sound Bar!
Page 17

- 17 -
www.oCOSMO.com
Smart Sound Bar 2.1 User Manual
If you have an audio device with your TV
1. Grab the included 3.5mm mini-jack cable.
2. Find the headphone jack connection on the audio device and connect one end of
the cable to it.
3. Connect the other end of the cable to the back of the Smart Sound Bar’s LINE IN
connection.
4. Turn on the audio device.
5. Turn on the Smart Sound Bar and press the SOURCE button on the Smart Sound
Bar’s remote repeatedly until you see LINE.
6. Enjoy your Smart Sound Bar!
Page 18

- 18 -
www.oCOSMO.com
Smart Sound Bar 2.1 User Manual
Using the features of Android on the Sound Bar with your TV
1. Obtain a HDMI cable (not included).
2. Find a HDMI port on the sound bar and the TV.
3. Connect one end of the cable to the back of the Smart Sound Bar’s HDMI
connection and the other end to TV’s HDMI connection.
4. Turn on the TV and switch the TV’s source to HDMI.
5. Turn on the Smart Sound Bar and press the SOURCE button on the Smart
Sound Bar’s remote repeatedly until you can’t see LINE,AUX and COAX in
the Smart Sound Bar’s display.
6. Wait for Android to launch completely and you can begin to use the feature. In
this source, audio will only be output from the Smart Sound Bar
Page 19

- 19 -
www.oCOSMO.com
Smart Sound Bar 2.1 User Manual
Operation
TO SWITCH ON / OFF THE UNIT
1. Press the POWER button on the front panel or the RED button on the remote control to
turn on the unit. If the unit is ON you will see the display window show the source
selected, volume level and sound mode.
2. Press the POWER button on the front panel or the RED button on the remote control
again to turn off the unit.
Please note:
The display will have a small dot lit up when it is on standby. When the unit is
turned on, the display will show the source and sound mode each for 10 seconds
then shut off, however the sound bar itself will be functional. Press any touch
sensor on the sound bar and the display will light up again.
SELECTING A SOURCE
1. Press the SOURCE button on the control panel repeatedly to switch between sources.
From the remote control press the SOURCE button repeatedly to switch sources. The
source will be shown on the display window.
VOLUME CONTROL
1. Press the VOL+ button to increase the volume of the sound bar.
2. Press the VOL- button to decrease the volume of the sound bar.
Please Note:
The sound bar has a maximum volume unit of 30.
SOUND MODES
1. Your Sound Bar includes 4 sound modes optimized for different types of program
content. Choose from MOVIE, GAMES, NEWS, and MUSIC.
2. You can change them by either pressing the Source button on the Sound Bar itself or
using the remote pressing S-Mode buttons. The selected mode will show up on the
Sound Bar display.
SLEEP FUNCTION
1. The sound bar can turn off by itself after a period of time. Press the SLEEP button
repeatedly to cycle through the available time duration option of 5, 10, 15, 30, 45, 60, 90
minutes.
DIM FUNCTION
1. Press the DIM button repeatedly to cycle through the states of brightness on the display.
TREBLE / BASE CONTROL
1. Press BASS (+/-) to increase or decrease the bass.
2. Press TREBLE (+/-) to increase or decrease the treble.
is a trademark of SRS Lab, Inc.
WOW HD technology is incorporated under license from SRS Labs, Inc.
WOW HD™ significantly improves the playback quality of audio, delivering
a dynamic 3D entertainment experience with deep, rich bass and high
frequency clarity for crisp detail.
Page 20

- 20 -
www.oCOSMO.com
Smart Sound Bar 2.1 User Manual
Setting up for Android
1. Follow the instructions in page 18.
2. Once the sound bar is displaying the initial setup screen for Android, you can begin
setting it up. Use the directional buttons on page 9 to select through the options.
3. Go through the selection, choosing your language, and setting up wireless network.
Please note: You can skip this step, if you do not have WIFI internet access, however
most of the functions from the ANDROID built into the sound bar depends on having an
internet connection. The utility of the ANDROID system will be greatly diminished if you
do not have WIFI internet access.
4. Input the password for your wireless network from the remote. You can use the
numerical keypad for letter and numerical input or use the mouse pointer with the on
screen keyboard.
Tips: Double Click becomes Caps Lock on every letter.
Page 21

- 21 -
www.oCOSMO.com
Smart Sound Bar 2.1 User Manual
5. In the event you cannot enter letters via the number pad, press the EN/CH button on the
remote control repeatedly until you see on the screen, then you can start entering
alphabets via the number pad.
6. Adjust the time, date, and finally adjust the screen size. The white border is supposed to
be at the edge of your screen. Once you finish hit the back button on the remote.
7. Once you finish setting up everything you will see the home screen below. You can start
using applications for ANDROID by select APPS.
Page 22

- 22 -
www.oCOSMO.com
Smart Sound Bar 2.1 User Manual
Apps, Media, & Settings
Apps
The APPS selection contains all the installed programs that allow the user to do a variety of things
similar to a computer such as to go on the internet, or use email. You can also go on Google Play
Store™ to install or remove additional applications.
Use the remote’s directional buttons to select the app you want to launch. To exit the app press the
HOME button or press the BACK button repeatedly.
Page 23

- 23 -
www.oCOSMO.com
Smart Sound Bar 2.1 User Manual
Media
The media selection allows the user to connect a USB flash drive or SD memory card and play
music, picture, or video files from them.
Use the remote’s directional buttons to select the media you want to launch. To exit the app press
the HOME button or press the BACK button repeatedly.
Page 24

- 24 -
www.oCOSMO.com
Smart Sound Bar 2.1 User Manual
Settings
The settings selection allows the user to adjust the inner workings for Android. You can manage
where to store your applications, change wall paper, setup WIFI manually, change the language and
input language for Android. You can also perform factory reset (wiping clean everything and start
from the beginning).
Use the remote’s directional buttons to select the media you want to launch. To exit the app press
the HOME button or press the BACK button repeatedly.
Page 25

- 25 -
www.oCOSMO.com
Smart Sound Bar 2.1 User Manual
How do I clean the Sound Bar?
IMPORTANT
1. The power cable has to be removed from the socket before cleaning the
Sound Bar.
2. Do not use volatile solvent (alcohol, rosin, and toluene) to clean the
Sound Bar. These types of chemicals might damage the housing .
Cleaning the bezel and remote control
1. Use a 100% cotton cloth or micro-fiber cloth for cleaning.
2. If the remote control or bezel is dirty to the point where you cannot
simply dry wipe it, please lightly dampen the wiping material (the wiping
material cannot be dripping wet, because if water drips into the
panel it will cause malfunction and possible permanent damage to
the speakers which will not be covered under the warranty) with
clean water and wipe again. Wipe the Sound Bar with a dry micro-fiber
cloth or 100% cotton cloth afterwards.
Please Note:
Make sure you wring the water out of the cloth before
cleaning the bezel or remote in order to prevent water
from penetrating into the electronics.
Page 26

- 26 -
www.oCOSMO.com
Smart Sound Bar 2.1 User Manual
Troubleshooting
The following table contains the common problems and the solutions to these
problems. Please check this list before you contact the technicians.
Problems
Solutions
NO SOUND
Try increasing the volume of the speaker.
Check that the Sound Bar is not turned off.
Check the Sound Bar volume level.
Make sure the correct input is selected.
Make sure the proper cables are connected.
If you are using digital audio, make sure the
source is sending out a PCM signal. Some
devices have default settings on Bitstream.
REMOTE DOES NOT
WORK
Make sure the battery is properly installed.
Take the battery out, press the buttons once or
twice, install the batteries back in to see if it works.
Maybe the battery is out of power, please replace
the battery.
NO POWER
Make sure the AC power cord is securely
connected to a power outlet.
Try another electrical device on the power outlet to
ensure there is power through it.
Speaker buzzing or
humming
Make sure both ends of the audio cables are
connected properly.
Test the sound bar with another audio cable.
Test the sound bar with another TV.
CAMERA APP DOES
NOT WORK
The app only works if you have a USB webcam
connected to the sound bar’s USB connection.
Please make sure you have one connected before
trying to use it.
HOW DO I ADD MORE
PROGRAMS IN
ANDROID
Launch the Google Play Store app. This app lets
you select a variety of programs paid or free.
Please remember you need to have a valid
Google email account in order to use this app.
I DON’T HAVE
WIRELESS INTERNET,
CAN I STILL USE THE
PROGRAMS FOR
ANDROID
Having high speed broadband internet with
wireless access is strongly recommended. Most
of the applications for Android require an internet
connection. There are some applications you can
use without internet such as calculator or alarm
clock, but most of the other functions require
having wireless internet access.
Android virtual keyboard
does not show up after
open the Google search
engine webpage
Make sure the selection is inside the search bar.
Then double click ENTER button on the remote.
Page 27

- 27 -
www.oCOSMO.com
Smart Sound Bar 2.1 User Manual
Call Us If You Need Help!
Products are often returned due to a technical problem rather than a defective
product that may result in unnecessary shipping charges billed to you. Our
trained support personnel can often resolve the problem over the phone or
email. For more information on warranty services or repairs after the warranty
period, please contact our support department at the number below.
For technical help, contact our Technical Support Group via email or phone.
Please have your p/n number, serial number, and date of purchase
available before you call.
Tech Support E-mail: ocosmoTS@oCOSMO.com
Customer Service Email: ocosmoCS@oCOSMO.com
TEL: (855) 6oCOSMO / (855) 662-6766
FAX: 626-322-2670
Website : www.oCOSMO.com
Operation Hours: Mon - Fri at 8:30 AM – 5:30 PM (PST)
Page 28

- 28 -
www.oCOSMO.com
Smart Sound Bar 2.1 User Manual
Specification
Sound Bar
Spec
Full range
Speaker
Speaker(s) x Diameter (inch)
2 × 2”
Speaker type
Active
Rated Impedance
8Ω
Frequency Response (Hz)
160 Hz – 20k Hz
Sound Pressure Level (dB)
80dB ± 3dB
Output Power (Watt)
2 × 18W
Subwoofer
Subwoofer x Diameter (inch)
1 × 3”
Bonus
Additional 1 passive radiator
Rated Impedance
4Ω
Frequency Response (Hz)
65 Hz – 160 Hz
Output Power (Watt)
35W
Connection
Connectivity Technology
Wired
Analog Audio Input
2 × Stereo RCA Inputs
1 × 3.5mm Stereo Jack
Digital Audio Input
1 × Coaxial
Power
Power Input Range
100 – 240VAC, 50/60 Hz
Power Off Consumption
≤ 0.5W
Modes
Music, Movie, News, Games
Preset EQ
ARM
Single Core Cortex A9 (up to
1.0GHz)
Android
Spec
CPU
ARM
3D GPU Mali 400, OpenGL
ES1.1 and 2.0
Graphic
Output Resolution
Supported
1080P, 720P
Video
TV Compatibility
Any HDTV with HDMI input
Video Playback Resolution
Supported
1080P, 1080i, 720P, 480P,
480i
Version
Android 4.0 Ice Cream
Sandwich
OS
RAM
1GB DDR3
Memory
NAND Flash Memory
4GB
Supported Band
IEEE 802.11b, 802.11g,
802.11n
WiFi
Frequency
2.4G Hz
Supported Encryption
Protection method
Wi-Fi Protected Access (WPA,
WPA2),
Wired Equivalent Privacy
(WEP),
Temporal Key Integrity
Protocol (TKIP),
Page 29

- 29 -
www.oCOSMO.com
Smart Sound Bar 2.1 User Manual
Advanced Encryption
Standard (AES),
Inputs (NTFS / FAT32 / FAT)
USB 2.0 × 2 (Support up to
2TB)
I/O Ports
Inputs (NTFS / FAT32 / FAT)
Outputs
SD Card × 1
HDMI × 1
Network
Multimedia
Media Sharing app
Access media on DLNA
enabled network devices*
Features
Smart
Sound Bar
Integration of a sound bar 2.1 with built-in subwoofer and
Android
Sound Bar
2.1
Compact Design stereo output of 18W x 2 and built-in
subwoofer 35W creates crisp and vivid audio sound to the last
note
SRS WOW
HD
Sound Enhancement Technology expands the horizontal and
vertical sound field, adding deep rich bass audio.
Preset EQ
4 Professional fine-tuned preset Equalizer Settings enhance
the audio experience
Subwoofer
35W with
Passive
Radiator
Enhance the sound to create rich, deep and powerful bass
quality with the help of the passive radiator to create the low
frequency performance
Play Store
Access to thousands of apps available on the Play store such
as music, games, movies and etc.
Android
system
Interactive media operating system creates for the ultimate
entertainment with the support of Wifi
HDMI
output
Connection that outsources and transfers a HDTV into a smart
TV
2.1 sound
channel
Audio sounds lifelike with high, medium and low tone as every
single detail
Sleep
Auto turn off function that provides peace of mind energy
saving
LED
Dimmer
Control the LED light brightness to match the atmosphere
Mute
One button switching the volume on / off instantly
Subwoofer
Level
Three levels bass enhancement maximized the performance
Design
Sleek and stylish compact design for the most ultimate
entertainment
Touch
Sensory
Control
Contemporary buttons with the slightest touch of your finger
Connection
ports
Adding flexibly with connecting multiple audio devices
Easy
installation
Table top or wall-mountable. Light Weight design.
* SD card in NTFS format can read files only.
Page 30

- 30 -
www.oCOSMO.com
Smart Sound Bar 2.1 User Manual
General
What’s Included
1 × CB301524W 2.1 Sound Bar
1 × 3 head RCA Audio Cable
1 × 3.5mm Stereo Cable
1 × Remote Control with Battery (AAA)
1 × Drywall Anchor with Screw (2 sets)
1 × User Manual
1 × Warranty Card
Dimension
Sound Bar Dimension (inch)
37.4” x 2.17” x 3.54”
Packaging Dimension (inch)
38.9” x 5.4” x 4.1”
Weight
Product Weight (pound)
4.26 lb
Gross Weight (pound)
6.24 lb
Regulations
Certifications
FCC, ETL
Compliances
RoHS
Warranty
One year Limited Parts and Labor
* Certain setup on mobile devices is required
** HDMI® cable is not included
***The product’s specifications may change without notice or obligation.
****This manual’s pictures and words are for references only and are subject to change without
notice or obligation. oCOSMO is not liable for the misuse or misinterpretation of this manual.
Page 31

- 31 -
www.oCOSMO.com
Smart Sound Bar 2.1 User Manual
LIMITED PRODUCT WARRANTY
Please read this warranty card carefully, it is a “ONE-YEAR LIMITED WARRANTY” on parts
and labor (90 days for commercial use) and is only valid when purchased from an Authorized
Reseller, only on new and non-refurbished product, and available to customers in the
Continental US, Alaska, Hawaii and Puerto Rico. See below for the oCOSMO Extended
Service warranty.
oCOSMO’s Responsibility
oCOSMO units purchased from an authorized oCOSMO U.S. Reseller in the United States
and that are used in the fifty (50) United States or Puerto Rico and Canada are warranted to
be free from manufacturing defects in materials and workmanship for a period of one (1) year
from the date of their original retail purchase (or a period of ninety (90) days for commercial
use). If the unit fails to conform to this warranty, we will service the units using new or
refurbished parts. In the event that the part required for replacement is no longer in
production and/or is obsolete, oCOSMO will repair or replace the unit with similar or like parts
of equal value. If a similar or like part is not available, a charge may be incurred to the owner,
for any upgraded parts substituted.
Service Labor
During a period of one (1) year from the effective warranty date (or a period of ninety (90)
days for commercial use), oCOSMO will provide, when needed, service labor to repair a
manufacturing defect at its designated Service Center. To obtain warranty service in the
United States, you must first call our Customer Support at (855) 662-6766. The determination
of service will be made by oCOSMO Customer Support. PLEASE DO NOT RETURN YOUR
UNIT TO oCOSMO WITHOUT PRIOR AUTHORIZATION.
Parts
New or remanufactured parts will be used for repairs by oCOSMO at its designated Service
Center for one (1) year (or ninety (90) days for commercial use) from the effective warranty
date. Such replacement parts are warranted for the remaining portion of the original warranty
period.
Service
During the one (1) year (or ninety (90) days for commercial use) warranty period, oCOSMO
will, at its option and sole discretion, repair or replace defective parts, including replacement
of the entire Panel. The Customer will be required to ship the unit to the Service Center
indicated at the time Customer Support is contacted to make the necessary repairs, you are
responsible for all transportation charges to the service facility. oCOSMO is not responsible
for the de-installation or re-installation of the unit.
Packaging and Shipping Instruction
When you send the product to an authorized oCOSMO service facility you must use the
original carton box and packing material or an equivalent as designated by oCOSMO. If you
no longer have them please contact oCOSMO’s Customer Support.
Not Covered
This warranty does not cover the following: cosmetic defects; damage, malfunctions, or
failures resulting from shipping or transit accidents, abuse, misuse, operation contrary to
furnished instructions, operation on incorrect power supplies, operation with faulty associated
equipment, modification, alteration, improper servicing, tampering and or, damage from fire,
water, lightning, power surges, abnormal environmental conditions, or other acts of nature;
normal wear and tear (oCOSMO reserves the right to determine “wear and tear” on any and
all products); unsatisfactory audio performance not caused by a manufacturing defect; or
Sound Bars on which the serial number has been removed or defaced. Mishandling are not
Page 32

- 32 -
www.oCOSMO.com
Smart Sound Bar 2.1 User Manual
covered by this warranty. Installation, removal, transportation and reinstallation of a speaker
and routine maintenance and cleaning, are not covered by this warranty. Any hardware,
components, and/or software bundled with the Sound Bar are not covered by this warranty.
Any damages caused directly or indirectly by Buyer’s or Reseller’s “Value Added Feature” are
not covered by this warranty or oCOSMO. Any damages of any kind including, but not limited
to, direct or indirect damages, lost profits, lost savings, or other special incidental, exemplary
or consequential damages whether for breach of contract, tort, or otherwise, or whether
arising out of the use of or inability to use the product, even if oCOSMO or any dealer,
distributor of authorized service provider/partner has been advised of the possibility of such
damages, or any claim by any other warranty are not covered by this warranty or oCOSMO.
ANY IMPLIED WARRANTIES, INCLUDING ANY IMPLIED WARRANTY OF
MERCHANTABILITY AND FITNESS FOR A PARTICULAR PURPOSE SHALL BE LIMITED
IN DURATION TO THE PERIOD OF TIME SET FORTH ABOVE. OUR LIABILITY FOR ANY
AND ALL LOSSES AND DAMAGES RESULTING FROM ANY CAUSE WHATSOEVER,
INCLUDING OUR NEGLIGENCE, ALLEGED DAMAGE OR DEFECTIVE GOODS,
WHETHER SUCH DEFECTS ARE DISCOVERABLE OR LATENT, SHALL IN NO EVENT
EXCEED THE PURCHASE PRICE OF THE SPEAKER. WE SHALL NOT BE RESPONSIBLE
FOR LOSS OF USE, COMMERCIAL LOSS OR OTHER INCIDENTAL OR
CONSEQUENTIAL DAMAGES. SOME STATES DO NOT ALLOW LIMITATIONS ON HOW
LONG AN IMPLIED WARRANTY LASTS OR THE EXCLUSION OR LIMITATION OF
INCIDENTAL OR CONSEQUENTIAL DAMAGES, SO THE ABOVE LIMITATIONS OR
EXCLUSIONS MAY NOT APPLY TO YOU. This warranty gives you specific legal rights, and
you may also have other rights which vary from state to state. This is the only warranty
applicable; no one is authorized to extend or modify it or to grant any other warranty.
oCOSMO retains the right to assess all warranty claims and to determine if damages are
covered by the warranty. In case of a claim that is not covered by the warranty, you will be
contacted to determine whether oCOSMO should repair the damage for a fee or whether the
product should be returned to you as received by the repair center.
Owner’s Responsibility
Effective Warranty Date
Warranty begins on the date of sale to the end user. To ensure warranty service, keep the
dated bill or sale receipt as evidence of the purchase date. If you can no longer obtain your
receipt, the warranty will revert to the unit’s manufacture date according to the serial number
of the unit. This limited warranty applies only to the original purchaser and is non-transferable.
Warranty Service
For warranty service information, contact oCOSMO Technical Support at email address
ocosmoTS@oCOSMO.com, via phone at (855) 662-6766, or via World Wide Web chatting
service at www.oCOSMO.com. oCOSMO Technical Support is available Monday to Friday
8:30 AM to 5:30 PM Pacific Time. Parts and service labor that are oCOSMO’s responsibility
(see above) will be provided without charge. Other services or services not covered by the
warranty are at the owner’s expense. You must provide the model, serial number and date of
purchase. Before you ask for warranty service, read your User Manual. You might avoid a
service call.
Warranty conditions are subject to change, for latest Warranty Terms and Conditions and
additional information regarding your warranty, please see complete details online at
www.oCOSMO.com.
Page 33

- 33 -
www.oCOSMO.com
Smart Sound Bar 2.1 User Manual
Disclaimer, Trademarks, &
Copyright Information
Android is a trademark of Google Inc.
Google Play is a trademark of Google Inc.
“HDMI, the HDMI logo and High-Definition
Multimedia Interface are trademarks or registered trademarks of HDMI
Licensing LLC.”
High-speed / Broadband Internet service and access equipment are required
and not provided by oCOSMO.
Additional fees and/or subscriptions are required for certain content and
services.
Apps pictured, described in this manual or its accompanying documentation
may not be available or may provide different functionality, content or services
at the time of purchase.
Applications are subject to future updates and/or modification without notice.
oCOSMO is a trademark or registered trademark of oCOSMO Group.
oCOSMO shall not be liable for technical or editorial errors or omissions
contained herein; nor for incidental or consequential damages resulting from
furnishing this material, or the performance or use of this product.
is a trademark of SRS Labs, Inc.
In the interest of continuing product improvement, oCOSMO reserves the right
to change product specifications without notice. Information in this document
may change without notice.
No part of this document may be copied, reproduced, or transmitted by any
means, for any purpose without prior written permission from oCOSMO.
Page 34

- 34 -
www.oCOSMO.com
Smart Sound Bar 2.1 User Manual
FCC Compliance Statement
This device complies with Part 15 of the FCC Rules.
Operation is subject to the following conditions:
This device may not cause harmful interference
This device must accept any interference received, including interference that my cause undesired
operation.
Please Note: This equipment has been tested and found to comply with the limits for a Class B
digital device, pursuant to part 15 of the FCC Rules. These limits are designed to provide reasonable
protection against harmful interference in a residential installation. This equipment generates uses
and can radiate radio frequency energy and, if not installed and used in accordance with the
instructions, may cause harmful interference to radio communications. However, there is no
guarantee that interference will not occur in a particular installation. If this equipment does cause
harmful interference to radio or television reception, which can be determined by turning the
equipment off and on, the user is encouraged to try to correct the interference by one or more of the
following measures:
Reorient or relocate the receiving antenna.
Increase the separation between the equipment and the receiver.
Connect the equipment into an outlet on a circuit different from that to which
the receiver is connected.
Caution: To comply with the limits for an FCC Class B computing device, always use the
signal cord and power cord supplied with this unit.
The Federal communications Commission warns that changes or modifications to the unit not
expressly approved by the party responsible for compliance could void the user’s authority to
operate the equipment.
European Notice
Products with the CE marking comply with both the EMC Directive (89/336/EEC), (93/68/EEC) and
the Low Voltage Directive (72/23/EEC) issued by the Commission of the European Community.
 Loading...