

Page 1
[]
DD
·Ö Çø
COS-DIS6502(6502)
Cosmo
0
1
6710022992
80
22
Page 2
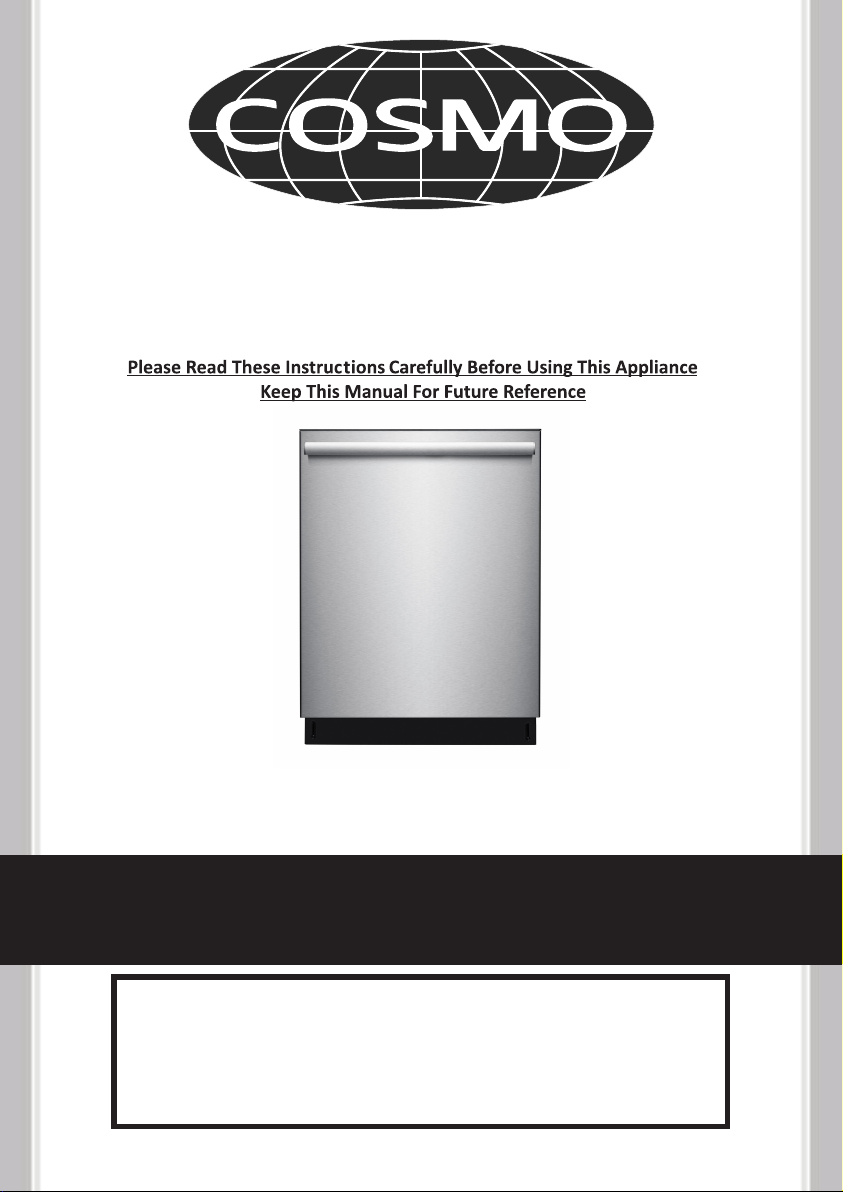
USE & CARE MANUAL
DISHWASHER
MODEL : COS-DIS6502
Page 3

TABLE OF CONTENTS
IMPORTANT SAFE GUARDS..................................................................1
SPECIFICATIONS....................................................................................2
FEATURES OF YOUR NEW DISHWASHER
OPERATING THE CONTROL PANEL.........................................5
INSTALLATION REQUIREMENTS..........................................................7
ENCLOSURE REQUIREMENTS.................................................8
DRAIN REQUIREMENTS............................................................9
ELECTRICAL REQUIREMENTS...............................................10
INSTALLATION INSTRUCTIONS..........................................................12
PARTS LIST............................................................................................20
EXPLODED VIEW...................................................................................23
...........................................3
Page 4

Please install your dishwasher properly and follow the installation guide.
Page 1
- Water supply temperature should be 120℉ or 149℉.
- Dispose of the discarded appliance and packing material properly.
- The dishwasher must be grounded, or it can result in a risk of electric shock.
- If there is any damage to the dishwasher, please contact to your retailer. Do not attempt to repair
or replace any part by yourself.
1. Read all instructions before using the dishwasher.
2. The manual does not cover every possible condition and situation that may occur.
3. Use the dishwasher only for intended function as described in this manual.
4. When loading items to be washed:
Load sharp items and knives so that they are not likely to damage the door seal and tub.
Load sharp items and knives with the handles up to reduce the risk of cut-type injury.
5. Do not wash plastic items unless marked dishwasher-safe or the equivalent, if not marked,
check with manufacturer for recommendation, items that are not dishwasher-safe may melt and
create a potential fire hazard.
6. If the dishwasher drains into a food disposer, make sure disposer is completely empty before
running dishwasher.
7. Do not tamper with control.
8. Do not operate your dishwasher unless all enclosure panels are in the properly place.
9. Do not touch the heating element during or immediately after use, especially if the sanitize
option has been selected.
10. Do not let children abuse, sit or stand on door or racks of a dishwasher.
11. Under certain conditions, hydrogen gas may be produced in a hot water system that has not
been used for two weeks or more. Hydrogen gas is explosive. If the hot water system has not
been used for such a period, before using on all hot water faucets and let water flow from each for
several minutes. This will release any accumulated hydrogen gas. Hydrogen gas is flammable. Do
not smoke or use an open flame during this time.
12. Do not store or use combustible materials, gasoline or other flammable vapors and liquids in
the vicinity of this or any other appliance.
13. Use only detergents or rinse agents recommended for use in a dishwasher and keep them out
of the reach of children.
14. Keep young children and infants away from dishwasher when it is operating.
15. Do not use the dishwasher if it has a damaged power line or plug, and do not plug the
dishwasher into a damaged outlet. Failure to observe these instructions may result in electrical
shock.
16. Remove the door to the washing compartment when removing an old dishwasher from
service or discarding it.
Page 5
SPECIFICATIONS
Page 2
Capacity: 14 place settings
Dimensions (W x D x H): 23.9 x 25.6 x 33.7 in.
Weight: 94 lbs
Power Supply: 120 volts, 60 Hz
Rated Power Usage: Wash Motor: 50W, Heater: 840W
Water Feed Pressure: 20 ~ 120 psi
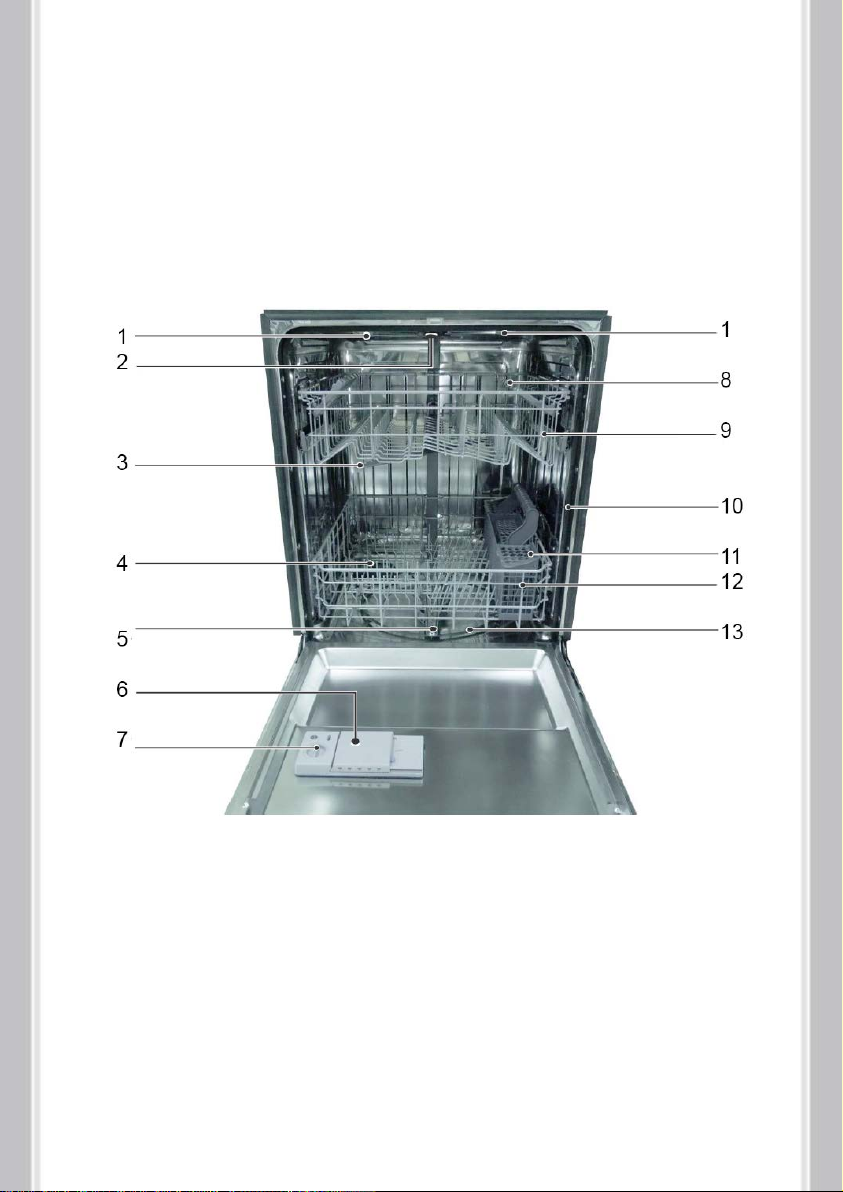
1. Top Light
2. Upper Spray Arm
3. Middle Spray Arm
4. Vortex Wash Arm
5. Low Spray Arm
6. Rinse Aid Dispenser
7. Detergent Dispenser
8. Cup Shelf
9. Adjustable Upper Rack
10. Tub Gasket
11. Silverware Basket
12. Bottom Rack
13. Heating Element
Page 6
FEATURES OF YOUR NEW DISHWASHER
Page 3
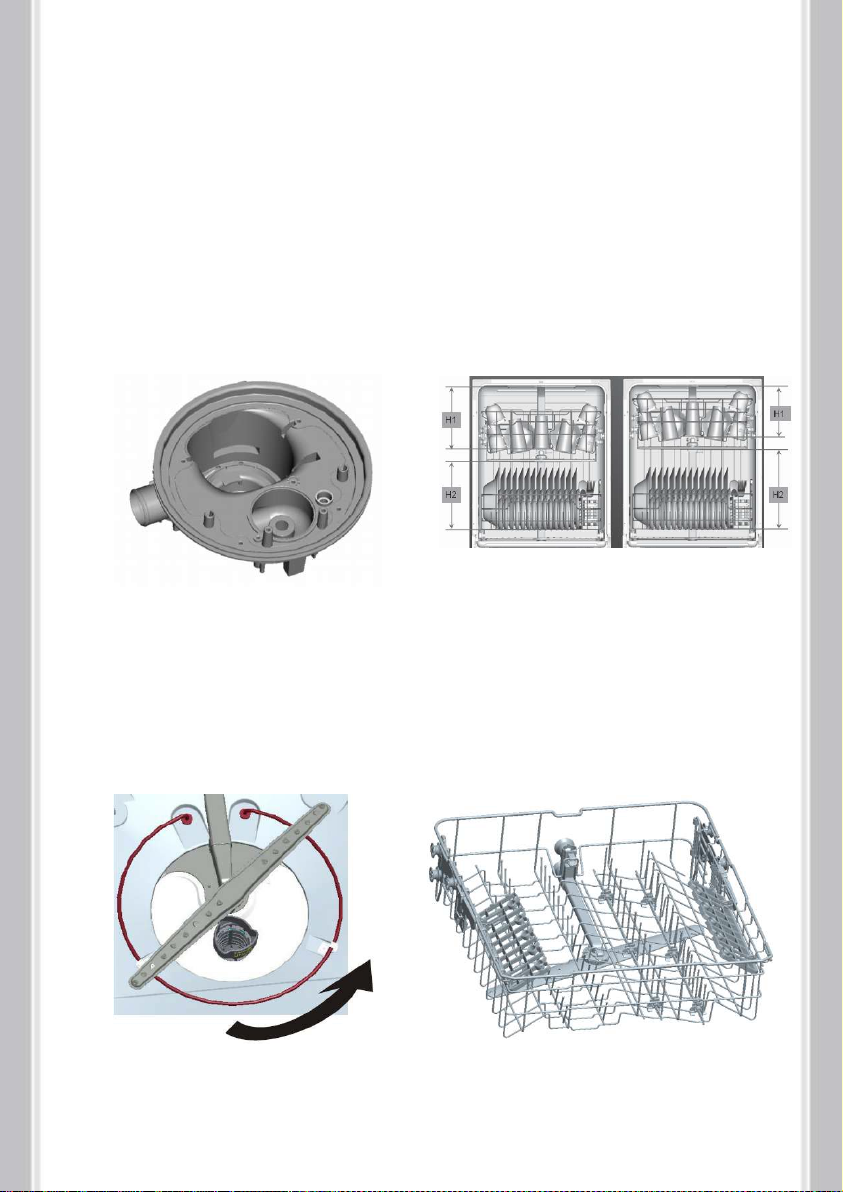
Filter System
Your dishwasher has a multiple Filter
System. In the Filter System, there are
four filter-meshes. It can separate soiled
water and clean water in different
chambers. The multiple filter system helps
your dishwasher to get better performance
with less water and less energy.
Adjustable Upper Rack
The Upper Rack can be raised or lowered
to accommodate loading taller dishes in
either rack. The Upper Rack clearance
height H1 goes from 8" to 10". The Bottom
Rack clearance height H2 is 11" to 13".
Smart Wash System
Your dishwasher has a Smart Wash System. When a partial load of lightly soiled dishes
is placed in the unit, a wash cycle similar to a short wash will automatically be
performed. When a full load of heavily soiled dishes is placed in the unit, a heavy wash
cycle will automatically be performed. It can
determine the type of cycle required to clean the dishes and will clean more efficiently
every time.
Page 7

How Your Dishwasher Cleans
Page 4
Your dishwasher cleans by spraying a
mixture of hot water and detergent through
the spray arms against soiled surfaces.
The dishwasher fills with water covering the
filter area. Water is then pumped through
the multiple filter and spray arms. Soiled
water goes down the drain as the water is
pumped out and replaced with clean water.
The number of water fills will vary with the
cycle being used.
Getting Started
1. Load dishwasher.
2. Add detergent.
3. Add rinse aid, if needed.
4. Close door latch.
5. Select desired CYCLE. The indicator light
above the touchpad will glow when
selected.
6. Select desired OPTIONS. The indicator
light above the touchpad will glow when
selected.
7. Run the hot water faucet nearest the
dishwasher until the water is hot. Turn
the water off afterwards.
8. To start, press START/CANCEL on
the touchpad.
NOTE: Selections will only be
activated when the door is firmly
closed.
NOTE: The dishwasher is programmed to
remember your last cycle so you do not
have to reset each time. To start the
dishwasher using the same cycle and
options selected on the previous wash, just
press START/CANCEL on the touchpad.
Wash Cycle Selections
Cycle times are approximate and will vary
with options. Hot water is necessary to
activate dishwasher detergent and clean
fatty food particles. An automatic sensor
will check the incoming water temperature
and if it is not hot, the timer will be delayed
for automatic water heating in the main
wash of all cycles. This happens even
when HI-TEMP WASH is selected and a
higher temperature is guaranteed to
handle heavier food particles.
Page 8
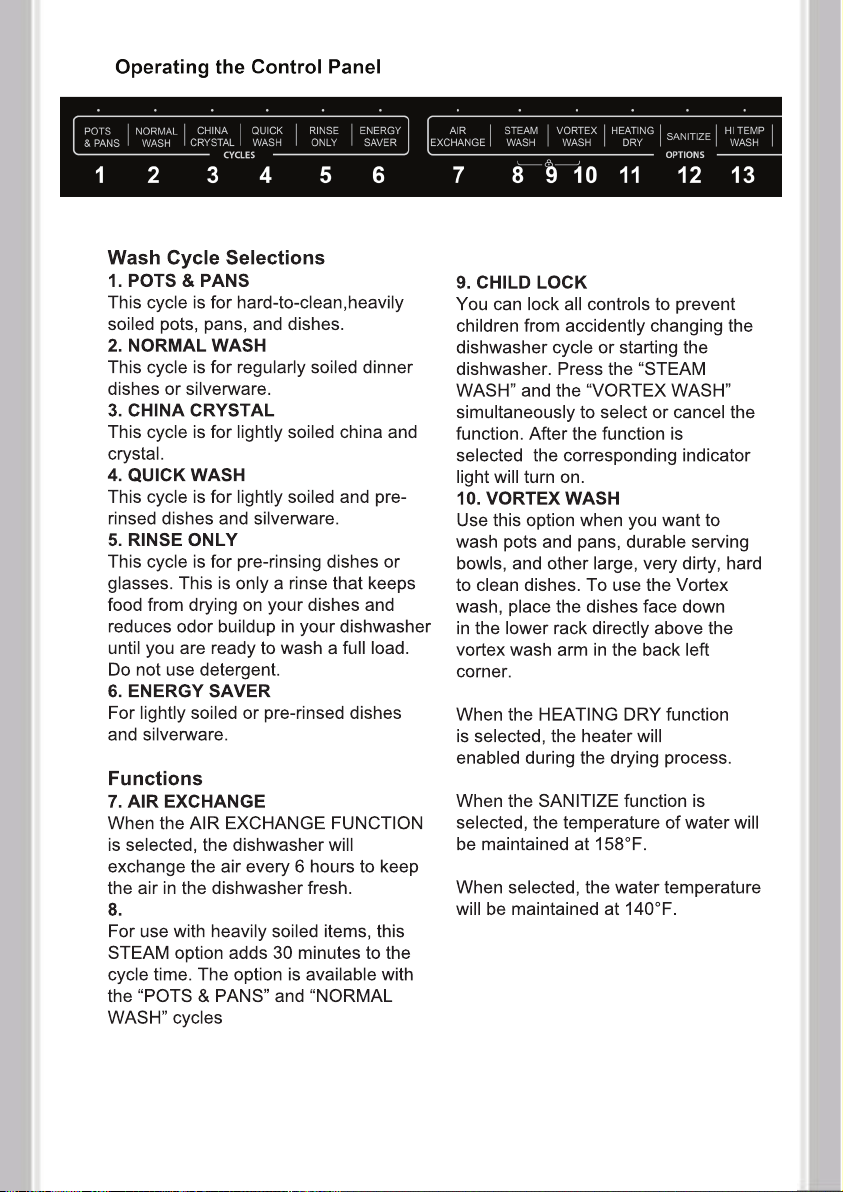
STEAM WASH
Page 5
,
11. HEATING DRY
be
12. SANITIZED
13. HI TEMP WASH
Page 9
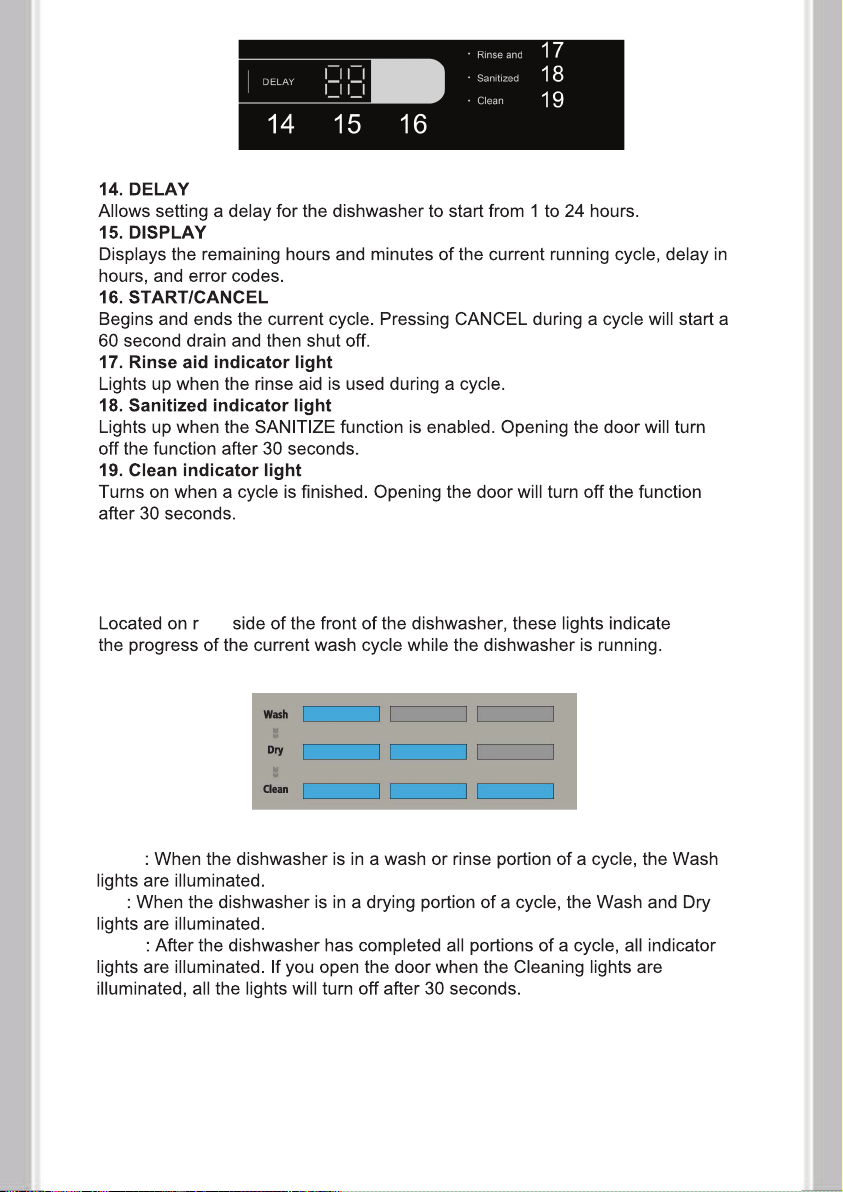
Page 6
Cycle Progress Indicator
ight
Wash
Dry
Clean
Page 10
INSTALLATION REQUIREMENTS
Page 7
Page 11
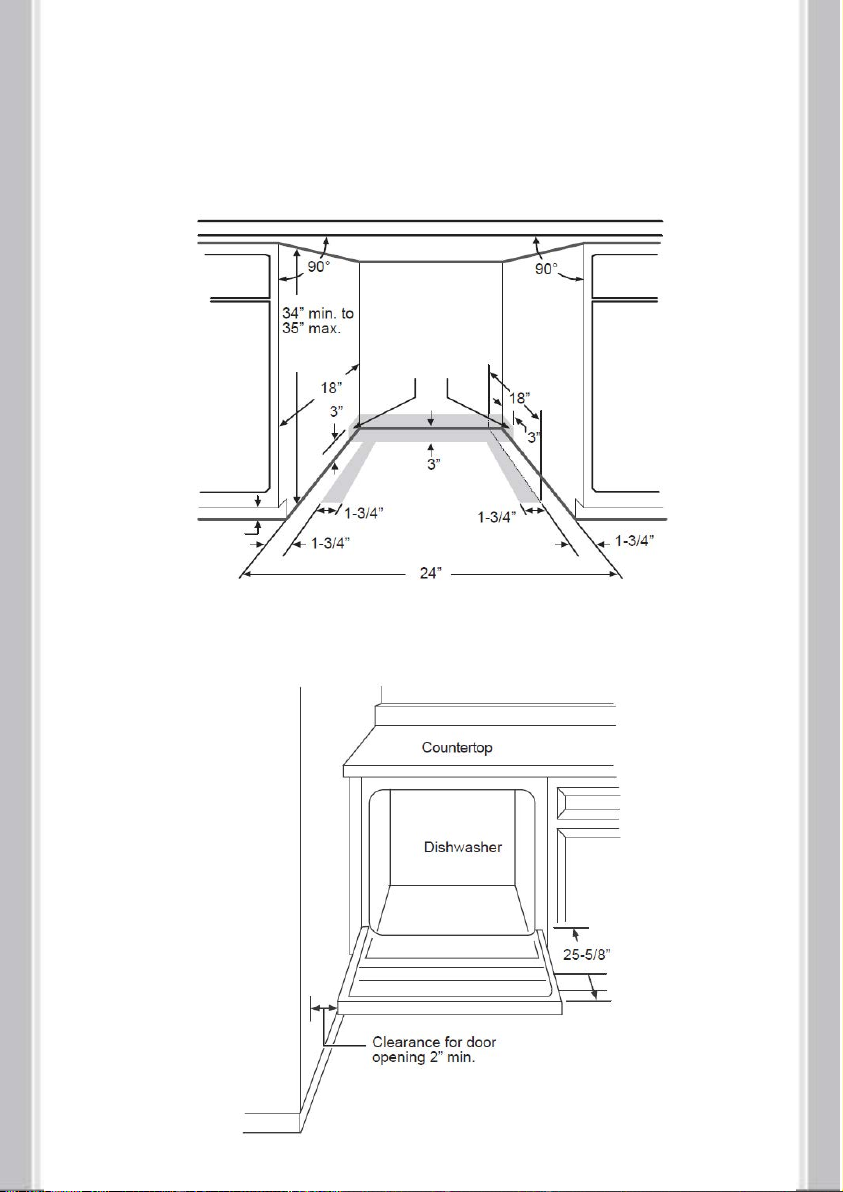
Enclosure Requirements
Page 8
• The cabinet opening must be at least 24 in. wide.
• The maximum height of the opening is 35 in.
• The dishwasher must be installed so that the drain hose is no more than 10 feet in
length, for proper drainage.
• The dishwasher must be fully enclosed on the top, sides, and back, and must not
support any part of the enclosure.
If installing into a corner, allow 2 in. min. clearance between dishwasher and adjacent
cabinet, wall, or other appliances. Allow 25-5/8 in. min. clearance from the front of the
dishwasher for opening the door.
Page 12

Drain Requirements
Page 9
• Follow all local codes and ordinances.
• Do not exceed 10 ft. of drain hose.
• Do not connect the drain lines from other devices to the dishwasher drain hose.
• The dishwasher must be connected to a waste line with an air gap (not provided) or a 32
in. high (min.) drain loop, depending on local codes and ordinances, to prevent back flow
into the dishwasher.
• An air gap must be used if the waste tee or garbage disposal connection is less than 18
in. above the floor, to prevent siphoning.
Drain Preparation
The type of drain installation required depends on the answers to the following questions:
• Do local codes or ordinances require an air gap?
• Will the waste tee or garbage disposal connection be less than 18 in. (45.72 cm) above
the floor?
• Will installation have a drain loop less than 32 in. (81.28 cm) above the floor?
If the answer to ANY of these questions is YES, Method 1 MUST be used. Otherwise
either Method 1 or Method 2 may be used.
Install the waste tee or garbage disposal connection and air gap according to
manufacturer’s instructions.
Method 1 - Air gap with a waste tee or garbage disposal connection
Method 2 - High drain with a waste tee or garbage disposal connection
You must provide a method to attach the drain hose to the underside of the
countertop.
Page 13

Electrical Requirements
- This appliance must be supplied with 120V, 60 Hz., and connected to its own,
properly grounded branch circuit, protected by a 15 or 20 ampere circuit breaker or
time delay fuse.
- Wiring must be two wire with ground.
- If the electrical supply does not meet the above requirements, call a licensed
electrician before proceeding.
GROUNDING INSTRUCTIONS
Grounding Instructions – Cable Direct
This appliance must be connected to a grounded metal, permanent wiring system,
or an equipment grounding conductor must be run with the circuit conductors and
be connected to the equipment ground-ing terminal orlead on the appliance.
Grounding Instructions – Power Cord Models
This appliance must be grounded. In the event of a malfunction or breakdown,
grounding will reduce the risk of electrical shock by providing a path of least
resistance for electric current. The plug must be plugged into an appropriate outlet
that is installed and grounded in accordance with local codes and ordinances.
Direct Wire Method
- The cable must be routed as shown in “Cabinet Preparation and Wire Routing”, and extend a
minimum of 24 in. from the rear wall.
- Use flexible, armored or nonmetallic sheathed, copper wire with grounding wire that meets
the wiring requirements for your home and local codes and ordinances.
- Use a UL Listed/CSA Approved strain relief.
Power Cord Method
- Install a 3-prong grounding type receptacle. The wall outlet can be installed in a cabinet or
on a wall adjacent to the undercounter space in which the dishwasher is to be installed.
- The recommended power cord length is 54 in. min. and 64 in. max.
Cabinet Preparation and Wire Routing
- The wiring may enter the opening from either side, the rear, or the floor within the shaded
area.
- The electrical connection is on the right front of the dishwasher.
- Drill a 1-1/2 in. maximum diameter hole to run the electrical cable through the wall of the
cabinet.
- The hole must be free of sharp edges. If the cabinet wall is metal, the hole edge must be
covered with a bushing or rubber grommet.
Page 10
Page 14

Cable direct connections may pass through the same hole as the drain hose and hot
Page 11
water line, but power cords with plugs must pass through a separate hole.
Preparing the Hot Water Line
- The water connection is on the left side of dishwasher.
- The hot water line may enter the opening from either side, the rear, or the floor within
the shaded area.
- The hot water line may pass through the same hole as the electrical and drain hose.
Or, you can drill an additional 1-1/2 in. maximum diameter hole for the hot water line.
- If a power cord with a plug is used, the hot water line may not pass through
the same hole as the power cord.
Connecting the Water Line to the
Water Supply
1. Turn off the water supply
2. Install a hand shut-off valve in an
accessible location, such as under the sink.
This is optional, but strongly recommended,
and may be required by local codes.
3. Install the hot water inlet line, using at
least 3/8 in. O.D. copper tubing. Route the
line as shown in the figure above and
extend it forward at least 18 in. from the rear
wall of the enclosure.
4. Adjust the water heater to a temperature
of from 120° F to 150° F.
5. Flush the water line to clean out any
debris.
NOTE: The hot water pressure must be
between 20 and 120 psi.
Page 15
IINSTALLATION INSTRUCTIONS
Page 12
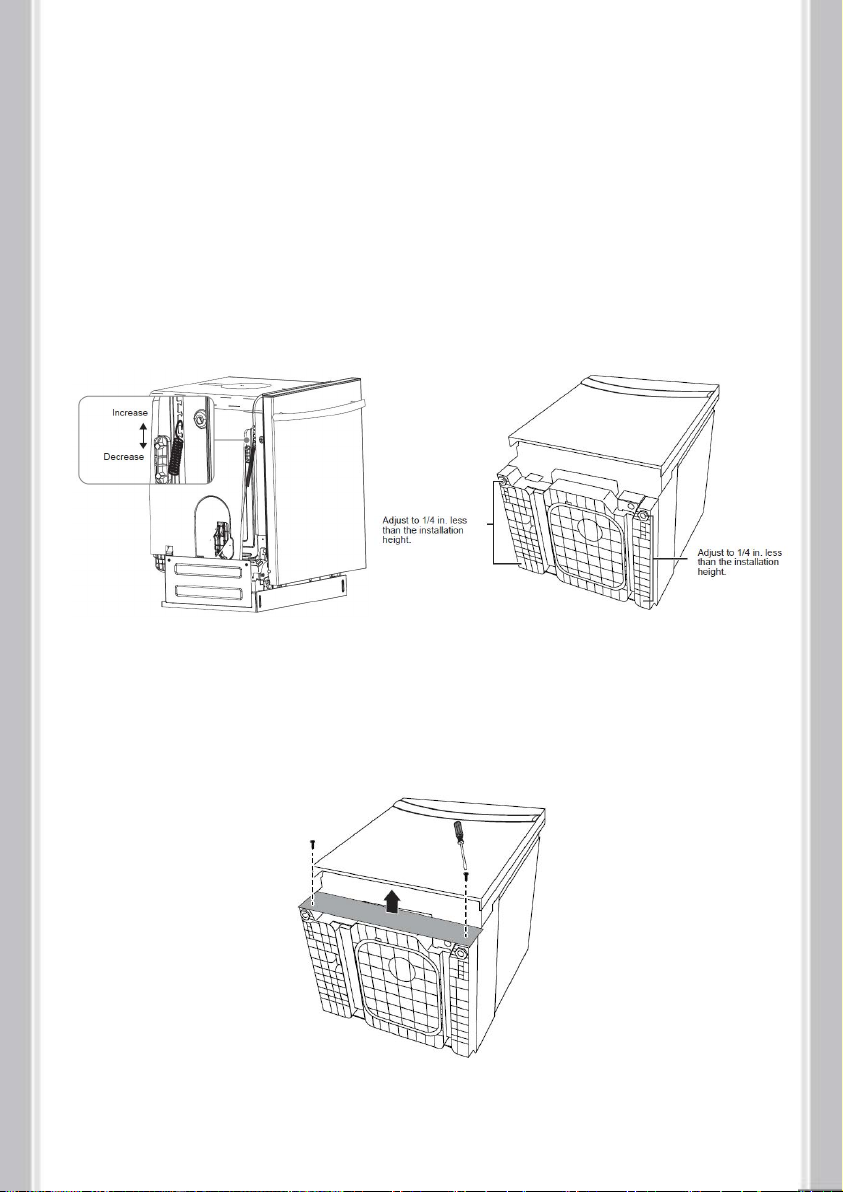
Step 1: Check the door balance
1. Hold the top of the dishwasher firmly.
2. Open the door slowly, then release it. If
the door drops, increase the spring
tension. If the door closes, decrease the
spring tension.
3. Continue moving the spring pin until the
door is balanced. Adjust both springs to
the same tension.
Step 2: Adjust the leveling legs
1. Move the dishwasher close to the
installation location and lay it on its
back.
2. Measure the installation height
and the dishwasher height.
3. Extend the leveling legs out from
the dishwasher base 1/4 in. (6.35
mm) less than the installation height.
Step 3: Remove the toekick
Remove the two toekick screws with a Phillips screwdriver, then remove the toekick.
Use adjustable wrench and Philips screwdriver.
Page 16

Step 4: Install the power cord
Page 13
Skip this step if the dishwasher will be direct wired.
1. Remove the junction box cover on the right front of the dishwasher.
2. Connect the incoming white (or ribbed) wire to the dishwasher’s white wire, the
black (or smooth) wire to the dishwasher’s black wire, and the ground wire to the
dishwasher’s green wire. Use cUL/UL listed wire nuts of the appropriate size.
3. Replace the junction box cover on the right front of the dishwasher. Be sure that
the wires are not pinched
Step 5: Install the 90° water supply elbow
1. Wrap the male thread of the 90° elbow with Teflon thread seal tape. Do not use
plumber's putty.
2. Install the 90° elbow onto the water valve. Do not overtighten the 90° elbow. The
water valve bracket could bend or the water valve fitting could break.
3. Position the end of the elbow to face the bottom right side of the dishwasher.
Use Philips screwdriver, power cord, wire nuts, adjustable wrench, 90° elbow, and
Teflon thread tape.
Page 17
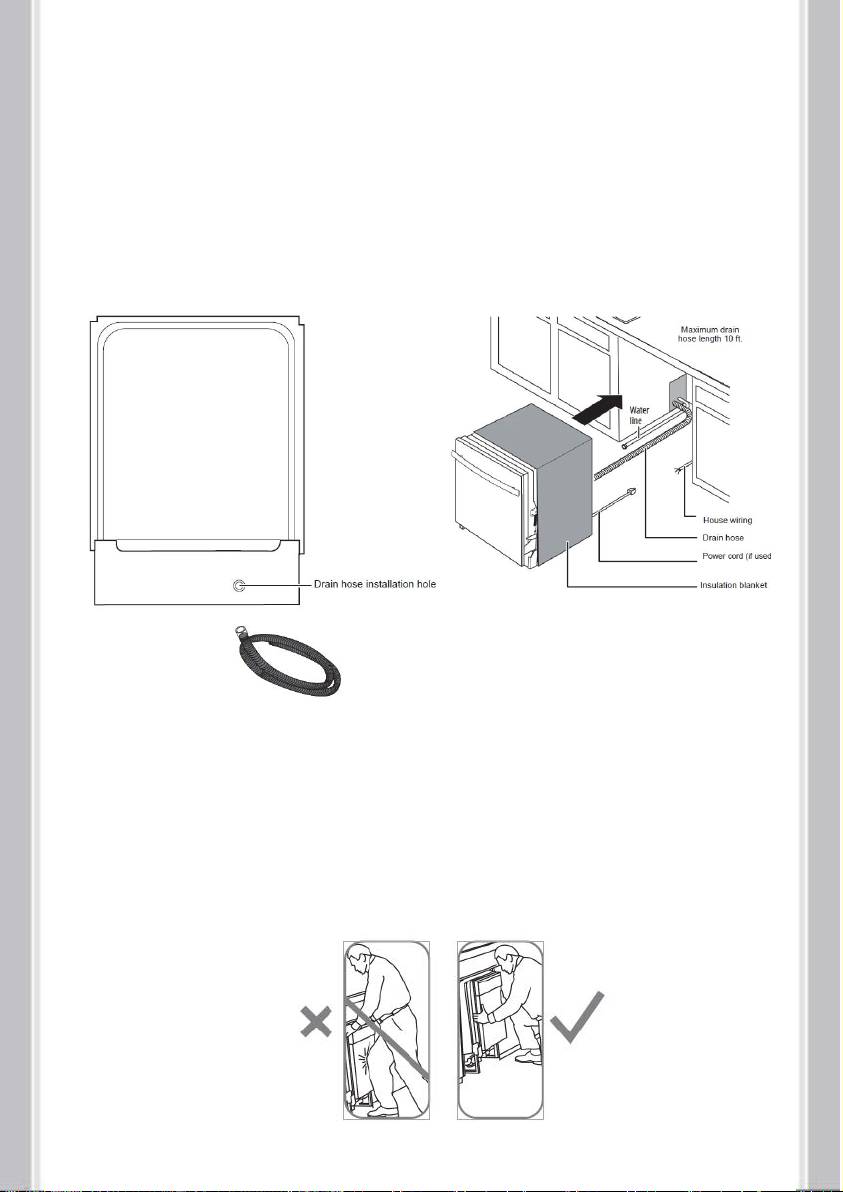
Step 6: Install the drain hose
Page 14
1. Turn the dishwasher upright.
2. Slide a screw-type hose clamp onto the
drain hose.
3. Install the drain hose to the dishwasher
drain outlet on the back of the dishwasher,
then tighten the screw-type hose clamp.
Use Philips screwdriver, screw-type hose
clamps, and drain hose.
Step 7: Inserting the drain hose
through the cabinet
Insert the drain hose into the hole in
the cabinet wall. If a power cord is
used, guide the end through a
separate hole.
Tip: Position the water line and house
wiring on the floor to avoid interfering
with the base of the dishwasher.
Step 8: Slide the dishwasher partially into the cabinet
Caution: Do not push against the front panel with your knees. Damage will occur.
1. Position the dishwasher in front of the opening, then slide the dishwasher into the
opening a few inches at a time.
2. Pull the drain hose through the opening under the sink as you proceed. Stop when
the dishwasher is a few inches in front of the adjacent cabinetry.
3. Make sure that the drain hose is not kinked under the dishwasher and that there is
no interference with the water line, wiring, or any other component.
Page 18
Step 9: Position the dishwasher under the countertop
Page 15
1. Make sure that the wires are secure under the dishwasher and not pinched or in
contact with door springs or other dishwasher components.
TIP: Check tub insulation blanket, if equipped. It should be positioned so it is not
bunched up or interfering with door springs. Check by opening and closing the door.
2. Push the dishwasher into the cabinet. The front corners of the dishwasher door
should be flush with the cabinet doors. Be careful not to dent the front panel with
your knees or damage the countertop or cabinets with dishwasher parts.
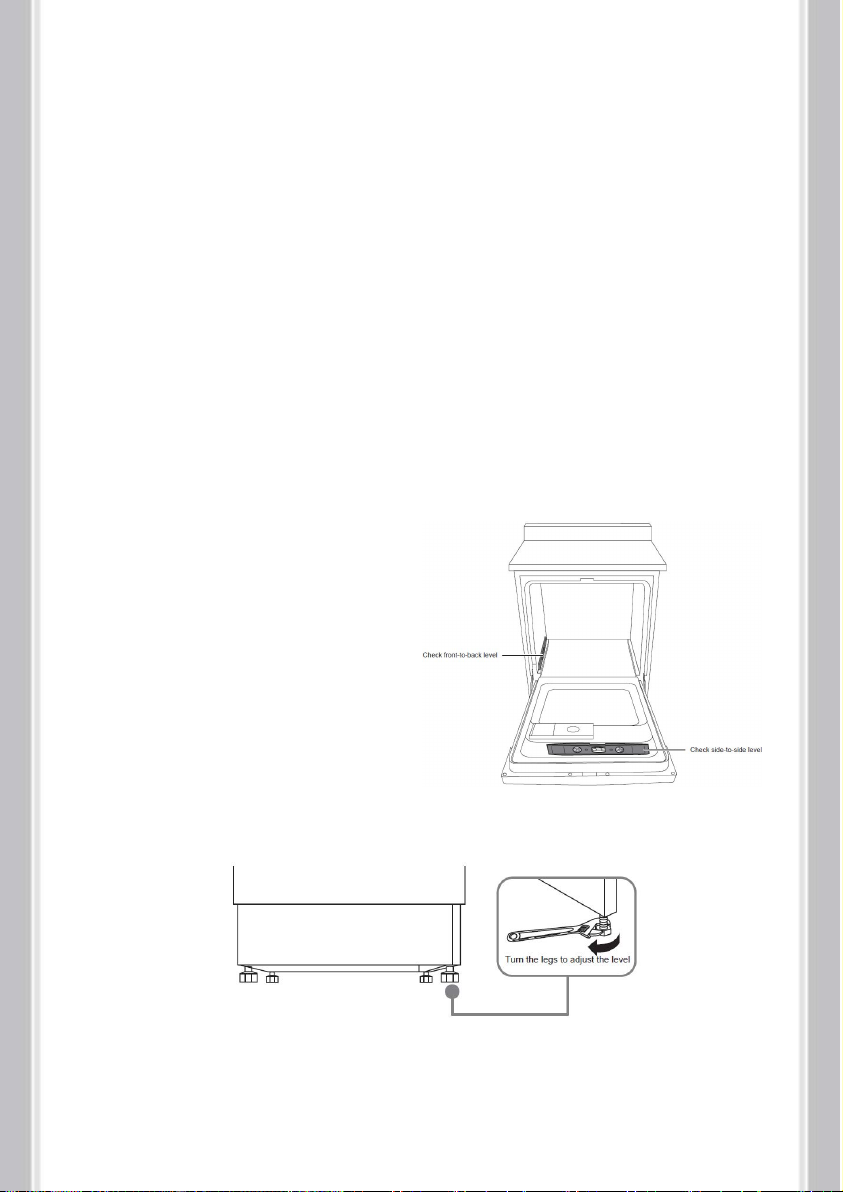
Step 10: Level the dishwasher
IMPORTANT: The dishwasher must be level for proper dish rack operation and wash
performance.
Use adjustable wrench and level.
1. Open the door, then place a level on the door and on the rack track inside the tub to
make sure that the dishwasher is level.
2. Level the dishwasher by adjusting the
four leveling legs individually.
TIP: Pull the lower rack out about halfway.
Make sure that the rack does not roll
forward or back into the dishwasher. If the
rack rolls in either direction, you must level
the dishwasher again.
3. If the door hits the tub, the dishwasher is not installed correctly. Adjust the leveling
legs to align the door to the tub.
Page 19

Step 11: Securing the dishwasher to the countertop
Page 16
- For countertops made of wood or materials that won’t be damaged by drilling, use
Method 1.
- For countertops made of granite, marble, or other materials that could be damaged
by drilling, use Method 2.
- If the gap between the control panel and the cabinet is less than 0.4 in. (10 mm),
use Method 2.
Method 1
1. Insert the long top mounting clips into the slot.
2. Bend the brackets to secure them to the dishwasher tub.
3. Secure the dishwasher to the countertop through the holes in the brackets, using
the screws provided.
Method 2
1. Remove the plastic tub caps from the
inside of the dishwasher tub.
2. Drive a wood screw through the hole
in the side of the dishwasher into the
cabinet frame.
IMPORTANT: Drive the screws straight
and flush. Protruding screw heads will
scratch the top of the control panel and
interfere with the door closing.
3. Reinsert the plastic tub caps.
Use Philips screwdriver, wood screws (2 per side), top mounting clips (2).
Page 20

Step 12: Connecting the water supply line
Page 17
1. Slide the compression nut, then the ferrule over the end of the water supply
line. 2. Insert the water supply line into the 90° elbow.
3. Slide the ferrule against the 90° elbow and secure it with the compression nut.
IMPORTANT: Make sure that the door spring does not rub or contact the water
supply line or drain hose. Test by opening and closing the door. Reroute the
lines if interference occurs.
Use adjustable wrench, waterline kit, and Teflon thread seal tape.
Step 13: Connecting the drain hose
IMPORTANT: Follow all local codes and ordinances.
1. Cut on the marked line as required for your installation. The drain hose’s
molded end will fit 5/8”, 3/4” or 1" diameter connections on the air gap, waste tee,
or garbage disposal.
Page 21
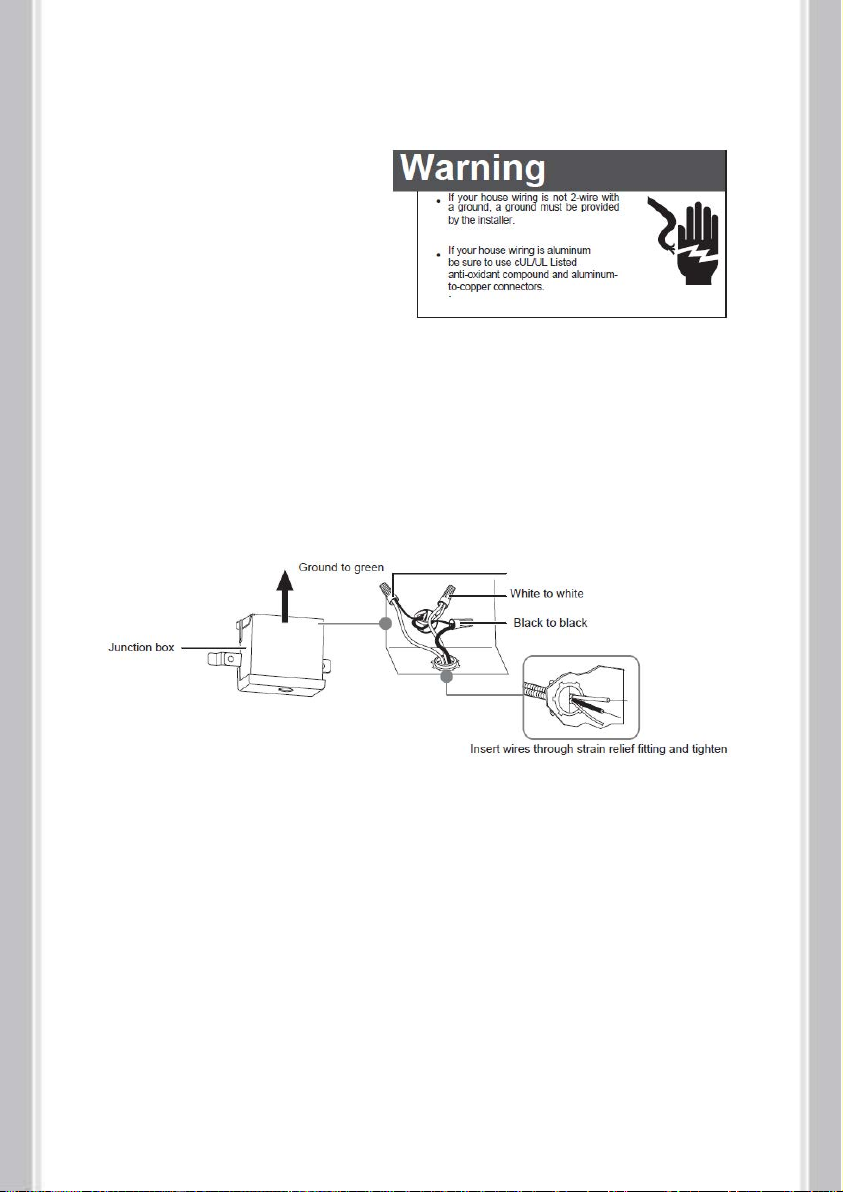
Step 14: Connecting the electrical power
Page 18
Turn off the electricity to the dishwasher’s electrical circuit. Skip this step if
your dishwasher is equipped with a power cord. Make sure that the electrical
power is turned off at the source.
1. Remove the junction box cover from the power supply junction box on the wall.
2. Locate the three dishwasher wires, (white, black, and green) with stripped ends,
then insert the dishwasher wires through the small hole in the junction box.
3. Secure the house wiring to the bottom of the junction box with a strain relief
fitting.
4. Use wire nuts to connect incoming ground to green, white to white, and black to
black.
5. Replace the junction box cover. Make sure that no wires are pinched under the
cover.
Use Philips screwdriver, strain relief (for electrical connections), and wire nuts (UL
listed).
Page 22

Step 15: Performing a pre-test check
Page 19
- Make sure that power is turned OFF.
- Open the door and remove all foam and paper packaging.
- Check the door opening and closing. If the door does not open and close freely, or
tends to fall, check the spring adjustments. See “Step 1: Check the door balance”.
- Make sure that the wiring is secure under the dishwasher and not pinched or in
contact with door springs or other components. See “Step 9: Position the dishwasher
under the countertop”.
- Check the door alignment with the tub. If the door hits the tub, level the dishwasher.
See “Step 10: Level the dishwasher”.
- Pull the lower rack out about half way. Make sure that it does not roll back or
forward on the door. If the rack moves, adjust the leveling legs. See “Step 10: Level
the dishwasher”.
- Check the door alignment with the cabinet. If the door hits the cabinet, reposition or
relevel the dishwasher. See “Step 10: Level the dishwasher”.
- Make sure that water supply and drain lines are not kinked or in contact with other
components. Any contact with the motor or dishwasher frame could cause a noise.
See “Step 8: Slide the dishwasher partially into the cabinet”.
- Turn on the sink hot water faucet and verify the water temperature. Incoming water
temperature must be between 120°F and 150°F. A minimum of 120°F temperature is
required for best wash performance. See “Preparing the hot water line”.
- Add a half gallon (2 l) of water to the bottom of the dishwasher to lubricate the pump
seal.
- Turn on the water supply. Check for leaks. Tighten connections if needed.
- Remove any protective film (if present) from the control panel and door.
Step 16: Wet testing the dishwasher
1. Turn on the power supply (or plug the power cord into the outlet, if equipped).
2. Turn on your dishwasher.
3. Close the door, select the RINSE ONLY cycle, and press START/CANCEL.
4. Make sure that water enters the dishwasher. If water does not enter the
dishwasher, check to be sure that water and power are turned on.
5. Check for leaks under the dishwasher. If a leak is found, turn the power supply off,
then tighten connections. Restore power after the leak is corrected.
6. Check for leaks around the door. A leak around the door could be caused by door
rubbing or hitting against adjacent cabinetry. Reposition the dishwasher if necessary.
See “Step 9: Position the dishwasher under the countertop”.
7. When the dishwasher is draining, check the drain lines. If leaks are found, turn
power off at the breaker and correct plumbing as necessary.
8. Restore the power after corrections are made. See “Step 12: Connecting the water
supply line”.
9. Open the dishwasher door and make sure that most of the water has drained. If
not, check that the disposer plug has been removed and/or the air gap is not plugged.
See “Step 13: Connecting the drain hose”. Also check the drain line for kinking.
10. Run the dishwasher through another fill and drain cycle. Check for leaks and
correct if required.
Page 23

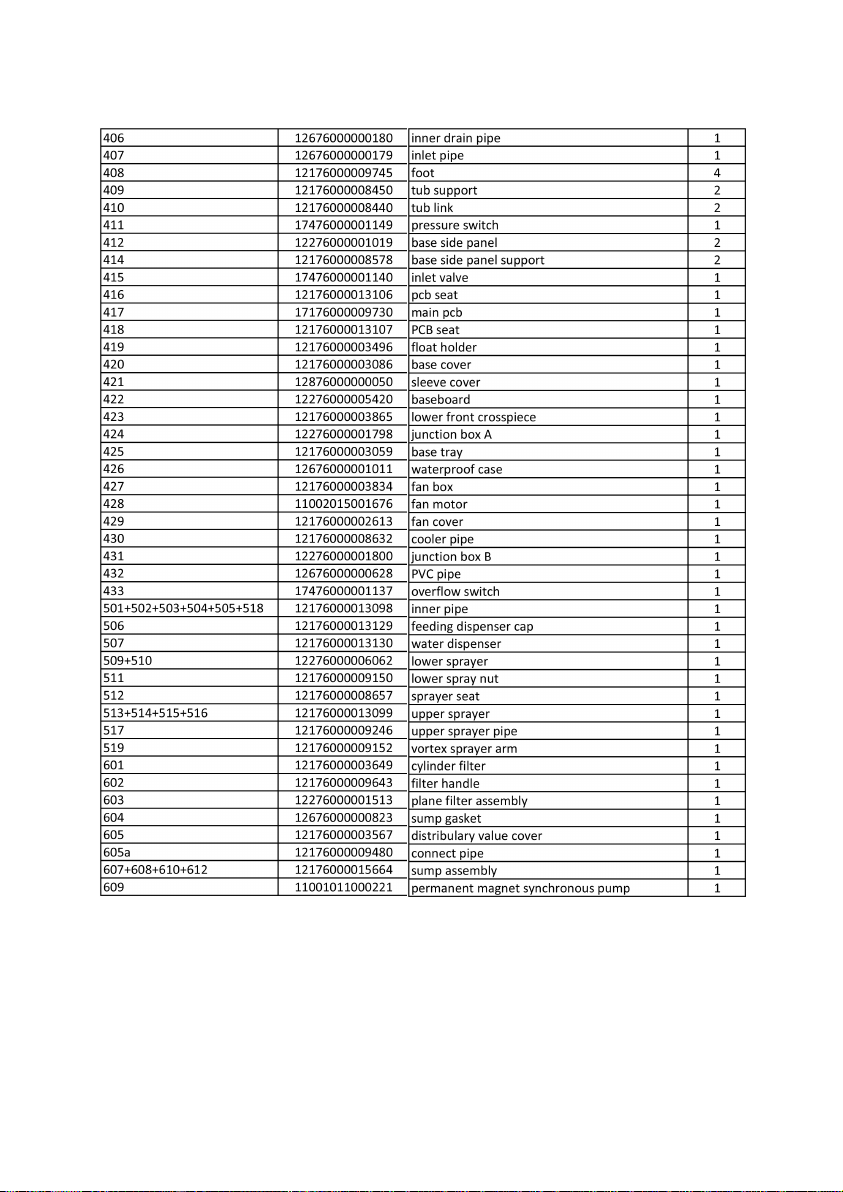
PARTS LIST
Page 20
Page 24
Page 21
Page 25

Page 22
Page 26

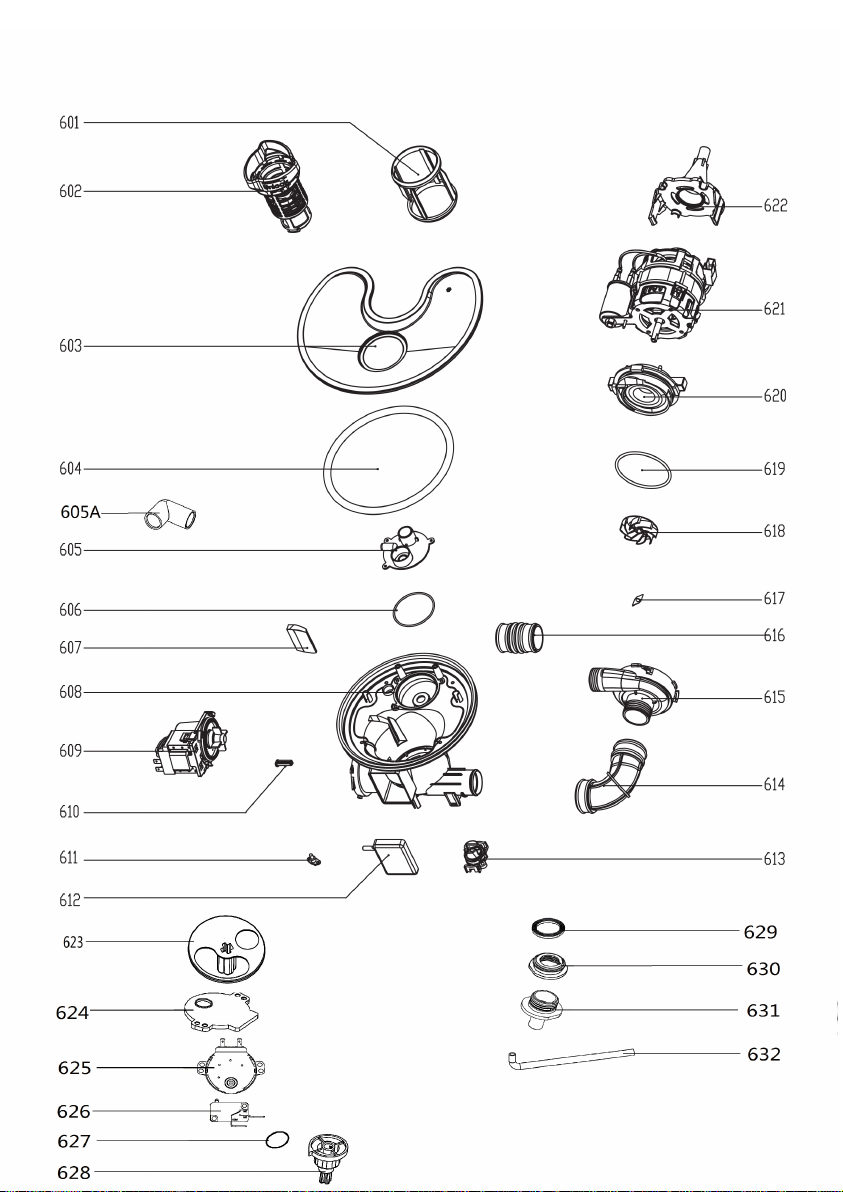
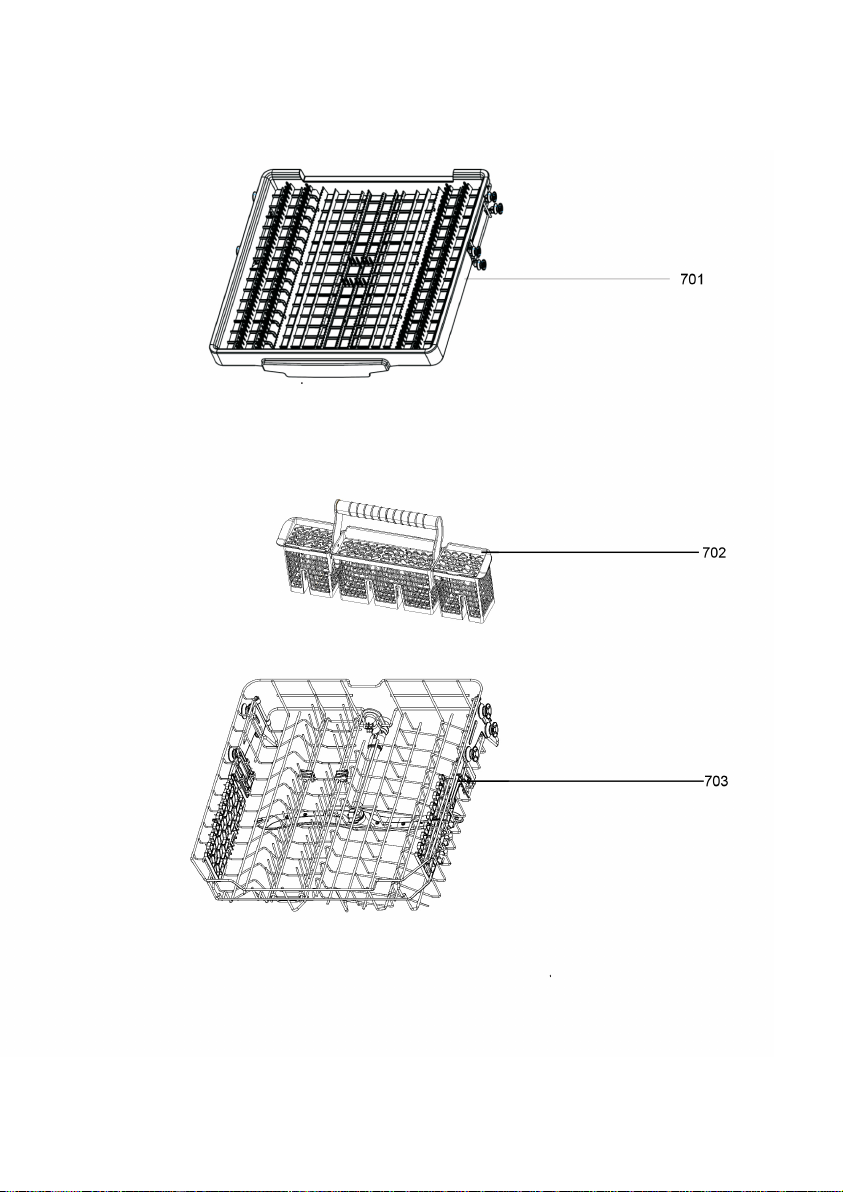
EXPLODED VIEW
Page 23
Page 27

Page 24
Page 28

Page 25
Page 29

Page 26
Page 30

Page 27
Page 31
Page 28
Page 32
Page 29
Page 33

Page 30
Page 34

WARRANTY AND SERVICE
Page 31
For full warranty details on this product please visit:
http://www.cosmoappliances.com/warranty
Warranty
Product Information: 1-888-784-3108
Support: 1-855-877-4085
 Loading...