

Page 1

WALL MOUNT RANGE HOOD
Page 2
Page 3

Page 4

Page 5

Page 6

Page 7

INSTAL LATION PROCEDURES
SAFET Y WARN IN G
HOOD MAY H AVE V ERY S HARP ED GES ;P LEASE W EA R
PROTE CT IVE G LO VES IF IT I S NEC ES SARY TO RE MO VE AN Y
PARTS F OR INSTA LLI NG , CLEAN IN G OR SE RVICI NG .
Step 1:
Pleas e put the c oo ker hoo d on the wa ll
and mar k the pos it ion whe re you wa nt t o
insta ll. We reco mm end the h eight f ro m
the hob t o the low er e dge of th e hood
shoul d be from 6 50 mm to 700 mm.
10m m
650 -700m m
4
2.How to use the push button control
A B C D E
3. How to u se the to uc h control
A: Pres s Butto n A on ce , turn on t he ligh t. Press it a gain, t urn off t he ligh t.
B: Pres s butto n B, t he fan ru ns at the b oo st spee d.
C: Pres s butto n C, t he fan ru ns at the m id dle spe ed.
D: Pres s butto n D, t he fan ru ns at the l ow s peed.
E: Pres s butto n E, t he fan tu rns off .
7
Wood Sc rew
5x6 0
Exp andin g Tube
Hoo k
232
368.35
A B C D E
A: Pres s Butto n A on ce , turn on t helig ht.Pres s it agai n,tur n off the l ight.
B: Pres s butto n B, t he fan ru ns at the b oo st spee d.
C: Pres s butto n C, t he fan ru ns at the s ec ond spe ed.
D: Pres s butto n D, t he fan ru ns at the l ow s peed.
E: Pres s butto n E, t he fan tu rns off .
4.How to use the soft touch control
A: Touch A , the fa n runs at t he l ow spee d. Pres s it a gain, t he fan tu rns off .
B: Touch B, t he f an runs a t the mid s pe ed. Pre ss it aga in , the fan t urns of f.
C: Touch C, t he f an runs a t the hig h sp eed. Pr ess it ag ai n, the fa n turns o ff.
A、B、C th ree b ot ton s in te rac t.
D: Wh en the ho od i s OFF, press an d hold D fo r 3 se conds ,and th en p ress C
(to adj ust the m in ute) an d E (to adj us t the hou r) resp ectiv el y,G ac ts like
a clock .On the s cr een, le ft side i s ho ur and th e right s ide is mi nu te;Wh en
the hoo d is oper at ing, to uch D to co nt rol wor king ti me of hoo d, 1minu tes
per one t ouch, th e longe st stay O N ti me is 1ho ur.
E: Pres s E, turn s on t he ligh t. Pres s it a gain to t urn off t he ligh t.
F: Dela y forma ti on: whe n the hoo d is o perat ing pre ss F, th e hood wi ll n ot
be OFF at o nce, it w il l remai n for one m in ute bef ore it is O FF.
FEDCBA
G
Step 2:
Accor ding th e sp ace bet ween th e ho le
A&B,d rill 2 ho le s in leve l on the wa ll with
8mm in di amete r an d 60-70 mm in dep th.
Press t he 2 expa nd ing tub e provi de d into
the hol es. Tigh ten the 2 woo d screw s of
5x60m m which s up plied t ogeth er w ith the
hood to t he expa nd ing tub e.Mak e su re it is
fixed e nough a nd c annot b e move. Ha ng the
cooke r hood on t he 2 w ood scr ews,m ak e
sure it i s to be lev el a nd stab le.
Exh aust pi pe
Air o utlet
Step 3:
Take o ut the co ok er hood f rom the c ar ton
and put i t on a hori zo ntal wo rk tabl e
gentl y. Fix the e xhaus t pipe in to t he air
outle t of the in ne r duct, a nd then f ix the
exhau st pipe i nt o the top o f reduc er, m ake
sure it i s conne ct ed to the r educe r tightly.
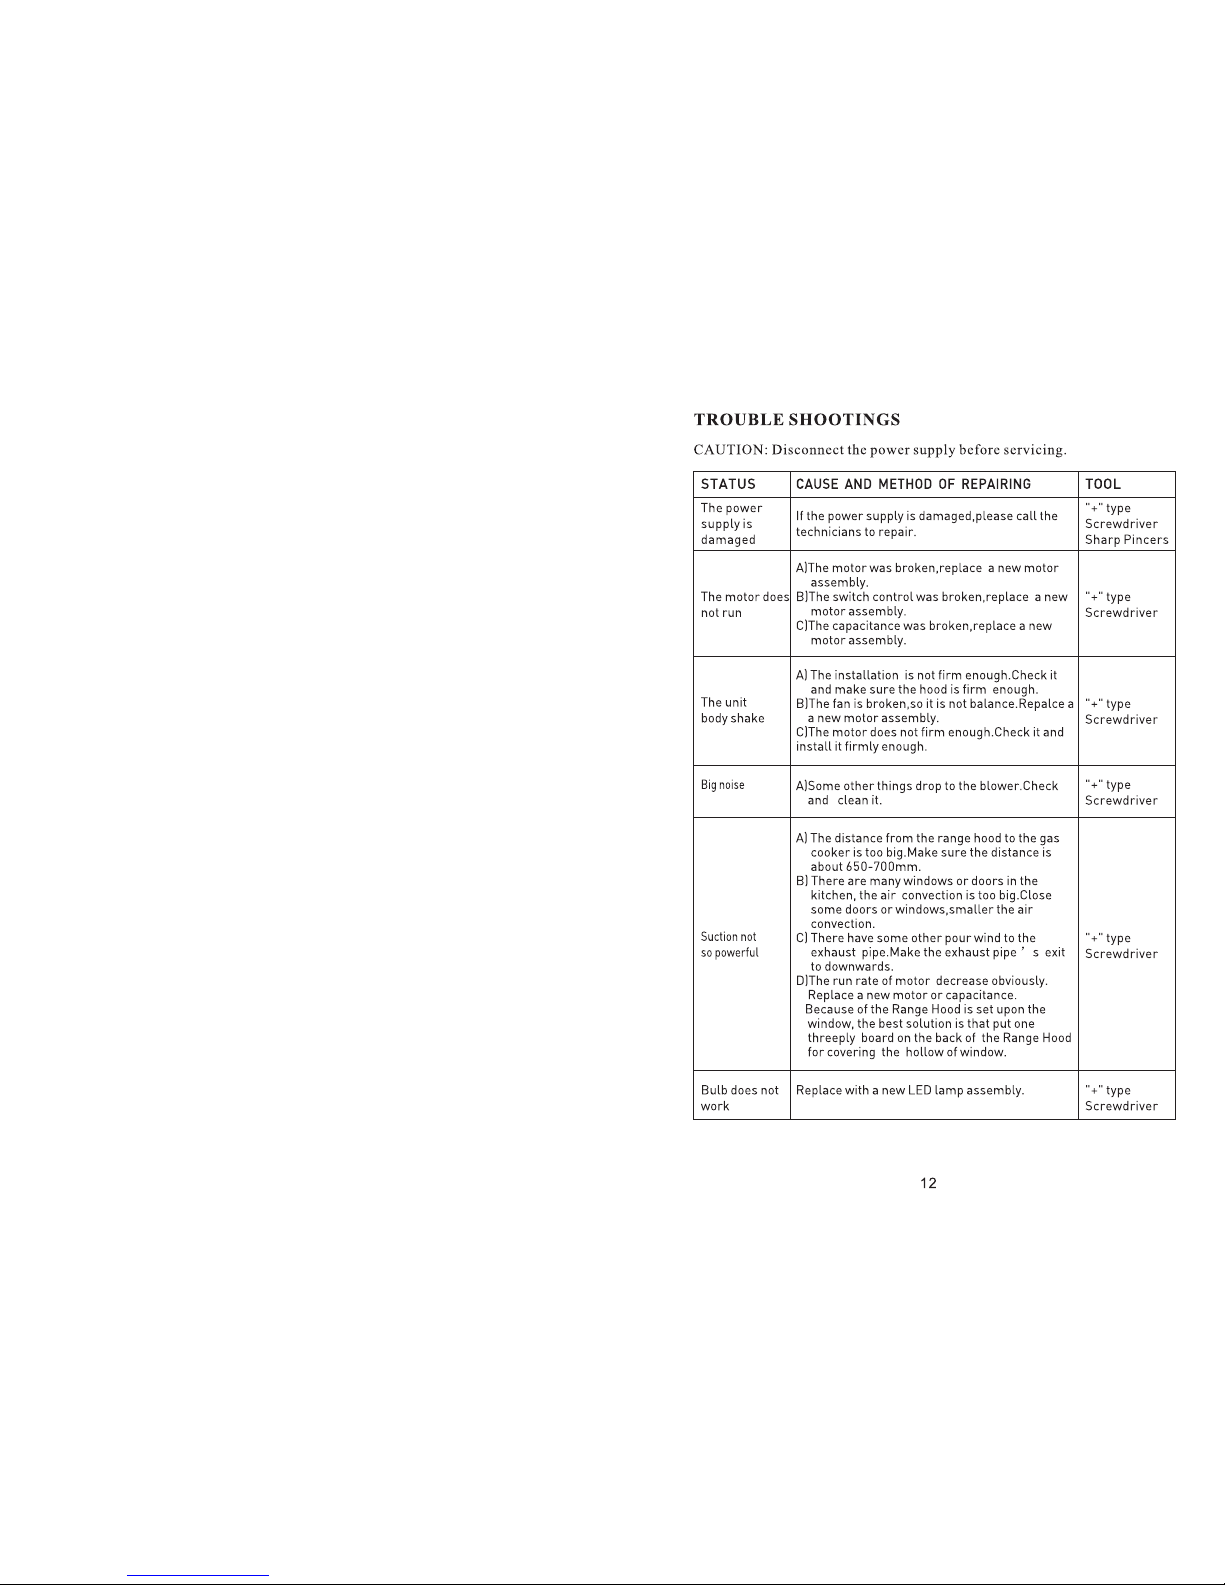
Page 8

 Loading...