

Coselgi Melodia CMe15-BTE, Melodia CMe10-BTE, Melodia CMe5-BTE, Melodia CMe3-BT User Instructions

USER INSTRUCTIONS
CMe15-BTE
•
CMe10-BTE
CMe5-BTE • CMe3-BTE
Behind-the-ear

2
YOUR MELODIA™ HEARING AID
(To be filled out by the hearing care professional)
Date: ______________________________________
Battery size: _________________________________
CMe15
CMe10
CMe5
CMe3

3
CONTENTS
THE HEARING AID ..........................4
Right/left identification ....................... 7
Acoustic indicators .......................... 7
The battery ...............................8
Inserting the battery ....................... 8
Low battery indication..................... 10
Turning the hearing aid on and off ............. 11
Positioning the hearing aid................... 12
Removing the hearing aid ...................13
Volume adjustment ........................14
Listening programs ........................ 16
Switching between the listening programs ...... 17
Using a telephone ......................... 18
CLEANING...............................19
The hearing aid........................... 20
ACCESSORIES ............................21
IN CASE OF MALFUNCTION ................. 25
CARING FOR YOUR HEARING AID ............. 27
WARNINGS .............................. 28
ADVICE .................................33
REGULATORY INFORMATION................. 34
SYMBOLS................................ 38
4
1
2
3
4
5
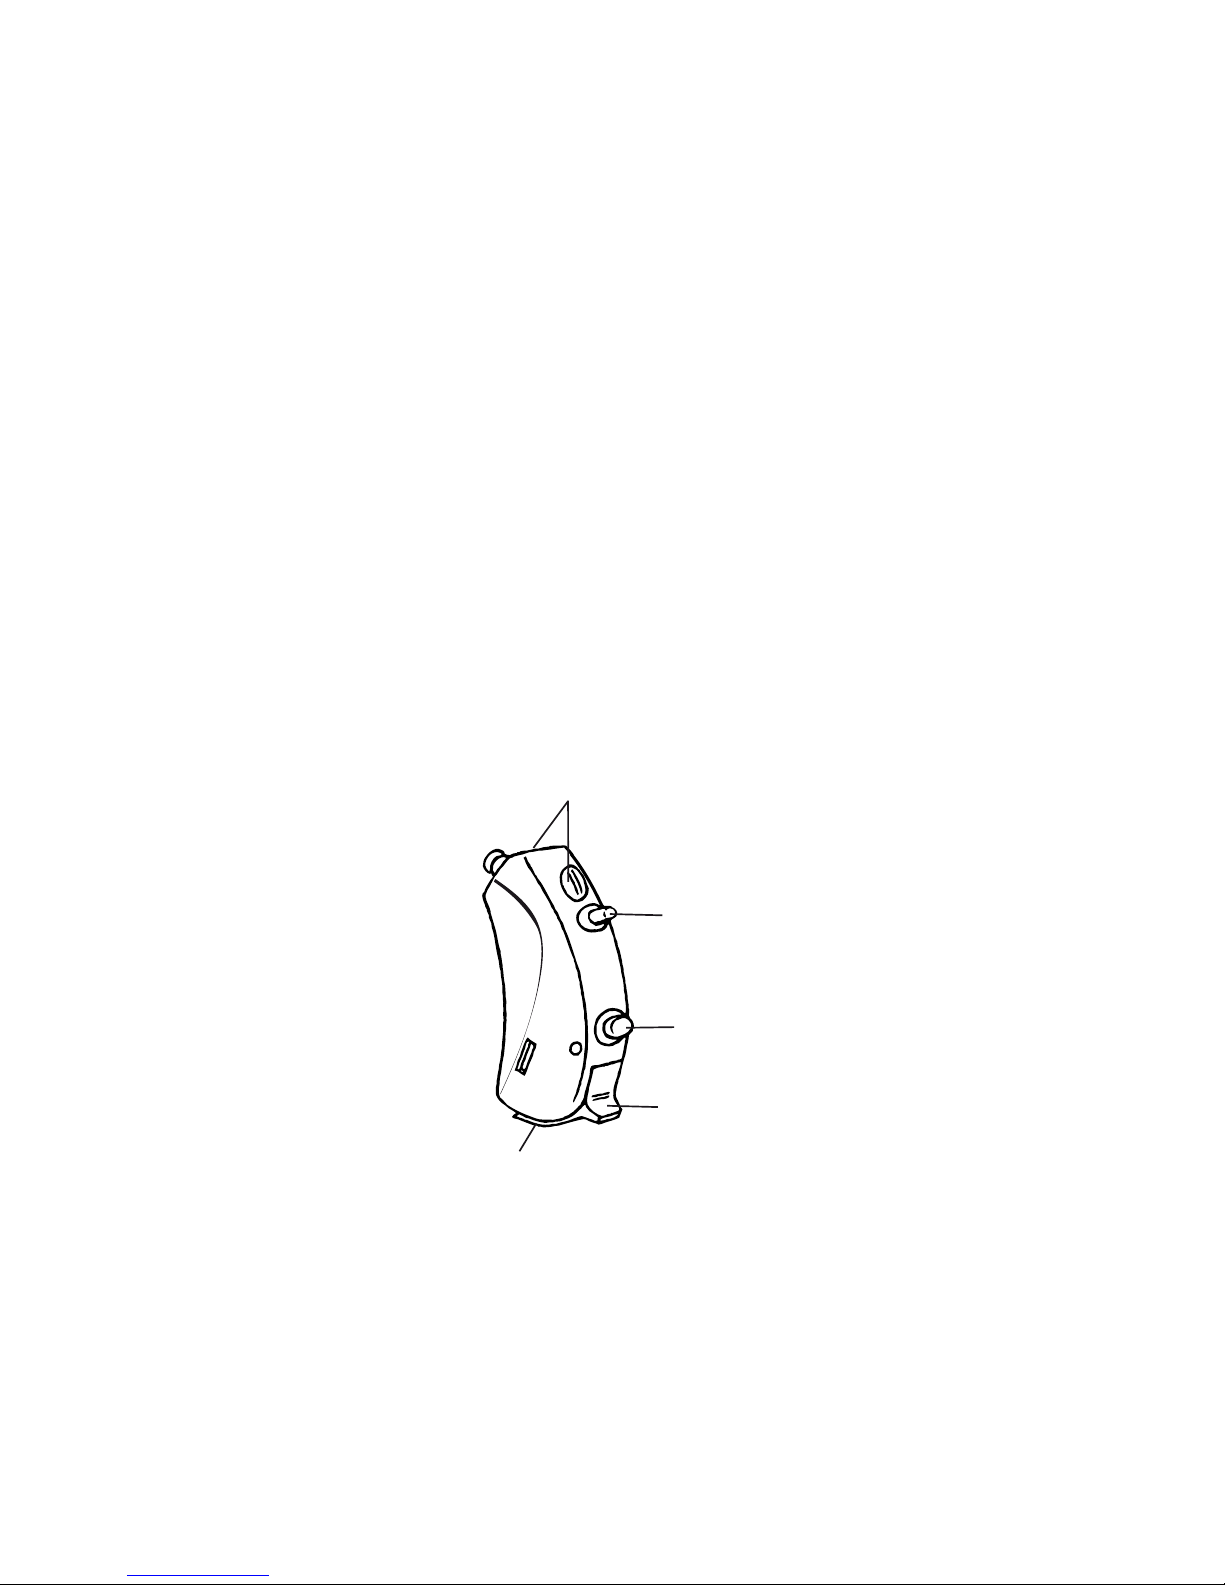
THE HEARING AID
The illustration below shows the hearing aid without the
ear-set. The choice of ear-set solution depends on your
specific needs. Please refer to the separate ear-set user
manual.
1. Microphone openings
2. Volume control (optional)
3. Program button
4. On/off switch
5. Battery drawer with nail grip
If you need help to identify the serial number (usually six or seven digits) on the product, please contact your hearing care professional.

5
NOTE
In addition to these user instructions, a separate user manual
is provided describing the various ear-set solutions available
for your hearing aid: “Ear-sets for Coselgi™ BTE hearing aids”
WARNING
This booklet and the manual “Ear-sets for Coselgi™ BTE hearing aids” contain important information and instructions. Read
these booklets carefully before you start using the hearing aid.
NOTE
Your hearing aid, ear-set and accessories may not look exactly as illustrated in this booklet. We also reserve the right to
make any changes considered necessary.

6
Intended use
The Melodia hearing aids are intended as air conduction amplification devices to be used in everyday listening environments.
Indications for use
The devices are indicated for individuals with a range of
hearing loss severity from minimal (10 dB HL) to severe
(90 dB HL) and all hearing loss configurations.
They are to be programmed by licensed hearing care
professionals (audiologists, hearing aid specialists, otolaryngologists) who are trained in hearing (re)habilitation.
Description of device
Your hearing aid is used with an ear-set which consists
of a tube and an ear-tip, dome or earmould. The hearing aid uses a proprietary wireless technology to enable communication between the left and the right hearing aids, as well as between the hearing aids and its
accessories.
7
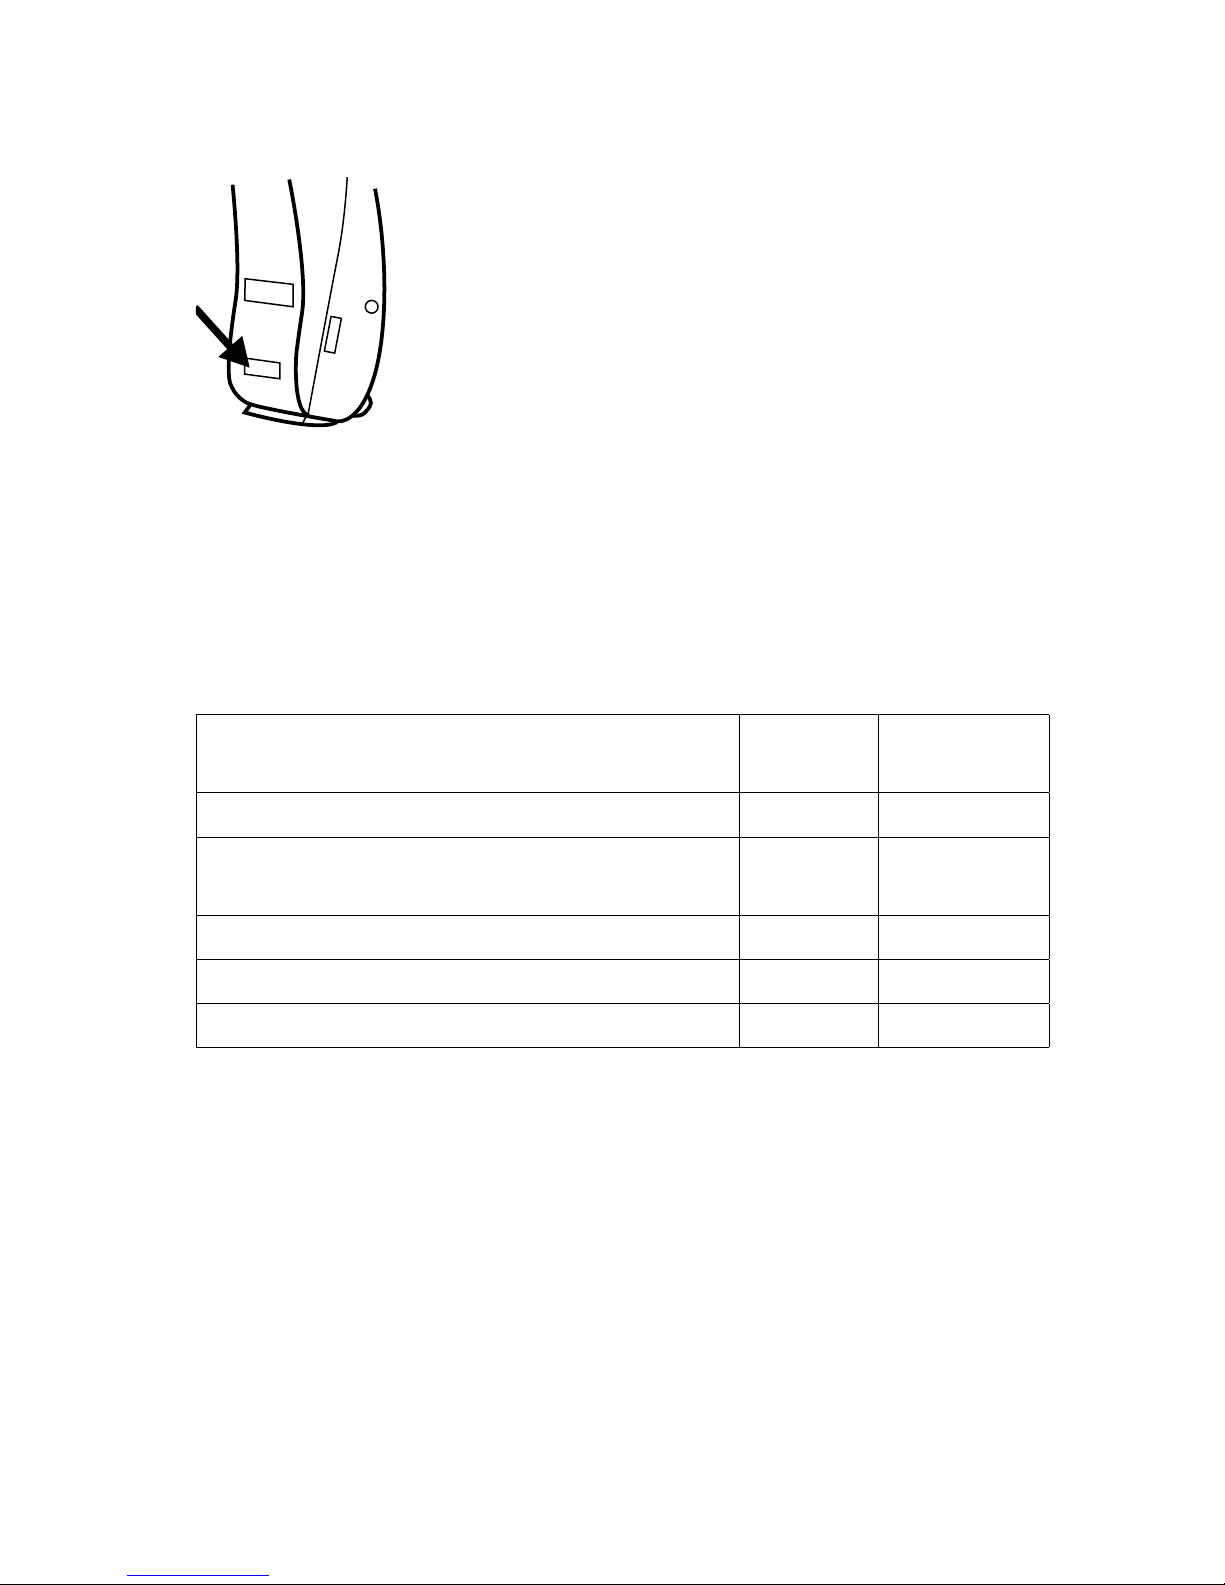
Right/left identification
The arrow shows the position of the
identification mark (red mark = right
and blue mark = left).
Acoustic indicators
The hearing aid may be set to produce tones to indicate
the use of certain functions.
Function Default
setting
Alternative
setting
Adjusting volume Tone Off
Confirming program button use Clicking
sound
Off
Changing program Tones Off
Starting up the hearing aid Tone Off
Warning about low battery 4 tones Off

8
The battery
We recommend zinc-air batteries. Use a size 13 battery for the hearing aid.
To obtain replacement batteries, please consult your
hearing care professional. It is important to take note
of the expiry date and the recommendations on the battery pack regarding disposal of used batteries.
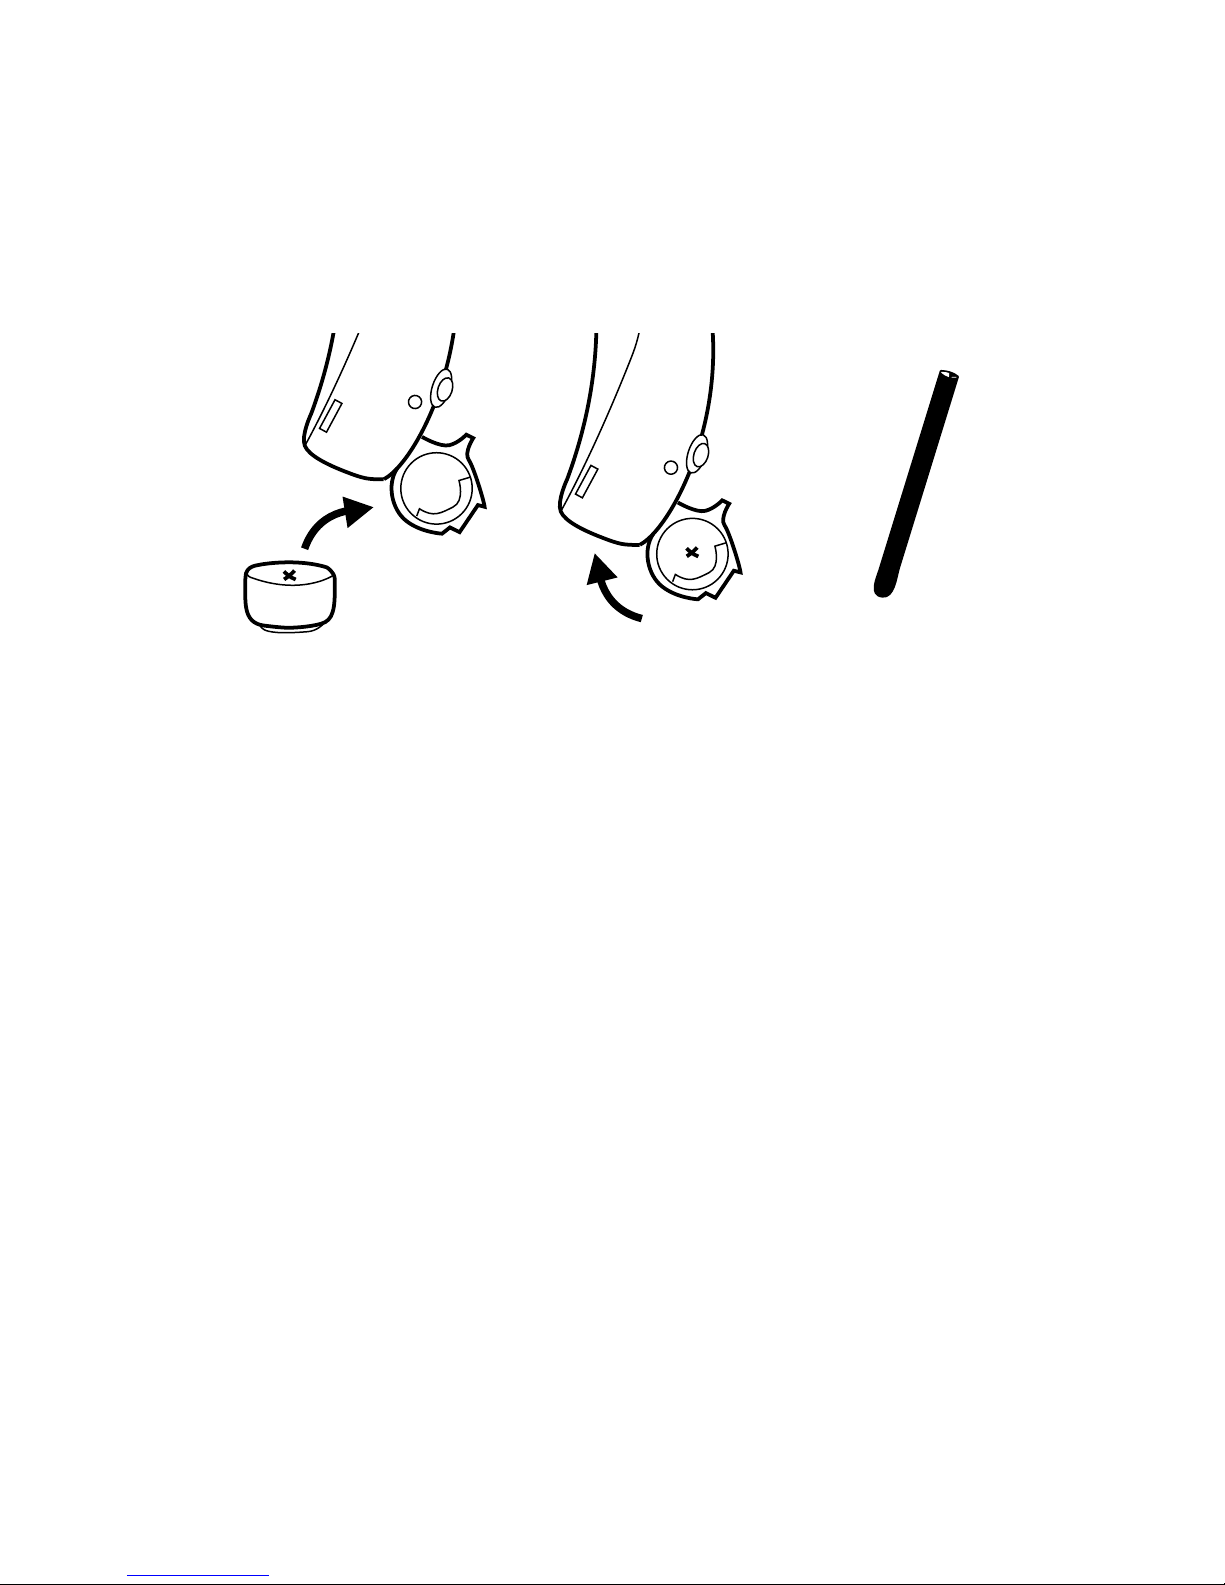
Inserting the battery
Before inserting a new battery into the hearing aid, remember to remove the adhesive
tab. Once the tab has been removed, the
battery will start functioning after a few seconds.
CAUTION
Do not use batteries if there is a sticky residue from the tab or
other unwanted substance, as this can cause the hearing aid
to malfunction.
Use the nail grip to gently swing the battery drawer open.
9
Place the battery in the drawer, so that the plus (+) sign
on the battery faces upward. You can use the battery
magnet provided to steer the battery into place.
If the battery drawer does not close easily, the battery is
incorrectly inserted.
When changing battery, it is a good idea to hold the
hearing aid over a table.
The hearing aid may be provided with a special battery
drawer, helping to secure the battery in the drawer. This
type of drawer can be a good choice if the hearing aid
is worn by a child.
10
Low battery indication
An acoustic indicator will sound when the battery is
nearly exhausted, unless this function has been disabled (see page 7). We recommend that you always
have a spare battery with you.
WARNING
Never leave an exhausted battery in the hearing aid. Exhaust-
ed batteries may leak, damaging the hearing aid.
WARNING
Your hearing aid may stop functioning, for instance if the
battery is exhausted. You should be aware of this possibility, in
particular when you are in traffic or are otherwise dependent
on warning signals.
11
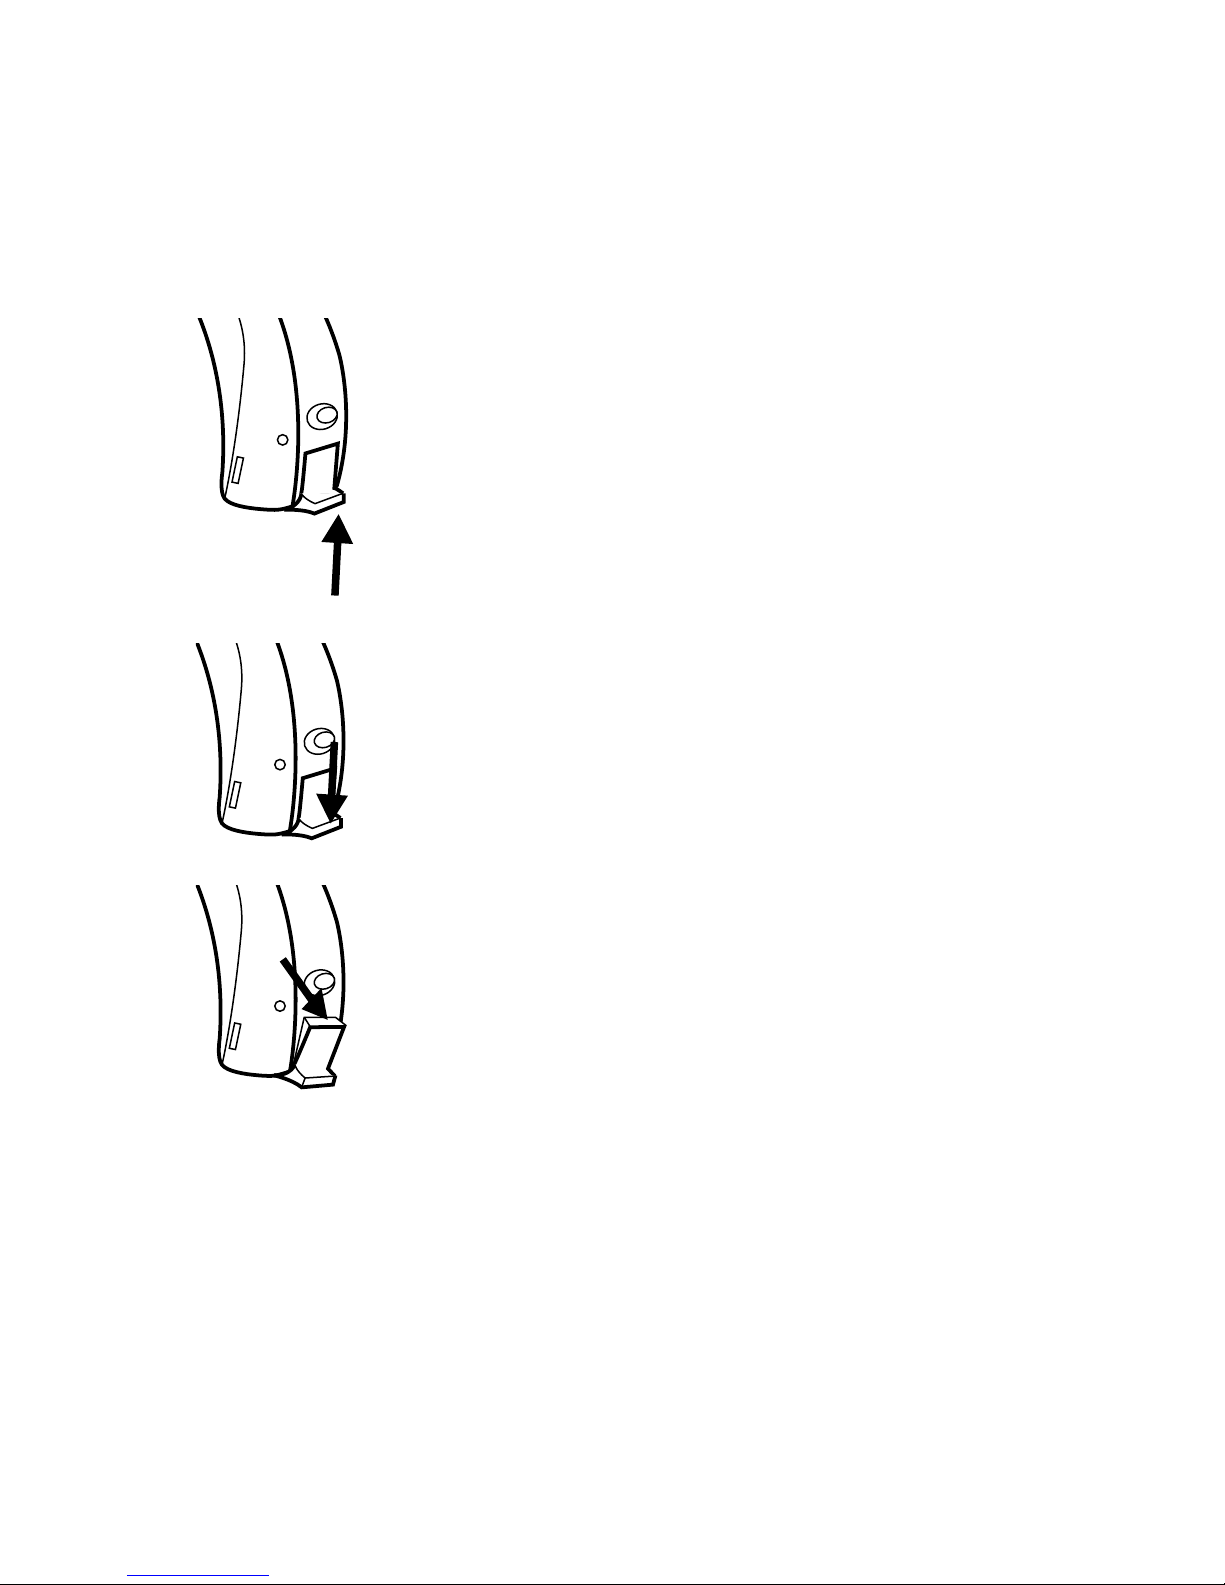
Turning the hearing aid on and off
The battery drawer of the hearing aid also functions as
the on/off switch.
Push the switch upwards to turn on the
hearing aid. An acoustic indicator will
indicate that the hearing aid has been
switched on unless this function has been
disabled.
Push the switch downwards to turn off the
hearing aid.
The word “OFF” is clearly visible on the
switch when the hearing aid is turned off.
Please remember to turn off the hearing aid when it is
not in use. Remove the battery if the hearing aid will not
be used for several days.
OFF
12
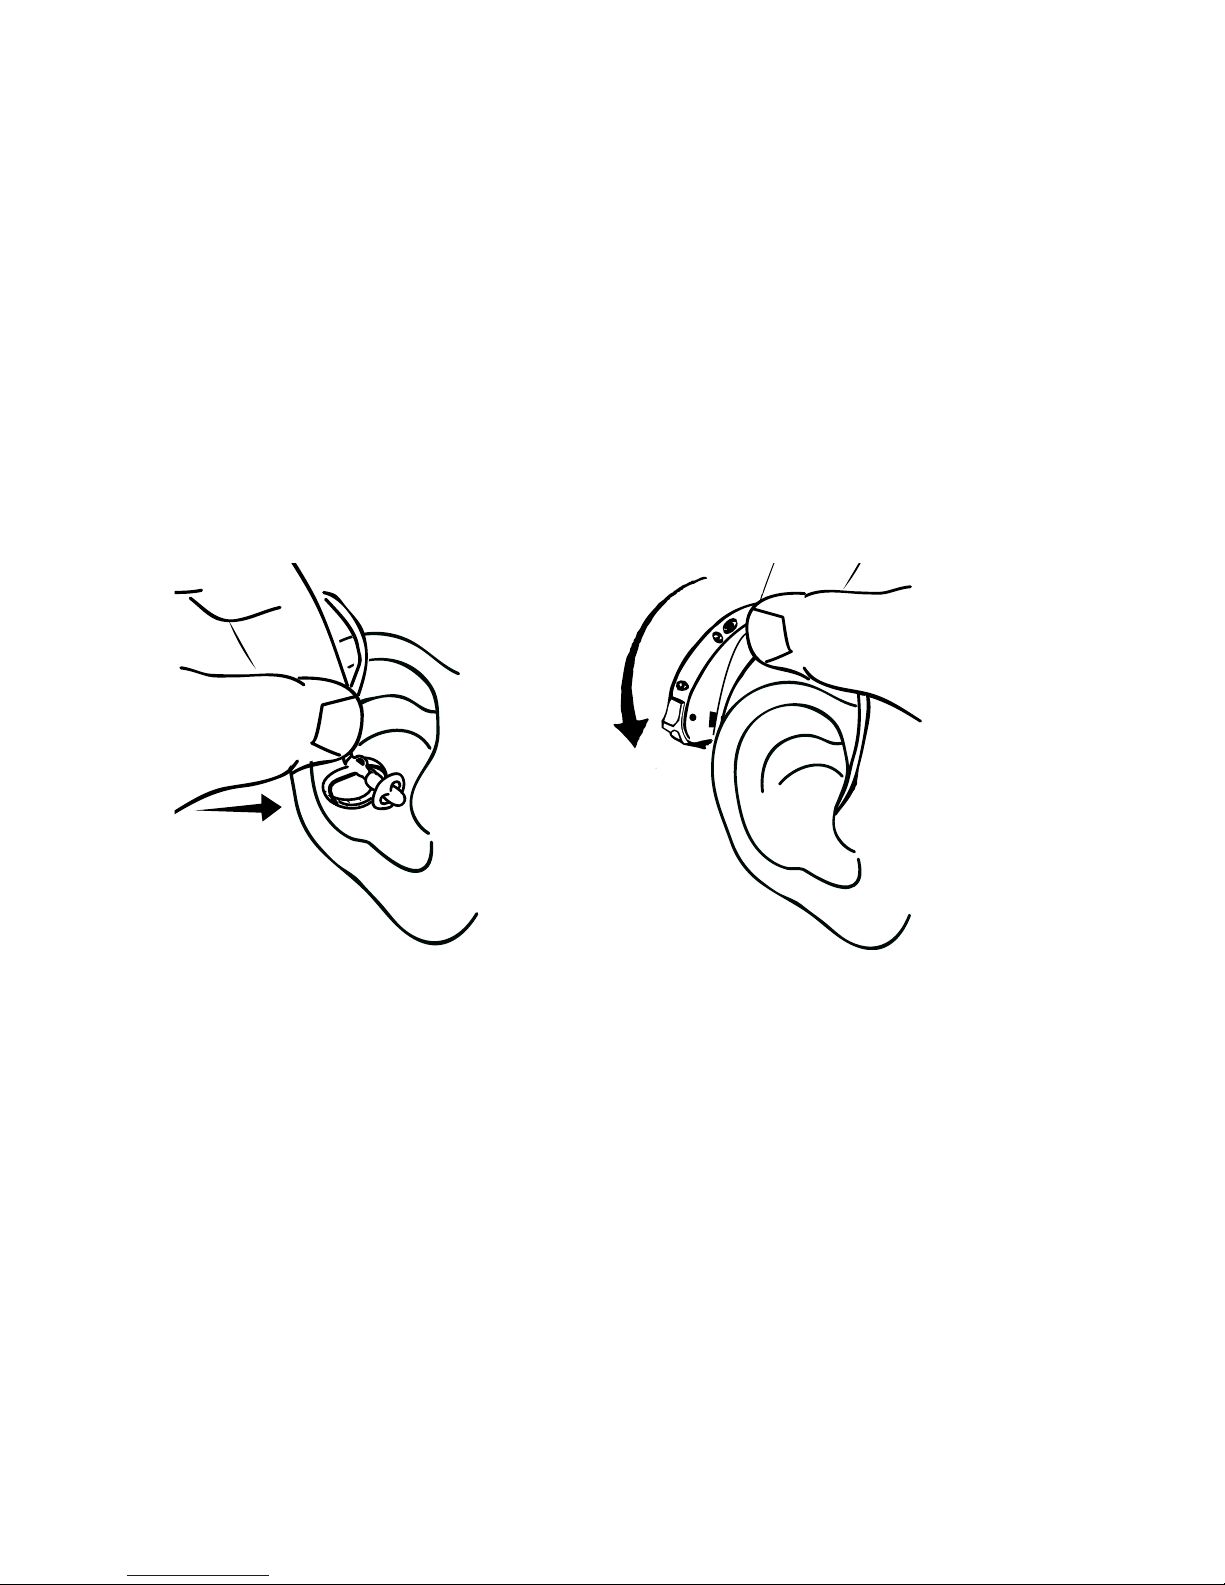
Positioning the hearing aid
Insert the earpiece in the ear canal while holding the
lower part of the tube. It may help to pull the outer ear
backwards and upwards with the opposite hand.
Place the hearing aid behind the ear, so that the hearing aid and tube rest comfortably on the ear, close to
your head.
The illustrations show an open dome. For further information on ear-tip/dome/earmould types, anchors and
procedures, see the separate ear-set user manual provided.
If the ear-set does not fit or sit properly, causing discomfort, irritation, redness or the like, contact your hearing
care professional.
13
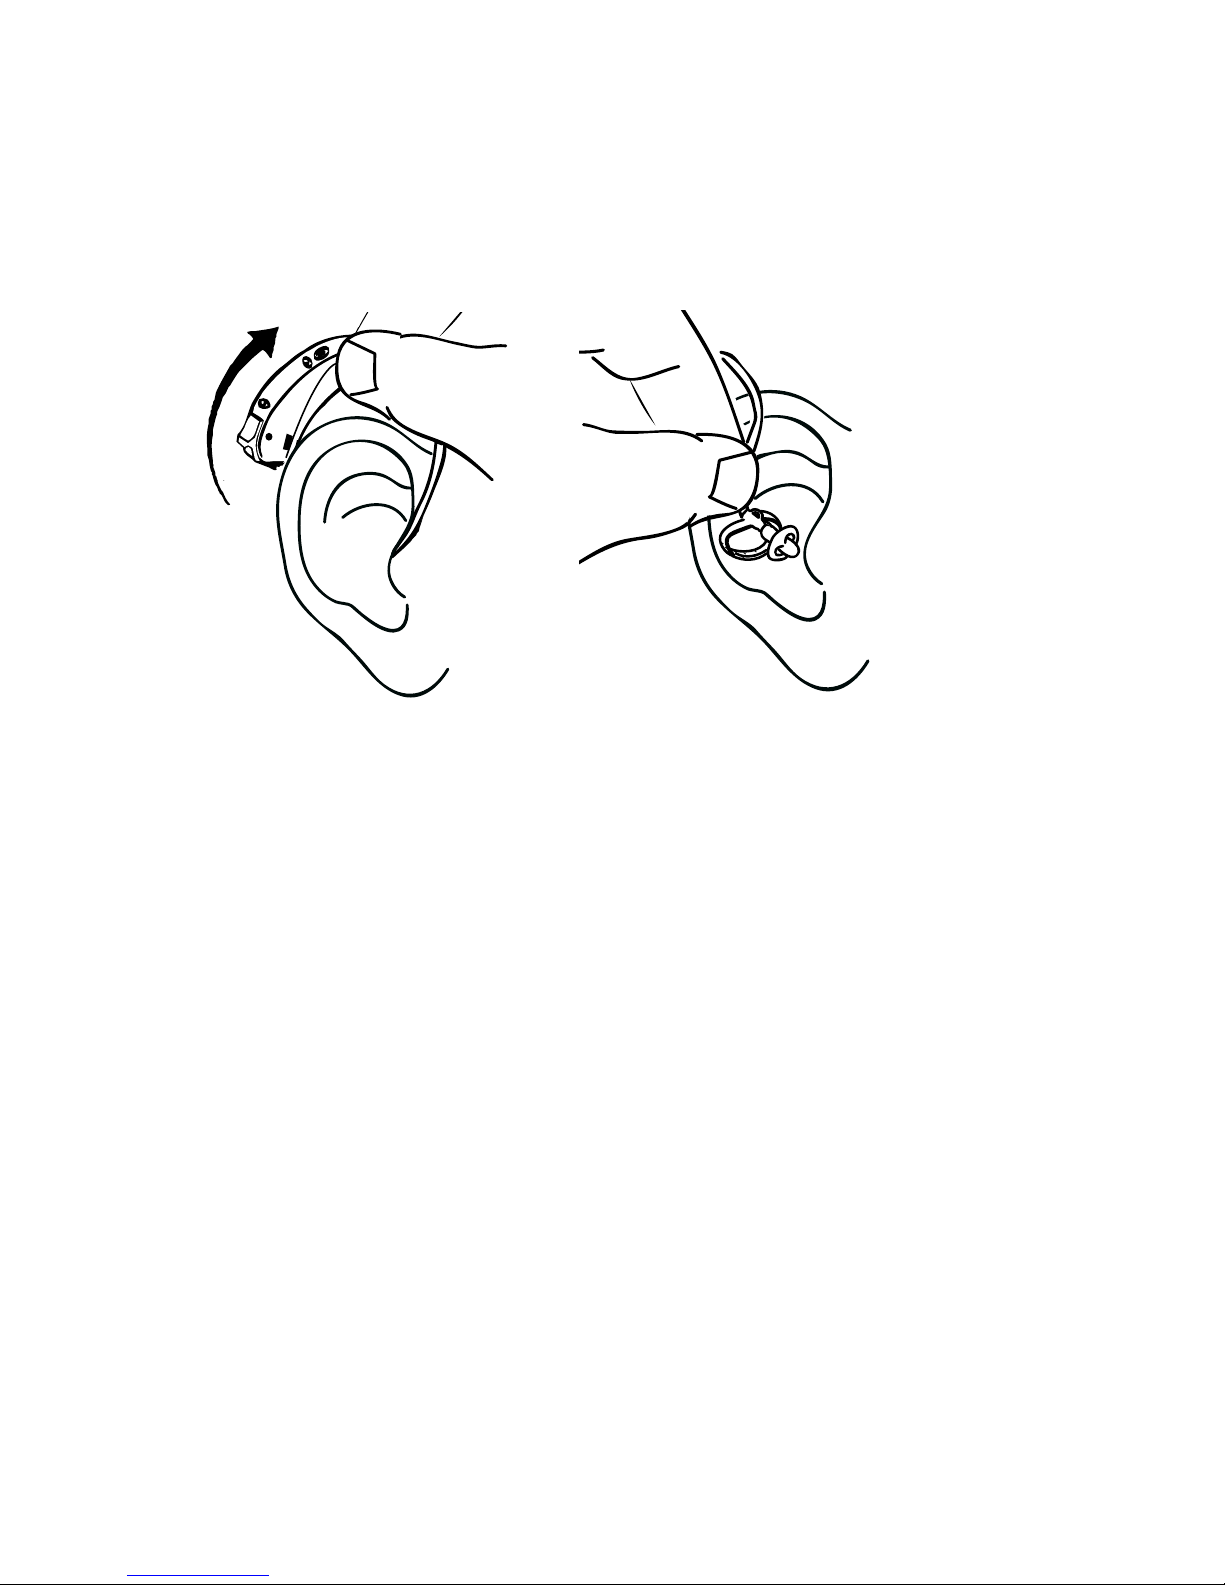
Removing the hearing aid
Remove the hearing aid from its position behind the
ear.
Carefully pull the earpiece out of the ear canal, while
holding the lower part of the tube. If the earpiece is
provided with an extraction cord, take hold of this and
carefully pull the earpiece out of the ear canal.

14
Volume adjustment
The hearing aid volume is adjusted automatically in accordance with your sound environment.
Your hearing aid may furthermore
be provided with a volume control,
shaped like a small lever.
Push the lever upward to gradually
raise the volume.
Push the lever downwards to gradually lower the volume.
In the default setting, any volume adjustment will affect
both hearing aids.
Each time you operate the volume control, you will
hear a beep-tone unless this function has been disabled. When the maximum or minimum adjustment level is reached, a steady tone will sound.
WARNING
If the volume in the hearing aid is generally too loud or too
weak, or the reproduced sounds are distorted, or if you would
like any further information, consult your hearing care professional.
 Loading...