

Page 1
©2014 Dorel Juvenile. www.djgusa.com (800) 544-1108 www.coscokids.com
Made in CHINA. Hecho en CHINA. Styles and colors may vary. Los estilos y los colores pueden variar.
Distributed by (distribuido por) Dorel Juvenile Group, Inc., 2525 State St. Columbus, IN 47201-7494
Dorel Juvenile Canada, 873 Hodge, St. Laurent, QC H4N 2B1 12/19/14 4358-6581B
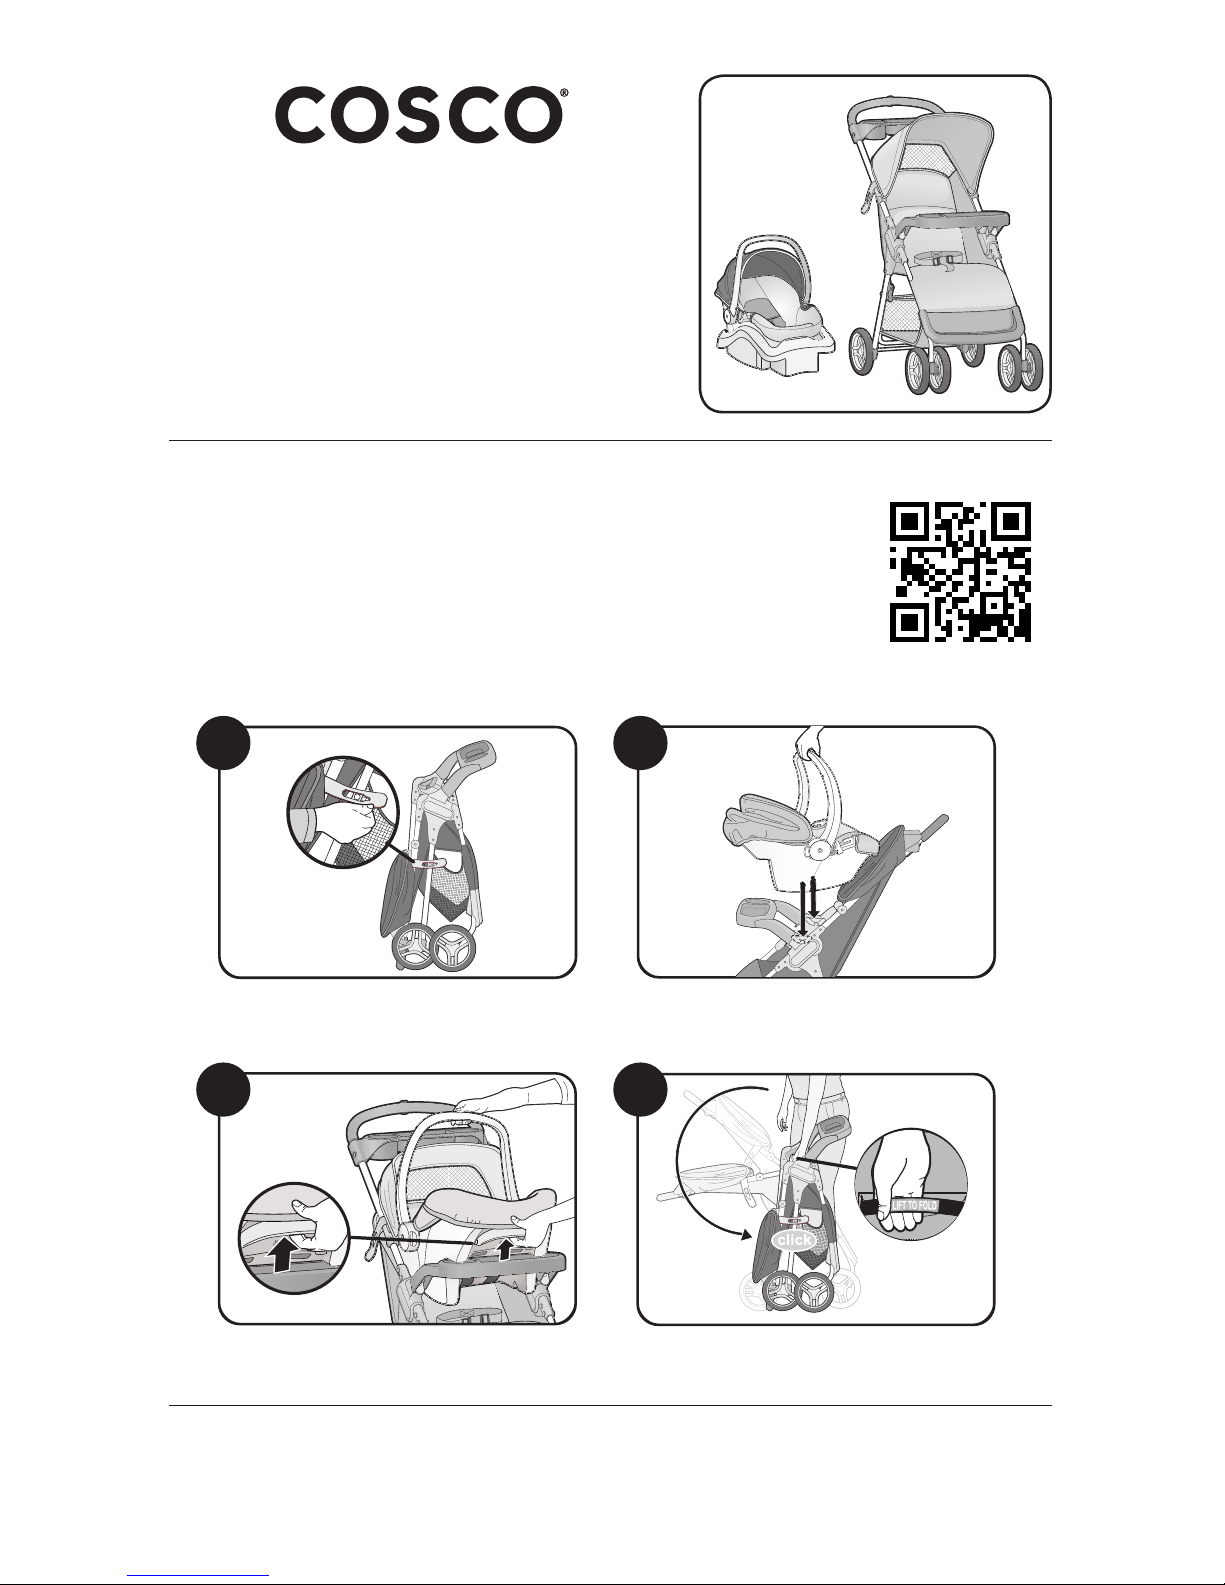
Lift & StrollTM Travel System
Sistema de viaje “Lift & StrollTM”
Models/Modelos TR305, TR336, TR341, TR349, TR355
User Guide/ Guía del usuario
RELEASE TO UNLOCK
SQUEEZE TO RELEASE
LOWER INTO POSITION
LIFT TO FOLD
LEVANTAR PARA PLEGAR
SOLTAR PARA ABRIR
APRETAR PARA SOLTAR
BAJAR A SU LUGAR
Quick Start Guide
1
2
3
4
SEE VIDEO
Instrucciones rápidas
VER VIDEO
Page 2
FOR THE SAFETY OF YOUR CHILD, PLEASE READ THE FOLLOWING
WARNINGS AND ASSEMBLY INSTRUCTIONS AND KEEP FOR
FUTURE REFERENCE.
• Adult assembly required. CAUTION: Keep small parts away from
children during assembly.
• NEVER LEAVE CHILD UNATTENDED. ALWAYS keep child in view
when in stroller.
• AVOID SERIOUS INJURY from falling or sliding out. ALWAYS use
seat belt. Check frequently to make sure it is secure.
• ALWAYS keep fingers away from moving parts, when folding,
unfolding or adjusting stroller to prevent finger entrapment.
• ALWAYS make sure stroller is FULLY OPEN AND LOCKED before using.
• ALWAYS use the brakes when stroller is stopped.
• ALWAYS remove protective material and poly bags and dispose
before assembly.
• NEVER put hot liquids in the cup holder.
• NEVER use stroller on stairs or escalators.
• NEVER rollerblade with stroller.
• NEVER allow children to play with or hang onto the stroller.
• NEVER allow children to climb into the stroller unassisted. Stroller
may tip over and injure child.
• NEVER place or hang parcels, bags or accessories on the handle or
canopy. The stroller may tip over or the canopy may collapse.
• This product will become unstable if a parcel bag or rack is used
when there is no provision for one.
• This product may become unstable if a parcel bag, other than the one
recommended by the manufacturer is used.
• This product will become unstable if the manufacturer’s
recommended load is exceeded.
• DO NOT carry additional children, goods or accessories in or on this
product except as recommended in the manufacturer’s instructions.
• NEVER place more than 2 lbs. (0.91 kg) in parent’s tray to prevent
tipping.
• NEVER place more than 10 lbs. (4.5 kg) in the storage basket. If
weight is exceeded, hazardous unstable conditions may exist.
• STROLLER is only for use with children up to 50 lbs. (22.7 kg), and
WHEN SEATED, the midpoint of the child’s head is at or below the
top of the stroller seat.
• ONLY use this stroller with ONE child at a time.
• STROLLER is for use with children who can sit up unassisted, and is
NOT recommended for newborns.
WARNING
2
Page 3
3
POR LA SEGURIDAD DE SU HIJO, POR FAVOR LEA LAS SIGUIENTES
ADVERTENCIAS E INSTRUCCIONES DE ENSAMBLE, Y GUÁRDELAS PARA
CONSULTA FUTURA.
• PRECAUCIÓN: El armado debe ser realizado por un adulto. Durante el
armado, mantenga las piezas pequeñas fuera del alcance de los niños.
• NUNCA DEJE AL NIÑO SIN SUPERVISIÓN. SIEMPRE mantenga al niño
a la vista cuando esté en la carriola.
• EVITE UNA LESIÓN GRAVE por caída o resbalamiento. SIEMPRE use el cinturón
de seguridad. Revise con frecuencia para asegurarse que esté asegurado.
• SIEMPRE mantenga los dedos alejados de las piezas movibles, al plegar,
desplegar o ajustar la carriola, con el fin de evitar que se atrapen los dedos.
• SIEMPRE asegúrese de que la carriola esté COMPLETAMENTE ABIERTA Y
BLOQUEADA antes de usarla.
• SIEMPRE use los frenos cuando la carriola esté parada.
• SIEMPRE quite el material de protección y las bolsas de plástico y
deséchelos antes de ensamblar.
• NUNCA ponga líquidos calientes en el apoyavasos.
• NUNCA use la carriola en escaleras ni escaleras eléctricas.
• NUNCA patine junto con la carriola.
• NUNCA deje que los niños jueguen con ni se cuelguen de la carriola.
• NUNCA deje que los niños se suban a la carriola sin ayuda. La carriola
podría volcarse y lesionar al niño.
• NUNCA coloque ni cuelgue paquetes, bolsas ni accesorios en el asa ni en
la capota. La carriola podría volcarse o la capota podría colapsarse.
• Este producto se volverá inestable si se usa una bolsa de paquetes o una
rejilla cuando no hay provisión para ello.
• Este producto puede volverse inestable si se usa una bolsa de paquetes
diferente a la recomendada por el fabricante.
• Este producto se volverá inestable si se excede la carga recomendada por
el fabricante.
• NO cargue a otros niños, artículos ni accesorios dentro o sobre este
producto excepto lo recomendado en las instrucciones del fabricante.
• NUNCA coloque más de 2 lbs. (0.91 kg) en la charola de los padres, para
evitar volcaduras.
• NUNCA coloque más de 10 lbs. (4.5 kg) en el cesto de almacenamiento.
Si el peso se excede, podrían existir condiciones inestables peligrosas.
• La carriola es sólo para niños que pesen hasta
50 lbs. (22.7 kg)
, y que
AL ESTAR SENTADOS, el punto medio de la cabeza del niño está al nivel
o más abajo que el borde superior del asiento de la carriola.
• SÓLO use esta carriola con UN niño a la vez.
•
LA CARRIOLA debe usarse con niños que pueden sentarsesin asistencia,
NO se recomienda para recién nacidos.
ADVERTENCIA
Page 4
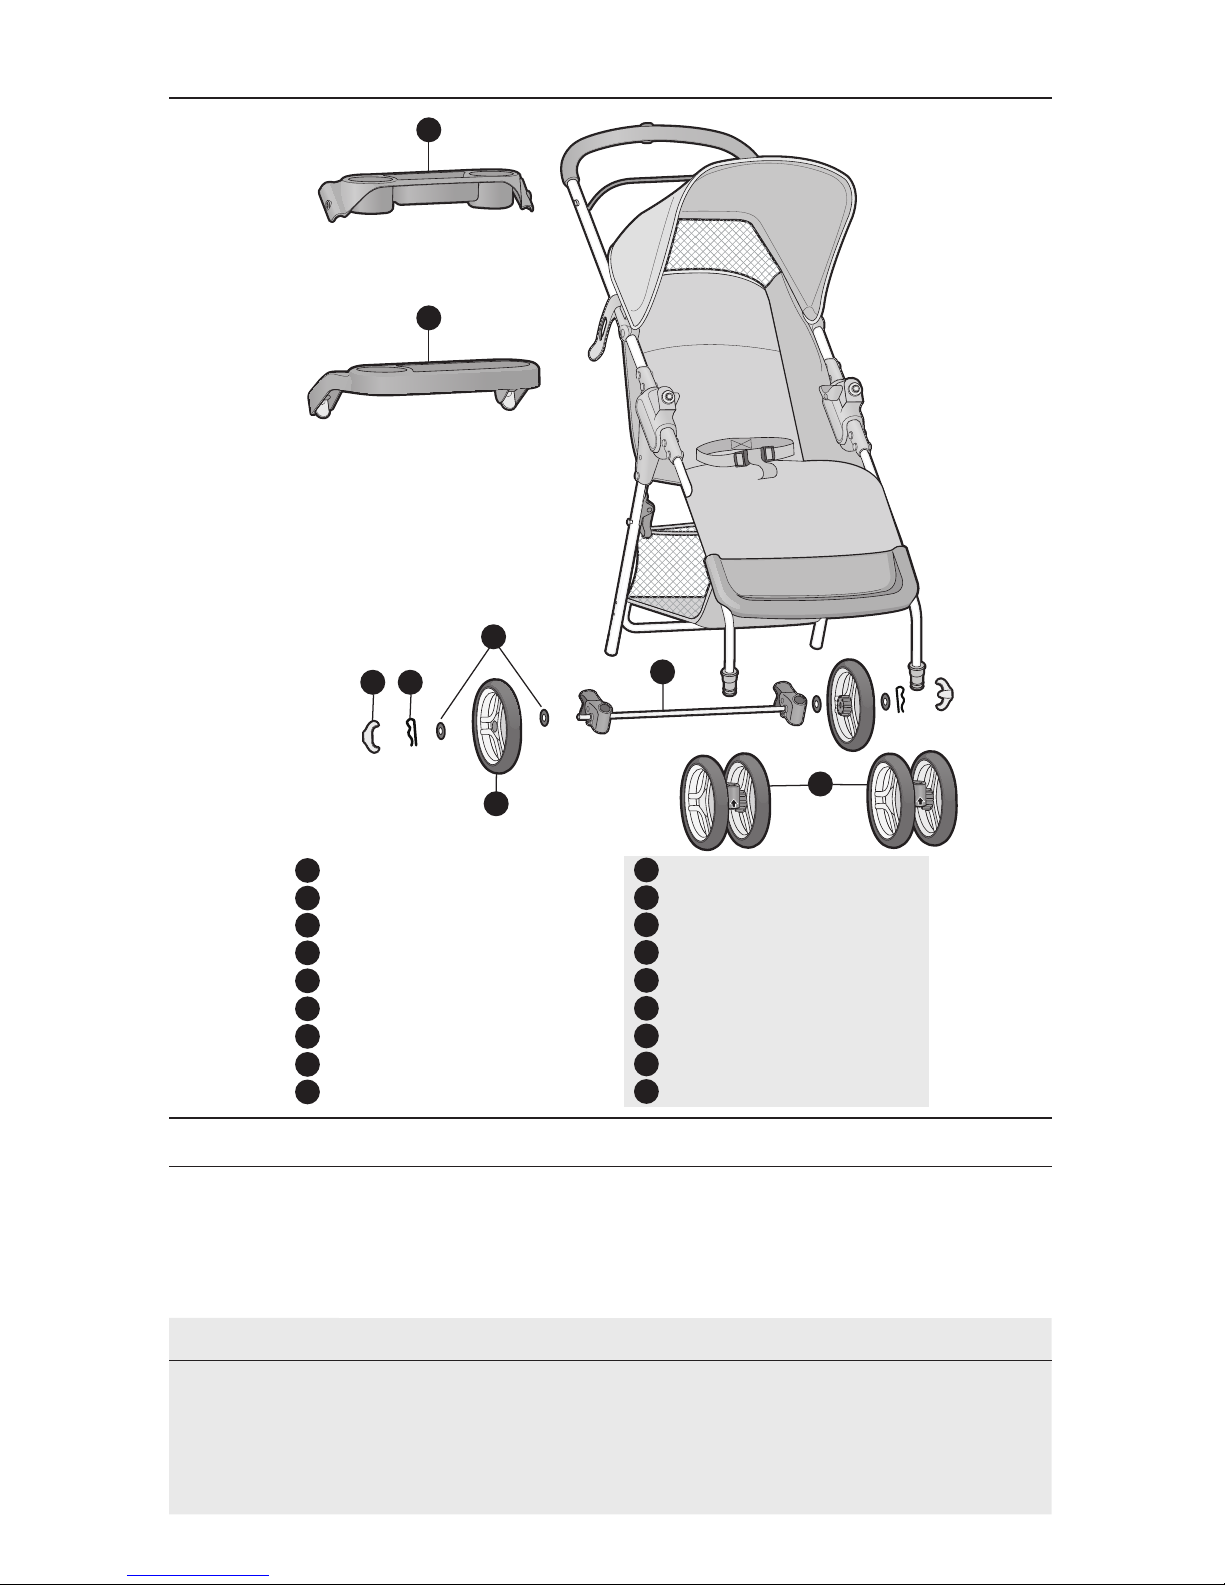
Parts List / Lista de piezas
C
A
B
• Hardware for rear wheel assembly is located on axle.
• Lay out and identify all parts.
• Do not return this product to the place of purchase. If any parts are missing, call Consumer
Relations at (800) 544-1108. Or visit our website at www.coscokids.com.
• Include the model number (TR305, TR336, TR341, TR349, TR355) and manufacture date (found
on the stroller) and a brief description of the part.
Keep These Instructions for Future Use
• Los elementos de ferretería para el armado de las ruedas traseras se encuentran en el eje.
• Presente todas las piezas e identifíquelas.
• No devuelva este producto al lugar donde lo compró. Si faltara alguna pieza, llame a Consumer
Relations al (800) 544-1108. O visite nuestro sitio web en www.coscokids.com.
• Incluya el número de modelo (TR305, TR336, TR341, TR349, TR355) y la fecha de fabricación (se
encuentran en la carriola) y una breve descripción de la pieza.
Guarde estas instrucciones para consulta futura
Parent’s tray
Child’s tray
2 Front wheel assemblies
Rear axle
2 Rear wheels
4 Washers
2 Cotter pins
2 Hubcaps
Car seat (not shown)
A
B
C
F
D
G
E
H
I
Charola para los padres
Charola para el niño
2 Ensamble de ruedas frontales
Eje trasero
2 Ruedas traseras
4 Arandelas
2 Pasadores de chaveta
2 Tapas de cubos
Autoasiento (no se muestra)
A
B
C
F
D
G
E
H
I
4
H G
E
F
D
Page 5
5
Assembling Your Stroller / Cómo ensamblar su carriola
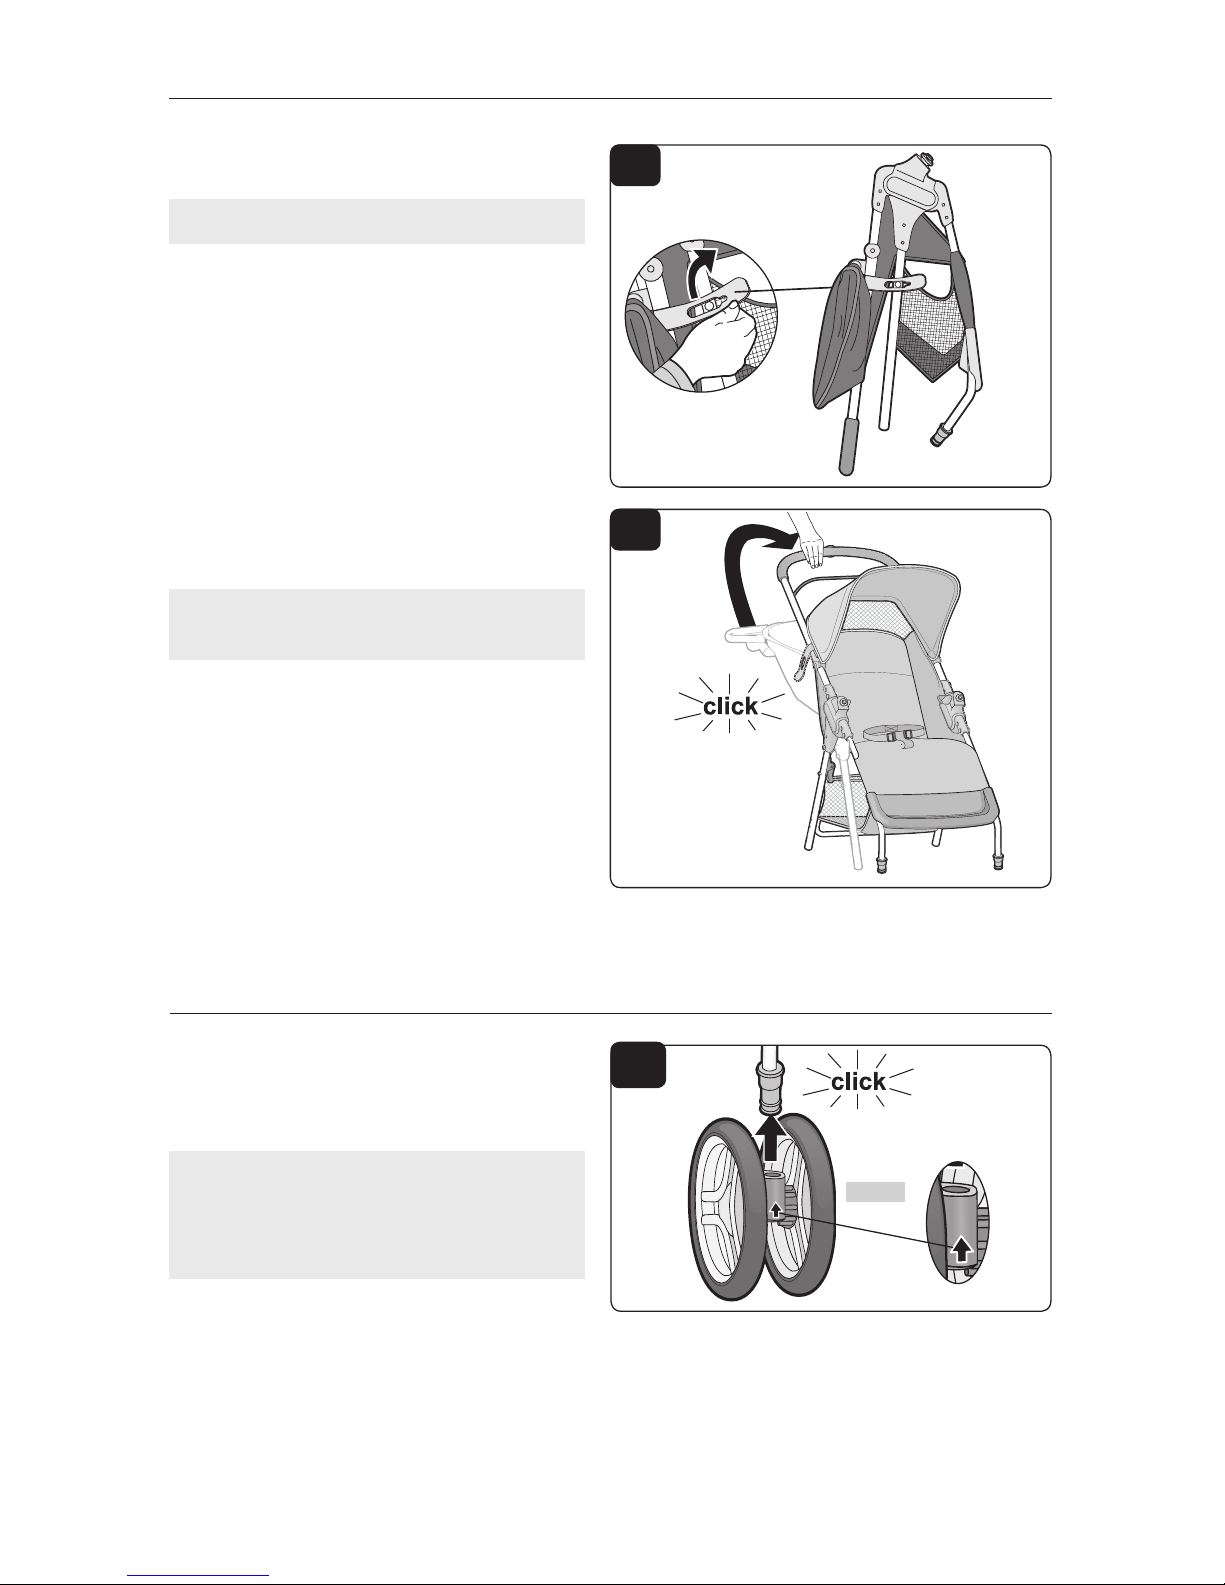
1. Unlatch stroller lock (Figure 1).
1. Destrabe el seguro de la carriola (Figura 1).
1
2. Lift handlebar (Figure 2). Stroller will click
when completely opened and locked.
2. Levante el manubrio (Figura 2). Cuando
la carriola esté completamente abierta y
trabada, se oirá un “clic.”
3
Install Front Wheels / Instale las ruedas delanteras
3. Orient arrow as shown (Figure 3) and slide
front wheel onto frame tube. Wheel will click
when installed properly. Repeat for other
front wheel.
3. Ubique la flecha como se muestra
(Figura 3) y deslice una rueda delantera
en el tubo del armazón. La rueda hará clic
cuando quede bien instalada. Repita el
procedimiento para la otra rueda delantera.
Arrow
2
Flecha
Page 6
6
Assembling Your Stroller / Cómo ensamblar su carriola
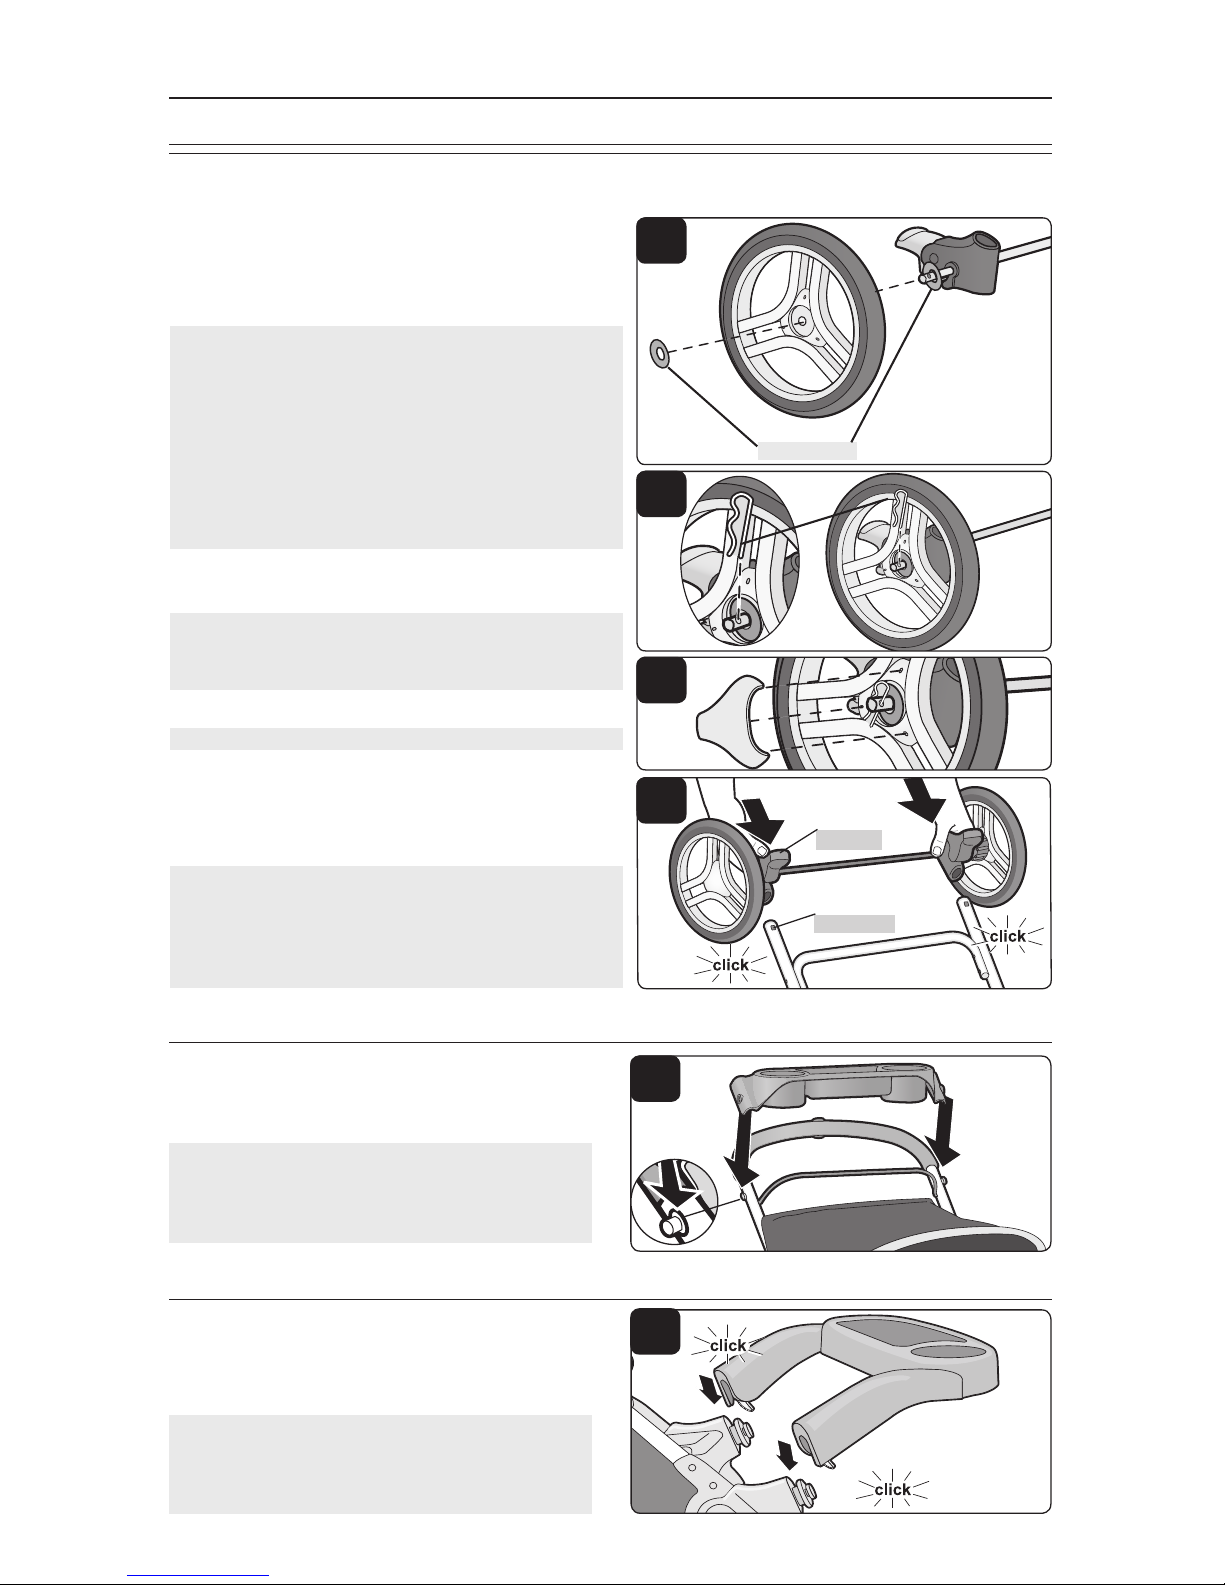
5. Open canopy. Align posts with holes on
parent tray (Figure 5). Snap parent’s tray
onto handlebar tubes.
5. Abra la capota. Alinee los puntales con
los orificios en la charola para los padres
(Figura 5). Encaje la charola para los padres
en los tubos del asa del manubrio.
Install Parent’s Tray/ Charola para los padres
Install Rear Wheels / Instale las ruedas traseras
4
4a
4b
4c
5
4. Remove cotter pin and one washer from axle
leaving one washer on the axle (Figure 4). With
the spokes facing out, slide a wheel onto the
axle. Slide on a second washer.
Turn stroller upside down (Figure 4c). Hold
the axle assembly with the brakes toward the
handlebars. Push axle assembly onto frame
until each side clicks.
Insert straight side of cotter pin through hole in axle
(Figure 4a) until the cotter pin snaps onto the axle.
Snap hubcaps onto both wheels (Figure 4b).
NOTA: Las elementos de ferretería para el armado
de las ruedas traseras se encuentran en el eje.
Sugerencia útil: Para retirar y armar fácilmente el
pasador de chaveta, utilice la pinza de punta aguja.
4. Quite del eje el pasador de chaveta y una
arandela, pero deje una arandela en el eje
(Figura 4). Con los rayos de la rueda hacia
fuera, deslice la rueda en el eje. Deslice una
segunda arandela.
Voltee la carriola boca abajo (Figura 4c).
Sostenga el ensamble del eje con los frenos
hacia las asas del manubrio. Empuje el conjunto
del eje en el armazón hasta que los dos
botones clic por el orificio.
Inserte el lado recto del pasador de chaveta a
través del orificio del eje (Figura 4a) y empuje
hasta que el pasador de chaveta encaje en el eje.
Encaje los tapones de los cubos en ambas ruedas.
Frenos
Abertura
Brakes
Openings
2 Washers
2 Arandelas
6.
To install: Align tray openings with posts
on stroller and slide tray onto posts until
both sides “click” (Figure 6).
Install Child’s Tray / Instale la charola para el niño
6.
Para instalar: Alinee las aberturas de la
charola con las ranuras de la carriola y
deslice la charola hacia las ranuras hasta
que ambos lados hagan “clic” (Figura 6).
6
NOTE: Hardware for rear wheel assembly is located on axle.
Helpful Hint: For ease of removal and assembly of cotter pin use needle nose pliers.
Page 7
Using Your Stroller / Uso de la carriola
To Use Child’s Tray / Uso de la charola para el niño
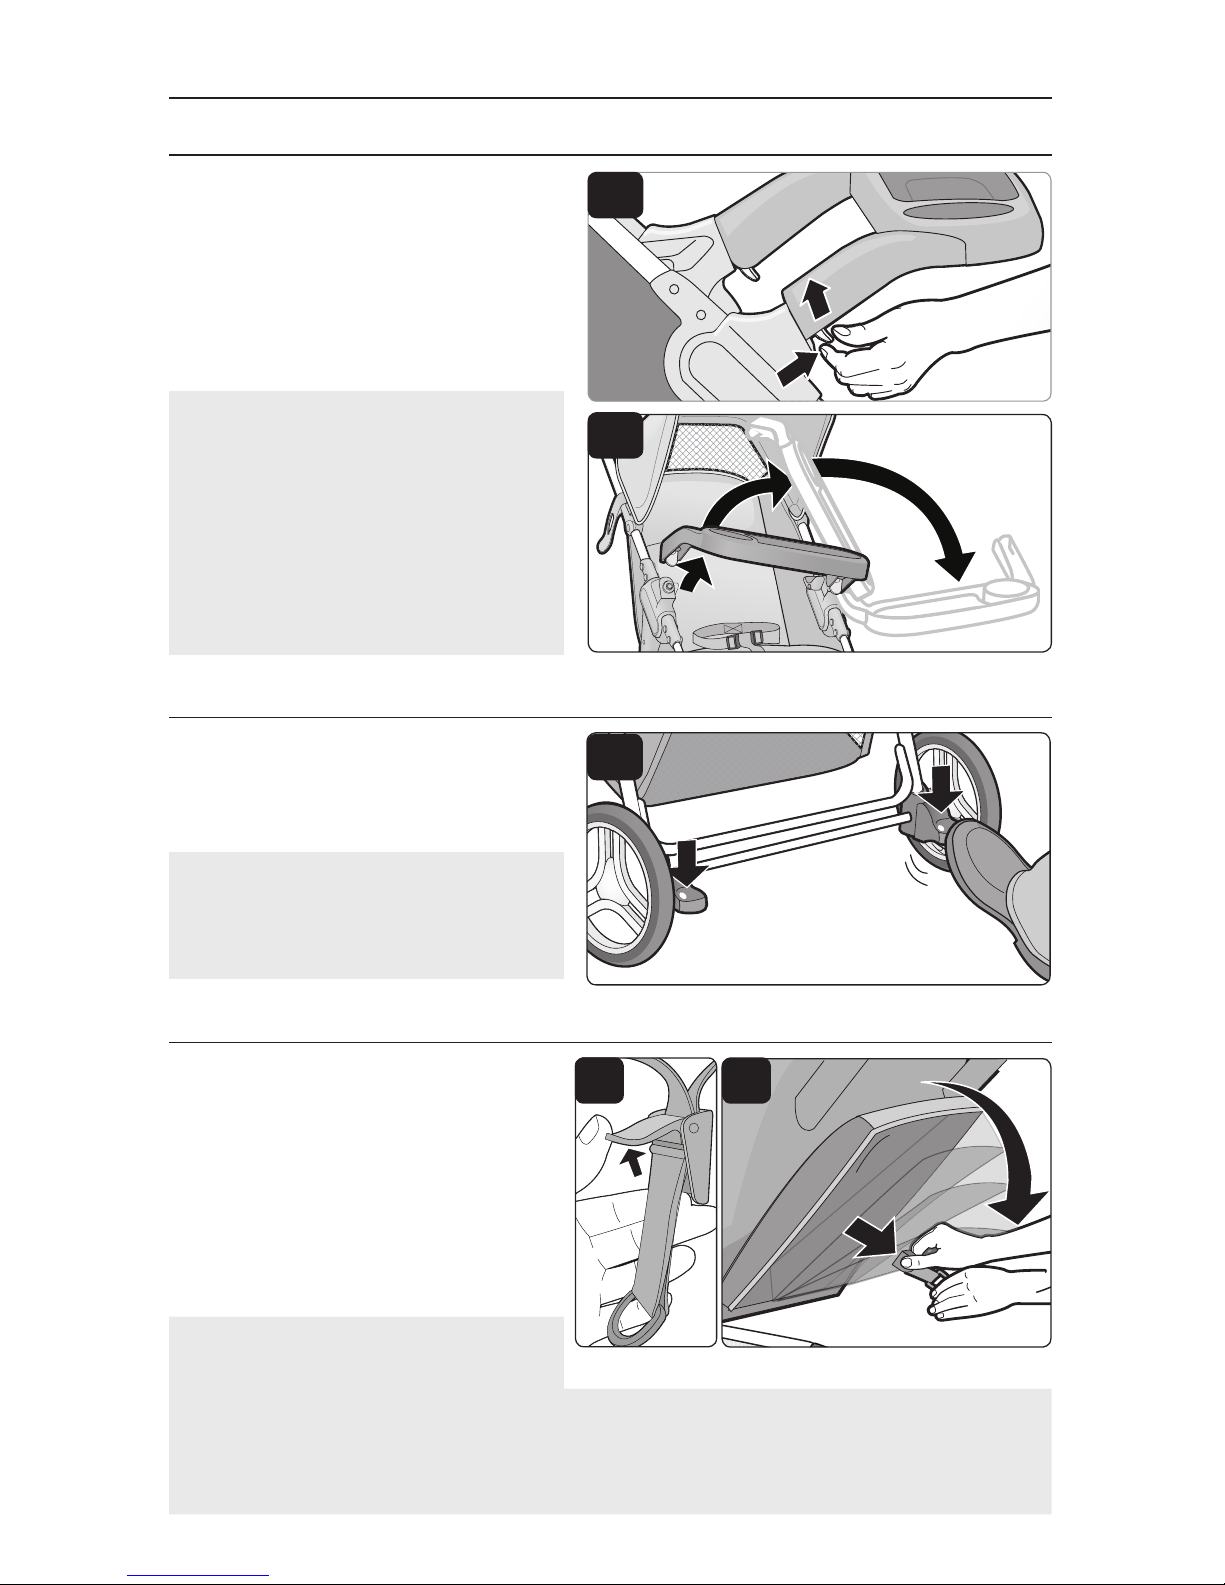
3. To lower seat back completely:
Lift the clamp lever (Figure 3) and lower
seat back (Figure 3a). Push clamp lever
closed.
To raise seat back: Lift clamp lever.
Holding clamp lever, push seat back
forward. Push clamp lever closed.
NOTE: DO NOT adjust the seat when
your child is in the stroller.
To Use Brakes / Para usar los frenos
2
2. Step down onto levers on both rear
wheels (Figure 2) To park stroller, BOTH
BRAKES MUST BE LOCKED. Lift up
levers to unlock brakes.
7
3. Para bajar el respaldo del asiento:
Para reclinar el asiento por completo:
Levante el pestillo (Figura 3) y recline el
asiento (Figura 3a). Cierre el pestillo.
Para colocar el asiento en posición vertical: Levante el pestillo. Sostenga el pestillo y traiga el
asiento hacia adelante. Cierre el pestillo.
NOTA: NO ajuste el asiento cuando su niño está en la carriola.
2. Pise las palancas rojas de ambas ruedas
traseras (Figura 2) Para estacionar la
carriola, AMBOS FRENOS TIENEN
QUE ESTAR PUESTOS. Levante las
palancas para soltar los frenos.
Tip: Child tray can be opened and closed
without removing.
1. To open: Squeeze button (Figure 1) and
rotate tray all the way over (Figure 1a).
To remove completely, squeeze both
buttons and pull tray off posts.
To close: Rotate tray onto post and press
down until tray “clicks” into place.
Consejo: La charola para el niño puede
abrirse y cerrarse sin ser retirada.
1. Para abrir: Apriete el botón (Figura 1) y
gire completamente la charola (Figura 1a).
Para quitarla por completo, apriete
ambos botones y tire hasta sacarla de las
ranuras de la carriola.
Para cerrarla: Gire la charola en la ranura
y presione hasta que la charola haga un
“clic” y encaje en su lugar.
To Adjust Seat Position / Para ajustar la posición del asiento
1
1a
3 3a
Page 8
Using Your Stroller / Uso de la carriola
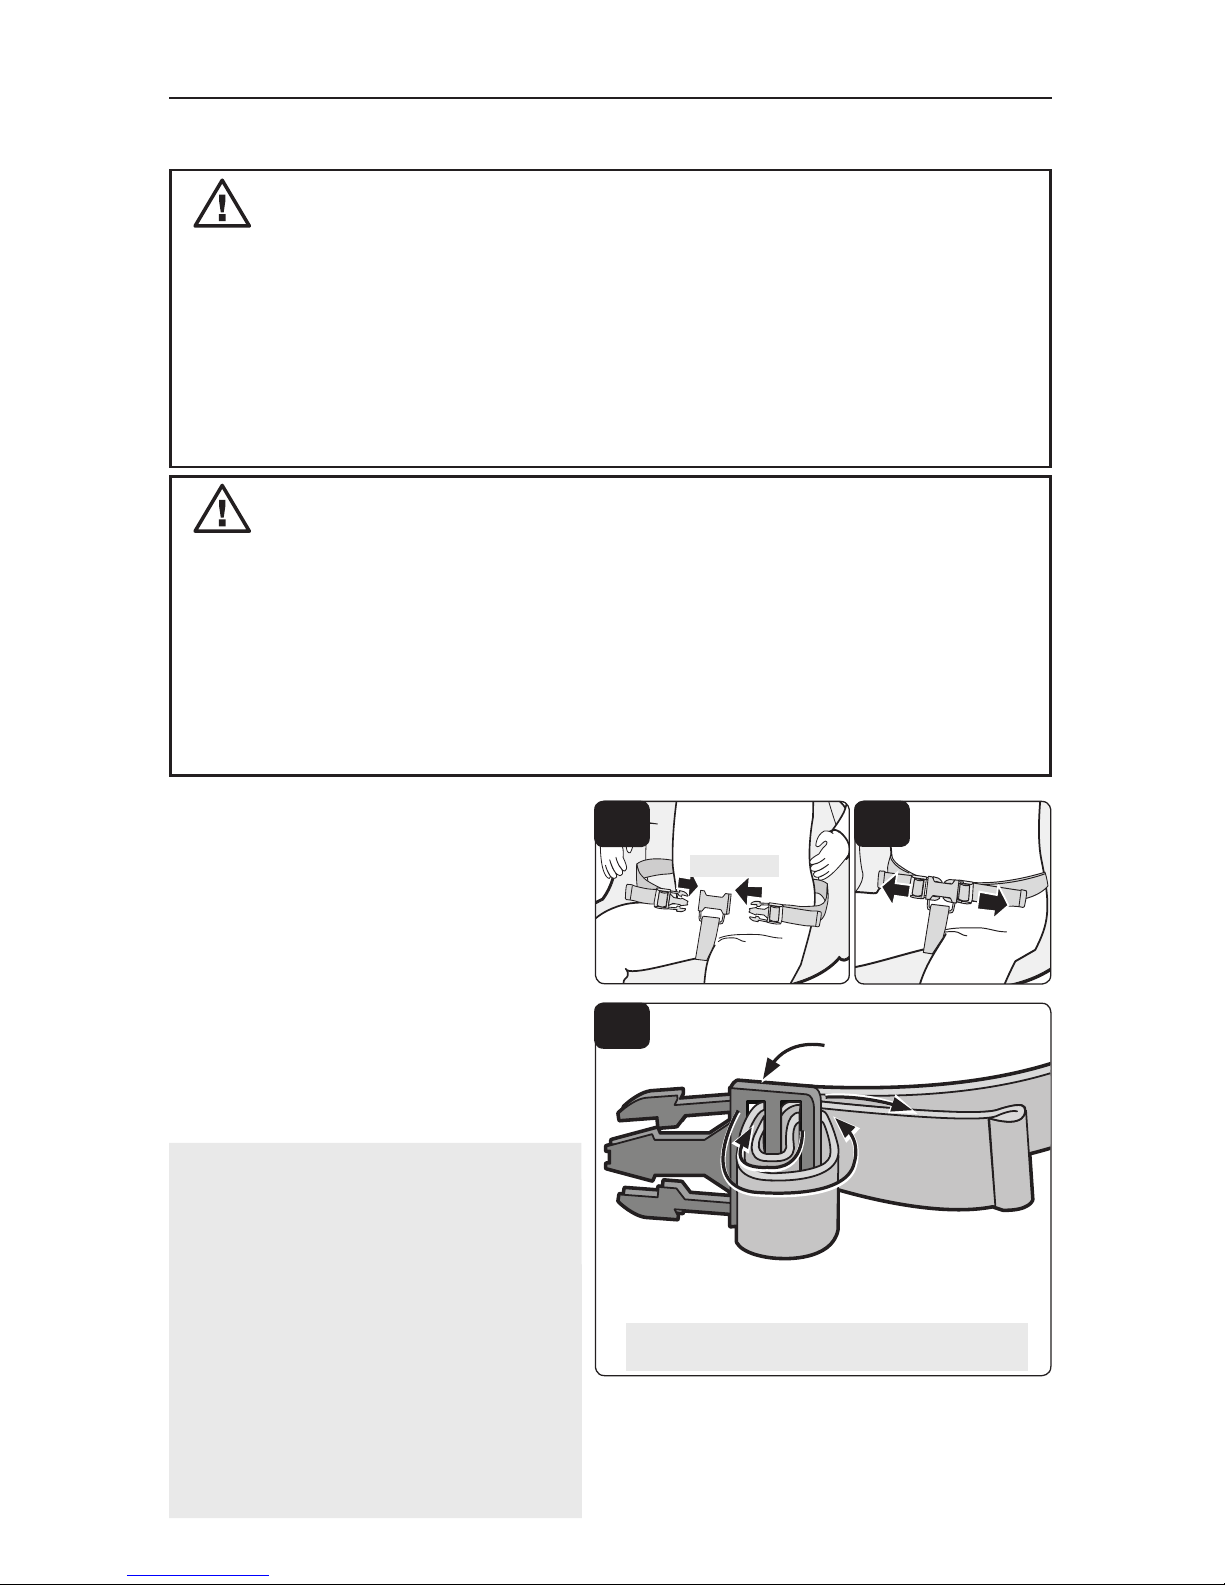
1. Place your child in the stroller, with the
crotch strap between the child’s legs.
Fasten both buckles (Figure 1).
Tighten straps: Pull out loop to
desired tightness, then pull on strap
end (Figure 1a).
Loosen straps: Pull out loop to desired
looseness, then pull on the buckle.
NOTE: If the straps should come out
of the buckle, rethread A - D as shown
(Figure 1b).
To Use Restraint System/ Para usar el sistema de cinturones
WARNING
Buckles
NOTE: Straps must be threaded
in direction of arrows shown.
1
1a
1b
1. Coloque al niño en la carriola, con la correa
de la entrepierna entre las piernas del
niño. Abroche ambas hebillas (Figura 1).
Ajuste las correas: Tire del lazo hasta
alcanzar el ajuste deseado y luego tire del
extremo de la correa (Figura 1a).
Afloje las correas: Tire del lazo hasta
aflojar según lo deseado; luego, tire de
la hebilla.
NOTA: Si las correas se salen de la
hebilla, vuelva a pasar A a D tal como se
muestra (Figura 1b).
Hebillas
8
ADVERTENCIA
• NEVER LEAVE CHILD UNATTENDED. ALWAYS keep child in view
when in stroller.
• AVOID SERIOUS INJURY from falling or sliding out. ALWAYS use
seat belt. Check frequently to make sure it is secure.
• Belts must be threaded exactly as shown (Figure 1b).
• Failure to follow these instructions could result in the serious injury
or death of your child.
• NUNCA DEJE AL NIÑO SIN SUPERVISIÓN. SIEMPRE mantenga al
niño a la vista cuando esté en la carriola.
• EVITE UNA LESIÓN GRAVE por caída o resbalamiento. SIEMPRE use el cinturón
de seguridad. Revise con frecuencia para asegurarse que esté asegurado.
• Los cinturones deben pasarse exactamente como se muestra
(Figura 1b)
.
• El no seguir estas instrucciones podría resultar en lesiones graves o la
muerte del niño.
B
A
C
D
B
A
C
D
NOTA: Las correas deben enhebrarse en
la dirección indicada por las flechas.
Page 9
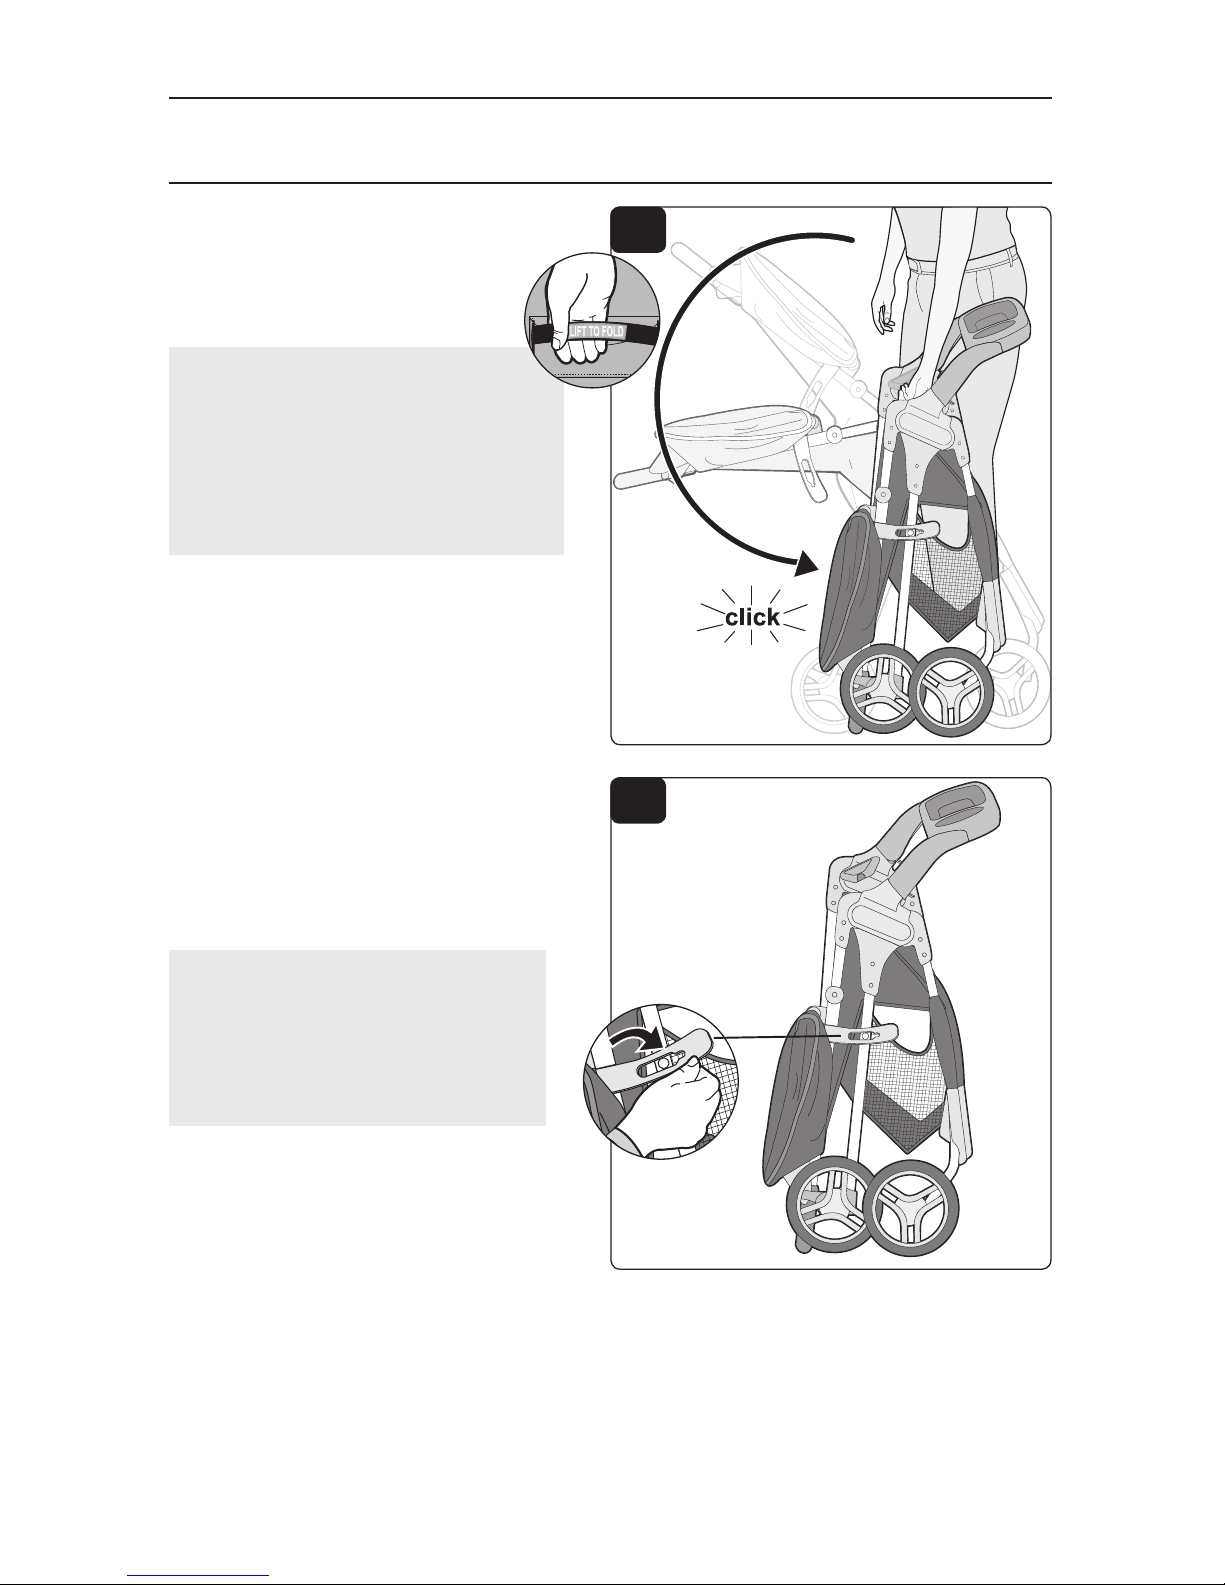
Using Your Stroller / Uso de la carriola
1. Lock rear brakes and remove your baby.
Pull stroller backward so wheels extend
outward. Find LIFT TO FOLD handle
under pocket on seat (Figure 1)
and pull up on handle to fold.
1
2. Ensure lock (on left side of stroller
handle) locks into place when folded, as
shown (Figure 2).
Stroller will stand on its own.
2
To Fold Stroller / Para plegar la carriola
1. Ponga los frenos traseros y saque
al bebé. Tire de la carriola hacia
atrás para que las ruedas queden hacia
afuera. Ubique la agarradera “
LIFT
TO FOLD” (tirar para plegar) que se
encuentra debajo del bolsillo del asiento
(Figura 1) y tire de la agarradera para
plegar.
2. Asegurar la lengüeta traba lateral
(que se encuentra a la izquierda
del manubrio) se en el lugar
correctamente trabada, como se
muestra (Figura 2).
La carriola se parará sola.
9
Page 10
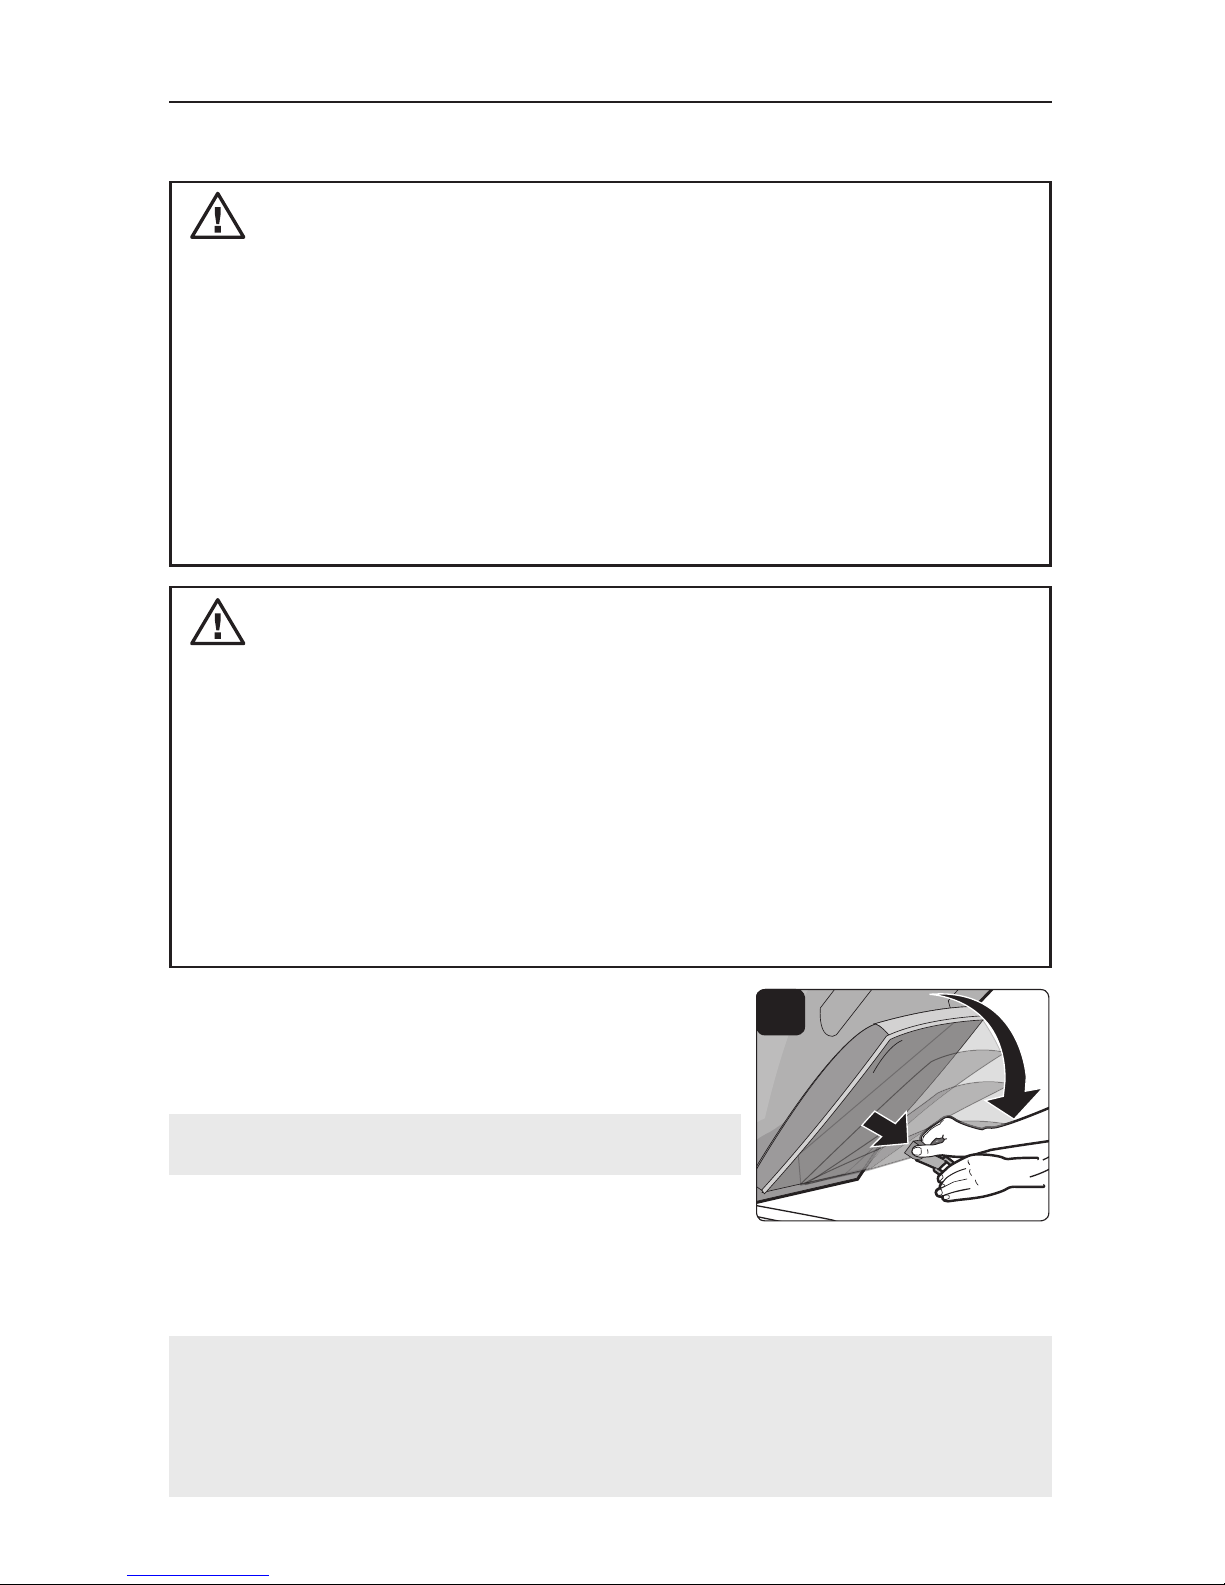
10
1. Recline seat back to lowest position (Figure 1). Close
canopy.
To Install Infant Car Seat / Para instalar el autoasiento de bebé
To Install Infant Car Seat / Para instalar el
autoasiento de bebé
To avoid serious injury:
• Use ONLY IC178, IC229, IC210, IC220, IC219, IC226, IC181, IC228, IC211,
IC217, IC218, IC224, IC244, IC234, IC230, IC231, IC206, IC207, IC208, IC233,
22056, IC201, IC203, IC205, IC240, 22326, 22036,IC250, IC251, IC252 infant
car seats with this stroller.
• Please refer to the manufacturer’s instructions for the use of your infant car seat.
• ALWAYS use child’s tray when car seat is installed.
• ALWAYS install car seat facing to the rear of the stroller.
• ALWAYS use the restraint system in the car seat.
WARNING
Using Your Stroller / Uso de la carriola
1. Recline el respaldo del asiento a la posición más baja
(Figura 1). Cierre la capota.
Para evitar lesiones graves:
• SÓLO use con esta carriola los autoasientos para bebé IC178, IC229, IC210,
IC220, IC219, IC226, IC181, IC228, IC211, IC217, IC218, IC224, IC244,
IC234, IC230, IC231, IC206, IC207, IC208, IC233, 22056, IC201, IC203,
IC205, IC240, 22326, 22036,IC250, IC251, IC252.
• Consulte las instrucciones del fabricante para el uso del autoasiento de bebé.
• SIEMPRE use la charola para el niño cuando el autoasiento está instalado.
• SIEMPRE instale el autoasiento mirando hacia atrás de la carriola.
• SIEMPRE use el sistema de cinturones del autoasiento.
ADVERTENCIA
2. Car seat must be positioned so child faces the stroller handle.
Position car seat over the stroller, touch rear flat vertical surface of car seat A against rear vertical
surface of the child tray B and lower straight down into stroller and push down on handle. Car
seat will click into place when fully nested (Figures 2a and 2b).
2. El autoasiento debe quedar colocado de modo que el niño mire hacia la
manija del carriola.
Coloque el autoasiento sobre la carriola de manera que la superficie plana vertical trasera
del autoasiento A se apoye en la superficie vertical trasera de la charola del niño B. Baje el
autoasiento directamente sobre la carriola y empuje la manija hacia abajo. El autoasiento se
encajará en posición cuando esté colocado por completo (Figuras 2a y 2b).
1
Page 11
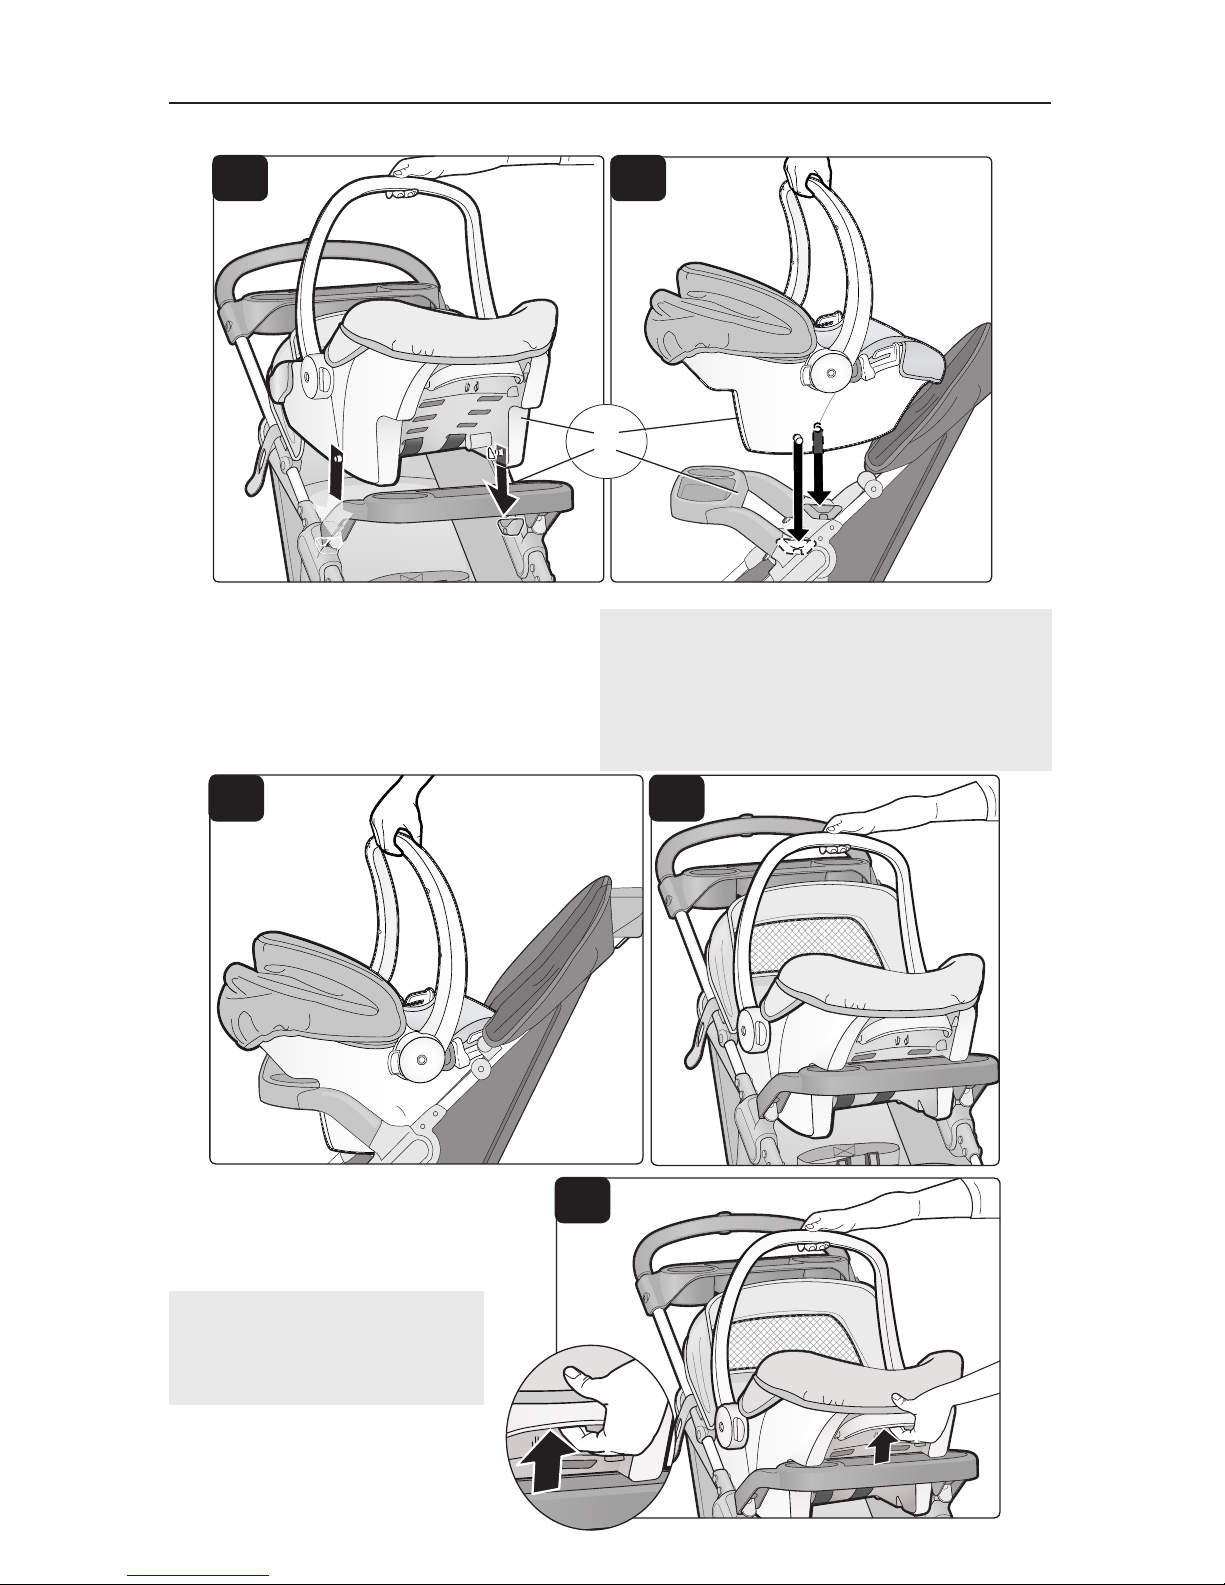
11
continued / continuación
3. To remove the car seat, pull the
release lever as shown (Figure
3). Lift car seat.
Using Your Stroller / Uso de la carriola
4
3
3. Para quitar el autoasiento, tire
de la palanca de liberación,
como se muestra (Figura 3).
Levante el autoasiento.
When properly installed, car seat will come to
rest on child tray and stroller frame (Figure 2c).
Pull up on car seat to make sure it is securely
installed (Figure 2d).
A
B
Una vez instalado correctamente, el autoasiento
descansará sobre charola para el niño y el armazón
de la carriola (Figura 2c).
Tire del autoasiento hacia arriba para
asegurarse de que esté firmemente instalado
(Figura 2d).
2a
2c
2b
2d
Page 12

12
• Dual front wheels
• Rear wheels
• Child’s tray
• Parent’s tray
• Axle
• Hardware bag for rear wheel assembly
• To order parts call (800) 544-1108. Include the model number (TR305, TR336, TR341, TR349, TR355)
and manufacture date (found on the stroller) and a brief description of the part.
Stroller Care and Maintenance / Cuidado y mantenimiento de la carriola
Replaceable Parts / Piezas de repuesto
• Spot clean pad, restraint and crotch straps with cold water and mild soap. Air dry.
• Periodically check for loose screws, worn parts, torn material or loose stitching. Tighten or replace
parts as needed.
One-Year Limited Warranty / Garantia limitada de un año
Dorel Juvenile Group, Inc. warrants to the original purchaser that this product (“Lift & StrollTM” Travel System)
is free from material and workmanship defects when used under normal conditions for a period of one (1) year
from the date of purchase. Should the product contain defects in material or workmanship Dorel Juvenile Group,
Inc., will repair or replace the product, at our option, free of charge. Purchaser will be responsible for all costs
associated with packaging and shipping the product to Dorel Juvenile Group Consumer Relations Department
at the address noted on front page and all other freight or insurance costs associated with the return. Dorel
Juvenile Group will bear the cost of shipping the repaired or replaced product to the purchaser. Product should
be returned in its original package accompanied by a proof of purchase, either a sales receipt or other proof that
the product is within the warranty period. This warranty is void if the owner repairs or modifies the product or
the product has been damaged as a result of misuse.This warranty excludes any liability other than that expressly
stated previously, including but not limited to, any incidental or inconsequential damages.
SOME STATES DO NOT ALLOW THE EXCLUSION OR LIMITATION OF INCIDENTAL OR CONSEQUENTIAL
DAMAGES, SO THE ABOVE LIMITATION OR EXCLUSION MAY NOT APPLY TO YOU.
THIS WARRANTY GIVES YOU SPECIFIC LEGAL RIGHTS, AND YOU MAY ALSO HAVE OTHER RIGHTS THAT
MAY VARY FROM STATE TO STATE.
• Ruedas delanteras dobles
• Ruedas traseras
• Charola para el niño
• Charola para los padres
• Eje
• Hardware bolsa para el montaje de la rueda trasera
• Para pedir piezas llame al (800) 544-1108. Incluya el número de modelo (TR305, TR336, TR341, TR349,
TR355) y la fecha de fabricación (se encuentran en la carriola) y una descripción breve de la pieza.
• Limpie las manchas del acojinado con agua fría y jabón suave. Deje secar al aire.
• De vez en cuando revise que no haya tornillos flojos, piezas desgastadas, material rasgado ni costuras
sueltas. Apriete o cambie las piezas según sea necesario.
Dorel Juvenile Group, Inc. garantiza al comprador original que este producto (Sistema de viaje “Lift & StrollTM”)
estará libre de defectos de material y mano de obra cuando se utilice bajo condiciones normales durante un
periodo de un (1) año a partir de la fecha de compra. Si el producto tuviese defectos de material o mano de obra,
Dorel Juvenile Group, Inc. reparará o reemplazará el producto, a nuestra opción, sin cargo. El comprador será
responsable de todos los costos asociados con embalar y enviar el producto al Departamento de Relaciones con
el Consumidor de Dorel Juvenile Group a la dirección indicada en la primera página y de todos los otros costos
de envío o seguro asociados con la devolución. Dorel Juvenile Group correrá con los gastos de enviar el producto
reparado o reemplazado al comprador. El producto se debe devolver en su embalaje original acompañado de la
constancia de compra, ya sea un recibo de compra u otra prueba que demuestre que el producto está dentro del
periodo de garantía. Esta garantía es nula si el propietario repara o modifica el producto o si éste sufrió daño como
resultado de uso incorrecto.Esta garantía excluye cualquier responsabilidad que no sea la expresamente indicada
anteriormente, incluyendo pero sin limitarse a daños incidentales o consecuentes.
ALGUNOS ESTADOS NO PERMITEN LA EXCLUSIÓN O LIMITACIÓN DE DAÑOS INCIDENTALES O
CONSECUENTES, POR LO TANTO LA LIMITACIÓN O EXCLUSIÓN ANTERIOR PODRÍA NO APLICARSE
EN SU CASO.
ESTA GARANTÍA LE OTORGA DERECHOS LEGALES ESPECÍFICOS Y USTED PODRÍA TENER TAMBIÉN
OTROS DERECHOS QUE PUEDEN VARIAR DE UN ESTADO A OTRO.
 Loading...