

Page 1
TETHER
Page 26
LOWER
ANCHOR
Page 19
FUNSMARTSIMPLE
COMMUTER, VENUTRA, HIGH BACK
BOOSTER CAR SEAT
Forward Facing: 22-40 lb and 34-43 in.
And at least 1 year old
(10.1-18 kg and 85.1-110 cm)
Belt-Positioning Booster: 40-80 lb and 43-52 in.
And at least 3 years old
(18.1-36.3 kg and 110.1-132.1 cm)
www.coscokids.com
©2016 Dorel Juvenile. All Rights Reserved.
4358-7082 9.20.16
KEEP INSTRUCTIONS FOR FUTURE USE.
Read all instructions before using this child restraint.
Failure to follow the warnings on the labels and in the
instruction manual can result in serious injury or death
to your child.
Page 2
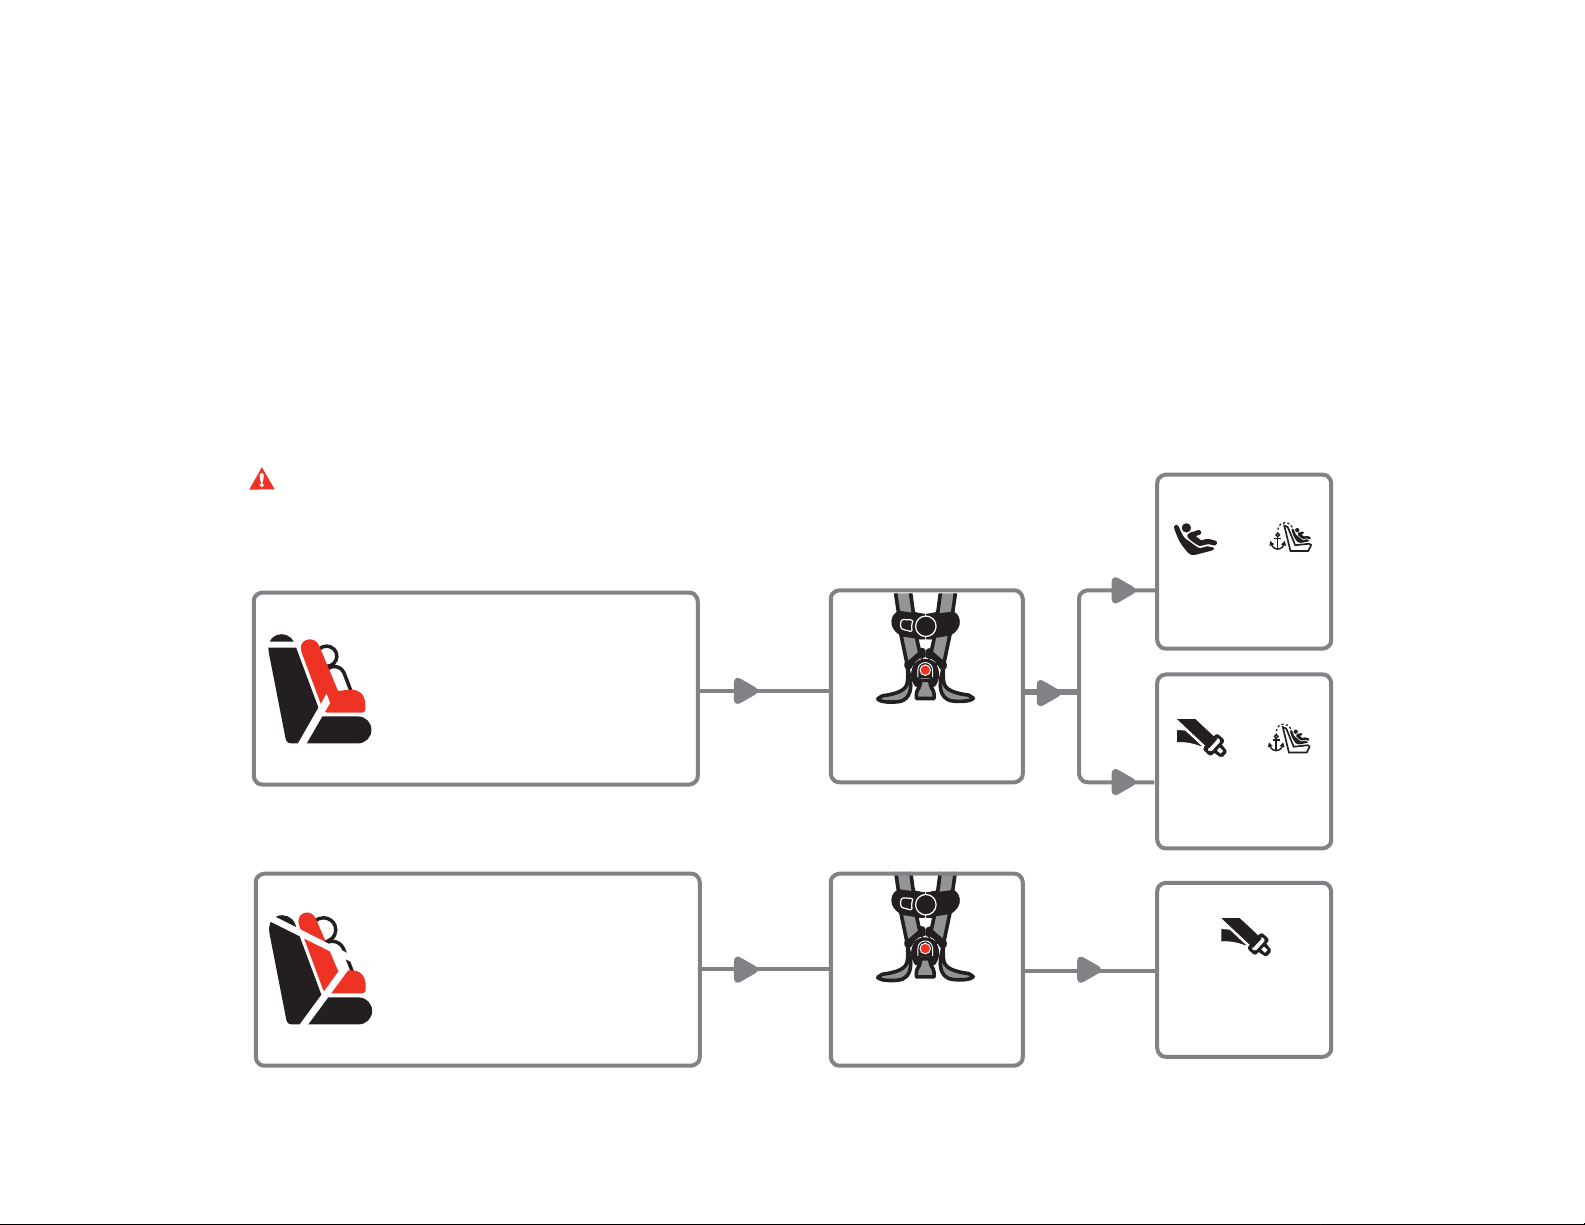
Choosing Forward Facing or Booster Seat
Your child’s height, weight, and age determine how your child
restraint should be placed in the vehicle.
Children up to 1 year of age must ride rear facing.
The American Academy of Pediatrics recommends that children
should remain rear facing until they are at least 2 years old.
Please talk to your doctor about the best option for your child.
This child restraint must always be used forward facingwith the internal harness system or as a booster seat.
WARNING: Verify your child’s weight and height
(do not guess) before choosing the child restraint’s
placement.
FORWARD FACING
with internal harness
22-40 lb (10.1-18 kg)
34-43 in. (85.1-110 cm)
At least 1 year old
See page 3 to
adjust internal
harness system
+
Lower Anchor Install
Page 27
+
BOOSTER SEAT
40-80 lb (18.1-36.3 kg)
43-52 in. (110.1-132.1 cm)
At least 3 years old
See page 9 to
remove internal
harness system
Vehicle Belt Install
Page 30
Lap and Shoulder
Belt Install
Page 33
Page 3
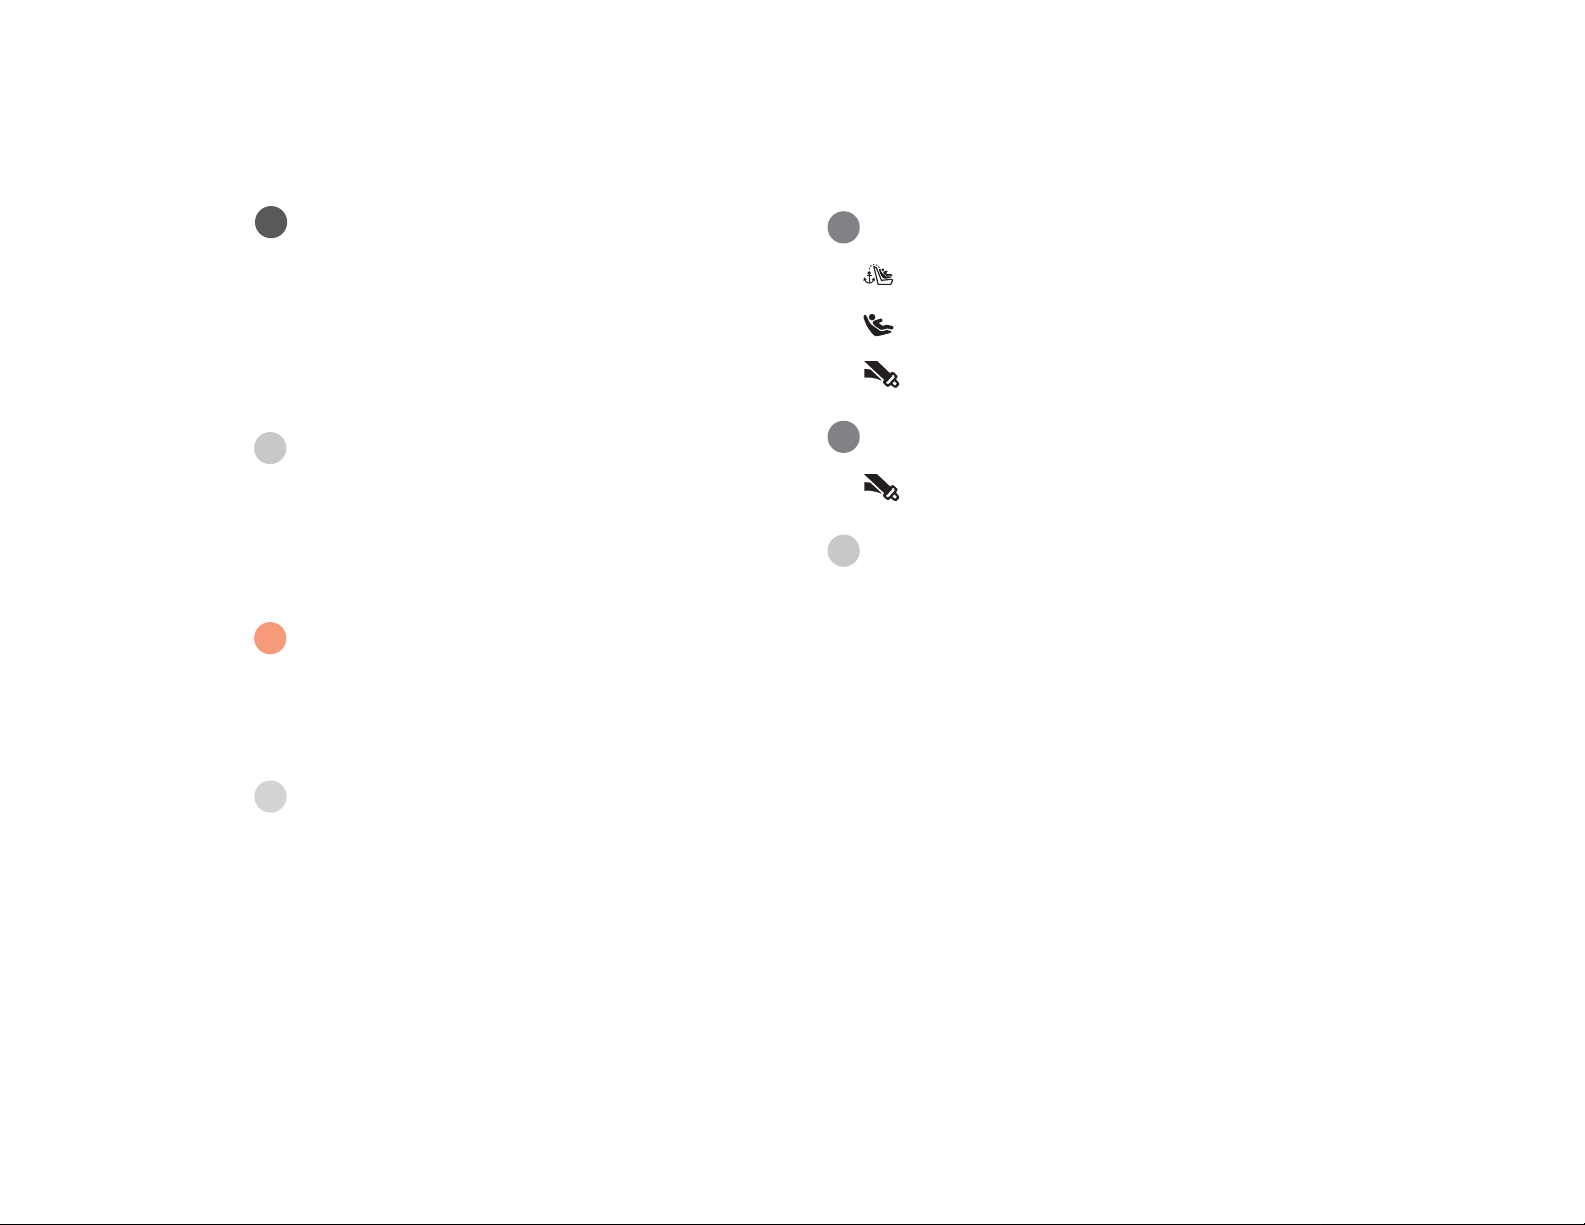
Table of Contents
Getting Started ......................................1
Parts of the Child Restraint .................................1
Prepare Child Restraint to Fit Your Child ..............3
How Does Your Child Fit? ...................................4
Changing Position of Shoulder Harness Strap ........5
Securing Child in Child Restraint .........................7
General Use ............................................9
Removing Harness System .................................9
Removing Seat Pad for Cleaning .........................11
Installing Harness System ..................................13
Accessories ......................................................16
Safety Information .................................17
Child Restraint Use ............................................17
Installation in Vehicle .........................................17
Vehicle Seating Position .....................................18
Vehicle Information ................................ 19
Forward Facing ...................................... 25
Tether Use ..................................................26
Lower Anchor Installation .............................27
Vehicle Belt Installation ................................30
Booster Seat ...........................................32
Lap and Shoulder Belt Installation .................33
Important Information ...........................34
Using a Locking Clip ..........................................34
Dorel Juvenile Group Information... .....................37
Troubleshooting .................................................38
Registration and Safety Notices ..........................39
Replacement Parts Order Form ...........................40
Warranty ...........................................................42
Choosing Lower Anchor or Vehicle Belts ..............19
Knowing Your V ehicle Belts .................................21
Aircraft Information ...........................................24
Page 4
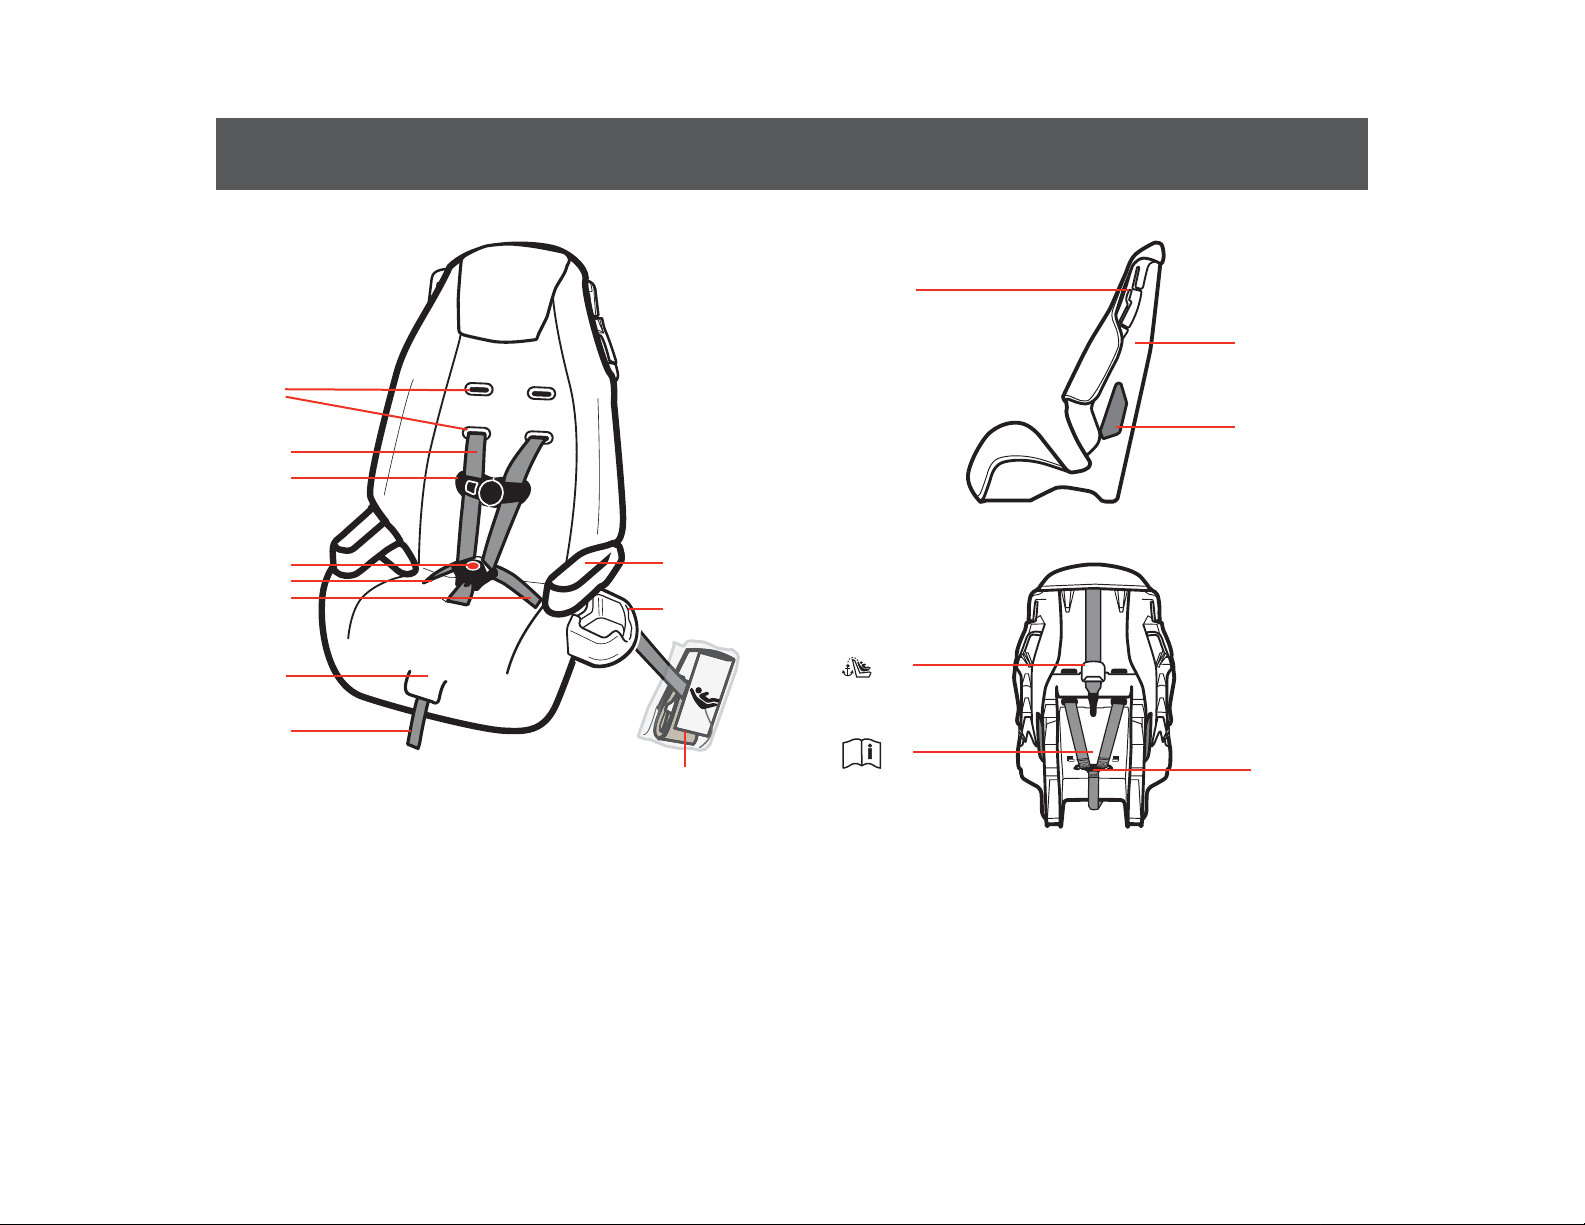
Parts of the Child Restraint
Front View
A
B
C
D
E
F
G
A. Shoulder Harness
Slots
H
I
J
G. Harness
Adjustment Strap
Side View
K
L
M
Back View
N
O
P
B. Harness Strap
C. Chest Clip
D. Buckle
H. Armrests
(on select models)
I. Cup Holder
(see page 16)
K. Belt-Positioning
Guide
L. Shell (child restraint)
N. Tether (see page 26)
O. Instruction Manual
Storage
E. Hip Harness Slots
F. Harness Release
J. Lower Anchor Belt
(see page 19)
M. Forward-Facing
Belt Path
P. Splitter Plate
Lever (under fl ap)
1 2
Page 5
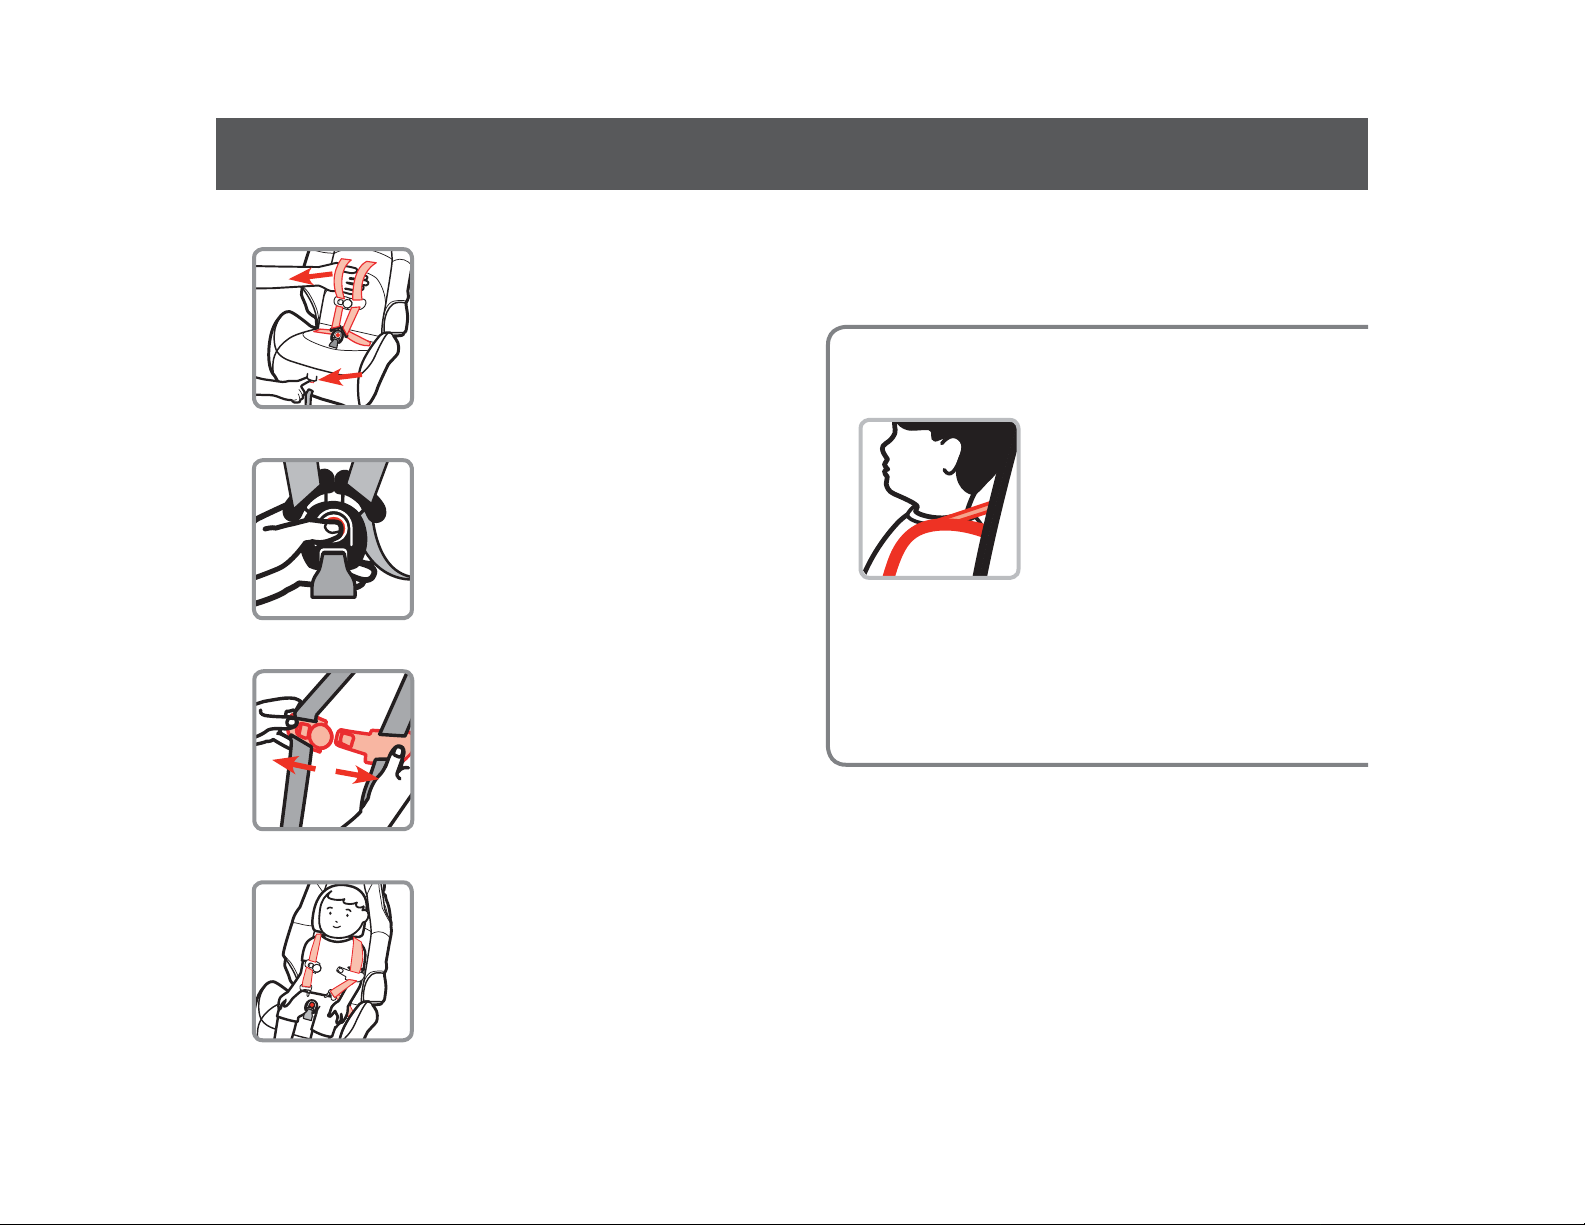
Prepare Child Restraint to Fit Your Child How Does Your Child Fit?
1. Fully Loosen Harness
Strap
Push down on harness release lever
(under fl ap on front of seat pad)
while pulling out on harness straps
as shown.
2. Unbuckle Harness
Press in towards the top of the red
button.
Pull buckle tongues out.
3. Release Chest Clip
Press on chest clip release button
and pull apart.
Place harness straps out of the way.
Use the guidelines below to determine if the harness strap
is in the right place for your child.
FORWARD FACING
with Internal Harness
Always choose the shoulder harness
slot that is closest to your child’s
shoulder height.
Harness strap MUST be at or
slightly above shoulders. To make
changes to the harness strap, see
pages 5-6.
If the highest shoulder harness slots are below the child’s
shoulders, and the child weighs at least 40 lb (18 kg) and is
at least 3 years old, you must convert the child restraint to a
booster seat.
To prepare seat as a booster, see pages 9-10.
4. Place Child in Child
Restraint to Determine
Proper Harness Fit
The child’s bottom and back should
be fl at against the child restraint.
See page 4 for fi t guidelines.
3 4
Page 6
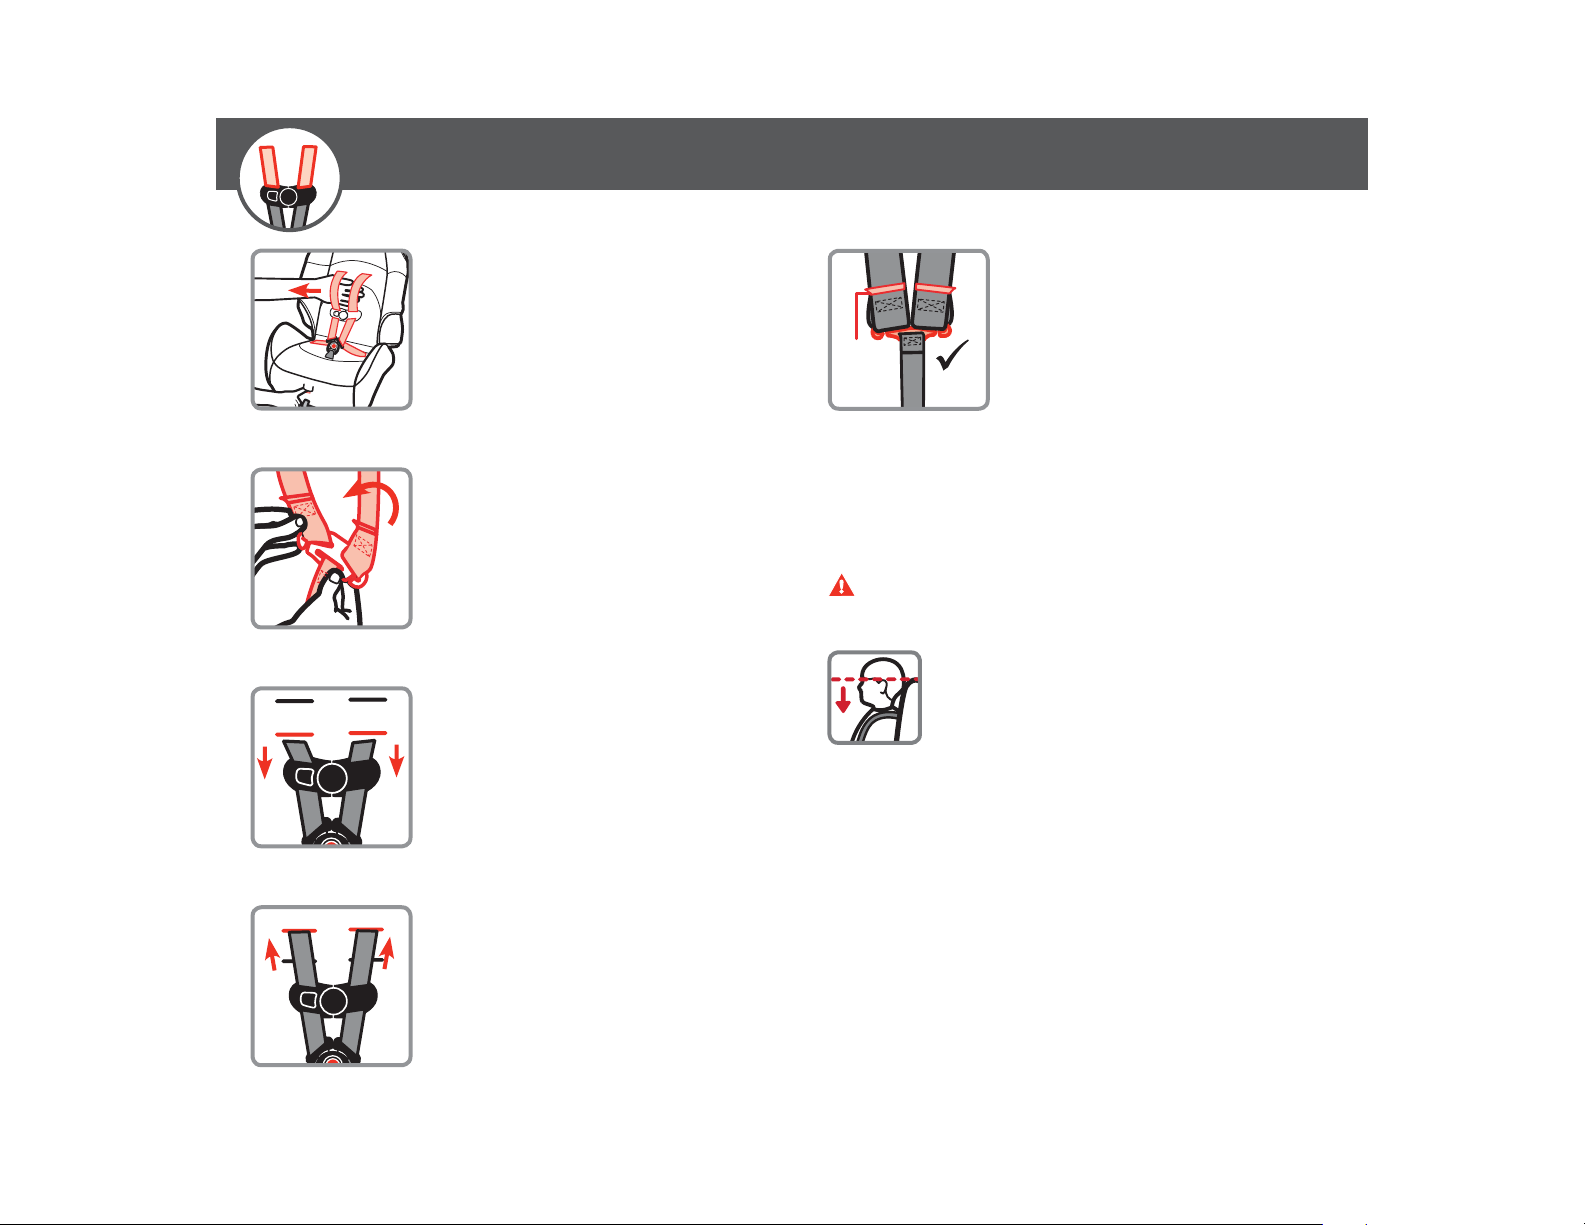
Changing Position of Shoulder
sewn
end
Harness Strap
1. Fully Loosen Harness
Strap
Push down on harness release lever
(under fl ap on front of seat pad)
while pulling out on harness straps
as shown.
2. From Back, Remove
Harness Strap Loops
From Splitter Plate
3. Pull Harness Strap Out of
Shoulder Harness Slots
5. Attach Harness Strap
Loops to Splitter Plate
As Shown
Sewn ends of the harness strap
loops
MUST face towards you.
DO NOT twist harness strap or
harness adjustment strap.
Make sure the loops are fitted
COMPLETELY ON both sides of
the splitter plate.
WARNINGS: Make sure that harness height is correct
for your child’s size.
Do not use this child restraint forward facing if
the tops of your child’s ears are above the top
of the child restraint.
Failure to follow these steps can result in serious injury or
death.
4. Rethread Harness Strap
into Correct Shoulder
Harness Slots For Your
Child
See page 4 for fi t guidelines.
5 6
Page 7
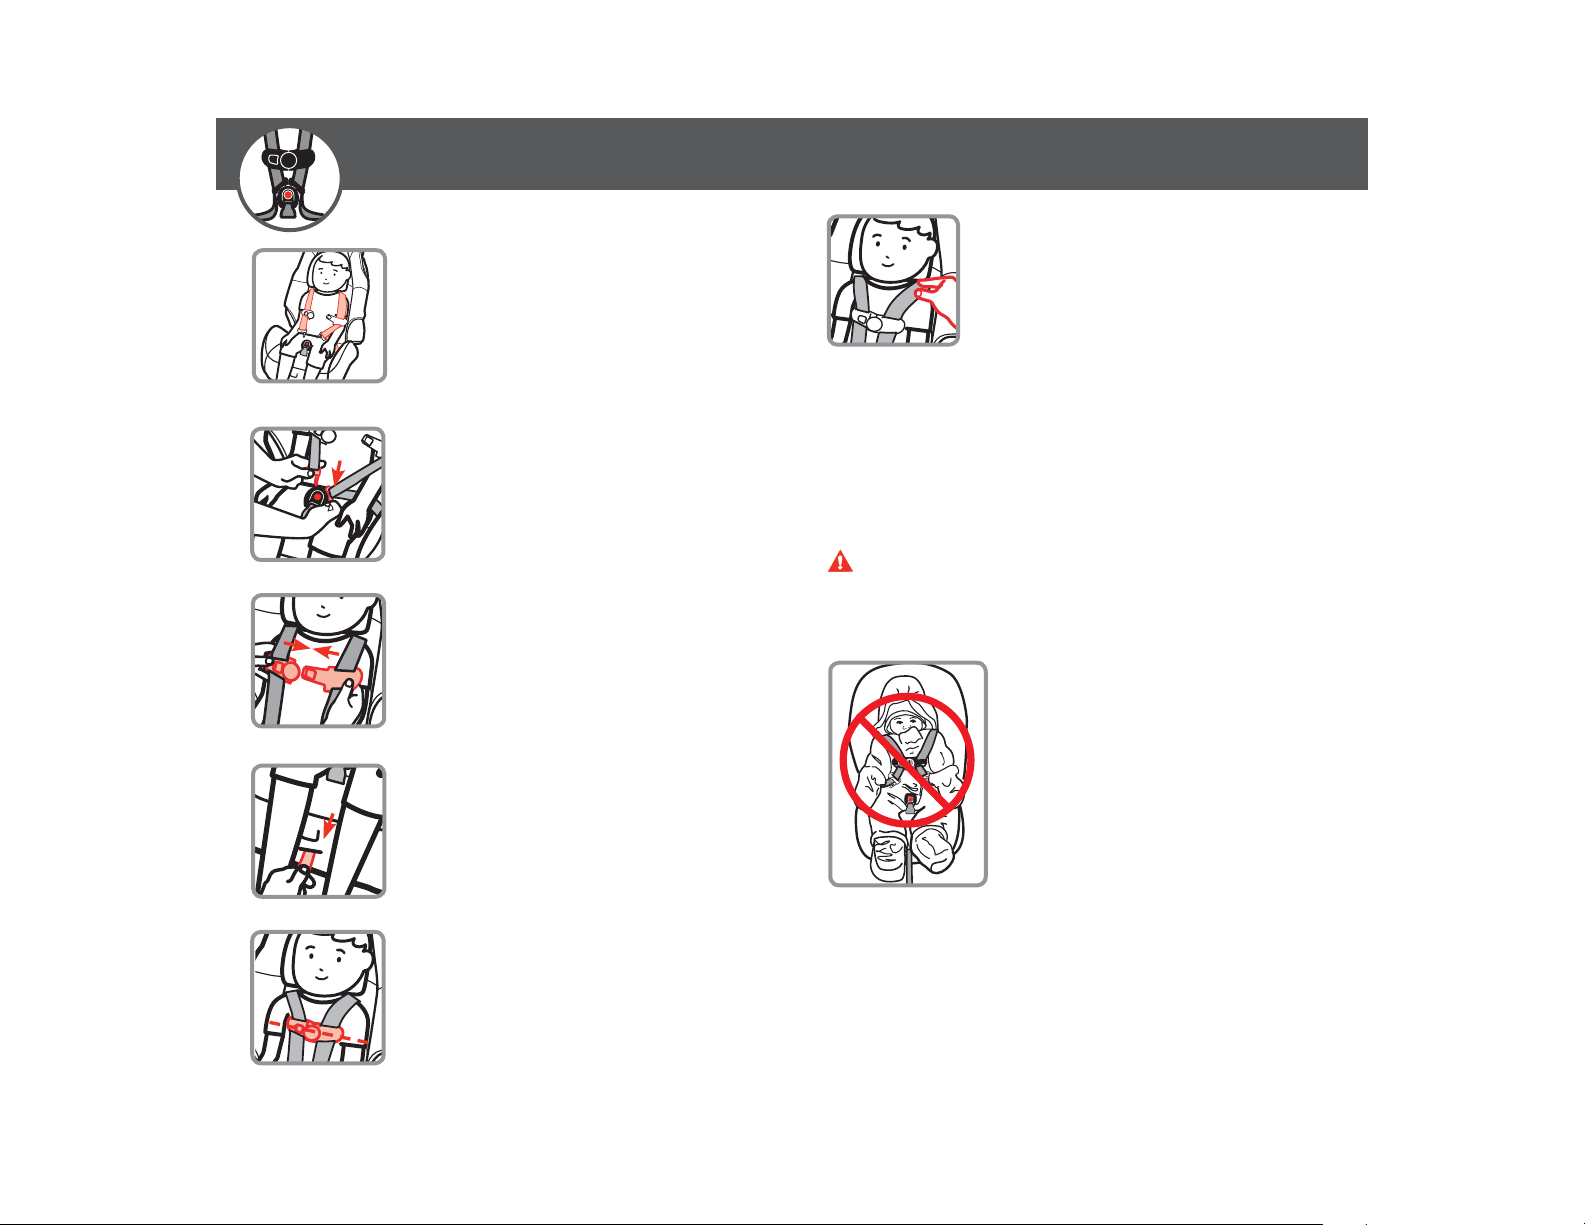
Securing Child in Child Restraint
1. Place Child in Child
Restraint
The child’s bottom and back should
be flat against the child restraint.
Position harness strap over child’s
shoulders and upper thighs.
2. Buckle Harness
Push buckle tongues into buckle
until you hear them “click.”
Pull up on harness strap to make
sure buckle is locked.
3. Close Chest Clip
Insert right half of chest clip into
left half and snap together.
6. Check Harness Tightness
Try to pinch the harness at the shoulders
vertically between index finger and thumb
as shown.
If your fingers slip off, the harness is
tight enough.
If you can pinch the harness strap, tighten more. The harness
strap should be snug throughout their length.
A snug strap should not allow any slack. It lies in a relatively
straight line without sagging. It does not press on the child’s
fl esh or push the child’s body into an unnatural position.
WARNINGS: Failure to fasten and tighten the harness
system correctly may allow the child to be ejected from the
child restraint in a crash or sudden stop causing serious
injury or death.
Do not mistake comfort for safety.
Harness system must be snugly
adjusted.
4. Tighten Harness
Pull on harness adjustment strap to
DO NOT put snowsuits or bulky
garments on your child when placing
them in the child restraint.
tighten harness snugly.
Bulky clothing can prevent the harness straps from being tightened
properly.
5. Position Chest Clip
To Remove Child From Child Restraint
The chest clip must be placed at
mid-chest (even with armpits) and
away from the child’s neck.
7
1. Loosen Harness Strap
2. Unbuckle Harness
3. Release Chest Clip
4. Remove Child
8
Page 8
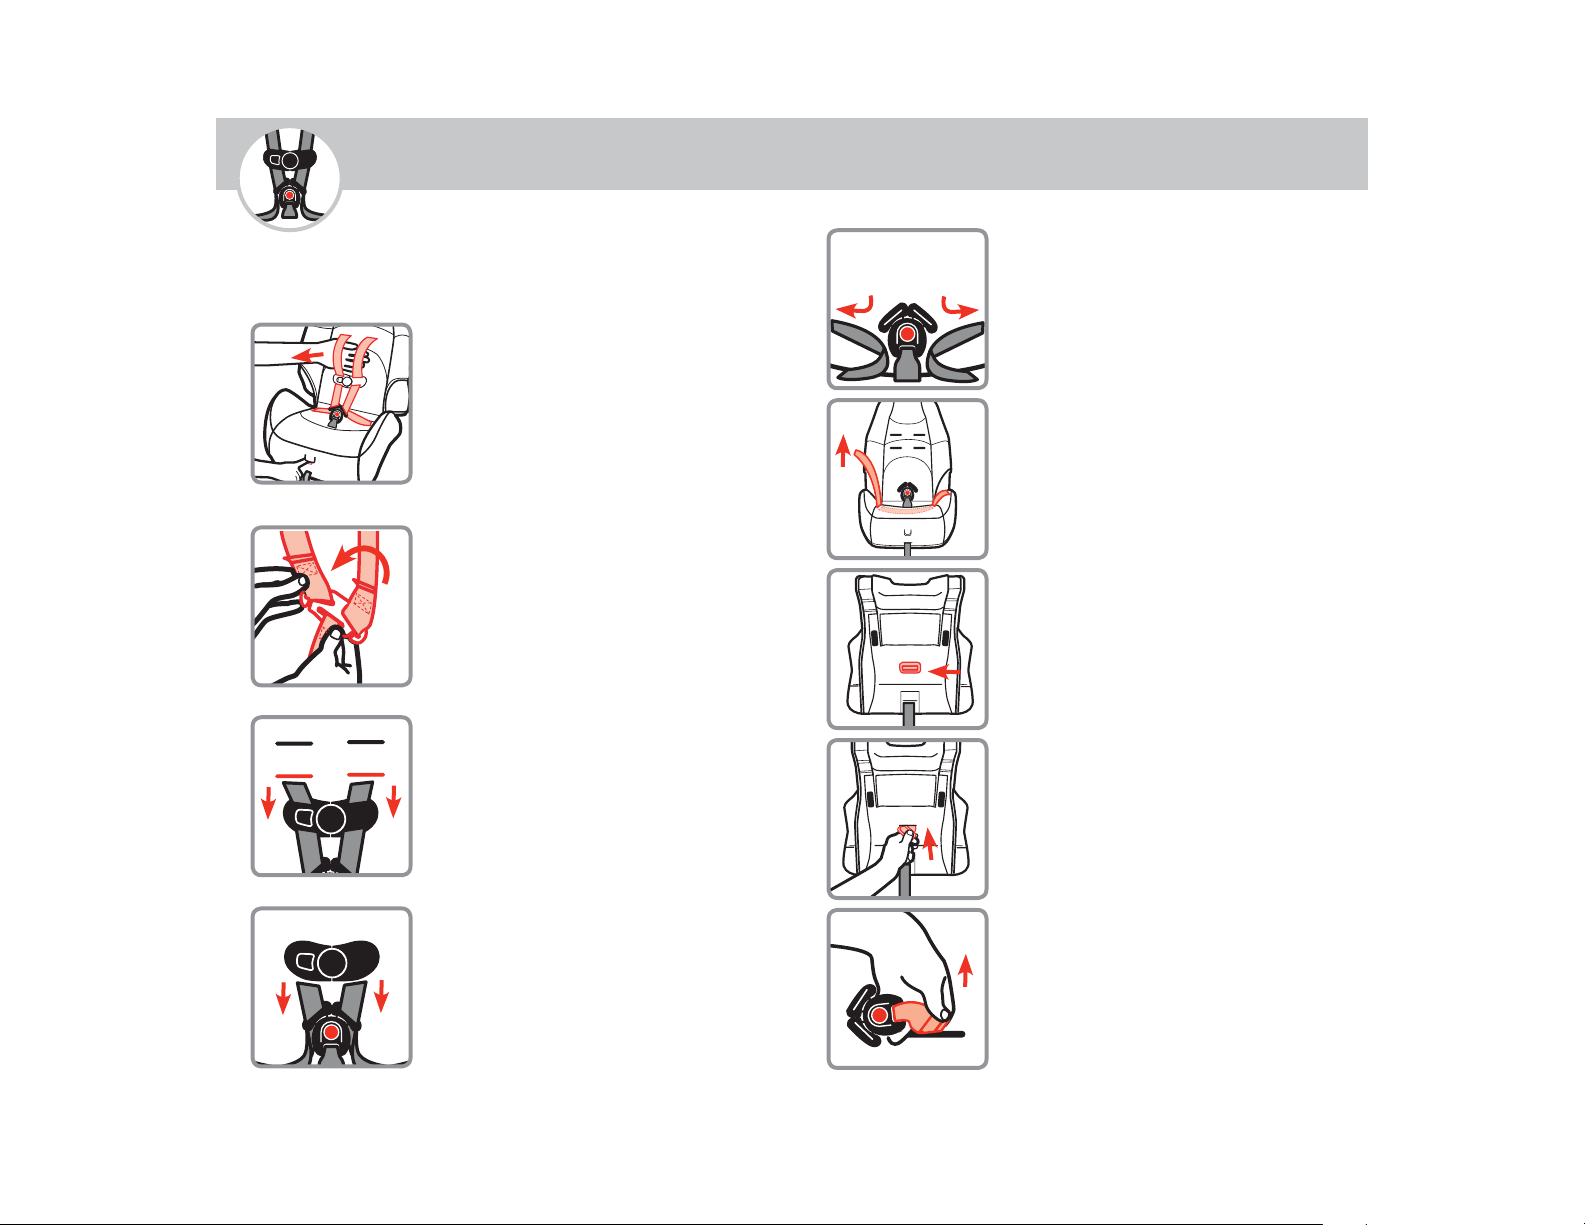
Removing Harness System
Only remove the harness system to clean seat pad or when
changing child restraint to a booster seat.
1. Fully Loosen Harness
Straps
Push down on harness release lever
(under fl ap on front of seat pad)
while pulling out on harness straps
as shown.
2. From Back, Remove
Harness Strap Loops
From Splitter Plate
3. Pull Harness Strap Out of
Shoulder Harness Slots
5. Unthread Buckle
Do not unbuckle the buckle.
6. Pull Harness Strap Out of
Seat
7. Turn Seat Over
Locate buckle’s metal retainer on
bottom of shell.
8. Rotate Metal Retainer
and Push It Up Through
Shell and Pad
4. Unthread Chest Clip
9. From Top of Seat,
Pull Buckle Out of Shell
Store the buckle and harness strap in
a safe place for future use.
109
Page 9
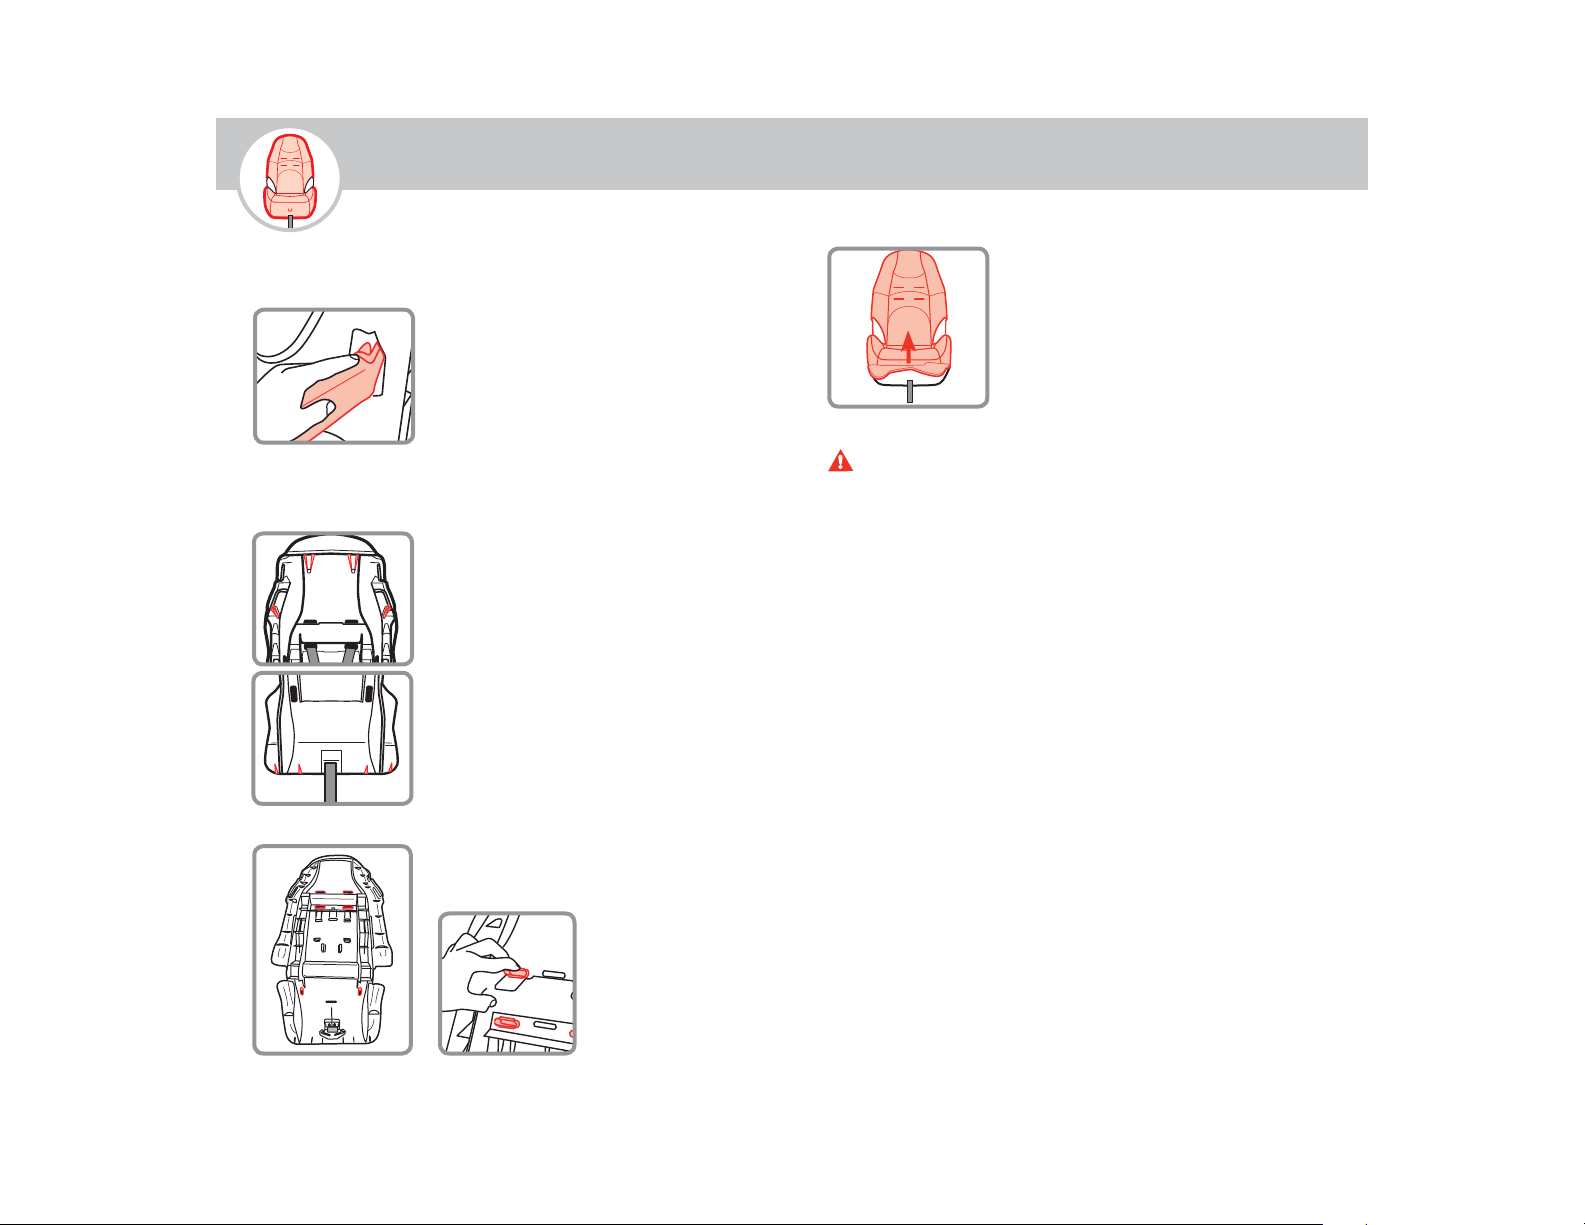
XXXXXXRemoving Seat Pad for Cleaning
You must remove the harness system to remove the pad
from the shell. See pages 9-10.
1. Remove Armrest
Covers (on select
models)
If your child restraint has
armrests, pull armrest covers off
armrests and pull through hole in
back of shell.
2. Release Elastic Straps on
Back and Bottom of the
Shell
4. Remove Pad
Pull pad off the bottom of child
restraint and remove pad.
WARNINGS: Do not use child restraint without the seat
pad. Failure to do this can result in serious injury or death.
If your seat pad has machine washable tag:
Machine wash separately with cold water on a gentle cycle. Do
not use bleach. Tumble dry separately for 10-12 minutes on low
heat. Remove immediately.
If your seat pad does not have machine washable tag:
Hand wash pad with warm sudsy water, rinse clean and air dry.
Spot clean the harness straps. Do not use bleach or use other
harsh cleaners. Do not dry clean.
Cleaning Harness Straps
Spot clean using warm sudsy water and damp cloth.
11
3. Remove Harness Guides
(on select models)
Push down on one
edge with one hand
and pulling out from
the front side with
the other.
Replace Pad
Starting from bottom of child restraint, slip pad on shell. Pull
harness adjustment strap through pad. Wrap pad around the top
of shell. Attach all of the elastic straps. Install harness guides and
armrest covers (onselect models).
Install harness system, see pages 13-15.
12
Page 10
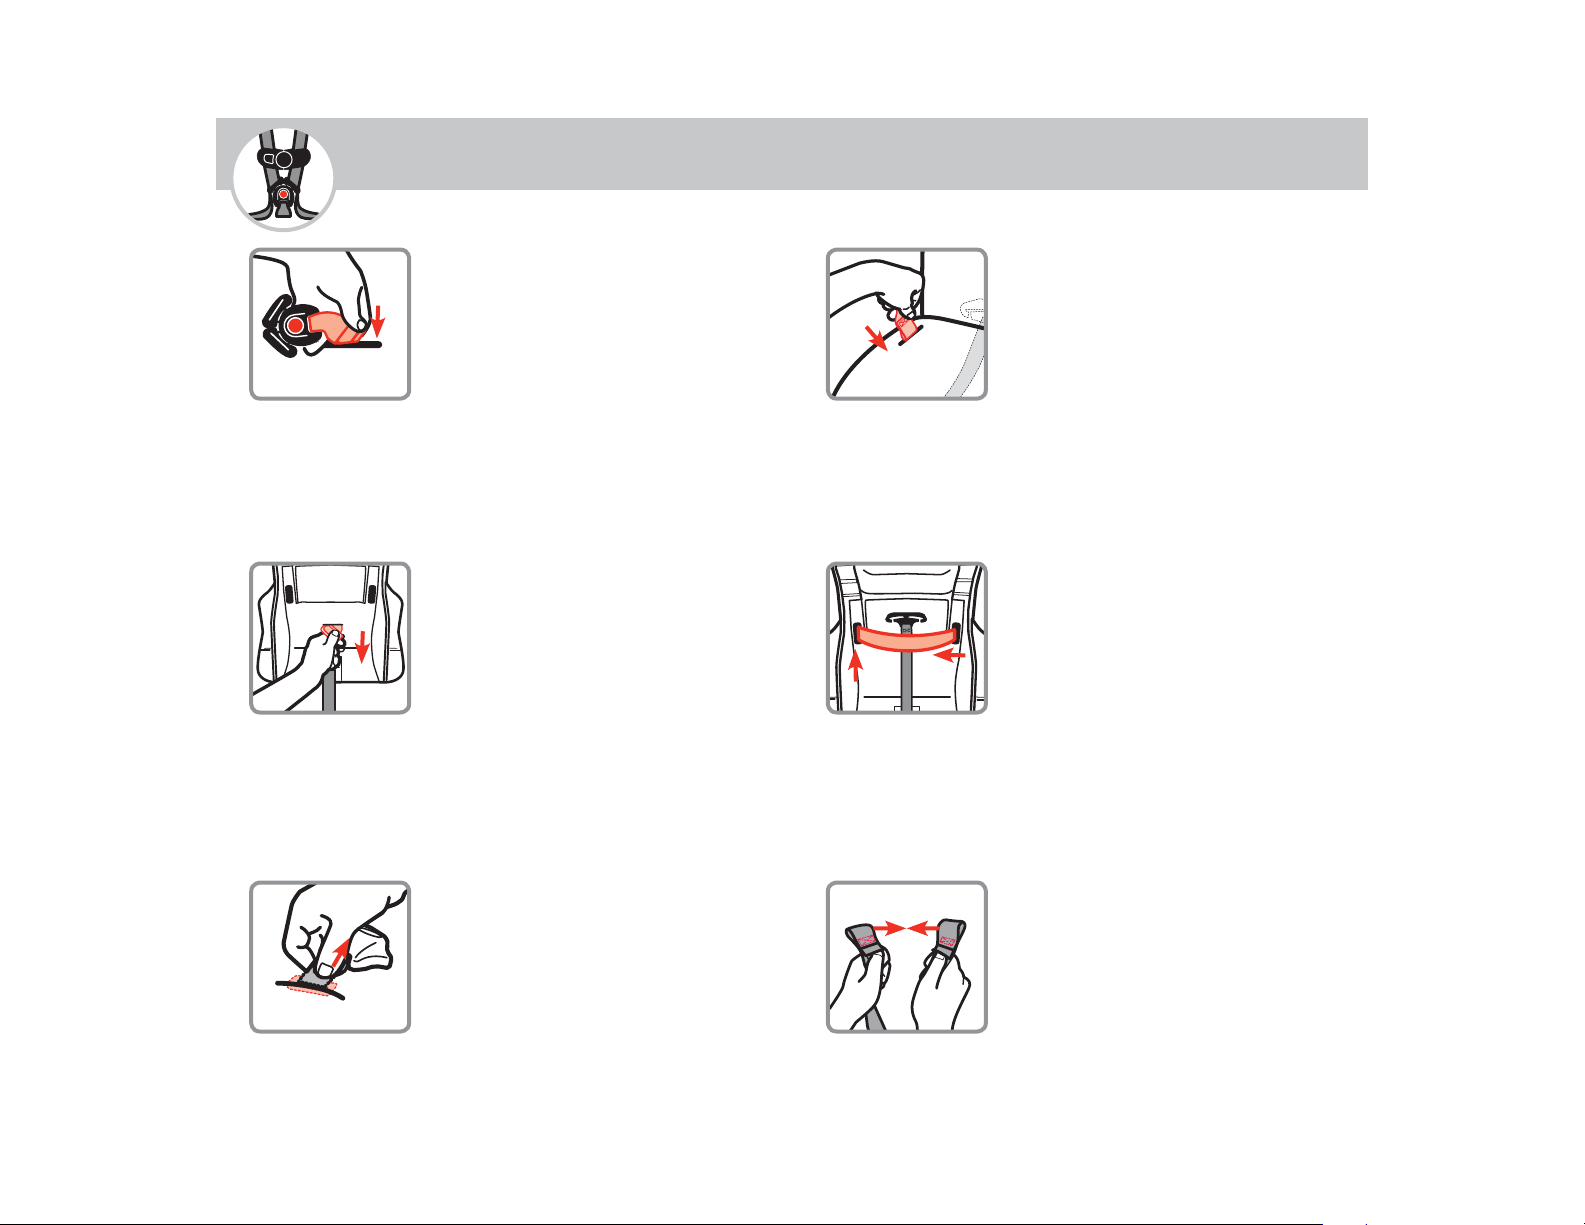
Installing Harness System
1. Insert Buckle’s Metal
Retainer into Slot
Buckle MUST face out.
2. Pull Metal Retainer
Completely Through
Pad and Shell
4. Rethread Harness Strap
With sewn end of harness strap
loop facing the buckle, thread
harness strap down through hip
harness slot.
5. Pull Harness Strap Across
Bottom of Shell
Harness strap MUST lay in front
harness adjustment strap as shown.
Push harness strap up through other
hip harness slot.
3. Check Buckle
Pull up on buckle to make sure it is
secured.
The buckle
13 14
MUST not pull out.
6. Make Harness Strap Even
Sewn ends of harness strap loops
MUST face each other.
continued on next page
Page 11
Accessories
sewn
end
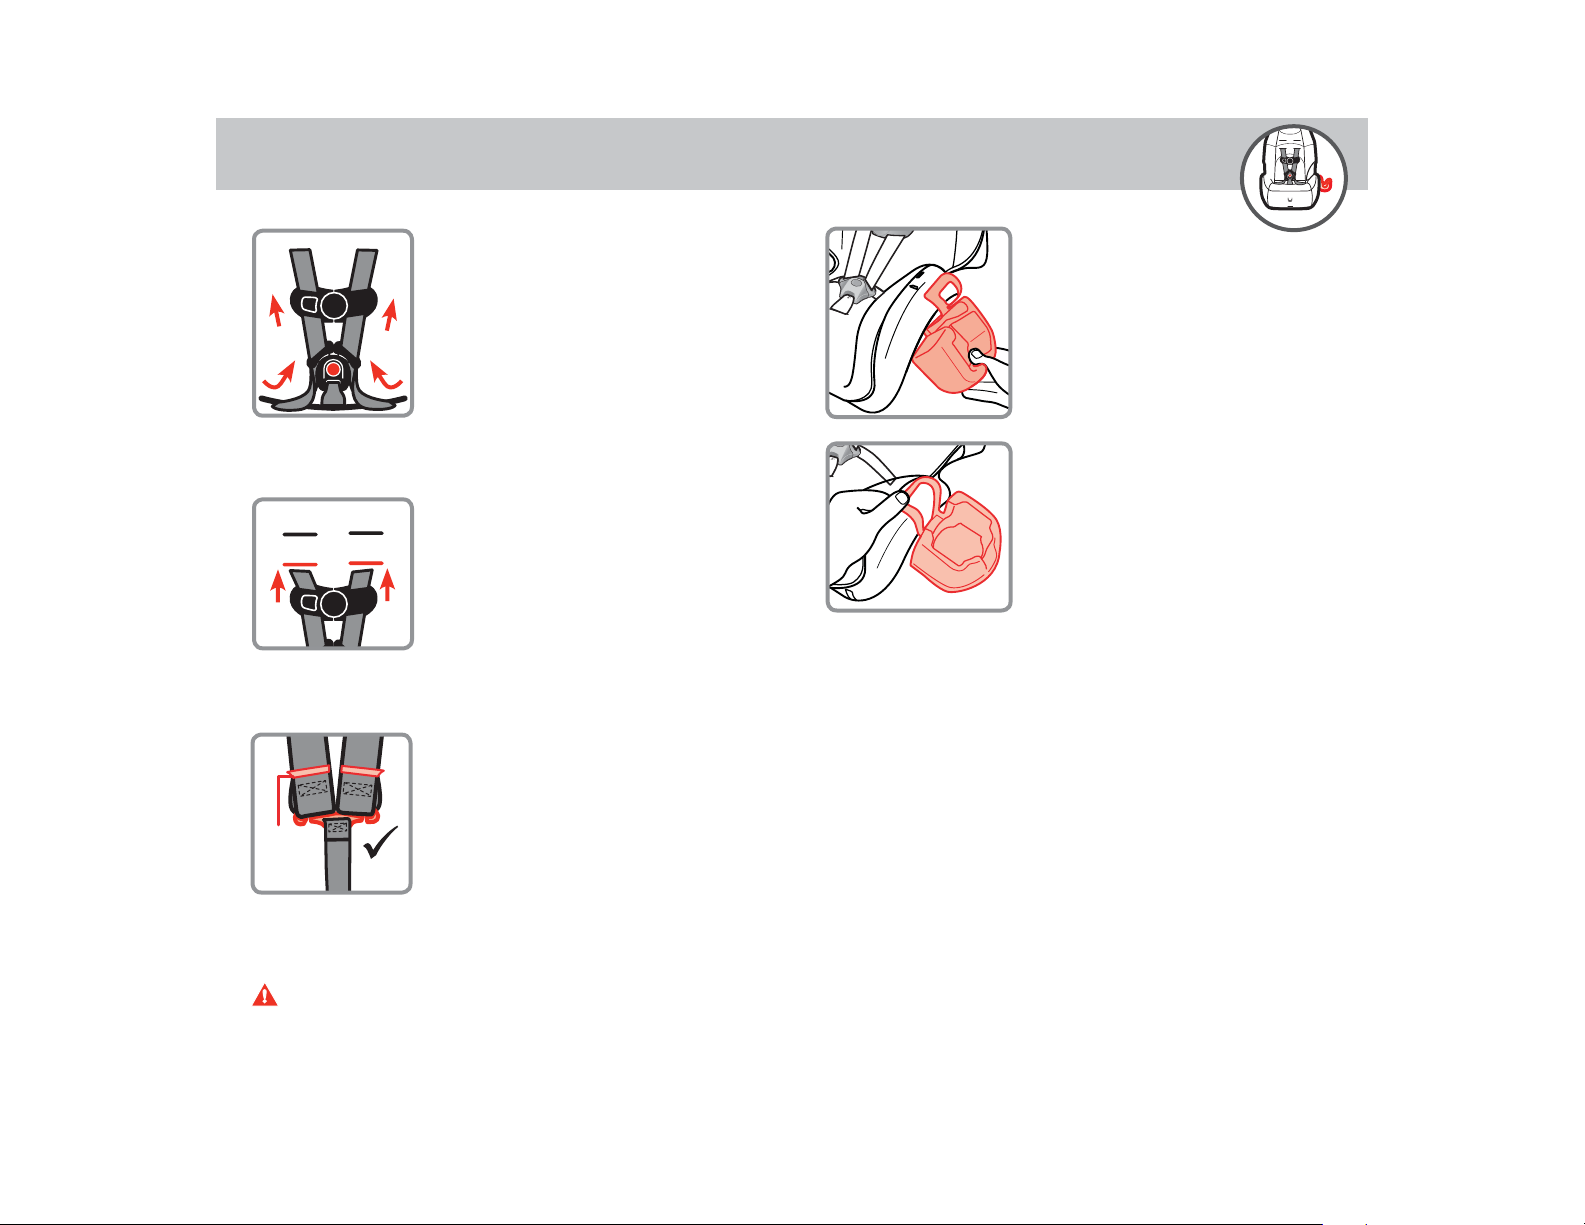
7. Thread Buckle and Chest
Clip
Harness strap ends go through the
back of buckle tongues and through
the chest clip front to back as
shown.
8. Thread Harness Strap
Into Correct Shoulder
Harness Slots For Your
Child
See page 4 for fi t guidelines.
9. Attach Harness Strap
Loops to Splitter Plate As
Shown
Sewn ends of the harness strap
loops
MUST face towards you.
DO NOT twist harness strap or
harness adjustment strap.
Make sure the loops are fitted COMPLETELY ON both sides of
the splitter plate.
WARNINGS: Harness system must be installed
correctly. Failure to follow these steps can result in serious
injury or death.
Cup Holder
The cup holder can be attached to
either side of the shell.
Pull pad off corner of shell.
Hook bottom of cup holder under
edge of shell.
Snap top of cup holder over edge of
shell.
Replace pad.
15
16
Page 12
Child Restraint Use Vehicle Seating Position
Never take your child out of the child restraint while the
vehicle is moving.
Never leave child unattended.
Placing your child in a hot child restraint may result in
burns.
Do not use a child restraint with damaged or missing parts.
Do not use cut, frayed or damaged harnesses.
Do not substitute parts or try to modify the child restraint in
any way.
Do not lubricate buckles and fasteners.
Do not use any child restraint accessory except those
approved by Dorel Juvenile Group.
Never allow any child to play with this child restraint; it is
not a toy.
Do not remove or cover up any of the warning labels or
other labels on the child restraint.
Read all instructions for additional warnings.
On the side of the child restraint there is a date of
manufacture label. Do not use this child restraint more than
10 years after the date of manufacture.
Installation in Vehicle
Check the vehicle belt or Lower Anchor belt before each use.
Use only if the belt is tightened properly and locked securely
in place.
This child restraint should be securely belted in the vehicle
even when not in use. In a crash or sudden stop, an
unsecured child restraint could injure occupants.
Do not use a child restraint that has been in a crash. You
must get a new child restraint.
17
Check the vehicle owner’s manual for more information
about air bag/child restraint use.
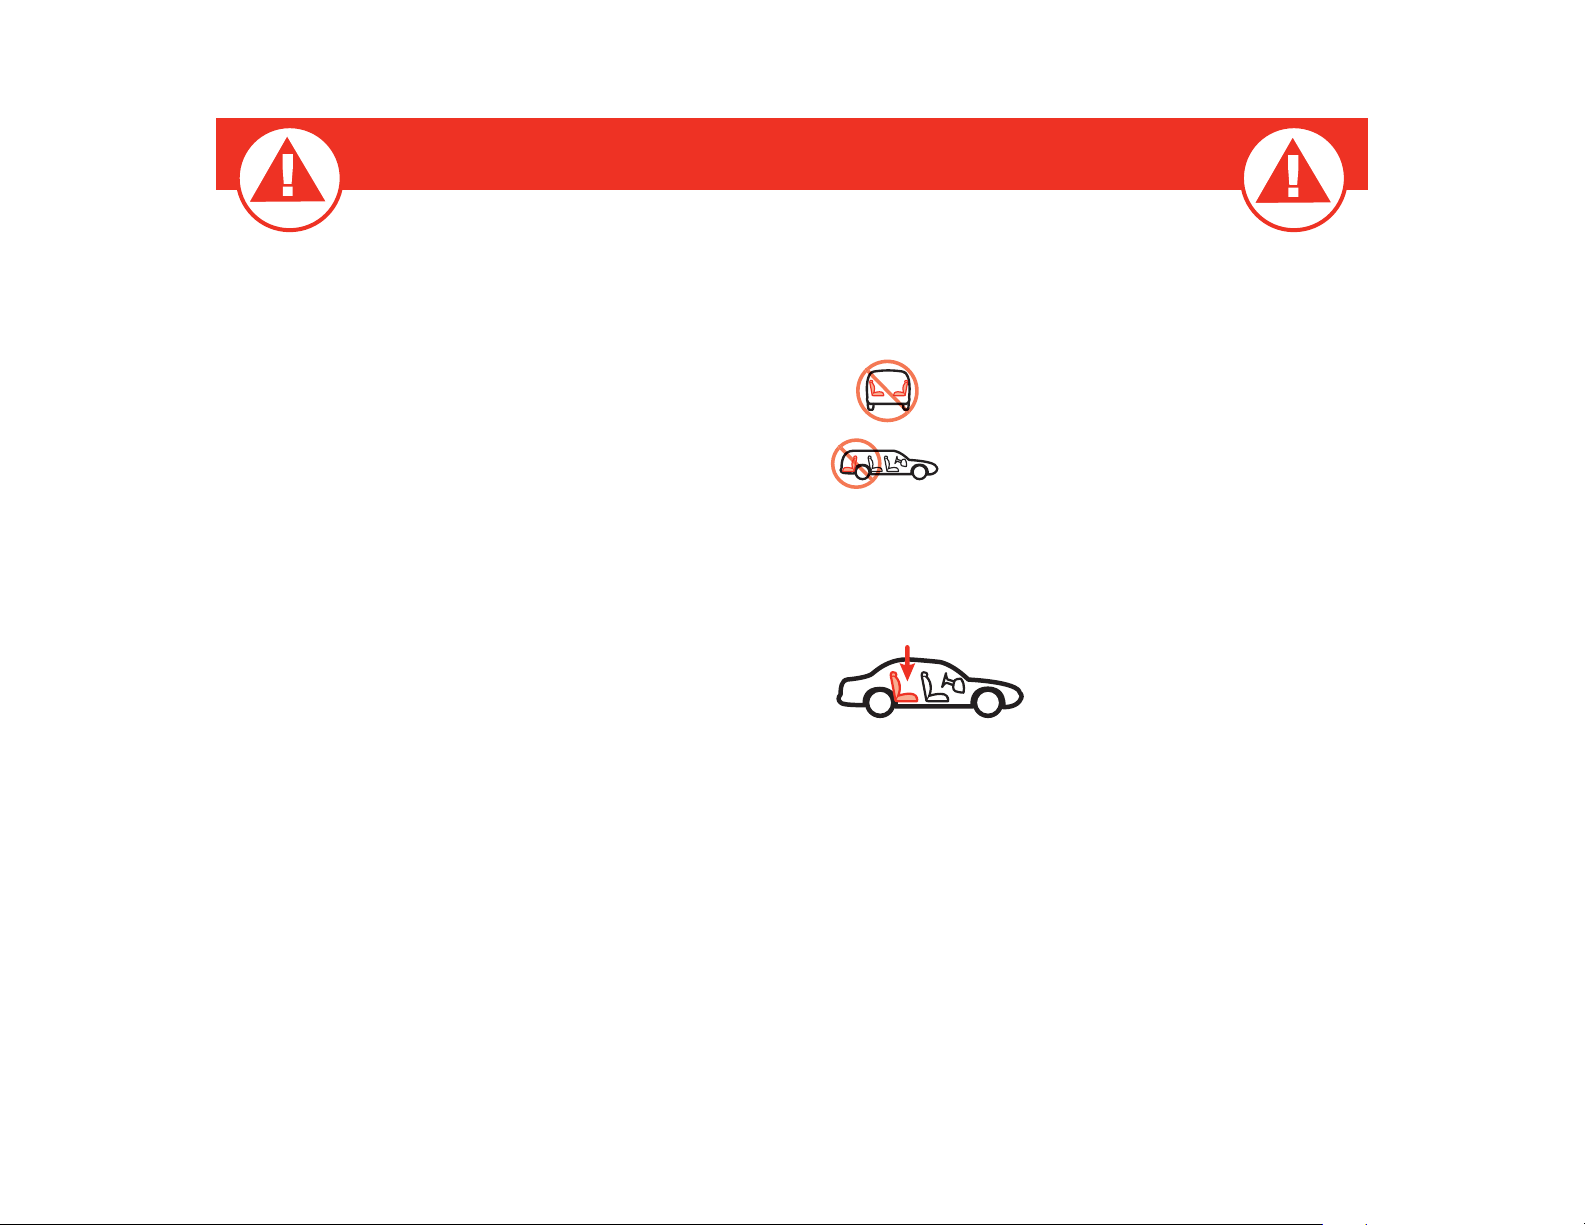
Use the child restraint only on vehicle seats that face forward.
Do not use on seats that face the sides or
rear of the vehicle.
Use the center seating position if possible.
For vehicles without a back seat, refer to
your vehicle owner’s manual.
If you are not sure where to place the child restraint in your vehicle,
consult your vehicle owner’s manual, contact Dorel Juvenile Group
Consumer Care Department, or visit your local Child Passenger Inspection Station. Go to http://www.safercar.gov/cpsApp/cps/index.htm to
find your closest station.
Children are safer when properly
restrained in rear seating positions
than in the front seating positions.
According to National Highway
Traffi c Safety Administration in-
formation, children in rear seating
positions are statistically safer, whether you have air bags,
advanced air bags, or no air bags at all.
To avoid your child being seriously burned, take the following
precautions:
1. Park in the shade or where sun does not directly hit the child
restraint.
2. Cover the child restraint with a sheet or blanket when not in use.
3. Check for hot seat and buckles before placing child in child
restraint.
To help protect your vehicle seat’s upholstery from damage, use a
single layer towel underneath and behind child restraint.
18
Page 13
Choosing Lower Anchor or
Vehicle Belts
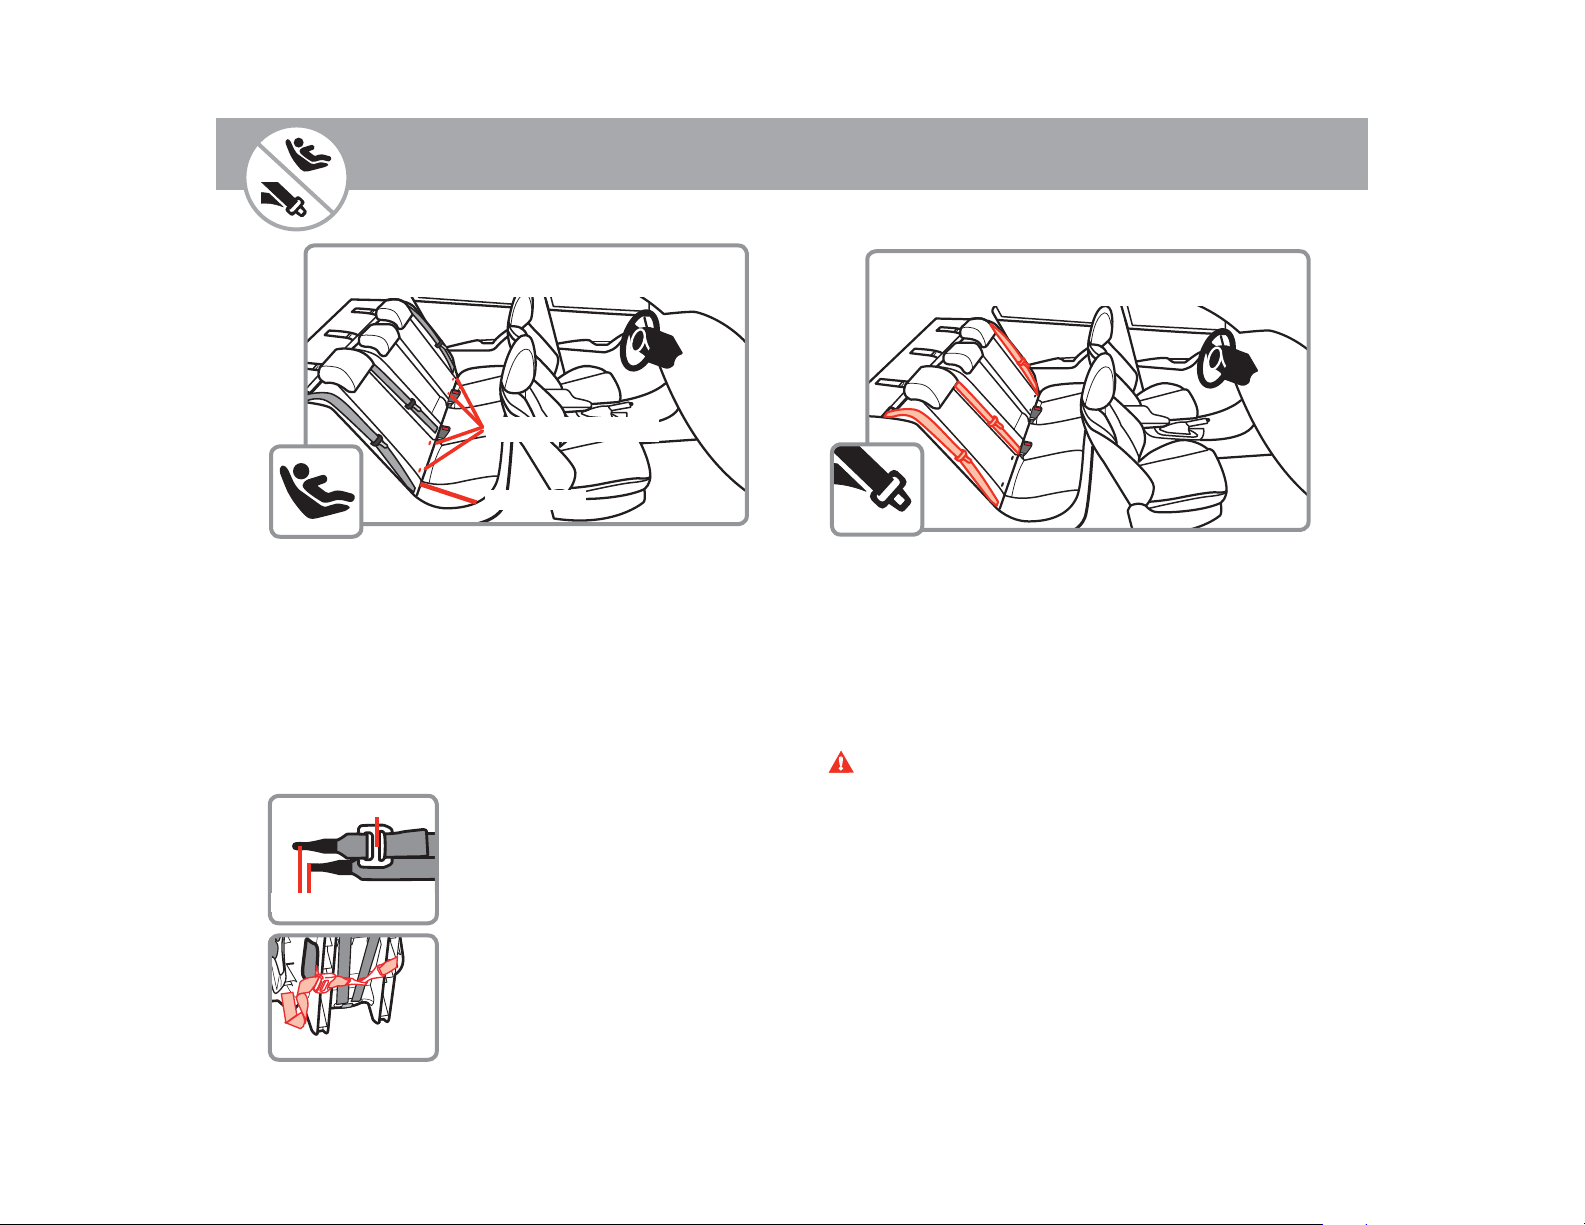
Your vehicle’s features may be considerably different than
those pictured here.
Lower Anchor Bars
Seat Bight
The LATCH System
The lower anchors of LATCH (Lower Anchors and Tethers for
CHildren) is a universal system for installing child
restraints without using vehicle seat belts.
The lower anchor system can ONLY be used in vehicles that
have the lower anchor bars installed and designated LATCH
seating positions. Most vehicles manufactured after September 2002 are equipped with lower anchor bars.
Check your vehicle owner’s manual to see which seating
positions may be equipped with the LATCH system.
Adjuster
Lower Anchor Hooks
19
When installing this child
restraint with vehicle belts or
when using as a booster seat,
the lower anchor hooks and belt
MUST be properly stored.
Storing Lower Anchor Belt
Thread lower anchor belt through
forward facing belt path and fasten
lower anchor hooks together behind
the child restraint as shown. Gently
pull free end of belt to remove slack.
Your vehicle’s features may be considerably different than
those pictured here.
Vehicle Belts
If lower anchors are not an option, you must use the
vehicle seat belt system to install the child restraint.
There are some vehicle belts that will not work with a child
restraint or will require special attention.
Check your vehicle owner’s manual for specific
instructions.
WARNINGS: When used correctly the lower anchor
belt or vehicle belts are equally safe. Do not use both
the lower anchor belt and vehicle belt at the same
time.
20
Page 14
Knowing Your Vehicle Belts
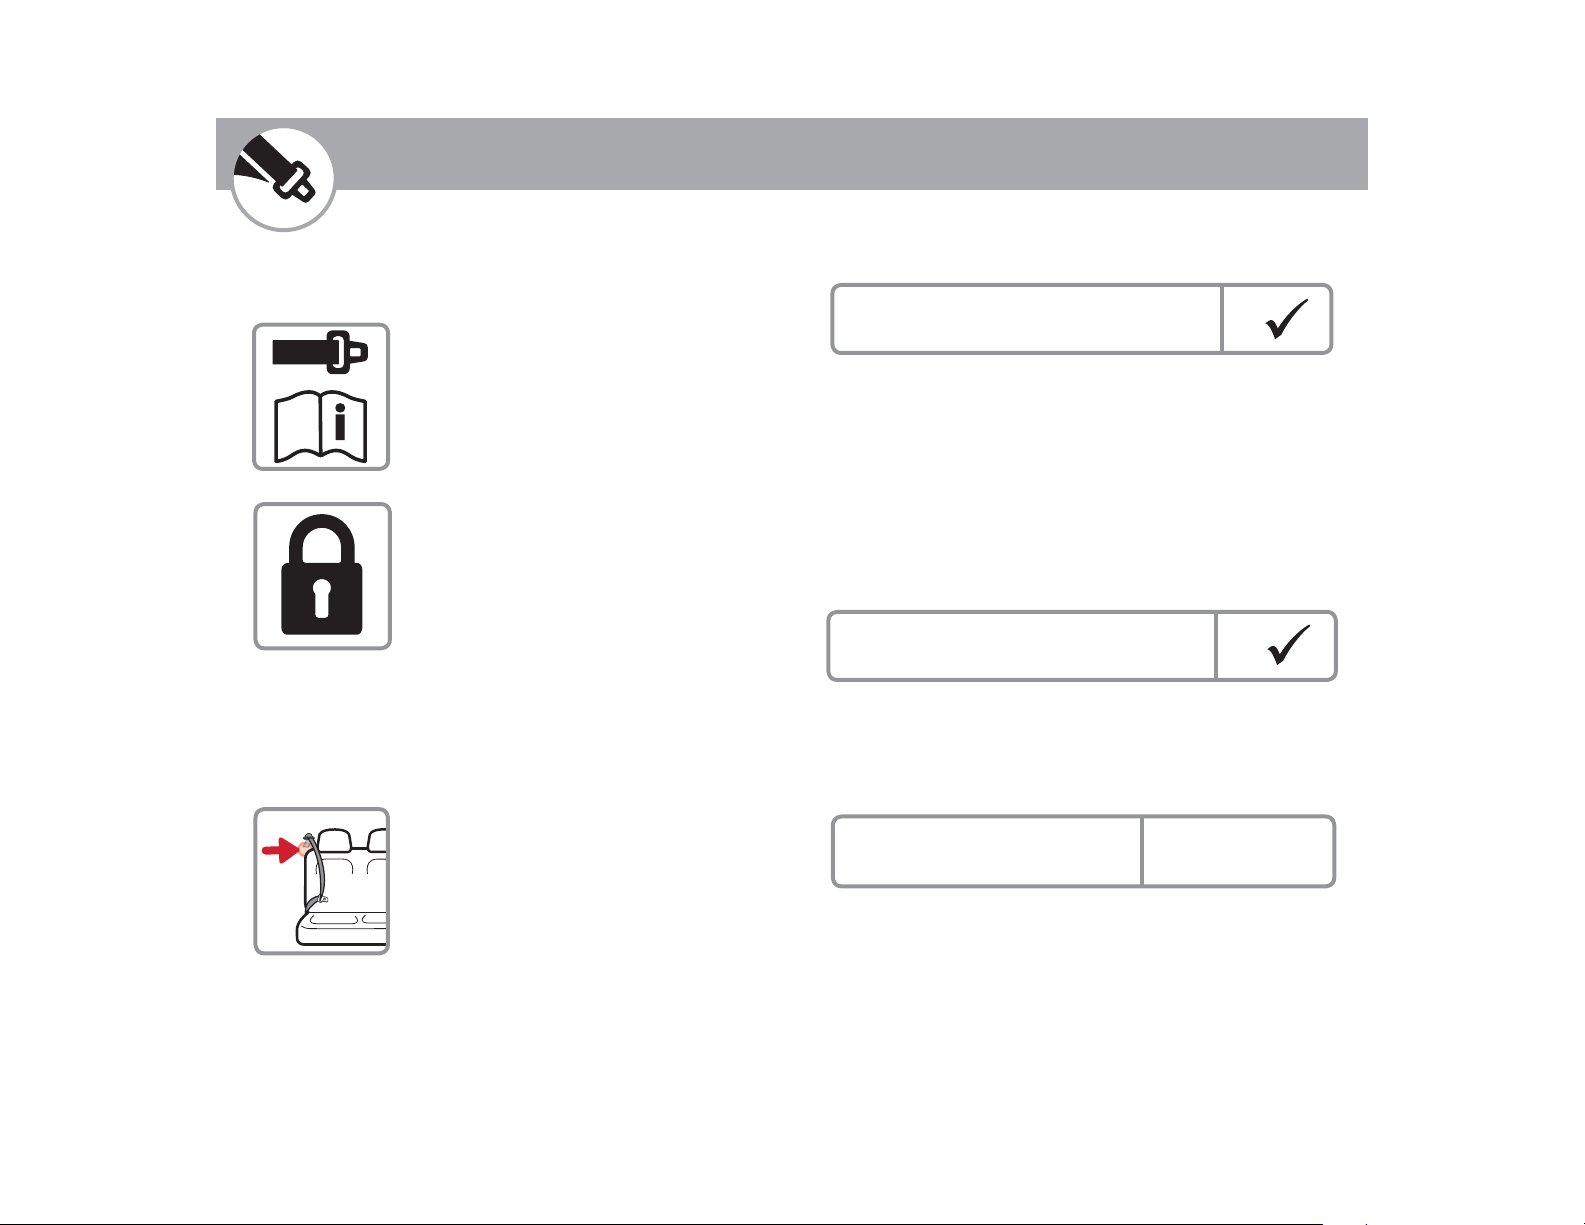
Not all vehicle belts and seating positions will work with child
restraints. Please follow the following steps to understand how to
lock a child restraint with a vehicle belt.
1. You MUST Review Your
Vehicle Owner’s Manual
Your vehicle owner’s manual will let
you know what vehicle belts and seating positions child restraints can be
installed in.
2. Determine How the Child
Restraint Will Be Locked Into Place
The vehicle belt MUST NOT loosen
after tightening.
This means there needs to be a way to
lock the vehicle belt.
The ways this can be done are:
• By using the seat belt’s retractor; or
• By using the seat belt’s latch plate.
3. Check the Retractor
Retractors pull seat belts into stored
positions and lock the belt to hold
passengers in place.
A retractor is most likely how you will
be locking a child restraint into place.
See the next page for some common types of vehicle belt
retractors that will work with this child restraint.
Types of Retractors
Switchable Retractor
(most vehicles have this type)
This retractor can be switched to a locking mode.
MUST have the retractor in the locking mode to use the
You
seat belt with this child restraint.
Switching to locking mode: Slowly pull the shoulder belt all
the way out, then let it go back in an inch or two.
As it goes back, in you will most likely hear a ratcheting sound.
Gently pull the belt to see if it has locked. You will not be able to
pull any more belt out if the lock has engaged.
Automatic Locking Retractor
This retractor always locks.
It will automatically lock after slowly pulling the seat belt out at
least halfway and letting the belt go back into the retractor an
inch or two.
See Step 4, “Check the
Emergency Locking Retractor
If the retractor does not lock, it is most likely an Emergency
Locking Retractor. These retractors only lock during a sudden
stop or collision.
You will need to determine if your seat belt’s latch plate can
lock the belt. See Step 4, “Check the Latch Plates,” on next
page.
Latch Plates,” on next
page.
continued on next page
2221
Page 15
Locking Latch Plate
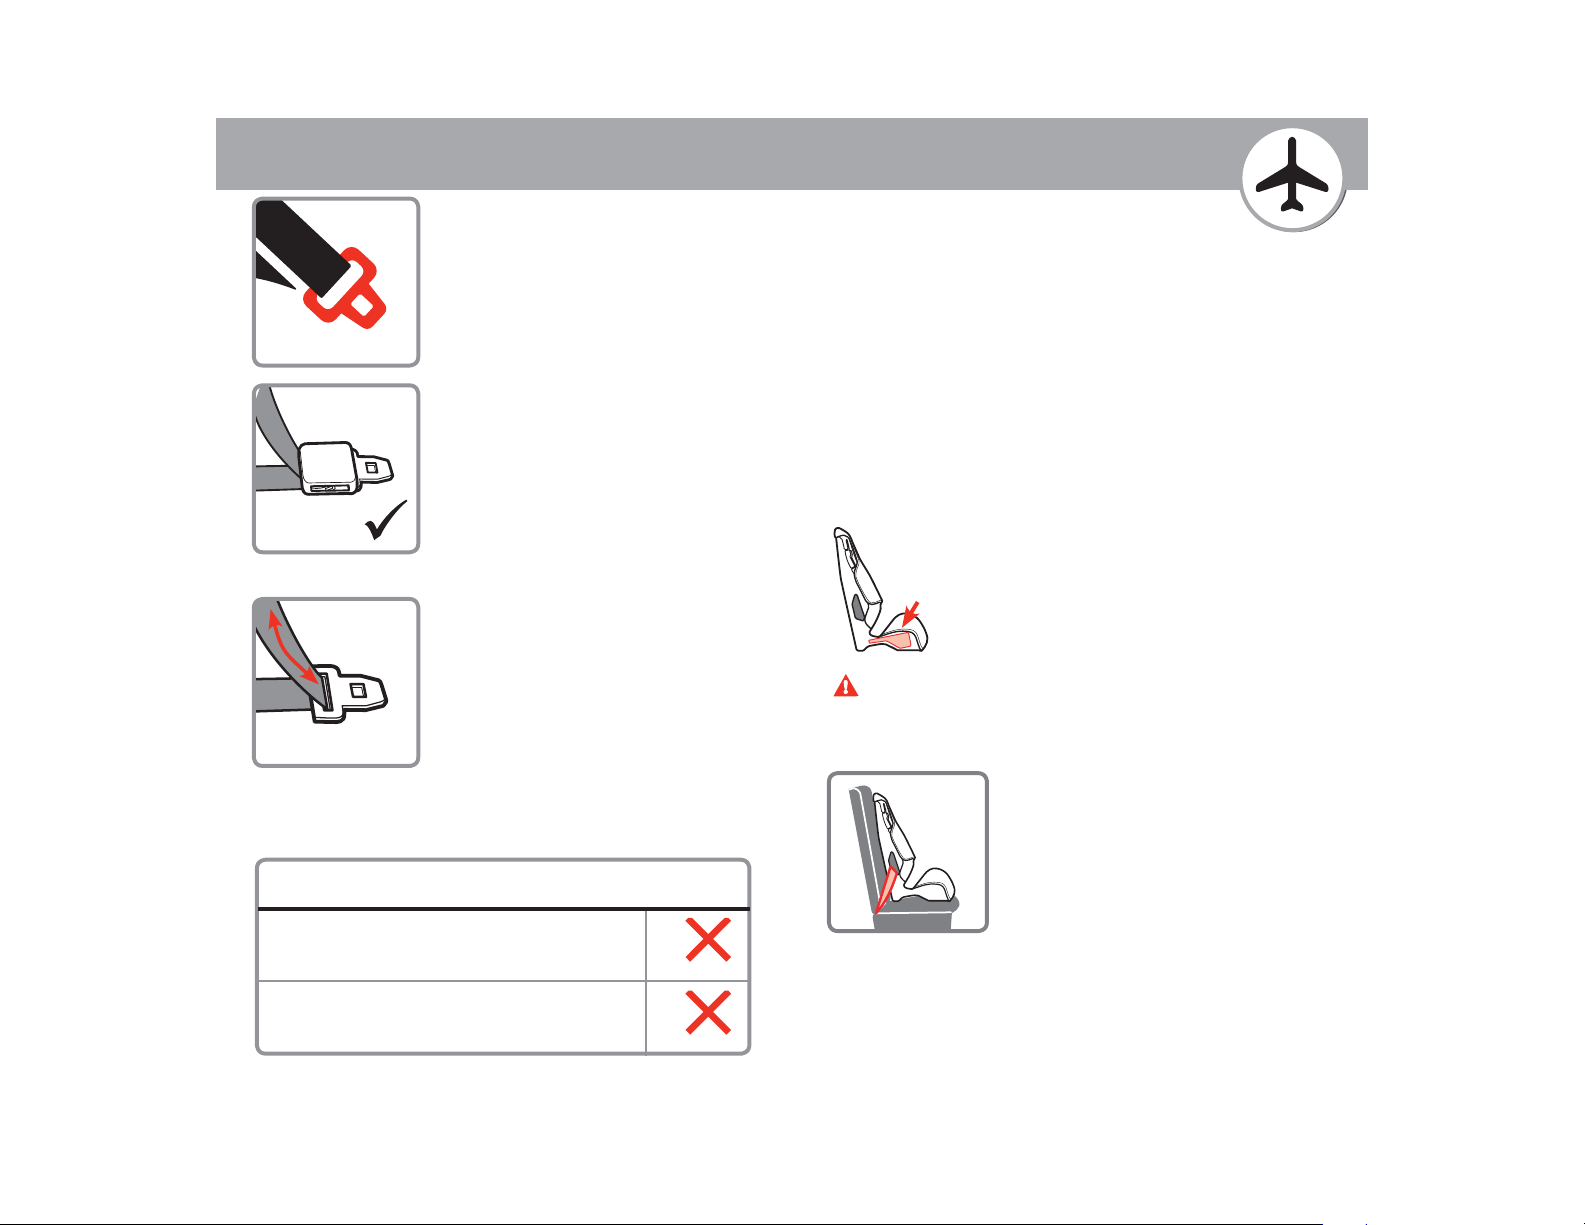
Emergency Locking
Retractor with a
Sliding Latch Plate
4. Check the Latch Plates
Latch plates are the part of
the seat belt that goes into the
buckle.
Hold the lap belt with one hand
and with your other hand grasp
the tongue of the latch plate (the
part that goes inside the buckle)
pull straight out, in line with the
lap belt.
If the latch plate does not slide up
and down the vehicle belt, it is a
locking latch plate.
If the latch plate slides up and
down the vehicle belt, it is a
sliding latch plate.
Sliding latch plates easily slip
between the lap and shoulder
portions of the belt.
If you have an Emergency
Locking Retractor with a Sliding
Latch Plate, you
locking clip to install the child
restraint. See pages 34-36.
MUST use a
XXXXXX
Aircraft Information
This restraint is certifi ed for aircraft use when used with the
internal harness.
This child restraint is not certifi ed for aircraft use when
used as a booster seat because aircraft seats do not have
shoulder belts.
Install the child restraint in a window seat to avoid blocking the
aisle. If the aircraft lap belt is too short, ask the flight attendant for
a belt extender.
Use only on forward facing aircraft seats.
Contact the airline for their specific policies.
Some airlines may ask to see a label stating that
this child restraint is certified for aircraft use.
There is an airplane certification label located on
the side of this child restraint as shown.
WARNING: Store lower archor belts and tether strap
when using the aircraft belts.
Forward Facing Air craft Installation
For forward facing installation follow
pages 30-31.
Never Use With This Child Restraint
Emergency Locking Retractor Lap Only Belt
Inflatable Seat Belts
23
24
Page 16
Forward Facing
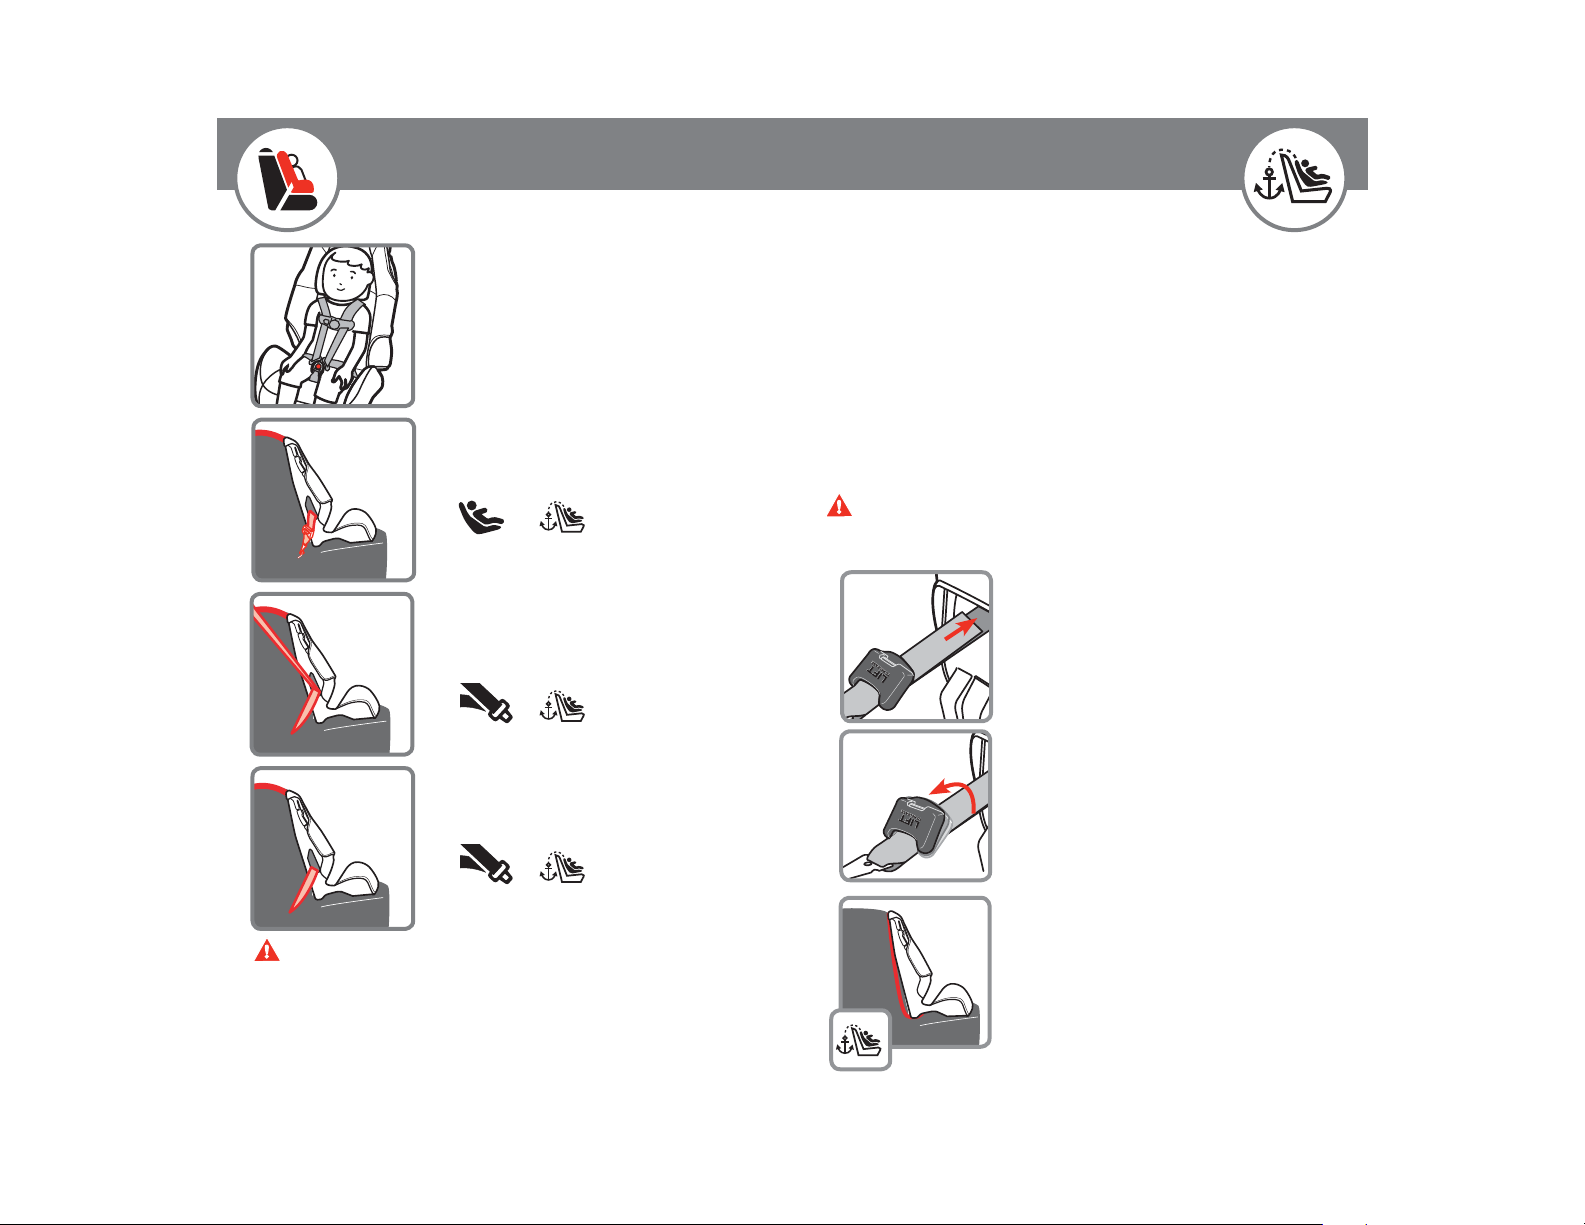
Tether Use
22-40 lb (10.1-18 kg)
34-43 in. (85.1-110 cm)
At least 1 year old
Lower Anchor Belt with Tether
Lap/Shoulder Belt with Tether
Lap Belt with Tether
You MUST always attach, adjust, and secure the top anchorage
(tether) strap when installing the child restraint forward facing
with internal harness. Tethers improve the installation and
stability of child restraints and reduce the risk of injury.
Attach the tether hook to the tether anchor designated by your
vehicle manufacturer for that seating position. Check your
vehicle owner’s manual for more information.
If the seating position does not have a tether anchor, use a
different seating position or see your dealer or a qualified
mechanic and have one installed.
WARNING: Do not fasten multiple tether hooks on the
same tether anchor in the vehicle.
Pull free
end to
tighten
Lift up to
loosen
Adjusting T ether Strap
To tighten: After the child restraint
is locked into place with lower
anchor belt or vehicle belt, push
down on child restraint and gently
pull on free end of tether.
To loosen: Lift up on tether lock
adjuster and push it towards tether
hook.
WARNINGS: In this child restraint your child MUST be at
least 1 year old before they sit forward facing.
The American Academy of Pediatrics recommends that children should
remain rear facing until they are at least 2 years old.
Please talk to your doctor about which is the best option for your child.
25
Storing T ether Strap
When using as a booster or when
not in use, tuck the tether hook and
strap under the booster seat.
26
Page 17
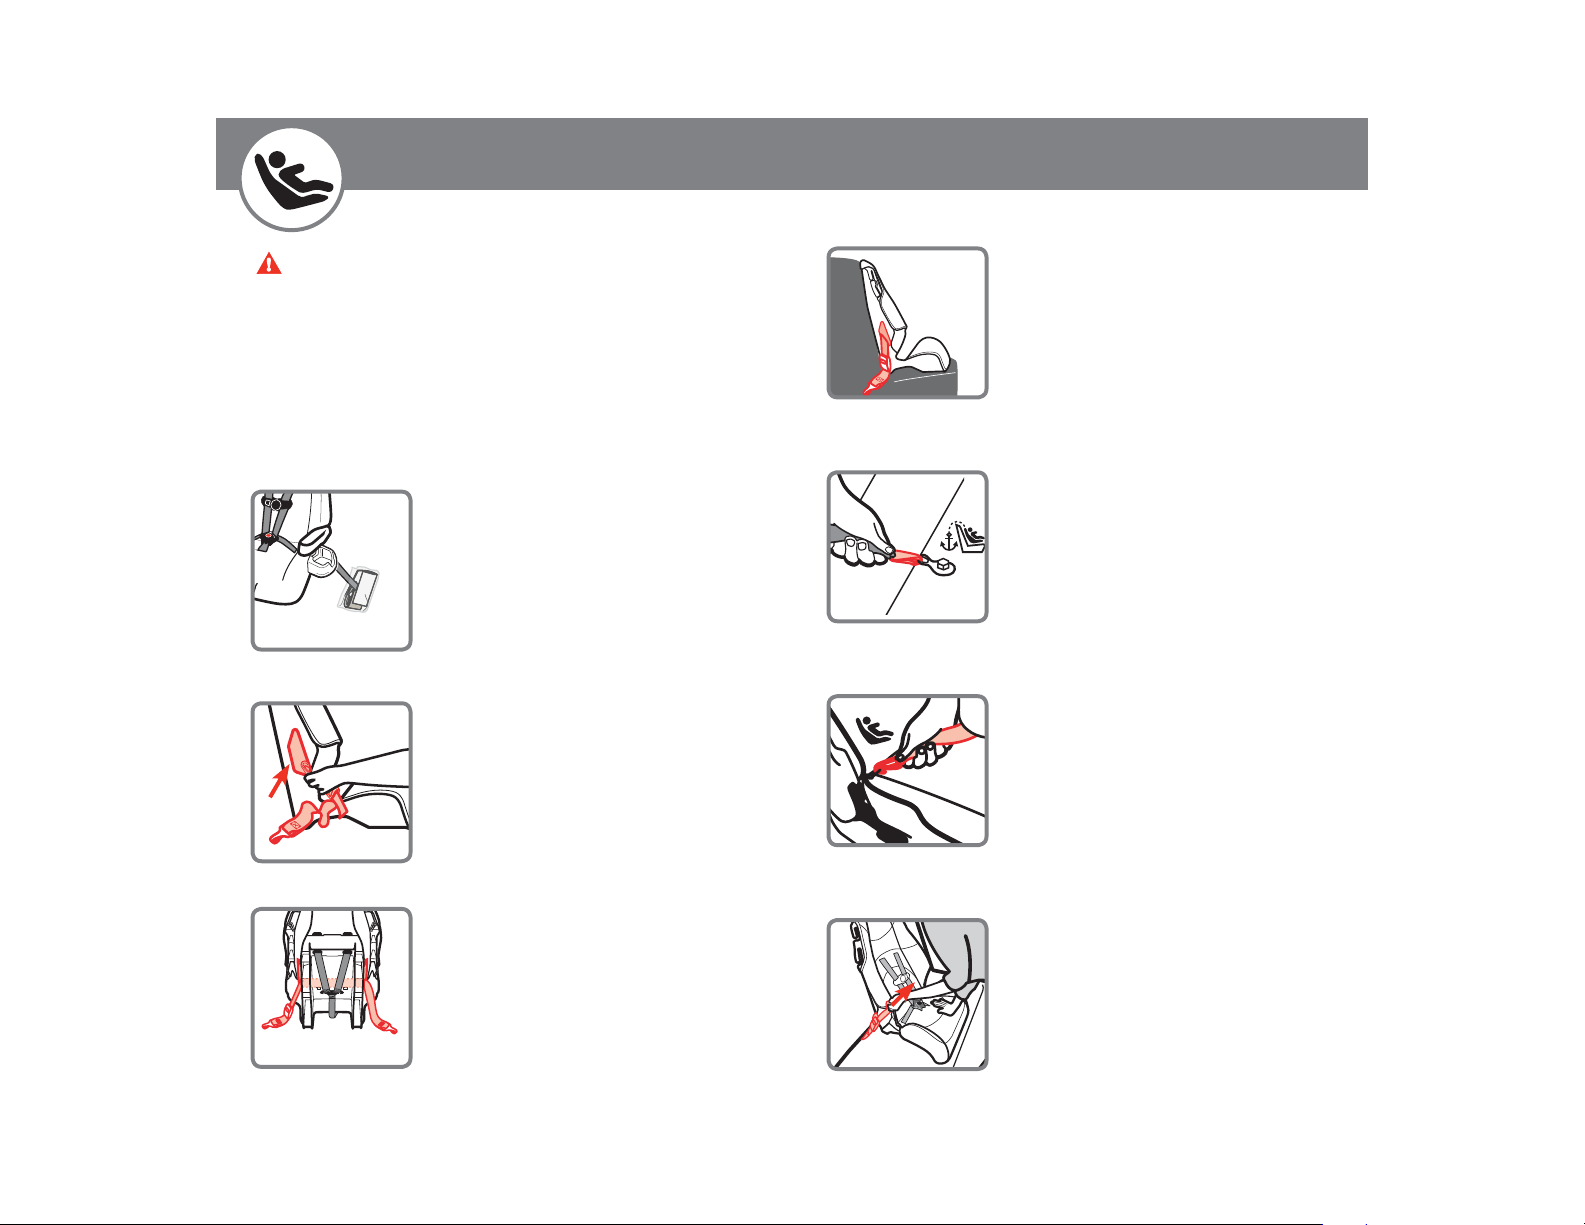
Lower Anchor Installation
WARNINGS: Check the lower anchor belt before
each use. Use only if the belt can be tightened
properly and securely.
Do not fasten multiple lower anchor hooks on the
same lower anchor bar in the vehicle.
Failure to follow these warnings can result in serious
injury or death.
1. Remove Lower Anchor
from Packaging
Pull lower anchor belt packaging out
of forward-facing belt path.
Remove lower anchor from
packaging.
Discard the packaging.
2. Route Lower Anchor Belt
Through Forward-Facing
Belt Path
Do not twist belt.
Lower anchor adjuster can be on
either side.
4. Place Child Restraint
Forward Facing Flush
Against Vehicle Seat Back
5. Loosely Attach Tether
Hook
Check vehicle owner’s manual for
specific location.
6. Attach Lower Anchor
Hooks to Vehicle’s
Lower Anchors
Review your vehicle owner’s
manual for lower anchor locations
and lower anchor belt use.
27
3. Finished Lower Anchor
Routing
7. Tighten Belt
Place hand in child restraint.
Firmly push down while pulling free
end of belt to tighten.
continued on next page
28
Page 18
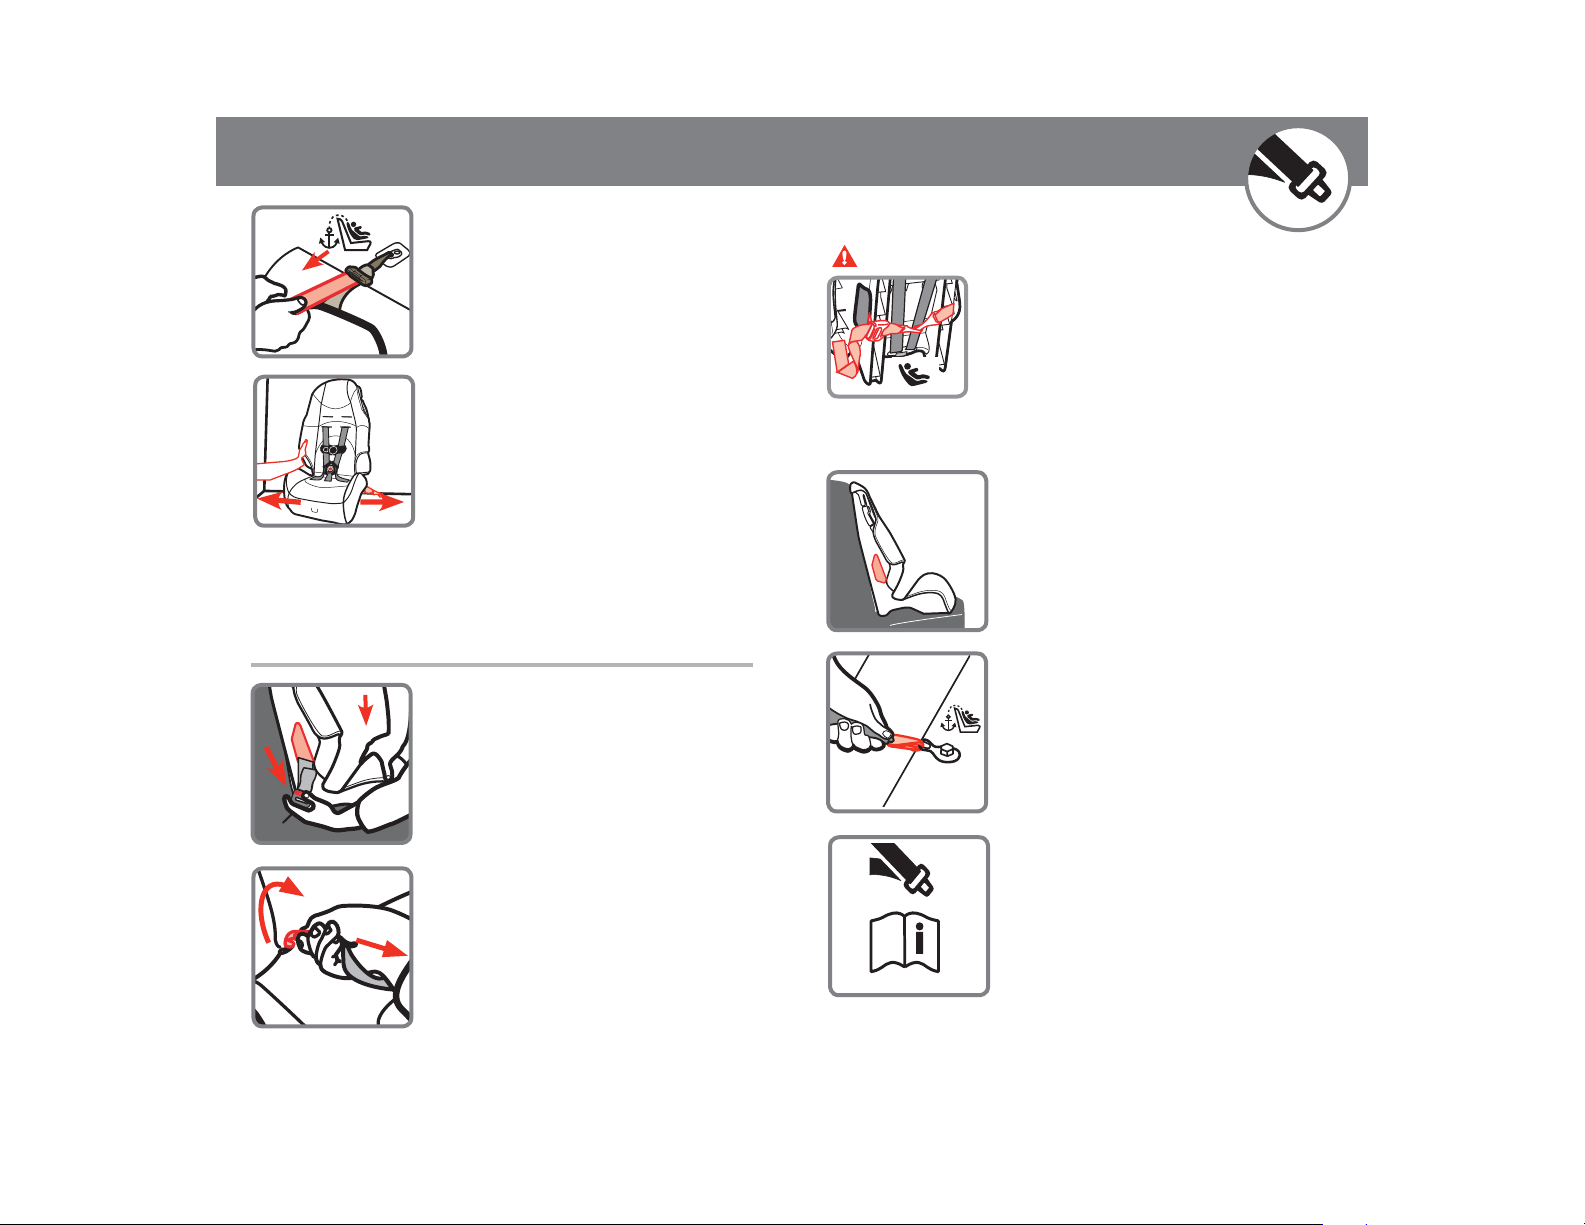
8. Tighten Tether
Push fi rmly on the back of the seat
and pull the tether strap to remove all
slack and create tension on the strap.
9. Check Belt Tightness
Hold child restraint at the belt path with
your weakest hand.
Push and pull from side to side.
It should not move more than
1 in. (2.5 cm).
If it moves more than 1 in. (2.5 cm), you can try:
A. Reinstalling the child restraint. B. Putting your knee in the
seat and pulling the belt tighter. C. Changing to a different seating location. D. Switching to vehicle belt installation.
To Release Lower Anchor
Belt
Remove child from child restraint.
Remove tension from the lower
anchor belt by pushing down on
side of child restraint with the lower
anchor belt adjuster. Then press the
adjuster button to loosen belt.
Unhook from anchor by squeezing
spring lever on hook, pushing
hook back into the seat bight, and
twisting.Then pull it out of the
vehicle seat.
Store lower anchor belt when not
29
in use. See page 19.
Vehicle Belt Installation
WARNINGS: Do not use the lower anchor belt along
with the vehicle lap or lap/shoulder belt.
Store lower anchor hooks and belt as shown
when installing with vehicle belts.
Check vehicle belt before each use.Use only
if the belt can be tightened properly and
locked securely in place.
Failure to follow these warnings can result in serious injuryor
death.
1. Place Child Restraint
Forward Facing Flush
Against Vehicle Seat Back
2. Loosely Attach Tether
Hook
Check vehicle owner’s manual for
specific location.
3. Check if Your Vehicle
Belts Will Work With This
Child Restraint
This is very important because
not all vehicle belts will work
with child restraints.
Review pages 21-23 and your vehicle owner’s manual to
determine what kind of vehicle belt you have and how to lock a
child restraint in place.
continued on next page
30
Page 19
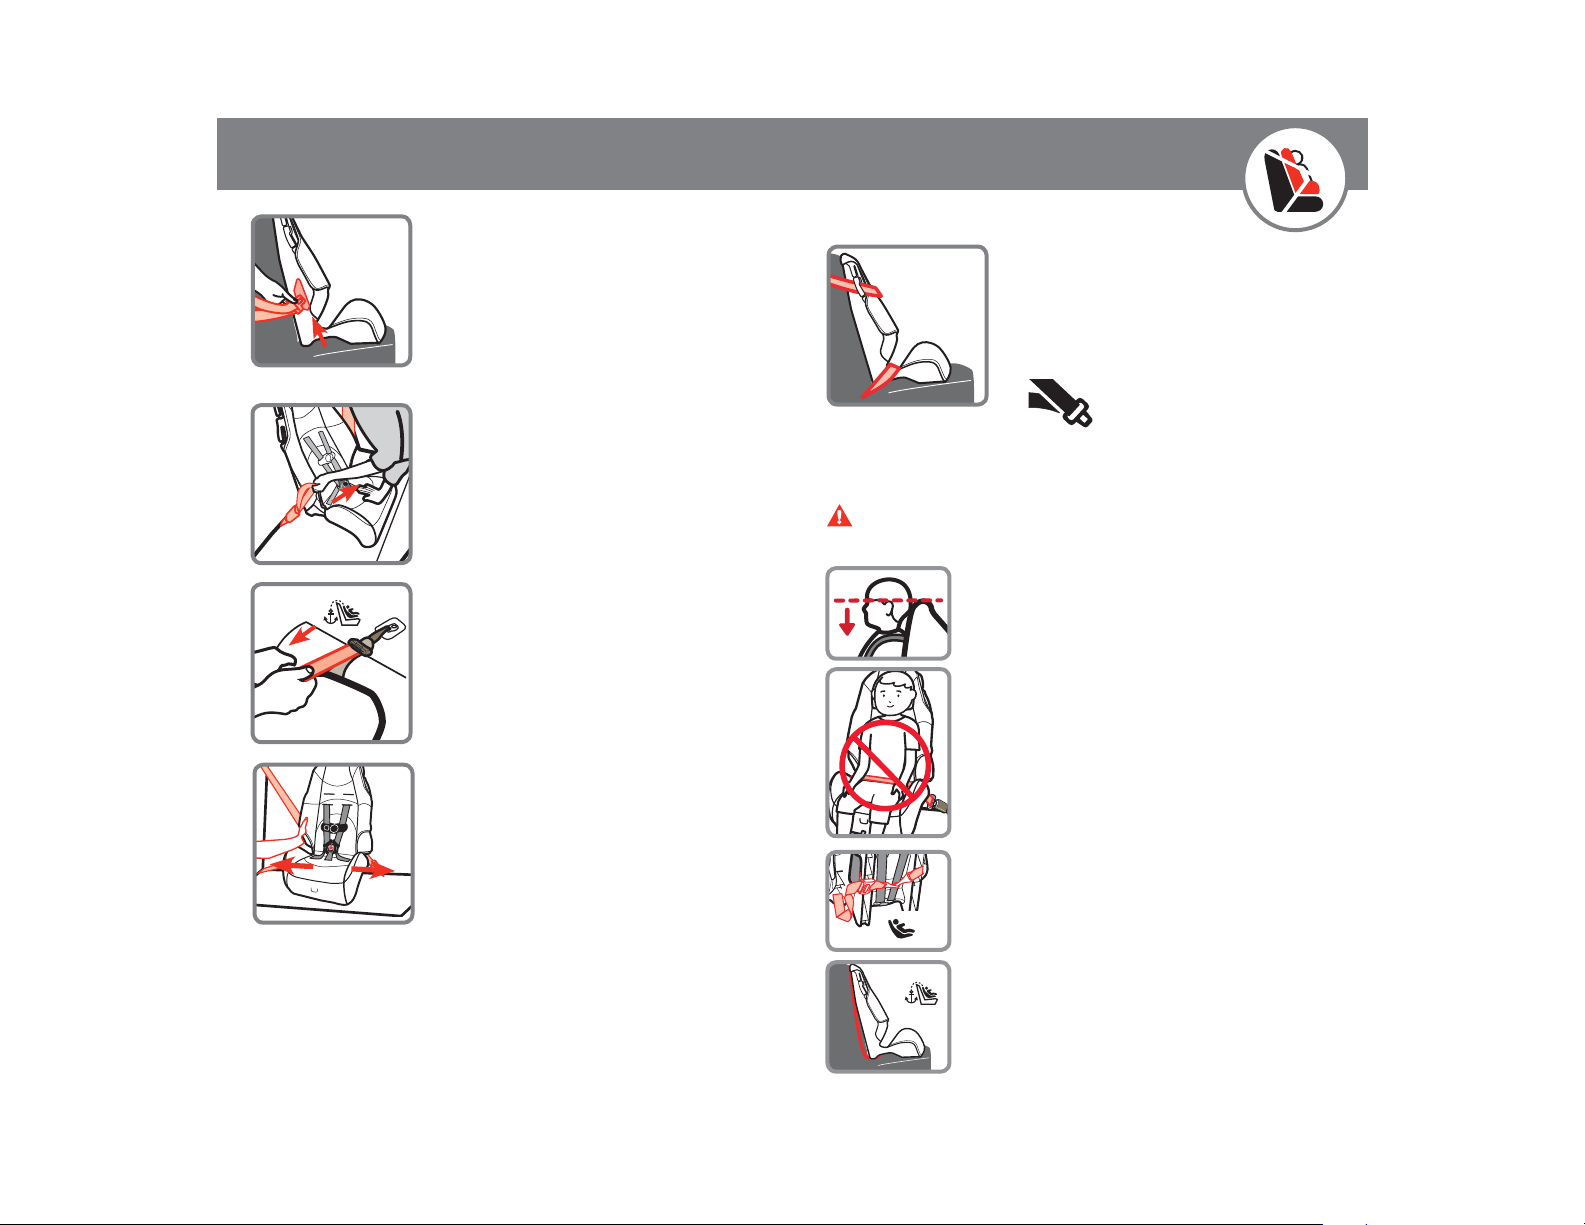
4. Route Vehicle Lap or
Lap/Shoulder Belt
Through Forward-Facing
Belt Path
Do not twist belt.
Buckle vehicle belt.
5. Tighten Belt
Place hand in child restraint.
Firmly push down while pulling
shoulder belt or free end of lap belt
to tighten.
XXXXXX
Booster Seat
40-80 lb (18.1-36.3 kg)
43-52 in. (110.1-132.1 cm)
At least 3 years old
Lap/Shoulder Belt
You MUST remove the harness system to use as a booster
seat. See pages 9-10.
WARNINGS: Do not use the harness system when
using as a booster seat.
Tighten Tether
6.
Push fi rmly on the back of the seat
and pull the tether strap to remove all
slack and create tension on the strap.
7. Check Belt Tightness
Hold child restraint at the belt path
with your weakest hand.
Push and pull from side to side.
It should not move more than 1 in.
(2.5 cm).
If it moves more than 1 in. (2.5 cm), you can try:
A. Reinstalling the child restraint. B. Putting your knee in the
seat and pulling the belt tighter. C. Changing to a different seating location. D. Switching to the lower anchor belt installation if
lower anchors are available in your vehicle.
31
Do not use this booster seat if the tops
of your child’s ears are above the top of
the booster seat.
Use only the vehicle’s lap and shoulder belt
system when restraining the child in this
booster seat.
Do not use only the lap belt when using
this seat as a booster seat.
The shoulder belt must always be adjusted
snugly across the child’s chest. NEVER
place the shoulder belt under the child’s
arms.
Do not use the LATCH system when using
as a booster seat. Secure lower anchor belt
and tether strap to their storage locations.
Failure to follow these warnings can
resultin serious injury or death.
32
Page 20
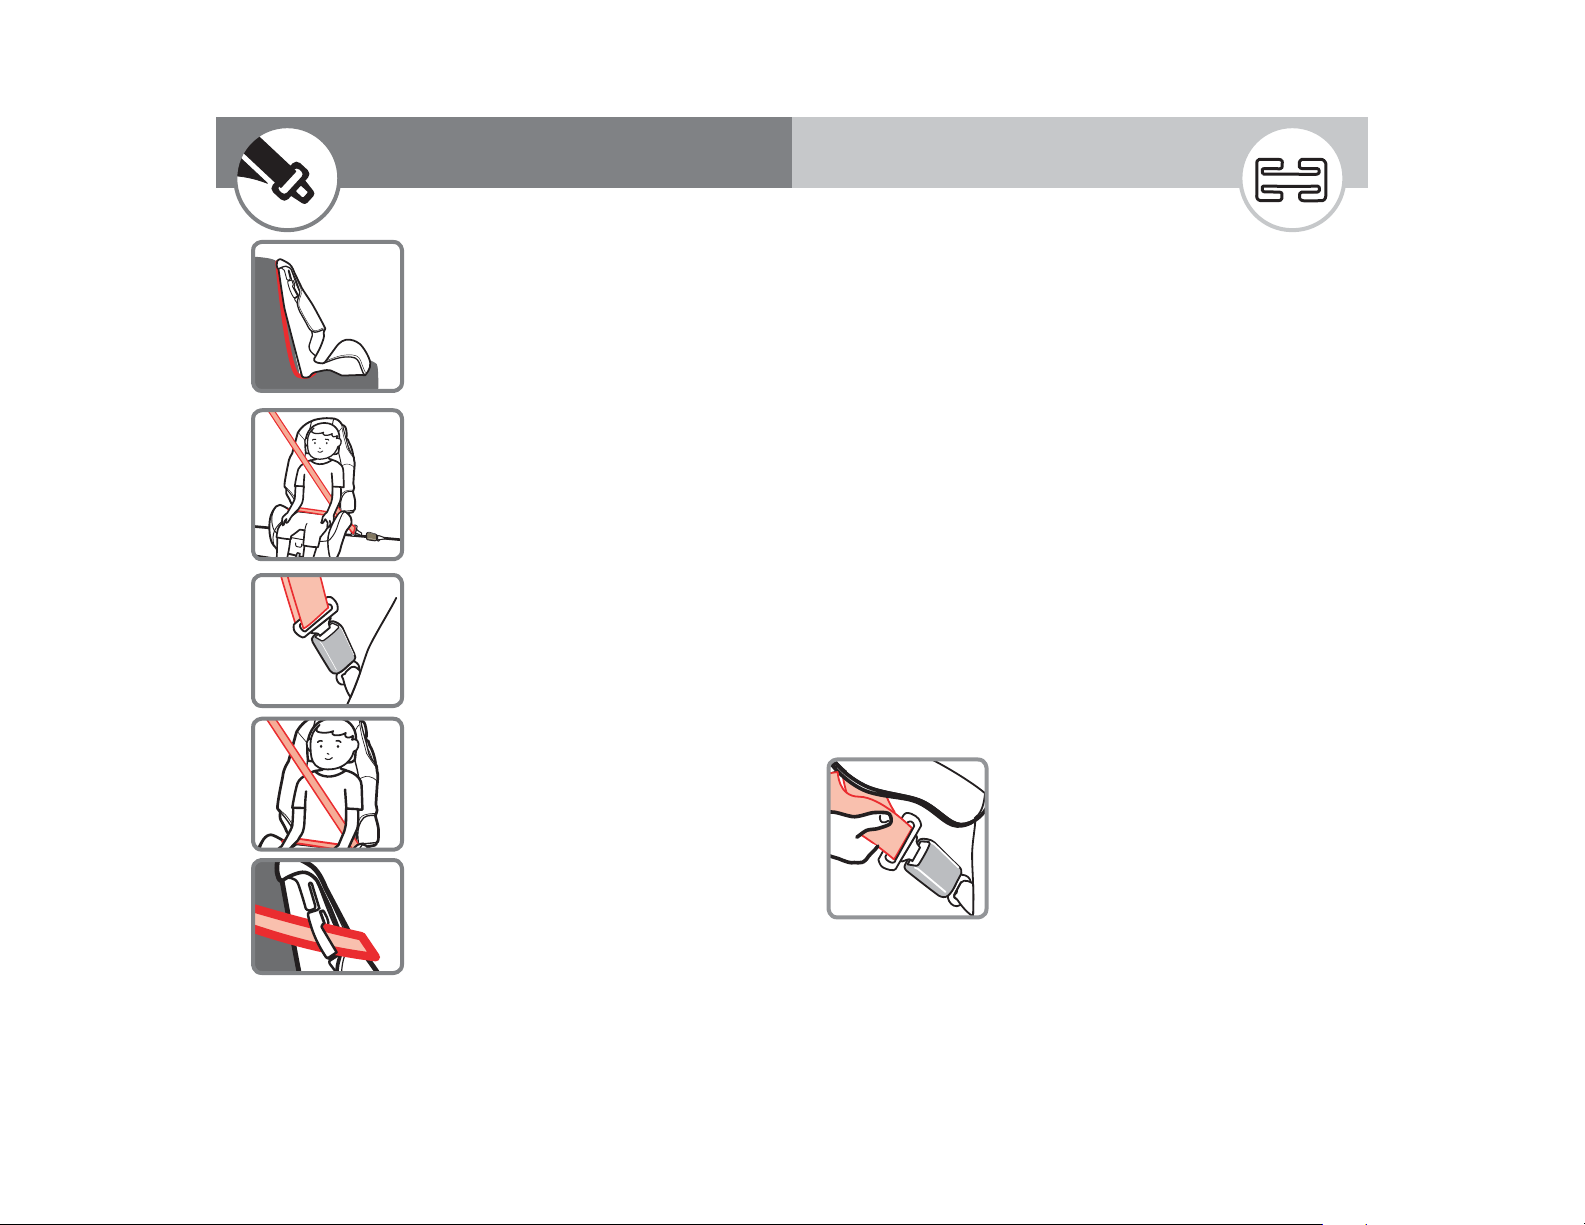
Lap and Shoulder Belt Installation
XXXXXX
Using a Locking Clip
1. Place Booster Seat
Forward Facing Flush
Against Vehicle Seat
Back
Tuck the tether hook and strap under
the booster seat.
2. Position Lap Belt on Child
The lap belt should lay snugly across
the child’s upper thighs and not on
the stomach.
3. Buckle Vehicle Belt
4. Position Shoulder Belt
on Child
Pull up on shoulder belt to tighten.
The shoulder belt should lay snugly
across the center of the child’s
shoulders and across the chest and not
on the face or neck.
To help position the shoulder belt, you
may need to secure the shoulder belt
in one of the notches in the shoulder
belt-positioning guides.
NOTE: Use the shoulder belt positioning guide only if necessary to
correctly position the shoulder belt on the child. Check periodically
to ensure your child has not moved out of position and loosened
the shoulder belt.
33
You will rarely need to use a locking clip except in some older
vehicles.
Built-in child restraint locking systems have been required in
vehicles since 1996, and many vehicles had these features
even earlier. Review pages 21-23 and your vehicle owner’s
manual to determine if your vehicle belts require a locking clip.
If you need a locking clip immediately, they are likely available at
an auto dealership, an auto store, or where you purchased this
child restraint. You can call us at 1-800-544-1108 for one.
A locking clip will not fix all types of seat belt problems. You
MUST have a lap and shoulder belt to use a locking clip.
Do not use the locking clip when using this seat as a
booster seat.
For Forward Facing installation, follow Pages 30-31
Warnings and Steps 1-5 before starting locking clip installation.
1. Determine Locking Clip Position
Grasp both vehicle belts together just
behind the latch plate to mark the
position for locking clip.
Unbuckle the belt.
NOTE: If the latch plate ends up just
at the belt path opening so you
cannot grasp the vehicle belt at the
latch plate, grasp the vehicle belts
on the opposite side of the child
restraint, as close to the latch plate
as possible.
continued on next page
34
Page 21
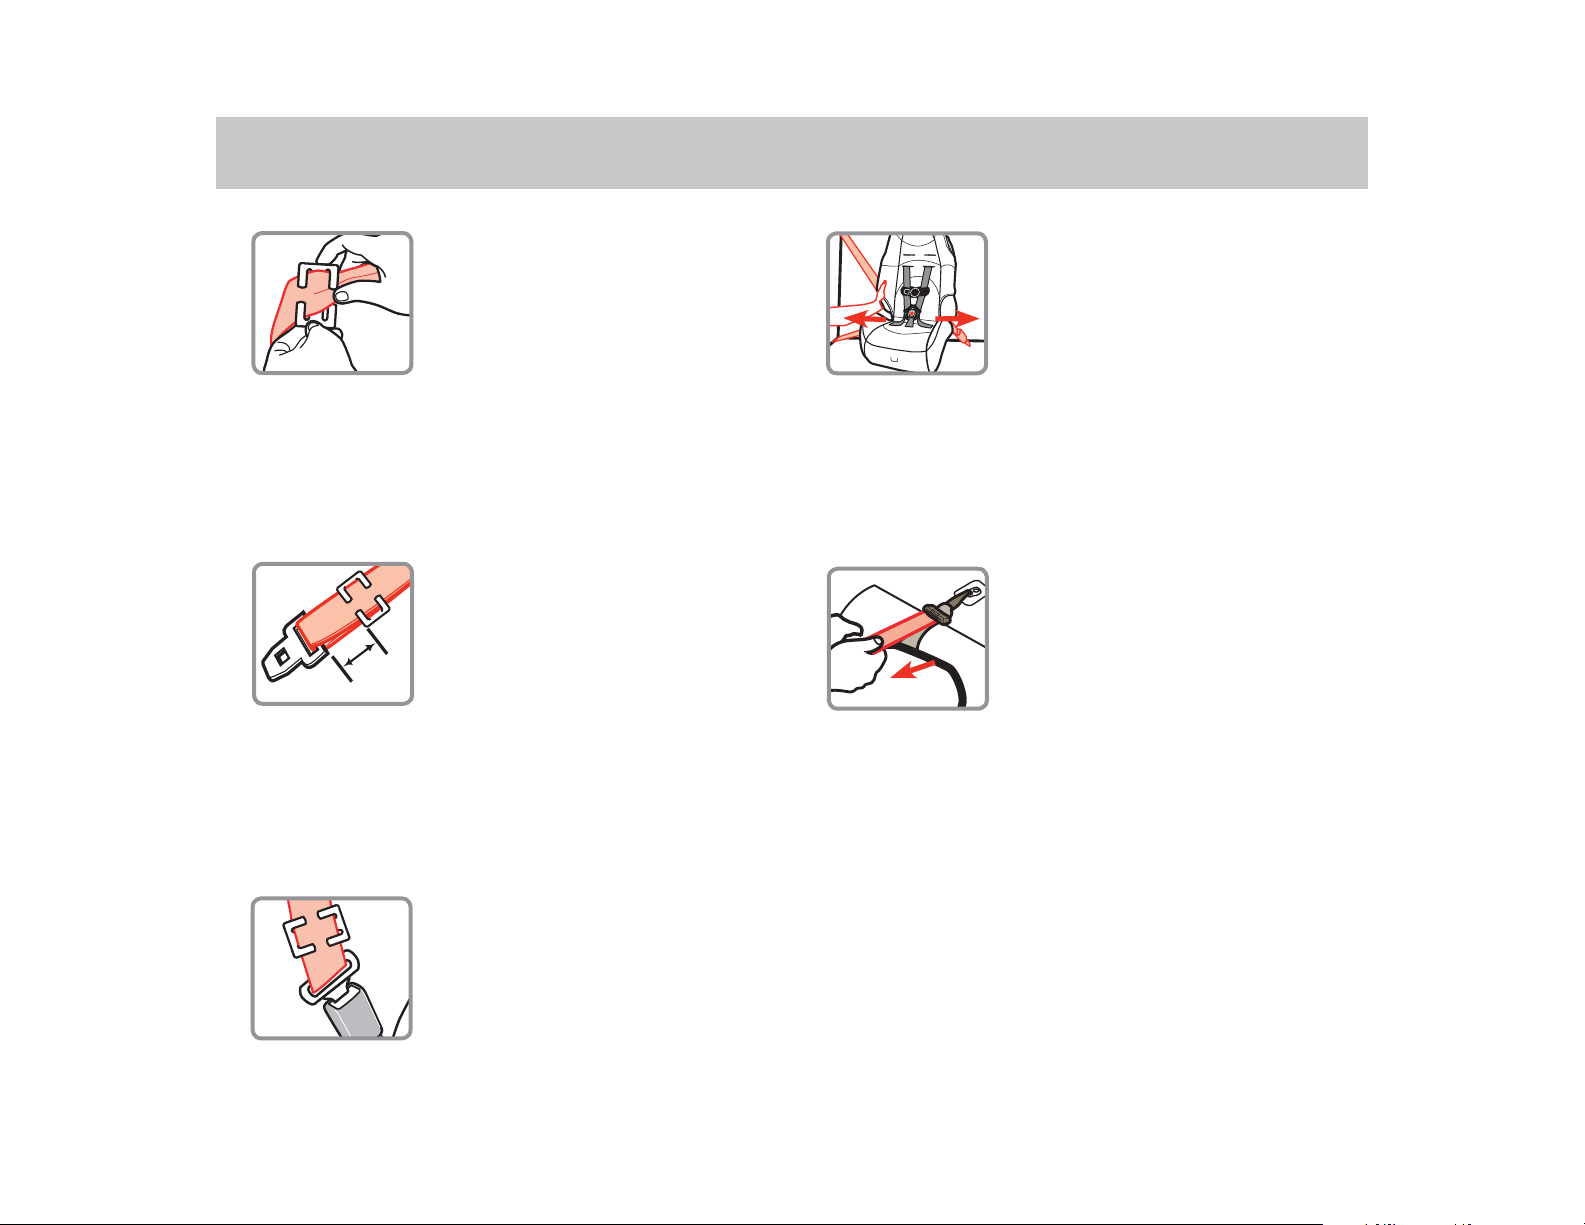
1 in.
(2.5 cm)
2. Attach Locking Clip
Thread both portions of the vehicle
belt onto the locking clip, as close to
the latch plate as possible.
5. Check Belt Tightness
Hold child restraint at the belt path
with your weakest hand.
Push and pull from side to side.
If it moves more than 1 in. (2.5 cm),
try reinstalling the child restraint or try
another seating location.
35
3. Position Locking Clip
It should be about 1 in. (2.5 cm) from
vehicle belt’s latch plate.
4. Rebuckle Vehicle Belt
6. Tighten Tether
With knee in child restraint, push
firmly on the back of the seat and
tighten tether strap.
Remove the locking clip when the seat belt is not being
used with a child restraint.
36
Page 22
Dorel Juvenile Group Information
Troubleshooting
Thank you for choosing this child restraint. The DJG family
is committed to creating child restraints with the most
comfort and convenience available today.
Remember, parents are a child’s first teachers and examples. If you always buckle your seat belt, your child will
think it is the natural thing to do. Make it a firm rule that
the vehicle does not go until everyone is buckled up. Make
no exceptions.
No one can predict if use of a child restraint will prevent
injury or death in a particular crash. However, when combined with careful driving, proper use of a child restraint
can lower a child’s risk of injury or death in most crashes.
Your child’s safety is worth the time it will take to read and
follow these instructions. After reading, if you still have
questions or have any concerns with this child restraint,
please contact our Consumer Care Department at:
Website: www.coscokids.com
Telephone: 1-800-544-1108
M-TH from 8 A.M. to 6 P.M. EST
FRI from 8 A.M. to 4:30 P.M. EST
Mailing Address:
Dorel Juvenile Group, Inc.
Consumer Care Department
P.O. Box 2609
Columbus, IN 47202-2609
1. Locate a Child Safety Seat Inspection Station for
hands on training on how to use your child restraint:
Visit your local Child Passenger Inspection Station or go to
http://www.safercar.gov/cpsApp/cps/index.htm to fi nd your
closest station.
2. If the child restraint buckle or harness release le-
ver sticks or you cannot get the straps tight enough
around child: DO NOT LUBRICATE. Check around lever
and retractor for dropped food, sticky spilled drinks, dirt,
leaves, etc. Clean with warm water and/or remove object
with tweezers. If you cannot get the harness to adjust and
remain tight with the buckle securely locked, do not use
the child restraint.
3. If your harness twists: Straighten the harness each
time you put your child in the child restraint to help prevent
twisting. Lock the buckle and tighten harness so it will be
ready for next use.
37 38
Page 23
Registration and Safety Notices
AB123CDE COSCO HIGHBACK 2-in-1
Replacement Parts Order Form
Please complete the postage-paid registration card that came
with your child restraint, and send it to us. Child restraints could
be recalled for safety reasons. You must register this restraint to
be reached in a recall. Send your name, address, email address
if available, and the restraint’s model number and manufacturing
date to:
Dorel Juvenile Group, Inc.
Consumer Care Department
PO Box 2609
Columbus, IN 47202-2609
or call 1-800-544-1108 or register online at www.djgusa.com/
registration/carseat/us.
For recall information, call the U.S. Government’s Vehicle Safety
Hotline at 1–888–327–4236 (TTY: 1–800–424–9153), or go to
http://www.NHTSA.gov.
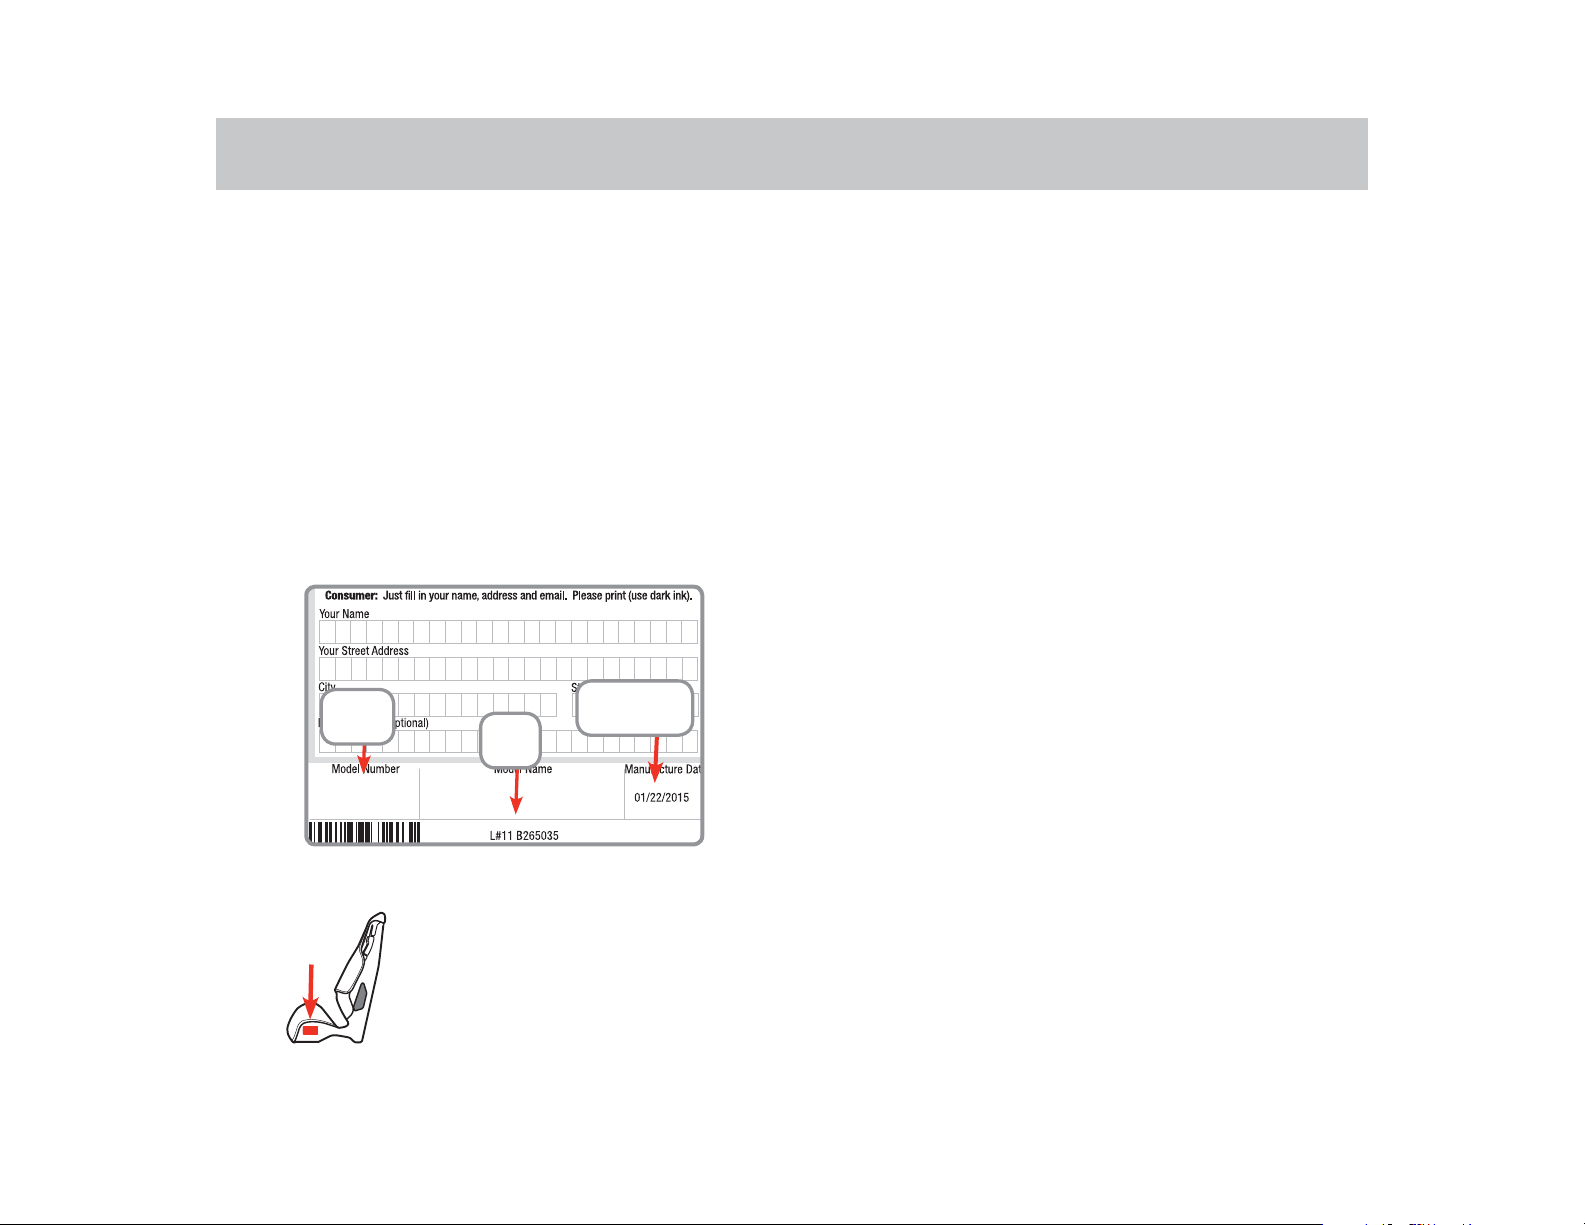
Model
Number
Line
Code
Manufacture
Date
Complete the form. Your model number with color code and
manufacturer date code MUST be included on the form to ensure
proper replacement parts. The codes can be found on a label on
side of child restraint. Payment in U.S. dollars must accompany your
order. Choose parts needed from the list on the next page. Return
the form with payment to:
Dorel Juvenile Group, Inc.
Consumer Care Department
P.O. Box 2609
Columbus, IN 47202-2609
Please make money orders payable to Dorel Juvenile Group, Inc. Fill
in the area on the next page to charge credit card. (Visa or Master-
only
Card
cards. All outside of U.S. and Canada MUST use credit card.
Ship To:
). We do not accept cash, personal checks, or other credit
(Please Print)
Name:_______________________________________
Address:_____________________________________
City:_________________________________________
State/Province:_______________Zip_______________
Example of model number, manufacture date, and line code.
If you don’t have the card or if your
address changes, you will find the
model number, manufacture date,
and line code on the label located
on side of shell.
Telephone: ___________________________________
Email Address: ________________________________
We MUST have this information:
Model Number (8 to 9 characters):_________________
Manufacture Date (mm/dd/yyyy):__________________
4039
Page 24
Replacement Parts List
Warranty
NOTE: If requested color is not available, similar color will be
substituted. Prices are subject to change.
Part Cost Qty Total Cost
Buckle Assembly ..............................$7.99 ....___ ........$_______
Harness Strap .............................$2.99 ....___ ........$_______
Seat Pad ...................................$18.00 ....___ ........$_______
Chest Clip ...................................$1.50 ....___ ........$_______
T ether .........................................$6.00 ....___ ........$_______
Lower Anchor ...........................$17.99 ....___ ........$_______
Instructions .................................$0.00 ....___ ........$_______
Locking Clip ................................$2.50 ....___ ........$_______
Merchandise Total: ..............................................$_______
Shipping and handling: ........................................$_______
Up to $25.00 .....................$5.95
$25.01 to $50.00 ..............$6.95
$50.01 to $75.00 ..............$8.95
$75.01 to $100.00 ............ $9.95
Sales Tax ...............................................................$_______
(Arizona, California, Georgia, Indiana, Missouri, South Carolina, and Texas
residents add applicable sales tax.)
Grand Total ............................................................$_______
No shipping and handling on instructions for quantities under 6. Add $.50 for each
instruction over 6, then add applicable shipping and handling.
$100.01 to $150.00 .......... $10.95
$150.01 to $200.00 .......... $11.95
$200.01 and up.................$13.95
Outside Continental USA.....$10.00
Fill Out For Credit Card
Visa q MasterCard
q
Card Exp. Date:
___________________________________________
Cardholder’s Name:
___________________________________________
Card Number:
___________________________________________
Signature:
___________________________________________
Dorel Juvenile Group, Inc. (DJG) warrants this product to the original
retail purchaser as follows:
This product is warranted against defective materials or workmanship for
one year
nal receipt is required to validate your warranty.
at its option, provide replacement parts or replace this product.
DJG reserves the right to substitute if the part or model has been
discontinued.
To make a claim under this warranty you write to DJG, Consumer
Care Department, P. O. Box 2609, Columbus, IN 47202-2609; or
call 1-800-544-1108 from 8:00 a.m. to 6:00 p.m. EST Monday
through Thursday and from 8:00 a.m. to 4:30 p.m. on Friday.
Proof of purchase is required and shipping charges are the
CUT ON DOTTED LINE
responsibility of the consumer.
Warranty Limitations:
which arise from misuse or abuse of this product.
Limitation of Damages:
are exclusive and in lieu of all others, oral or written, expressed or
implied. In no event will DJG or the dealer selling this product be
liable to you for any damages, including incidental or consequential
damages, arising out of the use or inability to use this product.
Limitation of warranties and other warranty terms and state
law rights:
Any implied warranties, including implied warranties of the
merchantability and fitness for a particular purpose, shall be limited
to the duration and terms of the express written warranty. Some
states do not allow limitations as to how long an implied warranty
lasts or the exclusion or limitation of incidental or consequential
damages, so the above limitations may not apply to you.
This warranty gives you specific legal rights, and you may have
other rights, which vary from state to state. Neither DJG nor the
dealer selling this product authorized any person to create for it any
other warranty, obligation, or liability in connection with this product.
from the date of original purchase.
This warranty does not include damages
The warranty and remedies as set forth
An origi-
DJG will,
41 42
 Loading...