

Page 1
Meijer.com
~!':!-::~
wa
~
~111111~0
Failure
to
follow
the warnings
on
the
labels
and in
the
instruction manual can result in
serious injury
or
death
to
your
child.
Page 2
2
1
E-1 Preparing to Install Rear-Facing
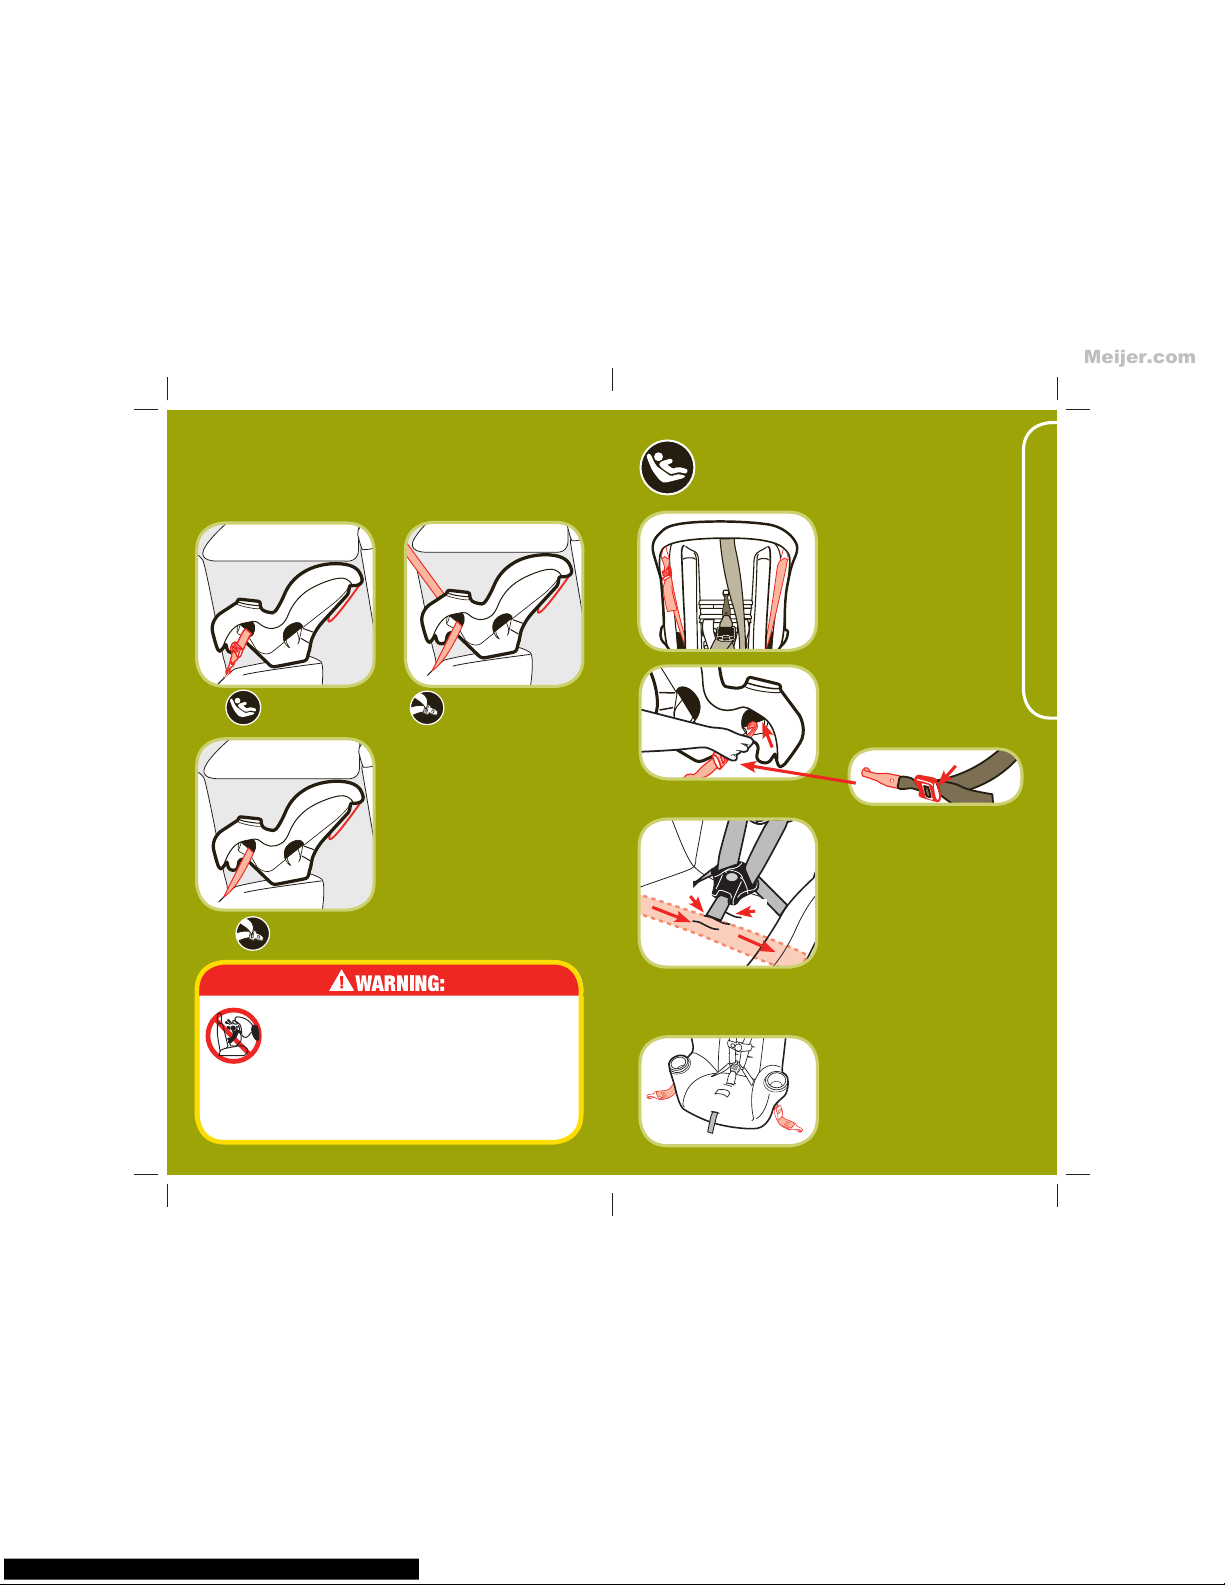
E-2 Preparing to Install LATCH Rear-Facing
E-3 Install Rear-Facing with LATCH
E-4 Install Rear-Facing with Vehicle Belts
E. Installing Rear-Facing ....................... Pages 31-39
F. Installing Forward-Facing Pages 40-48
F-1 Preparing to Install Forward-Facing
F-2 Adjusting Top Anchorage Strap (Tether)
F-3 Preparing to Install LATCH Forward-Facing
F-4 Install Forward-Facing With LATCH
F-5 Install Forward-Facing with Vehicle Belts
B. Safety Information ........................... Pages 9-10
B-1 Vehicle Seating Position
B-2 Installation in Vehicle
B-3 Child Restraint Use
A. Before You Begin ................................. Pages 3-8
C. Basic Use ............................................. Pages 11-25
C-1 Choose Position for Your Child
C-2 Preparing Child Restraint to Fit Your Child
C-3 Securing Child in Child Restraint
C-4 Removing Child From Child Restraint
C-5 Remove Pad for Cleaning
C-6 Rethreading Harness System
A-1 Thank You...
A-2 Registration and Safety Notices
A-3 Understanding Your Child Restraint
G. Additional Information .................. Pages 49-56
G-1 Using the Locking Clip
G-2 Trouble Shooting
G-3 Warranty
G-4 Replacement Parts
D. General Vehicle Installation .....Pages 26-30
D-1 Understanding Your Vehicle
D-2 Vehicle Seating Position
D-3 Choosing LATCH or Vehicle Belts
D-4 Knowing Your Vehicle Belts
D-5 Using Locking Clip
D-6 Installing on Aircraft
Meijer.com
Page 3
3
Thank you for choosing this car seat, referred to throughout
this manual as a child restraint. The DJG family is committed
to creating a child restraint with the most comfort and
convenience available today.
Remember, parents are a child’s first teachers and examples.
If you always buckle your seat belt, your child will think it is
the natural thing to do. Make it a firm rule that the vehicle
does not go until everyone is buckled up. Make no exceptions.
No one can predict if use of a child restraint will prevent
injury or death in a particular crash. However, combined with
careful driving, proper use of a child restraint can lower a
child’s risk of injury or death in most crashes.
Your child’s safety is worth the time it will take to read and
follow these instructions. After reading, if you still have
questions or have any problems with this child restraint,
please contact our Consumer Relations Department at:
Dorel Juvenile Group, Inc.
Website: www.djgusa.com
Fax: 1-800-207-8182
Mailing Address: Dorel Juvenile Group, Inc.
P.O. Box 2609
Columbus, IN 47202-2609
Telephone: 1-800-544-1108
7 A.M. to 6 P.M. EST M-TH
7 A.M. to 4:30 P.M. EST FRI
On the back of the plastic shell there is an expiration date
for use of this child restraint. Do not use this child restraint
after the expiration date.
A-1 Thank You...
Please complete the postage-paid registration card that
came with your child restraint, and send it to us. Child
restraints could be recalled for safety reasons. You must
register this restraint to be reached in a recall. Send
your name, address, email address if available, and the
restraint’s model number and manufacturing date to:
Dorel Juvenile Group, Inc.
PO Box 2609, Columbus, IN 47202-2609
Attn: Consumer Relations
or call 1-800-544-1108 or register online at www.djgusa.
com/registration/carseat/us.
For recall information, call the U.S. Government’s Vehicle
Safety Hotline at 1–888–327–4236
(TTY: 1–800–424–9153), or go to http://www.NHTSA.gov
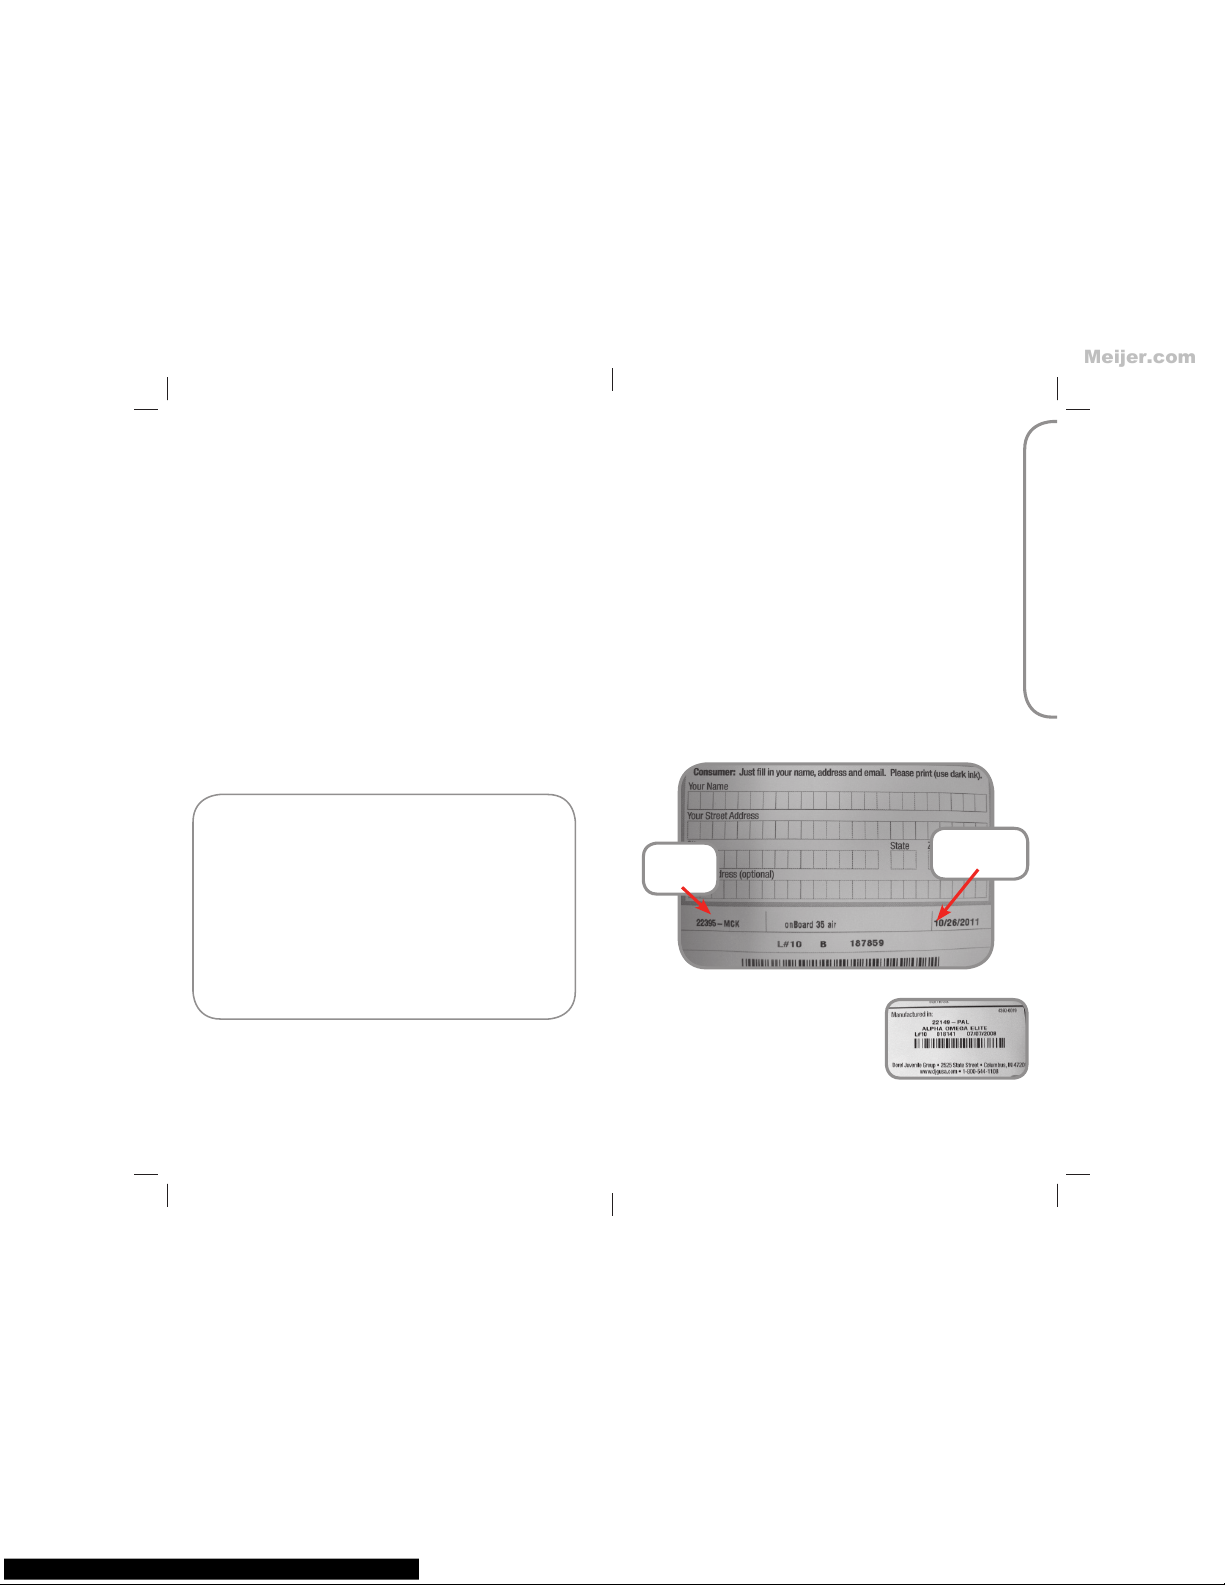
If you don’t have the card or if your
address changes, you will find the
model number and manufactured date
on the label located on side of plastic
shell.
A-2 Registration and Safety Notices
A. Before You Begin
Model
Number
Manufacture
Date
4
Para recibir las instrucciones en español, llame al
1-800-544-1108 o solicitarse por escrito al dirección por arriba.
Meijer.com
Page 4
5
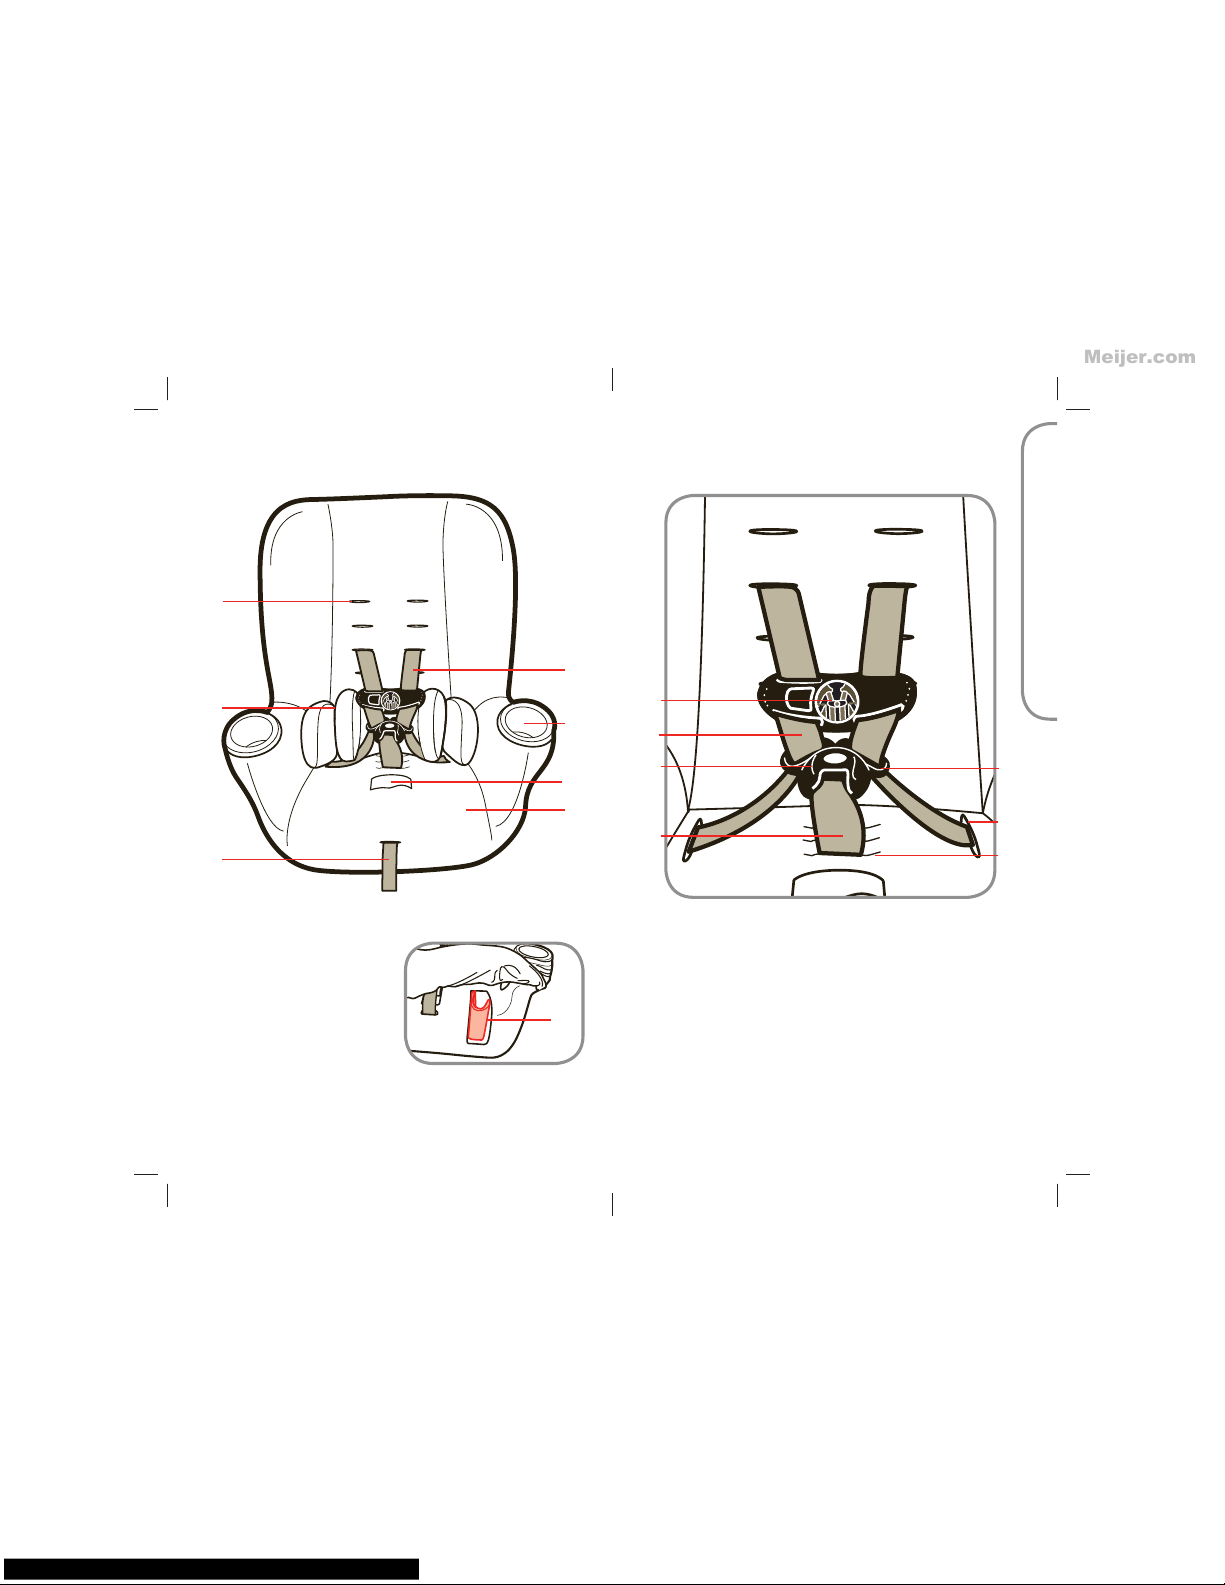
A. Upper Harness Slots
B. Harness System
C. Body Pillows
(on select models)
D. Cup Holder
E. Harness Release
Lever
(under flap)
F. Harness
Tightening Strap
G.
Instruction Manual
Storage (under pad)
A-3 Understanding Your Child Restraint
continued on next page.
6
A.
C.
H. Chest Clip
I. Harness Straps
J. Buckle Tongue
K. Buckle
L. Lower Harness Slots
M. Buckle Strap
N. Buckle Strap Slots
E.
F.
H.
J.
M.
L.
I.
K.
D.
Front View
Harness System Detail
A. Before You Begin
N.
B.
G.
G.
Meijer.com
Page 5
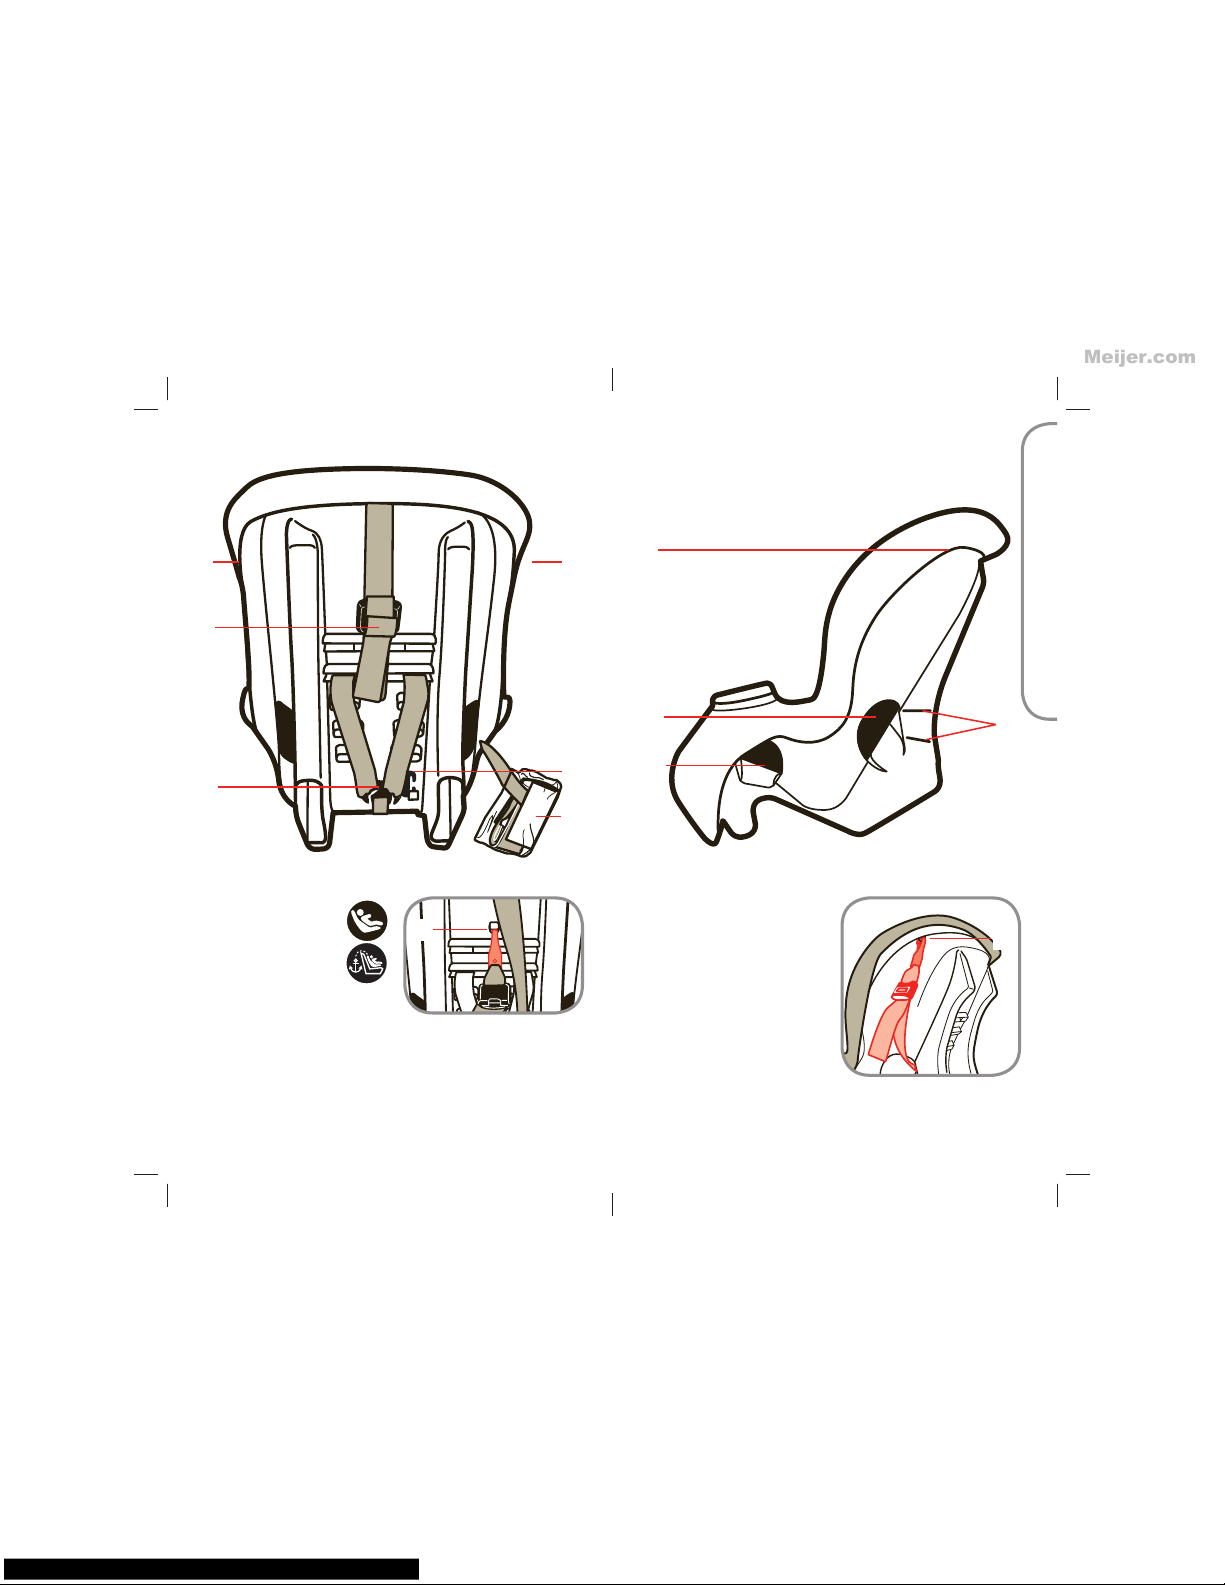
Back View
A. LATCH
(in plastic bag)
B. Top Anchorage
Strap (Tether)
C. Locking Clip
(behind harness)
D.
Splitter Plate
E. Top Anchorage
Hook (Tether) Storage
F.
LATCH Storage
(under pad on side of
shell)
B.
G. Forward-Facing
Belt Path
H. Rear-Facing Belt
Path
I. Level to Ground Lines
(on side of plastic shell)
C.
Side View
7
8
A. Before You Begin
E.
D.
I.
F.
A.
F.
H.
F.
G.
F.
Meijer.com
Page 6
9
10
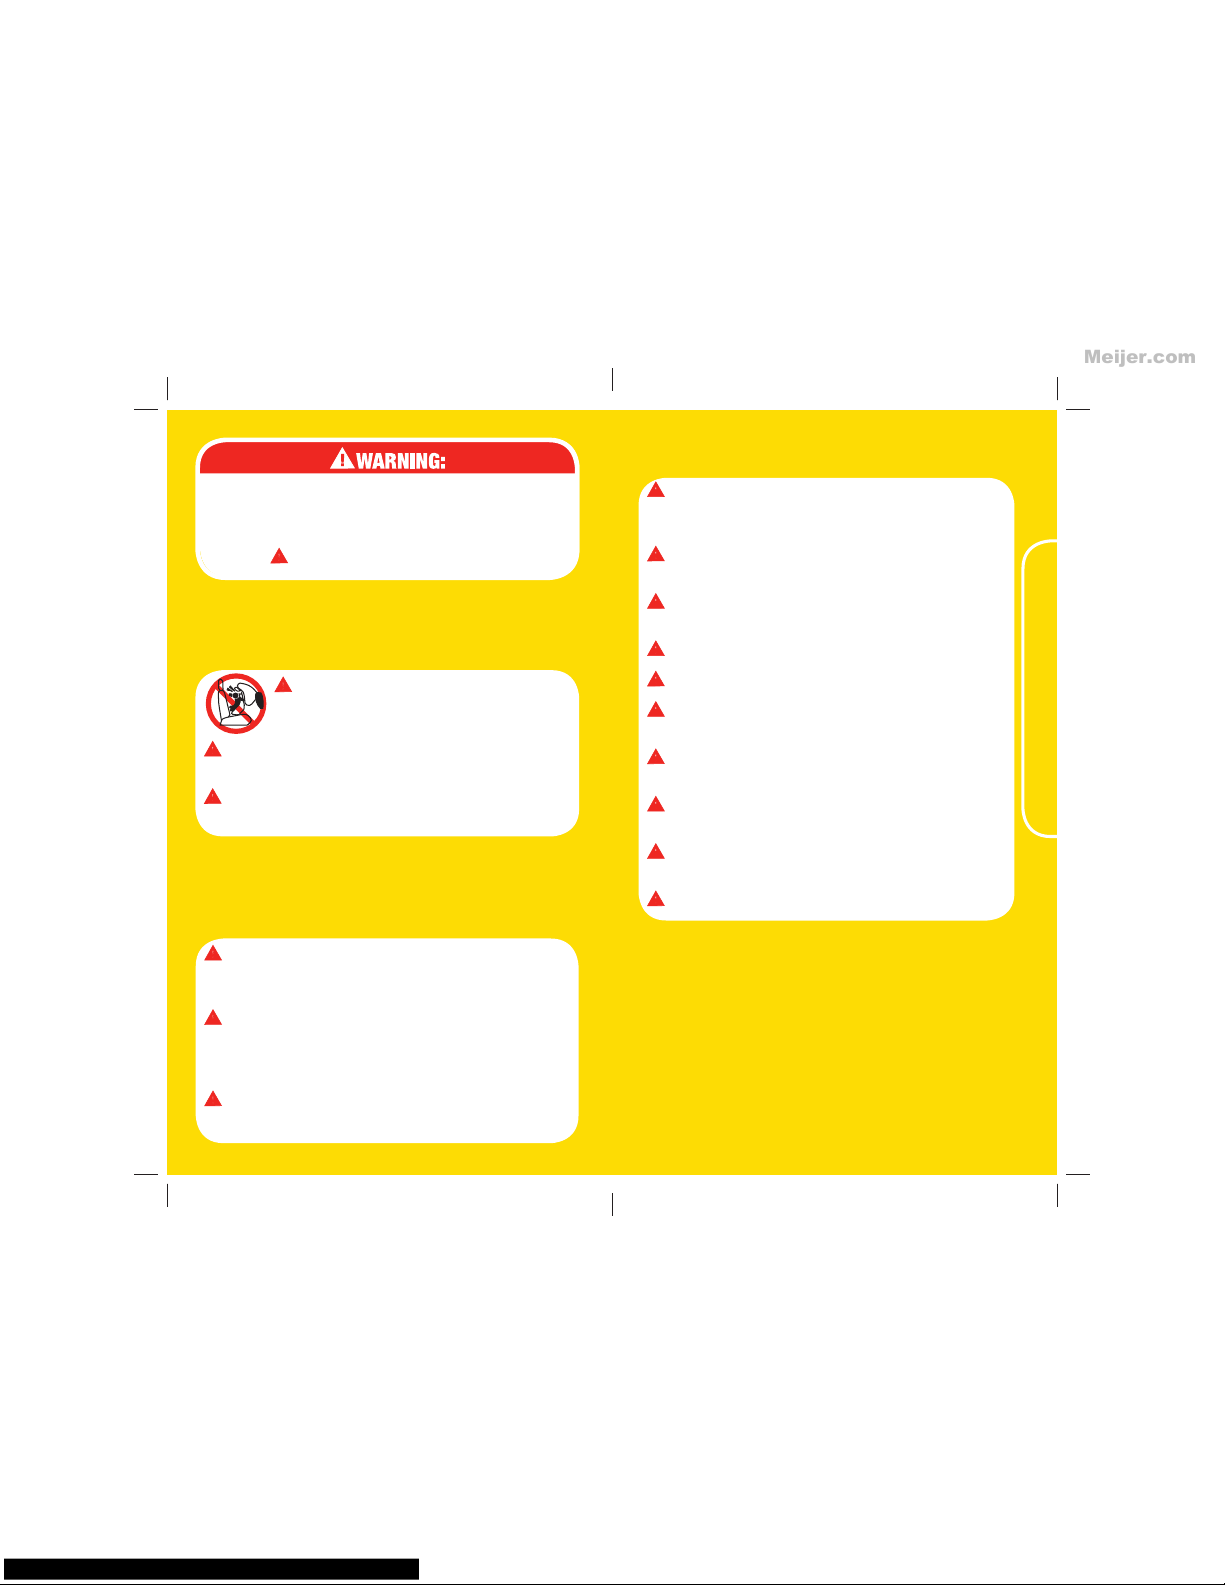
B-3 Child Restraint Use
Never take your child out of the child restraint
while the vehicle is moving. Never leave child
unattended.
Placing your child in a hot child restraint may
result in burns.
Do not use a child restraint with damaged or
missing parts.
Do not use cut, frayed or damaged harnesses.
Do not lubricate buckles and fasteners.
Do not substitute parts or try to modify the
child restraint in any way.
Do not use any child restraint accessory
except those approved by Dorel Juvenile Group.
Never allow any child to play with this child
restraint; it is not a toy.
Do not remove or cover up any of the warning
labels or other labels on the child restraint.
Read all instructions for additional warnings.
B-1 Vehicle Seating Position
Never place a child rear-facing in a
seating position with an active frontal
airbag.
Check the vehicle owner’s manual for more
information about air bag/child restraint use.
For vehicles without a back seat, refer to your
vehicle owner’s manual.
B. Safety Information
Failure to follow these warnings can result in
the serious injury or death of your child. To help
you recognize instructions which are most
critical to your child’s safety, we use this
symbol:
B-2 Installation in Vehicle
Check the vehicle belt or LATCH belt before
each use. Use only if the belt is tightened
properly and securely.
This child restraint should be securely belted
in the vehicle even when not in use. In a crash
or sudden stop, an unsecured child restraint
could injure occupants.
Do not use a child restraint that has been in a
crash. You must get a new child restraint.
Meijer.com
Page 7
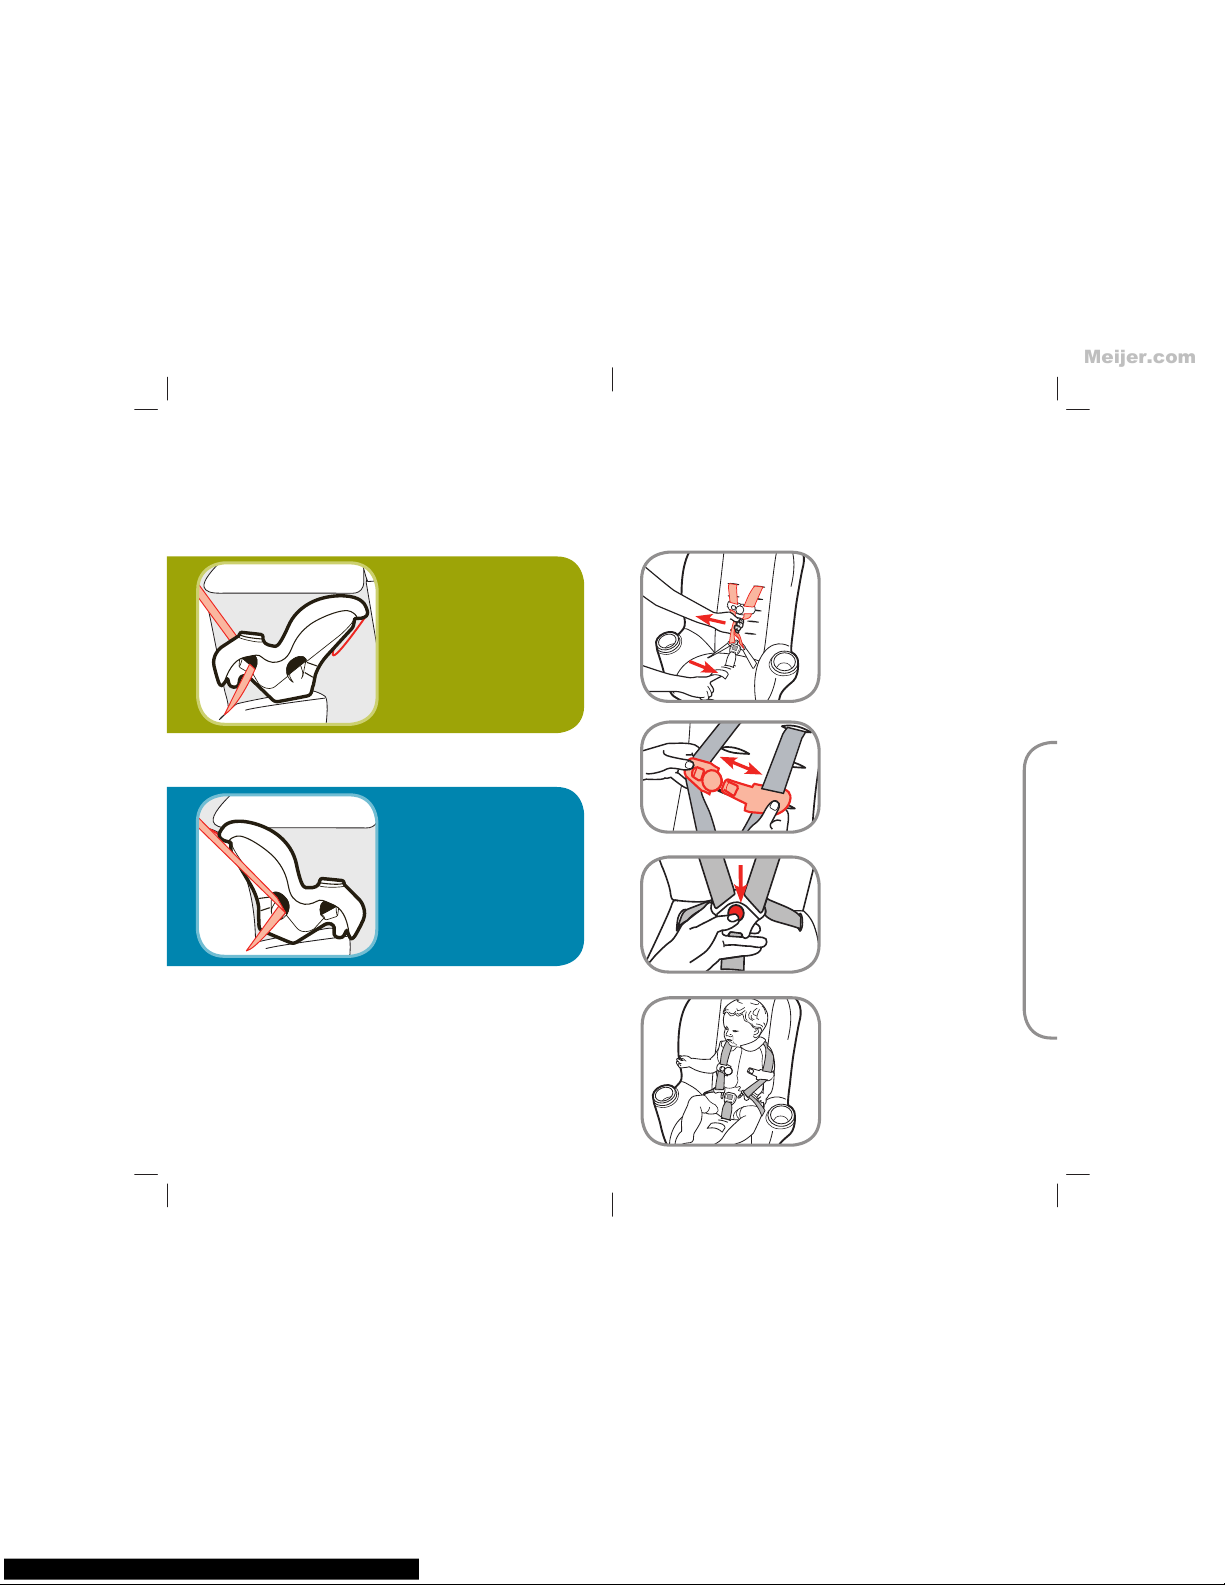
C-1 Choose Position for Your Child
Your child’s height, weight and age determine how your child
restraint should be placed in the vehicle.
5-40 lbs (2.3-18 kg)
and 19-40 in. (48-101.6 cm)
Rear-Facing using
5-point harness
Child and child restraint are
placed in the back seat, facing
the back of the vehicle.
22-40 lbs (10.1-18 kg)
and 34-43 in.
(85.1-110 cm) and
Over 1 Year Old
Forward-Facing using
5-point harness
Child and child restraint are
placed in the back seat,
facing the front of the vehicle.
C-2 Preparing Child Restraint to Fit
Your Child
Release Chest Clip
Press on chest clip release
button and pull apart.
Loosen Harness
Push down on the harness
release lever (under flap on
the front of child restraint)
while pulling out on the
harness straps.
Make these adjustments with your child in the child
restraint before you install in the vehicle.
Unbuckle Harness
Press red button. Pull
buckle tongues out. Place
harness straps out of
the way.
continued on next page.
1.
2.
3.
C. Basic Use
11
12
Place Child in Child
Restraint
Place the child’s bottom
and back flat against the
child restraint. This will
increase comfort and allow
the harness straps to be
properly tightened.
4.
Meijer.com
Page 8
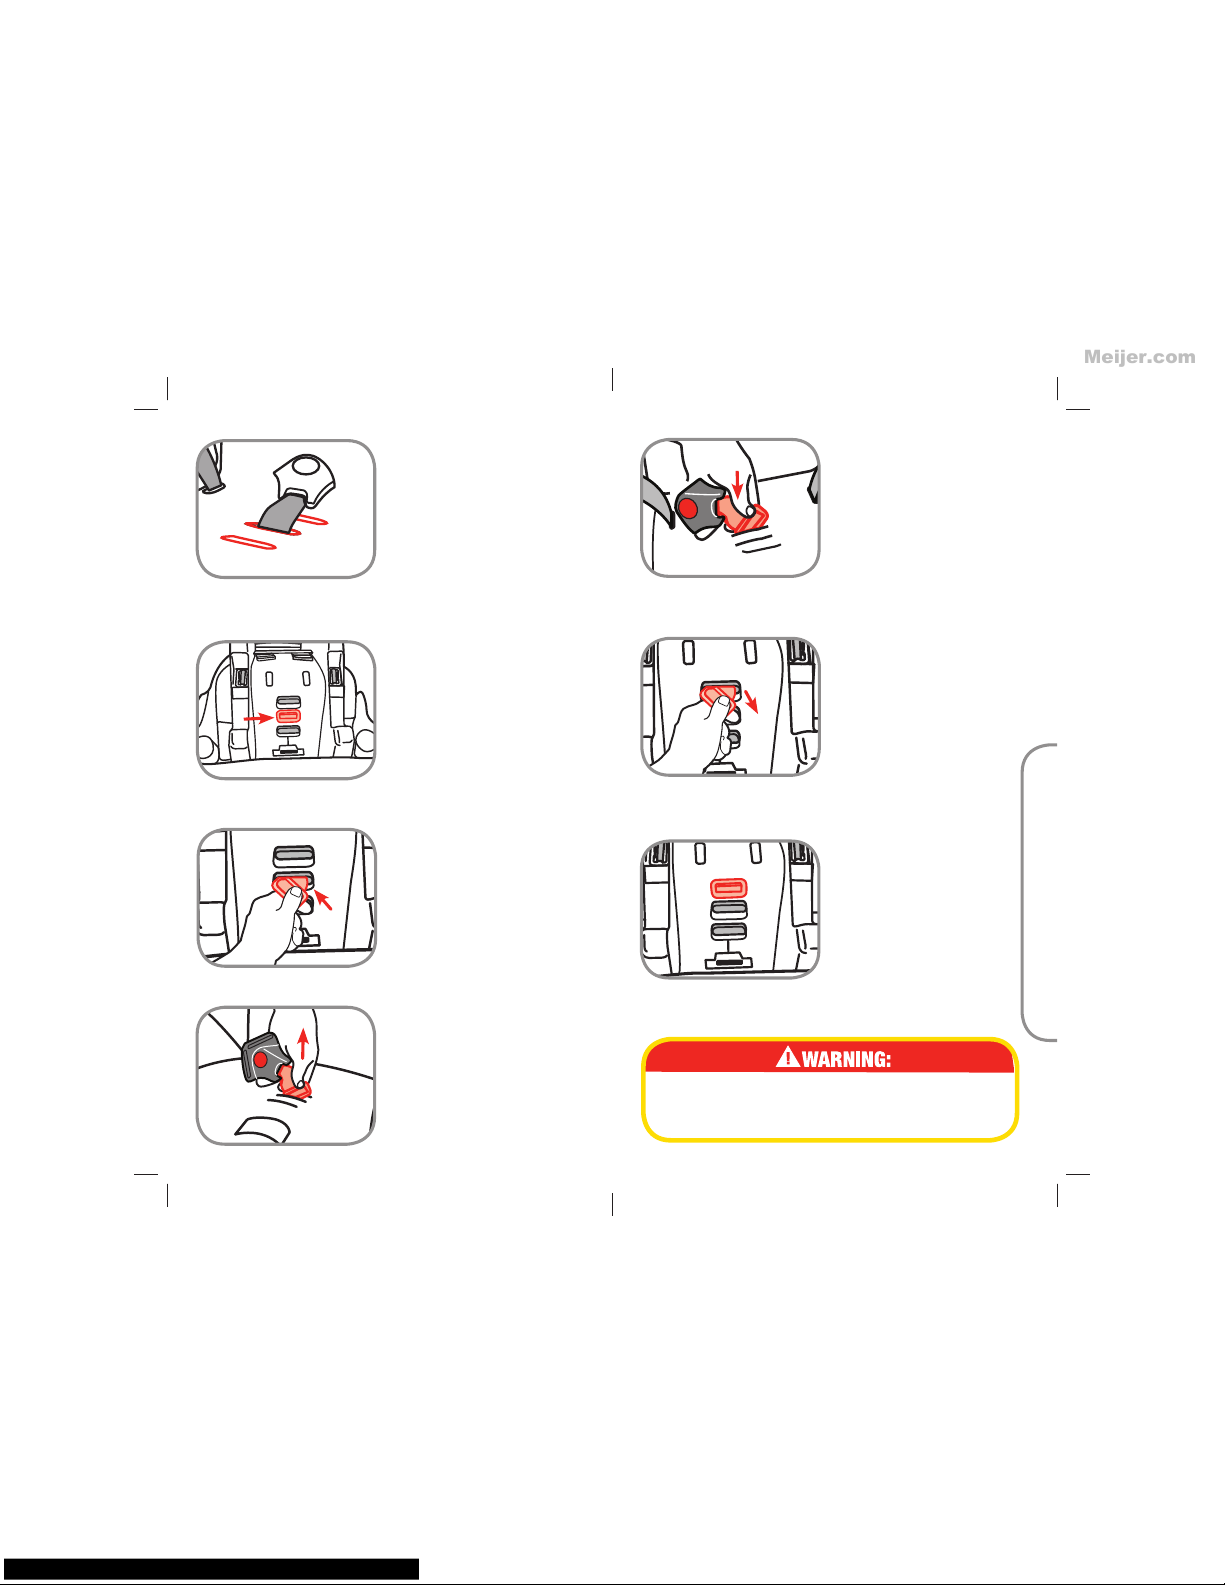
C. Basic Use
Check Buckle
Position
Determine which of the
available buckle positions
will be comfortable and
provide a snug fit for
your child.
5.
13
14
From the top, pull buckle
free from plastic shell and
pad.
Reposition buckle location.
Insert the buckle’s metal
retainer through the
desired slot. Make sure
buckle is facing forward.
Failure to place buckle’s metal retainer
completely through pad and plastic shell can
result in serious injury or death.
c.
d.
continued on next page.
Rotate metal retainer, then
insert retainer up through
the shell and pad.
b.
To Change Buckle
Position
Turn the child restraint over
and locate the buckle’s
metal retainer.
a.
Reach under seat between
base and shell. Pull
buckle’s metal retainer
completely through pad
and shell.
Pull up on buckle to make
sure it is secured. The
buckle’s metal retainer
must not pull out.
e.
f.
Meijer.com
Page 9
15
16
C. Basic Use
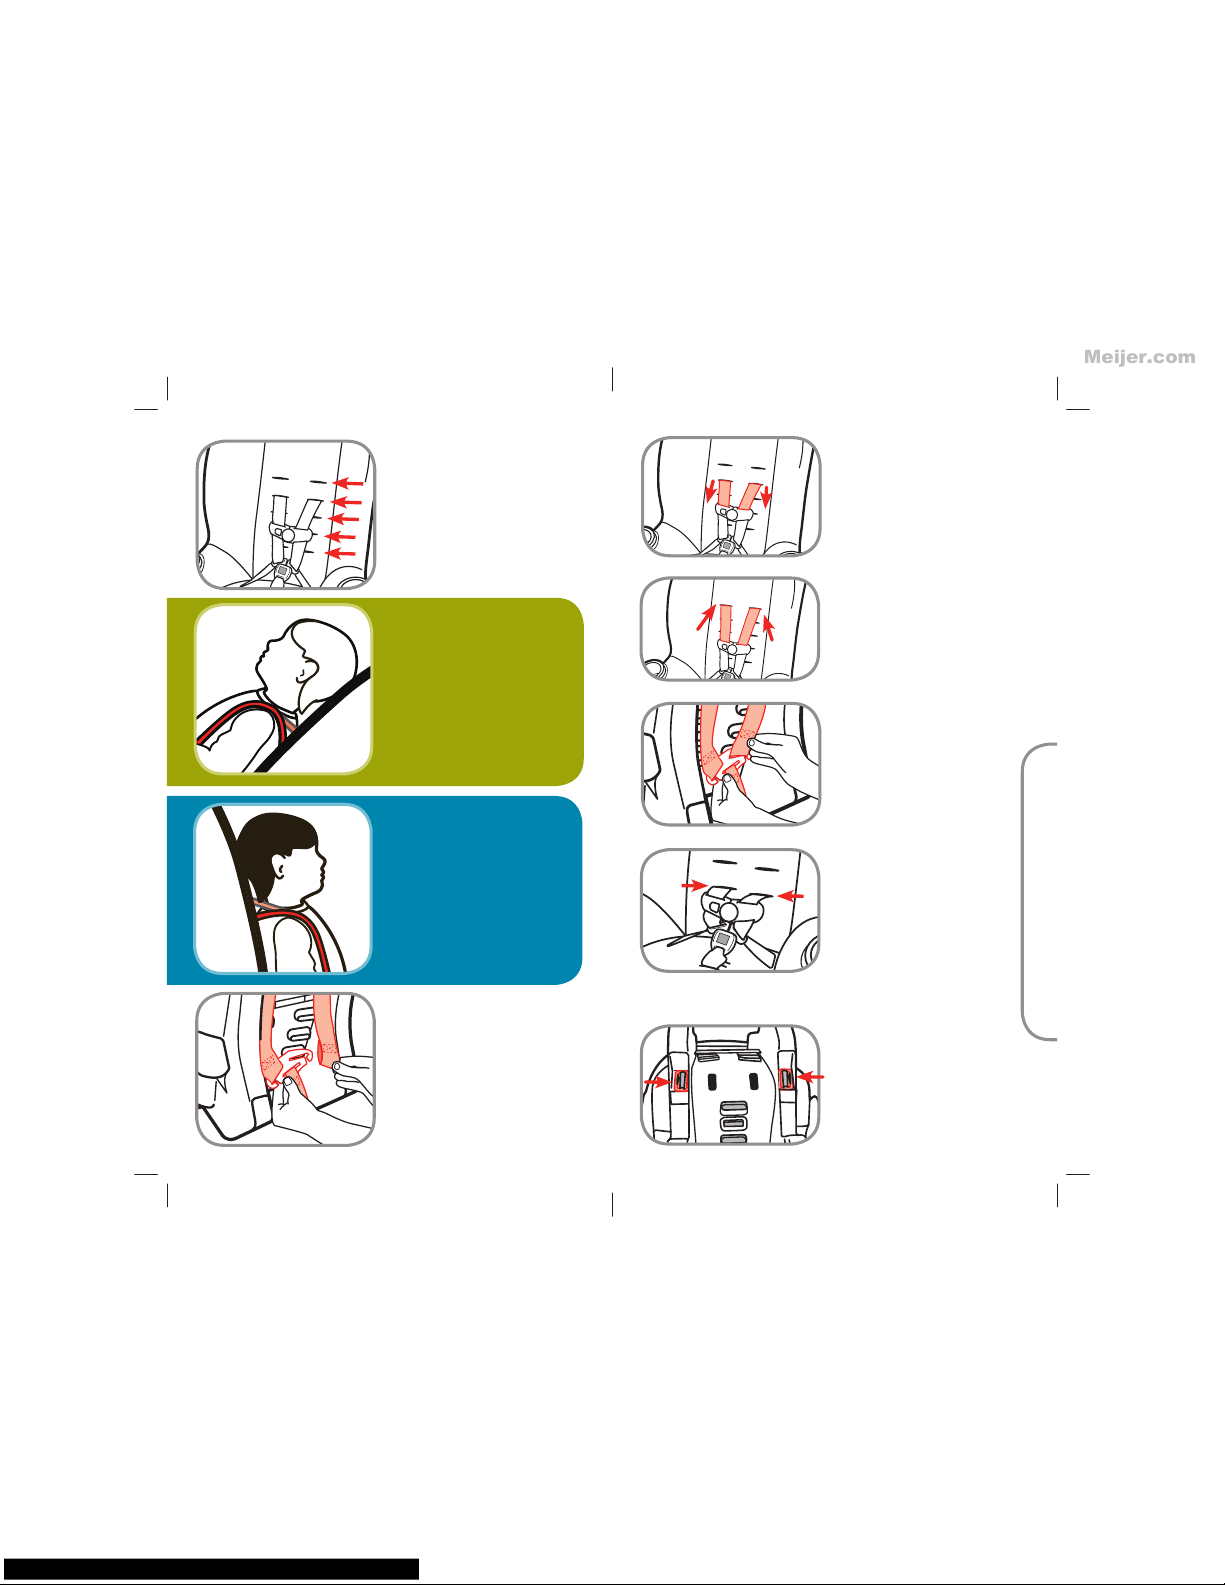
Check Harness
With child in the child
restraint, check the location
of the harness slot.
Follow the guidelines below
to determine the correct
harness height.
6.
Rear-Facing Position
Harness slot must be even
with or just below the
shoulders.
If the lowest harness slot is
above the child’s shoulders,
do not use this child restraint.
Forward-Facing Position
Harness slot must be even
with or just above the
shoulders.
If the highest harness slot is
below the child’s shoulders, do
not use this child restraint.
To Change Harness
Location
With harness system loose,
from the back, remove
harness from the splitter
plate.
7.
From the front of child
restraint, pull harness
straps out.
a.
Rethread harness into
new harness slot location.
Make sure harness straps
do not twist.
b.
Fit loops on harness ends
completely on the splitter
plate.
NOTE: Make sure sewn
end of the harness strap
loop faces towards you.
c.
Using the Lowest
Harness Slots
When using the lowest
slots, you MUST move the
harness’s metal retainer
to the inside position. This
will allow a proper fit for
the lowest harness slot
use.
a.
Rotate the child restraint
over and locate both metal
retainers.
b.
Meijer.com
Page 10
C. Basic Use
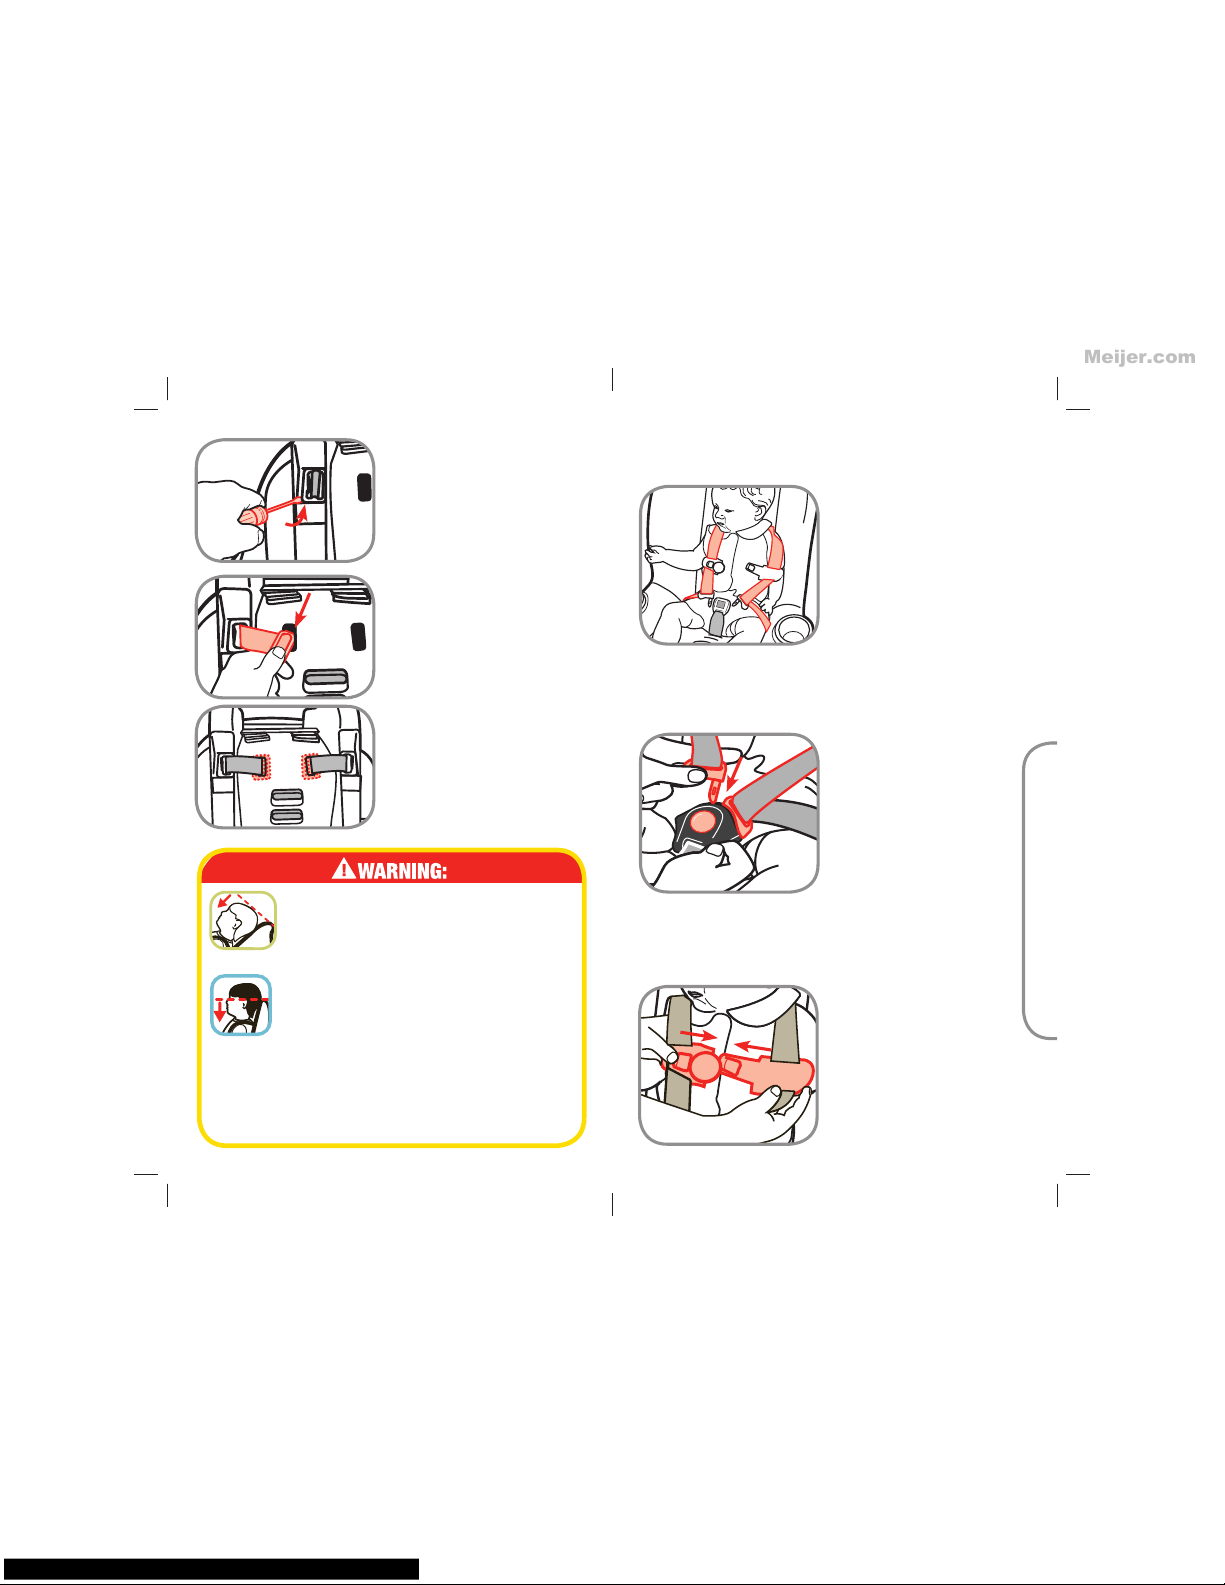
C-3 Securing Child in Child Restraint
Position Harness
Straps Over the
Child’s Shoulders.
1.
Buckle Harness
Push each buckle tongue
into buckle until you hear
a “click”. Remember to
always pull up on harness
straps to make sure buckle
is locked.
2.
Close Chest Clip
Insert right half of chest
clip into left half and
snap together.
3.
17
18
Use a flathead screwdriver
and lift metal retainer off
plastic tab.
c.
Pull harness and metal
retainer out of the outside
harness storage location.
Insert the metal retainer into
the closest slot as shown.
From the front, pull on the
harness straps to make sure
they do not pull out.
Repeat for other side.
d.
Do not use this child restraint rearfacing if the top of your child’s
head is above the top of the child
restraint.
Do not use this child restraint
forward-facing if the midpoint of
your child’s head is above the top of
the child restraint.
Make sure the harness height is correct for
your child’s size.
Failure to follow these steps can result in
serious injury or death.
Meijer.com
Page 11
C. Basic Use
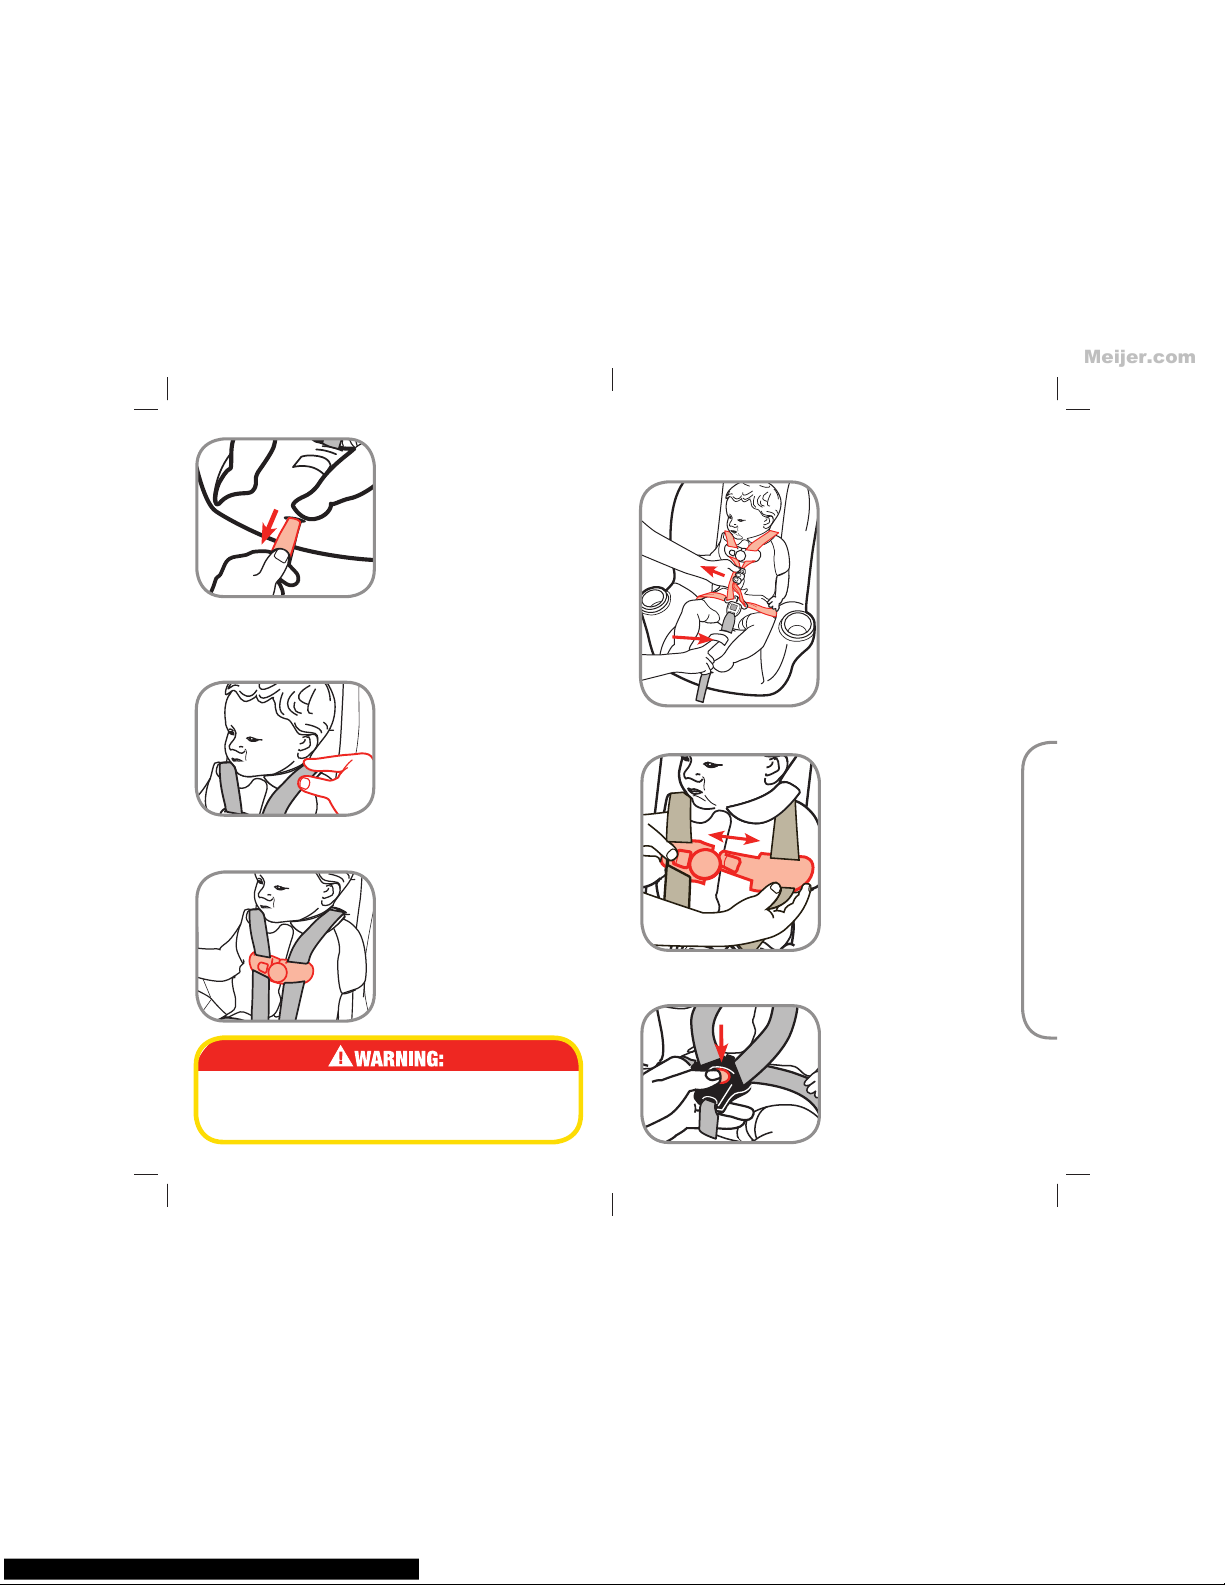
C-4 Removing Child From Child Restraint
Loosen Harness
Press on harness release
lever while pulling on
harness straps above the the
buckle to loosen.
1.
Release Chest Clip
Press on release button
and pull apart.
2.
Unbuckle
Press red button on buckle
to release the buckle
tongues. Move harness
away from child and
remove child.
3.
19
20
Tighten Harness
Pull on harness
tightening strap to tighten
harness snugly.
NOTE: A snug strap should
not allow any slack. It lies
in a relatively straight line
without sagging. It does not
press on the child’s flesh or
push the child’s body into an
unnatural position.
4.
Position Chest Clip
The chest clip must be
placed at mid-chest (even
with armpits) and away from
the child’s neck.
6.
Check Harness Tightness
Try to pinch the harness at
the shoulders. If you can
pinch the harness strap,
tighten more. If your fingers
slip off, the harness is tight
enough.
5.
Failure to fasten and tighten the harness system
correctly and snugly can result in serious injury
or death.
Meijer.com
Page 12
22
21
C. Basic Use
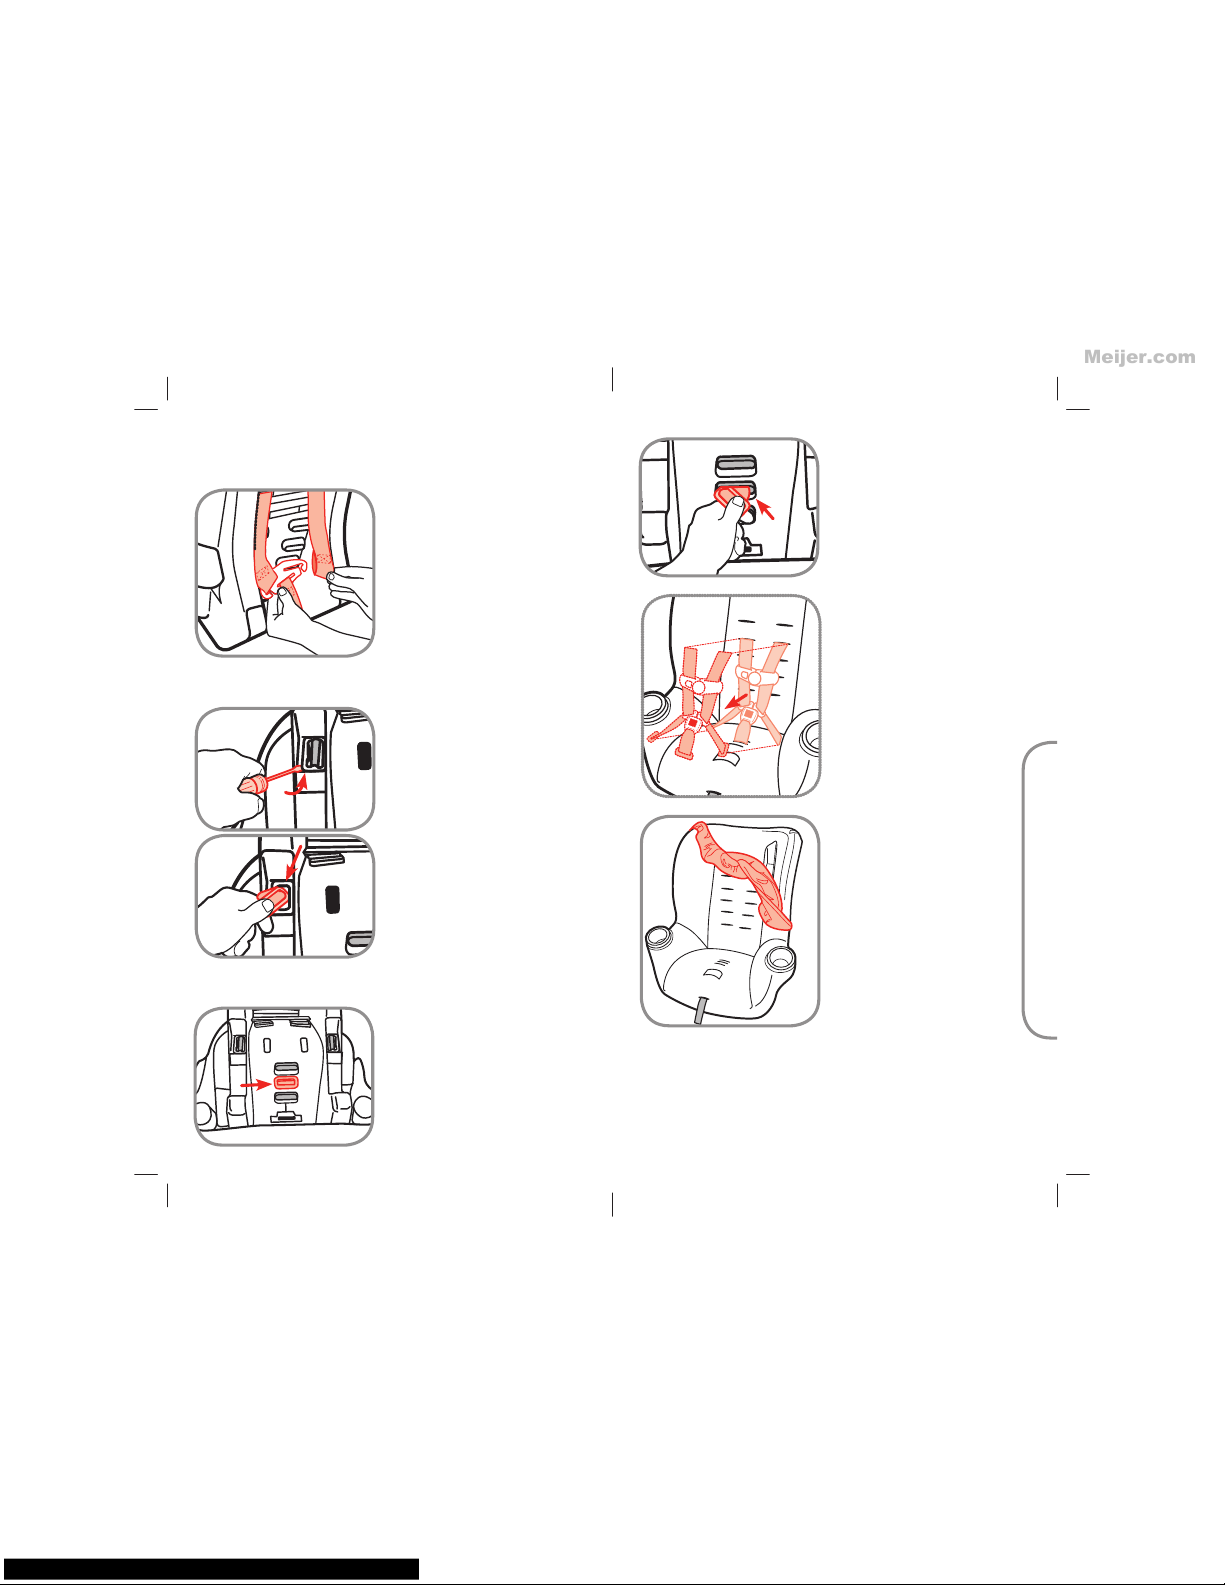
Remove Harness Straps
from Splitter Plate
Fully loosen harness straps.
Locate splitter plate on the
back of the child restraint
and unfasten the harness
straps.
1.
Lift Harness System Out
of Shell and Pad
Pull harness system
completely out of the shell
and pad.
2.
C-5 Removing Pad for Cleaning
3.
4.
Insert Metal Retainer
Through Shell and Pad
Rotate metal retainer, then
insert retainer up through
the shell and pad.
Locate Buckle’s Metal
Retainer
continued on next page.
Remove Pad
Pull pad off the top of
child restraint and remove
pad.
6.
Cleaning Pad
Hand wash pad with warm sudsy water, rinse clean and air
dry. Spot clean the harness straps. Do not use bleach or use
other harsh cleaners. Do not dry clean.
Remove Harness’s Metal
Retainer From Shell
Turn the child restraint over.
Use a flathead screwdriver
and lift metal retainer off
plastic tab. Insert metal
retainer through shell and
pad. Repeat for other side.
2.
Meijer.com
Page 13
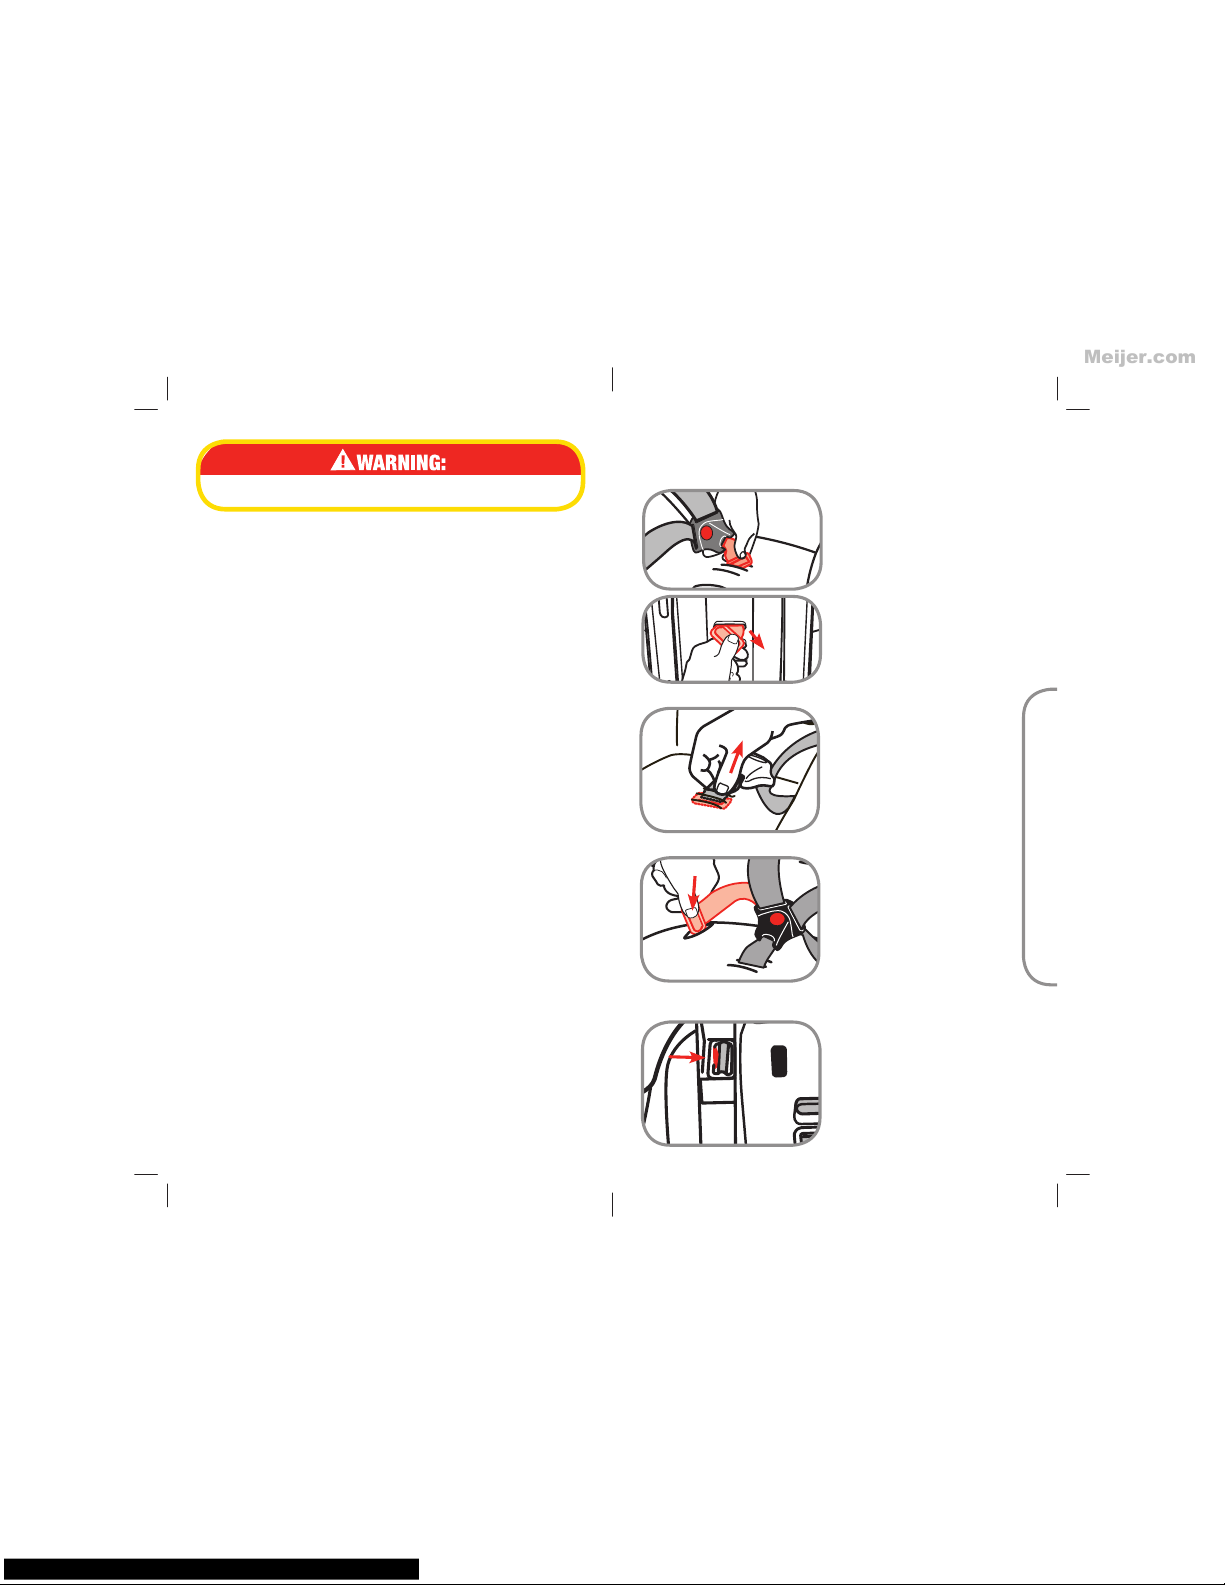
Replace child restraint pad by reversing order; Starting from
bottom of child restraint, slip pad on plastic shell; pull harness
tightening strap and each harness strap through pad. Wrap
pad around the top of shell. Pull pad around each cup holder
and slip pad over the sides of the restraints.
Rethread harness (see section C-6).
23
C. Basic Use
24
C-6 Rethreading Harness System
Install Buckle
Fit the buckle’s metal
retainer through the slot
in the child restraint. Red
button must face out.
Pull buckle’s metal retainer
completely through pad
and shell from bottom
of seat.
1.
Check Buckle
Pull up on buckle to make
sure it is secured. The
buckle must not pull
out.
2.
continued on next page.
Do not use child restraint without the pad.
Thread Harness’s
Metal Retainer Into
Shell
Push the harness’s metal
retaining into the lower
harness slot making
sure it goes completely
through the pad and shell.
3.
Lock Harness’s Metal
Retainer
Rotate the shell over to
expose the bottom of shell.
Pull on the harness straps
to lock the metal retainer
into place.
4.
Meijer.com
Page 14
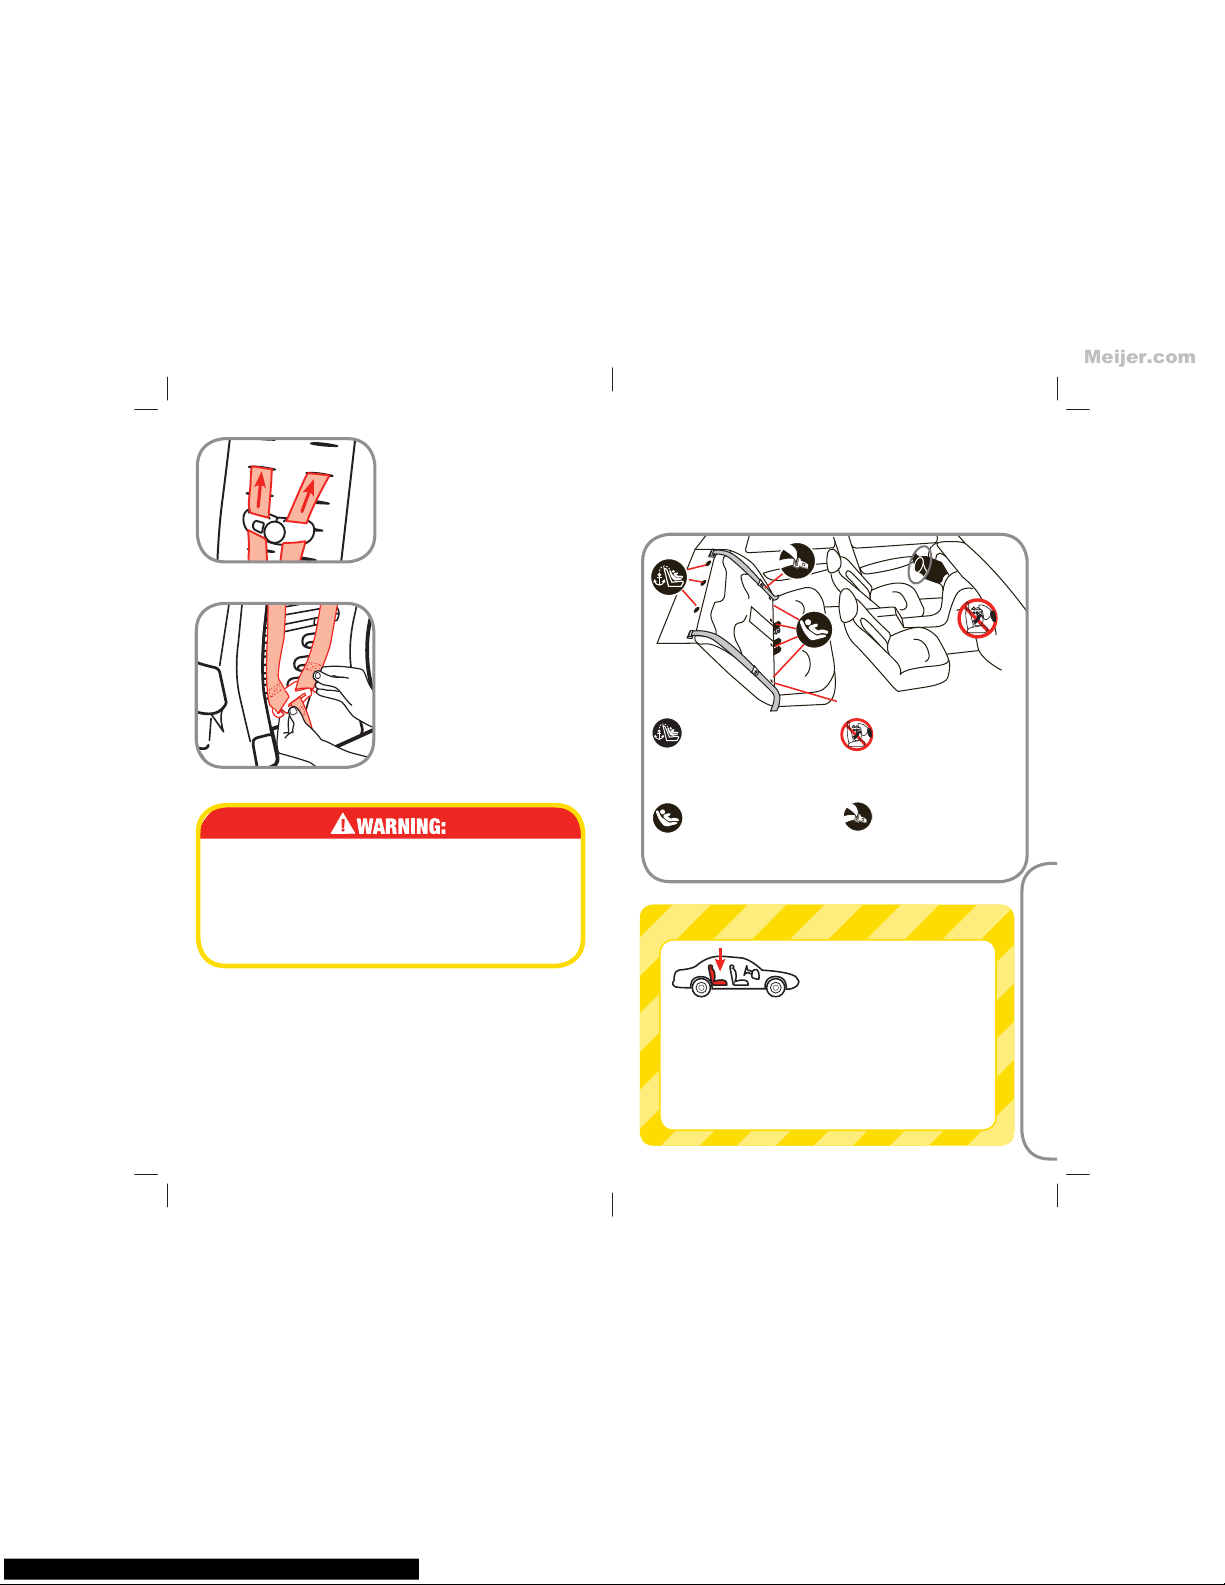
25 26
Attach Harness Straps to
Splitter Plate
Fit loops on harness ends
completely on the splitter
plate.
6.
Harness system must be reattached correctly.
Buckle’s metal retainer and harness’s metal
retainer must be completely through pad and
shell.
Failure to follow these warnings can result in
serious injury or death.
D. General Vehicle Installation
Safety Tip:
Children are safer
when properly
restrained in rear
seating positions than
in the front seating positions.
According to National Highway Traffic
Safety Administration information, children
in rear seating positions are statistically
safer, whether you have air bags,
advanced air bags, or no air bags at all.
Your vehicle’s features may be considerably different than
those pictured here. Consult your vehicle owner’s manual to
help identify your vehicle’s specific features and locations.
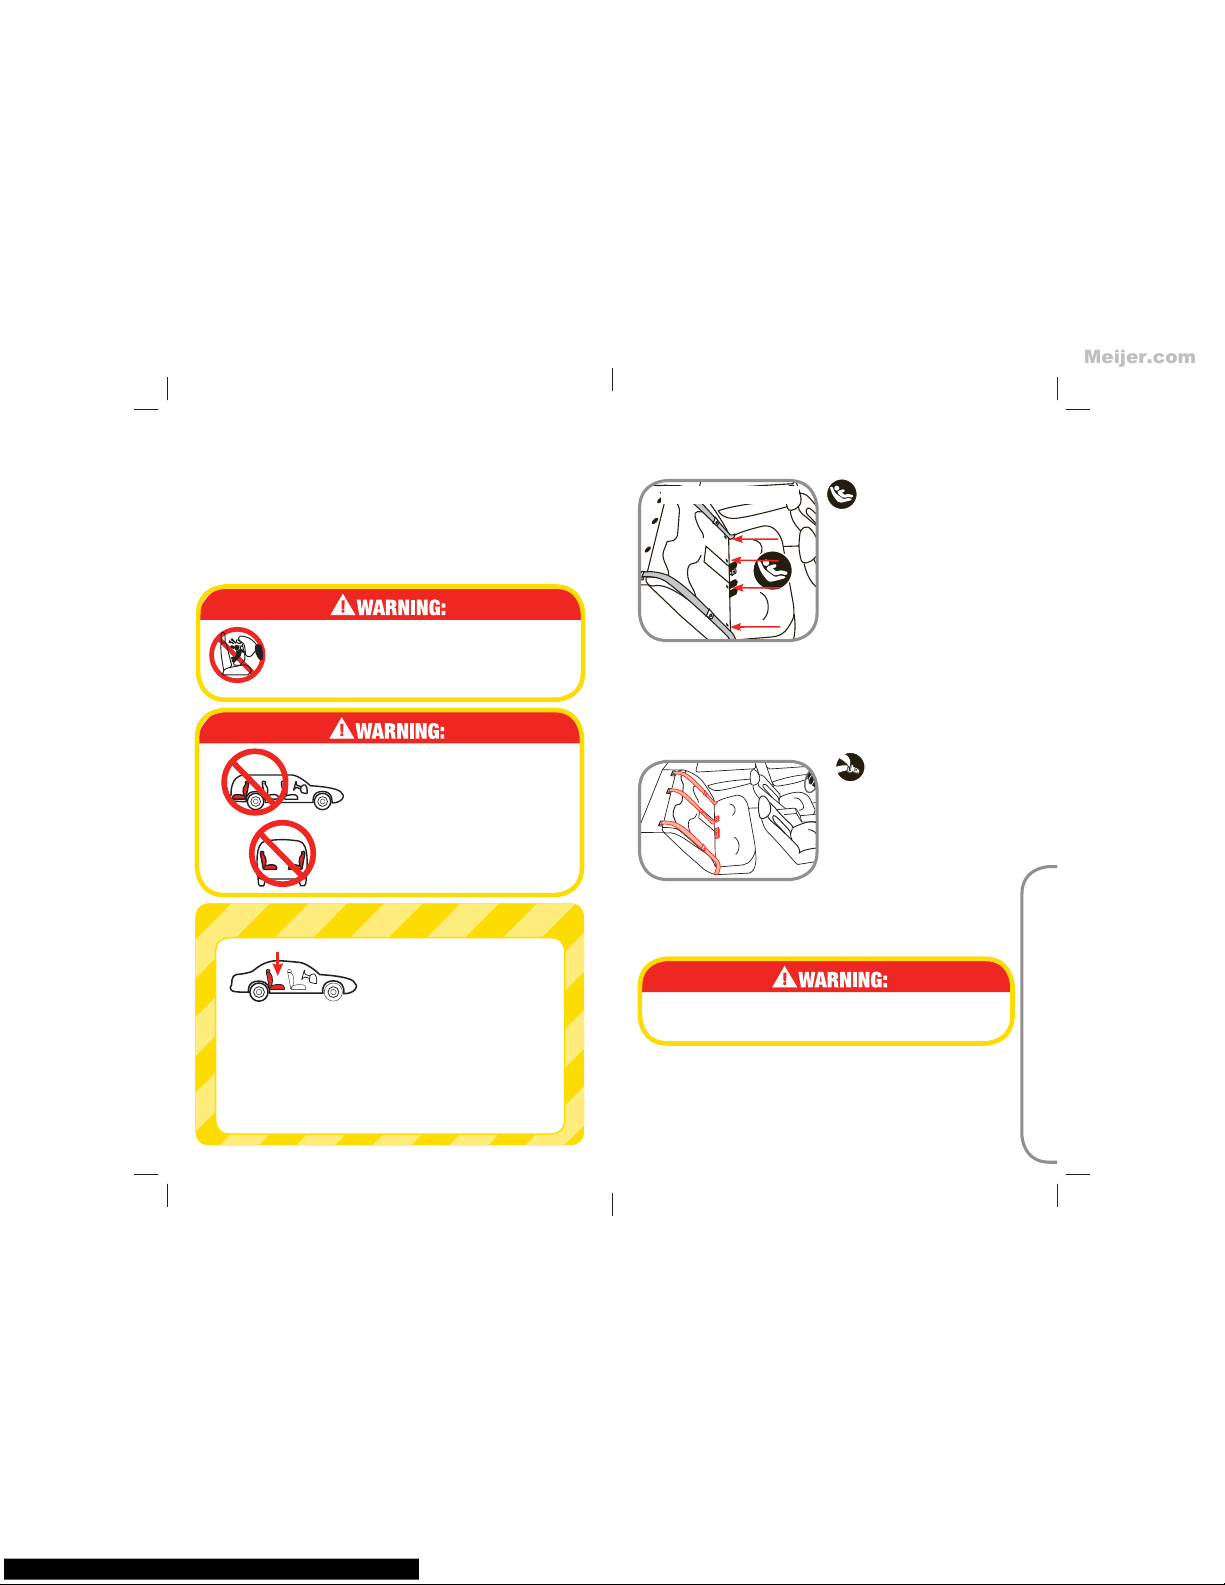
D-1 Understanding Your Vehicle
Anchor Brackets
For Top Anchorage
Strap (Tether)
(Forward-Facing Only)
LATCH Anchors
Located in the seat
bight.
Air Bags
Consult your vehicle
owner’s manual for
all air bag locations.
Seat Bight
Vehicle Seat Belts
Consult your vehicle
owner’s manual for
vehicle belt use.
Check Buckle
Push harness ends through
slots in the seat back at
the same height so they
are even.
5.
Meijer.com
Page 15
27
D-2 Vehicle Seating Position
Some seating positions in your vehicle may not be safe for
this child restraint. Some vehicles do not have a seating
position that can be used safely with this child restraint. If
you are not sure where to place the child restraint in your
vehicle, consult your vehicle owner’s manual or contact
Dorel Juvenile Group Consumer Relations Dept.
Safety Tip:
D. General Vehicle Installation
Children are safer when
properly restrained in
rear seating positions
than in the front seating
positions.
According to National Highway Traffic
Safety Administration information, children
in rear seating positions are statistically
safer, whether you have air bags, advanced
air bags, or no air bags at all.
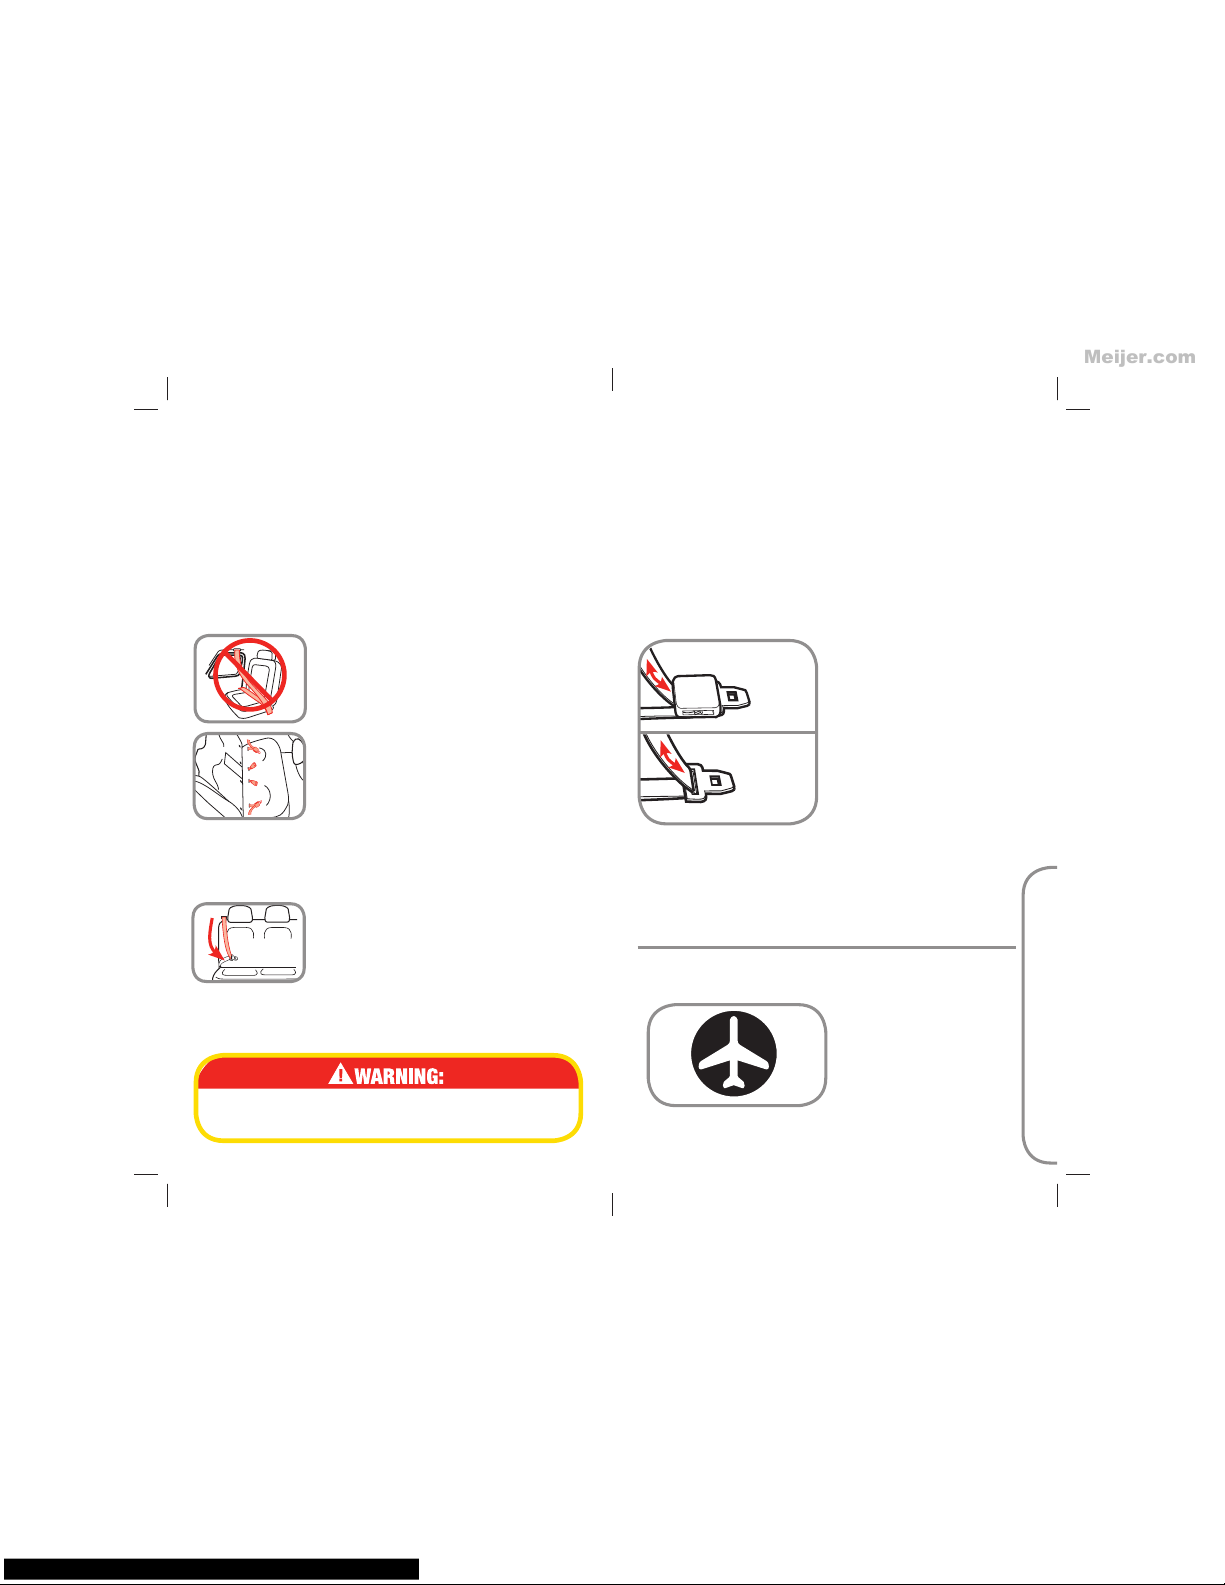
Never place a child rear-facing in a
seating position with an active frontal
airbag. This can result in serious injury
or death.
Use the child restraint
only on vehicle seats
that face forward. Do not
use on seats that face
the sides or rear of the
vehicle.
Vehicle Belts
If LATCH is not an option,
you must use the vehicle
seat belt system to install
the child restraint. There
are some vehicle belts that
will not work with a child
restraint or will require special attention.
See next page and check your vehicle’s owner’s manual for
specific instructions.
The LATCH System
LATCH (Lower Anchors and
Tethers for CHildren) is a
universal system for installing
child restraints without using
vehicle seat belts.
The LATCH system can ONLY
be used in vehicles that have
the LATCH anchor bars installed and designated LATCH seating
positions. Most vehicles manufactured after September 2002 are
equipped with LATCH.
Check your vehicle owner’s manual to see which seating
positions may be equipped with the LATCH system.
D-3 Choosing LATCH or Vehicle Belts
LATCH Anchor Bars
Do not use both the LATCH belt and vehicle
belt at the same time.
D-4 Knowing Your Vehicle Belts
Review your vehicle’s owner manual for vehicle seat belt use
with child restraints. This is your best source for information
concerning your vehicle.
28
continued on next page.
Meijer.com
Page 16
D. General Vehicle Installation
Not all vehicle belts will work with this child restraint. This
child restraint must be tightly locked in place at all times,
during travel. You must determine if your vehicles belts are
compatible with this child restraint.
Vehicle Belts
• Automatic/Passive vehicle seat belts
You MUST have a vehicle lap belt to install any child restraint.
An automatic (passive) shoulder vehicle belt may or may not
have a separate vehicle lap belt. Consult your vehicle owner’s
manual.
• Vehicle belts in center of the door
or side panel
You must move the child restraint to
another seating location. Consult your
vehicle owner’s manual.
• Vehicle belts that are in front of
the seat bight
You may need to move the child restraint
to another seating location. Consult your
vehicle owner’s manual.
• ELR (Emergency Locking
Retractor) vehicle belts
These lap and shoulder vehicle belts only lock in a sudden
stop or crash, and do not properly secure a child restraint
alone. Consult your vehicle owner’s
manual.
To learn if you have this type of vehicle
belt, gently pull the vehicle belt all the
way out of the retractor (spool), let it
return several inches, then pull on it again. If it moves freely,
it is an ELR vehicle belt. If it is locked and will not allow any
more vehicle belt to come out, it is a switchable retractor.
30
29
ELR lap-only vehicle belts MUST NOT be used
with this child restraint.
• Switchable retractor
These vehicle belts switch from ELR to ALR (Automatic
Locking Retractor). You must have the vehicle belts in the
locking mode to use them. Follow the instructions in the
installation sections.
• ALR (Automatic Locking Retractor)
These vehicle belts lock after pulling the webbing out and
letting the vehicle belt go back into the retractor an inch or
two. Follow the instructions in the installation sections.
Vehicle Latch Plates
• Check the Latch Plates
Grasp the tongue portion of
the latch plate (the part that
goes inside the buckle) and
pull straight out, inline with
the vehicle lap belt. If the
latch plate does not slide up
and down the vehicle belt,
you have a locking latch
plate. You should not need
to use a locking clip. Consult
your vehicle owner’s manual.
If the latch plate slides up and down on the vehicle belt, and you
have an ELR retractor, you MUST use a locking clip to install
the child restraint. You may not need to use the locking clip
with a switchable or ALR retractor. Consult your vehicle
owner’s manual.
Locking
Latch
Plate
Sliding
Latch
Plate
This restraint is certified
for aircraft use.
Use only on forwardfacing aircraft seats.
Follow instructions for
vehicle installation.
Contact the airline for their specific policies.
D-5 Installing on Aircraft
Meijer.com
Page 17
31
32
E. Installing Rear-Facing
LATCH Belt
Lap Belt
Lap/Shoulder Belt
5-40 lbs (2.3-18 kg) and 19-40 in. (48-101.6 cm)
Rear-Facing using 5-point harness
E-1 Preparing to Install Rear-Facing
Never place a child rear-facing in a
seating position with an active frontal
airbag. This can result in serious injury
or death.
This child restraint must always face the rear of
the vehicle and be in the fully reclined position
when the child is less than one year old.
E-2 Preparing to Install LATCH
Rear-Facing
Unhook LATCH from
Side of Shell
Remove the LATCH from
the forward-facing belt
path.
1.
Routing LATCH Belt
Insert the LATCH hook
with adjuster through the
rear-facing belt path.
2.
Pull Connector Across
to Opposite Side
Reach under pad and
pull the LATCH connector
across the plastic shell.
LATCH belt MUST be
under pad and in front of
buckle strap.
NOTE: You MUST use the
1st or 2nd buckle strap
slots when rear-facing.
3.
Finished LATCH
Routing
Make sure the LATCH belt
is not twisted.
4.
Adjuster
2
1
Meijer.com
Page 18
33
34
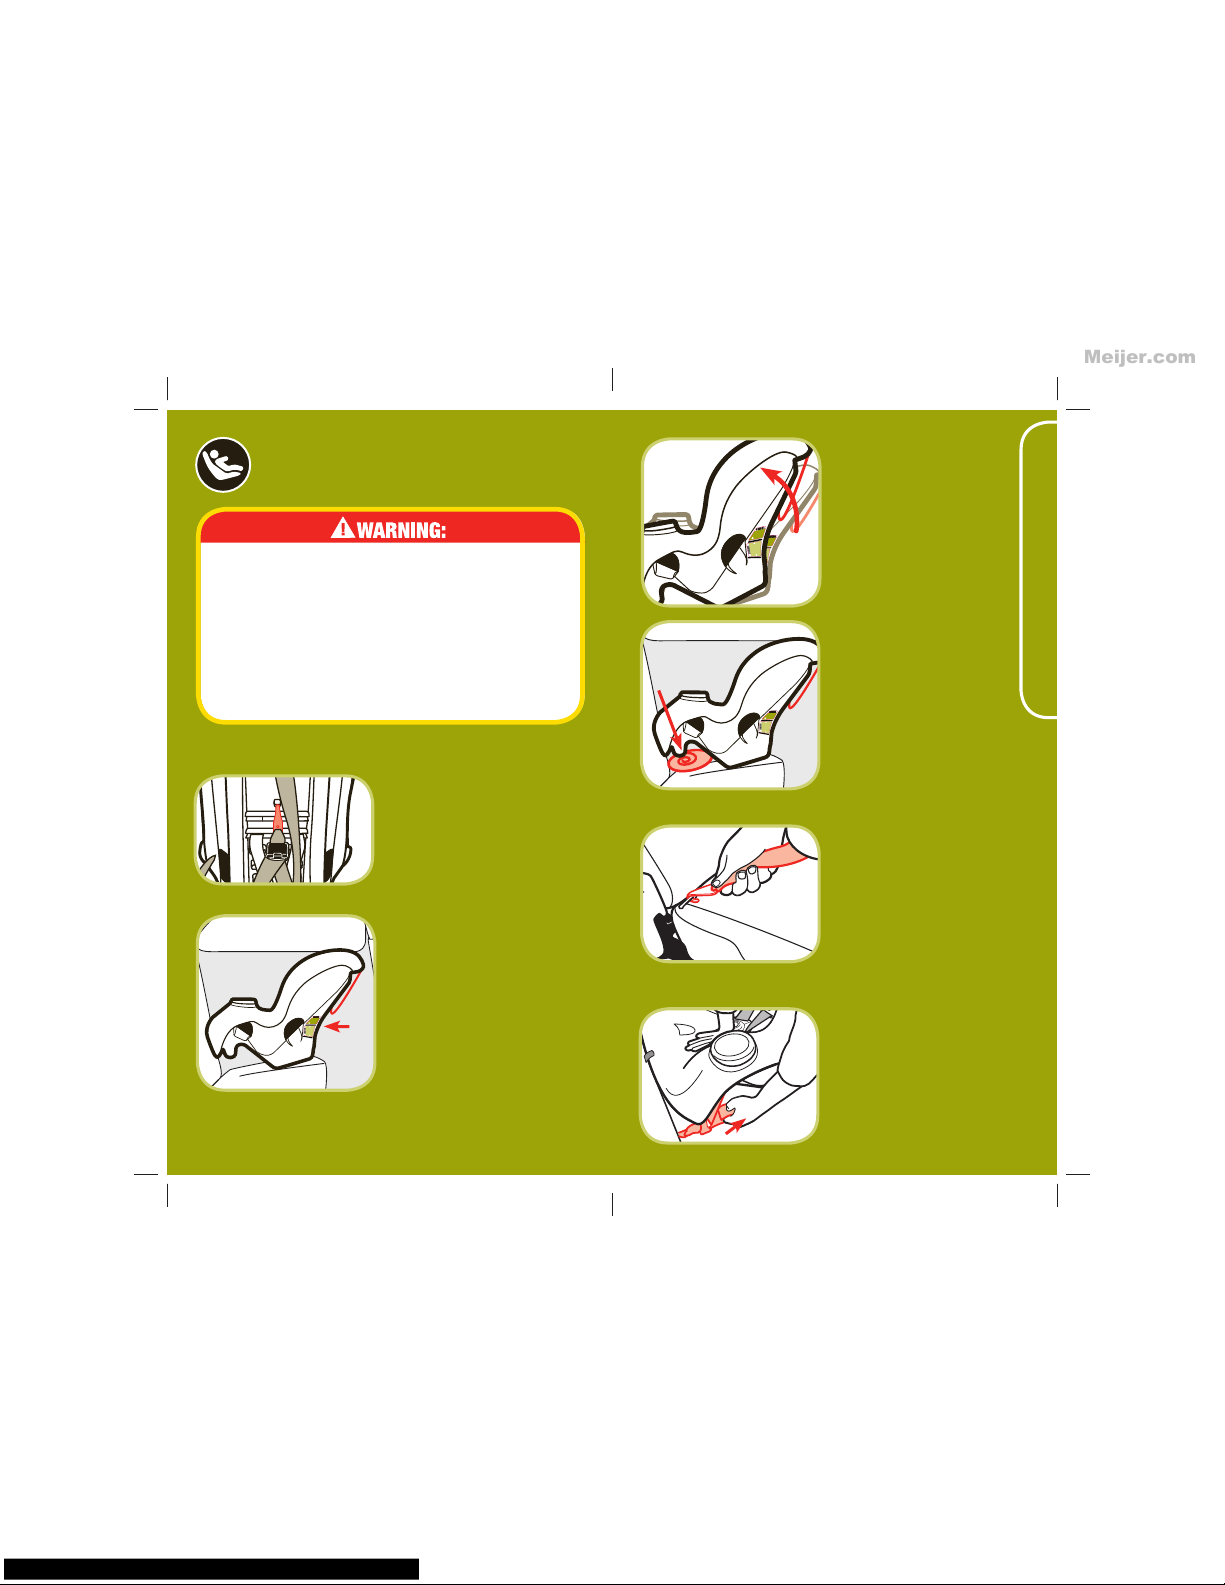
E-3 Install Rear-Facing with LATCH
Note: Review your vehicle’s owner manual for LATCH belt use.
Store Top Anchorage
Hook (Tether)
Attach the top anchorage
hook (tether) to the back
of shell as shown. Tighten
tether to remove the slack.
1.
E. Installing Rear-Facing
continued on next page.
Do not use the LATCH system along with the
vehicle lap or lap/shoulder belt.
Check LATCH belt before each use. Use only if
the belt can be tightened properly and securely.
Attach the top anchorage hook (tether) to the
child restraint’s seat back when used rear-facing.
Failure to follow these warnings can result in
serious injury or death.
Place Child Restraint
in the Back Seat RearFacing
Move the front seats forward
to give you room to install the
child restraint.
For children between 5-22
lbs (2.3-10 kg), the top
level to ground line MUST be
level to the ground. Rotate
the child restraint to make the
line level.
Rear-Facing
For
Children 5-22 lbs
(2.3-10 kg)
Top L
ine MUST
Be
Level with
the
Ground.
43
60-2
155
Rear-Facing
For Children 22-40 lbs
(10.1-18 kg)
AND can sit
up unassist
ed
Recline range
is betwee
n
the 2
level to
ground
lines.
Re
v
i
ew instr
u
ction manual.
43
60-21
54
2.
For children 22-40 lbs
(10.1-18 kg) and can sit
up unassisted,
rotate the
child restraint between the
2 level to ground lines.
Start
by making the bottom level to
ground line level, then rotate
seat up. DO NOT rotate past
the top most upright level to
ground line.
Adjust child restraint if
needed.
You may need to place a
large rolled towel(s) or foam
pool noodle(s) (A) under the
front of the child restraint
to help achieve the correct
recline. Check often to be
sure padding is still in place
and the LATCH belt is tight.
Rear-Facing
For Children 5-22 lbs
(2.3-10 kg)
Top Line MUST Be
Level with the Ground.
4360-2155
Rear-Facing
For Children 22-40 lbs
(10.1-18 kg)
AND can sit
up unassisted
Recline range is between
the 2 level to ground
lines.
Review instruction manual.
4360-2154
Rear-Facing
For Children 5-22 lbs
(2.3-10 kg)
Top Line MUST Be
Level with the Ground.
4360-2155
Rear-Facing
For Children 22-40 lbs
(10.1-18 kg)
AND can sit
up unassisted
Recline range is between
the 2 level to ground
lines.
Review instruction manual.
4360-2154
Rear-Facing
For Children 5-22 lbs
(2.3-10 kg)
Top Line MUST Be
Level with the Ground.
4360-2155
Rear-Facing
For Children 22-40 lbs
(10.1-18 kg)
AND can sit
up unassisted
Recline range is between
the 2 level to ground
lines.
Review instruction manual.
4360-2154
A
3.
Hook LATCH to Vehicle
Anchor
Fasten one LATCH belt hook
to the anchor in the vehicle
seat located in the vehicle
seat bight. Repeat for other
side of child restraint.
Tighten LATCH Belt
Push down firmly on the
child restraint and pull up
on the free end of LATCH
belt to tighten.
6.
Meijer.com
Page 19
36
35
E. Installing Rear-Facing
Check LATCH Belt
Tightness
Grasp the child restraint
at the belt path with one
hand. Push and pull the
child restraint from side to
side, forward and back. The
child restraint should not
move more than 1 inch.
NOTE: If it moves more than
an inch, try reinstalling the
child restraint or try another
seating location.
Secure your child in the
child restraint. Recheck the
recline angle to make sure it
is reclined according to your
child’s weight. Repeat steps
if not reclined correctly.
7.
Rear-Facing
For Children 5-22
(2.3-10 kg)
Top Line MUST Be
Level with the Ground
Rear-Facing
For Children 22-40 lb
s
(10.1-18 kg)
AND can sit
up unassisted
Recline range is between
the 2 level to ground
lines.
Review instruction manual.
4360-2154
To Remove LATCH Belt
From Vehicle Anchor
Remove child from child
restraint. Press down
firmly on adjuster side of
child restraint and press
release button to release
tension. Unhook LATCH
from bar by squeezing
spring lever and twist hook.
8.
It maybe easier to tighten the
LATCH belt through the belt
path opening as shown.
Rear-Facing
For Children 5-22 lb
s
(2.3-10 kg)
Top Line MUST Be
Level with the G
round.
4360-2155
Rear-Facing
For Children 22
-40 lbs
(10.1-18 kg)
AND can sit
up unassisted
Recline range is between
the 2 level to ground
lines.
Review instruction manual.
4360-2154
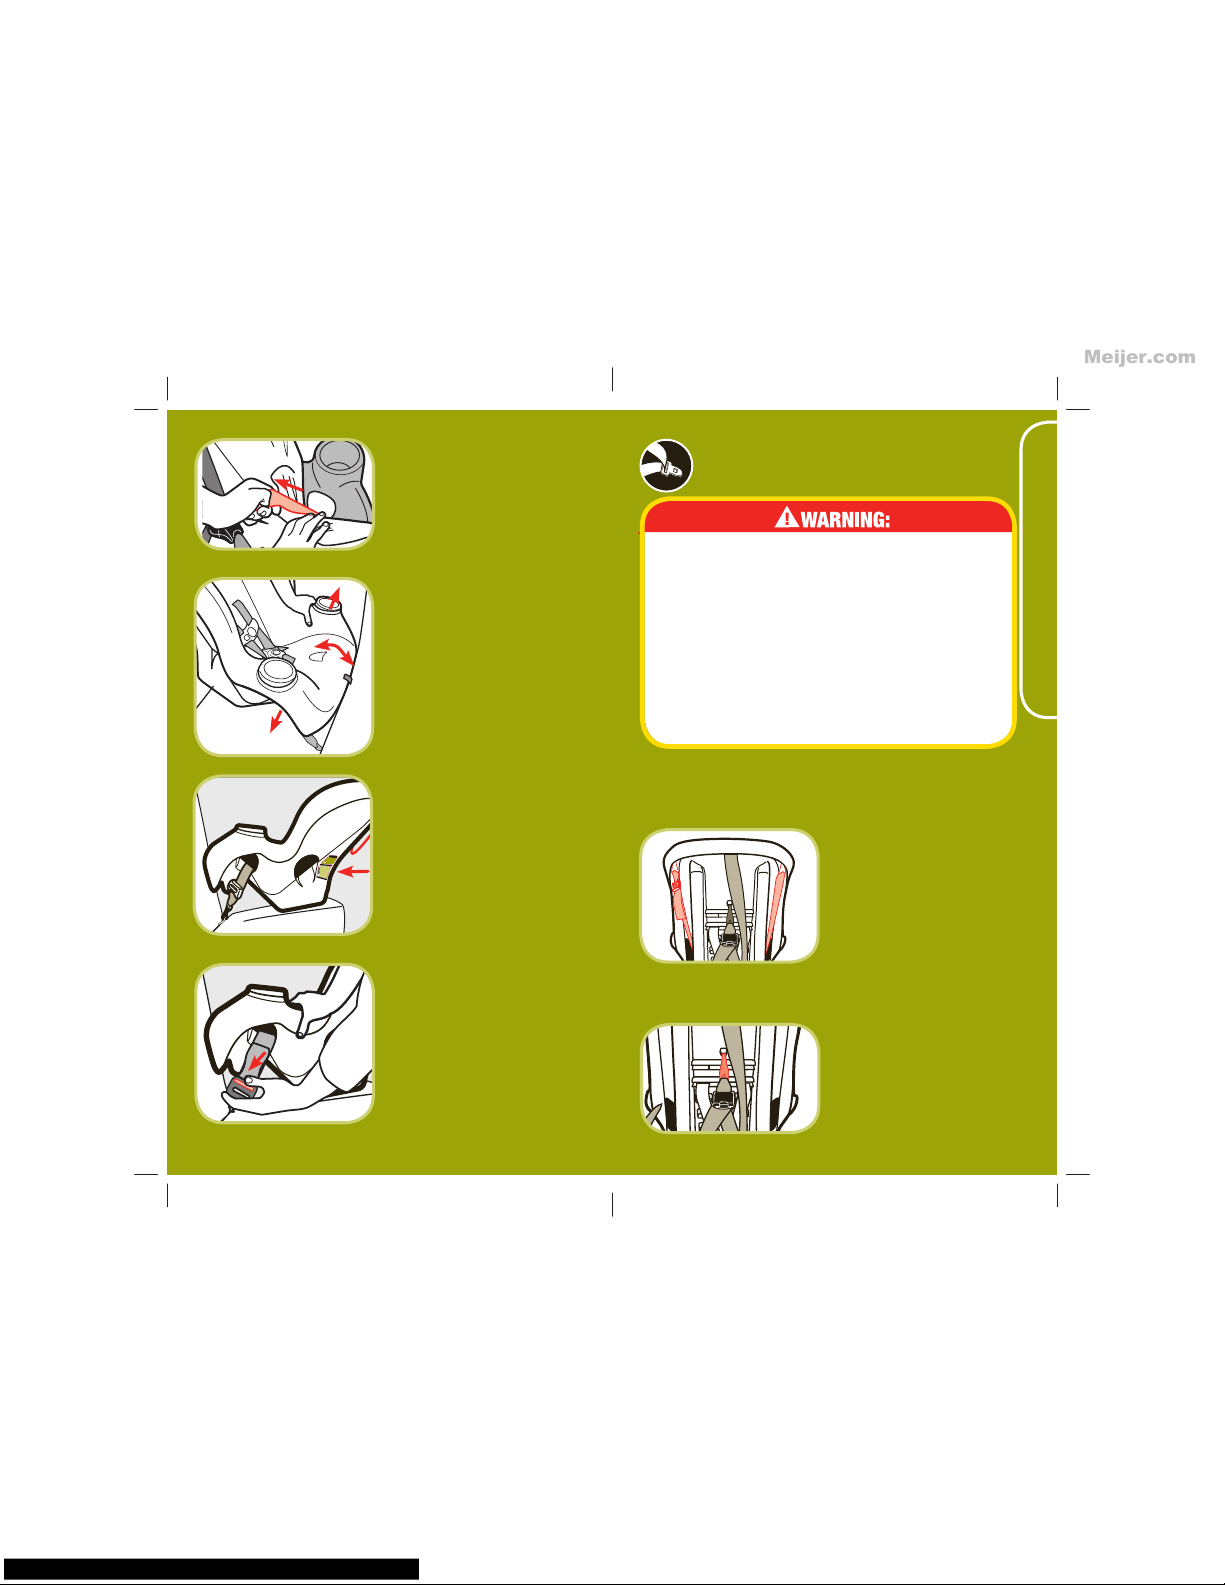
E-4 Install Rear-Facing with
Vehicle Belts
Do not use the LATCH system along with the
vehicle lap or lap/shoulder belt. Secure LATCH
belts when using the vehicle belts.
Check the vehicle belt before each use. Use
only if the belt is tightened properly and
securely.
Attach the top anchorage hook (tether) to the
child restraint’s seat back when used rear-facing.
Failure to follow these warnings can result in
serious injury or death.
Secure LATCH Belts
You MUST fasten the
LATCH belt hooks to the
side of plastic shells as
shown when using the
vehicle seat belts.
1.
Note: Review your vehicle’s owner manual for vehicle belt use.
Store Top Anchorage
Hook (Tether)
Attach the top anchorage
hook (tether) to the back
of shell as shown. Tighten
tether to remove the slack.
2.
Meijer.com
Page 20
38
37
E. Installing Rear-Facing
continued on next page.
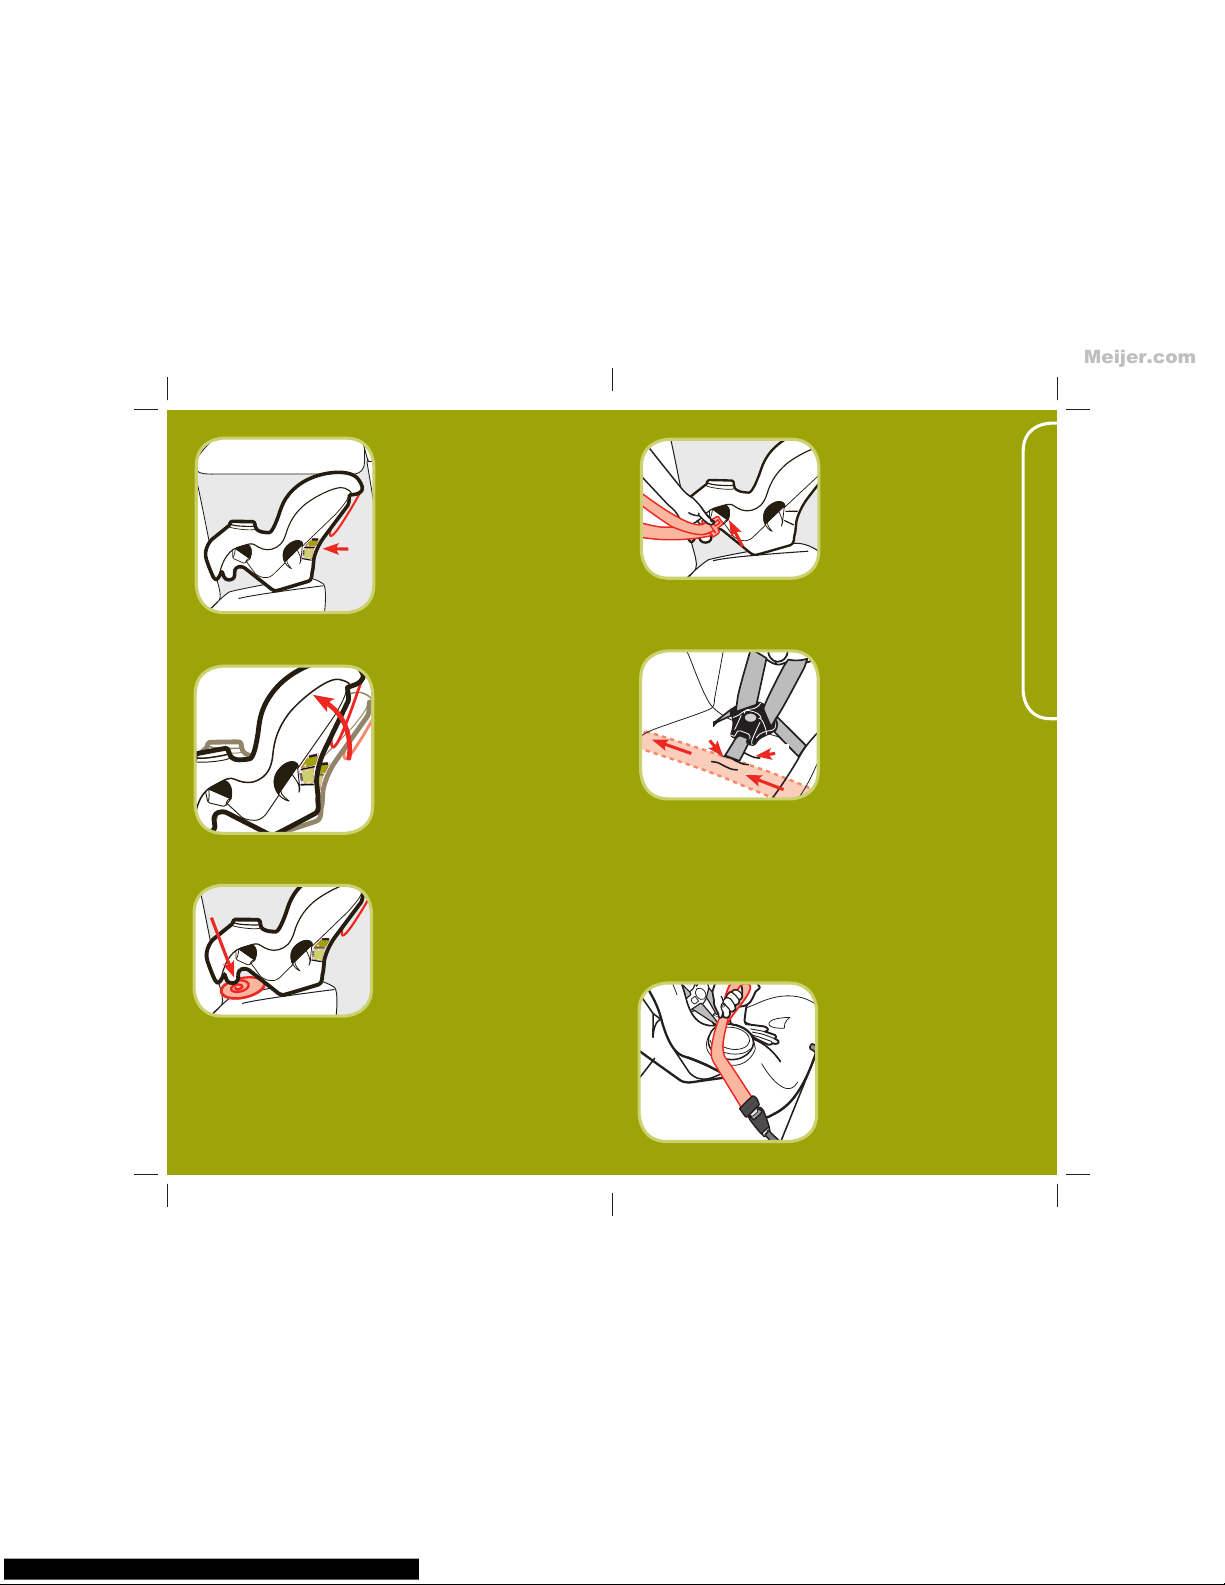
Thread Vehicle Belt
Thread the vehicle lap
or lap/shoulder belt
combination through the
rear-facing belt path.
With an ALR vehicle belt,
pull the vehicle belt all the
way out before threading
the child restraint.
4.
Place Child Restraint
in the Back Seat RearFacing
Move the front seats forward
to give you room to install the
child restraint.
For children between 5-22
lbs (2.3-10 kg), the top
level to ground line MUST be
level to the ground. Rotate
the child restraint to make the
line level.
For children 22-40 lbs
(10.1-18 kg) and can sit
up unassisted,
rotate the
child restraint between the
2 level to ground lines.
Start
by making the bottom level to
ground line level, then rotate
seat up. DO NOT rotate past
the top most upright level to
ground line.
Adjust child restraint if
needed.
You may need to place a
large rolled towel(s) or foam
pool noodle(s) (A) under the
front of the child restraint
to help achieve the correct
recline. Check often to be
sure padding is still in place
and the vehicle belt is tight.
Rear-Facing
For Children 5-22 lbs
(2.3-10 kg)
Top L
ine MUST
B
e
Level
with
the
Ground.
43
60-2
155
Rear-Facing
For Children 22-40 lbs
(10.1-18 kg)
AND c
an sit
up unassisted
Recline rang
e
is between
the 2
level to
ground
lines.
Re
v
i
ew i
nstruction
man
ual.
43
60-21
54
3.
Rear-Facing
For Children 5-22 lbs
(2.3-10 kg)
Top Line MUST Be
Level with the Ground.
4360-2155
Rear-Facing
For Children 22-40 lbs
(10.1-18 kg)
AND can sit
up unassisted
Recline range is between
the 2 level to ground
lines.
Review instruction manual.
4360-2154
Rear-Facing
For Children 5-22 lbs
(2.3-10 kg)
Top Line MUST Be
Level with the Ground.
4360-2155
Rear-Facing
For Children 22-40 lbs
(10.1-18 kg)
AND can sit
up unassisted
Recline range is between
the 2 level to ground
lines.
Review instruction manual.
4360-2154
Rear-Facing
For Children 5-22 lbs
(2.3-10 kg)
Top Line MUST Be
Level with the Ground.
4360-2155
Rear-Facing
For Children 22-40 lbs
(10.1-18 kg)
AND can sit
up unassisted
Recline range is between
the 2 level to ground
lines.
Review instruction manual.
4360-2154
A
Note: Review the section D-4 to determine what kind of
vehicle belts you have. Review your vehicle’s owner manual
for vehicle seat belt use.
Pull Latch Plate Across
to Opposite Side
Reach under pad and pull
the vehicle belt across
the plastic shell. Vehicle
belt MUST be under pad
and in front of buckle strap.
Do not place vehicle belt
over child’s legs.
NOTE: You must use the 1st or 2nd buckle strap slots when
rear-facing.
2
1
4.
Tighten Vehicle Belt
Push down firmly on the
child restraint and pull on
the vehicle shoulder belt
to tighten.
5.
Meijer.com
Page 21
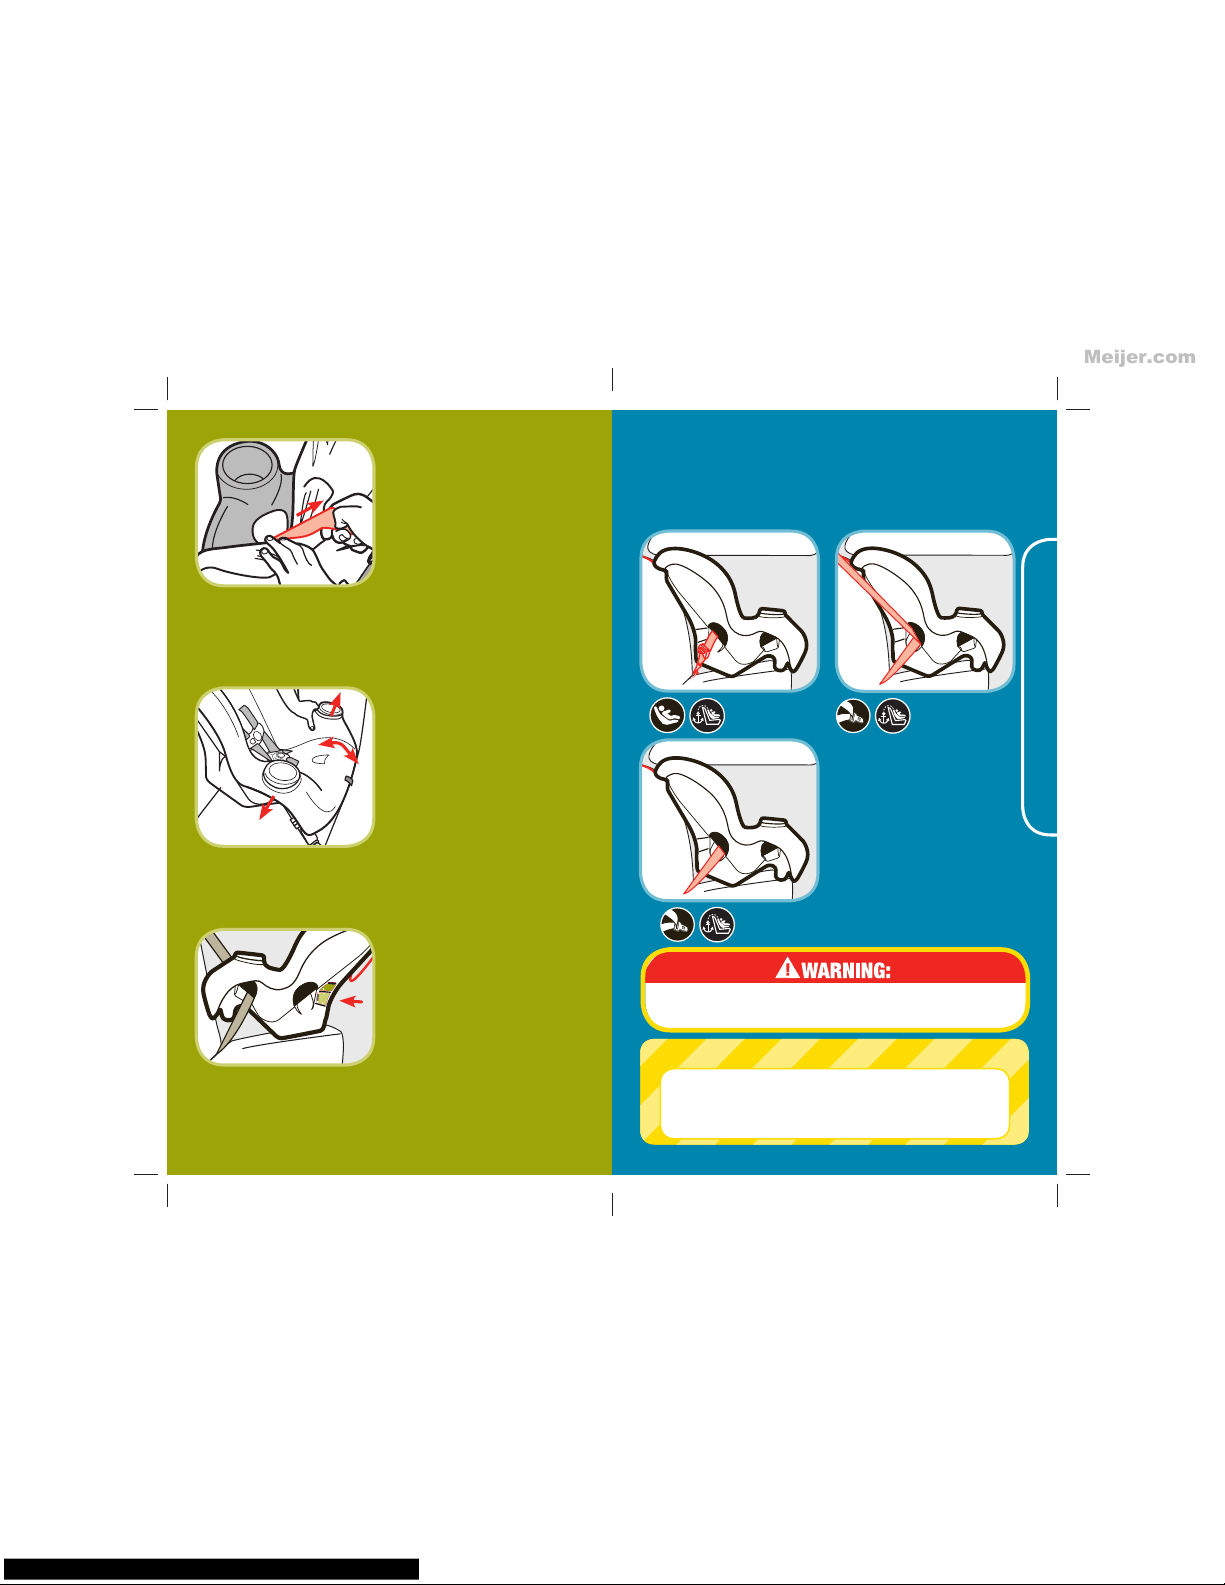
39
40
It maybe easier to tighten the
vehicle belt through the belt
path opening as shown.
With a switchable retractor,
pull the vehicle shoulder belt
all the way out to switch the
retractor into the ALR mode
before tightening. Feed the
slack back into the retractor
while tightening.
Check Vehicle belt
Tightness
Grasp the child restraint
at the belt path with one
hand. Push and pull the
child restraint from side
to side, forward and back.
The child restraint should
not move more than 1 inch.
NOTE: If it moves more than
an 1 inch, try reinstalling the
child restraint or try another
seating location.
Secure your child in the
child restraint. Recheck the
recline angle to make sure it
is reclined according to your
child’s weight. Repeat steps
if not reclined correctly.
6.
Rear-Facing
For Children 5-22 lbs
(2.3-10 kg)
Top Li
ne MUST Be
Leve
l
wi
t
h the
Gro
und.
4360-2
155
Rear-Fac
ing
For Children 2
2-40 lbs
(10.1-18 kg)
AND can sit
up unas
s
isted
Recline range i
s b
etwe
en
the 2 level to ground
lines.
Revi
e
w instruction manual.
4360-2154
F. Installing Forward-Facing
F-1 Preparing to Install Forward-Facing
Lap Belt
LATCH Belt
Lap/
Shoulder Belt
22-40 lbs (10.1-18 kg) and 34-43 in. (85.1-110 cm) and at
least 1 Year Old. Forward-Facing using 5-point harness
Never place a child less than one-year old or
weighing less than 22 lbs. forward-facing.
Safety Tip:
Experts agree that children should remain
rear-facing as long as possible. In this child
restraint, your child can remain rear-facing up
to 40 pounds and up to 40 inches.
Meijer.com
Page 22
41
42
F. Installing Forward-Facing
The top anchorage strap (tether) is used for the
forward-facing position only.
Note: We strongly recommend that you use the top
anchorage strap (tether) in the forward-facing position. If
your vehicle does not have an anchor bracket, please see
your dealer or a qualified mechanic and have one installed.
The top anchorage strap (tether) can greatly improve the
performance of this child restraint.
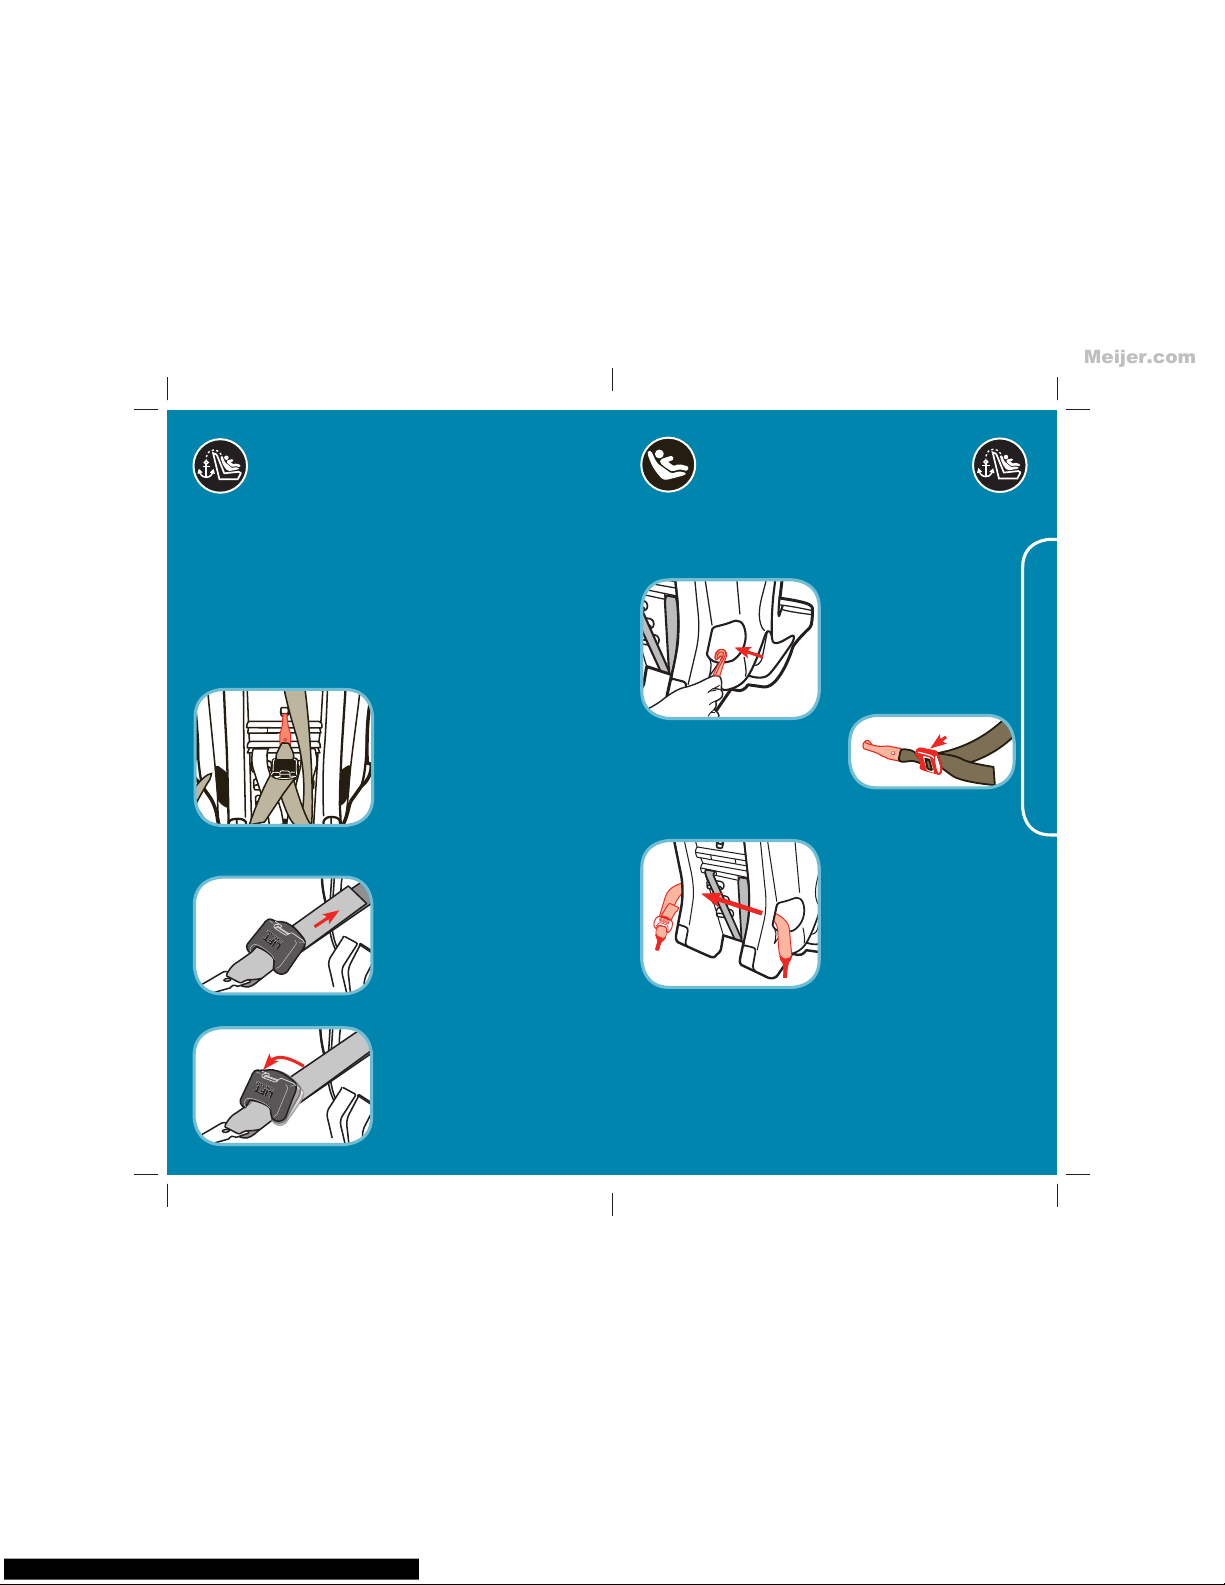
Storage of Top Anchorage Strap (Tether):
When the top anchorage
strap is not in use, attach the
top anchorage hook (tether)
to the child restraint’s seat
back as shown. Tighten
tether to remove the slack.
F-2 Adjusting Top Anchorage Strap
(Tether)
Lift up to
loosen
To loosen; Lift up on top
anchorage lock and push
lock toward top
anchorage hook (tether).
To tighten; After the child
restraint is locked into place
with LATCH or vehicle belt,
put knee in child restraint
and push down. Pull on
free end of top anchorage
strap (tether).
Pull loose
end to
tighten
To Adjust Top Anchorage Strap (tether):
F-3 Preparing to Install
LATCH Forward-Facing
Routing LATCH Belt
Insert the LATCH hook
with the adjuster closest
to it, through the
forward-facing belt path.
1.
Thread LATCH Across
Pull the LATCH hook
across the back and
out the other side as
shown. Do not twist the
LATCH belt.
2.
Note: Pull the LATCH belt out of the rear-facing belt path if you
have used this child restraint rear-facing.
Adjuster
Meijer.com
Page 23
43
44
F. Installing Forward-Facing
F-4 Install Forward-Facing
With LATCH
Note: Review your vehicle’s owner manual for LATCH belt use.
Do not use the LATCH system along with the
vehicle belt.
Check LATCH belt before each use. Use only if
the belt can be tightened properly and securely.
Failure to follow these warnings can result in
serious injury or death.
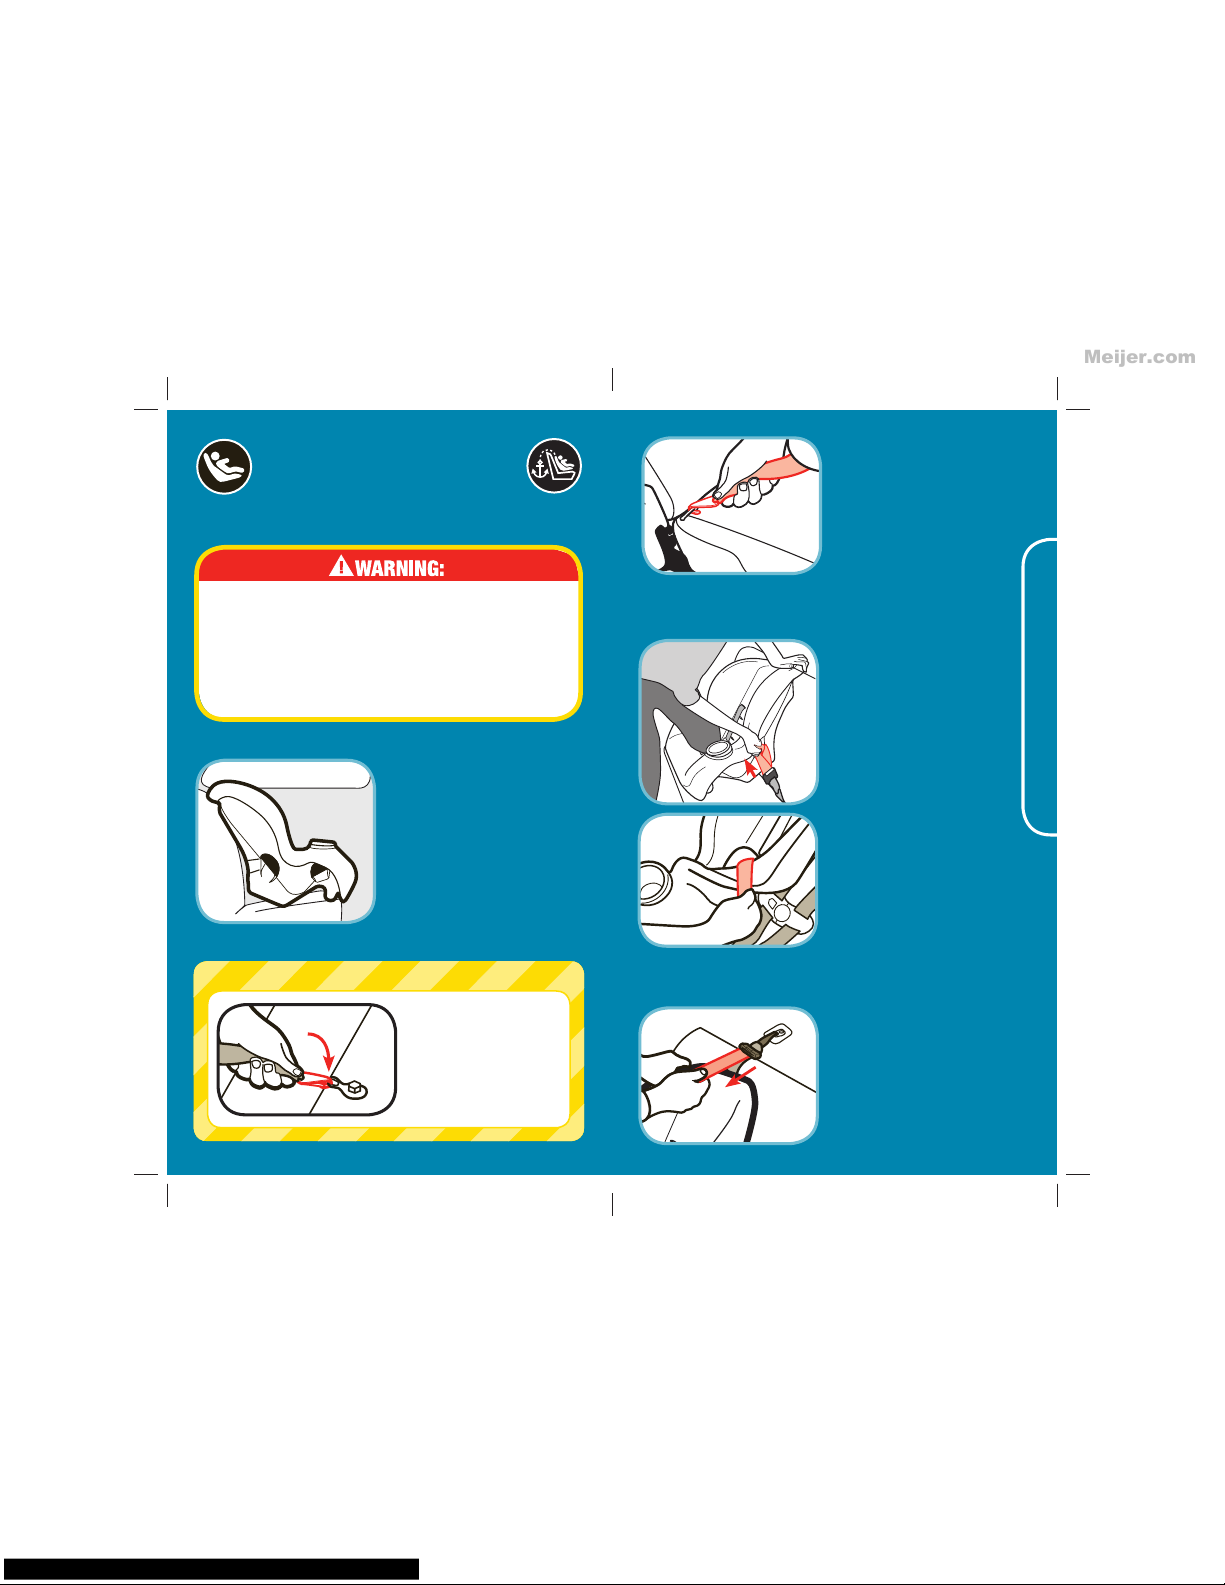
1.
Place Child Restraint in
the Back Seat
Forward-Facing
Place child restraint flush
against the vehicle seat
back forward-facing.
Installation Tip:
Loosely attach the
tether hook before
attaching the
LATCH belt. Consult
vehicle’s owner
manual for specific
location.
2.
Hook LATCH to
Vehicle Anchor
Fasten one LATCH belt
hook to the anchor in
the vehicle seat located
in the vehicle seat bight.
Repeat for other side of
child restraint.
continued on next page.
Tighten Top
Anchorage Strap
(Tether)
Push firmly on the back
of the child restraint and
tighten top anchorage
strap (tether).
4.
Tighten LATCH Belt
Place knee in the child
restraint. Push down
firmly while pulling up on
the loop to tighten LATCH
belt.
3.
It maybe easier to tighten
the LATCH belt through
the belt path opening as
shown.
Meijer.com
Page 24
45
46
F. Installing Forward-Facing
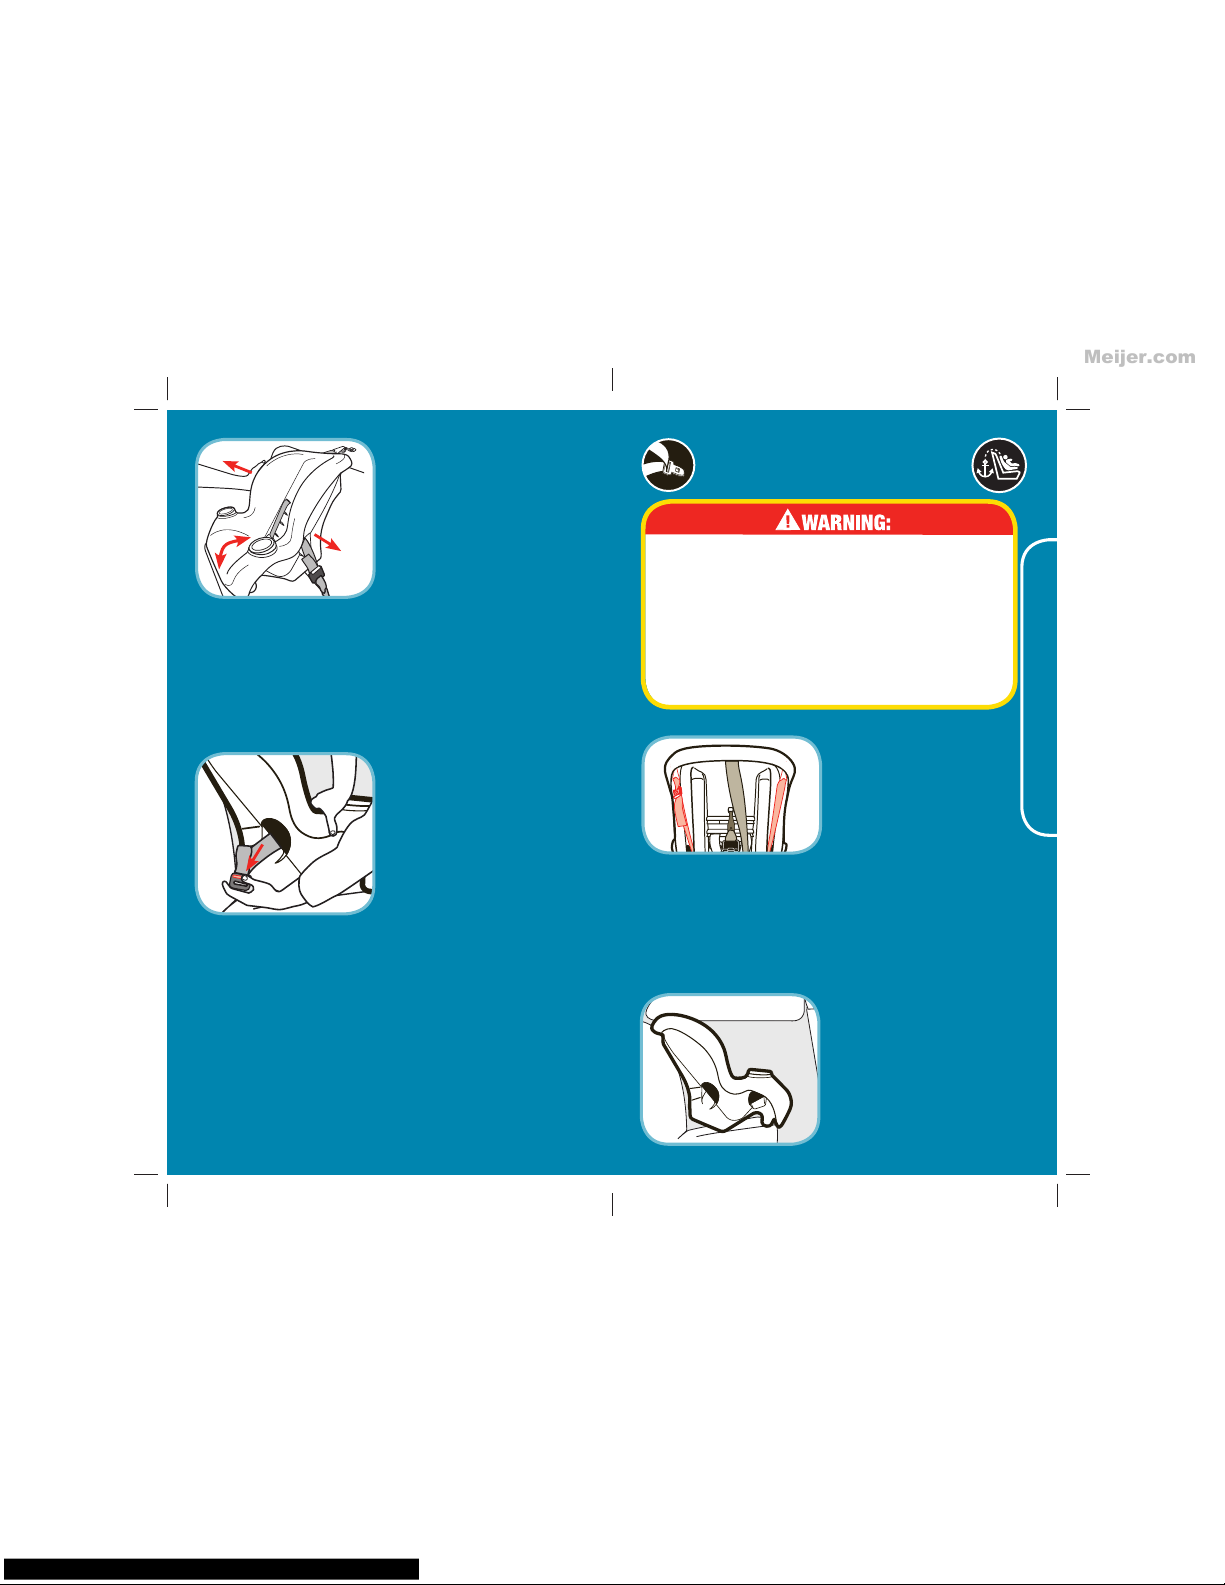
Check LATCH Belt
Tightness
Grasp the child restraint
at the belt path with one
hand. Push and pull the
child restraint from side to
side, forward and back. The
child restraint should not
move more than 1 inch.
NOTE: If it moves more than
an 1 inch, try reinstalling the
child restraint or try another
seating location.
Secure your child in the
child restraint.
5.
To Remove LATCH Belt
From Vehicle Anchor
Remove child from child
restraint. Press down
firmly on adjuster side of
child restraint and press
release button to release
tension. Unhook LATCH
from bar by squeezing
spring lever and twist hook.
6.
F-5 Install Forward-Facing
With Vehicle Belts
Secure LATCH Belts
You MUST fasten the
LATCH belt hooks to the
side of plastic shells as
shown when using the
vehicle seat belts.
1.
Do not use the LATCH system along with the
vehicle belt. Secure LATCH belts when using
the vehicle belts.
Check the vehicle belt before each use. Use
only if the belt is tightened properly and
securely.
Failure to follow these warnings can result in
serious injury or death.
Note: Review the section D-4 to determine what kind of
vehicle belts you have. Review your vehicle’s owner manual for
vehicle seat belt use.
Place Child Restraint
in Vehicle
Forward-Facing
Place child restraint flush
against the vehicle seat
back forward-facing.
2.
continued on next page.
Meijer.com
Page 25
47
F. Installing Forward-Facing
48
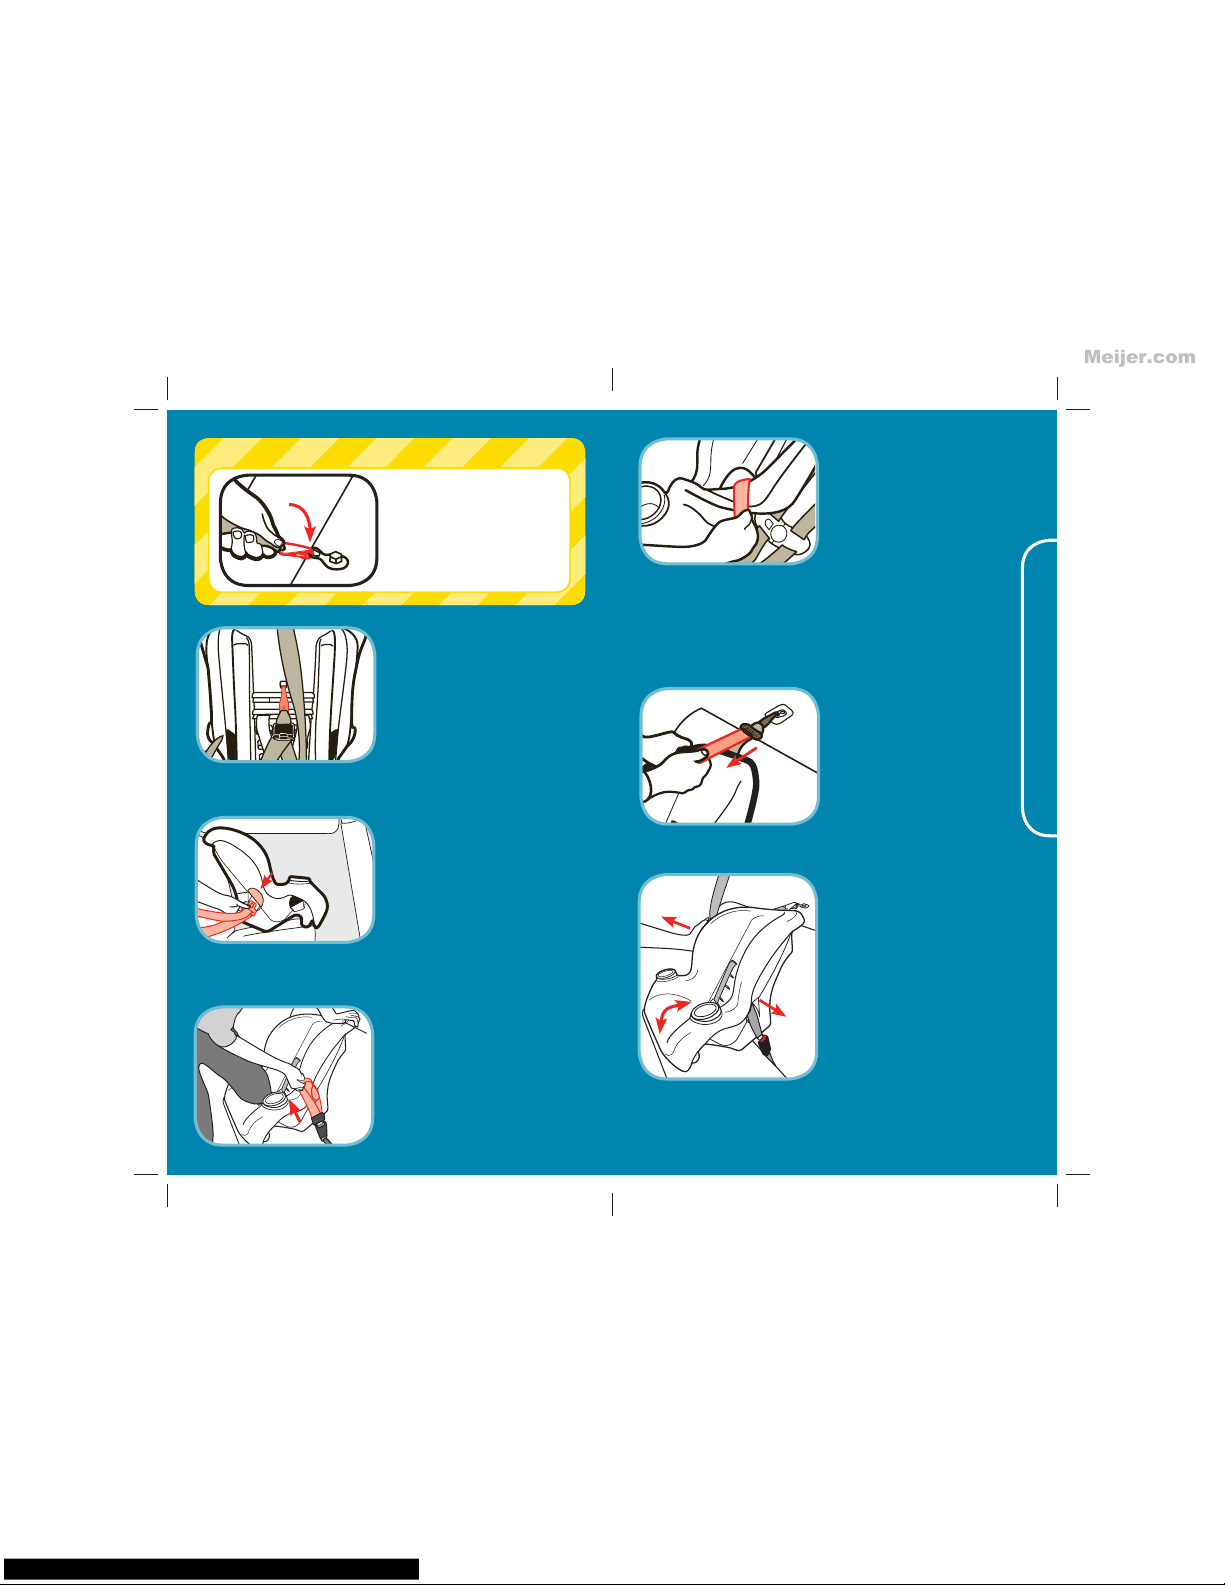
Installation Tip:
Thread Vehicle Belt
Thread the vehicle lap or lap/
shoulder belt combination
through the forward-facing
belt slot and out the other
side. Buckle vehicle belt.
3.
NOTE:
When not using the
top anchorage strap (tether),
attach the hook to the recline
stand as shown.
Tighten
tether to remove the slack.
Tighten Vehicle Belt
Push down firmly on the
child restraint and pull on
the vehicle shoulder belt or
lap belt adjuster to tighten.
4.
Loosely attach the top
anchorage hook (tether)
before threading the
vehicle belt. Consult
vehicle’s owner manual
for specific location.
7.
Check Vehicle Belt
Tightness
Grasp the child restraint at
the belt path with one hand.
Push and pull the child
restraint from side to side,
forward and back. The child
restraint should not move
more than 1 inch.
NOTE: If it moves more than
an 1 inch, try reinstalling the
child restraint or try another
seating location.
Secure your child in the
child restraint.
It maybe easier to tighten
the vehicle belt through the
belt path opening as shown.
With a switchable retractor,
pull the vehicle shoulder
belt all the way out to
switch the retractor into
the ALR mode before
tightening. Feed the slack
back into the retractor
while tightening.
Tighten Top
Anchorage Strap
(Tether)
Push firmly on the back
of the child restraint and
tighten top anchorage
strap (tether).
6.
Meijer.com
Page 26
49
50
A locking clip will not fix all types of vehicle seat belt
problems. Review section D-4 and your vehicle’s owner
manual for vehicle seat belt use with child restraints. The
locking clip is located on the back of the child restraint.
The following directions describe installing the child restraint
rear-facing. Same steps apply for forward-facing, except
install the restraint forward-facing and thread the vehicle belt
in the forward-facing belt path.
G-1 Using the Locking Clip
For children 22-40 lbs
(10.1-18 kg) and can sit
up unassisted,
rotate the
child restraint between the
2 level to ground lines.
Start
by making the bottom level to
ground line level, then rotate
seat up. DO NOT rotate past
the top most upright level
to ground line.
Adjust child
restraint if needed.
You may need to place a
large rolled towel(s) or foam
pool noodle(s) (A) under the
front of the child restraint
to help achieve the correct
recline. Check often to be
sure padding is still in place
and the LATCH belt is tight.
Thread Vehicle Belt
Thread the vehicle lap/
shoulder belt combination
through the rear-facing belt
slot.
2.
Place Child Restraint
in the Back Seat RearFacing
NOTE: Store top anchorage
hook (tether) on the recline
stand. See section F-2
Move the front seats forward
to give you room to install the
child restraint.
For children between 5-22
lbs (2.3-10 kg), the top
level to ground line MUST be
level to the ground. Rotate
the child restraint to make the
line level.
Rear-Facing
For Children 5-22 lbs
(2.3-10 kg)
Top Line MUST
Be
Level with
the
Ground.
4360-2
155
Rear-Facing
For Children 22-40 lbs
(10.1-18 kg)
AND c
an sit
up unassisted
Recline rang
e is betwee
n
the 2 level to
ground
lines.
Rev
i
ew i
nstr
u
ction man
ual.
43
60-21
54
1.
Rear-Facing
For Children 5-22 lbs
(2.3-10 kg)
Top Line MUST Be
Level with the Ground.
4360-2155
Rear-Facing
For Children 22-40 lbs
(10.1-18 kg)
AND can sit
up unassisted
Recline range is between
the 2 level to ground
lines.
Review instruction manual.
4360-2154
A
Rear-Facing
For Children 5-22 lbs
(2.3-10 kg)
Top Line MUST Be
Level with the Ground.
4360-2155
Rear-Facing
For Children 22-40 lbs
(10.1-18 kg)
AND can sit
up unassisted
Recline range is between
the 2 level to ground
lines.
Review instruction manual.
4360-2154
Rear-Facing
For Children 5-22 lbs
(2.3-10 kg)
Top Line MUST Be
Level with the Ground.
4360-2155
Rear-Facing
For Children 22-40 lbs
(10.1-18 kg)
AND can sit
up unassisted
Recline range is between
the 2 level to ground
lines.
Review instruction manual.
4360-2154
Do not use both the LATCH belt and vehicle
belt at the same time.
2
1
Pull Vehicle Belt Across
Child Restraint
Thread vehicle seat belt
under pad in front of buckle
strap to the opposite side.
Buckle vehicle belt.
Do not place vehicle belt
over child’s legs.
3.
NOTE: The buckle MUST be in the 1st or 2nd buckle strap
slots when rear-facing. Any slot can be used for
forward-facing.
Meijer.com
Page 27
51
52
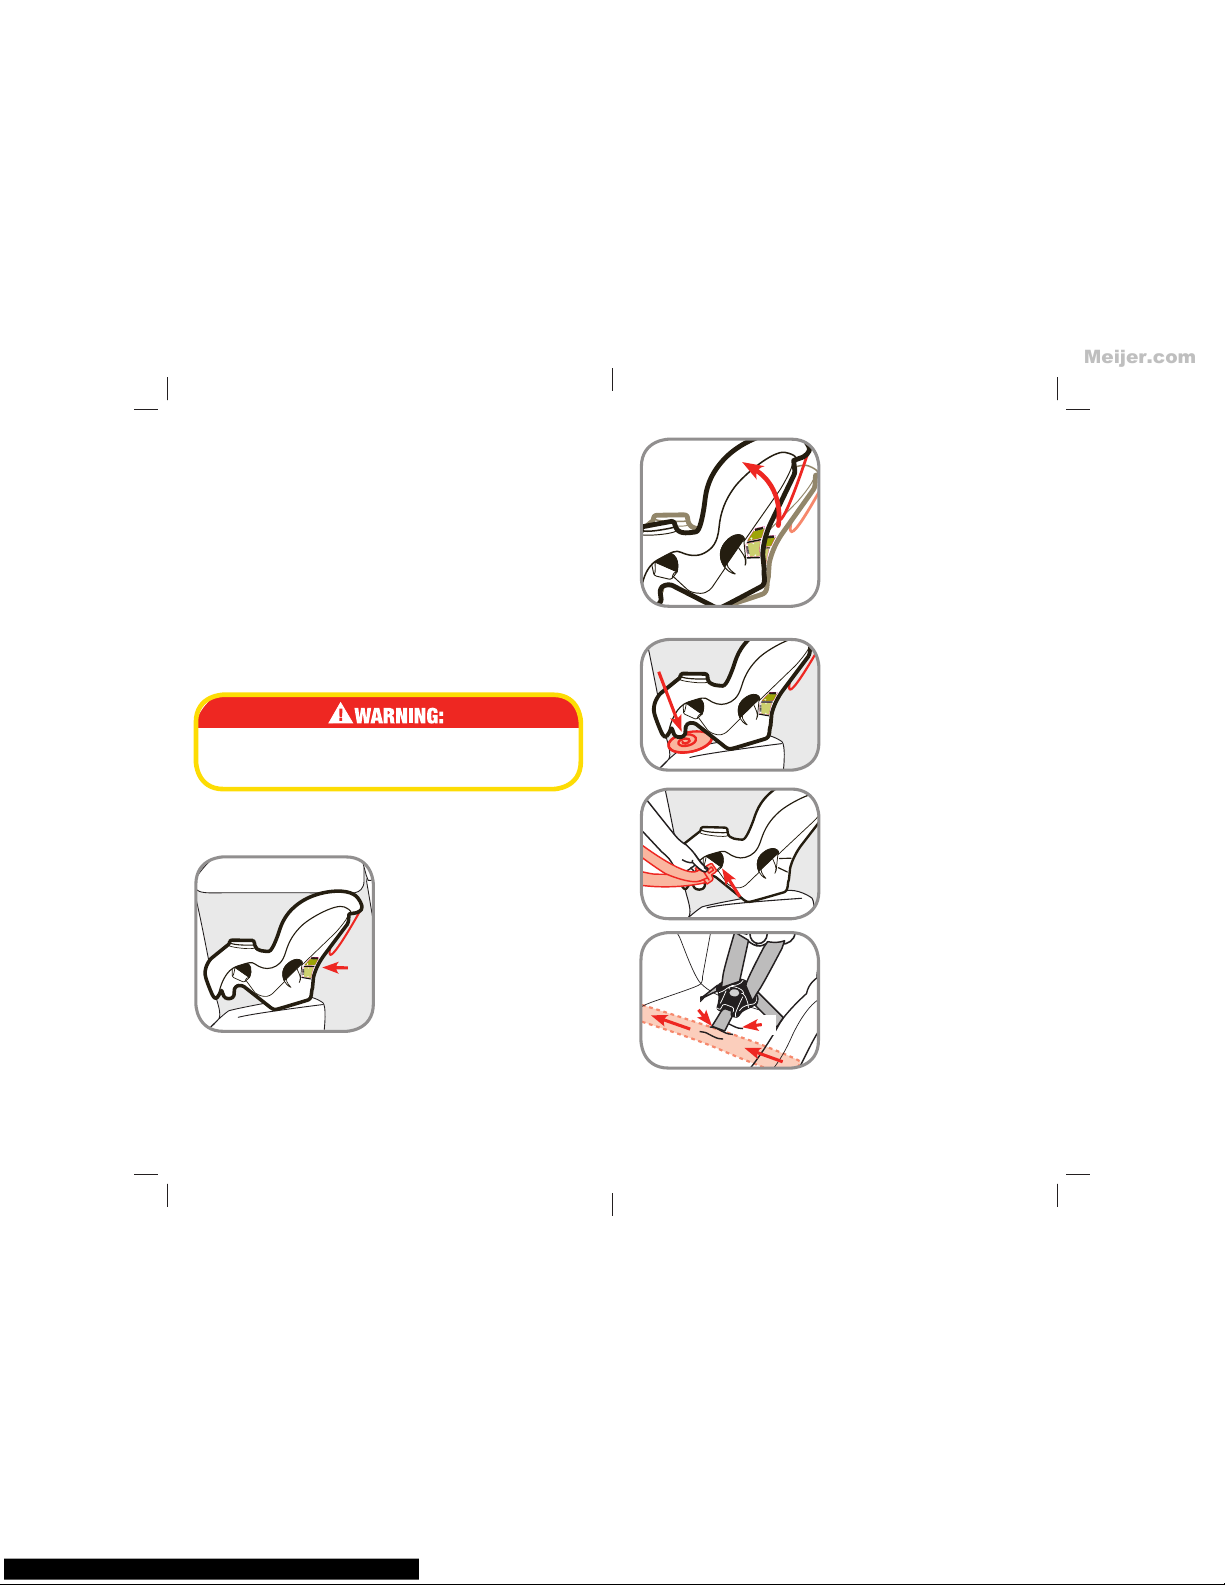
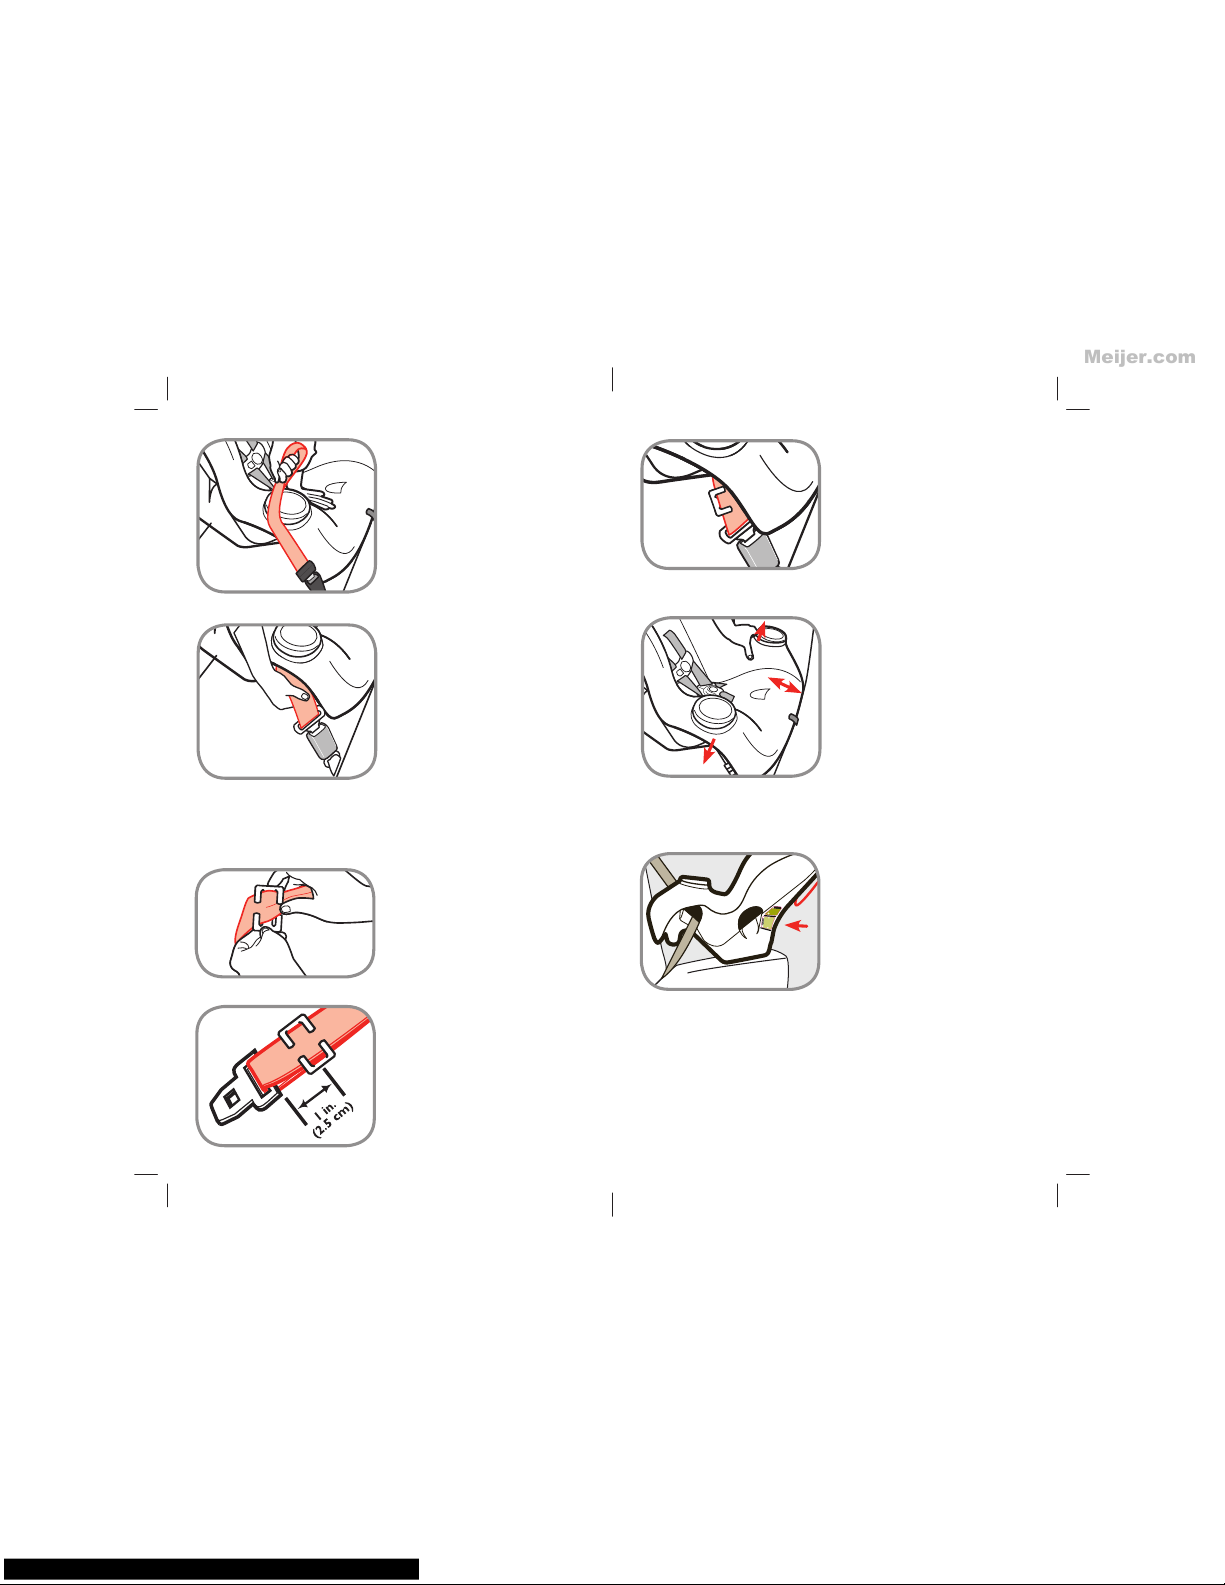
Locate Locking Clip
Location
Grasp both vehicle belts
together just behind the
latch plate and unbuckle.
NOTE: If the latch plate
ends up just at the belt
path opening so you cannot
grasp the vehicle belt at the
latch plate, grasp the vehicle belts on the opposite side of the
child restraint, as close to the latch plate as possible. Install
the locking clip on the latch plate end, as close as possible.
Tighten Vehicle Belt
Push down firmly on the
child restraint and while
pulling on the vehicle
shoulder belt to tighten.
4.
5.
Attach Locking Clip
Thread both portions of the
vehicle belt onto the locking
clip, as close to the latch
plate as possible.
6.
Position Locking Clip
Position locking clip about
1 in. (2.5 cm) from vehicle
belt’s latch plate.
7.
Rebuckle Vehicle Belt
8.
9.
Check Vehicle Belt
Tightness
Grasp the child restraint
at the vehicle belt path
with one hand. Push and
pull the child restraint from
side to side, forward and
back. The child restraint
should not move more than
1 inch.
NOTE: If it moves more
than an inch, redo the steps
5 through 9 again or try
another seating location.
Secure your child in the
child restraint. Recheck
the recline angle to make
sure it is reclined according
to your child’s weight.
Repeat steps if not reclined
correctly.
Remove the locking clip
when the vehicle seat belt
is not being used with a
child restraint.
Rear-Facing
For Children 5-22 lbs
(2.3-10 kg)
Top Line MUST Be
Leve
l
wi
t
h the
Gro
und.
4360-2
155
Rear-Fac
ing
For Children 2
2-40 lbs
(10.1-18 kg)
AND can sit
up unas
s
isted
Recline range i
s b
etwe
en
the 2 level to ground
lines.
Revi
e
w instruction manual.
4360-2154
Meijer.com
Page 28
53
54
G-3 Warranty
Dorel Juvenile Group, Inc. (DJG) warrants this product to the original
retail purchaser as follows:
This product is warranted against defective materials or
workmanship for one year from the date of original purchase. An
original receipt is required to validate your warranty. DJG
will, at its option, provide replacement parts or replace this product.
DJG reserves the right to substitute if the part or model has been
discontinued.
To make a claim under this warranty you may contact us at www.
djgusa.com, fax us at 1-800-207-8182 24 hours a day, write to
DJG, Consumer Relations Department, P. O. Box 2609, Columbus, IN
47202-2609, or call 1-800-544-1108 from 7:00 a.m. to 6:00 p.m.
EST Monday through Thursday and from 7:00 a.m. to 4:30 p.m. on
Friday. Proof of purchase is required and shipping charges
are the responsibility of the consumer.
Warranty Limitations:
This warranty does not include damages which arise from misuse or
abuse of this product.
Limitation of Damages:
The warranty and remedies as set forth are exclusive and in lieu of
all others, oral or written, expressed or implied. In no event will DJG
or the dealer selling this product be liable to you for any damages,
including incidental or consequential damages, arising out of the use
or inability to use this product.
Limitation of warranties and other warranty terms and state
law rights:
Any implied warranties, including implied warranties of the
merchantability and fitness for a particular purpose, shall be limited
to the duration and terms of the express written warranty. Some
states do not allow limitations as to how long an implied warranty
lasts or the exclusion or limitation of incidental or consequential
damages, so the above limitations may not apply to you. This
warranty gives you specific legal rights, and you may have other
rights, which vary from state to state. Neither DJG nor the dealer
selling this product authorized any person to create for it any other
warranty, obligation, or liability in connection with this product.
PLEASE COMPLETE AND MAIL THE PRE-ADDRESSED OWNER
REGISTRATION CARD WITHIN (30) DAYS OF PURCHASE TO EXPEDITE
WARRANTY CLAIMS AND TO VERIFY THE ORIGINAL DATE OF
PURCHASE.
1. If the child restraint buckle or harness release lever
sticks or you cannot get the straps tight enough around
child: DO NOT LUBRICATE. Check around lever and retractor for
dropped food, sticky spilled drinks, dirt, leaves, etc.
Clean with
warm water and/or remove object with tweezers.
If you cannot get
the harness to adjust and remain tight with the buckle securely
locked, do not use the child restraint.
2. If your harness twists: Straighten the harness each time you
put your child in the child restraint to help prevent twisting. Lock
the buckle and tighten harness and it will be ready for next use.
3. Locate a Child Safety Seat Inspection Station for hands
on training on how to use your child restraint: Visit your
local Child Passenger Inspection Station or go to
http://www.
nhtsa.dot.gov/cps/cpsfitting/index.cfm to find your closest station.
G-2 Trouble Shooting
Meijer.com
Page 29
55
56
Complete the form below. Your model number with color code and
manufacturer date code MUST be included on the form to ensure
proper replacement parts. Your model number with color code
and the date code can be found on a sticker on the side of child
restraint. Payment in U.S. dollars must accompany your order.
Choose parts needed from the list on the next page.
Return the form with payment to:
Dorel Juvenile Group, Inc.
Consumer Relations Department
P.O. Box 2609
Columbus, IN 47202-2609
Fax orders to: 1-800-207-8182
Please make money orders payable to Dorel Juvenile Group, Inc.
Fill in the area below to charge to Visa or Mastercard. We do not
accept personal checks or Discover Card. All outside of U.S. and
Canada MUST use credit card.
Ship To (Please Print): _________________________________
Name: _____________________________________________
Address: ___________________________________________
City: ______________________________________________
State/Province: __________________________ Zip _________
Telephone: _________________________________________
Email Address: ______________________________________
We MUST have this information
to process your order:
Model Number (5 digits & 3 letters): __________________
Manufacture Date (mm/dd/yyyy): _____________________
G-4 Replacement Parts Order Form
Meijer.com
Page 30
58
57
Replacement Parts List
NOTE: If requested color is not available, similar color will be
substituted.
Part Cost Quantity Total Cost
Buckle Strap/Buckle .... $4.99 X _____ = $ ______________
Harness Strap .............$2.00 X _____ = $ ______________
Seat Pad ..................$19.99 X _____ = $ ______________
Chest Clip .................... $1.50 X _____ = $ ______________
Locking Clip ................$2.50 X _____ = $ ______________
Tether Kit ....................$9.99 X _____ = $ ______________
Latch Kit .................... $24.99 X _____ = $ ______________
Instructions ................. $0.00 X _____ = $ ______________
Merchandise Total $ ________________
Shipping and handling: $ ________________
Sales Tax $ _______________
(Indiana, California, and Massachusetts residents add applicable sales tax.
Grand Total $ ________________
No shipping and handling on instructions for quantities under 6. Add $.50 for each
instruction over 6, then add applicable shipping and handling.
Fill Out For Credit Card
q Visa q Mastercard
Card Exp. Date: ________________________________
Cardholder’s Name: ____________________________
Card Number: _________________________________
Signature_____________________________________
Up to $25.00 ....................... $5.95
$25.01 to $50.00 ................$6.95
$50.01 to $75.00 ................$8.95
$75.01 to $100.00 ..............$9.95
$100.01 to $150.00 ............$10.95
$150.01 to $200.00 ............$11.95
$200.01 and up ................. $13.95
Outside Continental USA $10.00
CUT ON DOTTED LINE
Meijer.com
 Loading...