

Cosatto Wonder Owner's Manual

LOVE WONDER AND
IT LOVES YOU BACK
TRAVEL SYSTEM
OWNER’S MANUAL
Important instructions on
set up, maintenance and care.

Important: Keep these
GB
instructions for future reference.
Important safety Information
General:
• WARNING: Never leave your child unattended.
• WARNING: Ensure that all the locking devices are engaged
before use.
• WARNING: To avoid injury ensure that your child is kept away
when unfolding and folding this product.
• WARNING: Do not let your child play with this product.
• WARNING: Check that the pram body or seat unit or car seat
attachment devices are correctly engaged before use.
• WARNING: This product is not suitable for running or skating.
• Do not use replacement parts or accessories other than those approved by Cosatto.
• A basket is provided for the carriage of 2kg of goods, evenly distributed.
• A changing bag (style varies) is provided with a max load limit of 2 kg, evenly
distributed, while attached to the chassis handle.
• Any additional load attached to the handle or on the back of the backrest or on the
sides of the vehicle will aect the stability and safety of the vehicle.
• Do not use a platform with this product as it may render the product unsafe.
• Always apply the brake when placing or removing a child from vehicle.
• Never carry a second child on the product.
• This product complies with BS EN 1888:2012.
Carrycot mode:
The carry cot can be used separately from the chassis. In this mode:
• The carry cot is suitable from birth.
• Must only be used in lie at position.
• WARNING: This product is only suitable for a child who
cannot sit up unaided.
• WARNING: Use only on a rm, level and dry surface.
• WARNING: Do not let other children play unattended near the
carrycot.
• WARNING: Do not use if any part is broken, torn or missing.

• WARNING: Never use this carrycot on a stand.
• Be aware of the risk of open re and other sources of strong heat, in the near vicinity
of carry cot.
• Carry handle and the base of the carry cot should be inspected regularly for signs of
damage and wear.
• Prior to carrying or lifting, make sure that the hood handle is fully opened and locked
into position.
• The head of the child should never be lower than the body of the child.
• No additional mattress shall be added.
• This carry cot complies to BS EN 1466:2014.
Pram mode:
Pram mode is achieved using the carry cot mounted on the chassis. In this mode:
• The pram is suitable from birth until your child is ready for a fully seated position
(pushchair mode).
• As soon as your child can support their head, the adjustable backrest can be used.
• WARNING: Always use a harness as soon as your child can sit
unaided.
• WARNING: To prevent risk on entanglement, remove harness
when child is in lie-at position.
• A harness compliant with EN 13210:2004 is supplied with this product
• A mesh pocket is provided on the underside of the unit for carriage of the raincover
only.
• A pocket is provided on the underside of the apron for carriage of the mosquito net
only.
Pushchair mode:
Pushchair mode is achieved using the seat unit (forward or rear facing) attached to the
chassis. In this mode:
• The pushchair is suitable for children from birth up to a maximum user weight of 15kg.
• WARNING: Always use the restraint system.
• WARNING: Always use the crotch strap in combination with the
waist belt.
• Use the seat in the most reclined position for new born babies until they can sit up
unaided.
• Ensure your child wears a correctly tted and adjusted harness at all times. D-rings
are provided for the attachment of a separate safety harness approved to BS EN 13210
should this be required.
• A pocket is provided on the rear of seat unit for carriage of the raincover only.

Car seat:
For use as a travel system, the chassis is only compatible with the Wonder car seat. In
this mode:
• This product does not replace a cot or a bed. Should your child need to sleep, then it
should be placed in suitable cot, bed or carry cot.
Visual language Key:
Refer to warning XX
Correct action
Incorrect action
Audible sound
Repeat action x times
General action arrow
Lock
Unlock
Press and hold
Check
Continue to step XX
Repeat on other side

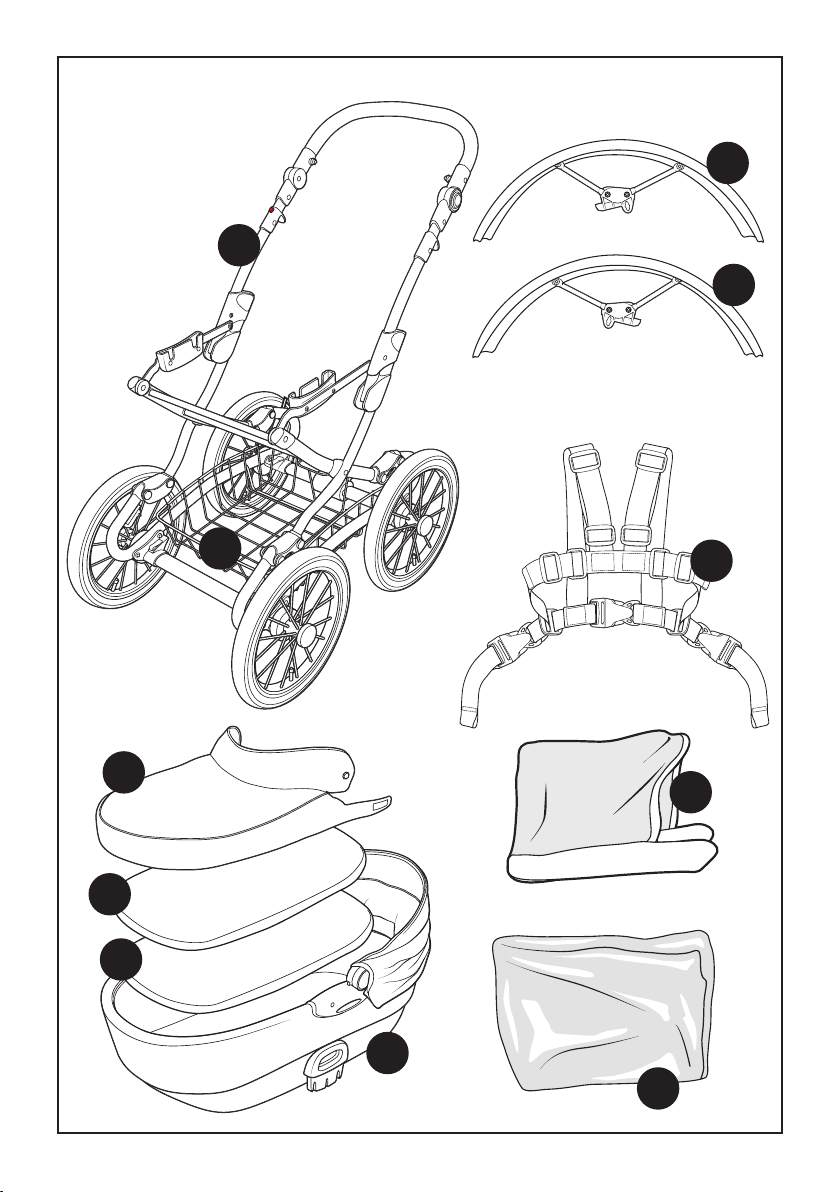
Parts
Chassis
1. Chassis
2. Mudguard ‘A’ x2
3. Mudguard ‘B’ x2
4. Basket
Carrycot
5. Harness
6. Apron
7. Mattress Cover
8. Mattress
9. Carrycot
10. Mosquito Net (Stored in pocket under carrycot apron)
11. Raincover (stored in pocket under carry cot)
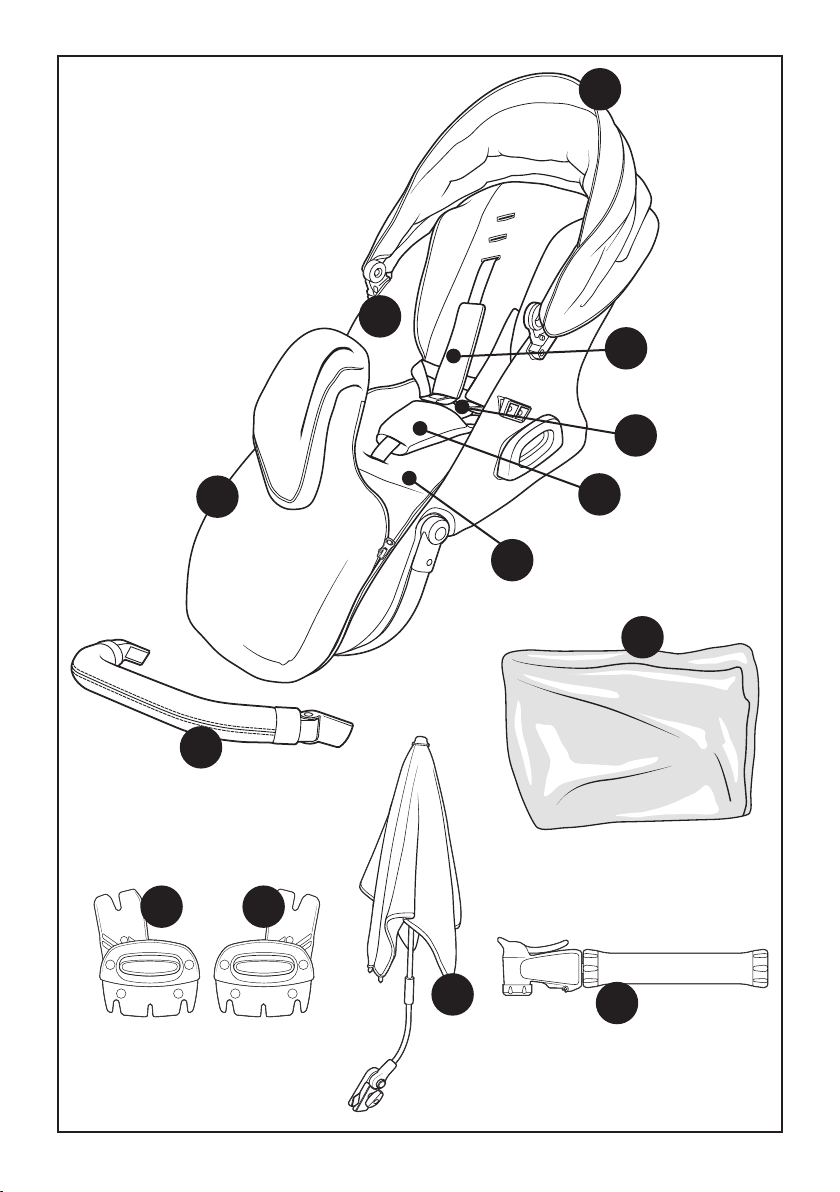
Seat Unit
12. Seat Unit
13. Hood
14. Chest Pads x2
15. Harness
16. Crotch Pad
17. Seat Liner
18. Footmu
19. Bumper Bar
20. Raincover (stored in pocket in backrest)
21. Car Seat Adaptor ‘L’
22. Car Seat Adaptor ‘R’
23. Parasol
24. Tyre Pump
25. Changing Bag (not shown) *style varies
1
2
A
3
B
7
8
6
4
5
10
9
11
12
13
14
15
21
18
19
22
23
16
17
20
24

Replacement Parts:
The replacement parts shown below are available for your product. For UK & Ireland
customers, order through our website: http://www.cosatto.com/service-centre/spares
For customer outside UK & Ireland, contact information for your local distributor can be
found on http://www.cosatto.com/stockists
If you require any further assistance, please contact us at cuddle@cosatto.com
Chassis
Mudguard ‘A’
Mudguard ‘B’
Wheel (full)
Wheel inner tube only
Wheel tyre only
Carrycot Inner liner
carrycot Mattress
Carrycot mattress cover
Carrycot mosquito net
Carrycot raincover
Carrycot apron
Carrycot harness
Seat unit fabric
Seat unit frame
Seat unit harness
Seat unit harness clip only
Seat unit crotch pad
Seat unit chest pad (set)
Seat unit bumper bar
seat unit hood
seat unit footmu
seat unit raincover
Changing bag
Changing mattress
Messy bag
Parasol
Pump
Car seat adaptor (set)

Care & Maintenance:
Your travel system has been designed to meet comprehensive safety standards, and with
correct use and maintenance will give many years of trouble free performance.
The chassis is strong but will weaken should the back wheels be bumped down stairs or
kerbs. Continual impact will cause damage.
If your child wears hard shoes these might damage the soft fabric.
Store your travel system in a dry, safe place.
Storing a damp travel system will encourage mildew to form, so after exposure to damp
conditions, dry o with a soft cloth and allow to dry thoroughly before storing.
Do not leave the travel system in sunlight for prolonged periods - some fabrics may fade.
Regularly inspect the locking devices, brakes, wheels, harness assembly, catches, seat
adjusters, joints and xtures to ensure they are secure and in full working order. They
should move freely at all times.
Cosatto products are designed to operate with minimum maintenance, however regular
lubrication of moving parts will extend the life of your travel system and make opening
and folding easier.
Should parts of your travel system become sti or dicult to operate, apply a light
application of a spray lubricant e.g. silicone. Do not use oil or grease.
Wheels are subject to wear and should be replaced if necessary.
Your travel system should be serviced and reconditioned before using it for a second
baby, or after 18 months, whichever is the sooner.
Hood may be cleaned by sponging lightly using warm water and a mild detergent.
Refer to the wash care label on soft goods for cleaning instruction.
Plastic and metal parts may be sponged clean with warm water and a mild detergent.
Never clean with abrasive, ammonia based, bleach based or spirit type cleaners.

Fitting & Operation information
Chassis
1
Open chassis:
Lift handle (1) over the chassis (2) until hinge locks engage (3).
2
Handle adjustment:
Press down the handle release buttons on each side (1) and adjust handle (2).
Release buttons when the handle is in desired position.
3
Brake:
Apply: Press down on brake lever (1).
Release: Push up the brake lever (2).
4
Mudguard:
Note: The mudguards are handed which are marked ‘A’ and ‘B’. (1).
5
Fitting: Align the mudguard xing bracket to the chassis mount (1). Slide the xing
bracket onto the chassis mount until it locks in place (2).
6
Remove: Press one release button down (1) and slide the mudguard xing bracket o the
chassis mount (2).
7
Wheels:
Remove: Press the wheel release button down (1) and pull the wheel away from the
chassis (2).
8
Fitting: Press the wheel release button down (1) and insert the wheel axle into the axle
housing fully (2) then release the button (3).
Note: Check the wheel is securely located by pulling back on the wheel.
9
Close Chassis:
Note: Chassis may be folded with seat unit tted forward facing.
First adjust the handle so it’s inline with the chassis tubing 2 (1).

Then, standing behind the handle, press down the primary lock button (2) on the right
side locking lever, then simultaneously pull both side locking levers (3 + 4) back.
10
Push the chassis handle forward (1) and down (2) until the chassis is fully closed.
Fold the handle down 2 (3).
Carrycot
11
Fitting to the chassis:
Note: The carrycot should only be tted rearward facing.
Align the carrycot mounts with the chassis bracket (1).
Push down until the carrycot is locked to the chassis (2).
12
Removing the carrycot:
Lift up and hold the levers on the mounts on each side of the carrycot (1) and lift the
carrycot away from the chassis (2).
13
Hood:
Open: Pull the hood forward (1) until the hinge locks into place (2).
14
Sun visor:
Fold out the sun visor (1) if required.
15
Viewing window:
Lift the window ap (1) to reveal the viewing window.
16
Carry position:
(A) On top of the hood: unfasten the zip (1) to reveal carry handle (2).
(B) On side of carrycot.
17
Closing hood: Press down the hood release buttons on each side (1) and push the hood
back (2).

18
Apron:
Fitting: Disconnect the fabric fastener strips (1) on each side of the carrycot hood ap.
Lay the apron over the footend of the carrycot (2). Attach the apron popper (3) and
fabric fastener strips (4) to each side of the carrycot.
Re-connect the fabric fastener strips on hood (5).
19
Mosquito net:
Fitting: Disconnect the fabric fastener strips (1) on each side of the carrycot hood ap.
Tip: Folding out the sun visor will making the tting of mosquito net easier.
Lay the mosquito net over the footend of the carrycot (2). Attach the mosquito net zip to
the hood (3) and fabric fastener strips (4) to each side of the carrycot.
Re-connect the fabric fastener strips on hood (5).
20
Storage: A storage pocket is located on the underside of the carrycot apron.
21
Raincover:
Fitting: Lay the raincover over the carrycot body (1).
Front access zip: Open the zip unit (2) to access your child or carry handle.
22
Storage: A storage pocket is located on the underside of the carrycot base.
23
Carrycot harness:
Fitting: First, press the buckle release button (1) and pull the harness clip away (2) to
release the retaining strap on each side of the harness. Then wrap the loop end of the
retaining strap around the “U” bar on mounted on the carrycot (3) then and then pass the
clip end through the loop to secure (4).
Reconnect the retaining strap to both sides of the harness (5).
24
Using harness:
First, disconnect the harness from retaining straps mounted on the carrycot (1) then
unfasten the harness buckle (2).
25
Fit the harness around the child and fasten the buckle at the back (1).
Reconnect the harness to the retaining straps (2).

26
Adjust Harness:
To adjust the harness, slide the 3 bar sliders (1) along the webbing to suitable length.
27
Backrest recline:
Note: The backrest recline should only be used in conjunction with the carrycot harness
tted.
To adjust the recline position, press in (1) and rotate (2) the adjustment knob to desired
position (3).
28
Liner removal:
If harness is tted then release the harness by unfasten the retaining strap buckle on
each side (1).
Starting from backrest, remove mattress & mattress cover (2).
Unfasten the liner retaining zips (3) and remove the liner (4).
Seat Unit
29
Fit:
Note: The seat unit can be tted either forward or rearward facing positions.
30
Align the seat unit mounts with the chassis bracket (1).
Push down on the mounts until the seat unit is locked to the chassis (2).
31
Remove:
Lift and hold the levers on the mounts on each side of the seat unit (1) and lift the seat
unit away from the chassis (2).
32
Seat unit recline position:
Note: The seat unit can be adjusted to 4 dierent positions.
Lower: Lift the lever (1) and allow the seat unit backrest to lower (2). Release buttons
when the backrest is in desired position.
33
Raise: Lift the top of the seat unit backrest to the required angle (1) until it clicked into
position.

34
Bumper bar:
Remove: Press down the bumper bar release button (1) on each side of the bumper bar
and pull the bumper bar away from the mount (2).
35
Fit: Slide the bumper bar (1) onto the mounting point on both sides of the seat unit until
it is clicked into position (2).
36
Harness:
Open: Press the buckle release button (1) and separate the harness clips (2).
37
Close: Overlap the harness clips (1) and press them into the buckle (2).
38
Shoulder strap position Adjustment:
Push the retainer clip through from rear of seat unit (1) and ret at suitable position (2).
39
Shoulder strap length adjustment:
Slide the 3 bar slider (1) along the webbing to suitable length.
Waist strap length adjustment:
Hold the 3 bar slider (2) and adjust the webbing to suitable length.
40
Crotch strap position adjustment:
Locate the crotch strap retaining clip under the seat.
Unfasten the retaining clip (1) and slide the crotch strap o the clip (2).
Move the crotch strap to the forward slot (3) and fasten the clip (4).
41
Calf support:
Raise: Lift the calf support to the required angle (1) until it clicked into position.
42
Lower: Press down the calf support release buttons on each side of the calf support (1)
and lower the calf support (2). Release buttons when the calf support at required
position.
 Loading...