

Page 1
Page 2
1 1
INSTRUMENTS and CONTROLS
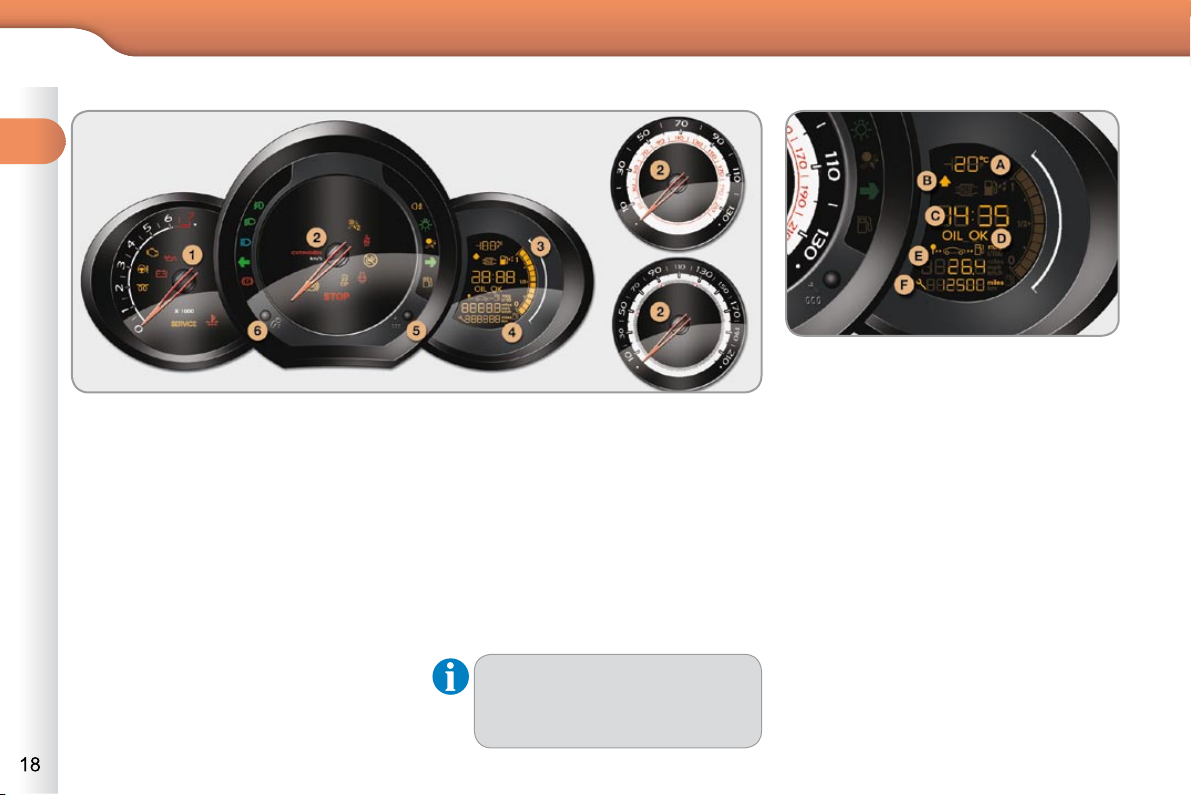
Panel grouping together the vehicle operation indication dials and warning lamps.
5. Display management button
Servicing information.
Adjust the time and choose units.
Reset the service indicator.
6. Instrument panel lighting button.
Adjusts the brightness of the lighting
of the instruments and controls.
For further information, refer
to the paragraph relating to the
button or function and its associated display.
Dials
1. Rev counter.
Indicates the speed of rotation of the
engine (x 1 000 rpm).
2. Vehicle speed.
Indicates the current speed of the
moving vehicle (mph or km/h).
3. Fuel level.
Indicates the quantity of fuel remain-
ing in the tank.
4. Screen.
A. Ambient temperature.
(°Celsius or °Fahrenheit)
B. Gear change indicator.
C. Time.
D. Engine oil level indicator.
Appears a few seconds after switch-
ing on the ignition, then disappears.
E. Trip computer.
F. Service indicator
(miles or km) then,
Total mileage.
These two functions are displayed
successively when switching on the
ignition.
Screen
Page 3
INSTRUMENTS and CONTROLS
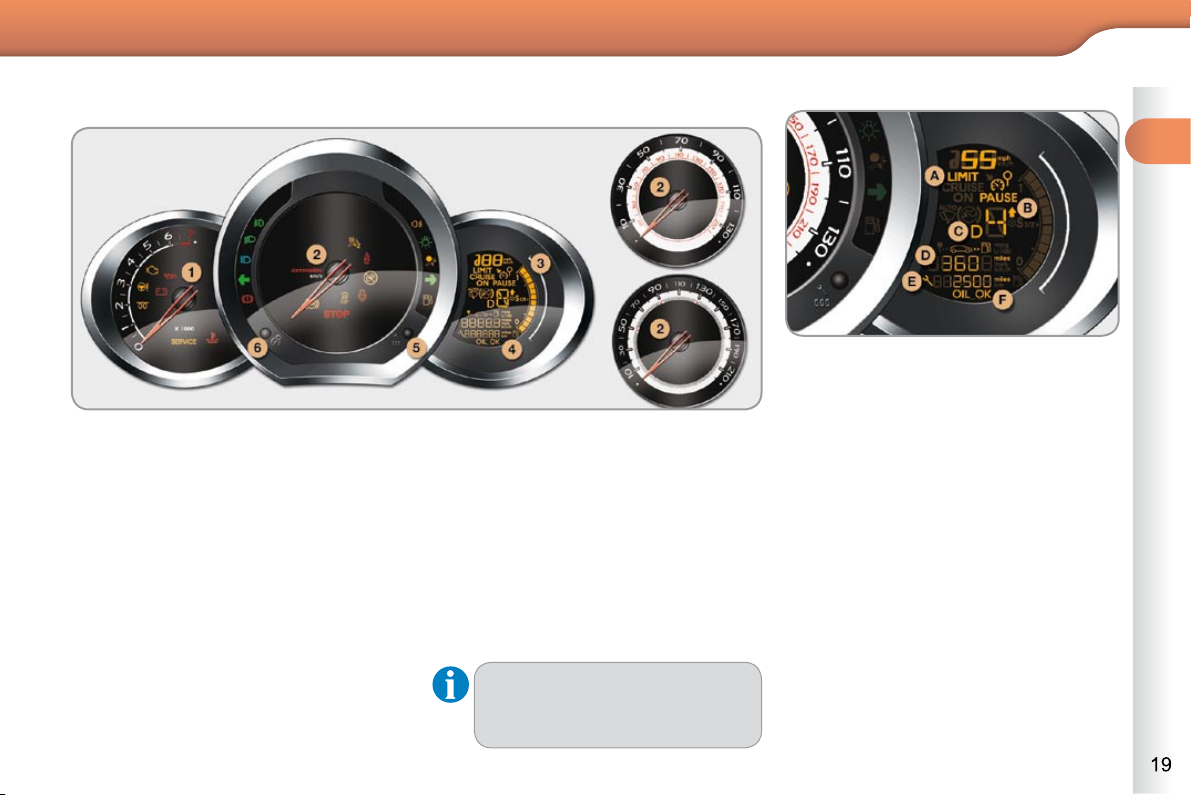
Panel grouping together the vehicle operation indication dials and warning lamps.
Depending on the version, the instrument panel may have permanent back-lighting.
Dials
1. Rev counter.
Indicates the speed of rotation of the
engine (x 1 000 rpm).
2. Vehicle speed.
Indicates the current speed of the
moving vehicle (km/h or mph).
3. Fuel level.
Indicates the quantity of fuel remaining
in the tank.
4. Screen.
5. Display management button
Alternates display between range
and trip mileage recorder.
Servicing information.
Resets the selected function to zero
(trip distance recorder or service
indicator).
6. Instrument panel lighting button.
Adjusts the brightness of the lighting
of the instruments and controls.
For further information, refer
to the paragraph relating to the
button or function and its associated display.
A. Speed limiter
(mph or km/h) or
Cruise control.
B. Gear change indicator.
C. Automatic gearbox information.
D. Range
(miles or km) or
Trip mileage recorder.
E. Service indicator
(miles or km), then
Total mileage recorder
These two functions are displayed
successively when switching on the
ignition
F. Engine oil level indicator
Appears a few seconds after switch-
ing on the ignition, then disappears.
Screen
Page 4
1 1
20
INSTRUMENTS and CONTROLS
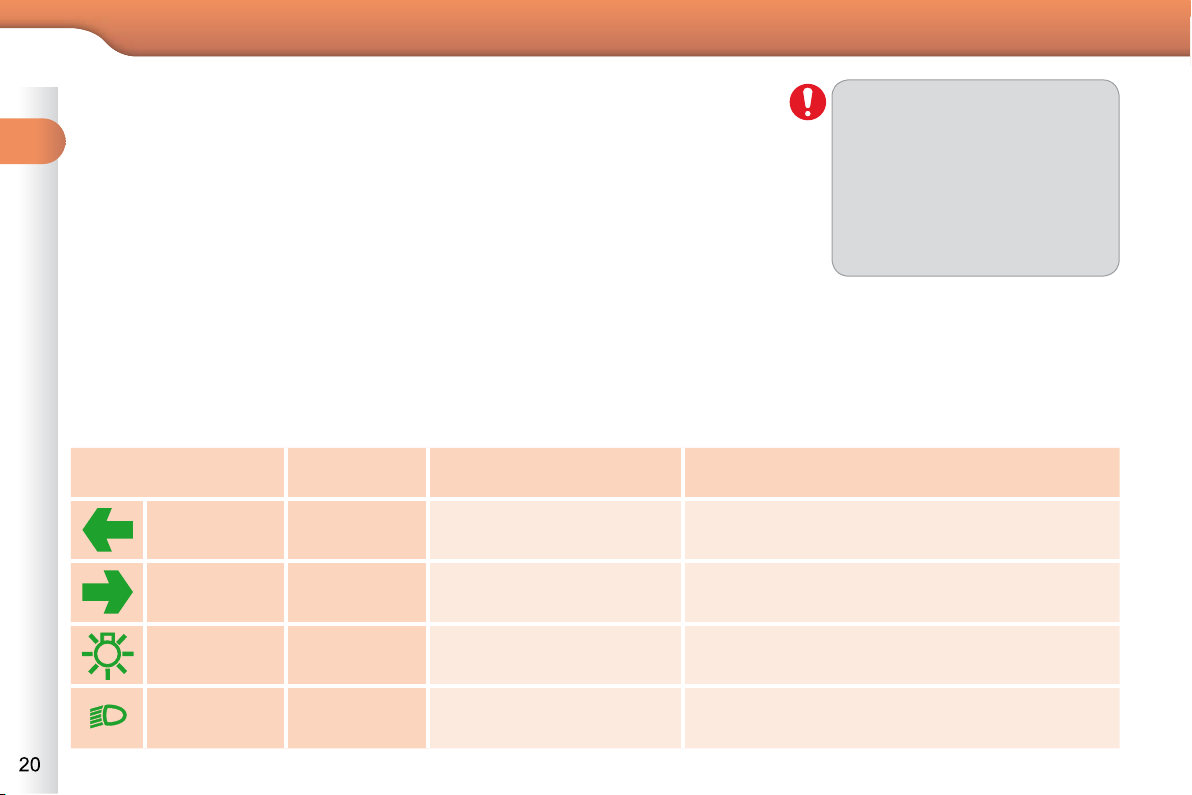
Indicator and warning lamps
Visual indicators informing the driver that a system is in operation (operation or
deactivation indicator lamps) or of the occurrence of a fault (warning lamp).
When the ignition is switched on
Certain warning lamps come on for a few seconds when the vehicle's ignition is
switched on.
When the engine is started, these same warning lamps should switch off.
If they remain on, before moving off, refer to the information on the warning lamp
concerned.
Operation indicator lamps
If one of the following indicator lamps comes on, this confi rms that the corresponding
system has come into operation.
The warning lamps may come
on continuously (fi xed) or fl ash.
Certain warning lamps may
come on in two different modes.
Only by relating the type of lighting to the operating status of the
vehicle can it be ascertained
whether the situation is normal
or whether a fault has occurred.
Associated warnings
The switching on of certain warning lamps may be accompanied by an audible
signal and a message on the multifunction screen.
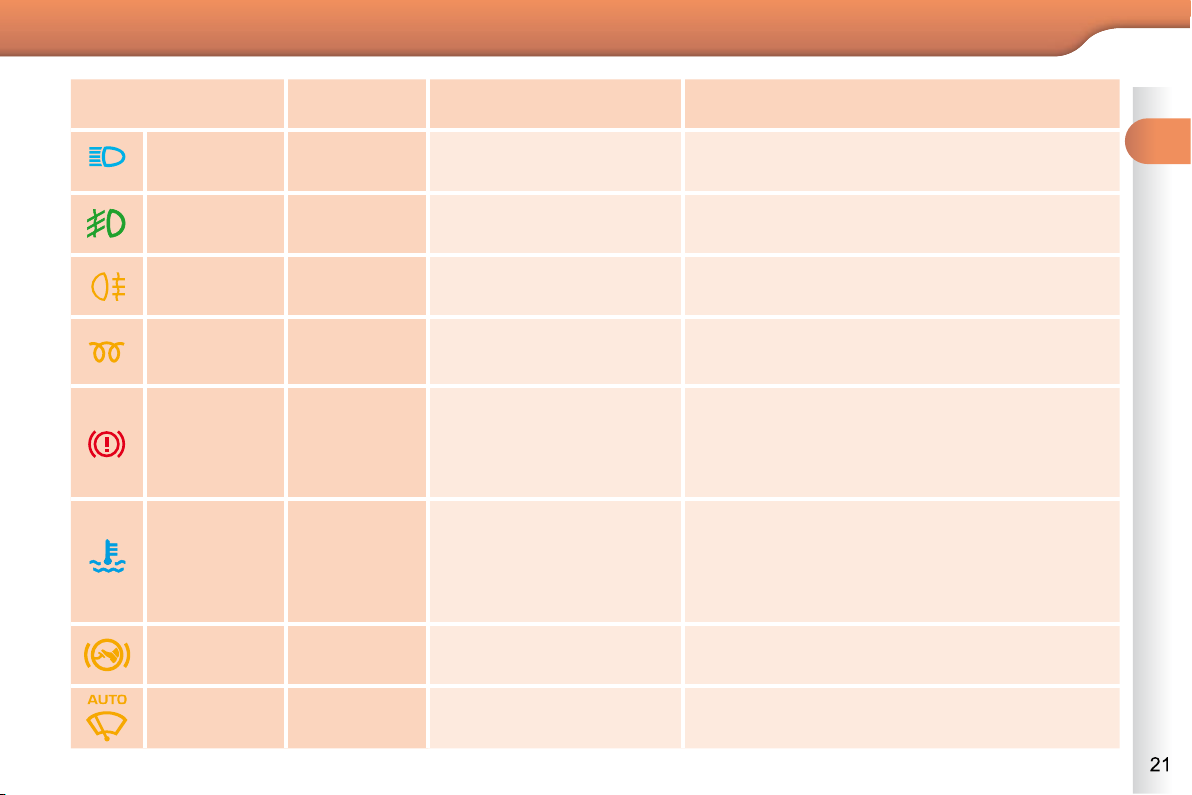
Warning lamp is on Cause Action/Observations
Left-hand
direction
indicato r
fl ashing with
buzzer.
The lighting stalk is pressed
down.
Right-hand
direction
indicator
fl ashing with
buzzer.
The lighting stalk is pushed up.
Sidelamps fi xed.
The lighting stalk is in the
"Sidelamps" position.
Turn the control to the desired position.
Dipped beam
headlamps
fi xed.
The lighting stalk is in the
"Dipped beam headlamps"
position.
Turn the control to the desired position.
Page 5
21
INSTRUMENTS and CONTROLS
Front
foglamps
fi xed.
The front foglamps are
switched on.
Turn the ring on the stalk rearwards twice to
switch off the front foglamps.
Rear
foglamps
fi xed.
The rear foglamps are
switched on.
Turn the ring on the stalk rearwards to switch off
the rear foglamps.
Diesel engine
pre-heating
fi xed.
The ignition switch is at the
2 nd position (ignition on).
Wait until the warning lamp has switched off before starting.
The duration for which the warning lamp is on is
determined by the climatic conditions.
Parking brake fi xed.
The parking brake is
applied or not properly
released.
Release the parking brake to switch off the
warning lamp, keeping your foot on the brake
pedal.
Observe the safety recommendations.
For further information on the parking brake, refer
to the "Driving" section.
Warning lamp is on Cause Action/Observations
Engine
coolant
temperature
fi xed blue.
On starting the engine, it
indicates that the engine is
cold.
After a few minutes driving, it swiches off to
indicate that the engine temperature is normal.
In order to protect your engine, avoid driving too
hard until the warning lamp has switched off.
Foot on the
brake pedal
fi xed.
The brake pedal must be
pressed.
To start the engine, put the automatic gearbox
selector lever in position P .
Automatic
wiping
fi xed.
The wiper control is pushed
downwards.
Automatic front wiping is activated.
Main beam
headlamps
fi xed.
The lighting stalk is pulled
towards you.
Pull the stalk to return to dipped beam
headlamps.
Page 6
1 1
22
INSTRUMENTS and CONTROLS
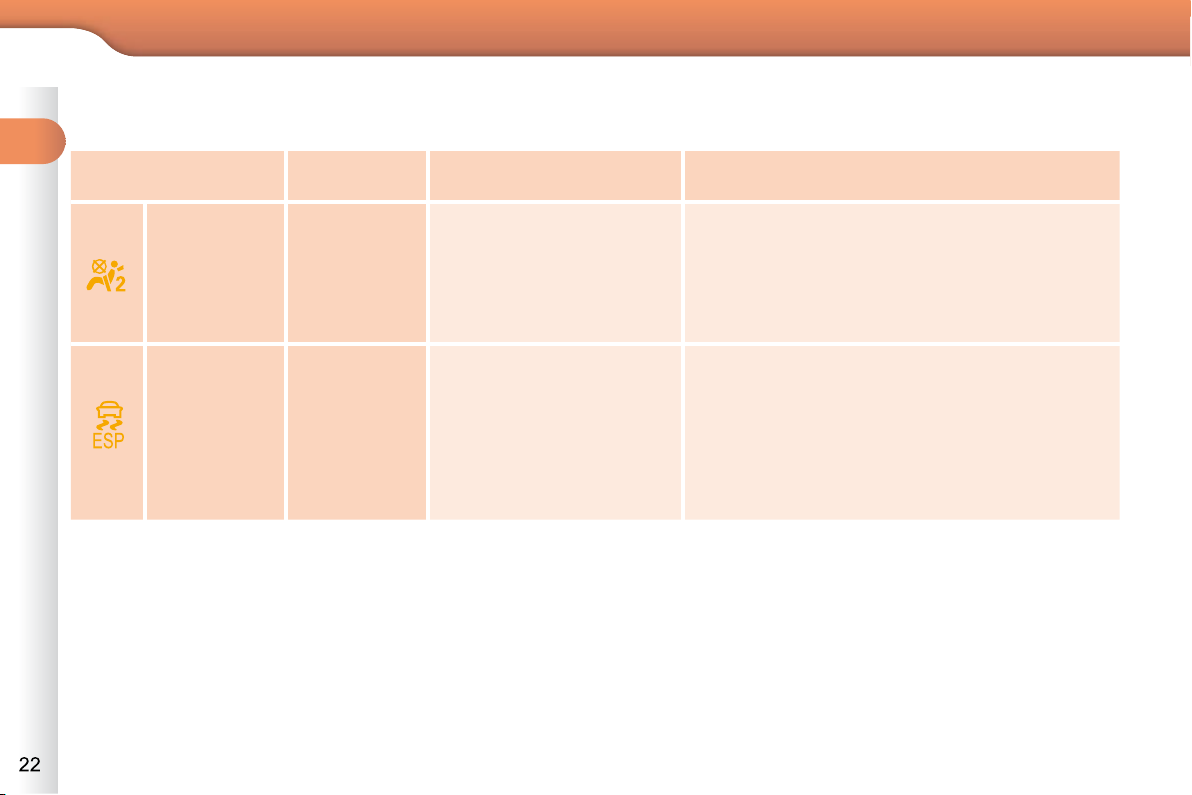
Deactivation warning lamps
If one of the following warning lamps comes on, this confi rms that the corresponding system has been switched off intentionally.
Passenger's
air bag
system
fi xed.
The control, located in the
glove box, is set to the OFF
position.
The passenger's front
airbag is deactivated.
Set the control to the ON position to activate the
passenger's front airbag. In this case, do not fi t a
child seat in the rear-facing position.
The passenger's airbag system is put into service
automatically when the vehicle is started.
ESP/ASR fi xed.
The button, located at
the bottom left of the
dashboard, is pressed. Its
indicator lamp is on.
The ESP/ASR is
deactivated.
ESP: electronic stability
programme.
ASR: anti-skid regulation.
Press the button to activate the ESP/ASR. Its
indicator lamp switches off.
From approximately 30 mph (50 km/h), the
system is reactivated automatically.
The ESP/ASR system is activated automatically
when the vehicle is started.
Warning lamp is on Cause Action/Observations
Page 7
23
INSTRUMENTS and CONTROLS
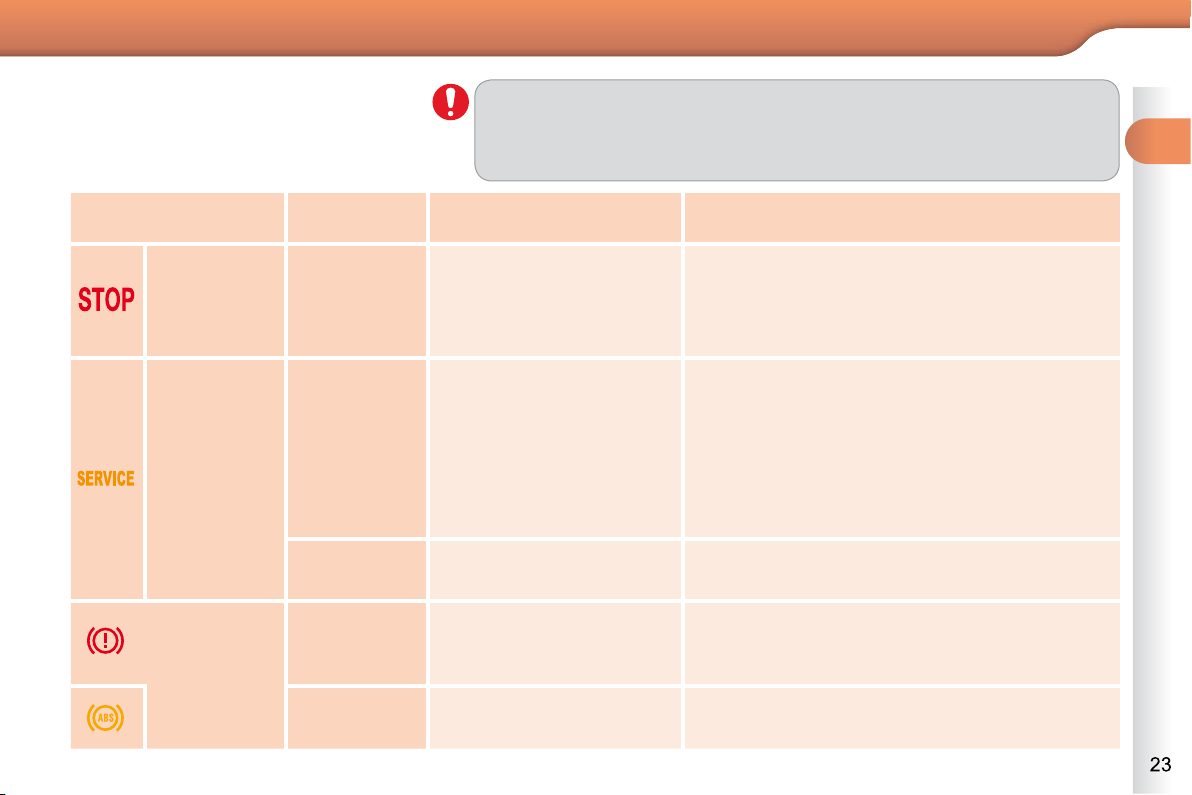
Warning lamps
When the engine is running or the vehicle is being driven, the switching on
of one of the following warning lamps
indicates a fault which requires action
on the part of the driver.
Any fault resulting in the switching on of a warning lamp must be investigated
further by reading the associated message on the multifunction screen.
If you encounter any problems, do not hesitate to contact a CITROËN dealer.
Warning lamp is on Cause Action/Observations
STOP
fi xed, associated
with another
warning
lamp and
accompanied by
an audible signal.
It is associated with the
braking system or the
engine coolant temperature.
Stop as soon as it is safe to do so.
Park, switch off the ignition and call a CITROËN
dealer.
Service
temporarily.
A minor fault has occurred
for which there is no
specifi c warning lamp.
Identify the fault by reading the message shown
on the screen, such as, for example:
- the engine oil level,
- the screenwash level,
- the remote control battery,
- saturation of the particle emission fi lter (Diesel).
For any other faults, contact a CITROËN dealer.
fi xed.
A major fault has occurred
for which there is no
specifi c warning lamp.
Identify the fault by reading the message shown
on the screen and contact a CITROËN dealer.
Braking
fi xed.
The braking system
fl uid level has dropped
signifi cantly.
Top up with brake fl uid recommended by
CITROËN.
If the problem persists, have the system checked
by a CITROËN dealer.
+
fi xed, associated
with the ABS
warning lamp.
The electronic brake force
distribution (EBFD) system
has a fault.
Have it checked by a CITROËN dealer.
Page 8
1 1
24
INSTRUMENTS and CONTROLS
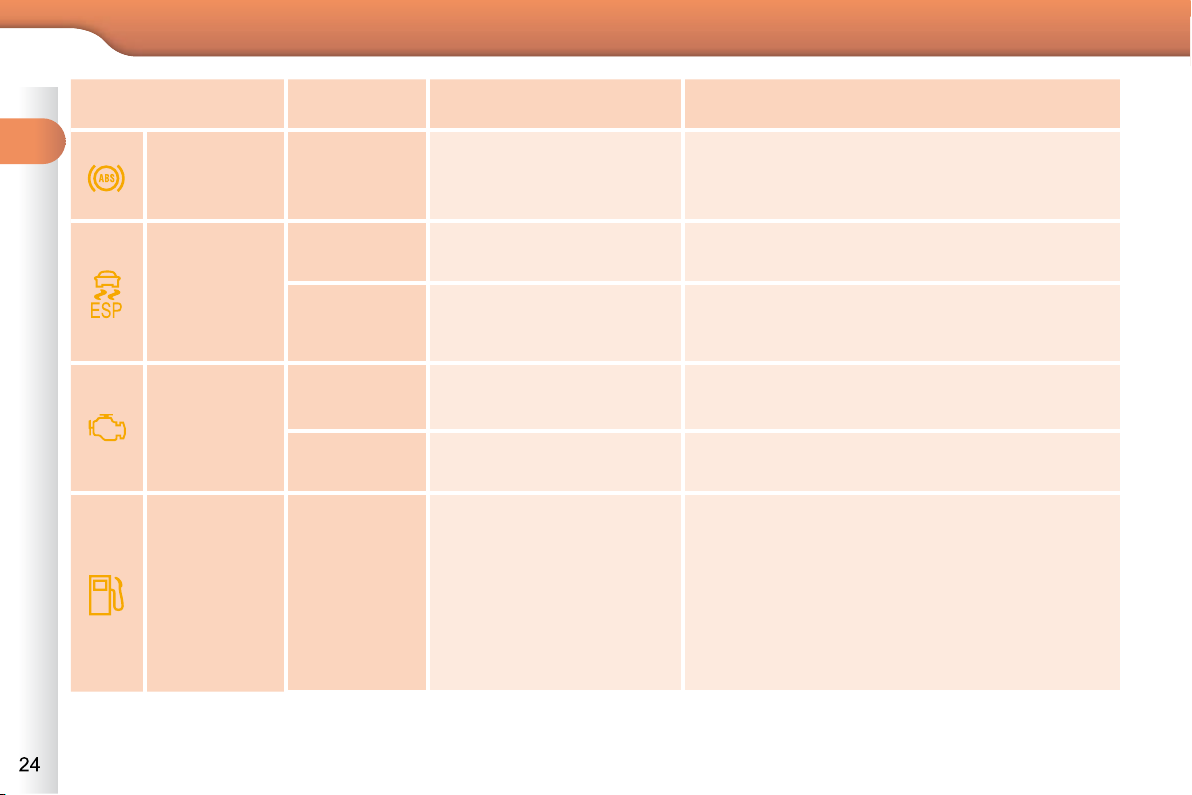
Warning lamp is on Cause Action/Observations
Anti-lock
Braking
System
(ABS)
fi xed.
The anti-lock braking
system has a fault.
The vehicle retains conventional braking without
servo assistance.
Drive carefully at reduced speed and contact a
CITROËN dealer without delay.
Dynamic
stability
control
(ESP/ASR)
fl ashing.
The ESP/ASR regulation is
active.
The system optimises traction and improves the
directional stability of the vehicle.
fi xed.
Unless it has been
deactivated with the indicator
lamp on the button on, the
ESP/ASR system is faulty.
Have it checked by a CITROËN dealer.
Engine
autodiagnosis
system
fi xed.
The emission control
system has a fault.
This lamp should switch off when the engine is started.
If it does not switch off, contact a CITROËN
dealer urgently.
fl ashing.
The engine management
system has a fault.
Risk of destruction of the catalytic convertor.
Have it checked by a CITROËN dealer.
Low fuel level
fi xed with
the last two
segement
bocks
fl ashing.
When it fi rst comes on there
remains approximately
5 litres of fuel in the tank.
Refuel as soon as possible to avoid running out
of fuel.
This warning lamp wil come on every time the
ignition is switched on, until a suffi cient addition
of fuel is made.
Fuel tank capacity: approximately 50 litres
(petrol) or 45 litres (Diesel).
Never continue to drive until you run out of fuel,
this could damage the emission control and
injection systems.
Page 9
25
INSTRUMENTS and CONTROLS
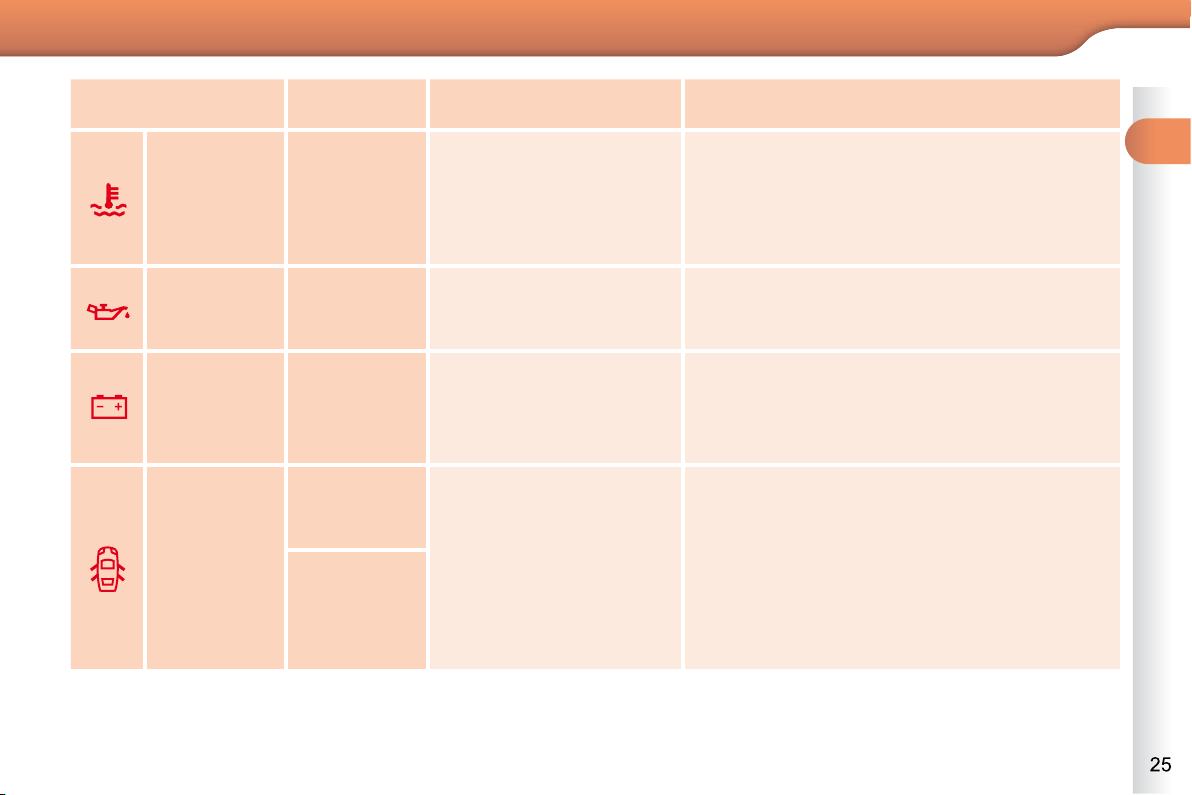
Warning lamp is on Cause Action/Observations
Maximum
coolant
temperature
fi xed red.
The temperature of the
cooling system is too high.
Stop as soon as it is safe to do so.
Wait until the engine has cooled down before
topping up the level, if necessary.
If the problem persists, contact a CITROËN
dealer.
Engine oil
pressure
fi xed.
There is a fault with the
engine lubrication system.
Stop as soon it is safe to do so.
Park, switch off the ignition and contact a
CITROËN dealer.
Battery
charge
fi xed.
The battery charging circuit
has a fault (dirty or loose
terminals, slack or cut
alternator belt, ...).
This lamp should switch off when the engine is
started.
If it does not switch off, contact a CITROËN
dealer.
Door(s) open
fi xed if the
speed is
below 6 mph
(10 km/h).
A door or the boot is still
open.
Close the door or boot.
fi xed and
accompanied
by an audible
signal if the
speed is
above 6 mph
(10 km/h).
Page 10
1 1
26
INSTRUMENTS and CONTROLS
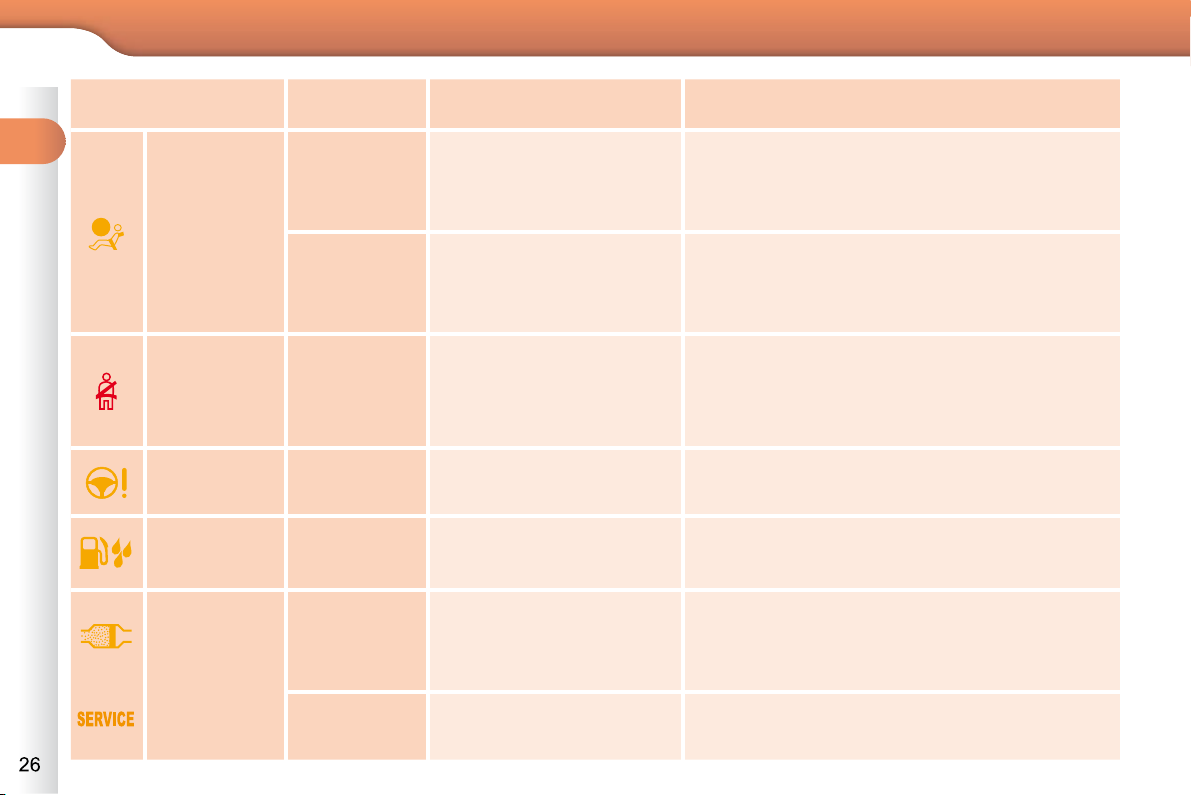
Airbags
temporarily.
This lamp comes on for
a few seconds when you
turn on the ignition, then
switches off.
This lamp should switch off when the engine is
started.
If it does not switch off, contact a CITROËN
dealer.
fi xed.
One of the airbag or seat
belt pretensioner systems
has a fault.
Have it checked by a CITROËN dealer.
Seat belt not
fastened/
unfastened
fi xed then
fl ashing
accompanied
by an
increasing
audible signal.
The driver and/or the front
passenger has not fastened
or has unfastened their seat
belt.
Pull the strap then insert the tongue in the
buckle.
Water in
Diesel
fi xed.
The diesel fi lter contains
water.
Risk of damage to the injection system on Diesel
engines.
Contact a CITROËN dealer without delay.
Power
steering
fi xed.
The power steering has a
fault.
Drive carefully at reducd speed.
Have it checked by a CITROËN dealer.
+
Particle
emissions
fi lter (Diesel)
fi xed, associated
temporarily with
lighting of the
service warning
lamp.
This indicates that the
particle emissions fi lter
is starting to become
saturated.
As soon as driving conditions allow, regenerate the
fi lter by driving at a speed of at least 35 mph
(60 km/h) until the service warning lamp switches off.
fi xed, associated
temporarily with
lighting of the service
warning lamp.
This indicates the minimum
level for the Diesel fuel
additive reservoir.
Have the reservoir topped up as soon as
possible by a CITROËN dealer.
Warning lamp is on Cause Action/Observations
Page 11
27
INSTRUMENTS and CONTROLS
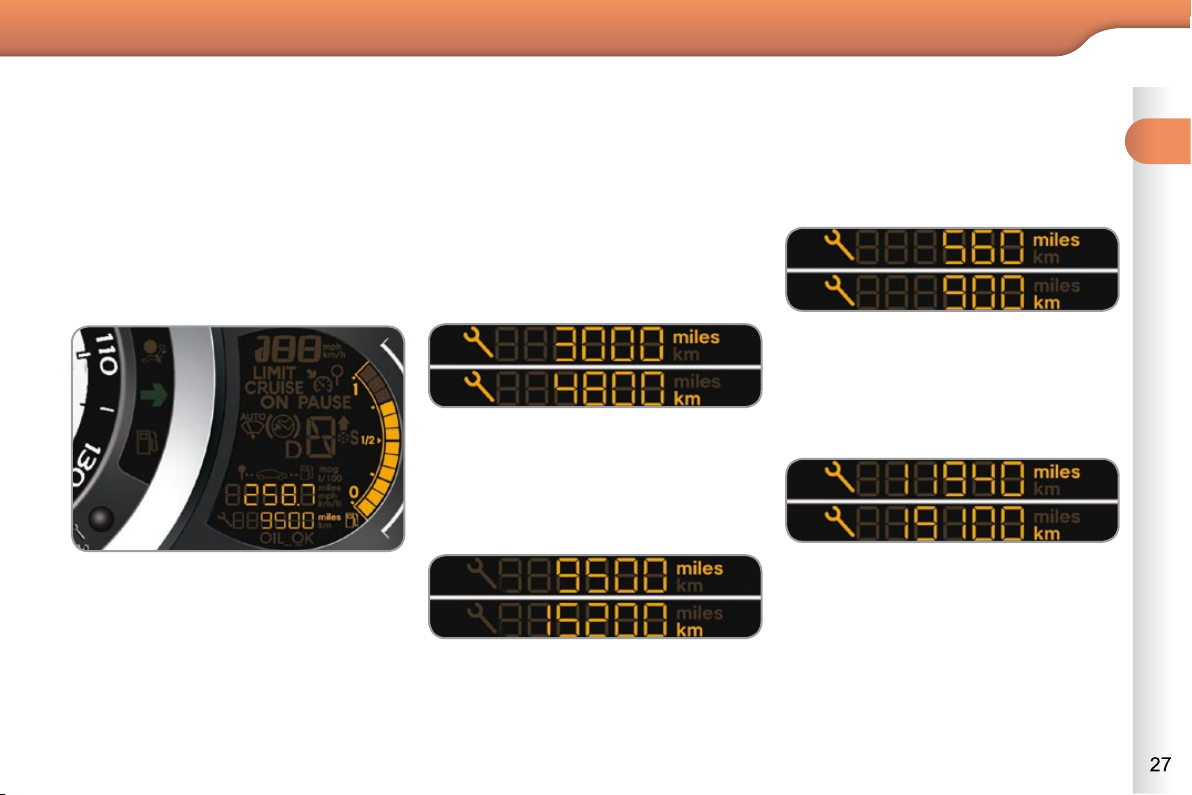
Service indicator
System which informs the driver when the
next service is due, in accordance with
the manufacturer's servicing schedule.
The point at which the service is due is
calculated from the last indicator zero reset. It is determined by two parameters:
- the distance travelled,
- the time elapsed since the last service.
More than 600 miles (1 000 km)
remain before the next service is due
For 5 seconds after the ignition is
switched on, the spanner symbolising
the service operations comes on. The
distance recorder display line indicates
the distance remaining before the next
service is due.
Example: 4 800 km remain before the
next service is due.
For 5 seconds after the ignition is
switched on, the display indicates:
Less than 600 miles (1 000 km)
remain before the next service is due
Example: 400 miles (900 km) remain
before the next service is due.
For 5 seconds after the ignition is
switched on, the display indicates:
5 seconds after the ignition is switched
on, the spanner is switched off ; the
distance recorder resumes its normal
operation. The display then indicates
the total and trip distances.
5 seconds after the ignition is switched
on, the distance recorder resumes its
normal operation. The spanner re-
mains on to indicate that a service
must be carried out soon.
Page 12
1 1
28
INSTRUMENTS and CONTROLS
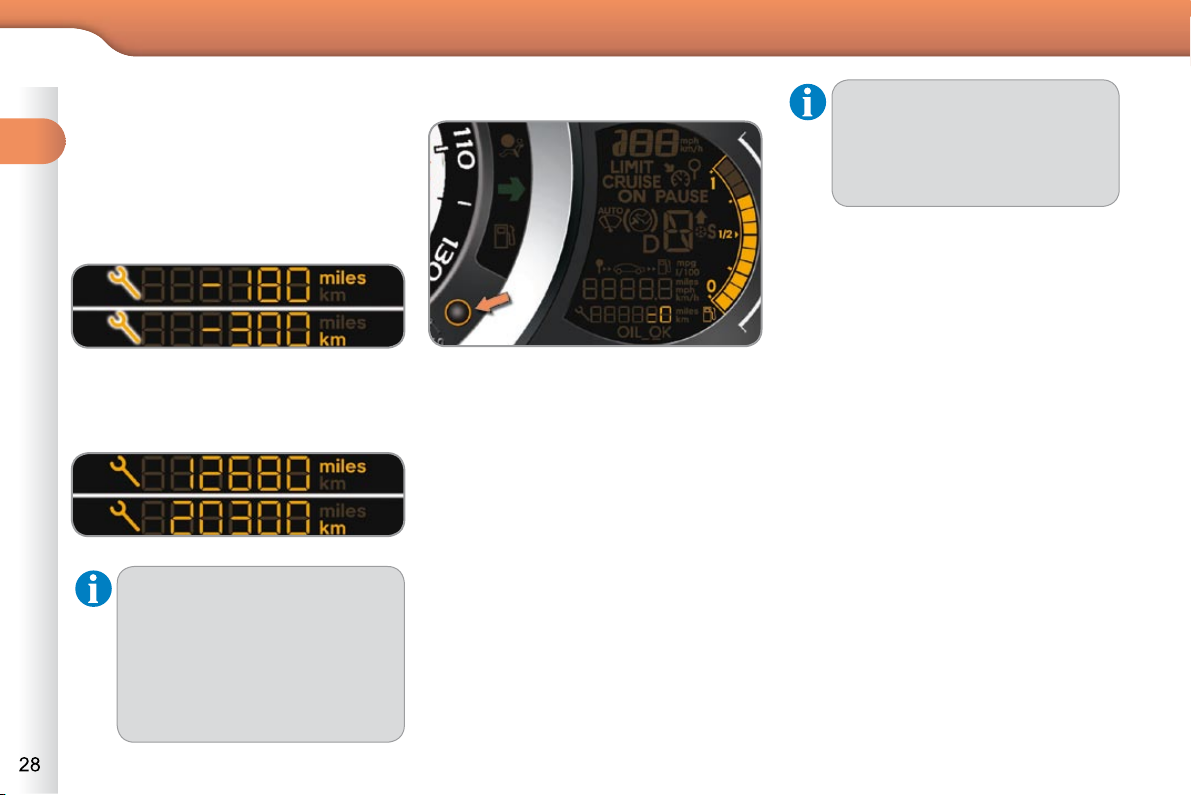
Service overdue
For 5 seconds after the ignition is
switched on, the spanner fl ashes to
indicate that the service must be carried
out as soon as possible.
Example: the service is overdue by
300 km.
For 5 seconds after the ignition is
switched on, the display indicates:
5 seconds after the ignition is switched
on, the distance recorder resumes its
normal operation. The spanner re-
mains lit .
The distance remaining may be
weighted by the time factor, depending on the driver's driving
habits.
Therefore, the spanner may also
come on if you have exceeded
the two year service interval.
Service indicator zero reset
After each service, the maintenance indicator must be reset to zero.
The procedure for resetting to zero is as
follows:
switch off the ignition,
press and hold the trip distance re-
corder zero reset button,
switch on the ignition; the distance
recorder display begins a count-
down,
when the display indicates "=0" ,
release the button; the spanner dis-
appears.
Retrieving the service information
You can access the service information
at any time.
Press the trip distance recorder zero
reset button.
The service information is displayed for
a few seconds, then disappears.
Following this operation, if you
wish to disconnect the battery,
lock the vehicle and wait at least
fi ve minutes for the zero reset to
be taken into account.
Page 13
1 1
28
INSTRUMENTS and CONTROLS
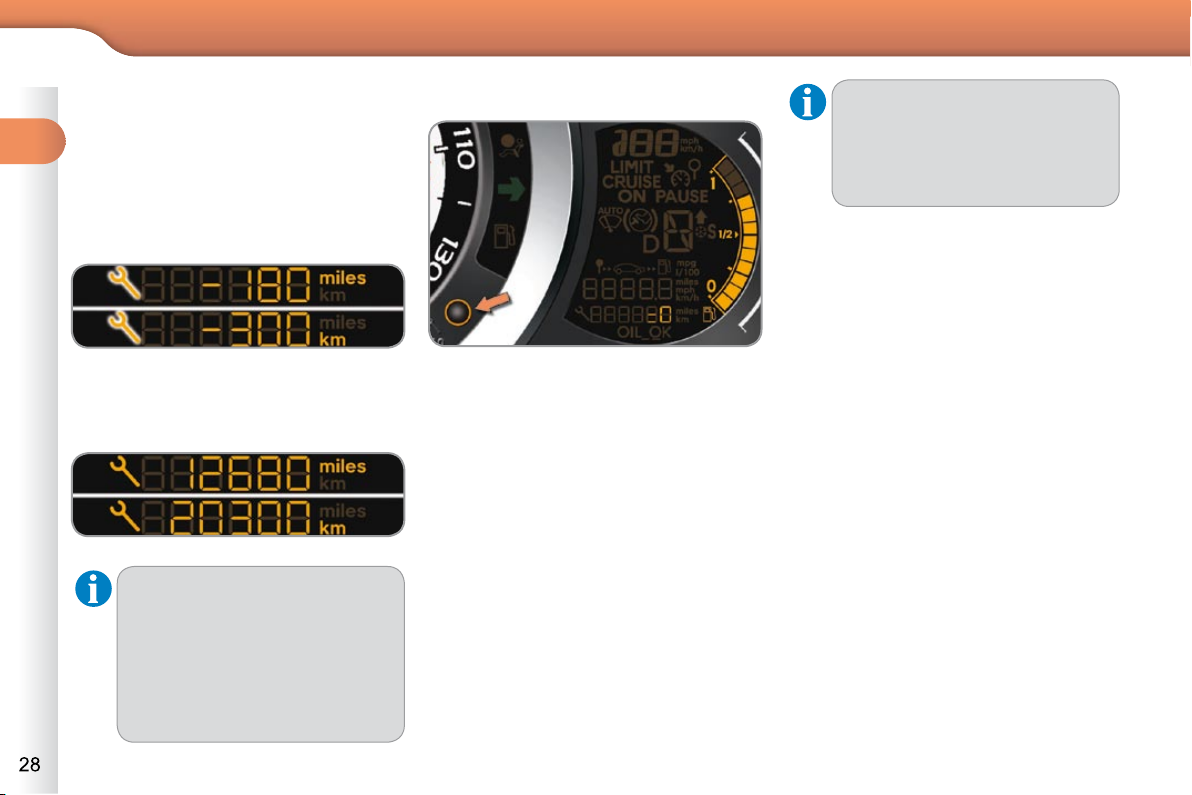
Service overdue
For 5 seconds after the ignition is
switched on, the spanner fl ashes to
indicate that the service must be carried
out as soon as possible.
Example: the service is overdue by
300 km.
For 5 seconds after the ignition is
switched on, the display indicates:
5 seconds after the ignition is switched
on, the distance recorder resumes its
normal operation. The spanner re-
mains lit .
The distance remaining may be
weighted by the time factor, depending on the driver's driving
habits.
Therefore, the spanner may also
come on if you have exceeded
the two year service interval.
Service indicator zero reset
After each service, the maintenance indicator must be reset to zero.
The procedure for resetting to zero is as
follows:
switch off the ignition,
press and hold the trip distance re-
corder zero reset button,
switch on the ignition; the distance
recorder display begins a count-
down,
when the display indicates "=0" ,
release the button; the spanner dis-
appears.
Retrieving the service information
You can access the service information
at any time.
Press the trip distance recorder zero
reset button.
The service information is displayed for
a few seconds, then disappears.
Following this operation, if you
wish to disconnect the battery,
lock the vehicle and wait at least
fi ve minutes for the zero reset to
be taken into account.
Page 14
29
INSTRUMENTS and CONTROLS
The level read will only be correct
if the vehicle is on level ground
and the engine has been off for
more than 15 minutes.
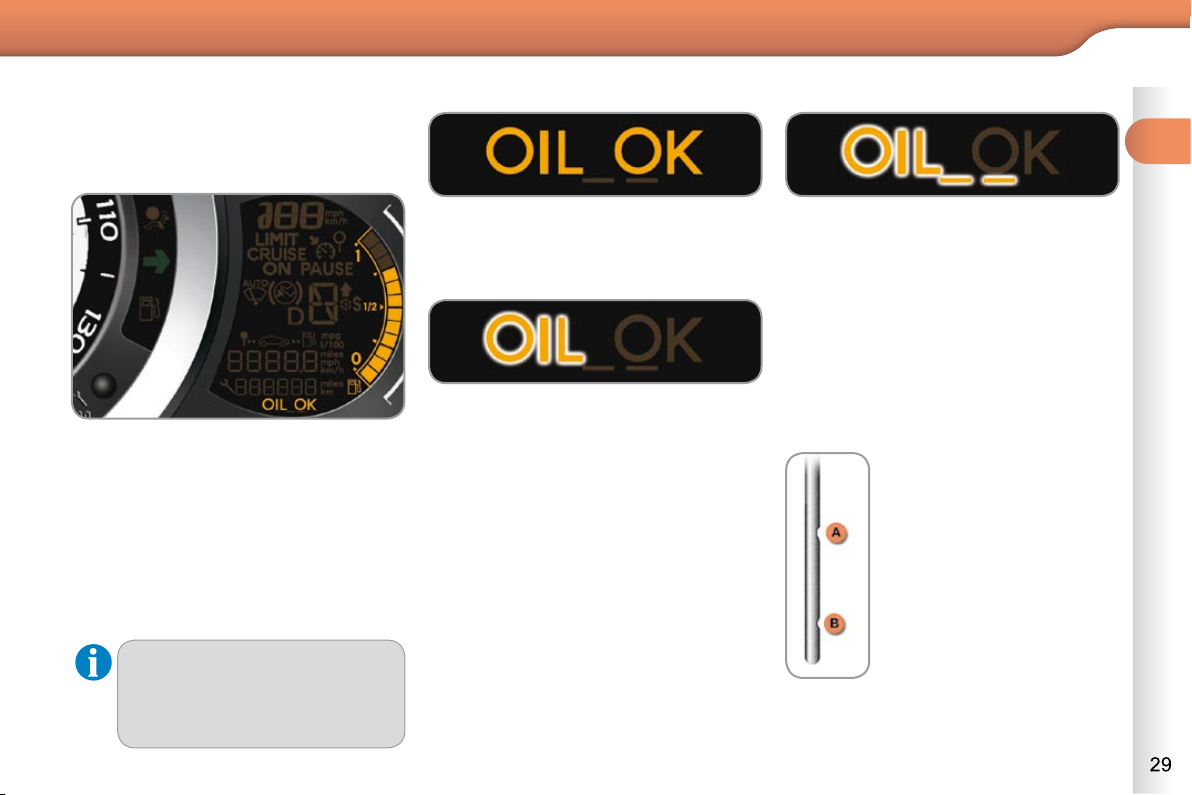
Engine oil level indicator
System which informs the driver whether
the engine oil level is correct or not.
This information is indicated for a few
seconds when the ignition is switched
on, after the service information.
Oil level correct
This is indicated by the fl ashing of
"OIL" , linked with the service warning
lamp, accompanied by an audible signal and a message on the multifunction
screen.
If the lack of oil is confi rmed by a check
using the dipstick, it is essential that the
level is topped up to prevent damage to
the engine.
Lack of oil
This is indicated by the fl ashing of
"OIL--" . Consult a CITROËN dealer.
Oil level indicator fault
Dipstick
There are 2 marks on the
dipstick:
- A = max; never exceed
this level (risk of damage to the engine),
- B = min; top up the level
via the oil fi ller cap, using
the grade of oil suited to
your engine.
Refer to the "Checks" section to locate
the dipstick and the oil fi ller cap on your
engine.
Page 15
1 1
INSTRUMENTS and CONTROLS
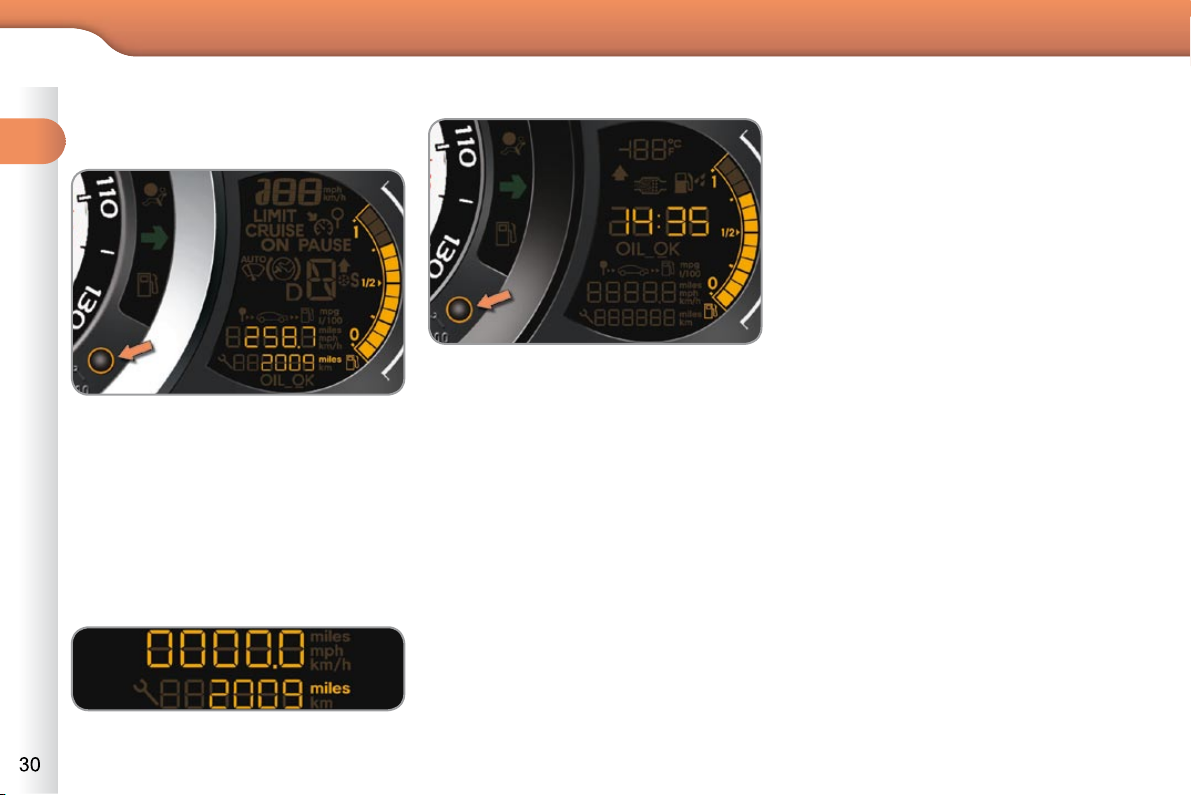
Total distance recorder
System which measures the total distance travelled by the vehicle during its
life.
The total and trip distances are displayed for thirty seconds when the ignition is switched off, when the driver's
door is opened and when the vehicle is
locked or unlocked.
With the ignition on, press the button
until zeros appear.
Trip distance recorder
System which measures a distance
travelled during a day or other period
since it was reset to zero by the driver.
Clock
Adjusting the time - Choice of units
press the button for more than
two seconds: °C or °F is displayed,
press the button to select °C or °F,
press the button for more than
two seconds to complete the adjust-
ments.
After approximately 30 seconds without
any action, the screen returns to the
normal display.
To adjust the time of the clock and
choose the units used by the screen,
use the right-hand button on the instrument panel, carrying out the operations
in the following order:
press the button for more than
two seconds: the minutes fl ash,
press the button to increase the
minutes,
press the button for more than
two seconds: the hours fl ash,
press the button to increase the
hours,
press the button for more than
two seconds: 24 H or 12 H is displayed,
press the button to select 24 H or
12 H,
Page 16
INSTRUMENTS and CONTROLS
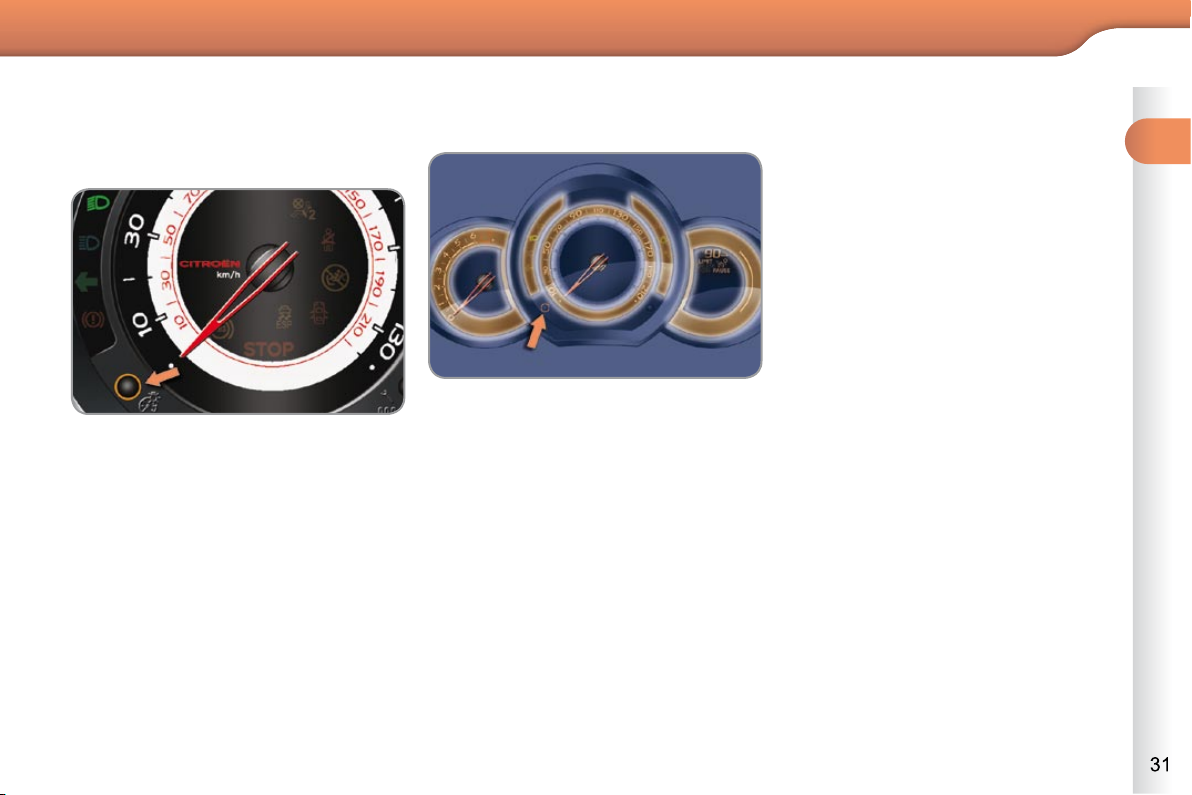
The instrument panel remains lit with
the vehicle speed and cruise control or
speed limiter information, if in use.
If there is an alert or a change in a function or to a setting, the black panel mode
is interrupted.
Activation
With the lighting on, press the left
hand button of the instrument panel
several times to progressively reduce the dashboard lighting level.
Press the button again to reduce the
lighting to the minimum level and
switch off the ambience lighting.
Press the button again to activate
the black panel.
The dashboard lighting rheostat remains operational when in black panel
mode.
Black panel
System allowing certain displays to be
switched off for night driving.
Activation
When the lighting is on:
press the button to change the
brightness of the instruments and
controls,
when the level of brightness required
is reached, release the button.
Deactivation
When the lighting is off, or in day mode
on vehicles fi tted with daytime running
lamps, pressing the button does not
have any effect.
Lighting rheostat
System for manual adjustment of the
brightness of the instruments and controls in relation to the exterior brightness.
Page 17
1 1
INSTRUMENTS and CONTROLS
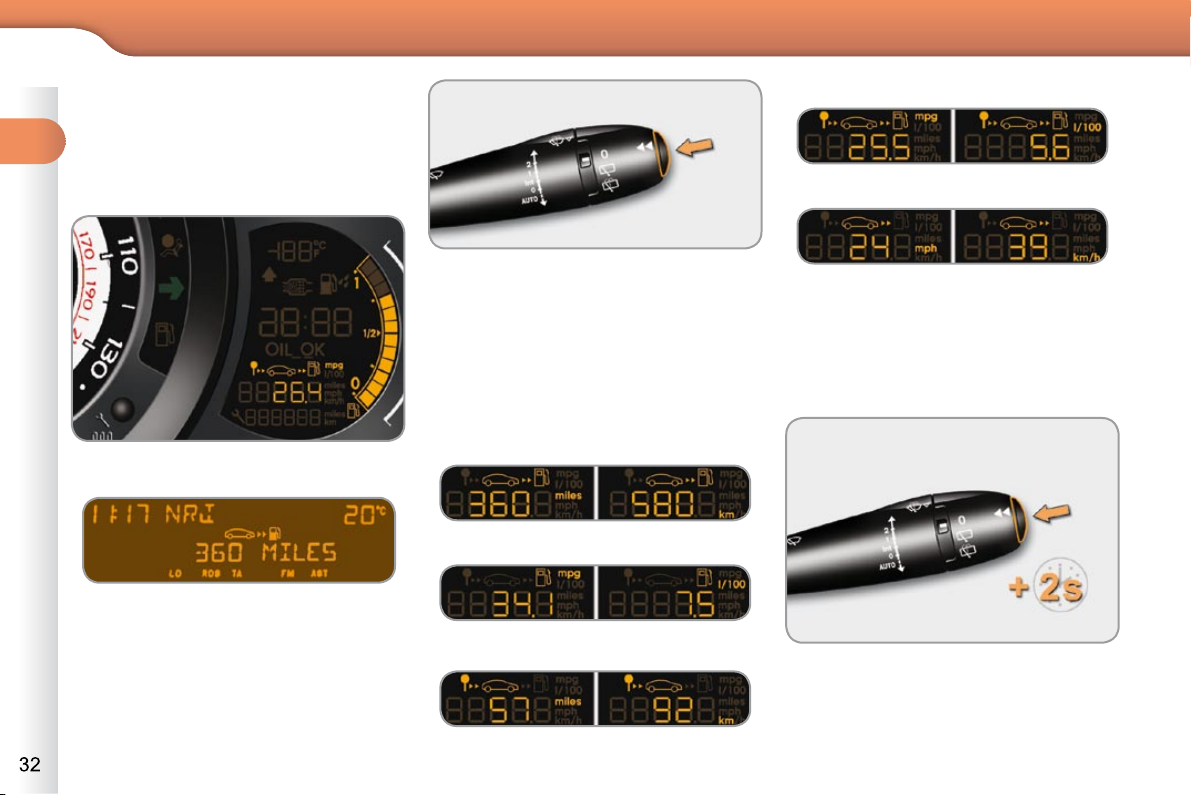
TRIP COMPUTER
System which provides current information concerning the route travelled
(range, consumption...).
Screen in instrument panel
Monochrome screen A
Zero reset
Data displays
Press the button, located at the end
of the wiper stalk , to display the
various items of trip computer data
in succession.
Press the control for more than
two seconds to reset to zero the
distance travelled, the average
fuel consumption and the average
speed.
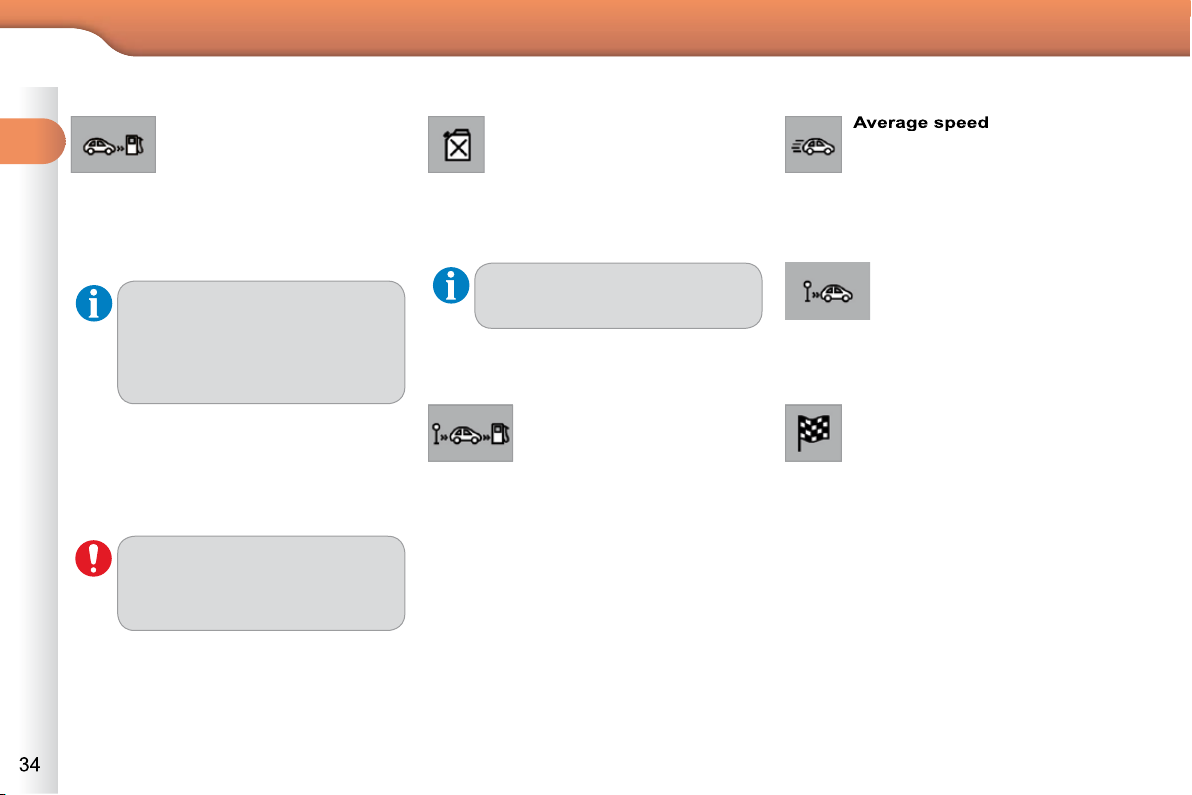
The trip computer provides the following
information:
- range,
- current fuel consumption,
- distance travelled,
- average fuel consumption,
- average speed.
The next press then returns you to
the normal display.
Page 18
1 1
INSTRUMENTS and CONTROLS
A few definitions…
Range
(miles or km)
This indicates the distance which can
still be travelled with the fuel remaining in the tank in relation to the average
consumption over the last few miles
(kilometres) travelled.
Current fuel consumption
(mpg or l/100 km or km/l)
This is the average fuel consump-
tion during the last few seconds.
Average fuel consumption
(mpg or l/100 km or km/l)
This is the average fuel consumption since the last trip computer
zero reset.
Average speed
(mph or km/h)
This is the average speed calculated since the last trip computer zero
reset (ignition on).
Distance travelled
(miles or km)
This indicates the distance
travelled since the last trip computer
zero reset.
This fi gure may vary following a
change in the style of driving or
the relief, resulting in a signifi -
cant change in the current consumption.
If dashes are displayed continuously while driving in place of
the digits, contact a CITROËN
dealer.
This function is only displayed
from 20 mph (30 km/h).
When the range falls below 20 miles
(30 km), dashes are displayed. After
fi lling with at least 5 litres of fuel, the
range is recalculated and is displayed
when it exceeds 60 miles (100 km).
Distance remaining to
destination
(miles or km)
This is the distance remaining to be
travelled to the fi nal destination. It can
be entered by the user.
If the distance is not entered, dashes
are displayed in place of the digits.
Page 19
INSTRUMENTS and CONTROLS
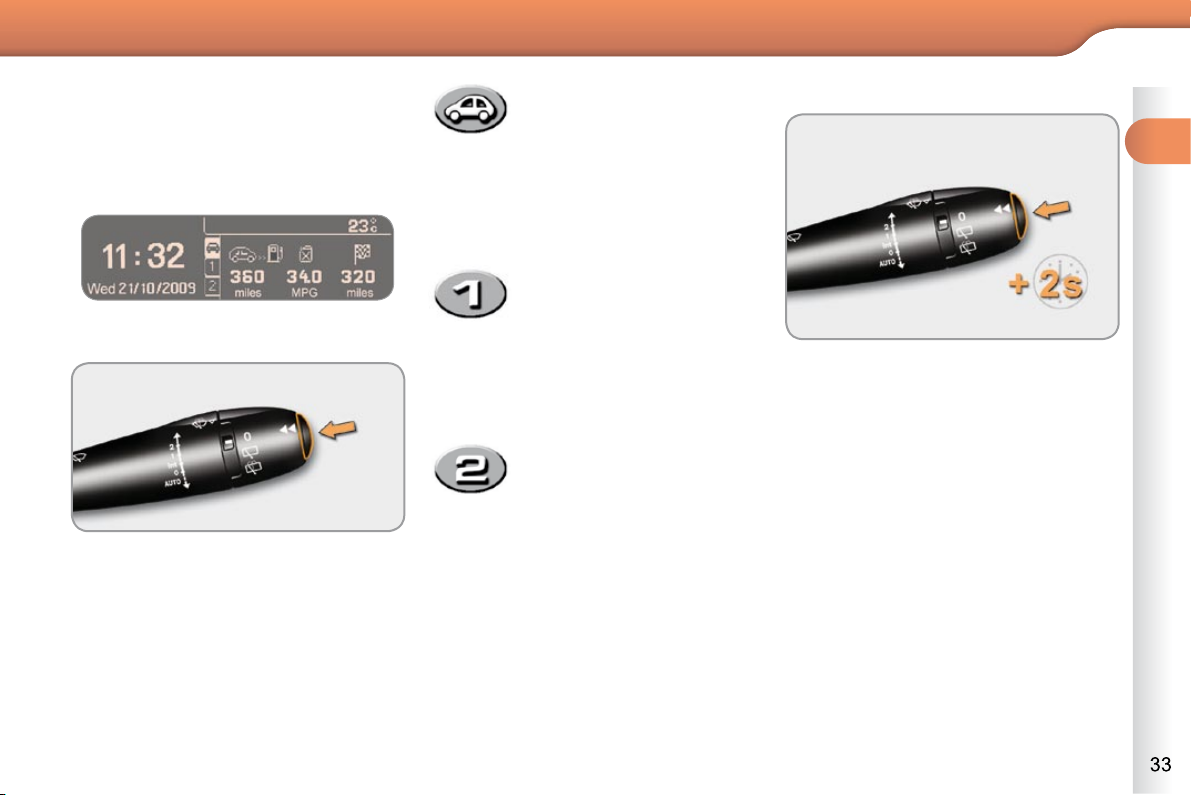
TRIP COMPUTER
System which provides current information concerning the route travelled
(range, consumption…).
Monochrome screen C
Data displays
Route zero reset
Press the button, located at the end
of the wiper stalk , to display the
various trip computer tabs in succession:
When the route required is dis-
played, press the control for more
than two seconds.
Trips "1" and "2" are independent but
their use is identical.
Trip "1" permits, for example, daily calcu-
lations, and trip "2" monthly calculations.
- the current information
tab with:
● the range,
● the current fuel
consumption,
● the distance remaining
to be travelled,
- the trip "1" tab with:
● the distance travelled,
● the average fuel
consumption,
● the average speed, for
the fi rst route.
- the trip "2" tab with:
● the distance travelled,
● the average fuel
consumption,
● the average speed, for
the second route.
Pressing the button again returns
you to the normal display.
Page 20
1 1
INSTRUMENTS and CONTROLS
A few definitions…
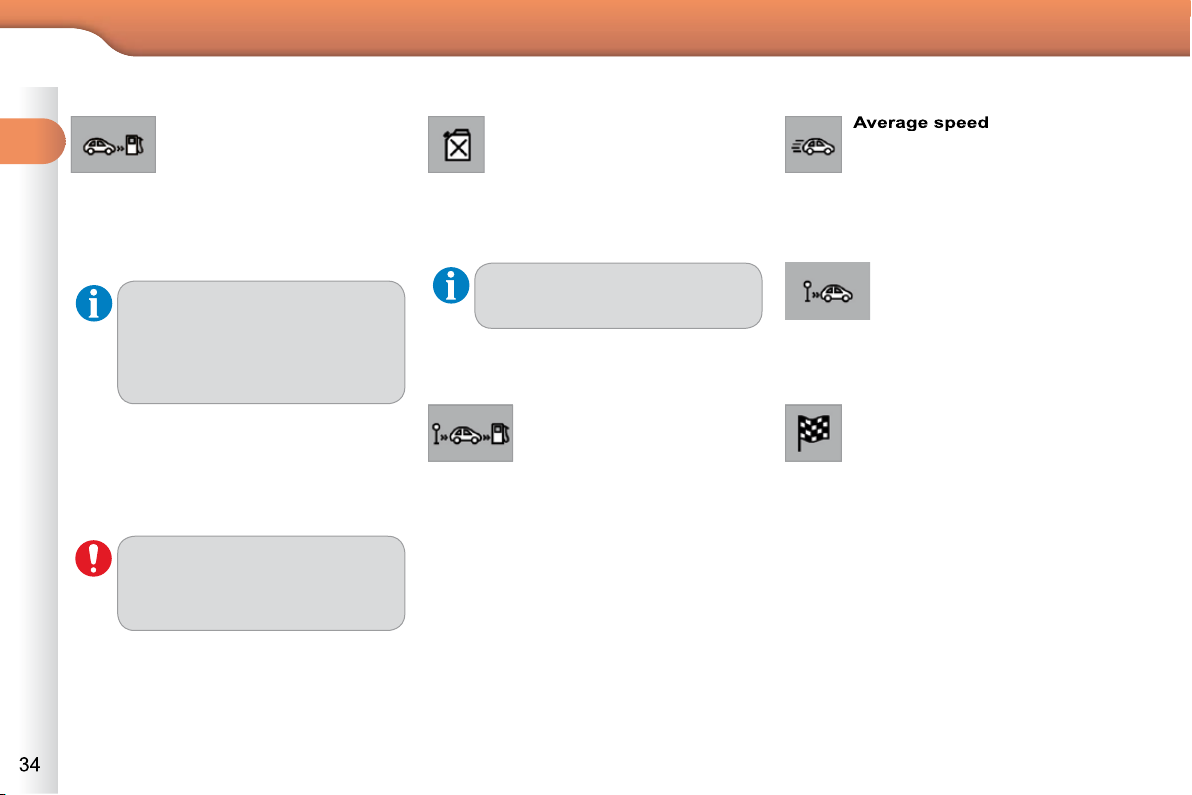
Range
(miles or km)
This indicates the distance which can
still be travelled with the fuel remaining in the tank in relation to the average
consumption over the last few miles
(kilometres) travelled.
Current fuel consumption
(mpg or l/100 km or km/l)
This is the average fuel consump-
tion during the last few seconds.
Average fuel consumption
(mpg or l/100 km or km/l)
This is the average fuel consumption since the last trip computer
zero reset.
Average speed
(mph or km/h)
This is the average speed calculated since the last trip computer zero
reset (ignition on).
Distance travelled
(miles or km)
This indicates the distance
travelled since the last trip computer
zero reset.
This fi gure may vary following a
change in the style of driving or
the relief, resulting in a signifi -
cant change in the current consumption.
If dashes are displayed continuously while driving in place of
the digits, contact a CITROËN
dealer.
This function is only displayed
from 20 mph (30 km/h).
When the range falls below 20 miles
(30 km), dashes are displayed. After
fi lling with at least 5 litres of fuel, the
range is recalculated and is displayed
when it exceeds 60 miles (100 km).
Distance remaining to
destination
(miles or km)
This is the distance remaining to be
travelled to the fi nal destination. It can
be entered by the user.
If the distance is not entered, dashes
are displayed in place of the digits.
Page 21
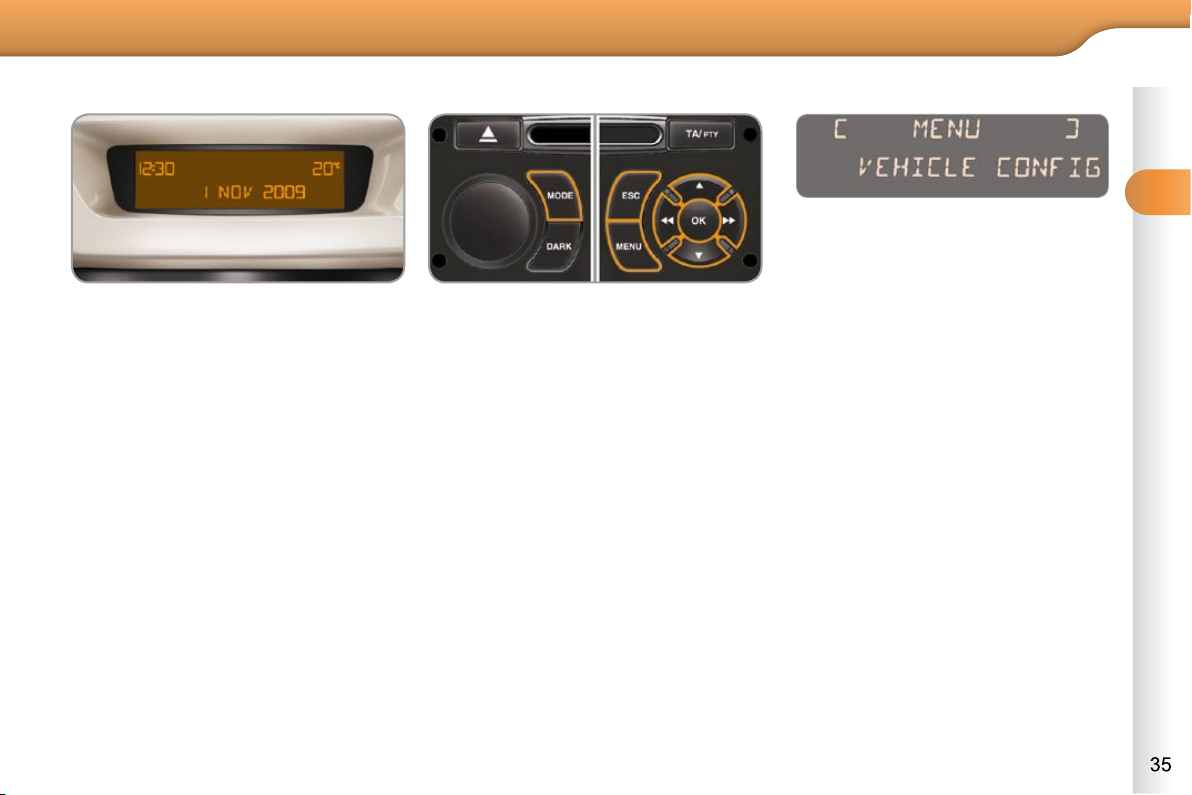
MULTIFUNCTION SCREENS
Displays on the screen
This displays the following information:
- time,
- date,
- ambient temperature (this fl ashes if
there is a risk of ice),
- status of the doors and boot,
- audio sources (radio, CD...),
- trip computer (refer to the "Instruments
and Controls" section).
Warning messages (e.g.: "Emission
control system faulty") or information
messages (e.g.: "Boot open") may appear temporarily. These can be cleared
by pressing the "ESC" button.
Controls
From the control panel of your Audio
system, you can:
press the "MENU" button to gain
access to the general menu ,
press the " " or " " buttons to scroll
through the items on the screen,
press the "MODE" button to change
the permanent application (date, audio
source...),
press the " " or " " buttons to
change a setting value,
press the "OK" button to confi rm,
or
press the "ESC" button to abandon
the operation in progress.
General menu
Press the "MENU" button to gain
access to the general menu , then
press the " " or " " buttons to
scroll through the various menus:
- radio-CD,
- vehicle confi guration,
- options,
- display settings,
- languages,
- units.
Press the "OK" button to select the
menu required.
Radio-CD
With the Audio system switched on, once
the "Radio-CD" menu has been selected
you can activate or deactivate the functions linked with use of the radio (RDS,
REG), or the CD (introscan, shuffl e, CD
repeat).
For further details concerning the
"Radio-CD" application, refer to the
Audio system part of the "Audio and
Telematics" section.
Page 22
2 2
MULTIFUNCTION SCREENS
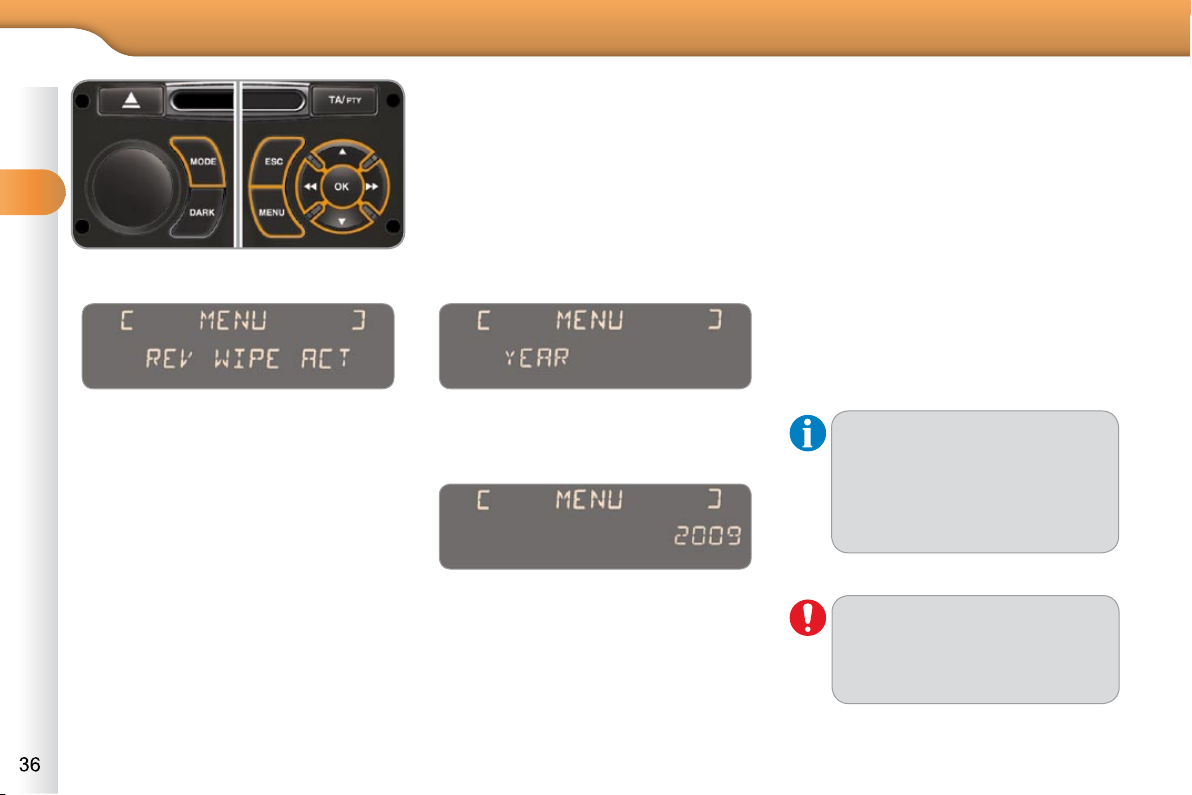
Vehicle configuration
Once the "Vehicle Confi guration" menu
has been selected, you can activate or
deactivate the following equipment:
- wiper linked with reverse gear (refer
to the "Visibility" section),
- "guide-me-home" lighting (refer to
the "Visibility" section),
- parking assistance (refer to the
"Driving" section).
Options
Once the "Options" menu has been selected, you can start diagnostics of the
status of the equipment (active, not active,
faulty).
Display settings
Once the "Display settings" menu has
been selected, you can gain access to
the following settings:
- year,
- month,
- day,
- hour,
- minutes,
- 12 or 24 hour mode.
Once you have selected a setting,
press the " " or " " buttons to
change its value.
Press the " " or " " buttons to
switch respectively to the previous
or next setting.
Press the "OK" button to save the
change and return to the normal
display or press the "ESC" button
to cancel.
Languages
Once the "Languages" menu has been
selected, you can change the language
used by the display (Français, Italiano,
Nederlands, Portugues, PortuguesBrasil, Deutsch, English, Espanol).
Units
Once the "Units" menu has been selected, you can change the units of the
following parameters:
- temperature (°C or °F),
- fuel consumption (l/100 km, mpg or
km/l).
Once the fuel consumption units
have been set to mpg, the information in the instrument panel
screen on speed and distance
will also be in mph and miles.
For safety reasons, confi guration
by the driver of the multifunction
screen must only be done when
stationary.
Page 23
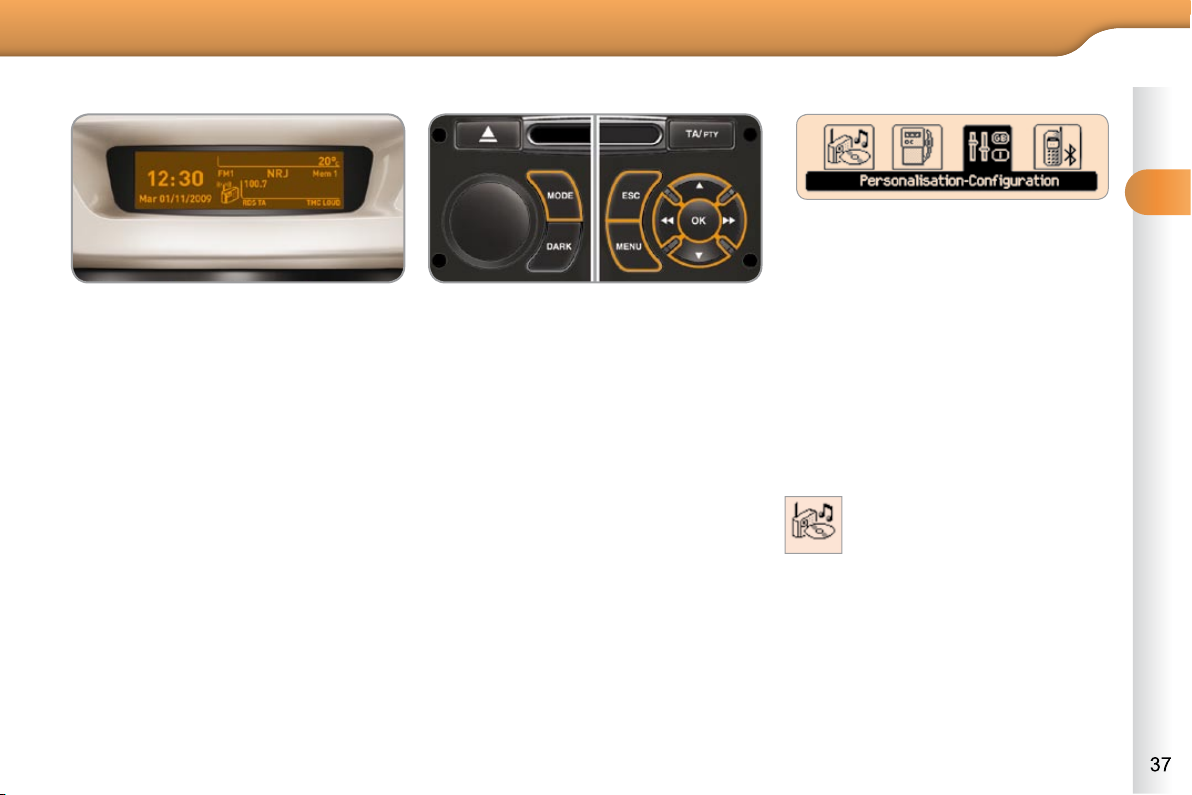
MULTIFUNCTION SCREENS
Displays on the screen
This displays the following information:
- time,
- date,
- ambient temperature (this fl ashes if
there is a risk of ice),
- status of doors and boot,
- audio sources (radio, CD, USB port,
jack socket etc.),
- trip computer (refer to the "Instruments
and controls" section).
Warning messages (E.g. "Emisions
control system faulty") or information
messages (E.g.: Automatic headlamps
active") may appear temporarily. These
can be cleared by pressing the "ESC"
button.
Controls
From your Audio system control panel,
you can:
press the "MENU" button to gain
access to the general menu ,
press the " " or " " buttons to scroll
through the items on the screen,
press the "MODE" button to change
the permanent application (trip
computer, audio source...),
press the " " or " " buttons to
change a setting value,
press the "OK" button to confi rm,
or
press the "ESC" button to abandon
the operation in progress.
General menu
Press the "MENU" button to gain
access to the general menu :
- audio functions,
- the trip computer,
- personalisation-confi guration,
- telephone (hands-free kit).
Press the " " or " " buttons to se-
lect the menu required, then confi rm
by pressing the "OK" button.
"Audio functions" menu
With the Audio system switched on,
once this menu has been selected you
can activate or deactivate the functions
linked with use of the radio (RDS, REG,
RadioText), the CD (introscan, shuffl e,
CD repeat) or the MP3 player (USB
port/jack socket).
For further details on the "Audio functions" application, refer to the Audio system part of the "Audio and Telematics"
section.
Page 24
2 2
MULTIFUNCTION SCREENS
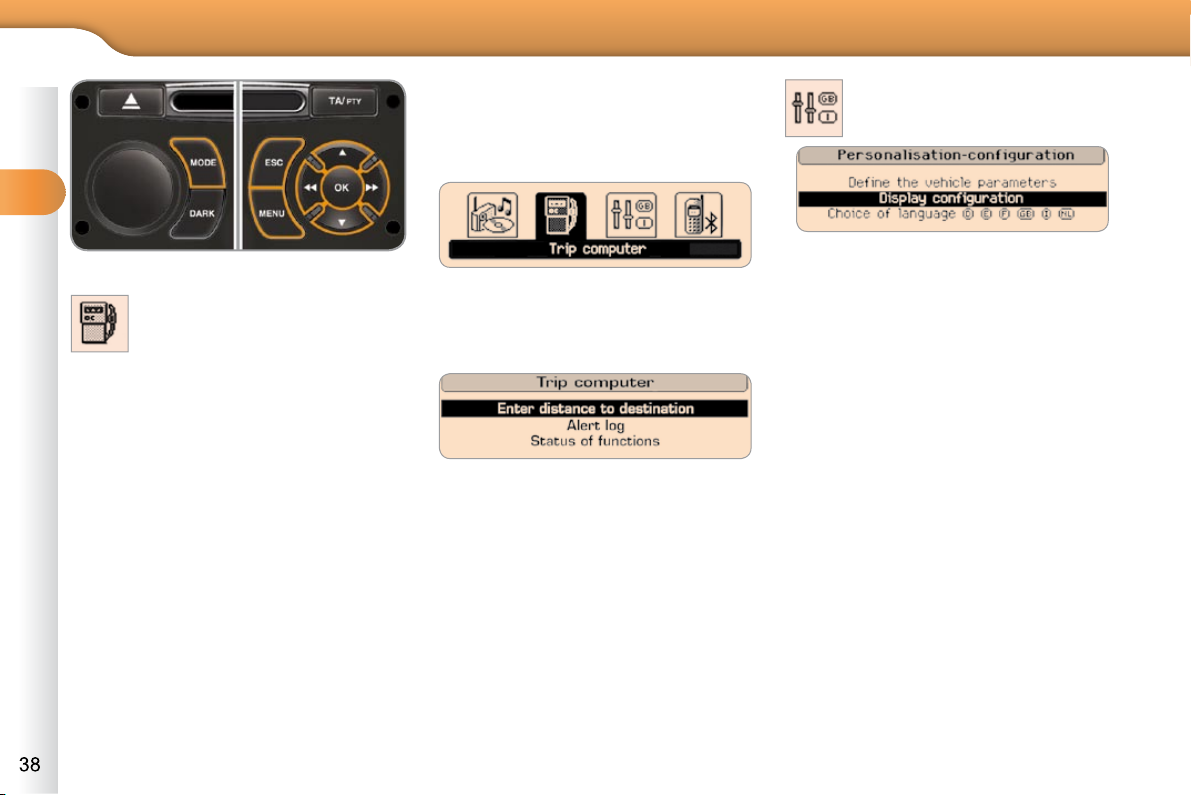
"Trip computer" menu
Once this menu has been selected, you
can consult information concerning the
status of the vehicle (warnings log, sta
tus
of functions, etc.)
Alert log
This summarises the active warning
messages, displaying them in succession on the multifunction screen.
"PersonalisationConfiguration" menu
Define the vehicle parameters
Once this menu has been selected, you
can activate or deactivate the following
equipment:
- wiper linked to reverse gear (refer to
the "Visibility" section),
- "guide-me-home" lighting ,
- parking assistance (refer to the
"Driving" section).
In the " Trip computer " menu, select
one of the following applications:
Press the "MENU" button to gain
access to the general menu .
Press the arrows, then the "OK"
button to select the " Trip computer "
menu.
Once this menu has been selected, you
can gain access to the following functions:
- defi ne the vehicle parameters,
- display confi guration,
- selection of the language.
Status of functions
This summarises the status (active or
inactive) of the vehicle's functions.
Enter distance to destination
This allows you to enter an approximate
distance until your fi nal destination.
Page 25
MULTIFUNCTION SCREENS
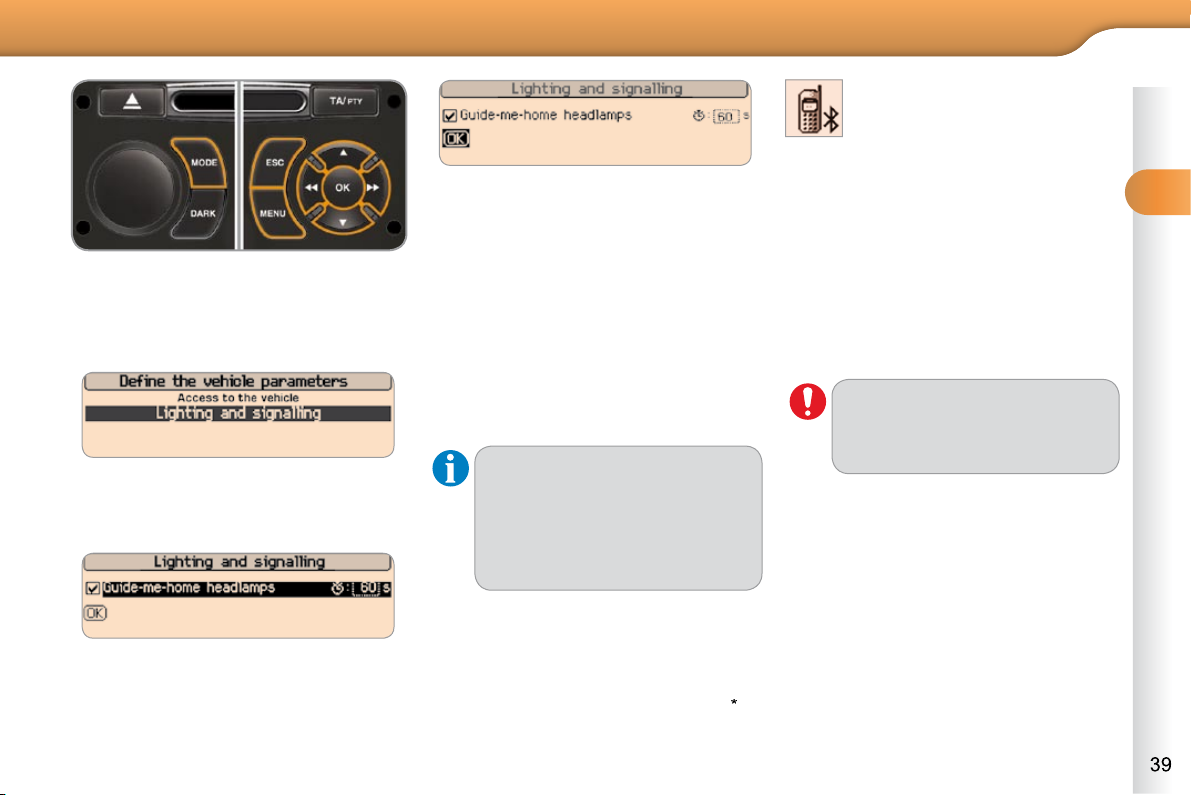
Example: setting of the duration of the
"guide-me-home" lighting
Press the " " or " " buttons, then
the "OK" button to select the menu
required.
Press the " " or " " buttons,
then the "OK" button to select the
"Guide-me-home lighting" line.
Press the " " or " " buttons to
set the value required (15, 30 or
60 seconds), then press the "OK"
button to confi rm.
Press the " " or " " buttons, then
the "OK" button to select the "OK"
box and confi rm or press the "ESC"
button to cancel.
Language selection
Once this menu has been selected,
you can change the language used
by the display (Deutsch, English,
Espanol, Français, Italiano, Nederlands,
Portugues, Portugues-Brasil, Türkçe
).
"Telephone" Menu
For safety reasons, confi guration
by the driver of the multifunction
screen must only be done when
stationary.
Display configuration
Once this menu has been selected, you
can gain access to the following settings:
- brightness-video setting,
- date and time setting,
- selection of units.
Once the fuel consumption units
have been changed to mpg, the
information in the screen relating to speed and distance also
changes to mph and miles respectively.
With Audio system on, once this menu
is selected you can confi gure your
Bluetooth hands-free kit (pairing), view
the various telephone directories (list
of calls, services...) and manage your
calls (call, hang up, second call, secret
mode...).
For more details on the "Telephone"
function, refer to the Audio system part
of the "Audio and telematics" section.
* According to country of destination.
Page 26
4
FAMILIARISATION
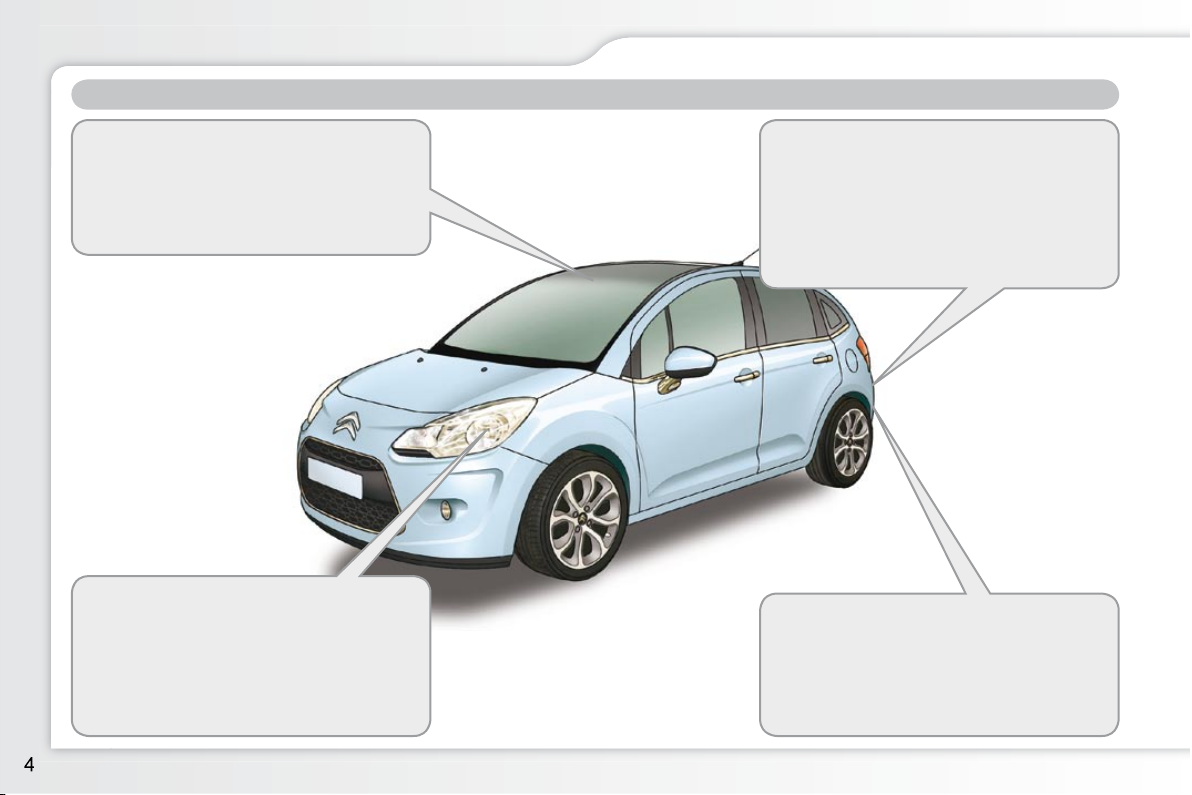
Rear parking assistance
This equipment provides a warning when
reversing by detecting obstacles located
behind the vehicle.
108
Guide-me-home lighting
After switching off the ignition, under
low lighting conditions the headlamps
remain on for a few seconds to help you
leave the vehicle.
69
Temporary puncture repair kit
This kit is a complete system consisting
of a compressor and integral sealant
product, to allow the temporary repair
of a tyre.
117
Zenith windscreen
This large windscreen provides incomparable visibility and light in the passenger
compartment.
6
EXTERIOR FEATURES
Page 27
FAMILIARISATION
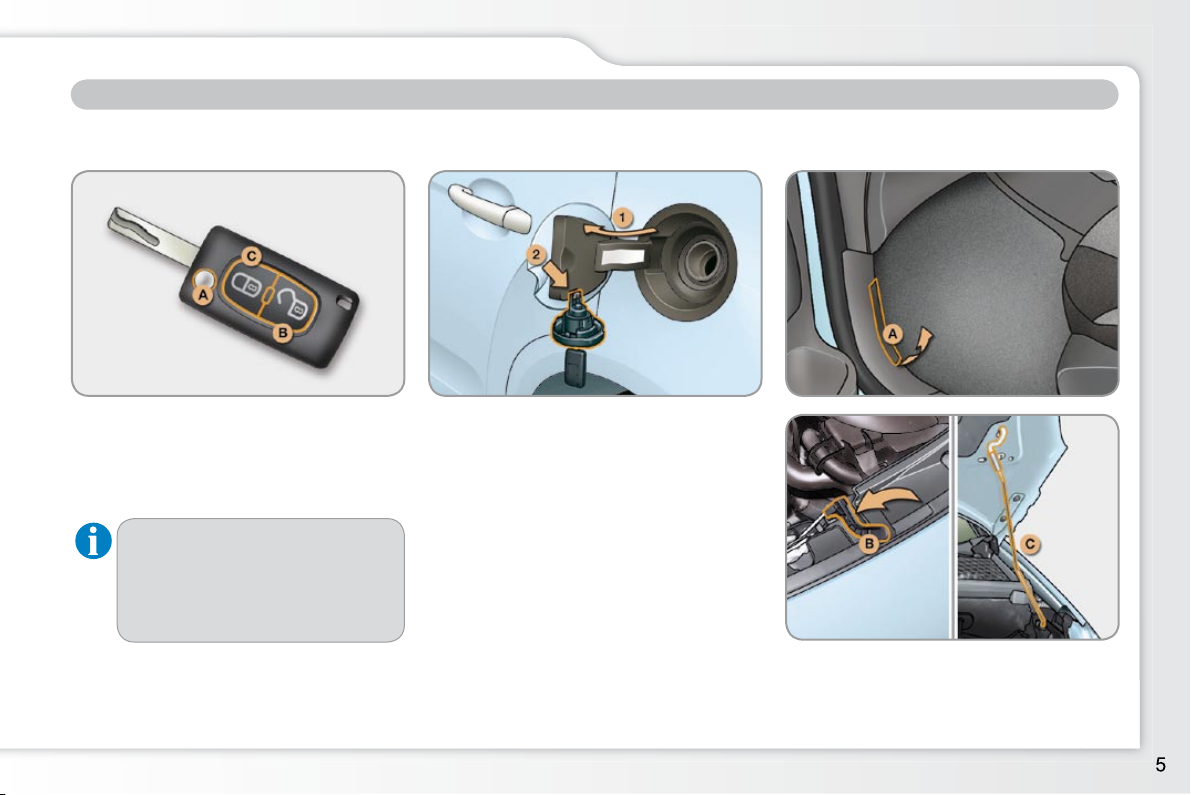
Remote control key Fuel tank
1. Opening the fuel fi ller fl ap.
2. Opening and hooking the fuel fi ller
cap.
A. Unfolding/Folding the key.
B. Unlocking the vehicle.
55
66
A. Interior control.
B. Exterior control.
C. Bonnet strut.
111
Bonnet
OPEN
Other functions...
C. Normal locking of the vehicle
or
Deadlocking of the vehicle.
Vehicle location.
Tank capacity:
- approximately 50 litres (petrol),
- approximately 45 litres (Diesel).
Page 28
6
FAMILIARISATION
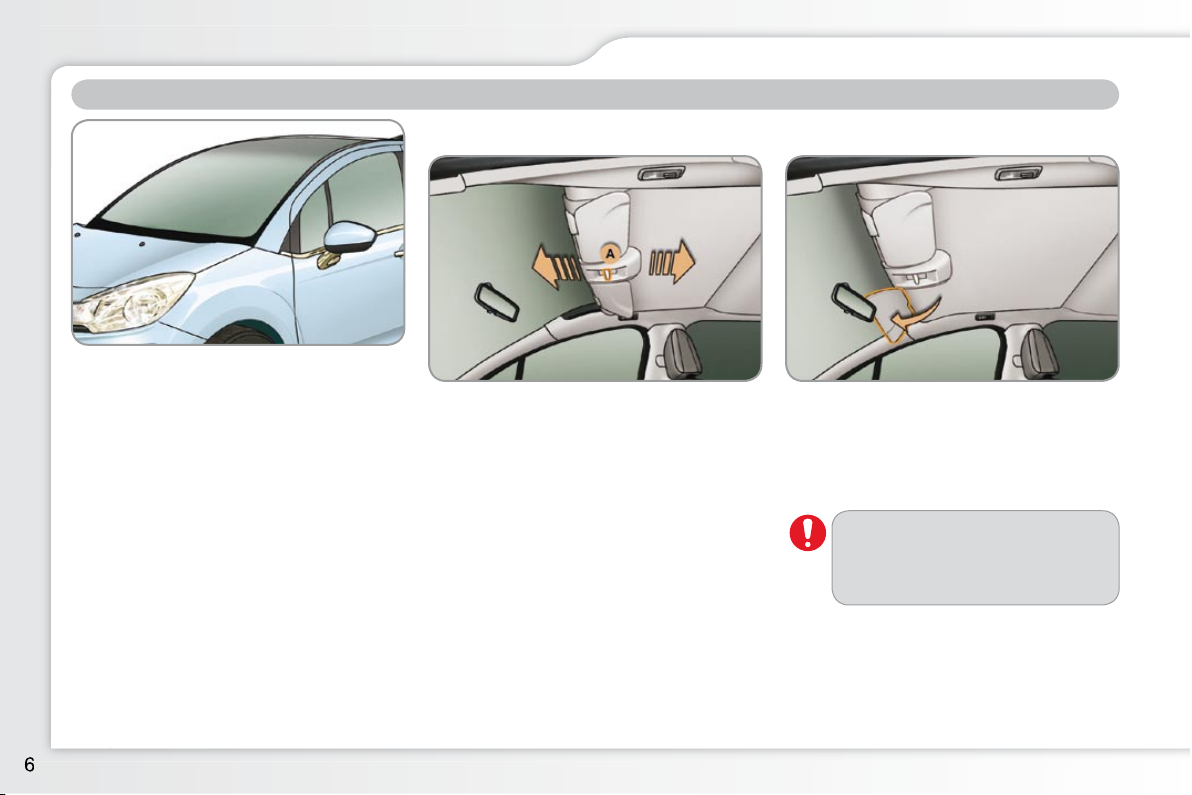
ZENITH WINDSCREEN
System comprising a panoramic tinted
glass area to increase lighting and vision in the cabin.
Fitted with a manual blind to improve
thermal comfort and sun visors to avoid
dazzle.
To open the blind, take it by its cen-
tral grip A , then pull it backward to
the desired position.
To close the blind, take it by its cen-
tral grip A , then pull it forwards to
the desired position.
lower the sun visors to avoid dazzle.
Do not attach or hang heavy
objects to the blind or its guide
rails.
Blind Sun visors
Before moving the blind, the sun visors
must be in the folded position.
Page 29
FAMILIARISATION
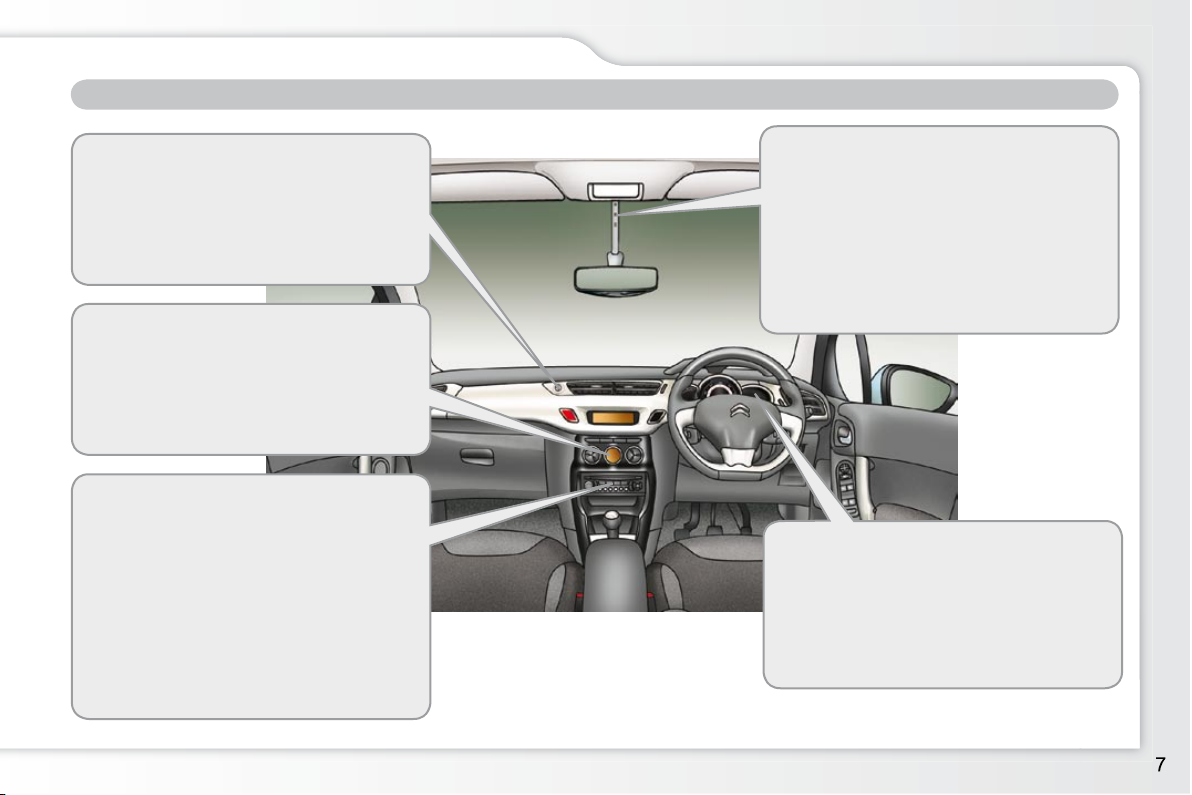
INTERIOR FEATURES
Ambiance lighting
This subdued passenger compartment
lighting improves visibilty inside the vehicle in low lighting conditions. It comprises 4 lamps, located in the automatic
day/night mirror support, in the footwells
and in the lower dashboard storage
compartment.
75
Gear change indicator
Associated with the manual gearbox,
this system suggests when to change
up to obtain optimum fuel consumption.
100
Scented air freshener
The scented air freshener diffuses the
selected fragrance throughout the passenger compartment from its location in
the ventilation system.
49
Automatic air conditioning
After setting the desired level of comfort, the system then automatically controls this level according to the exterior
climatic conditions.
47
Audio and communication
systems
This equipment benefi ts from the latest
technology: MP3 compatible Audio system, USB port, Bluetooth hands-free kit,
MyWay with 16/9 colour screen, auxilliary
inputs, Hi-Fi audio system.
MyWay
153
Audio system
179
Page 30
8
FAMILIARISATION
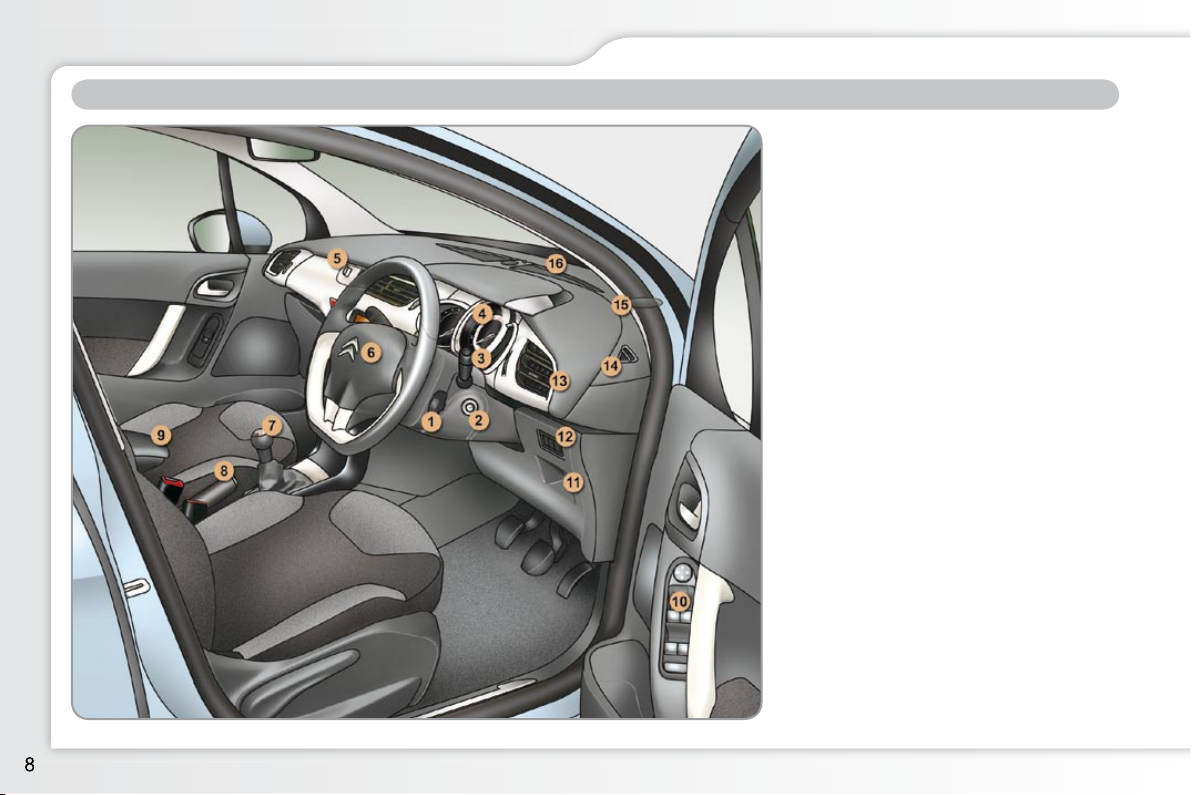
INSTRUMENTS AND CONTROLS
1. Audio equipment steering wheel
controls.
2. Steering lock and ignition.
3. Wipers/wash-wipe/trip computer
controls.
4. Instrument panel.
5. Scented air freshener.
6. Driver’s airbag.
Horn.
7. Gear lever.
8. Parking brake.
9. Central armrest with storage.
10. Exterior mirror controls.
Electric window controls.
Rear doors and electric windows
deactivation control.
11. Storage compartment.
12. Electric child lock button or
Alarm button.
Electronic stability programme
button (ESP/ASR).
13. Side adjustable air vent.
14. Front door window demisting/
defrosting vent.
15. Speaker (tweeter).
16. Windscreen demisting/defrosting
vent.
Page 31
FAMILIARISATION
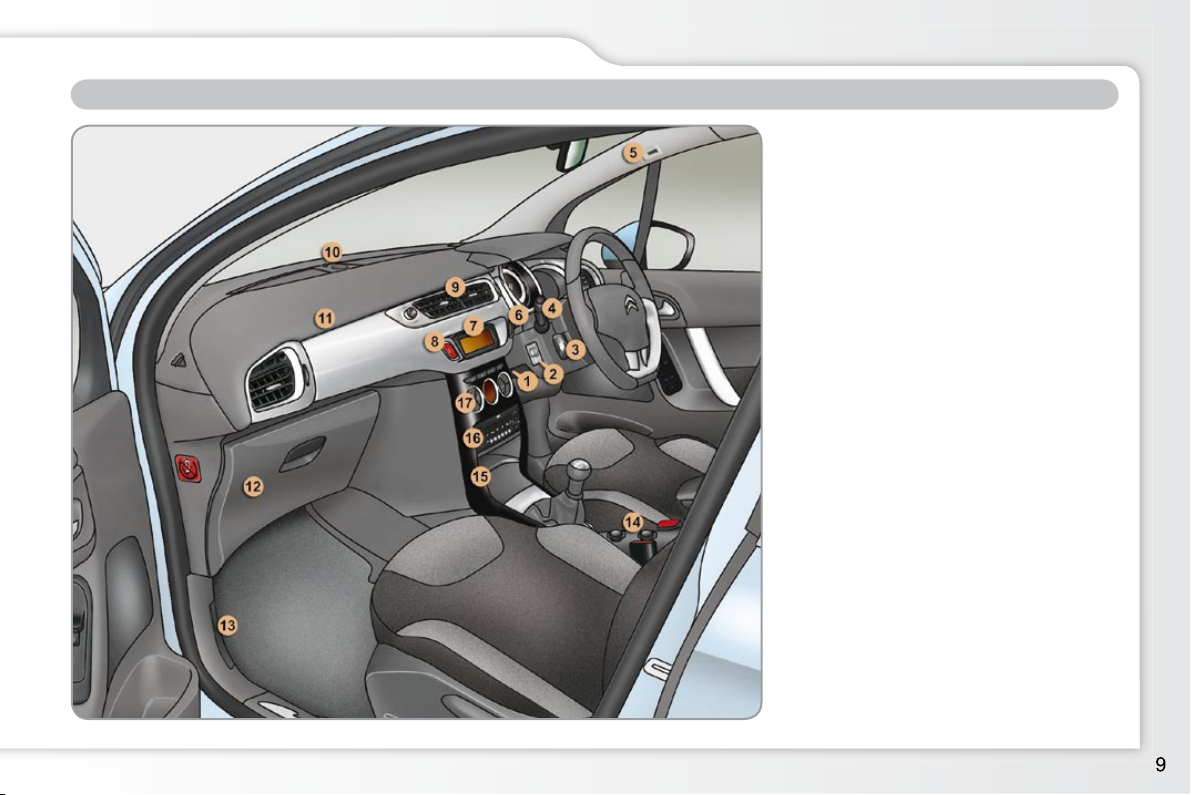
INSTRUMENTS AND CONTROLS
1. Steering wheel adjustment control.
2. Headlamp height adjustment.
3. Cruise control/speed limiter switch.
4. Lighting and direction indicators
control.
5. Microphone.
6. Central locking button.
7. Multifunction screen.
8. Hazard warning lamps switch.
9. Central adjustable air vents.
10. Sunshine sensor
HiFi audio system central speaker.
11. Passenger airbag.
12. Glove box/Passenger airbag
deactivation/Fusebox.
13. Bonnet release control.
14. 12 V accessory socket
USB port/Jack socket.
15. Upper and lower storage.
16. MyWay or Audio system.
17. Heating/air conditioning controls.
Page 32
FAMILIARISATION
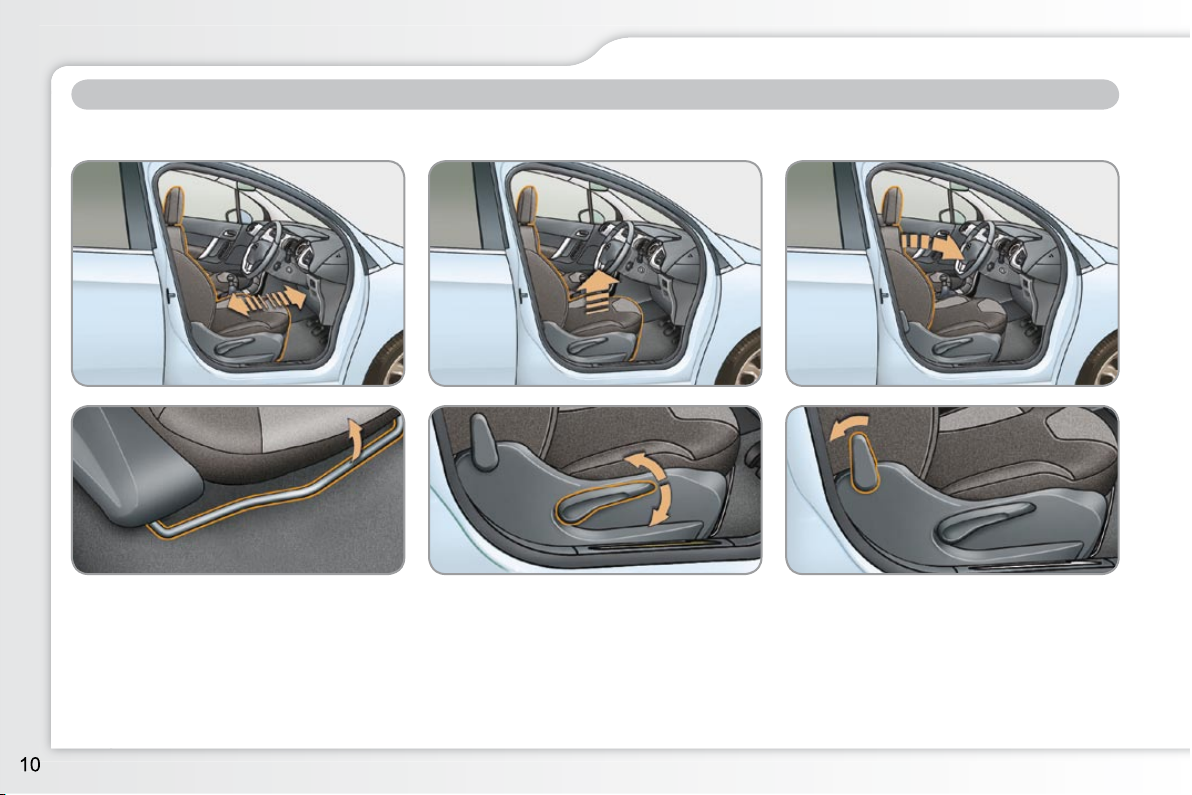
Front seats
SITTING COMFORTABLY
1. Forwards-backwards adjustment. 2. Height adjustment. 3. Seat back angle adjustment.
50
Page 33
FAMILIARISATION
Other adjustments
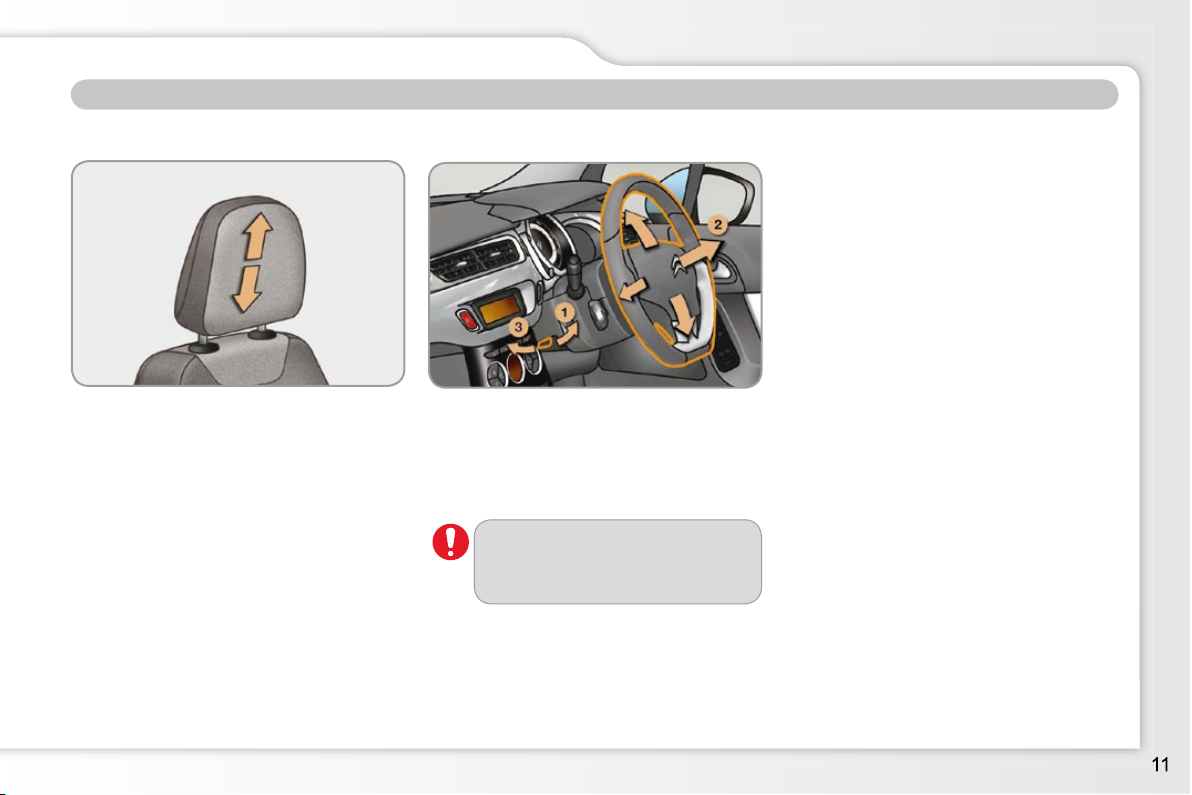
4. Head restraint height adjustment.
51
Steering wheel adjustment
1. Unlocking the steering wheel adjust-
ment.
2. Height and reach adjustment.
3.
Locking the steering wheel adjustment.
54
For reasons of safety, these
operations must only be carried
out with the vehicle stationary.
SITTING COMFORTABLY
Page 34
FAMILIARISATION
SITTING COMFORTABLY
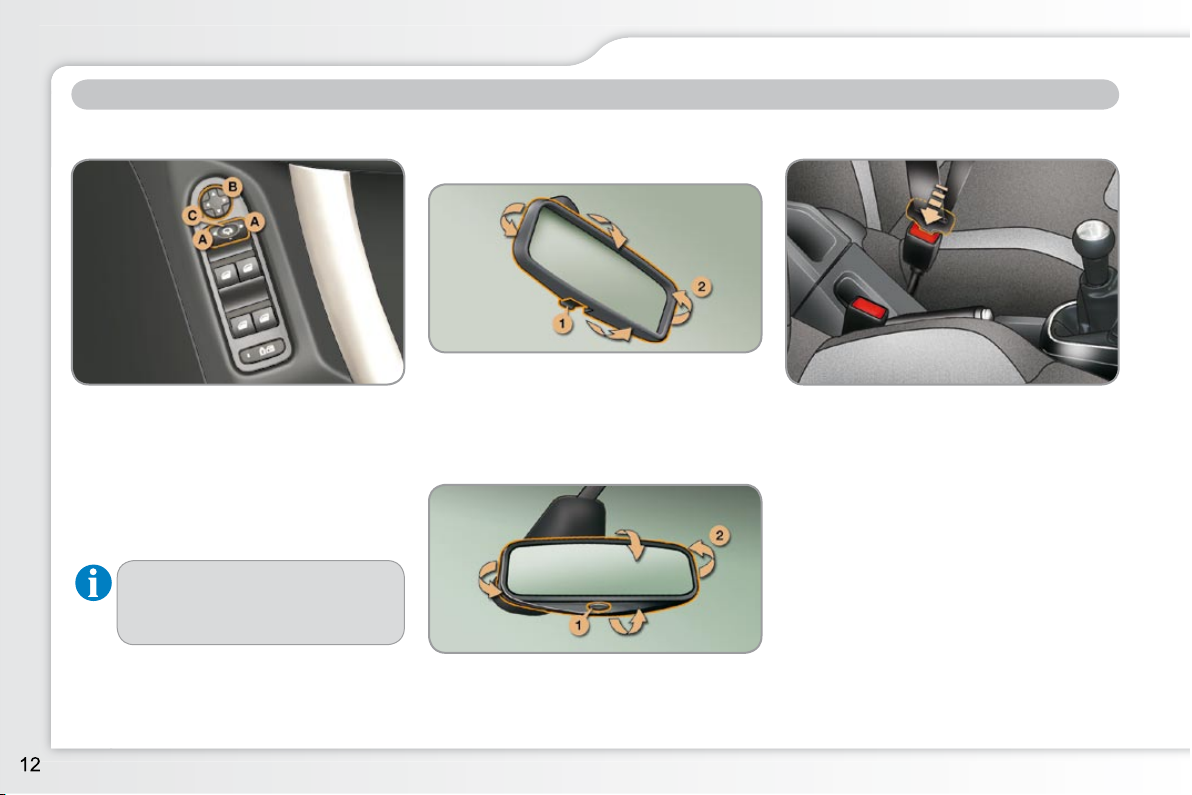
Exterior mirrors
Adjustment
A. Selecting the mirror.
B. Adjusting the position of the mirror.
C. De-selecting the mirror.
Interior mirror
Manual type
1. Selecting the "day" position of the
mirror.
2. Mirror orientation.
54
53
Automatic day/night type
Front seat belts
A. Fitting the belt.
B. Fastening.
C. Check that the belt is correctly fastened
by pulling on the belt webbing.
93
1. Automatic detection of day/night
mode.
2. Mirror orientation.
54
Other functions...
Folding/Unfolding.
Page 35
FAMILIARISATION
SEEING CLEARLY
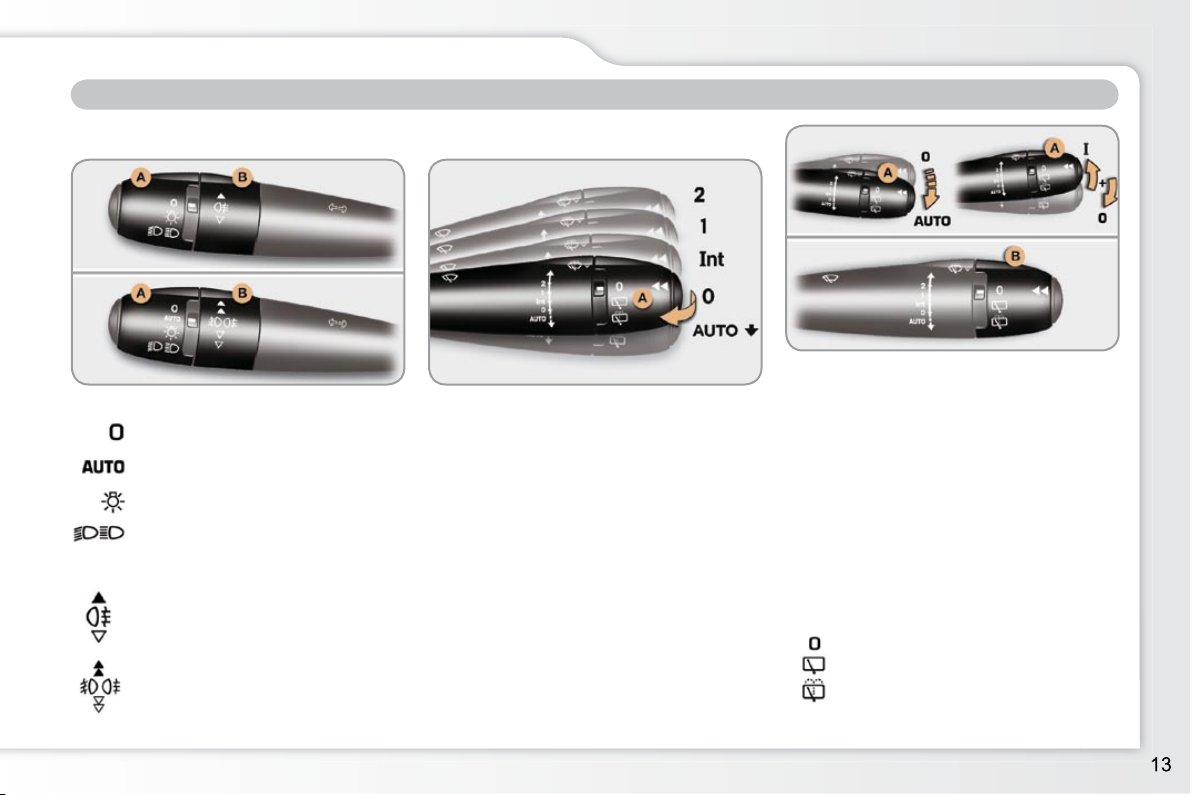
Lighting
Ring A
Ring B
67
Lighting off.
Automatic lighting.
Sidelamps.
Dipped/main beam headlamps.
Rear foglamps.
or
Front and rear foglamps.
Wipers
2. Fast wipe.
1. Normal wipe.
Int. Intermittent wipe.
0. Park.
AUTO
Automatic wiping or single wipe.
71
72
Park.
Intermittent wipe.
Wash-wipe.
Stalk A: windscreen wipers
Wash-wipe: pull the control towards
you.
Switching on "AUTO" mode
Push the stalk downwards and re-
lease it.
Switching off "AUTO" mode
Push the stalk upwards and return it
to position "0" .
Ring B: rear wiper
73
Page 36
FAMILIARISATION
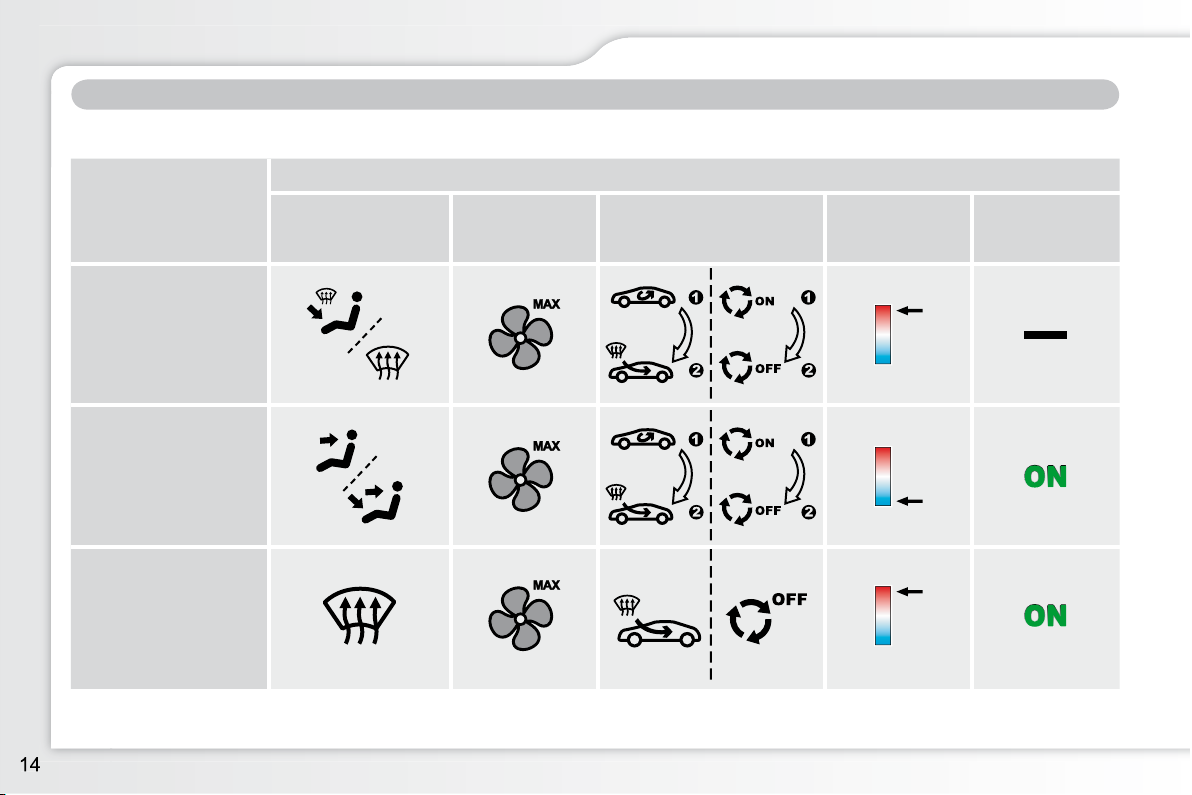
VENTILATION
Advice on interior settings
Automatic air conditioning: use of the fully automatic mode by pressing the "AUTO" button is preferable.
I require ...
Heating or Manual air conditioning
Air distribution Air fl ow
Air recirculation /
Exterior air intake
Temperature Manual A/C
HEAT
COOL
DEMISTING
DEFROSTING
Page 37
FAMILIARISATION
MONITORING
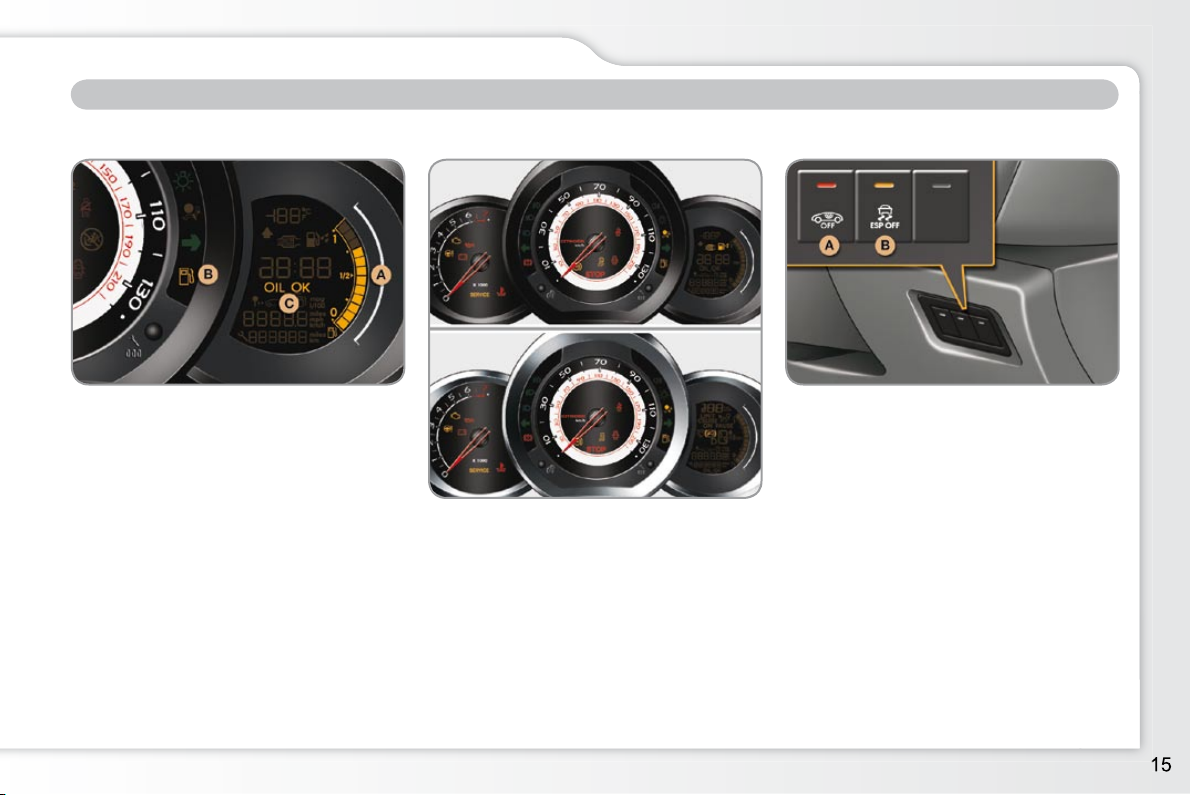
Instrument panel
A. With the ignition on, the fuel gauge
bars for the fuel remaining should
light up.
B. With the engine running, the associ-
ated low level warning lamp should
switch off.
C. With the ignition on, the oil level in-
dicator should display "OIL OK" for
a few seconds.
If the levels are not correct, top up the
level which is low.
18
Warning lamps
1. With the ignition on, the orange and
red warning lamps come on.
2. With the engine running, these
warning lamps should switch off.
If a warning lamp remains on, refer to
the page concerned.
20
Switch panel
Lighting of the indicator lamp indicates
the status of the corresponding function.
A. Activation of the electric child lock
89
or
Deactivation of the interior volumetric
alarm.
59
B. Deactivation of the ESP/ASR system.
92
Page 38
FAMILIARISATION
KEEPING YOUR PASSENGERS SAFE
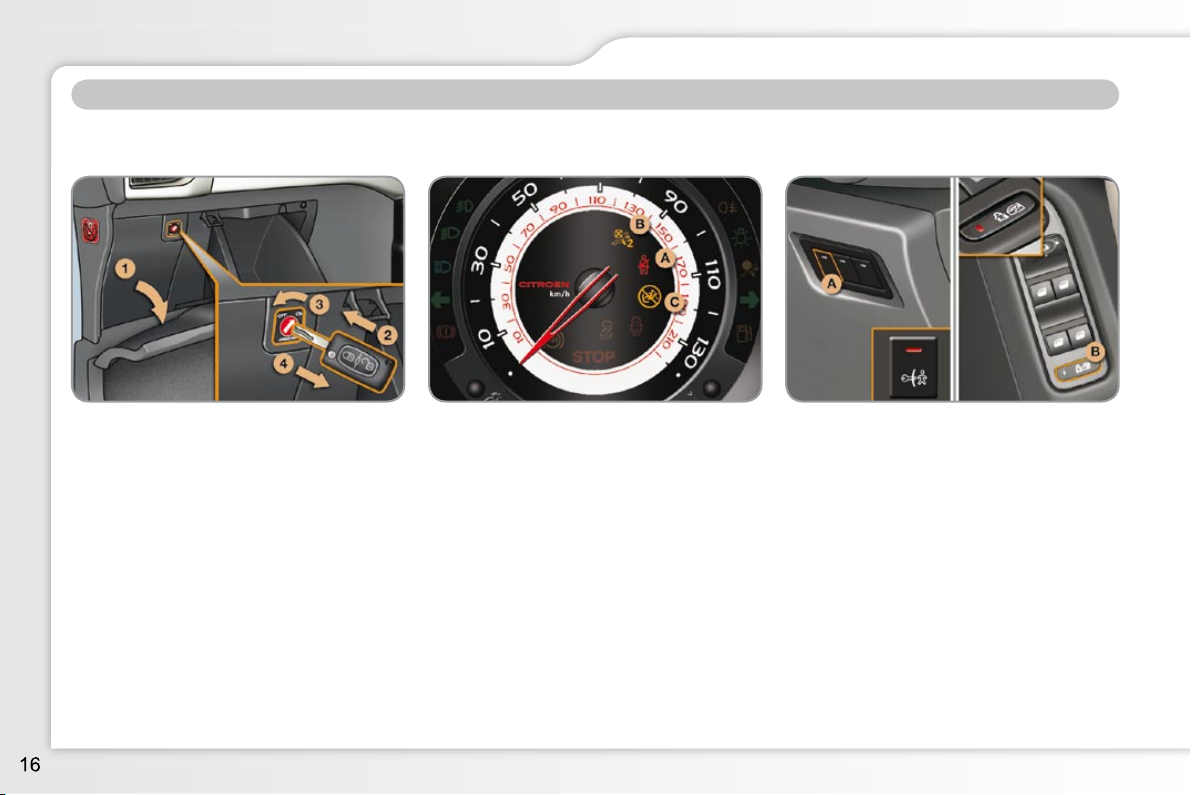
Front passenger’s airbag
1. Open the glove box.
2. Insert the key.
3. Select position:
"ON" (activation), with front passen-
ger or "forwards facing" child seat,
"OFF" (deactivation), with "rear fac-
ing" child seat".
4. Remove the key keeping the switch
in the new position.
95
Front seat belts and
passenger’s front airbag
A. Front seat belts not fastened or un-
fastened warning lamp.
96
Electric child lock
The lighting of the indicator lamp indicates the status of the corresponding
function.
A. Deactivation of the rear door controls.
or
B. Deactivation of the rear door and
rear elecric window controls.
89
B. Front passenger’s airbag deactiva-
tion indicator lamp.
C. Front passenger’s airbag activation
indicator lamp.
93
Page 39
FAMILIARISATION
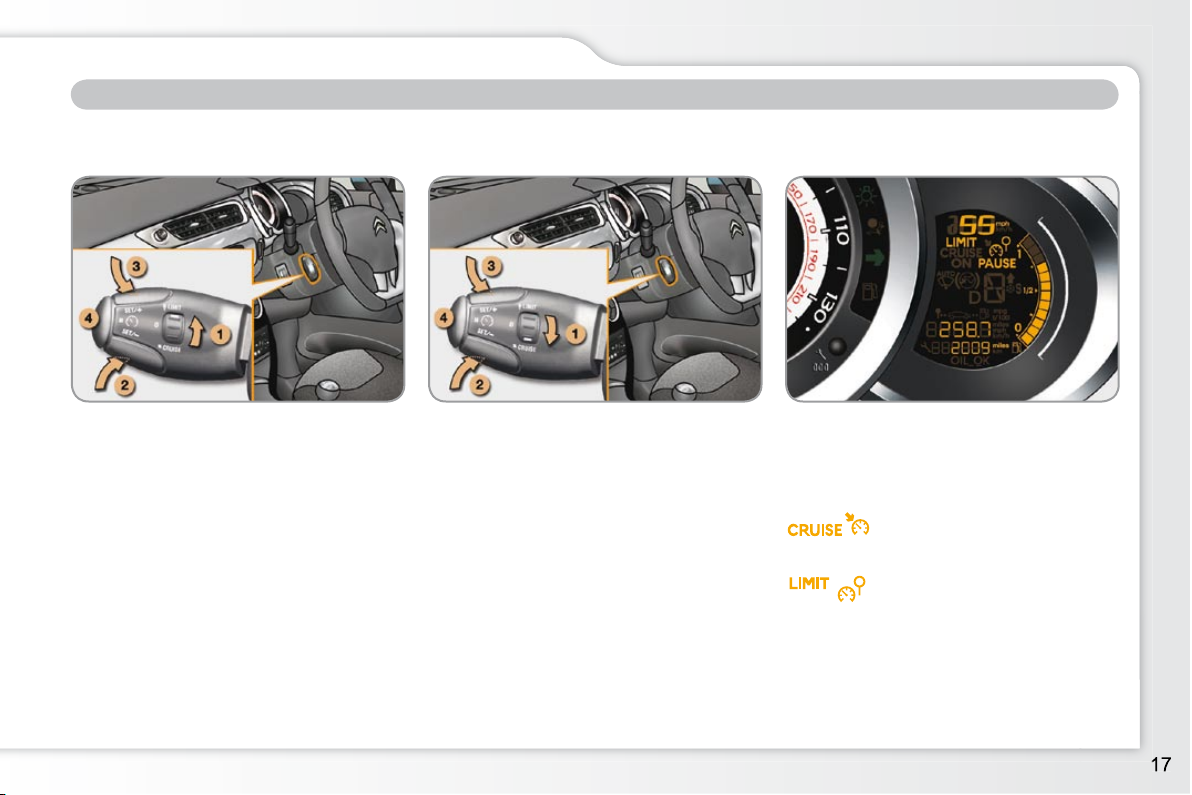
Speed limiter "LIMIT"
1. Selecting/Switching off speed limiter
mode.
2. Decrease the programmed value.
3. Increase the programmed value.
4. Speed limiter on/off.
104
DRIVING SAFELY
Cruise control "CRUISE"
1. Selecting/Switching off cruise con-
trol mode.
2. Decrease the programmed value.
3. Increase the programmed value.
4. Cruise control Off/Resume.
106
The values must be set with the engine
running.
Display in the instrument panel
The cruise control or speed limiter mode
appears on the instrument panel when
it is selected.
In order to be programmed or activated,
the vehicle speed must be higher than
25 mph (40 km/h), with at least fourth
gear engaged on a manual gearbox
(second gear on an automatic gearbox).
Cruise control
Speed limiter
Page 40
2 2
MULTIFUNCTION SCREENS
40
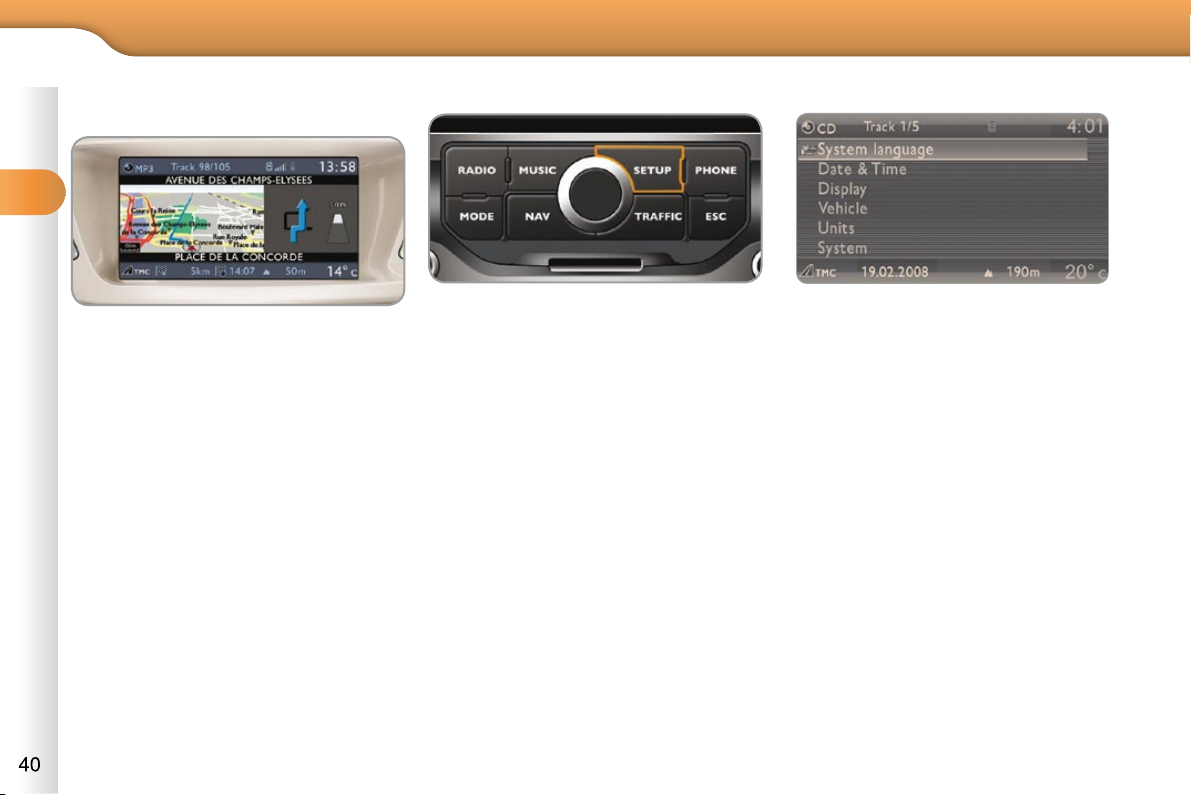
Displays on the screen
It displays the following information automatically and directly:
- time,
- date,
- altitude,
- ambient temperature (the value dis-
played fl ashes if there is a risk of
ice),
- check of the doors,
- warning and vehicle function status
messages, displayed temporarily,
- audio functions,
- satellite navigation system information.
Controls
MyWay To select one of the applications, at the control panel:
press the dedicated "RADIO" ,
"MUSIC" , "NAV" , "TRAFFIC" , "SETUP"
or "PHONE" button for access to
the corresponding menu,
turn the dial to move the selection,
press the dial to confi rm the selec-
tion,
or
press the "ESC" button to abandon
the current operation and return to
the previous display.
For further information on these ap-
plications, refer to the "Audio and
Telematics" section or to the specifi c
user guide given to you with the other
owner's documents.
"SETUP" menu
Press the "SETUP" button to gain
access to the "SETUP" menu. This
allows you to select from the following functions:
- "System language",
- "Date and time",
- "Display",
- "Vehicle",
- "Units",
- "System".
Page 41
MULTIFUNCTION SCREENS
41
* According to country.
System language
This menu allows you to select the language used by the display: Deutsch,
English, Espanol, Français, Italiano,
Nederlands, Polski, Portugues, Türkçe * .
Date and time
This menu allows you to set the date
and time, the format of the date and the
format of the time (refer to the "Audio
and Telematics" section or to the specifi c
user guide given to you with the other
owner's documents).
Display
This menu allows you to set the brightness of the screen, the screen colour
scheme and the colour of the map (day/
night or auto mode).
Vehicle
This menu allows you to activate or
deactivate certain driving and comfort
equipment:
- wiper linked with reverse gear (refer
to the "Visibility" section),
- guide-me-home lighting and dura-
tion (refer to the "Visibility" section),
- parking assistance (refer to the
"Driving" section).
Units
This menu allows you to select the
units: temperature (°C or °F) and fuel
consumption (km/l, l/100 or mpg).
System
This menu allows you to restore the fac-
tory confi guration, display the software
version and activate scrolling text.
For safety reasons, confi gura-
tion of the multifunction screen
by the driver must only be carried out when stationary.
Page 42
3 3
42
COMFORT
VENTILATION
System which creates and maintains
comfortable conditions in the vehicle's
passenger compartment.
Air intake
The air circulating in the passenger com-
partment is fi ltered and originates either
from the outside via the grille located at
the base of the windscreen or from the
inside in air recirculation mode.
Air treatment
The incoming air follows various routes
depending on the controls selected by
the driver:
- direct arrival in the passenger com-
partment (air intake),
- passage through a heating circuit
(heating),
- passage through a cooling circuit
(air conditioning).
The temperature control enables you to
obtain the level of comfort required by
mixing the air of the various circuits.
The air distribution control enables you
to diffuse the air in the passenger compartment combining several air vents.
The air fl ow control enables you to in-
crease or reduce the speed of the ventilation blower.
Control panel
The controls of this system are grouped
together on control panel A on the cen-
tre console. Depending on the model,
the functions offered are:
- level of comfort required,
- air fl ow,
- air distribution,
- demisting and defrosting,
- manual or automatic air conditioning
controls.
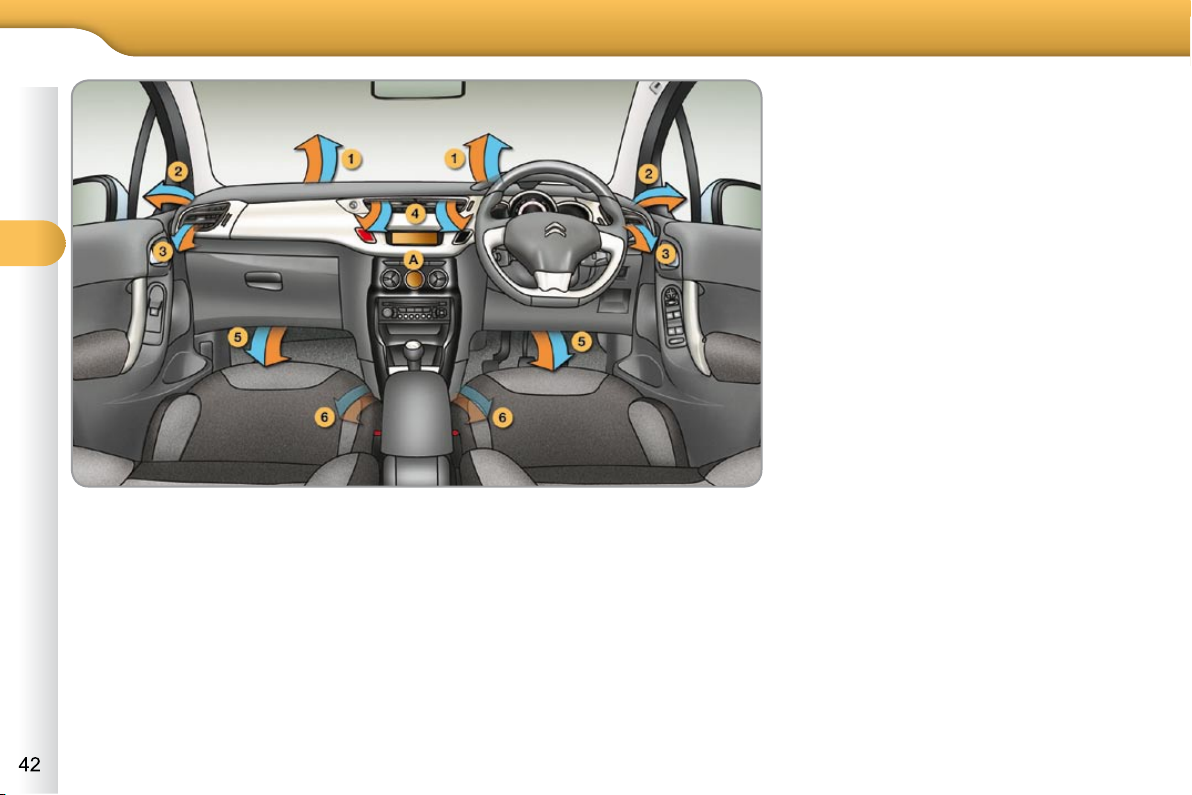
Air diffusion
1. Windscreen demisting/defrosting
vents.
2. Front side window demisting/de-
frosting vents.
3. Side adjustable and closing vents.
4. Central adjustable and closing vents.
5. Air outlets to the front footwells.
6. Air outlets to the rear footwells.
Page 43
43
COMFORT
In order for these systems to be fully effective, follow the operation and
maintenance guidelines below:
To obtain an even air distribution, take care not to obstruct the exterior
air intake grilles located at the base of the windscreen, the nozzles,
the vents and the air outlets, as well as the air extractor located in the
boot.
Do not cover the sunshine sensor, located on the dashboard; this is
used for regulation of the air conditioning system.
Operate the air conditioning system for 5 to 10 minutes, once or twice a
month to keep it in perfect working order.
Ensure that the passenger compartment fi lter is in good condition and have
the fi lter elements replaced regularly (refer to the "Checks" section).
We recommend the use of a combined passenger compartment fi lter.
Thanks to its special active additive, it contributes to the purifi cation of the air
breathed by the occupants and the cleanliness of the passenger compartment (reduction of allergic symptoms, bad odours and greasy deposits).
To guarantee correct operation of the air conditioning system, you are
also advised to have it checked regularly.
If the system does not produce cold air, do not use it and contact a
CITROËN dealer.
When towing the maximum load on a steep gradient in high temperatures,
switching off the air conditioning permits the recovery of engine power and
therefore improvement of the towing capacity.
If after an extended stop in sunshine, the interior temperature is
very high, fi rst ventilate the cabin
for a few moments.
Put the air fl ow control at a set-
ting high enough to quickly
change the air in the cabin.
The air conditioning system
does not contain chlorine and
does not present any danger to
the ozone layer.
The condensation created by
the air conditioning results in a
discharge of water under the
vehicle which is perfectly normal.
Page 44
3 3
44
COMFORT
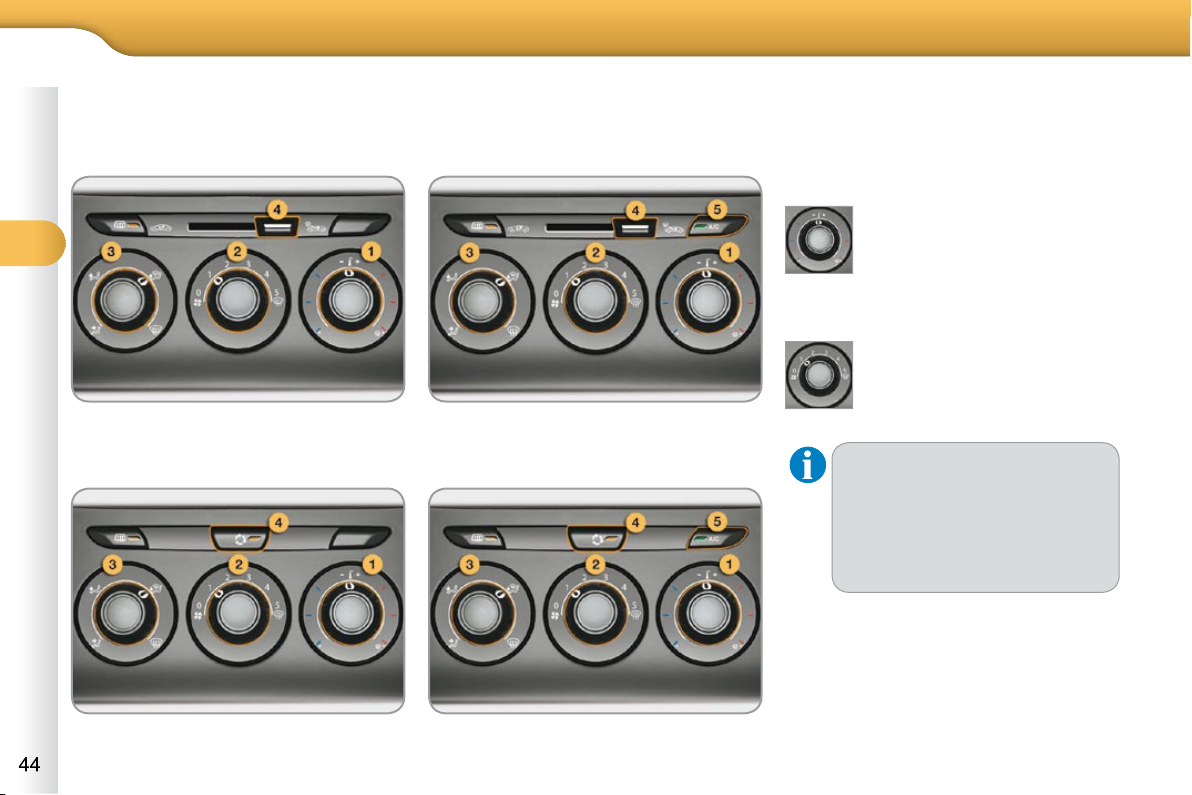
HEATING/
VENTILATION
MANUAL AIR CONDITIONING
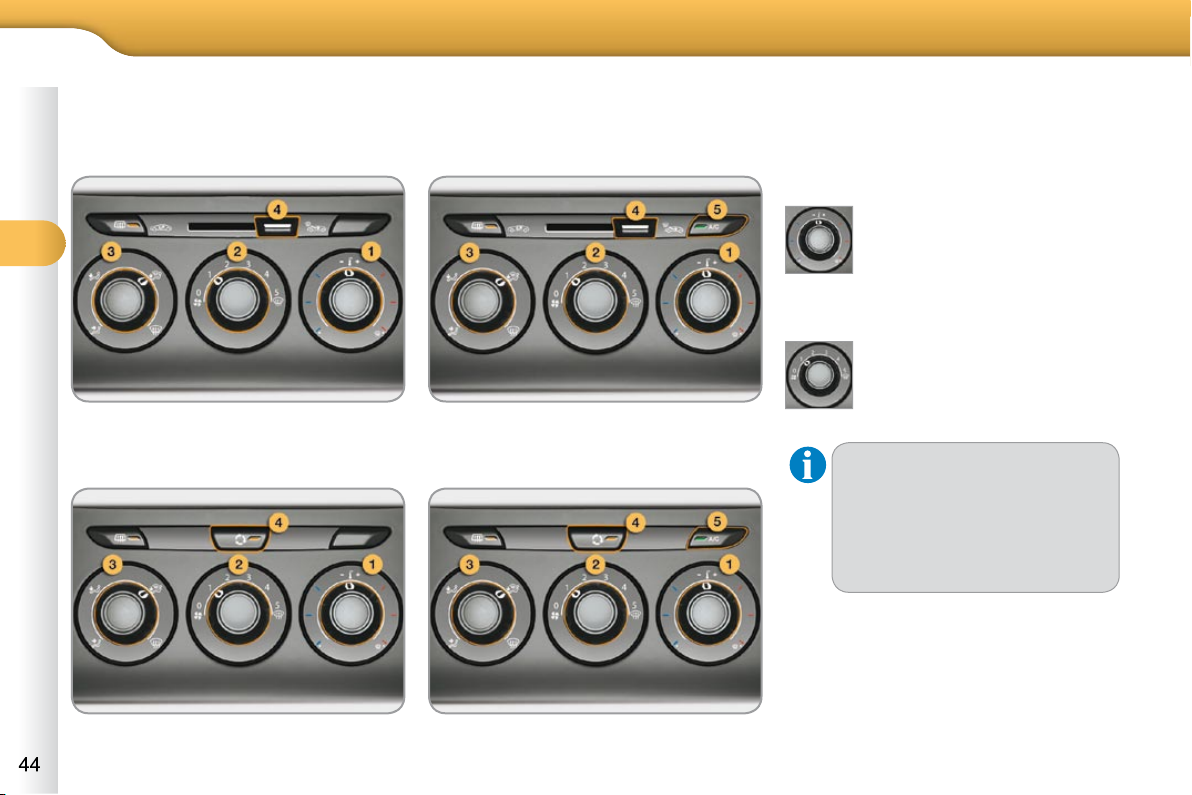
The heating/ventilation or air conditioning systems can only operate with the
engine running.
1. Temperature adjustment
2. Air flow adjustment
Turn the dial from blue
(cold) to red (hot) to adjust
the temperature to your requirements.
Turn the dial from posi-
tion 1 to position 5 to obtain
a comfortable air fl ow.
If you place the air fl ow control
in position 0 (deactivation of
the system), the temperature
is no longer maintained at a
comfortable level. However,
a slight fl ow of air, due to the
movement of the vehicle, can
still be felt.
Manual control panel
Electric control panel
Manual control panel
Electric control panel
Page 45
45
COMFORT
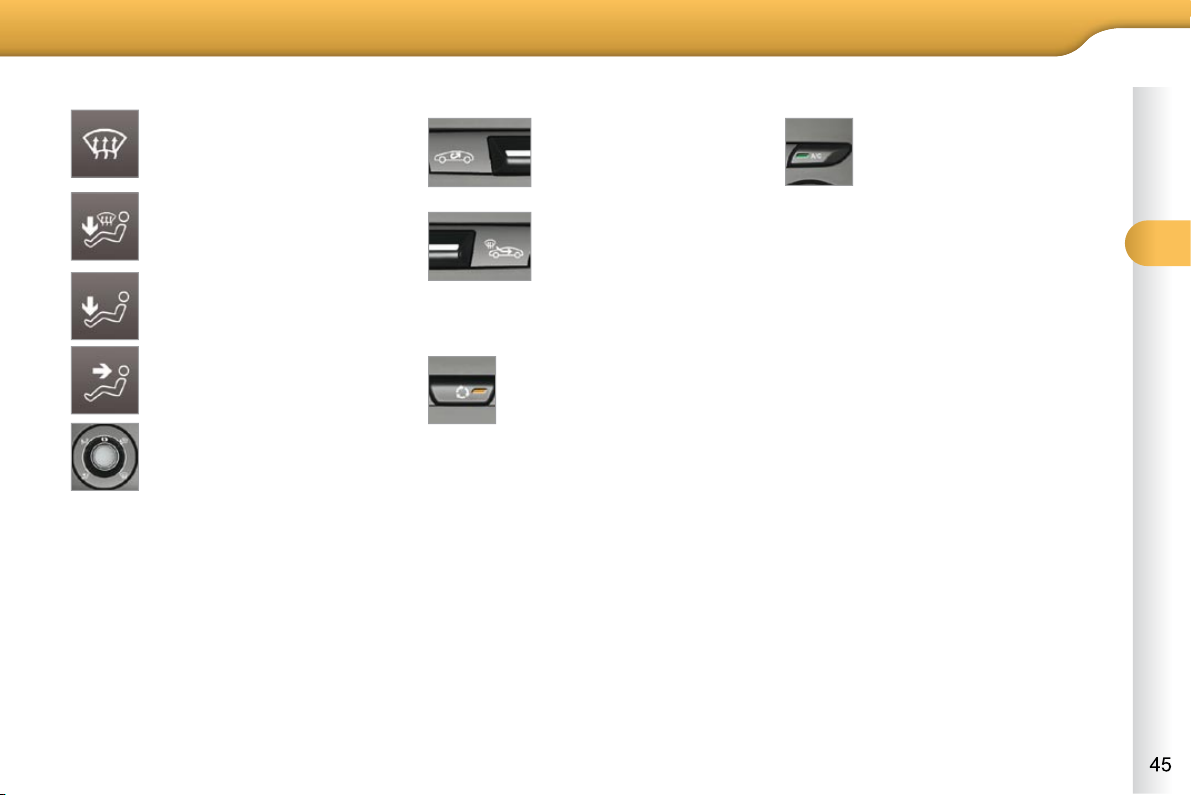
3. Air distribution adjustment
4. Air intake/Air recirculation
The intake of exterior air prevents misting of the windscreen and side windows.
The recirculation of interior air insulates
the passenger compartment from exterior odours and smoke.
Return to exterior air intake as soon as
possible to prevent deterioration of the
the air quality and avoid misting.
Windscreen and side windows.
Windscreen, side windows
and footwells.
Footwells.
Central and side vents.
The air distribution can be
adapted by placing the dial in
an intermediate position.
Press the button to
recirculate the interior
air. The indicator lamp
comes on to confi rm
this.
Press the button again
to permit the intake of
exterior air. The indicator lamp switches off to
confi rm this.
Manual control panel
Electric control panel
Press the button to recir-
culate the cabin air. This is
confi rmed by lighting of the
indicator lamp.
Press the button again to allow fresh
air into the cabin. This is confi rmed
by the indicator lamp switching off.
5. Air conditioning On/Off
Switching off
Press the "A/C" button again, the
associated green indicator lamp
switches off.
The air conditioning is designed to operate effectively in
all seasons, with the windows
closed.
It enables you to:
- lower the temperature, in summer,
- increase the effectiveness of the demisting in winter, above 3 °C.
Switching on
Press the "A/C" button, the associ-
ated green indicator lamp comes on.
The air conditioning does not op-
erate when the air fl ow adjustment
control 2 is in position "0".
Page 46
3 3
44
COMFORT
HEATING/
VENTILATION
MANUAL AIR CONDITIONING
The heating/ventilation or air conditioning systems can only operate with the
engine running.
1. Temperature adjustment
2. Air flow adjustment
Turn the dial from blue
(cold) to red (hot) to adjust
the temperature to your requirements.
Turn the dial from posi-
tion 1 to position 5 to obtain
a comfortable air fl ow.
If you place the air fl ow control
in position 0 (deactivation of
the system), the temperature
is no longer maintained at a
comfortable level. However,
a slight fl ow of air, due to the
movement of the vehicle, can
still be felt.
Manual control panel
Electric control panel
Manual control panel
Electric control panel
Page 47
3 3
46
COMFORT
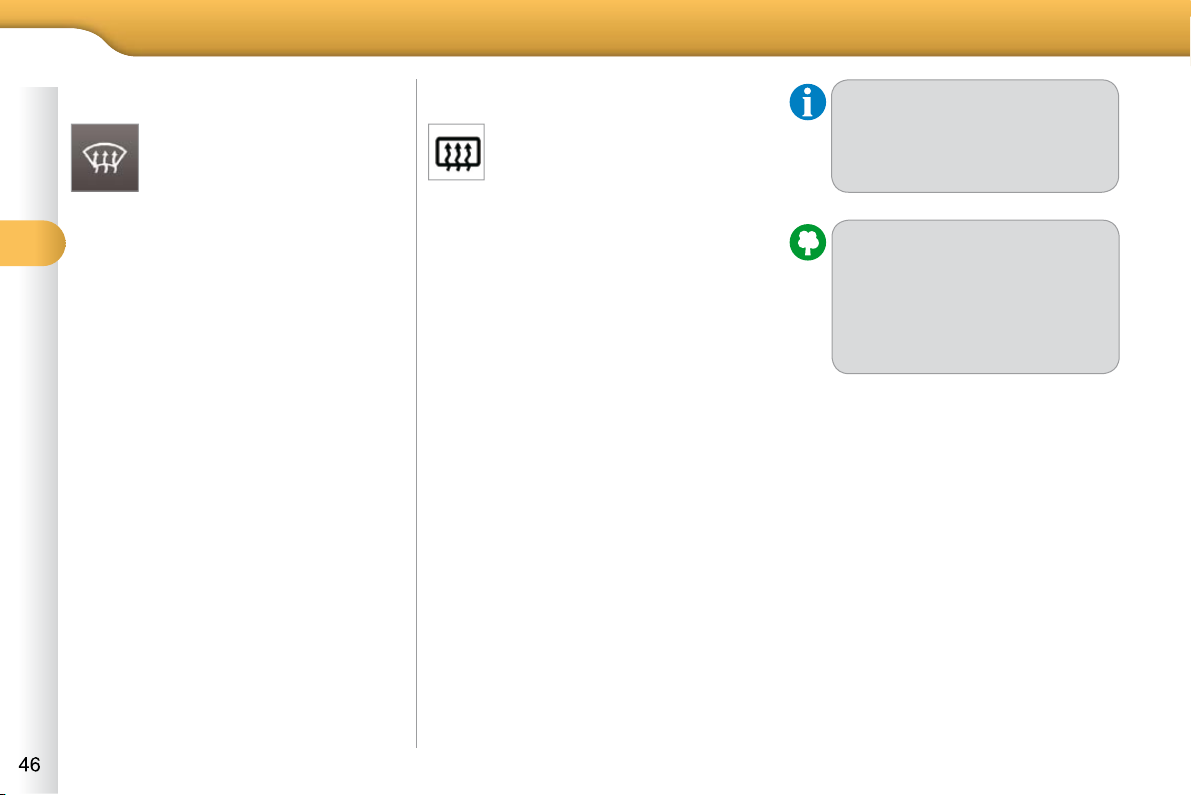
Switching on
The rear screen demisting/defrosting
can only operate when the engine is
running.
Press this button to demist/defrost
the rear screen and (depending on
version) the exterior mirrors. The
indicator lamp associated with the
button comes on.
Switching off
The demisting/defrosting switches off
automatically to prevent an excessive
consumption of current.
It is possible to stop the demist-
ing/defrosting operation before it is
switched off automatically by pressing the button again. The indicator
lamp associated with the button
switches off.
The control button is located on
the heating or air conditioning
system control panel.
If the engine is switched off before the demisting/defrosting is
switched off automatically, demisting/defrosting will resume next
time the engine is switched on.
Switch off the demisting/de-
frosting of the rear screen
and exterior mirrors as soon
as you consider this necessary as lower current consumption results in reduced
fuel consumption.
With the heating/ventilation
system
Put the temperature and air fl ow
controls to the dedicated marked
position.
Put the air intake control to the "Ex-
terior air intake" position
(manual control to the right or elec-
tric control with indicator lamp off).
Put the air distribution control to the
"Windscreen" position.
FRONT DEMIST - DEFROST
These markings on the control
panel indicate the control positions for rapid demisting or
defrosting of the windscreen
and side windows.
With the manual air
conditioning system
Put the temperature and air fl ow
controls to the dedicated marked
position.
Put the air intake control to the "Ex-
terior air intake" position
(manual control to the right or electric
control with indicator lamp off).
Put the air distribution control to the
"Windscreen" position.
Switch on the air conditioning by
pressing the "A/C" button; the associ-
ated green warning lamp comes on.
Page 48
47
COMFORT
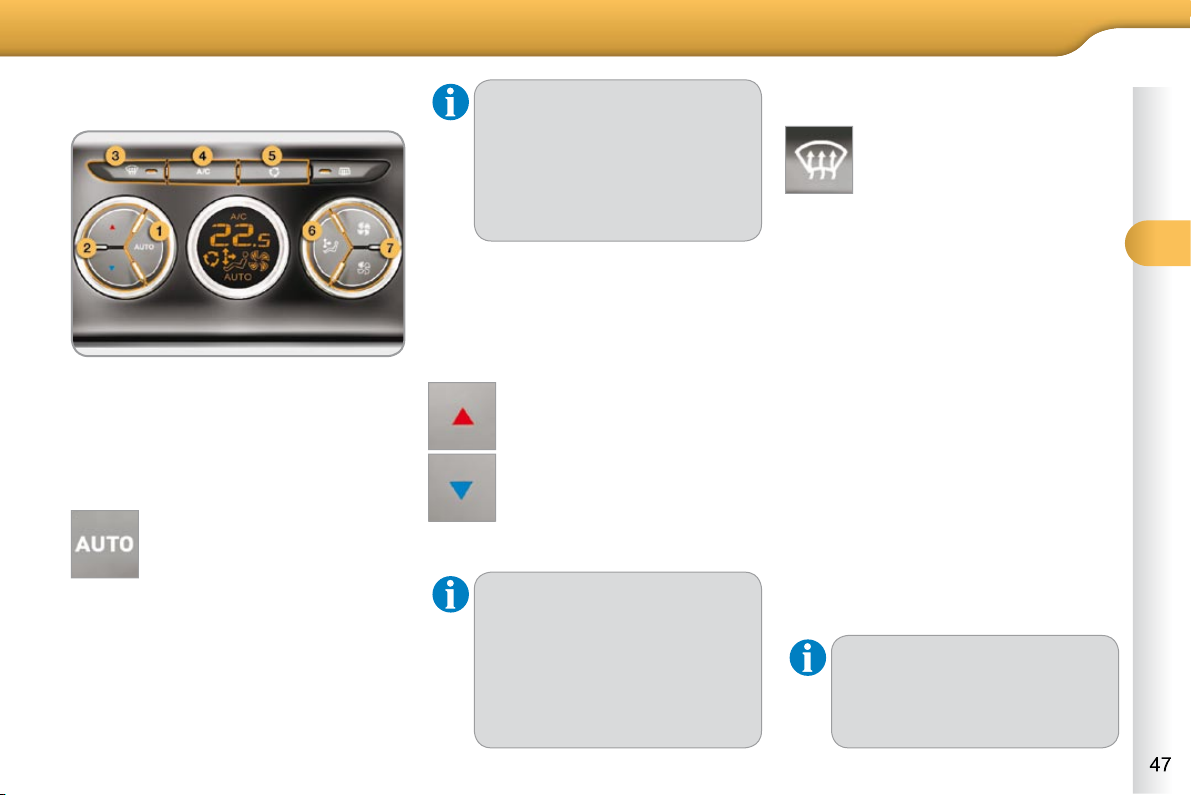
AUTOMATIC AIR CONDITIONING
The air conditioning can only operate
when the engine is running.
For your comfort, when the engine is switched off, the settings
are retained until the engine is
switched on again.
To prevent too great a distribution of cold air when the engine
is cold, the air fl ow will only reach
its optimum level gradually.
On entering the vehicle, if the
interior is very cold or hot, there
is no need to change the value
displayed in order to reach the
required level of comfort. The
system corrects the temperature
difference automatically and as
quickly as possible.
Automatic operation
1. Automatic "comfort" programme
Press the "AUTO" button. The
"AUTO" symbol is displayed.
We recommend that you use this mode,
it provides optimised automatic control
of all of the following functions: passen-
ger compartment temperature, air fl ow,
air distribution and air intake, in accordance with the comfort value that you
have chosen.
This system is designed to operate
effectively in all seasons, with the windows closed.
2. Temperature adjustment
The value indicated on the display corresponds to a level of comfort and not
to a temperature in degrees Celsius or
Fahrenheit.
Press the " " and " " but-
tons to change this value. A
setting around the value 21
enables optimum comfort to be
obtained. However, depending
on your requirements, a setting
between 18 and 24 is usual.
3. Automatic "visibility" programme
The automatic comfort pro-
gramme may not be suffi cient
for rapid demisting or defrosting of the windscreen and side
windows (humidity, several
passengers, ice, etc.).
In this case, select the automatic visibility programme. The button 3 indicator
lamp comes on.
The system automatically controls the
air conditioning and the fl ow of air and
provides optimum distribution of the ventilation to the windscreen and side windows. It deactivates air recirculation 5 .
To exit this programme, press button 3
again or "AUTO" , the indicator lamp on
the button is switched off and "AUTO"
is displayed.
Manual override
It is possible to adjust one or more functions manually while leaving the other
functions in automatic mode.
The "AUTO" symbol switches off.
To return to automatic mode, press the
"AUTO" button.
Switching to manual mode may
not be suitable (temperature,
humidity, odour, condensation)
and does not provide optimum
comfort.
Page 49
3 3
48
COMFORT
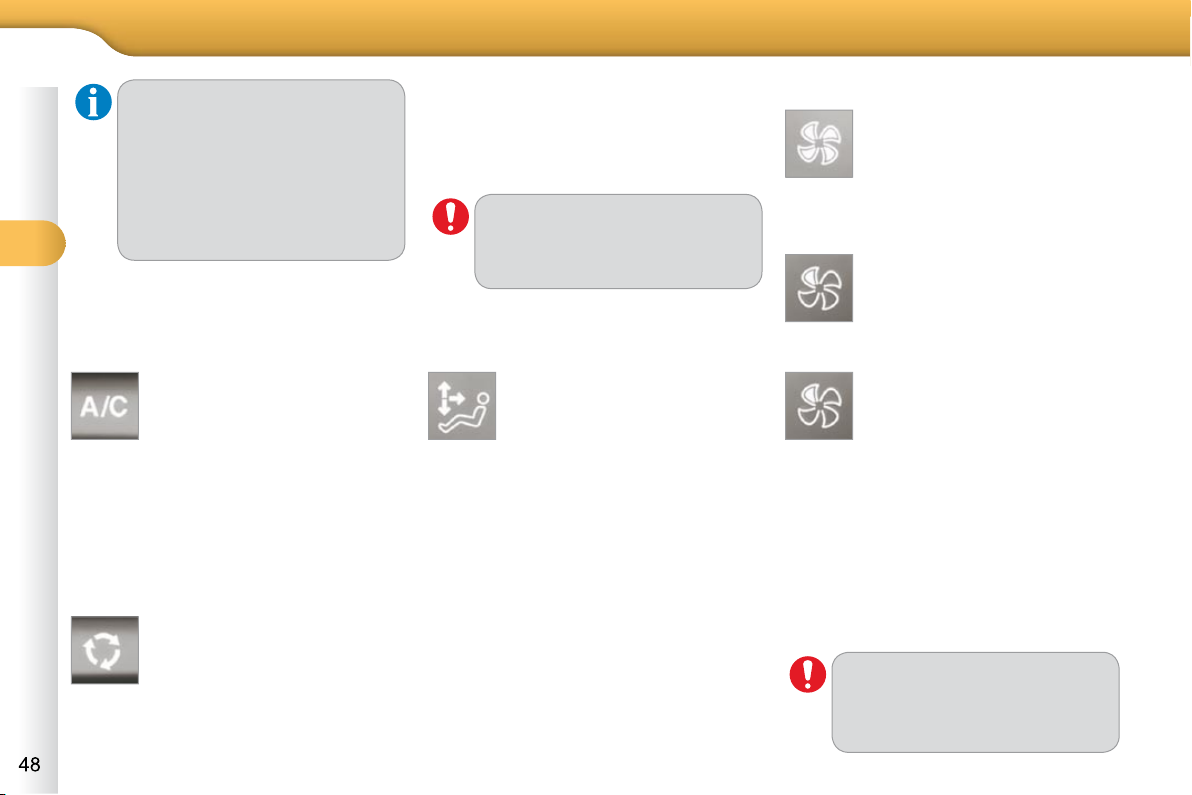
4. Air conditioning on/off
Press this button to switch off
the air conditioning.
Stopping the air conditioning may cause
some problems (humidity, misting).
Automatic operation of the air conditioning is resumed when the button is
pressed again. The symbol "A/C" is
displayed.
5. Air intake/Air recirculation
Press this button for recirculation of the interior air. The air
recirculation symbol 5 is dis-
played.
Air recirculation enables the passenger
compartment to be isolated from exterior odours and smoke.
6. Air distribution adjustment
Avoid prolonged recirculation of
interior air (risk of condensation
or deterioration of the air quality).
Pressing this button several
times in succession enables
the air fl ow to be directed in
turn towards:
- the windscreen and the side windows (demisting or defrosting),
- the windscreen, side windows and
air vents,
- the windscreen, the side windows,
the air vents and the footwells,
- the windscreen, the side windows
and the footwells,
- the footwells,
- the air vents and the footwells,
- the air vents.
7. Air flow adjustment
Press the "full fan" symbol to
increase the air fl ow.
The air fl ow symbol, the fan, fi lls pro-
gressively according to the value requested.
Switching the system off
Avoid driving for long periods
with the air conditioning switched
off (risk of misting and reduction
of the air quality in the cabin).
Press the air fl ow "empty fan"
button of air fl ow 7 until the fan
symbol disappears.
This action switches off all of the functions of the air conditioning system.
Thermal comfort is no longer control-
led. A slight fl ow of air resulting from the
movement of the vehicle, remains perceptible however.
Pressing the air fl ow "full fan" button of
air fl ow 7 or on "AUTO" reactivates the
system with the values set before it was
switched off.
Press the "empty fan" symbol
to decrease the air fl ow.
For maximum cooling or heating
of the cabin, it is possible to go
beyond the minimum 14 or maximum 28 values.
Press the blue button 2 until
"LO" is displayed or the red
button 2 until "HI" is displayed.
Press this button again or press the
"AUTO" button to resume automatic
management of the intake of air. The air
recirculation symbol 5 is switched off.
Page 50
49
COMFORT
SCENTED AIR FRESHENER
System permitting the diffusion of a fragrance in the passenger compartment
in accordance with your requirements,
by means of the adjustment dial and the
various fragrance cartridges available.
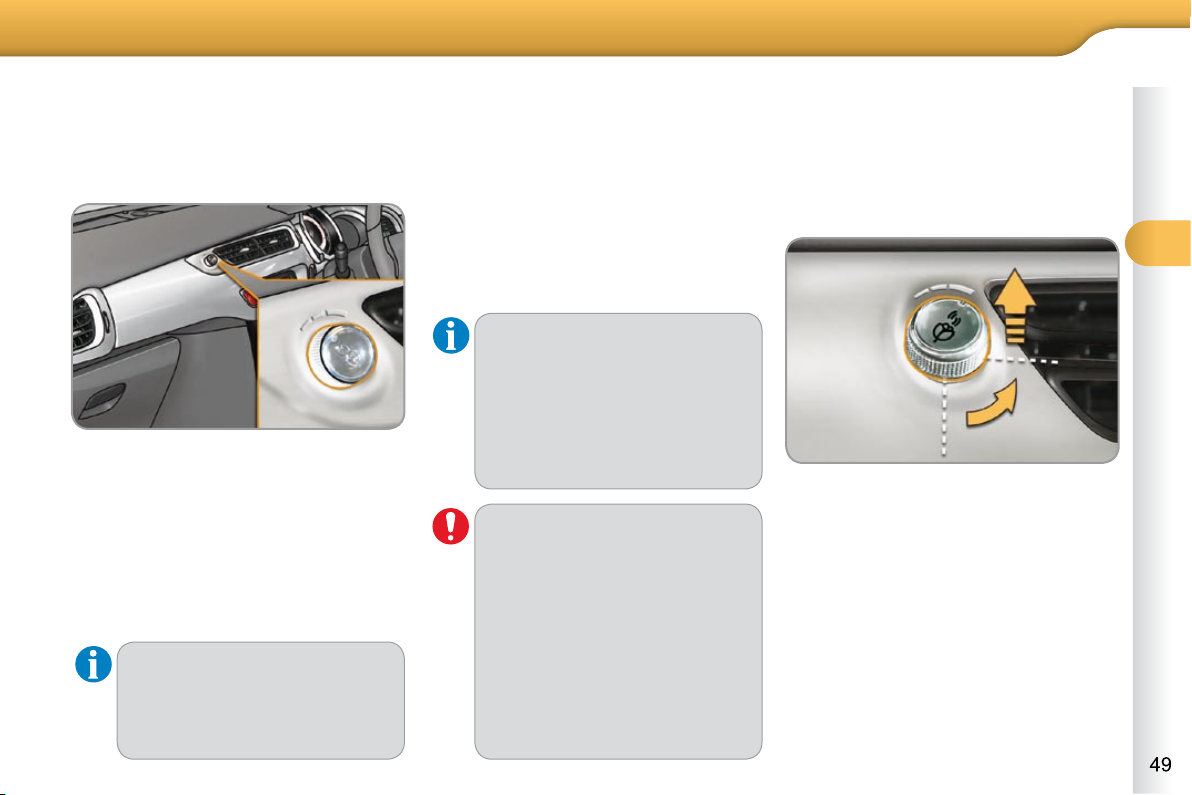
Adjustment dial
This dial is located on the dashboard.
It allows you to adjust the intensity of
diffusion of the fragrance.
Turn the dial to the right to permit
diffusion of the fragrance.
Turn the dial to the left to stop diffu-
sion of the fragrance.
Fragrance cartridge
This cartridge can be removed easily.
The fi rst time it is used, replace the plug
with a real cartridge
You can change it at any time and store
it in the sealed case which keeps it
closed once it has been opened.
You can obtain different fragrance cartridges from CITROËN dealers.
Removing the cartridge
Press the dial and turn it a quarter of
a turn anti-clockwise.
Remove the cartridge.
Refi t its sealing case.
Fitting the cartridge
Remove the cartridge from the seal-
ing case.
Install the cartridge (fl ower at top
left).
Press the dial and turn it a quarter of
a turn clockwise.
Leave the central vents open.
The intensity of diffusion of the
fragrance may depend on the
ventilation or air conditioning
settings.
Do not discard the original cartridge as this serves as a plug
when no fragrance cartridge is
in use.
In order to preserve the service
life of the cartridge, turn the dial
fully to the left when you no longer
wish to diffuse the fragrance in
the passenger compartment.
As a safety precaution, do not
carry out any action on the cartridge while driving.
Do not dismantle the cartridges.
Do not attempt to refi ll the fra-
grance diffuser or the cartridges.
Use genuinel CITROËN cartridges only.
Avoid all contact with the skin
and eyes.
Keep out of reach of children
and animals.
Page 51
3 3
COMFORT
Seat consisting of a seat cushion, a seat
back and a head restraint which can all
be adjusted to adapt your position for
ease of driving and comfort.
Manual adjustments
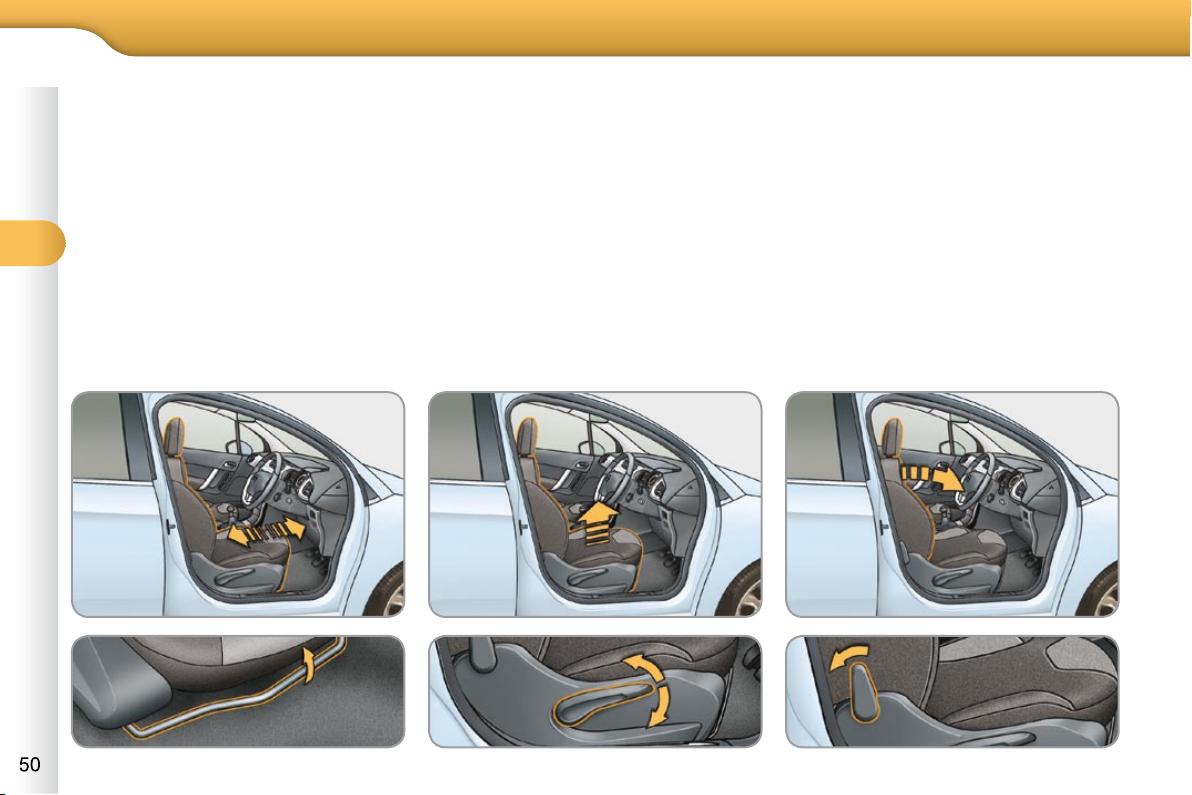
Forwards-backwards adjustment
Raise the control and slide the seat
forwards or backwards.
Driver's or passenger's seat height
adjustment
Pull the control upwards to raise
or push it downwards to lower, as
many times as necessary, to obtain
the position required.
Seat back angle adjustment
Push the control rearwards.
Page 52
COMFORT
Additional adjustments
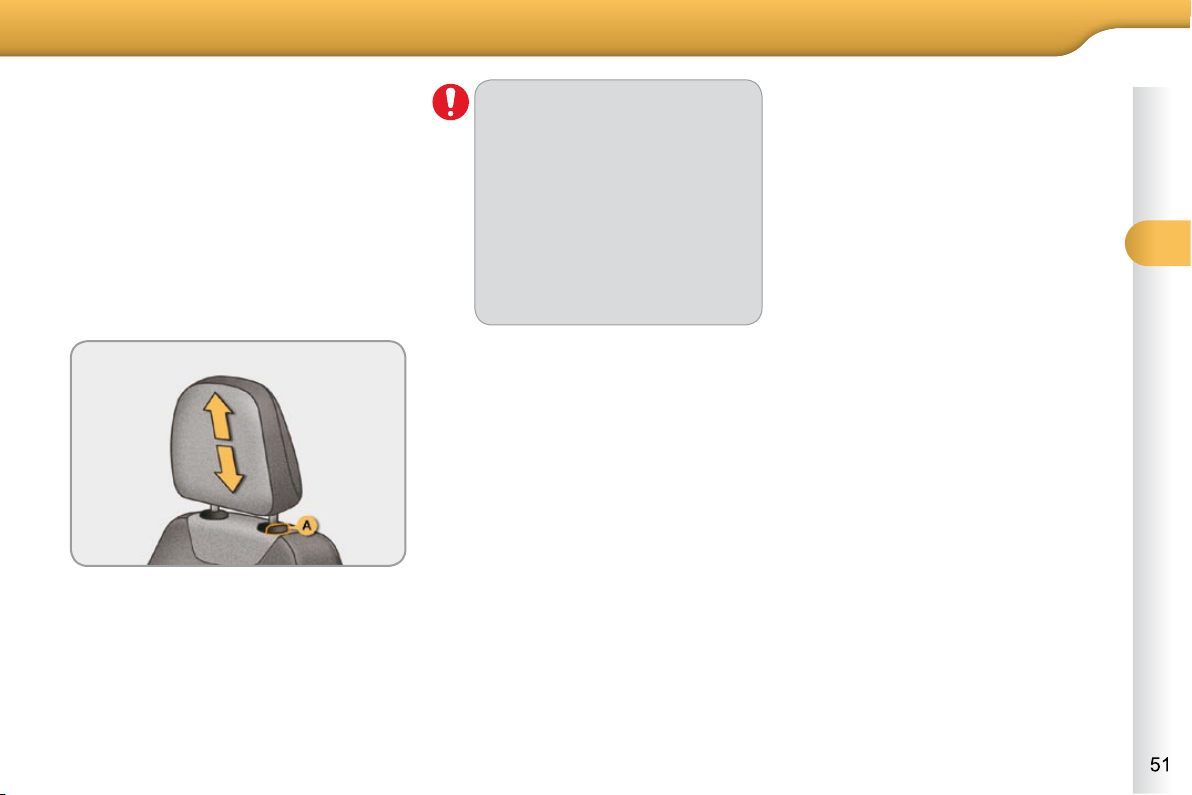
Head restraint height adjustment
To raise the head restraint, pull it for-
wards and upwards at the same time.
To remove the head restraint, press the
lug A and pull the head restraint upwards.
To put the head restraint back in
place, engage the head restraint
stems in the openings keeping them
in line with the seat back.
To lower the head restraint, press
the lug A and the head restraint at
the same time.
The head restraint is fi tted with
a frame with notches which prevents it from lowering; this is a
safety device in case of impact.
The adjustment is correct
when the upper edge of the
head restraint is level with the
top of the head.
Never drive with the head restraints removed; they must be
in place and adjusted correctly.
Page 53
3 3
COMFORT
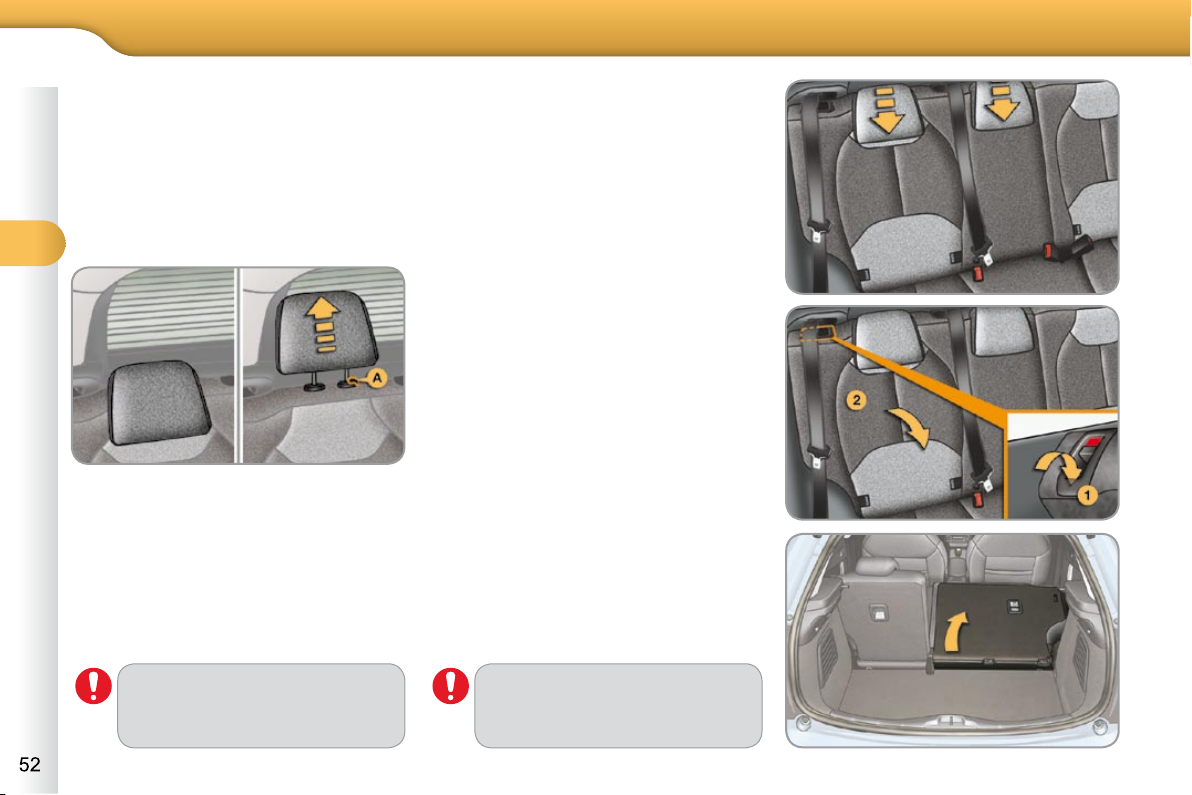
Bench seat with fi xed one-piece cush-
ion and split backrest (left hand 2/3,
right hand 1/3) which can be folded individually to adapt the load space in the
boot.
Rear head restraints
These have a high position (comfort)
and a low position (rear visibility).
Folding the backrest
Move the corresponding front seat
forward if necessary.
Check that the seat belt is positioned
correctly on the side of the seat back.
Place the head restraints in the low
position.
Repositioning the seat backrest
When repositioning the rear seat backrest:
Straighten the seat back 2 and se-
cure it.
Check that the red indicator, located
next to the control 1 , is no longer vi-
sisble.
They can also be removed.
To remove a head restraint:
release the backrest using control 1 ,
tilt the backrest 2 slightly forwards,
pull the head restraint upwards to
the stop,
then, press the lug A .
When repositioning the seat
backrest, take care not to trap
the seat belts.
Never drive with the head restraints removed; they must be
in place and correctly adjusted.
Pull control 1 forwards to release
the seat back 2 .
Fold the seat back 2 on to the cushion.
Page 54
COMFORT
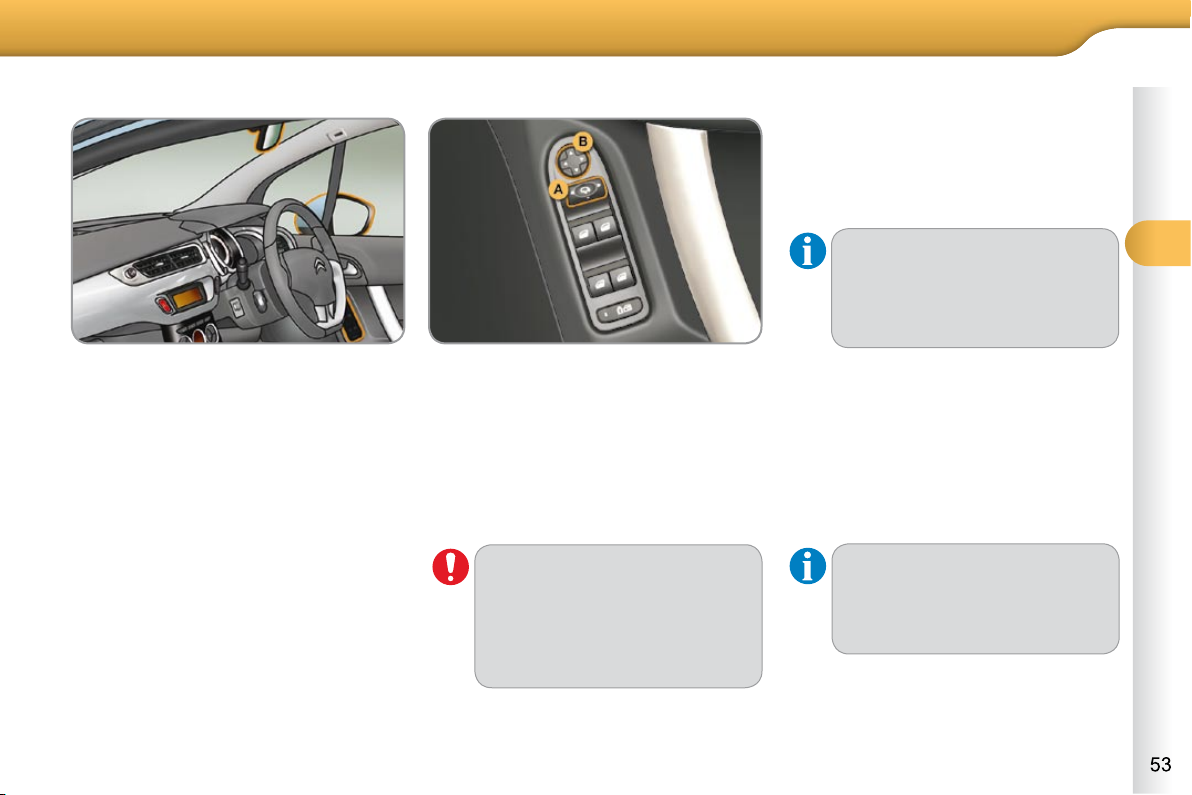
Exterior mirrors
Each fi tted with an adjustable mirror
glass permitting the lateral rearward vision necessary for overtaking or parking. They can also be folded for parking
in confi ned spaces.
Move control A to the right or to the left
to select the corresponding mirror.
Move control B in all four directions
to adjust.
Return control A to the central position.
Adjustment
Folding
From outside: lock the vehicle using
the remote control or the key.
From inside: with the ignition on, pull
control A rearwards.
Unfolding
From outside: unlock the vehicle using
the remote control or the key.
From inside: with the ignition on, pull
control A rearwards.
If the mirrors are folded using
control A , they will not unfold
when the vehicle is unlocked.
Pull again on control A .
The folding and unfolding of the
exterior mirrors using the remote
control can be deactivated by a
CITROËN dealer.
The objects observed are, in reality, closer than they appear.
Take this into account in order to
correctly judge the distance of vehicles approaching from behind.
Demisting - defrosting
If your vehicle is fi tted with heated mir-
rors, the demisting-defrosting is effected with the engine running, by switching
on the heated rear screen (refer to the
"Demisting-defrosting the rear screen"
section).
Page 55
3 3
COMFORT
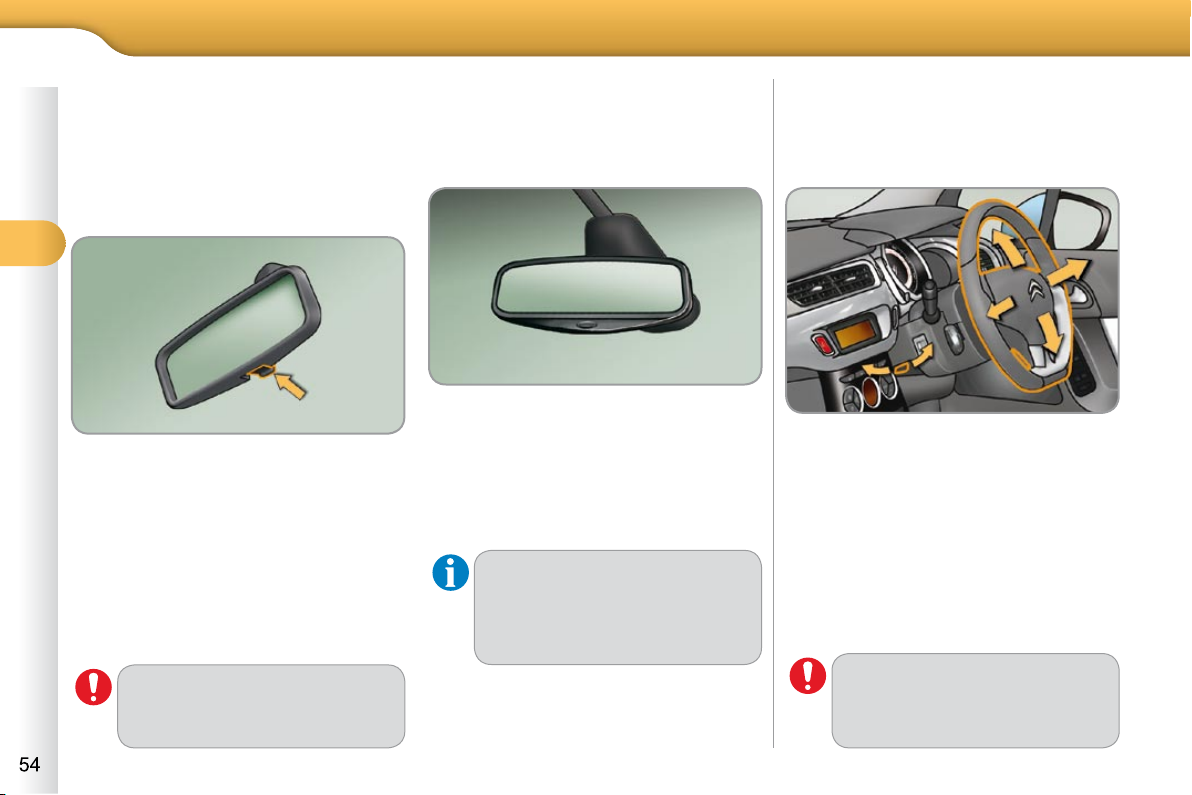
STEERING WHEEL ADJUSTMENT
The height and reach of the steering
wheel can be adjusted to adapt the driving position to the size of the driver.
Adjustment
When stationary , pull the control to
unlock the steering wheel.
Adjust the height and depth.
Push the control to lock the steering
wheel.
As a safety precaution, it is imperative that these operations
are carried out while the vehicle
is stationary.
Interior mirror
Adjustable mirror providing a central
rearward view.
Adjustment
Adjust the mirror so that the glass is
directed correctly in the "day" position.
Day/night position
Pull the lever to change to the "night"
anti-dazzle position.
Push the lever to change to the normal
"day" position.
Automatic day/night model
System which automatically and progressively changes between the day
and night uses.
In order to prevent dazzle, the interior
mirror glass darkens automatically in
relation to the intensity of the light from
the rear.
It lightens when the light (light beam of
following vehicles, sun...) decreases, so
guaranteeing optimum visibility.
In order to guarantee optimum
visibility during your manoeuvres, the mirror lightens automatically when reverse gear is
engaged.
As a safety precaution, the mirrors must be adjusted to reduce
the "blind spot".
Manual model
The mirror is fi tted with a night-time
anti-dazzle device.
Page 56
ACCESS
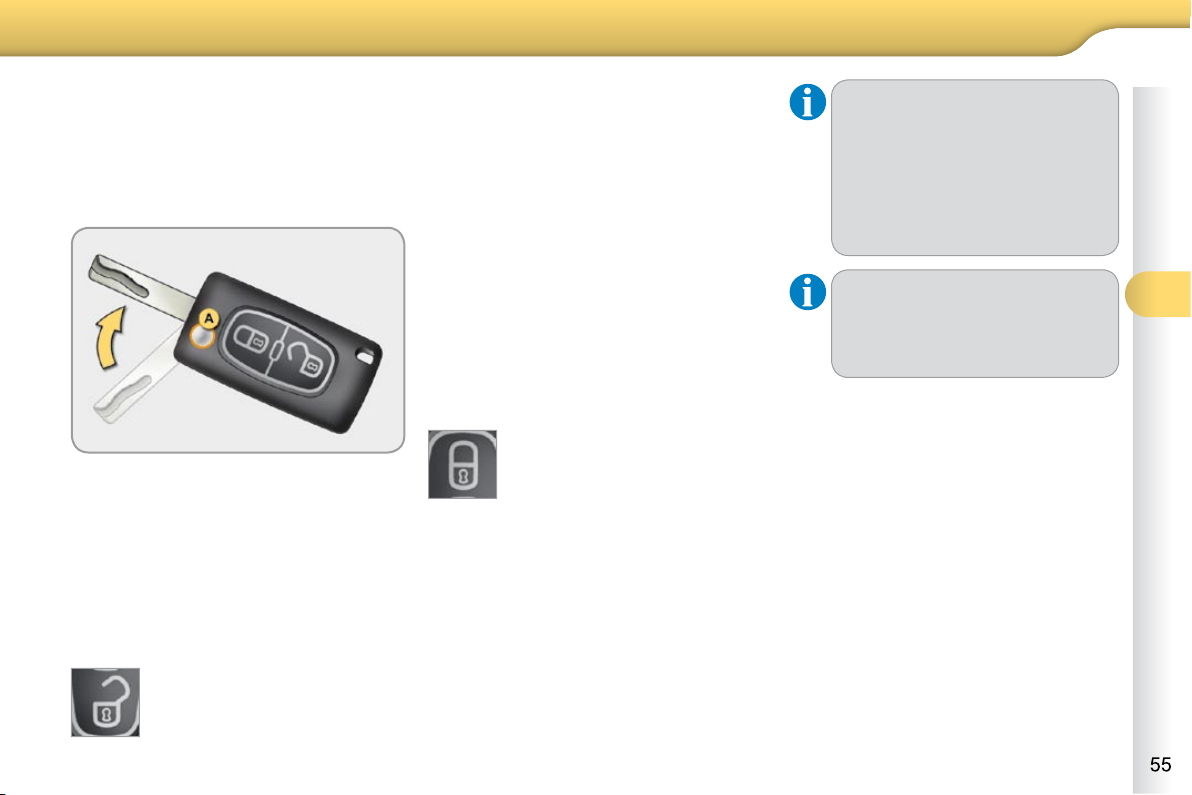
System which permits central unlocking or locking of the vehicle using the
lock or from a distance. It is also used to
locate and start the vehicle, as well as
providing protection against theft.
Unlocking the vehicle
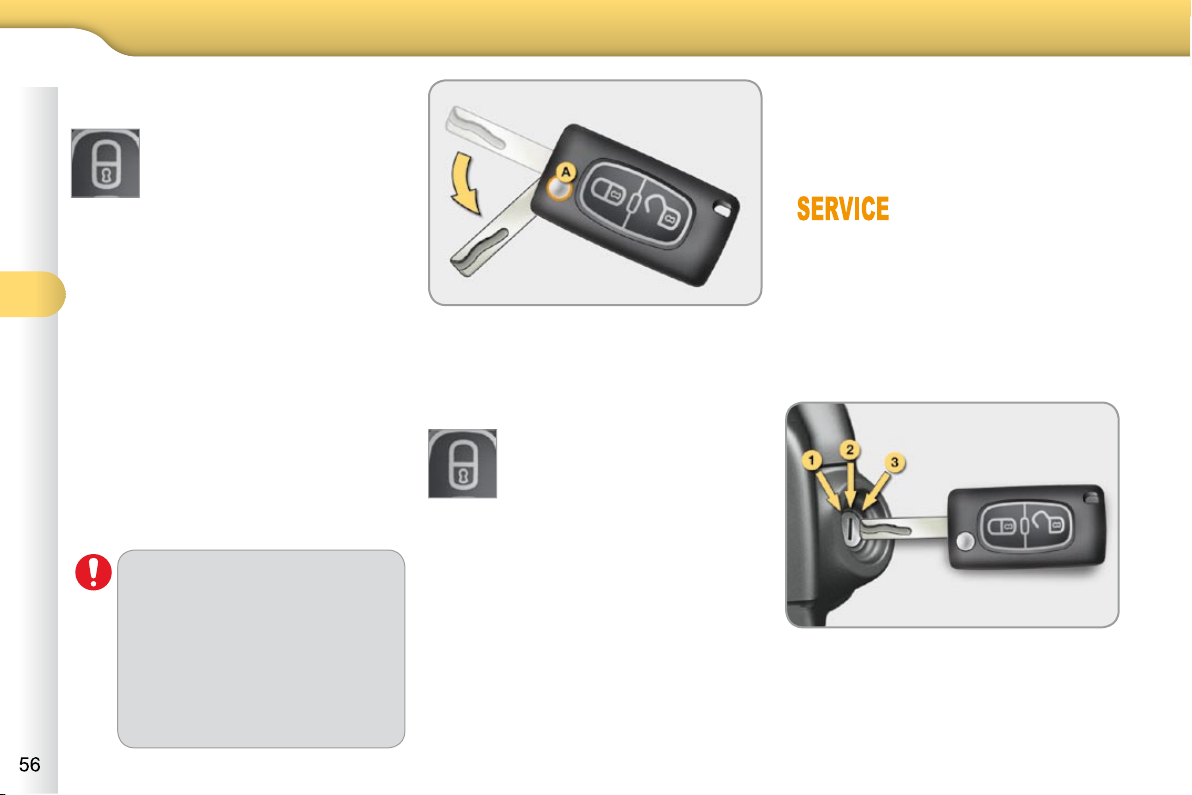
Unfolding the key
First press button A to unfold the
key.
Unlocking using the remote control
Press the open padlock to
unlock the vehicle.
Unlocking using the key
Turn the key to the left in the driver's
door lock to unlock the vehicle.
Locking the vehicle
Locking using the remote control
Press the closed padlock
to lock the vehicle.
Locking using the key
Turn the key to the right in the driv-
er's door lock to lock the vehicle
completely.
If one of the doors or the boot is
still open, the central locking does
not take place.
When the vehicle is locked, if it is
unlocked inadvertently, it will relock automatically after thirty seconds unless a door or the boot is
open.
The folding and unfolding of the
exterior mirrors using the remote
control can be deactivated by a
CITROËN dealer.
Locking is confi rmed by fi xed lighting of
the direction indicators for approximately
two seconds.
According to version, the exterior mirrors fold at the same time.
Unlocking is confi rmed by rapid fl ashing
of the direction indicators for approximately two seconds.
According to version, the exterior mirrors unfold at the same time.
Page 57
4 4
ACCESS
Anti-theft protection
Electronic engine immobiliser
The key contains an electronic chip
which has a special code. When the
ignition is switched on, this code must
be recognised in order for starting to be
possible.
In the event of a malfunction, you are informed by
lighting of this warning
lamp, an audible signal
and a message on the multifunction
screen.
In this case, your vehicle does not start;
contact a CITROËN dealer as soon as
possible.
Ignition switch
- Position 1: Stop
- Position 2: Ignition
- Position 3: Starting
Locating your vehicle
Press the closed padlock
to locate your locked vehicle in a car park.
This is indicated by lighting of the cour-
tesy lamps and fl ashing of the direction
indicators for a few seconds.
Folding the key
First press button A to fold the key.
Deadlocking using the key
Turn the key to the right in the driv-
er’s door lock to lock the vehicle
completely.
Turn the key to the right again within
fi ve seconds to deadlock the vehicle.
This electronic engine immobiliser locks
the engine management system a few
minutes after the ignition is switched off
and prevents starting of the engine by
anyone who does not have the key.
Deadlocking using the remote
control
Press the closed padlock to
lock the vehicle completely.
Press the closed padlock again
within fi ve seconds to deadlock the
vehicle.
Deadlocking renders the exterior
and interior door controls inoperative.
It also deactivates the manual
central control button.
Therefore, never leave anyone
inside the vehicle when it is
deadlocked.
Deadlocking is confi rmed by fi xed light-
ing of the direction indicators for approximately two seconds.
According to version, the exterior mirrors fold at the same time.
Page 58
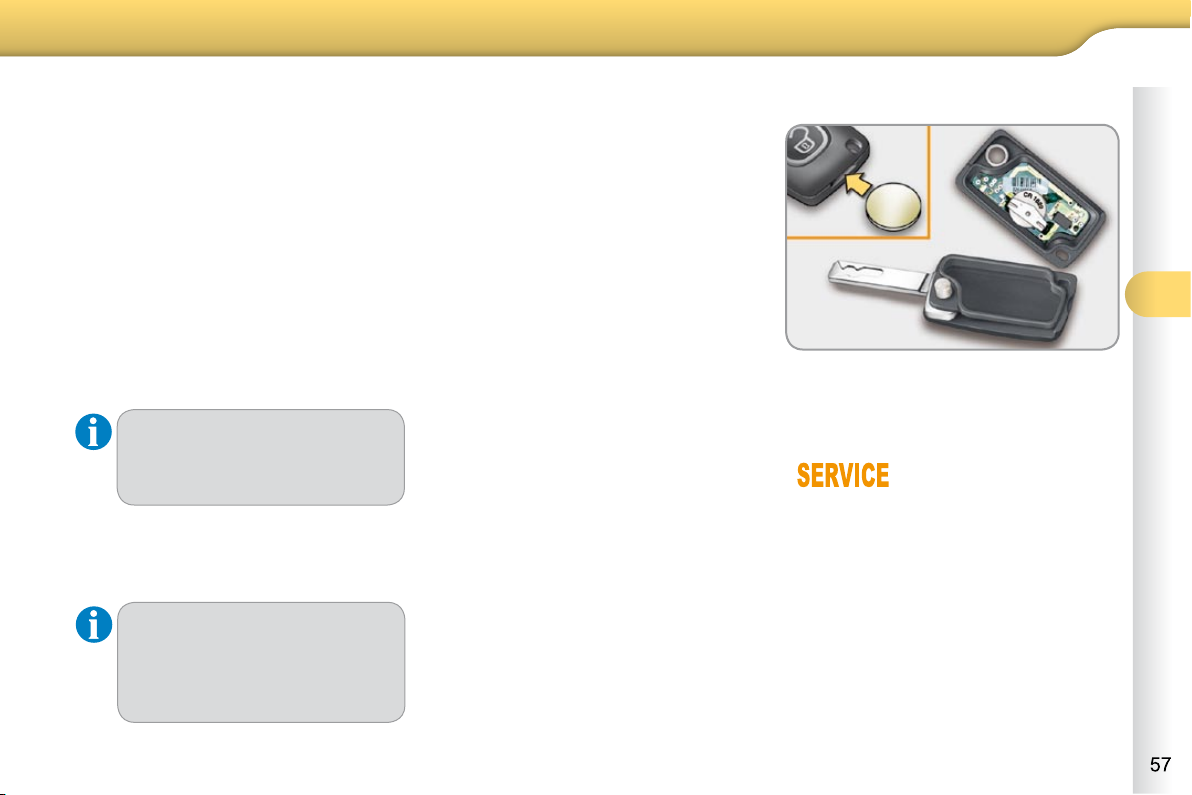
ACCESS
Remote control problem
Following disconnection of the vehicle
battery, replacement of the remote control battery or in the event of a remote
control malfunction, you can no longer
unlock, lock or locate your vehicle.
First of all, use the key in the lock to
unlock or lock your vehicle.
Then, reinitialise the remote control.
If the problem persists, contact a
CITROËN dealer as soon as possible.
Reinitialisation
Switch off the ignition.
Turn the key to position 2 (Ignition) .
Press the closed padlock immedi-
ately for a few seconds.
Switch off the ignition and remove
the key from the ignition switch.
The remote control is fully operational
again.
Changing the battery
Battery ref.: CR1620/3 volts.
This replacement battery is available
from CITROËN dealers.
If the battery is fl at, you
are informed by lighting of this warning lamp,
an audible signal and a
message on the multifunction screen.
Unclip the casing using a coin at the
notch.
Slide the fl at battery out of its location.
Slide the new battery into its loca-
tion observing the original direction.
Clip the casing.
Reinitialise the remote control.
Starting the vehicle
Insert the key in the ignition switch.
The system recognises the starting
code.
Turn the key fully towards the fascia
to position 3 (Starting) .
When the engine starts, release the
key.
Switching the vehicle off
Immobilise the vehicle.
Turn the key fully towards you to posi-
tion 1 (Stop) .
Remove the key from the ignition
switch.
Do not attach any heavy objects
to the key as this could weigh
down on it when in the ignition
switch and cause a fault.
Key reminder
If the key is left in the ignition switch, an audible signal
sounds when the driver's door is
opened.
Page 59
4 4
ACCESS
Lost keys
Visit a CITROËN dealer with the vehicle's V5 registration document and
your personal identifi cation documents.
The CITROËN dealer will be able to retrieve the key code and the transponder code required to order a replacement key.
Do not throw the remote control batteries away, they contain
metals which are harmful to the
environment.
Take them to an approved collection point.
Remote control
The high frequency remote control is a sensitive system; do not operate it
while it is in your pocket as there is a possibility that it may unlock the vehicle,
without you being aware of it.
Do not repeatedly press the buttons of your remote control out of range and
out of sight of your vehicle. You run the risk of stopping it from working and
the remote control would have to be reinitialised.
The remote control does not operate when the key is in the ignition, even
when the ignition is switched off, except for reinitialisation.
Locking the vehicle
Driving with the doors locked may make access to the passenger compart-
ment by the emergency services more diffi cult in an emergency.
As a safety precaution (with children on board), remove the key from the
ignition when you leave the vehicle, even for a short time.
Anti-theft protection
Do not make any modifi cations to the electronic engine immobiliser system;
this could cause malfunctions.
When purchasing a second-hand vehicle
Have the key codes memorised by a CITROËN dealer, to ensure that the
keys in your possession are the only ones which can start the vehicle.
Page 60
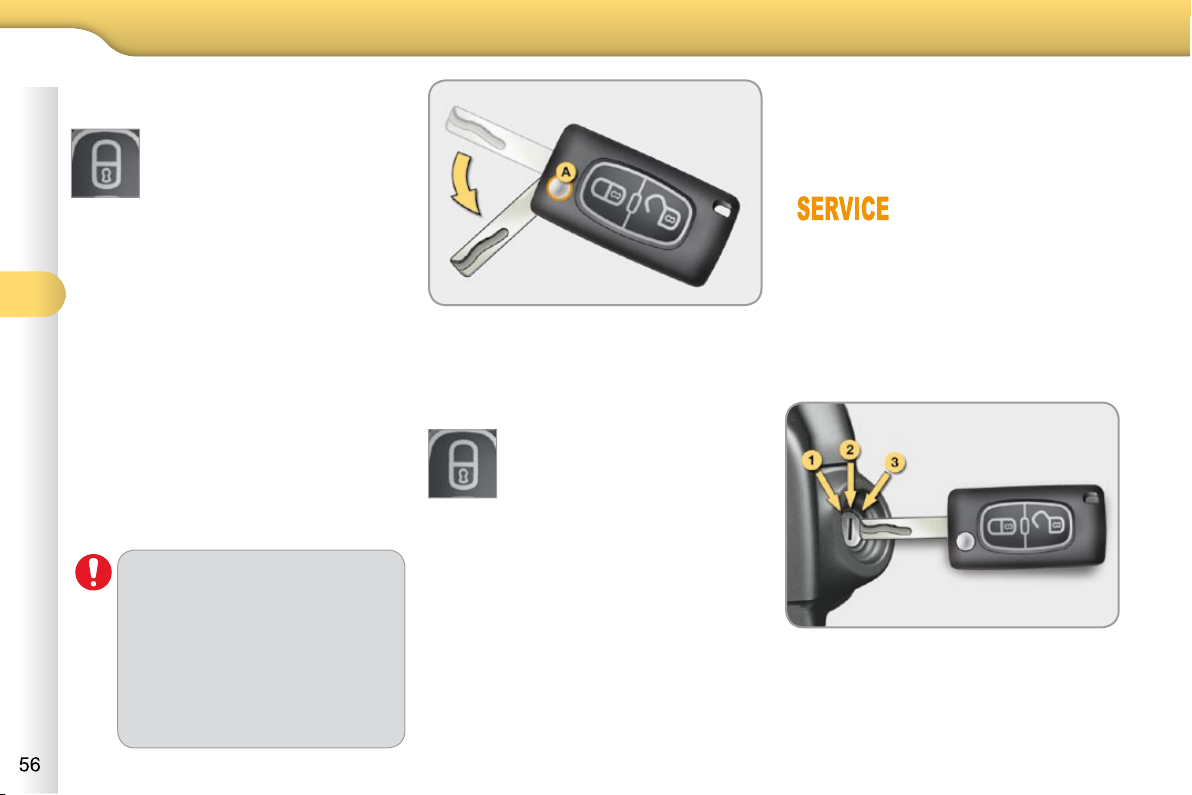
4 4
ACCESS
Anti-theft protection
Electronic engine immobiliser
The key contains an electronic chip
which has a special code. When the
ignition is switched on, this code must
be recognised in order for starting to be
possible.
In the event of a malfunction, you are informed by
lighting of this warning
lamp, an audible signal
and a message on the multifunction
screen.
In this case, your vehicle does not start;
contact a CITROËN dealer as soon as
possible.
Ignition switch
- Position 1: Stop
- Position 2: Ignition
- Position 3: Starting
Locating your vehicle
Press the closed padlock
to locate your locked vehicle in a car park.
This is indicated by lighting of the cour-
tesy lamps and fl ashing of the direction
indicators for a few seconds.
Folding the key
First press button A to fold the key.
Deadlocking using the key
Turn the key to the right in the driv-
er’s door lock to lock the vehicle
completely.
Turn the key to the right again within
fi ve seconds to deadlock the vehicle.
This electronic engine immobiliser locks
the engine management system a few
minutes after the ignition is switched off
and prevents starting of the engine by
anyone who does not have the key.
Deadlocking using the remote
control
Press the closed padlock to
lock the vehicle completely.
Press the closed padlock again
within fi ve seconds to deadlock the
vehicle.
Deadlocking renders the exterior
and interior door controls inoperative.
It also deactivates the manual
central control button.
Therefore, never leave anyone
inside the vehicle when it is
deadlocked.
Deadlocking is confi rmed by fi xed light-
ing of the direction indicators for approximately two seconds.
According to version, the exterior mirrors fold at the same time.
Page 61
4 4
ACCESS
Lost keys
Visit a CITROËN dealer with the vehicle's V5 registration document and
your personal identifi cation documents.
The CITROËN dealer will be able to retrieve the key code and the transponder code required to order a replacement key.
Do not throw the remote control batteries away, they contain
metals which are harmful to the
environment.
Take them to an approved collection point.
Remote control
The high frequency remote control is a sensitive system; do not operate it
while it is in your pocket as there is a possibility that it may unlock the vehicle,
without you being aware of it.
Do not repeatedly press the buttons of your remote control out of range and
out of sight of your vehicle. You run the risk of stopping it from working and
the remote control would have to be reinitialised.
The remote control does not operate when the key is in the ignition, even
when the ignition is switched off, except for reinitialisation.
Locking the vehicle
Driving with the doors locked may make access to the passenger compart-
ment by the emergency services more diffi cult in an emergency.
As a safety precaution (with children on board), remove the key from the
ignition when you leave the vehicle, even for a short time.
Anti-theft protection
Do not make any modifi cations to the electronic engine immobiliser system;
this could cause malfunctions.
When purchasing a second-hand vehicle
Have the key codes memorised by a CITROËN dealer, to ensure that the
keys in your possession are the only ones which can start the vehicle.
Page 62
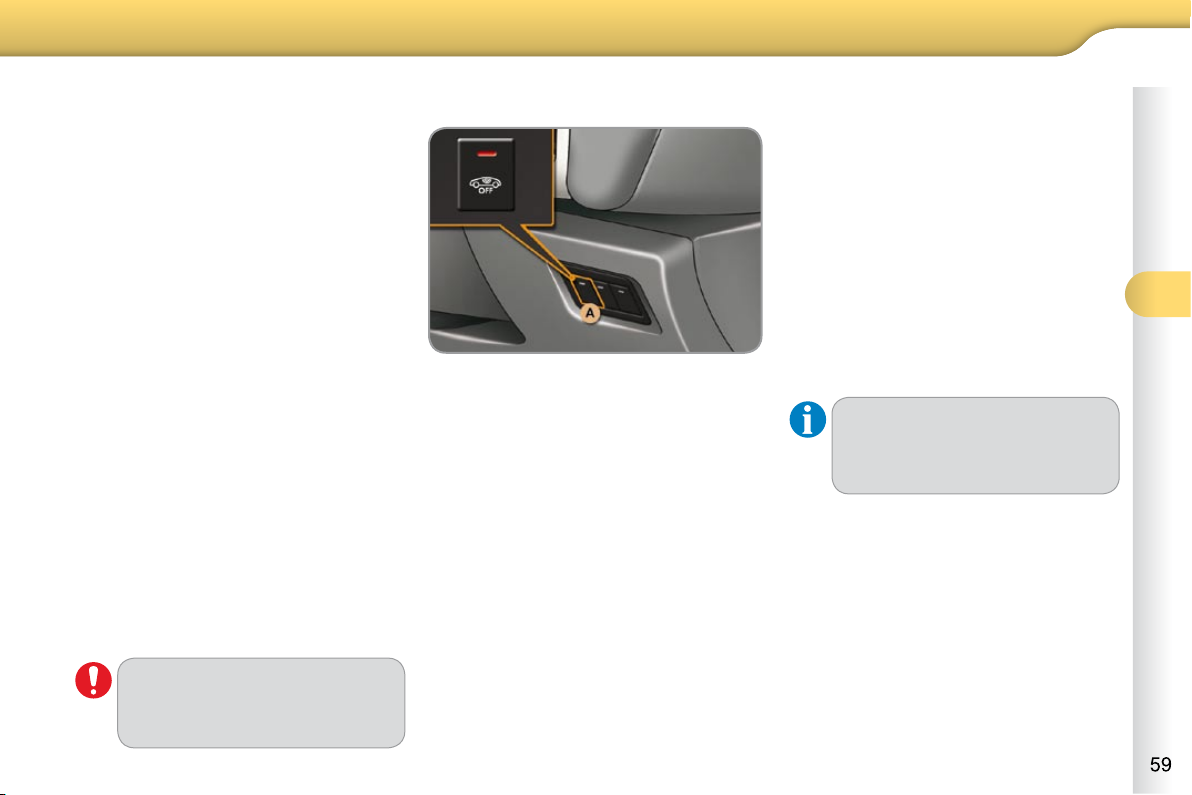
ACCESS
ALARM
System which protects and provides a
deterrent against the theft of your vehicle. It provides two types of protection,
exterior and interior, as well as an antitamper function.
Exterior perimiter protection
The system detects opening of the vehicle.
The alarm is triggered if anyone tries to
enter the vehicle by forcing a door, the
boot or the bonnet.
Interior volumetric protection
The system detects any variation in the
volume in the passenger compartment.
The alarm is triggered if anyone breaks
a window or moves inside the vehicle.
If you wish to leave a pet in the vehicle
or a window partially open, deactivate
the interior volumetric protection.
Anti-tamper function
The system detects the putting out of
service of its components.
The alarm is triggered if anyone tries
to put the wires of the siren, the central
control or the battery out of service.
Do not make any modifi cations
to the alarm system, this could
cause malfunctions.
Locking the vehicle with full
alarm
Activation
Switch off the ignition and get out of
the vehicle.
Lock or deadlock the vehicle using the
locking button on the remote control.
The alarm is activated; the indicator lamp
on button A fl ashes once per second.
Deactivation
Unlock the vehicle using the unlock-
ing button on the remote control.
The alarm is deactivated; the indicator
lamp on button A switches off.
Locking the vehicle with
exterior protection alarm only
Deactivation of the interior
volumetric protection
Switch off the ignition.
Within ten seconds, press button A
until the indicator lamp is lit continu-
ously.
Get out of the vehicle.
Lock or deadlock the vehicle using
the locking button on the remote
control.
The exterior protection alarm alone re-
mains activated; the indicator lamp on
button A fl ashes once per second.
To be effective, this deactivation
must be carried out each time
the ignition is switched off.
Reactivation of the interior
volumetric protection
Unlock the vehicle using the unlocking
button on the remote control.
Relock the vehicle using the remote
control.
The alarm is activated again with both
types of protection; the indicator lamp
on button A switches off.
Page 63
4 4
60
ACCESS
If the alarm is triggered ten times
in succession, the eleventh time
will result in it becoming inactive.
If the indicator lamp on button A
fl ashes rapidly, this indicates
that the alarm was triggered during your absence. When the
ignition is switched on, this fl ash-
ing stops immediately.
To avoid triggering the alarm
when washing your vehicle, lock
it using the key in the driver’s
door lock.
Do not activate the alarm before
disconnecting the battery, otherwise the siren will sound.
Triggering
This is indicated by sounding of the si-
ren and fl ashing of the direction indica-
tors for approximately thirty seconds.
After it has been triggered, the alarm is
again operational.
Failure of the remote control
Unlock the vehicle using the key in
the driver’s door lock.
Open the door; the alarm is trig-
gered.
Switch on the ignition; the alarm
stops.
Locking the vehicle without
activating the alarm
Lock or deadlock the vehicle using
the key in the driver’s door lock.
* According to country.
Malfunction
When the ignition is switched on, lighting of the indicator lamp on button A for
ten seconds indicates a siren fault.
Have it checked by a CITROËN dealer.
Automatic operation *
Depending on the legislation in force in
your country, one of these cases may
occur:
- 45 seconds after the vehicle is
locked using the remote control, the
alarm is activated, regardless of the
status of the doors and boot.
- 2 minutes after the last door or the
boot is closed, the alarm is activated.
To avoid triggering the alarm on en-
tering the vehicle, fi rst press the un-
locking button on the remote control.
Page 64
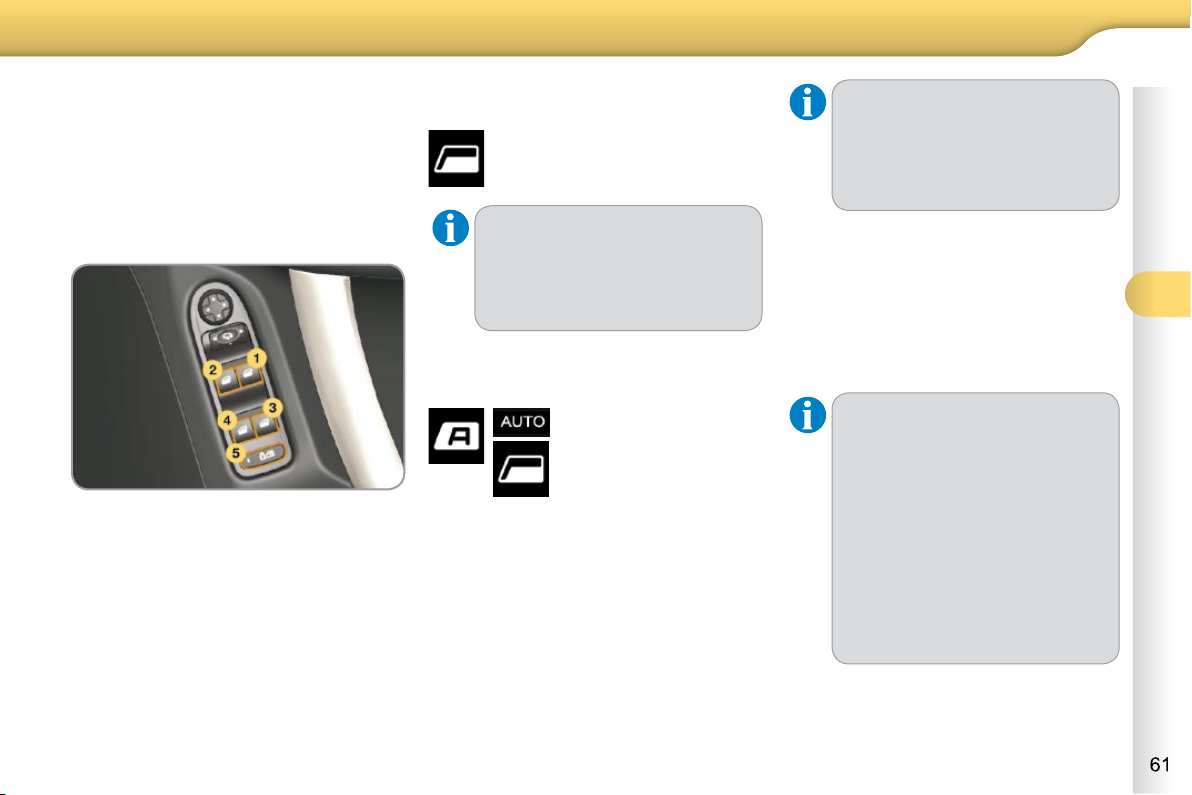
61
ACCESS
WINDOW CONTROLS
System which opens or closes a window
manually or automatically. It is fi tted with
a system which provides protection if an
obstacle is detected on the one-touch
models and a deactivation system to
prevent misuse of the rear switches on
all models.
1. Driver's electric window switch.
2.
Passenger's electric window switch.
3. Rear right electric window switch.
4. Rear left electric window switch.
5. Deactivating the rear electric win-
dow and door switches.
Electric windows
Press or pull the switch.
The window stops as soon
as the switch is released.
The electric window switches
remain operational for approximately 45 seconds after the ignition is switched off or until a front
door is opened.
One-touch electric windows
There are two methods
of operation:
- manual mode
Press or pull the switch gently.
The window stops as soon as the
switch is released.
- automatic mode
Press or pull the switch fully.
The window opens or closes
completely when the switch is
released.
Pressing the switch again stops
the movement of the window.
The electric window switches
remain operational for approximately 45 seconds after the ignition is switched off or until a front
door is opened.
Safety anti-pinch
The one-touch front electric windows are
fi tted with a safety anti-pinch function.
When the window rises and meets an
obstacle, it stops and partially lowers
again.
In the event of unwanted opening
of the window on closing (for example in the presence of frost):
press the switch until it opens
completely,
then pull it immediately until
it closes,
continue to hold the switch for
approximately one second after the window has closed.
The safety anti-pinch function is
not active during these operations.
Page 65
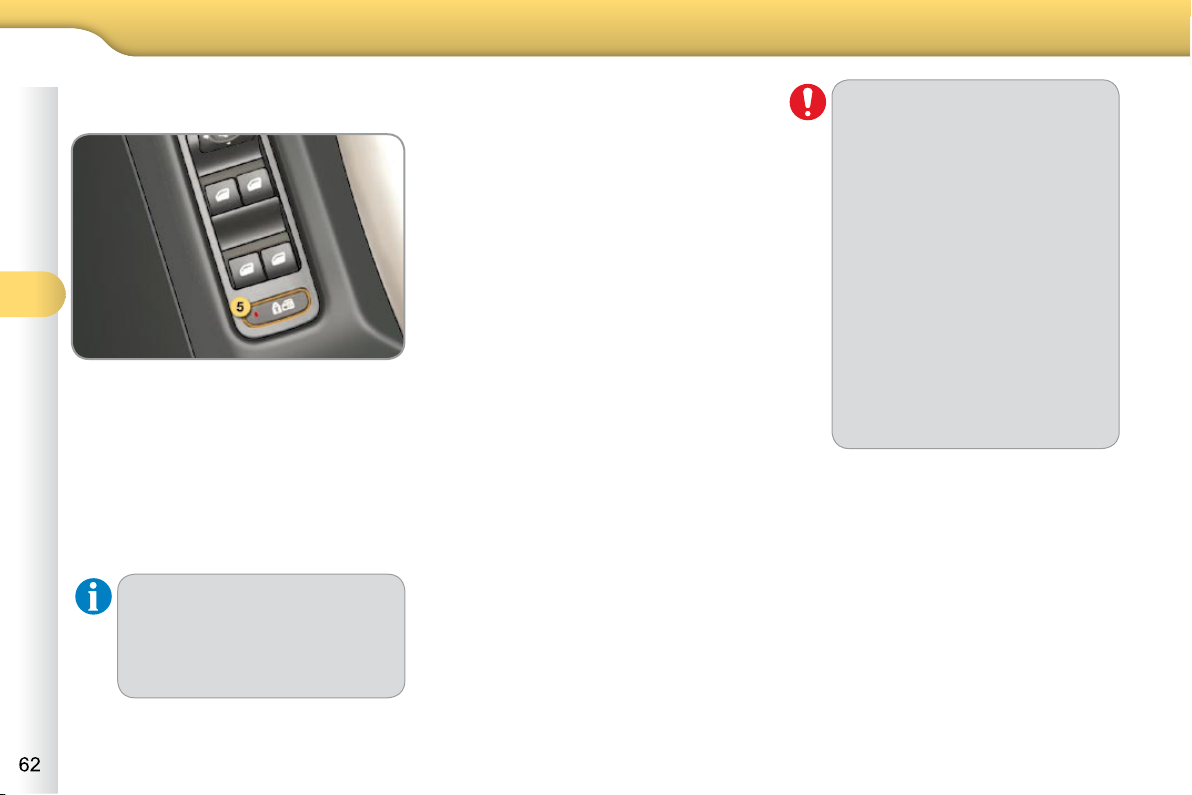
4 4
62
ACCESS
Deactivating the rear window and
door switches
For the safety of your children, press
switch 5 to prevent operation of the
rear windows irrespective of their
position.
With the lamp on, the rear controls are
disarmed.
With the lamp off, the rear controls are
activated.
This control also deactivates the
interior rear door controls (see
"Child safety - § Electronic child
safety").
Reinitialisation
In the event of a malfunction you have
to reinitialise the operation of the electric windows:
release the switch and pull it again
until the window closes completely,
hold the switch for approximately
one second after closing,
press the switch to lower the window
automatically.
The safety anti-pinch function is not
active during these operations.
Always remove the key from the
ignition when leaving the vehicle, even for a short time.
In the event of contact during
operation of the windows, reverse the movement of the window. To do this, press the switch
concerned.
When the driver operates the
passenger electric window
switches, they should ensure
that no one is preventing correct
closing of the windows.
The driver should ensure that
passengers use the electric
windows correctly.
Be aware of children when operating the windows.
Page 66
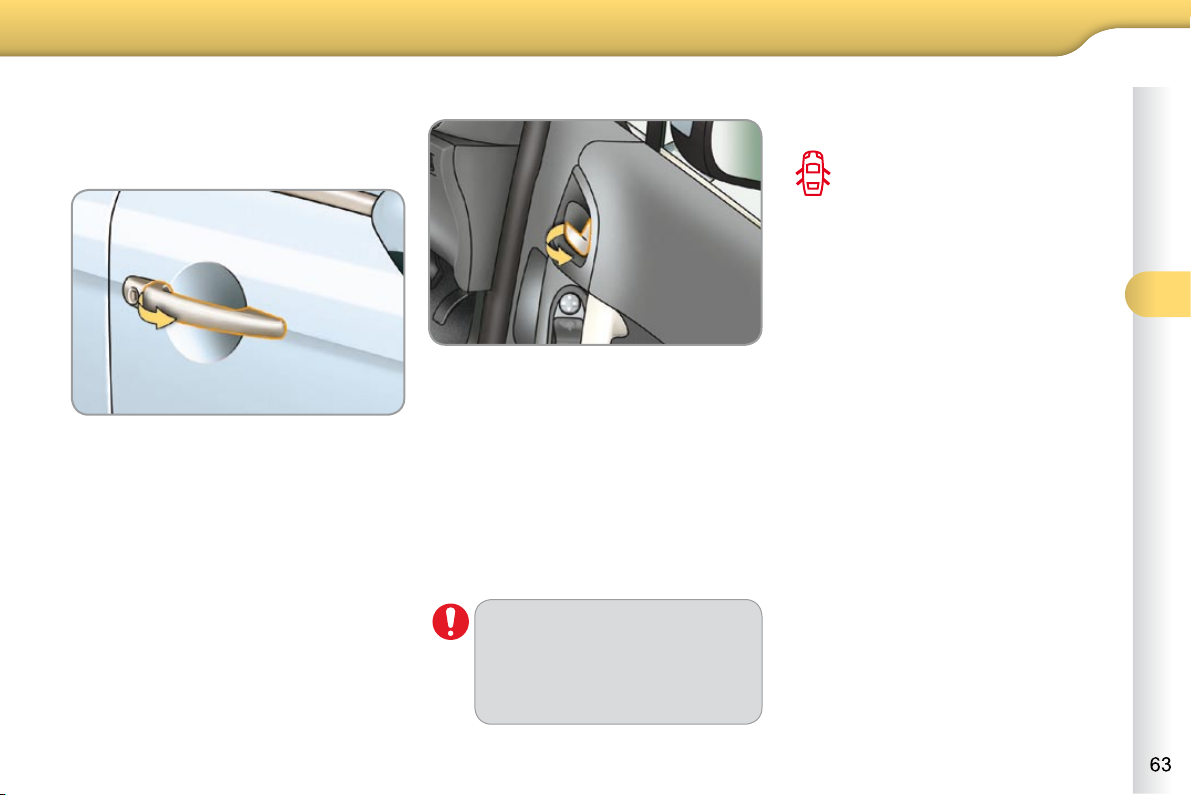
63
ACCESS
Opening
From outside
After unlocking the vehicle using the
remote control or the key, pull the
door handle.
From inside
Pull on the front door control to open
the door; this unlocks the vehicle
completely.
Pull on the rear door control to
open the door; this unlocks the door
concerned only.
Closing
When a door is not closed correctly:
-
when the engine is running ,
this warning lamp comes on,
accompanied by a message
on the multifunction screen
for a few seconds,
- when the vehicle is moving (speed
higher than 6 mph (10 km/h)), this
warning lamp comes on, accompa-
nied by an audible signal and a mes-
sage on the multifunction screen for
a few seconds.
Version with deadlocking
The interior door controls do
not operate when the vehicle is
deadlocked.
Page 67
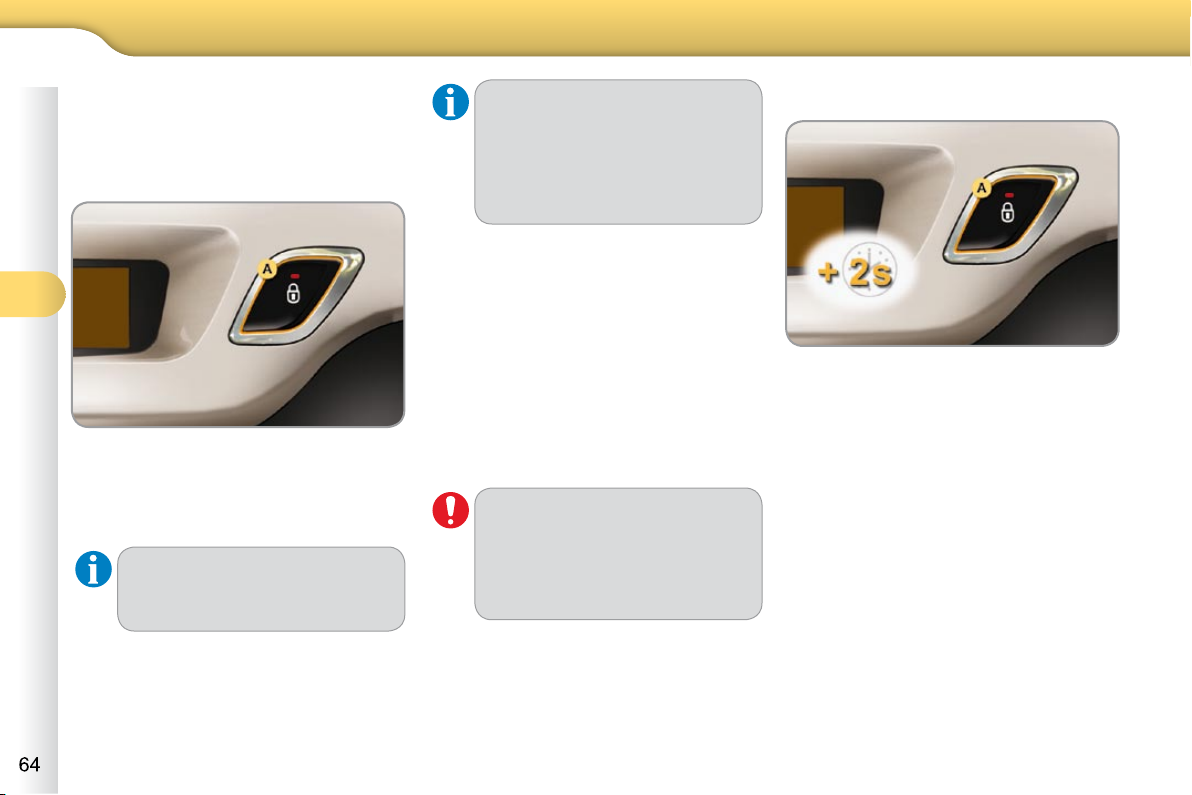
4 4
64
ACCESS
Manual centralised control
System which provides full manual
locking or unlocking of the doors from
the inside.
Locking
Press button A to lock the vehicle.
The red indicator lamp on the button
comes on.
If one of the doors is open, central locking from the inside does
not take place.
Unlocking
Press button A again to unlock the
vehicle.
The red indicator lamp on the button
switches off.
If the vehicle is locked from the
outside, the red indicator lamp
fl ashes and button A is inactive.
In this case, use the remote
control or the key to unlock
the vehicle.
Automatic centralised control
System which provides full automatic
locking or unlocking of the doors and
the boot while driving.
You can activate or deactivate this function.
Locking
When the speed exceeds 6 mph
(10 km/h), the doors and the boot lock
automatically.
If one of the doors is open, the
automatic central locking does
not take place.
If the boot is open, the automatic
central locking of the doors is active.
Unlocking
Above 6 mph (10 km/h), press but-
ton A to unlock the doors and the
boot temporarily.
Activation
Press button A for more than
two seconds.
A confi rmation message appears on the
multifunction screen, accompanied by
an audible signal.
Deactivation
Press button A again for more than
two seconds.
A confi rmation message appears on the
multifunction screen, accompanied by
an audible signal.
Page 68
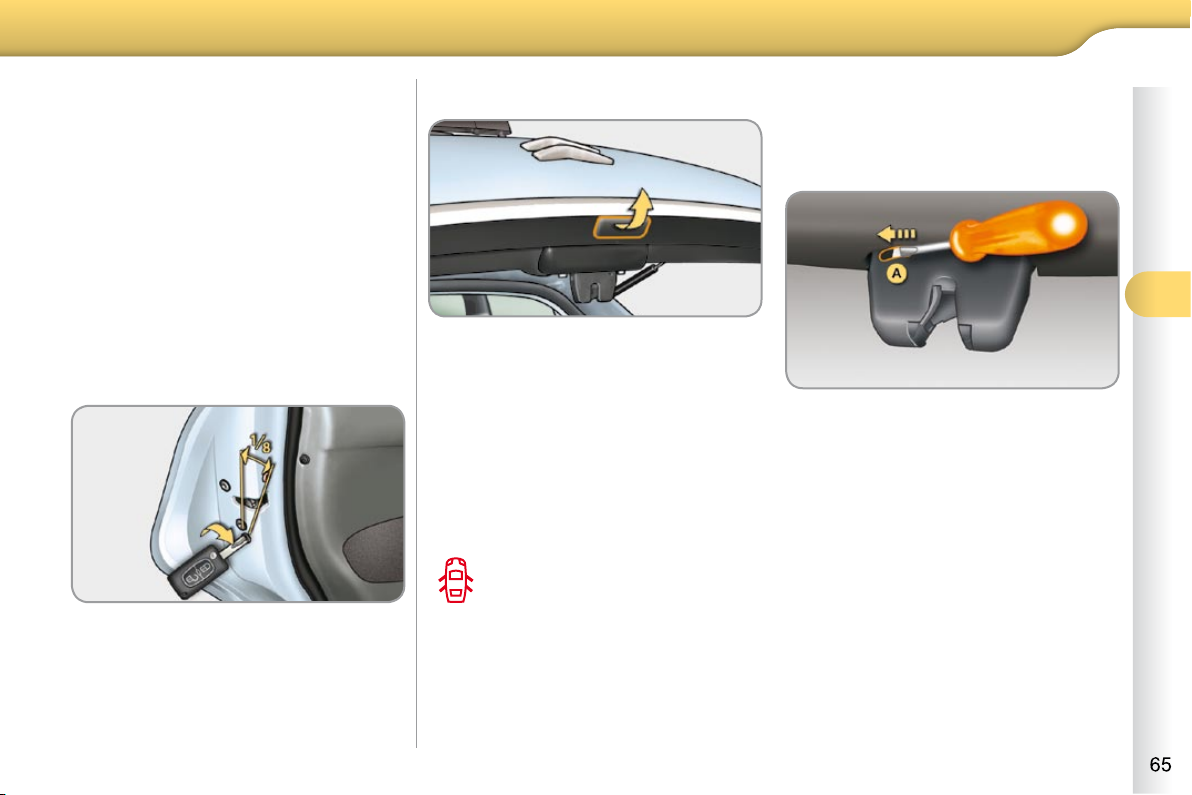
65
ACCESS
Emergency control
System which locks or unlocks the
doors mechanically in the event of a
malfunction of the battery or of the central locking.
Locking the driver's door
Insert the key in the lock, then turn it
to the right.
Unlocking the driver's door
Insert the key in the lock, then turn it
to the left.
Locking the front and rear
passenger doors
Insert the key in the lock, located on
the edge of the door, then turn it one
eighth of a turn .
Unlocking the front and rear
passenger doors
Pull the interior door opening control.
Opening
After unlocking the vehicle using the
remote control or the key, pull the
handle and raise the tailgate.
Closing
Lower the tailgate using the interior
grab handle.
If the tailgate is not closed correctly:
-
when the engine is running
,
this warning lamp comes on,
accompanied by a message
on the multifunction screen
for a few seconds,
- when the vehicle is moving (speed
above 6 mph (10 km/h)), this warning lamp comes on, accompanied
by an audible signal and a message
on the multifunction screen for a few
seconds.
Tailgate release
System for mechanical unlocking of the
boot in the event of a battery or central
locking malfunction.
Unlocking
Fold back the rear benchseat to
gain access to the lock from inside
the boot.
Insert a small screwdriver into hole A
of the lock to unlock the tailgate.
Page 69
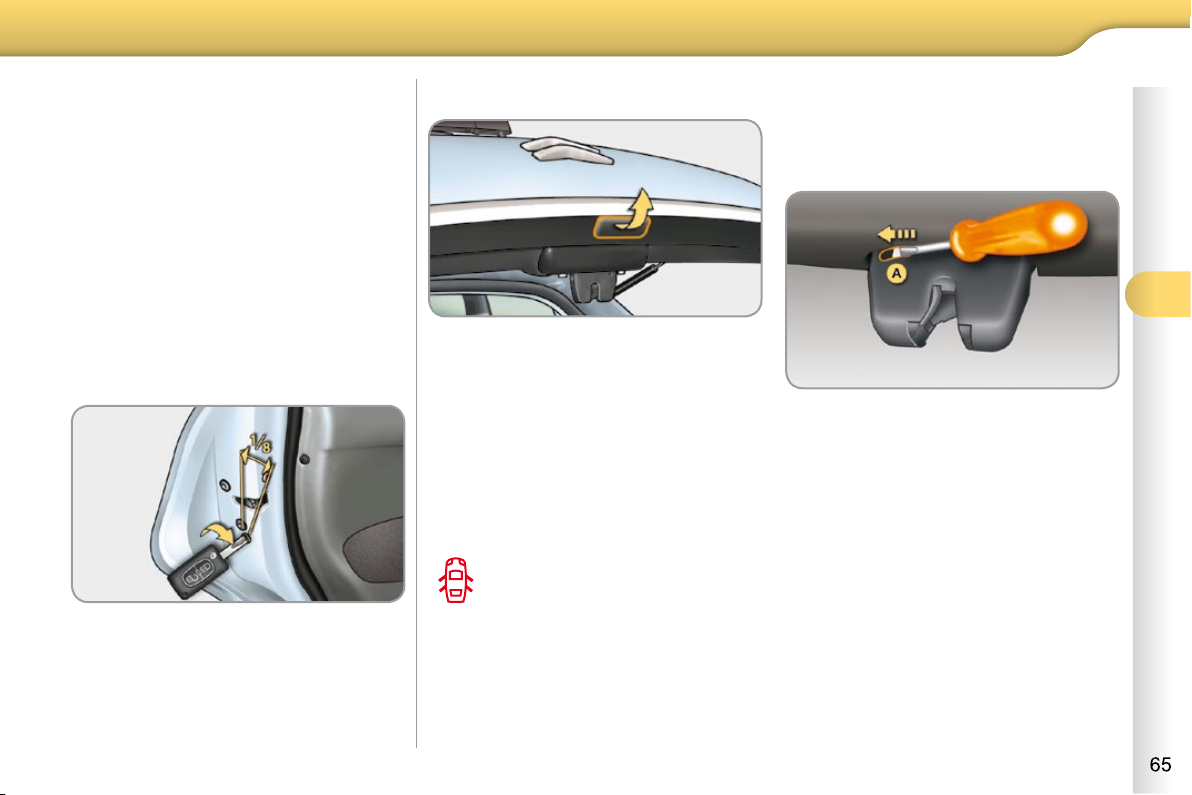
65
ACCESS
Emergency control
System which locks or unlocks the
doors mechanically in the event of a
malfunction of the battery or of the central locking.
Locking the driver's door
Insert the key in the lock, then turn it
to the right.
Unlocking the driver's door
Insert the key in the lock, then turn it
to the left.
Locking the front and rear
passenger doors
Insert the key in the lock, located on
the edge of the door, then turn it one
eighth of a turn .
Unlocking the front and rear
passenger doors
Pull the interior door opening control.
Opening
After unlocking the vehicle using the
remote control or the key, pull the
handle and raise the tailgate.
Closing
Lower the tailgate using the interior
grab handle.
If the tailgate is not closed correctly:
-
when the engine is running
,
this warning lamp comes on,
accompanied by a message
on the multifunction screen
for a few seconds,
- when the vehicle is moving (speed
above 6 mph (10 km/h)), this warning lamp comes on, accompanied
by an audible signal and a message
on the multifunction screen for a few
seconds.
Tailgate release
System for mechanical unlocking of the
boot in the event of a battery or central
locking malfunction.
Unlocking
Fold back the rear benchseat to
gain access to the lock from inside
the boot.
Insert a small screwdriver into hole A
of the lock to unlock the tailgate.
Page 70
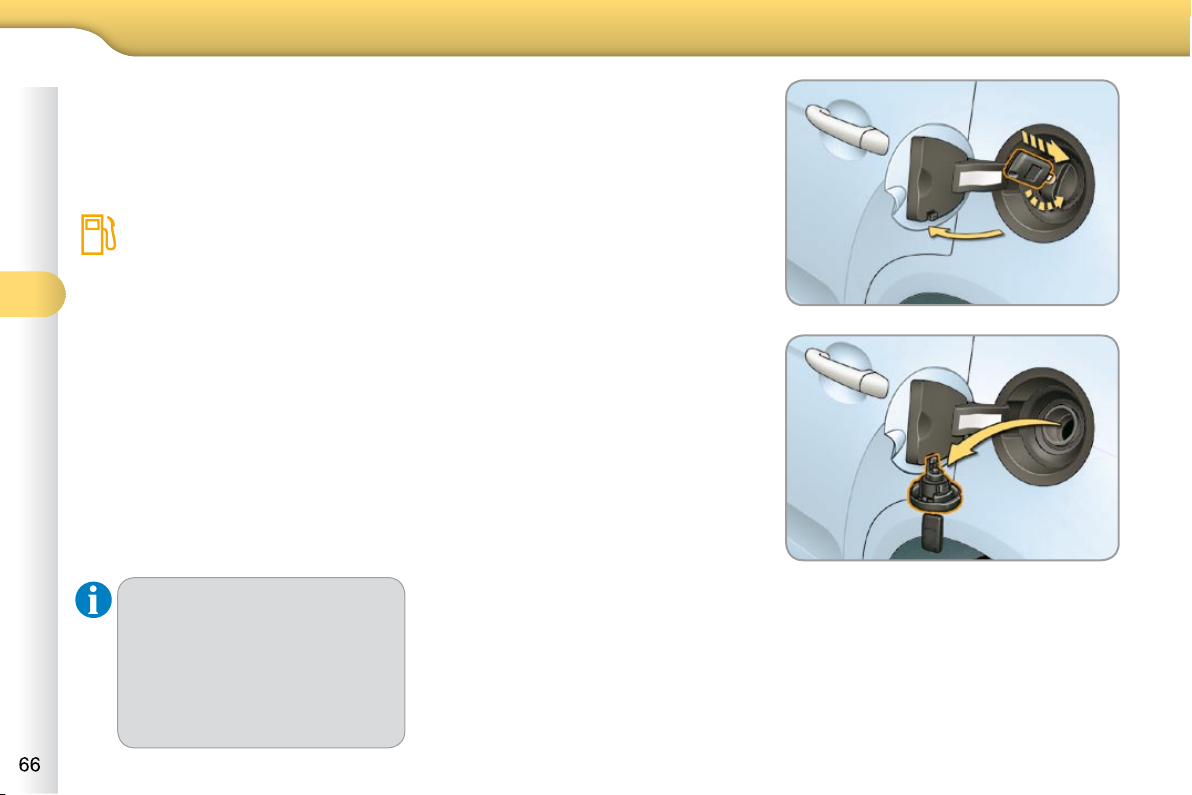
4 4
66
ACCESS
The key cannot be removed from
the lock until the cap is refi tted.
Opening the fi ller cap may create
a noise a caused by an inrush of
air. This vacuum is entirely normal, resulting from the sealing of
the fuel system.
Fuel tank capacity: approximately
50 litres (petrol) or 45 litres (Diesel).
Low fuel level
When the fuel tank minimum
level is reached this warning
lamp comes on on the instru-
ment panel. When it fi rst comes
on there remains approximately 5 litres
of fuel in the tank.
Refuel as soon as possible to avoid running out of fuel.
If you run out of fuel (Diesel), refer also
to the "Practical information" section.
Filling
A label affi xed to the inside of the fl ap
reminds you of the type of fuel to be
used depending on your engine.
Additions of fuel must be of at least 5 litres,
in order to be taken into account by the fuel
gauge.
To fi ll the tank in complete safety:
it is imperative that the engine is
switched off,
open the fuel fi ller fl ap,
insert the key in the cap, then turn it
to the left,
remove the cap and hook it onto
the clip located on the inside of the
fl ap,
fi ll the tank, but do not continue af-
ter the 3rd cut-off of the pump ; this
could cause malfunctions.
When you have fi lled the tank:
put the cap back in place,
turn the key to the right, then remove
it from the cap,
close the fl ap.
Page 71
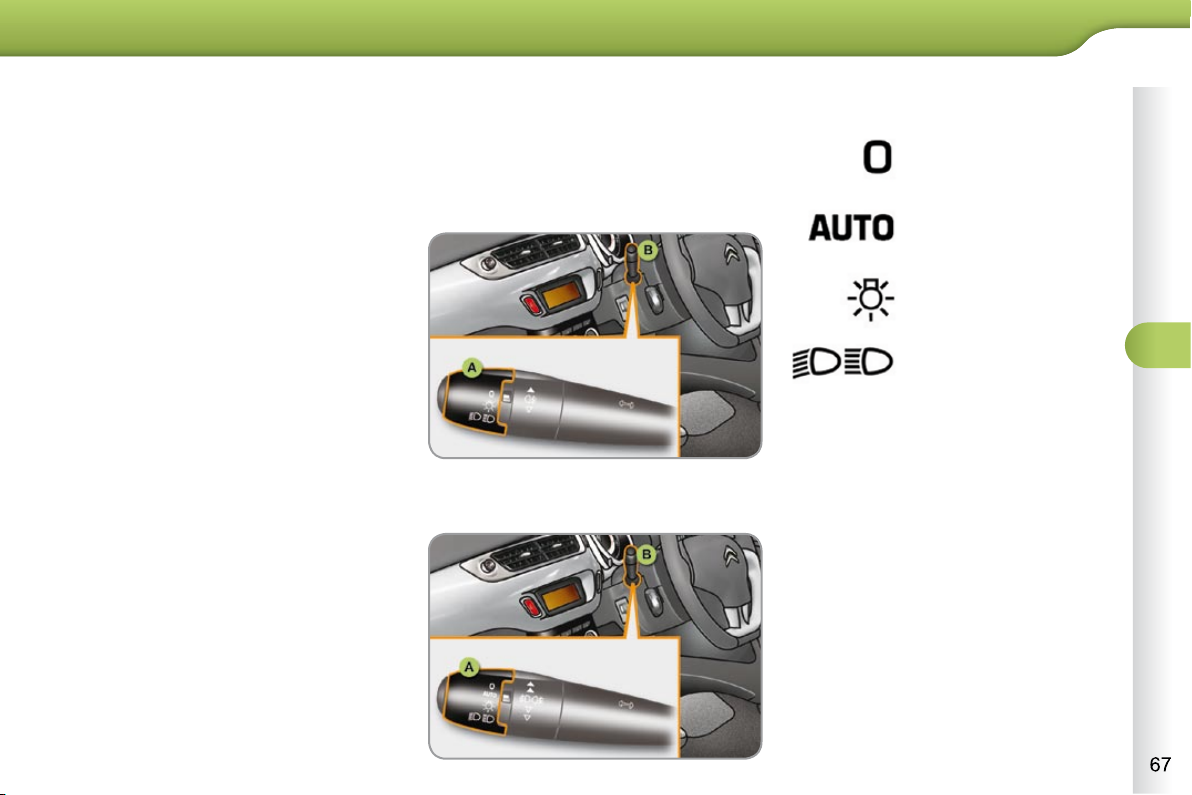
67
VISIBILITY
System for selection and control of the
various front and rear lamps providing
the vehicle's lighting.
Main lighting
The various front and rear lamps of the
vehicle are designed to adapt the driver's
visibility progressively according to climatic conditions:
- sidelamps, to be seen,
- dipped beam headlamps to see
without dazzling other drivers,
- main beam headlamps to see clearly
when the road is clear.
Additional lighting
Other lamps are installed to fulfi l the
requirements of particular conditions of
visibility:
- a rear foglamp,
- front foglamps.
Programming
Various automatic lighting control
modes are also available according to
the following options:
- guide-me-home lighting,
- automatic lighting.
Model without AUTO lighting
Model with AUTO lighting
lamps off,
automatic switching on
of the lamps,
sidelamps only,
dipped headlamps or
main beam headlamps.
B. Stalk for switching headlamps by
pulling: dipped headlamps/main
beam headlamps.
In the lamps off and sidelamps modes, the
driver can switch on the main beam head-
lamps temporarily ("headlamp fl ash") by
maintaining a pull on the stalk.
Displays
Lighting of the corresponding indicator
lamp on the instrument panel confi rms
the selective switching on of the lighting
selected.
Depending on the version, the instrument
panel may have permanent back-lighting.
In this case, illumination of the instrument
panel is not linked to the exterior lighting.
Manual controls
The lighting commands are issued directly by the driver by means of the
ring A and the stalk B .
A. Main lighting mode selection ring,
with:
Page 72
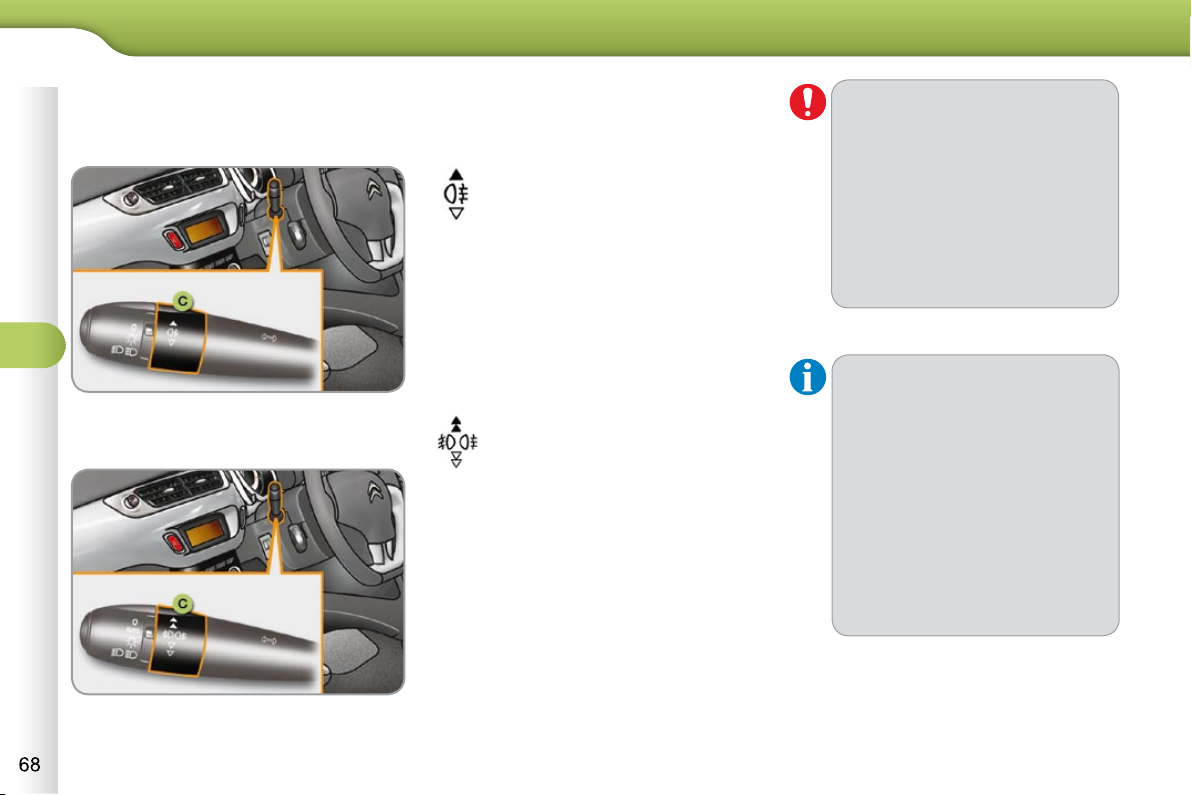
5 5
68
VISIBILITY
C. fog lamps selection ring.
The fog lamps operate with the dipped
and main beam headlamps.
rear foglamp
Turn the ring C forwards once to
switch on the front foglamps and
twice for the rear foglamp.
Turn the ring C rearwards once to
switch off the rear foglamp and twice
for the front foglamps.
When the lighting is switched off auto-
matically (with AUTO model) or when
the dipped headlamps are switched off
manually, the foglamps and sidelamps
will remain on.
Turn the ring rearwards to switch
off the foglamps, the sidelamps will
then switch off.
Model with rear foglamp only
To switch on the foglamp, turn the
ring C forwards.
When the lighting is switched off auto-
matically (with AUTO model), the fo-
glamp and the dipped headlamps will
remain on.
To switch off all of the lighting, turn
the ring C rearwards.
Model with front foglamps and
a rear foglamp
front and rear foglamps
In good or rainy weather, by both
day and night, the front foglamps
and the rear foglamp are prohibited. In these situations, the power
of their beams may dazzle other
drivers.
Do not forget to switch off the
front foglamps and the rear foglamp when they are no longer
necessary.
Lighting on buzzer
When the ignition is switched
off, all of the lamps switch off
automatically, unless "guide-mehome lighting" is activated.
If the lighting is switched on manually after switching off the ignition,
there is an audible signal when a
front door is opened to warn the
driver that they have forgotten to
switch off the vehicle's lighting,
with the ignition off.
Page 73
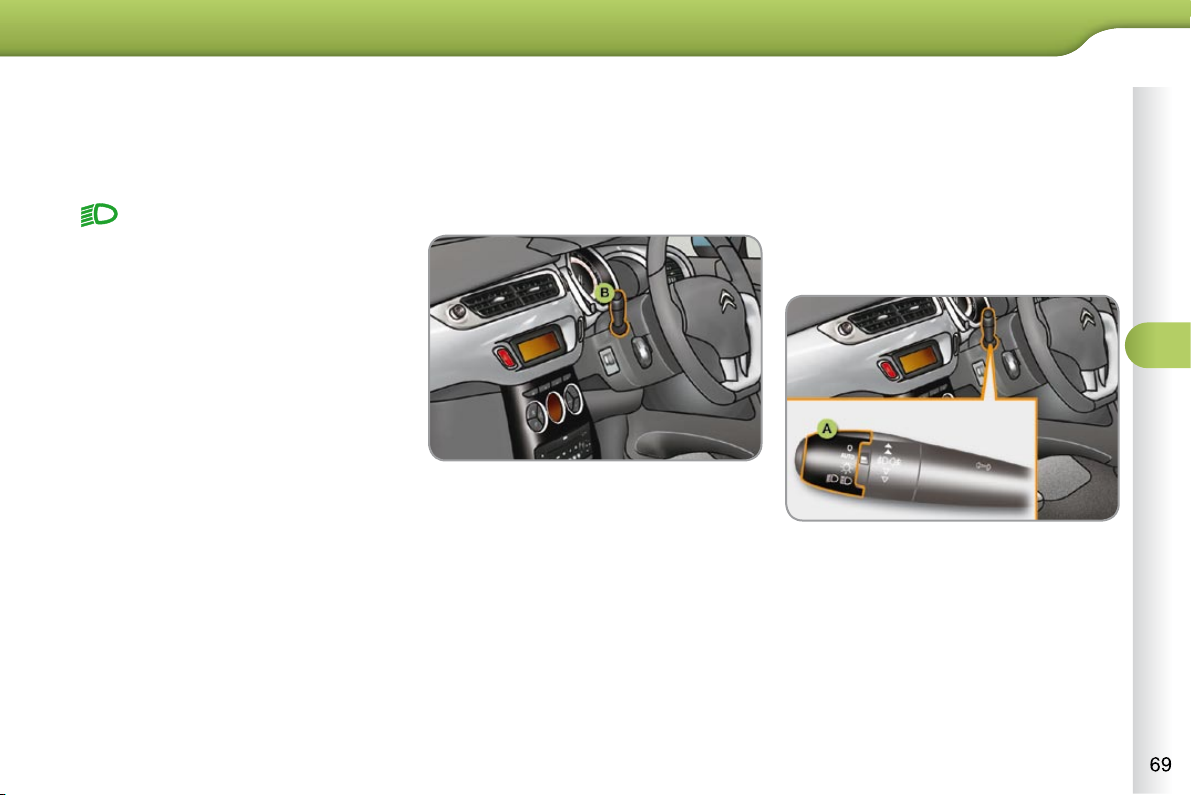
69
VISIBILITY
* According to country.
Daytime running lamps *
On vehicles fi tted with daytime run-
ning lamps, the dipped beams come on
when the vehicle is started.
Manual guide-me-home lighting
Temporarily keeping the dipped headlamps on after the vehicle's ignition has
been switched off makes the driver's
exit easier when the light is poor.
Switching on
With the ignition off, "fl ash" the head-
lamps using the lighting stalk B .
A second "headlamp fl ash" switches
the function off again.
Switching off
The manual guide-me-home lighting
switches off automatically after a set
time.
Automatic lighting
The sidelamps and dipped headlamps
are switched on automatically, without
any action on the part of the driver,
when a low level of external light is detected or in certain cases of activation
of the windscreen wipers.
As soon as the brightness returns to a
suffi cient level or after the windscreen
wipers are switched off, the lamps are
switched off automatically.
Activation
Turn ring A to the "AUTO" position.
The automatic lighting is accompanied
by a message on the multifunction
screen.
Deactivation
Turn ring A to a position other than
"AUTO" . Deactivation is accompanied
by a message on the multifunction
screen.
This warning lamp comes on on
the instrument panel.
The instruments and controls (instrument panel, multifunction display, air
conditioning control panel, etc.) are not
lit, except on switching to the automatic
lighting mode or when the lighting is
switched on manually.
This function can be activated/deactivated by a CITROËN dealer.
Page 74
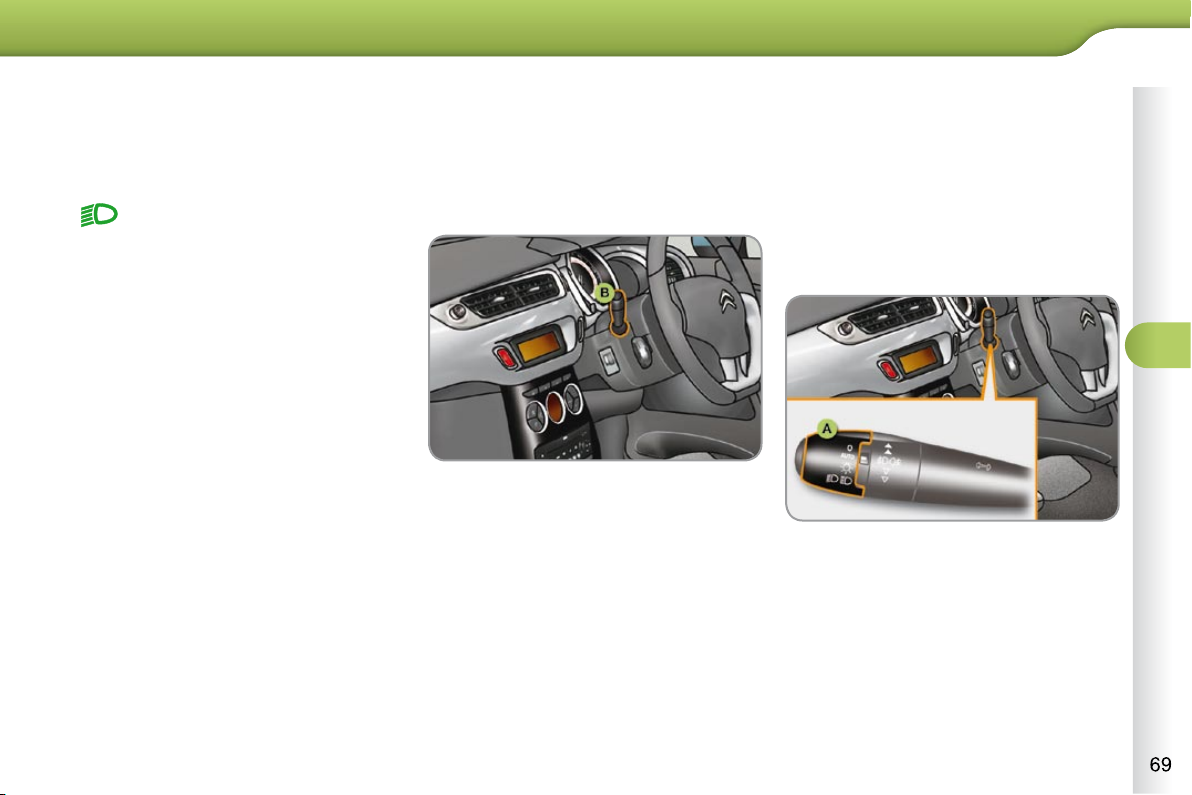
69
VISIBILITY
* According to country.
Daytime running lamps *
On vehicles fi tted with daytime run-
ning lamps, the dipped beams come on
when the vehicle is started.
Manual guide-me-home lighting
Temporarily keeping the dipped headlamps on after the vehicle's ignition has
been switched off makes the driver's
exit easier when the light is poor.
Switching on
With the ignition off, "fl ash" the head-
lamps using the lighting stalk B .
A second "headlamp fl ash" switches
the function off again.
Switching off
The manual guide-me-home lighting
switches off automatically after a set
time.
Automatic lighting
The sidelamps and dipped headlamps
are switched on automatically, without
any action on the part of the driver,
when a low level of external light is detected or in certain cases of activation
of the windscreen wipers.
As soon as the brightness returns to a
suffi cient level or after the windscreen
wipers are switched off, the lamps are
switched off automatically.
Activation
Turn ring A to the "AUTO" position.
The automatic lighting is accompanied
by a message on the multifunction
screen.
Deactivation
Turn ring A to a position other than
"AUTO" . Deactivation is accompanied
by a message on the multifunction
screen.
This warning lamp comes on on
the instrument panel.
The instruments and controls (instrument panel, multifunction display, air
conditioning control panel, etc.) are not
lit, except on switching to the automatic
lighting mode or when the lighting is
switched on manually.
This function can be activated/deactivated by a CITROËN dealer.
Page 75
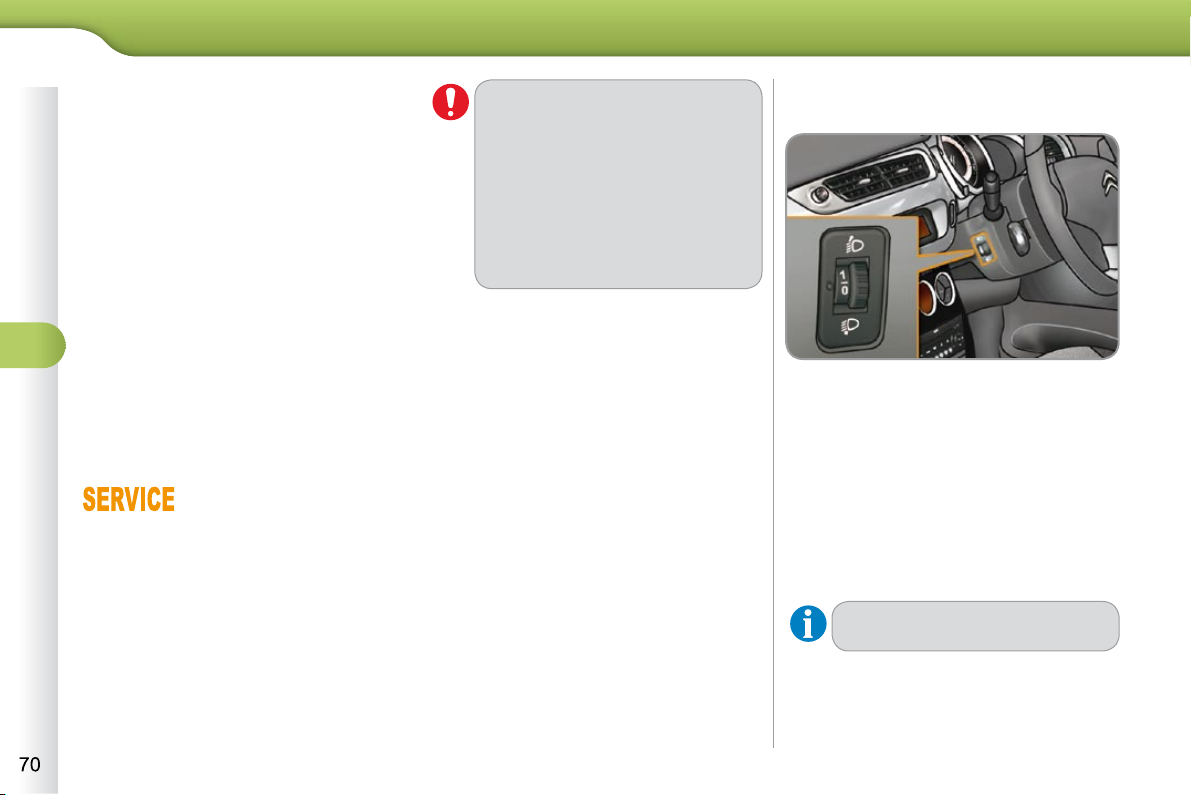
5 5
VISIBILITY
To avoid causing a nuisance to other
road users, the height of the headlamps
should be adjusted in relation to the load
in the vehicle.
0 . 1 or 2 people in the front seats.
-. 3 people.
1. 5 people.
2. 5 people + maximum authorised load.
3. Driver + maximum authorised load.
The initial setting is position "0" .
Coupling with the automatic
"Guide-me-home" lighting
Association with the automatic lighting
provides "guide-me-home" lighting with
the following additional options:
- selection of the lighting duration to
15, 30 or 60 seconds in the vehicle
parameters on the multifunction
screen confi guration menu (except
in the case of the monochrome
screen A, for which the duration is
set: 60 seconds),
- automatic activation of "guide-mehome" lighting when automatic lighting
is in operation.
Operating fault
In fog or snow, the brightness
sensor may detect suffi cient
light. Therefore, the lighting will
not come on automatically.
Do not cover the brightness sensor, coupled with the rain sensor
and located in the centre of the
windscreen behind the interior
mirror; the associated functions
would no longer be controlled.
In the event of a fault with
the brightness sensor,
the lighting come on, this
warning lamp is displayed
on the instrument panel and/or a message appears on the multifunction screen,
accompanied by an audible signal.
Consult a CITROËN dealer.
Page 76
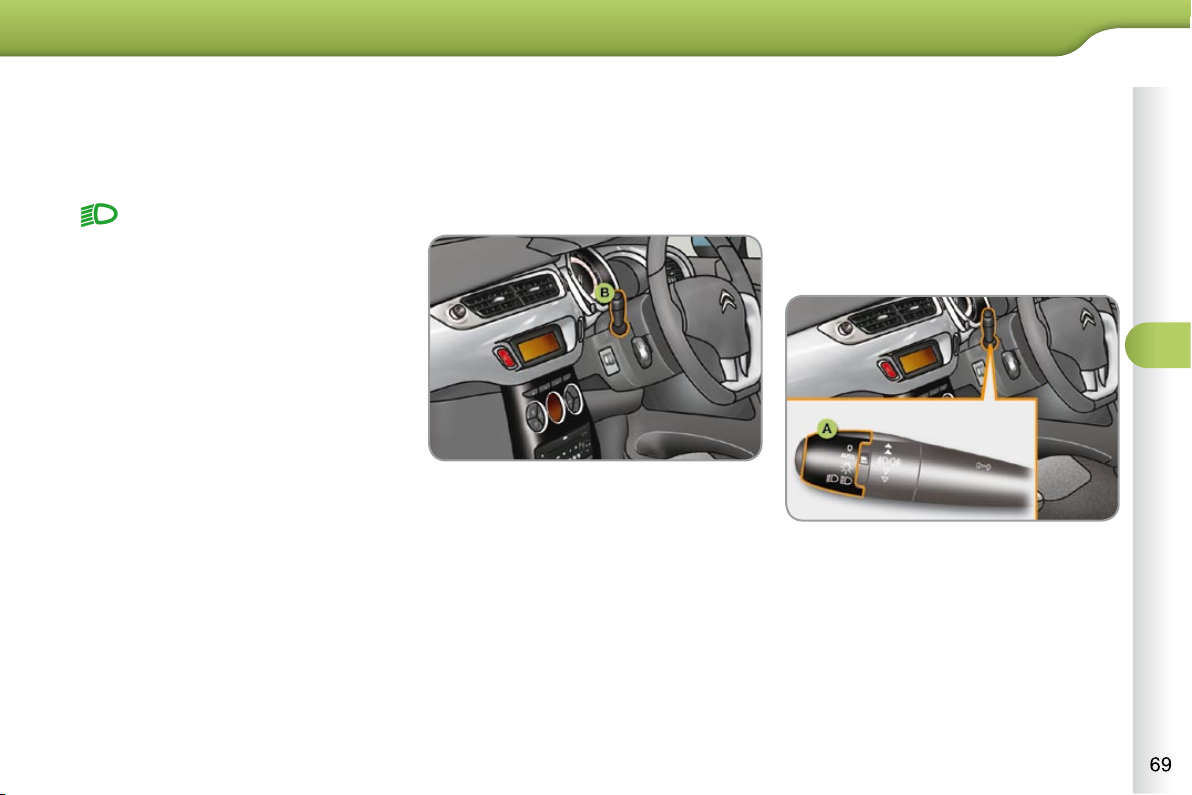
69
VISIBILITY
* According to country.
Daytime running lamps *
On vehicles fi tted with daytime run-
ning lamps, the dipped beams come on
when the vehicle is started.
Manual guide-me-home lighting
Temporarily keeping the dipped headlamps on after the vehicle's ignition has
been switched off makes the driver's
exit easier when the light is poor.
Switching on
With the ignition off, "fl ash" the head-
lamps using the lighting stalk B .
A second "headlamp fl ash" switches
the function off again.
Switching off
The manual guide-me-home lighting
switches off automatically after a set
time.
Automatic lighting
The sidelamps and dipped headlamps
are switched on automatically, without
any action on the part of the driver,
when a low level of external light is detected or in certain cases of activation
of the windscreen wipers.
As soon as the brightness returns to a
suffi cient level or after the windscreen
wipers are switched off, the lamps are
switched off automatically.
Activation
Turn ring A to the "AUTO" position.
The automatic lighting is accompanied
by a message on the multifunction
screen.
Deactivation
Turn ring A to a position other than
"AUTO" . Deactivation is accompanied
by a message on the multifunction
screen.
This warning lamp comes on on
the instrument panel.
The instruments and controls (instrument panel, multifunction display, air
conditioning control panel, etc.) are not
lit, except on switching to the automatic
lighting mode or when the lighting is
switched on manually.
This function can be activated/deactivated by a CITROËN dealer.
Page 77
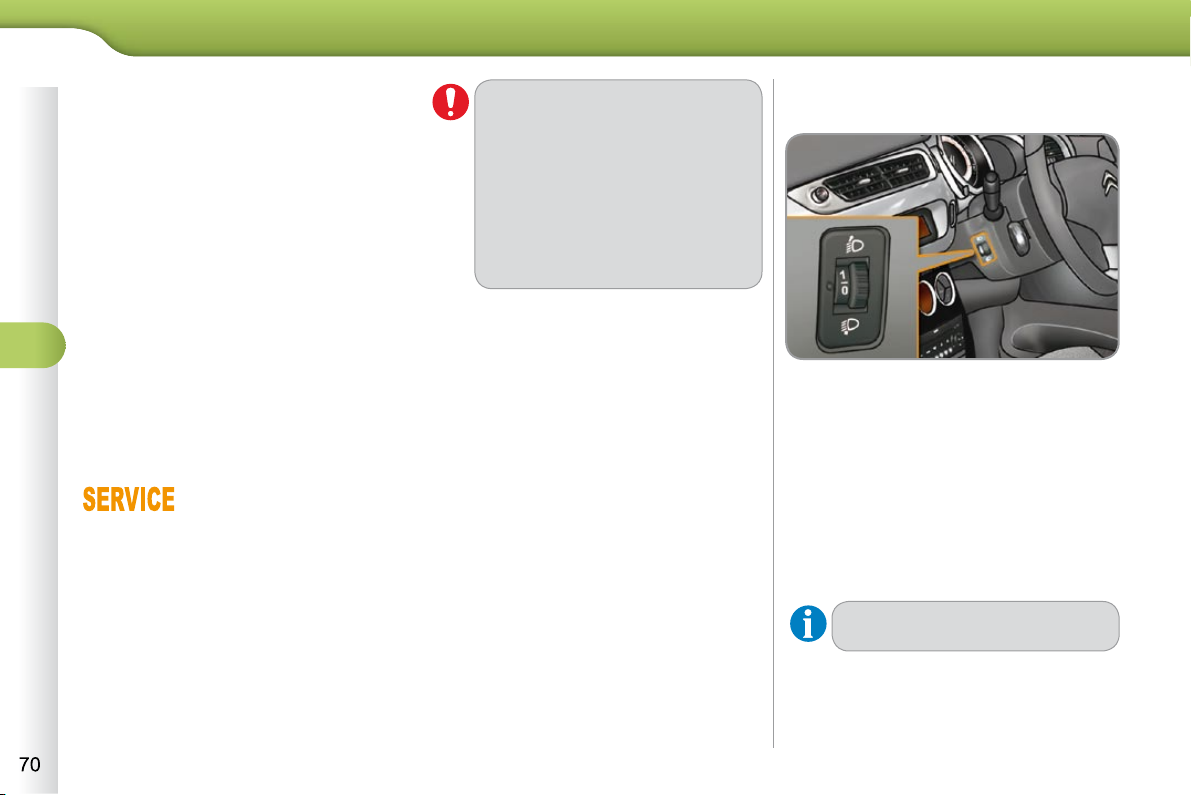
5 5
VISIBILITY
To avoid causing a nuisance to other
road users, the height of the headlamps
should be adjusted in relation to the load
in the vehicle.
0 . 1 or 2 people in the front seats.
-. 3 people.
1. 5 people.
2. 5 people + maximum authorised load.
3. Driver + maximum authorised load.
The initial setting is position "0" .
Coupling with the automatic
"Guide-me-home" lighting
Association with the automatic lighting
provides "guide-me-home" lighting with
the following additional options:
- selection of the lighting duration to
15, 30 or 60 seconds in the vehicle
parameters on the multifunction
screen confi guration menu (except
in the case of the monochrome
screen A, for which the duration is
set: 60 seconds),
- automatic activation of "guide-me-
home" lighting when automatic lighting
is in operation.
Operating fault
In fog or snow, the brightness
sensor may detect suffi cient
light. Therefore, the lighting will
not come on automatically.
Do not cover the brightness sensor, coupled with the rain sensor
and located in the centre of the
windscreen behind the interior
mirror; the associated functions
would no longer be controlled.
In the event of a fault with
the brightness sensor,
the lighting come on, this
warning lamp is displayed
on the instrument panel and/or a message appears on the multifunction screen,
accompanied by an audible signal.
Consult a CITROËN dealer.
Page 78
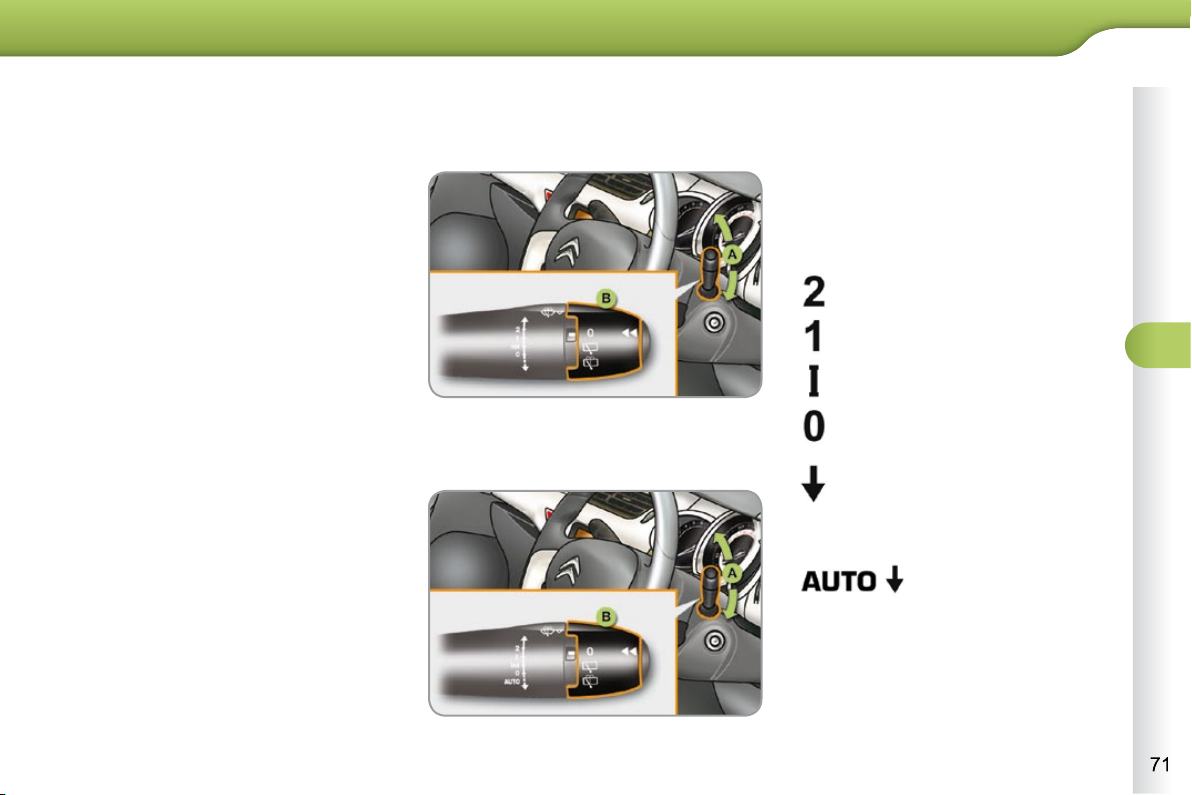
VISIBILITY
WIPER CONTROLS
System for selection and control of the
various front and rear wiping modes for
the elimination of rain and cleaning.
The vehicle's front and rear wipers are
designed to improve the driver's visibility
progressively according to the climatic
conditions.
Programming
Various automatic wiper control modes
are also available according to the following options:
- automatic wiping for the windscreen
wipers,
- rear wiping on engaging reverse
gear.
Model with intermittent wiping
Model with AUTO wiping
Manual controls
The wiper commands are issued directly
by the driver by means of the stalk A
and the ring B .
Windscreen wipers
A. wiping speed selection stalk:
single wipe (press downwards),
or
fast (heavy rain),
normal (moderate rain),
intermittent (proportional to the
speed of the vehicle),
park,
automatic, then single
wipe (see next page).
Page 79
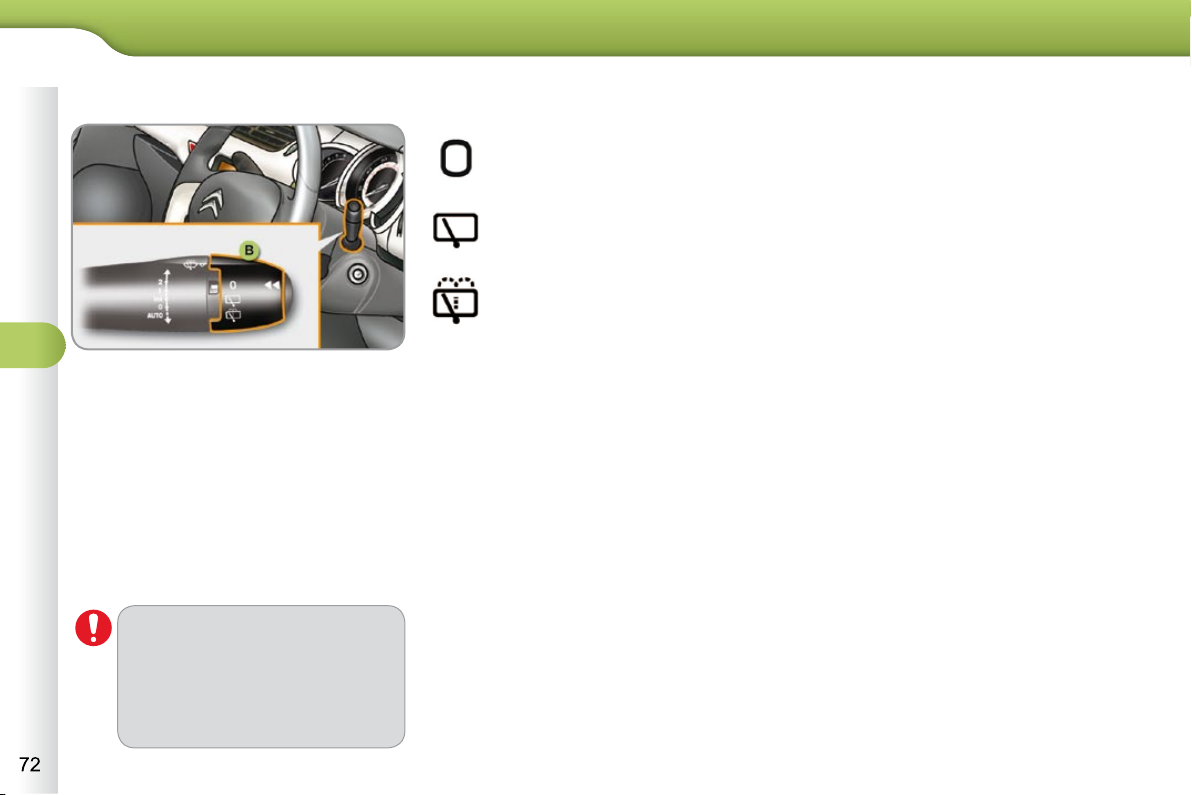
5 5
VISIBILITY
Rear wiper
park,
intermittent wipe,
wash-wipe (set duration).
Reverse gear
When reverse gear is engaged, the
rear wiper will come into operation if the
windscreen wipers are operating.
Programming
The function is activated or deactivated
via the multifunction screen confi gura-
tion menu.
This function is activated by default.
Windscreen wash
Pull the wiper stalk towards you. The
windscreen wash, then the windscreen
wipers, operate for a specifi ed time.
B. rear wiper selection ring:
If a signifi cant accumulation of
snow or ice is present, or when
using a tailgate bicycle carrier, deactivate the automatic
rear wiper via the multifunction
screen confi guration menu.
Page 80
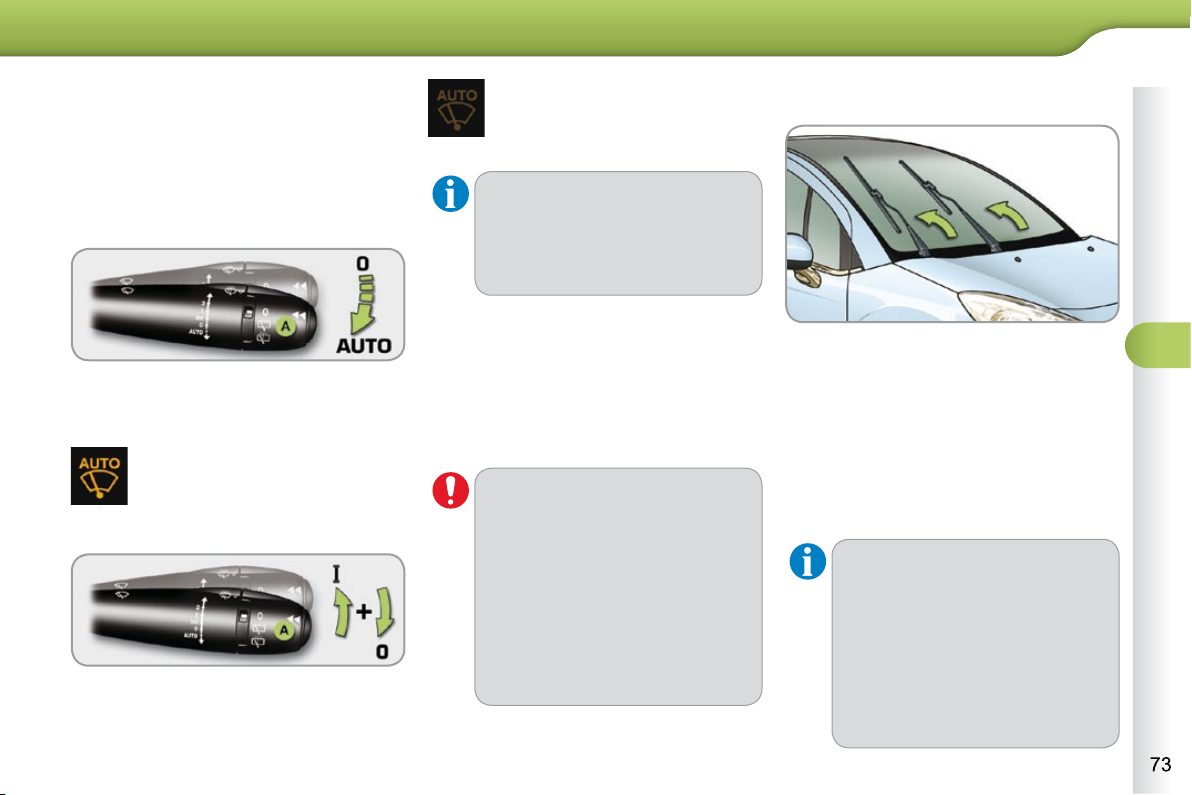
VISIBILITY
Automatic windscreen wiping
The windscreen wipers operate automatically, without any action on the part
of the driver, if rain is detected (sensor
behind the interior mirror), adapting their
speed to the intensity of the rainfall.
Activation
Switching off
Operating fault
If an automatic wiping malfunction
occurs, the wipers will operate in intermittent mode.
Have it checked by a CITROËN dealer.
Special position of the
windscreen wipers
For optimum and lasting wiping
of the "fl at-blade" wiper blades,
it is advisable to:
- handle them with care,
- clean them regularly using
soapy water,
- change them approximately
every 6 months,
- avoid using them to retain
cardboard on the windscreen.
Do not cover the rain sensor,
linked with the brightness sensor
and located in the centre of the
windscreen behind the interior
mirror.
Switch off the automatic wiping
when using an automatic car
wash.
In winter, it is advisable to wait
until the windscreen is completely
clear of ice before activating the
automatic wiping.
The automatic wiping must be reactivated if the ignition has been
off for more than one minute, by
pushing stalk A downwards.
In the minute following switching off of the
ignition, any action on the stalk positions
the wipers vertically.
This action enables you to position the
wiper blades for winter parking, cleaning
or replacement without damaging the
bonnet.
To park the wipers after this has been
done, switch on the ignition and operate
the stalk.
This is controlled manually by the driver by
pushing stalk A to the "AUTO" position.
This is controlled manually by the driver
by moving stalk A upwards and returning
it to position "0" .
It is accompanied by the indicator lamp in the instrument panel
switching off and a message on
the multifunction screen.
It is accompanied by the lighting
of this indicator lamp in the instrument panel and a message
on the multifunction screen.
Page 81
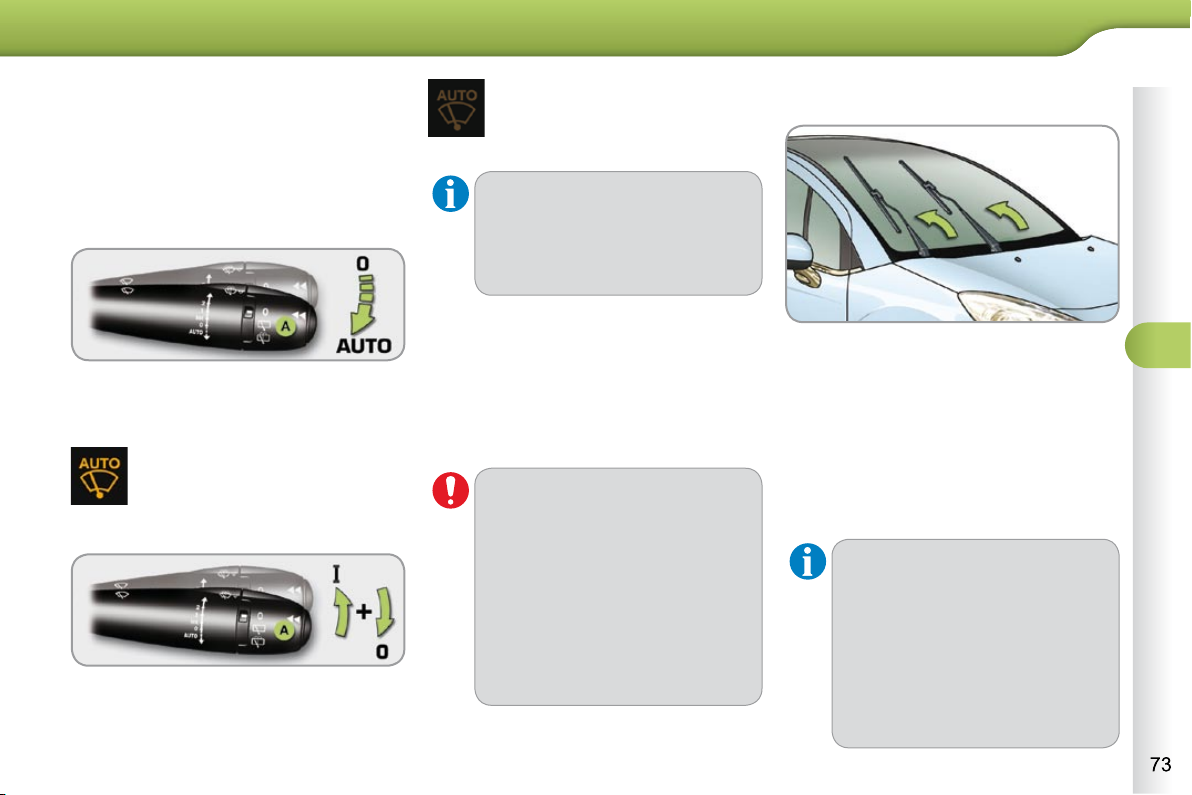
VISIBILITY
Automatic windscreen wiping
The windscreen wipers operate automatically, without any action on the part
of the driver, if rain is detected (sensor
behind the interior mirror), adapting their
speed to the intensity of the rainfall.
Activation
Switching off
Operating fault
If an automatic wiping malfunction
occurs, the wipers will operate in intermittent mode.
Have it checked by a CITROËN dealer.
Special position of the
windscreen wipers
For optimum and lasting wiping
of the "fl at-blade" wiper blades,
it is advisable to:
- handle them with care,
- clean them regularly using
soapy water,
- change them approximately
every 6 months,
- avoid using them to retain
cardboard on the windscreen.
Do not cover the rain sensor,
linked with the brightness sensor
and located in the centre of the
windscreen behind the interior
mirror.
Switch off the automatic wiping
when using an automatic car
wash.
In winter, it is advisable to wait
until the windscreen is completely
clear of ice before activating the
automatic wiping.
The automatic wiping must be reactivated if the ignition has been
off for more than one minute, by
pushing stalk A downwards.
In the minute following switching off of the
ignition, any action on the stalk positions
the wipers vertically.
This action enables you to position the
wiper blades for winter parking, cleaning
or replacement without damaging the
bonnet.
To park the wipers after this has been
done, switch on the ignition and operate
the stalk.
This is controlled manually by the driver by
pushing stalk A to the "AUTO" position.
This is controlled manually by the driver
by moving stalk A upwards and returning
it to position "0" .
It is accompanied by the indicator lamp in the instrument panel
switching off and a message on
the multifunction screen.
It is accompanied by the lighting
of this indicator lamp in the instrument panel and a message
on the multifunction screen.
Page 82
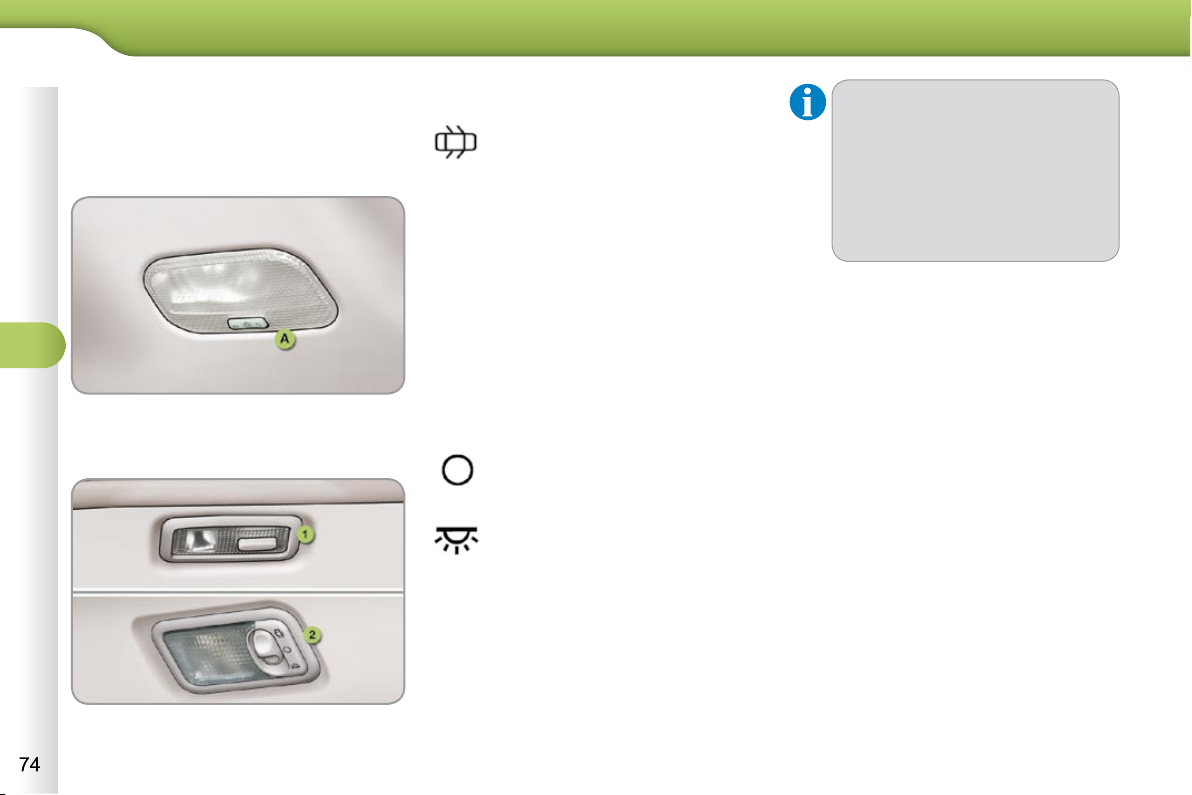
5 5
VISIBILITY
A. Central courtesy lamp
1. Rear side reading lamps
2. Rear courtesy lamp
Central or rear courtesy lamps
Version without Zenith windscreen
Front side reading lamps
With the ignition on, the fi rst press of
the corresponding switch switches
on the reading lamp concerned in
permanent lighting mode.
Following a second press, it comes on:
-
when the vehicle is unlocked,
-
when the key is removed from
the ignition,
-
when a door is opened,
-
when the remote control locking
button is pressed, in order to
locate your vehicle.
In permanent lighting mode, different lighting times are available:
- with the ignition off, approximately ten minutes,
- in energy economy mode, approximately thirty seconds,
- with the engine running, unlimited.
Version with Zenith windscreen
In this position, the courtesy
lamp comes on gradually:
- when the vehicle is unlocked,
- when the key is removed from the
ignition,
- when a door is opened,
- when the remote control locking button is activated, in order to locate your
vehicle.
It switches off gradually:
- when the vehicle is locked,
- when the ignition is switched on,
- 30 seconds after the last door is
closed.
Permanently off.
Permanent lighting.
It switches off gradually:
- when the vehicle is locked,
- when the ignition is switched on,
- 30 seconds after the last door is
closed.
To switch off the rear courtesy lamp,
place it in the "permanently off" position.
Selection and control of the various
passenger compartment lamps.
Page 83
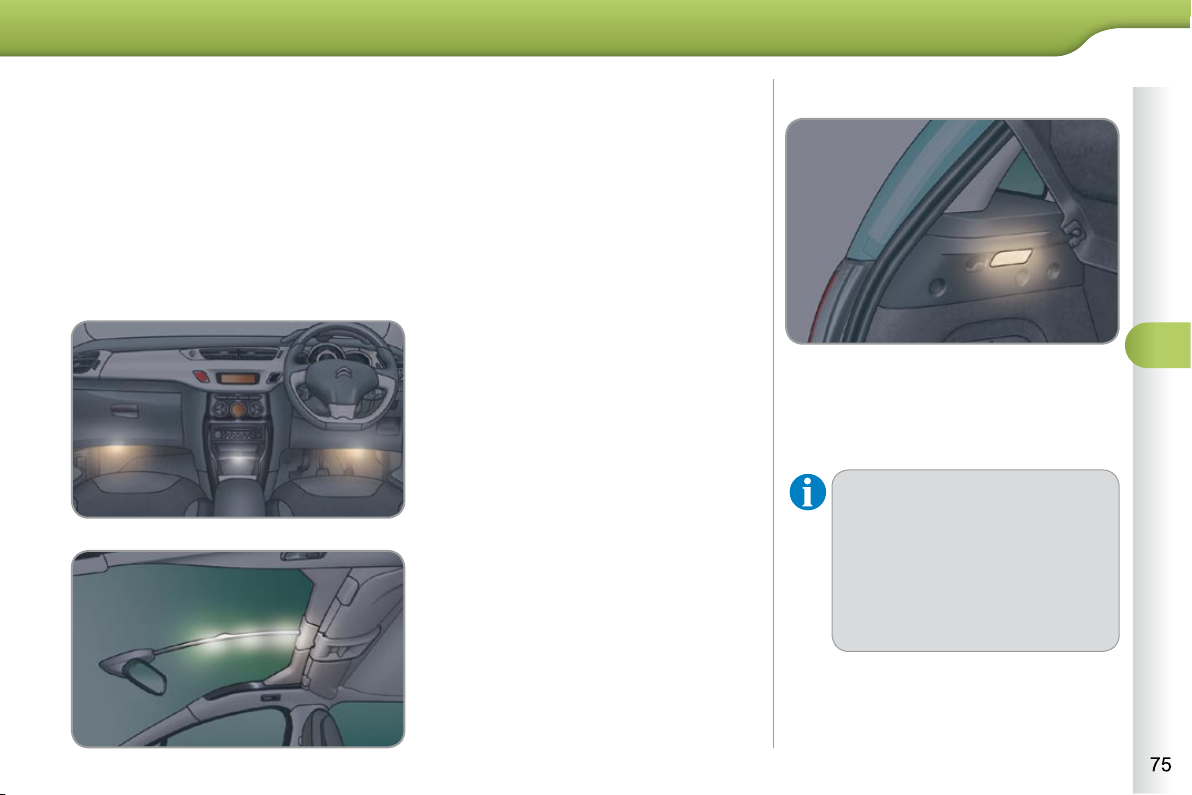
VISIBILITY
AMBIENCE LIGHTING
The dimmed passenger compartment
lighting improves visibility in the vehicle
when the light is poor.
Switching on
At night, the illumination of footwell and
the central dashboard stoarge compartment comes on automatically when the
sidelamps are switched on.
Switching off
The ambience lighting switches off automatically when the sidelamps are
switched off.
It can be switched off manually using
the instrument panel lighting rheostat
button.
With the lighting on, press several
times on the left hand button of the
instrument panel to progressively
reduce the dashboard lighting level.
Press again to reduce the lighting
level to the minimum and switch off
the ambience lighting.
This comes on automatically when the
boot is opened and switches off automatically when the boot is closed.
Different lighting times are available:
- when the ignition is off, approximately ten minutes,
- in energy economy mode, approximately thirty seconds,
- when the engine is running,
no limit.
On certain versions, three lamps located in the support between the roof and
the automatic day/night interior mirror
come on as well.
Page 84
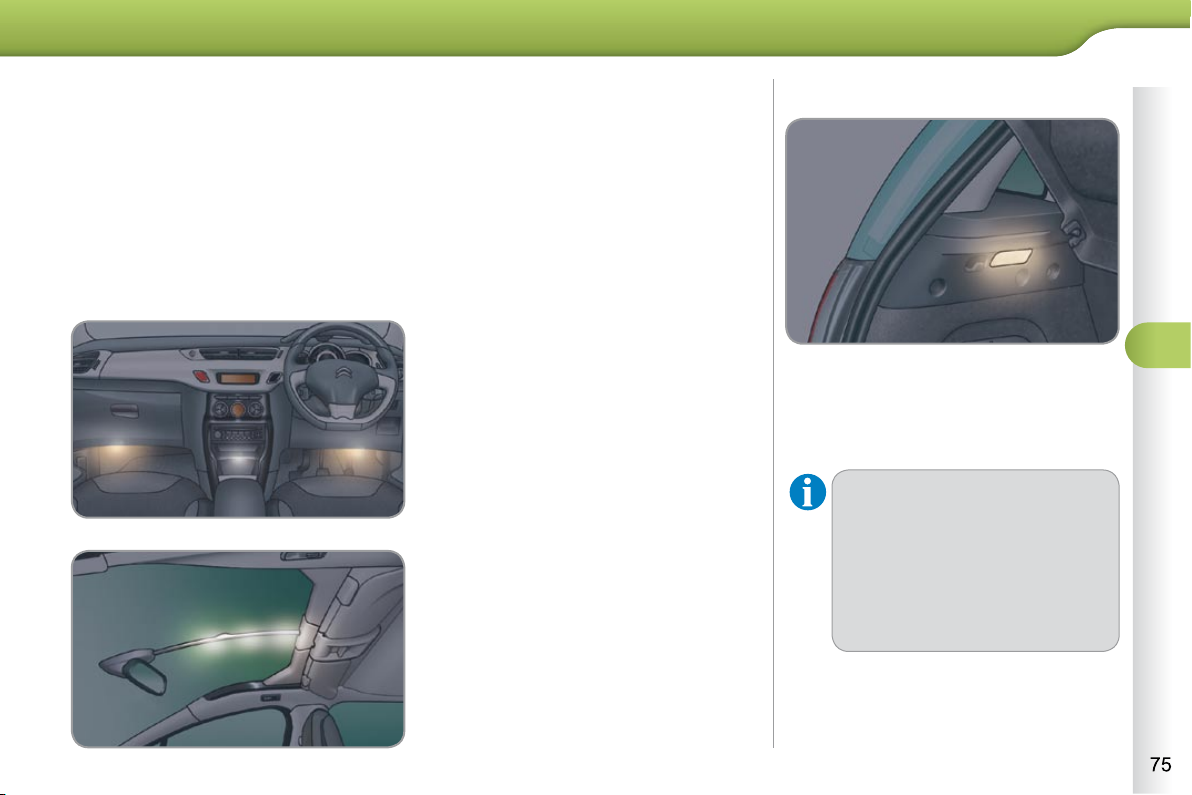
VISIBILITY
AMBIENCE LIGHTING
The dimmed passenger compartment
lighting improves visibility in the vehicle
when the light is poor.
Switching on
At night, the illumination of footwell and
the central dashboard stoarge compartment comes on automatically when the
sidelamps are switched on.
Switching off
The ambience lighting switches off automatically when the sidelamps are
switched off.
It can be switched off manually using
the instrument panel lighting rheostat
button.
With the lighting on, press several
times on the left hand button of the
instrument panel to progressively
reduce the dashboard lighting level.
Press again to reduce the lighting
level to the minimum and switch off
the ambience lighting.
This comes on automatically when the
boot is opened and switches off automatically when the boot is closed.
Different lighting times are available:
- when the ignition is off, approximately ten minutes,
- in energy economy mode, approximately thirty seconds,
- when the engine is running,
no limit.
On certain versions, three lamps located in the support between the roof and
the automatic day/night interior mirror
come on as well.
Page 85
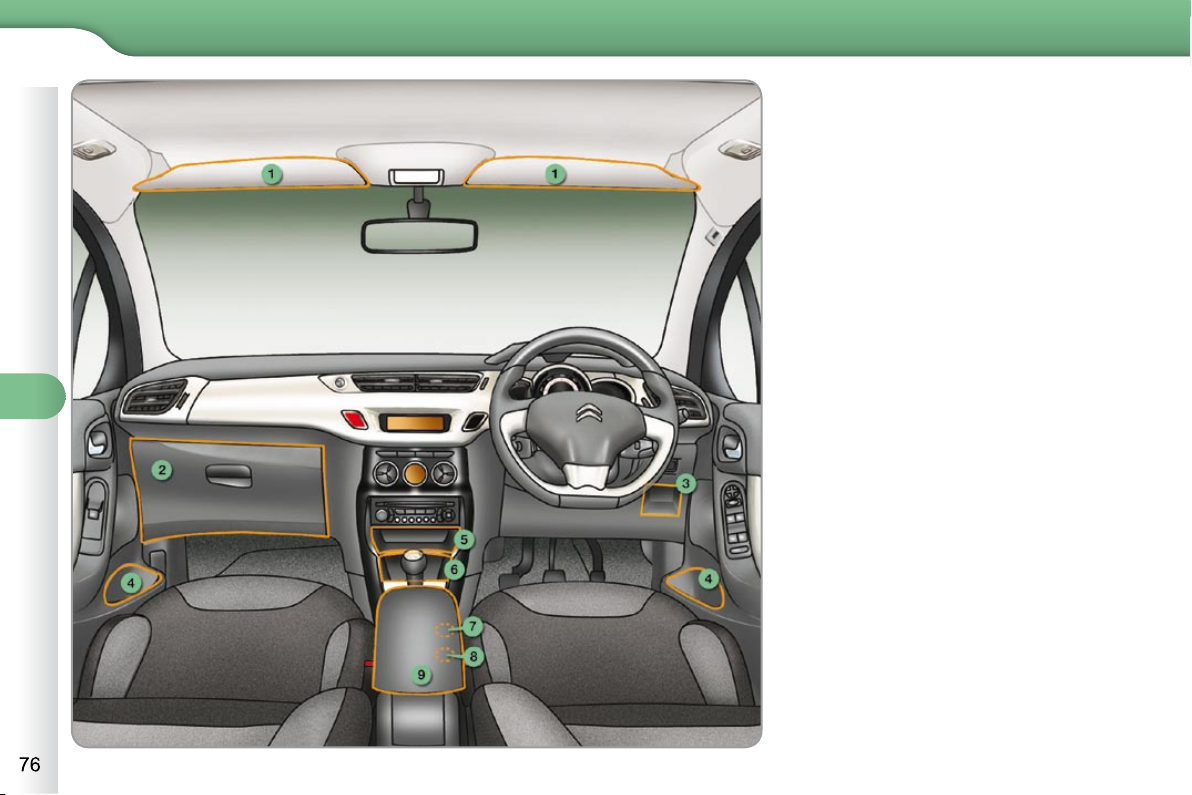
6 6
FITTINGS
INTERIOR
1. Sun visor
2. Glove box
(see details on following page)
3. Storage compartments
4. Door tray
5. Upper storage compartment
6. Lower storage compartment with
non-slip mat
7. USB port /Jack
(see details on the following page)
or
Coin holder
8. 12 V accessories socket
(see details on following page)
9. Centre armrest with storage
(see details on following page)
or
Cup/bottle holder
Page 86
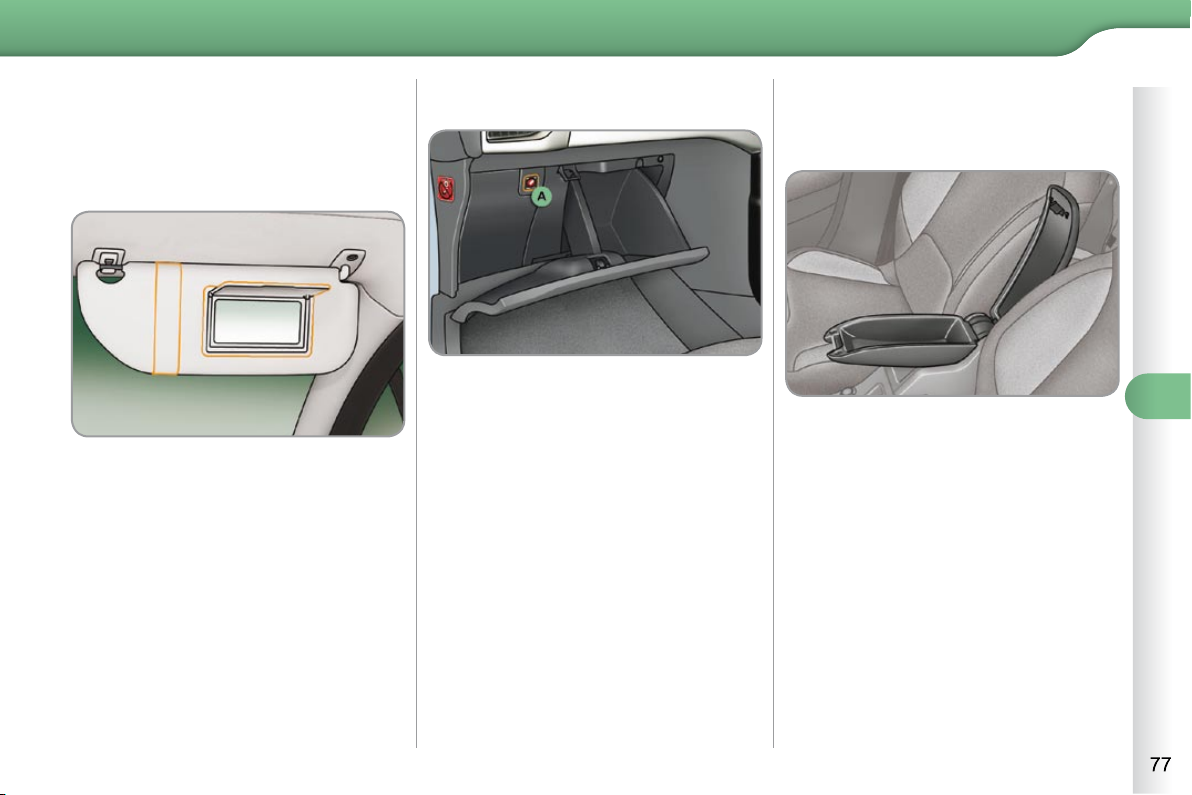
FITTINGS
SUN VISOR
Component which protects against sunlight from the front or the side.
Version without Zenith windscreen
GLOVE BOX
To open the glove box, raise the
handle.
It houses the front passenger airbag deactivation switch A .
It gives access to the dashboard fusebox (see the "Practical information - §
Changing a fuse" section).
Comfort and storage system for the
driver and front passenger.
Storage
For access to the closed storage
box, lift the lever to open the lid.
For access to the open storage box
below the armrest, lift the complete
armrest towards the rear.
These can be used for portable devices
(mobile phone, MP3 player...) which
can be connected to the USB port/Jack
socket or charged from the 12 V socket
in the centre console.
Version with Zenith windscreen
Refer to the "Familiarisation - § Zenith
windscreen" section.
The sun visors are fi tted with a courtesy
mirror, with concealing fl ap for the driver
and a ticket/card holder.
Page 87
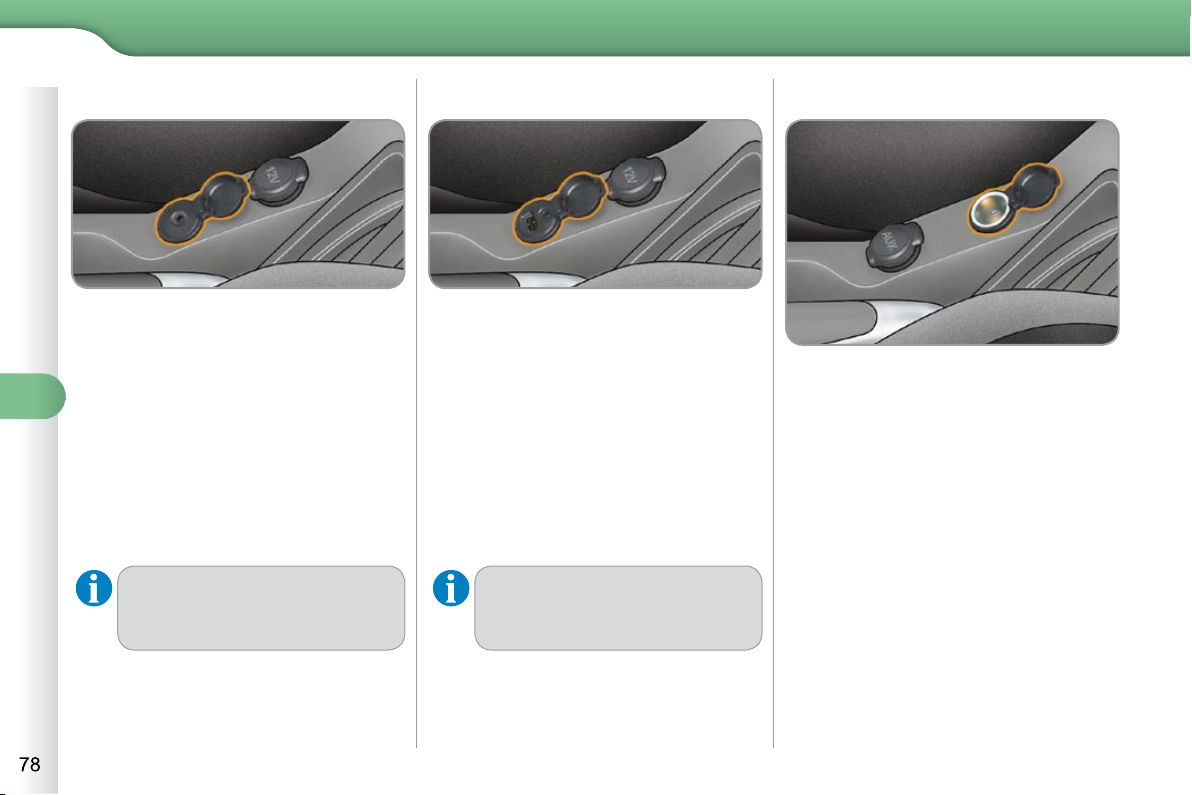
6 6
FITTINGS
This connection box, consisting of a
JACK socket and a USB port, is located
on the centre console.
It permits the connection of portable
equipment, such as a digital audio player
of the iPod ® or USB stick type.
It reads the audio fi le formats (mp3, ogg,
wma, wav...) which are transmitted to
your audio equipment and played via the
vehicle's speakers.
You can manage these fi les using the
steering wheel controls or the audio
equipment control panel and display
them on the multifunction screen.
When it is in use, the portable
equipment charges automatically.
For further details concerning the use of
this equipment, refer to the Audio system part of the "Audio and Telematics"
section.
To connect a 12 V accessory (max
power: 120 Watts), remove the cover
and connect a suitable adaptor.
JACK SOCKET
This connection box, consisting of a
JACK socket is located on the centre
console.
It permits the connection of portable
equipment, such as a digital audio player
of the iPod ® type.
It reads the audio fi le formats (mp3,
ogg, wma, wav, ...) which are transmitted to your audio equipment and played
via the vehicle's speakers.
You can manage these fi les using the
steering wheel controls or the audio
equipment control panel and display
them on the multifunction screen.
When it is in use, the portable
equipment charges automatically.
For further details concerning the use
of this equipment, refer to MyWay
Audio system part of the "Audio and
Telematics" section.
Page 88
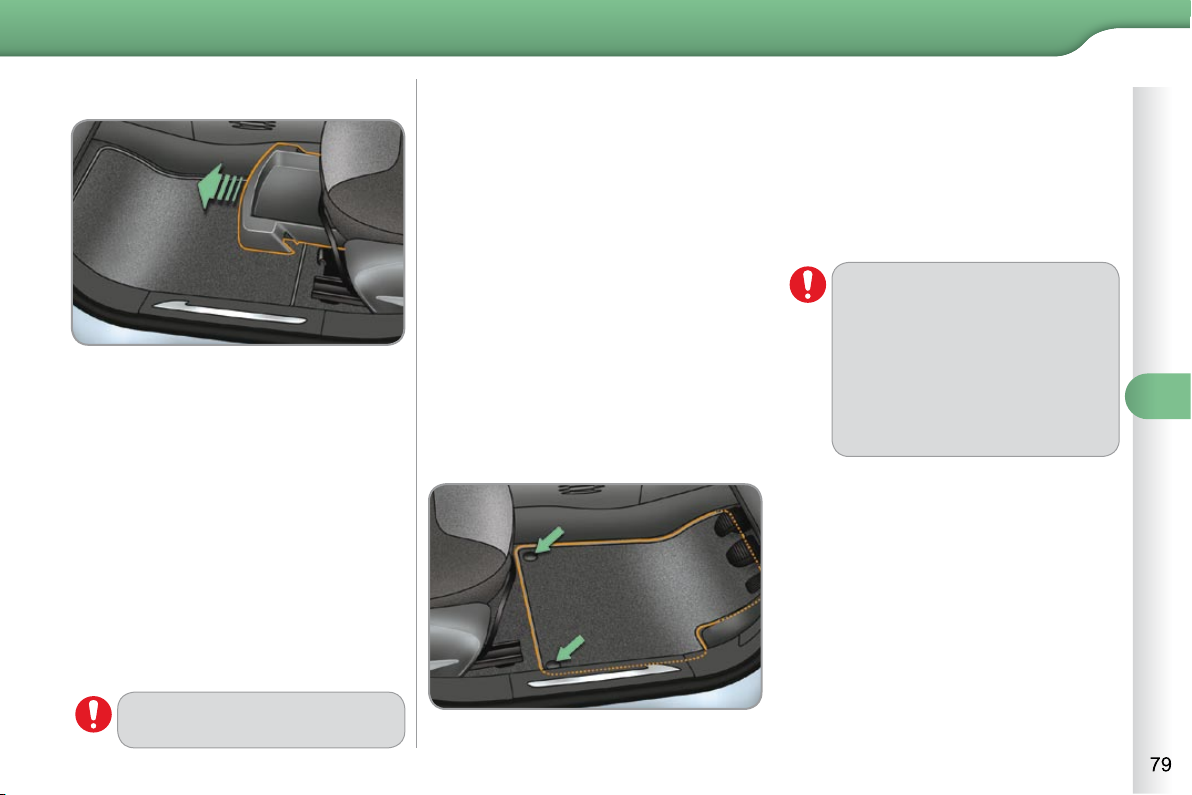
FITTINGS
STORAGE DRAWER
The storage drawer is located under the
front passenger's seat.
Opening
Raise the front of the drawer and
pull it.
Removal
Bring the drawer to the end of its
travel.
Press the ends of the slides.
Raise the drawer and pull it fully.
Refitting
Engage the drawer in its slides.
At the end of its travel, press on the
top of the drawer to secure it.
Do not place heavy objects in
the drawer.
Removable component which protects
the carpet against exterior dirt.
Fitting
When fi tting the mat for the fi rst time,
on the driver's side, use only the fi xings
provided in the wallet attached.
The other mats are simply placed on
the carpet.
Removal
To remove the mat on the driver's side:
move the seat as far back as pos-
sible,
unclip the fi xings,
remove the mat.
Refitting
To refi t the mat on the driver's side:
position the mat correctly,
refi t the fi xings by pressing,
check that the mat is secured correctly.
To avoid any risk of jamming of
the pedals:
- only use mats which are
suited to the fi xings already
present in the vehicle; it is
imperative that these are
used,
- never fi t one mat on top of
another.
Page 89
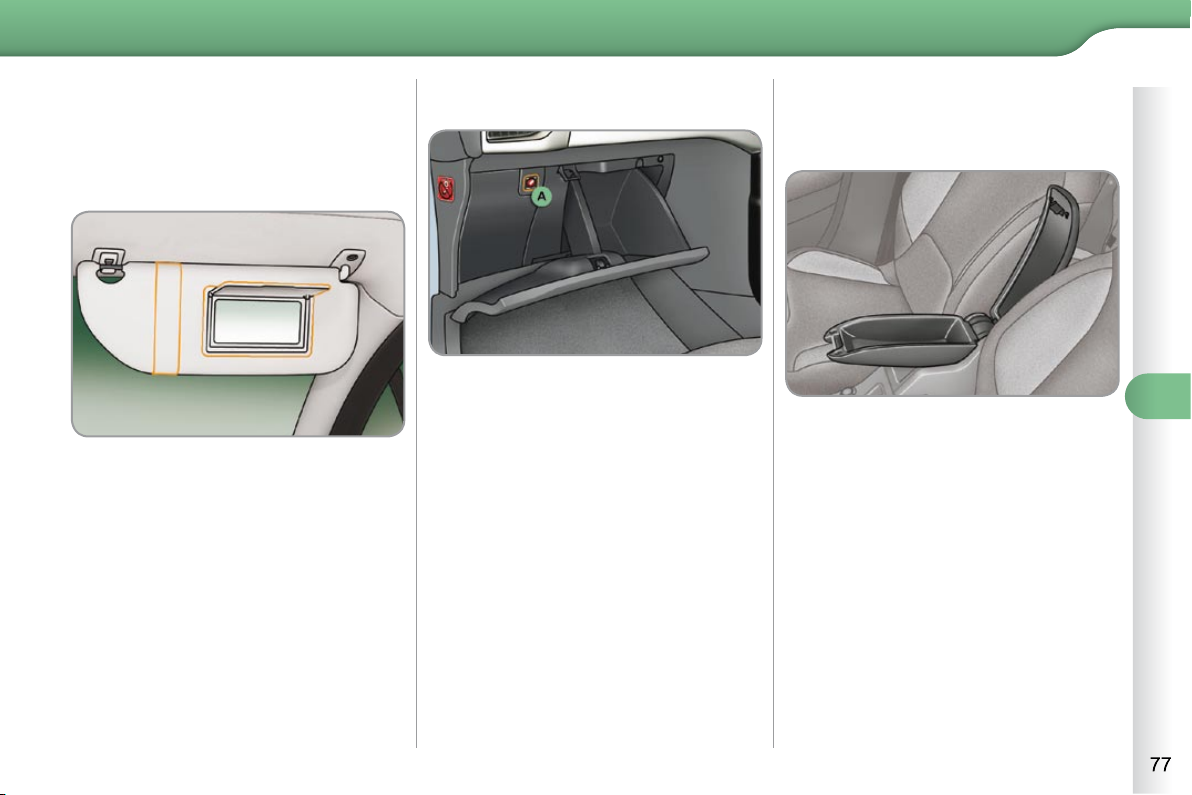
FITTINGS
SUN VISOR
Component which protects against sunlight from the front or the side.
Version without Zenith windscreen
GLOVE BOX
To open the glove box, raise the
handle.
It houses the front passenger airbag de-
activation switch A .
It gives access to the dashboard fuse-
box (see the "Practical information - §
Changing a fuse" section).
Comfort and storage system for the
driver and front passenger.
Storage
For access to the closed storage
box, lift the lever to open the lid.
For access to the open storage box
below the armrest, lift the complete
armrest towards the rear.
These can be used for portable devices
(mobile phone, MP3 player...) which
can be connected to the USB port/Jack
socket or charged from the 12 V socket
in the centre console.
Version with Zenith windscreen
Refer to the "Familiarisation - § Zenith
windscreen" section.
The sun visors are fi tted with a courtesy
mirror, with concealing fl ap for the driver
and a ticket/card holder.
Page 90
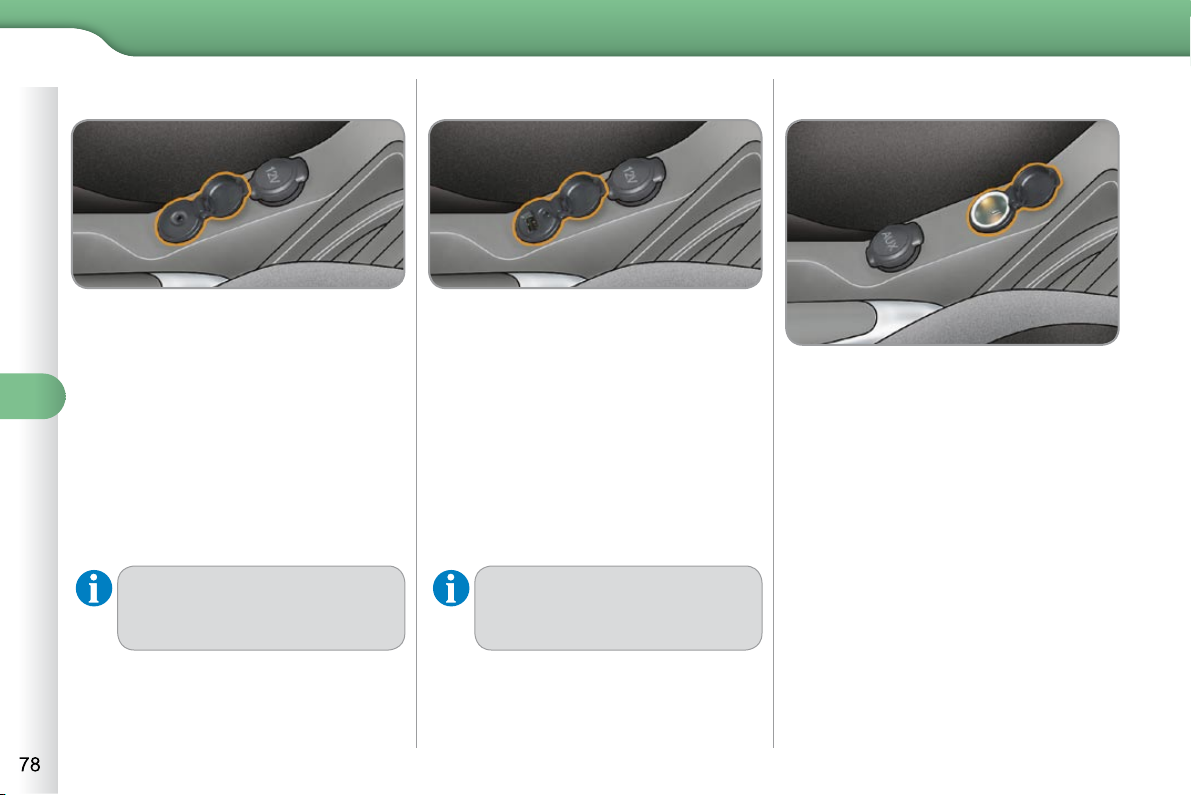
6 6
FITTINGS
This connection box, consisting of a
JACK socket and a USB port, is located
on the centre console.
It permits the connection of portable
equipment, such as a digital audio player
of the iPod ® or USB stick type.
It reads the audio fi le formats (mp3, ogg,
wma, wav...) which are transmitted to
your audio equipment and played via the
vehicle's speakers.
You can manage these fi les using the
steering wheel controls or the audio
equipment control panel and display
them on the multifunction screen.
When it is in use, the portable
equipment charges automatically.
For further details concerning the use of
this equipment, refer to the Audio system part of the "Audio and Telematics"
section.
To connect a 12 V accessory (max
power: 120 Watts), remove the cover
and connect a suitable adaptor.
JACK SOCKET
This connection box, consisting of a
JACK socket is located on the centre
console.
It permits the connection of portable
equipment, such as a digital audio player
of the iPod ® type.
It reads the audio fi le formats (mp3,
ogg, wma, wav, ...) which are transmitted to your audio equipment and played
via the vehicle's speakers.
You can manage these fi les using the
steering wheel controls or the audio
equipment control panel and display
them on the multifunction screen.
When it is in use, the portable
equipment charges automatically.
For further details concerning the use
of this equipment, refer to MyWay
Audio system part of the "Audio and
Telematics" section.
Page 91
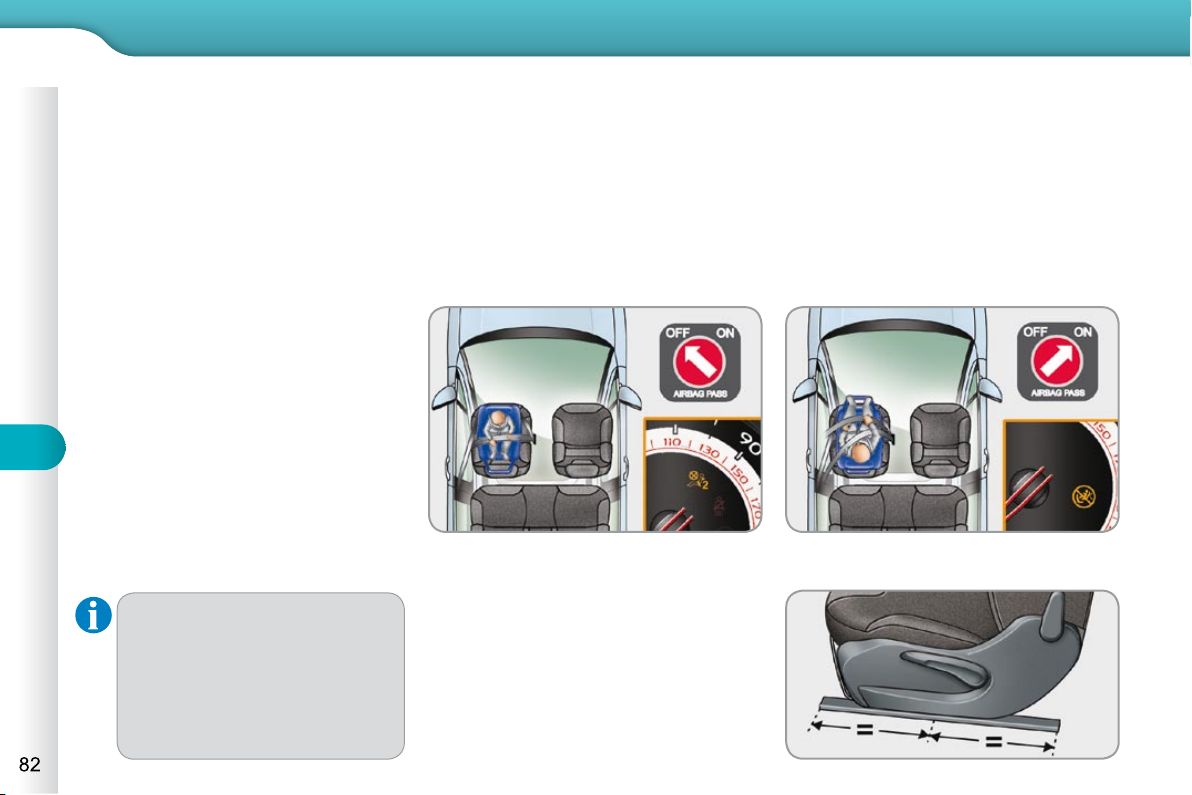
7 7
CHILD SAFETY
82
CITROËN recommends that
children should travel in the rear
seats of your vehicle:
- "rearwards-facing" up to the
age of 2,
- "forwards-facing" over the
age of 2.
* The rules for transporting children are
specifi c to each country. Refer to the
current legislation in your country.
TO CHILD SEATS
Although one of CITROËN's main cri-
teria when designing your vehicle, the
safety of your children also depends on
you.
For maximum safety, please follow
these precautions:
- in accordance with European regula-
tions, all children under the age of
12 or less than one and a half metres tall must travel in approved
child seats suited to their weight ,
on seats fi tted with a seat belt or
ISOFIX mountings * ,
- statistically, the safest seats in
your vehicle for the transportation
of children are the rear seats,
- a child weighing less than 9 kg
must travel in the "rearwardsfacing" position both in the front
and in the rear.
INSTALLING A CHILD SEAT
USING A THREE POINT SEAT
BELT
"Rearwards-facing"
When a "rearwards-facing" child seat is
installed on the front passenger seat ,
it is essential that the passenger airbag
is deactivated. Otherwise, the child
would risk being seriously injured or
killed if the airbag were to infl ate.
"Forwards-facing"
When a "forwards-facing" child seat is
installed on the front passenger seat ,
adjust the vehicle's seat to the interme-
diate longitudinal position with the seat
back upright and leave the passenger
airbag activated.
Intermediate longitudinal position
Page 92
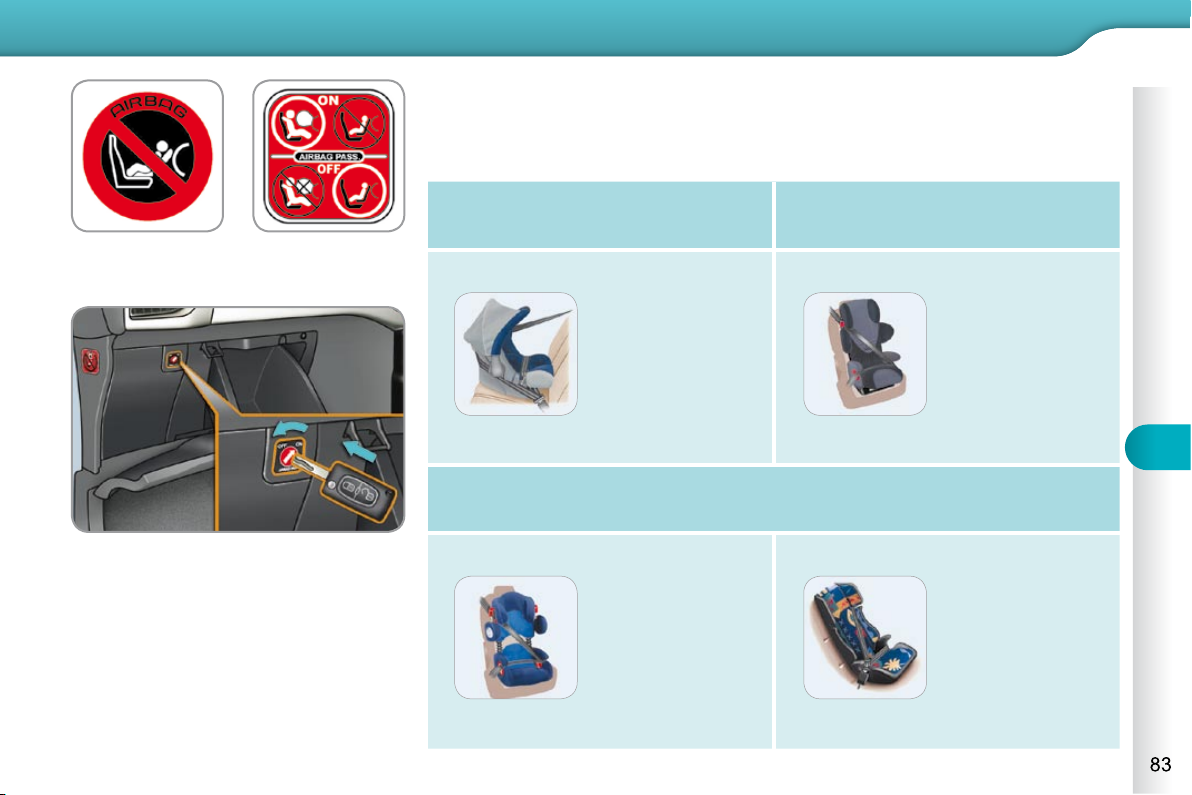
CHILD SAFETY
83
Passenger air bag OFF
CHILD SEATS RECOMMENDED BY CITROËN
CITROËN offers a complete range of recommended child seats which are secured
using a three point seat belt :
Group 0: from birth to 10 kg
Group 0+: from birth to 13 kg
Groups 1, 2 and 3: from 9 to 36 kg
L1
"RÖMER
Baby-Safe Plus"
Installed in the
rearwards-facing
position.
L2
"KIDDY Life"
The use of the
restraining cushion
is compulsory for
the transportation
of young children
(from 9 to 18 kg).
Groups 2 and 3: from 15 to 36 kg
L3
"RECARO Start''
L4
"KLIPPAN Optima"
From the age
of 6 years
(approximately
22 kg), the booster
is used on its own.
Page 93
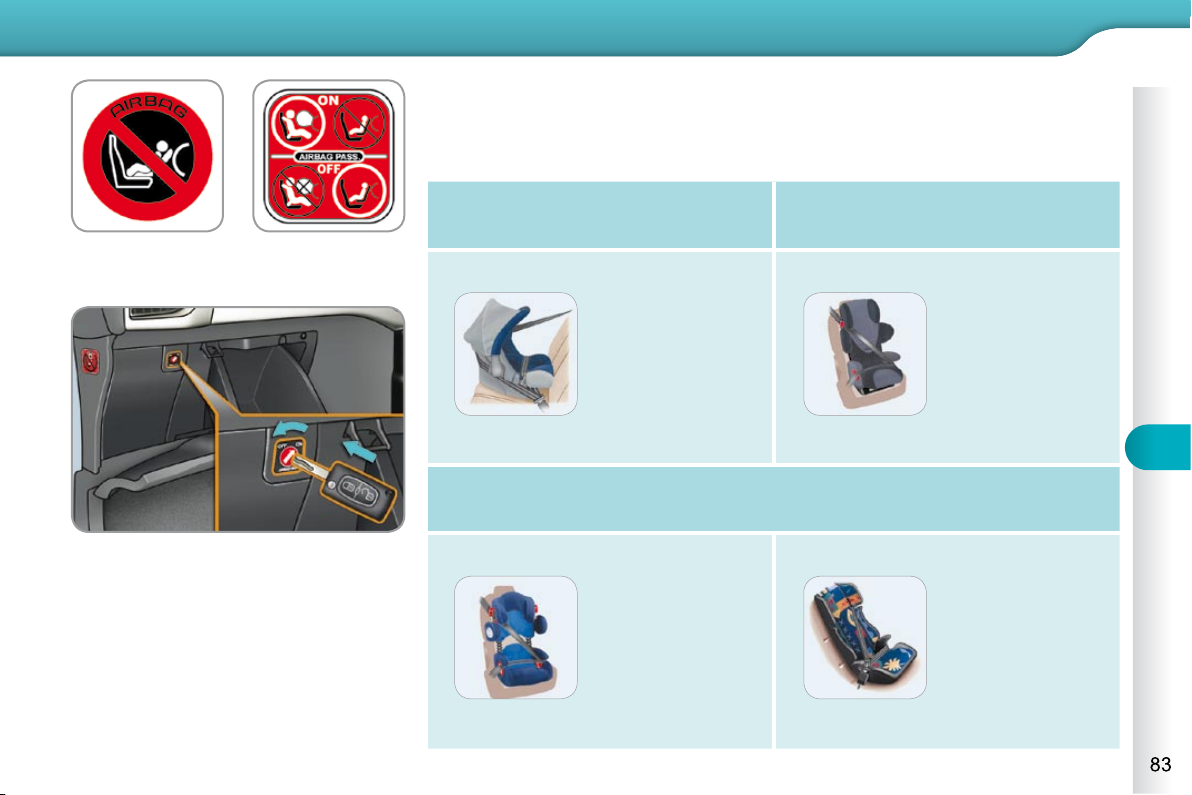
CHILD SAFETY
83
Passenger air bag OFF
CHILD SEATS RECOMMENDED BY CITROËN
CITROËN offers a complete range of recommended child seats which are secured
using a three point seat belt :
Group 0: from birth to 10 kg
Group 0+: from birth to 13 kg
Groups 1, 2 and 3: from 9 to 36 kg
L1
"RÖMER
Baby-Safe Plus"
Installed in the
rearwards-facing
position.
L2
"KIDDY Life"
The use of the
restraining cushion
is compulsory for
the transportation
of young children
(from 9 to 18 kg).
Groups 2 and 3: from 15 to 36 kg
L3
"RECARO Start''
L4
"KLIPPAN Optima"
From the age
of 6 years
(approximately
22 kg), the booster
is used on its own.
Page 94
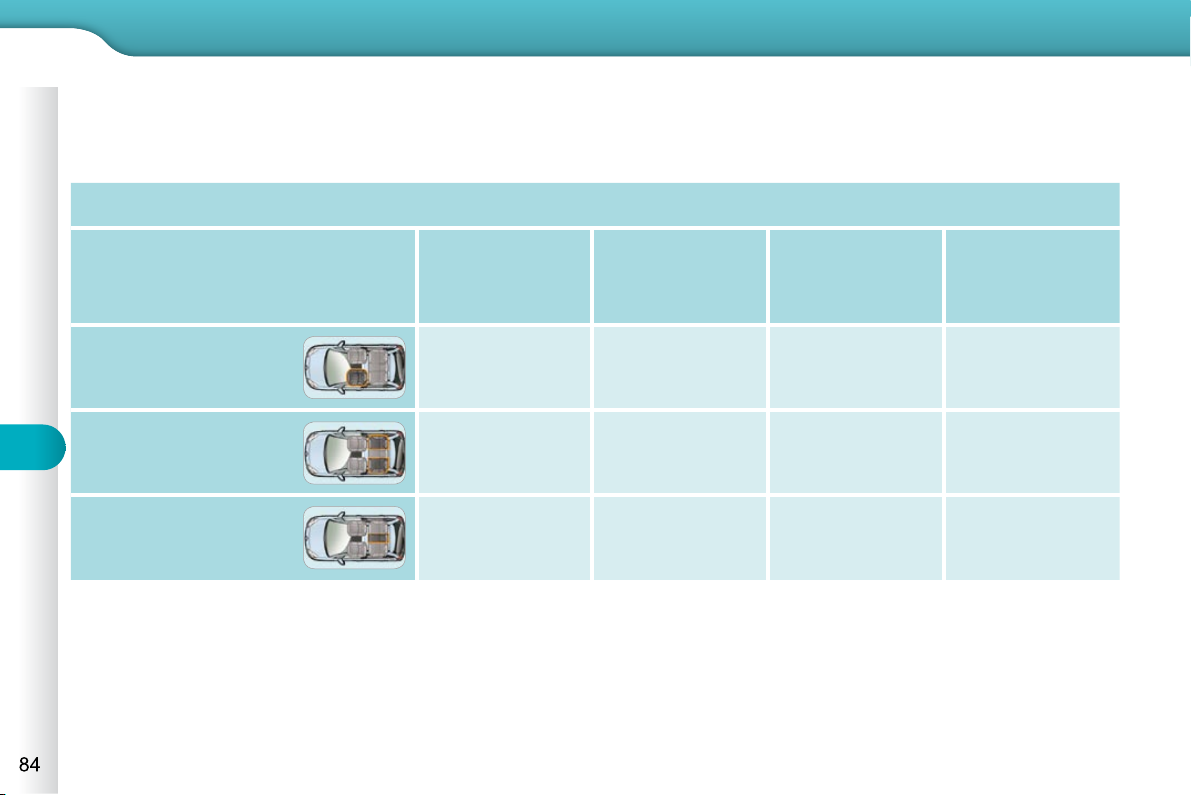
7 7
CHILD SAFETY
84
In accordance with European regulations, this table indicates the options for installing child seats secured using a seat belt
and universally approved (a) in accordance with the weight of the child and the seat in the vehicle.
Weight of the child and indicative age
Seat
Under 13 kg
(groups 0 (b)
and 0+)
Up to approx 1 year
From 9 to 18 kg
(group 1)
1 to 3 years approx
From 15 to 25 kg
(group 2)
3 to 6 years approx
From 22 to 36 kg
(group 3)
6 to 10 years approx
Front passenger seat (c) U U U U
Rear side seats U U U U
Rear centre seat U U U U
(a) Universal child seat: child seat that can be installed in all vehicles using a seat belt.
(b ) Group 0: from birth to 10 kg. Shells seats and baby carriers cannot be installed in the front passenger seat.
(c ) Consult the legislation in force in your country before installing your child on this seat.
U : Seat suitable for the installation of a child seat secured using a seat belt and universally approved, "rearwards-facing"
and/or "forwards-facing".
Page 95
CHILD SAFETY
85
ADVICE ON CHILD SEATS
The incorrect installation of a child
seat in a vehicle compromises the
child's protection in the event of an
accident.
Remember to fasten the seat belts or
the child seat harnesses keeping the
slack relative to the child's body to a
minimum, even for short journeys.
When installing a child seat using the
seat belt, ensure that the seat belt is
tightened correctly on the child seat
and that it secures the child seat fi rmly
on the seat of your vehicle.
For optimum installation of the "for-
wards-facing" child seat, ensure that
the back of the child seat is in contact
with the back of the vehicle's seat
and that the head restraint does not
cause any discomfort.
If the head restraint has to be removed,
ensure that it is stored or attached se-
curely to prevent it from being thrown
around the vehicle in the event of
sharp braking.
As a safety precaution, do not leave:
- one or more children alone and
unsupervised in a vehicle,
- a child or an animal in a vehicle
which is exposed to the sun, with
the windows closed,
- the keys within reach of children
inside the vehicle.
To prevent accidental opening of the
doors and rear windows, use the
"Child lock".
Take care not to open the rear win-
dows by more than one third.
To protect young children from the
rays of the sun, fi t side blinds on the
rear windows.
Children under the age of 10 must
not travel in the "forwards-facing"
position on the front passenger seat,
unless the rear seats are already oc-
cupied by other children, cannot be
used or are absent.
Deactivate the passenger airbag
when a "rearwards-facing" child seat
is installed on the front seat.
Otherwise, the child would risk being
seriously injured or killed if the airbag
were to infl ate.
Installing a booster seat
The chest part of the seat belt must
be positioned on the child's shoulder
without touching the neck.
Ensure that the lap part of the seat
belt passes correctly over the child's
thighs.
CITROËN recommends the use of a
booster seat which has a back, fi tted
with a seat belt guide at shoulder level.
Page 96
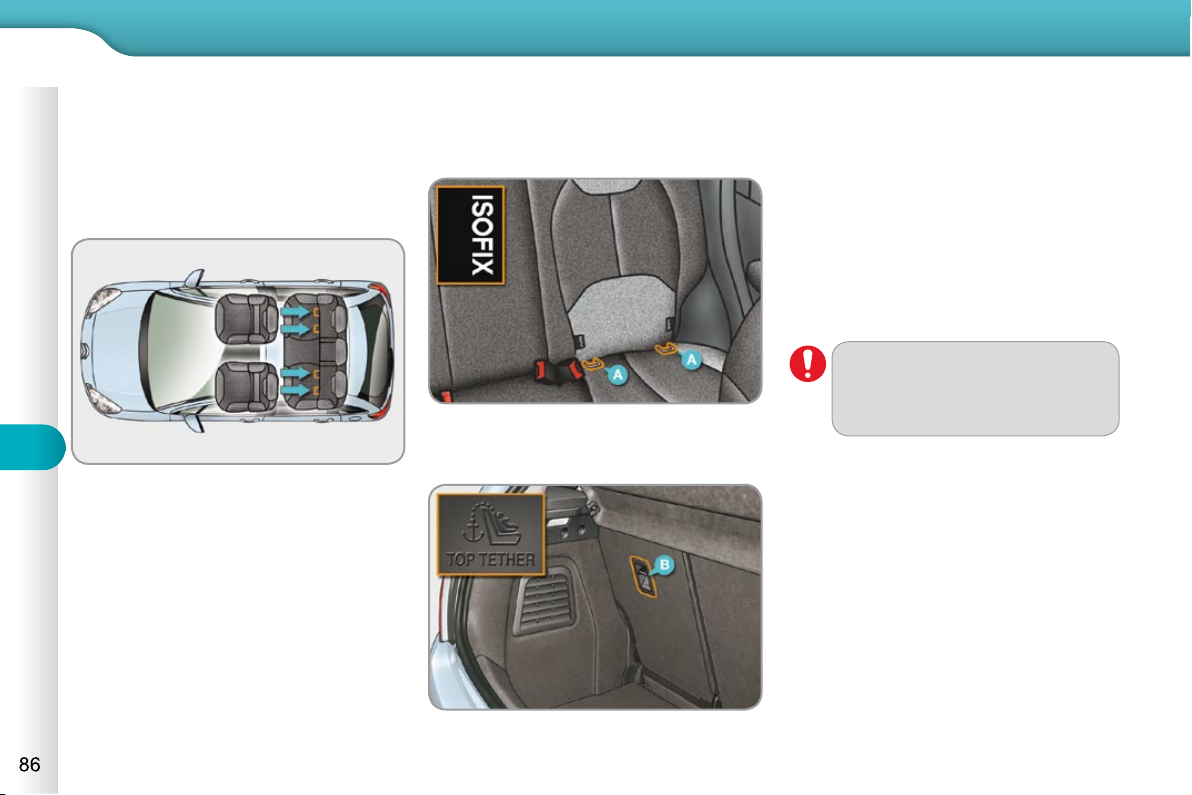
7 7
CHILD SAFETY
86
Your vehicle has been approved in accor-
dance with the new ISOFIX regulation .
The seats, represented below, are fi tted
with regulation ISOFIX mountings:
These are three rings for each seat:
- two rings A , located between the
vehicle seat back and cushion, indicated by a label,
This ISOFIX mounting system guarantees you fast, reliable and safe fi tting of
the child seat in your vehicle.
The ISOFIX child seats are fi tted with
two locks which are secured easily on
the two rings A .
Some also have an upper strap which
is attached to ring B .
To attach this strap, raise the vehicle
seat's head restraint then pass the hook
between its rods. Then fi x the hook on
ring B and tighten the upper strap.
- a ring B , behind the seat, referred to
as the TOP TETHER for fi xing the
upper strap.
The incorrect installation of a
child seat in a vehicle compromises the child's protection in
the event of an accident.
For information regarding the ISOFIX
child seats which can be installed in your
vehicle, consult the summary table for
the location of the ISOFIX child seats.
Page 97
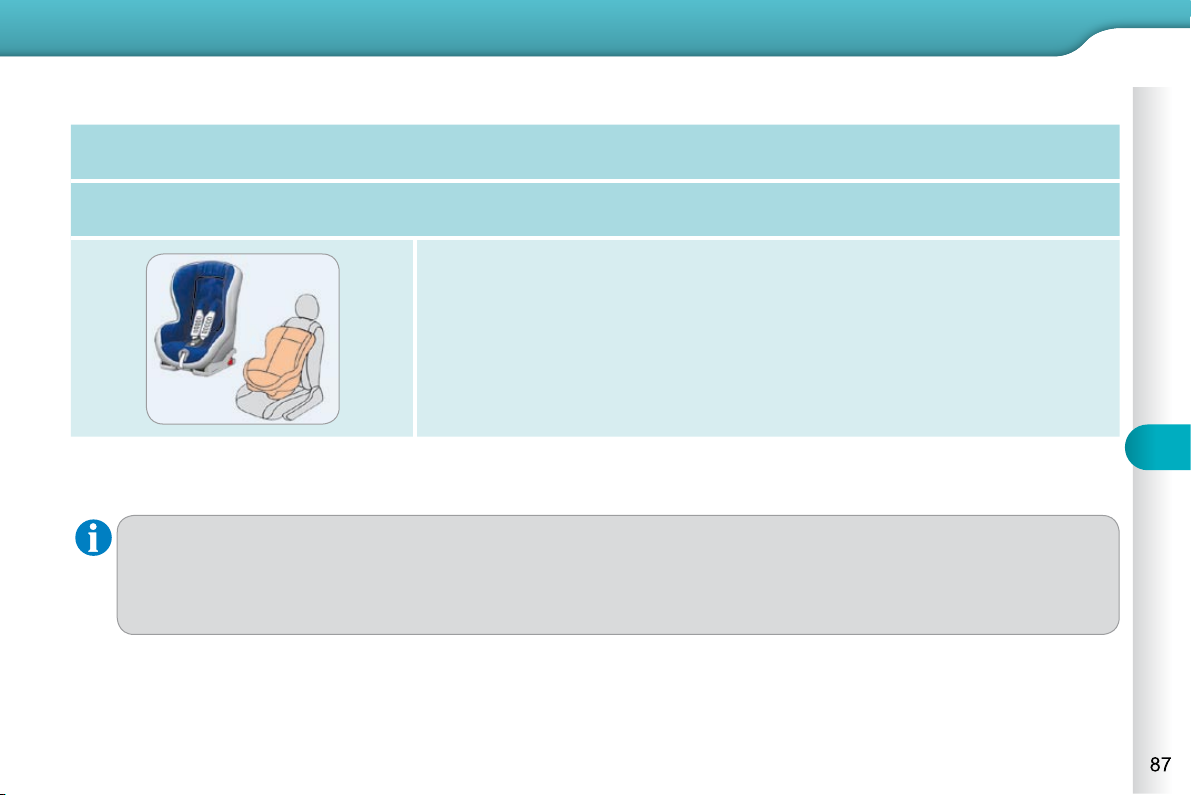
CHILD SAFETY
87
This child seat can also be used on seats which are not fi tted with ISOFIX mountings. In this case, it must be attached
to the vehicle seat using the three point seat belt.
Follow the instructions for fi tting the child seat given in the seat manufacturer's installation guide.
RÖMER Duo Plus ISOFIX (size category B1 )
Group 1: from 9 to 18 kg
Installed in the forwards-facing position.
Fitted with an upper strap to be secured on the upper ring B ,
referred to as the TOP TETHER.
Three seat body angles: sitting, reclining, lying.
Page 98
7 7
CHILD SAFETY
88
* Infant car seats and "car cots" cannot be installed on the front passenger seat.
SUMMARY TABLE FOR THE INSTALLATION OF ISOFIX CHILD SEATS
In accordance with European regulations, this table indicates the options for the installation of ISOFIX child seats on the vehicle seats fi tted with ISOFIX mountings.
In the case of the universal and semi-universal ISOFIX child seats, the child seat's ISOFIX size category, determined by a
letter from A to G , is indicated on the child seat next to the ISOFIX logo.
IUF: seat suitable for the installation of an I sofi x U niversal seat, " F orward facing" and secured using the "Top Tether" upper strap.
IL-SU: seat suitable for the installation an I sofi x S emi- U niversal seat which is:
- "rear facing" fi tted with a "Top Tether" upper strap or a stay,
- "forward facing" fi tted with a stay,
For the securing of the "Top Tether" upper strap, refer to the "Isofi x Mountings" section.
X: seat which is not suitable for the installation of an ISOFIX seat of the size category indicated.
Weight of the child /indicative age
Less than 10 kg
(group 0)
Up to 6 months
approx
Less than 10 kg
(group 0)
Less than 13 kg
(group 0+)
Up to 1 year approx
From 9 to 18 kg (group 1)
From 1 to 3 years approx
Type of ISOFIX child seat Infant car seat * "rear facing" "rear facing" "forward facing"
ISOFIX size category F G C D E C D A B B1
Universal and semi-universal
ISOFIX child seats which can be
installed on the rear side seats
X X IL-SU X IL-SU
IUF
IL-SU
Page 99
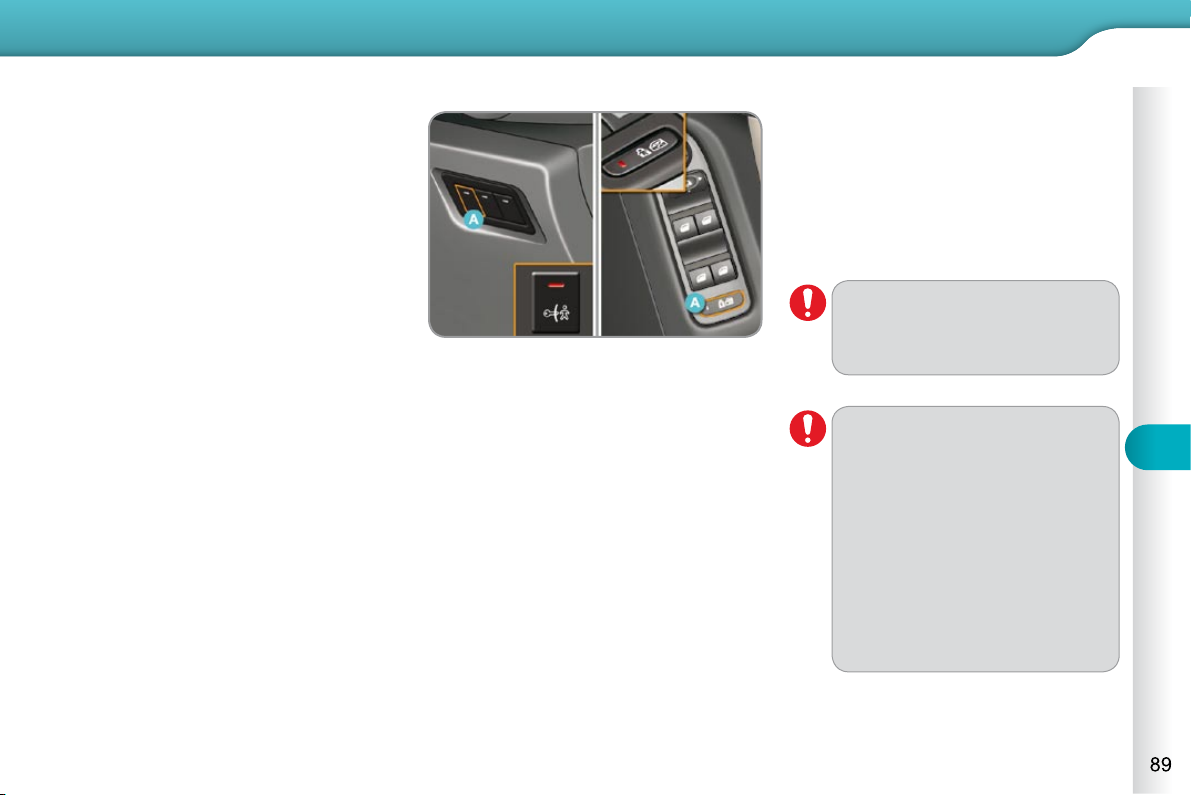
CHILD SAFETY
89
Any other status of the indica-
tor lamp indicates a malfunction
of the electric child lock. Have it
checked by a CITROËN dealer.
* According to version.
ELECTRIC CHILD LOCK
Remote control system to prevent open-
ing of the rear doors using their interior
controls and use of the rear electric windows * .
The control is located:
- either on the dashboard, driver’s
side, on versions without rear electric windows,
- or on the driver’s door, with the electric window controls, on versions fi tted
with rear electric windows.
Activation
Press button A .
The indicator lamp on button A comes
on, accompanied by a message on the
multifunction screen.
This indicator lamp remains on until the
child lock is deactivated.
Deactivation
Press button A again.
The indicator lamp on button A switches
off, accompanied by a message on the
multifunction screen.
This indicator lamp remains off until the
child lock is activated.
This system is independent and
in no circumstances does it take
the place of the central locking
control.
Check the status of the child lock
each time you switch on the igni-
tion.
Always remove the key from the
ignition when leaving the vehi-
cle, even for a short time.
In the event of a serious impact,
the electric child lock is deactivated automatically to permit the
exit of the rear passengers.
Page 100
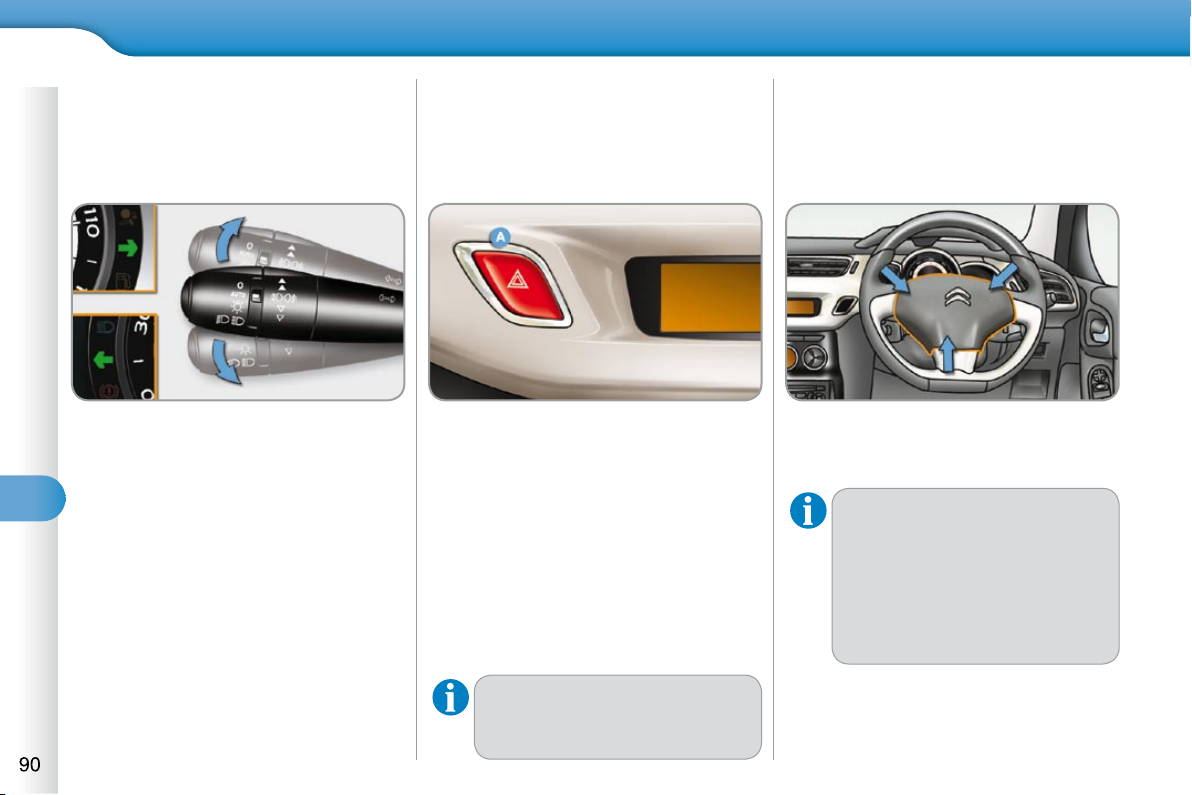
8 8
SAFETY
Selection of the left or right direction indicators to signal a change of direction
of the vehicle.
Lower the lighting stalk fully when
moving to the left.
Raise the lighting stalk fully when
moving to the right.
"Motorway" function
System for indicating a change of lane
on a motorway.
Move the lighting stalk briefl y up-
wards or downwards, without going
beyond the resistance point; the direction indicators will fl ash 3 times.
This function can be used at any speed,
but it is particularly useful when changing
lane on high-speed roads.
A visual warning by means of the direction indicators to alert other road users to
a vehicle breakdown, towing or accident.
Press the button A , the direction in-
dicators fl ash.
They can operate with the ignition off.
Automatic lighting of hazard
warning lamps
When braking in an emergency, de-
pending on the deceleration, the hazard
warning lamps come on.
They will switch off automatically the
fi rst time you accelerate.
If they do not, press button A to
switch the direction indicators off.
As a safety precaution in a traffi c
jam, switch on the hazard warning lamps if you are the last in
the queue.
HORN
Audible warning to alert other road users
to an imminent danger.
Press one of the spokes of the steer-
ing wheel.
Use the horn moderately and
only in the following cases:
- immediate danger,
-
when approaching an area
- where there is no visibility.
 Loading...