

Corsair H100iGTX User Manual

corsair.com
TM
FACEBOOK: facebook.com/corsairmemory
© 2014 Corsair Components, Inc. All Rights Reserved. The Corsair logo is a registered trademark, and Hydro Series is a trademark of
Corsair in the United States and/or other countries. All other names and products are trademarks and property of their respective owners.
EMAIL: support@corsair.com
BLOG: corsair.com/blog/
USA and CANADA: (800) 205-7657 | INTERNATIONAL: (510) 657-8747 | FAX: (510) 657-8748
46221 Landing Parkway • Fremont • California • 94538 • USA
Document Number: 49-001307 rev AA
FORUM: forum.corsair.com
TWITTER: twitter.com/corsairmemory
H100i GT PAGE: corsair.com/H100iGT
QUICK START GUIDE
GUIDE DE DÉMARRAGE RAPIDE
SCHNELLSTARTANLEITUNG
GUIDA INTRODUTTIVA
GUÍA BREVE DE INICIO
КРАТКОЕ РУКОВОДСТВО
EXTREME PERFORMANCE LIQUID CPU COOLER
Note: Most newer PC cases include a CPU cutout to allow access to the bottom of
the motherboard. If your case does not include a cutout, you will need to remove
your motherboard from the case before installation.
Remarque : la plupart des nouveaux boîtiers de PC comportent un accès facilité au
processeur qui permet d'accéder à la base de la carte mère. Si aucun accès n'est
prévu sur votre boîtier, vous devrez retirer votre carte mère du boîtier avant de
procéder à l'installation.
Hinweis: Bei neueren PC-Gehäusen gibt in der Regel eine CPU-Önung Zugang zur
Unterseite der Hauptplatine. Falls Ihr Gehäuse keine derartige Önung aufweist,
müssen Sie vor der Installation die Hauptplatine ausbauen.
Nota: la maggior parte dei più recenti case per PC prevede un ritaglio dietro la CPU
che consente l'accesso alla parte inferiore della scheda madre. Se il case non include
un ritaglio, occorrerà rimuovere la scheda madre dal case prima di procedere
con l'installazione.
Nota: La mayoría de las carcasas de las nuevas PC incluyen una puerta trasera para el
CPU a fin de permitir el acceso a la parte inferior del motherboard. Si su carcasa no
tiene esta entrada, deberá retirar el motherboard de la carcasa antes de la instalación.
Примечание. На большинстве современных корпусов ПК имеется прорезь для предоставления
доступа к нижней части материнской платы. Если на вашем корпусе нет такой прорези, то перед
установкой необходимо удалить материнскую плату из корпуса.
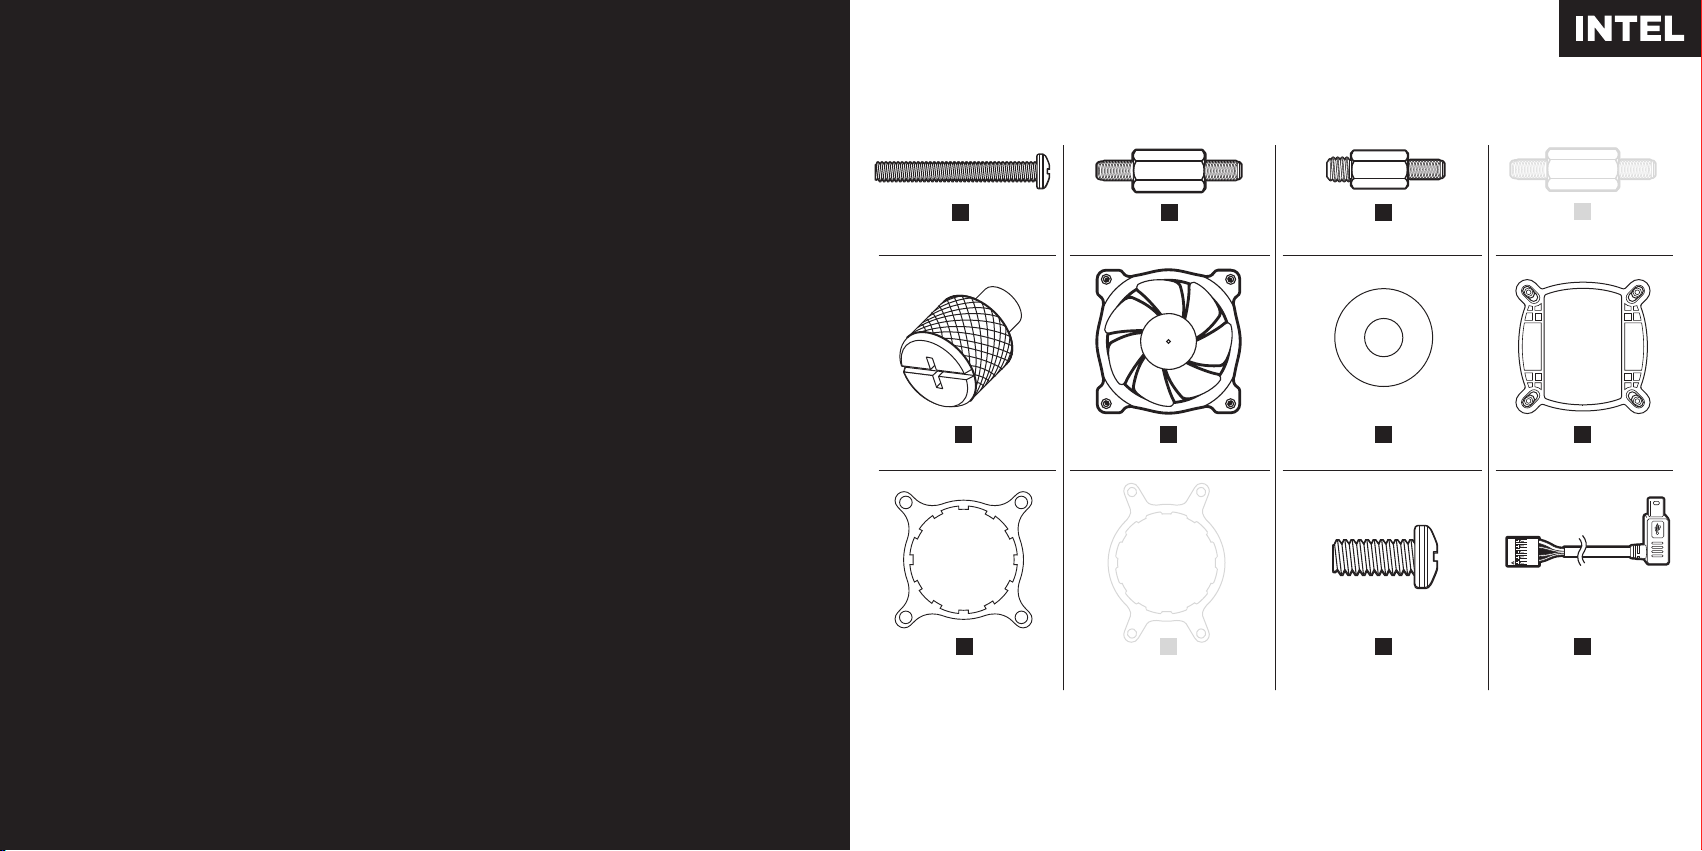
Included Hardware
Highlighted parts for Intel installation only • Les sections en surbrillance concernent
uniquement l'installation Intel • Die markierten Passagen beziehen sich nur auf die Intel
Parti evidenziate solo per l'installazione di Intel • Componentes de instalación solamente
para Intel • Части, выделенные цветом, только для установки Intel
x8 LONG FAN SCREWS
A
E
x4 THUMBSCREWS
x4 LGA 115X / 1366 STANDOFF
B
F
x2 SP120L FANS
x4 LGA 2011 STANDOFF
C
G
x16 WASHER
x4 AMD BLACK STANDOFF
D
H
x1 INTEL BACKPLATE
x1 INTEL MOUNTING BRACKET
Note: The H100i GTX comes with Intel mounting bracket pre-installed on the pump for quick installation.
Remarque : pour une installation plus rapide, le support de fixation Intel est déjà monté sur la pompe du dissipateur H100i GTX.
Hinweis: Beim Hochleistungsprozessorkühler H100i GTX ist die Intel-Montagehalterung bereits auf der Pumpe vorinstalliert und
ermöglicht so eine besonders schnelle Montage.
Nota: il modello H100i GTX è dotato di una staa di montaggio Intel preinstallata sulla pompa, per consentire una rapida installazione.
Nota: El H100i GTX viene con un soporte de montaje Intel preinstalado en la bomba para una instalación rápida.
Примечание. H100i GTX поставляется с установленным на насос монтажным кронштейном Intel для быстрой установки.
I
(PRE-INSTALLED)
J
x1 AMD MOUNTING
BRACKET
K
x8 SHORT SCREWS
CORSAIR LINK USB CABLE
L
(Included)
1
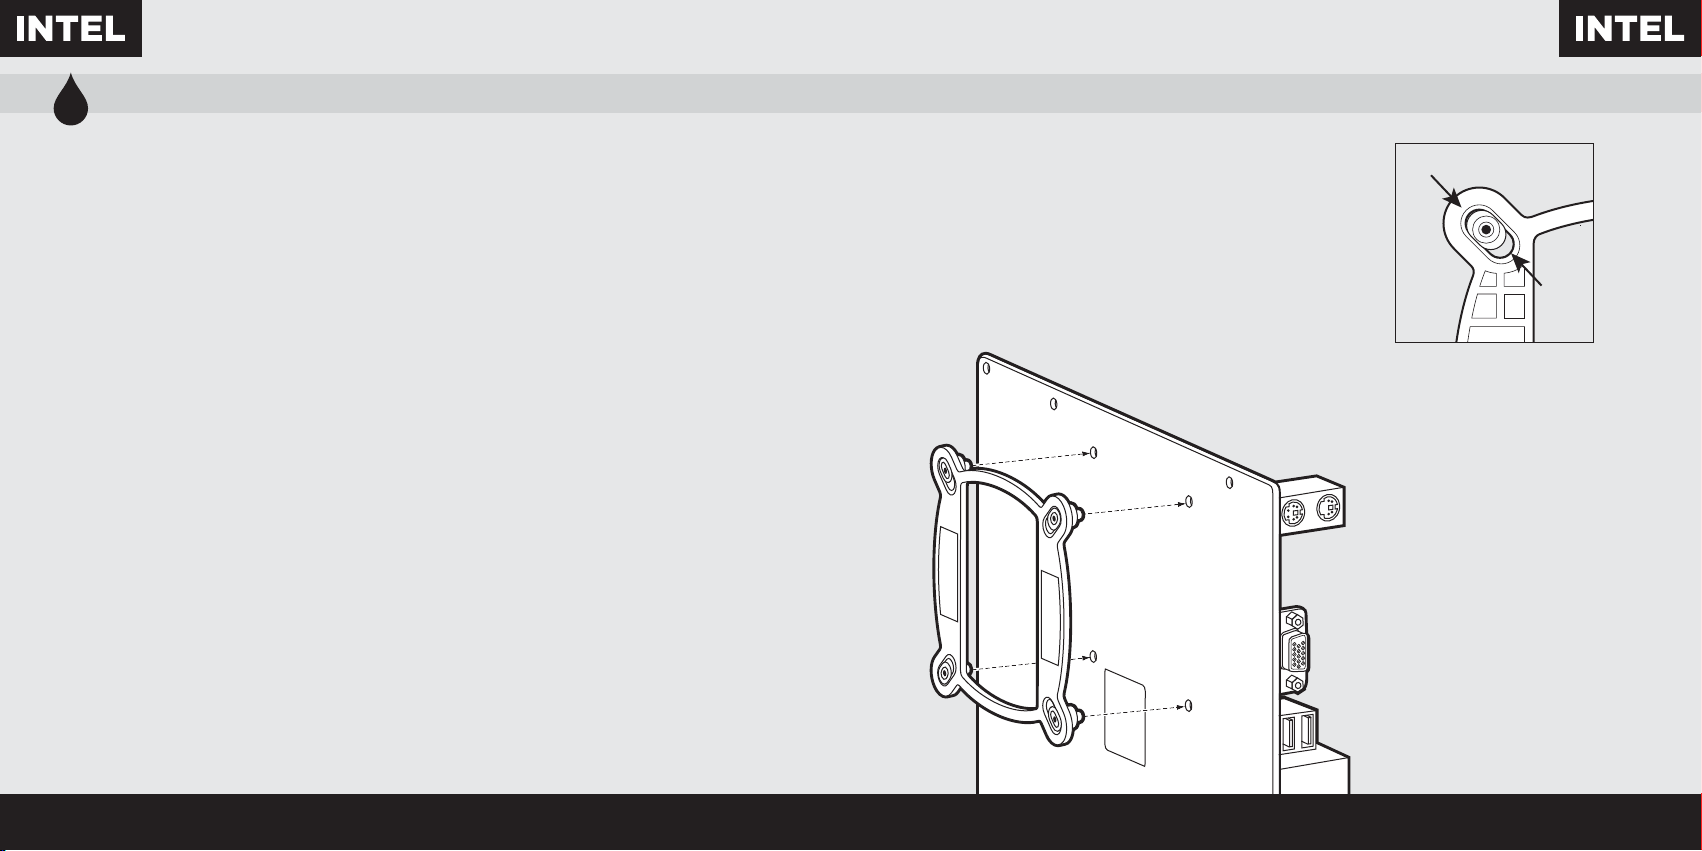
Installing the Intel Backplate
Installation de la plaque arrière Intel • Installation der Intel-Rückwand
Installazione della piastra posteriore Intel • Instalación de la placa de soporte para Intel
Установка опорной пластины Intel
LGA 1366
• For LGA 115X installation, slide the backplate
pins inside (figure 1).
• For LGA 1366 installation, slide the backplate
pins outside (figure 1).
• Install the assembled backplate (figure 2).
Note: Intel LGA 2011 does not require backplate
installation. Proceed to step 2.
• Pour l'installation sur un socket LGA 115x, faites glisser
les broches de la plaque arrière vers l'intérieur (figure 1).
• Pour l'installation sur un socket LGA 1366, faites glisser
les broches de la plaque arrière vers l'extérieur (figure 1).
• Installez la plaque arrière assemblée (figure 2).
Remarque: Le socket Intel LGA 2011 ne requiert pas
l'installation d'une plaque arrière. Passez à l'étape 2.
• Schieben Sie die Stifte der Rückwand nach innen,
um LGA 115X zu montieren (Abbildung 1).
• Schieben Sie die Stifte der Rückwand nach innen,
um LGA 1366 zu montieren (Abbildung 1).
• Montieren Sie die zusammengebaute Rückwand
(Abbildung 2).
Hinweis: Für den Intel LGA 2011 ist keine Rückwand
erforderlich. Fahren Sie mit Schritt 2 fort.
• Per l'installazione del supporto LGA 115X, far scorrere
verso l'interno i pin della piastra posteriore (figura 1).
• Per l'installazione del supporto LGA 1366, far scorrere
verso l'esterno i pin della piastra posteriore (figura 1).
• Installare la piastra posteriore assemblata (figura 2).
Nota: per il supporto Intel LGA 2011 non è richiesta
l'installazione della piastra posteriore.
Proseguire con il passo 2.
• Para instalación en LGA 115X, deslice la placa de soporte
con las patillas hacia dentro (figura 1).
• Para instalación en LGA 1366, deslice la placa de soporte
con las patillas hacia fuera (figura 1).
• Instale la placa de soporte ensamblada (figura 2).
Nota: Intel LGA 2011 no requiere que se instale
una placa de soporte. Siga con el paso 2.
• При установке LGA 115X задвиньте штырьки
внутрь (Рис. 1).
• При установке LGA 1366 задвиньте штырьки
наружу (Рис. 1).
• Установите собранную опорную пластину. (Рис. 2)
Примечание. Для Intel LGA 2011 установка опорной
пластины не требуется. Перейдите к шагу 2.
LGA
115X
figure 1
figure 2
2
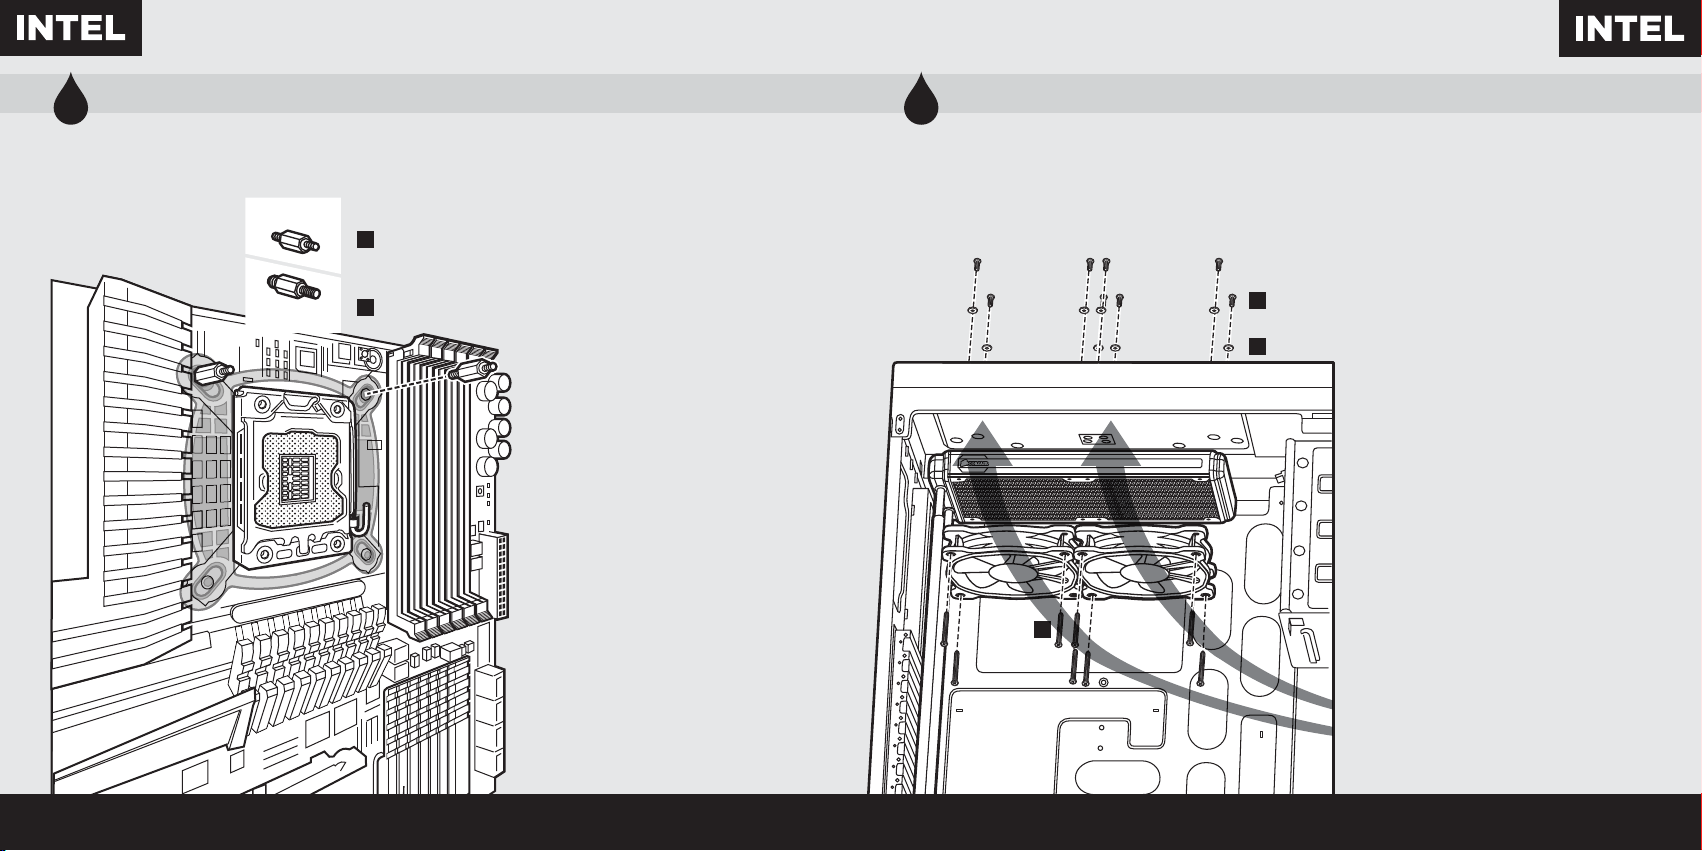
Installing the Intel Stando Screws
Installation des vis d'entretoise Intel • Installation der Intel-Abstandhalter
3
Installazione delle viti del supporto Intel • Instalación de los tornillos del separador para Intel
Установка опорных винтов Intel
LGA 115X/1366
LGA2011
B
C
• Attach the provided Intel stando.
• Use (B) for LGA 115X / 1366, or (C)
for LGA 2011.
• Tighten all four screws until firmly secure.
• Fixez les entretoises Intel fournies.
• Utilisez-en (B) pour un socket LGA 115X / 1366
ou (C) pour un socket LGA 2011.
• Serrez les quatre vis jusqu'à ce qu'elles ne
puissent plus bouger.
• Befestigen Sie den im Lieferumfang
enthaltenen Intel-Abstandhalter.
• Verwenden Sie (B) für LGA 115X / 1366
oder (C) für LGA 2011.
• Ziehen Sie alle vier Schrauben fest.
• Fissare il supporto Intel fornito.
• Utilizzare (B) per il supporto LGA 115X / 1366
o (C) per il supporto LGA 2011.
• Stringere le quattro le viti finché non sono
fissate saldamente.
• Conecte el separador para Intel suministrado.
• Utilice (B) para LGA 115X / 1366 o (C) para
LGA 2011.
• Apriete los cuatro tornillos hasta que estén
bien fijados.
• Прикрепите входящую в комплект опору
Intel.
• Для LGA 115X / 1366 используйте (B), а для
LGA 2011— (C).
• Хорошо затяните все четыре винта.
Install the Fans and Radiator
Installation des ventilateurs et du radiateur • Lüfter und Kühler einbauen
Installare la ventola e il radiatore • Instale los ventiladores y el radiador
Установка вентиляторов и радиатора
Attach the radiator and the fans as shown. For the best
cooling performance, we recommend mounting the fans
as an air-intake to your PC case.
Attachez le radiateur et les ventilateurs, comme illustré.
Pour des performances de refroidissement optimales,
nous vous recommandons d'installer les ventilateurs
E
J
D
comme une entrée d'air sur la tour de votre ordinateur.
Bringen Sie Kühler und Lüfter wie abgebildet an. Für
bestmögliche Kühlleistung empfehlen wir, die Lüfter als
Lufteinlass des PC-Gehäuses zu montieren.
Collegare il radiatore e le ventole come da illustrazione.
Per ottenere le prestazioni di rareddamento migliori, si
consiglia di montare le ventole in modo che aspirino aria
all’interno del PC.
Fije el radiador y los ventiladores tal como se muestra.
Para una refrigeración óptima, recomendamos montar los
ventiladores como entradas de aire en la carcasa del PC.
Установите радиатор и вентилятор, как показано на
рисунке. Для более эффективного охлаждения
рекомендуется установить вентиляторы таким образом,
чтобы они нагнетали воздух внутрь корпуса.
 Loading...