

Page 1

Quick Start Users Guide
Page 2

TABLE OF CONTENTS
תירבע
ENGLISH . . . . . . . . . . . . . . . . . . . . . . . . . . . . . . . . . . . . 3
FRANÇAIS . . . . . . . . . . . . . . . . . . . . . . . . . . . . . . . . . . 5
DEUTSCH . . . . . . . . . . . . . . . . . . . . . . . . . . . . . . . . . . . 8
ITALIANO . . . . . . . . . . . . . . . . . . . . . . . . . . . . . . . . . . 11
ESPAÑOL . . . . . . . . . . . . . . . . . . . . . . . . . . . . . . . . . . . 13
PORTUGUESE . . . . . . . . . . . . . . . . . . . . . . . . . . . . . . . 16
РУССКИЙ . . . . . . . . . . . . . . . . . . . . . . . . . . . . . . . . . . . 18
????? . . . . . . . . . . . . . . . . . . . . . . . . . . . . . . . . . . . . . . 20
中文 . . . . . . . . . . . . . . . . . . . . . . . . . . . . . . . . . . . . . . . . 22
日本語. . . . . . . . . . . . . . . . . . . . . . . . . . . . . . . . . . . . . . 24
Page 3
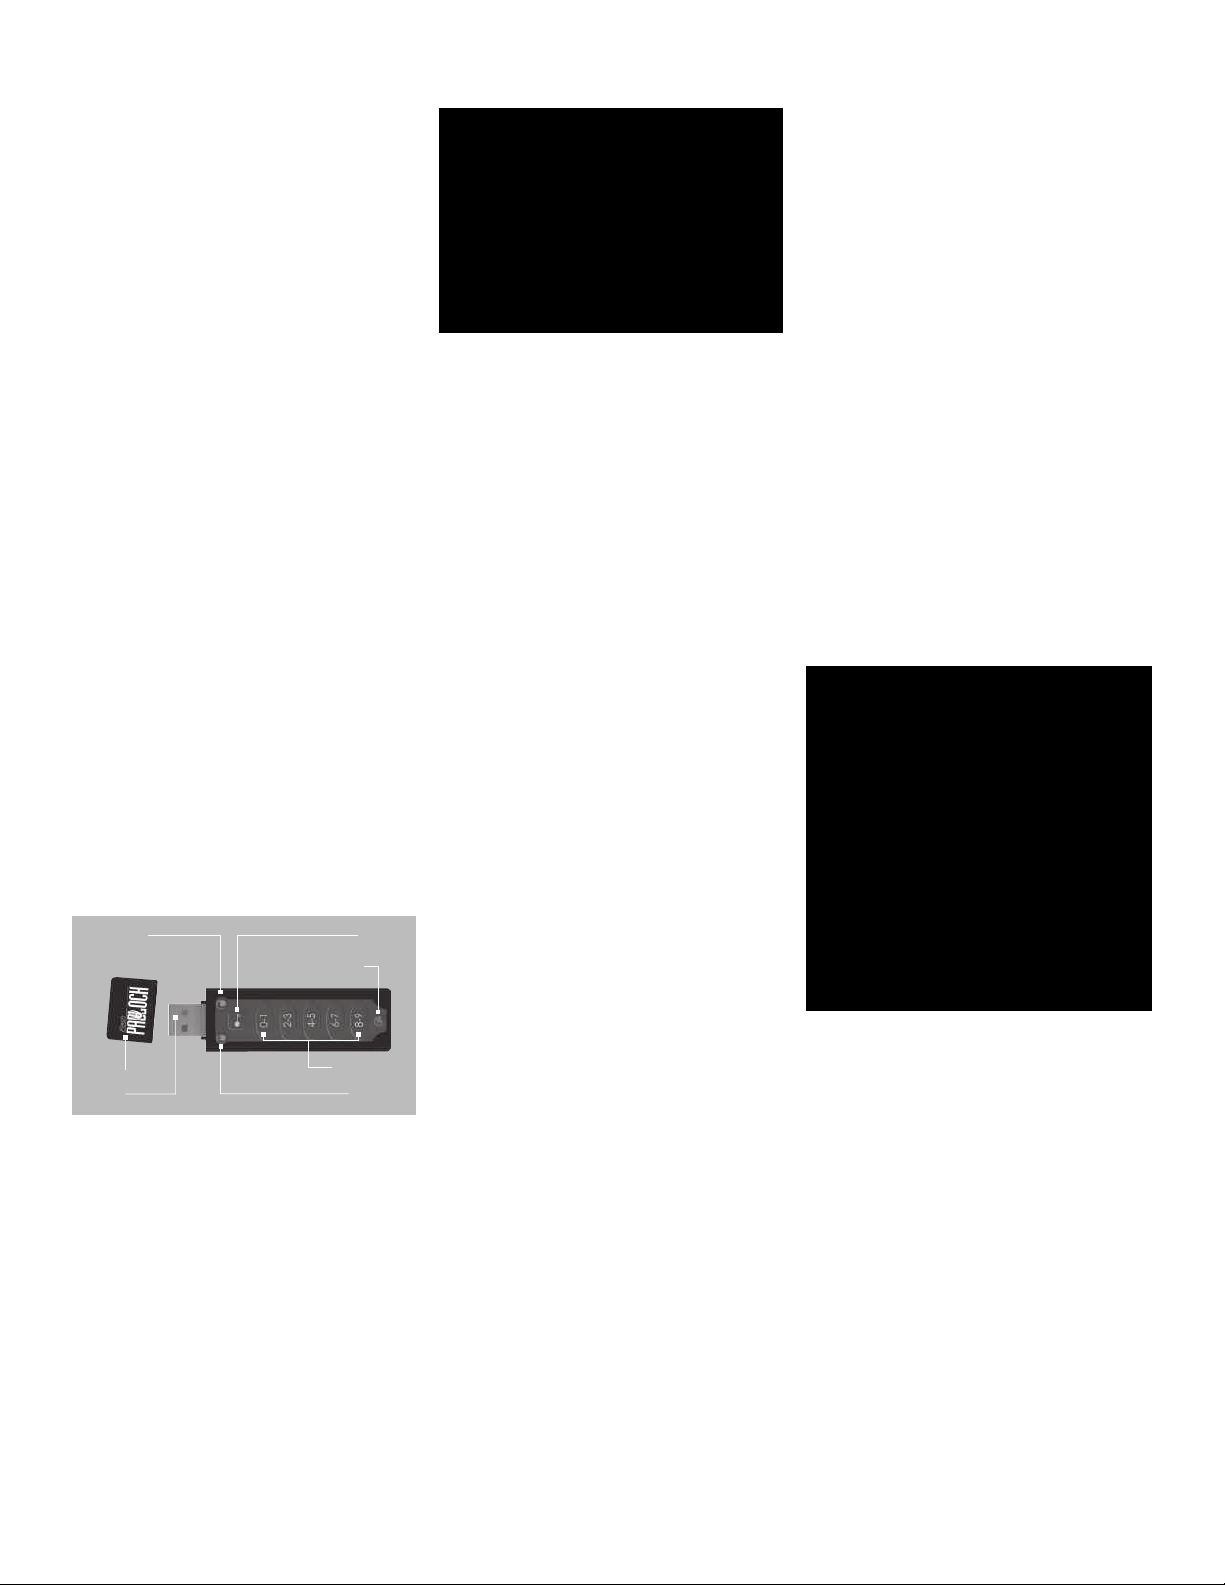
Flash Padlock™ — Convenient Security for Your Data
Locked
Indicator
Combination
K
eypad
Unlocked
Indicator
Key
B
utton
A
ccess
Indicator
Cap
USB
Plug
This document is designed to help users
become familiar with the Flash Padlock
security-enhanced USB flash drive and
its operation.
For additional support, please visit our
web site at: www.corsair.com or our user
forums at: www.asktheramguy.com.
FLASH PADLOCK FEATURES
• Auto-Locking mechanism after removing
from your computers
• Hardware, self contained security
authentication
• PIN (Personal Identification Number)
access authorization, similar to those used
for ATM’s (Automatic Teller Machine),
• USB 2.0 compliant
• Platform independent working on
Windows, MAC and Linux platforms
without the use of software
MINIMUM REQUIREMENTS
• A desktop or notebook computer with
one available USB port (NOTE: High
Speed USB 2.0 is recommended)
• Plug-and-play compatible with Windows
2000, Windows XP, Windows Vista or
Mac OS X and higher.*
PACKAGE CONTENTS
• Flash Padlock USB, installed
3V lithium (cr2032) battery
• USB cable
• Lanyard
• Quick Start Guide (this manual)
HOW TO OPERATE FLASH PADLOCK
Flash Padlock ships in an unlocked configuration ready to use in your computer.
To enable Flash Padlock’s security, you
will need to set up a combination.
Your combination must be between a
minimum of one (1) and a maximum of
ten (10) digits.
HOW TO SET UP A COMBINATION
Step 1: Press and hold the KEY button. The
GREEN LED light will start blinking. Keep
holding the KEY button until both the RED
and GREEN LED lights stay on (about 3
seconds), then release the KEY button.
NOTE: You will have about 15 seconds to
begin setting your combination.
Step 2: Enter the combination using any
variation of the five (5) numeric buttons
on Flash Padlock. You cannot use the KEY
button as part of your combination. The
RED and GREEN LED lights will remain
illuminated during this step.
NOTE: To prevent input errors, please press
buttons firmly and slowly. If you try to enter
more than 10 numbers as your combination,
Flash Padlock will set your combination
with only the first 10 numbers and ignore
the rest of the subsequent numbers.
Step 3: After entering the combination,
press the KEY button and release. Both
the RED and GREEN LED lights will blink.
Step 4: You will then need to re-enter your
combination to verify. After entering the
combination a second time, press and
release the KEY button.
NOTE: If you do not verify your combination
before the RED and GREEN LED lights turn
off (approximately 15 seconds), Flash Padlock
will revert back to its old combination and
you will need to restart the process. If no
combination was set, Flash Padlock will
revert back to its original unlocked status.
Step 5: The GREEN LED will blink to
indicate the combination has been set.
When the GREEN LED is flashing, Flash
Padlock will remain unlocked for about
15 seconds. When the GREEN LED
stops flashing, Flash Padlock will
Auto-Lock and will require you to enter
in your PIN to unlock.
NOTE: Auto-Lock will automatically lock
Flash Padlock. This is your way of locking
your Flash Padlock drive.
HOW TO UNLOCK FLASH PADLOCK
Step 1: Firmly press and quickly release
the KEY button. The RED LED will blink to
indicate Flash Padlock is locked, but ready
for you to enter your combination. You
have about 5 seconds to begin Step 2.
NOTE: If you hold the KEY button down for
longer than 2 seconds, you will get an error:
GREEN and RED lights alternately blinking.
AUTO-LOCKING FEATURE: Auto-Lock is
the way Flash Padlock becomes secured.
Auto-Lock only works when the Flash
Padlock has a combination set AND is
unplugged from your computer. If you
have set a combination and unlocked the
drive, Flash Padlock will remain unlocked
for about 15 seconds before Auto-Lock
becomes enable d. The only time Flash
Padlock’s Auto-Lock feature is disabled is
while it is connected into your computer.
HOW TO CHANGE A COMBINATION ON
FLASH PADLOCK
NOTE: If Flash Padlock does not have a
combination code assigned to it, the drive
is unlocked. If you want to set a combination, you need to follow the instructions
on “How to set up a combination” above.
Step 1: Follow the steps to unlock Flash
Padlock.
Step 2: Press and hold the KEY button until
both the RED and GREEN LED lights illuminate, (about 3 seconds) and then release.
Step 3: While the RED and GREEN LED lights
are illuminated, enter your new combination.
Step 4: When you are done, firmly press
and quickly release the KEY button.
Step 5: Both the RED and GREEN LED
lights will blink. You will then need to
re-enter your combination to verify. After
entering the combination a second time,
press and release the KEY button.
NOTE: If you do not verify your combination
before the RED and GREEN LED lights
turn off (approximately 15 seconds) Flash
Padlock will revert back to its old combination and you will need to restart the process.
Step 6: The GREEN LED light will blink to
indicate the combination has been set.
When the GREEN LED light stops blinking
(approximately 15 seconds), the Auto-Lock
feature will enable and Flash Padlock goes
into its locked state.
HOW TO LOCK FLASH PADLOCK
Step 1: You cannot lock Flash Padlock
while it is plugged into your computer.
Disconnect Flash Padlock from your
computer.
CAUTION: Once your combination has been
set, Flash Padlock will be permanently
locked and your data cannot be accessed,
unless you enter in your combination. Please
store your combination in a safe place, or
you may register your combination through
secure registration at the Corsair Website:
http://www.corsair.com/padlock.
Step 2: While the RED LED is blinking,
enter your combination then firmly press
and quickly release the KEY button.
During this combination entry stage, the
RED and GREEN LED lights will blink in
unison. If any of the lights turn off, you
will need to repeat Step 1.
3
Step 2: Flash Padlock’s Auto-Locking
feature will secure the drive in approximately
15 seconds. When the GREEN LED light
stops blinking, Auto-Lock has secured
the drive.
NOTE: If Flash Padlock does not have a
combination set, Auto-Lock cannot enable
and the drive will remain open. If you want
to have Auto-Lock enabled, see instructions on “how to set a combination”.
Continued on next page
Page 4

HOW TO SET FLASH PADLOCK AS
“ALWAYS UNLOCKED”
Step 1: Don’t set a combination. Flash
Padlock is shipped in an ‘unlocked’ state
and will not lock until you set a combination.
OR
RED and GREEN LED lights alternately
blinking—An input error has occurred.
BLUE LED light blinking — Flash Padlock
is reading or writing data. To prevent data
corruption or loss, never remove Flash
Padlock while the BLUE LED light is blinking.
PadLocks are developed and produced by
Corsair Memory (www.corsair.com) based
on licensed technology (patents pending)
from ClevX LLC (www.clevx.com).
Step 1: Follow the “How to unlock” steps
(see above).
Step 2: Once unlocked the GREEN LED
light will blink. Press and hold the KEY
button until both the RED and GREEN
LED lights illuminate. (about 3 seconds).
Then release the KEY button.
Step 3: Press firmly and quickly release
the KEY button again. Both the RED and
GREEN LED lights will blink in unison.
Step 4: Press firmly and quickly release
the KEY button a third and final time.
The GREEN LED light will blink indicating
that Flash Padlock is now in an “always
unlocked” mode. This won’t change until
you set a combination (see above).
NOTE: Flash Padlock will be permanently
unlocked and your data can be accessed if
you set Flash Padlock in “always unlocked”
mode. Additionally, while Flash Padlock is
unlocked and connected to a computer,
Flash Padlock remains unlocked and data
can be accessed. The drive can only be
locked again by setting a combination
and then letting Auto-Lock secure it. See
“how to set a combination” above.
RED, GREEN and BLUE LED lights off—
Flash Padlock is in sleep mode and
unplugged from the computer.
TROUBLESHOOTING
1. If you make a mistake, both the RED and
GREEN LED lights will blink alternately.
2. While trying to set the combination, I get
a RED LIGHT instead of a GREEN light.
• If you just press the KEY once (or
earlier than 3 seconds), a RED light
will appear. Wait until the RED light
disappears and then repeat the “how
to set a combination” steps again
from the beginning.
3. I am setting the combination but mistak-
enly entered in the wrong code or want
another. How do I change?
• If this is during the confirmation step
of setting your combination, just wait
15-20 seconds for the RED and GREEN
LEDs to turn off. Flash Padlock will
revert back to its prior state–either old
combination (if it had one) or unlocked
state (if it had no combination set).
• If you have already set the combination
and want to change it to another,
follow the steps on “how to change
your combination”.
LED LIGHT STATUS
GREEN LED light on, non-blinking —Flash
Padlock is plugged into your computer and
is unlocked so you can access the drive to
store or retrieve data.
GREEN LED light blinking — Flash Padlock
is unlocked for about 15 seconds before the
Auto-Locking feature locks the drive. You
will need to plug Flash Padlock into your
computer during this time to ensure you
can access the drive before the Auto-Lock
feature locks the drive.
RED LED light on, non-blinking —Flash
Padlock is plugged into your computer
and is locked.
RED LED light blinking—Flash Padlock is
locked and is ready for combination input.
RED and GREEN LED lights blinking in
unison — Flash Padlock is ready to accept
combination input.
RED and GREEN LED lights illuminated,
non-blinking — Change of combination
initiated.
4. Can I unlock Flash Padlock while it is
plugged into my computer?
• Yes, you can unlock Flash Padlock while
it is plugged into your computer. Follow
the “how to unlock” instructions above.
5. My computer doesn’t recognize Flash
Padlock when I plug it in. What can I do?
• This indicates that Flash Padlock is in
its locked state. Flash Padlock’s AutoLock feature prevents unauthorized
access to your drive until you put in
your correct combination to unlock.
Once unlocked, your computer can
now recognize the drive.
SAFETY INFORMATION
• Don’t expose Flash Padlock to water,
electrical charge, and/or physical impact.
These may cause Flash Padlock to fail.
• Packaging and product disposal–dispose
of the packaging and/or product in
accordance with the laws of your locality.
This product contains a lithium button
cell battery which is to be removed only
by a qualified individual.
4
Page 5
Flash Padlock™ — Une solution pratique pour la sécurité de vos données
Etat
Verrouillé
Clavier
de combinaison
E
tat
Déverrouillé
Touche
Clé
I
ndicateur
d’accès
Capuchon
Prise
USB
Ce document est conçu pour aider les
utilisateurs à se familiariser avec la clé
USB sécurisée Flash Padlock et son
fonctionnement.
Pour toute assistance supplémentaire, veuillez
vous rendre sur notre site Web à l’adresse :
www.corsair.com ou sur nos forums
utilisateurs à l’adresse :
www.asktheramguy.com.
FONCTIONS DE LA CLÉ FLASH PADLOCK
• Dispositif de verrouillage automatique
lorsque la clé est débranchée de votre
ordinateur.
• Authentification de sécurité autonome
par le matériel.
• Autorisation d’accès avec un code
personnel, comme ceux utilisés avec
les distributeurs automatiques de billets.
• Conforme USB 2.0.
• Indépendant de la plate-forme :
fonctionne sous Windows, MAC et Linux
|sans utilisation de logiciel.
CONFIGURATION MINIMALE REQUISE
• Ordinateur portable ou de bureau muni
d’un port USB disponible (REMARQUE :
USB 2.0 grande vitesse recommandé)
• Compatible Plug-and-play avec Windows
2000, Windows XP, Windows Vista ou
Mac OS X et versions supérieures.*
CONTENU DU COFFRET
• Clé USB Flash Padlock, batterie au
lithium 3V installée (cr2032)
• Câble USB
• Cordon
• Guide de démarrage (ce manuel)
COMMENT UTILISER LA CLÉ
FLASH PADLOCK
La clé Flash Padlock est livrée en position
déverrouillée, prête à utiliser avec votre
ordinateur. Pour activer la sécurité de la
clé Flash Padlock, vous devez choisir une
combinaison d’accès. Cette combinaison
doit contenir entre un (1) et dix (10)
chiffres.
ATTENTION : Une fois votre combinaison
configurée, la clé Flash Padlock est
verrouillée de façon permanente et vos
données ne seront pas accessibles tant
que vous n’aurez pas entré votre
combinaison. Veuillez conserver votre
combinaison dans un endroit sûr ou
l’enregistrer en ligne de manière sécurisée
sur le site Web de Corsair :
http://www.corsair.com/padlock.
COMMENT CONFIGURER VOTRE
COMBINAISON
Etape 1 : Maintenez la touche CLÉ
enfoncée. Le voyant DEL VERT se met
à clignoter. Maintenez la touche CLÉ
enfoncée jusqu’à ce que les voyants DEL
ROUGE et VERT restent allumés (environ
3 secondes), puis relâchez la touche CLÉ.
REMARQUE : Vous avez environ 15 secondes
pour commencer à saisir votre combinaison.
Etape 2 : Entrez votre combinaison à l’aide
des cinq (5) touches numériques de la clé
Flash Padlock. Vous ne pouvez pas utiliser
la touche CLÉ dans votre combinaison.
Les voyants DEL ROUGE et VERT restent
allumés pendant cette étape.
REMARQUE : Pour éviter les erreurs de
saisie, appuyez sur les touches fermement
et lentement. Si vous essayez d’entrer plus
de 10 chiffres pour votre combinaison, les
10 premiers chiffres sont enregistrés et tout
autre chiffre saisi après est ignoré.
Etape 3 : Une fois votre combinaison
saisie, appuyez sur la touche CLÉ puis
relâchez-la. Les voyants DEL ROUGE et
VERT se mettent à clignoter.
Etape 4 : Vous devez alors entrer à
nouveau votre combinaison afin de la
confirmer. Après avoir saisi votre
combinaison une deuxième fois, appuyez
sur la touche CLÉ puis relâchez-la.
REMARQUE : Si vous ne confirmez pas votre
combinaison avant que les voyants DEL ROUGE
et VERT ne s’éteignent (environ 15 secondes),
la clé Flash Padlock réactive la combinaison
qui lui étaitattribuée précédemment et vous
devez recommencerl’opération. Siaucune
combinaison n’existait, la clé Flash Padlock
retourne à son état initial« non ouverte ».
Etape 5 : Le voyant DEL VERT se met à
clignoter pour indiquer que votre
combinaison a été configurée. Lorsque le
voyant DEL VERT clignote, la clé Flash
Padlock reste déverrouillée pendant près de
15 secondes. Dès que le voyant VERT s’arrête
de clignoter, la clé Flash Padlock se verrouille
automatiquement et ne se déverrouillera que
lorsque vous entrez votre code personnel.
REMARQUE : Le dispositif de verrouillage
automatique verrouille automatiquement
la clé Flash Padlock. C’est ainsi que vous
verrouillez votre clé Flash Padlock.
5
COMMENT DÉVERROUILLER LA CLÉ
FLASH PADLOCK
Etape 1 : Appuyez fermement sur la
touche CLÉ et relâchez-la rapidement. Le
voyant DEL ROUGE se met à clignoter
pour indiquer que la clé Flash Padlock est
verrouillée, mais prête à recevoir votre
combinaison. Vous disposez de 5
secondes pour démarrer l’étape 2.
REMARQUE : Vous recevrez une erreur si
vous maintenez la touche CLÉ enfoncée
pendant plus de 2 secondes : les voyants
VERT et ROUGE clignotent en alternance .
Etape 2: Pendant que le voyant DEL
ROUGE clignote, entrez votre
combinaison, appuyez fermement sur la
touche CLÉ puis relâchez-la rapidement.
Pendant la saisie de votre combinaison, les
voyants DEL ROUGE et VERT clignotent à
l’unisson. Si l’un des deux voyants s’éteint,
vous devez répéter l’étape 1.
Etape 3 : Le voyant DEL VERT clignote
pour indiquer que la clé Flash Padlock
est déverrouillée.
FONCTION DE VERROUILLAGE
AUTOMATIQUE : Le dispositif de
verrouillage automatique assure la
sécurisation de la clé Flash Padlock. Ce
dispositif ne fonctionne que si une
combinaison a été saisie dans la clé Flash
Padlock ET que celle-ci est débranchée de
votre ordinateur. Si vous avez saisi une
combinaison et déverrouillé la clé Flash
Padlock, celle-ci reste déverrouillée
pendant environ 15 secondes avant que le
dispositif de verrouillage automatique ne
se déclenche. La seule fois où la fonction
de verrouillage automatique est
désactivée est quand la clé est connectée
à l’ordinateur.
COMMENT CHANGER UNE
COMBINAISON SUR LA CLÉ FLASH
PADLOCK
REMARQUE : Si aucune combinaison
secrète n’est attribuée à la clé Flash Padlock,
celle-ci est déverrouillée. Pour saisir une
combinaison, suivez les instructions fournies
dans la section précédente « Comment
configurer votre combinaison ».
Etape 1 : Suivez la procédure de
déverrouillage de la clé Flash Padlock.
Etape 2 : Maintenez la touche CLÉ
enfoncée jusqu’à ce que les voyants DEL
ROUGE et VERT s’allument (environ 3
secondes), puis relâchez-la.
Etape 3 : Pendant que les voyants DEL
ROUGE et VERT sont allumés, entrez votre
nouvelle combinaison.
Continued on next page
Page 6

Etape 4 : Une fois terminé, appuyez
fermement sur la touche CLÉ et
relâchez-la rapidement.
Etape 5 : Les voyants DEL ROUGE et
VERT se mettent à clignoter. Vous devez
alors entrer à nouveau votre combinaison
afin de la confirmer. Après avoir saisi votre
combinaison une deuxième fois, appuyez
sur la touche CLÉ puis relâchez-la.
REMARQUE : Si vous ne confirmez pas votre
combinaison avant que les voyants DEL
ROUGE et VERT ne s’éteignent (environ
15 secondes), la clé Flash Padlock réactive
la combinaison précédente qui lui était
attribuée et vous devez recommencer
l’opération.
Etape 6 : Le voyant DEL VERT se met
à clignoter pour indiquer que votre
combinaison a été configurée. Lorsque
le voyant DEL VERT s’arrête de clignoter
(environ 15 secondes), la fonction de
verrouillage automatique est activée et
la clé Flash Padlock se verrouille.
COMMENT VERROUILLER LA CLÉ
FLASH PADLOCK
Etape 1 : Vous ne pouvez pas verrouiller la
clé Flash Padlock tant qu’elle est
connectée à votre ordinateur. Débranchez
la clé Flash Padlock de votre ordinateur.
Etape 2 : Il faut compter environ 15
secondes pour que la fonction de
verrouillage automatique sécurise la clé
Flash Padlock. Vous savez que la clé est
verrouillée lorsque le voyant DEL VERT
cesse de clignoter.
REMARQUE : Si aucune combinaison
n’est attribuée à la clé Flash Padlock, le
verrouillage automatique ne peut pas se
déclencher et la clé reste ouverte. Si vous
voulez activer la fonction de verrouillage
automatique, référez-vous aux instructions
fournies dans la section « Comment
configurer votre combinaison ».
COMMENT CONFIGURER LA CLÉ
FLASH PADLOCK EN POSITION DE
DÉVERROUILLAGE PERMANENT
Etape 1 : Ne configurez pas de combinaison.
La clé Flash Padlock est livrée en position
déverrouillée et ne se verrouille que lorsque
vous saisissez une combinaison.
OU
Etape 1 : Suivez les instructions de
déverrouillage fournies précédemment.
Etape 2 : Dès que la clé est déverrouillée,
le voyant DEL VERT clignote. Maintenez la
touche CLÉ enfoncée jusqu’à ce que les
voyants DEL ROUGE et VERT s’allument
(environ 3 secondes). Puis relâchez la
touche CLÉ.
Etape 3 : A nouveau, appuyez fermement
sur la touche CLÉ et relâchez-la
rapidement. Les voyants DEL ROUGE et
VERT clignotent à l’unisson.
Etape 4 : Une troisième et dernière fois,
appuyez fermement sur la touche CLÉ et
relâchez-la rapidement. Le voyant DEL
VERT se met à clignoter pour indiquer
que la clé Flash Padlock est en position
de déverrouillage permanent. Ceci ne
changera pas tant que vous ne saisirez pas
de combinaison (voir ci-dessus).
REMARQUE : Si vous configurez votre
clé Flash Padlock en position de
déverrouillage permanent, celle-ci est
déverrouillée de façon permanente et
vos données sont accessibles. Par ailleurs,
lorsque la clé Flash Padlock est
déverrouillée et connectée à un
ordinateur, elle reste déverrouillée et
l’accès aux données est ouvert. La clé
ne peut être reverrouillée qu’en saisissant
une combinaison, ce qui déclenche le
dispositif de verrouillage automatique.
Référez-vous à la section précédente «
Comment configurer votre combinaison ».
ETAT DES VOYANTS DEL
Voyant DEL VERT allumé, non
clignotant—La clé Flash Padlock est
branchée dans votre ordinateur et est
déverrouillée ; vous pouvez donc y
accéder pour stocker ou récupérer
des données.
Voyant DEL VERT clignotant — La clé |
Flash Padlock est déverrouillée pendant
environ 15 secondes avant d’être
verrouillée par la fonction de verrouillage
automatique. Vous devez alors brancher
la clé Flash Padlock dans votre ordinateur
pour pouvoir y accéder avant qu’elle ne
soit verrouillée par la fonction de
verrouillage automatique.
Voyant DEL ROUGE allumé, non
clignotant — La clé Flash Padlock est
branchée dans votre ordinateur et est
verrouillée.
Voyant DEL ROUGE clignotant — La clé
Flash Padlock est verrouillée et prête à
recevoir votre combinaison d’accès.
Voyants DEL ROUGE et VERT clignotants
à l’unisson — La clé Flash Padlock est prête
à recevoir votre combinaison d’accès.
Voyants DEL ROUGE et VERT allumés,
non clignotants — Changement de
combinaison en cours.
Voyants DEL ROUGE et VERT clignotants
en alternance— Une erreur de saisie s’est
produite.
Voyant DEL BLEU clignotant — Lecture ou
écriture de données en cours sur la clé
Flash Padlock. Pour ne pas risquer de
corrompre ou de perdre vos données, ne
débranchez jamais la clé Flash Padlock
pendant que le voyant DEL BLEU clignote.
Voyants DEL ROUGE, VERT et BLEU
éteints— La clé Flash Padlock est en mode
veille et est débranchée de l’ordinateur.
DÉPANNAGE
1. Si vous commettez une erreur, les
voyants DEL ROUGE et VERT clignotent
en alternance.
2. Pendant la configuration de ma
combinaison, le voyant ROUGE s’allume
au lieu du voyant VERT.
• Si vous n’appuyez sur la touche CLÉ
qu’une seule fois (ou pendant moins
de 3 secondes), le voyant ROUGE
s’allumera. Attendez que le voyant
ROUGE s’éteigne, puis répétez depuis
le début la procédure de configuration
de la combinaison d’accès.
3. Pendant la configuration de ma
combinaison, j’ai entré par erreur un code
incorrect ou souhaiterais en configurer un
nouveau. Comment puis-je changer ma
combinaison d’accès ?
• Si vous êtes à l’étape de confirmation de
votre combinaison, attendez simplement
15 ou 20 secondes que les voyants
ROUGE et VERT s’éteignent. La clé
Flash Padlock retourne à son état
d’origine : c’est-à-dire soit la
combinaison précédente (s’il y en avait
une) est réactivée, soit elle retourne à sa
position déverrouillée (si aucune
combinaison n’était configurée).
• Si vous avez déjà configuré votre
combinaison et souhaitez la changer,
suivez la procédure décrite dans la
section « Comment changer une
combinaison sur la clé Flash Padlock ».
4. Puis-je déverrouiller la clé Flash Padlock si
elle est connectée à mon ordinateur ?
• Oui, vous pouvez déverrouiller la clé Flash
Padlock quand elle est connectée à votre
ordinateur. Suivez les instructions de
déverrouillage fournies précédemment.
5. Mon ordinateur ne reconnaît pas la clé
Flash Padlock lorsque je la branche. Que
puis-je faire ?
• Ceci indique que la clé Flash Padlock
est en position verrouillée. La fonction
de verrouillage automatique de la clé
Flash Padlock empêche l’accès non
autorisé à votre clé jusqu’à ce que
vous la déverrouilliez en saisissant
votre combinaison. Une fois
déverrouillée, votre clé sera reconnue
par votre ordinateur.
Continued on next page
6
Page 7

INFORMATIONS DE SÉCURITÉ
• N’exposez pas la clé Flash Padlock à de
l’eau, à une charge électrique et/ou à des
chocs physiques, au risque d’entraîner la
défaillance de la clé Flash Padlock.
• Élimination de l’emballage et du
produit— Jetez l’emballage et/ou le
produit en conformité avec la
réglementation locale. Ce produit
contient une batterie au lithium qui
ne peut être retirée que par une
personne qualifiée.
PadLocks are developed and produced by
Corsair Memory (www.corsair.com) based
on licensed technology (patents pending)
from ClevX LLC (www.clevx.com).
7
Page 8
Flash Padlock™ — Praktische Sicherheit für Ihre Daten
Sperranzeige
Tastenfeld zur
Zahleneingabe
Freigabeanzeige
Schlüsseltaste
Z
ugriffsanzeige
Kappe
USB-Stecker
Dieses Dokument soll dem Benutzer helfen,
sich mit dem verschlüsselbaren USBSpeicher-Stick Flash Padlock und dessen
Bedienung vertraut zu machen.
Besuchen Sie für weitere Informationen
unsere Website unter www.corsair.com oder
unsere Foren unter www.asktheramguy.com.
MERKMALE DES FLASH PADLOCK
• Automatische Datensperrung nach dem
Entfernen vom Computer.
• Eigenständige Hardware-SicherheitsAuthentifizierung.
• Zugriffsberechtigung über Geheimzahl
(Personal Identification Number = PIN),
ähnlich wie bei Geldautomaten.
• USB 2.0-konform
• Plattformunabhängig – Einsatz unter
Windows, MAC OS und Linux ohne
zusätzliche Software möglich.
MINDESTANFORDERUNGEN
• Desktop- oder Notebook-Computer mit
einem freien USB-Anschluss (HINWEIS:
High Speed USB 2.0 wird empfohlen).
• Plug & Play-kompatibel mit Windows
2000, Windows XP, Windows Vista oder
Mac OS X und höher.*
LIEFERUMFANG
• Flash Padlock USB-Stick, 3-VLithiumbatterie (cr2032) installiert
• USB-Kabel
• Trageschleife
• Kurzanleitung (das vorliegende Dokument)
VORSICHT: Wenn Sie die Kombination
einmal festgelegt haben, wird der Flash
Padlock permanent gesperrt, und Zugriff
auf die Daten ist dann nur durch Eingabeder
Zahlenkombination möglich. Bewahren Sie
Ihre Zahlenkombination an einem sicheren
Ort auf. Sie können die Kombination auch
durch einen sicheren Registriervorgang
auf der Corsair-Website
http://www.corsair.com/padlock hinterlegen.
FESTLEGEN DER ZAHLENKOMBINATION
Schritt 1: Die Schlüsseltaste drücken und
gedrückt halten. Die grüne LED beginnt
zu blinken. Halten Sie die Schlüsseltaste
so lange gedrückt (ca. 3 Sekunden), bis
sowohl die rote als auch die grüne LED
ununterbrochen aufleuchten. Lassen Sie
dann die Schlüsseltaste los.
ANMERKUNG: Sie haben etwa 15
Sekunden Zeit, mit der Eingabe der
Zahlenkombination zu beginnen.
Schritt 2: Geben Sie die gewünschte
Zahlenkombination ein. Verwenden Sie
dazu eine beliebige Kombination der fünf
(5) Zahlentasten des Flash Padlock. Die
Schlüsseltaste kann nicht mit in die
Zahlenkombination einbezogen werden.
Die rote und grüne LED leuchten für die
Dauer des Vorgangs von Schritt 2 auf.
ANMERKUNG: Um Eingabefehler zu
vermeiden empfehlen wird, die Tasten fest
und langsam zu drücken. Wenn Sie als
Kombination mehr als 10 Zahlen eingeben,
werden die ersten 10 Zahlen als Ihre
Kombination registriert und die darauf
folgenden Zahlen ignoriert.
Schritt 5: Die grüne LED blinkt, was
bedeutet, dass die Zahlenkombination
festgelegt wurde. Wenn die grüne LED
blinkt, verbleiben noch etwa 15 Sekunden,
bevor Flash Padlock gesperrt wird. Wenn
die grüne LED zu blinken aufhört, wird Flash
Padlock automatisch gesperrt, und Sie
benötigen Ihre Geheimzahl, um auf die
Daten zuzugreifen.
ANMERKUNG: Die Autosperre sorgt dafür,
dass Flash Padlock gesperrt wird, und ist
Ihre Methode, den USB-Stick zu sichern.
FREIGEBEN DES FLASH PADLOCK
Schritt 1: Die Schlüsseltaste fest drücken
und rasch wieder loslassen. Die rote LED
beginnt zu blinken. Dies bedeutet, dass
der Flash Padlock gesperrt ist, dass Sie
aber Ihre Geheimzahl eingeben können.
Es bleiben Ihnen 5 Sekunden Zeit, mit
Schritt 2 fortzufahren.
ANMERKUNG: Wenn Sie die Schlüsseltaste
länger als 2 Sekunden gedrückt halten, führt
dies zu einem Fehler. Die grüne und rote
LED blinken abwechselnd.
Schritt 2: Geben Sie bei blinkender roter
LED Ihre Geheimzahl ein. Dann die
Schlüsseltaste fest drücken und rasch
wieder loslassen. Während der
Geheimzahleingabe blinken die rote und
grüne LED synchron. Sollte eine der
Anzeigen erlöschen, müssen Sie Schritt 1
wiederholen.
Schritt 3: Die grüne LED blinkt, was
bedeutet, dass der Flash Padlock
freigegeben ist.
BEDIENUNG DES FLASH PADLOCK
Der Flash Padlock wird in ungesperrtem
Zustand ausgeliefert und kann sofort am
Computer verwendet werden. Zum
Aktivieren der Sicherheitsfunktionen des
Flash Padlock müssen Sie eine
Zahlenkombination festlegen. Diese
Kombination muss mindestens eine (1)
und maximal zehn (10) Zahlen umfassen.
Schritt 3: Drücken Sie nach Eingabe der
Zahlenkombination die Schlüsseltaste
und lassen Sie diese wieder los. Sowohl
die rote als auch die grüne LED beginnen
zu blinken.
Schritt 4: Sie müssen nun Ihre
Zahlenkombination zur Bestätigung
erneut eingeben. Drücken Sie nach der
erneuten Eingabe der Zahlenkombination
die Schlüsseltaste und lassen Sie diese
wieder los.
ANMERKUNG: Wenn Sie die Zahlenkombination
nicht bestätigen, bevor die rote und grüne LED
erlöschen (nach ca. 15 Sekunden), kehrt Flash
Padlockzur alten Kombination zurück und Sie
müssen den Vorgang erneut beginnen. Wenn
keine Zahlenkombination festgelegt wurde,
kehrt Flash Padlock zu seinemursprünglichen,
ungesperrten Zustand zurück.
8
AUTOSPERRE: Die Autosperre ist die
Methode, mit der die Daten im Flash
Padlock gesichert werden. Die Autosperre
wird aber nur dann aktiviert, wenn eine
Zahlenkombination festgelegt UND der
Flash Padlock vom Computer getrennt ist.
Wenn Sie eine Zahlenkombination
festgelegt und den USB-Stick freigegeben
haben, bleibt der Flash Padlock etwa 15
Sekunden lang freigegeben, bevor die
Autosperre wieder aktiviert wird. Die
Autosperre des Flash Padlock ist nur dann
deaktiviert, wenn das Gerät an den
Computer angeschlossen ist.
ÄNDERN DER GEHEIMZAHL DES
FLASH PADLOCK
ANMERKUNG: Wenn für den Flash Padlock
keine Zahlenkombination festgelegt wurde,
bleibt das Gerät ungesperrt. Wenn Sie
eine Zahlenkombination oder Geheimzahl
festlegen wollen, folgen Sie den
Anleitungen im Abschnitt „Festlegen
der Zahlenkombination“ weiter oben.
Continued on next page
Page 9

Schritt 1: Folgen Sie den Schritten zum
Entsperren des Flash Padlock.
Schritt 2: Halten Sie die Schlüsseltaste
so lange gedrückt (ca. 3 Sekunden), bis
sowohl die rote als auch die grüne LED
aufleuchten. Lassen Sie dann die
Schlüsseltaste los.
Schritt 3: Geben Siedie neue Zahlenkombination
ein,währenddie rote und grüneLED aufleuchten.
Schritt 4: Wenn Sie mit der Eingabe fertig
sind, die Schlüsseltaste fest drücken und
rasch wieder loslassen.
Schritt 5: Sowohl die rote als auch die
grüne LED beginnen zu blinken. Sie
müssen nun Ihre Zahlenkombination zur
Bestätigung erneut eingeben. Drücken
Sie nach der erneuten Eingabe der
Zahlenkombination die Schlüsseltaste
und lassen Sie diese wieder los.
ANMERKUNG: Wenn Sie die Zahlenkombination
nicht bestätigen, bevor die rote und grüne LED
erlöschen (nach ca. 15 Sekunden), kehrt Flash
Padlockzur alten Kombination zurück und Sie
müssen den Vorgang erneut beginnen.
Schritt 6: Die grüne LED blinkt, was
bedeutet, dass die Zahlenkombination
festgelegt wurde. Wenn die grüne LED
(nach ca. 15 Sekunden) zu blinken aufhört,
wird die Autosperre aktiviert und der
Flash Padlock gesperrt.
SPERREN DES FLASH PADLOCK
Schritt 1: Der Flash Padlock kann nicht
gesperrt werden, so lange er am
Computer angeschlossen ist. Trennen
Sie den Flash Padlock vom Computer.
Schritt 2: Die Autosperre des Flash Padlock
sorgt dafür, dass der Zugriff auf die Daten
des USB-Sticks in ca. 15 Sekunden blockiert
wird. Wenn die grüne LED zu blinken
aufhört, hat die Autosperre den Zugang
zum USB-Stick gesperrt.
ANMERKUNG: Wenn für den Flash Padlock
keine Zahlenkombination festgelegt ist,
kann die Autosperre nicht aktiviert werden
und der USB-Stick bleibt zugreifbar. Wenn
Sie die Autosperre aktivieren wollen,
folgen Sie den Anleitungen unter
„Festlegen der Zahlenkombination“.
EINSTELLEN DES FLASH PADLOCK AUF
„IMMER FREIGEGEBEN“
Schritt 1: : Legen Sie keine
Zahlenkombination fest. Der Flash Padlock
wird in einem „ungesperrten“ Zustand
ausgeliefert und erst dann gesperrt, wenn
Sie eine Geheimzahl festlegen.
ODER
Schritt 1: Folgen Sie den Schritten
„Freigeben des Flash Padlock“
(siehe oben).
Schritt 2: Wenn der USB-Stick freigegeben
ist, beginnt die grüne LED zu blinken.
Drücken Sie die Schlüsseltaste und halten
Sie diese so lange gedrückt (ca. 3
Sekunden), bis sowohl die rote als auch
die grüne LED aufleuchten. Lassen Sie
dann die Schlüsseltaste los.
Schritt 3: Die Schlüsseltaste fest drücken
und rasch wieder loslassen. Sowohl die
rote als auch die grüne LED beginnen
synchron zu blinken.
Schritt 4: Die Schlüsseltaste ein drittes
und letztes Mal fest drücken und rasch
wieder loslassen. Die grüne LED beginnt
zu blinken, was angibt, dass das Flash
Padlock nun „Immer freigegeben“ ist.
Dieser Zustand dauert an, bis Sie wieder
eine Zahlenkombination festlegen (siehe
oben).
ANMERKUNG: Wenn Sie den Flash
Padlock auf „Immer freigegeben“
einstellen, ist der USB-Stick permanent
ungesperrt und der Zugang zu den Daten
steht offen. Darüber hinaus bleibt Flash
Padlock ungesperrt und erlaubt Zugriff
auf die Daten, wenn er ungesperrt und
mit einem Computer verbunden ist.
Der USB-Stick kann nur dann wieder
gesperrt werden, indem man eine
Zahlenkombination festlegt und die
Autosperre aktiviert. Näheres dazu unter
„Festlegen der Zahlenkombination“
weiter oben.
LED-STATUS
GRÜNE LED — leuchtet ununterbrochen
auf: Flash Padlock ist am Computer
angeschlossen und freigegeben. Zugriff
auf die gespeicherten Daten bzw. Ablegen
von Daten ist möglich.
GRÜNE LED — blinkt: Flash Padlock ist ca.
15 Sekunden lang freigegeben, bevor die
Autosperre den USB-Stick sperrt. Schließen
Sie den Stick in diesem kurzen Zeitraum am
Computer an, um sicherzustellen, dass Sie
auf die Daten zugreifen können, bevor die
Autosperre den Zugriff blockiert.
ROTE LED —leuchtet ununterbrochen auf:
Flash Padlock ist am Computer
angeschlossen und gesperrt.
ROTE LED —blinkt: Flash Padlock ist
gesperrt und zur Eingabe der Geheimzahl
bereit.
ROTE und GRÜNE LED —blinken
synchron: Flash Padlock ist zur Eingabe
der Geheimzahl bereit.
ROTE und GRÜNE LED —leuchten
ununterbrochen auf: Änderung der
Geheimzahl eingeleitet.
ROTE und GRÜNE LED —blinken
abwechselnd: Ein Eingabefehler ist
aufgetreten.
BLAUE LED —blinkt: Flash Padlock liest
Daten aus oder schreibt Daten in den
Speicher. Um Datenfehler bzw. Datenverlust
zu verhindern, darf der Flash Padlock
niemals vom Computer getrennt werden,
wenn die blaue LED blinkt.
ROTE, GRÜNE und BLAUE LED leuchten
nicht auf: Flash Padlock befindet sich
im Ruhezustand und ist vom Computer
getrennt.
FEHLERSUCHE
1. Wenn Sie einen Eingabefehler machen,
blinken die rote und grüne LED
abwechselnd.
2. Beim Festlegen der Geheimzahl leuchtet
die ROTE und nicht die GRÜNE LED auf.
•Wenn Sie die Schlüsseltaste nur einmal
(oder früher als 3 Sekunden) drücken,
leuchtet die ROTE LED auf. Warten, bis
die ROTE LED erlischt, und dann die
Schritte unter „Festlegen der
Zahlenkombination“ von Anfang an
wiederholen.
3. Ich bin dabei, die Geheimzahl festzulegen,
habe aber aus Versehen die falsche Zahl
eingegeben bzw. will eine andere Zahl
eingeben. Wie kann ich die Zahl ändern?
• Wenn Sie sich in der Bestätigungsphase
befinden, warten Sie 15 bis 20 Sekunden,
bis die rote und grüne LED erlöschen.
Flash Padlock kehrt dann zu seinem
vorherigen Status zurück – entweder zur
alten Geheimzahl (falls bereits eine
festgelegt war) oder zum ungesperrten
Status (wenn noch keine Geheimzahl
definiert war).
• Wenn Sie bereits eine Geheimzahl
festgelegt haben und diese ändern
wollen, folgen Sie den Anleitungen unter
„Ändern der Geheimzahl“.
4. Kann ich den Flash Padlock freigeben,
während er am Computer angeschlossen ist.
• Ja, der Flash Padlock kann freigegeben
werden, während er am Computer
angeschlossen ist. Folgen Sie den
Anleitungen „Freigeben des Flash
Padlock“ weiter oben.
5. Mein Computer erkennt den Flash
Padlock nicht, wenn ich diesen
anschließe. Was kann ich tun?
• Dies deutet darauf hin, dass sich der
Flash Padlock im gesperrten Zustand
befindet. Die Autosperre des Flash
Padlock verhindert Zugriff auf die
gespeicherten Daten ohne Freigabe
durch Eingeben der korrekten
Geheimzahl. Wenn der USB-Stick
freigegeben ist, kann er vom
Computer erkannt werden.
Continued on next page
9
Page 10

SICHERHEITSINFORMATIONEN
• Schützen Sie den Flash Padlock vor
Wasser, elektrischen Ladungen und/oder
Stößen, da diese zum Versagen des
Produkts führen können.
• Entsorgung von Verpackungsmaterial
und Gerät–halten Sie sich beim
Entsorgen des Verpackungsmaterials
und/oder Geräts and alle zutreffenden
gesetzlichen Bestimmungen. Dieses
Produkt enthält eine Lithiumzelle, die
nur von einem Fachmann entnommen
werden darf.
PadLocks are developed and produced by
Corsair Memory (www.corsair.com) based
on licensed technology (patents pending)
from ClevX LLC (www.clevx.com).
10
Page 11

Flash Padlock™ — La massima protezione dei vostri dati
Indicatore
di blocco
Tastierino per
la combinazione
Indicatore
di sblocco
Tasto
C
hiave
I
ndicatore
di accesso
Cappuccio
Presa
USB
Questo documento fornisce le informazioni
necessarie per familiarizzare con l'unità USB
Flash Padlock, le sue caratteristiche di
protezione dei dati ed il suo funzionamento.
Per ulteriori informazioni, visiti
www.corsair.com od il forum utenti
all'indirizzo www.asktheramguy.com.
CARATTERISTICHE DEL FLASH PADLOCK
• Meccanismo di blocco automatico dopo
la rimozione dal computer.
• Autenticazione di protezione integrata
in hardware.
• Autorizzazione d'accesso tramite PIN
(numero identificativo personale), simile
a quello di un normale bancomat.
• Conforme a USB 2.0
• Indipendente dalla piattaforma, adatto
per sistemi operativi Windows, MAC e
Linux senza l'uso di software aggiuntivo.
REQUISITI MINIMI
• Computer desktop o portatile con porta
USB disponibile (NOTA: si consiglia una
porta USB 2.0 ad alta velocità).
• Compatibile plug-and-play con Windows
2000, Windows XP, Windows Vista e
Mac OS X e superiore*.
CONTENUTO DELLA CONFEZIONE
• Flash Padlock USB, con batteria al litio
3 V (cr2032) installata
• Cavo USB
• Cordicella di trasporto
• Manuale utente (questo documento)
USO DI FLASH PADLOCK
Flash Padlock è fornito in configurazione
sbloccata, pronto per l'uso con il
computer. Per abilitare la protezione di
Flash Padlock, è necessario scegliere una
combinazione composta da un minimo di
una (1) ed un massimo di dieci (10) cifre.
ATTENZIONE: una volta scelta la
combinazione, Flash Padlock si bloccherà
in modo permanente e non consentirà
l'accesso ai dati senza immettere tale
combinazione. Annotare la combinazione
in un luogo sicuro oppure registrarla in
maniera protetta sul sito Corsair:
http://www.corsair.com/padlock
IMPOSTAZIONE DELLA COMBINAZIONE
Passaggio 1: Tenere premuto il tasto
CHIAVE. Il LED VERDE inizia a
lampeggiare. Tenere premuto il tasto
CHIAVE fino a quando i LED ROSSO e
VERDE rimangono accesi (circa 3
secondi), quindi rilasciare il tasto CHIAVE.
NOTA: è necessario impostare la
combinazione entro 15 secondi.
Passagio 2: Immettere la combinazione
desiderata utilizzando i cinque (5) tasti
numerici di Flash Padlock. Non è
possibile utilizzare il tasto CHIAVE nella
combinazione. I LED ROSSO e VERDE
restano accesi fissi durante questo
passaggio.
NOTA: Tal fine di impedire errori
nell'immissione, premere i tasti con
decisione, ma lentamente. Se si usa una
combinazione a più di 10 cifre, Flash
Padlock accetterà soltanto le prime 10 cifre
e ignorerà il resto della sequenza immessa.
Passaggio 3: Una volta immessa la
combinazione, premere e rilasciare il
tasto CHIAVE. I LED ROSSO e VERDE
lampeggiano.
Passaggio 4: Reimmettere la stessa
combinazione a scopo di conferma. Dopo
averla reimmessa, premere e rilasciare il
tasto CHIAVE.
NOTA: se non si conferma la combinazione
prima che si spengano i LED ROSSO e
VERDE (entro 15 secondi circa), Flash
Padlock ripristinerà la combinazione
precedente e si dovrà ripetere l'intera
procedura. Se non si imposta una
combinazione, Flash Padlock ripristinerà
lo stato originale.
Passaggioi 5: Il LED VERDE lampeggia
per indicare che la combinazione è stata
impostata. Mentre lampeggia, Flash Padlock
rimane sbloccato per 15 secondi circa.
Quando il LED VERDE cessa di lampeggiare,
Flash Padlock si blocca automaticamente e
richiede l'immissione del PIN per lo sblocco.
NOTA: la funzione di chiusura automatica
blocca Flash Padlock. In questo modo si
blocca completamente l'unità.
SBLOCCO DI FLASH PADLOCK
Passaggio 1: Premere e rilasciare
velocemente il tasto CHIAVE. Il LED
ROSSO inizia a lampeggiare per indicare
che Flash Padlock è bloccato, ma
pronto per accettare la combinazione.
È necessario eseguire il passaggio 2
entro 5 secondi.
NOTA: Itenendo premuto il tasto CHIAVE
per oltre 2 secondi si produce un errore
ed i LED ROSSO e VERDE inizieranno a
lampeggiare a intermittenza.
Passaggio 2: Mentre il LED ROSSO
lampeggia, immettere la combinazione,
quindi premere e rilasciare velocemente
il tasto CHIAVE. Durante l'immissione, i
LED ROSSO e VERDE lampeggiano
all'unisono. Se uno dei LED si spegne,
tornare al passaggio 1.
Passaggio 3: . Il LED VERDE lampeggia
per indicare che Flash Padlock è
sbloccato.
LA FUNZIONE DI CHIUSURA
AUTOMATICA è il meccanismo di
protezione di Flash Padlock. Questa
funzione è abilitata solo se è stata
impostata una combinazione su Flash
Padlock E solo se non è inserito nel
computer. Se è stata impostata una
combinazione e l'unità è sbloccata,
Flash Padlock rimarrà in tale condizione
per 15 secondi circa prima che si attivi
la chiusura automatica. La funzione di
chiusura automatica di Flash Padlock
è disabilitata soltanto durante il
collegamento al computer.
MODIFICA DELLA COMBINAZIONE DI
FLASH PADLOCK
NOTA: se non è stata impostata una
combinazione per il Flash Padlock,
l'unità è sbloccata. Per impostare una
combinazione, attenersi alle istruzioni
della sezione precedente “Impostazione
della combinazione”.
Passaggio 1: Attenersi alle istruzioni per
lo sblocco di Flash Padlock.
Passaggio 2: Tenere premuto il tasto
CHIAVE fino a quando i LED ROSSO e
VERDE si accendono (circa 3 secondi),
quindi rilasciare il tasto CHIAVE.
Passaggio 3: Mentre i LED ROSSO e VERDE
sono accesi, immettere la combinazione.
Passaggio 4: Al termine, premere e
rilasciare velocemente il tasto CHIAVE.
Continued on next page
11
Page 12

Passaggio 5: I LED ROSSO e VERDE
lampeggiano. Reimmettere la stessa
combinazione a scopo di conferma. Dopo
averla reimmessa, premere e rilasciare il
tasto CHIAVE.
NOTA: se non si conferma la combinazione
prima che si spengano i LED ROSSO e
VERDE (entro 15 secondi circa), Flash
Padlock ripristinerà la combinazione
precedente e si dovrà ripetere l'intera
procedura.
Passaggio 6: Il LED VERDE lampeggia
per indicare che la combinazione è stata
impostata. Quando il LED VERDE cessa di
lampeggiare (15 secondi circa), la funzione
di chiusura automatica si abilita e Flash
Padlock si blocca.
BLOCCO DI FLASH PADLOCK
Passaggio 1: Non è possibile bloccare
Flash Padlock quando è collegato al
computer. Scollegare Flash Padlock
dal computer.
Passaggio 2: La funzione di chiusura
automatica di Flash Padlock blocca l'unità
entro 15 secondi circa. Quando il LED
VERDE cessa di lampeggiare, la chiusura
automatica ha bloccato l'unità.
NOTA: se non è stata impostata una
combinazione per Flash Padlock, non sarà
possibile abilitare la chiusura automatica e
l'unità rimarrà sbloccata. Per abilitare la
chiusura automatica, attenersi alle
istruzioni della sezione “Impostazione
della combinazione”.
SBLOCCO PERMANENTE DI FLASH
PADLOCK
Passaggio 1: Non impostare una
combinazione. Flash Padlock è fornito in
stato sbloccato e si blocca solo dopo aver
specificato una combinazione.
OPPURE
Passaggio 1: Attenersi alle istruzioni
della sezione precedente “Sblocco di
Flash Padlock”.
Passaggio 2: Una volta sbloccato, il LED
VERDE inizia a lampeggiare. Tenere
premuto il tasto CHIAVE fino a quando i
LED ROSSO e VERDE si accendono (circa
3 secondi). Rilasciare il tasto CHIAVE.
Passaggio 3: Premere e rilasciare
velocemente il tasto CHIAVE. I LED
ROSSO e VERDE lampeggiano all'unisono.
Passaggio 4: Premere e rilasciare
velocemente il tasto CHIAVE per la
terza volta. Il LED VERDE lampeggia
per indicare che Flash Padlock è in stato
di sblocco permanente. Tale condizione
cambia solo impostando una
combinazione (v. sopra).
NOTA: Flash Padlock rimane in condizione
di blocco permanente e consente sempre
l'accesso ai dati. Inoltre, mentre è
sbloccato e collegato al computer, Flash
Padlock consente sempre l'accesso ai dati.
È possibile bloccare nuovamente l'unità
impostando una combinazione e quindi
lasciando che la funzione di chiusura
automatica lo blocchi. Vedere la sezione
precedente “Impostazione di una
combinazione”.
STATO DEI LED
LED VERDE acceso fisso (non
lampeggiante)—Flash Padlock è collegato
al computer ed è sbloccato per consentire
l'accesso ai dati.
LED VERDE lampeggiante — Flash Padlock
è sbloccato per 15 secondi circa prima che
la funzione di chiusura automatica lo
blocchi. Inserire Flash Padlock nel
computer mentre permane questa
condizione per poter accedere ai dati
prima che la chiusura automatica blocchi
l'unità.
LED ROSSO acceso fisso (non
lampeggiante)—Flash Padlock è collegato
al computer e bloccato.
LED ROSSO lampeggiante — Flash
Padlock è bloccato e pronto per
l'immissione della combinazione.
LED ROSSO e VERDE lampeggianti
all'unisono — Flash Padlock è pronto
per l'immissione della combinazione.
LED ROSSO e VERDE accesi fissi (non
lampeggianti) — È iniziata la procedura
per la modifica della combinazione.
LED ROSSO e VERDE accesi a
intermittenza— È stato commesso un
errore durante l'immissione.
LED BLU lampeggiante — Flash Padlock è
in fase di lettura o scrittura dei dati. Per
impedire danni o perdita dei dati, non
scollegare mai Flash Padlock mentre il
LED BLU lampeggia.
LED ROSSO, VERDE e BLU spenti —
Flash Padlock è inattivo e scollegato
dal computer.
RISOLUZIONE DEI PROBLEMI
1. Se si commette un errore, i LED ROSSO
e VERDE lampeggiano a intermittenza.
2. Durante l'impostazione della
combinazione, si accende il LED ROSSO,
non quello VERDE.
• Se si preme il tasto CHIAVE una
volta (o per meno di 3 secondi), il
LED ROSSO inizia a lampeggiare.
Attendere che il LED ROSSO si
spenga, quindi ripetere la procedura
“Impostazione della combinazione”
dal primo passaggio.
3. Ho digitato cifre errate durante
l'immissione della combinazione.
Come posso correggerle?
• Se l'errore è avvenuto durante la fase di
conferma della combinazione, attendere
15-20 secondi che i LED ROSSO e
VERDE si spengano. Flash Padlock
ripristinerà lo stato precedente — la
combinazione precedente (se esisteva)
o lo stato di sblocco (se non esisteva
una combinazione).
• Se è già stata impostata una
combinazione e si desidera cambiarla,
attenersi alle istruzioni della sezione
precedente “Impostazione della
combinazione”.
4. Posso sbloccare Flash Padlock quando
è collegato al computer?
• Sì, è possibile sbloccare Flash Padlock
quando è collegato al computer.
Attenersi alle istruzioni della sezione
“Sblocco di Flash Padlock”.
5. Al collegamento, il mio computer non
riconosce Flash Padlock. Cosa posso fare?
• Flash Padlock è in stato di blocco. La
funzione di chiusura automatica di Flash
Padlock impedisce l'accesso non
autorizzato all'unità sino all'immissione
della combinazione che lo sblocca.
Dopo averlo sbloccato, il computer
riconoscerà l'unità.
INFORMAZIONI DI SICUREZZA
• Non esporre Flash Padlock all'acqua o
a scariche elettriche ed evitare urti o
cadute che potrebbero danneggiare
l'unità.
• Smaltimento della confezione e del
prodotto–Smaltire l'involucro e/o il
prodotto in conformità alle normative
vigenti in materia. Questo prodotto
contiene una batteria al litio a bottone,
che può essere rimossa solo da un
utente competente.
PadLocks are developed and produced by
Corsair Memory (www.corsair.com) based
on licensed technology (patents pending)
from ClevX LLC (www.clevx.com).
12
Page 13

Flash Padlock™ — Seguridad práctica para los datos
Seguridad
no activa
Teclado de
combinación
S
eguridad
activa
Botón de
la llave
Indicador
de acceso
Tapa
Llave
USB
Este documento tiene el objeto de ayudar
a los usuarios a familiarizarse con la
memoria Flash Padlock USB con seguro y
su funcionamiento.
Si desea más asistencia, visite nuestro sitio
web: www.corsair.com o nuestros foros
de usuarios: www.asktheramguy.com.
CARACTERÍSTICAS DE LA
FLASH PADLOCK
• Mecanismo de seguro automático al
retirar la llave del ordenador.
• Autentificación de seguridad autónoma
en el hardware.
• Autorización de acceso mediante PIN
(número de identificación personal),
similar a los usados en los ATM
(cajeros automáticos).
• Cumple con la norma USB 2.0
• Funcionamiento independiente de la
plataforma en sistemas Windows, MAC
y Linux, sin necesidad de software.
REQUISITOS MÍNIMOS
• Ordenador de escritorio o portátil con
un puerto USB disponible (NOTA: Se
recomienda USB 2.0 de alta velocidad).
• Configuración automática en Windows
2000, Windows XP, Windows Vista
y Mac OS X, así como versiones
posteriores*.
CONTENIDO DEL PAQUETE
• Memoria Flash Padlock USB, pila de litio
de 3V (cr2032)
• Cable USB
• Correa
• Guía Inicial Rápida (este manual)
CÓMO UTILIZAR LA FLASH PADLOCK
La Flash Padlock se envía no activada, lista
para usarse en el ordenador. Para habilitar
el seguro de la Flash Padlock es necesario
fijar una combinación. La combinación
debe tener entre uno (1) y diez (10) dígitos.
PRECAUCIÓN: Una vez que se fija la
combinación, la Flash Padlock queda
permanentemente con la seguridad
activada y no puede tenerse acceso a los
datos, a menos que se introduzca dicha
combinación. Guarde la combinación en un
lugar seguro, o guárdela en el sitio web de
Corsair, mediante el proceso de registro
seguro del mismo:
http://www.corsair.com/padlock.
CÓMO FIJAR LA COMBINACIÓN
Paso 1: Presione el botón de la llave y
no lo suelte. La luz VERDE comienza a
destellar. Mantenga presionado el botón
de la llave hasta que tanto la luz ROJA
como la VERDE permanezcan encendidas
(unos 3 segundos), y luego suéltelo.
NOTA: Se dispone de unos 15 segundos
para comenzar a fijar la combinación.
Paso 2: Introduzca la combinación usando
cualquier variación de los cinco (5)
botones numéricos de la Flash Padlock.
No puede usarse el botón de la llave como
parte de la combinación. Las luces ROJA y
VERDE permanecen encendidas durante
este paso.
NOTA: Para evitar errores, presione los
botones firme y lentamente. Si intenta
introducir más de 10 números para la
combinación, la Flash Padlock fija ésta
con los 10 primeros e ignora los siguientes.
Paso 3: Después de introducir la
combinación, presione el botón de la
llave y suéltelo. Tanto la luz ROJA como
la VERDE empiezan a destellar.
Paso 4: Después necesita volver a
introducir la combinación para verificarla.
Después de introducir la combinación por
segunda vez, presione el botón de la llave
y suéltelo.
NOTA: Si no verifica la combinación antes de
que se apaguen las luces ROJA y VERDE
(15 segundos aproximadamente), la Flash
Padlock vuelve a la combinación anterior
y es necesario reiniciar el proceso. Si no se
fija ninguna combinación, la Flash Padlock
vuelve al estado original en que estaba antes
de abrirse.
Paso 5: La luz VERDE empieza a destellar
para indicar que ha sido fijada la
combinación. Cuando la luz VERDE está
destellando, la Flash Padlock permanece
con seguridad no activada cerca de 15
segundos. Cuando la luz VERDE deja de
destellar, la seguridad de la Flash Padlock
està activada automáticamente y se requiere
introducir el PIN para no activarla.
NOTA: El seguro automático està activo
automáticamente la Flash Padlock. Ésta
es la forma de activar la seguridad.
CÓMO QUITAR LA SEGURIDAD DE LA
FLASH PADLOCK
Paso 1: Presione firmemente el botón de
la llave y luego suéltelo rápidamente. La
luz ROJA empieza a destellar para indicar
que la seguridad de la Flash Padlock
está activada, pero lista para recibir la
combinación. Dispone de unos 5 segundos
para comenzar el paso 2.
NOTA: Si mantiene oprimido el botón de
la llave más de 2 segundos, resulta un
error. Luces VERDE y ROJA destellando
alternadamente.
Paso 2: Mientras la luz ROJA está
destellando, introduzca la combinación,
después presione firmemente el botón
de la llave y luego suéltelo rápidamente.
Durante esta etapa de la introducción de
la combinación, las luces ROJA y VERDE
destellan al unísono. Si cualquiera de
las luces se apaga, es necesario repetir
el paso 1.
Paso 3: La luz VERDE empieza a destellar
para indicar que la seguridad de la Flash
Padlock no está activada.
EL SEGURO AUTOMÁTICO: constituye
la forma en que la seguridad de la
Flash Padlock esté activada. El seguro
automático sólo funciona cuando la
Flash Padlock tiene una combinación
fijada y dicha unidad está desconectada
del ordenador. Si se tiene fijada una
combinación y la seguridad de la Flash
Padlock no està activada, ésta permanece
no activada durante unos 15 segundos
antes de que se habilite el seguro
automático. La única vez en que se
inhabilita el seguro automático de la
Flash Padlock es mientras está conectada
al ordenador.
CÓMO CAMBIAR LA COMBINACIÓN DE
LA FLASH PADLOCK
NOTA: Si no se ha fijado la combinación
de la Flash Padlock, la seguridad no está
activada. Si se desea fijar la combinación,
es necesario seguir las instrucciones
señaladas en el apartado “Cómo fijar
la combinación”.
Paso 1: Siga los pasos necesarios para
quitar la seguridad de la Flash Padlock.
Paso 2: Presione el botón de la llave
|hasta que se enciendan tanto la luz
ROJA como la VERDE (unos 3 segundos),
y luego suéltelo.
Paso 3: Mientras luces ROJA y VERDE están
encendidas, introduzca la nueva combinación.
Continued on next page
13
Page 14

Paso 4: Una vez que termine, presione
firmemente el botón de la llave y
suéltelo rápidamente.
Paso 5: Tanto la luz ROJA como la VERDE
empiezan a destellar. Es necesario volver
a introducir la combinación para
verificarla. Después de introducir la
combinación por segunda vez, presione
el botón de la llave y suéltelo.
NOTA: Si no verifica la combinación antes
de que se apaguen las luces ROJA y VERDE
(15 segundos aproximadamente), la Flash
Padlock vuelve a la combinación anterior
y es necesario reiniciar el proceso.
Paso 6: La luz VERDE empieza a destellar
para indicar que ha sido fijada la
combinación. Cuando la luz VERDE deja
de destellar (unos 15 segundos), se habilita
el seguro automático y la Flash Padlock
queda activada.
CÓMO ACTIVAR LA SEGURIDAD DE LA
FLASH PADLOCK
Paso 1: No puede activar la Flash Padlock
mientras esté conectada al ordenador.
Desconecte la Flash Padlock del
ordenador.
Paso 2: El seguro automático de la Flash
Padlock està activo en 15 segundos
aproximadamente. Cuando la luz VERDE
deja de destellar significa que el seguro
automático ha asegurado la unidad.
NOTA: Si no se ha fijado la combinación de
la Flash Padlock, no puede habilitarse el
seguro automático y ésta permanece no
activada. Si desea habilitar el seguro
automático, lea las instrucciones señaladas
en el apartado “Cómo fijar la
combinación”.
CÓMO DEJAR LA FLASH PADLOCK
“SIEMPRE NO ACTIVADA”
Paso 1: No fije la combinación. La Flash
Padlock se envía en estado “no activado”
y no està activo hasta que no se fije la
combinación.
O
Paso 1: Siga los pasos señalados en el
apartado “Cómo quitar la seguridad de
la Flash Padlock” (ver arriba).
Paso 4: Por tercera y última vez presione
firmemente el botón de la llave y suéltelo
rápidamente. La luz VERDE empieza a
destellar para indicar que la Flash Padlock
está ahora “siempre no activada”. Esto no
cambia hasta que no fije usted la
combinación (ver arriba).
NOTA: La Flash Padlock quedará
permanentemente no activada y puede
tenerse acceso a los datos si se deja ésta
“siempre no activada”. Además, mientras
la Flash Padlock no está activada y
conectada a un ordenador, permanece en
tal estado y puede tenerse acceso a los
datos. La unidad puede estar activada de
nuevo fijando la combinación y luego
dejando que el seguro automático sea
activado. Vea el apartado “Cómo fijar la
combinación”, más arriba.
ESTADO DE LAS LUCES LED
Luz VERDE encendida, sin destellar —
La Flash Padlock está conectada al
ordenador y no está activada; puede
tenerse acceso a la unidad para guardar
o extraer datos.
Luz VERDE destellando — La Flash
Padlock queda no activada durante unos
15 segundos antes de que la característica
de seguro automático sea activado. Se
necesita conectar la Flash Padlock al
ordenador durante este período para
poder tener acceso a la unidad antes de
que la característica de seguro automático
sea activado.
Luz ROJA encendida, sin destellar —
La Flash Padlock está conectada al
ordenador y está activada.
Luz ROJA destellando — La Flash
Padlock está activada y lista para
recibir la combinación.
LED ROJA y VERDE destellando al
unísono — La Flash Padlock está lista
para recibir la combinación.
LED ROJA y VERDE encendidas, sin
destellar— Se ha iniciado un cambio
de combinación.
SOLUCIÓN DE PROBLEMAS
1. Si usted comete un error, tanto la luz
ROJA como la VERDE empiezan a
destellar alternadamente.
2. Mientras estoy tratando de fijar la
combinación, se enciende la luz ROJA
en lugar de la VERDE.
• Si se presiona el botón de la llave sólo
una vez (o antes de 3 segundos), se
enciende la luz ROJA. Espere a que se
apague la luz ROJA y luego repita los
pasos indicados en el apartado “Cómo
fijar la combinación” desde el
principio.
3. Estoy fijando la combinación pero por
error introduje un código equivocado
o deseo otro. ¿Cómo puedo efectuar
el cambio?
• Si esto es durante el paso para confirmar
la combinación, sólo espere de 15 a
20 segundos para que se apaguen las
luces ROJA y VERDE. La Flash Padlock
vuelve a su estado anterior, ya sea la
combinación antigua (si estaba fijada)
o el estado no activado (si estaba fijada
la combinación).
• Si usted ya ha fijado la combinación y
desea cambiarla, siga los pasos
señalados en el apartado “Cómo
cambiar la combinación”.
4. ¿Puedo quitar la seguridad de la
Flash Padlock mientras está conectada
al ordenador ?
• Sí, puede quitar la seguridad de la
unidad mientras está conectada al
ordenador. Siga las instrucciones
señaladas en el apartado “Cómo quitar
la seguridad de la Flash Padlock” (ver
arriba).
5. El ordenador no reconoce la Flash
Padlock cuando la conecto. ¿Qué
puedo hacer?
• Esto indica que la unidad Flash Padlock
está en estado activado. El seguro
automático de la Flash Padlock impide
todo acceso no autorizado a ésta hasta
que usted no introduce la combinación
correcta para quitar la seguridad. Una
vez no activada la unidad, el ordenador
puede reconocerla.
Paso 2: Una vez no activada la unidad, la
luz VERDE comienza a destellar. Presione
el botón de la llave y no lo suelte hasta
que no se enciendan tanto la luz ROJA
como la VERDE (unos tres segundos).
Después suéltelo.
Paso 3: De nuevo presione firmemente el
botón de la llave y suéltelo rápidamente.
Tanto la luz ROJA como la VERDE
empiezan a destellar al unísono.
LED ROJA y VERDE destellando
alternadamente— Ha ocurrido un error
al introducir la combinación.
Luz AZUL destellando — La Flash Padlock
está leyendo o guardando datos. Para
evitar corrupción o pérdida de datos,
nunca retire la Flash Padlock mientras
esté destellando la luz AZUL.
LED ROJA, VERDE y AZUL apagadas— La
Flash Padlock está en modo de reposo y
desconectada del ordenador.
Continued on next page
14
Page 15

INFORMACIÓN DE SEGURIDAD
• No exponga la Flash Padlock al agua,
cargas eléctricas o impactos físicos.
Podrían causar que la unidad falle.
• Desecho del material de empaquetado y
del producto— Deseche el material de
empaquetado y/o el producto de
conformidad con las leyes de la
localidad. Este producto contiene un
pila de litio tipo botón, la cual debe ser
retirada por una persona calificada.
PadLocks are developed and produced by
Corsair Memory (www.corsair.com) based
on licensed technology (patents pending)
from ClevX LLC (www.clevx.com).
15
Page 16

Flash Padlock™ - Proteçào máxima dos “data”
Indicador
de travação
Botões
da senha
Indicador de
destravação
B
otão
chave
Indicador
de acésso
Capa
Chave
USB
Este documento destina – se a familiarizar o
usuário com a unidade USB Flash Padlock
para proteção máxima de dados e fornece
informações a respeito de suas
caracteristicas e seu funcionamento.
Para informações adicionais, visite
www.corsair.com ou então o forum de
usuários www.asktheramguy.com.
CARACTERISTICAS DO FLASH PADLOCK
• Mecanismo de bloqueio automático
depois de ser removido do computador.
• Autentificção de proteção integrada no
“hardware”
• Autorização de acesso mediante PIN
(número pessoal de identificação),
similar ao dos “bancomat”
• Em conformidade com USB 2.0
• Funcionamento independente da
plataforma: adaptado para os sistemas
operacionais Windows, MAC e Linux,
sem necessidade de “software” adicional.
REQUISITOS MINIMOS
• Computador de mesa ou portátil
com porto USB disponivel (NOTA:
recomenda— se um porto USB 2.0
de alta velocidade.
• Compativel “plug - and – play” com
Windows 2000, Windows XP, Windows
Vista e Mac.OS X e versões posteriores.
CONTEÚDO DA EMBALAGEM
• Flash Padlock USB, com batería instalada
de Litio 3 V (cr2032).
• Cabo USB.
• Correia para transporte.
• Manual do usuário (que é o presente
documento).
ATENÇÃO: Uma vez escolhida a senha, o
Flash Padlock fica com a proteção ativada
permanentemente; não será possivel
acessar dados, a menos que se introduza
a referida senha. Anote a senha escolhida
em local seguro ou registre – a (de
maneira protegida ) no site Corsair:
http://www.corsair.com./padlock
COMO INTRODUZIR A SENHA
1 Passo: Pressione o botão chave e
mantenha – o pressionado; a luz (LED)
verde começará a cintilar (piscar);
mantenha pressionado o botão chave
enquanto os LED verde e vermelho
cintilam (aproximadamente três
segundos), e em seguida solte o
botão chave.
NOTA: é necessário introduzir a senha
dentro de 15 segundos.
2 Passo: Introduzir a senha escolhida
utilizando os 5 (cinco) botões numéricos
do Flash Padlock. Não é possivel utilizar o
botão chave como parte da senha. Os
LED verde e vermelho permanecem
acesos durante esse passo.
NOTA: afim de impedir erros durante a
introdução da senha, pressione os botões
firmemente, mas lentamente. Se forem
introduzidos mais do que 10 (dez) digitos,
a unidade aceitará somente os 10 (dez)
primeiros digitos introduzidos, ignorando
os restantes.
3 Passo: Após introduzir a senha,
pressione o botão chave e solte – o; os
LED verde e vermelho ficarrão acesos
durante 15 segundos aproximadamente.
COMO DESTRAVAR O FLASH PADOCK.
1 Passo: Pressione e solte rapidamente o
botão chave. O LED vermelho começa a
cintilar, indicando que o Flash Padock está
travado, mas está em situação de aceitar a
senha. Este passo deverá ser executado
em menos de 5 (cinco) segundos.
NOTA: Se o botão chave for mantido
pressionado por dois segundos adicionais,
a unidade interpreta este fato como sendo
um erro e os LED verde e vermelho
começarão a cintilar alternadamente.
2 Passo: Enquanto o LED vermelho estiver
cintilando, introduza a senha; em seguida,
pressione e solte rapidamente o botão
chave. Durante a introdução da senha os
LED verde e vermelho cintilm
simultaneamente; se um desses LED se
“apaga”, será necessário repetir o
procedimento desde o 1º Passo.
3 Passo: O LED verde cintila, indicando
que o Flash Padock está destravado.
A FUNÇÃO “TRAVAÇÃO AUTOMÁTICA”
é o mecanismo de proteção (de dados)
existente no Flash Padlock. Esta função
somente é ativada depois de introduzida
a senha e a unidade estiver desconectada
do computador. Se uma senha já foi
introduzida e a unidade for destravada,
ela permanecerá neste estado por 15
(quinze) segundos e em seguida a função
“TRAVAÇÃO AUTOMÁTICA” é ativada.
A referida função permanece desativada
enquanto a unidade estiver conectada
ao computador.
UTILIZAÇÃO DO FLASH PADLOCK
A unidade é fornecida destravada, pronta
para ser ligada ao computador. Para
habilitar a proteção do Flash Padlock é
necessário escolher uma senha, composta
por digitos: no mínimo 1 (um) e no
máximo 10 (dez) digitos.
4 Passo: Introduza de novo a (mesma)
senha, para confirma – la. Em seguida
pressione o botão chave e solte – o.
NOTA: A confirmacão da senha deverá ser
feita com os LED verde e vermelho
acesos, do contrário o Flash Padock
retorna ao estado inicial e todo o
procedimento deverá ser repetido, a
começar do 1o Passo.
5 Passo: O LED verde estará cintilando,
indicando que a senha foi introduzida.
Enquanto durar a cintilação, o Flash
Padock fica destravado (durante 15
segundos aproximadamente). Cessada a
cintilação, a unidade se trava
automaticamente, e só será destravada se
a senha escolhida for introduzida.
NOTA: A travação automática bloqueia
totalmente a unidade; o que garante
proteção completa dos seus dados.
16
COMO ALTERAR A SENHA DO FLASH
PADLOCK
NOTA : Se nenhuma senha foi introduzida,
a unidade estará desbloqueada.
1 Passo: Execute o procedimento para
destravar a unidade.
2 Passo: Mantenha pressionado o botao
chave até que os LED verde e vermelho
se acendam (isso demora três segundos
aproximadamente), e em seguida soltar o
botão chave.
3 Passo: Enquanto os LED verde e
vermelho continuem acesos, introduza a
nova senha.
4 Passo: Em seguida, pressionar e soltar
rapidamente o botão chave.
Continued on next page
Page 17

5 Passo: Os LED verde e vermelho
começarão a cintilar; introduza outra vez
a (mesma) nova senha para confirmá –
la. Depois disso,pressionar e soltar o
botão chave.
NOTA: A confirmação mencionada acima
deverá ser executada enquanto os LED
verde e vermelho estiverem acesos (e isso
tem a duração de 15 segundos
aproximadamente).Caso contrário, a
unidade retorna á senha precedente e
torna-se necessário refazer o
procedimento desde o 1o Passo.
6 Passo: O LED verde cintila, indicando
que a nova senha foi inroduzida. Depois
de 15 segundos aproximadamente cessa
a cintilação e a função “travação
automática” bloqueia a unidade.
BLOQUEIO DO FLASH PADOCK.
1 Passo: Deve - se desconectar o Flash
Padlock do computador, pois não é
possivel bloquea – lo quando está
conectado.
2 Passo: A função “travação automática”
do Flash Padock bloqueia
a unidade dentro de 15 segundos.
aproximadamente. Em seguida, o LED
verde interrompe a cintilação, indicando
que o bloqueio foi implementado.
NOTA: Não é possivel ativar a função
“travação automática” se não foi
intoduzida uma senha; neste caso a
unidade permanecerá destravada.
DESTRAVAÇÃO PERMANENTE DO
FLASH PADOCK
Uma possibilidade é (simplesmente) não
introduzir senha na unidade (o Flash
Padock é fornecido em estado
destravado).
Outra possibilidade consiste no seguinte
procedimento:
1 Passo: Executar as instruções do
procedimento “COMO DESTRAVAR O
Flash Padock”.
2 Passo: Logo depois da unidade ser
destravada, o LED verde começa a cintilar.
Mantenha o botão chave pressionado
(durante três segundos
aproximadamente) até que os LED verde e
vermelho fiquem acesos e então solte o
referido botão chave.
3 Passo: Pressione e solte rapidamente e
firmemente o botão chave. Com isto os
LED verde e vermelho cintilarão
simultâneamente.
4 Passo: Pressione e solte rapidamente o
botão chave pela terceira vez ; com isso o
LED verde cintila, indicando que a unidade
está destravada de modo permanente.
Esta situação só será alterada se for
introduzida uma senha.
NOTA Depois de executado o
procedimento acima, a unidade ficará
permanentemente destravada e permitirá
o acésso aos dados. Alem disso, o Flash
Padlock permite acésso aos dados se for
destravado (não permanentemente) e
conectado ao computador.
SIGNIFICADOS DOS DIVERSOS
“STATUS” DOS LED.
LED verde aceso fixo (não cintilante) - a
unidade está conectada ao computador e
está destravado para permitir acesso aos
dados.
LED verde cintilando – a unidade ficará
destravada durante 15 segundos
aproximadamente e em seguida a função
“travação automática” será ativada.
Conecte o Flash Padlock ao computador
enquanto houver cintilação para poder
acessar os dados.
LED vermelho aceso fixo (não cintilante)
– a unidade está conectada ao
computador e está travada.
LED vermelho cintilando – A unidade está
travada e pronta para a introdução de uma
senha.
LED vermelho e o verde cintilando
simultaneamente – a unidade está travada
e pronta para a introdução de uma senha.
LED vermelho e o verde acesos fixos (não
cintilando) – foi iniciado o procedimento
para modificar a senha.
LED vermelho e o verde cintilando
alternadamente – ocorreu um erro
(num passo).
LED azul cintilando – a unidade está na
fase de leitura ou redação de dados. Para
não causar danos ou perda de dados, não
se deve desligar ou desconectar a unidade
enquanto oreferido led estiver cintilando.
LED vermelho, verde e azul apagados – o
Flash Padock está inativo e desconectado
do computador.
RESOLUÇÃO DE PROBLEMAS
1. Se for cometido um erro, os LED
vermelho e verde cintilarão
alternativamente.
2. Durante a introdução de uma senha,
ficou aceso o LED vermelho em vez do
LED verde – pressione o botão chave
(durante menos de três segundos) e o
LED vermelho começará a cintilar.
Aguarde até que o LED vermelho se
apague e em seguida repita o
procedimento “COMO INTRODUZIR UMA
SENHA” desde o primeiro passo.
3. Digitei um algarismo errado durante a
introdução de uma senha; como poderei
corrigir?
• Se o erro foi cometido durante a fase da
confirmação, aguarde 15 – 20 segundos
até que os LED vermelho e verde se
apaguem; o Flash Padock retornará ao
status precedente – á senha anterior
(caso exista) ou ao status destravado no
caso contrário.
• Se já foi introduzida uma senha e eu
desejo troca – la: siga as instruções do
procedimento “como introduzir uma
senha”
4. É possivel destravar a unidade quando ela
estiver conectada ao computador?
• Sim; basta executar as instruções do
procedimento “como destravar o
Flash Padock”.
5. Meu computador não reconhece o Flash
Padlock conectado a ele; como devo
proceder?
• A unidade está no status travado e a
função “travação automática “está
impedindo o acesso não autorizado;
execute o procedimento “COMO
DESTRAVAR o Flash Padlock” para que
o computador reconheça a unidade.
IINFORMAÇÃO DE SEGURANÇA
• Não exponha o Flash Padlock a agua ou
a descrgas elétricas; evite quedas ou
impactos que possam danificar a
unidade.
• A remoção ou destruição da embalagem
e/ou da unidade deverá ser feita de
acordo com os regulamentos locais.
• A unidade contem uma batería de Litio
do tipo botão, que só pode ser removida
por uma pessôa qualificada.
PadLocks are developed and produced by
Corsair Memory (www.corsair.com) based
on licensed technology (patents pending)
from ClevX LLC (www.clevx.com).
17
Page 18

Flash Padlock™ — Удобство и безопасность хранения Ваших данных
Индикатор
установки защиты
Клавиатура
для ввода кода
Индикатор
снятия защиты
Кнопка
KEY
Индикатор
доступа
Колпачок
Разъём
USB
астоящая инструкция предназначена в помощь
пользователям для ознакомления с
характеристиками и работой устройства Flash
Padlock – флеш-накопителя с интерфейсом USB
и повышенной степенью защиты доступа.
ополнительную информацию можно получить
на нашем сайте www.corsair.com или
форуме наших пользователей по адресу
www.asktheramguy.com.
Характеристики устройства Flash
Padlock
• истема автоматической блокировки при
отсоединении от компьютера.
• Автономная аппаратная система проверки
прав доступа.
• Обеспечение доступа через личный код (PIN),
схожий с кодом, используемым в банкоматах.
• оответствие стандарту USB 2.0
• езависимость от операционной системы,
совместимость с платформами Windows, MAC
и Linux без использования специального
программного обеспечения.
Минимальные технические
требования
• астольный или портативный с портом
USB (А: рекомендуется
скоростной порт USB 2.0).
• Windows 2000, Windows XP, Windows Vista или
Mac OS X или выше*, обеспечивающие режим
динамической настройки (Plug-and-play) .
омплектация
• Flash Padlock USB с установленной литиевой
батарейкой на 3 (cr2032)
• оединительный кабель USB
• емешок
• раткая инструкция для пользователя (данный
буклет)
Порядок работы с Flash Padlock
Flash Padlock поставляется в разблокированном
состоянии и полностью готов к использованию.
ля активирования системы защиты доступа
необходимо выбрать и задать код защиты.
опускается использование кодов длиной от 1
до 10 цифр.
ВНИМАНИЕ: Как только кодовая
комбинация задана,включается
постоянная защитная блокировка Flash
Padlock, после чего доступ к информации
на нём возможен только посредством
ввода кода. Просим хранить свой код в
безопасном месте или зарегистрировать
его (регистрация защищена) на сайте
Corsair: http://www.corsair.com/padlock
Порядок задания кодовой
комбинации
Шаг 1: ажмите кнопку KEY и удерживайте её
в нажатом положении. ри этом начнет мигать
светодиодный индикатор. ержите
кнопку KEY в нажатом положении около 3
секунд до тех пор, пока и А
индикаторы не начнут светиться непрерывно,
после чего отпустите кнопку.
Примечание: В вашем распоряжении
около 15 секунд для того, чтобы начать
ввод выбранного кода.
Шаг 2: аберите код, используя пять (5)
цифровых клавиш на Flash Padlock в
произвольном порядке. спользование кнопки
KEY в наборе кода не допускается. и
А индикаторы продолжают светиться
на протяжении всей этой операции. светиться
непрерывно, после чего отпустите кнопку.
Примечание: Для предотвращения
ошибок в наборе кода просим
нажимать клавиши медленно и до
конца. При наборе комбинации из
более чем 10 цифр Flash Padlock
зарегистрирует код, состоящий из
первых десяти цифр и проигнорирует
остальные.
Шаг 3: акончив набор кода, нажмите и
отпустите кнопку KEY. ри этом и
А индикаторы начнут мигать.
Шаг 4: осле этого необходимо повторно
ввести код для верификации. осле повторного
набора кода нажмите и отпустите кнопку KEY.
Примечание: если код не будет
верифицирован до выключения
КРАСНОГО и ЗЕЛЕНОГО индикаторов
(примерно 15 секунд), Flash Padlock
вернется в свое исходное состояние и
необходимо будет начать весь процесс
сначала. В случае, если код не задан,
Flash Padlock возвращается в исходное
незаблокированное состояние.
Шаг 5: индикатор мигнет,
подтверждая, что код задан. случае, если
индикатор продолжает мигать, Flash
Padlock останется незаблокированным еще
порядка 15 секунд. момент прекращения
вспышек индикатора срабатывает
автоматическая блокировка Auto-Lock, для
снятия которой необходимо повторно набрать
код.
18
Примечание: Функция Auto-Lock
автоматически блокирует Flash
Padlock.Так осуществляется защита
доступа к Flash Padlock.
Порядок снятия защиты доступа к
Flash Padlock
Шаг 1: о конца нажмите и быстро отпустите
кнопку KEY. ри этом А индикатор
мигнёт, указывая, что доступ к Flash Padlock
заблокирован, но Flash Padlock готов к набору
кода. осле этого у ас есть примерно 5 секунд
для того, чтобы приступить к шагу 2.
Примечание: При удержании кнопки
KEY в нажатом положении более 2-х
секунд ЗЕЛЕНЫЙ и КРАСНЫЙ
индикаторы начнут попеременно
мигать,указывая на ошибку при вводе.
Шаг 2: ока А индикатор продолжает
мигать, наберите код, а затем до конца
нажмите и быстро отпустите кнопку KEY. а
всем протяжении набора кода и
А индикаторы будут мигать
одновременно. случае, если один из них при
этом погаснет, необходимо повторно
произвести операции 1-го шага.
Шаг 3: индикатор мигнёт,
подтверждая, что защита доступа снята.
орядок смены кода на Flash Padlock.
Функция Auto-Lock: Функция AutoLock обеспечивает блокирование
доступа к Flash Padlock. Auto-Lock
действует только тогда, когда код
на Flash Padlock задан, а устройство
физически отсоединено от
компьютера. После установки кода
и снятия защиты доступа Flash
Padlock остается
незаблокированным еще порядка
15 секунд, после чего срабатывает
Auto-Lock. Функция Auto-Lock не
действует только тогда, когда Flash
Padlock физически присоединен к
компьютеру.
Порядок смены кода на Flash Padlock
Шаг 1: ыполните операции по
разблокированию Flash Padlock.
Шаг 2: ажмите кнопку KEY и удерживайте её
в нажатом положении до тех пор, пока
А и индикаторы не начнут
светиться непрерывно (около 3-х секунд), после
чего отпустите кнопку.
Шаг 3: ока А и
индикаторы продолжают светиться, наберите
новый код.
Шаг 4: акончив набор кода, до конца
нажмите и быстро отпустите кнопку KEY.
Continued on next page
Page 19

Шаг 5: осле того, как А и
индикаторы начнут мигать, необходимо
повторно набрать код для верификации. осле
этого нажмите и отпустите кнопку KEY.
Примечание: Если код повторно не
набран для верификации до
ыключения КРАСНОГО и ЗЕЛЕНОГО
в
индикатора (порядка 15 секунд), Flash
Padlock вернется к ранее заданной
кодовой комбинации и необходимо
будет начать весь процесс сначала.
Шаг 6: индикатор начнет мигать,
указывая, что код задан. осле того, как
индикатор погаснет (приблизительно
15 секунд), срабатывает функция Auto-Lock и
Flash Padlock блокируется.
Порядок задания кодовой
комбинации
Шаг 1: аблокировать доступ к Flash Padlock,
пока он присоединен к компьютеру,
невозможно. ля этого отсоедините Flash
Padlock от компьютера.
Шаг 2: ункция Auto-Lock на Flash Padlock
автоматически заблокирует доступ к устройству
приблизительно через 15 секунд. ак только
погаснет мигающий индикатор, Flash
Padlock заблокирован.
Примечание: Если код на Flash
Padlock никогда не был задан,AutoLock не работает, и устройство
остается в разблокированном
состоянии. Для включения функции
Auto-Lock смотри раздел“Порядок
задания кодовой комбинации”.
Установка положения “всегда
разблокирован” на Flash Padlock
Шаг 1: пециально устанавливать положение
“всегда разблокирован” изначально нет
необходимости. Flash Padlock поставляется в
разблокированном состоянии и остается в нем
до тех пор, пока блокирующий код не задан.
ИЛИ
Шаг 1: ледуйте инструкциям в разделе
“орядок снятия защиты доступа” выше.
Шаг 2: осле разблокирования
индикатор продолжает мигать. ажмите и
держите в нажатом положении кнопку KEY до
тех пор, пока не начнут светиться непрерывно
А и индикаторы (примерно 3
секунды). осле этого отпустите кнопку KEY.
Шаг 3: нова до конца нажмите и быстро
отпустите кнопку KEY. А и
индикаторы начнут одновременно мигать.
Шаг 4: третий, и последний, раз до конца
нажмите удержите кнопку KEY.
индикатор мигнет один раз, подтверждая, что
задано постоянное положение “всегда
разблокирован”. Это положение сохранится до
тех пор, пока снова не будет задан код защиты
доступа (см. инструкцию выше).
ПРИМЕЧАНИЕ: В случае установки
положения“всегда разблокирован”
Flash Padlock остается
разблокированным и защита
доступа к информации на нём
отсутствует. Помимо этого, до тех
пор, пока разблокированный Flash
Padlock подключен к компьютеру,
информация также никак не
защищена. Заблокировать
устройство при этом можно только
путем задания кода защиты и
отсоединения от компьютера,
чтобы могла сработать функция
Auto-Lock. Для этого см. раздел
“Порядок задания кодовой
комбинации” выше.
Состояния светодиодных
индикаторов ЗЕЛЕНЫЙ
индикатор светится непрерывно–
Flash Padlock подключен к компьютеру и
разблокирован, доступ к устройству для записи
или чтения информации открыт.
ЗЕЛЕНЫЙ индикатор мигает–Flash
Padlock останется в разблокированном
положении еще примерно 15 секунд до
срабатывания функции Auto-Lock. ля
предотвращения автоматической блокировки
и сохранения свободы доступа к информации
необходимо в этот момент присоединить Flash
Padlock к компьютеру.
КРАСНЫЙ индикатор светится
непрерывно–Flash Padlock подключен к
компьютеру и заблокирован.
КРАСНЫЙ индикатор мигает–Flash
Padlock заблокирован и готов к набору кода.
КРАСНЫЙ и ЗЕЛЕНЫЙ индикаторы
одновременно мигают–Flash Padlock
готов к набору кода.
КРАСНЫЙ и ЗЕЛЕНЫЙ индикаторы
одновременно светятся
непрерывно–дет процесс смены кода.
КРАСНЫЙ и ЗЕЛЕНЫЙ индикаторы
попеременно мигают–роизошла ошибка
в наборе.
СИНИЙ индикатор мигает–Flash Padlock
находится в процессе записи или считывания
информации. о избежание потери или
искажения данных не допускается
отсоединение Flash Padlock от компьютера,
пока мигает индикатор.
КРАСНЫЙ, ЗЕЛЕНЫЙ и СИНИЙ
индикаторы не светятся–Flash Padlock
находится в режиме ожидания и отсоединен от
компьютера.
УСТРАНЕНИЕ НЕПОЛАДОК
1. сли допущена ошибка, А и
индикаторы начнут попеременно
мигать.
2. процессе задания кода загорается
А, а не индикатор.
• момент разового нажатия (или при
нажатии за 3 секунды до этого) кнопки KEY
загорается А индикатор.
ождитесь, пока погаснет А
индикатор, а затем повторите операции,
описанные в разделе “орядок задания
кодовой комбинации”.
3. процессе задания кодовой комбинации я по
ошибке ввел неправильный код или желаю
тут же его изменить. то делать?
• сли ошибка произошла на этапе
верификации нового кода, просто
подождите 15-20 секунд, до тех пор, пока
А и индикаторы не
погаснут. Flash Padlock вернется при этом в
предыдущее состояние – либо к действию
старого кода (если он был задан), либо в
состояние “всегда разблокирован” (если код
не был задан).
• сли код уже задан, и его необходимо
изменить, выполните операции, описанные в
разделе “орядок смены кода”.
4. ожно ли разблокировать Flash Padlock, пока
он присоединен к компьютеру?
• а, можно. ля этого просто следуйте
инструкциям из раздела “орядок снятия
защиты доступа” выше.
5. омпьютер не распознает Flash Padlock при
подключении. то делать?
• Это свидетельствует о том, что Flash
Padlock заблокирован. ункция Auto-Lock на
Flash Padlock защищает его от
несанкционированного доступа до тех пор,
пока не набран правильный код. омпьютер
сможет распознать устройство после
разблокирования.
ТЕХНИКА БЕЗОПАСНОСТИ
• ледует предохранять Flash Padlock от
проникновения влаги, электрических разрядов
и/или механических повреждений. аждый из
этих факторов может привести к поломке.
• Утилизацию упаковки и самого устройства
следует производить в соответствии с
законодательством ашего местонахождения.
анное устройство содержит литиевую
батарейку таблеточного типа, извлечение
которой должно производиться только
квалифицированным персоналом.
PadLocks are developed and produced by
Corsair Memory (www.corsair.com) based
on licensed technology (patents pending)
from ClevX LLC (www.clevx.com).
19
Page 20

™
•
•
•
•
•
•
•
•
•
•
•
20
Page 21

∞
•
•
•
•
•
•
21
Page 22

Flash Padlock™ — 方便的数据安全保护
本文档旨在帮助用户熟悉 Flash Padlock
安全增强 USB 闪存驱动器及其操作。
如需进一步支持,请访问我们的网站
www.corsair.com 或用户论坛
www.asktheramguy.com
Flash Padlock 特点:
• 从计算机上卸下之后自动锁定的机制
• 硬件独立式安全验证
• PIN(个人身份识别号)访问授权,与用于
ATM(自动取款机)的相类似
• 符合 USB 2.0 标准
• 不依赖于平台,无需使用软件,即可在
Windows、MAC 和 Linux 平台上工作
最低要求:
• 带有一个可用 USB 端口的台式机或笔记本电
脑(注:建议使用高速 USB 2.0)
• 与 Windows 2000、Windows XP、
Windows Vista 或 Mac OS X
及更高版本实现即插即用兼容。*
包装内容
• Flash Padlock USB,已安装 3V 锂电池
(cr2032)
• USB 电缆
• 系索
• 快速入门指南(本手册)
KEY 按钮 =
如何设置暗码:
步骤 1:按住 KEY 按钮。绿色 LED 灯将开始
闪烁。一直按住 KEY 按钮,
直至红色和绿色 LED 灯都保持亮起(大约 3
秒钟),然后松开 KEY 按钮。
注:您大约有 15 秒钟时间来设置暗码。
步骤 2:使用 Flash Padlock 上的五 (5)
个数字按钮的任何变化来输入暗码。
不能将 KEY 按钮用作暗码的一部分。红色和
绿色 LED 灯在此步骤期间将一直亮起。注:
为防止输入错误,请稳定且缓慢地按下按钮。
如果您尝试输入的暗码超过 10 个数字,
Flash Padlock 只会将前 10 个数字设定为暗
码,并且忽略之后输入的数字。
步骤 3:输入暗码之后,按下 KEY
按钮并松开。红色和绿色 LED 灯都将闪烁。
步骤
4:随后,您必须重新输入暗码以便验证。
第二次输入暗码之后,按下并松开 KEY
按钮。
注:如果您在红色和绿色 LED 灯熄灭之前
(大约 15 秒钟)未验证暗码,Flash Padlock
将恢复为
其旧暗码,并且您需要重新开始此过程。
如果未设定暗码,Flash Padlock 将恢复为
其原来的未打开 状态。
自动锁定功能:
自动锁定是 Flash Padlock 的安全保护方
法。只有当 Flash Padlock 已设定暗码并从
计算机中拔下时,自动 锁定才能发挥作
用。如果您已设定暗码并已解锁驱动器,
Flash Padlock 将保持解锁大约 15
秒钟,然后启用自动锁定。只有将 Flash
Padlock 连接至 计算机时,自动锁定功能
才会被禁用。
如何在 Flash Padlock 上更改暗码:
注:如果没有为 Flash Padlock
指定暗码,驱动器将会解锁。如果您要设定暗码
则必须遵循以上“如何设置暗码”中的说明。
步骤 1:按照既定步骤解锁 Flash Padlock。
步骤 2:按住 KEY 按钮直至绿色和绿色 LED
灯亮起(大约 3 秒钟),然后松开。
步骤 3:当红色和绿色 LED 灯亮起时,
输入您的新暗码。
步骤 4:完成之后,稳定按下并快速松开
KEY 按钮。
步骤 5:红色和绿色 LED 灯都将闪烁。
随后, 您必须重新输入暗码以便验证。
第二次输入暗码之后,按下并松开 KEY
按钮。注:如果您在红色和绿色 LED
灯熄灭之前 (大约 15 秒钟)未验证暗码,
Flash Padlock 将恢复为其旧暗码,
并且您需要重新开 始此过程。
如何操作 Flash Padlock
Flash Padlock 以未锁定配置提供,可随时在您
的计算机上使用。要启用 Flash Padlock 的安全
保护,您必须设置一个暗码。您的暗码必须介于
最少一位数 (1) 和最多十位数 (10) 之间。
注意:一旦您的暗码已设定,Flash Padlock
将被一直锁定且您的 数据无法访问,除非
您输入自己的暗码。请将您的暗码保存在安
全的地方,或者通过安全注册在以下
Corsair 网站上注册您 的暗码:
http://www.corsair.com/padlock
步骤 5:绿色 LED 将会闪烁,表示暗码已设
定。当绿色 LED 闪烁时,Flash Padlock
将保持解锁大约 15 秒钟。当绿色 LED
停止闪烁时,Flash Padlock 将自动锁定,
您必须输入自己的 PIN 码才能解锁。
注:自动锁定操作将自动地锁定 Flash
Padlock。这是锁定 Flash Padlock 驱动器
的方法。
如何解锁 Flash Padlock
步骤 1:稳定按下并快速松开 KEY 按钮。
红色 LED 将会闪烁,表示 Flash Padlock
已锁定但可随时输入您的暗码。您大约有 5
秒钟时间开始执行步骤 2。
注:如果您按下 KEY 按钮的时间超过 2
秒钟,则会出现错误:绿灯和红灯交替闪烁。
步骤 2:当红色 LED 闪烁时,输入您的
暗码,然后稳定按下并快速松开 KEY
按钮。在此暗码输入阶段中,红色和绿色 LED
灯将会同步闪烁。如果任何一个灯 熄灭,则
必须重复步骤 1。
步骤 3:绿色 LED 将会闪烁,表示 Flash
Padlock 已解锁。
步骤 6:绿色 LED 灯将会闪烁,表示暗码已
设定。当绿色 LED 灯停止闪烁时(大约 15
秒钟),自动锁定功能将会启用,并且 Flash
Padlock 将进入锁定 状态。
如何锁定 Flash Padlock
步骤 1:Flash Padlock 插入计算机时,
不能将其锁定。请从计算机中断开 Flash
Padlock 的连接。
步骤 2:Flash Padlock 的自动锁定功
能将在大约 15 秒钟内保护驱动器。当绿色
LED 灯停止闪烁时,表示自动锁定已经
保护了驱动器。
注:如果 Flash Padlock 未设定暗码,则自动
锁定功能无法启用,并且驱动器将保
持打开状态。
如果您希望启用自动锁定,
请参阅“如何设置暗码”中的说明。
如何将 Flash Padlock 设置为“始终解锁”:
步骤 1:不要设置暗码。Flash Padlock
出厂时处于“解锁”状态,在设置暗码之前
将不会锁定。
22
Continued on next page
Page 23

或者
步骤 1:执行“如何解锁”步骤(参阅上文)
步骤 2:一旦解锁,绿色 LED 灯将会闪烁。
按住 KEY 按钮,直至红色和绿色 LED
灯亮起。(大约 3 秒钟)。然后松开 KEY
按钮。
步骤 3:再次稳定按下并快速松开 KEY
按钮。红色和绿色 LED 灯都同步闪烁。
步骤 4:第三次(也是最后一次)稳
定按下并快速松开 KEY 按钮。绿色 LED
灯将会闪烁,表示 Flash Padlock
现在已进入“始终解锁”模式。在您设置暗
码(参见上文)之前,此模式将不会更改
注:如果您将 Flash Padlock 设置为“始
终解锁”模式,则 Flash Padlock
将被永久解锁且 您的数据可供访问。此外,
如果 Flash Padlock 已解锁并连接至
计算机,则会保持解锁 状态,并且数据也可
供访问。只有在设定暗码并由自动锁定功能加
以保护之后,驱动器才能再次锁定。请参阅上
面的“如何设置暗码”。
故障诊断
1. 如果出现错误,红色和绿色 LED 灯将交替
闪烁。
2. 在尝试设定暗码时,出现红灯而不是绿灯。
o 如果您只按下一次 KEY 按钮(或时间短于
3 秒钟),则会亮起红灯。等待至红灯
熄灭,然后从头开始再次重复“如何设
置暗码”步骤。
3. 我正在设置暗码,但是不小心输入 了错误的
代码(或者希望使用另一个 代码)。
如何更改?
o 如果是在设置暗码的确认步骤中发生,
则只需等待 15-20 秒钟后红色和绿色 LED
熄灭。Flash Padlock 将返回其之前的状态
使用旧暗码(如果有一个)或进入 解锁
状态(如果未设置暗码)。
o 如果您已设置了暗码,但是希望更改
为另一个暗码,请遵循“如何更改
暗码”中的 步骤。
4. Flash Padlock 插入计算机时,是否可以将其
解锁
o 是的,您可以在 Flash Padlock 插入计算
机时将其解锁。请遵循上面的“如何解锁”
说明。
LED 灯状态:
绿色 LED 灯亮起,不闪烁 −Flash Padlock
已插入计算机并已解锁,您可以访问 驱动器以
存储或检索数据。
绿色 LED 灯闪烁 −Flash Padlock 已解锁大约
15 秒钟,之后会由自动锁定功能锁定 驱动器。
您必须在此期间将 Flash Padlock 插入计算机,
以便确保在自动锁定功能锁定 驱动器之前能
够访问驱动器。
红色 LED 灯亮起,不闪烁 −Flash Padlock
已插入计算机且已被锁定。
红色 LED 灯闪烁 −Flash Padlock
已被锁定,可随时输入暗码。
红色和绿色 LED 灯同步闪烁 −Flash Padlock
可随时接受暗码输入。
红色和绿色 LED 灯亮起,不闪烁 −开始更改
暗码。
红色和绿色 LED 灯交替闪烁 −发生输入错误。
蓝色 LED 灯闪烁 −Flash Padlock
正在读取或写入数据。为了防止数据损坏或
丢失,切勿在蓝色 LED 灯闪烁时卸下 Flash
Padlock。
5. 在插入 Flash Padlock 时,我的计算机不
能识别。应该怎么做
o 这表示 Flash Padlock 处于锁定状态。
Flash Padlock 的自动锁定功能可以防止
未经授权访问您的驱动器,除非输入
正确的暗码以便解锁。一旦解锁,
您的计算机就能识别驱动器。
安全信息
o 不要将 Flash Padlock 置于水中、遭受电击
和/或受到物理碰撞。这些都可能会导致
Flash Padlock 出现 故障。
o 包装和产品弃置 −请按照当地法律规定弃置
包装和/或产品。本产品含有锂币 电池,
只能由合格的人员进行拆卸。
红色、绿色和蓝色 LED 灯熄灭 −Flash Padlock
进入休眠状态,并且已从计算机中 拔出。
23
Page 24

Flash Padlock™ — データのセキュリティ保護を手軽に実現
このガイドは、セキュリティ機能を強化した
USB フラッシュドライブ Flash Padlock
の特長と操作方法を 理解していただくことを
目的としています。
サポートが必要な場合は、弊社のホームページw
(www.corsair.com)または弊社製品のユーザー
フォーラム(www.asktheramguy.com)をご覧く
ださい。
Flash Padlock の特長:
• コンピュータから取り外した後にオートロ
ック機能が起動
• セキュリティ認証機能を本体ハードウ
ェアに内蔵
• ATM(現金自動支払機)と同様の、PIN(個
人識別番号)によるアクセス許可を使用
• USB 2.0 に対応
• プラットフォームに依存せず、ソフト
ウェアを使用しなくても Windows、MAC
および Linux の各プラットフォーム上で動作
最小要件:
• 未使用の USB ポートを 1 つ備えたデスク
トップコンピュータまたはノートブック
コンピュータ(注意:ハイスピード USB 2.0
のご使用をお勧めします)
• Windows 2000、Windows XP、Windows Vista
または Mac OS X 以上の、プラグアンド
プレイに対応したオペレーションシステム*
パッケージの内容:
• Flash Padlock USB本体(3V リチウム
電池(CR2032)内蔵)
• USB ケーブル
• ストラップ
• クイックスタートガイド(本誌)
警告:いったん暗証番号を設定すると、
Flash Padlock はロックされた 状態に
なり、暗証番号を入力しないかぎりデータ
にはアクセスできなくなります。暗証番号
は安全な場所に保管してください。または
、Corsair 社のウェブサイト内のセキュ
リティで保護された登録ページから暗証番
号を登録することもできます。(登録ペー
ジ:http://www.corsair.com/padlock)
鍵ボタン =
暗証番号を設定するには:
手順 1:鍵ボタンを長押しします。緑色の
LED ライトが点滅し始めます。そのまま(約
3 秒間)鍵ボタンを押し続け、赤色と緑色の
LED ライトが両方とも点灯したら、鍵
ボタンを放します。
意:約 15 秒以内に暗証番号の設定を開始
注
てください。
し
手順 2:Flash Padlock 上の 5 つの数字ボタ
ンを使用して、任意の暗証番号を入力
します。暗証番号に鍵ボタンを含めること
はできません。暗証番号を入力しているあい
だは、赤色および緑色の LED ライトは点灯
した状態になります。
注意:入力エラーにならないように、ボタンはしっ
かりと押してください。暗証番号として 10
桁を超える数字を入力 しようとしても、Flash
Padlock では最初の 10 個の数字だけで暗証番
号が設定され、11 個目以降の数字は無視されます。
手順 3:暗証番号を入力し終わったら、
鍵ボタンを押します。赤色と緑色の LED
ライトが両方とも点滅します。
手順 4:次に、確認のために暗証番号をもう
1 度入力します。暗証番号の 2 回目の入力
が終わったら、鍵ボタンを押します。
注意:赤色と緑色の LED ライトが消灯す
る前(およそ 15 秒以内)に暗証番号を確認
できなかった場合は、Flash Padlock の暗証番号
は古い暗証番号に戻り、設定手順を再度実行する必
要があります。暗証番号が設定されていない状態で
確認できなかった場合、Flash Padlock は暗証番号
が設定されていない状態に戻 ります。
Flash Padlock をアンロックするには:
手順 1:鍵ボタンを強く押してすぐ放
します。Flash Padlock がロックされている
ことを示す赤色の LED が点滅しますが、
これは暗証番号の入力待ち状態です。約 5
秒以内に 手順 2 を開始してください。
意:鍵ボタンを押した状態が 2 秒を超えた場合
注
エラーになり、緑色 と赤色のライトが交互に
は
点滅します。
手順 2:赤色の LED が点滅している間
に暗証番号を入力し、鍵ボタンを強
く押してすぐに放します。暗証番号の
入力モードになっているあいだは、
赤色と緑色の LED ライトが同時に点滅
します。いずれかのライトが消灯し
た場合は、手順 1 から繰り返す必要が
あります。
手順 3:緑色の LED が点滅し、Flash
Padlock がアンロックの状態になったこ
とを示します。
オートロック機能:
オートロックとは、Flash Padlock
を自動でロックする機能です。オートロッ
クが動作するのは、Flash Padlock
に暗証番号が設定されており、なおかつコ
ンピュータに装着されていない場合のみで
す。暗証番号が設定されたドライブをアン
ロックした場合、Flash Padlock はアンロ
ックの状態が約 15 秒間続いた後、オー
トロックが有効になります。Flash Padlock
のオートロック機能が無効になるのは、コ
ンピュータに接続されているあいだだけで
す。
Flash Padlock の暗証番号を変更するには:
注意:Flash Padlock に暗証番号が設定されて
いない場合、ドライブはアンロックの状態にな
っています。暗証番号を設定する必要がある場
合は、前述の「暗証番号を設定するには」の手
順を実行する必要があります。
手順 1:「Flash Padlock のロックを解除す
るには」の手順を実行します。
Flash Padlock を使用するには:
Flash Padlock は、コンピュータに接続して
すぐに使えるように、アンロックの状態で出荷
されています。Flash Padlock のセキュリテ
ィ機能を有効にするには、暗証番号を設定する
必要があります。暗証番号は 1 桁以上 10
桁以内で設定してください。
手順 5:緑色の LED ライトが点滅し、暗証
番号が設定されたことを示します。緑色の
LED が点滅している約 15 秒間は、Flash
Padlock はアンロックの状態のままです。
緑色の LED の点滅が停止すると、Flash
Padlock はオートロックの状態になり、
アンロックするには PIN を入力する必要が
あります。
注意:オートロック機能により、Flash Padlock
は自動的にロックされます。 このようにして、
Flash Padlock ドライブにロックがかかります。
24
手順 2:赤色と緑色の LED ライトが点灯する
まで、約 3 秒間鍵ボタンを長押します。
手順 3:赤色の緑色のLED ライトが点灯し
ている間に、新しい暗証番号を入力します。
手順 4:暗証番号を入力し終わったら、
鍵ボタンを強く押してすぐ放します。
手順 5:赤色と緑色の LED ライトが両方と
も点滅します。次に、確認のために暗証番号
を再入力します。暗証番号の 2 回目の入力が
終 わったら、鍵ボタンを押します。
注意:赤色と緑色の LED ライトが消灯する前に(約
15 秒以内)暗証番号を確認できなかった場合は、
Flash Padlock の暗証番号は古い暗証番号に戻り、
設定をやり直すことが必要になります。
Continued on next page
Page 25

手順 6:緑色の LED ライトが点滅し、暗証番
号が設定されたことを示します。緑色の LED
ライトの点滅が停止すると(約 15 秒後)、
オートロック機能が有効になり、Flash
Padlock はロックされた状態になります。
Flash Padlock をロックするには:
手順 1:Flash Padlock がコンピュータに
装着されているあいだは Flash Padlock
をロックすることはできません。Flash
Padlock をコンピュータから取り外し
てください。
手順 2:Flash Padlock のオートロック機能
により、ドライブは約 15 秒でセキュリ
ティで保護された状態になります。緑色の
LED ライトの点滅が停止すると、オー
トロックによりドライブのセキュリ
ティが確保されます。
注意:Flash Padlock に暗証番号が設定されて
ない場合は、オートロックを有効にするこ
い
とはできません。ドライブはアンロック状態の
ままになります。オートロックを有効にする必
がある場合は、「暗証番号を設定するに
要
」の手順を参照してください。
は
Flash Padlock を「常時アンロック」
に設定するには:
手順 1:暗証番号は設定しません。Flash
Padlock は「アンロック」の状態で出荷
されており、ユーザーが暗証番号を設定す
るまでロックされません。
または
手順 1:前述の「アンロックするには」
の手順を実行します(上記参照)。
手順 2:いったんアンロックされると、
緑色の LED ライトが点滅します。赤色と緑
色の LED ライトが両方とも点灯するまで鍵ボ
タンを長押しします (約 3 秒間)。
その後、鍵ボタンを放します。
手順 3:もう 1 度、鍵ボタンを強く押してす
ぐ放します。赤色と緑色の LED ライトが
同時に点滅します。
手順 4:もう 1 度、鍵ボタンを強く押し
てすぐ放します。緑色の LED ライトが点
滅し、Flash Padlock が「常時アンロック」
モードになったことを示します。暗証番
号を設定する(上記参照)まで、「常時
アンロック」モードのままです。
注意:Flash Padlock を「常時アンロッ
ク」 モードに設定した場合、Flash
Padlock は永続的にアンロック状態に
なり、データへのアクセスが可能になりま
す。また、Flash Padlock がアンロッ
クの状態でコンピュ ータに接続されている
あいだ、Flash Padlock はアンロックのま
まになり、データへのアクセスが可能です
。もう 1 度ドライブをロック できるよ
うにして、オートロック機能でデータ保護
するには、暗証番号を設定する以外にはあ
りません。前述の「暗証番号が設定するに
は」を参照してください。
LED ライトの状態:
緑色の LED ライトが点灯(点滅していない)
— Flash Padlock はコンピュータに装
着されておりアンロック状態である
ため、ドライブにアクセスしてデータ
を格納および取得できます。
緑色の LED ライトが点滅 — Flash Padlock
は約 15 秒間アンロックの状態になった
後、オートロック機能によってド
ライブがロックされます。ドライブにア
クセスできるようにするには、オート
ロック機能によってドライブがロックさ
れる前の、緑色の LED ライトが点滅している
あいだに Flash Padlock をコンピュータ
に装着する必要があります。
赤色の LED ライトが点灯(点滅していない)
— Flash Padlock はコンピュータに装着
され、ロックされています。
赤色の LED ライトが点滅 — Flash Padlock
はロックされており、暗証番号の入力
待ち状態です。
赤色と緑色の LED ライトが同時に点滅 —
Flash Padlock は暗証番号を設定できるこ
とを示します。
赤色と緑色の LED ライトが点灯(点滅し
ていない) — 暗証番号を変更できることを
示します。
赤色と緑色の LED ライトが交互に点滅 —
入力エラーが発生したことを示します。
青色の LED ライトが点滅 — Flash Padlock
でデータの読み取りまたは書き込みが行わ
れています。データの破損や損失を防ぐ
ために、青色の LED ライトが点滅している
あいだは Flash Padlock を取り外さないで
ください。
赤色、緑色および青色の LED ライトが消灯 —
Flash Padlock はスリープモードになっ
ており、コンピュータから取り外されて
います。
トラブルシューティング
1.操作ミスをした場合は、赤色と緑色の LED
ライトの両方が交互に点滅します。
2.暗証番号の設定中に、緑色のライトで
はなく赤色のライトが点灯した場合。
• 鍵ボタンを 1 度押しただけ(または長押
しの時間が 3 秒未満)の場合は、赤色の
ライトが点灯します。赤色のライ
トが消灯するまで待ち、「暗証番号を
設定するには」の手順をもう 1 度、最初
から実行します。
3.暗証番号の設定中に誤った番号を入力し
てしまった場合、または別の番号を入
力したい場合の暗証番号の変更方法。
• 暗証番号の設定手順のうち、番号確
認の手順を実行中であれば、赤色と緑色の
LED が 消灯するまで 15 〜 20 秒待ち
ます。Flash Padlock は以前の状態に戻り
ます。つまり、暗証番号が設定され
ていた場合は古い暗証番号に戻り、
暗証番号が設定されていなかった場
合はアンロックの状態に戻ります。
• すでに暗証番号が設定されており、
その番号を別の番号に変更したい
場合は、「暗証番号を変更するには」
の手順を実行してください。
4.Flash Padlock をコンピュータに装着した状
態でアンロックしたい場合。
• Flash Padlock は、コンピュータに装着
したま までアンロックできます。前述
の「アンロックするには」を実行して
ください。
5.Flash Padlock を装着してもコンピュータ
に認識されない場合に、Flash Padlock を
認識させる方法。
• 認識されないということは、Flash
Padlock がロックされた状態である
ことを示しています。Flash Padlock
のオートロック機能により、正しい
暗証番号を入力してドライブをアンロ
ックするまで、未認証でドライブにア
クセスすることはできません。いったん
アンロックすれば、コンピュータにドラ
イブが認識されるようになります。
安全情報
• Flash Padlock は水に濡らしたり充電
したり衝撃を与えないようにしてくだ
さい。Flash Padlock が故障する恐れがあ
ります。
• 梱包材および製品の廃棄 — 梱包材および
製品は自治体の法令に従って廃棄し
てください。本製品にはリチウムボタン
電池が使用されています。リチウム
ボタン電池の取り外しができるのは認
定業者に限られています。
25
Page 26

Corsair
46221 Landing Parkway • Fremont • CA 94538 • USA
Tel: 510 657 8747 • Fax: 510 657 8748
© 2007 Corsair
Corporation. All
rights reserved.
All rights in this
publication are
reserved by Corsair
Corporation. Corsair
and Flash Padlock
are trademarks of
Corsair Corporation
in the United
States and other
countries. The
contents of this
publication are
believed to be
correct at the time
of print, but any
information,
specifications,
products or services
mentioned may be
modified,
supplemented or
withdrawn without
further notice.
Other names and
brands may be
claimed as the
property of others.
Technical Support/Technischer Support/Support Technique/Assistenza Tecnica/Soporte Técnico
USA and Canada
Tel: 1 800 205 7657
International
Tel: +1 510 657 8747 • Fax: +1 510 657 8748
Forum: www.askthepowerguy.com
Email: powerguy@corsair.com
Web: www.corsair.com
Document Number: PXX-XXXXX
© 2007 Corsair
Corporation. Tous
droits réservés.
Tous les droits
relatifs à la présente
publication sont
réservés par Corsair
Corporation. Corsair
et Flash Padlock
sont des marques de
Corsair Corporation
aux Etats-Unis et
dans d’autres pays.
Le contenu de cette
publication est, à
notre connaissance,
correct au moment
de la mise sous
presse, mais il est
possible que
certaines informations, spécifications,
produits ou services
cités ici soient
modifiés, complétés
ou retirés sans avis
préalable.
D’autres noms et
marques peuvent
être la propriété
d’autres détteurs.
© 2007 Corsair
Corporation. Alle
Rechte vorbehalten.
Alle Rechte in dieser
Publikation liegen
bei Corsair
Corporation. Corsair
und Flash Padlock
sind Handelsmarken
der Corsair
Corporation in den
USA und anderen
Ländern. Der Inhalt
dieser Publikation ist
nach bestem Wissen
korrekt zum
Zeitpunkt der
Drucklegung.
Änderungen,
Ergänzungen oder
Rücknahmen aller
hierin erwähnten
Informationen,
technischer Daten,
Produkte, oder
Dienstleistungen
vorbehalten.
Andere Namen und
Marken sind unter
Umständen das
Eigentum Dritter.
© 2007 Corsair
Corporation. Tutti i
diritti riservati.
Tutti i diritti di
questo documento
appartengono a
Corsair Corporation.
Corsair e Flash
Padlock sono marchi
commerciali di
Corsair Corporation
negli Stati Uniti e in
altri paesi. Il
contenuto di questo
documento è
ritenuto corretto al
momento della
stampa. Qualsiasi
informazione,
specifica, prodotto o
servizio menzionato
può essere soggetto
a modifiche,
aggiunte o ritiro
senza obbligo di
preavviso.
Altri nomi di marca
e di prodotto
menzionati sono di
proprietà dei
rispettivi titolari.
© 2007 Corsair
Corporation. Todos
los derechos
reservados.
Corsair Corporation
se reserva todos los
derechos relacionados con esta publicación. Corsair y
Flash Padlock son
marcas registradas
de Corsair
Corporation en
Estados Unidos y
en otros países.
Creemos que el
contenido de esta
publicación es
correcto al
momento de su
impresión, pero
cualquier
información,
especificación,
producto o servicio
mencionado puede
ser modificado,
complementado o
retirado sin ningún
aviso.
Otros nombres y
marcas pueden ser
declarados como
propios por los
respectivos
interesados.
© 2007 Corsair
Corporation. се права
защищены.
се авторские права на
данную инструкцию
принадлежат компании
Corsair Corporation. Corsair
и Flash Padlock являются
торговыми марками
компании Corsair
Corporation, защищенными
в А и других странах.
нформация,
содержащаяся в данной
инструкции, считается
верной на момент сдачи в
тираж, однако
допускается изменение,
дополнение или изъятие
любой информации,
технических
спецификаций или
упомянутых товаров и
услуг без
дополнительного о том
уведомления.
рочие названия и
товарные марки могут
представлять собой
собственность иных лиц.
© 2007 Corsair
Corporation. Todos os
direitos reservados.
Corsair Corporation se
reserva todos os direitos
relacionados com esta publicaç ã o. Corsair y Flash
Padlock sã o marcas registradas de Corsair
Corporation nos Estados
Unidos e em outros paí
ses. Acreditamos que o conteúdo desta publicaç ã o é
corré to no momento da sua
ediç ã o, porem qualquer
informaç ã o,
especificaç ã o, produto ou
serviç o mencionado pode
ser modificado, complementado ou retirado sem aviso
pré vio.
Otros nomes e marcas
podem ser declarados como
adequados pelos
respectivos interessados.
© 2007 Corsair
Corporation。保留所有
权利。
本出版物中的所有权利均
归 Corsair Corporation
所有。Corsair 和 Flash
Padlock 是 Corsair
Corporation 在美国和其
它 国家/地区 的商标。
本出版物的内容经确认在
印刷时正确无误,但是提
及的任何信息、规格、产
品或服务都可能会出现
修改、补充或 撤回,并恕
不另行通知。
其它名称和品牌可能已被
宣称为他人的财产。
© 2007 Corsair
Corporation. All rights
eserved.
r
本書の記載内容の所有権
は Corsair Corporation
にあります。Corsair
および Flash Padlock
は、米国およびその他の
各国における Corsair
Corporation の登録商
標です。本書には発行時
において正しいとされる
内容が記載されておりま
すが、記載された情報、
仕様、製品またはサービ
スは、予告なしに変更、
追加または削除される場
合があります。
その他の名称および商標
は他社の所有物である可
能性があります。
26
 Loading...