

Page 1

SmartSERVER
Physical Installation Guide
SmartSERVER building 001-10134 Rev. 1
automation products
PHYSICAL INSTALLATION GUIDE
Section Contents
Physical Installation Guide........................................................................................................................................................1
1 . 1 S c o p e ............................................................................................................................................................................................................1
1 . 2 P h y s i c a l I n s t a l l a t i o n ............................................................................................................................................................................1
1.2.1 Before you start...........................................................................................................................................................................................................1
1.2.2 Mounting Preparation (Step 1)....................................................................................................................................................................................2
1.2.3 C-Bus Cable Termination (Step 2)...............................................................................................................................................................................2
1.2.4 Physical Installation (Step 3).......................................................................................................................................................................................3
1 . 3 Te ch n i c a l S p e c i f i c a ti o n s ....................................................................................................................................................................3
1.3.1 Electrical......................................................................................................................................................................................................................3
1.3.2 Physical.......................................................................................................................................................................................................................3
1 . 4 I m p o r t a n t I n f o r m a t i o n .........................................................................................................................................................................3
1.4.1 General Disclaimer......................................................................................................................................................................................................3
1.4.2 Limitations of Usage....................................................................................................................................................................................................3
1.4.3 Copyright and Trademarks..........................................................................................................................................................................................4
1.4.4 Contact Correlate........................................................................................................................................................................................................4
1.1 Scope
The following instructions apply to the electrician who is
responsible for the physical installation activities (only) of a
SmartSERVER.
Information on other aspects of the installation including C-Bus
and Network integration can be found within the SmartSERVER
Instruction manual, document 001-10036.
1.2 Physical Installation
1.2.1 Before you start
Prior to commencing a SmartSERVER installation ensure that
your intended approach will satisfy all of the following
considerations detailed in this section:
• C-Bus connection
• Ethernet Connection
• Power Source
• Location, Access and Security
C-Bus connection
The SmartSERVER requires access to a wired C-Bus system in
a manner similar to that required by a Clipsal C-Bus wall switch
– two terminations are required at a pluggable connection
provided at the rear.
Ethernet Connection
A connection to a local wired ethernet or fast ethernet network
is required. This is provided at the front of the unit by a standard
RJ style connector (as is typically present on Cat 5e and Cat 6
patch cables).
SmartSERVER includes an auto MDIX feature so cross over
cables are never required (but can be used at any time).
Power Source
SmartSERVER requires a 5V DC input for operation. This can
be provided to the front facing barrel style connector by:
• Suitably rated 5V plug pack or similar supply
• USB to barrel connector cable. USB3 sources will,
and most USB2.0 interfaces, can provide sufficient
current (The later meaning it may be possible to
power SmartSERVER off an unused router USB port)
NOT E: Consider the total curr ent dra w of oth er
devices (if pres ent ) f rom a USB router or power ed
hub to con fir m s ufficie nt capacity r ema ins.
Correlate carries a range of accessories that can help you
professionally complete any installation. Please visit our website
www.correlate.com.au for further details.
IMP ORTANT: Is is li kely a genera l powe r o utl et (GPO) will also
nee d to b e provi ded i n the vic ini ty of the Smar tSE RVER to
pro vide inpu t to a DC plug pac k/s upply and for oth er custom er
IT equipme nt.
Location, Access and Security
SmartSERVER is designed for indoor use only. It does not in
itself generate any appreciable heat nor require convection for
cooling. The selected location must afford occasional front
panel access ..
Common suitable locations include:
© Copyright Correlate Pty Ltd 2015
Page 1 of 4
A
Page 2
SmartSERVER
Physical Installation Guide
SmartSERVER building 001-10134 Rev. 1
automation products
• wall mounting near a wired ethernet connection and
GPO
• within a communications cabinet
Unsuitable locations include:
• areas of high electromagnetic radiation
• corrosive, explosive or highly dusty environments
• close proximity to medical apparatus or similarly
sensitive equipment
• anywhere where the SmartSERVERs rated
parameters (Section 1.3) will be exceeded
WARNING : Always selec t a location which complie s with local
bui ldi ng codes and reg ula tio ns, a nd ensure cabling sepa rat ion
req uirements are m et. Typi cally equ ipment of th is typ e, as we ll
as other I T equipmen t s hould n ot be i nst alled with in a mains
swi tchboar d.
1.2.2 Mounting Preparation (Step 1)
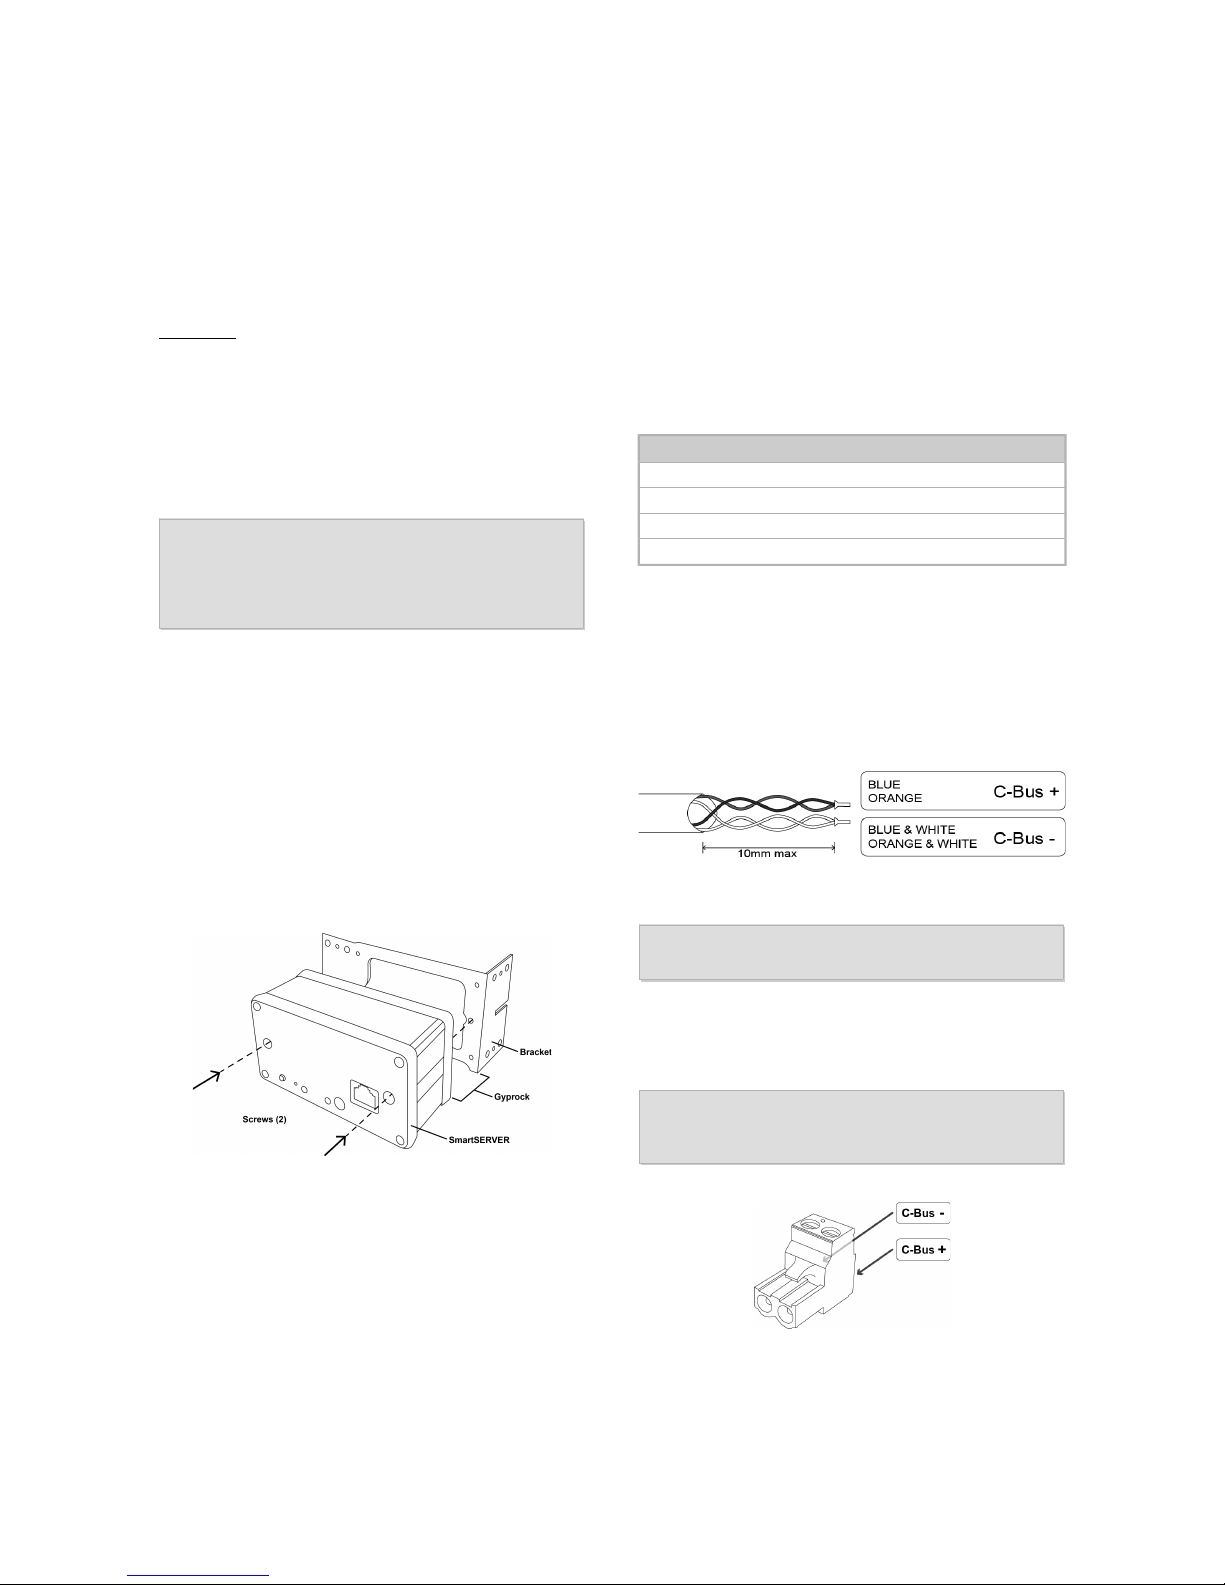
The method of fixing the SmartSERVER is via two mounting
screws spaced at 84mm centres. This is compatible with the
standard spacing used by Australian and New Zealand switch
plates and other mounting accessories.
Orientation of the SmartSERVER can be determined to best
suit the installation position, however note that front panel
artwork runs horizontally.
The two screws provided have sufficient reach for a mounting
bracket present at the rear of a gyprock cavity wall (Illustration
1).
C-Bus cable entry is from the rear, meaning that on solid walls a
suitable wall box cavity must be present, or a mounting block
affixed to the wall. Non-standard configurations will need to be
addressed by the installation professional on a case by base
basis.
1.2.3 C-Bus Cable Termination (Step 2)
It is recommended the C-Bus cable termination and fitting of the
connector be completed immediately prior to installation of the
SmartSERVER, and after application of all finishes to the
mounting surface.
Untwist the 2 cable pairs identified in Table 1. The other twisted
pairs present are not used for the SmartSERVER installation
and should remain unterminated.
C-Bus Connection Colour
C-Bus positive (+) blue
C-Bus negative (-) blue & white
C-Bus positive (+) orange
C-Bus negative (-) orange & white
Table 1: C-Bus cable colour code
Now strip approximately 7mm of insulation off each of the four
wires of interest being careful not to nick the centre conductor.
Combine the positive and negative C-Bus cables are shown in
Illustration 2. A crimp ferule as used by other C-Bus products
can be optionally applied to the cable ends, but is not required.
WARNING : Cable out er j acket not to be strippe d back f urther
tha n shown in Il lus tration 2 (requir ed for SELV complianc e).
Sufficiently loosen the two connector screws to allow the cable
(with or without crimp ferule) to be inserted. Insert the cables
maintaining the polarity as shown in Illustration 3 and securely
tighten.
IMP ORTANT: Ensure the C-Bus wires are cor rec tly paired
tog ether and te rmi nated to the correct locatio ns o n th e
pro vided conn ect or.
© Copyright Correlate Pty Ltd 2015
Page 2 of 4
Illustration 3: C-Bus connector termination
A
Illustration 2: C-Bus cable connection
Illustration 1: Example cavity installation
Page 3
SmartSERVER
Physical Installation Guide
SmartSERVER building 001-10134 Rev. 1
automation products
Optionally, electrical insulating tape can be applied over the
connectors screw terminals and onto the cable to provide
additional mechanical support.
1.2.4 Physical Installation (Step 3)
Plug the connector into the mating socket on the rear of
SmartSERVER. The connector is keyed and will easily engage
when inserted with the correct orientation.
NOT E: Ful ly engage t he con nec tor wi th correc t ori enta tio n –
Do not force.
Carefully move the SmartSERVER back against the mounting
surface ensuring the C-Bus cable generally feeds away from
the unit at right angles, and does not kink or sharply bend any
of the individual conductors.
Loosely inserting both of the provided retention screws prior to
final tightening may assist in initially aligning the unit.
Do not over tighten the screws, also taking care to avoid
cosmetic damage to both the screw head and SmartSERVER
front panel.
1.3 Technical Specifications
An abbreviated set of specifications are given here to support
site selection and other aspects of the installation. Please refer
to the SmartSERVER Instruction Manual for a complete set.
1.3.1 Electrical
Parameter Value Note
min nom max units
DC Supply IN 4.5 5 7.5 V Reverse, under, over voltage
protected.
200 mA
Ethernet Fast Ethernet with auto MDIX
(crossover).
C-Bus system
clock
none yes Software selectable via C-
Bus toolkit.
C-Bus network
burden
none yes Software selectable via C-
Bus toolkit.
Operating
Temperature
0 21 45 C
Operating
Humidity
0 95 % RH Non-condensing.
Table 2: Abbreviated Electrical Specifications
1.3.2 Physical
Parameter Value Note
Controls Restart Front panel. Momentary press will
restart SmartSERVER reloading
currently saved parameters.
Reset Recessed – operation requires
insertion of fine blunt instrument.
Press and hold with Restart for 5
seconds then release to restore
factory default settings.
Indicators Power On when supply IN is within protection
limits.
Run Flash every 1s (typ) during operation.
Ethernet Link On when Ethernet network present.
Ethernet Activity On during any data activity on
connected Ethernet network.
Connections DC-Power Centre pin positive. 5.5mm/2.0mm
barrel connector
Ethernet (RJ45) Auto MDIX crossover if required.
C-Bus (2 pin plug) TE Connectivity 5.08mm pitch Termi
Blok
Weight 198g Nominal, SmartSERVER only
including mounting screws (2).
Dimensions
(WxHxD)
106.5 x 56.5 x 47mm Nominal, not including rear C-Bus
connector.
Table 3: Abbreviated Physical Specifications
1.4 Important Information
1.4.1 General Disclaimer
The information in this manual is provided in good faith. Whilst
Correlate has endeavoured to ensure the relevance and
accuracy of the information, it assumes no responsibility for any
loss incurred as a result of its use.
1.4.2 Limitations of Usage
The products offered by Correlate are not endorsed for life
or safety critical applications. They should never be used as
the primary, principle or only means to achieve a purpose,
where failure to operate could have unacceptable
consequences.
Unless specifically identified within the product specification all
of Correlate's products are intended for indoor use only and are
not developed for use in explosive or otherwise dangerous
environments.
Correlate does not recommend or endorse use of its products in
any of the applications mentioned above.
Other situation may exist where the use of Correlate's products
are not appropriate. Installation of equipment should only be
carried out by personnel able to adequately assess the
suitability and safety of any particular potential installation.
1.4.3 Copyright and Trademarks
© Copyright Correlate Pty Ltd 2015. All rights reserved.
© Copyright Correlate Pty Ltd 2015
Page 3 of 4
A
Page 4

SmartSERVER
Physical Installation Guide
SmartSERVER building 001-10134 Rev. 1
automation products
This material is copyright under Australian and international
laws. Except as permitted under the relevant law, no part of this
work may be reproduced by any process without prior written
permission of and acknowledgement to Correlate Pty Ltd.
A
,
B
and SmartSERVER are trademarks of
Correlate Pty Ltd.
Clipsal and C-Bus are registered trademarks of Clipsal Australia
Pty Ltd.
1.4.4 Contact Correlate
If you need to contact us:
Function Email address
Technical Support:
Sales:
Enquires of a
general nature:
Table 4: Correlate e-mail contact addresses
All written correspondence should be sent to:
Correlate Pty. Ltd.
P.O. Box 580
Church Point NSW 2105
Australia
Please note, return items will NOT be accepted at our P.O. box
address. If you have a warranty claim please first contact
Correlate to receive an RMA number and return address details
© Copyright Correlate Pty Ltd 2015
Page 4 of 4
A
 Loading...