

Page 1
GENERAL INFORMATION
BT-20060-00002
VER:20120319
TH-2006(TX)
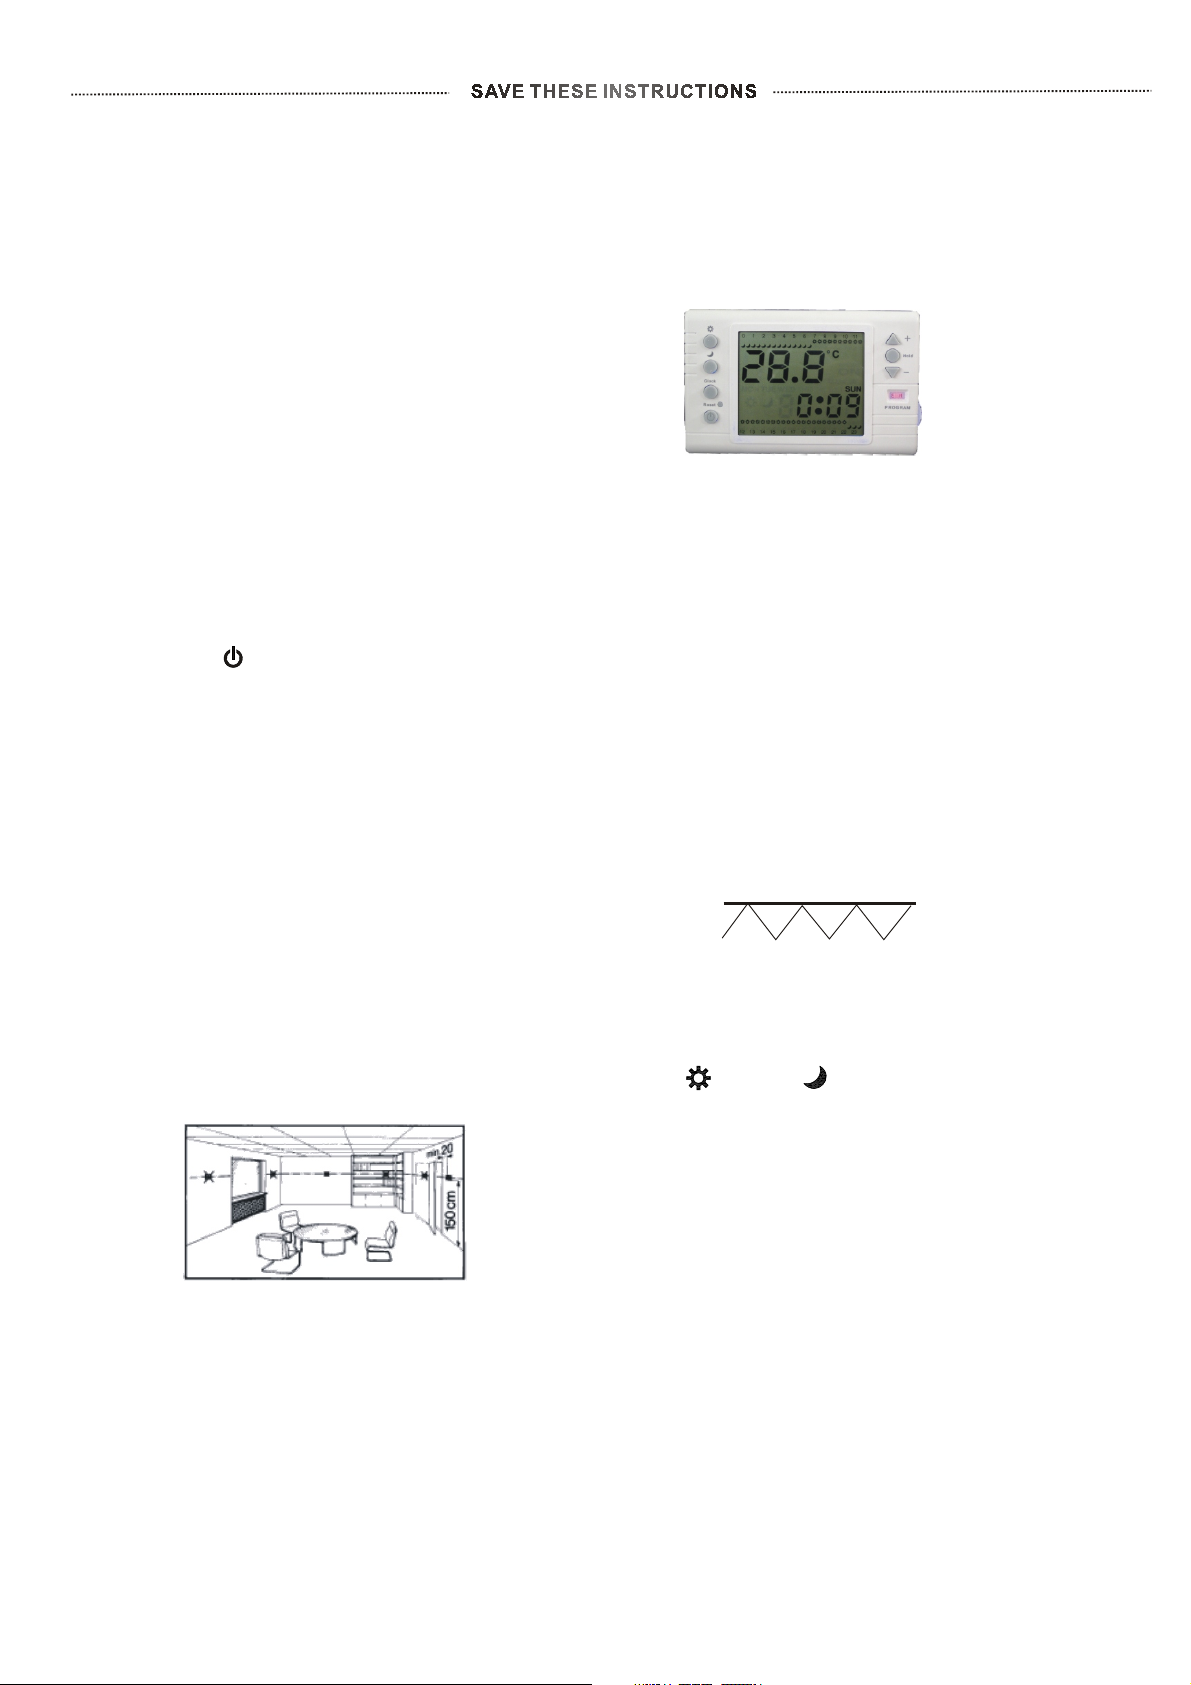
This thermostat commands heating-system to operate
with two pre-selected temperature setpoint
( COMFORT & ECONOMY). Each of 7-day is spread into
48 time-zone, provides great convenience to users to
select desired temperature setting to the needs in daily
life.
This large LCD thermostat is produced with
self-explanatory programming design, backlight
function incorporated
to users upon programming this thermostat in dim
surrounding.
Also an unique LED reflector(Auto) is built to
illuminate operate mode to avoid confusion in
programming this thermostat.
For easy operate in actual application, this unit
has STAND-BY function provides quick & simple
way to temporary cut off
required.
Useful advices for installation
In the main occupancy room or reference room
■
■ The place of installation should be chosen so that
sensor can capture the room temperature as
accurately as possible, without being affected
by direct solar radiation or other heating or
cooling source.
■ Mounting
meters above the floor.
■ The unit can be fitted to most commercially
available recessed conduit boxes or directly
on the wall.
height should be approximate 1.5
to bring great convenience
heating when it is not
Technical data
●EEPROM memory backup
●Temperature display range:
0 ~ 50°C
●Temperature control range:
5 ~ 35°C
●Temperature sampling rate:
1 minute
●Switching differential(Hysteresis): 0.5°C.
Setpoint
ON
●
Temperature adjusting scale: 1°C
●
Temperature display scale: 0.1°C
●
All 7-Day independently programmed
●
24-Hour- format, spread into 48 time
programming zones
●
Solar & Lunar
“Comfort” &”Economy” temperature setting,
easy to programming
Battery-low indication(for Battery model only)
●
Relay output compulsory shut-off, after 5-time
●
Battery-low warning.
●
Battery replacement frequency: once every 12 months.
●
Output rating: 10 AMP / 250 Vac, Voltage-free,
Dimension: 138 x 86 x 29.6 mm
●
SPDT.
symbols represents
OFF
1/5
Page 2
ANGER
BT-20060-00002
VER:20120319
D
lectric Shock Or Fire Hazard
E
READ ALL WIRE SIZING, VOLTAGE REQUIREMENT AND SAFETY
DATA AVOID PROPERTY DAMAGE AND PERSONAL INJURY
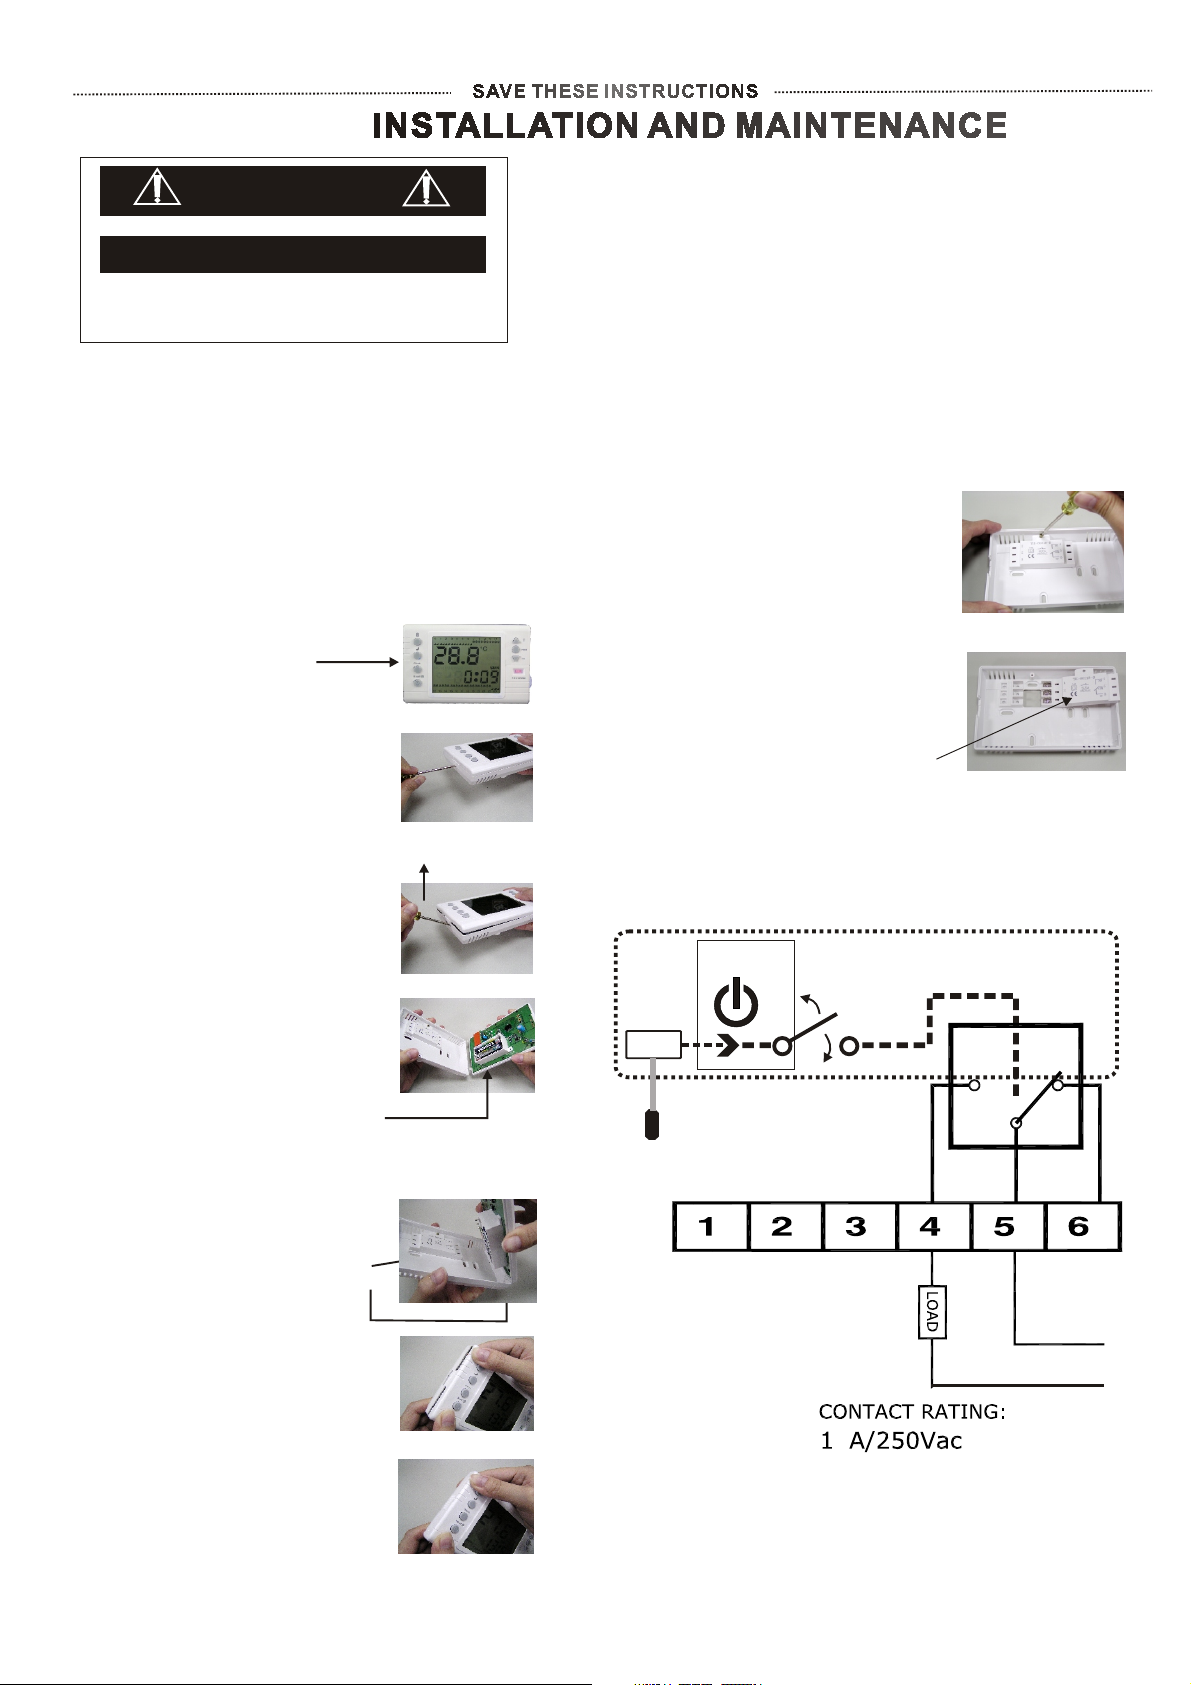
Guide to batteries replacement & Wiring
Under normal operation, users requires to replace
batteries once every year, to avoid unnecessary
damage which might occur while changing batteries
or newly installation of this thermostat, it’s
recommended to follow up with description
stated below.
Assisting tool required: “ “ Flat-head screw driver
To open top case to replace batteries
.Open top plastic case from
1
“closure” from here
.One hand holds thermostat
2
another hand holds flat-head
screw driver.
Gently position head of
screw-driver into aperture.
-
Proposed application(wiring)
ssisting tool required: “+” head screw-driver
A
1.Slacken screw on bottom
plastic case.
2.Connect output terminals to
heating system in accordance
with instruction printed on
protective cover.
(Proposed application described
below)
3.Gently lift tail of screw-driver
upward, to open “closure”.
4.Use two hands to separate
top and bottom plastic cases.
5.Replacing batteries
Close top case after batteries
replacement or wiring works
.Positioning two closure-stud
1
at top-case to 2 closure-slot
at bottom-case.
.Close.
2
3.Press to firmly close thermostat.
from here.
tandby
S
CU
M
oom sensor
R
commissioning
heating ON/OFF
to desired
setpoints.
TH-2006-1H-B
elay Off
R
Relay Active
0
olt-free
V
C
OM
R
elay
NCNO
L
N
2/5
Page 3
ROGRAMMING INSTRUCTIONS # 1
BT-20060-00002
VER:20120319
P
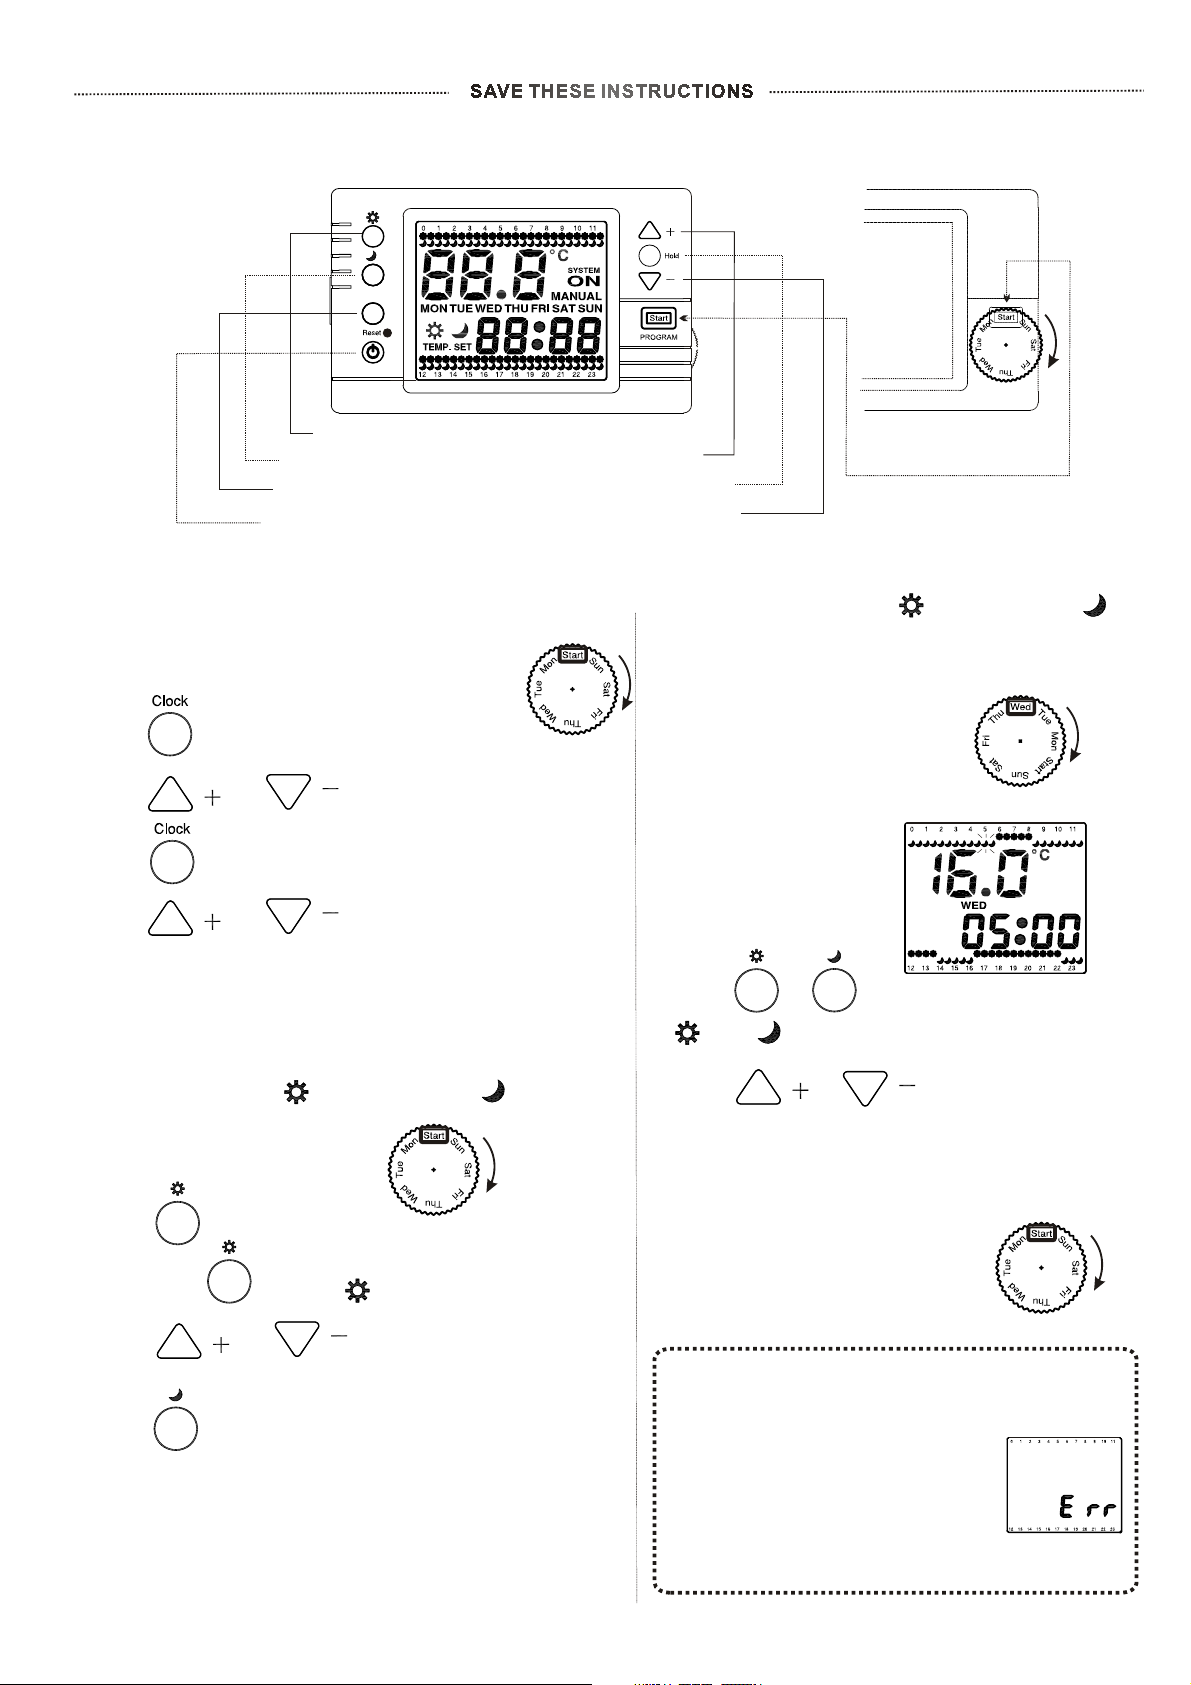
Description to function keys
lock
C
OMFORT setpoint setting
C
ncrease/Forward
CONOMY setpoint setting
E
LOCK setting
C
TAND-BY (Relay active or OFF)
S
. Adjusting CLOCK to accurate time before
A
I
ecrease/Backward
D
programming thermostat
1. Spin Rotary programming selector to “START”.
2.Press to enter clock setting.
3.Press or to select accurate Day of Week.
4.Press again to select
5.Press or to select.
6.Repeat procedure above to complete CLOCK setting.
7.Wait 5 seconds after CLOCK setting completed,
thermostat shall automatic memorize setting.
accurate Hour of Day.
Rotary
programming
OLD mode
H
.Setting COMFORT & ECONOMY
C
selector
setpoint for each of independent
time-zone in Day of Week
*Wednesday 05: 00 chosen for graphic example)
(
1.Spin rotary selector to desired
Day of Week.
2.Follow the guide by flashing shown on LCD.
3.Press or to alter setting between
and on
LCD.
. Set COMFORT ( ) & ECONOMY ( ) setpoint
B
.Spin rotary selector to “START”.
1
2.Press to enter COMFORT setpoint selection.
Press again , symbol shall be flashing on LCD.
3.Press or
setpoint.
4.Press to enter ECONOMY setpoint selection.
Selecting setpoint with the same procedure as described
above.
5.Wait 5 seconds after both COMFORT & ECONOMY
setpoints selection is done, thermostat
execute.
to set desired COMFORT
shall automatic
3/5
4.Press or to select each
independent time-zone. LCD shall indicate each
time-zone by digital numbers and flashing on
on LCD throughout entire programming process.
5.After completed programming all
spin rotary selector
to “START”.
Thermostat shall begin
commissioning heating-system
to operate in accordance with
programmed commands.
uring programming this section, if by any reason
D
users stop procedure more than 1 minutes,
a “Err” symbol shall show on LCD
(as graphic shown below) and Relay
shall be temporary shut-off,until
programming completed.
To spin rotary selector away its last
position and then switch back, the
programming shall resume, “Err”
symbol shall vanish
7-day,
Reminder
Page 4
P
BT-20060-00002
VER:20120319
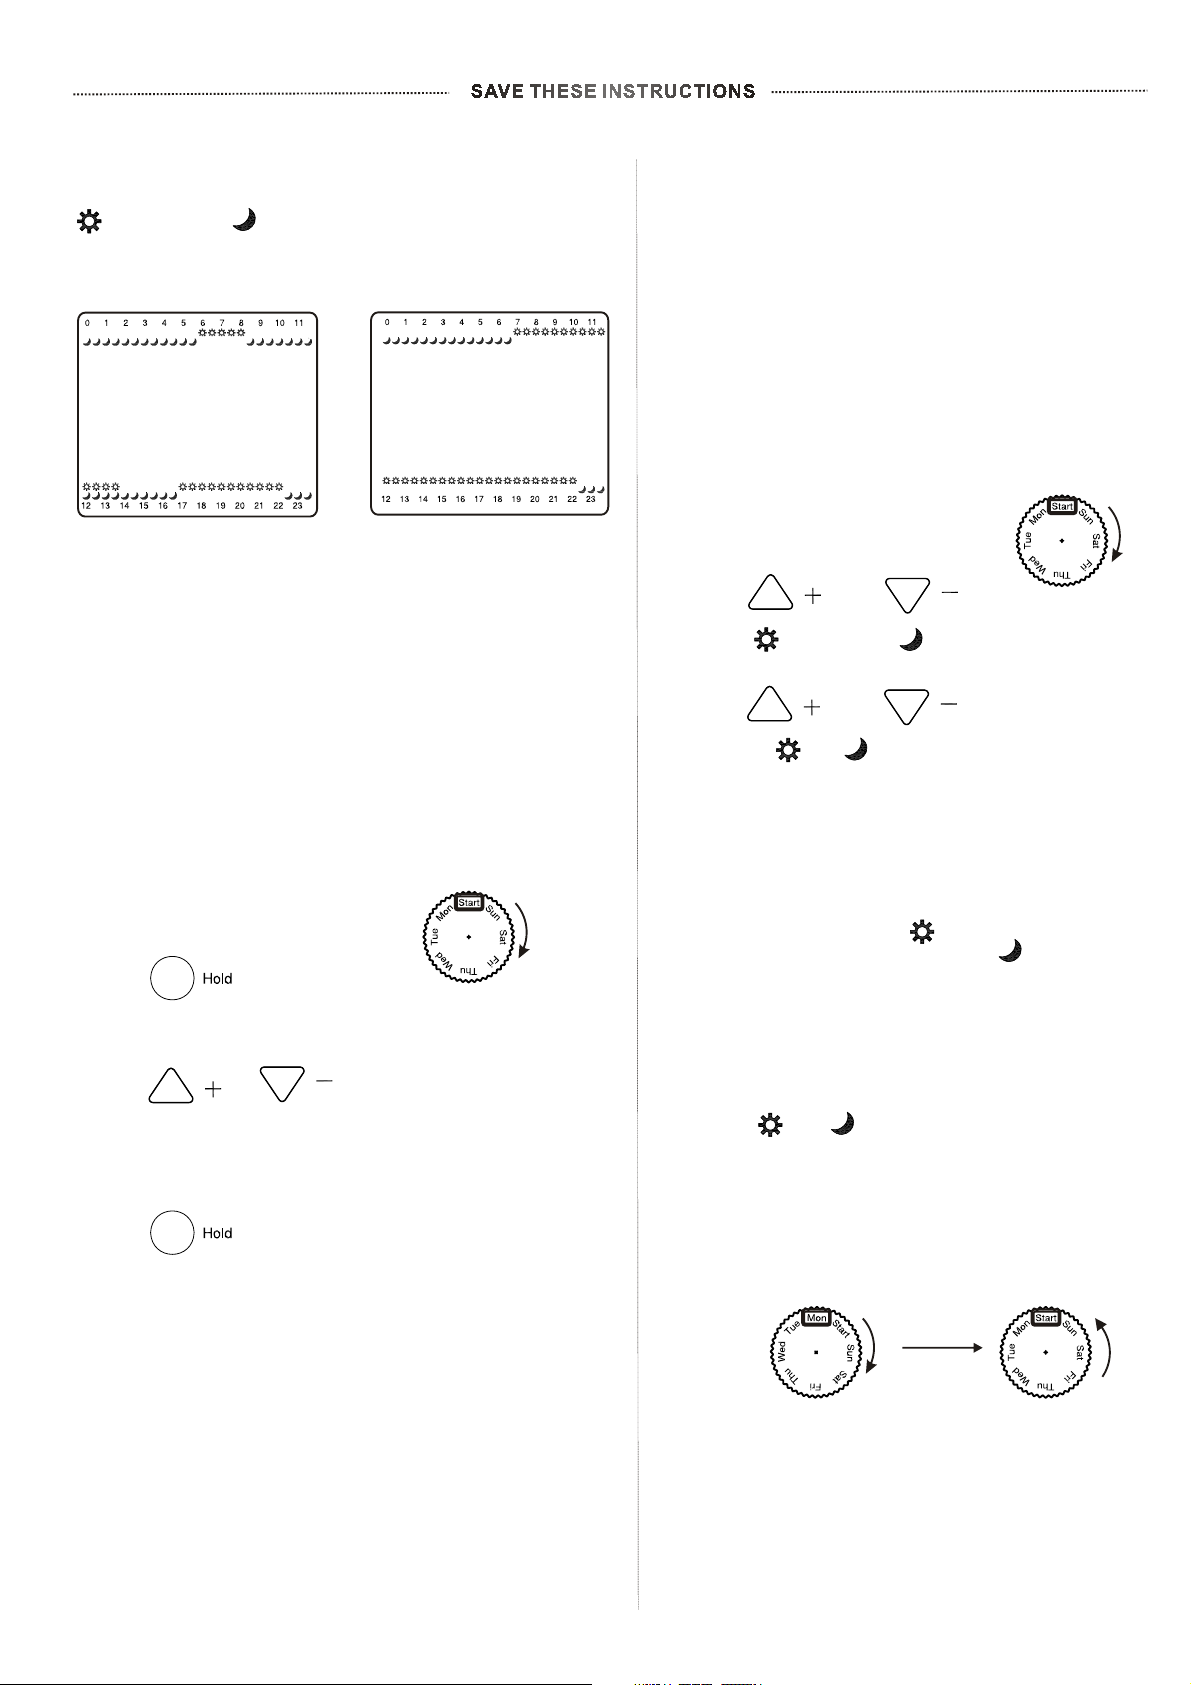
rogramming default
P
ROGRAMMING INSTRUCTIONS # 2
= 21°C
Pre-programmed
Mon ~ Fri
= 16°C= 21°C
D.Override function
S
at ~ Sun
2
.MANUAL(Temporary override)
■Spin rotary selector to “START”
■Press or
C
urrent (comfort) or (economy)
setpoint.
■
Press or
to change or setpoint.
■
LCD shall be flashing 8 seconds after
setpoints was changed, and starts to
operate temporary override.
1.HOLD (Permanent override)
■Spin rotary selector to “START”.
■Press to enter this
override mode. “Temp Set”
& "HOLD” shall be shown on LCD.
■Press or
“HOLD” temperature setpoint.
■Wait 10 seconds, thermostat shall
automatic operate this permanent override.
■Press again, shall deactivate
HOLD.
to adjust
*If MANUAL is operating in
programming zones of , when
it reaches programming-zone of
this temporary override shall
be automatic stopped and the
programming resumes its
commissioning the heating system.
Vice versus.
When MANUAL is operating, symbols
either or in programming-zone
shall temporary disappear.
■Users can deactivate this temporary override
by spinning rotary selector away from “START”
and then spin it back to “START”. The
programming shall resume commanding
heating system.
4/5
Page 5
R
BT-20060-00002
VER:20120319
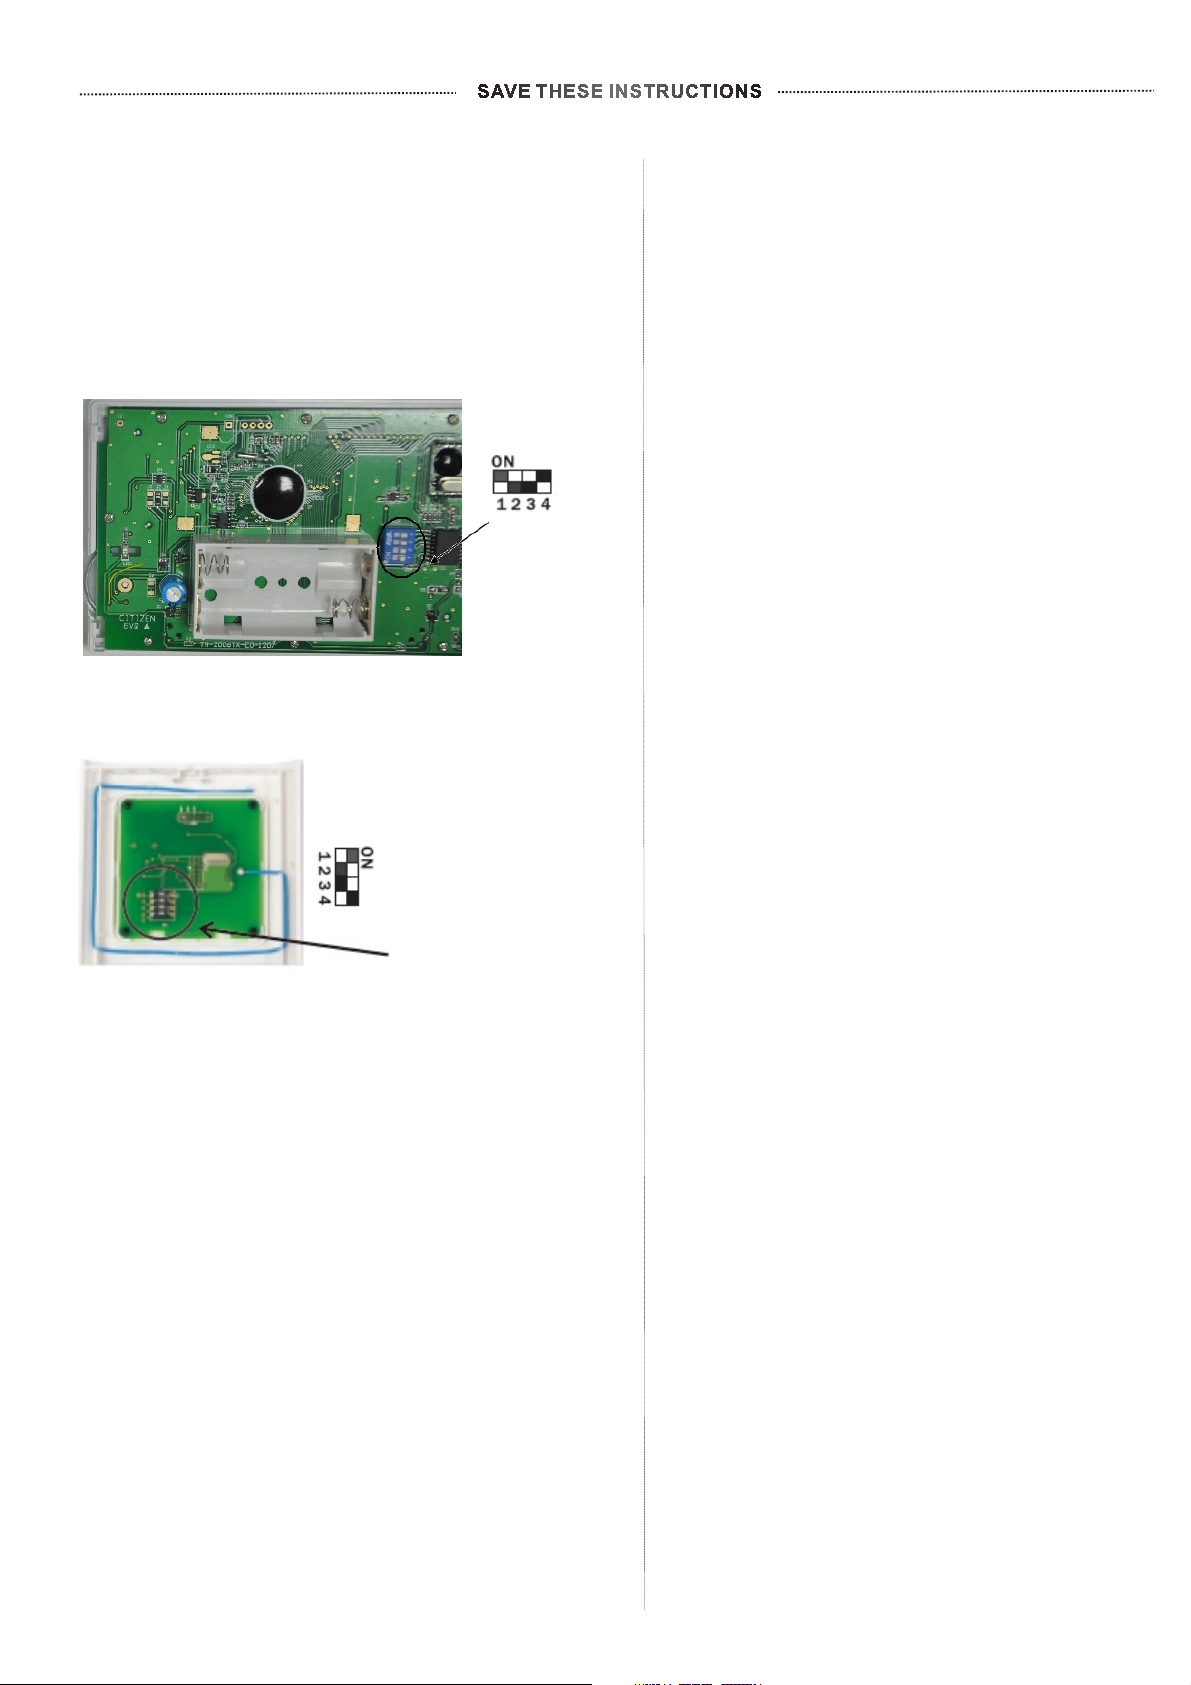
F Address Code Setting
On the back of the transmitter circuit board.
If there is another RV-0356 receiver unit nearby, e.g in the
next house, the receiver may be fault triggered by the other
transmitter. You may select different RF address code to
prevent this. Receiver can only response to RF coding with
the same address code
O
n the back of the transmitter circuit board
setting as its own address code.
O
n the back of the receiver circuit board.
Set the selection the same way on both frequency selection
switches.
5/5
 Loading...