

CORONA SX-2E Owner's Manual
o:usn
®
3~-
xs
130011\1
This instruction manual
is
important to
you.
PLEASE
READ
IT
THOROUGHL
V.
This manual will show you how
to
assemble, operate and maintain
your heater for best perfo
rm
ance.
It
shows you simple things
to
check before you
co
ntact your Corona dealer··· This will save you
the
cost
of unnecessary service.
TABLE
OF
CONTENTS
SPECIFICAT
IONS
· · · · · · · · · · · · · · · · · · · · · · · · · · · · · · · · · · · · · · · · · · · · · · · · · · · · · · · · · · · · · · · · · · · · · · · · · · · · · · · · · · · · · · · · · · · · · · · · · · · · · · · · · · · · · · · · · · · · · · · · ·
SAFETY INSTRUCTIONS · · · · · · · ·
· · · · · · · · ·· · · · · · · · · · ·· · · · · · · · · · · · · · ·· ·· · · · · · · · · · · · ·
··
· · · · · · · · · ·· · · · · · · · · · · · ·· · · · · ·· · · · · · · · · · · · · · · · · · · · · 2
FUEL
GUIDE ····· ·· · ············ · ······ ·· ·
··
····· ··· ··· ···· ·· · · · ··· ·
··
········· ···· ·· ·
··
· ····· · · · ······ · · · ·········· ·· ·· · ··· ··· · ······ ··· · 3
MAJOR PARTS · · · · · · · · · · · · · · · · · · · · · · · · · · · · · · · · · · · · · · · · · · · · · · · · · · · · · · · · · · · · · · · · · · · · · · · · · · · · · · · · · · · · · · · · · · · · · · · · · · · · · · · · · · · · · · · · · · · · · · · · · · · 3
ASSEMBLING Y
OUR
HEATER · · · · · ·· · · · · · · · ·· · · · · · · · · · ·· · · · · · · · · · · · · · · · · · · · · · · · · · · · ·· · · · · · ·· · · · · · ·· · · · · · · · · · · · · · · · · · · ·· · · · · · · · · · · · · 4
1 . Unpacking
·· · · · · · · · · ·· · · · · · · · · · ·· · · · · ·· · · · · · · · · · · · · · · · · · · · · · · · · · · · · · · · · · · · · · · · · · · · · · · · · · · · · · · · ·· · ·· · · ·· · · · · · · · · · ·· · · · · · · · ·· · · · · · 4
2.
Placing burner chimney in right positi
on
·········
········
······ ······ ·
···························
············· ····· 4
3.
Loading batteries ··························· ·· ······ ······················
···················································
5
FILLING
FUEL TANK
WITH
FUEL
...................
............... .........
...........
........ .....
................................
5
MAKING PRELIMINARY CHECKS
BEFORE
LIGHTING ............. ....
...................................................
6
LIGHTING Y
OUR
HEATER .......... ............. .
...................................................................................
6
1. Lig
ht
ing heater by means
of
igni
tion
lever .. · · ·· · .. · .. · ·· · .. · ·
..
· · ...... . · .. · · ·· · .. · .... · · · · · .. · · · · · .... · · ·
·........
6
2.
Lighting heater manually ..............
......................................................................................
6
3.
Checking after i
gnit
ion
.............
.............. ...............................
............................................
7
ADJUSTING WICK DURING OPERATION ....
..................
...........
....................................................
. 7
TURNING YOUR HEATER
OFF
·· · · .. ·
..
·· · · · · · · ·
..
· · .... · .... · · · · · · · .... ·· .. · .... · · ·
..
·· .. · · ·
..
· · · · .. · · .. · · · · · · · · · · .. · · · ·· · · · · · · · · 7
INSTRUCTIONS F
OR
REIGNITING Y
OUR
HEATER AFTER BEING PUT
OUT
...............................
..... 8
DAILY INSPECTION AND MAINTENANCE .. · ... · .. · .... ·· · · ·· · · · .. · · .. · .... · .... · · .. · ...... ·· ·· · · · · · · ·· .... · · · · ·· · · · · · ·
....
·· · 8
1.
Chec
kin
g Heater and
Its
Periphery · · · · · · · · · · · · · · · · · · · · · · · · · · · · · · · · · · · · · · · · · · · · · · · · · · · · · · · · · · · · · · · · · · · · · · · · · · · · · · · · · · · · 8
2.
Wick Gu
ide Assembly · ...... · · .... ·
..
· · · · ·· .. · · · .... · · · · ·· · · .. · ...... · · · .... ·
..
· · .... · ........ ·
..
· · · · · · · · · · · · .. · · · .. · · · · · · · 8
3. Wick
.. ..
.... .. ........................
................
...............
.... ..........
............................
.........
......
.... 8
4. Automati c Shut-o
ff
System · · · · · · · · · · · · .. · · · · · · · · · · ·
..
· · .. · · · · · · · .. · · · · · ·· · · · · · · · · · ·· · ·· · · · · · · · ·· · · · · · · · · · · · · · .. · · · · · · · .. · · 9
5.
Glow Plug .....
....................................................
.......
..............................................
.......... 9
6. Batte
ries
....................................... ....
.........................................
.......... .......
...................
10
7.
Ignition System · · · · · · · ·.
·.............
....................................................................................
.. . . . . 10
HOW
TO REPLACE PARTS
.......................................................
............... ............. ........
..........
....
10
1. Wick .....................................................................................
............... .......... .....
...........
10
2.
Glow Pl
ug
... · · .. ·
..
····· ...... · ........ · ........ ··· ....... · ...... ·
..
·· ... ···· ..... · ··· · ........... ·
................
......... · ....
12
3. Glass Cylinder ................. ............
..................................
...... ...
.............
...
..........................
13
STORAGE
·············································
······ ············· ················ ···· ·········· ·············
··················
····· 14
TROUBLESHOOTING
GUIDE
· ........ ·
..
· ..... · ..... ··· ·
..
······· · .. · · · .... · ...... · · · ...... · ............... · .... · .... · · · .... · .. · ....
15
Replaceme
nt
Parts .. · · · ........ · · · .......... · · · ...... · ...... · ...... · · · · .. .. · ................. · ...... · ...... · ...... ·
..
· · · · · .... · · · · · · .... · 16
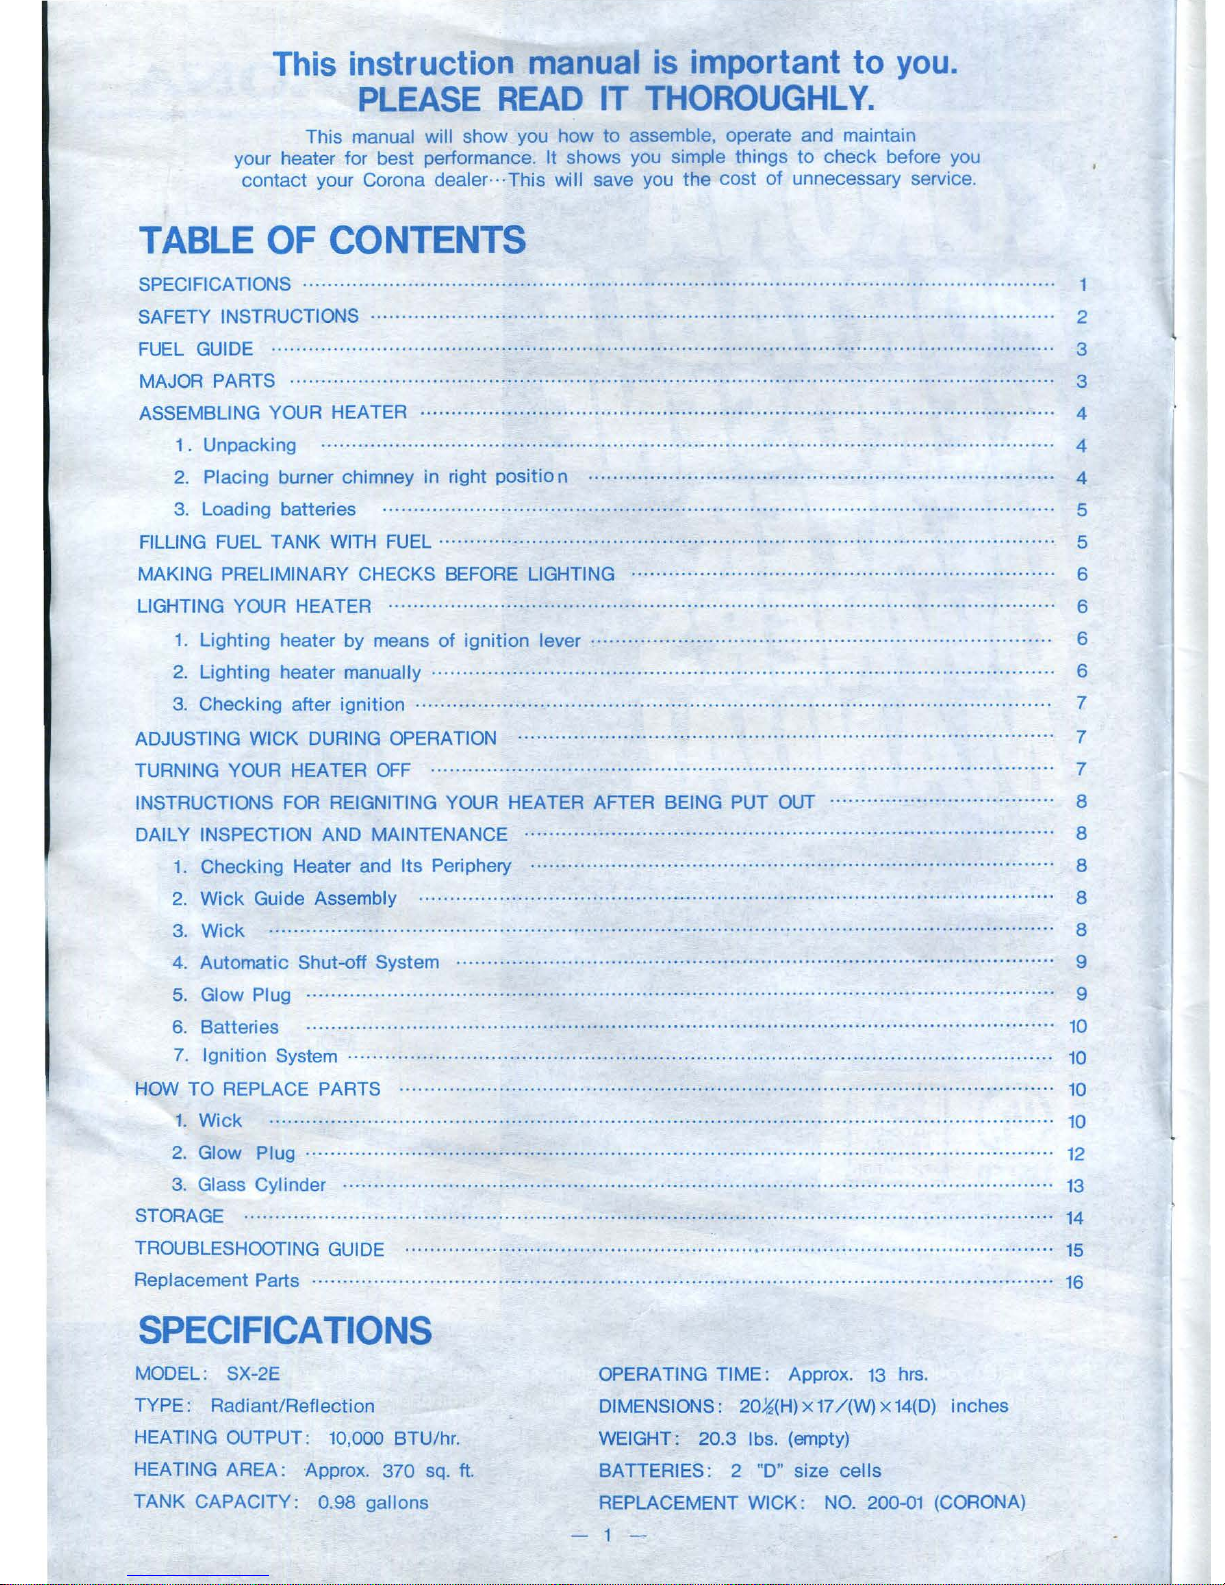
SPECIFICATIONS
MODEL: SX-2E
TY
PE
: Radiant/Reflection
HEATING OUTPUT: 10,000 BTU/hr.
HEATING AREA: Approx. 370 sq. ft .
TA
NK
CAPACIT
Y:
0.98 gall ons
OPERATING TIME :
Approx.
13
hrs.
DIMENSIONS:
20~{H
)x17/
{W)x14{D
)
inches
WEIGHT: 20.3 lbs. {empt
y)
BATTERIES: 2 "D" size
cells
REPLACEMENT WICK: NO. 200-Q1
{CORONA )
- 1 -
SAFETY INSTRUCTIONS
Before
using
your
heater,
read
these important
words
of
caution.
A WARNING:
1.
Risk
of
Explosion
A.
Never use any fuel other than water clear No. 1-K kerosene (ASTM 1-K) or synthetic fuels for
use with kerosene-fired portable heaters. Never use gasoline.
B.
Never refill heater fuel tank when heater is operating or still hot.
C.
Never fill heater fuel tank in living space. Fill heater
tank
outdoors.
D. Never use heater in areas where
flammable vapors or gases may be present.
E.
Never store or transport the fuel in other than a metal or plastic container that is acceptable
for use with the specific
fuel, nonred in color, for 1-K kerosene clearly marked, "kerosene",
or is in the original container for the Synthetic Fuel. Never store fuel in the living space.
A WARNING:
2. Due
to
high surface temperature, keep children, clothing, and furniture at least three feet away
from
the
heater while in operation. High temperatures can produce severe burns and cause
ignition
of
clothing
or furniture.
A WARNING:
3.
Risk
of
indoor
air
pollution. Use your heater only in well-ventilated areas. People
with
breath-
ing problems should consult a physician before using
the
heater.
A WARNING:
4. Do not use heater
to
heat or boil water or use as a cooking appliance. Placing cooking vessels
on
top
of
heater may create a risk
of
abnormal burning ..
A WARNING:
5. Never use containers
that
have been used for other fuels such as gasoline,
paint
thinner,
alcohol, benzol, No. 2
fuel oil, diesel oil, white gas or camping stove fuel. Contamination may
cause
wick
fouling smoking or high flames.
6. Never move, handle, service or refuel your heater
while
it
is operating or still hot.
7.
Never leave your heater unattended while in use.
8. Never
allow
children
to
operate or refuel heater.
9. Never
place
your heater in high
traffic
areas such as doorways or hallways. Be sure heater is
sitting
on level surface during operation.
10
. Never place your heater in windy or drafty locations.
11
. Never use your heater in a moving vehicle.
12
. Always extinguish heater before sleeping.
13.
Never
attempt
to
modify or repair
the
Automatic Shut-off System.
14. In
the
safe operation
of
the
heater,
the
owner must monitor
the
heater for
at
least
15
minutes
to
be sure heater is working properly and avoid any abnormal burning.
COMBUSTION AND VENTILATING
AIR
FOR
UNVENTED HEATERS:
In a house
of
typical construction,
that
is, one
that
is not
of
unusually
tight
construction due
to
heavy
insulation and
tight
seal against
air
infiltration, an adequate supply
of
air for combustion and ventilation
is provided through infiltration. However,
if
the
heater is used in a small room where less than 200
cub
ic
feet (5.7
1li
3
)
of air space is provided for each 1,000
Btu
per hour of hea
ter
rating (considering
the
' maximum burner adjustment), the door(s) to a
dja
cent roo
m(s)
should be kept open or
the
window
to
the
outside should be opened
at
least 1 inch (25.
4mm)
to
guard against potential buildup
of
indoor air
pollution. Do not use the heater in a bathroom or any other small room
with the door closed.
- 2 -
FUEL GUIDE
A WARNING:
USE
ONLY WATER CLEAR N0.1-K
KEROSENE
(ASTM 1-K)
OR
SYNTHETIC FUELS
FOR
USE WITH
KEROSENE-FIRED
PORT ABLE HEATERS.
DO
NOT
USE
GASOLINE
OR
OTHER FLAMMABLE FUELS THAT
WILL DANGEROUSLY INCREASE THE
RISK
OF
FIRE
.
DO
NOT
USE
KEROSENE
OR
SYNTHETIC FUEL THAT IS DEGENERATED, CONTAMINATED BY IMPURITIES,
OR
CONTAINS WATER
IN
YOUR
HEATER.
Degenerated or contaminated kerosene or synthetic fuel refers to;
• Fuel that has been carried over from the previous season.
• Fuel that has been stored
in
the sun for a long period
of
time.
• Fuel that has been stored with its container cover left open for a long period
of
time.
• Fuel that
is
contaminated by water, dust, oil other than kerosene or synthetic fuel, even
if
only
by a very small quantity.
• Degenerated or contaminated kerosene or synthetic fuel is yellowish in color or smells like
acid
.
If your heater is fueled by degenerated or contaminated fuel:
•
The
wick
rapidly accumulate large amounts
of
tar.
• The
wick
won 't move
up
and down easily, and
the
heater cannot be ignited or
ext
inguished
readily;
•
The burner chimney won't heat to redness satisfactor ily, resulting in a decrease in
heat
output;
• The heater will give out an offensive smell;
•
Water contaminated fuel will restrict the fuel flow through
the
wick
and cause the flame
to
extinguish;
• The use
of
highly volatile fuels, such as gasoline and paint thinner, may result uncontrollable fire;
What to do
should the fuel tank be filled with degenerated or contaminated fuel:
•
Drain degenerated or contaminated fuel out
of
the fuel tank completely.
•
Wash the fuel tank in clean 1-K kerosen e or synthetic fuel
two
or three times.
• Repair or replace the wick, following the instructions given on page 9.
• If repair does
no
good, replace the wick with a new one.
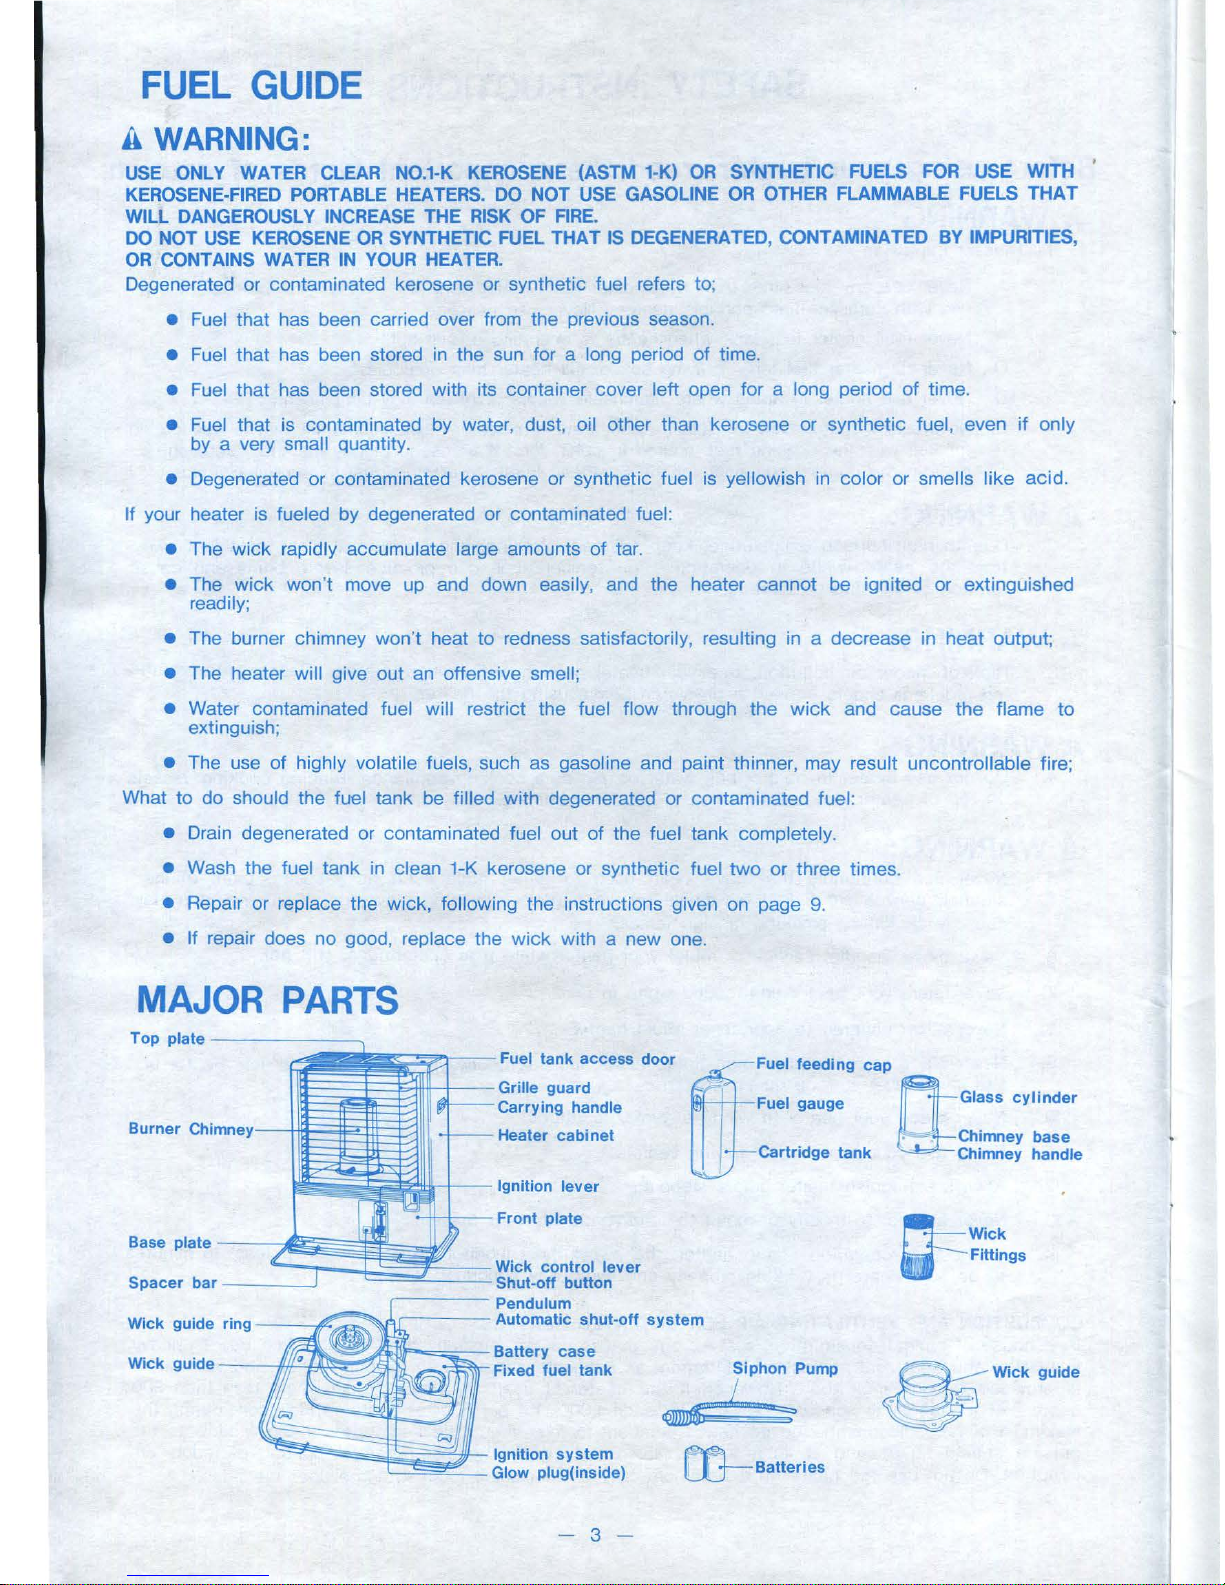
MAJOR PARTS
Top
plate
-----
-
--,
Burner
Ch
~
:
Fuel
tank
access
door
~"'"-+~--Grille
guard
~
Carrying
handle
Heater
cabinet
Ignition
lever
~
Fuel
feeding
cap
Fuel gauge Glass
cylinder
. · Chimney
base
Cart•ldge tank
D:::;
Chlmney handle
- '
Front
plate
Base plate
AF
1
~·~ ~
L:':
=----
f
~
Wick
control
lever
Spacer
bar
I Shut-
off
button
,------
Pendulum
~
Automatic
shut-off
system
-
~
Battery
case
Wick guide
~
~Fixed
fuel
tank
Wick guide rina
~
Siphon
Pump
S:S
lfo
:-
iCJ Ignition
system
'--___;:
="--
- Glow plug(inside)
-
3-
L
~·
5;
ffi-
Batteries
~Wick
a-
Fittings
~
Wick
guide
.
'
ASSEMBLING YOUR HEATER
1.
Unpacking
1) Open top
of
the carton, remove batteries and the top pad.
2)
Take the heater and the siphon pump out of the carton.
3)
Remove all external packing materials.
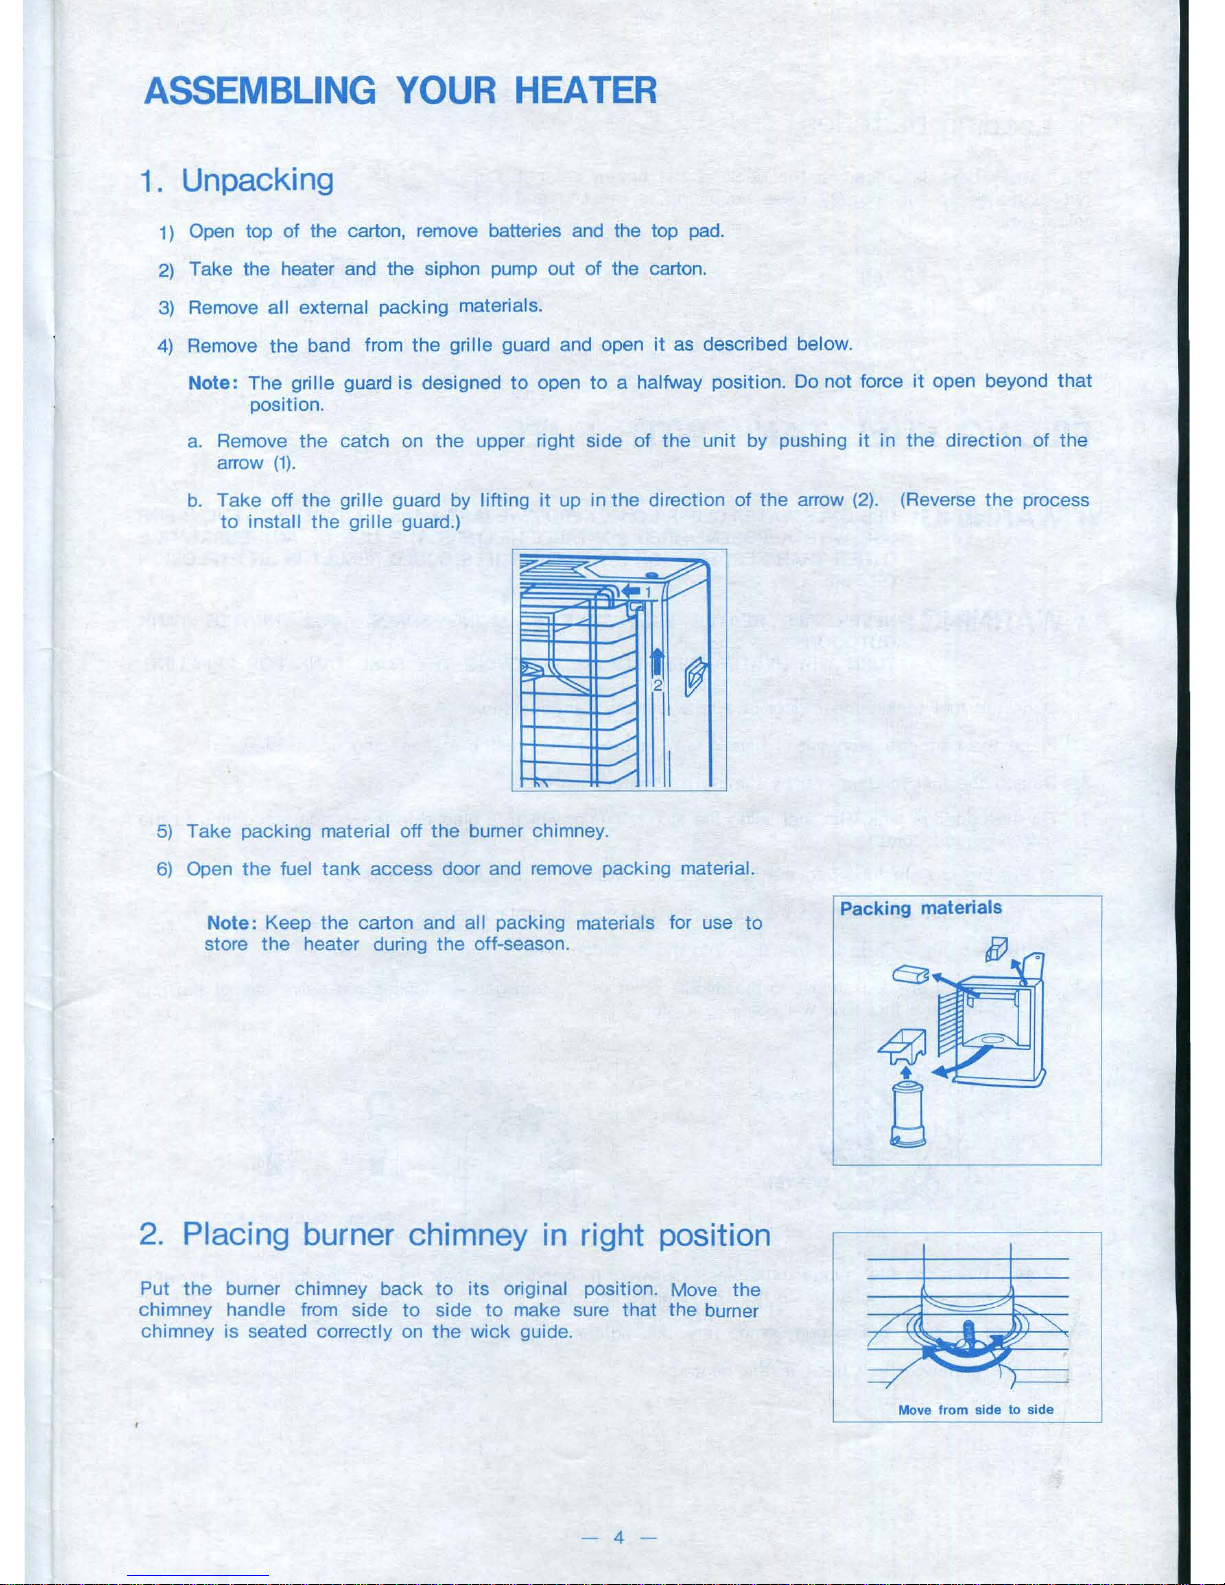
4) Remove
the
band from
the
grille guard and open
it
as described below.
Note:
The
grille guard
is
designed
to
open
to
a halfway position. Do not force
it
open beyond
that
position.
a. Remove
the
catch
on
the
upper right side
of
the
unit
by pushing
it
in
the
direction of
the
arrow
(1).
b.
Take
off
the
grille guard by
lifting
it
up in
the
direction of
the
arrow
(2)
. (Reverse
the
process
to
install
the
grille guard.)
5)
Take
packing material off
the
burner chimney.
6)
Open
the
fuel
tank
access
door and remove packing material.
Note: Keep
the
carton and all packing materials for use
to
store
the
heater during
the
off-season.
2.
Placing burner chimney
in
right position
Put
the
burner chimney
back
to
its
original position . Move
the
chimney handle from side
to
side
to
make sure
that
the
burner
chimney is seated
correctly on
the
wick
guide.
- 4 -
Packing materials
Move from side to
side

3.
Loading batteries
The battery case is placed
at
the
back
of
the
heater cabinet. Put
two
batteries in
the
battery case according
to
the
(
+)
and
(-)
polar,ity marks.
FILLING FUEL TANK WITH FUEL
A WARNING:
USE
ONLY WATER CLEAR N0.1-K KEROSENE (ASTM 1-K)
OR
SYNTHETIC FUELS
FOR
USE
WITH
KEROSENE-FIRED
PORTABLE HEATERS. THE
USE
OF ANY SUBSTANCE
OTHER
THAN
KEROSENE
OR
SYNTHETIC FUELS COULD RESULT IN
AN
EXPLOSION
OR
ARE.
A WARNING:
NEVER
ALL
HEATER FUEL TANK
IN
LIVING SPACE.
ALL
HEATER TANK
OUTDOORS.
TURN
THE HEATER "OFF"
BEFORE
REMOVING
THE FUEL TANK
FOR
REALUNG.
1. Open
the
fuel
tank
access door and
take
out
the
cartridge
tank
.
2. Place
the
cartridge
tank
out
of
harm's way in
the
open with
the
fuel feeding
cap
upside.
3. Detach
the
fuel feeding
cap
by turning
it
counterclock-wise.
4.
Fill the cartridge tank with fuel using the siphon pump, which is placed in the carton, according
to
the
following procedure:
1)
Put the straight tube into the fuel container and
the
flexible tube into the cartridge tank.
2)
Tighten the valve
cap
on the
top
of the grip (see illustration below).
3)
Squeeze the grip
to
let fuel flow into the cartridge
tank
.
4)
When fuel is filled almost
to
the middle point of the fuel gauge, loosen the valve
cap
of
the
grip
and then the
fuel flow will come
to
a stop.
0 )(
@ @
rr
GOOD OVER-FILLED
Note:
When the fuel gauge turns black halfway up,
it
indicates
that
the
cartridge
tank
is filled with
right amount of
fuel. Do not fill beyond this level.
5. Replace the fuel feeding cap on the
tank
and tighten it. Clean up all fuel spills.
6. Put
the
cartridge
tank
back in
the
heater.
- 5 -
 Loading...