

Page 1
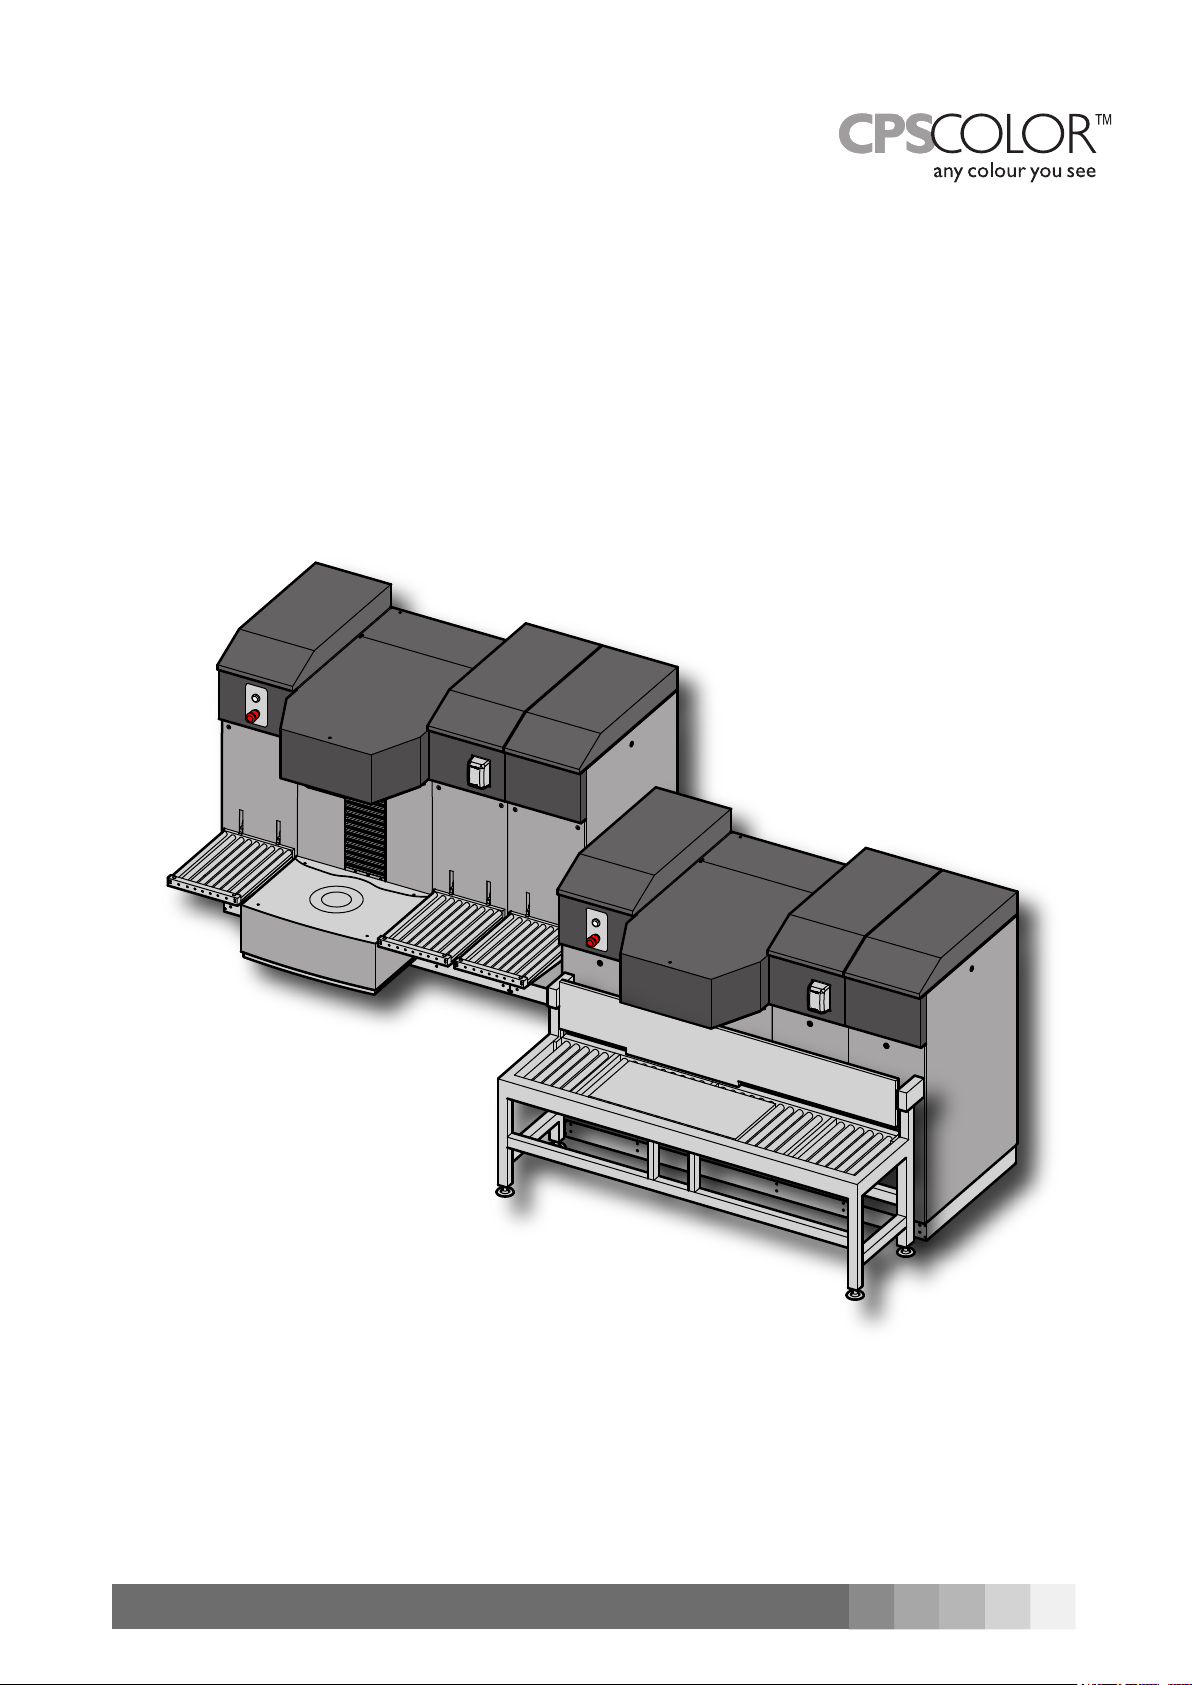
COROB™ D800 HD
Automatic Dispenser
User’s Manual
DU006C010015901 - ENGLISH Version 1.0 - R1 (October 2008)
Page 2

User’s Manual
Automatic Dispenser
COROB™ D800 HD
Version 1.0 - R1 (October 2008)
© COPYRIGHT 2008, CPS Color Equipment S.p.A.
All rights reserved in all countries
If you require additional copies of this manual or further technical information about it, please write to:
CPS Color Equipment S.p.A.
Via Agricoltura 103 • 41038 San Felice s/P • Modena • Italy
Phone: +39-0535-6633 • Fax: +39-0535-663400
Web site: www.cpscolor.com
Email: [email protected]
INTELLECTUAL PROPERTY RIGHTS AND DISCLAIMER
No part of this manual may be translated into any other languages and/or adapted and/or reproduced in any form, or by any means, electronic
or mechanical, including but not limited to photocopying and recording, without prior written permission of CPS Color Equipment S.p.A.
CPSCOLOR™ and COROB™ are registered trademarks or commercial trademarks used on an exclusive basis by CPS Color Equipment S.p.A.
and its afliated companies (hereinafter CPS Color).
A failure of a trademark to appear hereunder does not mean that CPS Color does not use the trademark in question nor does it constitute a
waiver by CPS Color of any related intellectual property rights.
Valuable proprietary technical information contained in the present manual are referring to proprietary know-how, designs, drawings and/or
applications used on an exclusive basis by CPS Color frequently covered by Patents and/or Patent Applications and thus protected by International and National Intellectual Property Laws.
Unless otherwise indicated, all references to other companies not being part of CPS Color Group, their names, data and addresses used in the
screens and/or examples are purely coincidental and serve as a reference only to clarify the use of the COROB™ products.
CPS Color has carefully reviewed the wording and imagines contained in the present manual, nevertheless CPS Color reserves the right to
modify and/or update the information herein to correct editorial errors and/or inaccuracy of the information herein without notice or commitment on its part.
The present manual contains all information necessary for the foreseeable and normal use of the COROB™ products by the nal user.
The manual does not contain guidelines and/or information for product repair. For safety reasons, only trained and authorized technical personnel should perform such interventions. Failure to do so may result in personal injury or damage to the product.
For the purpose mentioned above, CPS Color has appointed authorized technical personnel.
Authorized technical personnel shall mean technicians who have attended a CPS Color technical training course.
Unauthorized interventions could void the warranty coverage of your COROB™ product pursuant to the sales contract or to the General Sales
Conditions of CPS Color.
CPS Color does not intend to limit or exclude its liability against any statutory provisions under any applicable law. Therefore the reference to
above warranty limitations or exclusions may not apply.
The nal user can ask CPS Color or visit the web site www.cpscolor.com for contact details about the nearest authorized technical service.
Warranty
In order for the warranty to be valid, please complete the form included in the machine packing, and send it to
the address listed on the form itself.
Contact our authorized and qualied personnel only for all your service needs. Use only original CPS
COLOR spare parts for all maintenance and replacement interventions.
Altering or removing the guards and safety devices provided on the machine will not only void the warranty
immediately, but is also dangerous and illegal.
The manufacturer may not be held liable for personal injury or property damage caused by improper use of the
equipment or tampering with the guards and safety devices installed on the machine.
The following shall void the manufacturer’s warranty:
Improper use of the machine.•
Failure to observe the instructions and maintenance rules set forth in the manual.•
Making or having changes and/or repairs made on the machine by personnel outside the service organiza-•
tion authorized by the manufacturer and/or made using non-original CPS COLOR spare parts.
COROB™ D800 HD
Page 3

COROB™ AUTOMATIC DISPENSER
QUICK GUIDE
At the beginning of the working day
Check that the nozzle center is clean. •
(Without humidier system) Check that the sponge is clean and saturated; if it is necessary to saturate, use •
only appropriate liquid (the choice of the liquid depends on the nature of the colorants, and must be done
directly by the manufacturer of the products used).
(With humidier system for water-based colorants) Check that the water in the bottle is not below the mini-•
mum level.
Carry out system Initialization and Purge.•
Things to remember
Never let the machine OFF.•
In the canisters, stirring of each colorant takes place automatically (stirring times can however be •
customized).
Be careful not to ll the canisters with too much colorant. In case of overlling, act as indicated in the user’s •
manual.
The colorant to be poured inside the canisters must be stirred manually. Do not use automatic shakers.•
Close the canisters with their lids right after lling operations.•
Remember to update accordingly the canisters lling levels via the management software.•
(Without humidier system) The sponge must be saturated at least twice a week (the frequency of interven-•
tion is indicative, since it depends on the nature of colorants and the environment conditions).
(With humidier system for water-based colorants) Top up the water bottle as soon as the minimum level is •
reached. Do not exceed the maximum level.
At the end of the working day
Rell the canisters.•
Update the canister lling levels in the management software.•
Shut down the computer. Do not shut off the machine.•
It is recommended to carefully read the user’s manual.
Page 4

Page 5

ORIGINAL INSTRUCTIONS
- 1
CONTENTS
CONTENTS
1 GENERAL INFORMATION .........................................................................................................3
1.1 Purpose and use of this manual .........................................................................................3
1.1.1 Conventionally used graphics .................................................................................3
1.2 Identifying information.....................................................................................................3
1.3 Intended and improper use ..............................................................................................4
1.4 Denitions .....................................................................................................................4
2 SAFETY ...................................................................................................................................5
2.1 General warnings ............................................................................................................5
2.2 Warnings on the use of colorants ....................................................................................... 6
2.3 Residual risks ................................................................................................................. 7
2.4 Safety devices ................................................................................................................8
3 FEATURES ............................................................................................................................... 9
3.1 Description of the machine ...............................................................................................9
3.2 Description of units ....................................................................................................... 10
3.3 Standard and optional congurations ............................................................................... 12
3.4 Usable cans .................................................................................................................. 12
4 SHIPPING, HANDLING AND UNPACKING ...............................................................................13
4.1 General warnings .......................................................................................................... 13
4.2 Environment conditions of the installation site .................................................................. 13
4.3 Unpacking and placement .............................................................................................. 14
4.3.1 Adjusting the support feet ................................................................................... 16
4.3.2 Standard material supplied .................................................................................. 16
4.4 Installation ................................................................................................................... 16
4.5 Packing and handling ..................................................................................................... 16
5 START-UP .............................................................................................................................17
5.1 General warnings .......................................................................................................... 17
5.2 Control devices and connections ...................................................................................... 18
5.3 Electrical connection and start-up .................................................................................... 19
5.3.1 Grounding instructions ........................................................................................ 19
5.3.2 Extension cords ................................................................................................. 20
5.4 Machine conditions ........................................................................................................ 21
5.5 Initialization ................................................................................................................. 21
5.6 Use of the off-line button ............................................................................................... 21
5.7 Emergency stop ............................................................................................................ 22
5.8 Shut-down ................................................................................................................... 22
6 USING THE DISPENSER ......................................................................................................... 23
6.1 General warnings .......................................................................................................... 23
6.2 At the beginning of the working day................................................................................. 23
6.3 Running the machine ..................................................................................................... 23
6.3.1 Loading the can - Roll Conveyor ........................................................................... 24
6.3.2 Loading the can - Pull Out Shelf ........................................................................... 24
6.3.3 Loading the can - Automatic Shelf ........................................................................ 25
6.3.4 Use of the Bung Hole Locator ............................................................................... 25
6.3.5 Dispensing ........................................................................................................ 26
6.4 Automatic timed processes ............................................................................................. 26
6.5 Relling the canisters ..................................................................................................... 27
6.6 Troubleshooting ............................................................................................................ 29
7 ORDINARY MAINTENANCE ....................................................................................................31
7.1 General warnings .......................................................................................................... 31
7.2 Maintenance table ......................................................................................................... 31
Page 6

CONTENTS
2 -
7.3 Products to be used ....................................................................................................... 31
7.4 External cleaning ......................................................................................................... 32
7.5 Cleaning the nozzle center .............................................................................................. 32
7.6 Cleaning and moistening the humidier cap sponge ........................................................... 33
7.7 Relling the humidier system bottle ............................................................................... 34
8 TECHNICAL SPECIFICATIONS ...............................................................................................35
8.1 Technical data ............................................................................................................... 35
8.2 Dimensions .................................................................................................................. 36
COROB™ D800 HD
Page 7
GENERAL INFORMATION - 3
GENERAL INFORMATION1
Purpose and use of this manual1.1
This manual, inserted in the product packing, contains instructions on the use and routine maintenance needed
to uphold the machine’s performance over time.
Read this manual carefully before using the machine.
The manual is to be considered an integral part of the machine, and must be stored until it is fully
dismantled.
The manual contains all information available at the time of preparation regarding the machine and any ac-
cessories; for accessories, the manual includes any variations or changes that involve different operating
procedures.
Should it be lost or partially ruined, so that its contents can no longer be read in full, you must request a new
manual from the manufacturer.
Some of the illustrations in this manual were taken from prototypes; some details may differ on
machines in standard production.
Conventionally used graphics1.1.1
Boldface type is used to highlight notes or information of particular importance to a topic.
DANGER
Indicates a risk of personal injury.
WARNING
Indicates a risk of damage to the machine that could interfere with its operation.
Indicates important instructions referring to precautionary rules and/or measures to adopt.
Indicates situations and/or operations that involve the management software installed on the
computer.
Indicates that to carry out the intervention described, the use of the specied tools is required.
Identifying information1.2
The machine has an identication plate on the rear door, indicating:
Manufacturer’s name.1.
Markings.2.
Machine model.3.
Year of manufacture.4.
Serial number.5.
Electrical specications.6.
Do not remove or tamper with the identication plate in any way.
ORIGINAL INSTRUCTIONS
Page 8

4 - GENERAL INFORMATION
COROB™ D800 HD
Intended and improper use1.3
The machine must be used only within the limitations set forth by the technical specications and according to
the procedures described in this manual.
Any use other than that stated, which cannot be implied or deduced from this manual, is to be considered
prohibited.
Denitions 1.4
A person familiar with the methods to produce paints or similar products, assigned to
OPERATOR
MA INT ENANCE
TECHNICIAN
operate and use the machine by its controls and to load and unload production materials
with all safety devices enabled. He or she must work only in safety conditions and is allowed to carry out routine maintenance operations.
Specialist prepared and trained in a technical eld (mechanical and electrical) and assigned to work on the machine to perform adjustments, repair breakdowns or carry out
maintenance.
Page 9

SAFETY - 5
ORIGINAL INSTRUCTIONS
SAFETY2
2.1 General warnings
COMPULSORY
Read the user’s manual carefully before carrying out any operation on the machine.•
The machine must be used only for its intended purpose.•
Pay close attention to the signs on the machine.•
The substances that may be used on the machine -- such as colorants, paints, solvents, lubricants and •
cleansers -- may be hazardous to your health; handle, store and dispose of these substances in keeping
with current regulations and the instructions provided with the product.
Only qualied and appropriately trained personnel (MAINTENANCE TECHNICIANS) are authorized to access •
the machine parts protected by panels for maintenance and repair interventions.
During routine maintenance operations, scrupulously follow the safety instructions given in the correspond-•
ing chapters before accessing the dangerous area.
PROHIBITED
The OPERATOR must not carry out operations reserved to the MAINTENANCE TECHNICIAN. The manufac-•
turer CANNOT BE HELD RESPONSIBLE for damages deriving from the non-observance of this prohibition.
It is strictly forbidden to bypass or disable the protections and any safety devices present on the machine. •
The panels must be kept closed at all times.•
THE MACHINE IS NOT EXPLOSION-PROOF AND MUST NOT BE USED IN AREAS AT RISK FOR •
EXPLOSION.
Do not stare the light source of the Laser Bung Hole Locator (Class II laser product).•
If the machine catches re, • never use water. Use only dry powder or carbon dioxide re extinguishers, and
strictly follow the instructions and warnings indicated by the manufacturer and listed on the extinguisher.
ELECTRICAL DANGER
In the event of a sudden power outage, when power returns the machine will automatically be switched on •
to allow the automatic processes to prevent products from drying out.
The machine must not be powered by a power source having specications other than those listed on the •
identication plate.
Incorrect grounding may lead to the risk of electrical shock; always plug the machine into a socket that •
ensures proper grounding. The line must be protected from overloads, short-circuits and direct contacts according to current accident prevention regulations.
To prevent any risk of electric shock or injuries, the machine must be used indoors only.•
Always unplug the power supply cable from the socket outlet before carrying out any maintenance •
operations.
The machine is isolated from the power supply line when the power cable is disconnected; it must therefore •
be installed near an easily accessible mains socket outlet.
Do not use extension cords to power the machine.•
Do not use multisockets to connect other equipment to the same socket that powers the machine.•
Periodically check the condition of the power supply cable; if it is damaged, replace it with a new cable sup-•
plied by the manufacturer.
Page 10

6 - SAFETY
COROB™ D800 HD
2.2 Warnings on the use of colorants
DANGER
The machine is suitable for use with tinting products in general. Scrupulously follow the instructions for use
given on the colorant package and carefully read the SAFETY DATA SHEET that the dealer or manufacturer
of the product is required to provide. Observe all of the safety instructions provided. When compulsory, use
personal protection equipment for eyes and hands.
Below are some of the most common warnings and safety precautions provided by colorant manufacturers.
Harmful if swallowed. 1.
Avoid eye and skin contact. In case of eye and skin contact, rinse with plenty of water.2.
Keep out of the reach of children.3.
When compulsory, wear protecting equipment for eyes and hands.4.
In case of accidental product leaks or spills, thoroughly ventilate the area and proceed as indicated in this 5.
manual and in the instructions provided with the product itself.
Do not dispose of colorant in the sewage system. Follow local regulations when disposing of waste.6.
Page 11
SAFETY - 7
ORIGINAL INSTRUCTIONS
Residual risks2.3
Risk Preventive measure
Risk of crushing during the cans
loading and unloading operations.
Risk of crushing during the automatic movement of the humidier
cap.
Risk of crushing during the movement of the shelf.
Risk of electrocution if you perform any operation without rst
cutting off electrical power.
Risk of electrocution caused by
high leakage current.
Dorsal/lumbar injuries caused by
handling of heavy loads.
Contact or inhalation of colo-
rants during the canister relling
operations.
Contact or inhalation of colorants
during the cleaning operations of
the nozzle center and moistening
of the humidier cap sponge.
Exposure to laser beam.
Wear appropriate personal protective equipment
(shoes and gloves).
The machine must be used by a single operator.
Keep hands away from the dispensing area at all
times while the machine is operating.
Wear appropriate personal protective equipment
(shoes and gloves).
The operator is not authorized to access the machine
parts protected by panels.
Before removing the panels, unplug the power supply
cable from the mains socket outlet.
Power the machine through a grounded socket outlet. chapter 5.3
Do not exceed the weight limits stated by the
current regulations in force (kg 20 for women, kg
30 for men).
Keep the room suitably ventilated.
Wear appropriate personal protective equipment
(safety goggles, gloves and mask).
The Bung Hole Locator (B.H.L.) uses red laser light
sources which can be potentially dangerous for the
eyes.
AVOID STARING AT THE LIGHT SOURCE.
Re. in the
manual
chapter 6
chapter 6
chapter 6
chapter 2.1
chapter 6
chapter 6
chapter 2.2
chapter 6
Fire due to the use of colorants
containing volatile solvents.
Do not use naked ames, electrical tools or other
types of devices that could cause sparks or re
hazards close to the machine.
The room in which the machine is installed must be spacious, with good ventilation (air exchange) and no type
of parts must be leant against or stocked close to the
machine.
Canister top up must be carried out opening one canister at the time.
If during this operation, some colorant should spill out of
the canister, immediately disconnect the machine from
the mains before cleaning.
chapter 4.2
chapter 6.5
Page 12
8 - SAFETY
COROB™ D800 HD
MAX
MIN
2
3
1
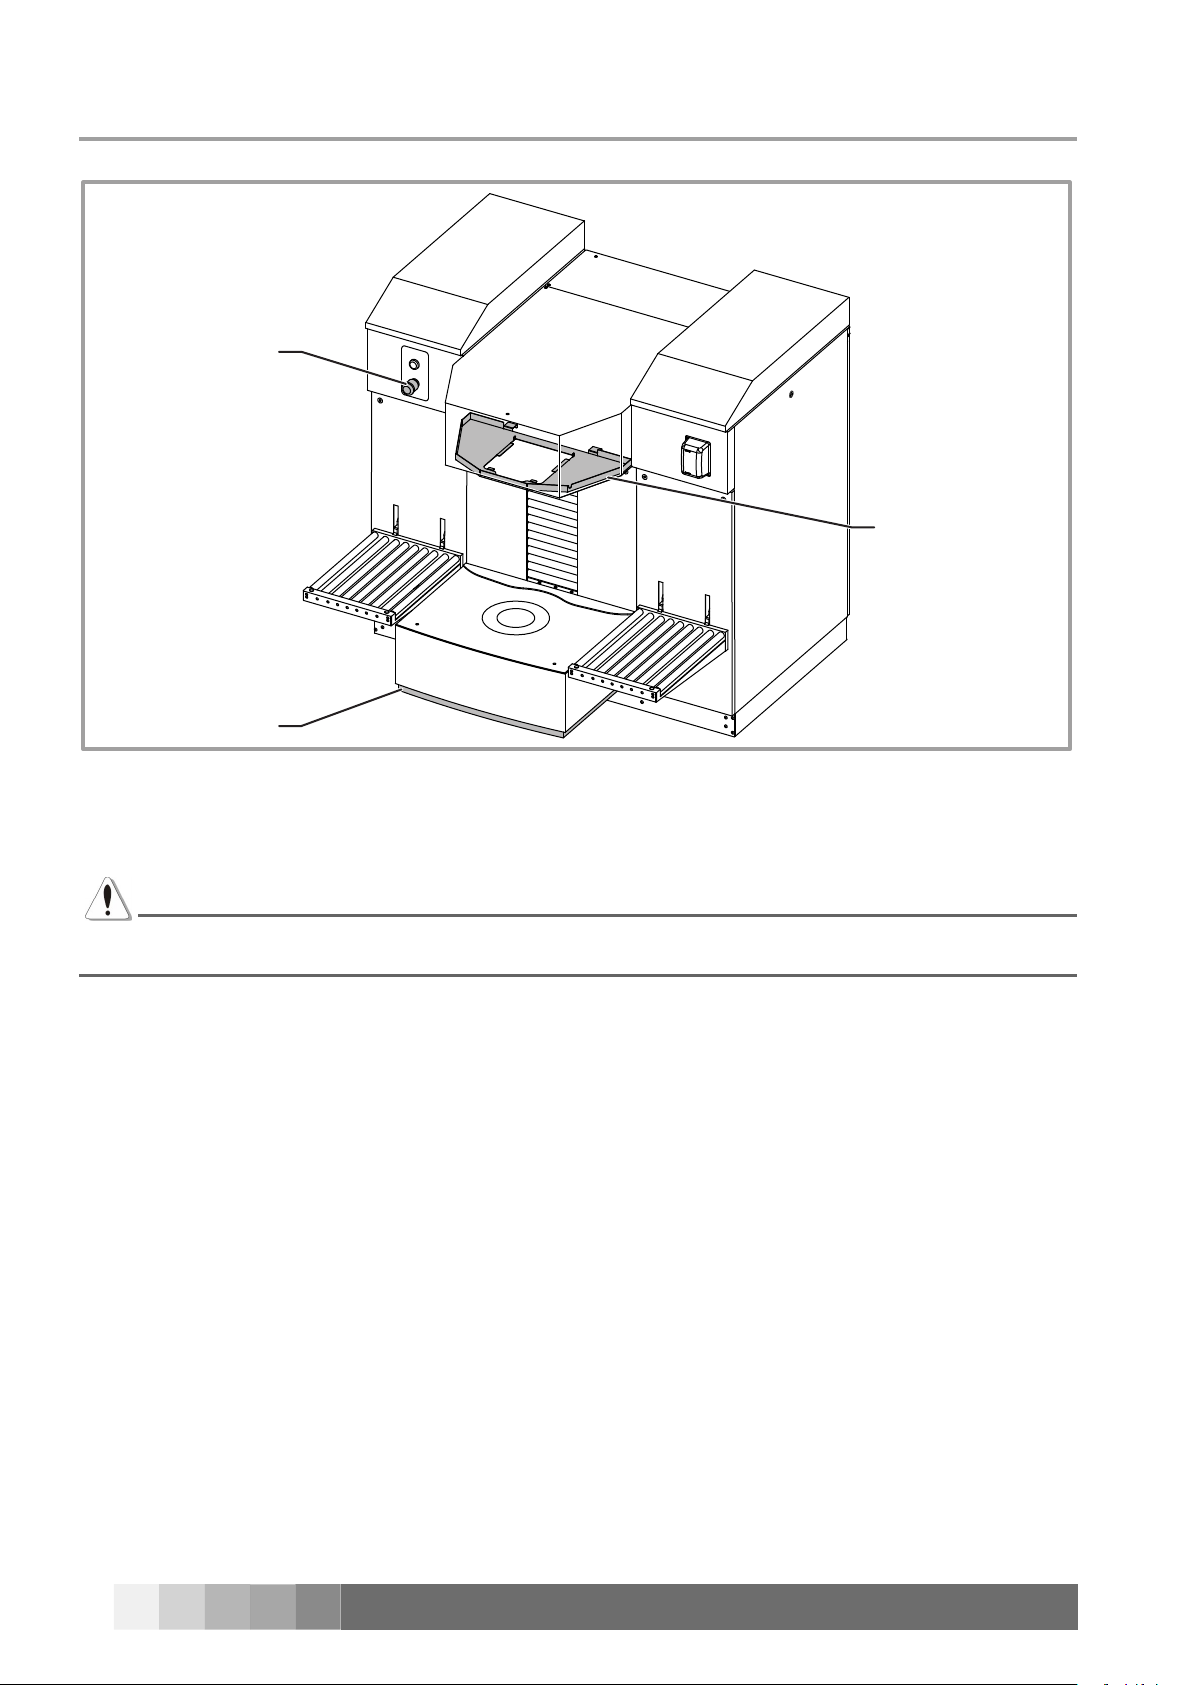
2.4 Safety devices
Emergency button.1.
Shelf upper safety plate (with automatic shelf).2.
Shelf lower safety plate (with automatic shelf).3.
DANGER
In the event of a breakdown of the safety devices, it is forbidden to use components not provided by the
manufacturer. In case of need, contact only the service organization authorized by the manufacturer.
Page 13
FEATURES - 9
ORIGINAL INSTRUCTIONS
MAX
MIN
MAX
MIN
1
1
2
2
3
3
4
4
5
5
FEATURES3
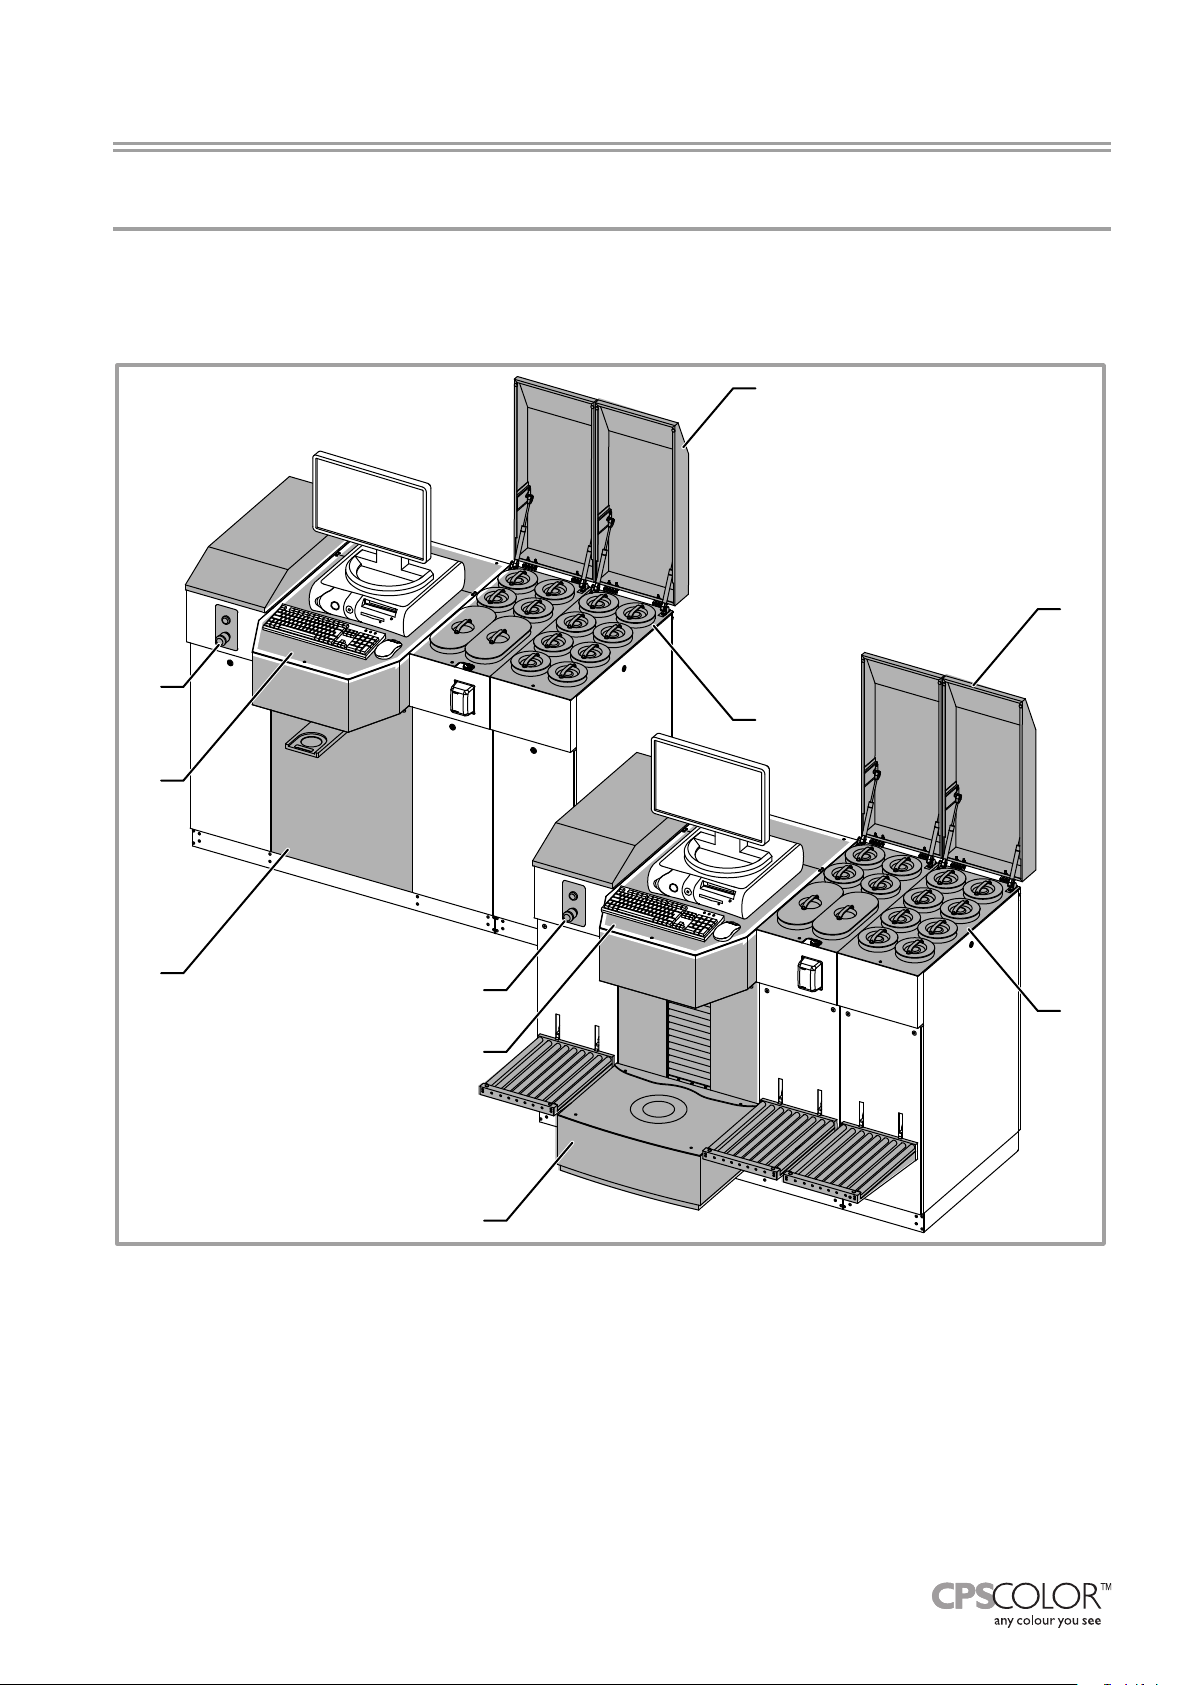
Description of the machine3.1
The COROB™ D800 HD automatic dispenser is a device to automatically dispense uid colorant products into
containers (metal or plastic canisters, cans or bins) of the size indicated in this manual, pre-lled with base, to
produce nished products such as paints, dyes, enamels, and inks of the desired hue, chosen by means of the
machine management software.
The dispenser consists of:
Dispensing area and can handling system.1.
Control panel.2.
Upper covers.3.
Canister lling area.4.
Computer support surface.5.
The dispenser is fully managed by a normal personal computer that can be provided upon request, since it is
not supplied as standard together with the machine.
Page 14
10 - FEATURES
COROB™ D800 HD
MAX
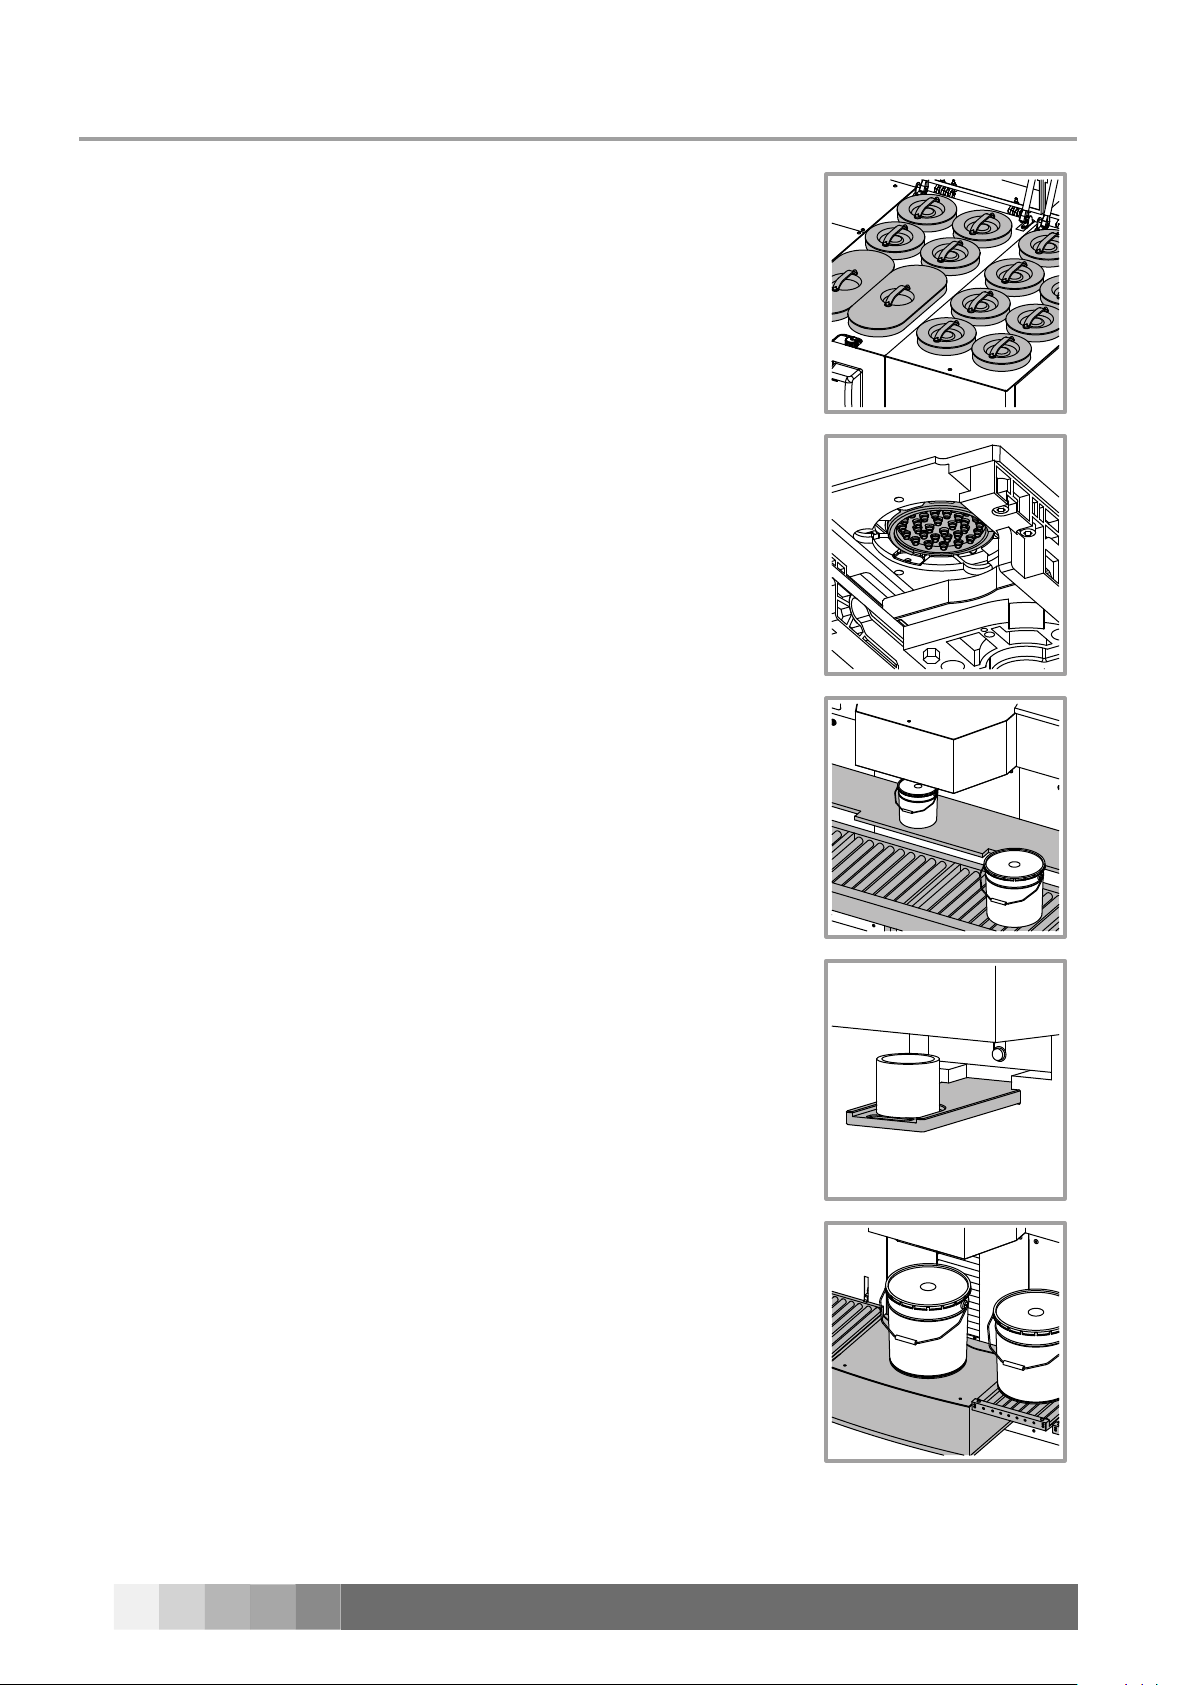
Description of units3.2
Canisters
The machine canisters can be of different capacities and are suitable for containing the product to be dispensed. The covers in the upper part of the machine
provide access for lling the canisters.
Nozzle Center
The ends of the dispensing pipes coming from the canisters converge and
are xed to the nozzle center, from which the tinting product to ll the can is
dispensed.
Roll Conveyor
Allows the positioning of medium and large cans under the dispensing nozzles.
Pull Out Shelf for Small Cans
The Shelf is pulled out to position small cans (quarts or samples jars) under the
dispensing nozzles.
Automatic Shelf
The can shelf allows for the correct positioning of the can under the dispensing
nozzles. The computer controls the shelf positioning and checks that the can
placed on it is actually the one selected for dispensing.
A photocell checks for the presence of the can and that the shelf is correctly
positioned. The tipping roll conveyors xed to the machine front panels allow
the cans to be eased as far as the shelf.
Page 15
FEATURES - 11
ORIGINAL INSTRUCTIONS
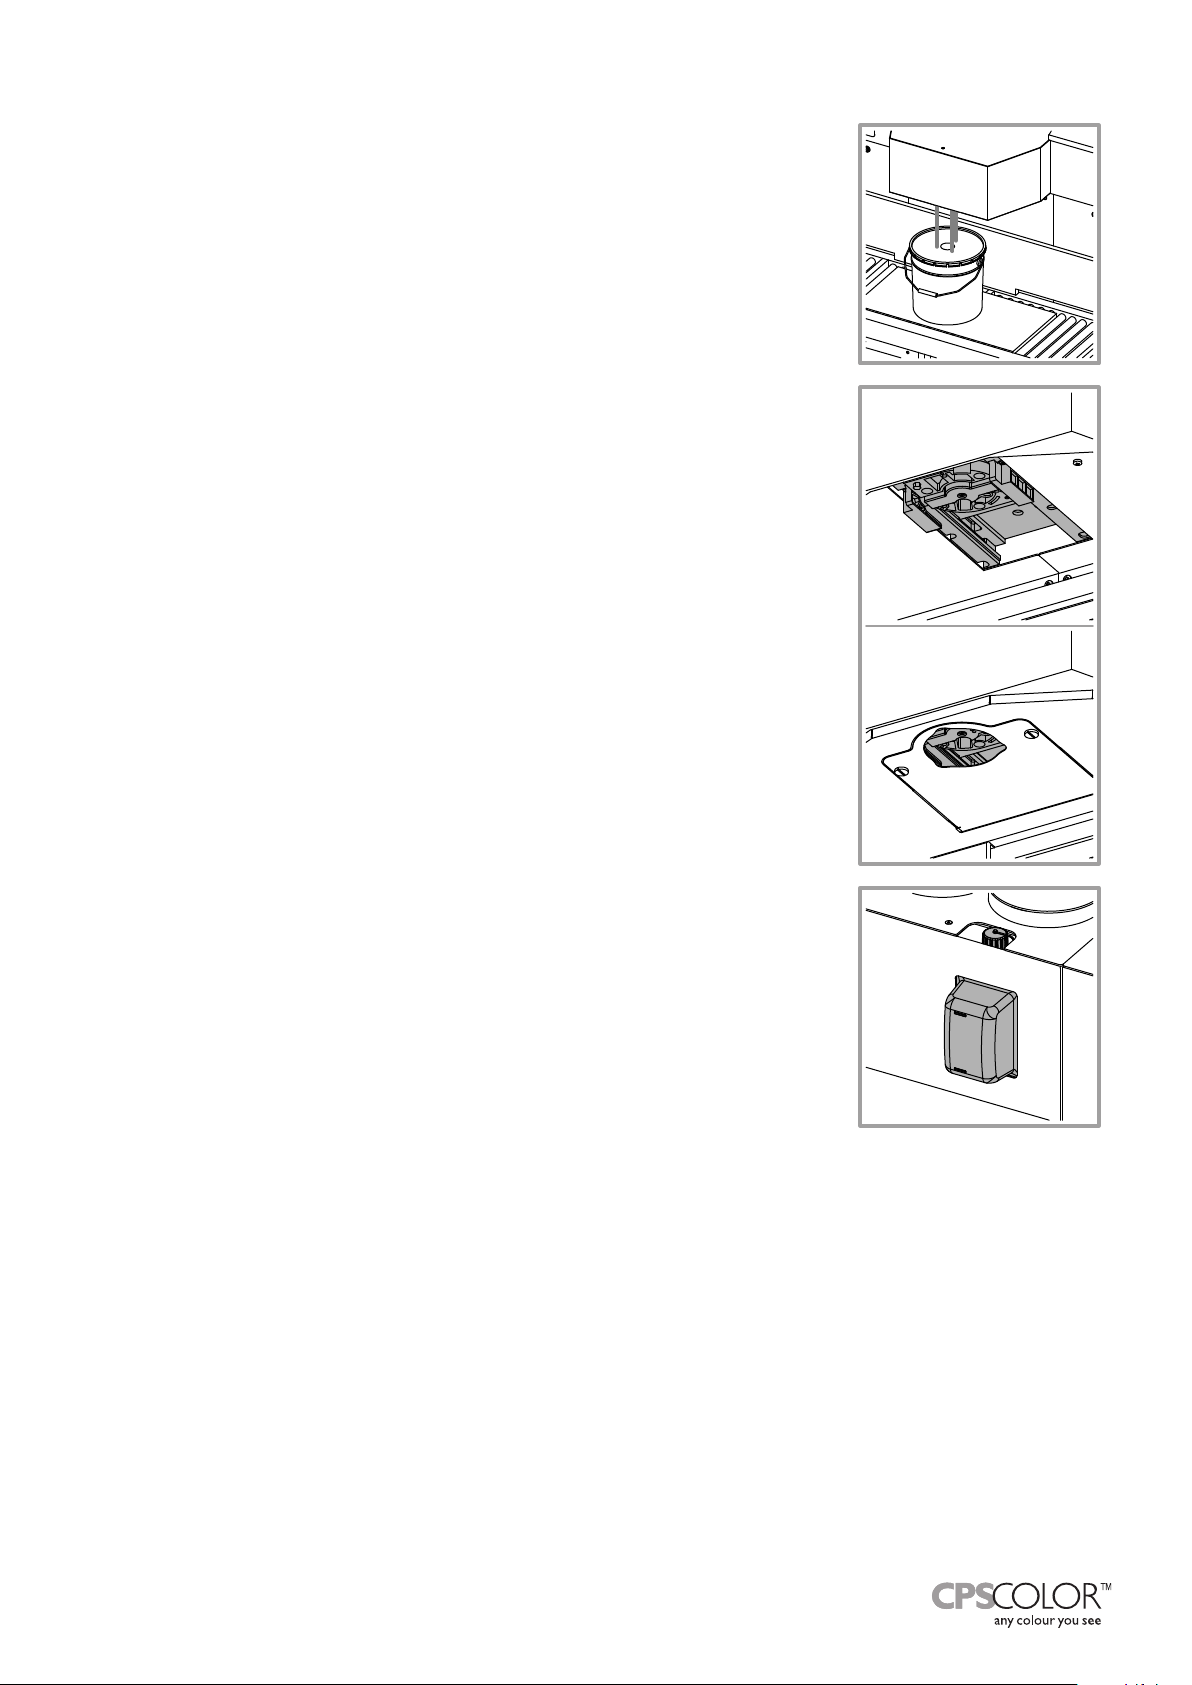
Bung Hole Locator (B.H.L.)
MAX
MIN
This is a system that emits laser beams that allow the positioning of pre-punched
cans, so that the hole is in line with the center of the dispensing nozzles.
Nozzle Humidier Cap
Colorants tend to dry out; this tendency may be more or less strong depending
on the type of colorant and the environment conditions (temperature, relative
humidity, etc.). To prevent colorants from drying out in the nozzle center, the ma-
chine is equipped with a humidier cap which requires constant maintenance.
The Lift-up Autocap is an automatic humidier cap which ensures that
the nozzles are hermetically sealed. It is managed by the software,
which opens it automatically before dispensing and closes it immediately
afterwards.
No-Dry-Nozzle Humidier System
The humidier system for water-based colorants guarantees the nozzles are
humidied not only with Autocap closed but also during dispensing. The air,
humidied by the water contained in the bottle, is transferred to the nozzles
area. Based on the humidity level detected, the system activates or shuts off
whenever needed.
Page 16
12 - FEATURES
COROB™ D800 HD
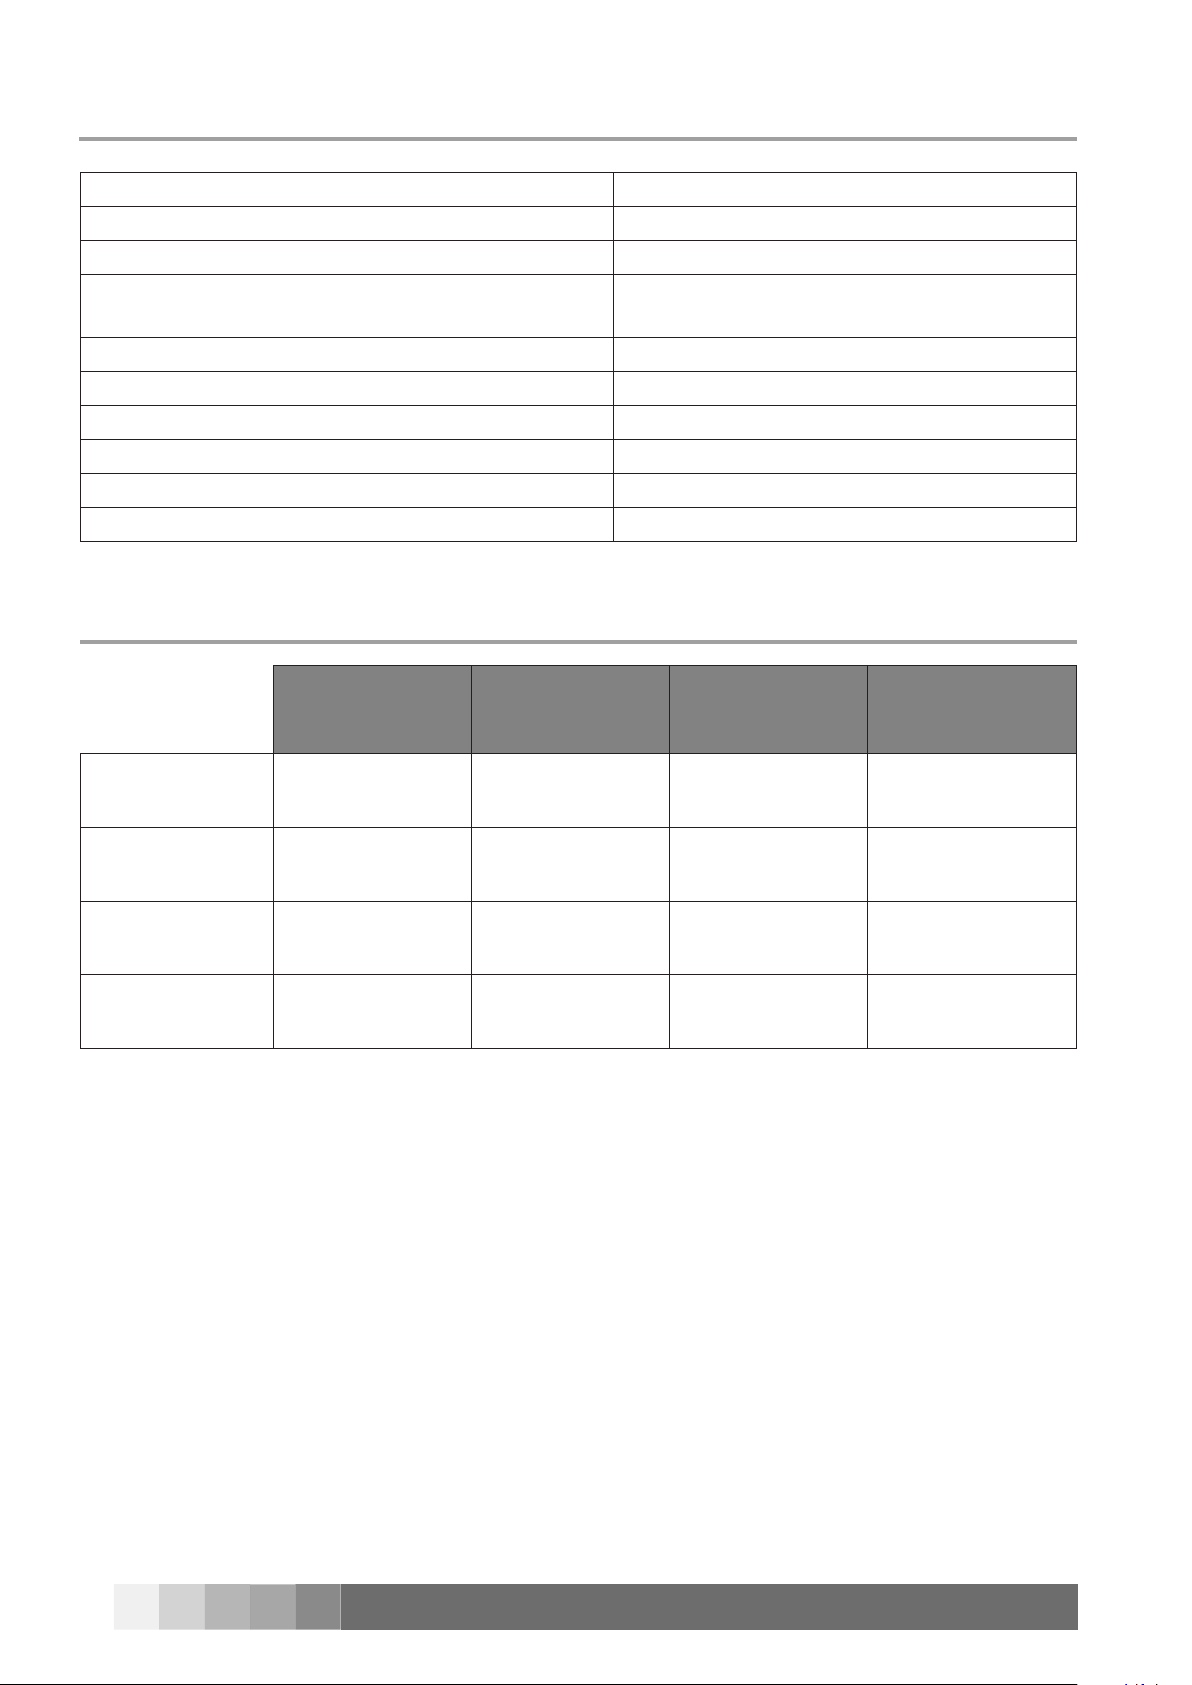
Standard and optional congurations3.3
Canister capacity 6 Quarts - 4 Gallons (6 - 15 liters)
Number of circuits maximum 32
Circuit ow rate 0.5 l/min
Nozzle center ow diameter*
1.54” (39 mm) (17-20)
1.77” (45 mm) (21-32)
Lift-up Autocap standard
Laser Bung Hole Locator (B.H.L.) standard
Roll Conveyor standard
Pull Out Shelf for small cans standard
No-Dry-Nozzle Humidier System optional
Automatic Shelf with Tipping Panel Roll Conveyors optional
* Hole diameter for pre-punched cans = ow diameter + 0.59” (15 mm).
Usable cans3.4
Roll Conveyor
(5 Gallons)
Maximum height 17.1” (435 mm) 9.7” (245 mm) 5” (127 mm) 17.7” (450 mm)
Minimum height 13.6” (345 mm) 7.6” (194 mm) 3.1” (80 mm) 2.8” (70 mm)
Horizontal shelf of
the Roll Conveyor
(1 Gallon)
Pull Out Shelf
(¼- Samples jar)
Automatic Shelf
(¼ - 1 - 5 Gallons)
Maximum diameter 12.6” (320 mm) 9.3” (235 mm) 4.2” (107 mm) 14.2” (360 mm)
Minimum diameter 10.5” (266 mm) 6.6” (168 mm) 2.9” (74 mm) 3.9” (100 mm)
Page 17
SHIPPING, HANDLING AND UNPACKING - 13
ORIGINAL INSTRUCTIONS
SHIPPING, HANDLING AND UNPACKING4
General warnings4.1
DANGER
To avoid personal injuries and property damage, use the utmost care and caution when handling the machine, and carefully follow the instructions given in this chapter.
The packing must be handled only by skilled personnel using appropriate handling equipment.
4.2 Environment conditions of the installation site
Environment requirements for the site where the machine is to be used:
Clean and dust-free.•
With level and stable oor.•
Fitted with a grounded power supply socket.•
Equipped with sufcient lighting to ensure good visibility from every point of the machine.•
Ventilated to prevent the concentration of harmful fumes.•
Temperature between 10 °C (50 °F) and 40 °C (104 °F) and relative humidity between 5% and 85%, with-•
out condensation.
WARNING
The environment working conditions are strictly related to the type of colorants used (ask for information
from the paint manufacturer). The requirements indicated above are valid for the machine only.
Do not place the machine near heat sources or in direct sunlight. Also humidity sources should be avoided.
The machine must be used indoors only.
Environment conditions outside the values indicated (chapter 8.1) may cause serious damage to the machine, especially the electronic equipment.
DANGER
When using colorants containing volatile solvents the room in which the machine is installed must be
spacious, with good ventilation (air exchange) and no type of parts must be leant against or stocked close
to the machine.
If the machine is installed near a wall, keep it at least 4” (10 cm) away to allow the upper covers to be
opened and prevent the cables from being crushed.
Page 18
14 - SHIPPING, HANDLING AND UNPACKING
COROB™ D800 HD
1 2 3
MAX
MIN
MAX
MIN
MAX
MIN
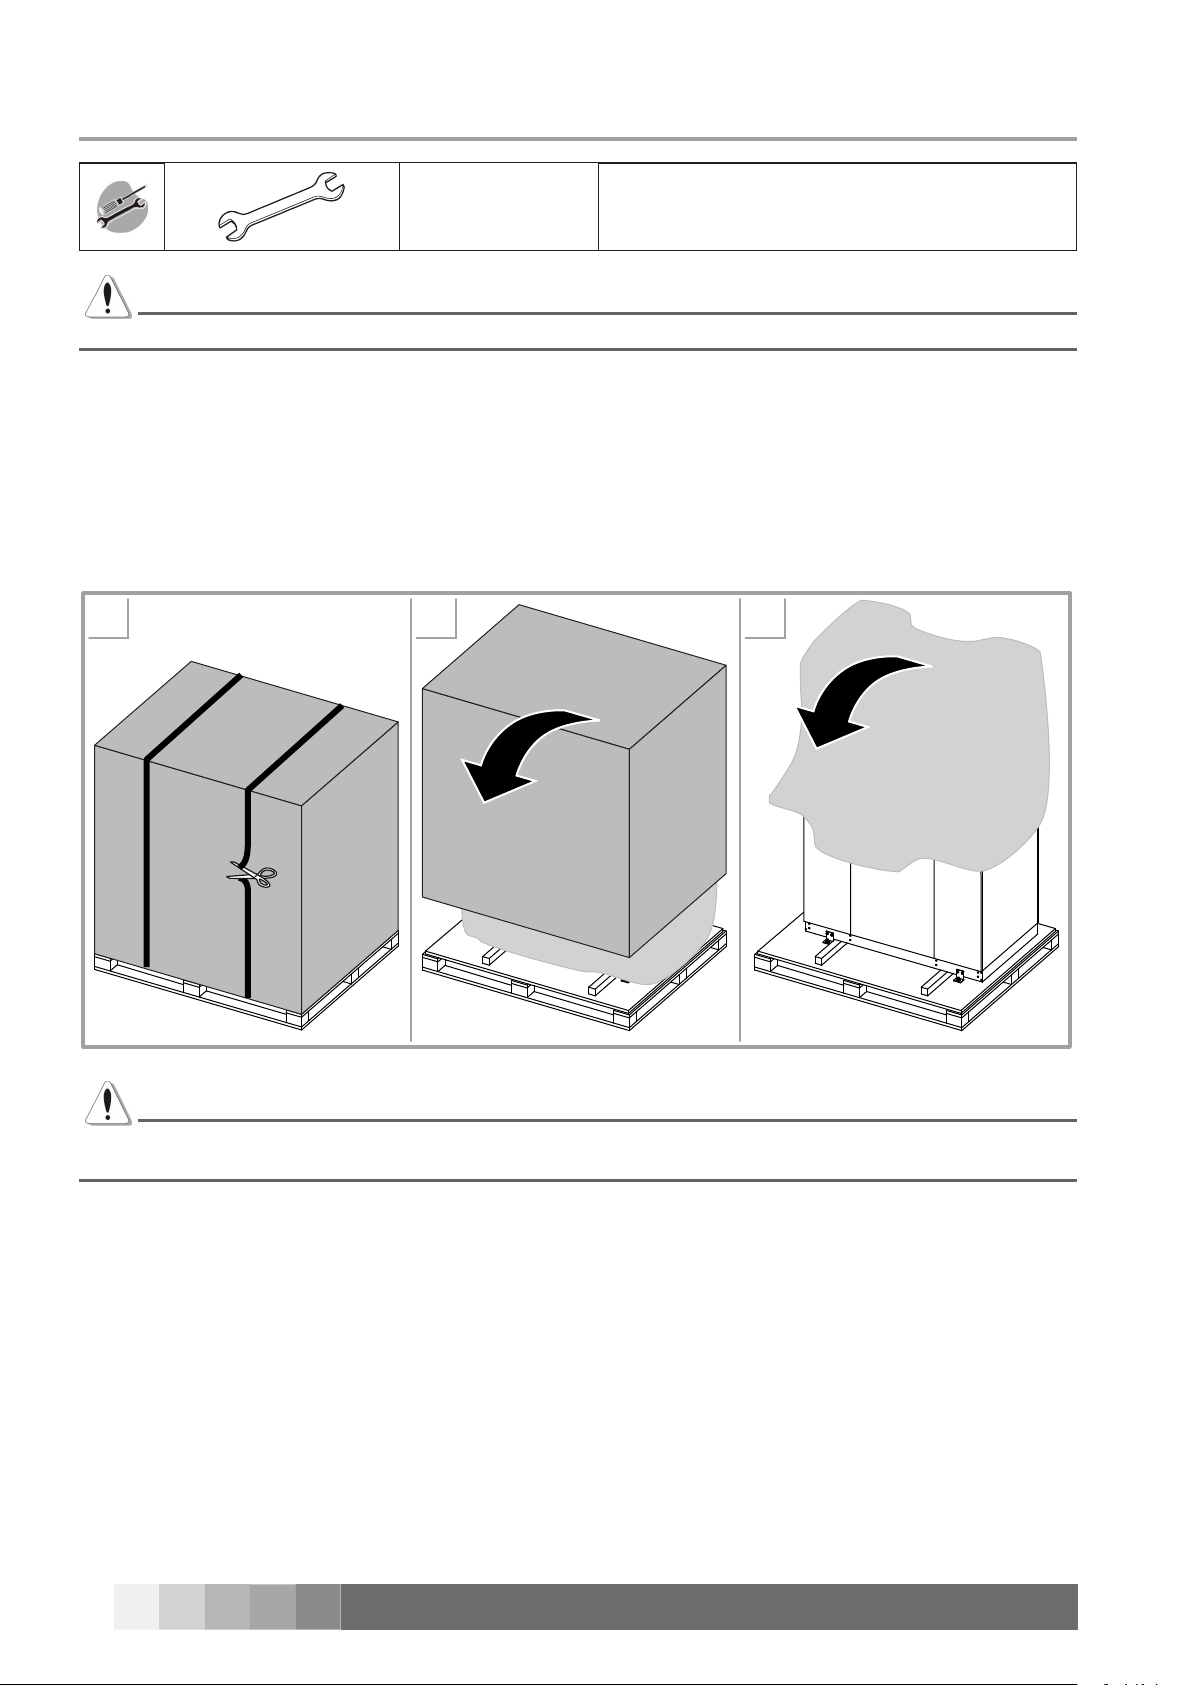
Unpacking and placement4.3
1 x 10 mm
To remove the xing brackets
2 x 17 mm
DANGER
The following procedure must be carried out by at least 2 people.
Store the packing material for future use, or dispose of it according to current regulations. In any case, we
recommend that you keep it for the entire duration of the machine warranty.
Make sure the packing has not suffered any damage or tampering during shipping; if so, contact the
authorized technical service or your dealer.
Cut the straps wrapped around the packing.1.
Remove the covering from the pallet.2.
Remove machine wrapping.3.
DANGER
Should the machine appear damaged during shipping, do not attempt to start it and contact the authorized
technical service or dealer.
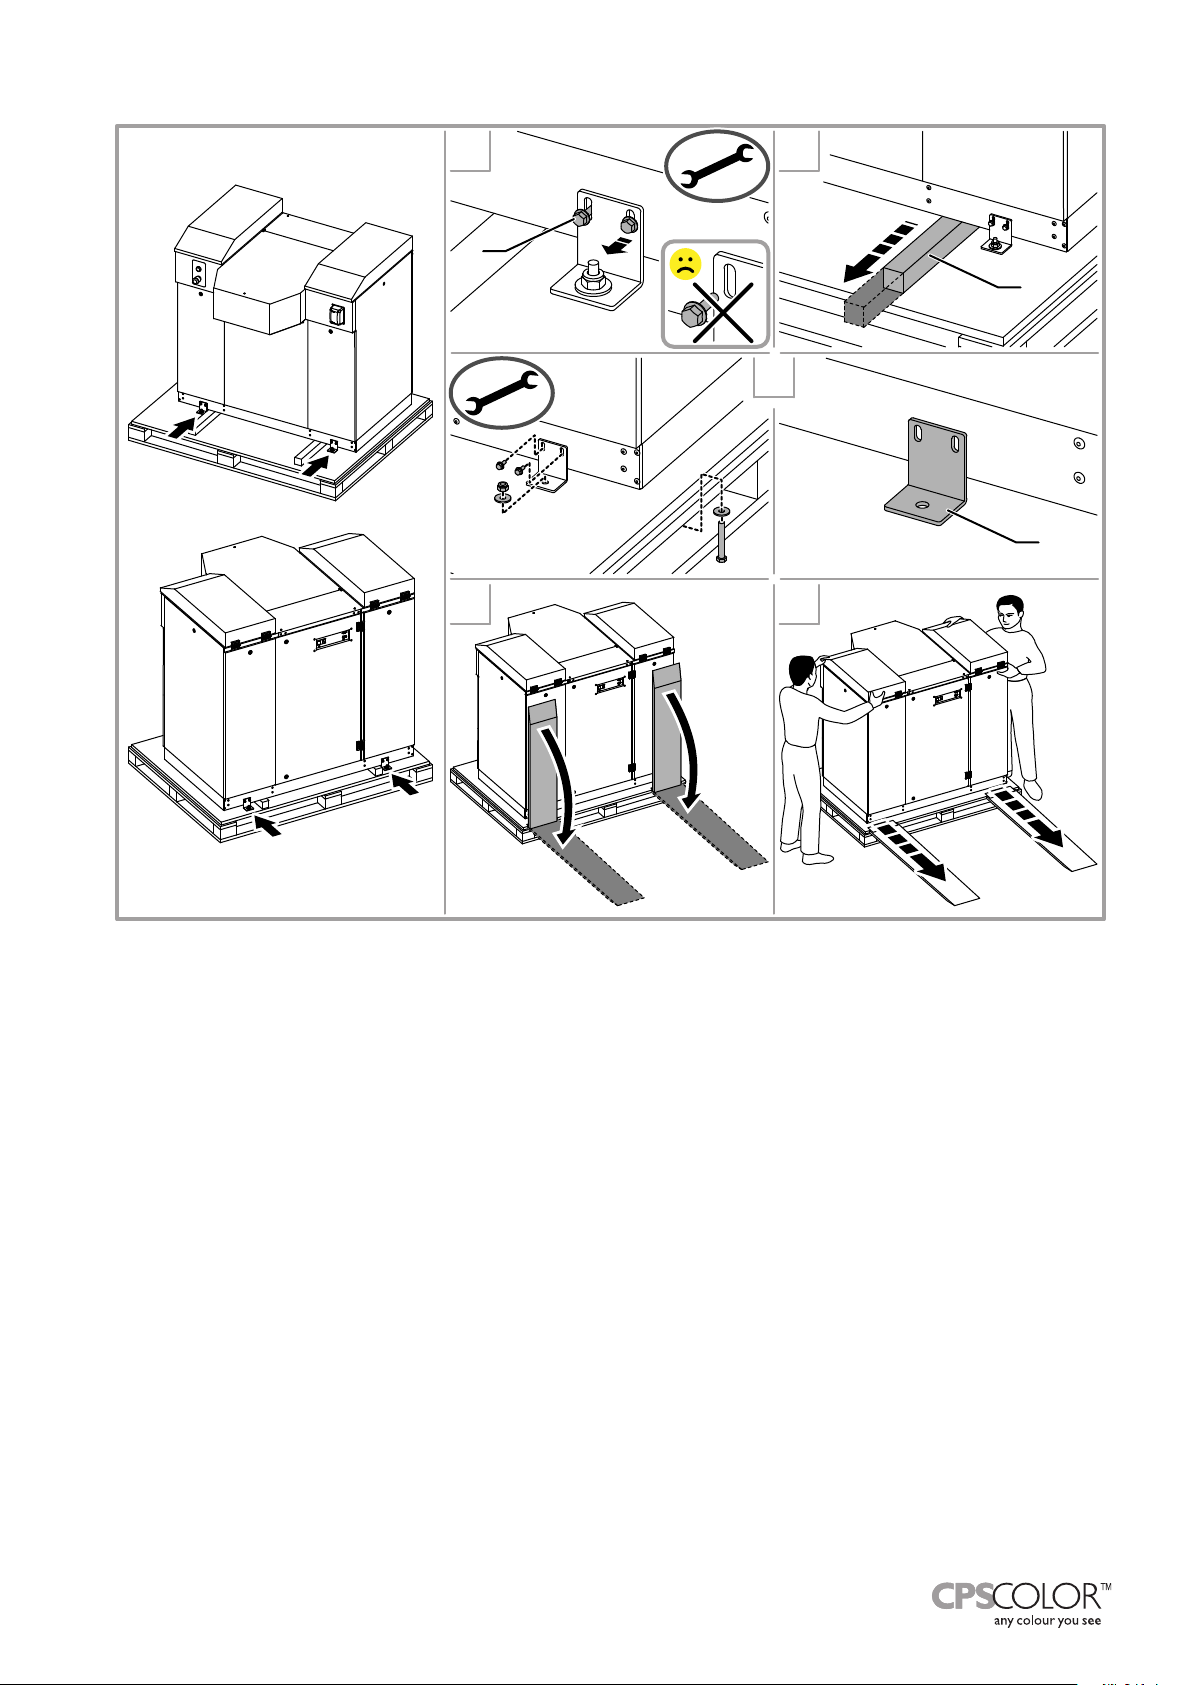
Loosen all screws 4. A holding the brackets to the machine.
Lower the feet (5. chapter 4.3.1) so that the machine is slightly raised from the wooden beams on which it
rests.
Remove the wooden beams 6. B.
Completely unscrew and remove all screws and nuts fastening each bracket 7. C to the pallet.
Raise the feet (8. chapter 4.3.1) until when the machine can move easily on its wheels.
Lower both platforms.9.
Grasp the machine on the sides (this must be done by at least two people) then slide it slowly along the 10.
platforms on its wheels, then lower it to the ground.
Lower the feet (11. chapter 4.3.1) to support and level the machine properly, and make sure that the wheels
are not resting.
Page 19
SHIPPING, HANDLING AND UNPACKING - 15
ORIGINAL INSTRUCTIONS
4 6
7
9 10
MAX
MIN
A
B
C
Page 20
16 - SHIPPING, HANDLING AND UNPACKING
COROB™ D800 HD
1
2
3
a
b
c
a
b
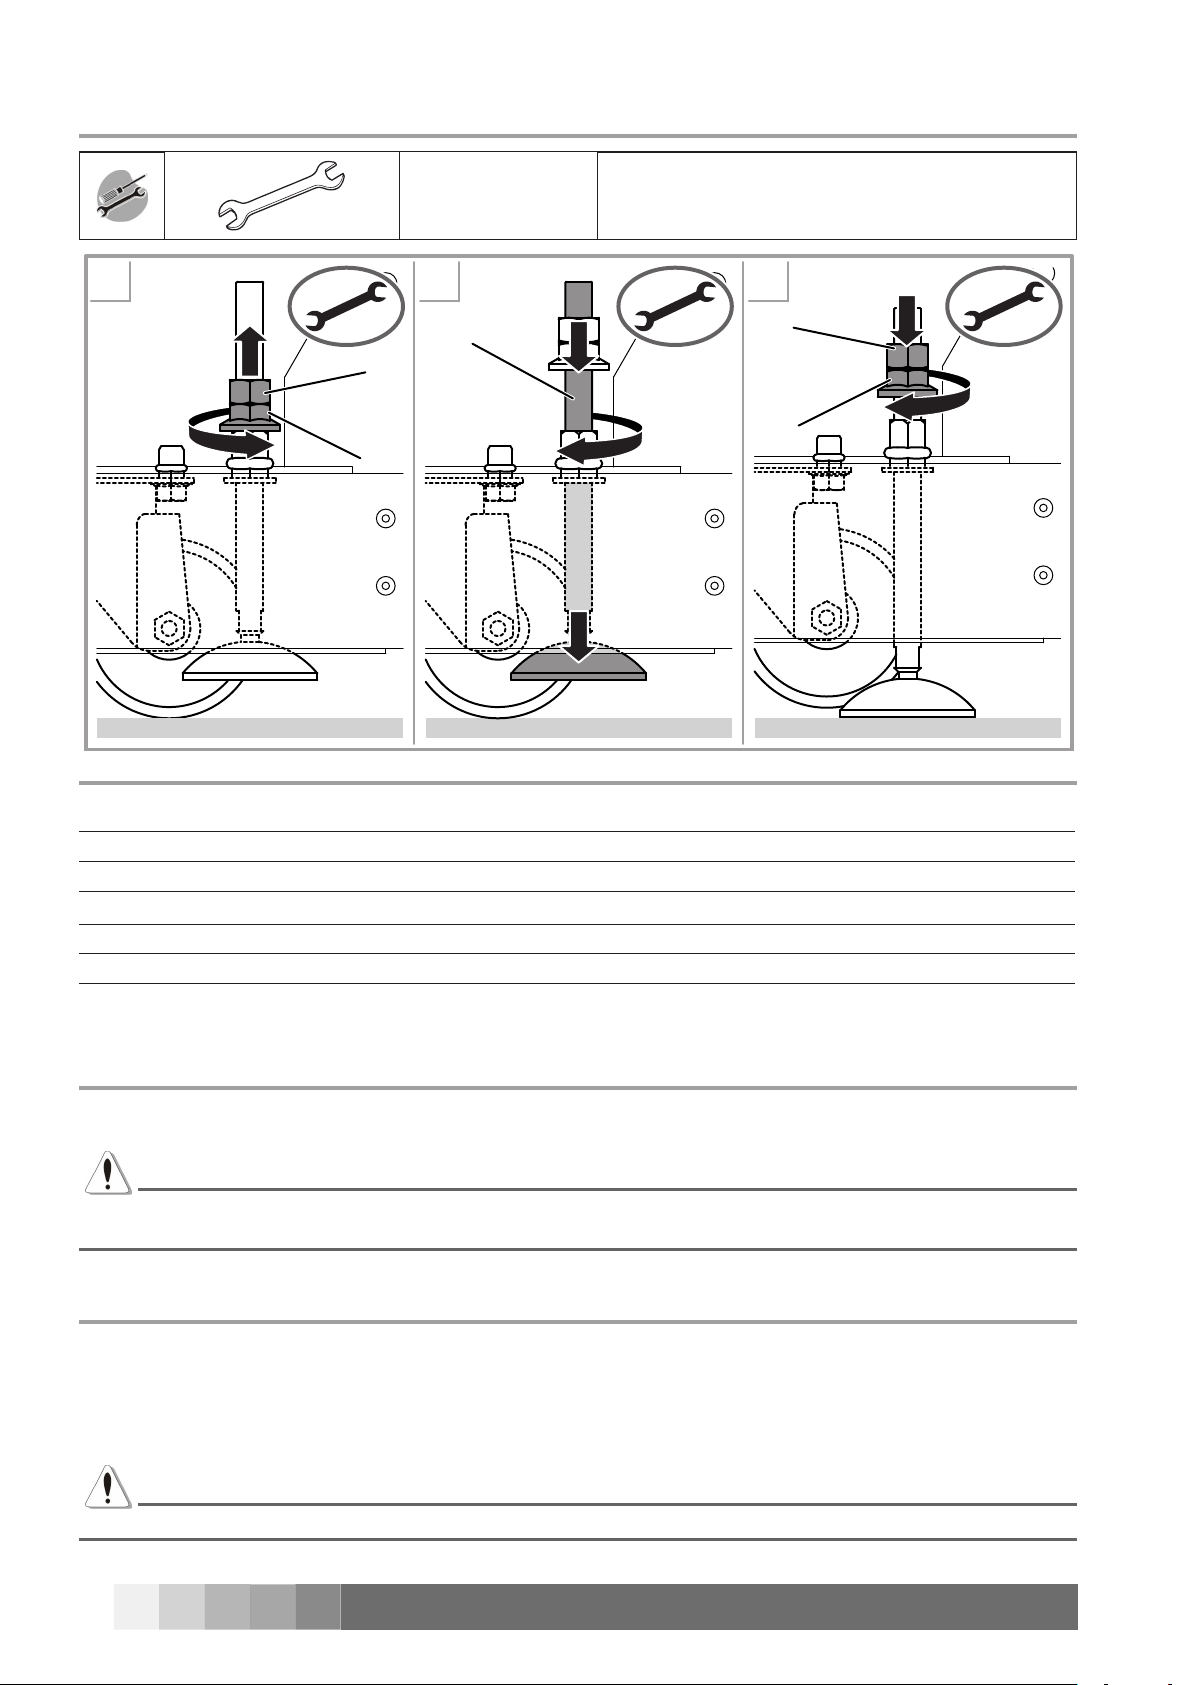
4.3.1 Adjusting the support feet
1 x 19 mm To adjust machine feet
Standard material supplied4.3.2
After unpacking the machine, make sure the following items are present:
Power supply cable.1. Computer power cables.2.
USB cable.3. RS232 cable.4.
Spare fuses.5. Panel key.6.
Phillips screwdriver and T-wrench.7. Spare parts for humidier cap.8.
User’s manual.9.
Make sure that all of the above items are included in the packing; if not, contact the manufacturer.
Installation4.4
Once the machine has been unpacked and placed in its operating site, it must be installed.
WARNING
Only qualied and appropriately trained personnel are authorized to install the machine.
Packing and handling4.5
To repack the machine, follow the unpacking instructions in reverse order. We recommend reusing the original
packing any time the dispenser must be moved or shipped.
Use appropriate equipment to move the packed machine. If stored, the machine must be kept in a protected,
dry environment, not subjected to harsh weather, to avoid damaging the electrical components.
WARNING
Do not stack items on the packing.
Page 21
START-UP - 17
ORIGINAL INSTRUCTIONS
START-UP5
General warnings5.1
DANGER
THIS EQUIPMENT MUST BE GROUNDED.
Check the grounding of the power supply system before connecting the machine.
Do not use extension cords to power the machine.
Do not use multisockets to connect other equipment to the same socket that powers the machine.
The computer and any other devices connected to the machine via a serial line or connected to the computer
itself must be powered by a grounded outlet.
WARNING
Do not attempt to power the machine from a source having specications other than those listed on the
identication plate.
The machine is isolated from the power supply line when the power plug is disconnected; it must therefore
be installed near an easily accessible mains socket outlet.
The conductors of the power cable which is supplied are color-coded as follows:
GREEN/YELLOW = GROUND•
WHITE = NEUTRAL•
BLACK = LINE•
Page 22
18 - START-UP
COROB™ D800 HD
MAX
MIN
6
7
0
1 3
5
2
4
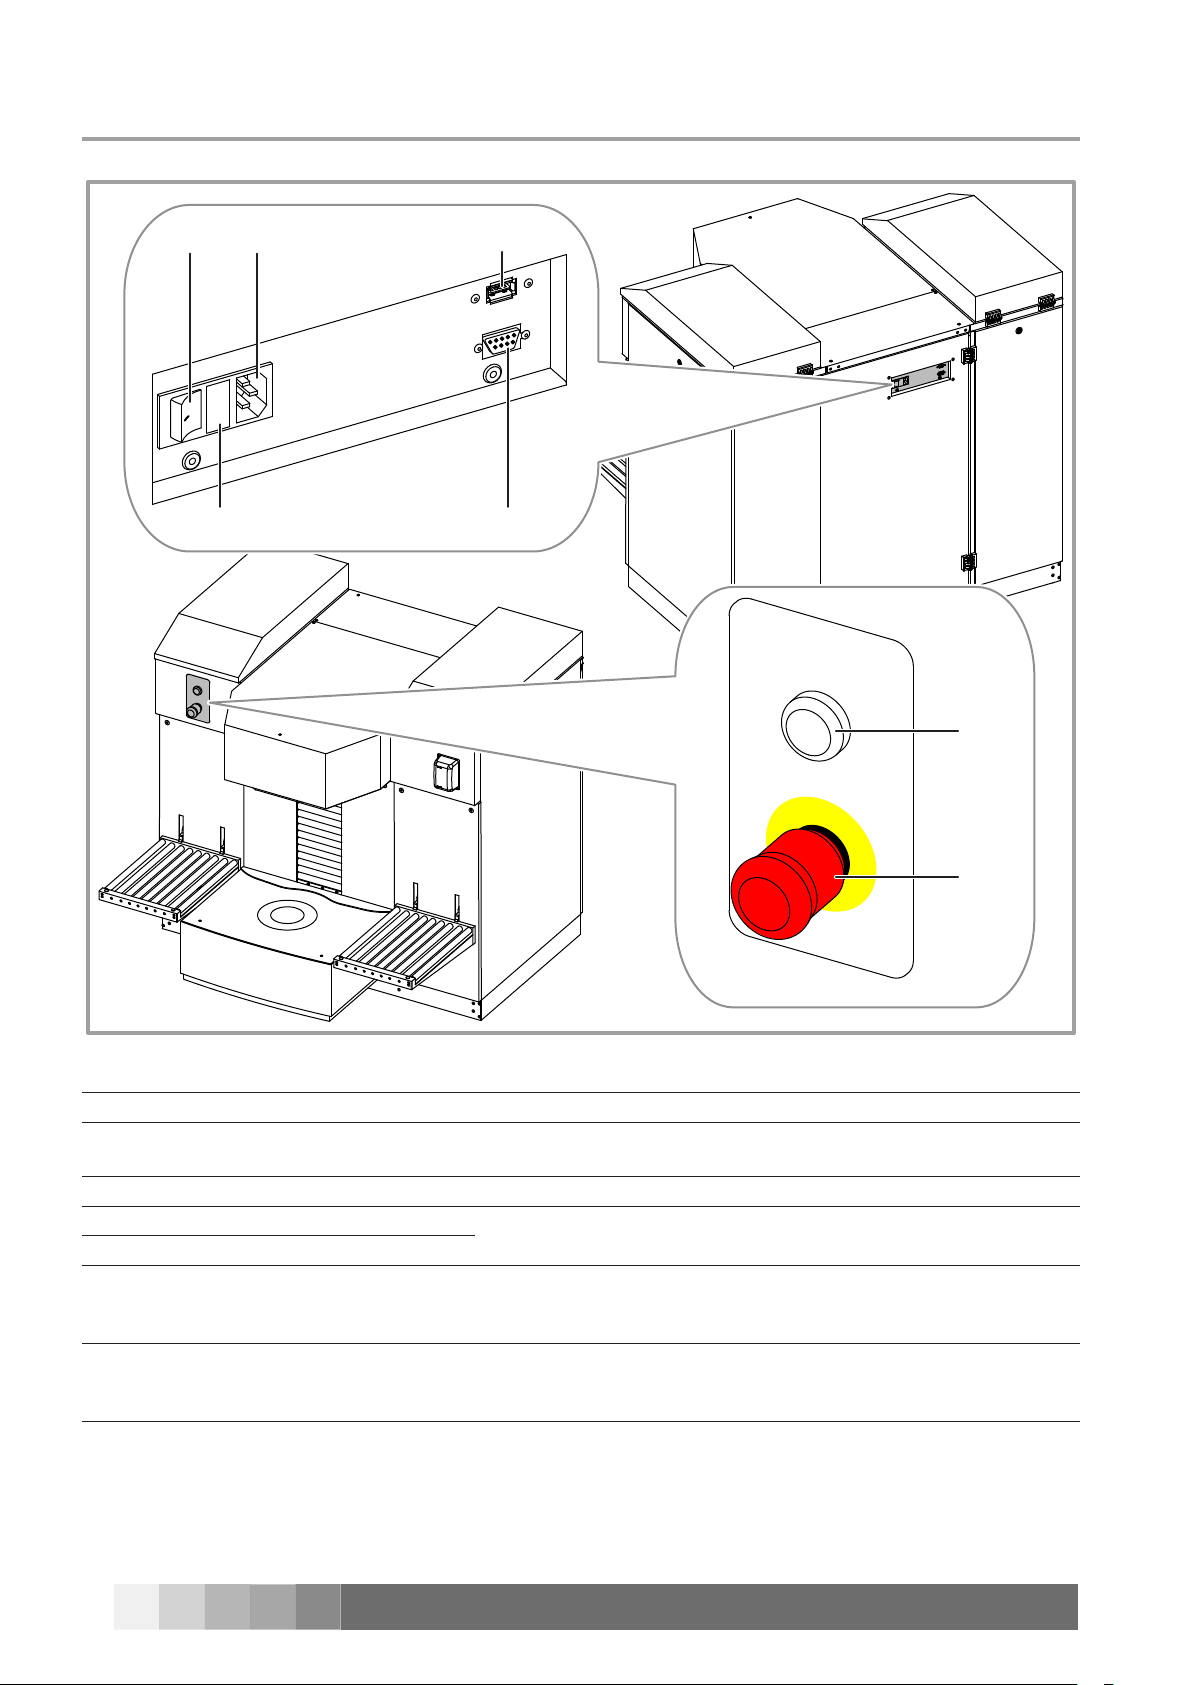
5.2 Control devices and connections
Machine main switch.1.
Fuse compartment.2.
Main plug.3.
RS232 serial port.4.
USB serial port.5.
Off-line button with ON lamp.6.
Emergency button.7.
The value of fuses is shown in the technical specications table
(chapter 8.1).
For the connection to the management computer.
To interrupt machine functions, without shutting it off; it also
enables to open and close the Autocap to allow cleaning the
nozzles.
Red mushroom-head button. This is the emergency stop button
for the machine, to use in case of a breakdown or dangerous conditions (chapter 5.7).
Page 23
START-UP - 19
ORIGINAL INSTRUCTIONS
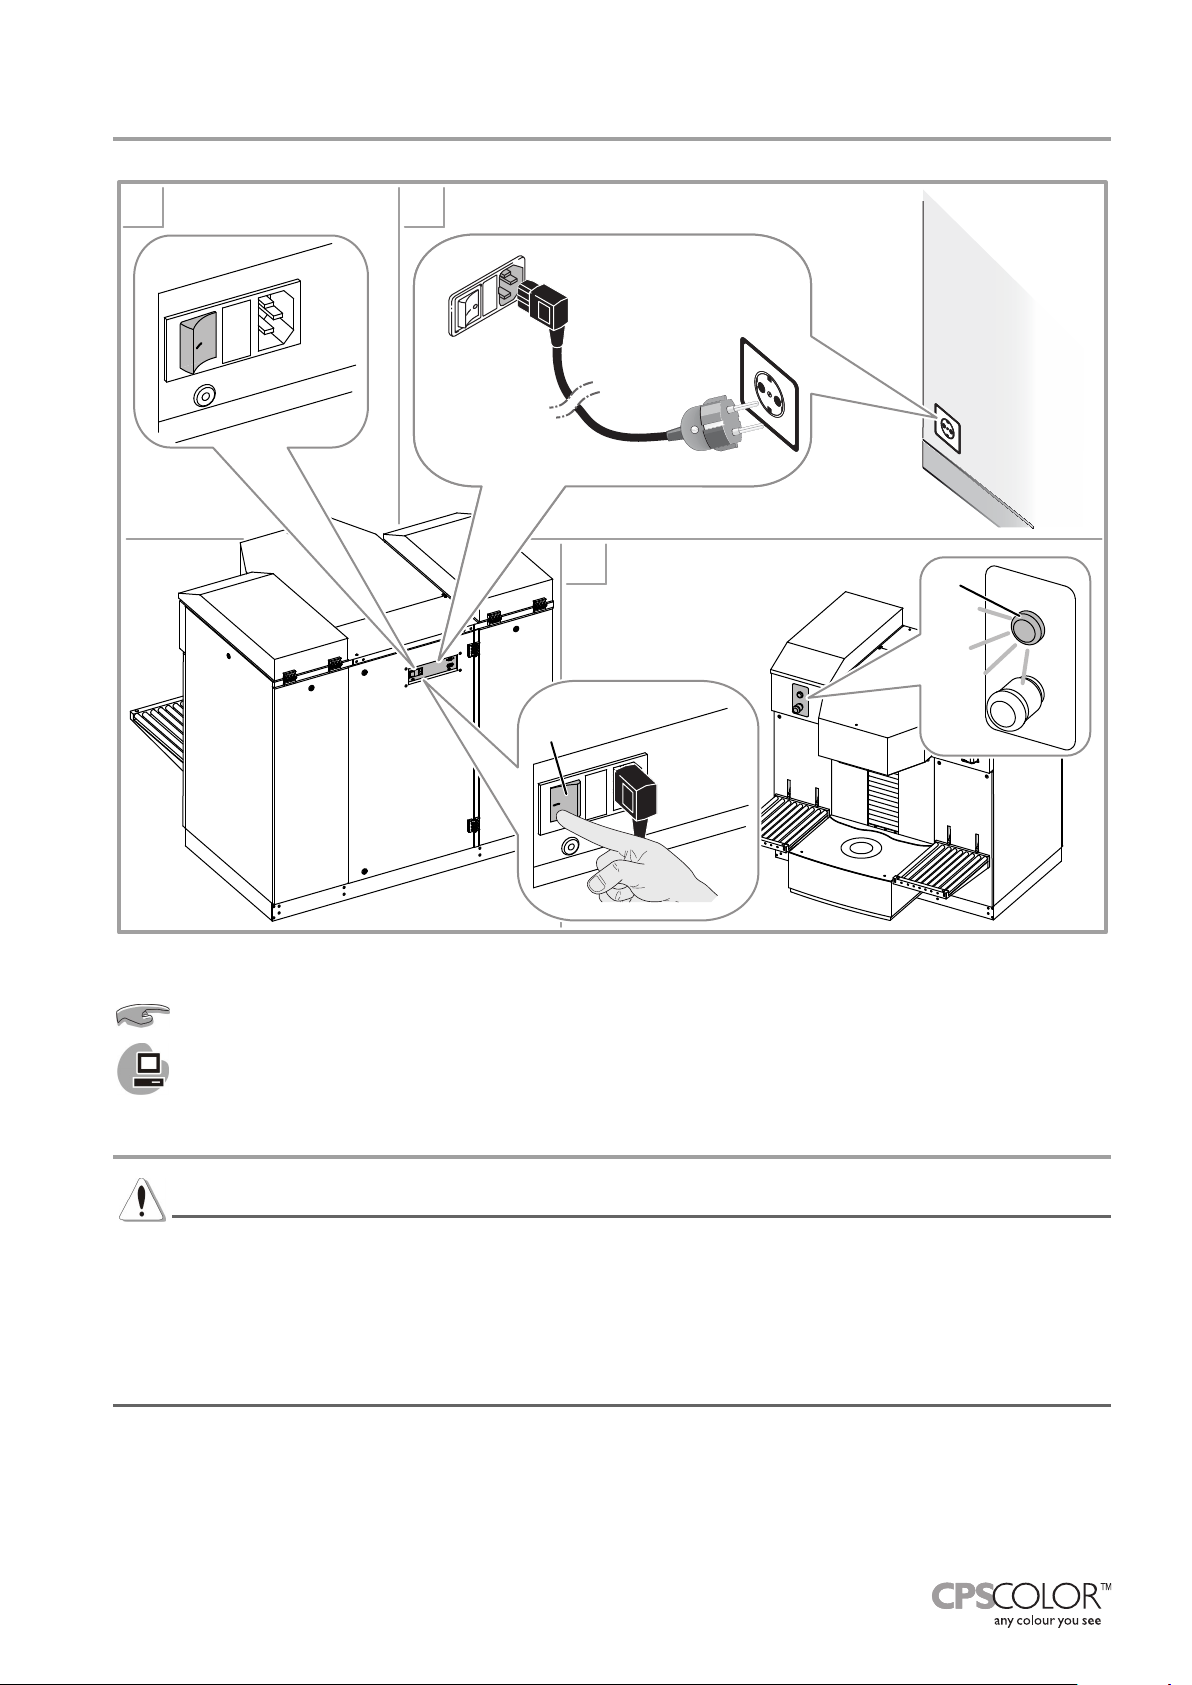
5.3 Electrical connection and start-up
MAX
MIN
1
2
3
0
0
a
b
If the ON lamp does not light, make sure the emergency button is not pressed (chapter 5.7).
When the software is launched it offers the operator a series of procedure requests, including initialization (chapter 5.5).
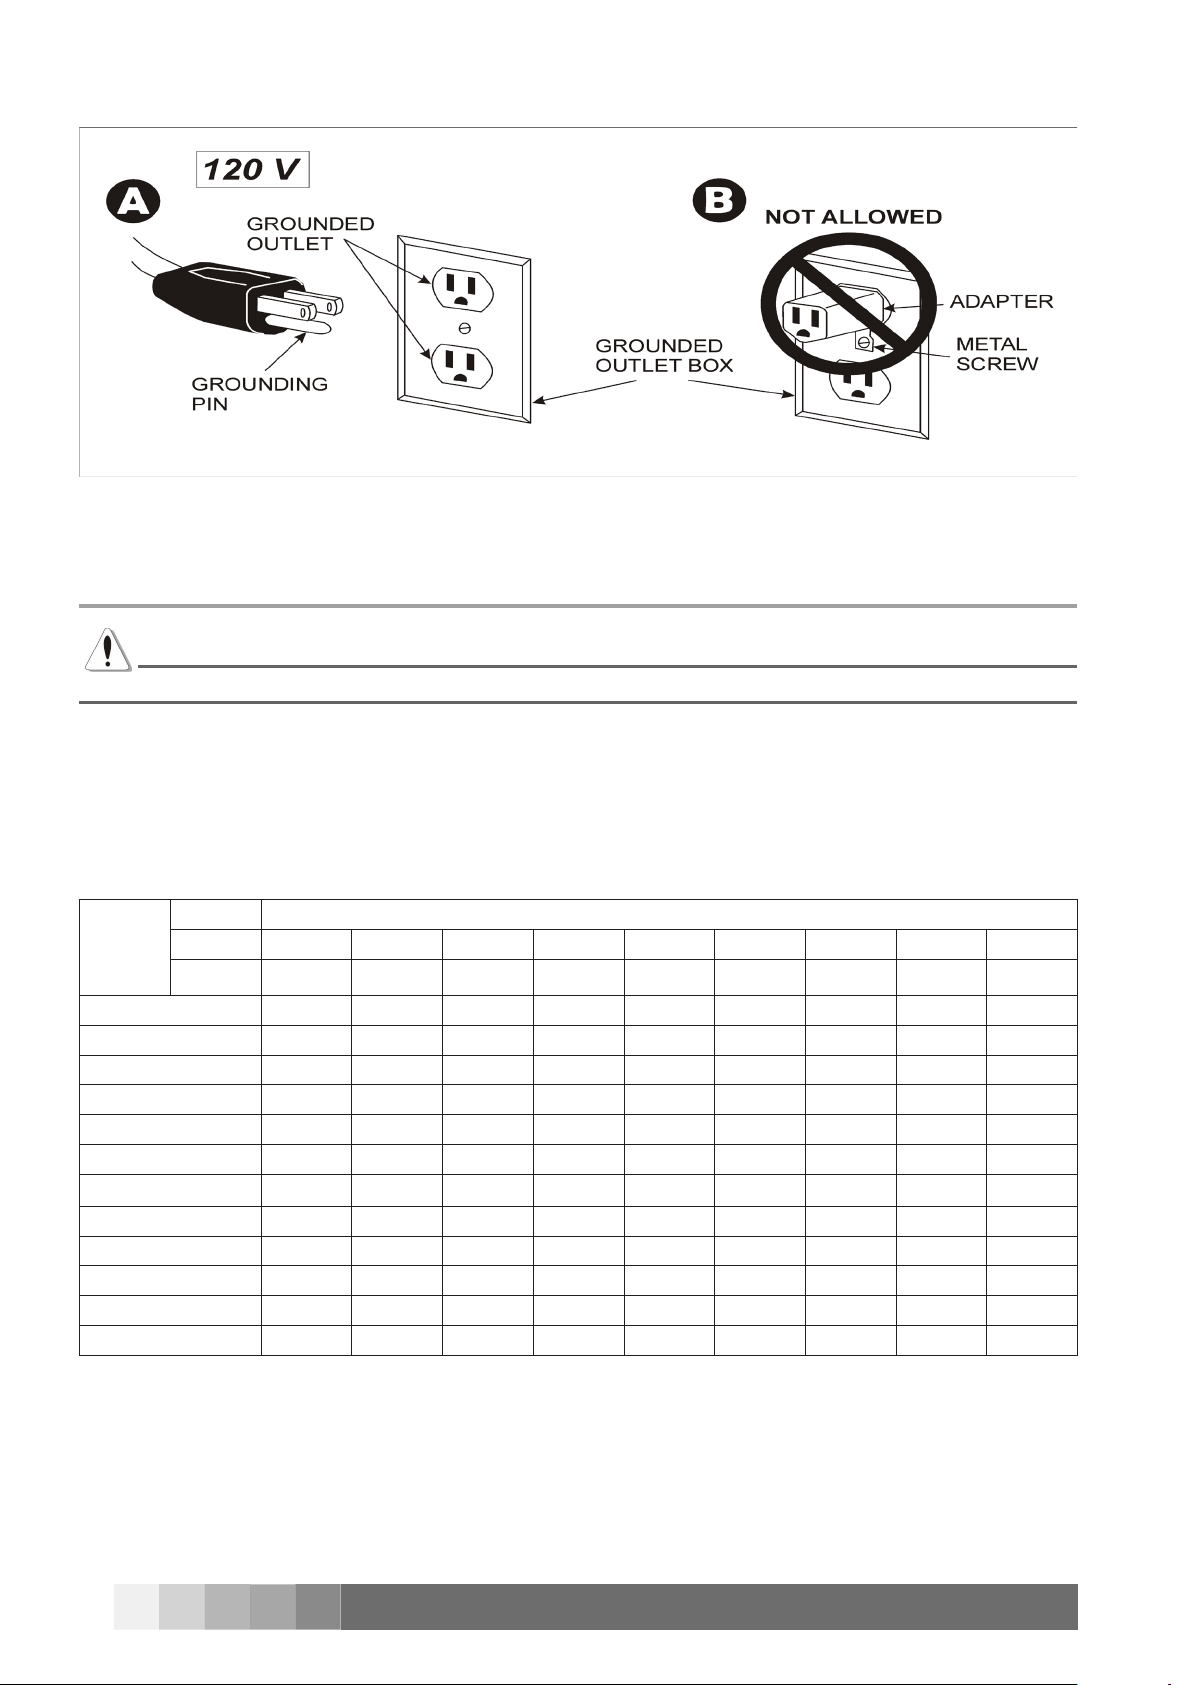
Grounding instructions5.3.1
DANGER
This product should be grounded. In the event of an electrical short circuit, grounding reduces the risk of
electric shock by providing an escape wire for the electric current. This product is equipped with a cord having
a grounding wire with an appropriate grounding plug. The plug must be plugged into an outlet that is properly
installed and grounded in accordance with all local codes and ordinances.
DANGER! Improper use of the grounding plug can result in a risk of electrical shock. If repair or replacement
of the cord or plug is necessary, do not connect the grounding wire to either at blade terminal. The wire with
insulation having an outer surface that is green with or without yellow stripes is the grounding wire.
Check with a qualied electrician or serviceman if the grounding instructions are not completely understood, or
if in doubt as to whether the product is properly grounded. DO NOT modify the plug provided; if it will not t
the outlet, have the proper outlet installed by a qualied electrician.
This product has a grounding plug that looks like the plug illustrated in the following gure.
Page 24
20 - START-UP
COROB™ D800 HD
Make sure that the product is connected to an outlet having the same conguration as the plug. No adapter
should be used with this product.
Extension cords5.3.2
WARNING
Manufacturer strongly recommends NOT using an extension cord with this equipment.
Use only a 3-wire extension cord that has a 3-blade grounding plug, and a 3-slot receptacle that will accept
the plug on the product. Make sure your extension cord is in good condition. When using an extension cord,
be sure to use one heavy enough to carry the current your product will draw. For lengths less than 25 feet, no.
18 AWG extension cords should be used. An undersized cord will cause a drop in line voltage resulting in loss
of power and overheating.
Note - The following table shows the correct size to use depending on cord length and nameplate ampere rating. If in doubt, use the next heavier gage. The smaller the gage number, the heavier the cord.
Ampere
Rating
Range
0 - 2 18 18 18 16 16 14 14 12 12
2 - 3 18 18 16 14 14 12 12 10 10
3 - 4 18 18 16 14 12 12 10 10 8
4 - 5 18 18 14 12 12 10 10 8 8
5 - 6 18 16 14 12 10 10 8 8 6
6 - 8 18 16 12 10 10 8 6 6 6
8 - 10 18 14 12 10 8 8 6 6 4
10 - 12 16 14 10 8 8 6 6 4 4
12 - 14 16 12 10 8 6 6 6 4 2
14 - 16 16 12 10 8 6 6 4 4 2
16 - 18 14 12 8 8 6 4 4 2 2
18 - 20 14 12 8 6 6 4 4 2 2
Volts Length of cord in feet
120 V 25 ft. 50 ft. 100 ft. 150 ft. 200 ft. 250 ft. 300 ft. 400 ft. 500 ft.
240 V 50 ft. 100 ft. 200 ft. 300 ft. 400 ft. 500 ft. 600 ft. 800 ft. 1000 ft.
Page 25
START-UP - 21
ORIGINAL INSTRUCTIONS
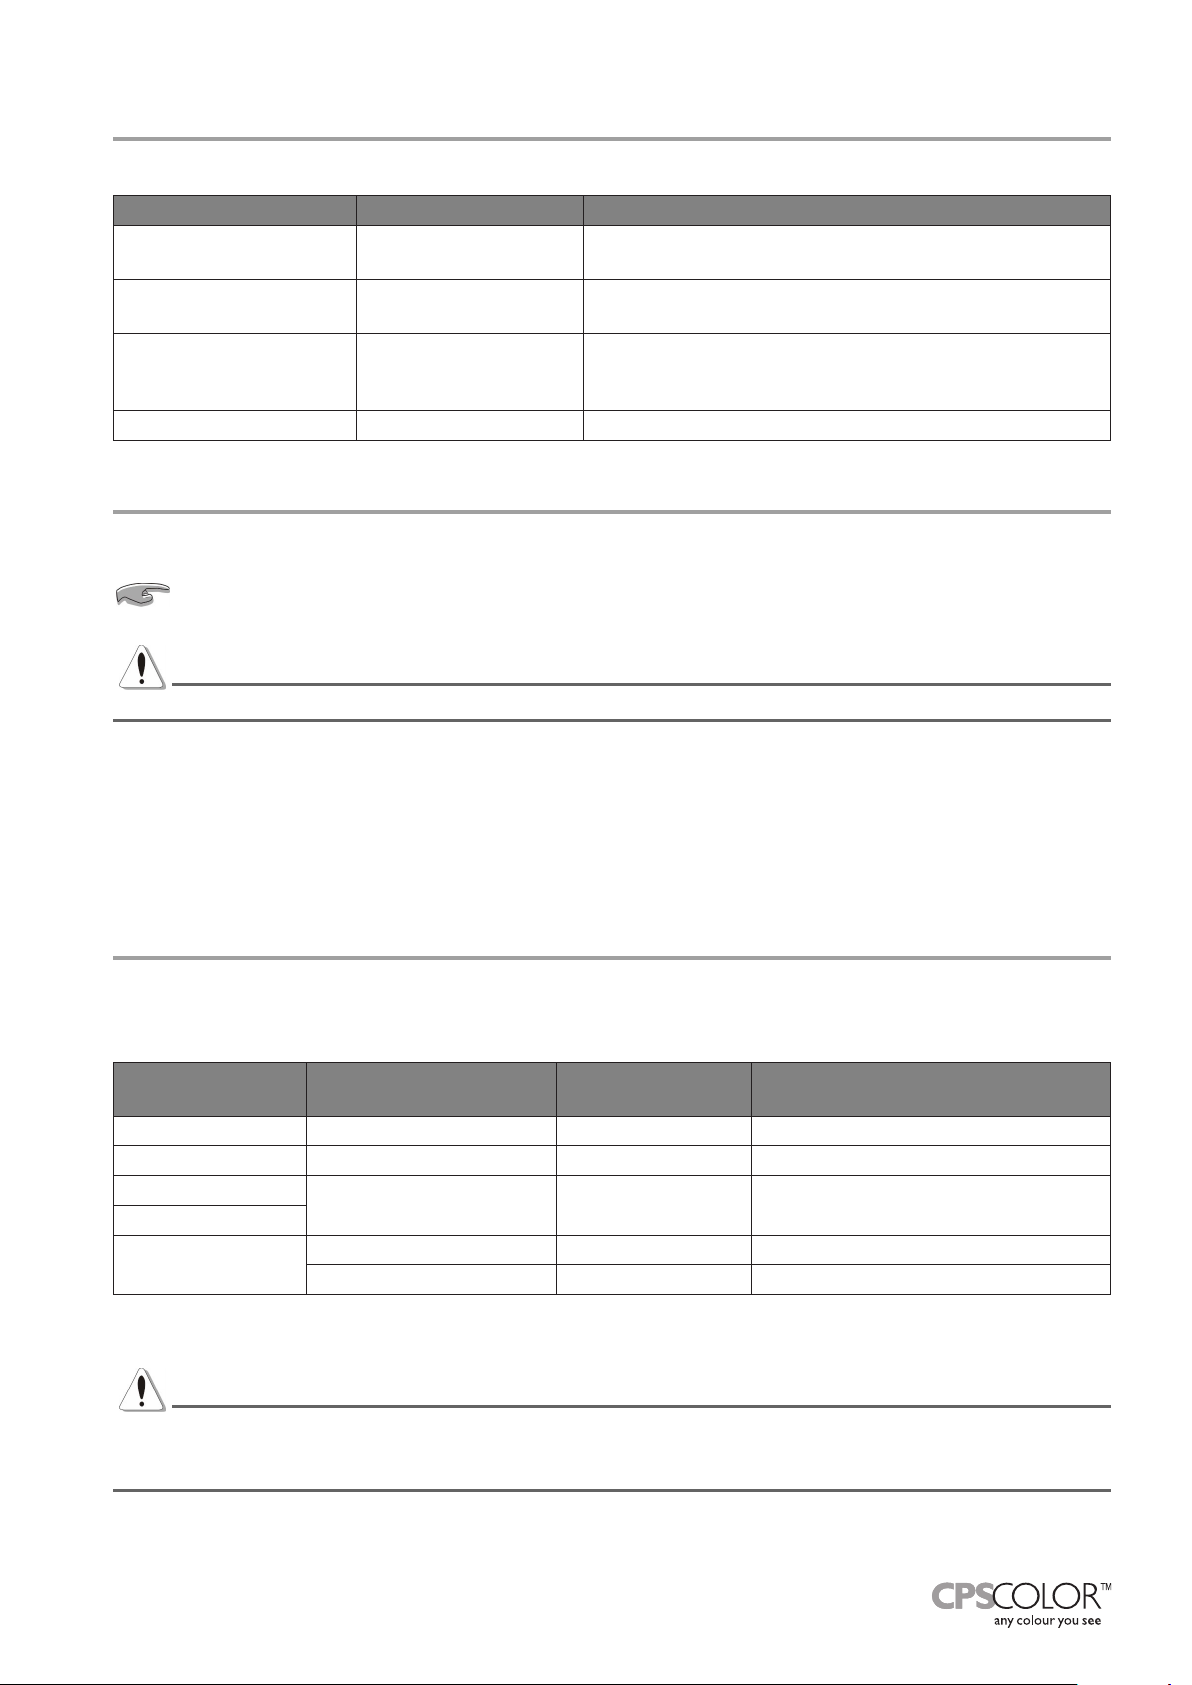
Machine conditions5.4
The status of the ON lamp highlights the condition in which the machine is:
Status of the ON lamp Machine condition Meaning
ON On-line
Blinking slowly Off-line 1
Blinking fast Off-line 2
OFF Off The machine is OFF.
The machine is ON and ready to receive commands coming from the computer.
Machine functions are interrupted and the commands
coming from the computer are refused.
The Autocap is open, machine functions are interrupted and the commands coming from the computer are
refused.
5.5 Initialization
INITIALIZATION is a preparatory phase that must be carried out when the machine is turned on.
If the computer is turned off and back on again, initialization is not strictly necessary, even if required
by the software; it is solely at the discretion of the operator.
DANGER
If the Autocap is open, initialization automatically closes it.
Moreover, initialization must be carried out in the following cases:
At the beginning of each work shift, even if only the computer had been shut down.•
To send new operating parameters set via the management software.•
After an emergency stop (• chapter 5.7).
For more information about the Initialization function, refer to the software user’s manual.
5.6 Use of the off-line button
When the off-line button is pressed, all functions of the machine are interrupted; the ON lamp blinks to indicate that the machine is switched on but with the functions blocked (off-line 1 or off-line 2 condition). In these
conditions, any commands coming from the computer are refused.
Initial machine
condition
On-line ...for an instant Off-line 1 Blinking slowly
Off-line 1 ...for an instant On-line ON
Off-line 1
On-line
Off-line 2
The machine on-line condition can also be restored by sending a Reset command via software, from off-line 1
or off-line 2 machine status.
Push the off-line
button...
...for a few seconds Off-line 2 Blinking fast
...for a few seconds On-line ON
...for an instant Off-line 2 Blinking fast
Final machine
condition
ON lamp
WARNING
Pressing the off-line button while a formula is being dispensed will cause dispensing to be interrupted. Once
the machine has been restored to normal operation, IT WILL NOT BE POSSIBLE to continue dispensing the
formula previously interrupted.
Page 26
22 - START-UP
COROB™ D800 HD
1
2
0
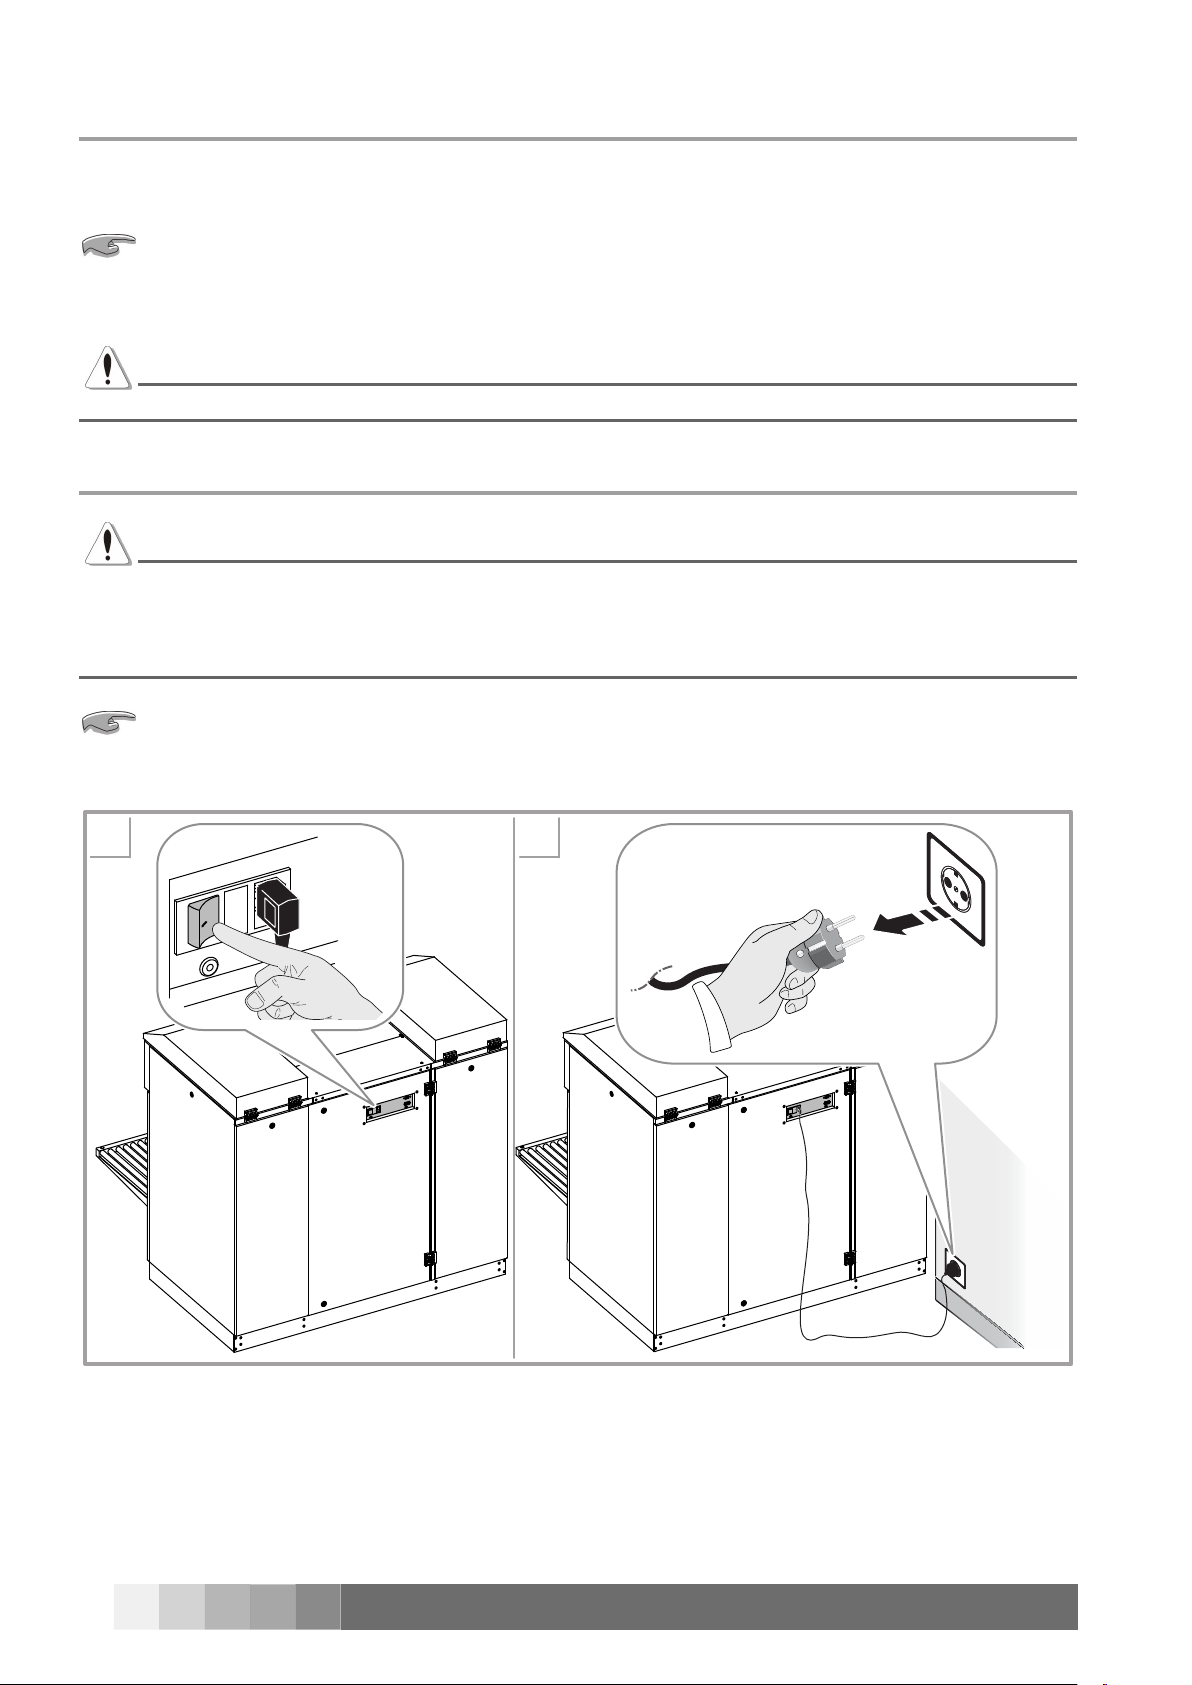
5.7 Emergency stop
In case of a breakdown or dangerous conditions, press the emergency stop button. Pressing this button, power
is cut off to the entire machine and all movements are stopped.
The emergency button does not turn the computer off, since it requires special shut-down
procedures.
After eliminating the cause of the malfunction or solved the dangerous condition, reset the button by pulling
it.
WARNING
When normal operation is restored, it is necessary to carry out machine initialization (chapter 5.5).
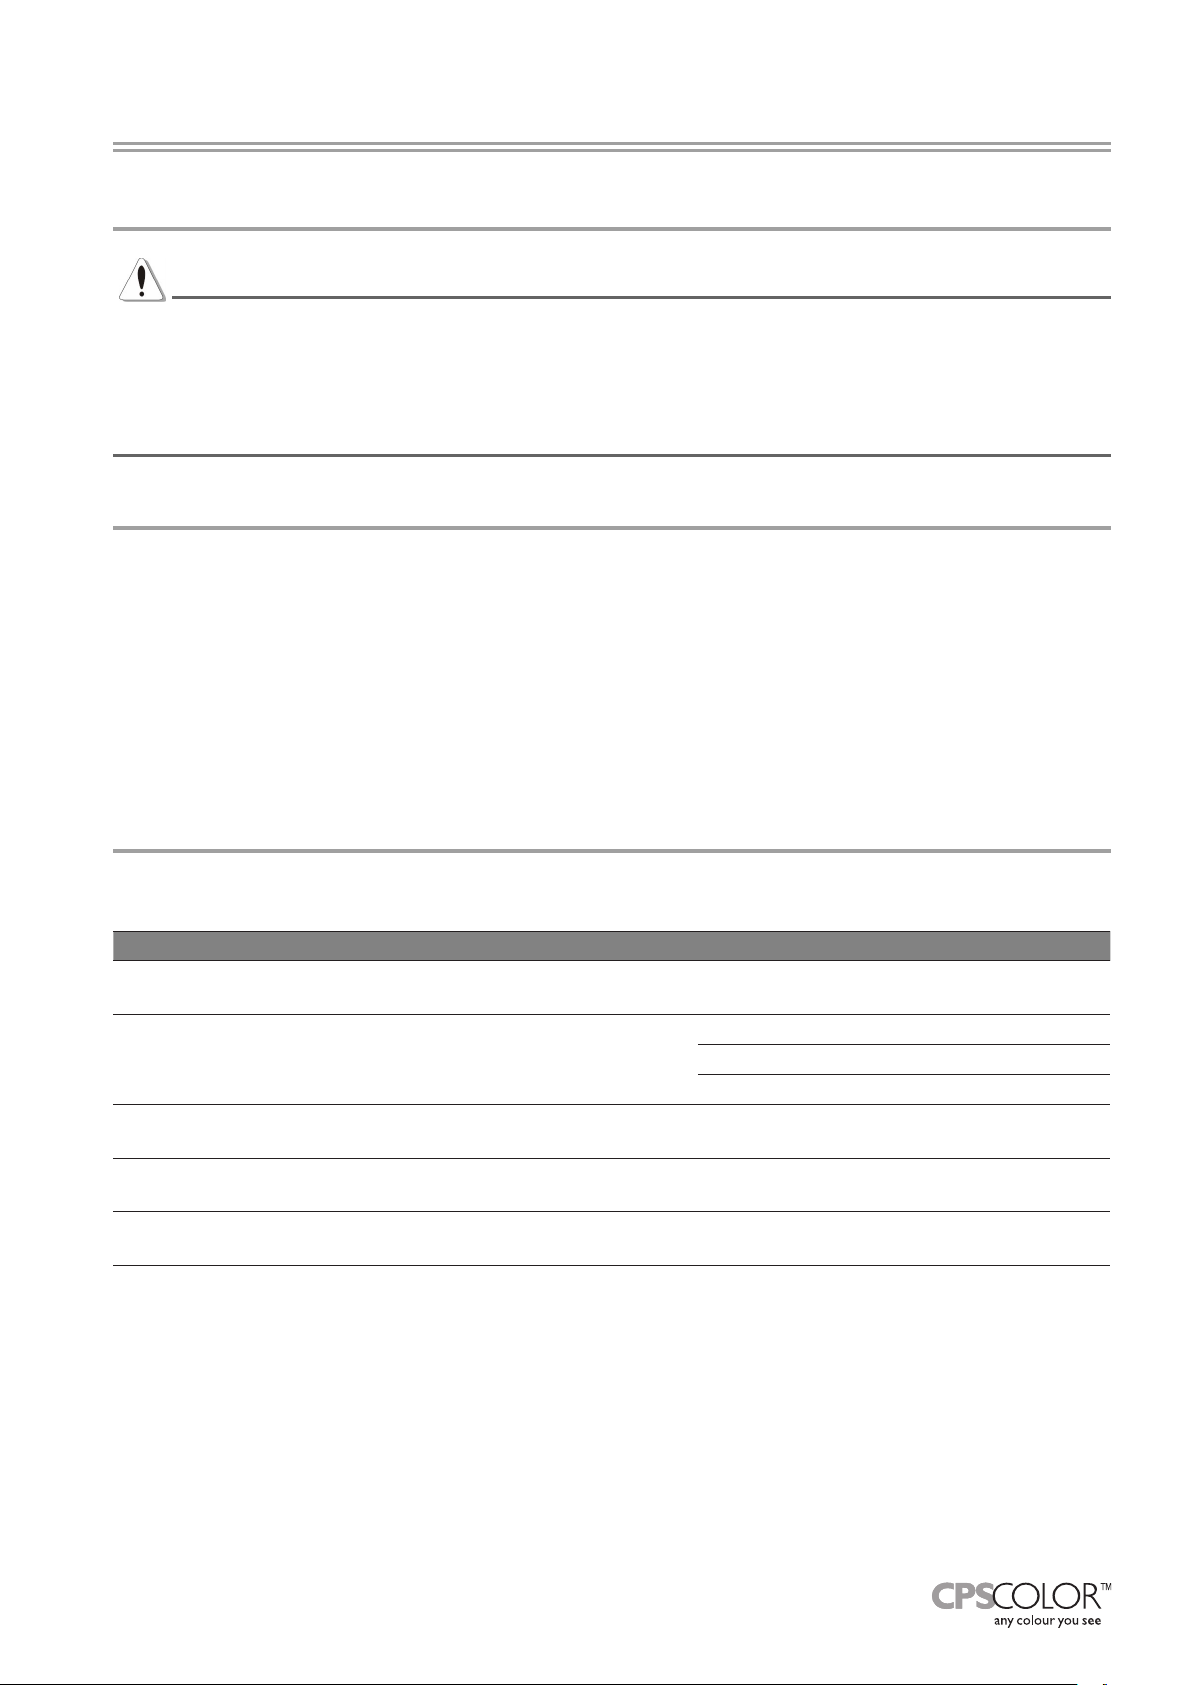
5.8 Shut-down
WARNING
WE RECOMMEND THAT YOU NEVER SHUT DOWN THE MACHINE, even when closed for business, because the automatic, timed functions help keep the colorant preserved and homogeneous.
Should it be essential to shut down the machine, avoid keeping it off for extended periods of time. When the
machine is not being used, shut off only the computer.
Very little power is used by the machine itself when inactive or during a stirring cycle.
After carrying out the computer shut-down procedure, shut off the machine as follows:
Page 27
USING THE DISPENSER - 23
ORIGINAL INSTRUCTIONS
6 USING THE DISPENSER
General warnings6.1
DANGER
The machine must be used by a single operator.
It is strictly forbidden to bypass and disable the safety devices and protections.
Do not, for any reason, place your hands in the dispensing area when running the machine, except for loading and unloading the cans.
The panels must be kept closed at all times.
At the beginning of the working day6.2
At the beginning of each work shift, always carry out the following operations:
Check that the nozzle center is clean. •
(Without humidier system) Check that the sponge is clean and saturated; if it is necessary to saturate, use •
only appropriate liquid (the choice of the liquid depends on the nature of the colorants, and must be done
directly by the manufacturer of the products used).
(With humidier system for water-based colorants) Check that the water in the bottle is not below the mini-•
mum level.
Carry out system Initialization and Purge.•
6.3 Running the machine
The operator is guided in running the machine by the management software, which displays the instructions to
be carried out and the actions performed by the machine.
Steps Options Reference
Make the selections from the management software
(selection of the product, formula and cansize).
Load the can in the machine and adjust the height of
the can shelf.
Adjust can position with respect to the dispensing
center.
Via the software, enter the formula dispensing
command.
When dispensing is nished, remove the can and
proceed with another dispensing process.
with roll conveyor chapter 6.3.1
with pull out shelf chapter 6.3.3
with automatic shelf chapter 6.3.3
with Laser B.H.L. chapter 6.3.4
chapter 6.3.5
Page 28
24 - USING THE DISPENSER
COROB™ D800 HD
1 2
MAX
MIN
MAX
MIN
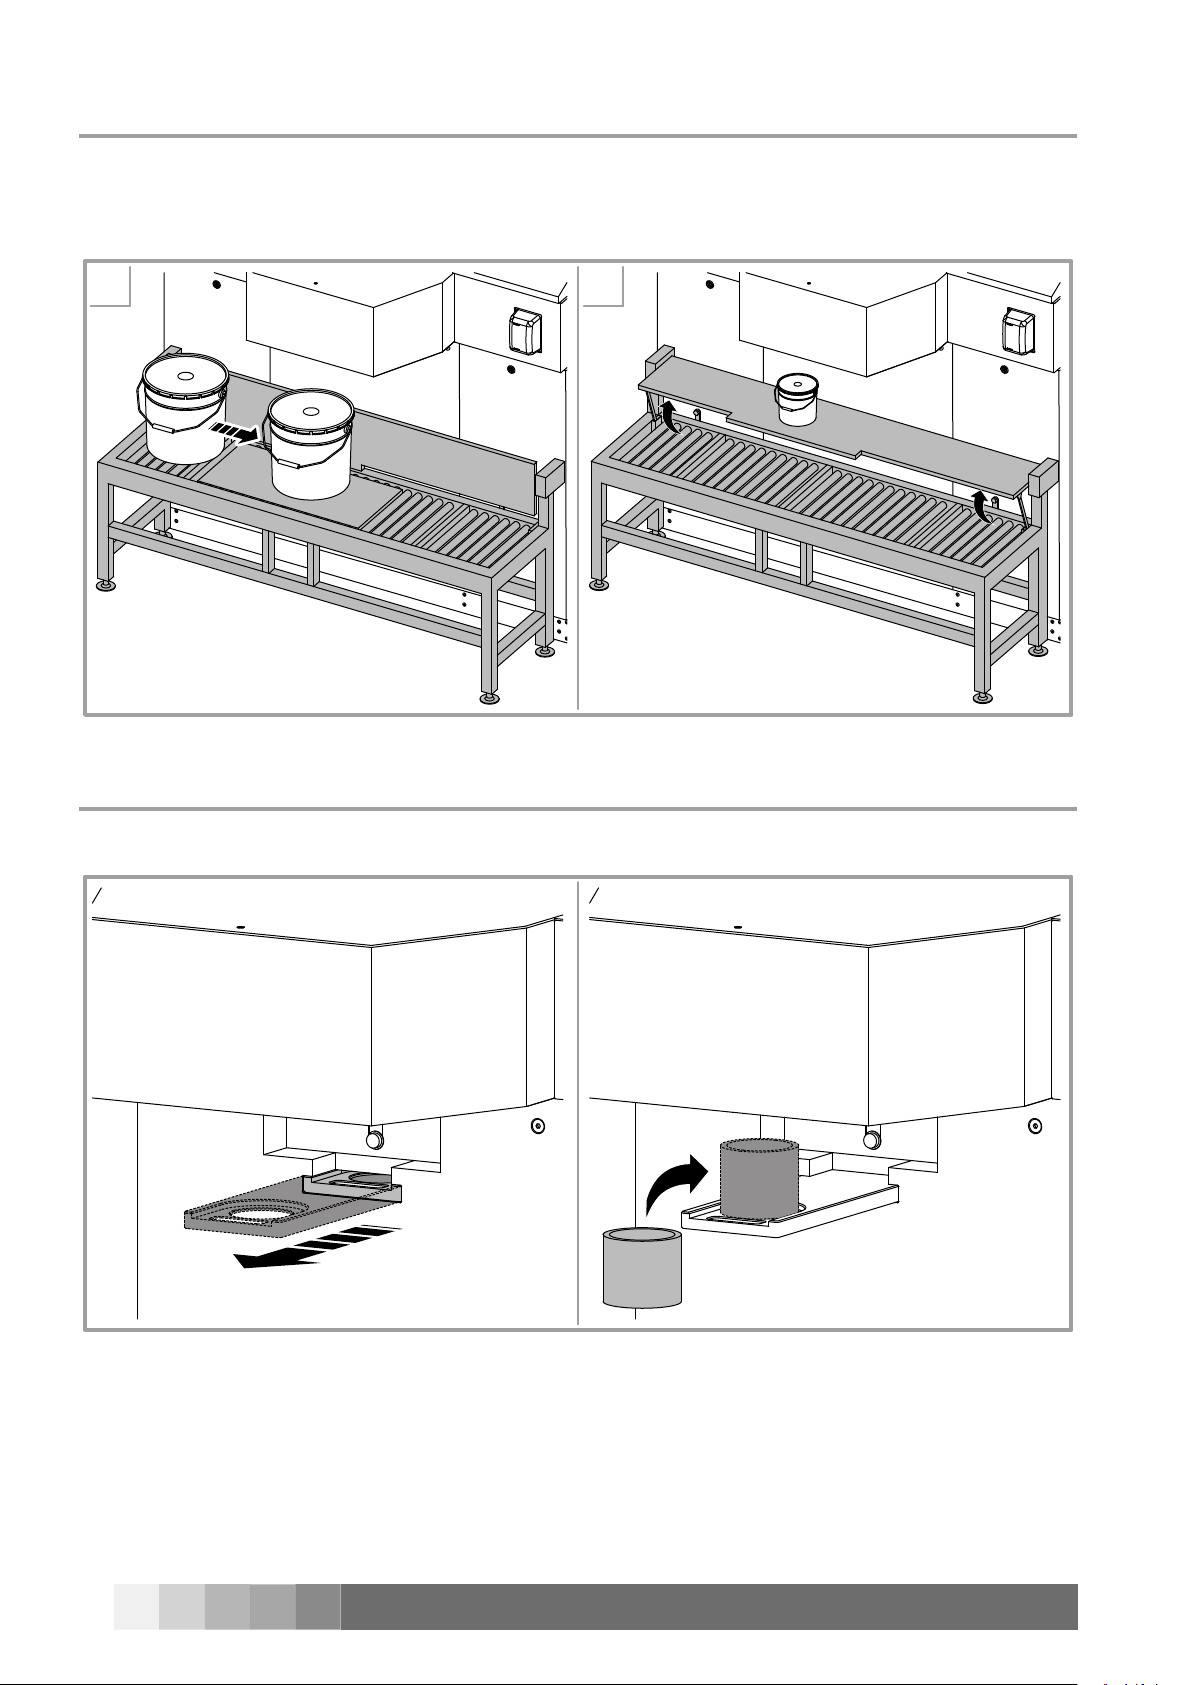
6.3.1 Loading the can - Roll Conveyor
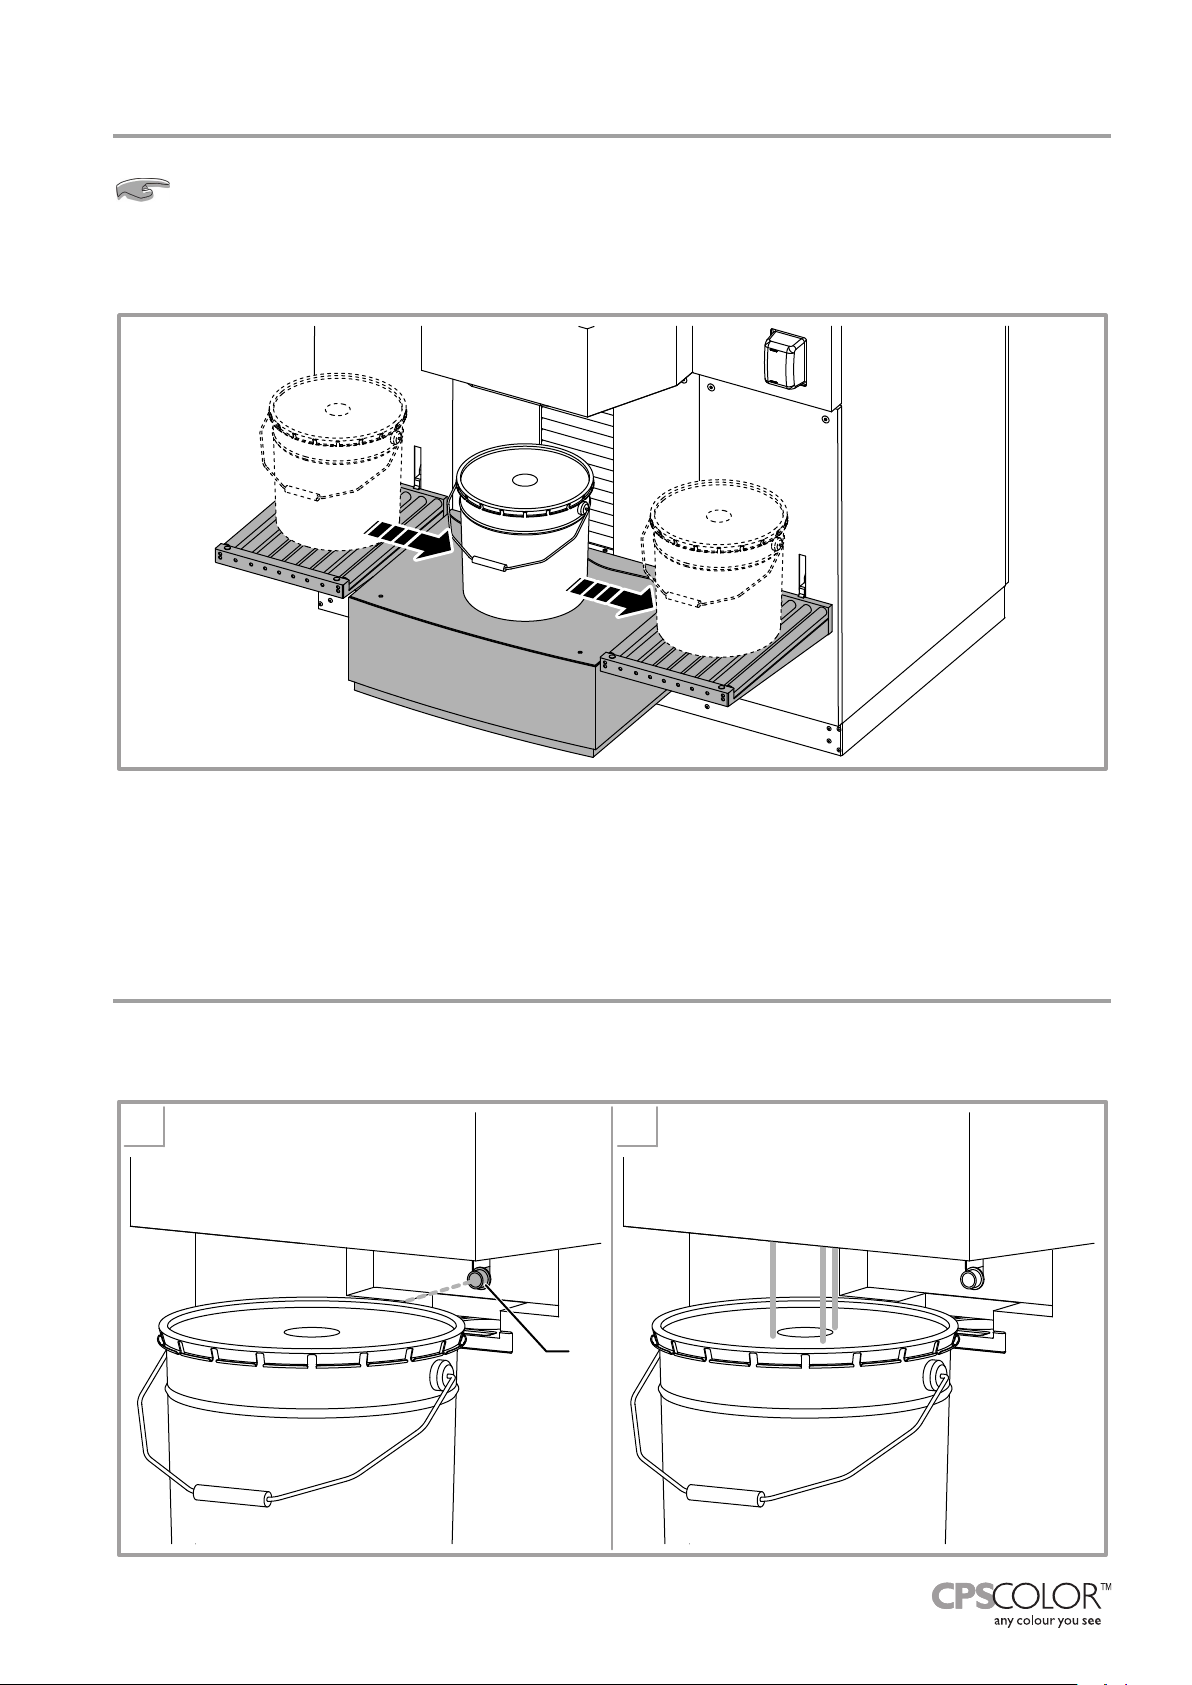
Place the can on the roll conveyor and slide it under the dispensing nozzles.1.
For 1 Gallon tinting, lift up on the built-in shelf just past horizontal and then lower until it locks into place 2.
and position the can under the dispensing nozzles.
Loading the can - Pull Out Shelf6.3.2
Pull out the shelf and place the can in the centering ring of the appropriate diameter.1.
Page 29
USING THE DISPENSER - 25
ORIGINAL INSTRUCTIONS
6.3.3 Loading the can - Automatic Shelf
MAX
MIN
1 2
A
With the purpose to prevent any crushing risks, the machine is tted with two safety plates (chapter
2.4). The safety plates intervene by causing the shelf to stop if they are inadvertently touched by the
operator.
Place the can on the shelf. Use the tipping panel roll conveyors, if present, to ease heavy cans on the 1.
shelf.
The management software controls the movement of the automatic shelf, checks for the can presence and that
the can placed on it is actually the one selected by the software for dispensing the formula.
These checks are also carried out by a photocell located underneath the nozzle center. The shelf automatically
stops when the can is detected by the photocell.
After a can has been positioned, the management software will indicate an error if the can is missing from the
shelf, or if it is larger or smaller than the one selected for dispensing.
6.3.4 Use of the Bung Hole Locator
After having correctly positioned the can so as to obscure photocell 1. A, the laser beams will switch on.
Position the can in such a way that the hole on the lid is in the center of the laser beams.2.
Page 30

26 - USING THE DISPENSER
COROB™ D800 HD
6.3.5 Dispensing
When the dispensing command is entered, the Autocap opens to expose the nozzles and the machine begins
to dispense the products included in the formula in the set amounts; the Autocap will automatically close when
dispensing is nished.
The dispensing time is the time required by the colorant of which the greatest amount is used in the formula.
Automatic timed processes6.4
Colorant stirring is a timed process, activated automatically to properly store the product in the canisters and
keep it in ideal, homogeneous conditions for dispensing, through the movement of stirring paddles inside
canisters.
The recirculation process circulates the colorant through the dispensing circuits, avoiding pigment sedimentation in the various parts of the circuit. The colorant leaves the bottom of the canister and returns in the canister
through the recirculation connector, without being dispensed through the nozzle center.
The duration and the interval between one stirring or recirculation cycle and another can be customized via
the conguration software (refer to the CorobTECH user’s manual), based on the nature of the products used
on the machine.
We recommend to keep the canisters closed with their corresponding lids; do not insert hands in the
canister even when no colorant is present.
When the timed process is in progress, the machine can still be used; the process will be suspended and restarted after a few seconds that the machine is inactive.
Page 31
USING THE DISPENSER - 27
ORIGINAL INSTRUCTIONS
2
3
4
1.5 cm
0.6”
6.5 Relling the canisters
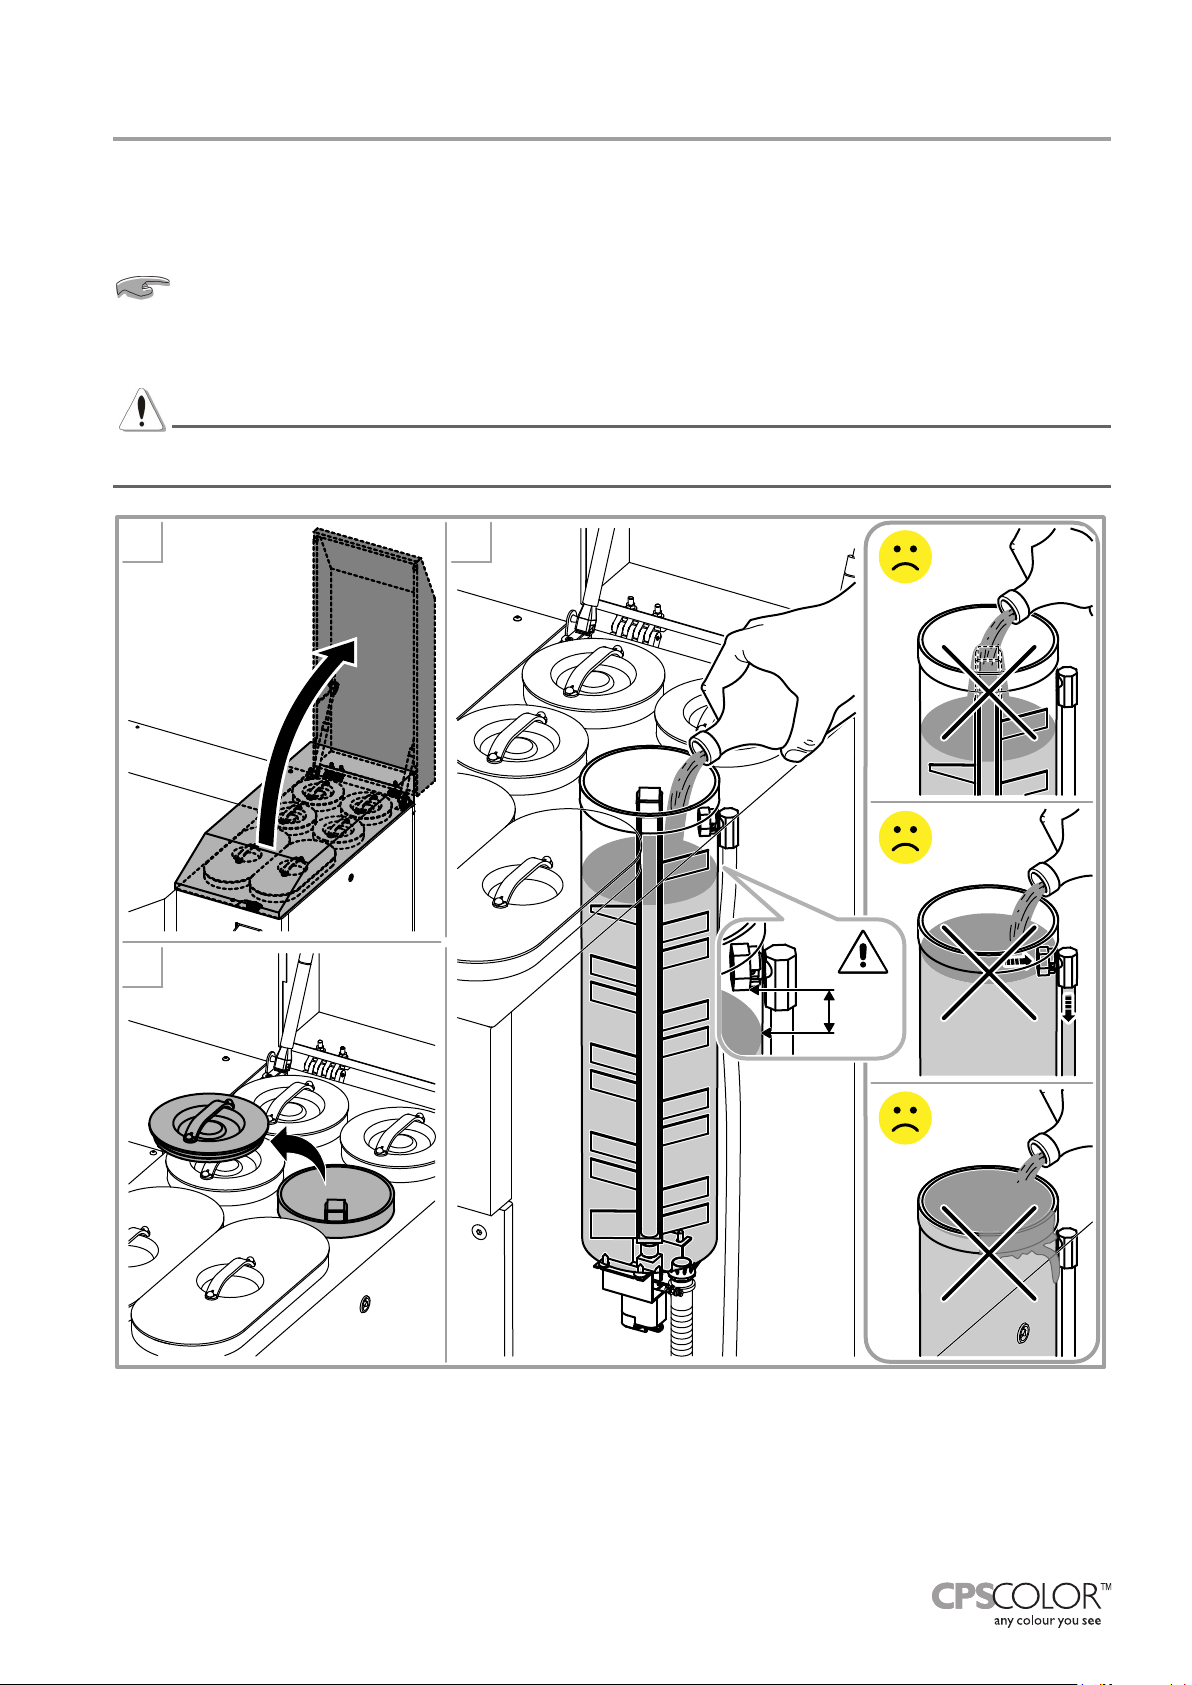
Push the off-line button for an instant (1. chapter 5.6).
Open the upper covers.2.
Remove the lid of the canister to be lled.3.
Shake the container of colorant to be poured into the canister manually. Do not use automatic
shakers.
Add the desired colorant to the canister, so as to avoid spattering or creating air emulsions in the 4.
colorant.
WARNING
Never exceed the maximum colorant level in the canister, approximately 0.6” (1.5 cm) under the recirculation
connector. Never pour colorant directly onto the stirrer shaft.
Close the canister with its corresponding lid.5.
Repeat the above steps to ll other canisters. 6.
Close the upper covers and restore the machine by pushing for an instant the off-line button (7. chapter
5.6).
Update the colorant level value for the topped up canisters in the machine management software (refer to 8.
the software user’s manual).
Page 32
28 - USING THE DISPENSER
COROB™ D800 HD
WARNING
In case of improper actions, which caused canister overlling with colorant:
In case the colorant has poured inside the machine, do not try to clean; turn the machine off at once and •
contact an authorized service center.
If, on the contrary, the product has already poured out of the canister, it is necessary to shut off the ma-•
chine immediately and clean with paper or a moistened cloth. Whenever possible, leave the colorant to
dry itself and remove with a spatula.
If the product has not yet come out of the canister borders, it is necessary to avoid closing the canister •
with its lid and provide immediately to dispense the exceeding colorant until the correct level is reached.
Clean carefully the upper border of the canister with paper or a moistened cloth before closing it with the
lid.
NEVER USE WATER OR SOLVENT-BASED CLEANING PRODUCTS TO CLEAN THE MACHINE.
DANGER
When using colorants containing volatile solvents the canister top up must be carried out opening one
canister at the time.
WARNING
Failure to update the colorant levels in the canisters may compromise the accuracy of the hue produced or,
worse yet, lead to emptying the machine canisters and circuits.
If “SOLVENT FREE” colorants are used, or those that dry out quickly, we recommend that you keep the
canisters full at all times by topping up frequently.
After topping up the colorant, it is advisable to carry out the stirring process using the functions provided in the
management software, to eliminate any air that may be emulsied and incorporated into the colorant.
Page 33
USING THE DISPENSER - 29
ORIGINAL INSTRUCTIONS
Troubleshooting6.6
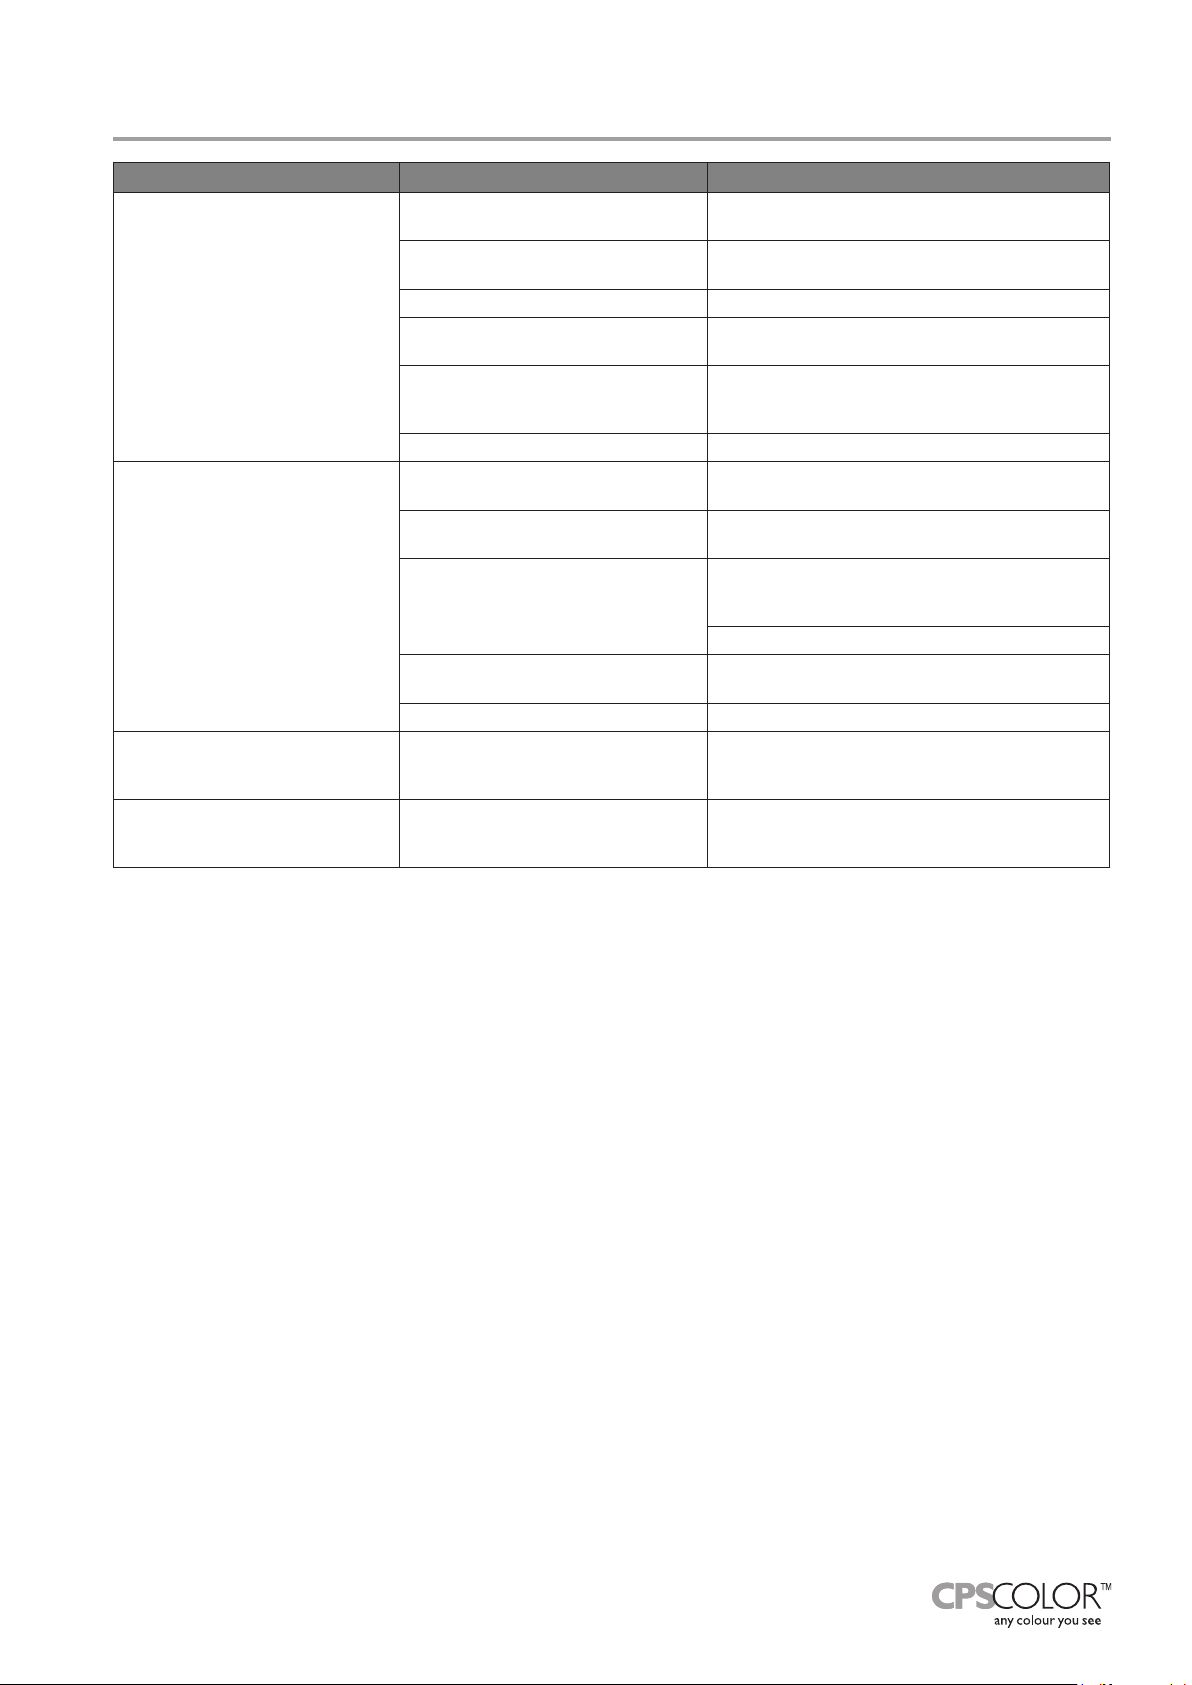
Problem Cause Solution
Check the connections at the back of the machine (chapter 5.3).
Set the main switch to the ON position (I)
(chapter 5.3).
Replace any blown fuse inside the fuse compartment (chapter 5.2).
Wait a few minutes and try to restart the
machine. If the problem persists, contact the
authorized technical service.
Turn the machine on (chapter 5.3) and restart
the management software.
Check the connections at the back of the machine (chapter 5.3).
Use the conguration and calibration software
to make sure you have correctly congured the
port used to communicate with the machine.
Repair the computer serial port or USB port.
Replace the communication cable using manufacturer’s original spare parts.
Bring the machine to the on-line condition by
pushing the off-line button or by sending a
Reset command.
Close the Autocap and bring the machine to the
on-line condition by using the off-line button or
by sending a Reset command (chapter 5.6).
The machine does not turn on.
The management software
shows an error in the communication protocol.
The ON lamp blinks slowly
and the machine refuses the
commands.
The ON lamp blinks fast and the
machine refuses the commands.
Power supply is missing.
Main switch in OFF position (O).
Emergency button is pressed. Release the emergency button (chapter 5.7).
One or more fuses may be blown
up.
The power supply unit is in
overcurrent.
Electrical connections are defective. Contact the authorized technical service.
Machine is OFF.
Machine disconnected from the
computer.
Computer serial port or USB port
wrongly congured or defective.
Serial cable damaged.
Connection defective. Contact the authorized technical service.
The machine is in the off-line 1
condition.
The Autocap is open and the machine is in the off-line 2 condition.
Page 34

30 - USING THE DISPENSER
COROB™ D800 HD
Page 35
ORDINARY MAINTENANCE - 31
ORIGINAL INSTRUCTIONS
7 ORDINARY MAINTENANCE
General warnings7.1
DANGER
Before carrying out any maintenance operations, you must turn off the machine and unplug the power supply
cable from the mains socket outlet.
During machine maintenance operations there is a high risk of contact with the coloring product; strictly follow the indications of chapter 2.2.
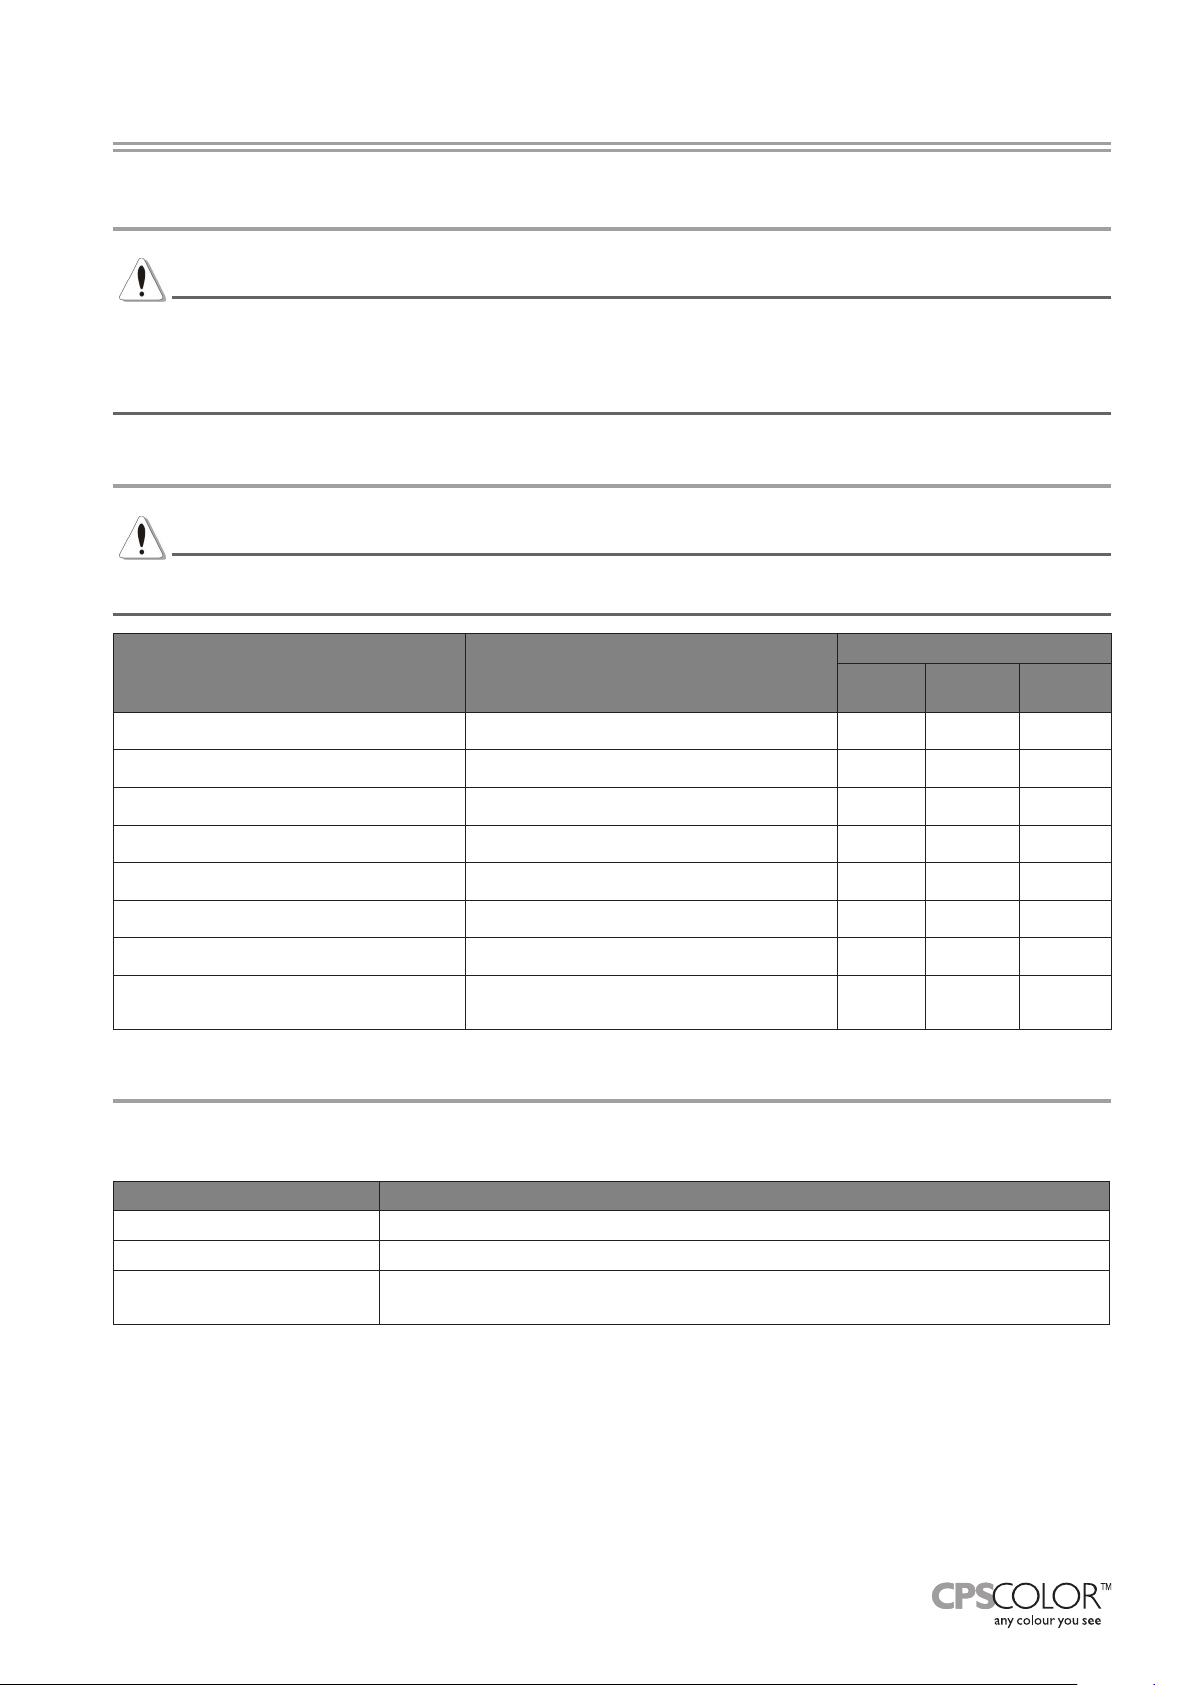
Maintenance table7.2
WARNING
The frequencies indicated are approximate, since they depend on the type of colorants, environment conditions and frequency of use of the machine.
Frequency
Operations Accessories
Initialize and purge machine
Clean the nozzle center
Check the sponge is clean
Check the sponge is saturated without humidier system
Moisten the sponge without humidier system
Clean the sponge
Clean the dispenser externally
Fill up the humidier system bottle
with humidier system for water-based
colorants
beginning
of shift
twice a
week
when
necessary
Products to be used7.3
We recommend to use products compatible with the type of colorants in the machine when cleaning the nozzle
center and moistening the humidier cap sponge.
Type of colorant Suggested product
Solvent-based colorants slow-evaporating solvent, compatible with the colorants used
Water-based colorants water
Mixed systems
Should growths form in the Autocap, in the sponges or in the humidier system water bottle, it is advisable to
use the following uids:
Propylene glycol solution, 50% by volume, in water;•
AgCl solution in water;•
Bleach (dilution 1%).•
the choice depends on the type of vehicles used to produce the colorants; for
more information, contact the dealer or colorant manufacturer.
Page 36
32 - ORDINARY MAINTENANCE
COROB™ D800 HD
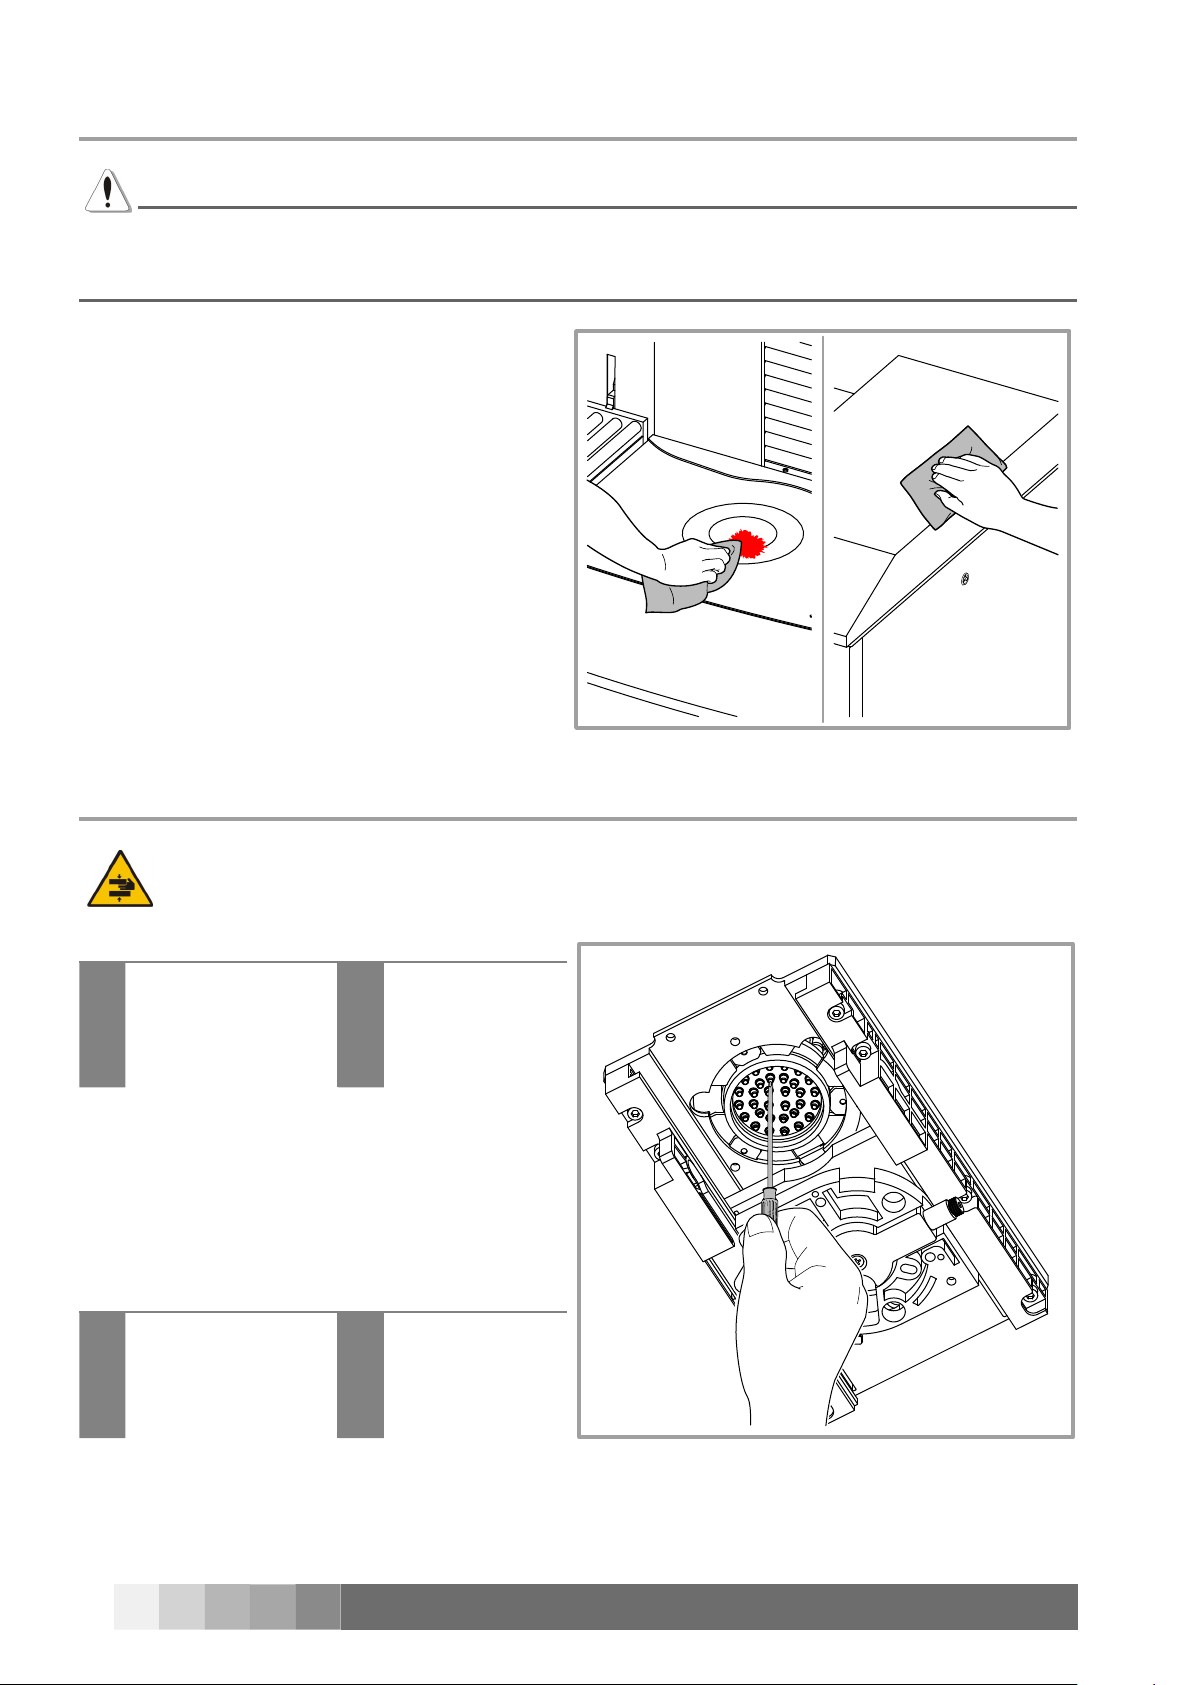
7.4 External cleaning
WARNING
NEVER USE WATER OR SOLVENT-BASED CLEANING PRODUCTS TO CLEAN THE MACHINE.
In case the colorant has poured inside the machine, do not try to clean; turn the machine off at once and
contact an authorized service center.
In case of paint spills, clean the machine
immediately.
Disconnect power supply (1. chapter 5.8).
Clean coverings, panels and control devices of 2.
the machine, to remove dirt, dust and any colorant stains, using a soft and dry cloth, or slightly
moistened with a mild cleansing solution.
Connect power supply and switch on the ma-3.
chine (chapter 5.3).
See the manufacturer manual for instructions on
cleaning the computer.
7.5 Cleaning the nozzle center
Open the Autocap...1.
bringing the ma-
using the command
I
in the management
software.
Disconnect power supply (2. chapter 5.8).
Accurately clean the nozzles using a sharp tool; 3.
remove any dried colorant residue delicately, to
avoid damaging the ends of the circuits.
Connect power supply and switch on the ma-4.
chine (chapter 5.3).
Close the Autocap... 5.
it closes automatically
I
during initialization.
Carry out Purge, using the command in the man-6.
agement software.
chine to the off-
II
line 2 condition,
by means of the
off-line button.
bringing the machine to the on-
II
line condition, by
means of the offline button.
Page 37
ORDINARY MAINTENANCE - 33
ORIGINAL INSTRUCTIONS
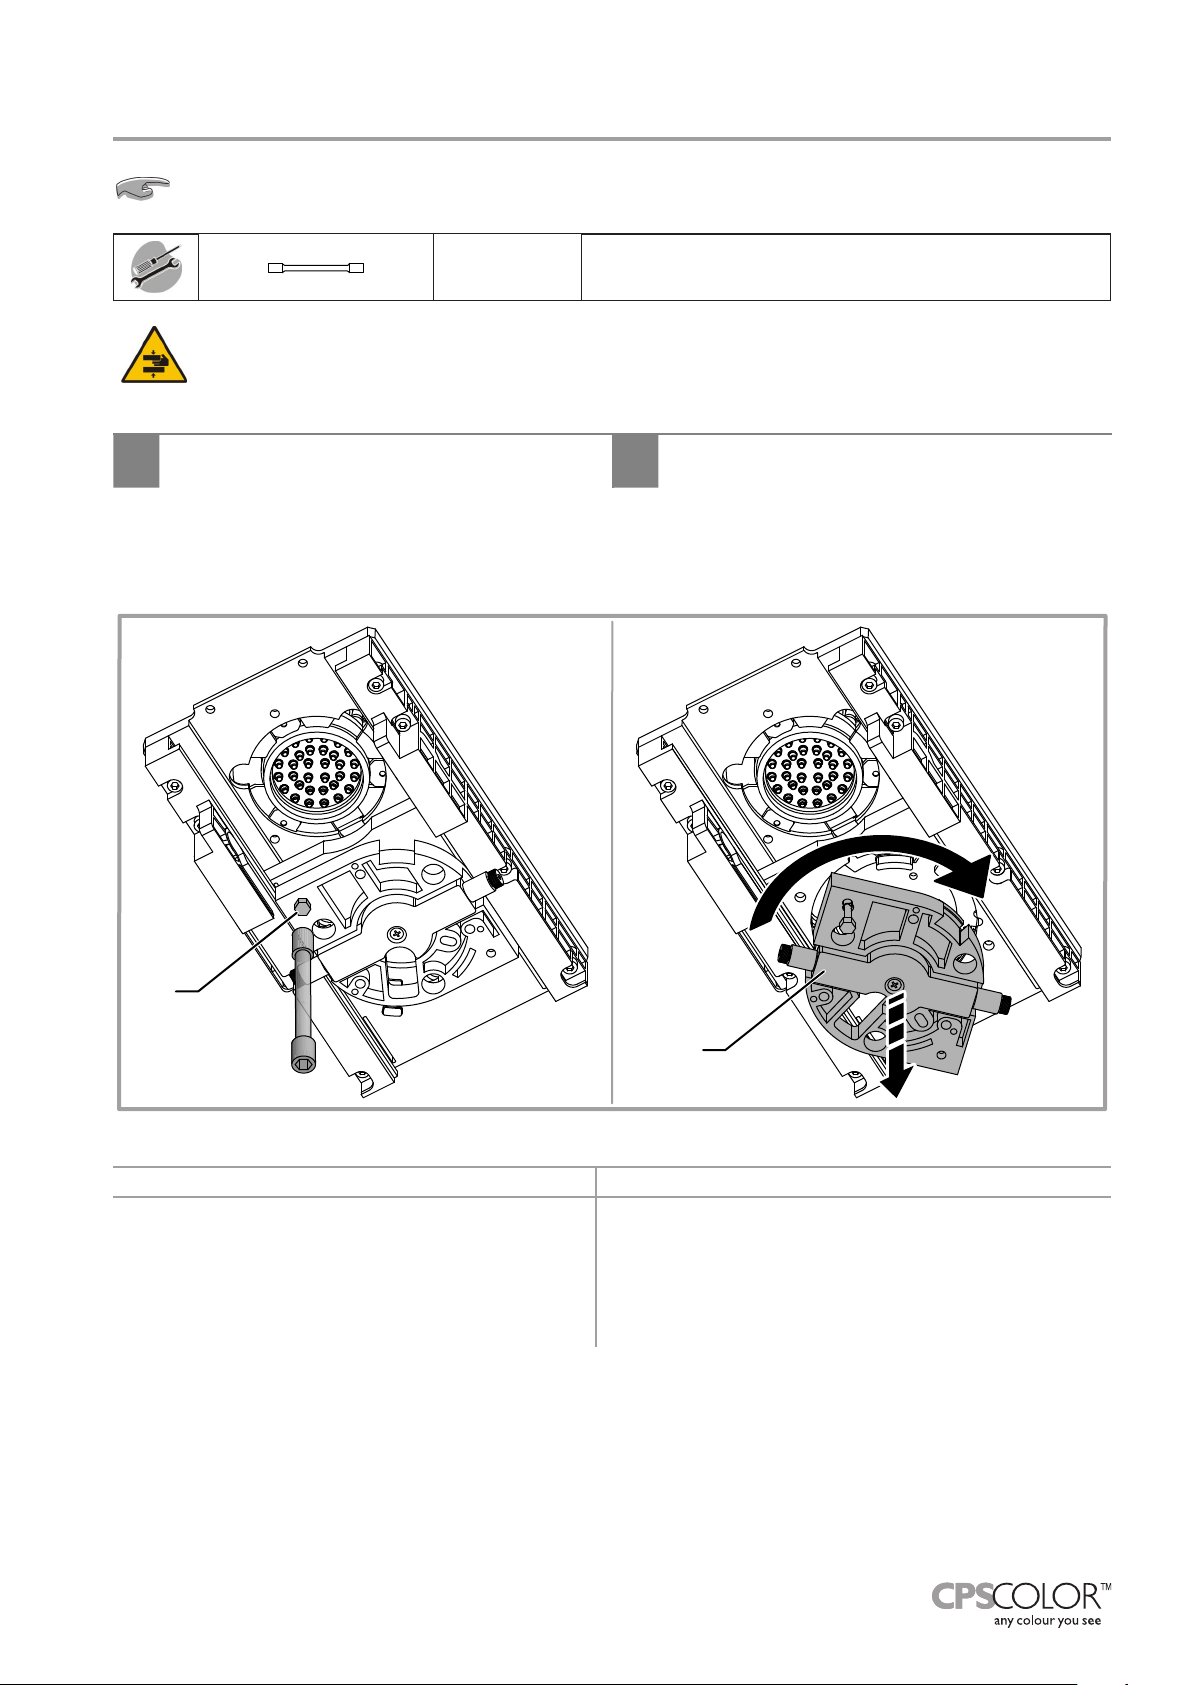
Cleaning and moistening the humidier cap sponge7.6
A
B
In case of sponge replacement, use only those supplied with the machine.
8 mm To remove the Autocap screw(s)
Open the Autocap...1.
using the command in the management
I
software.
Disconnect power supply (2. chapter 5.8).
If present, open the inspection door provided in the nozzles area.3.
Loosen the screw 4. A and remove the sponge support B by turning it counter-clockwise.
bringing the machine to the off-line 2 condition,
II
by means of the off-line button.
WITHOUT HUMIDIFIER SYSTEM WITH WATER HUMIDIFIER SYSTEM
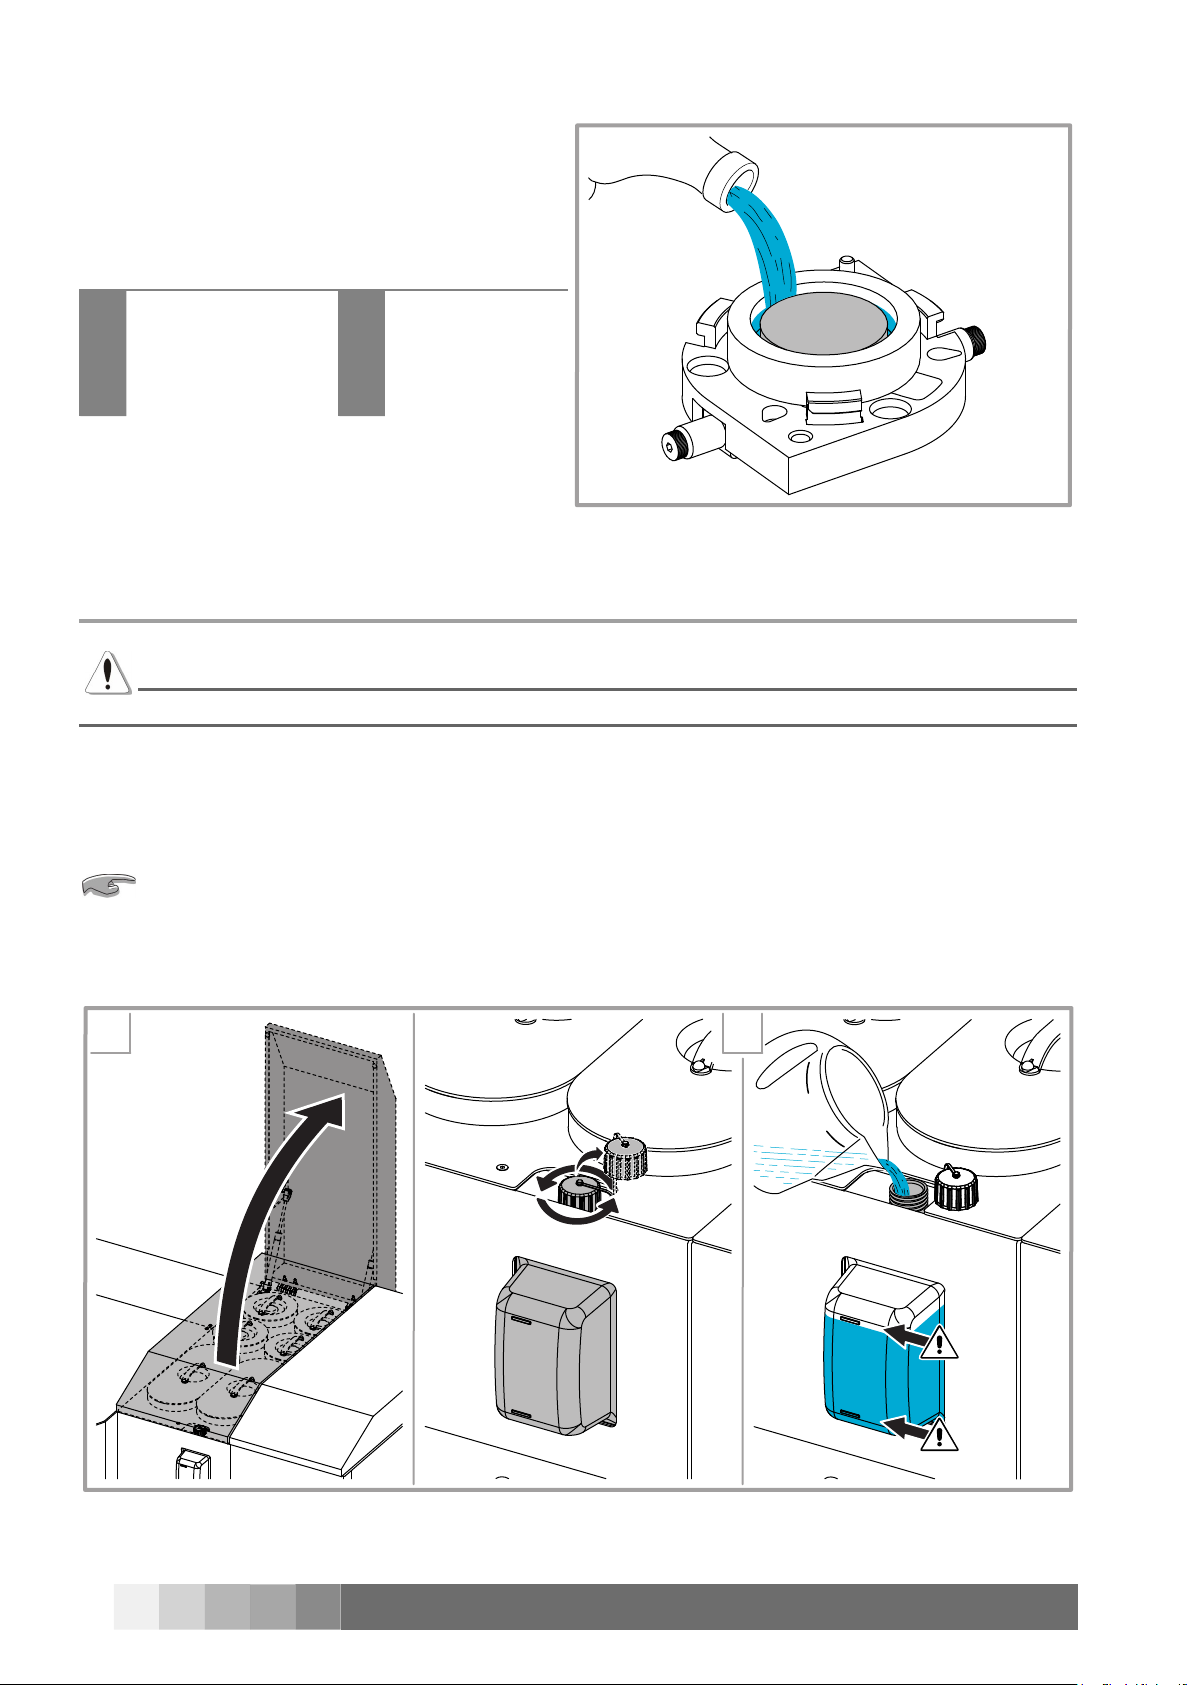
Check the condition of the sponge and moisten a.
as needed. The level of the humidifying liquid
must not exceed the height of the sponge. If it
is very dirty, remove the sponge from the cap
and wash it thoroughly. Replace it if it is severely damaged.
Check the condition of the sponge. If it is very b.
dirty, remove the sponge from the cap and wash it
thoroughly.
Page 38
34 - ORDINARY MAINTENANCE
COROB™ D800 HD
2 3
MAX
MAX
MIN
MAX
MIN
5
0
0
m
l
MAXMAX
MIN
MIN
1
P
i
n
t
In all cases, if the sponge is severely damaged, 5.
replace it.
Fit back the sponge support.6.
Connect power supply and switch on the ma-7.
chine (chapter 5.3).
Close the Autocap...8.
bringing the ma-
it closes automatically
I
during initialization.
chine to the on-
II
line condition, by
means of the offline button.
7.7 Relling the humidier system bottle
WARNING
When the water in the bottle reaches the minimum level, ll up immediately.
Disconnect power supply (1. chapter 5.8).
Open the machine upper cover where the bottle is located.2.
Unscrew the bottle cap and add water (1 Pint / 0.5 liters maximum), paying attention NOT TO EXCEED THE 3.
MAXIMUM LEVEL.
To reduce the risk of lime encrustations due to hard water, it is recommended to use distilled water.
Replace the cap and rmly tighten.4.
Close the upper cover, connect power supply and switch on the machine (5. chapter 5.3).
Page 39

TECHNICAL SPECIFICATIONS - 35
ORIGINAL INSTRUCTIONS
8 TECHNICAL SPECIFICATIONS
8.1 Technical data
Power supply Single-phase 100 - 240 V ~ ± 10%
Frequency 50/60 Hz
Fuses F 10 A
Maximum power absorbed 500 W
Noise level Level of equivalent acoustic pressure: < 70 dB (A)
Environment working conditions*
Vibrations
Dispensing technology gear pump
Dispensing system simultaneous
Dispensing center external
Type of canisters all-purpose (POM acetalic resin)
Type of valves electrovalves
Minimum dispensed quantity** 1/768 US oz (0,0385 ml)
Theoretical resolution** 0,001339 cc/step
* The environment working conditions are strictly related to the type of colorants used (ask for information from the paint manufacturer). The
data shown are valid for the machine only.
** Values highly affected by the nature of the colorants and their rheological properties.
Temperature: between 10 °C (50 °F) and 40 °C (104 °F)
Relative humidity: between 5% and 85%, without condensation
The machine does not transmit vibrations to the oor that may compromise the stability and precision of any nearby equipment.
Page 40
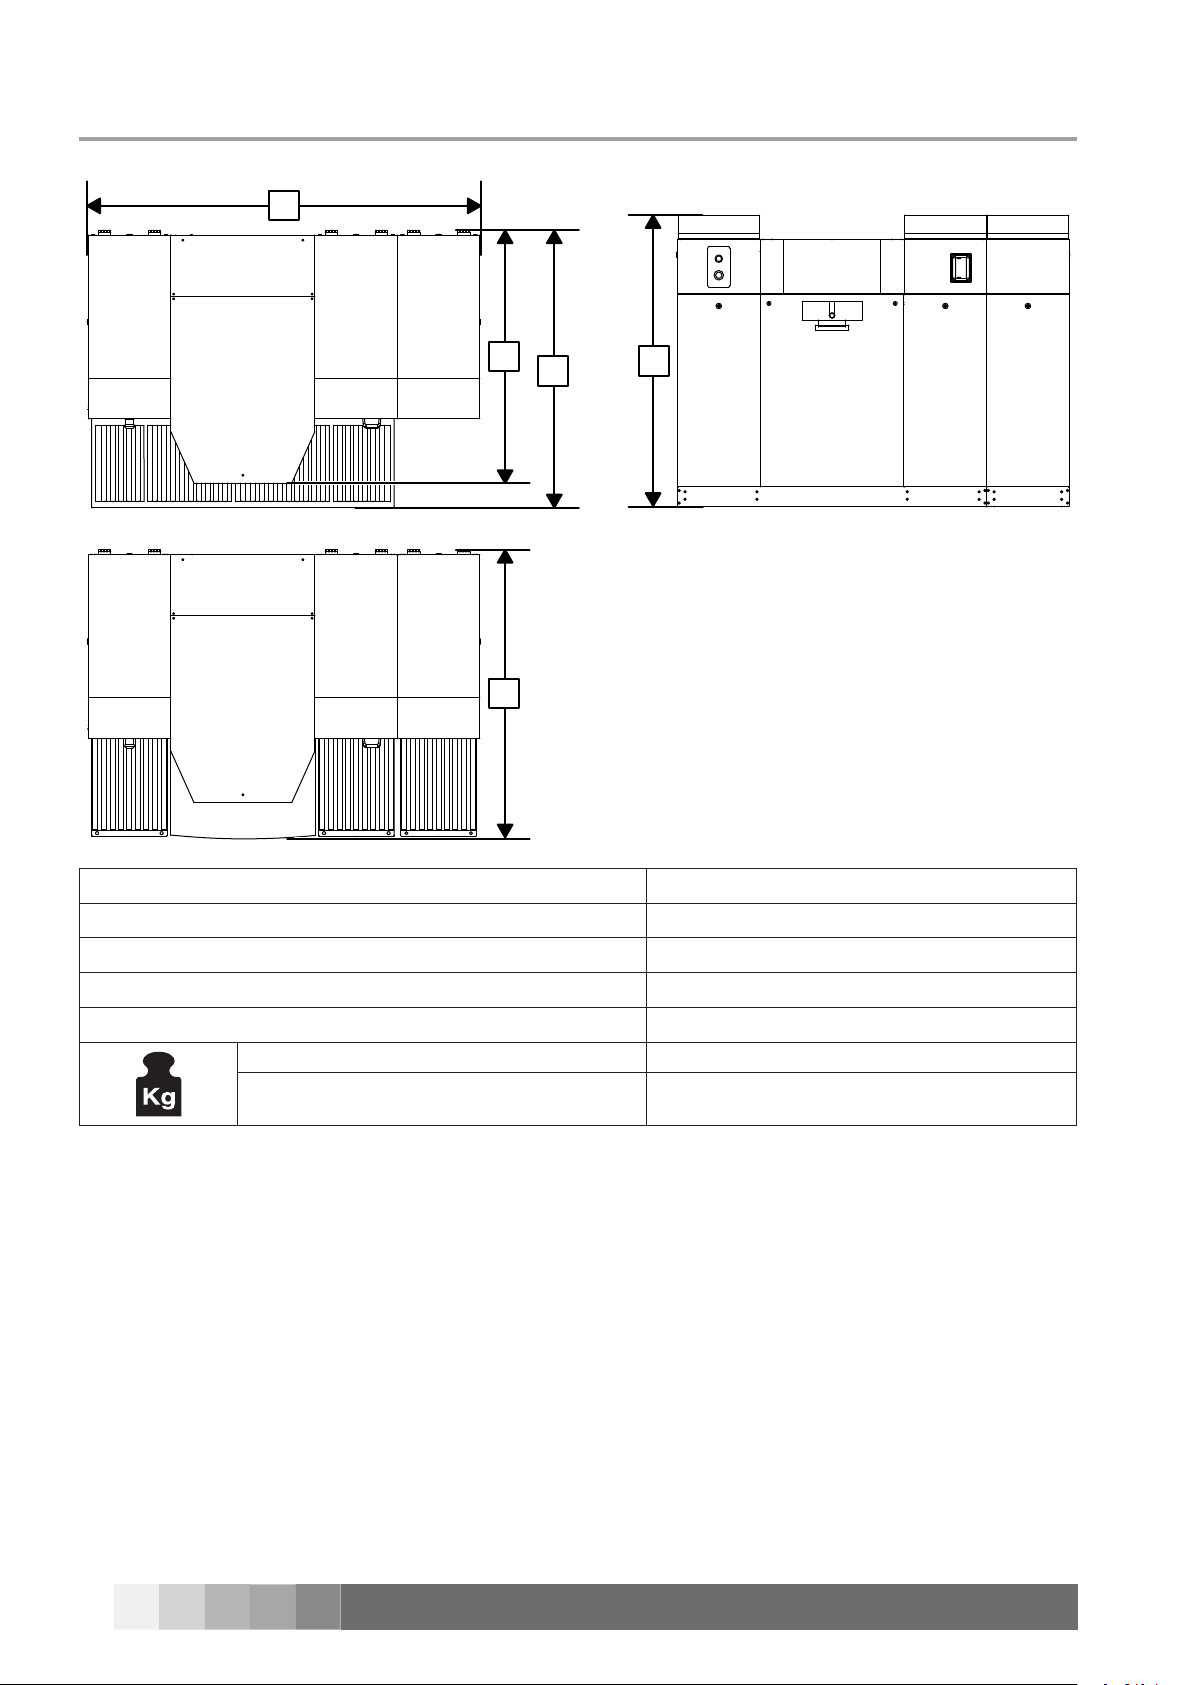
36 - TECHNICAL SPECIFICATIONS
MAX
MIN
B
A
B2
B1
C
Dimensions8.2
A - Width
B - Depth
B1 - Depth (with roll conveyor)
B2 - Depth (with automatic shelf)
C - Height
Machine 948 lb (430 kg)
Packed machine 1146 lb (520 kg)
* Data are indicative, depend on machine conguration, and refer to the machine with empty canisters.
61.7” (1566 mm)
38.3” (972,5 mm)
47.2” (1200 mm)
45.9” (1165 mm)
47.1” (1197 mm)
COROB™ D800 HD
 Loading...