


Instruction Manual
For All Corning® Hot Plates, Stirrers,
Stirrer/Hot Plates with Digital Displays, and
External Temperature Controller (6795PR)
Corning Cat. No.
230V 230V
Model No. Product Top Plate Size 120V 100V (Non-Europe) (Europe)
PC-400D Hot Plate 5 x 7 in. 6795-400D 6797-400D 6798-400D 6796-400D
(12.7 x 17.8 cm)
PC-410D Stirrer 5 x 7 in. 6795-410D 6797-410D 6798-410D 6796-410D
(12.7 x 17.8 cm)
PC-420D Stirrer/ 5 x 7 in. 6795-420D 6797-420D 6798-420D 6796-420D
Hot Plate (12.7 x 17.8 cm)
PC-600D Hot Plate 10 x 10 in. 6795-600D 6797-600D 6798-600D 6796-600D
(25.4 x 25.4 cm)
PC-610D Stirrer 10 x 10 in. 6795-610D 6797-610D 6798-610D 6796-610D
(25.4 x 25.4 cm)
PC-620D Stirrer/ 10 x 10 in. 6795-620D 6797-620D 6798-620D 6796-620D
Hot Plate (25.4 x 25.4 cm)
6795PR External All Models 6795PR
Temperature
Controller
Find Quality Products Online at: sales@GlobalTestSupply.com
www.GlobalTestSupply.com

About This Manual
This manual is designed to assist you in the optimal usage of your Corning®
hot plate, stirrer, stirrer/hot plate, or external temperature controller.
The manual contains English, German, French, Italian, Spanish, and Polish
versions and are also available at
Table of Contents
1.0 Safety Information ....................... 2
2.0 Operating Conditions .................... 3
Product Voltages
Hot plates, stirrers, and stirrer/hot plates are available in different voltages.
Before initial use, check that the unit you received is the correct voltage for
your location.
Warranty Registration
Register your product warranty online at
3.0 Product Controls and Indicators .......... 4
4.0 Product Connections ..................... 4
5.0 Stirring Instructions ...................... 5
6.0 Heating Instructions ..................... 6
7.0 Heating Operation ...................... 7
7.1 Principles ............................ 7
7.2 Safety ............................... 9
8.0 Repair ................................... 9
9.0 Maintenance ............................ 9
10.0 Optional Accessories .................... 11
11.0 Replacement Parts ...................... 12
12.0 Technical Specifications ................ 12
13.0 Size and Dimensions .................... 13
14.0 Troubleshooting ........................ 13
15.0 Product Disposal ........................ 14
16.0 Warranty ............................... 15
Find Quality Products Online at: sales@GlobalTestSupply.com
www.GlobalTestSupply.com
1

1.0 Safety Information
This instruction manual contains important operating and maintenance
instructions that must be read, understood, and followed by the product
user. Failure to use this product according to this instruction manual may
degrade or defeat the protection normally provided by this product. Read
this instruction manual prior to product use and keep this instruction
manual for future reference.
Product Symbols
Caution – Risk of Danger: Cautions there is material in the
instruction manual which must be read, understood, and
followed in order to preserve product safety features.
Caution – Hot Surface: Cautions that the top plate is too
hot to touch.
Indicates that the unit is plugged into power supply.
Indicates that the accessory external temperature
controller is properly plugged into the unit.
Warnings
Personal Injury
w Do not use this product in a manner other than as stated in the Operating
Conditions section as the protection provided by the equipment may be
impaired.
w This product is designed for use in laboratory environments by persons
knowledgeable in safe laboratory practices.
w Always wear safety glasses and other appropriate protective equipment
when operating this product.
Electric Shock
w This product must be connected to a grounded power outlet for safe
functioning.
w Use only the power cord supplied with the product.
w The power cord is the device available for full disconnect from mains input.
w Position the product for use so the power cord can be easily disconnected
without having to move the product.
w Disconnect the power cord before moving or cleaning the unit.
Product Damage
w Keep the product dry and clean.
w Do not immerse the product for cleaning.
w The ceramic top may break if impacted.
w The maximum gross weight placed on the top surface must not exceed
25 lbs. (11 kg).
w These units are not explosion- or spark-proof.
w Do not heat or stir volatile or flammable materials.
w Do not operate this product near volatile or flammable materials.
w Do not use this product with a metal vessel.
2.0 Operating Conditions
Corning hot plates, stirrers, and stirrer/hot plates are designed to provide
safe functioning under the following conditions:
w Indoor use
w Altitude up to 6,500 feet (2,000 meters)
w Ambient temperatures of 0°C to 30°C
w Product should be placed on a flat surface at least 12 in. (30.5 cm) from
walls, 48 in. (122 cm) from ceilings, and 12 in. (30.5 cm) from other hot
plates if using multiple units.
w Maximum relative humidity of 80% for temperatures up to 31°C, decreasing
linearly to 50% relative humidity at 40°C.
w Pollution Degree 2: Any foreign matter that may accumulate on or within
the product during normal use is not electrically conductive.
w Installation Category II: Product is designed for connection to an electrical
branch circuit inside a building with main supply voltage fluctuations not
exceeding ±10% of the nominal voltage.
Find Quality Products Online at: sales@GlobalTestSupply.com
www.GlobalTestSupply.com
32
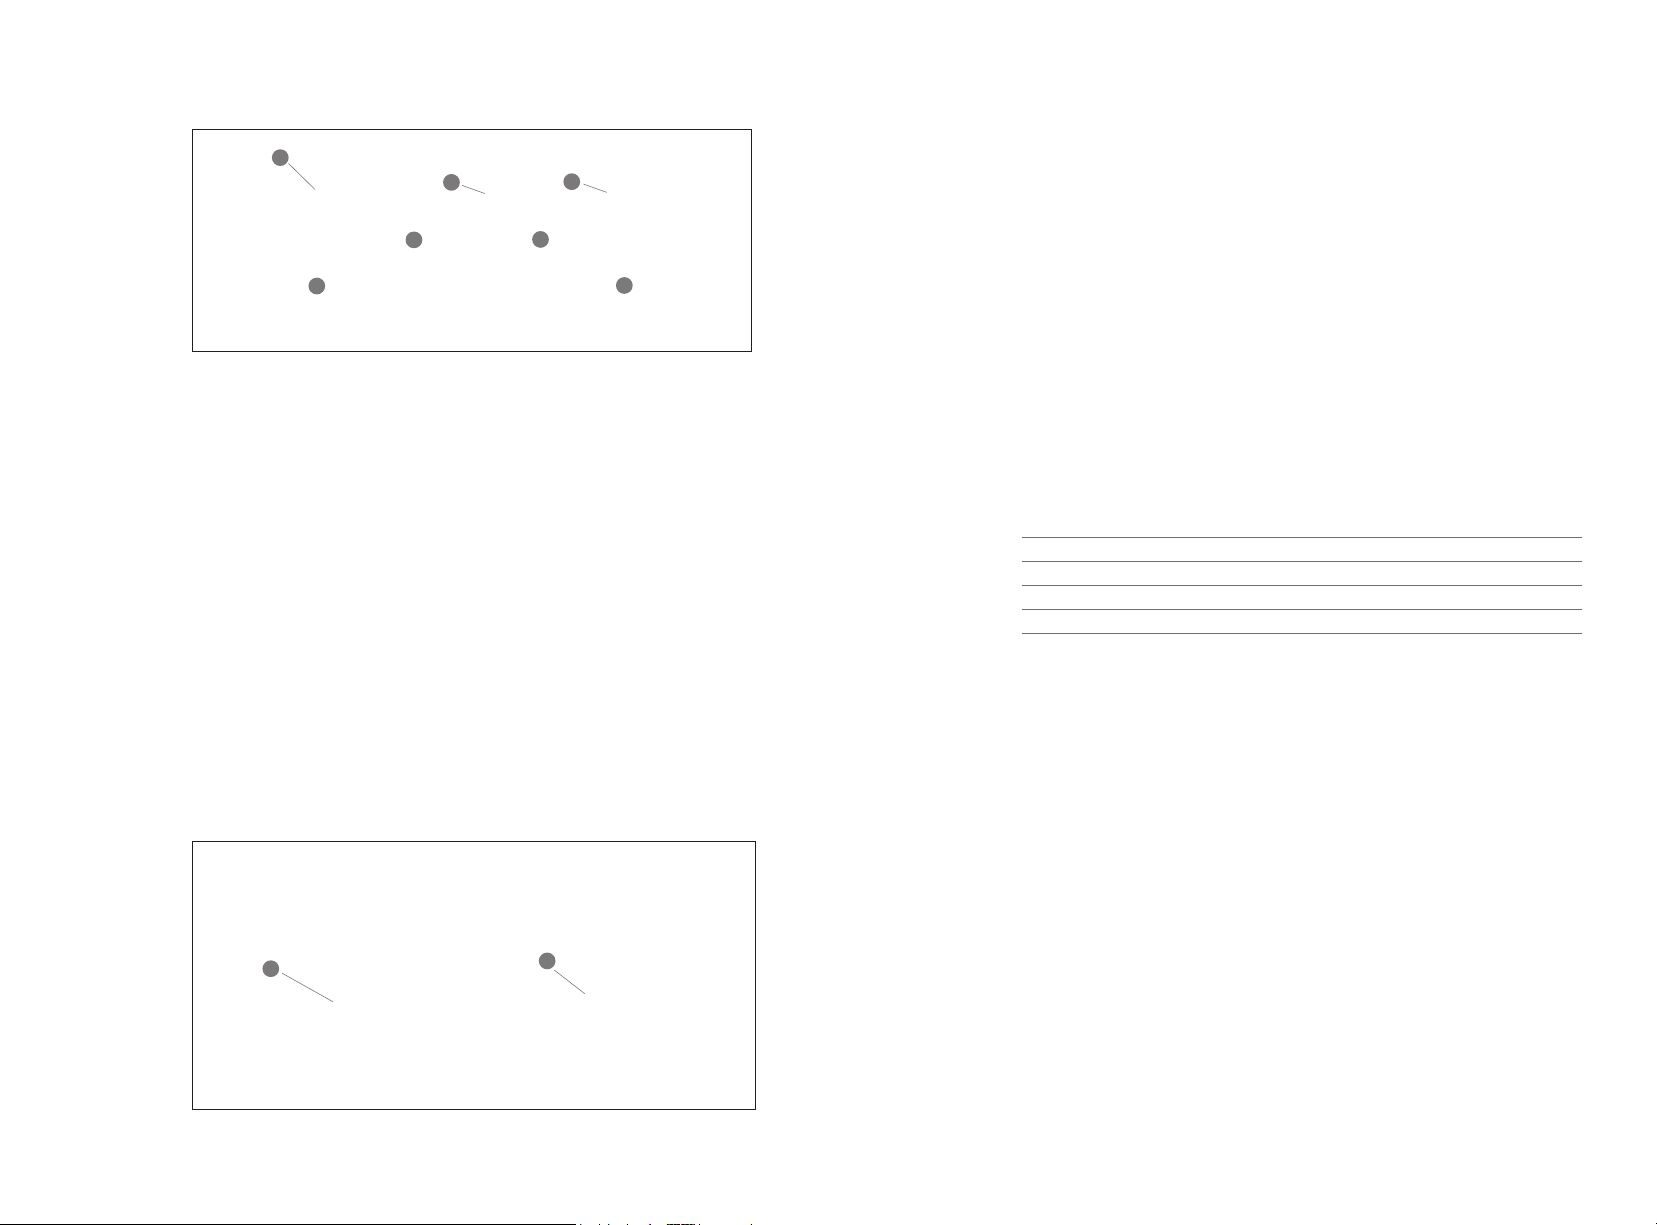
3.0 Product Controls and Indicators
1
7
3
2
6
5
4
1. Power Indicator: Illuminates at all times when the product is properly
connected to input power.
2. Stir Control Knob: Turn the knob all the way counterclockwise to turn off
stirring function. Turn the knob clockwise to set desired stirring speed.
3. Stirring Speed Display: Shows the speed set for stirring
4. Heat Control Knob: Turn the knob all the way counterclockwise to turn
off heating function. Turn the knob clockwise to set the desired heating
temperature.
5. Heating Temperature Display: Shows the temperature set for heating.
6. Hot Top Indicator: Illuminates when the temperature of the top is too
hot to touch (greater than ~60°C).
7. Temperature Probe In-Use Indicator: Illuminates when the external
temperature probe is connected to the unit.
4.0 Product Connections
1. Power Cord Input: Connect the supplied power cord into this connector.
2. External Temperature Controller Input: Connect the optional External
Temperature Controller (Corning Cat. No. 6795PR) into this connector.
2
1
To Connect the External Temperature Controller
1. Turn the Stir Control Knob and Heat Control Knob to the OFF position.
2. Disconnect power cord.
3. Insert temperature controller connector into the input connector.
4. Reconnect power cord.
5. Product is now ready for use with the External Temperature Controller.
Repeat the above process when disconnecting the Temperature Controller.
5.0 Stirring Instructions
for
1. Fill the vessel with solution to be stirred.
2. Place the stir bar into the vessel.
3. Place the vessel in the center of the top surface.
4. Turn Stir Control Knob until the Stirring Speed Display shows the
5. When desired stirring is complete, turn the Stir Control Knob to the OFF
6. Heating and stirring can be performed simultaneously with the PC-420D
NOTE: The viscosity of the stirred material will affect the ability of the
stir bar to remain coupled to the rotating ring magnet. Materials of high
viscosity must be stirred at slower speed settings.
PC-410D, PC-420D, PC-610D, PC-620D Models
desired speed. The speed setting can be adjusted according to the table
below.
Operating Range (rpm) Adjustable Increment (rpm)
60 - 100 5
100 - 200 10
200 - 400 20
400 - 1,150 50
w Flashing Display: The number will FLASH when the actual stirring
speed is not at set speed.
w Constant Display: The number will not flash when the actual stirring
speed is at the set speed. The number will remain constantly ON when
the actual stirring speed is at the set speed.
position. Allow stir bar to cease rotation before removing the vessel from
the unit.
and PC-620D models, which offer both heating and stirring functions.
Find Quality Products Online at: sales@GlobalTestSupply.com
www.GlobalTestSupply.com
54

6.0 Heating Instructions
Without External Temperature Controller for PC-400D, PC-420D,
PC-600D, and PC-620D Models
1. Fill the vessel with solution to be heated.
2. If using a PC-420D or PC-620D model and the stirring function, place the
stir bar into the vessel.
3. Place vessel in the center of the top surface.
4. Turn Heat Control Knob until the Heating Temperature Display shows
the desired temperature. The temperature setting can be adjusted in 5°C
increments.
w Flashing Display: The number shown on the Heating Temperature
Display will FLASH
set temperature.
w Constant Display: The number shown on the Heating Temperature
Display will remain constantly ON when the actual heating temperature
is at the set temperature.
w Hot Top Indicator: The Hot Top Indicator will be ON at all times when
the temperature of the top surface is too hot to touch (greater than
60°C).
~
w The Hot Top Indicator will FLASH when the Heat Control Knob is
turned OFF
w The Hot Top Indicator will be OFF when the temperature of the top is
less than
~
Caution: The Hot Top Indicator will turn OFF when the power cord is
disconnected from the product even if the temperature of the top surface
is still too hot to touch.
With External Temperature Controller, Corning Cat. No. 6795PR
for PC-400D, PC-420D, PC-600D, PC-620D, and 6795PR Models
1. Connect the External Temperature Controller to the connector on the
back of the unit.
w Temperature Probe in Use Indicator: This will illuminate when the
External Temperature Controller is properly connected.
2. Fill the vessel with solution to be heated.
3. If using a PC-420D or PC-620D model and the stirring function, place the
stir bar into the vessel.
4. Place the vessel in the center of the top surface.
when the actual heating temperature is not at the
but the top surface is still too hot to touch.
60°C.
5. Insert the tip of the External Temperature Probe into the solution.
w The tip should be located in the center of the vessel and at
approximately one-half of the depth of the solution.
6. Secure the position of the External Temperature Controller by using a
ring stand/support rod and clamp.
w Ensure the cable of the External Temperature Controller does not come
into contact with the heating surface.
7. Turn the Heat Control Knob until the Heating Temperature Display
shows the desired heating temperature.
w Flashing Display: The number shown on the Heating Temperature
Display will FLASH when the actual heating temperature is not at the
set temperature.
w Constant Display: The number shown on the Heating Temperature
Display will remain constantly ON when the actual heating temperature
is at the set temperature.
w Hot Top Indicator: The Hot Top Indicator will be ON at all times when
the temperature of the top surface is too hot to touch (greater than
60°C).
~
w The Hot Top Indicator will FLASH when the Heat Control Knob is
turned OFF
w The Hot Top Indicator will be OFF when the temperature of the top is
less than
but the top surface is still too hot to touch.
60°C.
~
Caution: The Hot Top Indicator will turn OFF when the power cord is disconnected from the product even if the temperature of the top surface is
still too hot to touch.
7.0 Heating Operation
7.1 Principles
The heating element and a temperature sensor are located just beneath
the ceramic top surface of the product. The microprocessor-controlled heat,
generated by the heating element, is based upon the sensor temperature
and the value set on the Heating Temperature Display. When the sensor
temperature is not within range of the value set on the display, the display
will FLASH
will remain constantly ON.
The Heating Temperature Display does not indicate the actual temperature
of materials placed on top of the product or the actual temperature of the
ceramic top surface.
. When the sensor temperature is within range, the value displayed
Find Quality Products Online at: sales@GlobalTestSupply.com
www.GlobalTestSupply.com
76

The following table shows a typical difference between the temperature
set on the Heating Temperature Display and the actual temperature
measurement of the ceramic top surface.
Actual Actual
Temp. Set Top Surface Temp. Set Top Surface
on Display (°C) Temp. (°C) on Display (°C) Temp. (°C)
50 45 350 285
100 85 400 325
150 125 450 365
200 165 500 405
250 205 550 440
300 245
(This information was taken using a 6795-420D with no top load in 20°C
ambient conditions).
Using the External Temperature Controller (Corning Cat. No. 6795PR) enables
precision temperature control of materials placed in vessels on top of
the product.
When the External Temperature Controller is connected to the product, the
closed loop control process is extended to include temperature input from
the External Temperature Controller. The microprocessor-controlled heat,
generated by the heating element, is based upon the sensor temperature
located in the tip of the External Temperature Controller and the value set
on the Heating Temperature Display. When the sensor temperature is not
within range of the value set on the display, the display will FLASH. When
the sensor temperature is within range, the value displayed will remain
constantly ON
.
To directly control the temperature of liquid in a vessel on the top surface,
place the External Temperature Controller into the liquid and connect the
Controller to the product. The Heating Temperature Display shows the
temperature of the liquid and can be used to adjust the temperature of
the liquid.
See Section 10.0 for ordering information.
Caution: The top surface and the vessel used may be at substantially higher
temperatures than indicated by the setting on the Heating Temp erature
Display as the controller regulates the liquid temperature inside the vessel.
7.2 Safety
The microprocessor-controlled system has built-in error routines to detect
product operation in some unfavorable conditions. The type of error routines which may be active in a product varies depending upon the functionality of the model and the operating software version.
If an error routine is engaged, the product will typically shut down. Some
error routines will display an error code number in the left digital location
of the Heating Temperature Display when the product is shut down.
A product shut down by an error routine must be disconnected and reconnected to mains input before it can be used again.
Caution: Error routines built into these products do not substitute the need
to use these products per the specified operating conditions and according
to safe laboratory practices. There are potential failure modes in product
functionality or in the process of use that could result in uncontrolled or
unexpected heating of the top surface. Reaction plans should be developed
and safety precautions put in place based on the worse case scenario that
any materials placed on the top surface could be subjected to a continuous
supply of heat, raising the material temperature to levels in excess of 550°C.
8.0 Repair
There are no direct user serviceable components inside this series of
products. A list of available replacement parts are listed in Section 11.0.
9.0 Maintenance
Power
Caution: Disconnect power to the product by unplugging the power cord
before performing any maintenance or inspection procedures.
w Inspect the power cord regularly and replace if damaged. Use only
replacement power cords available from Corning or Corning authorized
product distributors.
Find Quality Products Online at: sales@GlobalTestSupply.com
www.GlobalTestSupply.com
98

Ceramic Top Plate
w These products are supplied with a Pyroceram® top that is easy to clean
and highly resistant to scratches, corrosion, and chemical attack.
w The ceramic top may break during use if not properly maintained.
w Keep the ceramic top clean. A nonabrasive cleaner may be used to clean
the ceramic top.
w Inspect the ceramic top for damage during cleaning.
w Discontinue product use if the ceramic top is chipped, etched, or shows
excessive scratching. A replacement top can be ordered (Section 11.0).
General
w It is important to keep this product dry and clean.
w Remove minor exterior liquid spills promptly.
w Clean exterior surfaces with a nonabrasive cleaner. Do not reconnect
product to power input until all cleaned surfaces have dried.
w If liquid or wet solid material gets inside the product, immediately
disconnect the power to the product and discontinue use.
Accessories (Shown with Corning Cat. No. 6795-420D)
10.0 Optional Accessories
Corning Cat. No. Description
6795PR External Temperature Controller for digital display Hot Plates and
Hot Plate/Stirrers. Use with all PC-400D, 420D, 600D, and 620D models.
FEP-coated stainless steel.
440129 Vertical Support Rod. Supplied as two 9 in. (22.86 cm) rods which can be
screwed together. Use with all PC-XXXD series products. Stainless steel.
440140 Boss Head Clamp. Use for connecting the 440141 Holding Rod at a 90° angle
to the 440129 Support Rod. Aluminum.
440141 Holding Rod. Use for holding the 6795PR External Temperature Controller in
position. Aluminum.
6795KIT Universal Accessories Kit includes: 6795PR, 6970SR, and 440129
6795-420KIT Kit includes: 6795-420D Stirrer/Hot Plate, 6795PR, 6970SR, and 440129
6795-620KIT Kit includes: 6795-620D Stirrer/Hot Plate, 6795PR, 6970SR, and 440129
400430 PTFE-coated magnetic stir bar, .39 x 2 in. (1 x 5.1 cm) – recommended size
for all PC-610D and 620D models
401435 PTFE-coated magnetic stir bar, .39 x 1 in. (1 x 2.5 cm) – recommended size
for all PC-410D and 420D models
6970SR Stir bar retriever, polypropylene
Find Quality Products Online at: sales@GlobalTestSupply.com
www.GlobalTestSupply.com
1110

11.0 Replacement Parts
Corning Cat. No. Description Model Usage
411007 Power cord PC-400D/410D/420D, 120V
410956 Power cord PC-600D/610D/620D, 120V
411021 Power cord PC-400D/410D/420D and PC-600D/610D/620D, 100V
410942 Power cord PC-400D/410D/420D and PC-600D/610D/620D,
230V (UK plug)
440124 Power cord PC-400D/410D/420D and PC-600D/610D/620D,
230V (Euro Plug)
Contact Corning Ceramic top plate/ PC-400D/410D/420D, All Voltages
Customer Service element assembly,
5 x 7 in.
Contact Corning Ceramic top plate/ PC-600D/610D/620D, All Voltages
Customer Service element assembly,
10 x 10 in.
Contact Corning PC control board —
Customer Service
440135 Control knob All models
12.0 Technical Specifications
Power
120V/60Hz 100V/60Hz 230V/50Hz 230V/50Hz Temp. Stir Range
Model No. Type (6795 models) (6797 models) (6796 models) (6798 models)1 Range2 (rpm) Weight
PC-400D Hot 628W/ 548W/ 628W/ 628W/ 5°C-550°C — 6.0 lbs.
Plate 5.3A 5.5A 2.7A 2.7A (41°F-1,022°F) (2.7 kg)
PC-600D Hot 1043W/ 1043W/ 1043W/ 1043W/ 5°C-550°C — 10.0 lbs.
Plate 8.7A 10.5A 4.5A 4.5A (41°F-1,022°F) (4.5 kg)
PC-410D Stirrer 73W/ 78W/ 73W/ 73W/ — 60-1,150 7.0 lbs.
0.7A 0.8A 0.3A 0.3A (3.2 kg)
PC-610D Stirrer 73W/ 78W/ 73W/ 73W/ — 60-1,150 11.5 lbs.
0.7A 0.8A 0.3A 0.3A (5.2 kg)
PC-420D Stirrer/ 698W/ 623W/ 698W/ 698W/ 5°C-550°C 60-1,150 7.0 lbs.
Hot Plate 5.9A 6.3A 0.3A 0.3A (41°F-1,022°F) (3.2 kg)
PC-620D Stirrer/ 1113W/ 1113W/ 1113W/ 1113W/ 5°C-550°C 60-1,150 11.5 lbs.
Hot Plate 9.3A 11.2A 4.8A 4.8A (41°F-1,022°F) (5.2 kg)
1
Cat. Nos. beginning with 6798 in 230V are non-European configuration models.
2
The Temperature Range using the External Temperature Controller is 5°C - 200°C (41°F - 392°F).
13.0 Size and Dimensions
Model No. Top Plate Size Product Dimensions
PC-400D/410D/420D 5 x 7 in. 4.25 x 7.75 x 11 in.
(12.7 x 17.8 cm) (10.8 x 19.7 x 28 cm)
PC-600D/610D/620D 10 x 10 in. 4.625 x 11 x 15.375 in.
(25.4 x 25.4 cm) (11.75 x 19.7 x 39.05 cm)
14.0 Troubleshooting
w I have a beaker of water on my hot plate and set the temperature for
550°C. Why does the display setting blink and not remain constant?
The display will blink at any time when the temperature sensor is not
within range of the set temperature value. The temperature measured
by the sensor is a composite of the temperature of the heating element
located beneath the sensor, the ceramic top above the sensor, and the
very small air space around the sensor. Water requires a substantial
amount of heat in order to boil yet remains at a constant temperature
of 100°C for the duration of the boiling process. Although the heating
element is producing maximum heat at the 550°C setting, the water
consumes this heat so quickly during the boiling process that the heat
is unable to raise the temperature measured by the sensor to within the
range of the 550°C set value.
w How long does it take to bring a beaker of water to a boil?
Using a 600 mL PYREX® beaker with 400 mL of water at 25°C, it takes
approximately 15 minutes to bring the water to a full, rolling boil.
w Can I use a metal tray on top of my Corning
No. The metal will act as a heat sink, and have a high probability of
creating an abnormal heating condition. If an abnormal condition is
detected, the product will shut down. A metal vessel will also scratch the
ceramic top plate.
w The stir bar keeps decoupling. Why and what can I do to stop this?
These units are programmed to minimize decoupling. However, liquid
viscosity, stir bar magnetic strength, vessel used, and speed changes
can cause decoupling. High viscosity liquids must be stirred at slower
speed settings. The magnetic strength of stir bars can weaken over time
and may need to be replaced. The vessels used need to have thin, flat
bottoms to insure optimal performance. Rapid decreases in stir speed
can cause decoupling as the magnet slows down quicker than the stir bar
and the liquid.
w What size vessel should I use?
The vessels used on the top of a hot plate must not be larger than the
top plate.
®
hot plate?
Find Quality Products Online at: sales@GlobalTestSupply.com
www.GlobalTestSupply.com
1312

w Corning sells replacement parts. Can I do the repairs myself instead of
sending it in to Corning’s equipment repair department?
When repairs are completed by Corning or a Corning authorized repair
facility, the performance and safety of the product will be verified before
being returned to you. We do sell replacement parts so customers can
complete repairs themselves. It is recommended that only people knowledgeable in electronics complete those repairs. There is no warranty or
return on equipment replacement parts.
15.0 Product Disposal
According to Directive 2012/19/EU of the European Parliament and Council
of 4th July 2012 on waste and electronic equipment (WEEE) as amended,
Corning® Hot Plates, Stirrers, and Stirrer/Hot Plates are marked with the
crossed-out wheeled bin and must not be disposed of with domestic waste.
Consequently, the buyer shall follow the instructions for reuse and recycling
of waste electronic and electrical equipment (WEEE) provided with the
products and available at the following link:
16.0 Warranty
Corning Incorporated (Corning) warrants that this product will be free from
defects in material and workmanship for a period of two (2) years from
date of purchase. CORNING DISCLAIMS ALL OTHER WARRANTIES WHETHER
EXPRESSED OR IMPLIED, INCLUDING ANY IMPLIED WARRANTIES OF
MERCHANTABILITY OR OF FITNESS FOR A PARTICULAR PURPOSE. Corning’s
sole obligation shall be to repair or replace, at its option, any product or
part thereof that proves defective in material or workmanship within
the warranty period, provided the purchaser notifies Corning of any such
defect. Corning is not liable for any incidental or consequential damages,
commercial loss or any other damages from the use of this product.
This warranty is valid only if the product is used for its intended purpose
and within the guidelines specified in the supplied instruction manual.
This warranty does not cover damage caused by accident, neglect, misuse,
improper service, natural forces, or other causes not arising from defects
in original material or workmanship. This warranty does not cover motor
brushes, fuses, light bulbs, batteries, or damage to paint or finish. Claims
for transit damage should be filed with the transportation carrier.
In the event this product fails within the specified period of time because
of a defect in material or workmanship, contact Corning Customer Service
Corning’s Customer Service team will help arrange local service where
available, coordinate a return authorization number, or provide a return
authorization number and shipping instructions. Products received without
proper authorization will be returned. All items returned for service should
be sent postage prepaid in the original packaging or other suitable carton, padded to avoid damage. Corning will not be responsible for damage
incurred by improper packaging. Corning may elect for onsite service for
larger equipment.
Some states do not allow limitation on the length of implied warranties
or the exclusion or limitation of incidental or consequential damages. This
warranty gives you specific legal rights. You may have other rights which
vary from state to state.
No individual may accept for, or on behalf of Corning, any other obligation
of liability, or extend the period of this warranty.
For your reference, make a note of the model and serial number, date of
purchase, and supplier here.
Model No. _______________________________________________________________
Serial No. ________________________________________________________________
Date Purchased ___________________________________________________________
Supplier _________________________________________________________________
Find Quality Products Online at: sales@GlobalTestSupply.com
www.GlobalTestSupply.com
1514
 Loading...