

Cornerstone 933-3824 Quick Start Manual
N Structure Kit
CLASSIC CAR RESTORATION
933-3824
© 2013 Wm. K. Walthers, Inc., Milwaukee, WI 53218 waltherscornerstone.com I-933-3824
Thanks for purchasing this Cornerstone kit. All parts are styrene plastic, so use compatible glue and paint to assemble and
finish your model. Please read these instructions and study the drawings before starting construction.
From mass-produced “grocery getter” to hand-built, rolling work of art, very few machines have endured themselves to people
quite as much as automobiles. Whether a reminder of major events in our lives, an investment, or the realization of a life-long
dream, collecting and restoring cars is not only a fun hobby but big business as well. For many, the long ride from a hulk that
was driven into the ground to prize-winning show car or family heirloom starts on the floor of a restoration shop. Much of what
needs to be done will depend on the vehicle’s overall condition and the owner’s wishes. As a result, a shop has to be set up to
handle everything from basic buffing and polishing, all the way to a complete frame-off restoration. This requires all kinds of
specific departments to tackle engine, drive train and transmission, cooling and other systems, electrical work, interiors, a
complete body shop equipped to do repairs and painting, along with a complete machine shop to fabricate items that the
parts department was unable to locate. While the inside of the shop may be high-tech, many are located in older garage
facilities or utilize modern buildings constructed to look like the originals, helping carry on the historic heritage.
This classic structure makes a great freestanding restoration shop, but could easily serve as the most visible portion of a
larger operation. To complete your scene, visit your hobby shop, check out the current Walthers N&Z Scale Model Railroad
Reference Book, or see walthers.com for period vehicles, figures and many other details.
5
15 x2
26 x2
22
29
27 x2
14 x2
14
27
15
26
22
29
13
28
21
3
1
13
28
15
26
24
16
17
25
28
44
24
16
2
26 x5
15 x5
4
23
7 x4
8
9
10
6
11
8
12
11
10
9
8
20
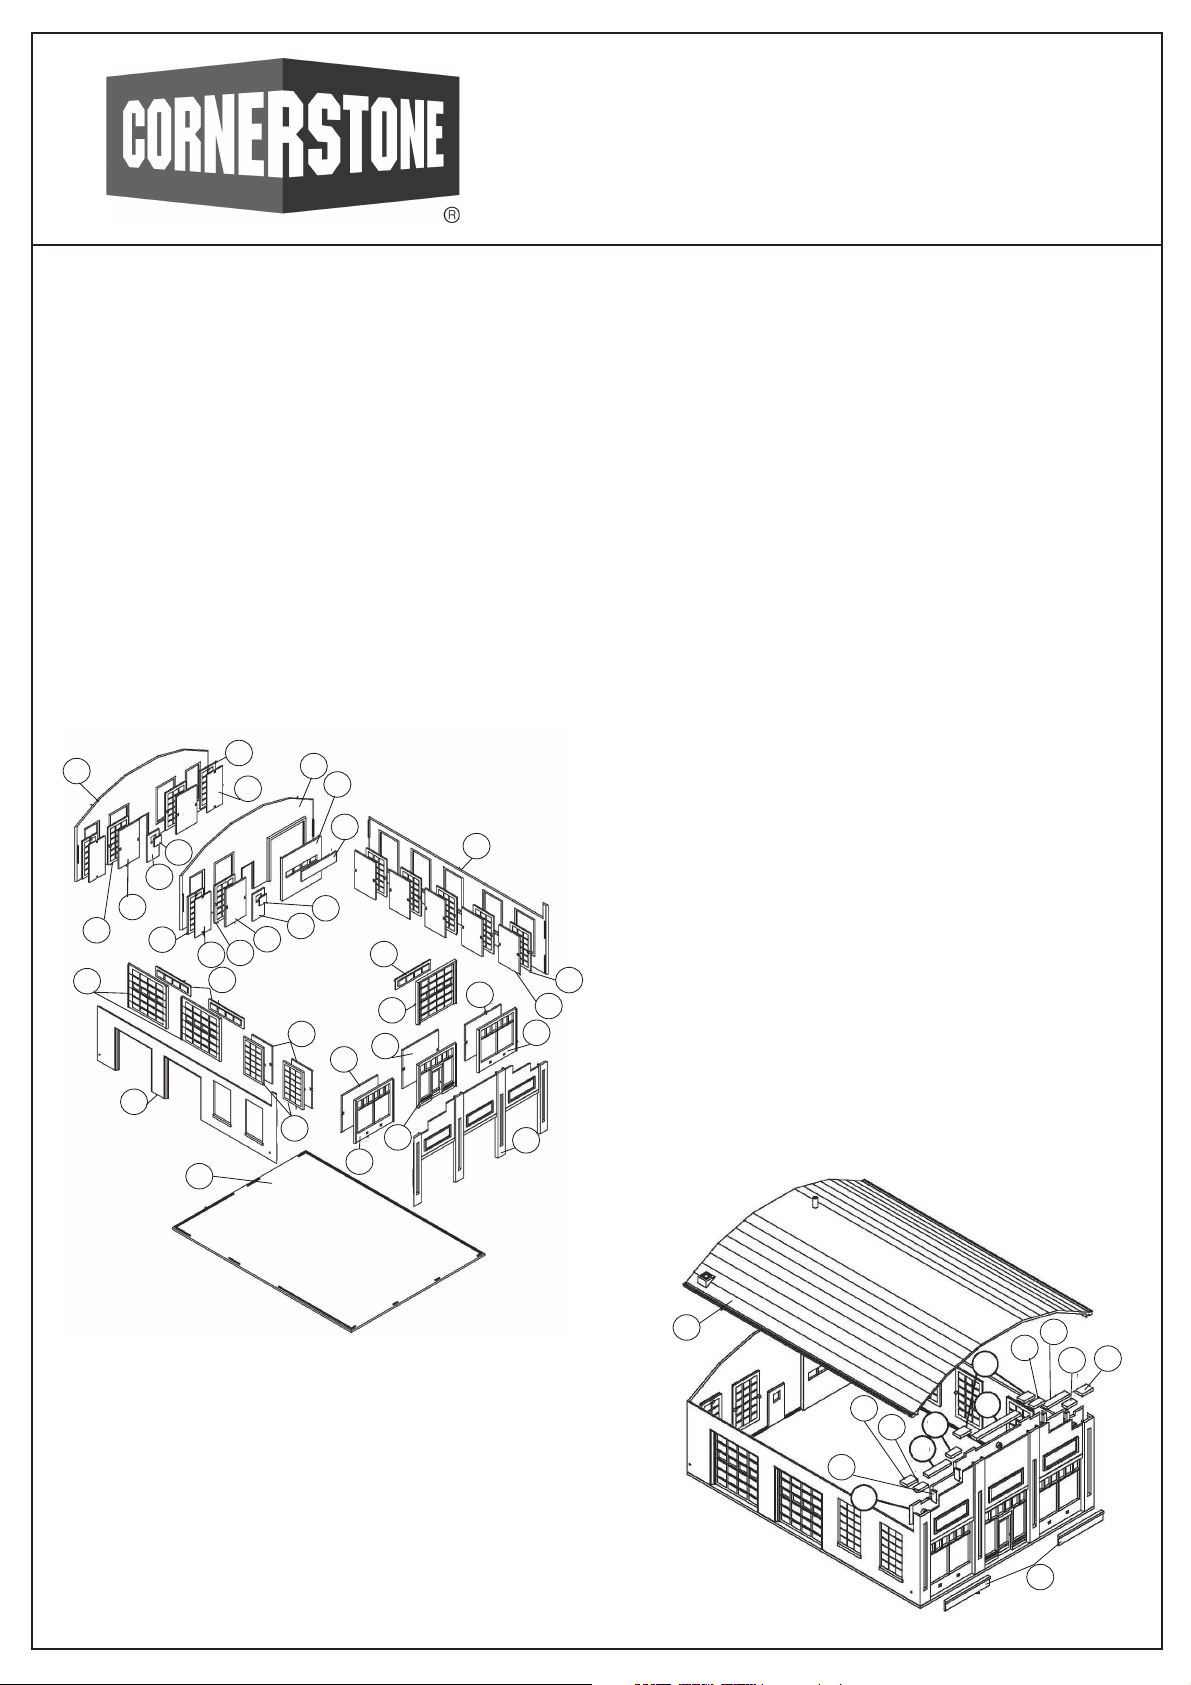
1) Start by carefully removing the vertical post in the center of Large
Window (16) and directly above the Entrance Door (17). This will
change the look of the part, and allow decal application later. Snap
"Glass" (24, 25, 26, 27) to the back of the respective Window Frames
(14, 15, 16, 17). A drop of glue on each pin will secure them in place.
Glue the Overhead Door "Glass" (28) to the back of each Door (13, 44).
Then glue the Small Door "Glass" (29) to the back of Door (22).
2) Glue the Doors (22, 13 or 44) and Windows (14, 15,
16, 17) to the openings in the back of the appropriate
walls (2, 3, 4, 5, or 21). Note #1: We selected Wall #21
to create a "Service Department" with this kit. Wall #5
can be used, but the Service Department and Decal will
now appear on the Side Wall (3). Note #2: You can also
customize Front Wall #2 - either install all Windows (16
and 17 - in any order), or one Overhead Door (44) and
two Windows (16 or 17) in the openings. Overhead Doors
(13) can be glued in place or left off to model open
doorways.
3) Glue the Walls ( 2, 3, 4, 5 or 21) together using the Base as a
guide. NOTE: Do not glue the Base until decaling is finished.
4) Glue Brick Inserts (20) into Windows (16) on the Front Wall
(2). Glue the Front Wall Back (6) in place. Then glue the four
Wall Corners (7). Next, glue Wall Caps (8, 9, 10, 11, 12) on as
shown.
5) The Roof (23) can be glued in place or simply set in place
after assembly is complete to add interior details, sold separately.

13) Glue the Service Department Oil Tank parts (36, 37,
38, 39, 40) together and place
where desired.
41
42
43
43
43
35
18
19
43
36
37
40
39
38
38
39
6) Assemble the Roof Sign halves (47, 48) as shown. Place
the top of the Sign on a flat surface as the glue dries to ensure
the assembly is level.
7) Glue Light Conduits (45) into each recess on the backside of
parts 47 and 48, and 49. Make sure they are straight and level.
When dry, add Sign Lamps (46) to the tip of each Conduit as
shown.
8) Glue the Downspouts (43) into the holes at the bottom of the
Roof Gutters and Side Walls.
9) Add the Electric Box (42) and Electric Feed (41) where desired
on the Back Wall.
10) Place the Heating Oil Tank
(35) along any wall you chose.
The opening on the back faces
the structure.
11) Glue the Chimney together
(18, 19) and onto the Roof (23).
12) Glue the Roof Sign Assembly and Font Wall Sign Assembly from step 7 to the roof and
wall as shown.
DECALING
1. The decals printed backward are the only two that must be placed on the inside of Glass parts (#24) to appear correct.
Careful positioning will hide the edges of the decals behind the window frames.
2. The "Honk To Open" decal is individual letters. They fit the recessed squares cast into Door (13) or start with the panels
that are directly under the window and work down.
3. The "456" decal is the business address. This decal fits the space above the Entrance Door (17).
DECAL APPLICATION
1. Trim out the decal and place in a cup of warm water for 15 seconds. Remove and let stand for 1 minute, or until the decal
moves freely. Slide the decal onto the model surface and gently blot off any remaining water.
2. Lightly Brush Micro Sol® on top. This softens the decal and makes it confirm to irregular surfaces. DO NOT TOUCH the
decal while wet.
3. When thoroughly dry, check for trapped air bubbles. Prick them with the point of a pin or hobby knife and apply more Micro
Sol®.
47
48
45 x8
46 x8
49
45 x3
46 x3
 Loading...