

Page 1
TITAN BARATTO
CORNELY
CORNELY LG3
English
OPERATOR'S MANUAL
NV. A. DE KONINCK
Avenue Sleeckx 84-86
B-1030 BRUSSELS -BELGIUM
Phone : ++32/2 216 31 40 Fax : ++32/2 242 41 89
E-mail : [email protected] Web : www.titansew.com
Page 2

C O N T E N T
C_LG3_MANUAL
11/01/2006
1
CHAPTER 1 : INSTALLATION 2
1. Fly Wheel Rotation 2
2. Training 2
3. Sewing 2
CHAPTER 2 : MECHANICAL ADJUSTMENT 3
1. Needle Setting 3
2. Needle Bar Orientation 4
3. Needle Plate Setting 6
4. Feeddog Setting 6
5. Foot Pressure Adjustment 7
CHAPTER 3 : THREADING 8
CHAPTER 4 : STITCH LENGTH 14
CHAPTER 5 : THREAD TENSION 14
CHAPTER 6 : LUBRICATION 16
CHAPTER 7 : INSTALLATION OF THE BOBIN STAND 17
CHAPTER 8 : INSTALLATION OF THE EURAMOT MOTOR 18
CHAPTER 9 : SPARE PARTS MANUAL 19
Page 3

CHAPTER 1 : INSTALLATION
C_LG3_MANUAL
11/01/2006
2
FLY WHEEL ROTATION
While sitting in front of the machine and you put your hand on the top of the Fly
Wheel you have to push the flying wheel away from you (backwards).
The Fly Wheel must turn clockwise. NEVER PULL !!
TRAINING
To use the Cornely LG3 is not that difficult, the only thing you have to do is
practising.
You have to begin to sew on the piece of paper on which the design is drawn.
You have to follow this design by operating the crank.
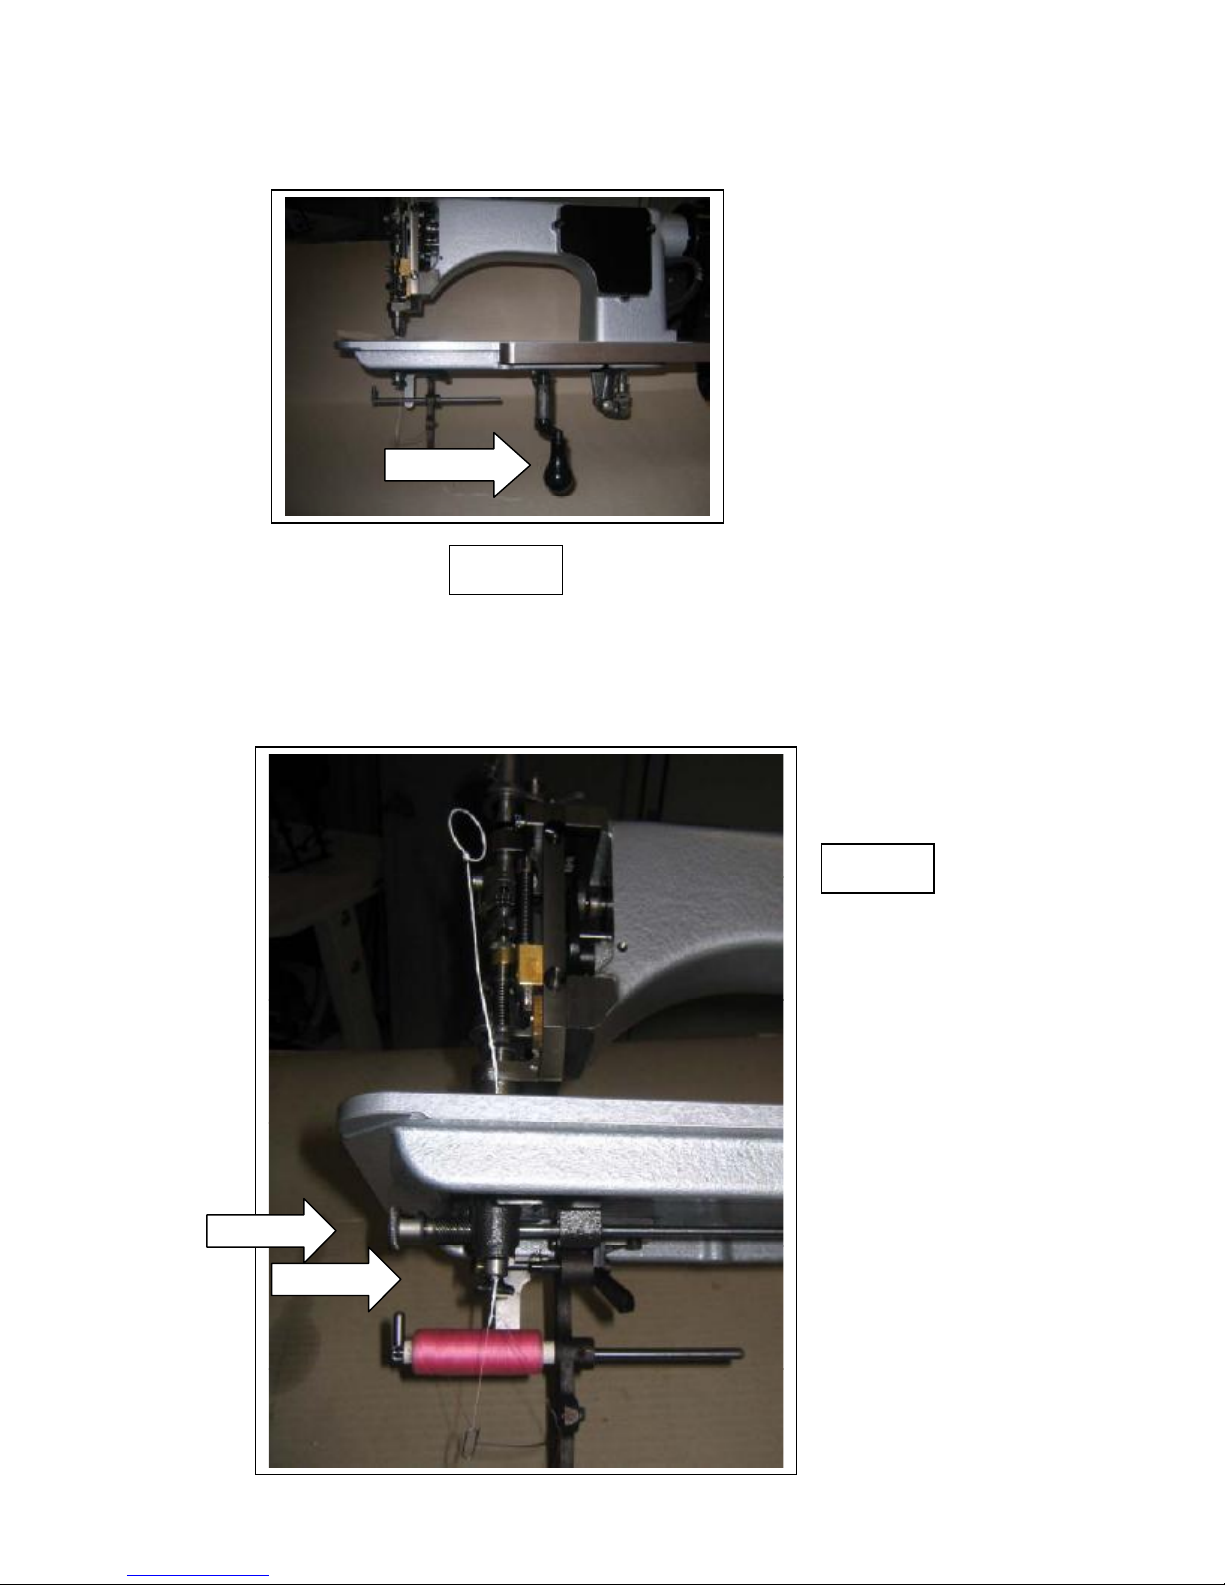
The so called hook (=needle) will punch along this pre-traced design together with
the movements of the Crank C.00797 (Fig. 1B).
After a while you can handle it perfectly.
TO START SEWING
You have to start the motor by pressing the pedal and the motor starts running.
The harder you push the faster the motor will run.
To stop the motor you have to release the pedal so the speed will decrease.
Page 4
CHAPTER 2 : MECHANICAL ADJUSTMENT
C_LG3_MANUAL
11/01/2006
3
1. NEEDLE SETTING
Select carefully the needle according the thickness of the thread.
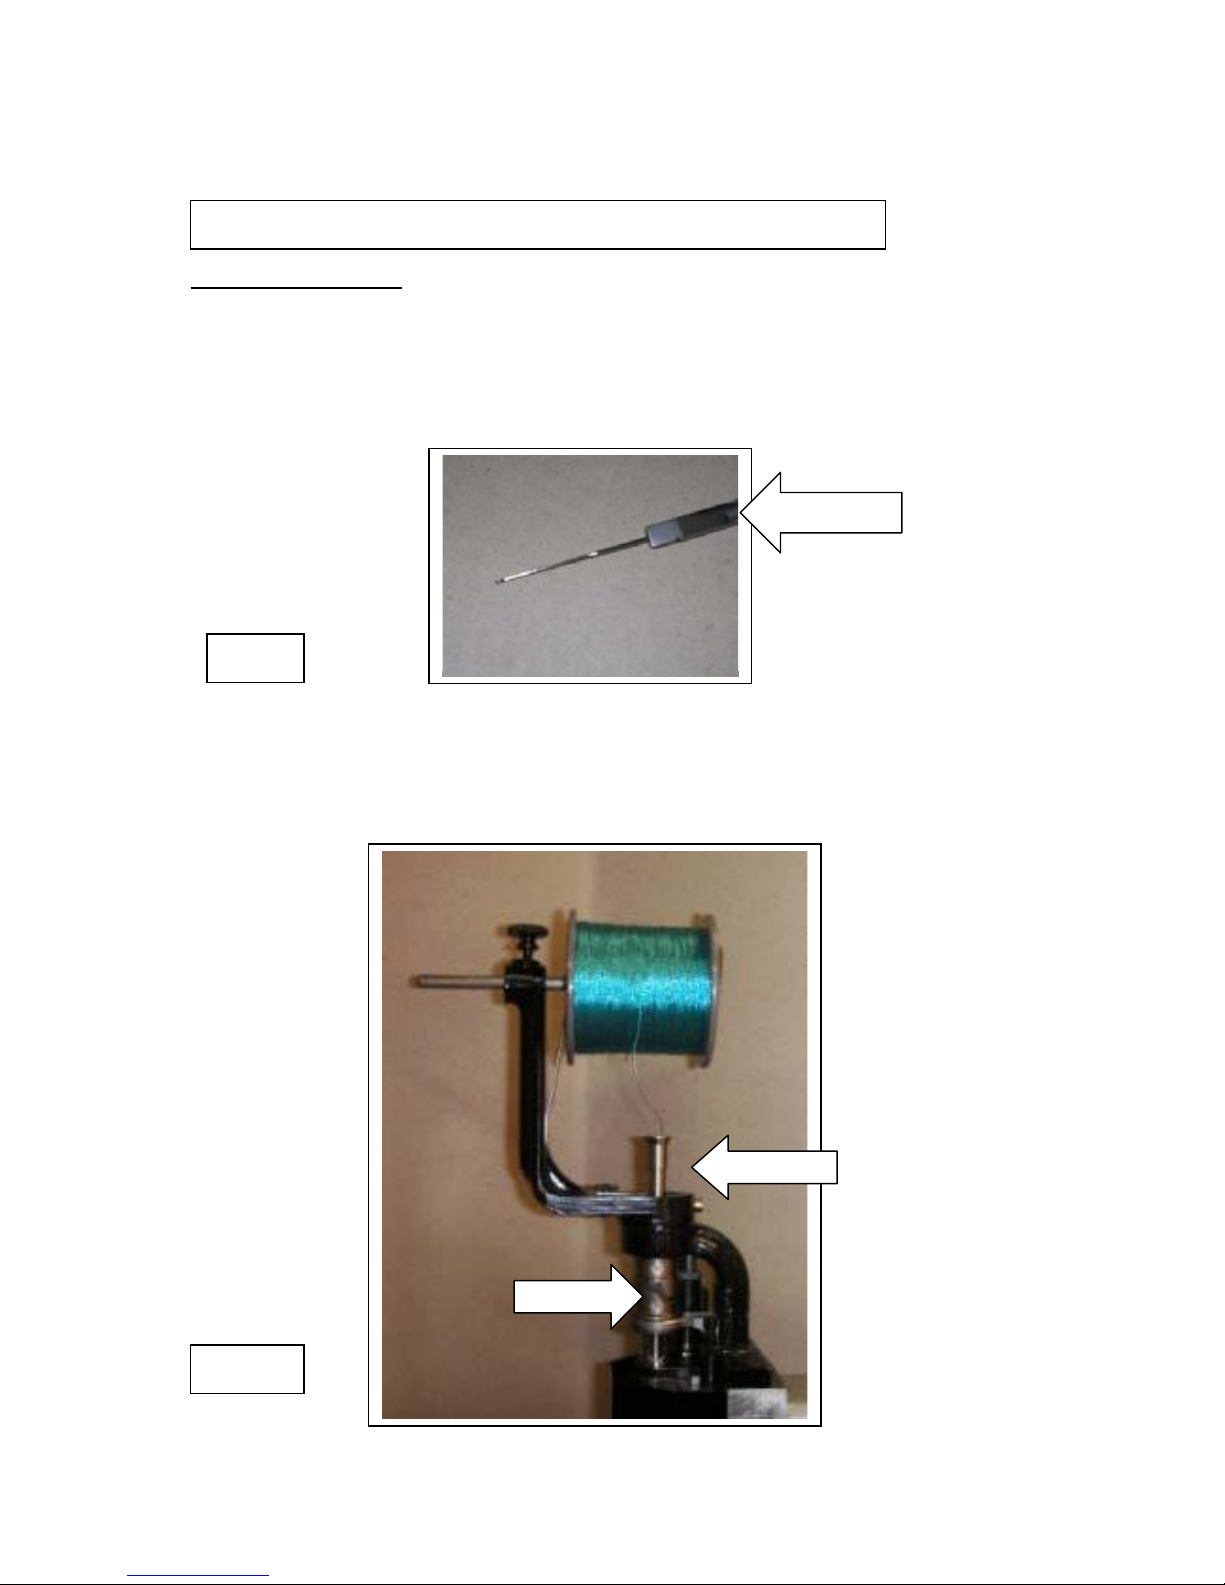
Screw tightly the needle into the needle holder C.01120 by means of the flat
tweezer delivered with the accessories. The needle should be positioned in the flat
opening of the needle holder. (Fig. A)
C.01120
FIG. A
The needle holder is passing through the tube C.10273 and should be placed in
the correct position with the screw C.10298 by hand and adjust the height so that
the material can slide under the needle without touching it. (Fig. B)
C.10273
C.10298
FIG. B
Page 5
The needles have different sizes and named as :
C_LG3_MANUAL
11/01/2006
4
Hook N° 1 : Part n° : C.0253SC070
Hook N° 2 : Part n° : C.0253SC080
Etc. C.0253SC090
C.0253SC100
C.0253SC110
C.0253SC120
The lower side of this hook is guide into C.00601. You have to adjust the lower
guide so that the material can slide under needle without touching it.
You have different kind of guides according to the thickness of the hooks.
Guide Part n° : C.00601C01 for hook : C.0253SC070
C.00601C02 for hook : C.0253SC080
C.00601C03 for hook : C.0253SC090
C.00601C04 for hook : C.0253SC100
C.00601C05 for hook : C.0253SC110
C.00601C06 for hook : C.0253SC120
2. NEEDLE BAR ORIENTATION
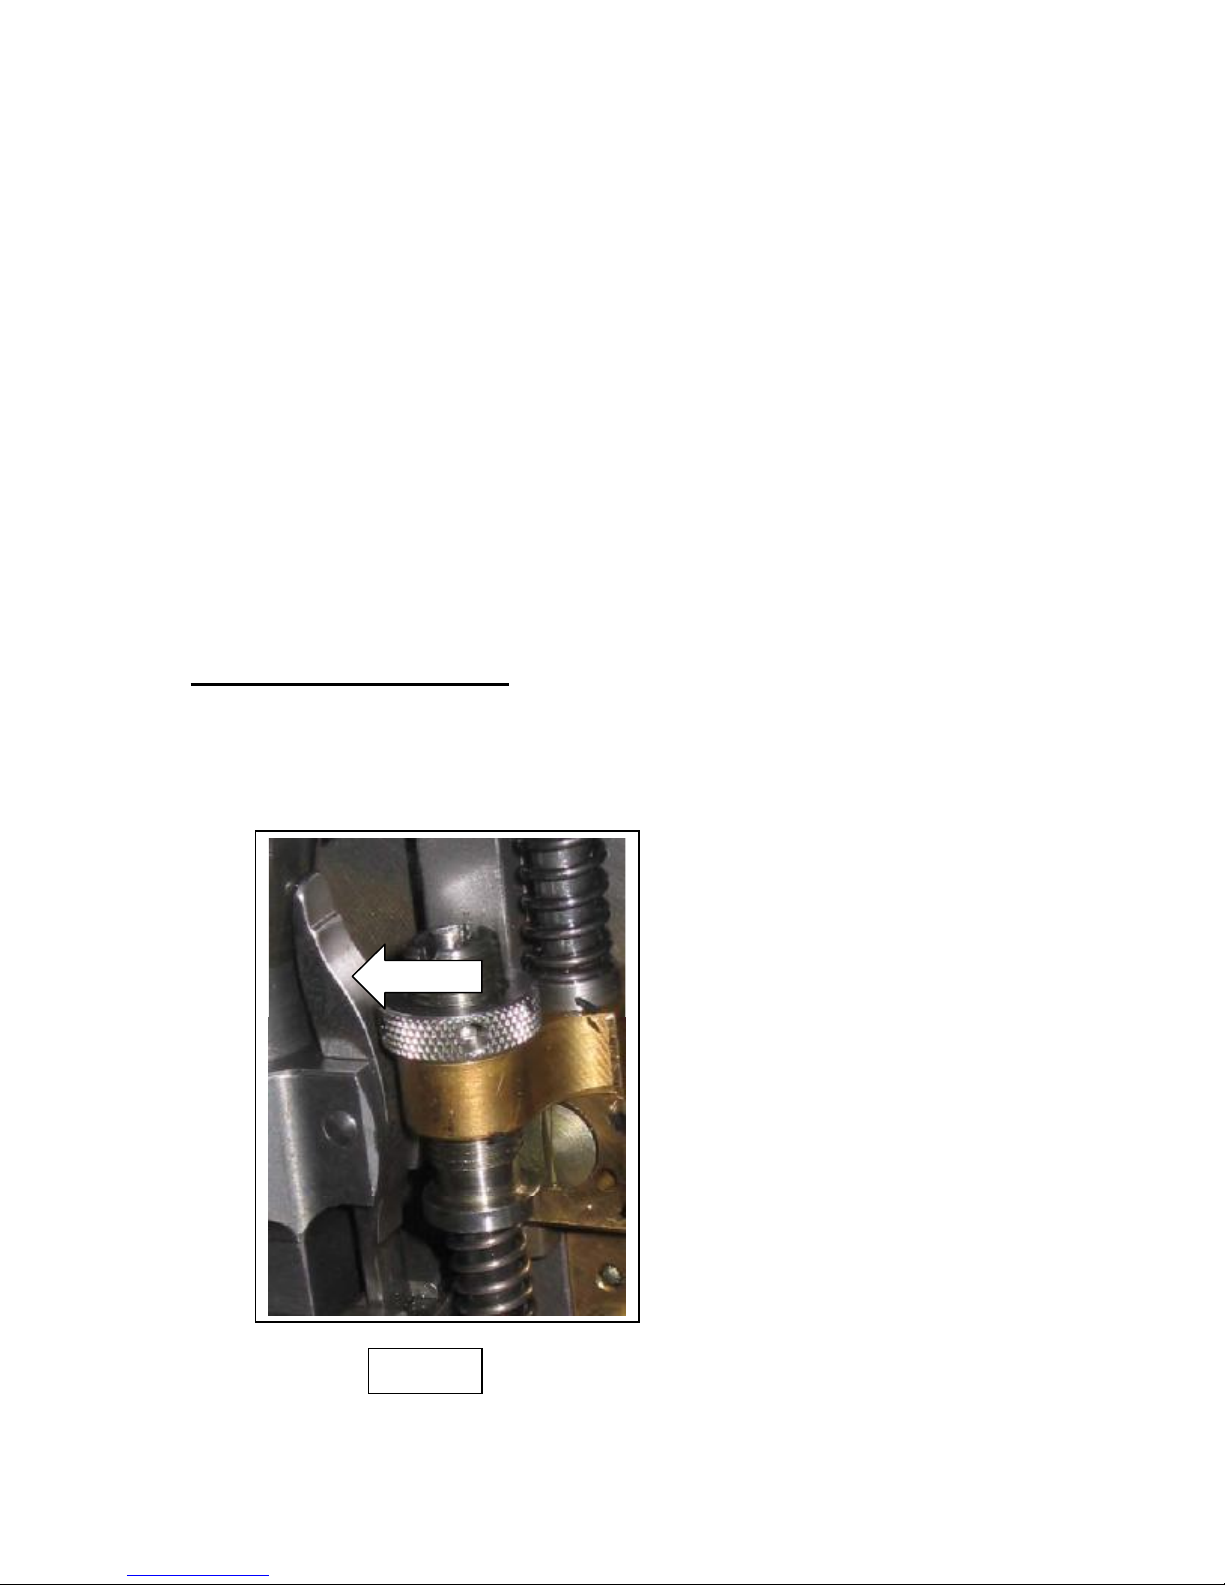
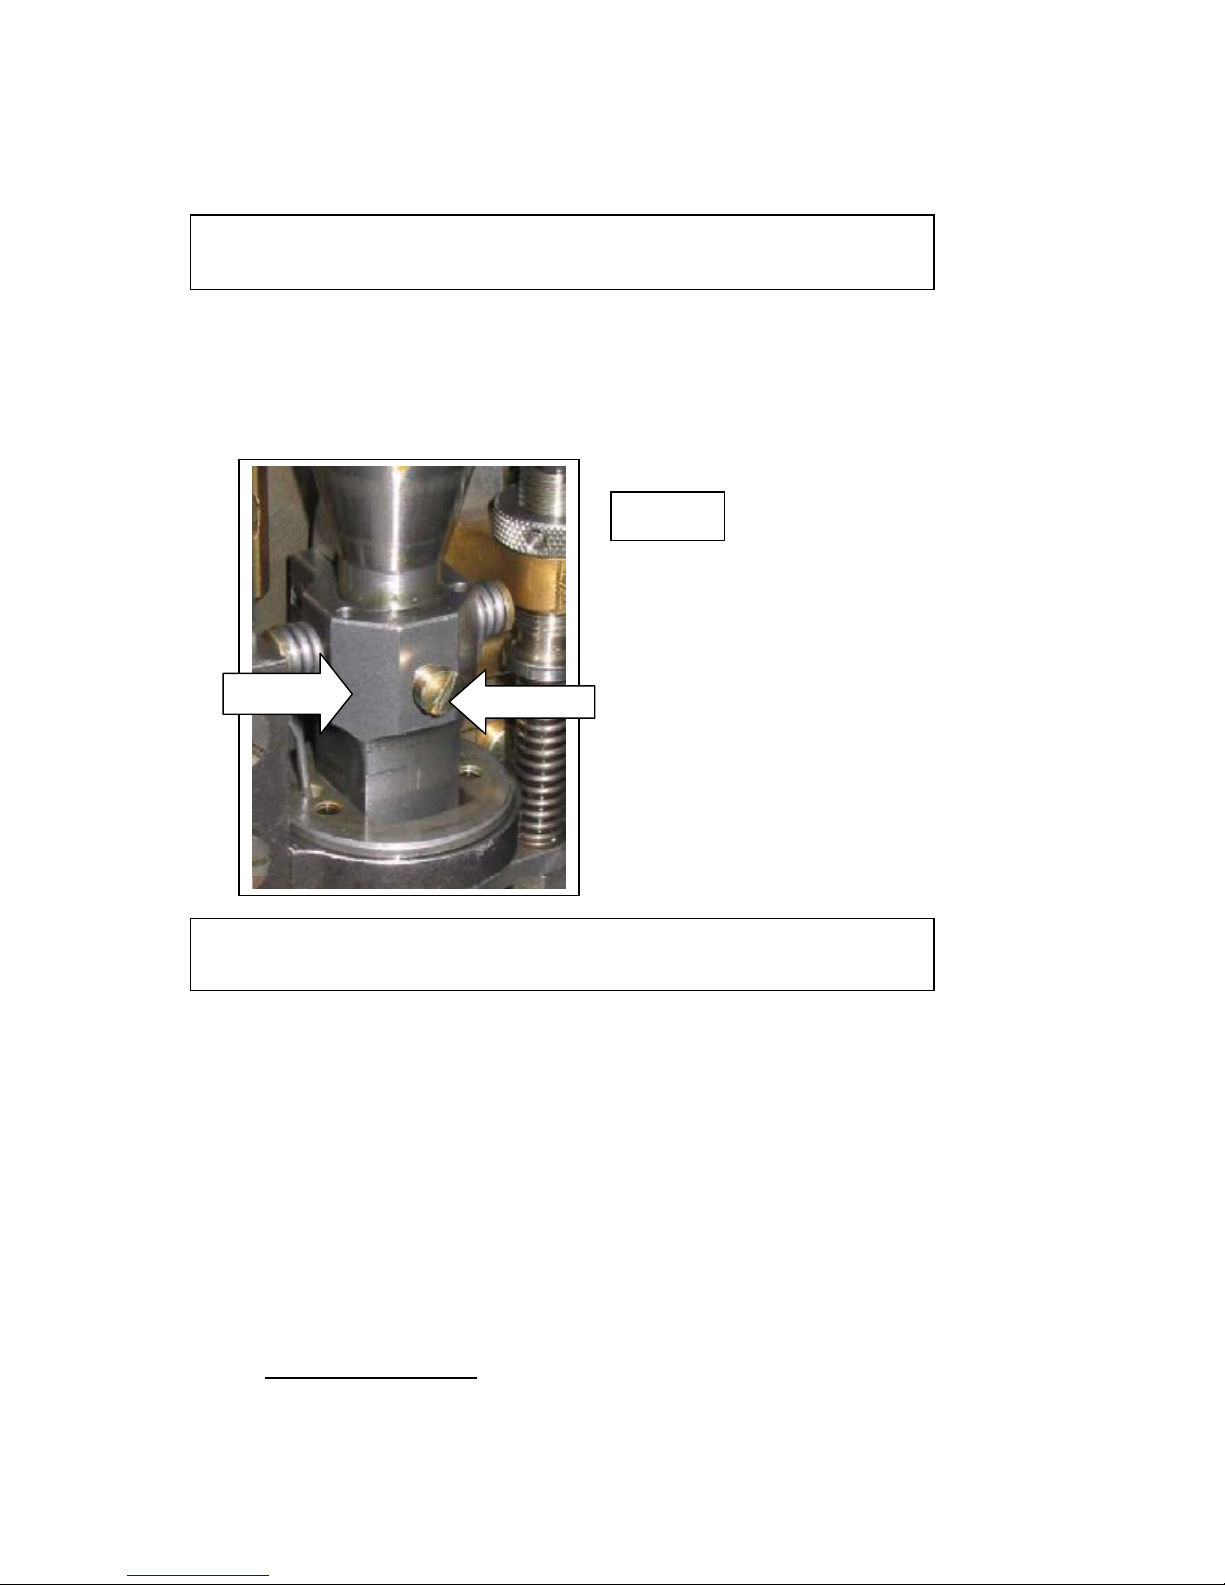
The crank C.00797 and the hook and the cone lever C.10033 must be placed in
the same direction. (Fig. 1A-1B)
This means for the Chain-stitch at 6 o’clock.
C.10033
FIG. 1A
Page 6
C.00797
C_LG3_MANUAL
11/01/2006
5
FIG. 1B
If you are sewing the Moss-stitch, you have to turn the hook 180 °.
This means : the hook at 12 o’clock and the crank at 6 o’clock and pulling the part
C.10063 to the left and turning backwards. (Fig. 2)
The hook must be exactly in the opposite position as it was during the chain stitch
work.
FIG. 2
C.10063
C.00056
Page 7
3. NEEDLE PLATE SETTING
C_LG3_MANUAL
11/01/2006
6
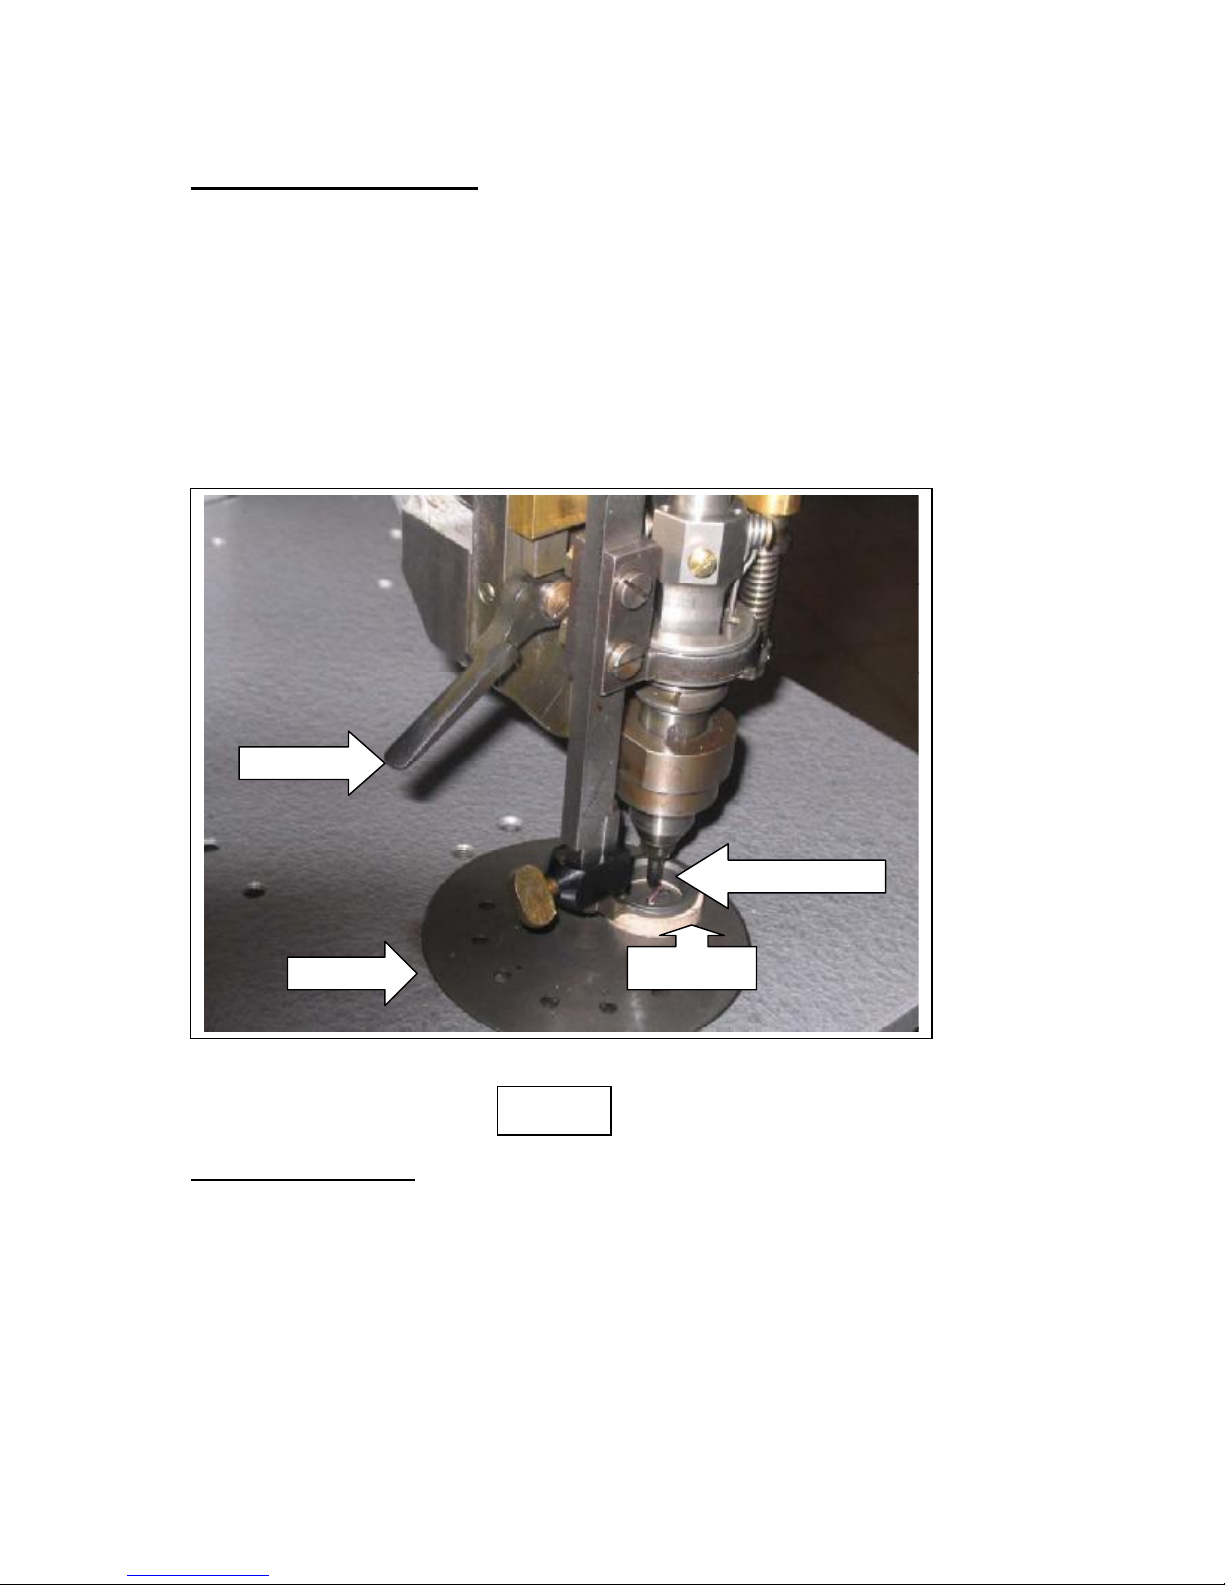
The needle should pass the needle plate in one of the 12 foreseen holes.
Use the hole just in front from where the threaded needle is coming out of the
needle plate.
Choose a convenient hole so that the needle can pass freely though the hole. The
needle must be exactly in the middle of the hole.
Don’t use too large holes, especially with thin material.
If this is not the case, do the following :
To turn the plate : C.01707 (Fig. 3), unscrew part C.00056 (Fig. 2) and use the
curved point knife.
If the hole is correctly placed, screw part C.00056 again. (Fig.2)
C.00051
C.00601C01/2/3
C.01707
C.00946A
FIG. 3
4.FEEDDOG SETTING
The Cornely LG3 is normally equipped with 1 rubber feeddog : C.00946A.
We are using the feeddog with teeth C.00946D when using hard fabric. The other
feeddog is used for fine fabric. (Fig. 4)
By raising lever C.00051 (Fig. 3), you are moving the feeddog upwards.
Page 8
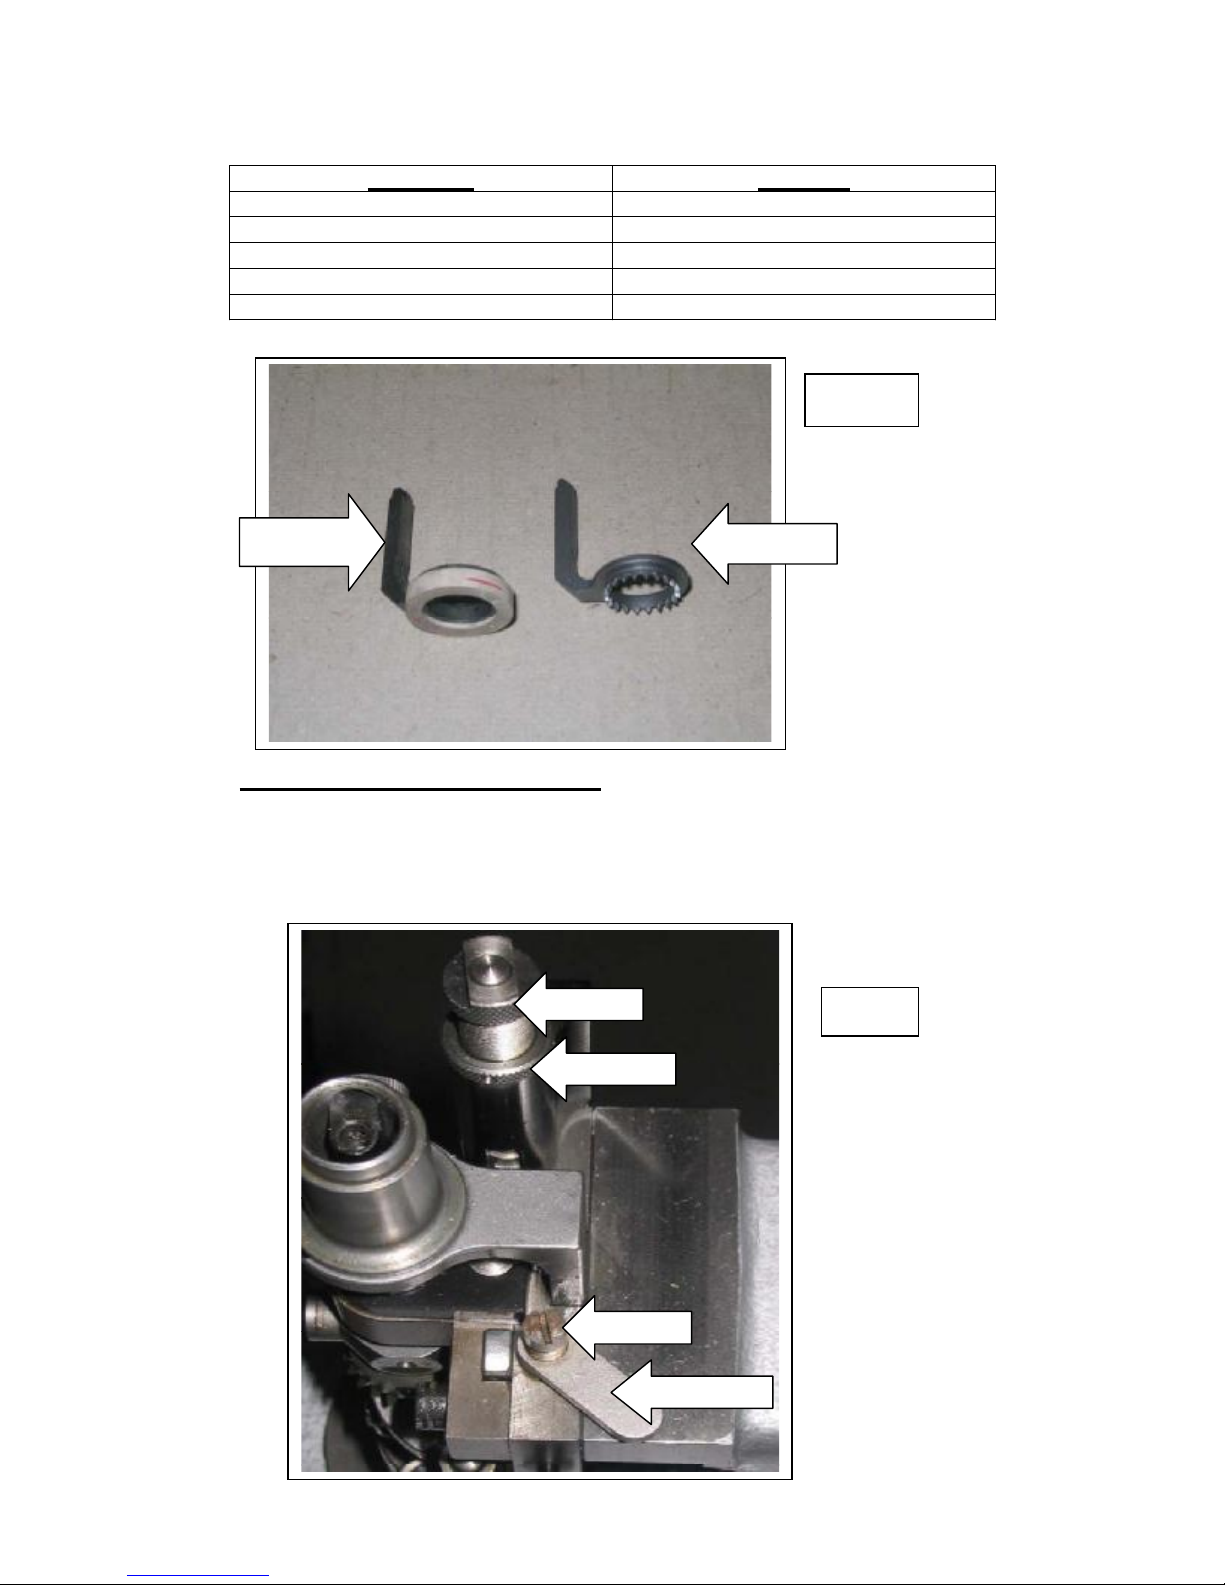
FEEDDOG RUBBER
C.00946A C.CA-26
C.00946D
C.00946L C.CA-28
C.01133 C.CA-33
C.01133D
.
FIG. 4
C.00946A
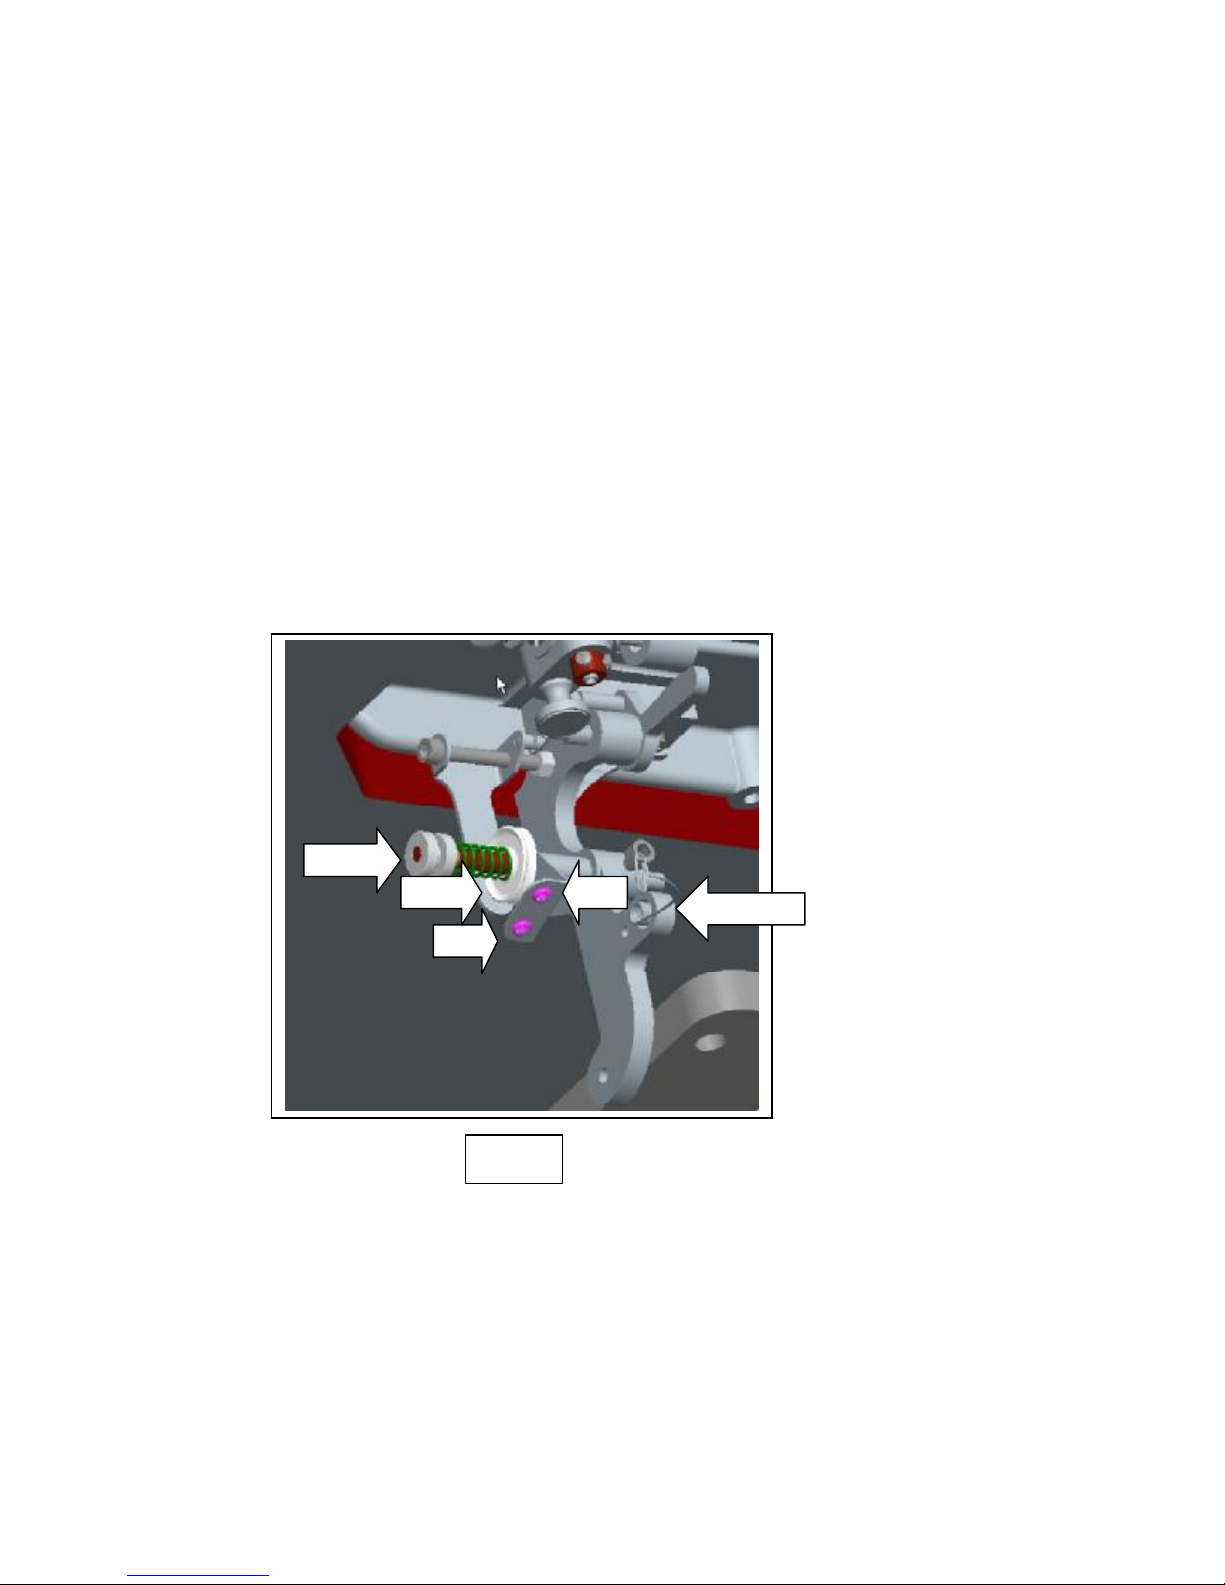
5. FOOT PRESSURE ADJUSTMENT
By unscrewing the nut : C.10152, you are regulating the tension in the
C.10151, regulating bushing. (Fig. 5)
For very high speed, ask for the spring C.10154 instead of the spring C.10171
to increase the tension of the pressure foot
C.10151
C.10152
C.00946D
FIG. 5
C.00100
C.13296
Page 9
CHAPTER 3 : THREADING
V
C_LG3_MANUAL
11/01/2006
8
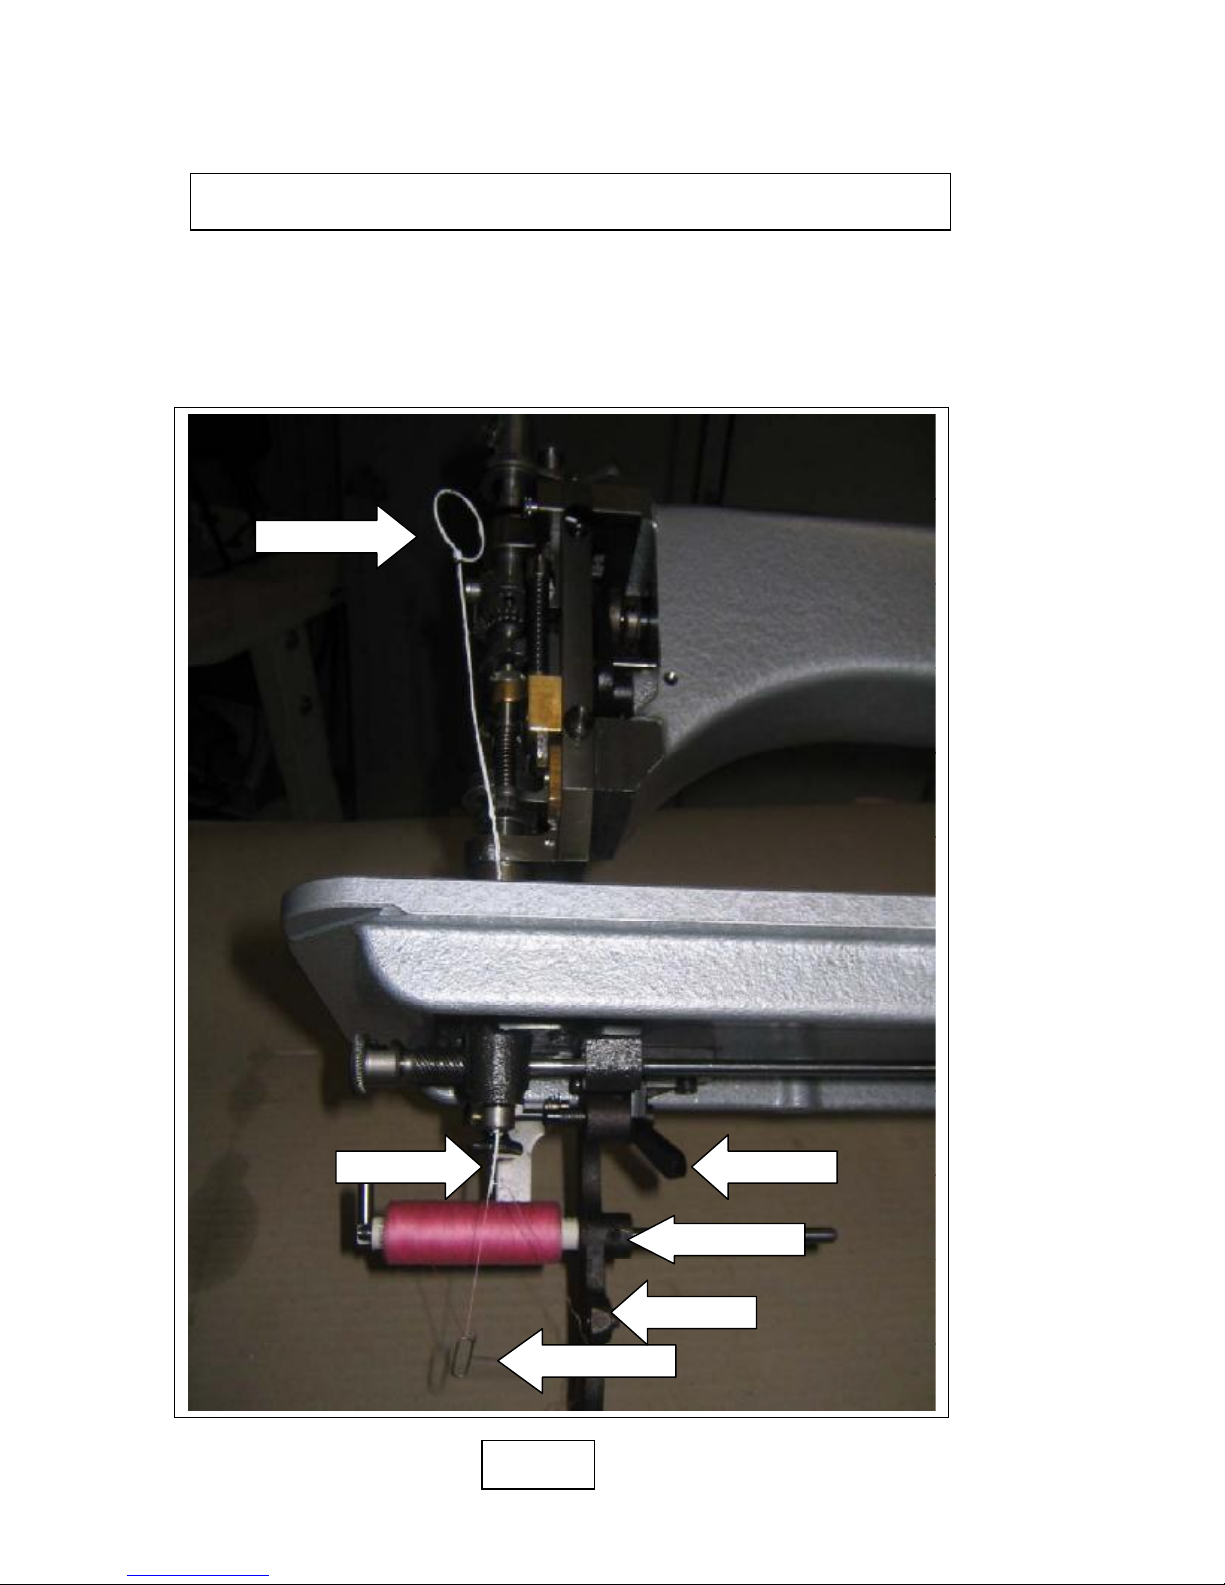
The machine is supplied with spoolholder C.10011 (Fig. 6), which requires
cylindrical spools.
We also have spoolholders for conical spools.
a. The machine threading with a cylindrical spoolholder is the following :
C.01305
C.00093
C.00094
C.13295
C.10011
C.00945
FIG. 6
Page 10
Raise the pad, C.00093 (Fig. 6) insert the spool on the shaft and adjust nut screw
C_LG3_MANUAL
11/01/2006
9
C.13295V. Pull the thread through the eye of the tension spring C.00945. The
thread must come from below the spool.
Pass the thread hook C.01305 through the big hole of the needleplate C.01707
which is in front of the needle hole.
Catch the thread and pull it up under the needleplate C.01707.
Pass the thread under foot C.00946A which has been raised beforehand.
The thread must be laying towards you.
Start the motor while holding the thread on the table with your left hand as
instructed above just the time to do one stitch so that the needle catches the thread
and let it pass through the plate.
Now, remove the thread from the needle with the curved knife and lay the thread
on the table.
The thread tension is adjusted by pad pressure.
The spool tension can be regulated by raising the lever C.00094 (Fig. 6) or lower
the lever C.00094.
b. The machine threading with a conical spoolholder is the following :
25764
D
E
C.00945
C
FIG. 7
Put the conical Bobbin on the spoolholder A.,(Fig. 8 ), put the yarn through the eye
B (Fig. 8), pass through eye C (Fig. 7) between the tension disc D
(Fig. 7) then pass through the eye E to pass afterwards through the tensionspring
C.00945.
Follow now the instruction as for the cylindrical spoolholder.
Page 11
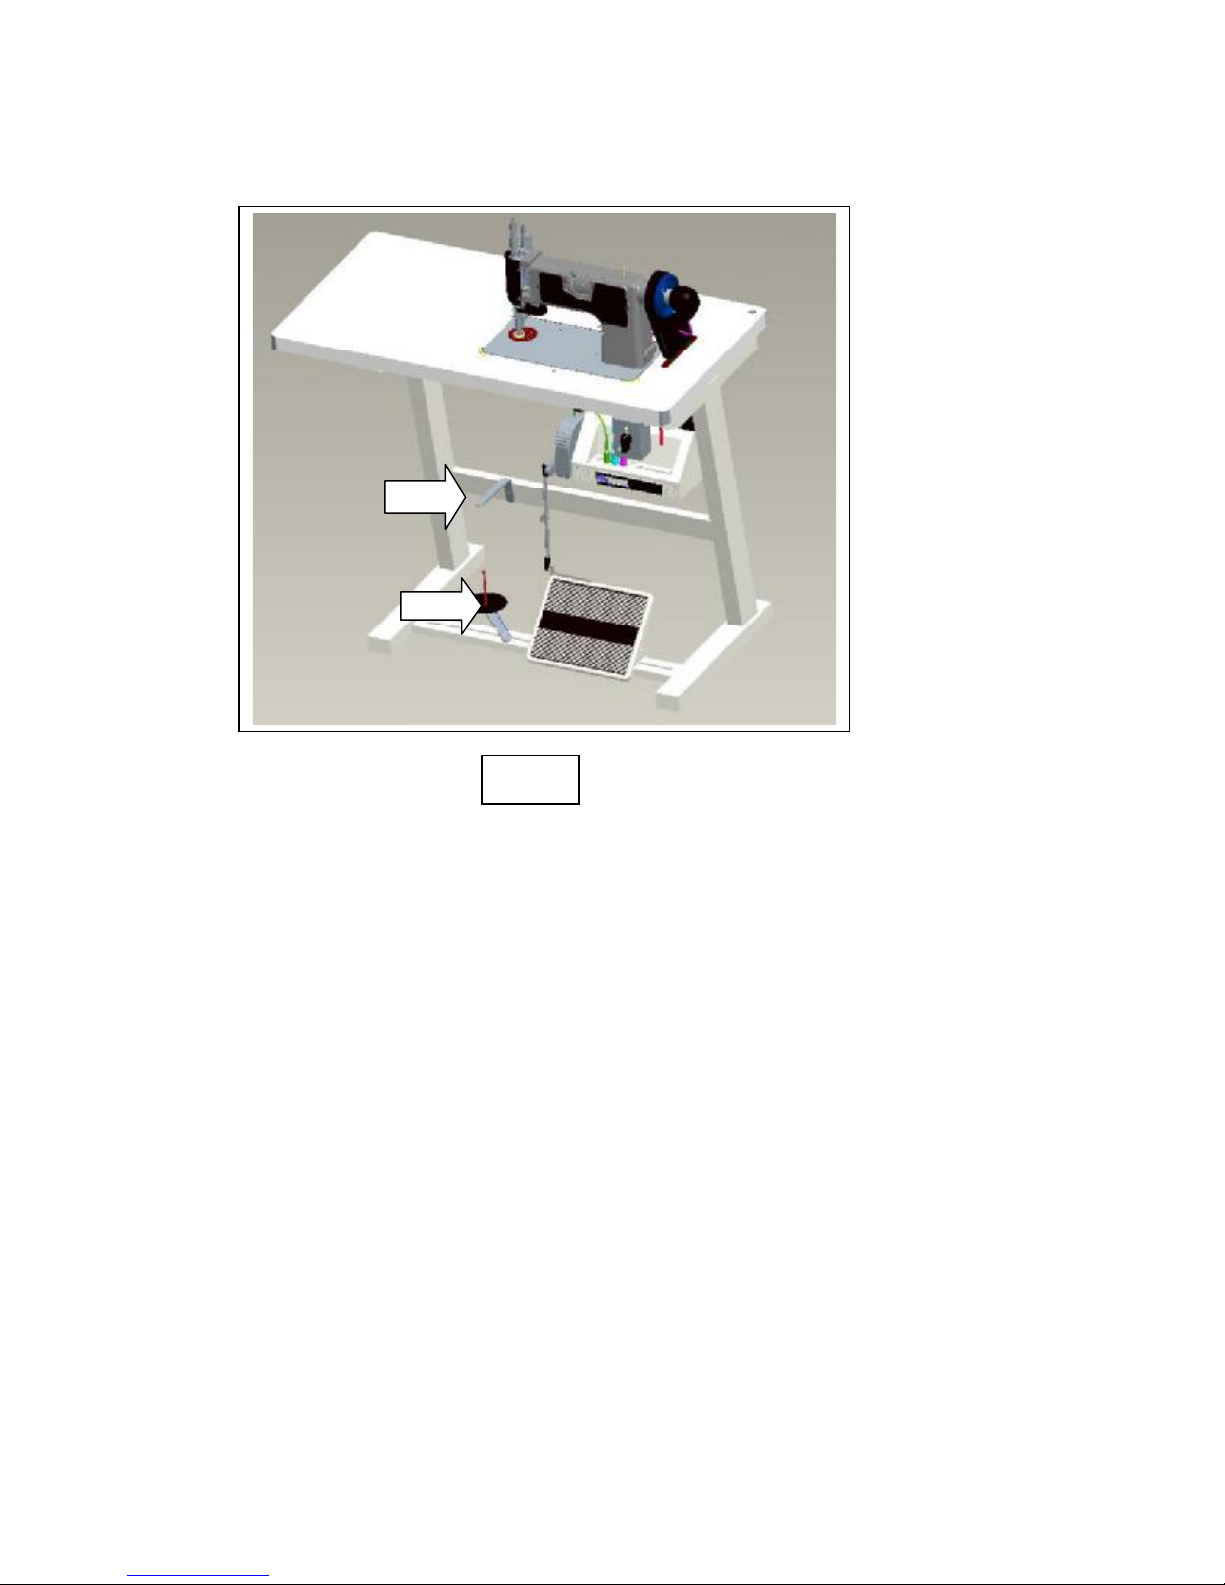
FIG. 3
C_LG3_MANUAL
11/01/2006
10
B
A
FIG. 8
C The machine threading for braiding.
The machine CORNELY LG3 makes every kind of braiding (flat, raised, side sewn
of center sewn) with any braid, cord, ribbon, strung beads, silk, cotton, tergal,
terylene, cellophane, plastics, metal threads etc.
Work with a chain stitch and check that the hook point of the needle is in the same
place as the flat edge of needle tube. Then set the braiding attachment C.10288W
complete .(Fig. 10)
Place the braid, cord or ribbon, etc. on the spool L (Fig. 9) above the head of the
machine. Use small ball chaplet to pass the braid through the needle tube,
entering top opening, going out of the needle tube through the botton opening, then
passing through the suitable guide or nipple. (See Chapter 7.)
Nipple must be in the same direction as the hollow part of the needle tube
The nipple is composed of four parts :
- small tube tightened in the needle tube
- screw.
- Small spring for cloth pressure (if taping)
- guide
The braid must slide freely in the nipple but reasonable. When you ask for a new
guide, never forget to send us a small sample of the braid or cord.
Page 12
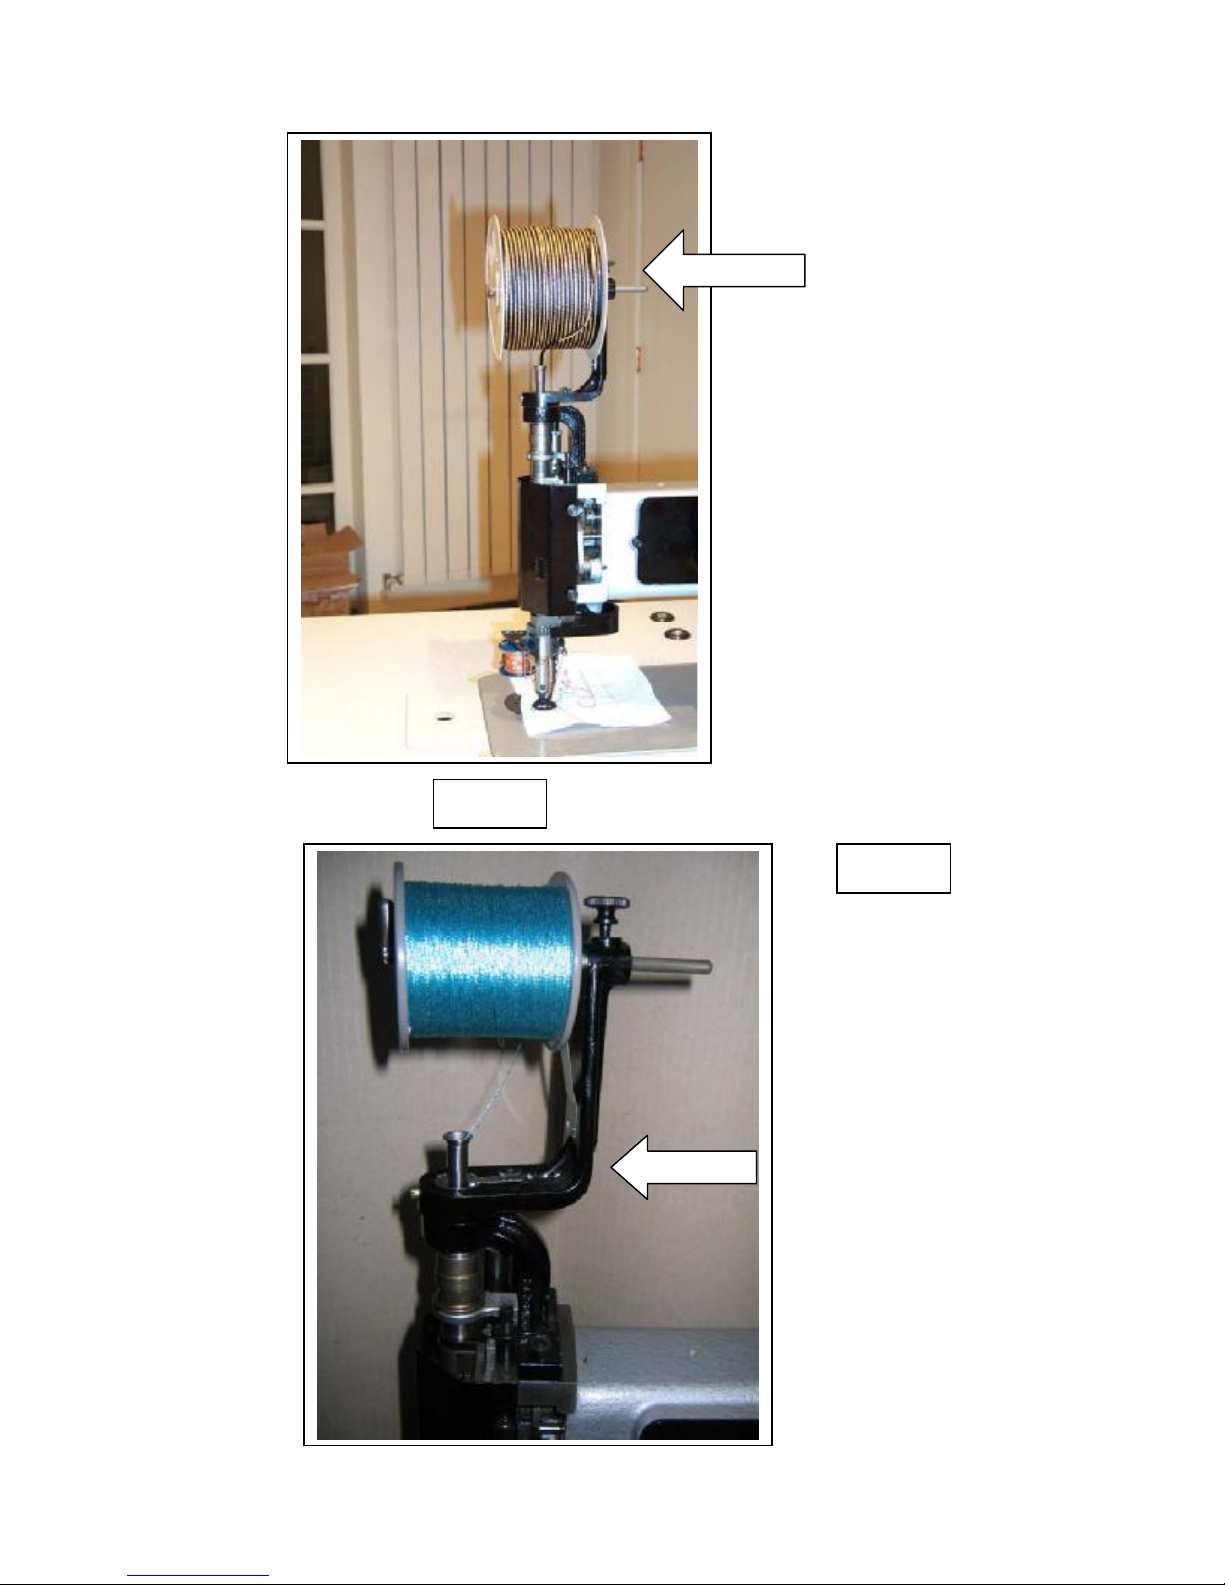
FIG. 9
C_LG3_MANUAL
11/01/2006
11
SPOOL L
C.10288W
FIG. 10
Page 13

SEVERAL THREAD WORKS
C_LG3_MANUAL
11/01/2006
12
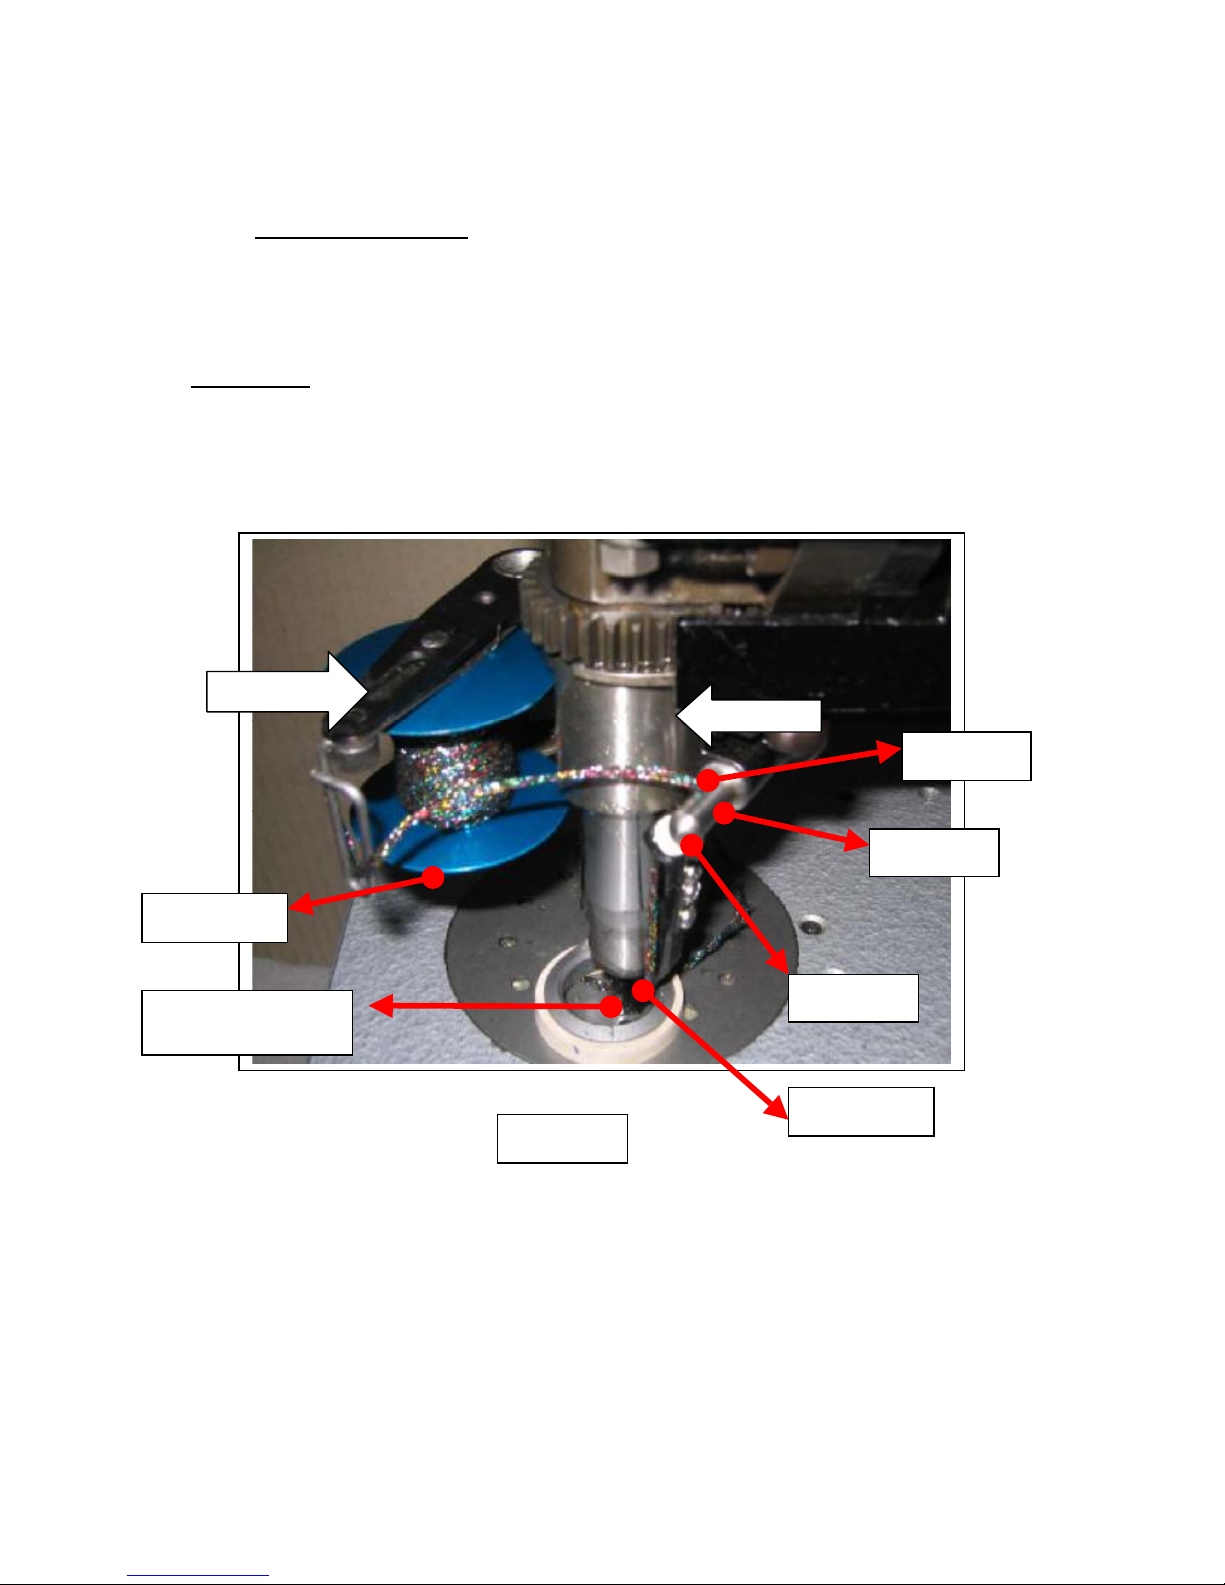
Accessories are mounted on weaving gear C.10294 and are marked A & C , as
well as on the gear. (Fig. 11)
Two threads works are made by braid curling around the chainstitch row which
sews it on the cloth.
Three threads works are made with additional stuffing between coiling and chain
stitch.
a.Two threads works
Use the following parts :
- Spoolholder C.10632W mounted on the weaving gear C.10294
- Weaver C.10300W
- Nipple C.00601C...for 2 threads screwed in lower tube (according
thickness)
(Fig. 11).
The thread comes from spool C.00635M, passes through the hole of the weaver
holder C.10302 through the eyelet C.00619 then into the thread guide C.10304/1.7
or C.10304/3, according to the thickness.
Let the lace pass under the pressure foot. The thread tension is adjusted by the
screw which is under the spoolholder.
The weaver height settings will be made when the machine is disclutched and the
nipple is in upper position. Release the weaver assembly holding screw and set
the lining with lower part of nipple.
Since in two threads works, the chain stitch is completely coated by the coiling
thread, machine must be set with a rather short stitch.
b.Three threads works
Use the following parts :
- Spoolholder C.10632W complete
- Weaver C.10300W complete
- Nipple C.01127A… for three threads, size according to cord
thickness
- Braiding attachment C.10288W complete
(Fig. 10 & 11)
Same works as with two threads, plus a “Stuffing” thread which must come through
the hook needle holder. It is better to use a rather flexible material.
Put the crank towards the operator, the stuffing thread passage hole must be on
the opposite side. The hook needle will be screwed so that its hook will be on the
opposite side of the flat part of the needle holder. The coiling thread comes from
spool C.00635M and passes through holes. Follow the instructions as for 2
threads. The stuffing thread comes from the braiding attachment C.10288W
complete and passes through the needle holder and the guide and comes upon
material. The hook needle is set rather close to the material to obtain a short chain
stitch.
Page 14
c.Spine or Picot works
C_LG3_MANUAL
11/01/2006
13
The thread is coming from the braid spool, passes through the hook holder and the
nipple. Adjust very strong then tension and increase the hook height. The chain
stitch thread tension must be practically zero. This spine stitch happens only when
working on circles or curves.
WARNING :
For all those kinds of works, make sure that the weaving gear is correctly set.
To check this, run the machine at full speed to be sure the declutching is correct.
Turn the crank to the left, hole A on the weaving gear must be just in front of the
operator.
C.10632W
C.10294
C.10302
C.00635M
C.00601C01/02…
C.01127A…
C.10300W
C.00619
C.10304/1.7
FIG. 11
Page 15
CHAPTER 4 : ADJUSTING THE STITCH LENGTH.
C_LG3_MANUAL
11/01/2006
14
To adjust the stitch length, you have to unscrew the nut : C.13296 (fig. 5), then turn
the screw C.00100 (Fig. 5). Screw downwards to shorten the stitch and screw
upwards to lengthen the stitch. If you want to have very big stitches or the fabric
has to pass fluently the feeddog without braking the thread you have to unscrew
C.00106 and raise part : C.10015 (Fig. 12)
FIG. 12
C.10015
C.00106
CHAPTER 5 : ADJUSTING THE THREAD TENSION
The thread tension can be regulated by 1. adjusting the needle height
2. adjusting the thread tension
a. Adjusting the needle height
If you want a very thin stitch you have to lower the needle.
If you want a very large stitch you have to upper the needle but not TOO high
because this can cause lack of stitches.
b. Adjusting the thread tension
There is also here a difference in adjusting the thread tension depending from the
Cylindrical or Conical spoolholder.
The tension cannot be too high or too less.
For the cylindrical spoolholder you can regulate the tension by the lever C.00094
(Fig. 6)
Page 16
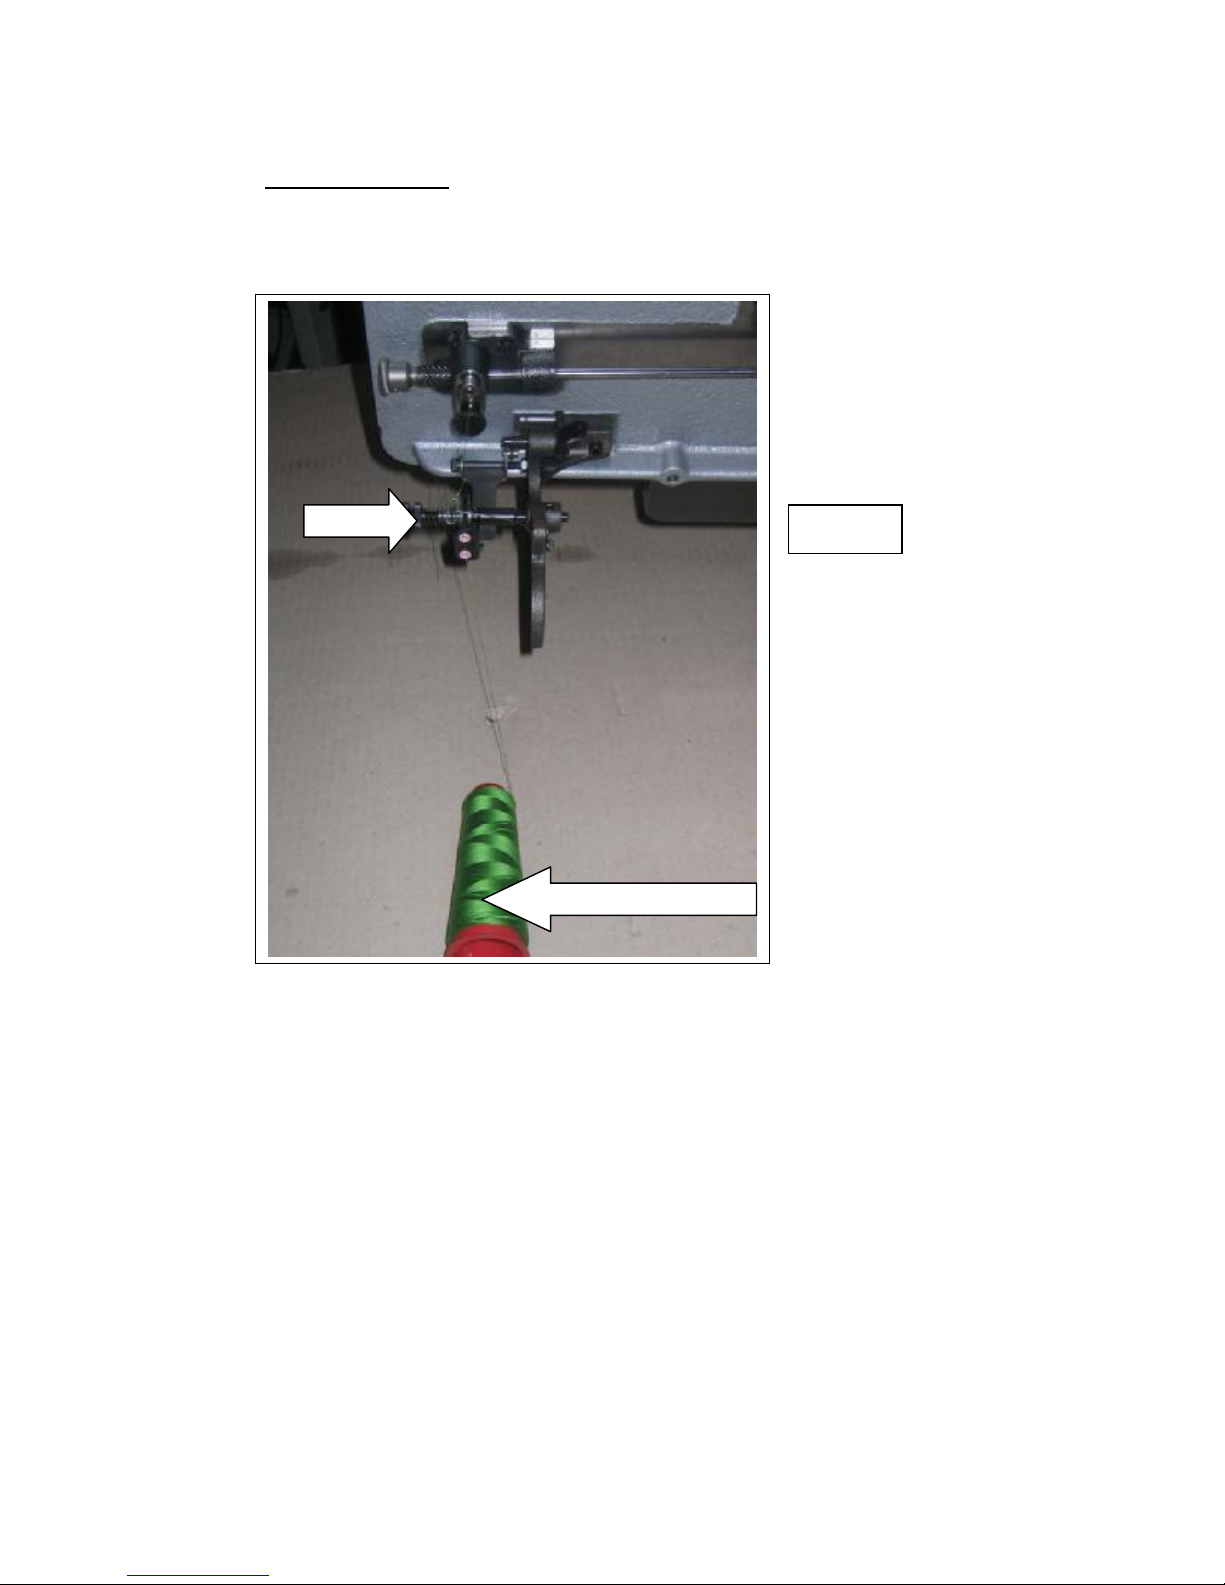
For the conical spoolholder you can regulate the tension by screw 25764
C_LG3_MANUAL
11/01/2006
15
(Fig 13).
If you are missing some stitches : increase the tension
If the thread is breaking : decrease the tension.
25764
FIG. 13
CONICAL BOBBIN
The Cornely machine is probably the most durable piece of machinery ever made.
This could be due to the care they are given by the operator.
Page 17
CHAPTER 6 : LUBRICATION
C_LG3_MANUAL
11/01/2006
16
When you oil the machine, do it sparingly.
If you get too much oil, the machine will spit the oil back onto the fabric.
Every moving part needs oil on it.
OIL TYPE
ARAL VITAN G F 22
BP ENERGOL HLP 22
FINA HYDRAN 22
MOBIL D.T.E. 22
SHELL TELLUS C.22
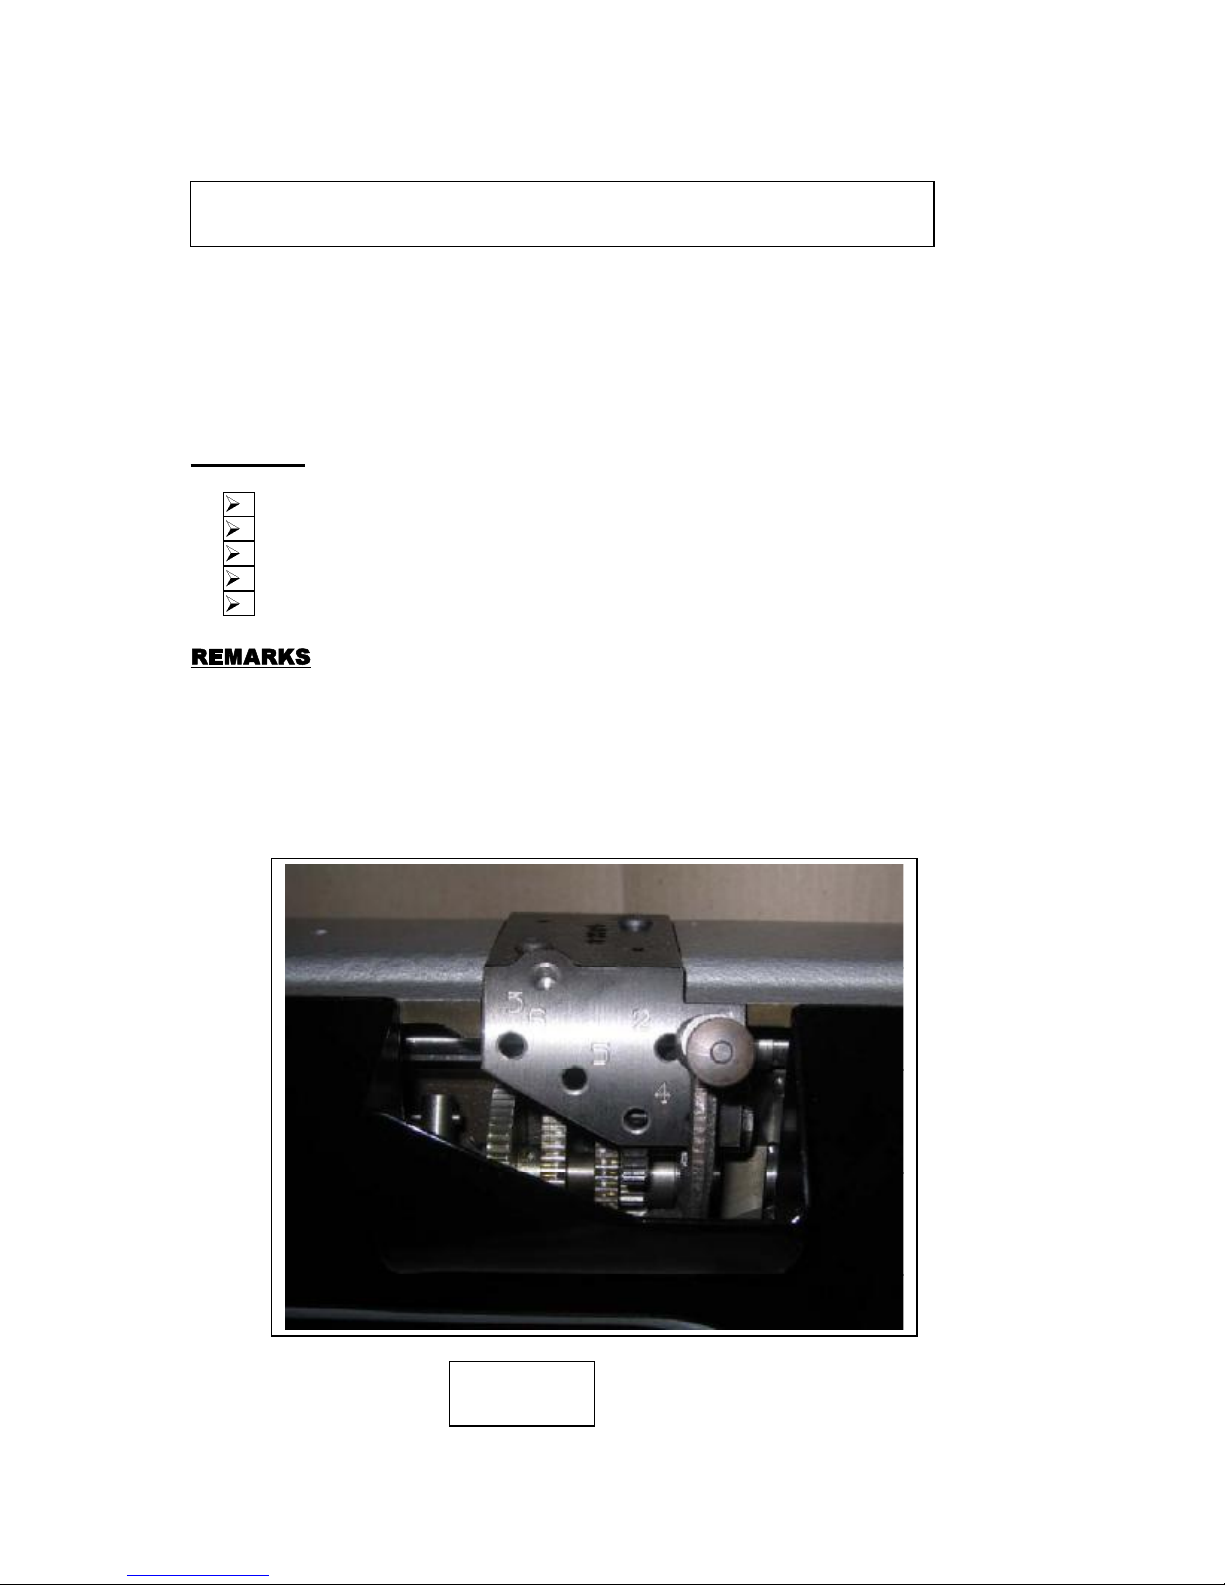
The machine Cornely LG3 has a special equipment situated in front of the head
with which you can change the speed when curling around the chainstitch row.
You can choose to curle around every 2/3/4/5 or 6 stitches according the work.
This is a very easy operation. For the simple chainstitch work you have to put the
speed on O. (Fig 14).
FIG 14
Page 18
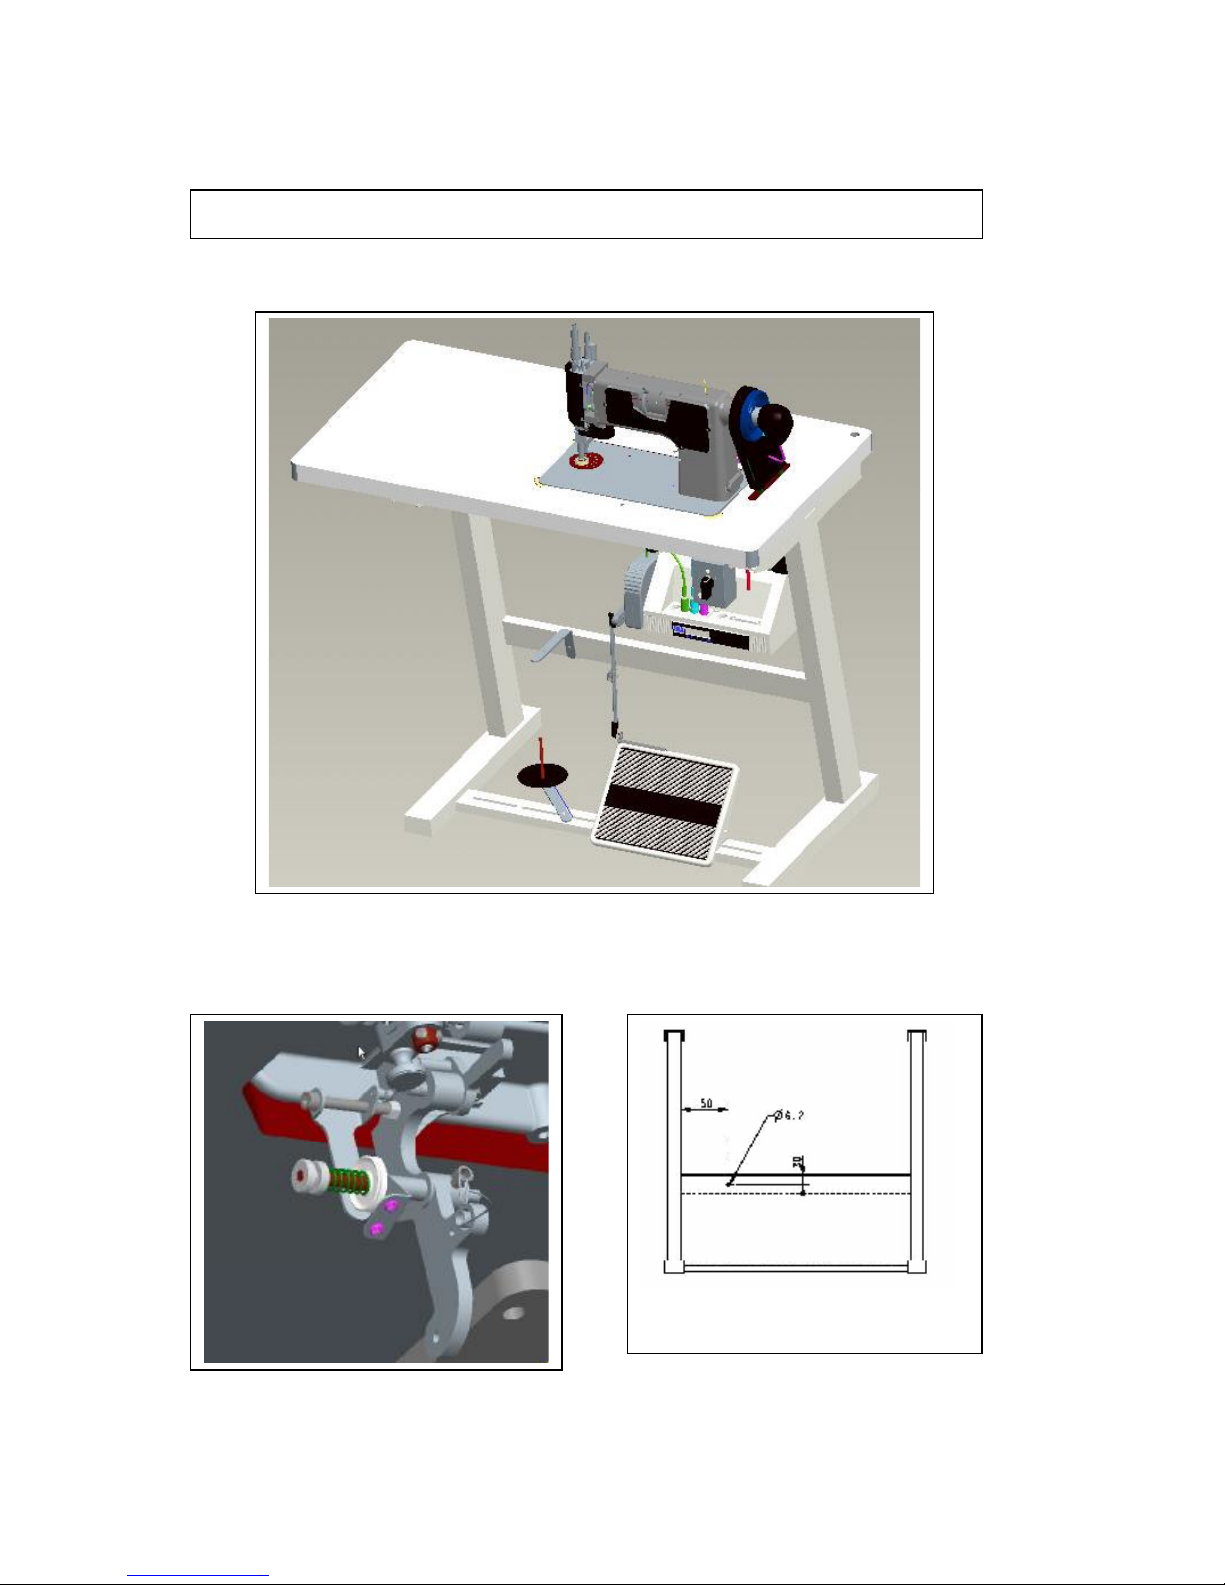
CHAPTER 7 : INSTALLATION OF THE BOBIN STAND
C_LG3_MANUAL
11/01/2006
17
Page 19
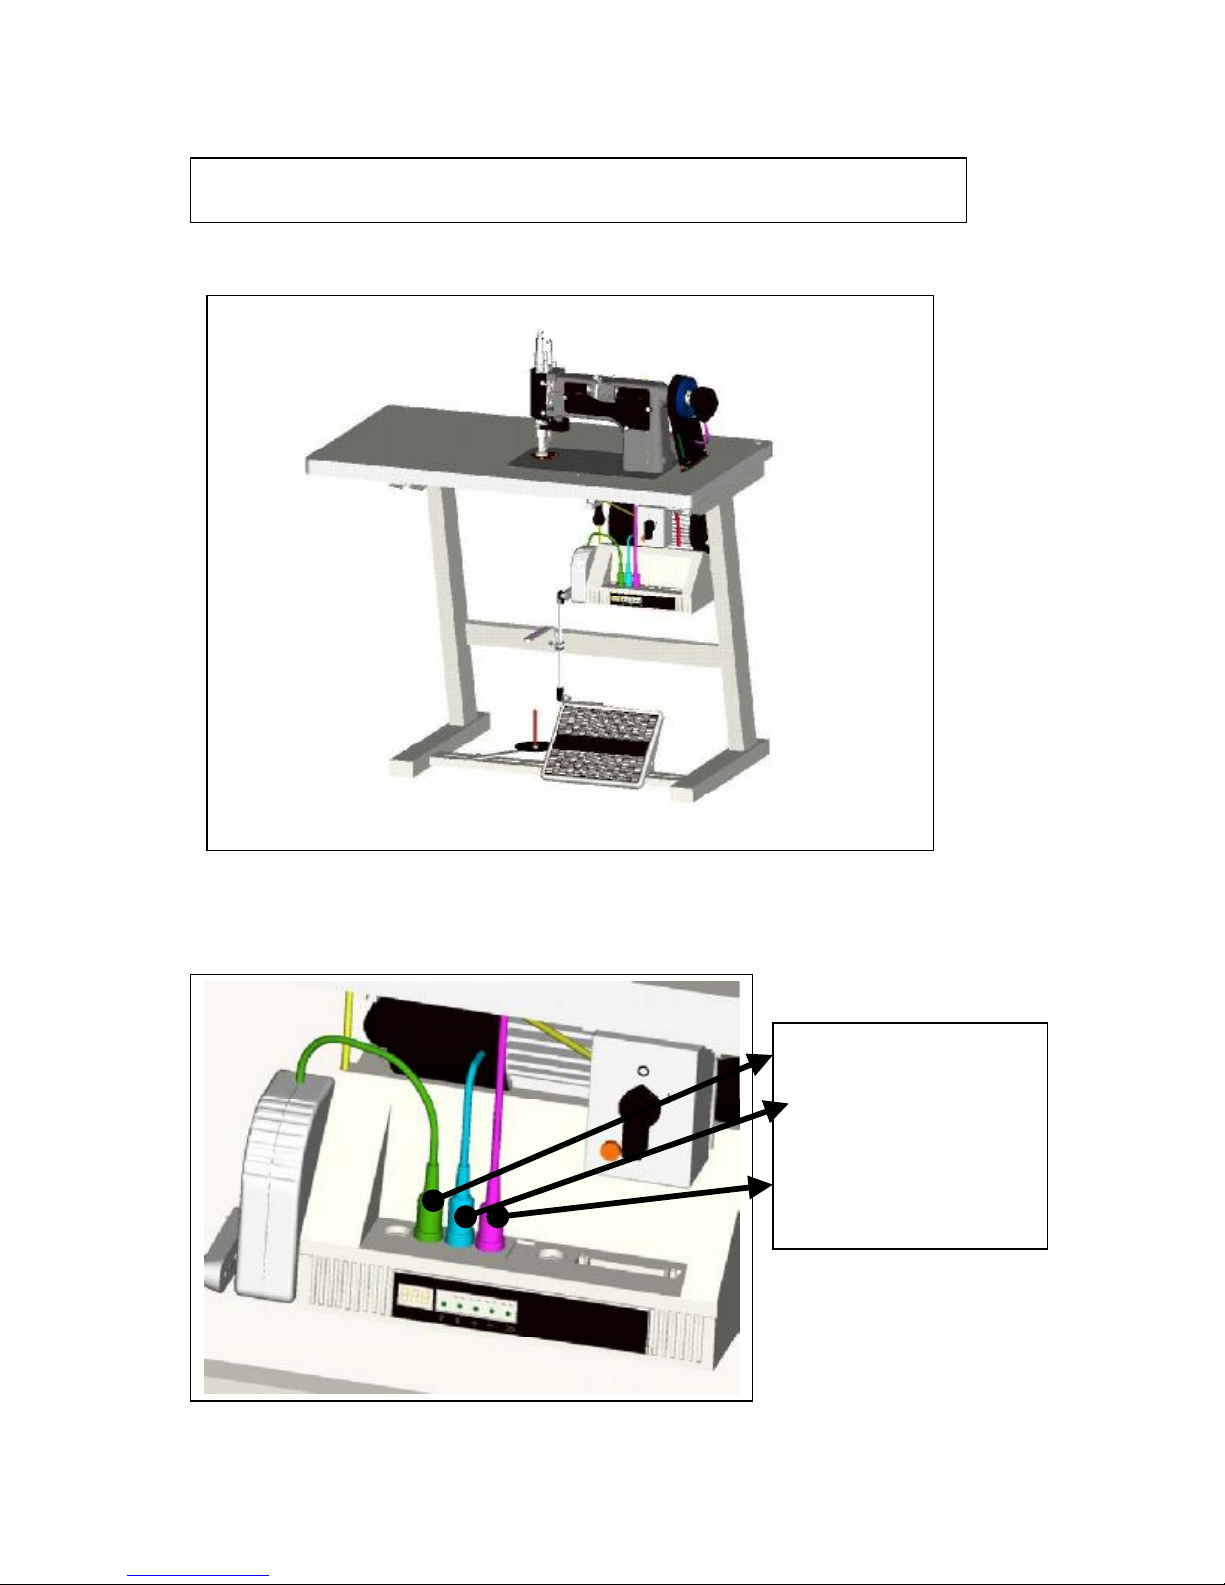
CHAPTER 8 : INSTALLATION OF THE EURAMOT MOTOR
C_LG3_MANUAL
11/01/2006
18
*ACTUATOR
*COMMUTATION
TRANSMITTER FOR
DC MOTOR
*POSITION
TRANSMITTER
 Loading...