

Page 1
Please read the Instruction manual and warranty information carefully before using and
keep it for future reference.
DIGITAL PRESSURE COOKER
MODEL: CPC-P60CSS
INSTRUCTION MANUAL
Page 2

Page 3

1. Impotant Safety Instructions
2. Package Contents and Technical Specifications
2.1
Package Contents
2.2
Technical Specifications
Reminder
4.7
4.6
Contents
....................................................................01
.....................................02
.................................................................................02
.........................................................................02
....................................................................................03
..........................................................................................04
..................................................................................05
..............................................................................................05
...........................................................................06
....................................................................11
...............................................................................................12
.................................................................................12
........................................................................13
..........................................................................................15
Product Diagram
2.3
3. Safety Features
4. Operating Instructions
4.1
Before use
4.2
Lid Open/Close Guide
Cooking Reference
5. Cleaning and Maintenance
6. Troubleshooting
4.4 Screen and Indicator Guide
EN
...............................................................................................07
4.3
Operation
...............................................................................04
..........................................04
3.1
Schematic Diagram
3.2
Lid Open/Close and Dismantle/Install Guide
................................................................................12
4.5 Keep Warm/Cancel
Page 4
1. Impotant Safety Instructions
1.This appliance is not intended for use by persons(including children) with reduced physical,
sensory or mental capabilities, or lack of experience and knowledge, unless they have been
given supervision or instruction concerning use of the appliance by a person responsible for their
safety.
2.Children should be supervised to ensure that they do not play with the appliance.
3. place the product near flammable materials or use it in humid environment.DO NOT
4.The amount of food and water to be put into the Inner Pot be strictly according to the step MUST
2 in the section “ ”.Operation
5. damage the Seal Belt and replace it with any other rubber belt or tensile belt.DO NOT DO NOT
6. move the Steel Ring in the Lid with any tools or external forces. If the Steel Ring breaks DO NOT
off from the Lid, please stop using the cooker and replace the Lid with a new one.
7.Clean the Filter regularly to keep the cooker clean.
8. open the Lid with external force when the Floating Valve has not sunk.DO NOT
9. add any additional weight on the Pressure Limiting Valve or replace the Pressure NEVER
Limiting Valve with other object.
10.The surface of contact between the Inner Pot and the Electronics Heater should always in
clean condition. use the Inner Pot to cook by using other heating sources. DO NOT DO NOT
replace the Inner Pot with other container.
11.Please do not use the damaged Pot, otherwise will cause air leaking.
12.The Inner Pot consist of a Non-stick layer surface. To avoid scratching the Non-stick surface,
please use wooden or plastic ladle or spoon.
13.Food should not be kept warm for more than 6 hours in order to preserve the Natural Nutrients,
Texture and Tastiness of the foods.
14.If steam is released around the Lid during the cooking process, please unplug the power supply
immediately, and send the product back to our company for repair. This is an abnormal
situation because the Pressure Discharging Device has been activated and this indicates that
the Pressure Limiting Device is malfunction.
15.If there is any malfunction of the cooker during the cooking process, please stop using the
device and send it back to the workshop for checking and repairing.
16.When moving the product, please use the Side Handle and avoid using the Lid Handle.
17.DO NOT disassembly the product, or replace its parts with others which are not produced by
our company. The product can only use the spare parts produced by our company.
18.When discharging, keep your face or hand away from the relief pipe and from the lid during
operation to avoid scald.
19.Unplug appliance from main electricity supply before taking food.
20.Don’t touch the lid during cooking procedure or in heating status.
21.Never block the periphery of the clamping position to ensure safety.
22.Never attempt to uncover the cooker when floating valve is flopping or hercis pressure inside.
23.Please mind of flowing hot water from the pressure limiting valve when opening the lid.
When using our product, basic precautions should always be followed, including the
following:
EN
01
READ ALL INSTRUCTIONS BEFORE USING THIS APPLIANCE.
PLEASE KEEP THE INSTRUCTION MANUAL
Page 5
2. Package Contents and Technical Specifications
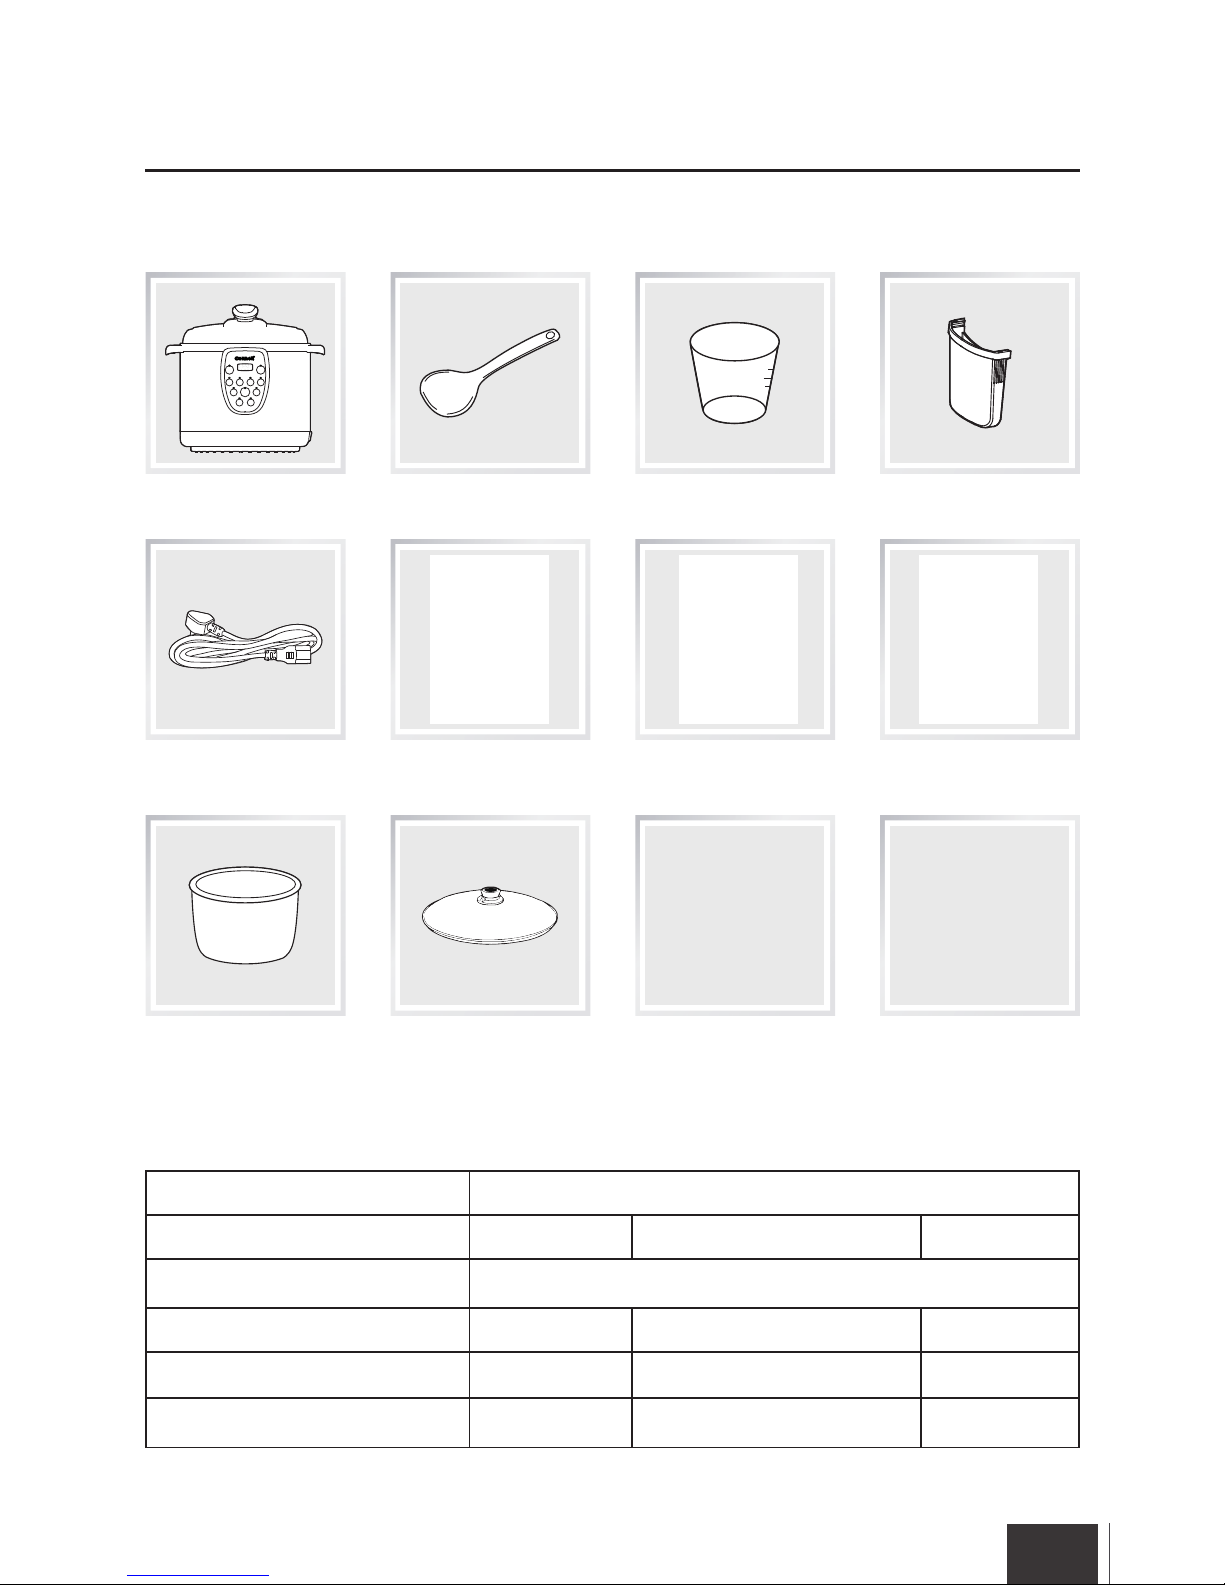
2.1 Package Contents
IM
*
Package Contents, technical and design specifications may be changed in the course of continuous product improvement.
Spoon
Cup
Recipe
Water Storage
2.2 Technical Specifications
Model
Voltage
220 240- V AC
Frequency
50Hz
Power
Capacity Diameter
2 cm2
Working Pressure
Keep Warm Temperature
Preset Timer
CPC-P60CSS
Warranty
Power Cable
CPC-P60CSS
1 000 W
6L
90kPa0~70kPa
1~24Hours
60~80°C
Maximum Pressure
EN
02
SS Inner Pot
Glass Lid
Page 6
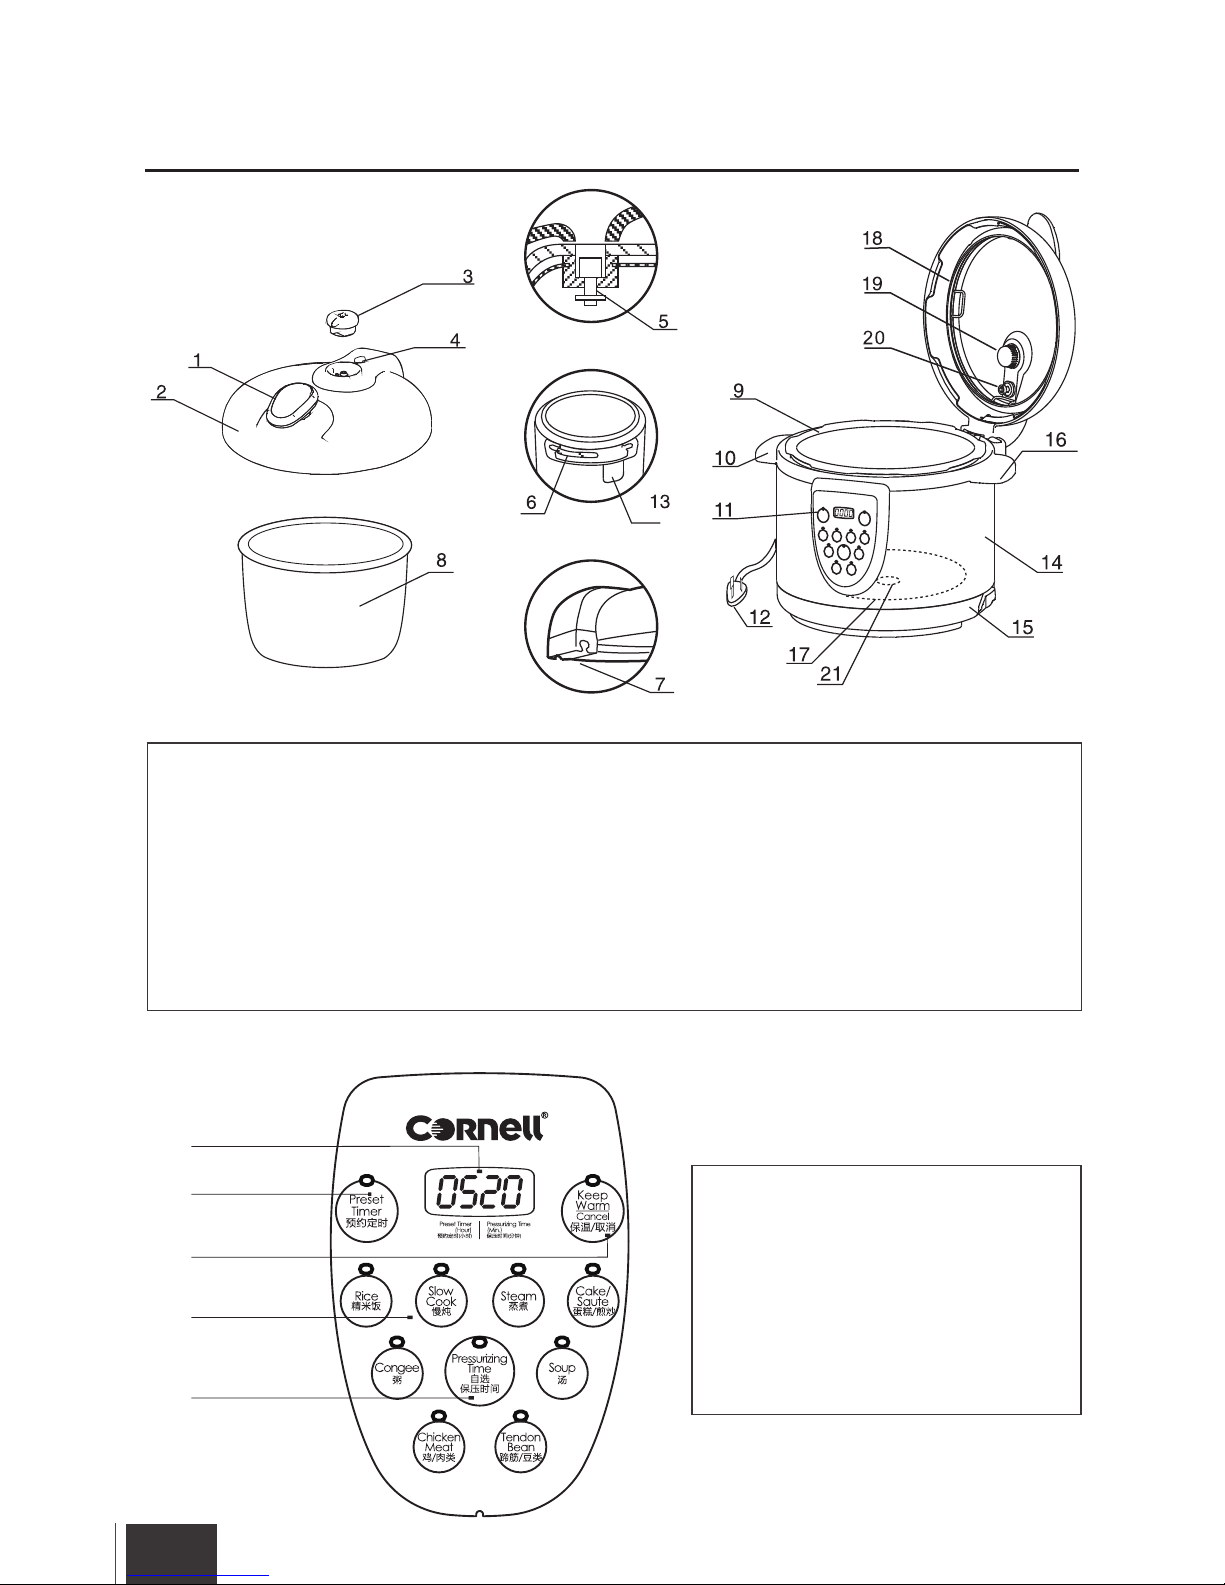
Control Panel
Handle
Lid
Pressure Limiting Valve
Floating Valve
Floater
Hinge
Hinge Groove
Inner Pot
Outer Pot
Upper Body
Control Panel
Power Cable
Water Storage
1.
2.
3.
4.
5.
Screen
Button of Preset Timer
Housing
Lower Body
Side Handle
Electronic Heater
Seal Belt
Filter
1.
2.
3.
4.
5.
6.
7.
Button of Keep Warm/Cancel
Button of menus
Buttons of Pressurizing Time
8.
9.
10.
11.
12.
13.
14.
15.
16.
17.
18.
19.
20.
21.
EN
03
2. Package Contents and Technical Specifications
2.3 Product Diagram
Main Unit
Seal Ring for Floating Valve
Sensor
1
2
3
4
5
Page 7
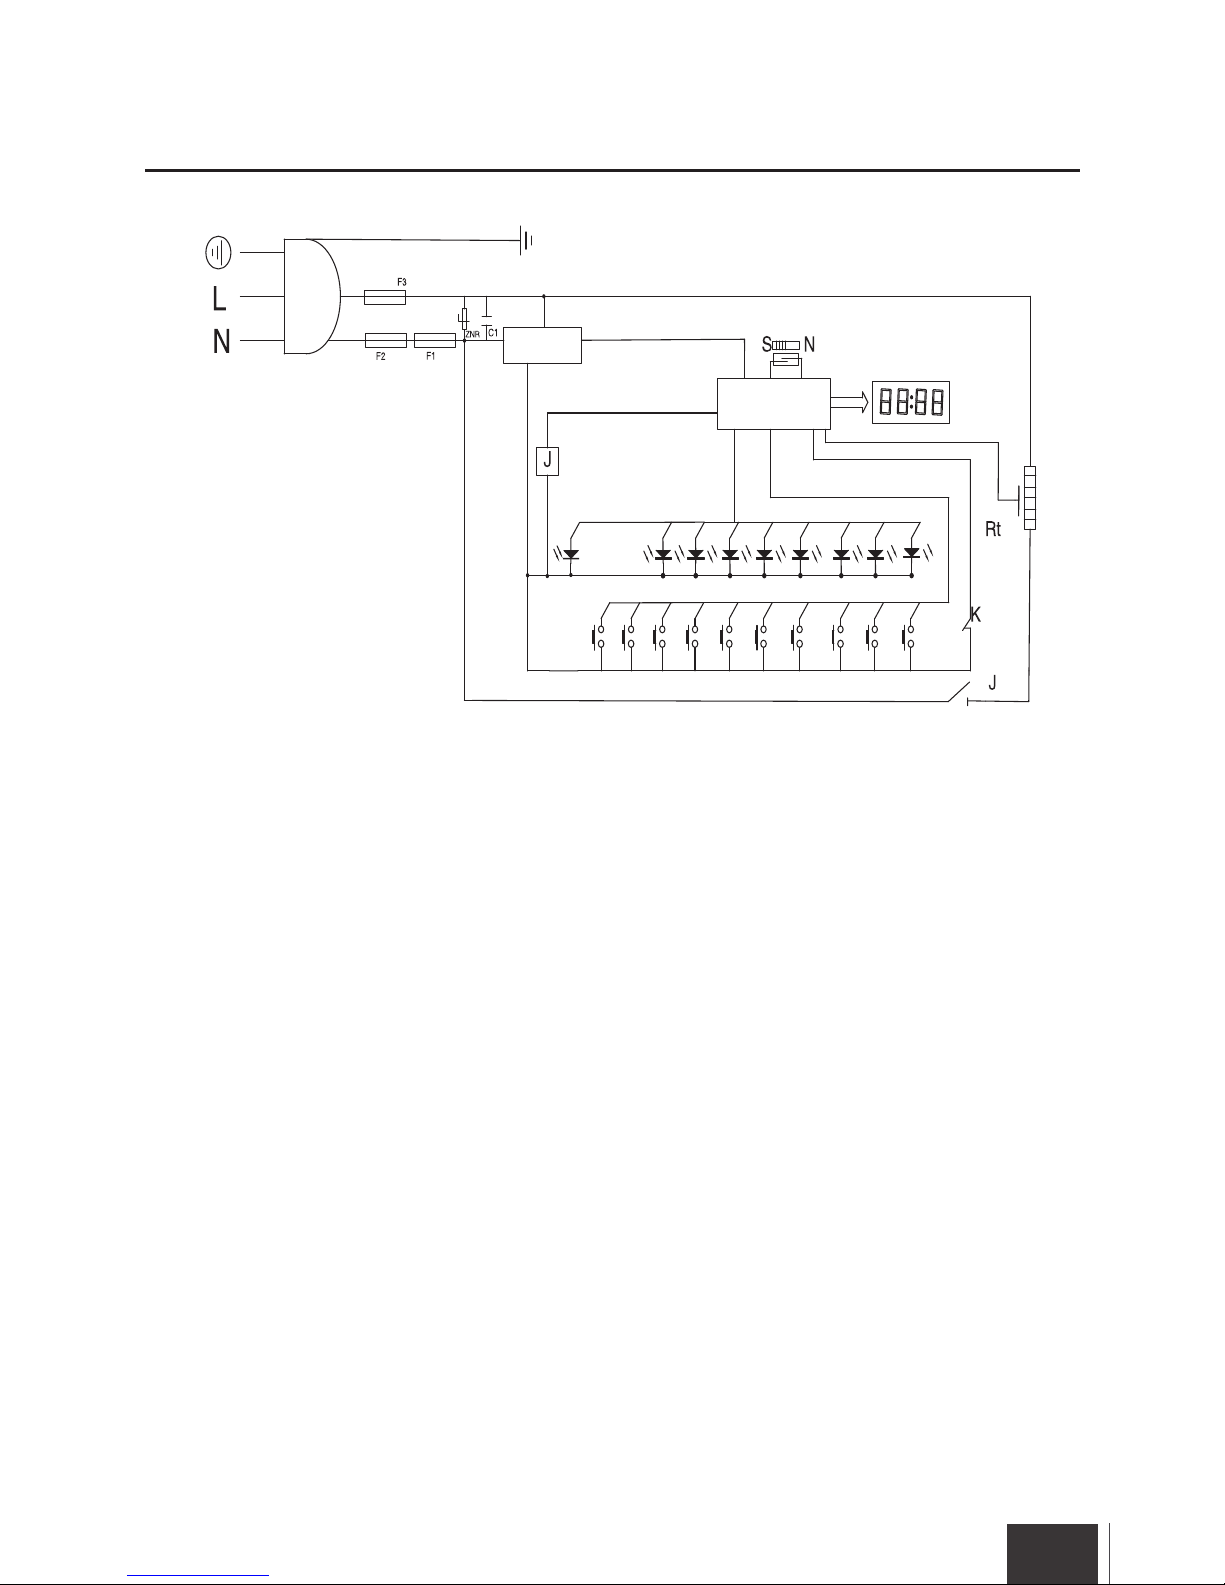
3. Safety Features
EN
04
XP
Plug
Fus e
Fus e
Swi tch Pow er
Con troll er
Ind icato r/Scr een
Ele ctron ic
Hea ter
Sen sor
Sen sor
Fus e
220-240V~
3.2 Safety Protections
There are nine safety devices installed in the pressure cooker to assure its reliability.
1. Lid-locked detect device
One switch installed behind the lid, Only the lid turn to the end position, to press the switch, the
heating program will operating. (except the menu: Slow cook, Steam, Cake/Saute)
2. Lid-locked protection
The floater will release pressure when the lid is not closed properly, then no pressure rising up.
3. Floater protection
The floater will rise up when the cooker has pressure, the lid cannot be opened.
4. Pressure Control Device
The correct pressure level is automatically maintained during cooking cycle.
5. Pressure Limiting Valve
The pressure limiting valve will release air automatically when the pressure inside exceeds the
preset temperature.
NOTE: Overfilling the pressure cooker (see Instructions for Use) may clog the pressure limiting
valve, which can cause excess pressure to develop.
6. Anti-Block Cover
Prevents food material from blocking the pressure limiting valve.
7. Thermostat
The power will auto-shut-off when the cooking pot temperature reaches the preset value, or the
pressure cooker is heating without enough liquid inside.
8. Thermal Fuse
The circuit will be opened when the pressure cooker reaches the maximum temperature.
9. Pressure Relief Device
When the cooker reaches the maximum allowable pressure and temperature, the cooking pot
will move down until the lid separates from the sealing ring, releasing air pressure.
3.1 Schematic Diagram
Page 8
First time use
Daily use
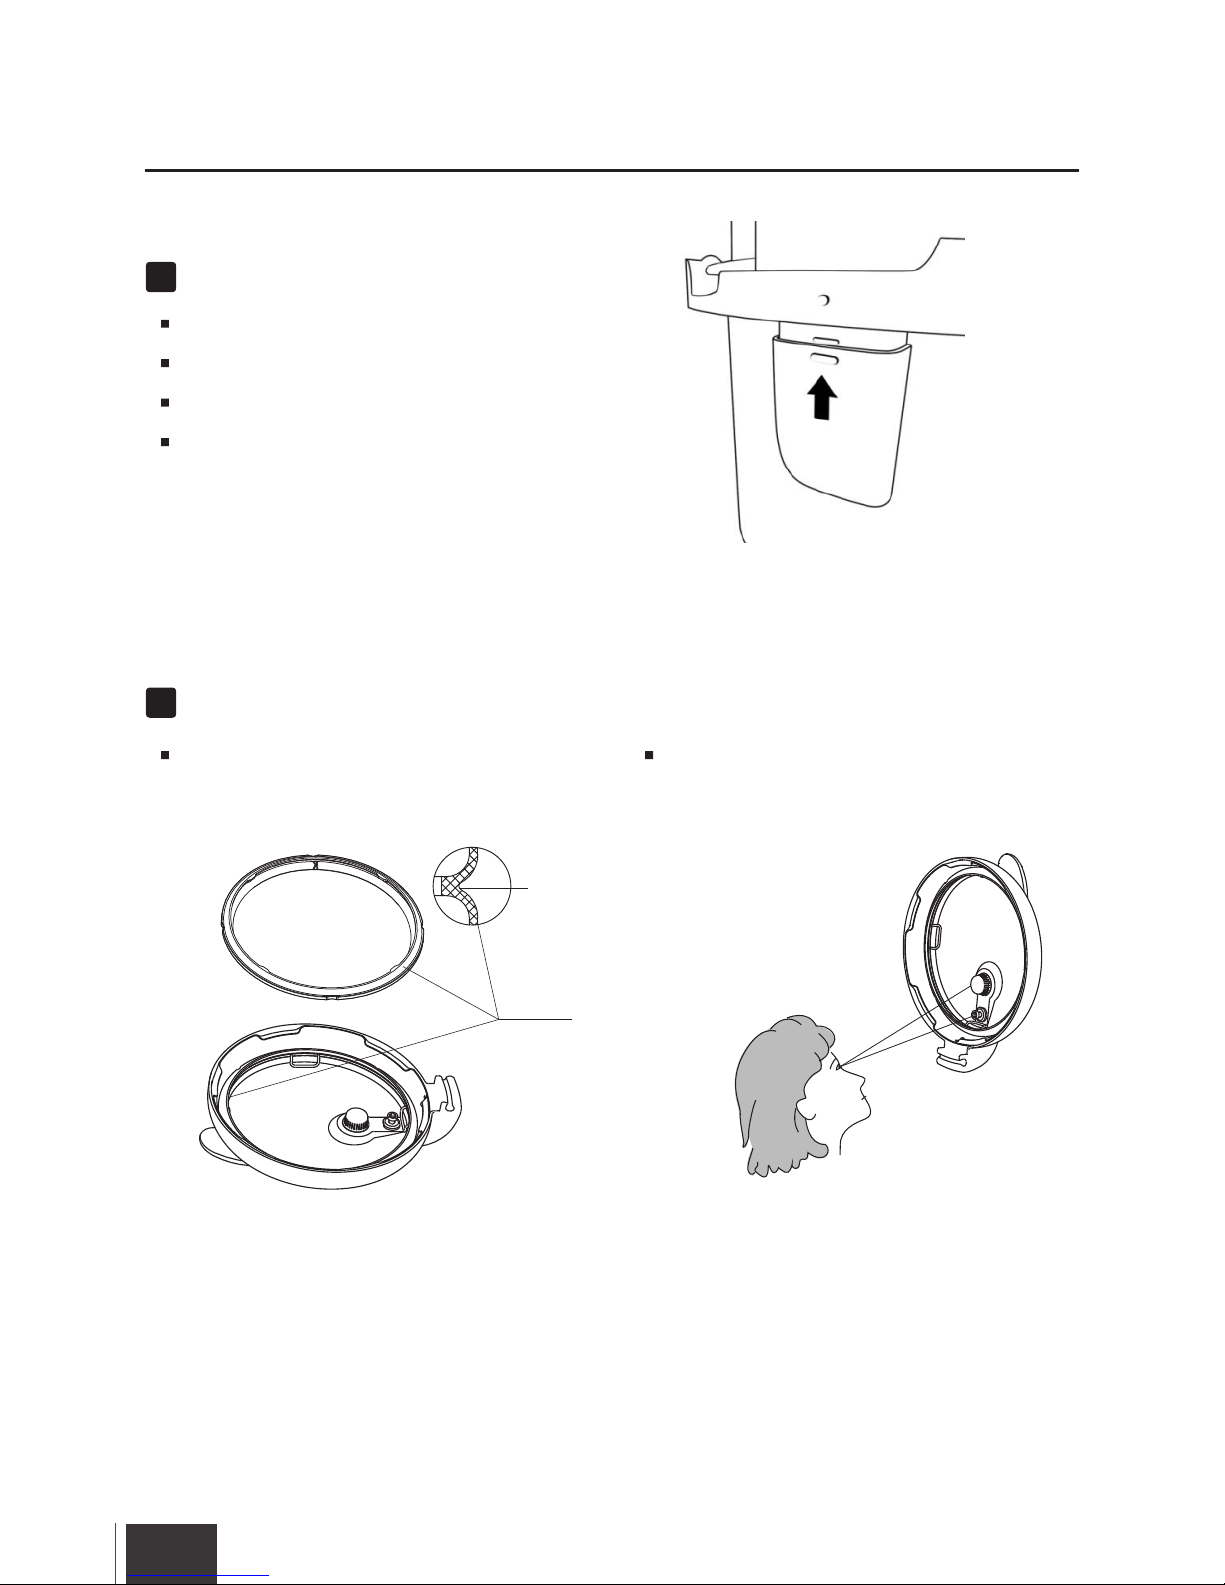
Make sure that the Seal Belt is fitted onto the
inner part of the Lid.
Dismantle the packaging.
Take out all package contents .
Fix the Water Storage on the cooker.
Clean all food contact components by soft
cloth.
4.1 Before Use
EN
05
4. Operating Instructions
Seal Belt
Slot
Check the Exhausting Hole, Floating Valve
hole, if blocking, must clean up first.
Page 9
EN
06
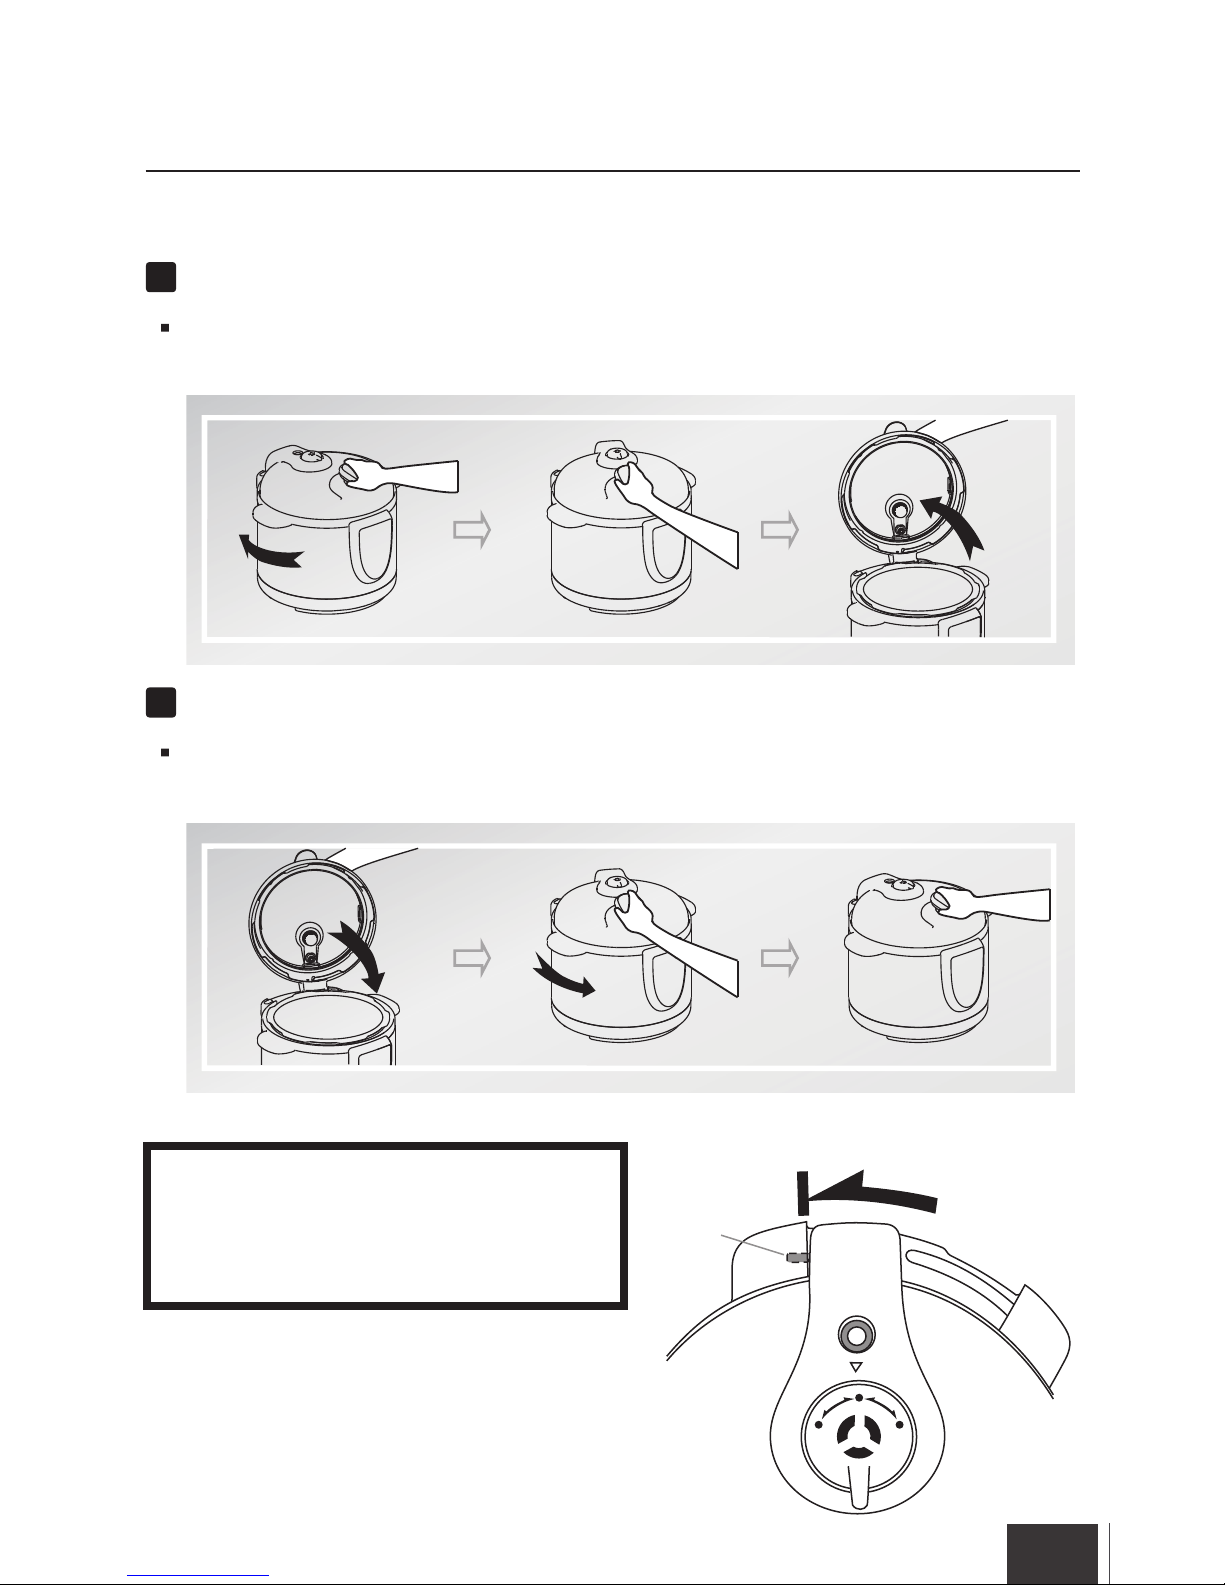
How to open the Lid
When the Lid of the cooker is at the closed Lid position, hold the Handle and turn it clockwise
until reach to the end. Lastly, hold the Handle and pull it backward until the Lid is in vertical
position.
4.2 Lid Open/Close Guide
How to close the Lid
When the Lid of the cooker is in vertical position, hold the Handle and close it downward at the
opened Lid position. After that, turn it anticlockwise until reach to the end.
Make sure the Lid turned to the end
and pressing the switch which
behind the cooker, otherwise it
could not operate.
*
Airtight
Ex
haus
t
Exhau
s
t
Lid-locked
Switch
r
n
t
h
e
T
u
l
i
d
t
o
t
h
e
e
n
d
!
4. Operating Instructions
Page 10
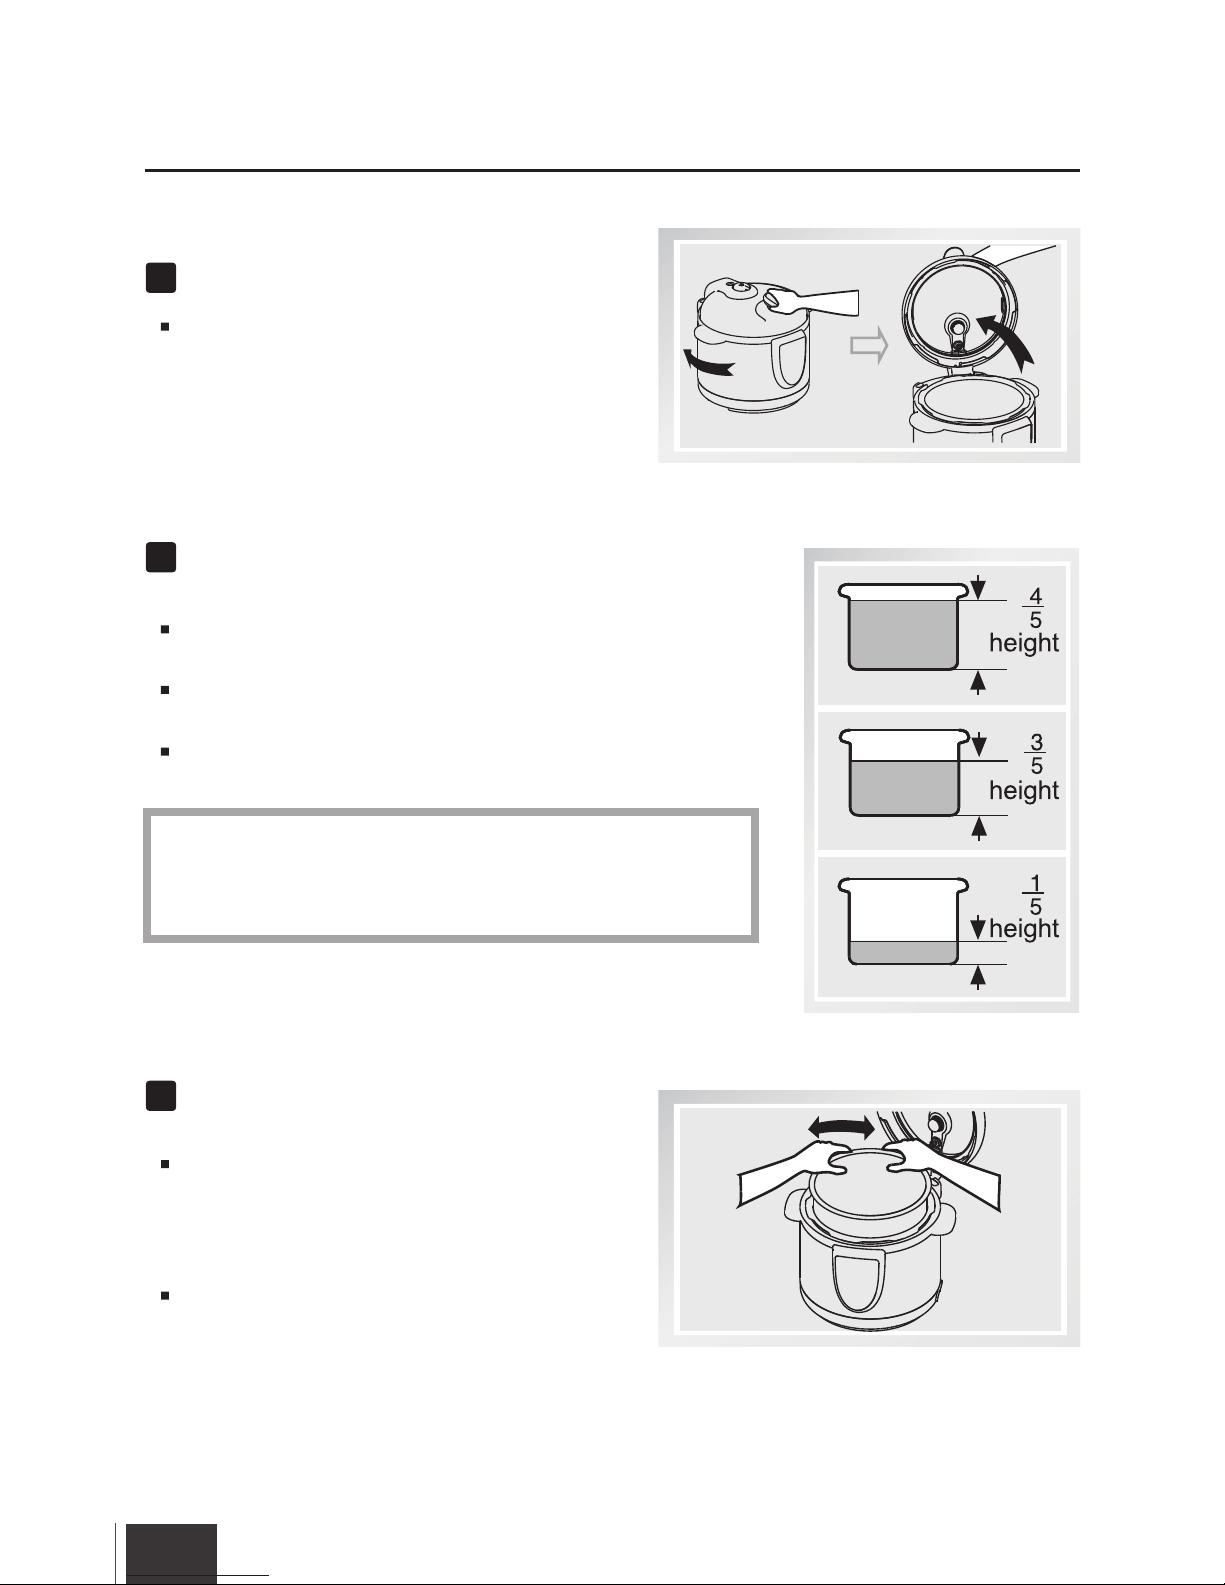
Putting the Inner Pot into the
Outer Pot
Dry clean the outer surface of the Inner Pot
and the Electronics Heater before putting the
Inner Pot into the Outer Pot. Do not place
any material on the surface of the Electronics
Heater and inside the Outer Pot.
After that, turn the Inner Pot left and right to
ensure a firm contact between the Inner Pot
and the Electronic Heater.
Open the Lid
Take the Inner Pot and place food
and water into the Inner Pot.
The amount of water and food shall not exceed 4/5 of the
height of Inner Pot.
For food that will swell in water, the level should not exceed
3/5 of the Inner Pot.
The minimum allowable level would be 1/5 of the Inner Pot.
Hold the Handle and turn it clockwise until
reaching the end position. Then, lift the Lid
upward.
In the case of rice cooking, the maximum amount of rice
allowed for 6L are 12 cups. Normally one cup of rice will
need one cup of water for cooking rice. But this can be
adjusted according to the taste of individuals.
*
4.3 Operation
4. Operating Instructions
EN
07
Page 11
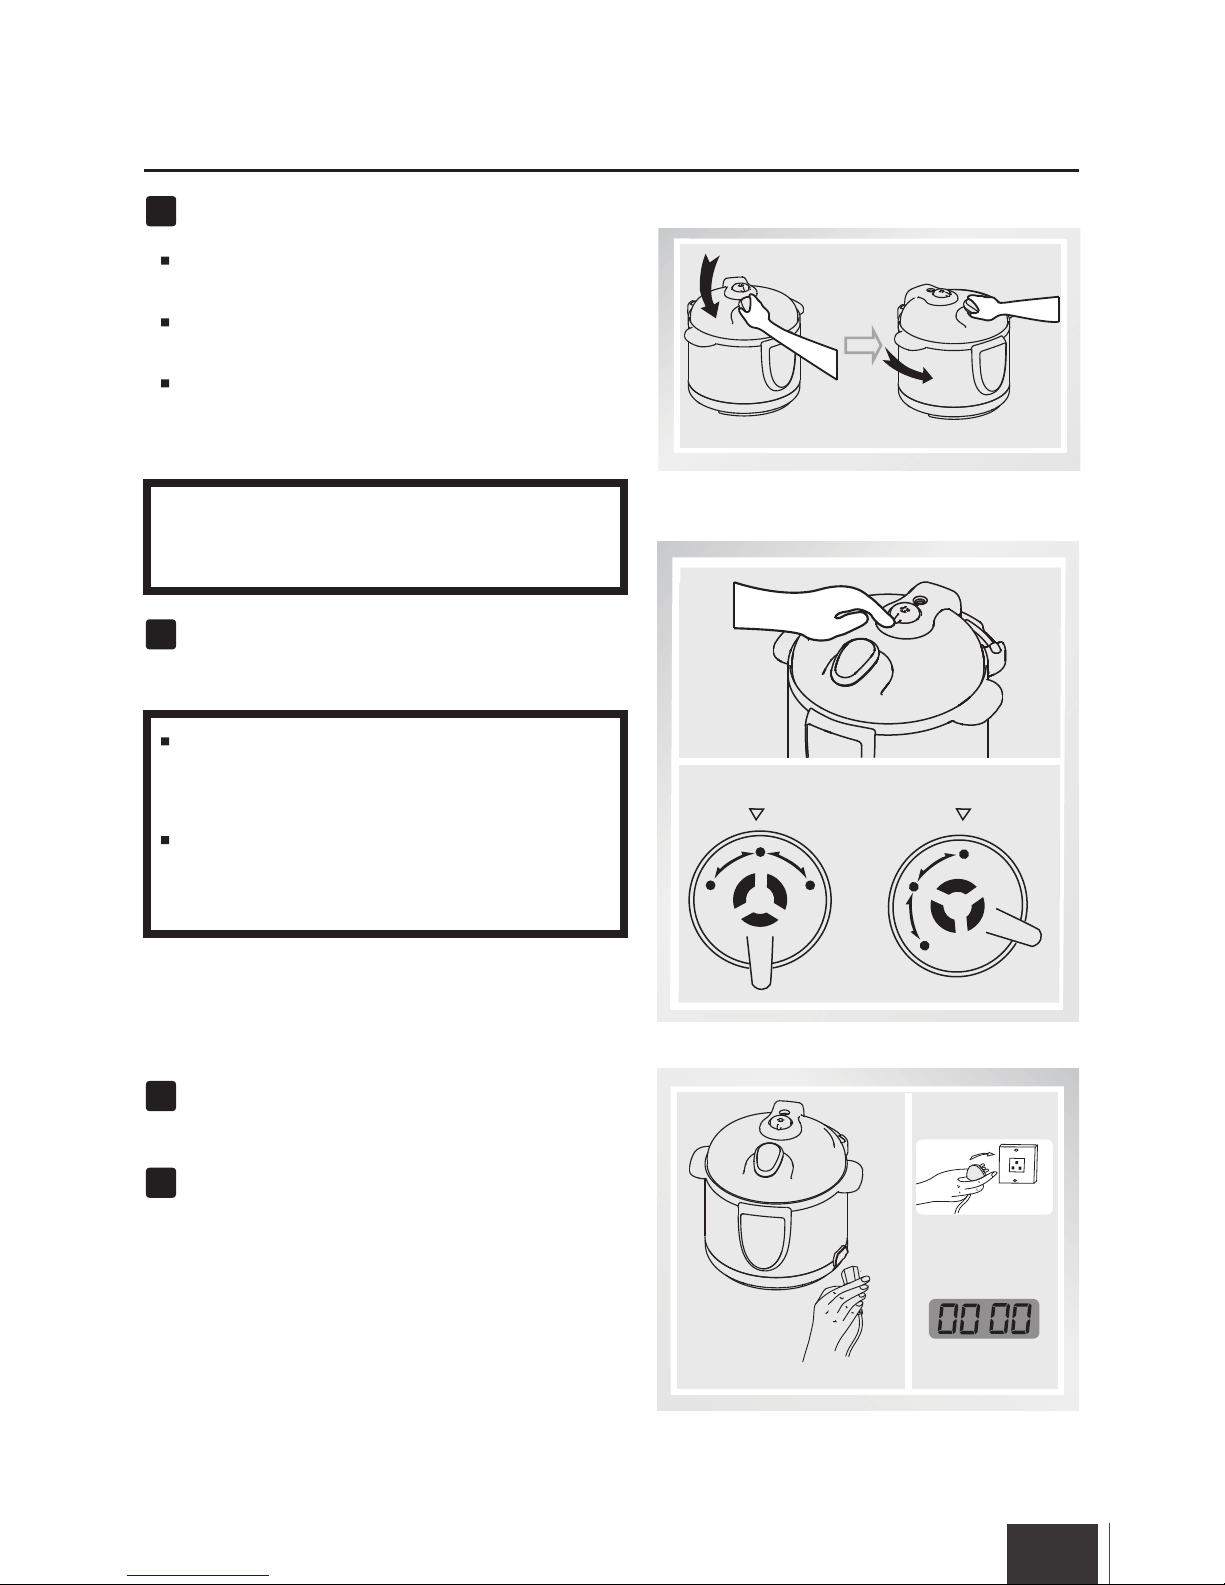
Adjust the Pressure Limiting Valve to the
“Airtight” position, and ensure that the
Floating Valve sinks.
Connect the end of Power cord into the
socket of cooker, insert the plug to the power
outlet.
Turn on the power supply, the cooker will be
on standby mode and the LED Screen
displays 0000(The first two red digits
indicates the Preset time, the last two green
digits indicates the Pressure cooking time.
Close the Lid
Make sure that the Seal Belt is fitted onto the
inner part of the Lid.
Move the Seal Belt inside the Lid to ensure
that it is evenly fitted into the track.
Hold the Lid's Handle and turn it downwards
at the opened Lid position. Then, in the
anticlockwise direction, turn it to the closed
Lid position and a clamping sound is heard.
220-240V~
Standby mode
4. Operating Instructions
Make sure the Lid turned to the end and
pressing the switch which behind the cooker,
otherwise it could not operate.
*
When using the Menu: Slow Cook, Steam,
Cake/Caute, please adjust the Pressure
Limiting Valve to “Exhaust” position.
When adjusting the Pressure Limiting Valve
to either the "Airtight" or "Exhaust" positions,
line up the marking on the Pressure Limiting
Valve with the triangle marking on the lid.
*
*
Airtight
Ex
h
a
u
st
E
xh
a
u
st
“Airtight” position
Air
t
ig
h
t
Exh
a
us
t
Exha
u
st
“Exhaust” position
EN
08
Page 12
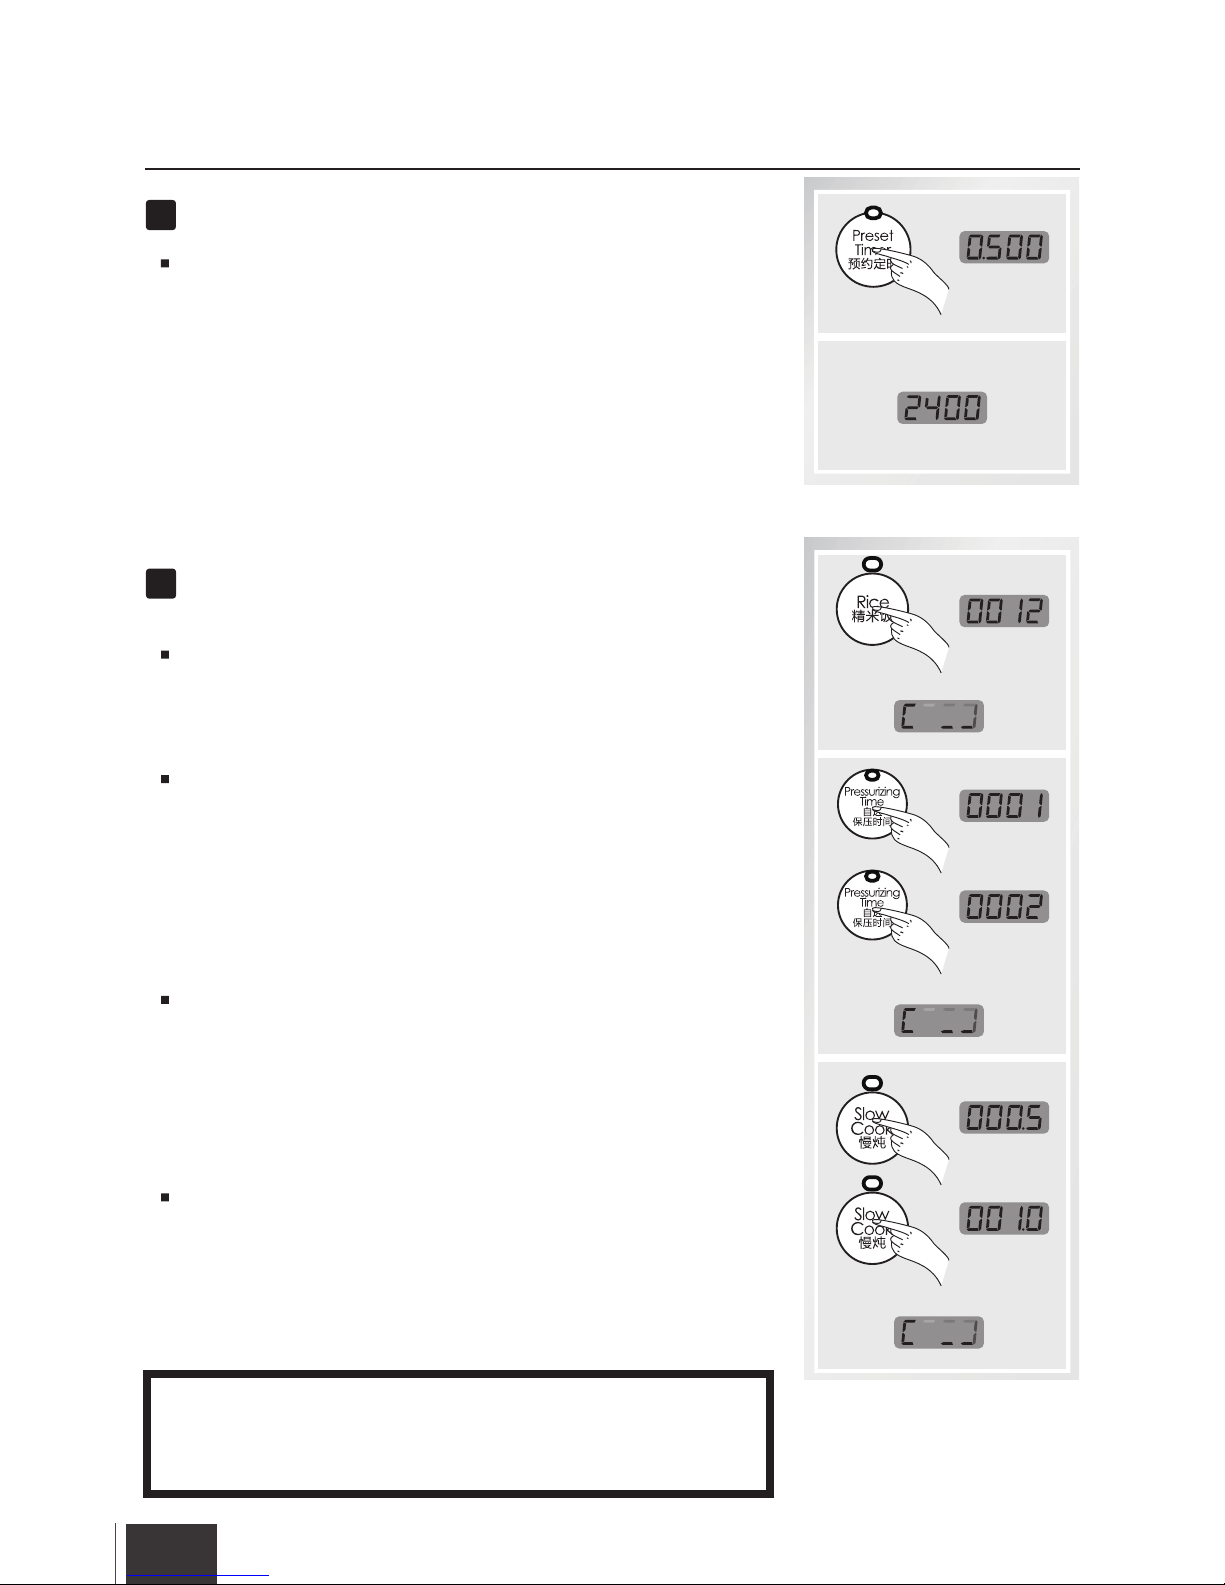
Preset Timer
Set the Preset Timer(If Preset Timer is not required, skip
this step).
Press “Preset Timer” button to increase the timer by 0.5hour increments(or hold for rapid increase) up to a
maximum of 24-hours. (The time that displays on the
Screen shows how long user wants the cooker to wait
before heating process starts).
4. Operating Instructions
Max. 24-hours
Choose the menu according to different recipes.
Press the menu button:Rice, Congee, Soup, Chicken/Meat,
Tendon/Bean, Cake/Saute, the indicator light switches on
and the screen displays the time, after 2 seconds, heating
process starts.
If user want to set the DIY cooking time, select menu:
Pressurizing Time, Screen displays the default cooking
time 1 minute, Press the “Pressurizing Time” button to
increase in 1 minute increments.
Hold the button down for rapid increase of cooking time up to
99 minutes.
The desired cook time will show on the screen. After time
setting, wait 6 seconds, the heating process starts.
If select “Slow cook” menu, Screen displays the default
cooking time 0.5 hour, Press the “Slow cook” button to
increase in 0.5 hour increments.
Hold the button down for rapid increase of cooking time up to
9.5 hours.
The desired cook time will show on the screen. After time
setting, wait 6 seconds, the heating process starts.
If select “Steam” menu, Screen displays the default cooking
time 10 minutes, Press the “Steam” button to increase in 1
minute increments.
Hold the button down for rapid increase of cooking time up to
99 minutes.
The desired cook time will show on the screen. After time
setting, wait 6 seconds, the heating process starts.
after 6 seconds
after 2 seconds
Before use Slow Cook and Steam, please adjust the
Pressure Limiting Valve to “Exhaust” position.
Or we suggest open the Lid and place the Glass Lid onto
the inner pot.
*
*
after 6 seconds
EN
09
Page 13
EN
10
4. Operating Instructions
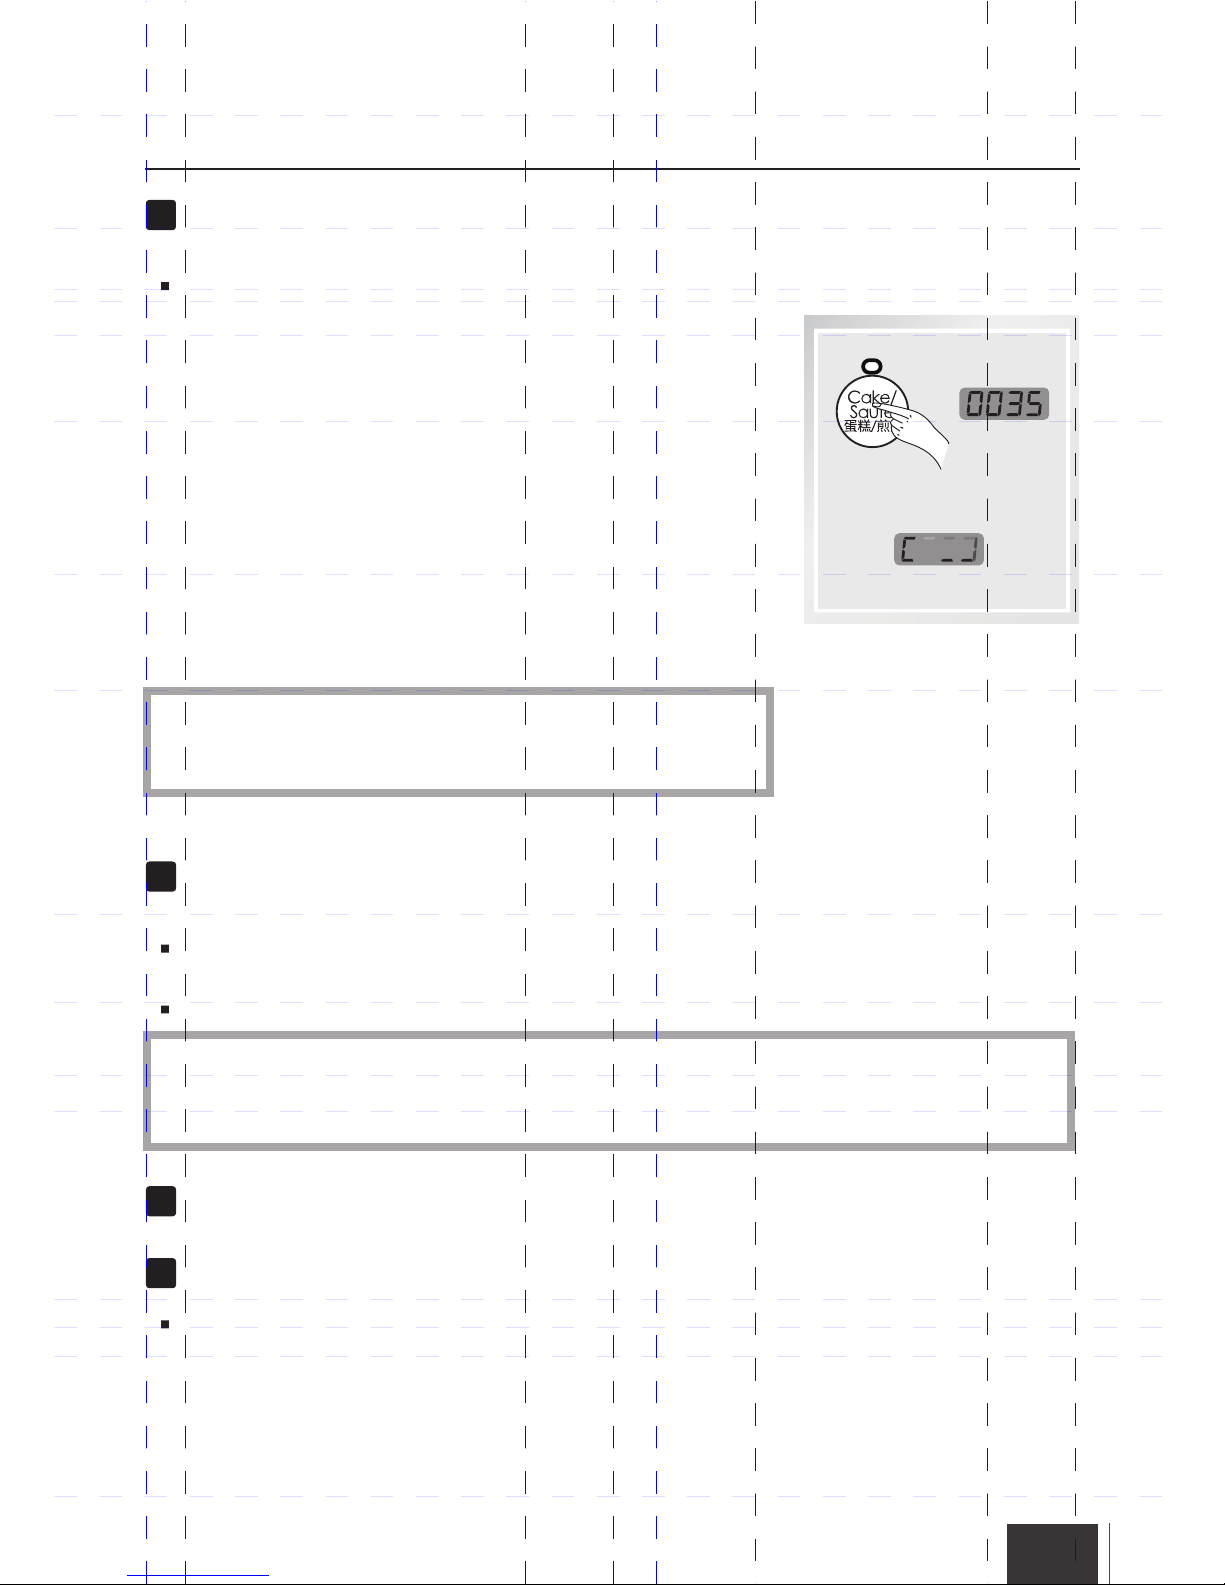
Choose the menu according to different recipes.
How to use “Cake/Saute”.
This menu includes two different functions: Cake and Saute.
To cook the Cake, after place ingredients into the Inner Pot,
please close the lid and adjust the Pressure Limiting Valve
to “Exhaust” position.
To use Saute, this function allows cooking over high heat,
1. Make sure the lid is not on the unit.
2. Add oil or butter as directed in your recipe and place food
into the Inner Pot.
3. Watch up in the whole Saute process, avoid the food
overcooking.
4. Stir or turn food as needed until desired color and
consistency is reached.
5. Press “Keep Warm/Cancel” button to stop the cooking.
Before Pressure cooking, most recipes will benefit from the
golden color, richer flavors and moist results gained from
Sauteing/Browning.
*
after 2 seconds
When screen displays END, the cooking is finished,
you need release the pressure as follow:
Method One: Press “Keep Warm/Cancel” button to stop Keeping Warm, adjust the Pressure
Limiting Valve to “Exhaust” position to release the steam, until the Floating Valve sinks.
Method Two: Wait for cooling down itself and until the Floating Valve sinks.
For liquid food(Congee, viscous fluid), when screen displays END, never use method one,
must use method two to serve the food to avoid the fluid of food to spurt out from the vent
holes. Wet towel can be placed on the Lid to increase the speed of cooling down.
*
Unplug the Power cord.
Open the Lid
Hold the Lid's Handle, turn it in clockwise
direction unit reach the end position, lift
upward the Lid, then the food can be served.
Page 14
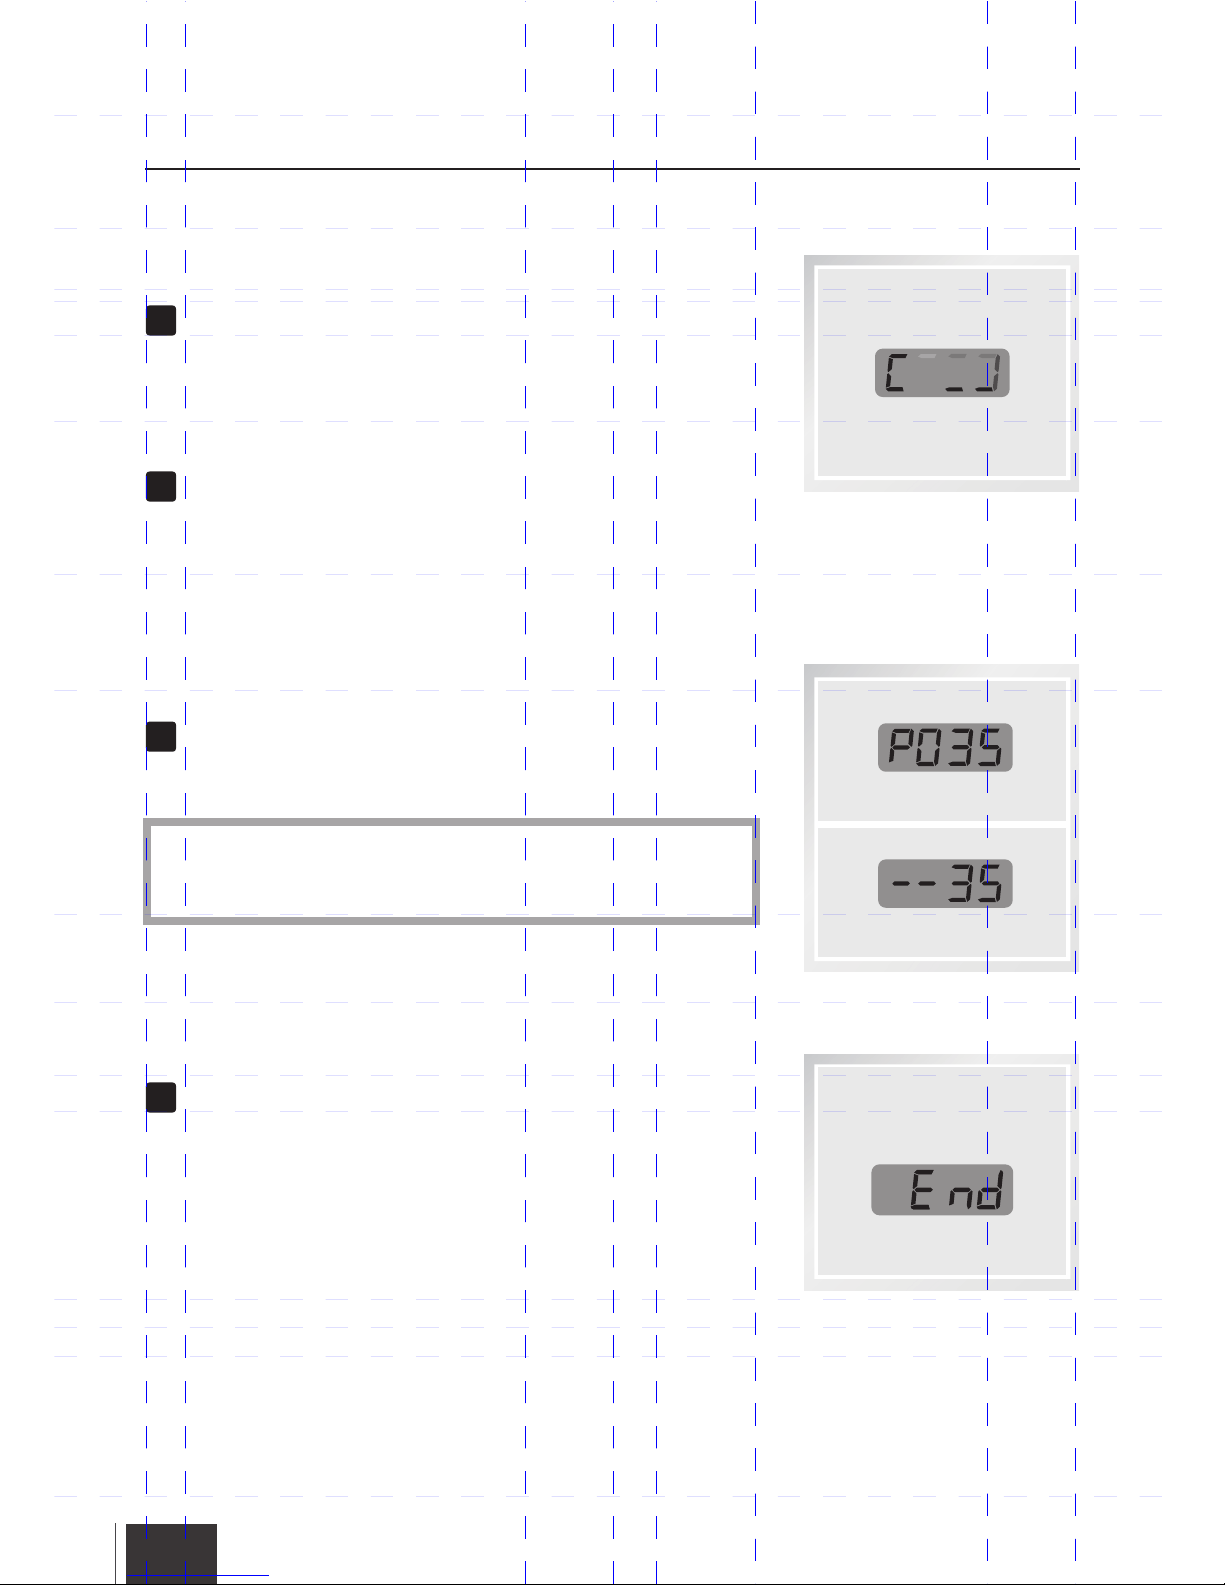
After the cooking time countdown to 00, screen displays
END, and beep 3-times, then enter the Keep Warm mode,
the indicator of Keep Warm light switches on, now the
cooking process is finished.
EN
11
After press the menu button, screen displays the cooking
time and the indicator keep flash 2 seconds(for menu: Slow
Cook, Steam, Pressurizing Time, it will keep flashing for 6
seconds), then screen turns to C000, the indicator light
remains on, it means the heating process starts.
If Preset Time is activated, the indicator of “Preset Timer”
lights will be on, screen displays preset time, after selecting
menu, the indicator of menu light remains on, means this
menu is activated. Then, the preset time starts to
countdown. When the preset time countdown finishes, the
screen displays the heating process as mentioned above.
4.4 Screen and Indicator Guide
Screen
For menu: Slow Cook, Steam, Cake/Saute, once inside
temperature reach to the cooking level, screen displays
“--+time” and begin countdown.
*
4. Operating Instructions
After heating process run for a few minutes, when the
pressure inside reach to the pressure cooking level, screen
displays “P+time” and begin countdown.
Page 15
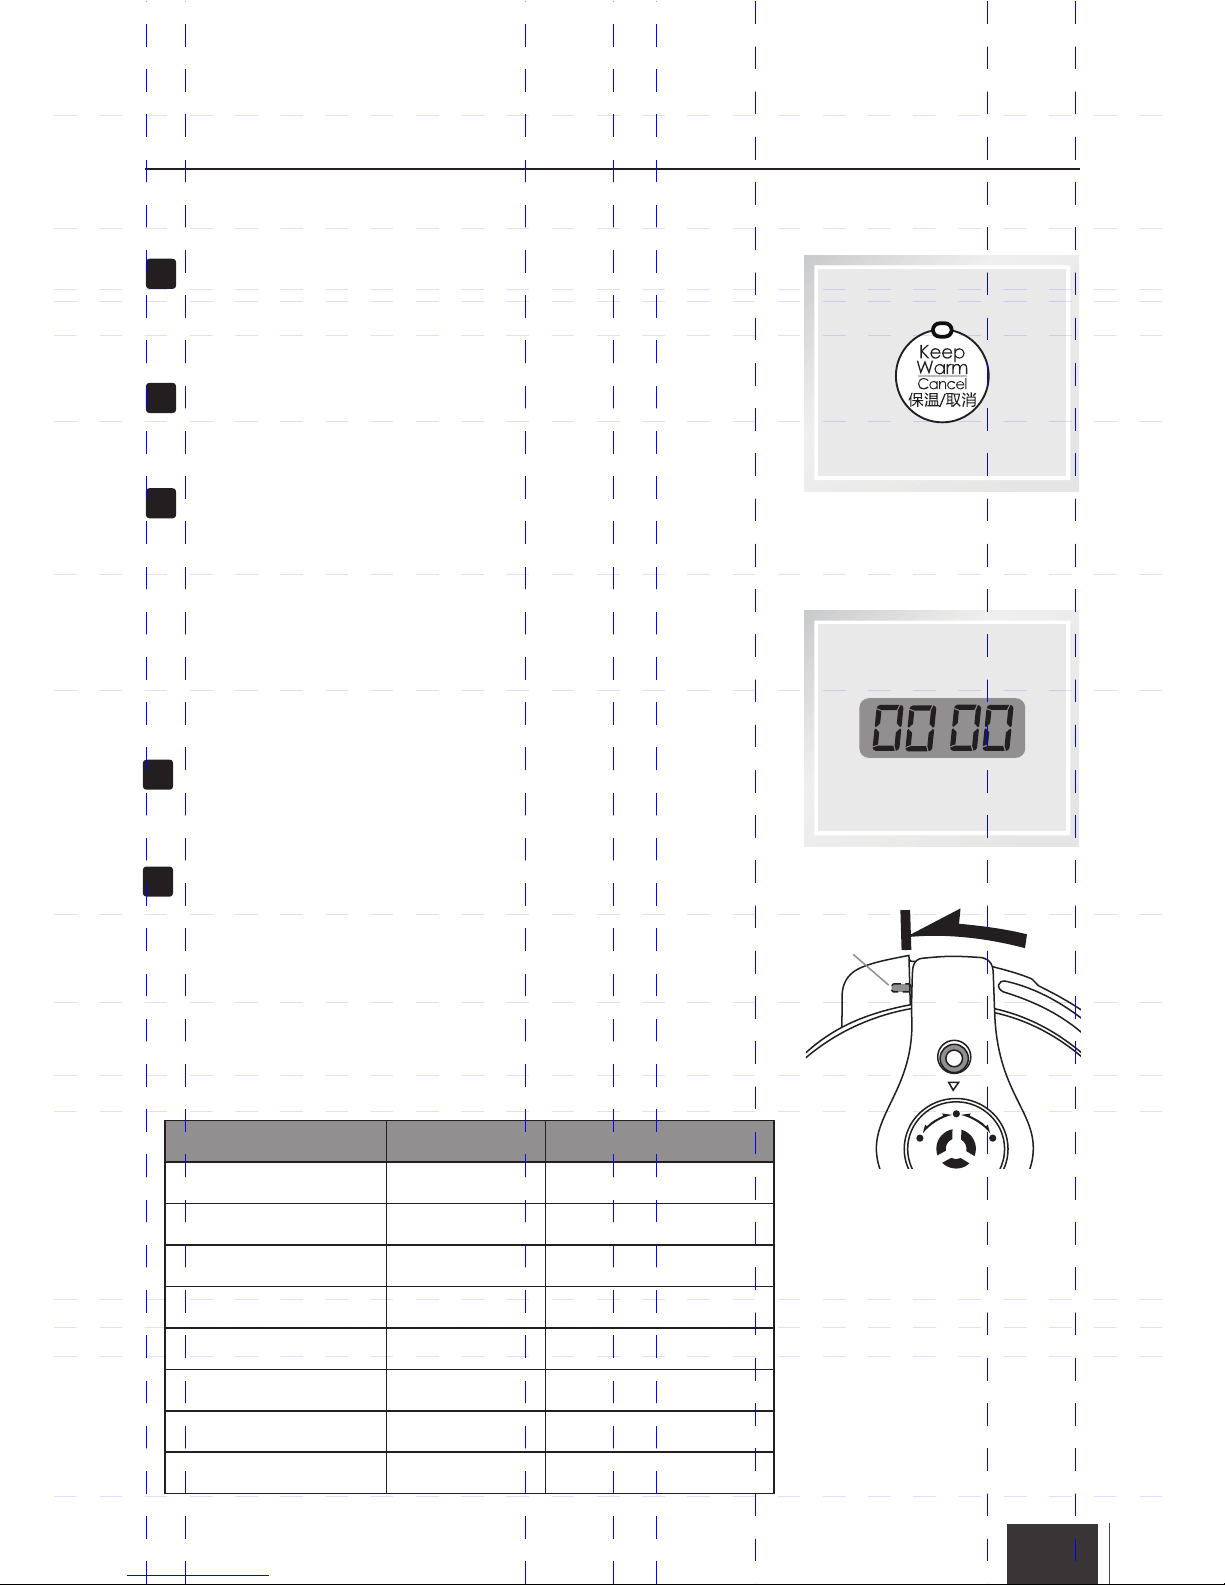
Under standby mode, press “Keep Warm/Cancel” button,
the Keep Warm light will be on and start keeping warm, if
press this button again, it will be canceled.
EN
12
When the cooking time finishes, automatically turns to Keep
Warm mode for up to 24 hours, during the period, by
pressing “Keep Warm/Cancel” button, the keep warm
processes can be canceled.
During the setting or cooking process, by pressing “Keep
Warm/Cancel” button, the keep warm or cooking processes
can be canceled.
4.5 Keep Warm/Cancel
4. Operating Instructions
4.6 Reminder
Menu
Rice
Slow Cook
Steam
Cake/Saute
Congee
Chicken/Meat
Tendon/Bean
Pressurizing Time
4.7 Cooking Reference
Default Time
Adjustable Time
12 Minutes
0.5 hour
10 Minutes
35 Minutes
20 Minutes
8 Minutes
27 Minutes
1 Minutes
/
/
/
/
/
Before press above menus button, the Lid must be locked
well(turn to the end), otherwise will deliver 3 buzzs as
warning, and the screen returns to standby mode: 0000.
This cooker has lid-locked detecting protection for the following
menus: Rice, Congee, Soup, Chicken/Meat, Tendon/Bean,
and Pressurizing Time, .
During the cooking process of above menus, if the Lid is
unlocked/opened, the cooker will deliver a buzz as warning
and stops heating, the screen display 0000, it will continue
the cooking process when the Lid is back to locked position.
Airtight
E
xh
au
st
Exh
aus
t
Lid-locked
Switch
r
n
t
h
e
T
u
l
i
d
t
o
t
h
e
e
n
d
!
0.5-9.5 hours
1-99 Minutes
1-99 Minutes
Page 16
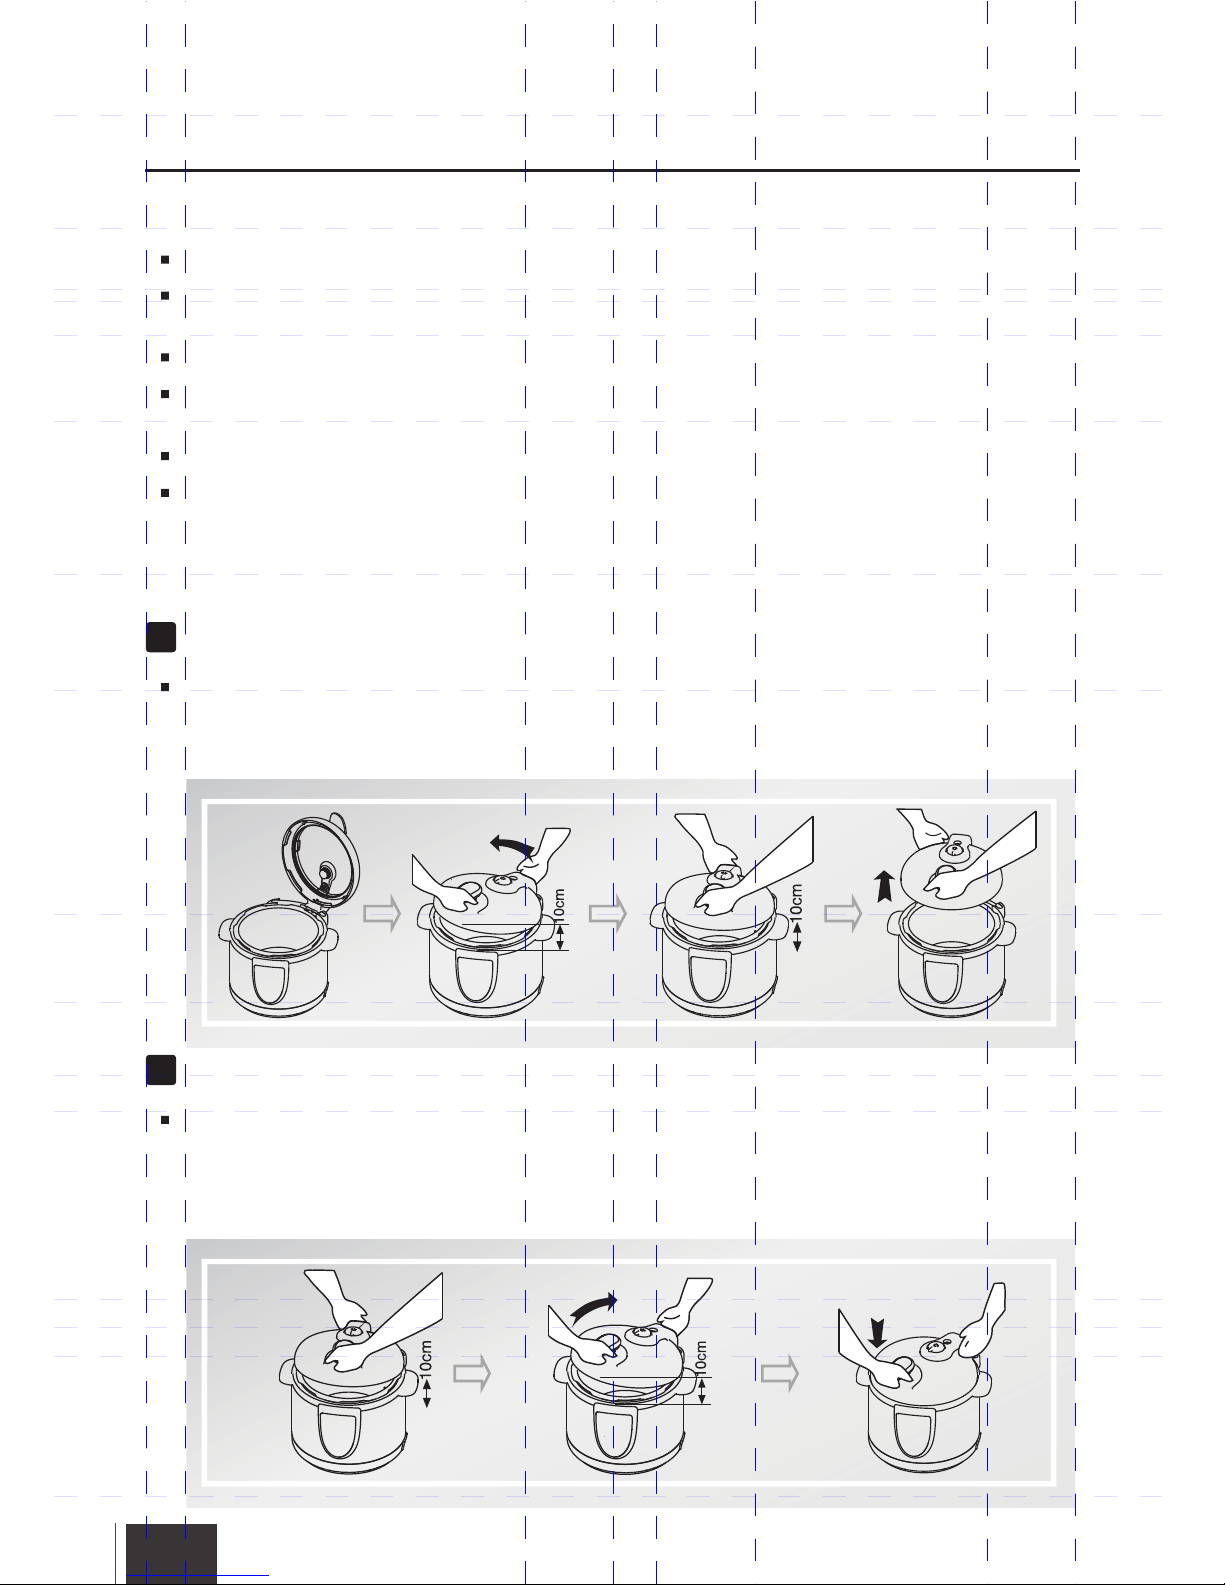
Unplug the power cable prior to cleaning.
Brush the bottom of the cooker with a cloth. Never place the cooker into water or spray water
on it.
Take off and clean the water storage and wash it with a wet towel.
Clean the inner side of the cooker, including the sealant washer, pressure discharging valve,
anti-blocking case, steam relief pipe, floating valve with water and clean it with a cloth.
Use a sponge or nonmetal soft brush to wash the inner pot and clean it with a cloth.
Clean the base of pressure limiting valve and water drain hole with a small brush.
5. Cleaning and Maintenance
Cleaning Methods
Lid Cleaning Methods
How to dismantle the Lid
When the Lid of the cooker is in the upright vertical position, hold the lid with both hands, and
adjust the height between the Lid and the upper edge of the cooker to approximately 10cm.
Then turn it counter-clockwise until you reach the Closed Lid position. In order to remove the
lid, you will need to move in an upward direction.
How to install the Lid
Hold the Lid with both hands at the Closed Lid position and pull it upwards in a slanted
position to a height of 10cm between the Lid and the upper edge of the cooker. Align the Lid's
Sliding Latch to the pressure cooker's Lock-Slider and turn it in a clockwise direction until you
reach the Opened Lid position. The lid will be installed when the lid is seated and in the
horizontal position.
EN
13
Page 17
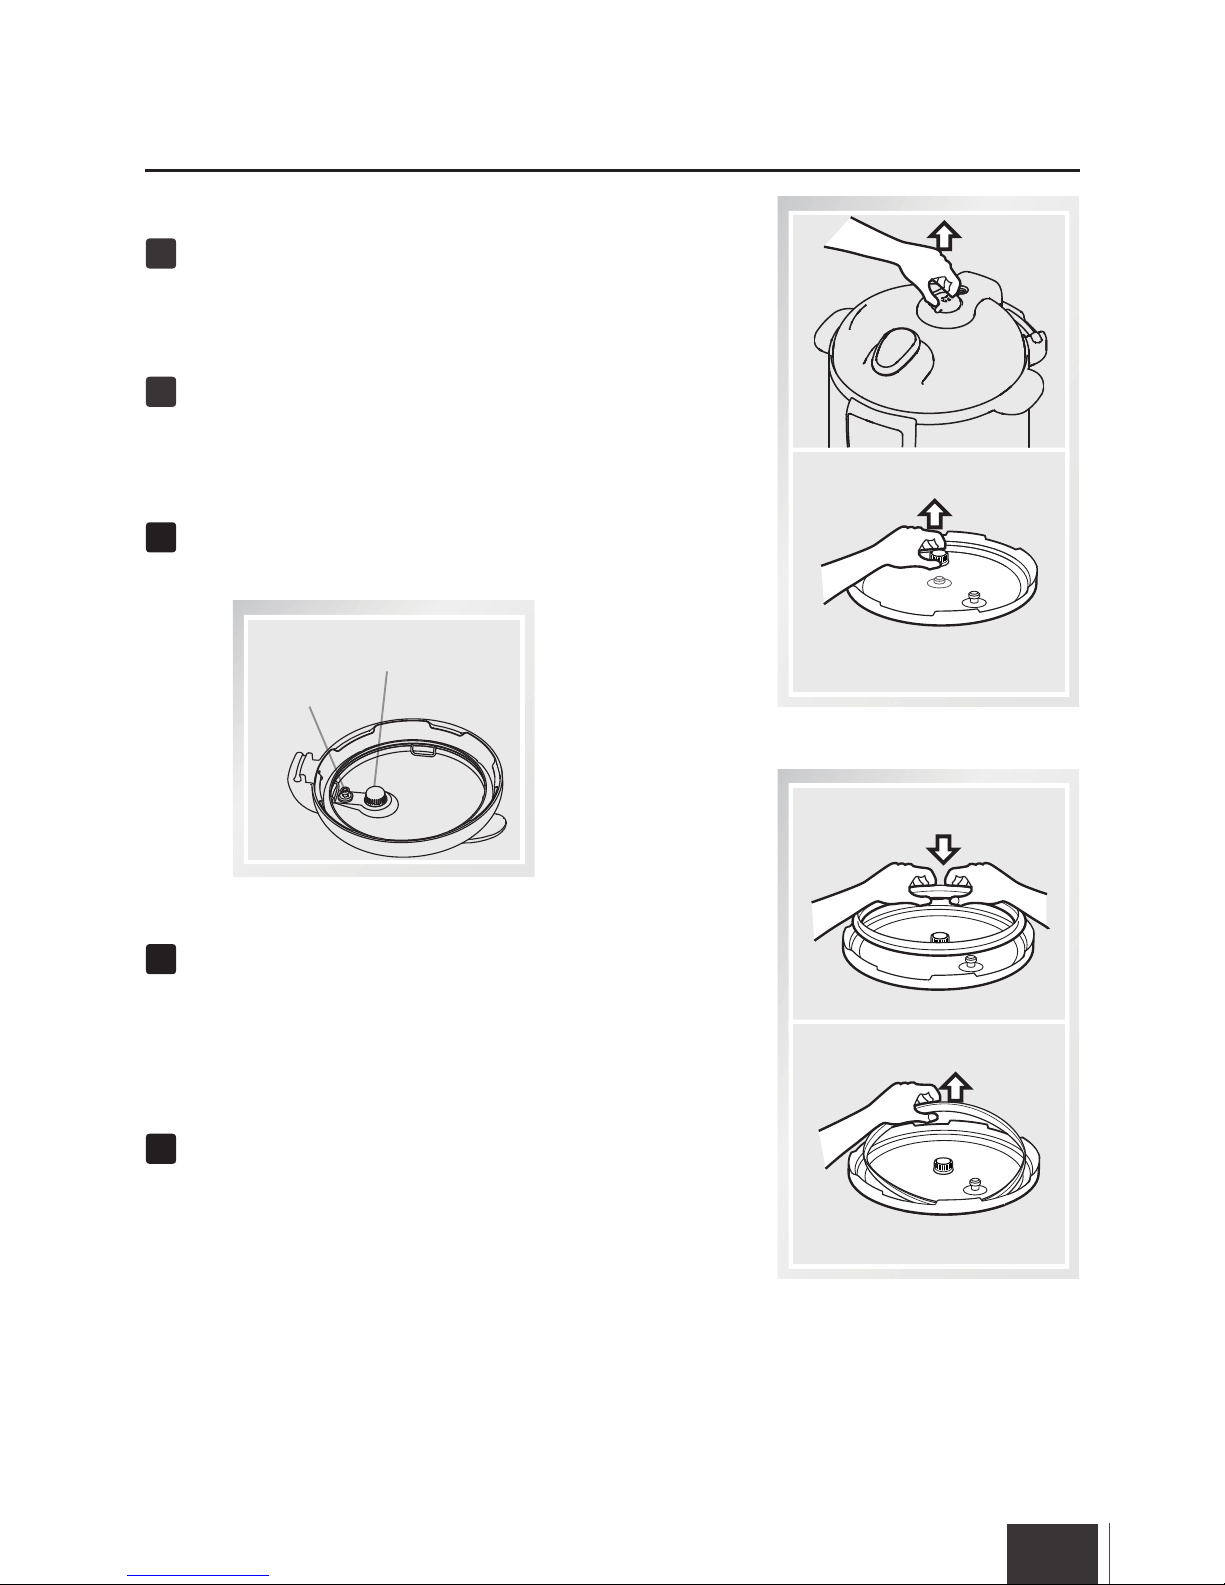
Gently pull out the Seal Belt from the Steel
Ring of the Lid. After cleaning, fix it in the
Steel Ring well
Pull out
Fix
Check and clean the Exhausting hole,
Floater.
5. Cleaning and Maintenance
Make sure all components fix well in Lid
before using.
Turn the Lid and take it out. Then, take off
the Pressure Limiting Valve, clean it with
water.
Turn the Filter anticlockwise to take it off,
clean it with water. Then fix in the same
position.
Floater
Exhausting hole
EN
14
Page 18
6. Troubleshooting
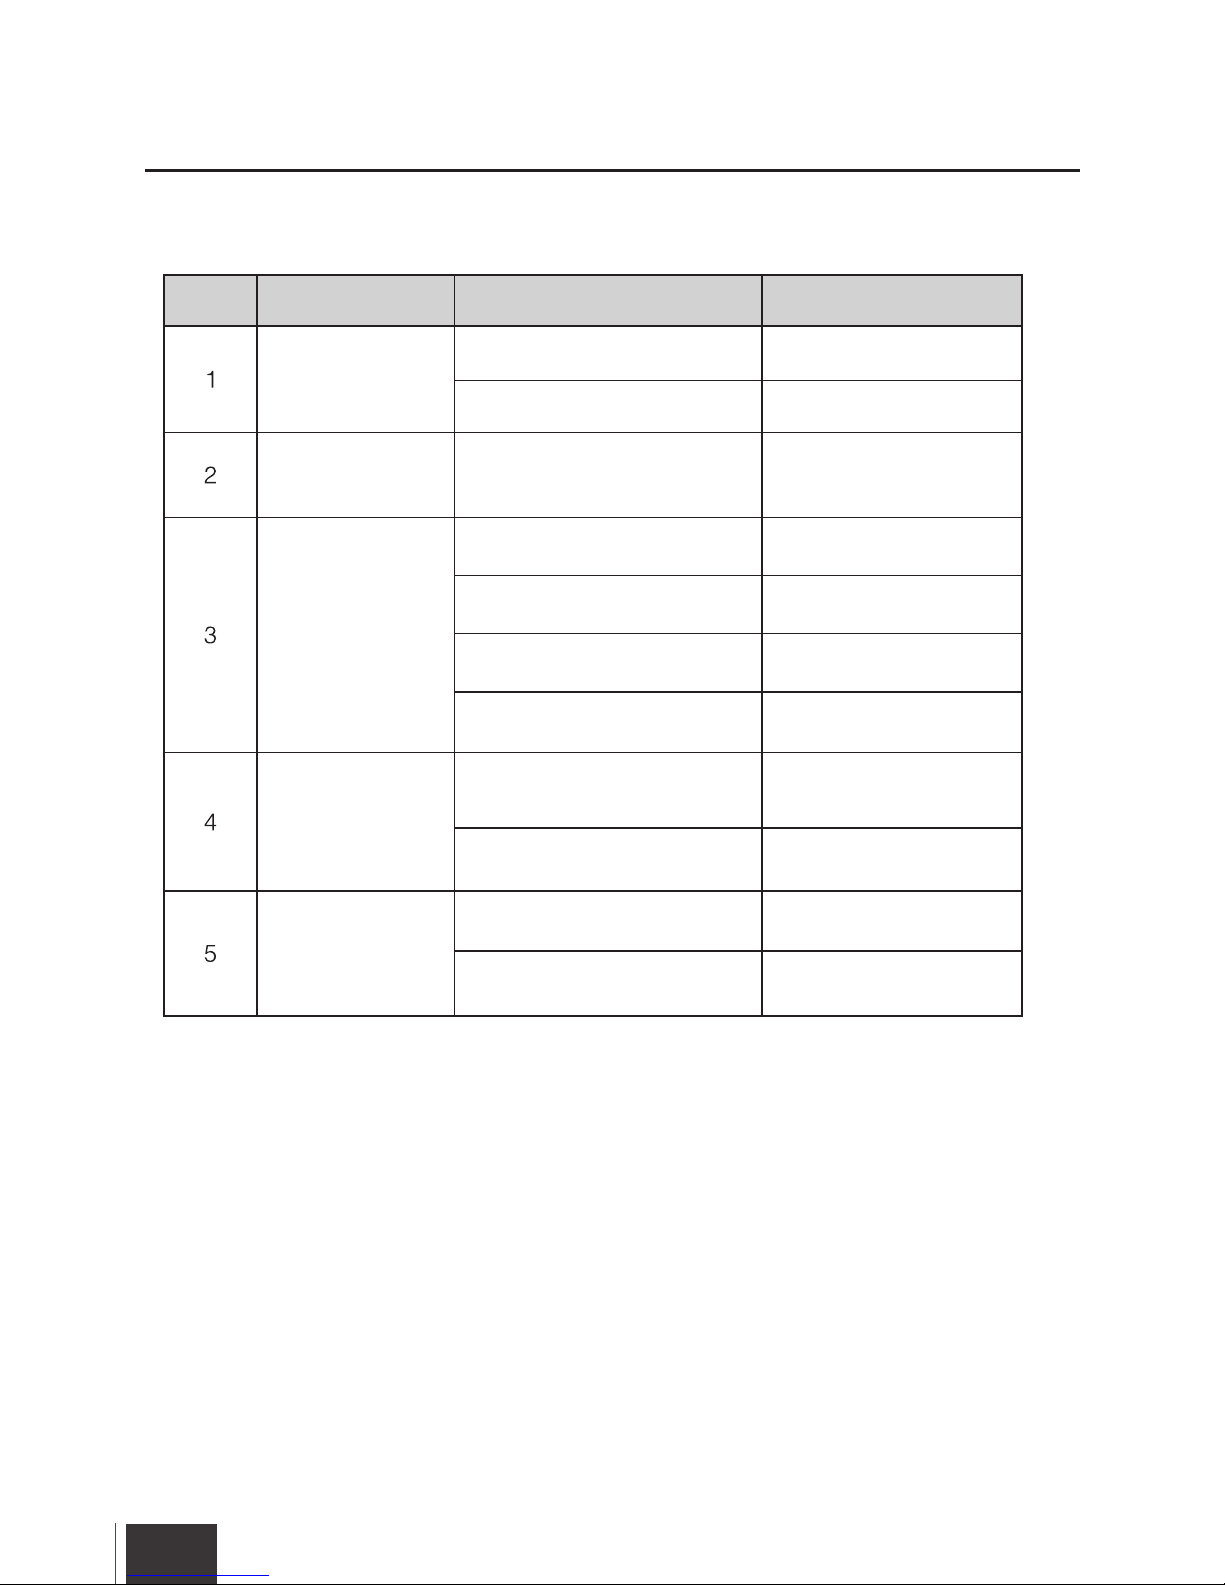
Please use this chart to troubleshoot common problems of using Primada Speedy
Refine Cooker
No.
Malfunction
Possible causes
Solutions
Difficulty in closing
the lid
Difficulty in opening
the lid
Steam leaking out
around the lid
Steam leakage from
the Floating Valve
Floating Valve is not
rising up
Seal Belt is not properly fitted
Floating valve stuck on the bar
Floating Valve has not sunk
Seal Belt is missing
Dirty Seal Belt
Damaged Seal Belt
Lid is not closed tightly
Dirty Seal Ring for Floating Valve
Damaged Seal Ring For Floating
Valve
The amount of food and water is
lower than the minimum level
Steam leakage around the lid or
from Pressure Limiting Valve
Fit in the Seal Belt properly
Push the bar gently
Spank the cooker several
times to let the valve down
in place.
Fit in the Seal Belt
Clean the Seal Belt
Replace the Seal Belt
Close the lid according to
the instructions
Clean the Seal Ring for
Floating valve
Replace the Seal Ring for
Floating Valve
Determine the amount of food
according to the instructions
Send the cooker to Service
Center for checking purposes
EN
15
Page 19

Page 20

 Loading...