

Page 1
Circulation Fan
CCF-E80R
0
Page 2
SAFETY REGULATION
1
Read all the instruction carefully. Keep this user manual for
future reference.
This appliance in not intended for use by persons (including
children) with reduced physical, sensory or mental
capabilities, or lack of experience and knowledge, unless
they have been given supervision or instruction concerning
the use of appliance by a person responsible for their safety.
Use only original accessories supplied.
The current voltage which indicates on the plate must
correspond to your local voltage.
The appliance should be used only on condition that the type
of power supply corresponds to the marking label. Otherwise,
it will not work or even be damaged.
Never use the appliance inside the bath, under a shower or
over a wash basin full of water.
If the appliance falls into water, pull the power plug out from
the power socket immediately.
Never use the appliance unless it is fully assembled.
Do not overload outlets or extension cords. It can result in fire
or electric shock.
Do not use the appliance if the power supply cord or plug has
been damaged.
Unplug from outlet when not in use, before putting on or
taking off parts, and before cleaning.
The use of accessory attachments not recommended by
the appliance manufacturer may cause injuries.
1
Page 3
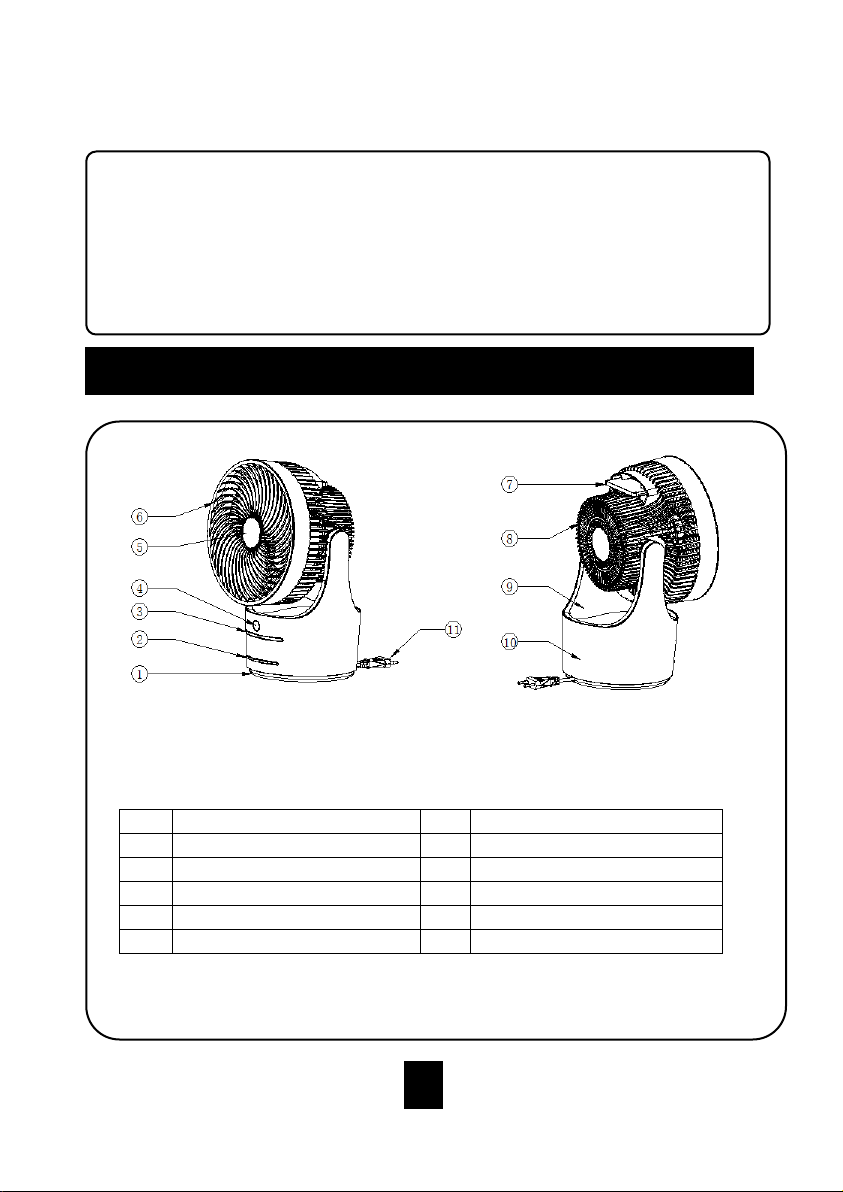
Do not immerse the cord, plug or appliance in water or other
1.
Base
7.
Remote Controller
2.
Key
8.
Rear Housing
3.
LED Indicator light
9.
Oscillation bracket
4.
Receiving Windows
10.
Fan Body
5.
Decorate cover
11.
Power cord
6.
Fan guard
PARTS IDENTIFICATION
2
2
types of liquid and do not pour water onto it to avoid from fire,
electrical shock or personal injury.
To protect against risk of electrical shock, do not force any
foreign objects such as pins and wires into any openings.
2
Page 4
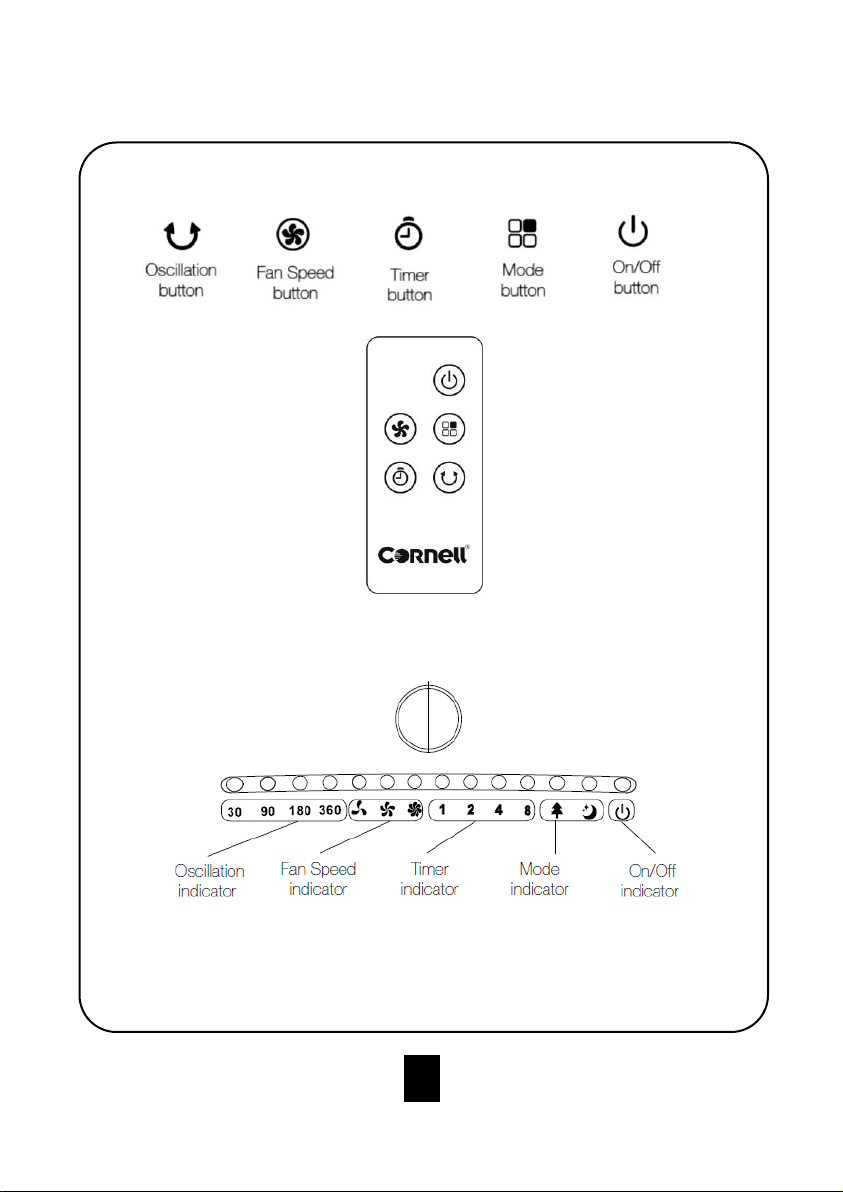
Control Panel & Remote
3
Indicator light display panel
Indicator Light Display Panel
3
Page 5
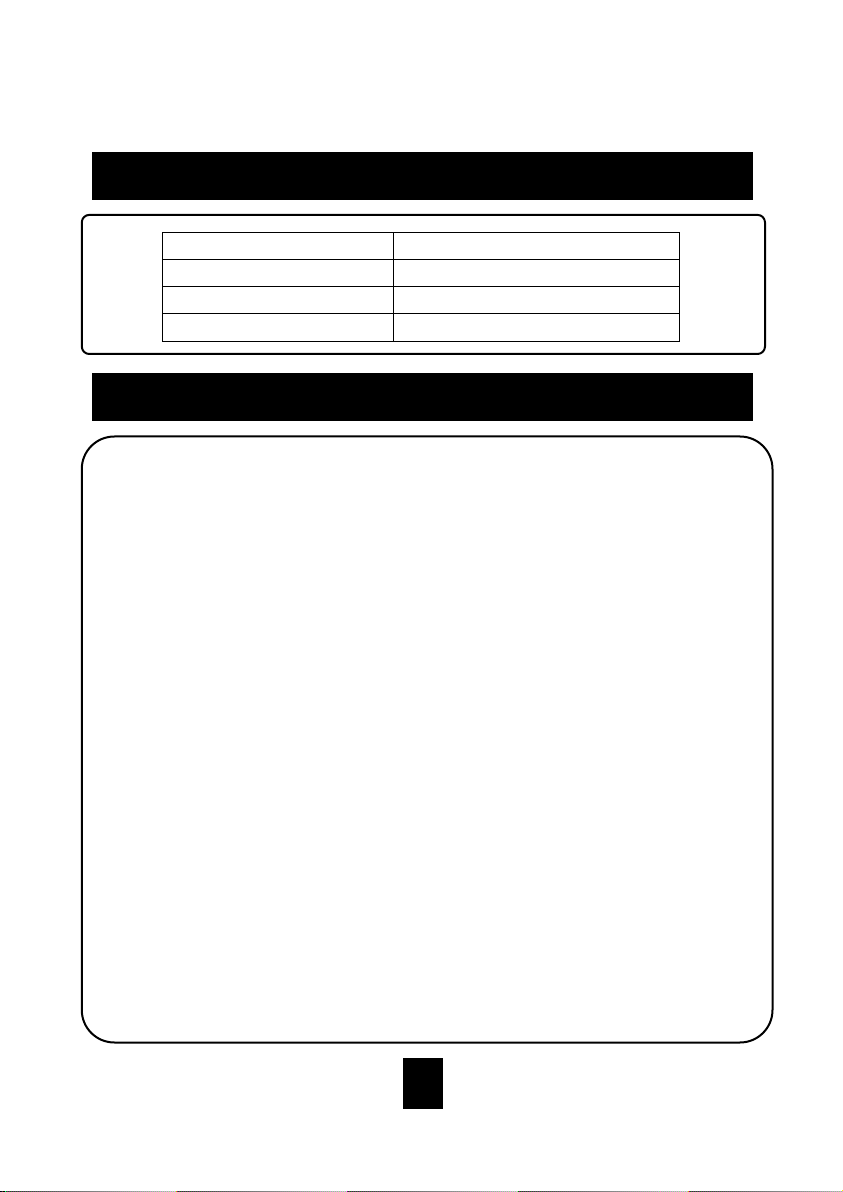
Model
CCF-E80R
Voltage
220-240V~
Frequency
50Hz
Power
45W
SPECIFICATION
OPERATING INSTRUCTIONS
4
1. Remove the unit from its packaging
2. Plug the unit into a power outlet, a ‘beep beep’ will sound
and the unit will be in standby mode.
3. Press the “On/Off” button to turn the unit On.
4. Press the “Fan Speed” button to change the fan speed
(low, med, high).
5. The unit defaults in “Normal” mode. Press the mode
button to change to Natural or Sleep Mode.
6. The unit will operate initially on a continual basis. If a set
period of operation is required, please follow “TIMER”
instructions on page 6.
7. To activate 360° oscillation, press the oscillation button.
To turn off oscillation, press again.
8. To switch the unit off at any time, press the “On/Off”
button.
4
Page 6
REMOTE CONTROL
5
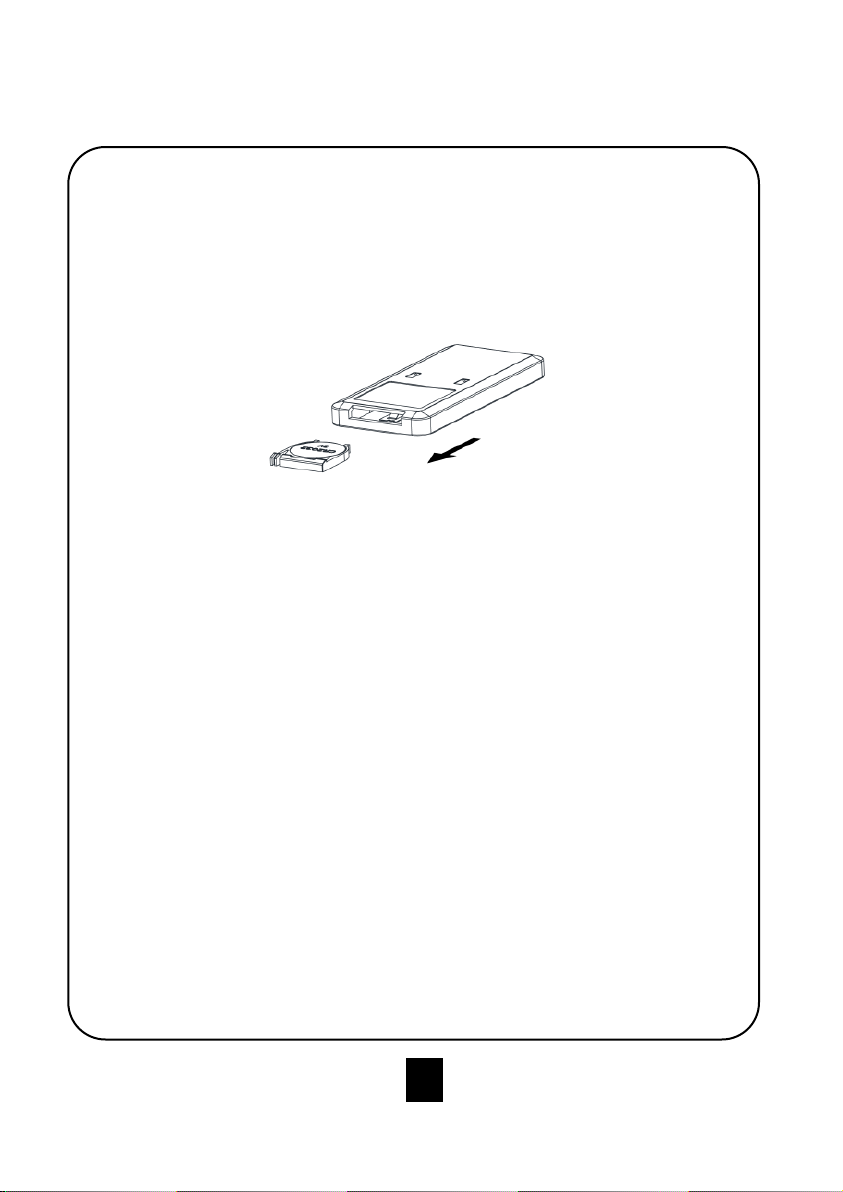
The remote control can be used to operate all functions.
1. Remove the battery cover at the back of remote control
(Picture 2).
2. Insert the 3V CR2032 battery.
3. Replace the battery cover.
ON / OFF
This button is used to switch the unit on and off. By simply
pressing the button, you can turn the unit on or off. Once
turned on, default mode is Normal Mode & Low Speed.
FAN SPEED
This button is used to select the desired fan speed – Low,
Med, or High. The fan speed indicator light will illuminate
indicating what speed has been selected. Press once for low
speed, press twice for medium speed, press three times for
high speed. Pressing again in high speed, will return to low
speed.
MODE
This button is used to switch between pre-set operating
modes. By simply pressing the button, you can regulate the
mode from NORMAL, NATURAL or SLEEP depending on
your needs. The unit automatically starts in NORMAL mode.
Normal Mode: Operates normally with the selected wind
speed –Low, Med, High.
5
Page 7

6
Natural Mode: The fan speeds automatically shift through
High,Med, Low speed to imitate a natural wind speed rhythm.
Sleep Mode: The fan automatically lowers the set wind speed
in 30 minute intervals. E.g. High speed: 30mins -> Med speed
30mins -> Low speed 30 mins.
TIMER
This air circulator comes with an 8 hour timer that allows you
to pre-set the unit to switch off automatically, in intervals of 1,
2, 4 or 8 hours. To operate, simply select the number of hours
ahead you wish the unit to switch off and the respective
indicator lights will illuminate. If you’d like the unit to run
continuously, ensure no timer indicator lights are illuminated.
OSCILLATION
Press the oscillation button to activate 360° Horizontal
oscillation. Press again to deactivate.
90° VERTICAL OSCILLATION Tilt the fan head to achieve up
to 90° angled oscillation. Ensure the fan is OFF when djusting
the fan head position.
6
Page 8
CARE AND CLEANING
7
Dust may accumulate on the rear grill cover and wind wheel,
which would affect fan performance. Thus, we suggest that
cleaning the fan at least once every other month.
Always unplug the product from the wall socket prior to
cleaning.
Do not use abrasive sponge, scouring pads or stiff
brush to clean the appliance.
Please be cautious when cleaning the product near to
the motor housing area.
Occasionally wipe the exterior surfaces with a damp
cloth.
In an unlikely event of the appliance malfunctioning, it
should be taken to the nearest authorized service
centre.
Do not allow the motor or other electrical components to
be exposed to water.
For proper storage, always place the fan in a low
humidity environment.
Cleaning the Fan Blade
Firstly, loosen the screws which are on the rear cover
then remove the front guard by turning anti-clockwise.
Remove the fan blade for cleaning.
Dry thoroughly before re-assemble.
7
Page 9

8
 Loading...