

Page 1
Air Cooler CAC-21
Page 2

1
Safety Precautions
1. Always switch off and unplug the appliance from the Mains
electrical supply BEFORE cleaning and also when the
appliance is not in use.
2. When adding water, does not overfeed above “MAX” level.
3. Choose normal wind when environmental humidity is too high
as cooling function is accompanied with humidifying.
4. After adding water into the unit, do not lean or crash to keep
water from overflowing when placing or moving.
5. Do not put any objects on the unit.
6. Disconnect power and pull out the plug before cleaning and
repairing.
7. Clean the outside of the unit with wet mop (or add some
detergent). Do not use corrosive detergent or solvent to clean.
Pouring water on the unit is strictly forbidden.
8. If machine fallen down with water in it, plug should be pulled off
immediately. Machine can be switched on after 24 hours’ drying.
You may damage the machine if you do not follow this
instruction.
9. Do not place the wind outlet and wind inlet of the unit close to
wall or curtain; otherwise air can be blocked to influence effect.
10. You may find some noise from the unit and uneven wind volume
after using for a certain period of time. This is because the air
filtering net is dusty and blocks the airflow. It will be back to
normal after cleaning the air filtering net.
11. When not using the appliance, pull the plug out of the outlet.
12. The appliance must be taken to the appointed local agent for
Page 3
2
repairing.
13. If the supply cord is damaged, it must be replaced by the
manufacturer, its service agent or similarly qualified persons in
order to avoid a hazard.
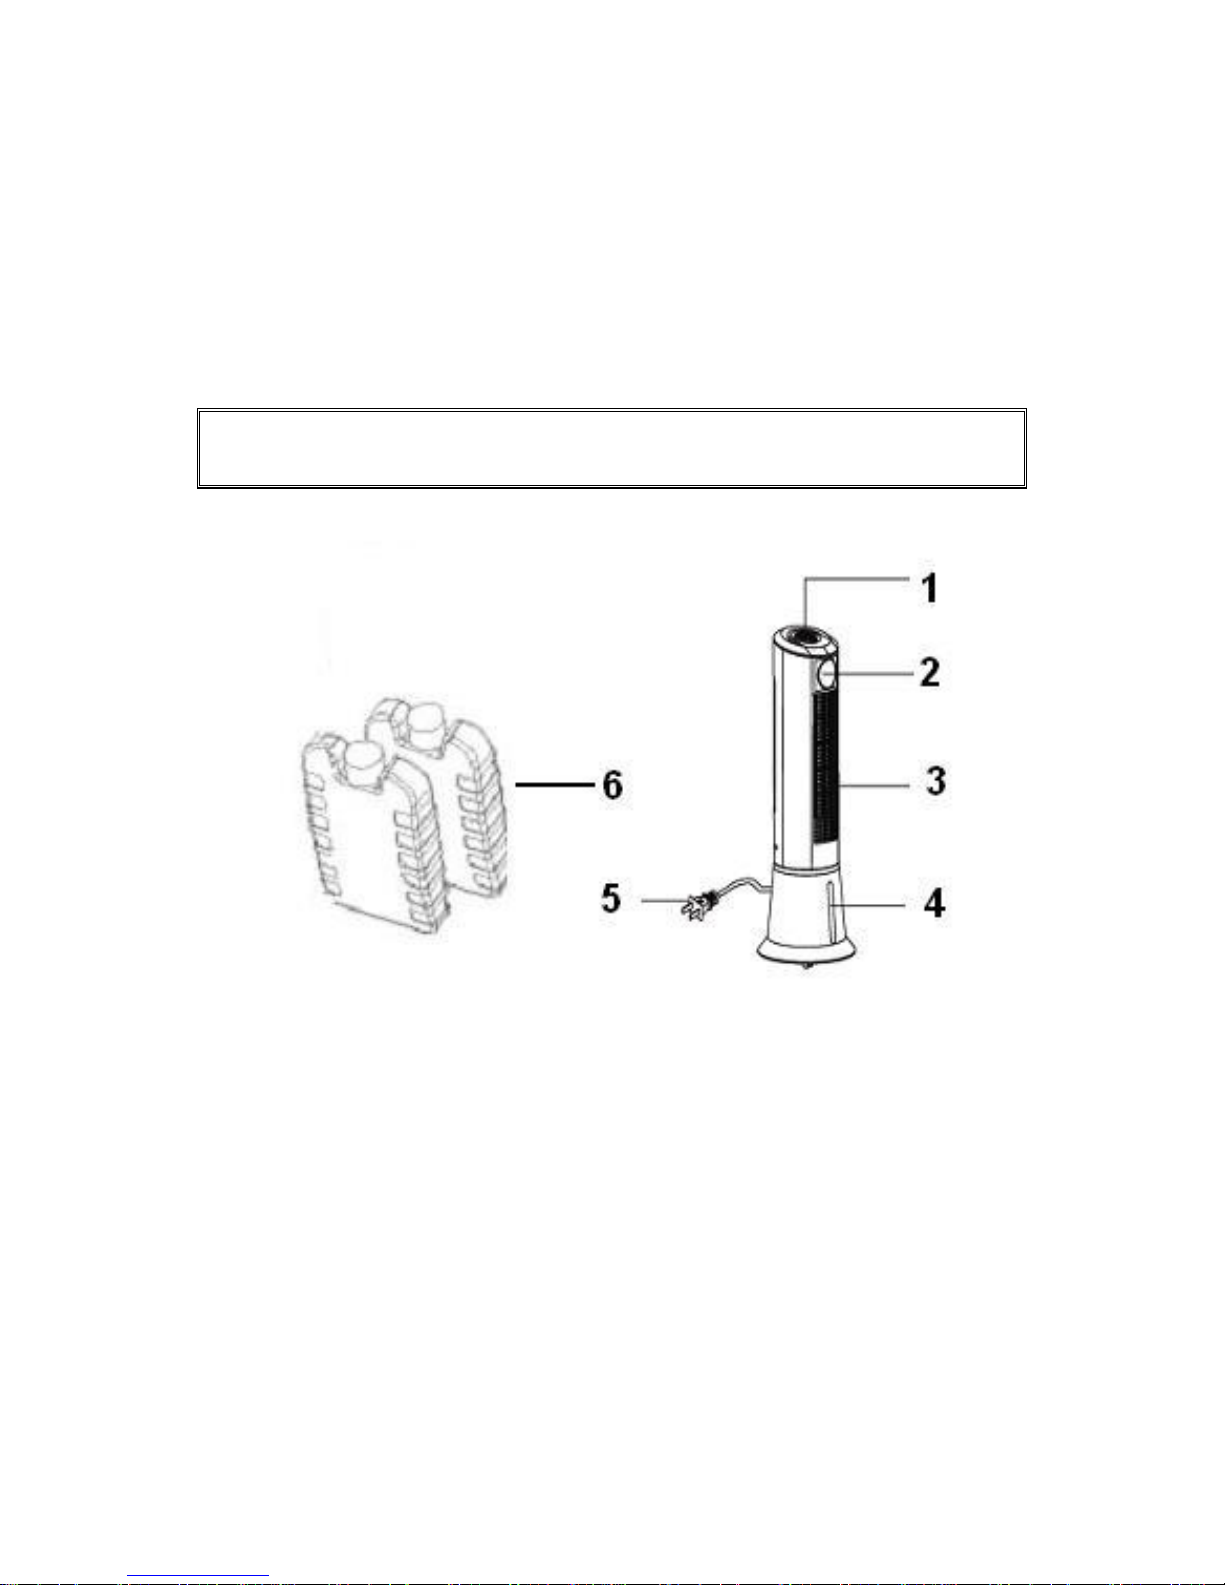
Parts Identification
1. Control panel
2. LED display
3. Wind outlet
4. Water Level Indicator
5. Power cord
6. Ice Box
Page 4
3
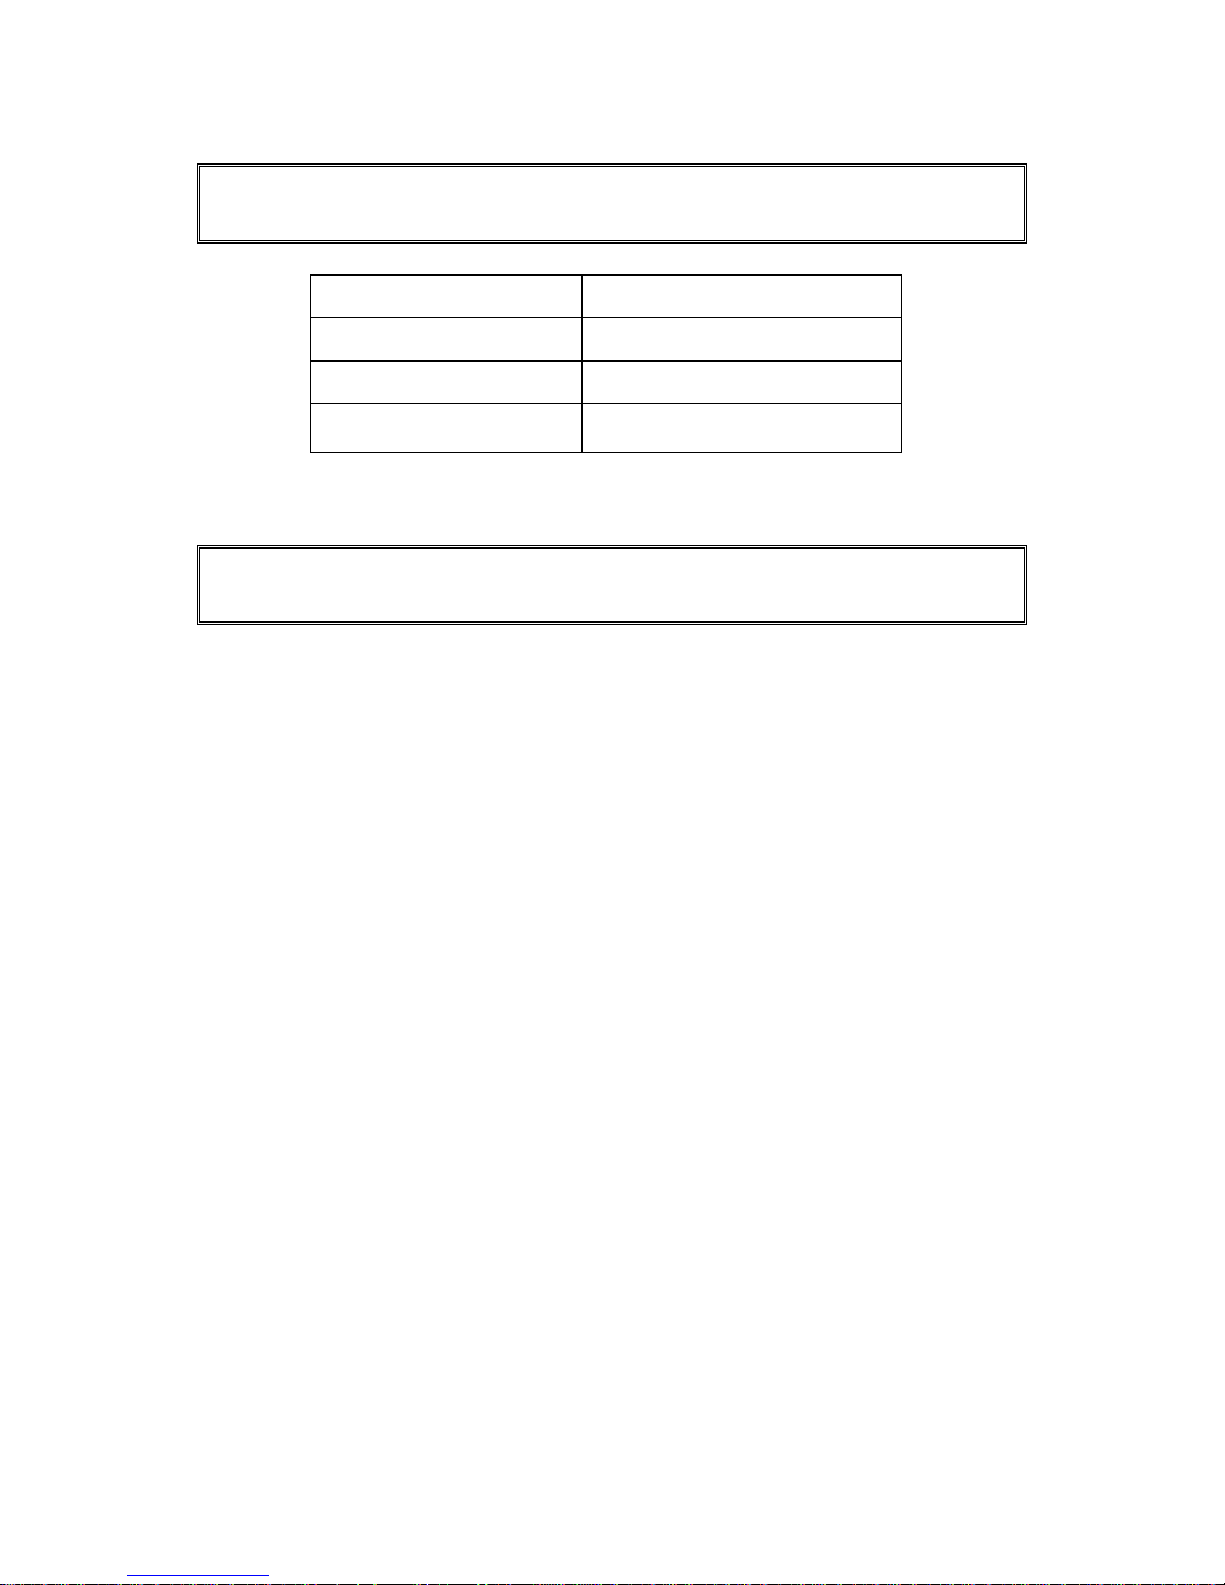
Specifications
Model
CAC-21
Rated Voltage
220-240V~
Rated Wattage
45W
Frequency
50Hz
How to Use
Features
Strong wind but quiet motor.
ION generator purifies the air.
Large angle left and right Auto wind.
Ice pot can save cooling large capacity, long time release and
good cooling performance.
Long distance control for convenient operation.
0-9 hours timing.
LED luxury display window
Injection type water circle technology. Big volume water
sprinkling make the cooling quicker.
Dismountable water filter, washing easily.
Optical catalyst patch can deodorize, sterilize, Optical rebirth
and ensure the long term performance.
Double filter setting to purify and clean the air.
Outside filter: Filter the big dust grain and fiber.
Water curtain cloth Filter: Filter the exiguity dust grain and
reduce the temperature by injection water circle.
How to assembly
Open the package and take the unit out. To connect power for
use after abandoning foam cover.
Page 5

4
Open Adding water cover on the left of the unit and then adding
clean water into water tank (figure1, figure24). Observe the
water level through watermark when adding water and control
the quantity.
Pay attention to the following
When adding water, attention to the water level indicator on the
front of the unit.
Do not over feed water above red water level line.
Please close the cover when finish adding water, otherwise the
unit will not work.
If you want to reduce more temperature, you can put ice on the
top of the unit.
Instruction of “ICE BOX”
The unit assembles with two unique “ice boxes”, as for its
special ability of keeping cool, it can absorb the energy of water
little by little, keeping the temperature of the water around 180 C
lower than that of the ambience, making the wind more cool.
Operation Method
Put the ICE BOXES into the refrigerator and keep them inside
till they are completely frozen.
Put one into the water tank from the Adding water cover on the
back of the unit. And then close the door. The temperature of
the water will be 80 C lower than that of the ambience and
keeping for 4 hours, making the wind cooler.
The unit assembles with two ICE BOXES, which can be re-used
continuously by turns.
On/Speed Key
On/Speed key is used for starting the unit and changing wind
speed of it. Wind speed is started from medium speed and
changed to low speed 3 seconds later, then you can press
On/Speed key to set what you need. Wind speed is divided
into ”HIGH”, ”MEDIUM” and “LOW” with indicators for related wind
Page 6

5
speed.
Cooler/Humidifier Key
Press this key when adding water or ice, outlet temperature is
obviously lower 20 seconds later and indicator is lighted on.
Oscillation Key
Press this key, wind will be moved automatically from left to right
and the indicator is lighted on.
Timer
It can be selected between 1-9hours freely.
Ion Key
Connect power and then press this key, the build-in anion generator
start to release anion, meanwhile the light is on.
Mode Key
Normal Wind (When two indicators are off)
Constant rotation with different wind speed of “LOW”, “MED” and
“HI” as set.
Natural Wind
The fan operates in a circle of Hi, Medium and Low as preset by
microcomputer program for 90 seconds per circle and 6 seconds for
each section (pause for 3 seconds.) High, medium or low wind can
be generated by using together with Wind Speed Key that imitates
the natural breeze with gentleness and comfort.
After the unit being operated, this button may be used to select the
type of unit rotation for a circle of “Normal Wind”, “Natural Wind”,
and “Sleeping Wind”.
Page 7
6
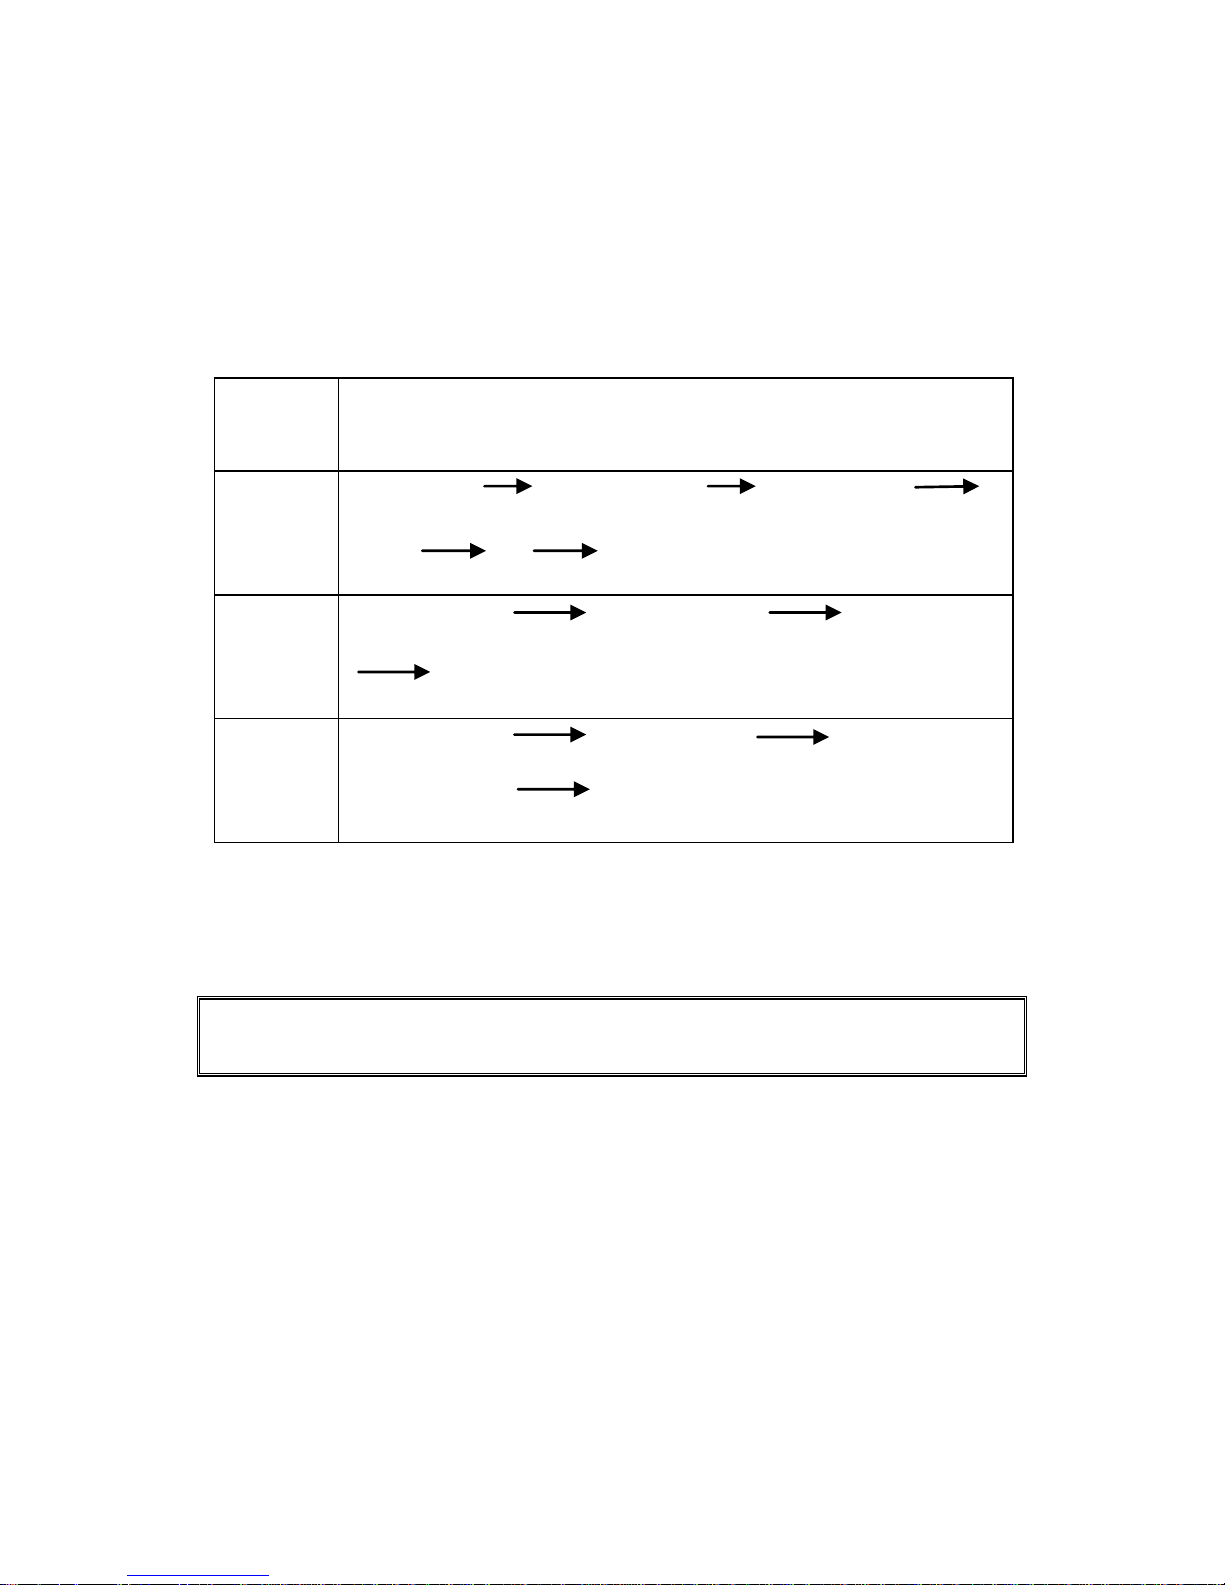
Sleeping Wind
Under this mode, the unit may enter computer-controlled normal
wind mode, in which the speed will lower down gradually according
to the change of human body temperature, eliminating the risk of
getting cold during sleeping. The lowering procedure will be as
follows:
Speed
Wind Condition on Sleeping & natural mode
High
Natural Hi Natural Med natural Low
Stop Hi Repeat
Medium
Natural Med Natural Low Stop
Repeat
Low
Natural Low Natural Med Stop
Natural Low Repeat
*Only if timer is set
Care and Cleaning
Air Filtering Net
Pull out electric plug, and then hold the handle of Air Filtering
Net to pull out the Air Filtering Net. (If the environment is so dirt,
you’ d better wash it once time in one or two month and replace
with fresh water every two months.)
Cleaning method
Wash the net with thin soap water and soft brush (note that
regenerative light contact agent on net do not touch water). Let
Page 8

7
one side of net fixed with light contact agent dry under the sun
for at least 4 hours to regenerate light contact agent and mount
it back to the unit.
Clean the water tank once a month for best performance and
hygiene purpose.
Disconnect power and then set free the water in the water tank.
Open the Adding water cover and clean the sediments and
fouling in the water tank with gentle detergent. Then screw
down the drainage stopper at the bottom of the unit and drain
off the wastewater.
Take off the air filtering net, then take the water screen cloth
out.
Cleaning with thin soap and soft cloth for outer cover.
As high pressure exists in the machine, plug has to be pulled off
when cleaning and operating with power cutting off.
 Loading...