

Page 1
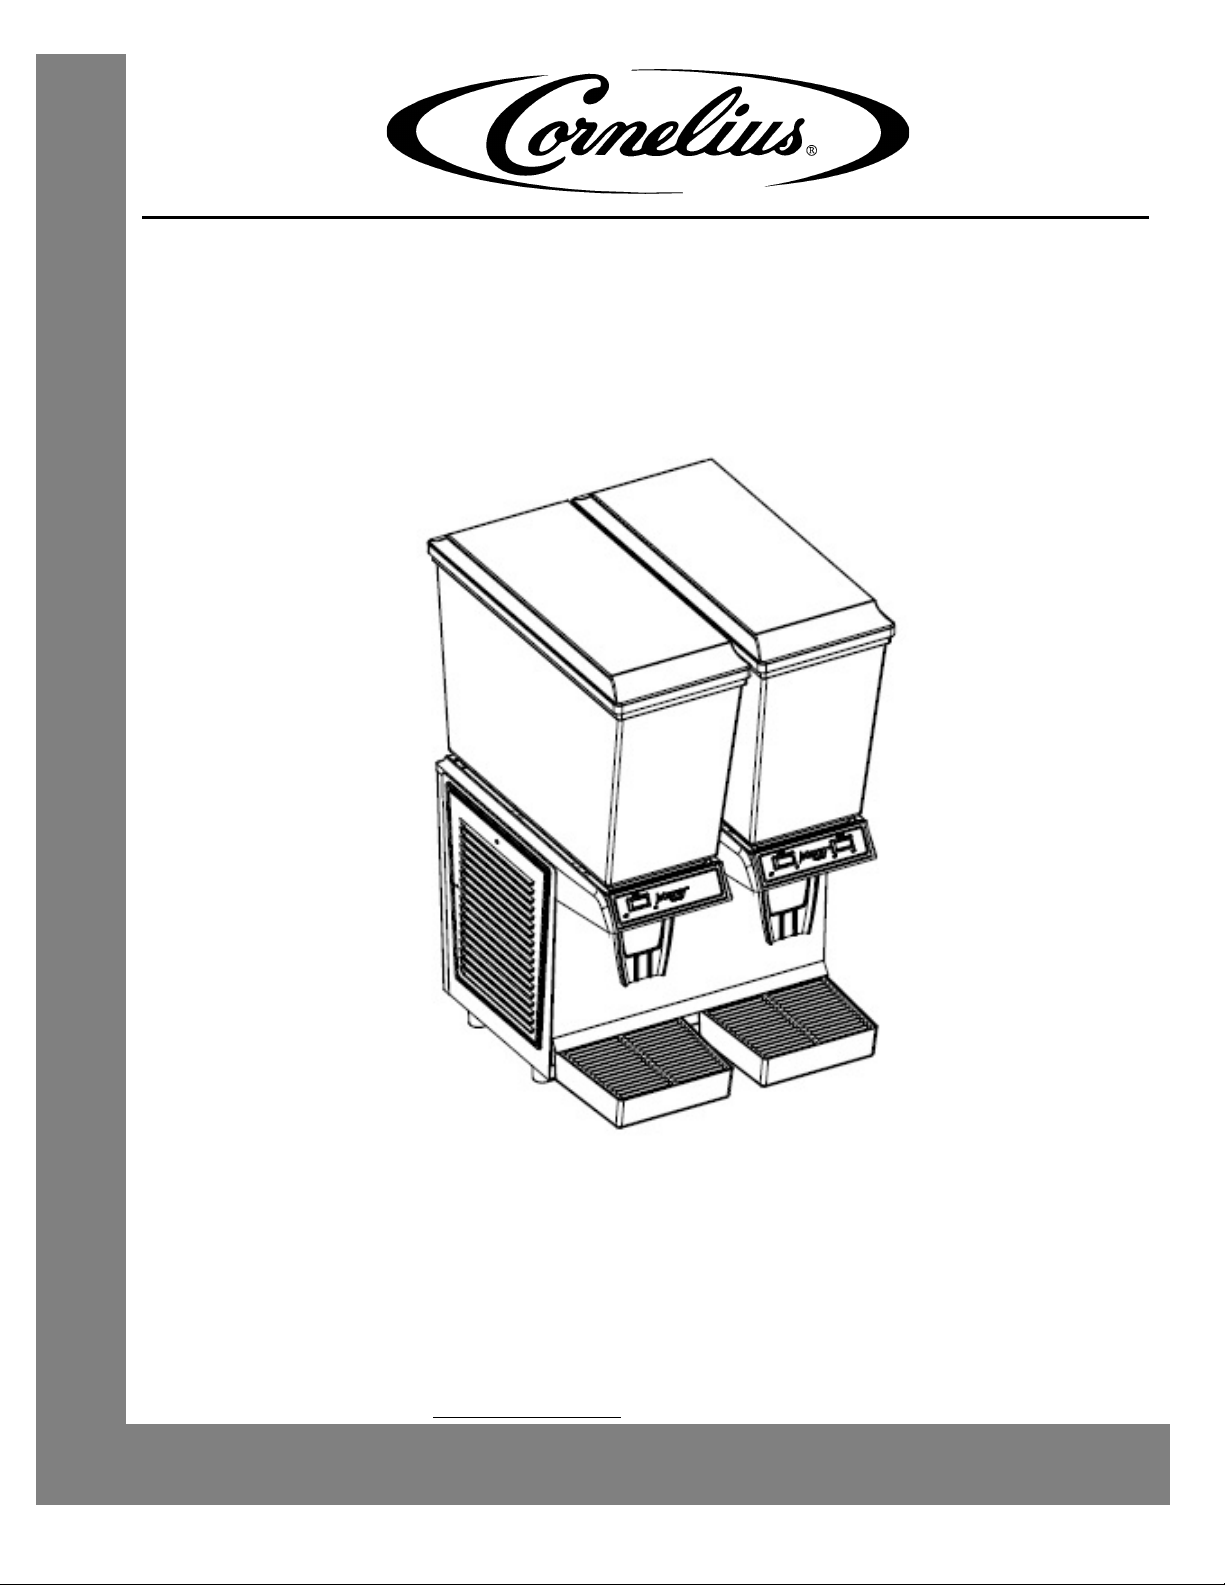
OPERATORS MANUAL
JT20D
JETSPRAY VISUAL DISPLAY DISPENSER
Release Date: June 27, 2008
Publication Number: 620920865INS
Revision Date: March 13, 2019
Revision: C
Visit the Cornelius web site at
www.cornelius.com for all your Literature needs.
Page 2

RECYCLE
The products, technical information, and instructions contained in this manual are subject to change without notice.
These instructions are not intended to cover all details or variations of the equipment, nor to provide for every possible
contingency in the installation, operation or maintenance of this equipment. This manual assumes that the person(s)
working on the equipment have been trained and are skilled in working with electrical, plumbing, pneumatic, and
mechanical equipment. It is assumed that appropriate safety precautions are taken and that all local safety and con
struction requirements are being met, in addition to the information contained in this manual.
This Product is warranted only as provided in Cornelius’ Commercial Warrant applicable to this Product and is subject
to all of the restrictions and limitations contained in the Commercial Warranty.
Cornelius will not be responsible for any repair, replacement or other service required by or loss or damage resulting
from any of the following occurrences, including but not limited to, (1) other than normal and proper use and normal
service conditions with respect to the Product, (2) improper voltage, (3) inadequate wiring, (4) abuse, (5) accident, (6)
alteration, (7) misuse, (8) neglect, (9) unauthorized repair or the failure to utilize suitably qualified and trained persons
to perform service and/or repair of the Product, (10) improper cleaning, (11) failure to follow installation, operating,
cleaning or maintenance instructions, (12) use of “non-authorized” parts (i.e., parts that are not 100% compatible with
the Product) which use voids the entire warranty, (13) Product parts in contact with water or the product dispensed
which are adversely impacted by changes in liquid scale or chemical composition.
Contact Information:
To inquire about current revisions of this and other documentation or for assistance with any Cornelius product contact:
www.cornelius.com
800-238-3600
-
Trademarks and Copyrights:
This document contains proprietary information and it may not be reproduced in any way without permission from
Cornelius.
This document contains the original instructions for the unit described.
CORNELIUS INC
101 Regency Drive
Glendale Heights, IL
Tel: + 1 800-238-3600
Printed in U.S.A.
Correct Disposal of this Product
This marking indicates that this product should not be disposed with other household wastes throughout the EU. To
prevent possible harm to the environment or human health from uncontrolled waste disposal, recycle it responsibly to
promote the sustainable reuse of material resources. To return your used device, please use the return and collection
systems or contact the retailer where the product was purchased. They can take this product for environmental safe
recycling.
Page 3

Operators Manual
Safety Instructions . . . . . . . . . . . . . . . . . . . . . . . . . . . . . . . . . . . . . . . . . . . . . . . . . . . . .1
Read and Follow ALL Safety Instructions . . . . . . . . . . . . . . . . . . . . . . . . . . . . . . . . . .1
Safety Overview . . . . . . . . . . . . . . . . . . . . . . . . . . . . . . . . . . . . . . . . . . . . . . . . . .1
Recognition . . . . . . . . . . . . . . . . . . . . . . . . . . . . . . . . . . . . . . . . . . . . . . . . . . . . . .1
Different Types of Alerts . . . . . . . . . . . . . . . . . . . . . . . . . . . . . . . . . . . . . . . . . . . . . . .1
Safety Tips . . . . . . . . . . . . . . . . . . . . . . . . . . . . . . . . . . . . . . . . . . . . . . . . . . . . . . . . . 1
Qualified Service Personnel . . . . . . . . . . . . . . . . . . . . . . . . . . . . . . . . . . . . . . . . . . . .1
Safety Precautions . . . . . . . . . . . . . . . . . . . . . . . . . . . . . . . . . . . . . . . . . . . . . . . . . . .2
Shipping And Storage . . . . . . . . . . . . . . . . . . . . . . . . . . . . . . . . . . . . . . . . . . . . . . . . .2
CO2 (Carbon Dioxide) Warning . . . . . . . . . . . . . . . . . . . . . . . . . . . . . . . . . . . . . . . . .2
Mounting in or on a Counter . . . . . . . . . . . . . . . . . . . . . . . . . . . . . . . . . . . . . . . . . . . .2
Power and Water . . . . . . . . . . . . . . . . . . . . . . . . . . . . . . . . . . . . . . . . . . . . . . . . . . . .3
Power . . . . . . . . . . . . . . . . . . . . . . . . . . . . . . . . . . . . . . . . . . . . . . . . . . . . . . . . . .3
Power Cord . . . . . . . . . . . . . . . . . . . . . . . . . . . . . . . . . . . . . . . . . . . . . . . . . . . . . .3
Water . . . . . . . . . . . . . . . . . . . . . . . . . . . . . . . . . . . . . . . . . . . . . . . . . . . . . . . . . . .3
Operating Adjustments . . . . . . . . . . . . . . . . . . . . . . . . . . . . . . . . . . . . . . . . . . . . . . . 3
INTRODUCTION . . . . . . . . . . . . . . . . . . . . . . . . . . . . . . . . . . . . . . . . . . . . . . . . . . . . . . .5
Specifications. . . . . . . . . . . . . . . . . . . . . . . . . . . . . . . . . . . . . . . . . . . . . . . . . . . . . . . 5
Power Cord . . . . . . . . . . . . . . . . . . . . . . . . . . . . . . . . . . . . . . . . . . . . . . . . . . . . . 5
Size . . . . . . . . . . . . . . . . . . . . . . . . . . . . . . . . . . . . . . . . . . . . . . . . . . . . . . . . . . . .5
Beverage Bowl & Cover . . . . . . . . . . . . . . . . . . . . . . . . . . . . . . . . . . . . . . . . . . . .5
Cabinet . . . . . . . . . . . . . . . . . . . . . . . . . . . . . . . . . . . . . . . . . . . . . . . . . . . . . . . . .5
Capacity . . . . . . . . . . . . . . . . . . . . . . . . . . . . . . . . . . . . . . . . . . . . . . . . . . . . . . . .5
Refrigeration . . . . . . . . . . . . . . . . . . . . . . . . . . . . . . . . . . . . . . . . . . . . . . . . . . . . .5
Refrigerant . . . . . . . . . . . . . . . . . . . . . . . . . . . . . . . . . . . . . . . . . . . . . . . . . . . . . .5
Spray Drive and Fan Motor . . . . . . . . . . . . . . . . . . . . . . . . . . . . . . . . . . . . . . . . . .5
Power Drive Magnet . . . . . . . . . . . . . . . . . . . . . . . . . . . . . . . . . . . . . . . . . . . . . . .5
Net Weight . . . . . . . . . . . . . . . . . . . . . . . . . . . . . . . . . . . . . . . . . . . . . . . . . . . . . .5
Shipping Weight . . . . . . . . . . . . . . . . . . . . . . . . . . . . . . . . . . . . . . . . . . . . . . . . . .5
Carton Cube . . . . . . . . . . . . . . . . . . . . . . . . . . . . . . . . . . . . . . . . . . . . . . . . . . . . .5
Machine Clearance . . . . . . . . . . . . . . . . . . . . . . . . . . . . . . . . . . . . . . . . . . . . . . . .6
Class of Windings . . . . . . . . . . . . . . . . . . . . . . . . . . . . . . . . . . . . . . . . . . . . . . . . .6
Environment . . . . . . . . . . . . . . . . . . . . . . . . . . . . . . . . . . . . . . . . . . . . . . . . . . . . .6
INSTALLATION AND OPERATING INSTRUCTIONS . . . . . . . . . . . . . . . . . . . . . . . . . .7
Setting Up Your JT20D . . . . . . . . . . . . . . . . . . . . . . . . . . . . . . . . . . . . . . . . . . . . . . . .7
Cleaning the Dispenser . . . . . . . . . . . . . . . . . . . . . . . . . . . . . . . . . . . . . . . . . . . . . . . .7
To Assemble . . . . . . . . . . . . . . . . . . . . . . . . . . . . . . . . . . . . . . . . . . . . . . . . . . . . . . . .8
Operating Procedures . . . . . . . . . . . . . . . . . . . . . . . . . . . . . . . . . . . . . . . . . . . . . . . .10
FREQUENT MAINTENANCE PROCEDURES . . . . . . . . . . . . . . . . . . . . . . . . . . . . . . .11
Cleaning the Bowls . . . . . . . . . . . . . . . . . . . . . . . . . . . . . . . . . . . . . . . . . . . . . . . . . .11
Cleaning the Condensate Drains . . . . . . . . . . . . . . . . . . . . . . . . . . . . . . . . . . . . . . .11
Sanitizing the Unit . . . . . . . . . . . . . . . . . . . . . . . . . . . . . . . . . . . . . . . . . . . . . . . . . . .12
Ventilation . . . . . . . . . . . . . . . . . . . . . . . . . . . . . . . . . . . . . . . . . . . . . . . . . . . . . . . . .12
Cleaning the Condenser . . . . . . . . . . . . . . . . . . . . . . . . . . . . . . . . . . . . . . . . . . . . . .12
Bowl Leaks . . . . . . . . . . . . . . . . . . . . . . . . . . . . . . . . . . . . . . . . . . . . . . . . . . . . . . . .12
© 2018, Cornelius Inc. - 1 - Publication Number: 620920865
Page 4

Publication Number: 620920865 - 2 - © 2018, Cornelius Inc.
Page 5

Operators Manual
!
DANGER:
!
WARNING:
CAUTION:
!
!
WARNING:
!
SAFETY INSTRUCTIONS
READ AND FOLLOW ALL SAFETY INSTRUCTIONS
Safety Overview
• Read and follow ALL SAFETY INSTRUCTIONS in this manual and any warning/caution labels on the unit
(decals, labels or laminated cards).
• Read and understand ALL applicable OSHA (Occupational Safety and Health Administration) safety regulations
before operating this unit.
Recognition
Recognize Safety Alerts
This is the safety alert symbol. When you see it in this manual or on the unit,
be alert to the potential of personal injury or damage to the unit.
DIFFERENT TYPES OF ALERTS
Indicates an immediate hazardous situation which if not avoided WILL result in serious injury, death or equipment
damage.
Indicates a potentially hazardous situation which, if not avoided, COULD result in serious injury, death, or equipment
damage.
Indicates a potentially hazardous situation which, if not avoided, MAY result in minor or moderate injury or
equipment damage.
SAFETY TIPS
• Carefully read and follow all safety messages in this manual and safety signs on the unit.
• Keep safety signs in good condition and replace missing or damaged items.
• Learn how to operate the unit and how to use the controls properly.
• Do not let anyone operate the unit without proper training. This appliance is not intended for use by very young
children or infirm persons without supervision. Young children should be supervised to ensure that they do not
play with the appliance.
• Keep your unit in proper working condition and do not allow unauthorized modifications to the unit.
QUALIFIED SERVICE PERSONNEL
Only trained and certified electrical, plumbing and refrigeration technicians should service this unit. ALL WIRING
AND PLUMBING MUST CONFORM TO NATIONAL AND LOCAL CODES. FAILURE TO COMPLY COULD
RESULT IN SERIOUS INJURY, DEATH OR EQUIPMENT DAMAGE.
© 2018, Cornelius Inc. - 1 - Publication Number: 620920865
Page 6
Operators Manual
!
WARNING:
CAUTION:
!
CAUTION:
!
!
DANGER:
!
WARNING:
SAFETY PRECAUTIONS
This unit has been specifically designed to provide protection against personal injury. To ensure continued
protection observe the following:
Disconnect power to the unit before servicing following all lock out/tag out procedures established by the user. Verify
all of the power is off to the unit before any work is performed.
Failure to disconnect the power could result in serious injury, death or equipment damage.
Always be sure to keep area around the unit clean and free of clutter. Failure to keep this area clean may result in
injury or equipment damage.
SHIPPING AND STORAGE
Before shipping, storing, or relocating the unit, the unit must be sanitized and all sanitizing solution must be
drained from the system. A freezing ambient environment will cause residual sanitizing solution or water remaining
inside the unit to freeze resulting in damage to internal components.
CO2 (CARBON DIOXIDE) WARNING
CO2 displaces oxygen. Strict attention MUST be observed in the prevention of CO2 gas leaks in the entire CO2 and
soft drink system. If a CO
contaminated area before attempting to repair the leak. Personnel exposed to high concentrations of CO
experience tremors which are followed rapidly by loss of consciousness and DEATH.
2 gas leak is suspected, particularly in a small area, IMMEDIATELY ventilate the
2 gas
MOUNTING IN OR ON A COUNTER
When installing the unit in or on a counter top, the counter must be able to support a weight in excess of 580 lbs. to
insure adequate support for the unit. FAILURE TO COMPLY COULD RESULT IN SERIOUS INJURY, DEATH OR
EQUIPMENT DAMAGE.
NOTE: Many units incorporate the use of additional equipment such as ice makers. When any additional
equipment is used, you must check with the equipment manufacturer to determine the additional weight
that the counter will need to support to ensure a safe installation.
Publication Number: 620920865 - 2 - © 2018, Cornelius Inc.
Page 7
Operators Manual
!
WARNING:
!
WARNING:
POWER AND WATER
Power
The JT20D requires a 120 Volt, 60Hz grounded receptacle for proper operation, grounding and safety.
NOTE: If the colors of the wires in the main leads of this unit do not correspond with the colored marking
identifying the terminals in your plug, process as follows.
The green and yellow wire must be connected to the terminal in the plug marked with one of the following
indicators.
1. The Letter E
2. Colored Green
3. The Earth Ground Symbol
4. Colored Green and Yellow
The blue wire must be connected to the terminal in the plug marked with the letter N or colored blue.
The brown wire must be connected to the terminal in the plug marked with the letter L or colored Orange.
Power Cord
If a power cord is damaged, do not attempt to replace it. Take your unit to your nearest authorized service center
for repair. A special tool is required to replace the cord.
Water
The water supply should be consistent with proper water quality standards (neutral ph of 7.0 to 8.0), and should not
be connected to a water softener. Drink quality may be affected by poor water conditions.Water connections should
be sized, installed and maintained according to federal, state and local laws.
NOTE: Unit should be filled from a potable water supply in accordance with federal, State, and Local codes.
It is the operator’s responsibility to ensure that the potable water supply is available.
NOTE: JetSpray dispensers confirm to the requirements of the model water Bylaws of 1986, SI 11476.
NOTE:All surfaces that come into contact with food or drinking water are constructed of food quality nontoxic materials, are non-corosive, non-tainting and do not support the growth of bacteria.
OPERATING ADJUSTMENTS
Dangerous voltages are present within the unit even if the power switch is turned off. Before attempting any
adjustments inside the machine, turn the machine off and unplug it from the electrical receptacle.
© 2018, Cornelius Inc. - 3 - Publication Number: 620920865
Page 8

Operators Manual
Publication Number: 620920865 - 4 - © 2018, Cornelius Inc.
Page 9

Operators Manual
INTRODUCTION
The JT20D Dispenser is a counter top visual display action beverage dispenser. It is designed to dispense a
variety of products.
It dispenses fruit juice, lemonade or other non-carbonated drinks.
SPECIFICATIONS
Power Cord
7 ft. w/ground connection (2.1 meters)
Size
16 in. Wide X 19 in. Long X 26.625 in. High (19.7 cm Wide X 48.3 cm Long X 67.7 cm High)
Beverage Bowl & Cover
Transparent, virtually unbreakable LEXAN® resin
Cabinet
Stainless steel and beige LEXAN® resin
Capacity
Over 10 US gallons; 40 liters
Refrigeration
Jet Spray 1/5 h.p. Hermetically Sealed System
Refrigerant
R134a Refrigerant - 5.08 ounces (144 grams)
Spray Drive and Fan Motor
No Oiling Required
Power Drive Magnet
Permanent INDOX Magnet
Net Weight
Base Only: 51 lbs. (23.1 kgs.)
Large Bowl: 7 lbs. (3.2 kgs.)
Shipping Weight
Base Only: 61 lbs. (27.7 kgs.)
Large Bowl: 10 lbs. (4.5 kgs.)
Carton Cube
Base Only: 4.8 cu. ft. (0.136 cu. m.)
Large Bowl: 1.7 cu. ft. (0.048 cu. m.)
© 2018, Cornelius Inc. - 5 - Publication Number: 620920865
Page 10

Operators Manual
Machine Clearance
6 inches - Rear
6 inches - Sides
Open - Top
Class of Windings
Compressor Motor - Class H (climatic rating: normal)
Condenser Fan Motor - Class B
Environment
Temperature
Operating: 60°F (16°C) to 110°F (43°C)
Storage: Above 20°F (-7°C) with bowl empty and dry.
Humidity: Below 95%
Publication Number: 620920865 - 6 - © 2018, Cornelius Inc.
Page 11
Operators Manual
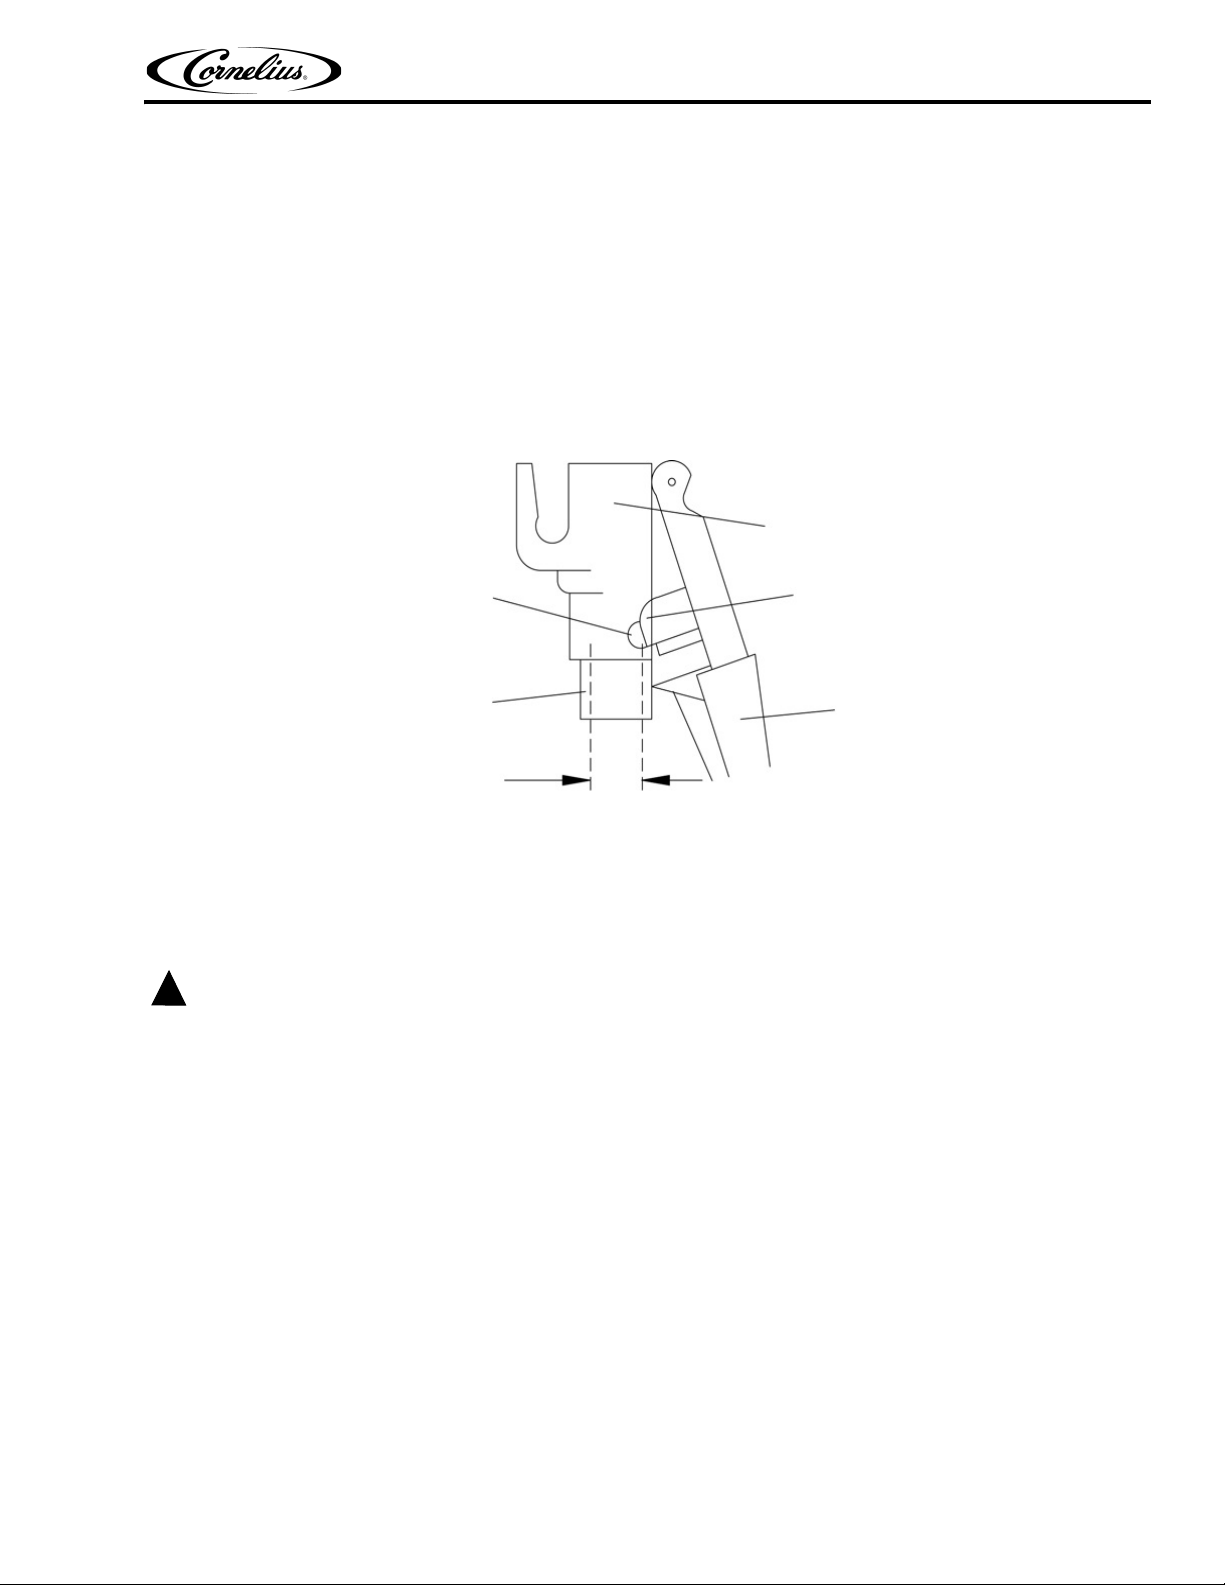
Handle Support
Clips
Handle
Tube Path
Spout
Sealing Button
CAUTION:
!
INSTALLATION AND OPERATING INSTRUCTIONS
SETTING UP YOUR JT20D
1. Set dispenser chassis in desired location. Dispenser should be level and located on a solid counter.
2. Be sure dispenser has adequate free space on both sides; approximately 3" away from any wall or
ruction.
obst
CLEANING THE DISPENSER
1. Removing the push handles. See Figure 1.
Figure 1.
A. Push handle back until it stops.
B. Grasp the clips on the handle. Squeeze clips until they a
handle.
2. Disassemble the bowl, lid, gasket. and pump housing assemblies.
Abrasive cleaners scratches the plastic parts. DON’T USE abrasive cleaners.
re free from the panel. Pull straight down on the
© 2018, Cornelius Inc. - 7 - Publication Number: 620920865
Page 12
Operators Manual
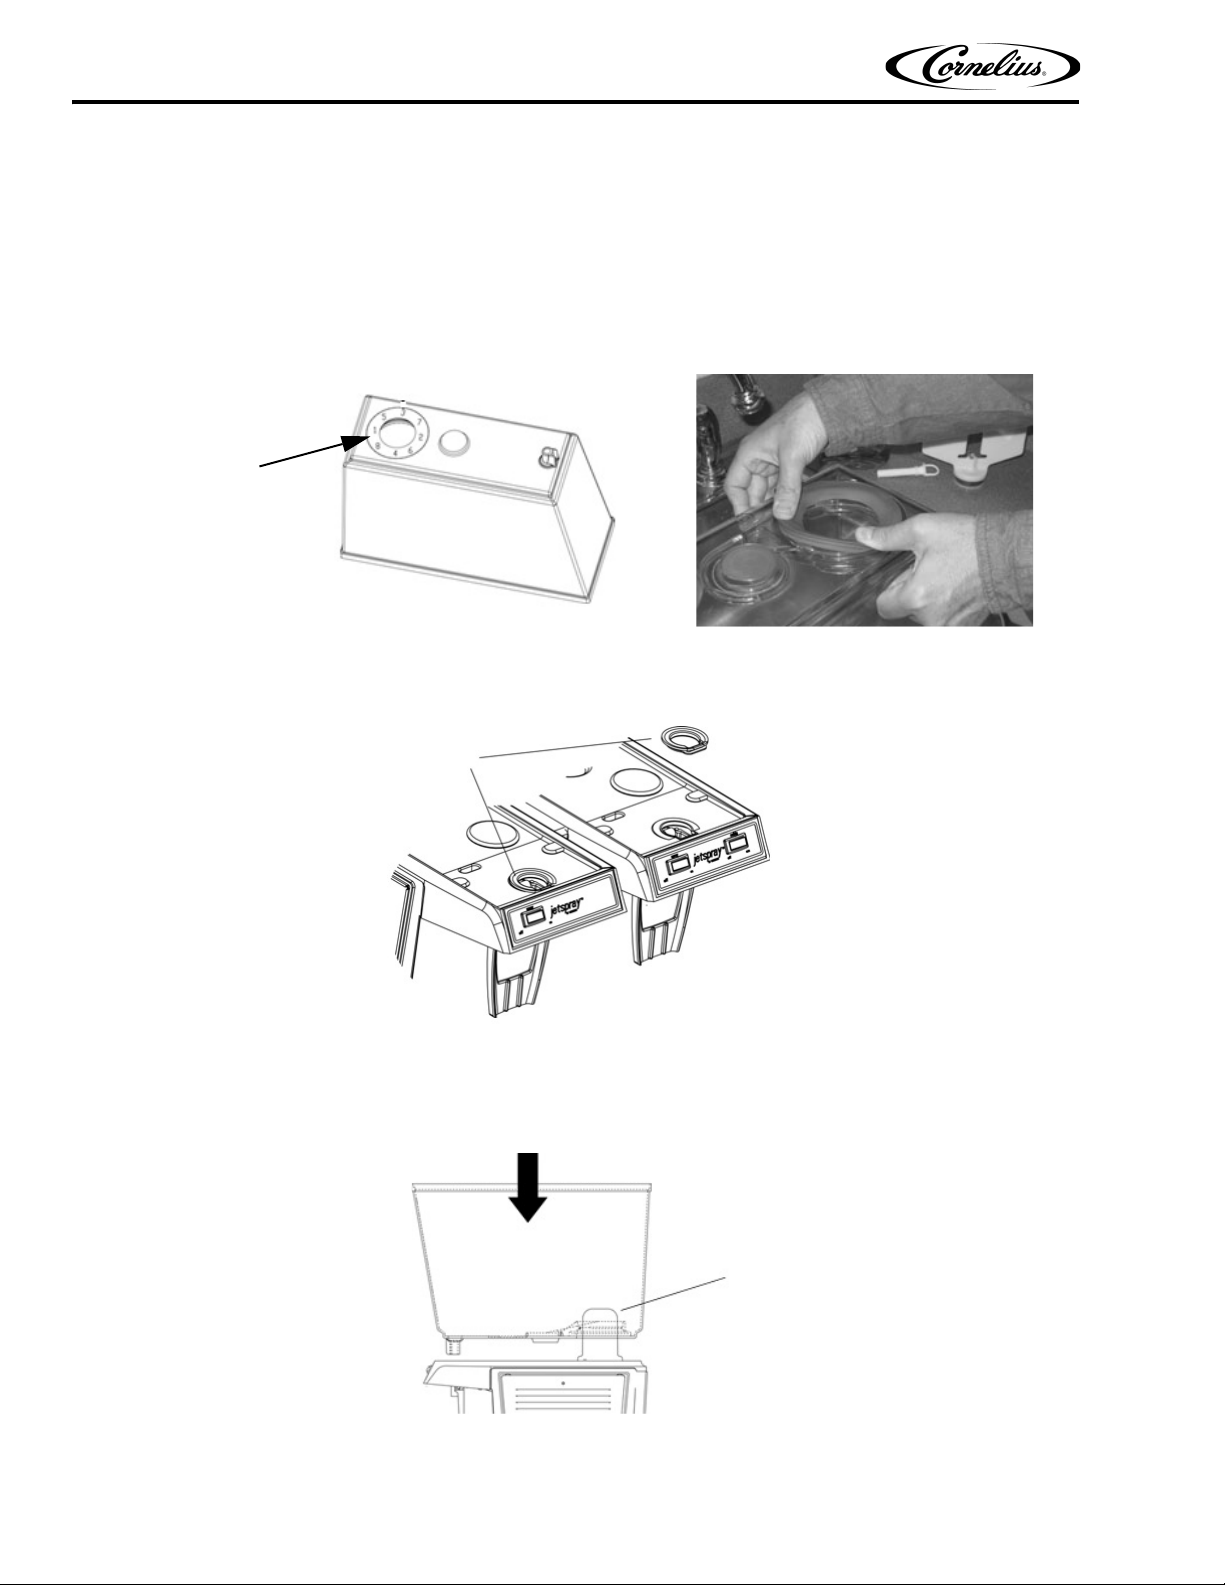
Press In Gasket
According to Sequence
Shown Until Gasket is
Completely Seated
Bowl Spout Gasket
Cooling Dome
TO ASSEMBLE
1. Slide the drip tray with grill into place.
2. Consider installation of a drain hose which connects to the outlet on drip tray bottom (Part No. S-
379).
3
3. Turn bowl upside down and insert gasket into groove. Wet gasket for ease of insertion, pressing gasket
to groove while following the number sequence (1 - 9) shown in Figure 2.
in
Figure 2.
4. Check that bowl spout gasket is mounted properly to the base assembly, as shown in Figure 3.
Figure 3.
5. Slide bowl over the cooling dome and assemble the bowl to the dispenser. Be careful not to wrinkle the
gasket. If gasket is wrinkled, beverage will leak out of bowl. See Figure 4.
Publication Number: 620920865 - 8 - © 2018, Cornelius Inc.
Figure 4.
Page 13
Operators Manual
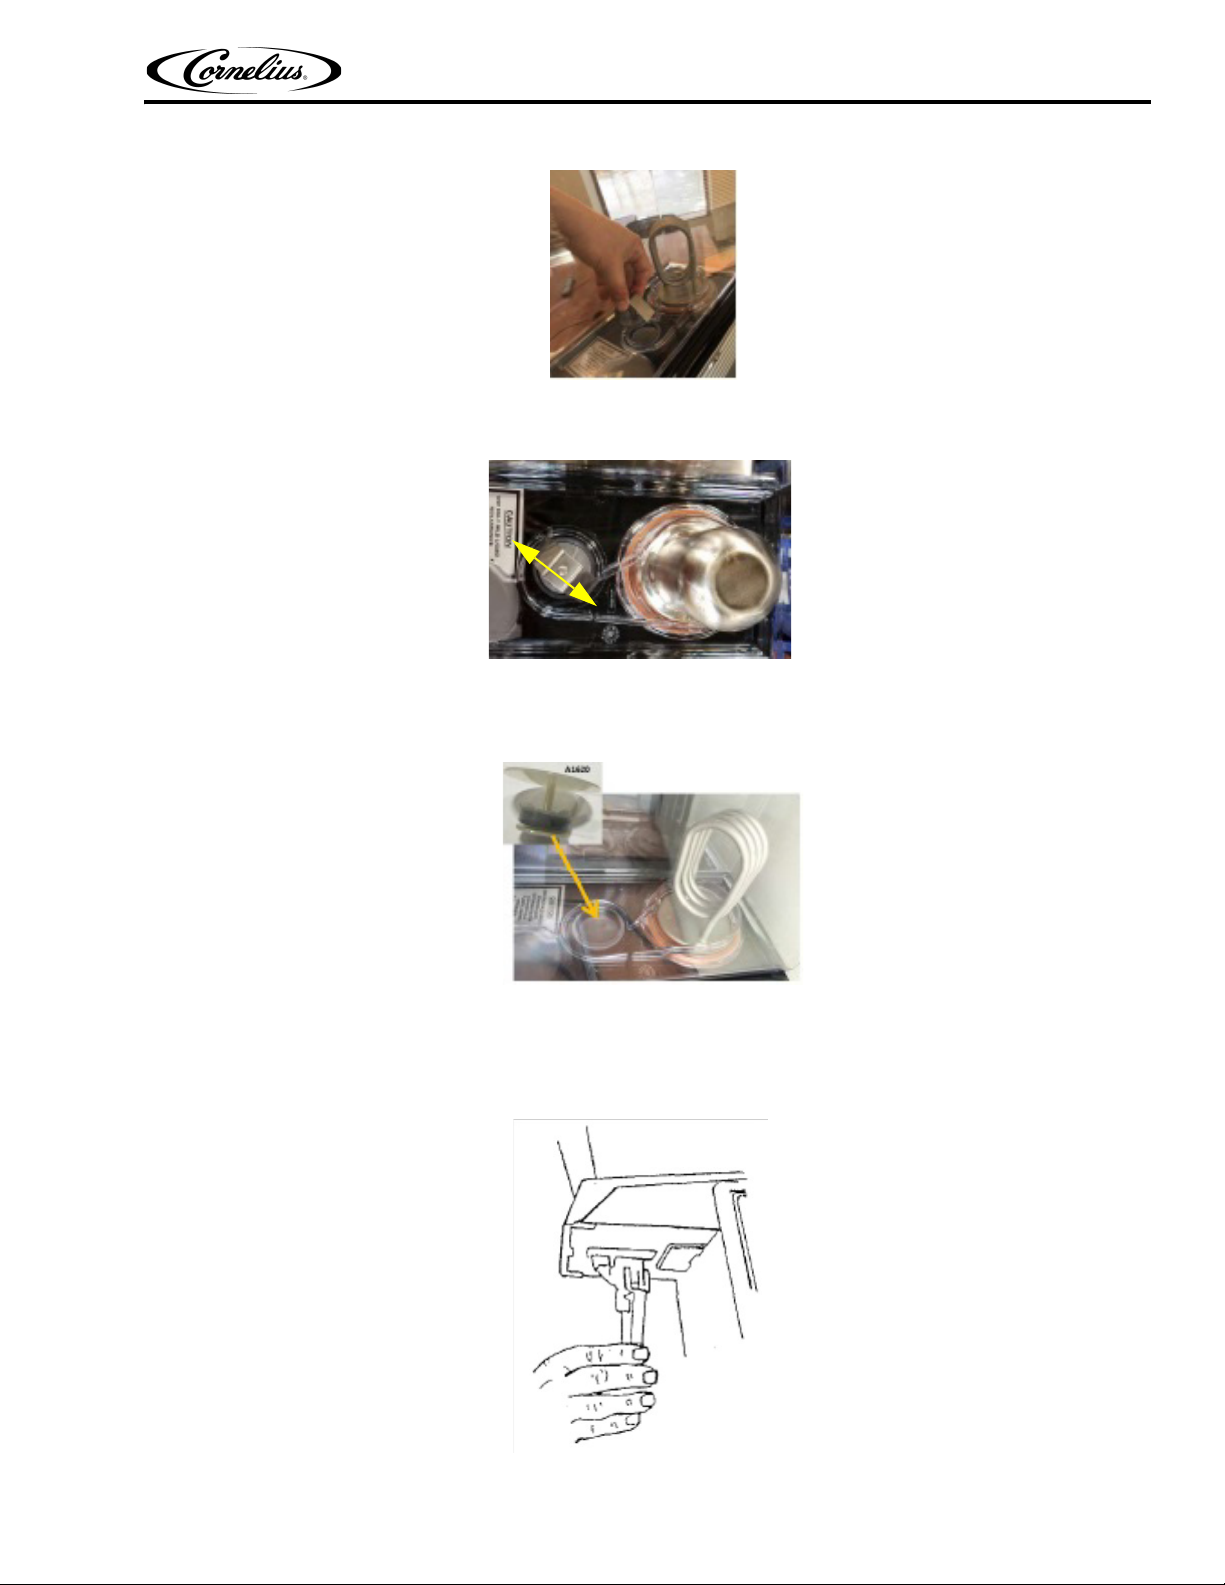
6. For pulpy product Use propeller PN S6737. Place propeller in bowl insert as shown in Figure 5.
Figure 5.
7. Align propeller PN S6737 as shown in Figure 6.
Figure 6.
8. For foamy product, use propeller PN A1620. Place propeller in bowl insert as shown in Figure 7. no
special alignment required.
Figure 7.
9. Replace push handle and pinch tube.
A. Push t
he handle assembly straight up through the rectangular hole until the clips snap into place see
Figure 8.
Figure 8.
© 2018, Cornelius Inc. - 9 - Publication Number: 620920865
Page 14
Operators Manual
B. Remove pinch tube from the plastic bag and wash it.
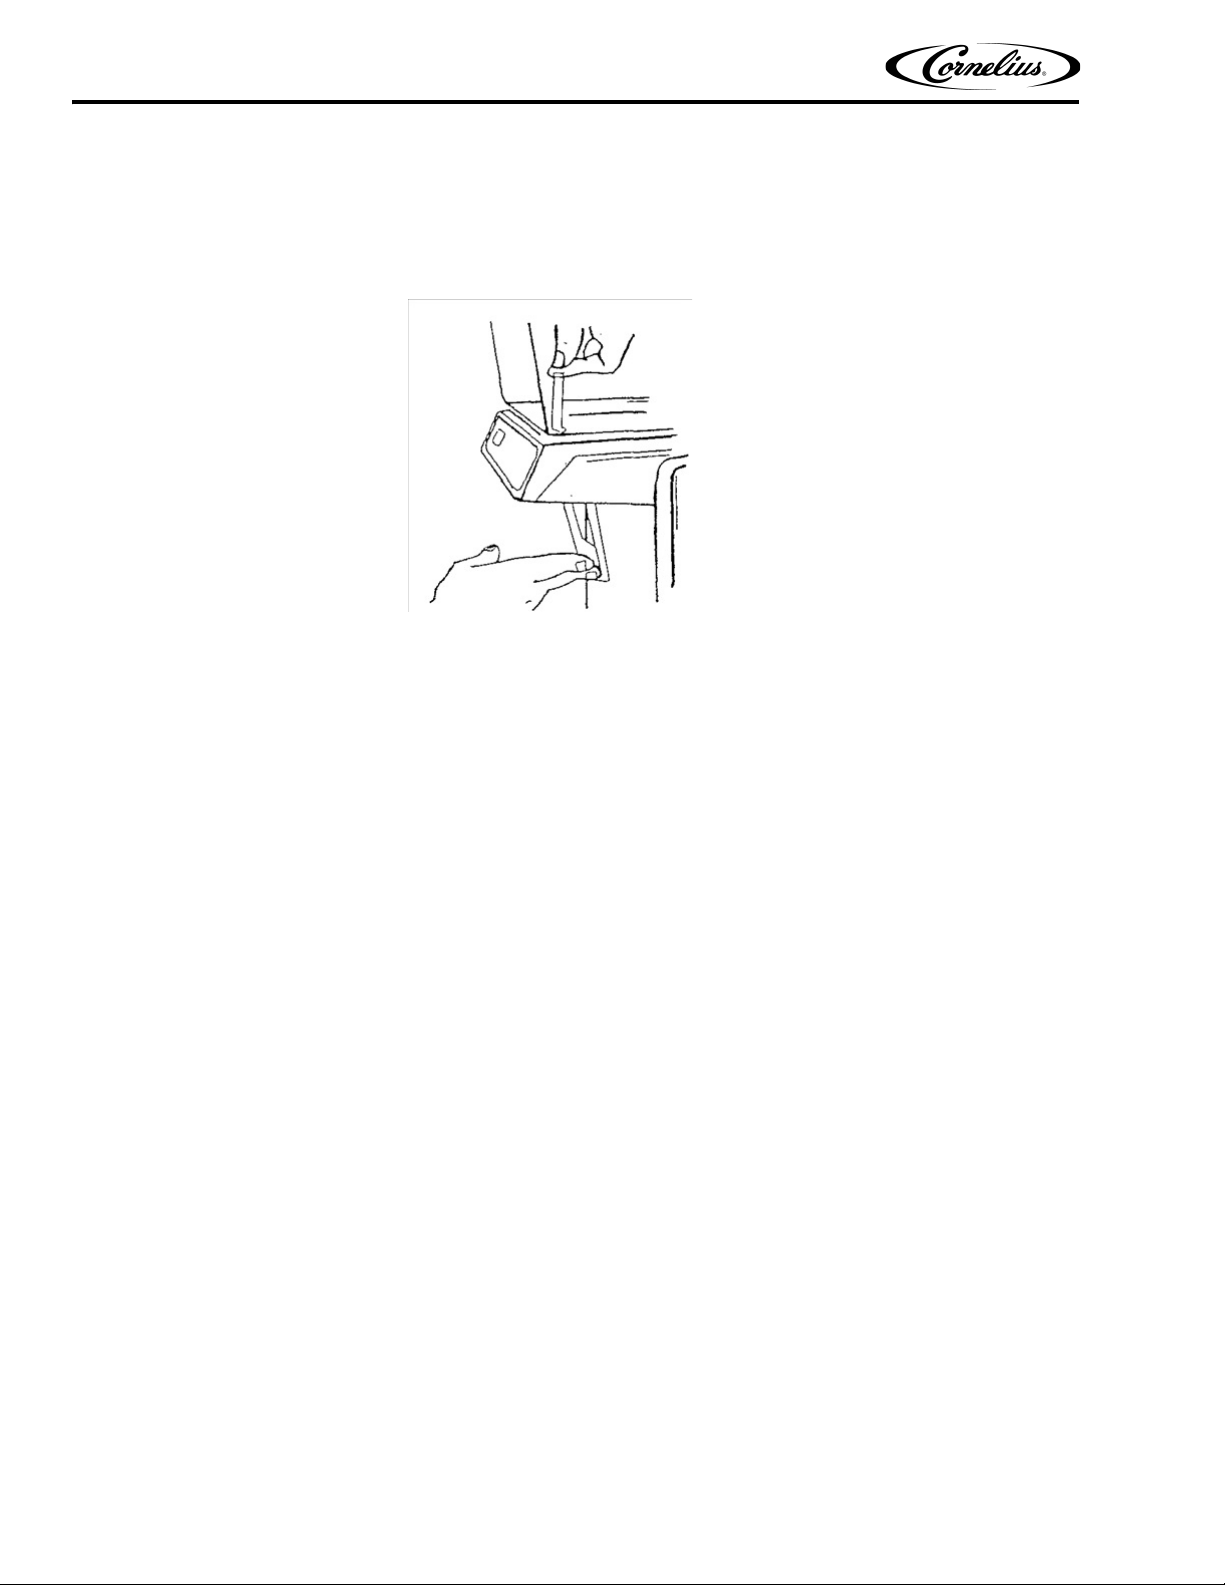
C. Before installing, wet the bowl spout surface and pinch tube. Push back the handle until it stops.
D. Carefully insert pinch t
spout. Make sure the end of the tube does not get caught on the edge above the handle support spout
opening. Pull the end of the tube to seat it firmly into the bowl spout seat. Make sure the tube is free of wrinkles and extends below the support spout about a 1/4 inch See Figure 9.
ube into the bowl spout opening and on into lower opening of the handle support
Figure 9.
OPERATING PROCEDURES
1. Follow beverage manufacturer's directions in filling bowls. To aid in filling, the bowls have gallon and
liter markings up the center of the front wall. Gallons are on the left and liters are on the right.
2. Turn on the refrigeration and spray switches. Product should be cold enough to serve in 2 hours.
hes should be left ON 24 hours a day to insure efficient operation.
Switc
NOTE: If unit is to be used to dispense beverage from only one bowl, use right hand bowl, but add
gallon of water to left bowl to assure proper cooling.
a
3. The thermostat is preset at the factory and does not normally require resetting by owner.
Publication Number: 620920865 - 10 - © 2018, Cornelius Inc.
Page 15
Operators Manual
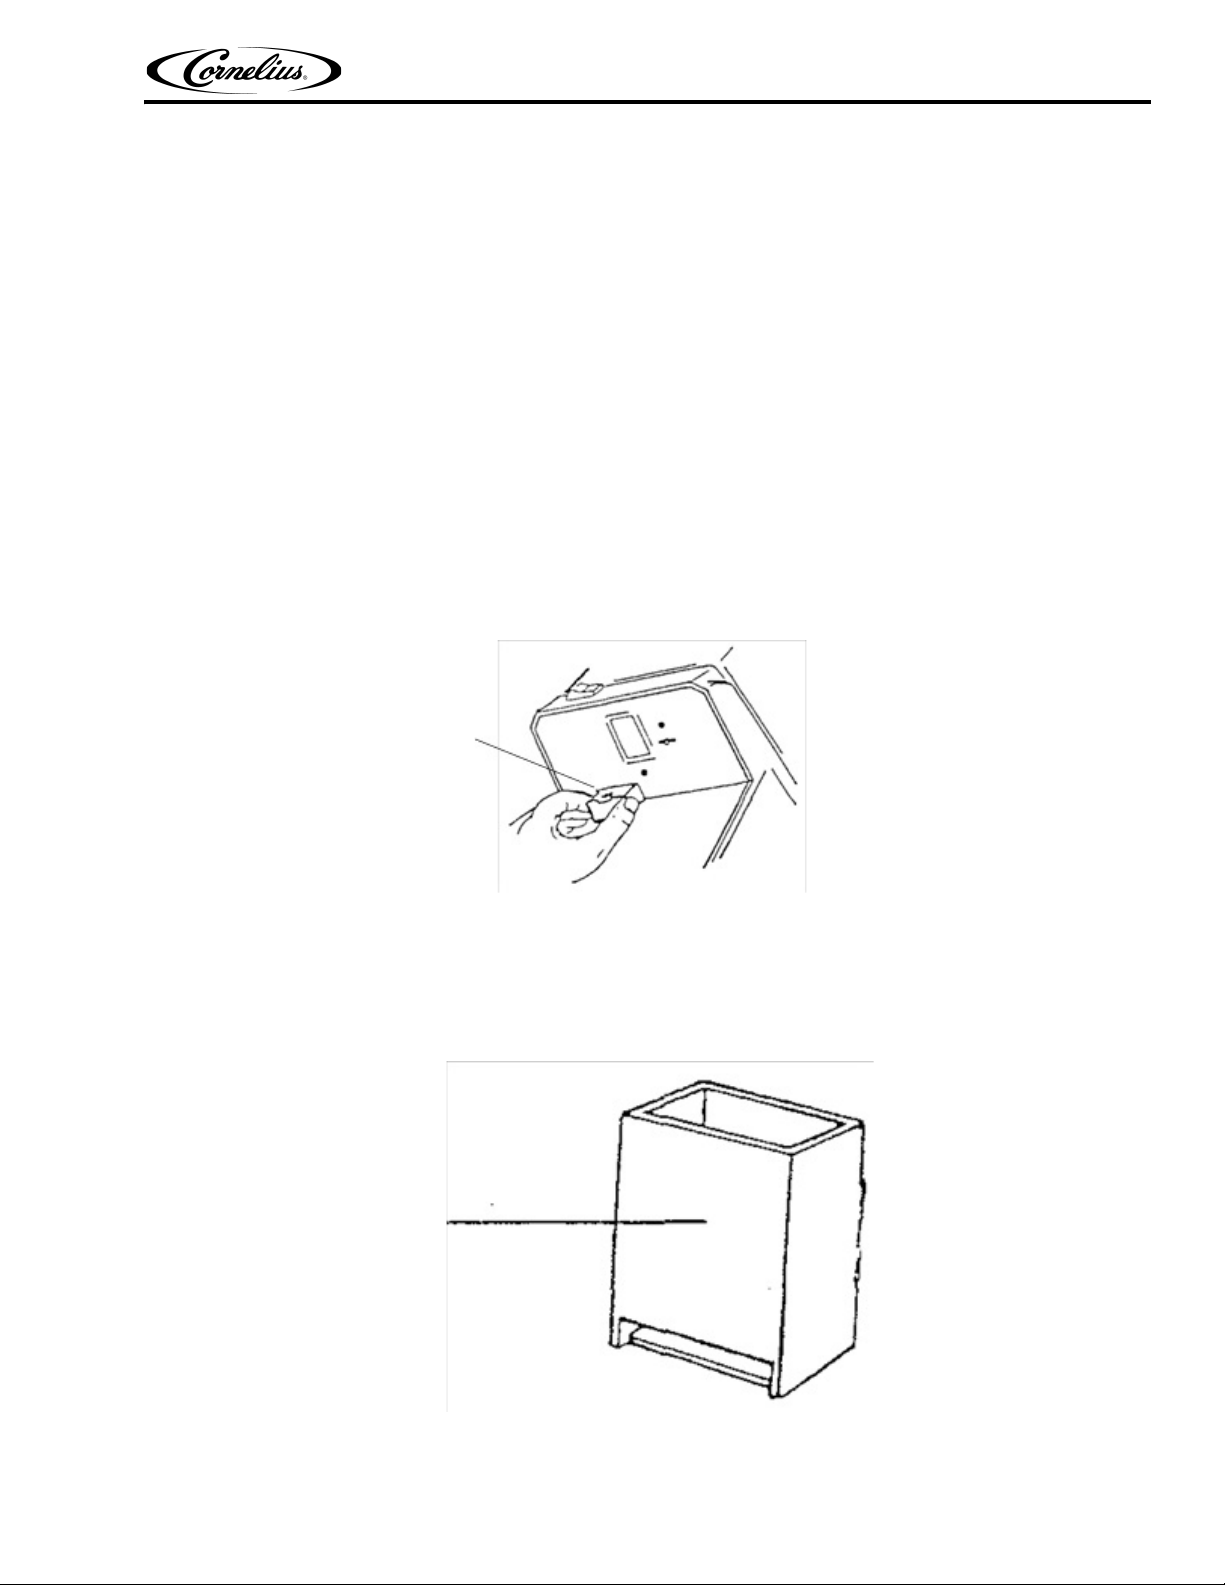
Condensation Drain
Towards
Front Panel
FREQUENT MAINTENANCE PROCEDURES
CLEANING THE BOWLS
1. Before removing the bowls, turn off both the refrigeration and spray switches. Unplug the unit from its
power source.
2. Drain any beverage left in the bowls.
3. Remove pinch tube by pushing handle until it stops. Pull up on the pinch tube until it is free, then
emove the handle. Lift off the bowls, drip trays and covers. Clean them thoroughly.
r
4. Clean as described in “Cle
5. After cleaning, assemble as described in “To
insert the pinch tube into the bowls.
CLEANING THE CONDENSATE DRAINS
1. To remove the condensation drains, push in on the front panel, just under the drain and pull down with
fingers, as shown in Figure 10.
aning the Dispenser” on page 4.
Assemble” on page 5. Replace the push handle and
2. To replace the condensate drains, hold the drain against the front panel under the rectangular hole
(opening in side of drain should be toward front panel). Push up through the hole until the drain snaps
into place see Figure 11.
Figure 10.
Figure 11.
© 2018, Cornelius Inc. - 11 - Publication Number: 620920865
Page 16
Operators Manual
CAUTION:
!
SANITIZING THE UNIT
After cleaning, add one gallon of water at a temperature of between 75°F and 100°F to the bowl. Mix one
tablespoon of approved powdered chlorine sanitizer* to a pint of water and when dissolved, pour into bowl.
Replace the lid and run the unit for two or three minutes. Shut off the unit and drain the contents through the pinch
be valve.
tu
*Diversey - MultiChlor or equivalent powder or liquid sanitizer.
DO NOT run the refrigeration system while sanitizing the unit.
VENTILATION
AIR FLOW IS ESSENTIAL TO THE OPERATION OF THE UNIT. ALLOW AT LEAST 3 INCHES OF SPACE ON
THE BACK AND SIDE OF THE DISPENSER. LINT OR DUST COLLECTING ON THE CONDENSER RESULTS IN
POOR REFRIGERATION.
CLEANING THE CONDENSER
1. Turn off the Refrigeration Switch.
2. Remove the right side panel. Clean filter(s) by runnin
of filter(s) and allow them to dry. Filter(s) should be replaced, if necessary. (See Parts List).
3. Clean the condenser with vacuum cleaner or brush, making sure no loose dirt goes into the dispenser.
4. Clean and replace the panels.
BOWL LEAKS
1. Do not confuse drippings from condensation on the outside of the bowl as bowl or faucet leaks. High
humidity causes condensation on the bowls.
2. Be sure gasket has been installed properly. Check gasket for tears or cuts in the rubber.Tears cause
aks in the gasket.
le
3. Remove and inspect pinch tube for holes.
g a stream of hot water through the inside surface
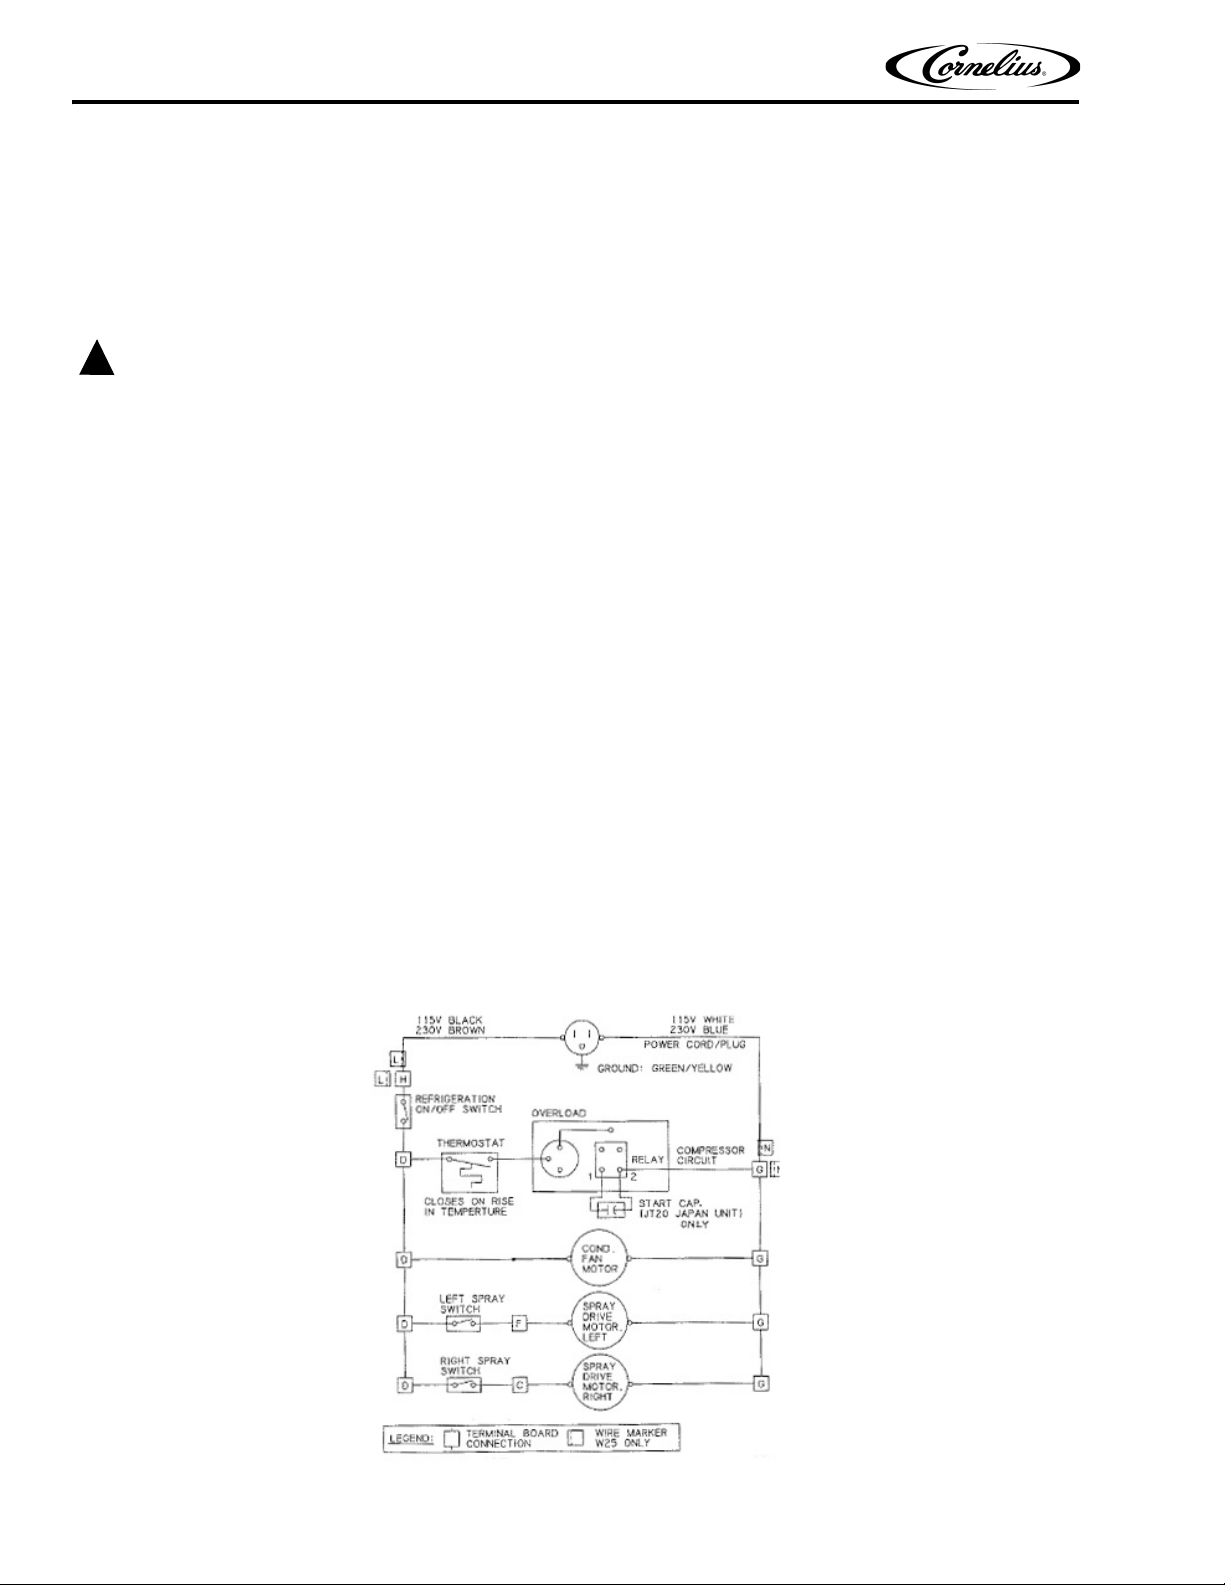
Figure 12. Model JT20D Wiring Diagram (Rev 8)
Publication Number: 620920865 - 12 - © 2018, Cornelius Inc.
Page 17

Page 18

Cornelius Inc.
www.cornelius.com
 Loading...