

Cornelius ICE MAKER, JEACS50SL1, JEACS50SL4 Use & Care Manual
ICE MAKER
Use & Care Guide
Table of Contents................................................. 2
2217249

TABLE OF CONTENTS
ICE MAKER SAFETY ......................................................................3
PARTS AND FEATURES ................................................................ 4
ICE MAKER INSTALLATION ......................................................... 5
Unpacking ....................................................................................5
Location Requirements ................................................................5
Electrical Requirements ...............................................................5
Leveling ........................................................................................6
Water Supply Connection............................................................6
Reversing the Door Swing ...........................................................8
Normal Sounds ............................................................................9
ICE MAKER USE ..........................................................................10
How Your Ice Maker Works .......................................................10
Using the Controls .....................................................................10
ICE MAKER CARE........................................................................10
Cleaning Exterior Surfaces......................................................... 10
Cleaning the Ice Maker System.................................................11
Cleaning the Condenser ............................................................11
Cleaning the Interior Components............................................. 12
Vacation and Moving Care.........................................................12
TROUBLESHOOTING ..................................................................13
WARRANTY ..................................................................................14
2
ICE MAKER SAFETY
Your safety and the safety of others are very important.
We have provided many important safety messages in this manual and on your appliance. Always read and obey all
safety messages.
This is the safety alert symbol.
This symbol alerts you to potential hazards that can kill or hurt you and others.
All safety messages will follow the safety alert symbol and either the word “DANGER” or
“WARNING.” These words mean:
You can be killed or seriously injured if you don't
immediately follow instructions.
can be killed or seriously injured if you don't
You
follow instructions.
All safety messages will tell you what the potential hazard is, tell you how to reduce the chance of injury, and tell you
what can
WARNING : To reduce the risk of fire, electric shock, or injury when using your ice maker, follow these basic
precautions
■ Plug into a grounded 3 prong outlet.
■ Do not remove ground prong.
■ Do not use an adapter.
■ Do not use an extension cord.
happen if the instructions are not followed.
IMPORTANT SAFETY INSTRUCTIONS
:
■ Disconnect power before cleaning.
■ Disconnect power before servicing.
■ Replace all panels before operating.
■ Use two or more people to move and install ice maker.
SAVE THESE INSTRUCTIONS
3
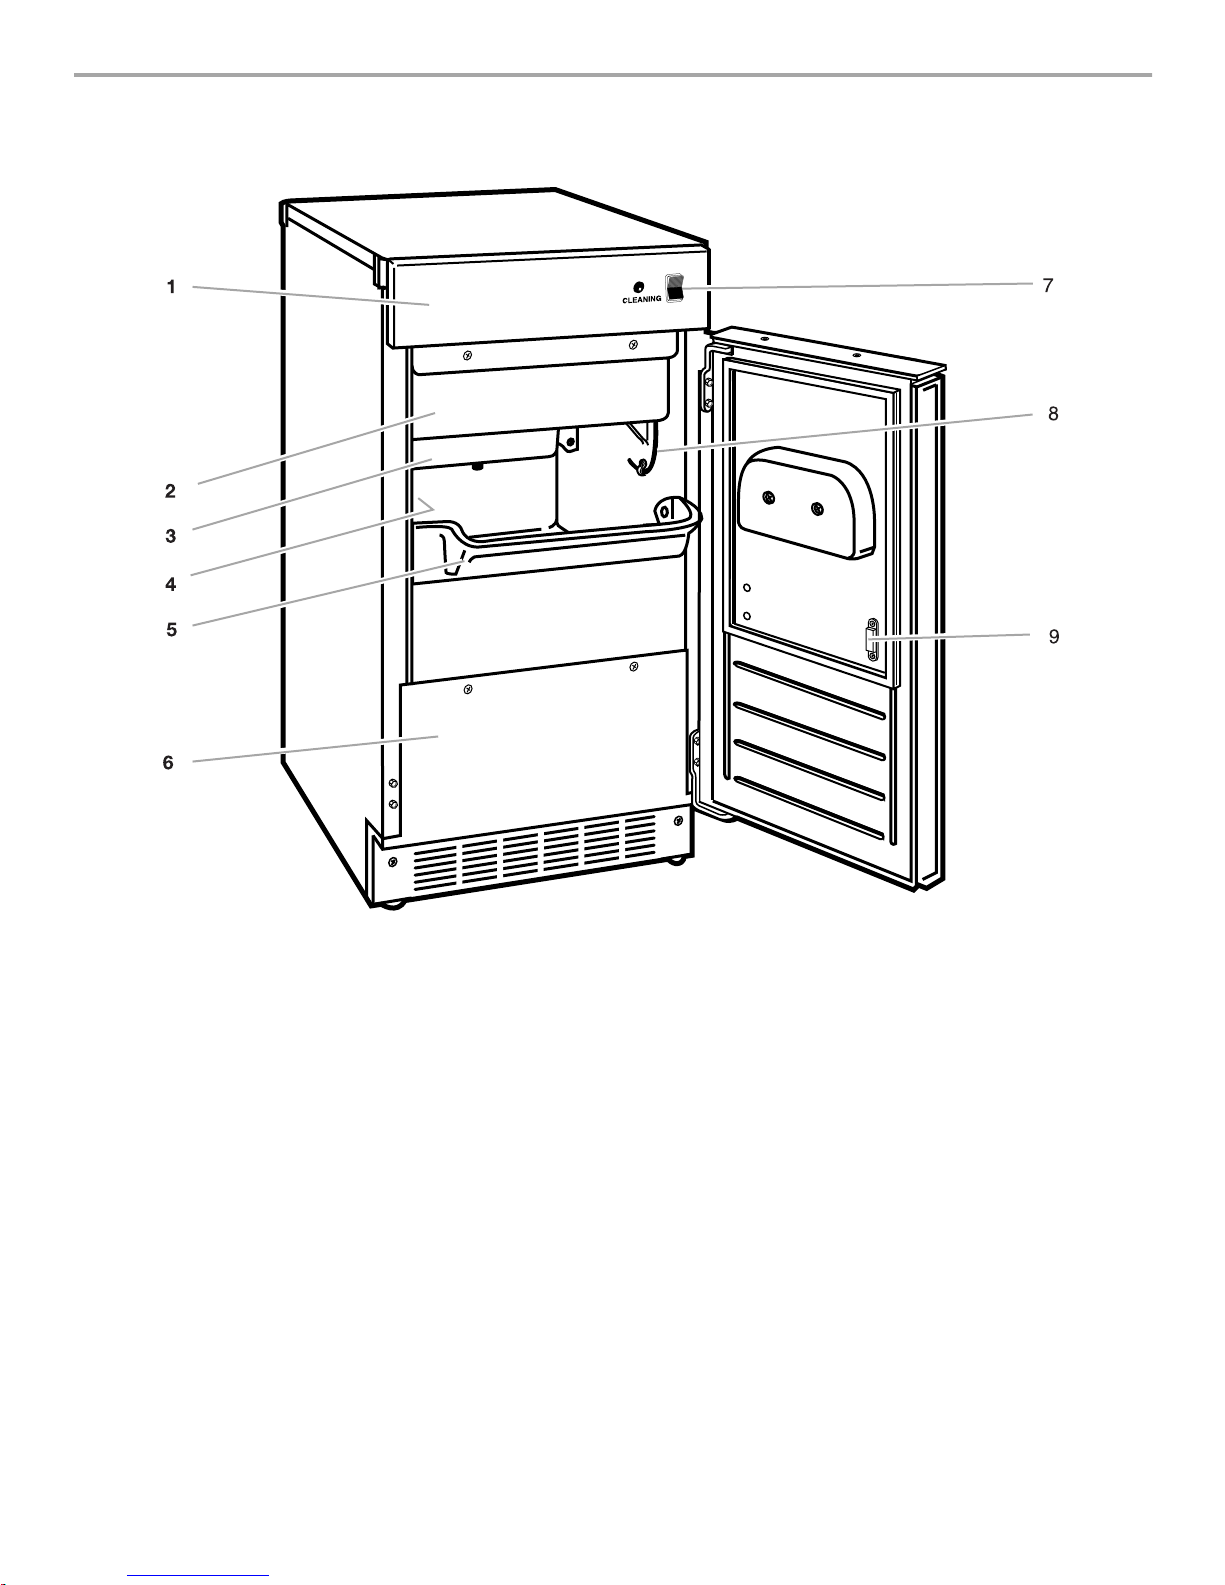
PARTS AND FEATURES
N
O
F
F
O
N
A
E
L
C
1. Upper Access Panel
2. Cutter Grid Cover
3. Water Pan
4. Model Serial Number Label
(on left cabinet wall)
5. Ice Retainer Baffle
6. Lower Access Panel
7. Control Panel
8. Ice Level Sensor
9. Magnetic Door Catch
4
ICE MAKER
INSTALLATION
Unpacking
WARNING
Excessive Weight Hazard
Use two or more people to move and install
ice maker.
Failure to do so can result in back or other injury.
Do not kink or pinch the power supply cord between
NOTE:
the ice maker and cabinet.
1/2
11
"
(29.2 cm)
34"
(86.4 cm)
Min.
1/2
34
"
(87.6 cm)
Max.
1/2
3
(8.9 cm)
24"
(60.1 cm)
"
9"
(22.9 cm)
1/2
28
"
(72.4 cm)
Removing packaging materials
Remove tape and glue from your ice maker before using.
■ To remove any remaining tape or glue, rub the area briskly
with your thumb. Tape or glue residue can also be easily
removed by rubbing a small amount of liquid dish soap over
the adhesive with your fingers. Wipe with warm water and
dry.
Do not use sharp instruments, rubbing alcohol, flammable
■
fluids, or abrasive cleaners to remove tape or glue. These
products can damage the surface of your ice maker.
Cleaning before use
After you remove all of the packaging materials, clean the inside
of your ice maker before using it. See the cleaning instructions in
the “Ice Maker Care” section.
Location Requirements
■ To ensure proper ventilation for your ice maker, the front side
must be completely unobstructed. The unit may be closed-in
on the top and three sides, but the installation should allow
the ice maker to be pulled forward for servicing if necessary.
Installation of the ice maker requires a cold water supply inlet
■
of ¹⁄₄ in. (6.35 mm) OD soft copper tubing with a shutoff valve
and either a gravity-drain system or condensate pump to
carry the water to an existing drain.
Choose a well ventilated area with temperatures above 55°F
■
(13°C) and below 100°F (38°C). Best results are obtained
between 70°F (21°C) and 90°F (32°C). This unit MUST be
installed in an area protected from the elements, such as
wind, rain, water spray, or drip.
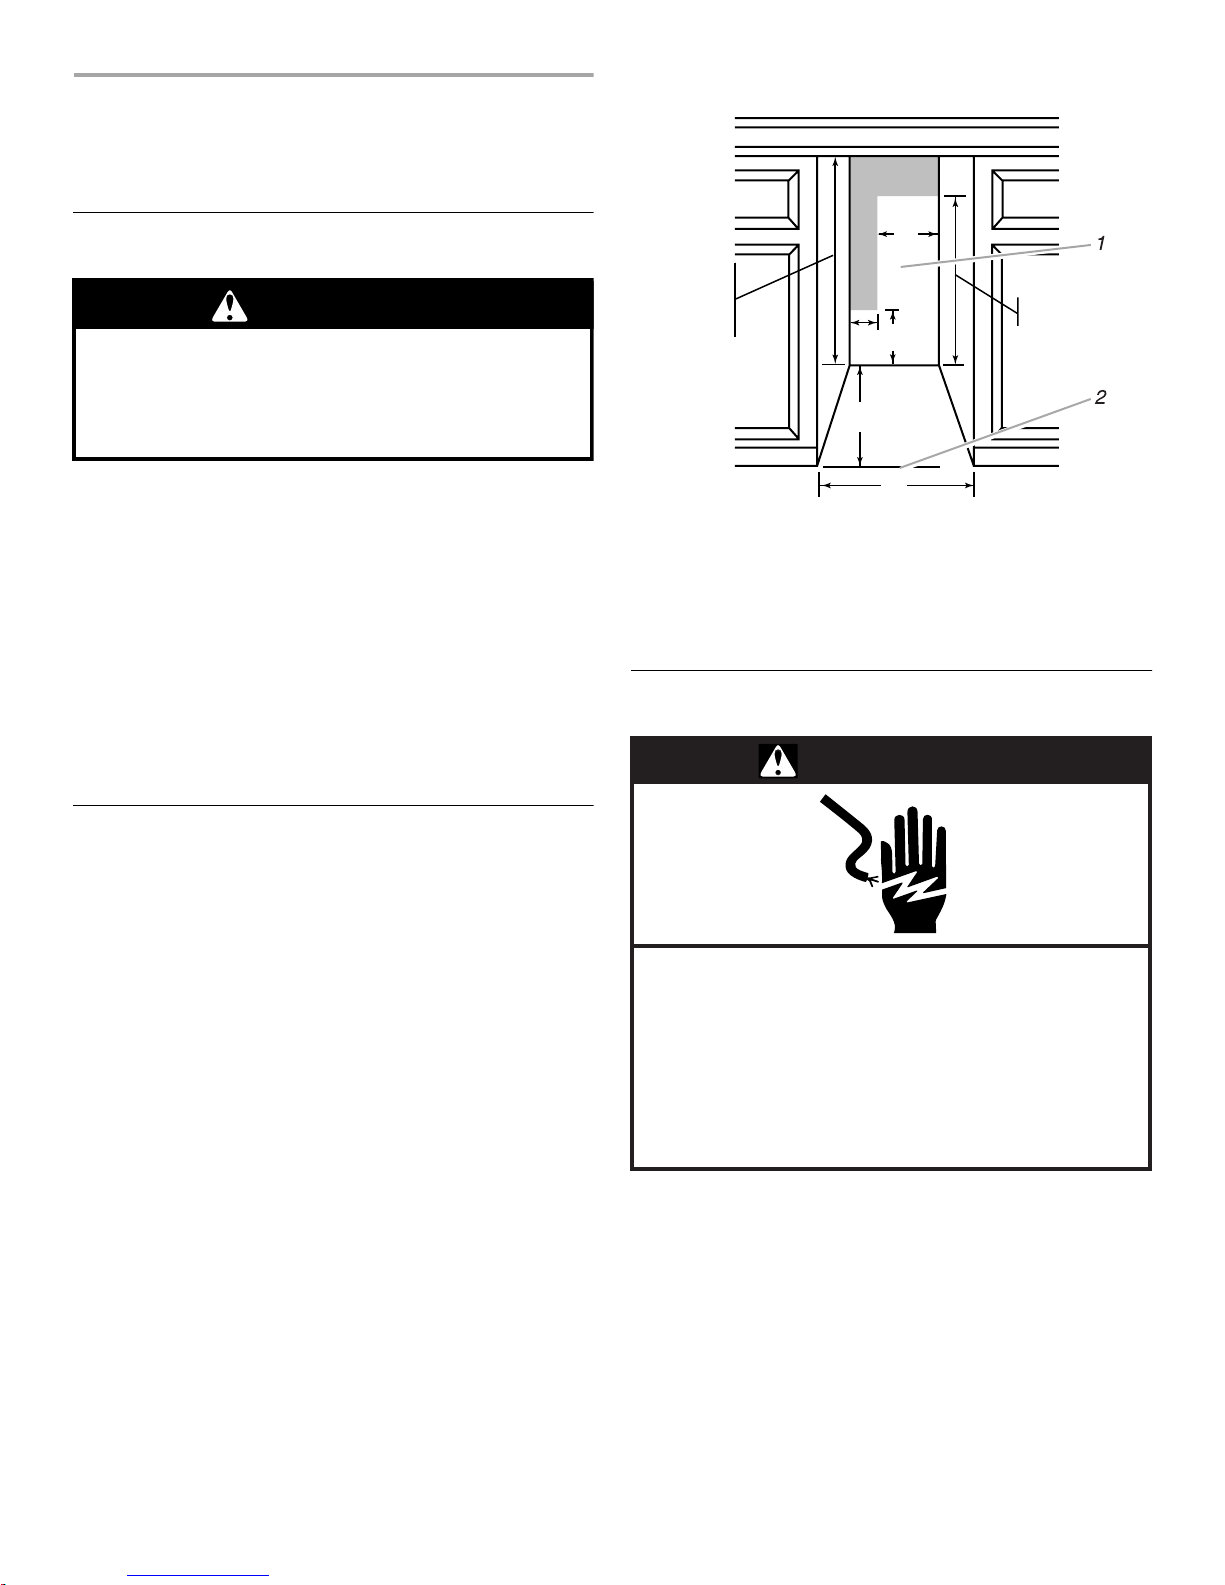
When installing the ice maker under a counter, follow the
■
recommended opening dimensions shown. Place electrical
and plumbing fixtures in the recommended location as
shown.
15"
1. Recommended Location for Electrical and Plumbing Fixtures
2. Floor Level
You should choose a location where the floor is even. It is
■
(38.1 cm)
important for the ice maker to be level in order to work
properly. If needed, you can adjust the height of the ice maker
by changing the position of the rear wheels. See the
“Leveling” section.
Electrical Requirements
WARNING
Electrical Shock Hazard
Plug into a grounded 3 prong outlet.
Do not remove ground prong.
Do not use an adapter.
Do not use an extension cord.
Failure to follow these instructions can result in
death, fire, or electrical shock.
Before you move your ice maker into its final location, it is
important to make sure you have the proper electrical
connection:
A 115 Volt, 60 Hz., AC only 15 ampere electrical supply, properly
grounded in accordance with the National Electrical Code and
local codes and ordinances, is required.
It is recommended that a separate circuit, serving only your ice
maker, be provided. Use a receptacle which cannot be turned off
by a switch or pull chain.
5
 Loading...