

Page 1
IMI CORNELIUS INC One Cornelius Place Anoka, MN 55303-6234
Telephone (800) 238-3600 Facsimile (800) 535-4231
OPERATORS MANUAL – ICE COOLED DISPENSERS
This instruction applies to all models of Drop-In and Free-Standing Ice Cooled
dispensers.
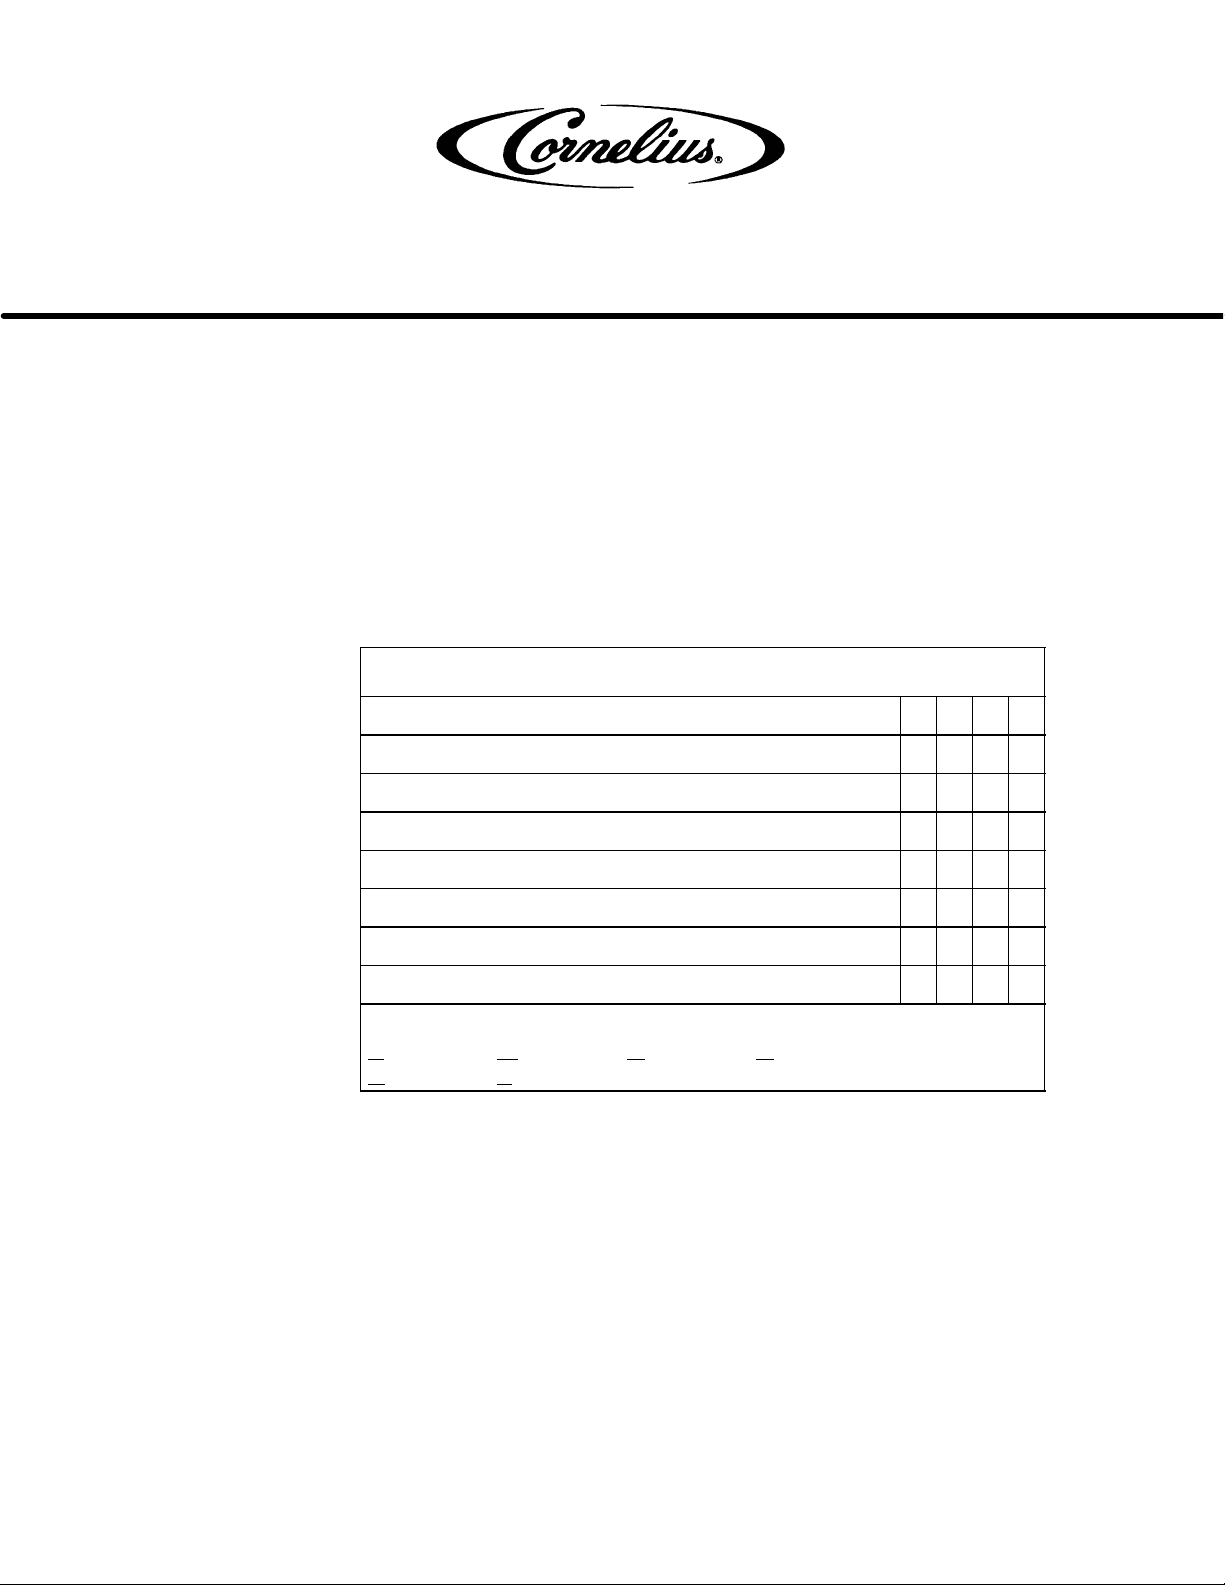
RECOMMENDED MAINTENANCE
Details of each task are listed immediately below the chart. Refer to the details by task number.
Maintenance Schedule
Task D W M Q
1. Clean all exterior surfaces O
2. Clean dispensing valves, Post-Mix O
3. Clean dispensing valves, Pre-Mix O
4. Clean & sanitize ice bin O
5. Sanitize tank systems, post-mix and pre-mix S
6. Sanitize syrup lines, B-I-B systems S
7. Sanitize Bin Drain & Drip Tray Drain O
Legend:
aily Weekly Monthly Quarterly
D
perator Serviceperson
O
DETAILS OF MAINTENANCE TASKS
1. Clean All Exterior Surfaces
Cleaning The Tower
IMPORTANT: DO NOT USE ABRASIVE CLEANERS
A. Remove the cup rest from the drip tray.
B. Wash the drip tray with warm soapy water. Rinse the drip tray, allowing the rinse water to run down
the drain hose.
C. Wipe entire exterior of the tower with a damp cloth. Dry the tower with a clean cloth (see caution be-
low).
IMI Cornelius Inc; 1994–2003
1
Rev 10/8/03
166239002
166239002
Rev. Level 1
Page 2

CAUTION: To minimize the possibility of damaging the surface of the painted tower care
must be taken when choosing a cloth. The cloth must be of clean cotton with a deep nap,
or equivalent. If a damp cloth is instructed to use, it must be rinsed out in clean water, the
damp or the dry cloth must be manually fluffed to a softened consistency before using to wipe or
polish the painted tower.
D. For the painted tower, (rather than a stainless steel tower) the painted surface may be cleaned using
mild detergents or most house hold cleaners like “ Fantastik or Mr. Clean”. After cleaning, wipe entire
exterior of the tower with a damp cloth. (Do not use strong soaps, abrasive cleaners or any
cleaner that contains Alcohol) Dry the tower with a clean cloth.
E. The painted tower surface may be waxed after cleaning using “Simoniz” paste wax, Aero Wax or Glo-
Coat. After applying wax, buff the surface with a clean dry cloth to a high luster finish.
2. Clean Dispensing Valves, Post-Mix
A. Remove the valve cover(s) and wash in plain water.
B. Remove the nozzle and the syrup diffuser and wash the parts in plain water.
IMPORTANT: When washing the dispensing valve, care must be taken not to get water on the electrical solenoid.
C. Hold an appropriate container under the dispensing valve. Being very careful not to get water on the
electrical solenoid, slowly pour plain water over the dispensing valve.
D. Install the nozzle and syrup diffuser on the valve.
E. Install the valve cover(s).
3. Clean Dispensing Valves, Pre-Mix
A. Pour clean water over the valve to rinse away any
sticky residue.
B. Using a small round nylon bristle brush, clean the valve spout with plain water.
C. Dry the valve with a clean dry cloth.
4. Clean and Sanitize Ice Bin, Drains and Drip Tray
IMPORTANT: Only trained and qualified persons should perform these cleaning and sanitizing
procedures.
Sanitizing Solution - Household liquid bleech that contains 5.25% sodium hypochlorit concentration, (such as
Hi-Lex or Chlorox).
Prepare the sanitizing solution by mixing 0.5-ounces of household bleech to one gallion of potable water. This
mixture must not exceed 200 PPM of chorine, allowable by the FDA. Use this mixture for all sanitizing procedures.
A. Remove all ice from the ice bin and melt any remaining ice with hot water.
B. Remove ice bin drain strainer by lifting straight up.
C. Prepare a mild detergent solution in 120 F potable water.
DO NOT use water hotter than 120F
D. Using a nylon bristle brush (Do Not use a wire brush), clean the cold plate and the interior of the ice
bin with the detergent solution.
E. Pour the remainder of the detergent solution down the drip tray and bin drains. Observe that the solu-
tion flows freely. If not, determine the cause. It may be necessary to replace the drain tubing.
IMI Cornelius Inc; 1994–2003
2
Rev 10/8/03
166239002
166239002
Rev. Level 1
Page 3

F. Prepare two or more gallons of sanitizing solution. Pour half of the solution down the bin and drip tray
drains. After the has completely drained, pour the remaining solution down the drains.
G. Replace the drain strainer.
H. Using a mechanical spray bottle, prepare sanitizing solution and spray the entire interior bin surfaces.
Allow to air dry.
5. Sanitize Tank Systems, Post-Mix and Pre-Mix
A. Remove all ice from the ice bin and melt any remaining ice with hot water.
B. Remove all the quick disconnects from all the tanks.
C. Prepare a mild detergent soap solution in 100 F potable water in a suitable pail or bucket.
D. Submerge all disconnects (gas and liquid) in the soap solution and then clean them using a nylon
bristle brush (Do Not use a wire brush). Rinse with clean water.
E. Prepare sanitizing solution and using a mechanical spray bottle, spray the disconnects. Allow to air
dry.
F. Using a clean, empty tank, prepare five gallons of sanitizing solution. Rinse the tank disconnects with
approximately 9 oz. of the sanitizing solution. Close the tank.
G. Connect a gas disconnect to the tank and then apply one of the product tubes to the tank of sanitizing
solution. Operate the appropriate valve until the sanitizing solution is flowing from the valve.
H. Repeat the step above, applying a different product tube each time until all tubes are filled with the
sanitizing solution.
I. For post-mix valves, remove the nozzle and syrup diffuser and clean them in a mild detergent soap
solution. Rinse with clean water and reassemble the nozzle and syrup diffuser to
the valve.
J. For pre-mix valves, disconnect all product tubes from the tank of sanitizing solution and then open the
valves to allow the pressure to be relieved. Remove the valves from the dispenser, disassemble and
wash thoroughly in a mild detergent soap solution.
K. Rinse the parts in clean water, reassemble the valve and reconnect it to the dispenser.
L. Allow the sanitizing solution to remain in the tubes for the manufacturer’s recommended exposure
time.
M. Discard the tank of sanitizing solution and connect the disconnects to a tank of potable water. Operate
the valves until all sanitizer has been flushed from the system and only water
is flowing.
N. Connect the disconnects to the appropriate product tanks and operate each valve until all water is
purged from the tubing.
6. Sanitize Syrup Lines, B-I-B Systems
A. Remove all ice from the ice bin and melt any remaining ice with hot water.
B. Remove all the quick disconnects from all the B-I-B
containers.
C. Prepare a mild detergent soap solution in 100 F potable water in a suitable pail or bucket.
D. Submerge all disconnects in the soap solution, then clean them using a nylon bristle brush (Do Not
use a wire brush). Rinse with clean water.
E. Using a plastic pail, prepare approximately five gallons of sanitizing solution.
IMI Cornelius Inc; 1994–2003
3
Rev 10/8/03
166239002
166239002
Rev. Level 1
Page 4

F. Rinse the B-I-B disconnects in the sanitizing solution.
G. Sanitizing fittings must be attached to each B-I-B disconnect. If these fittings are not available, the
fittings from empty B-I-B bags can be cut from the bags and used. These fittings open the disconnect
so the sanitizing solution can be drawn through the disconnect.
H. Place all the B-I-B disconnects into the pail of sanitizing solution. Operate all the valves until the sani-
tizing solution is flowing from the valve.
I. Remove the nozzle and syrup diffuser from the valve and clean them in a mild detergent soap solu-
tion. Rinse with clean potable water and reassemble the nozzle and syrup diffuser to the valve.
J. Allow the sanitizing solution to remain in the tubes for the manufacturer’s recommended exposure
time.
K. Remove the sanitizing fittings from the B-I-B disconnects and place them in a container of potable wa-
ter. Operate the valves until all the sanitizing solution has been purged from the tubing.
L. Connect the disconnects to the appropriate B-I-B container. Operate the valves until all water has
been flushed from the system and syrup is flowing freely.
CO2 SETTINGS
IMPORTANT: The settings shown below are nominal settings and they may not satisfy your system.
If your installer or serviceperson has indicated other pressure settings to you, please adhere to those
settings. If your system is not performing to your satisfaction, call your serviceperson. DO NOT
make adjustments without consulting with a qualified
serviceperson.
The CO2 regulators should be set as indicated in the following chart:
Regulator Pressure Setting
Primary (Carbonator) 90 – 120 PSI
Secondary, Sugared Syrup Tank 55 PSI
Secondary, Diet Syrup Tank 8 – 12 PSI
Secondary, B–I–B 60 PSI
Basic Pressure 47 PSI
For each 10 ft. of horizontal tubing
between tank and dispenser
For each 2 ft. of elevation Add 1 PSI
For each tank per flavor over
3 tanks
Basic pressure shown is based on ambient temperature of 72F. Use a
Cornelius Pre-Mix slide rule for exact calculations.
Post-Mix
Pre-Mix
Add 1 PSI
Add 1 PSI
IMI Cornelius Inc; 1994–2003
4
Rev 10/8/03
166239002
166239002
Rev. Level 1
Page 5

DRINK DISPENSER VALVES
IMI CORNELIUS INC.
MASON CITY IA.
DRINK DISPENSERS
VALVE TYPE
MANUFACTURER
PORTION CONTROL MAXIMUM OPERATING PRESSURE
CORNELIUS 130 psi
LANCER 100psi
FLOWMATIC 100psi
McCANN 130psi
PUSH BUTTON
CORNELIUS 130psi
LANCER 100psi
FLOWMATIC 100psi
McCANN 130psi
LEVER TYPE
CORNELIUS 130psi
LANCER 100psi
FLOWMATIC 100psi
McCANN 130psi
AUTOFILL LEVER
CORNELIUS 130psi
LANCER 100psi
FLOWMATIC 100psi
McCANN 130psi
NON–ELECTRIC
CORNELIUS 130psi
LANCER 100psi
PREMIX TYPE
CORNELIUS 130psi
IMI Cornelius Inc; 1994–2003
5
Rev 10/8/03
166239002
166239002
Rev. Level 1
Page 6

TROUBLESHOOTING
Trouble Probable Cause Remedy
TROUBLESHOOTING
WATER-TO-SYRUP ‘‘RATIO’’
TOO LOW OR TOO HIGH
ADJUSTMENT OF
DISPENSING VALVE SYRUP
FLOW REGULATOR DOES
NOT INCREASE TO DESIRED
WATER-TO-SYRUP ‘‘RATIO’’
A. Dispensing valve syrup flow
regulator not properly
A. Adjust Water-to-Syrup ‘‘Ratio’’ of
dispensed drink as instructed.
adjusted.
B. CO2 gas pressure to syrup
tanks insufficient to push syrup
B. Adjust syrup tanks secondary
CO2 regulator as instructed.
out of tank or to pump from the
B-I-B container.
A. Dispensing valve syrup flow
regulator, syrup tank quick
A. Sanitize syrup system as
instructed.
disconnect, or syrup line
restricted.
B. Syrup tank quick disconnects
B. Secure quick disconnects.
not secure.
C. Syrup tanks secondary CO
regulator out of adjustment.
C. Adjust syrup tanks secondary
2
CO2 regulator as instructed.
D. No syrup supply. D. Replenish syrup supply.
E. Improper syrup Baume. E. Replace syrup supply.
F. Dirty or inoperative piston or
spring in dispensing valve
syrup flow regulator.
F. Disassemble and clean
dispensing valve syrup flow
regulator.
ADJUSTMENT OF
DISPENSING VALVE SYRUP
FLOW REGULATOR DOES
NOT DECREASE TO
DESIRED WATER-TO-SYRUP
‘‘RATIO’’
G. Tapered nylon washer inside
tube swivel nut connector
distorted from being
overtightened.
A. Dirty or inoperative piston or
spring in dispensing valve
syrup flow regulator.
G. Replace nylon washer and make
sure it seats properly.
A. Disassemble and clean
dispensing valve syrup flow
regulator.
IMI Cornelius Inc; 1994–2003
6
Rev 10/8/03
166239002
166239002
Rev. Level 1
Page 7

Trouble RemedyProbable Cause
DISPENSED PRODUCT
CARBONATION TOO LOW
DISPENSED PRODUCT
COMES OUT OF
DISPENSING VALVE CLEAR
BUT FOAMS IN CUP OR
GLASS
A. Carbonator primary CO
regulator out of adjustment for
existing water conditions or
2
A. Adjust carbonator primary CO
regulator (Reference manual
provided with carbonator).
temperature.
B. Air in carbonator tank. B. Vent air out of carbonator tank
through relief valve. Actuate
dispensing valve carbonated
water lever to make carbonator
pump cycle on.
C. Water, oil, or dirt, in CO
supply.
2
C. Remove contaminated CO2.
Clean CO2 system (lines,
regulators, etc.) using a mild
detergent. Install a clean CO
supply.
A. Oil film or soap scum in cup
A. Use clean cup or glass.
or glass.
B. Ice used for finished drink is
sub-cooled.
B. Do not use ice directly from
freezer. Allow ice to become ‘‘wet’’
before using. (Refer to following
NOTE).
2
2
NOTE: Crushed ice in the glass also causes dispensing problems. When finished drink hits sharp
edges of ice, carbonation is released from dispensed drink.
C. Carbonator CO2 regulator
pressure too high for existing
water conditions or
C. Reduce carbonator CO2 regulator
pressure setting. (Reference
manual provided with carbonator).
temperature.
D. Syrup over-carbonated with
CO2 as indicated by bubbles in
inlet syrup lines leading to
unit.
D. Remove syrup tanks quick
disconnects. Relieve tank CO
pressure, shake tank vigorously,
then relieve tank CO2 pressure as
many times as necessary to
remove over-carbonation.
2
IMI Cornelius Inc; 1994–2003
7
Rev 10/8/03
166239002
166239002
Rev. Level 1
Page 8

Trouble Probable Cause Remedy
DISPENSED PRODUCT
PRODUCES FOAM AS IT
A. Dispensing valve restricted
or dirty.
A. Sanitize syrup system as
instructed.
LEAVES DISPENSING VALVE
B. Tapered nylon washer inside
carbonated water line swivel
B. Replace nylon washer. Make sure
it is properly seated.
nut connector distorted
restricting carbonated water
flow.
C. Dirty water supply. C. Check water filter. Replace
cartridge. (see NOTE)
D. Warm Product - No ice in bin,
bridged ice on cold plate or
plugged drain.
D. Replenish ice, break ice up to
eliminate bridging, unplug the
drain.
NOTE: If water supply is dirty, be sure to flush lines and carbonator completely. It may be necessary to
remove lines to carbonator tank, invert tank, and flush tank and all inlet lines to remove any foreign
particles or dirt.
NO PRODUCT DISPENSED
A. Transformer unplugged. A. Plug in the transformer.
FROM ALL DISPENSING
VALVES
B. No electrical power to
B. Check fuse or circuit breaker.
transformer.
C. Disconnected dispensing
valves power cord.
C. Connect dispensing valves
power cord.
NO PRODUCT DISPENSED
FROM ONE DISPENSING
VALVE
D. Disconnected or broken wiring
D. Connect or replace wiring.
to dispensing valves.
E. Inoperative transformer. E. Replace transformer as
instructed.
A. Broken or disconnected wiring. A. Repair or connect wiring.
B. Inoperative dispensing valve
solenoid coil.
C. Inoperative dispensing valve
micro switch.
B. Replace solenoid coil as
instructed.
C. Replace micro switch as
instructed.
IMI Cornelius Inc; 1994–2003
8
Rev 10/8/03
166239002
166239002
Rev. Level 1
Page 9

Trouble Probable Cause Remedy
ONLY CARBONATED WATER
DISPENSED
A. Quick disconnects not secure
on syrup tanks.
B. Out of syrup. B. Replenish syrup supply as
C. B-I-B connectors not properly
connected.
D. Syrup secondary CO
2
regulator not properly
adjusted.
E. Inoperable dispensing valve. E. Repair dispensing valve.
F. Dispensing valve syrup flow
regulator not properly
adjusted.
G. Dispensing valve syrup flow
regulator, syrup tank quick
disconnect, or syrup lines
restricted.
ONLY SYRUP DISPENSED A. Plain water inlet supply line
shutoff valve closed.
B. Carbonator power cord
unplugged from electrical
outlet.
A. Secure quick disconnects on
syrup tanks.
instructed.
C. Properly attach the connectors.
D. Adjust syrup tanks secondary
CO2 regulator as instructed.
F. Adjust dispensing valve syrup
flow regulator (Water-to-Syrup
‘‘Ratio’’) as instructed.
G. Sanitize syrup system as
instructed.
A. Open plain water inlet supply line
shutoff valve.
B. Plug carbonator power cord into
electrical outlet.
C. Carbonator primary CO
regulator not properly
adjusted.
2
C. Adjust carbonator primary CO
2
regulator (Reference manual
provided with carbonator).
IMI Cornelius Inc; 1994–2003
9
Rev 10/8/03
166239002
166239002
Rev. Level 1
Page 10

WARRANTY
IMI Cornelius Inc. warrants that all equipment and parts are free from defects in material and workmanship under normal use and service. For a copy of the warranty applicable to your Cornelius product, in your country,
please write, Fax or telephone the IMI Cornelius office nearest you. Please provide the equipment model number and the date of purchase.
IMI Cornelius Offices
AUSTRALIA P. O. 210, RIVERWOOD, NSW 2210, AUSTRALIA (61) 2 533 3122 FAX (61) 2 534 2166
AM LANGEN FELDE 32 A-1222 VIENNA, AUSTRIA (43) 1 233 520 FAX (43) 1-2335-2930
AUSTRIA
BOSKAPELLEI 122 B-2930 BRAASCHAAT, BELGIUM (32) 3 664 0552 FAX (32) 3 665 2307
BELGIUM
RUA ITAOCARA 97 TOMAS COELHO RIO DE JANEIRO, BRAZIL (55) 21 591 7150 FAX (55) 21 593 1829
BRAZIL
TYTHING ROAD ALCESTER WARWICKSHIRE, B49 6 EU, ENGLAND (44) 789 763 101 FAX (44) 789 763 644
ENGLAND
71 ROUTE DE ST. DENIS F-95170 DEUIL LA BARRE PARI S, FRANCE (33) 1 34 28 6200 FAX (33) 1 34 28 6201
FRANCE
GERMANY
GREECE
HONG
ITALY
NEW
SINGAPORE
SPAIN
USA
CARL LEVERKUS STRASSE 15 D-4018 LANGENFELD, WEST GERMANY (49) 2173 7930 FAX (49) 2173 77 438
488 MESSOGION AVENUE AGIA PARA SK EV I 153 42 ATHENS, GREECE (30) 1 600 1073 FAX (30) 1 601 2491
KONG 1104 TAIKOTSUI CENTRE 11-15 KOK CHEUNG ST TAIKOKTSUE, HONG KONG (852) 789 9882 FAX (852) 391 6222
VIA PELLIZZARI 11 1-20059 VIMARCATE, ITALY (39) 39 608 0817 FAX (39) 39 608 0814
ZEALAND 20 LANSFORD CRES. P. O. BOX 19-044 AVONDALE AUCKLAND 7, NEW ZEALAND (64) 9 8200 357 FAX (64) 9 8200 361
16 TUAS STREET SINGAPORE 2263 (65) 862 5542 FAX (65) 862 5604
POLIGONO INDUSTRAIL RIERA DEL FONOLLAR E-08830 SANT BOI DE LLOBREGAT BARCELONA, SPAIN (34) 3 640 2839 FAX (34) 3 654 3379
ONE CORNELIUS PLACE ANOKA, MINNESOTA (612) 421-6120 FAX (612) 422-3255
IMI Cornelius Inc; 1994–2003
10
Rev 10/8/03
166239002
166239002
Rev. Level 1
 Loading...