

Cornelius IACSSO, IACS50 Use And Care Manual

MODEL IACSSO
Use and Care Guide
and features
Copy your Model and Serial Numbers here . . .
When YOU need service, or call with a
question, have this information ready.
1. COmPlefe Model and Serial Numbers
(from the Plate located as shown).
2. Purchase date from sales slip.
COPY this information in these spaces
this book, your warranty, and sales slib
Keep
together in a handy place,
Part
No. 2 180630
Model Number
Serial Number
Purchase Date
Service Company and Telephone Number
Contents
Page
BEFORE YOU PLUG IT IN
. . . . . . . . . . . . . . . . . . . . . . . 2
USING YOUR ICE MAKER
. . . . . . . . . . . . . . . . . . . . . . . 2
How the Ice Maker Works
. . . . . . . . . . . . . . . . . . . . . 2
Setting the Controls . . . . . . . . . . . . . . . . . . . . . . . . . . . . . .
3
Changing the Bin Door Panel
. . . . . . . . . . . . . . . 3
Changing the Lower
Access Panel . . . . . . . . . . . . . . . . . . . . . . . . . . . . . . . . . . . . . . . .
4
CLEANING AND CARING FOR
YOUR ICE MAKER
. . . . . . . . . . . . . . . . . . . . . . . . . . . . . . . . . . . 5
Page
Cleaning Exterior Surfaces ...................
5
Cleaning the Condenser ....................... 5
Cleaning the Ice Maker System
...........
.6
Cleaning the Interior Components
.......
.7
Filtering and Treating Water
.................
8
VACATION AND MOVING CARE ............
8
IF YOU NEED SERVICE
OR ASSISTANCE
...................................
10
Before Calling for Service ...................
10
Before you plug it in
IMPORTANT
Before using your ice maker, you are responsible
for making sure that it
l
has been installed where it is protected from
the elements.
l
is located so that the front is not blocked to
restrict incoming or discharge airflow.
l
is properly leveled.
. is located in a well ventilated area with tempera-
tures above 55°F (13°C) and below 110°F (43°C).
Best results are obtained at temperatures between 70°F (21 “C) and 90°F (32°C).
l
is properly connected to a water supply
and drain.
l
is properly connected to electricity. A 115 Volt,
60 Hz., AC only, 15 or 20 ampere electrical supply
circuit, properly grounded in accordance with
the National Electrical Code and local codes
and ordinances, is required. NOTE : A time delay
fuse or circuit breaker is recommended.
l
is not operated by anyone unable to use it
properly.
l
is used only for the job it was designed to
perform.
l
is properly maintained.
Using your ice maker
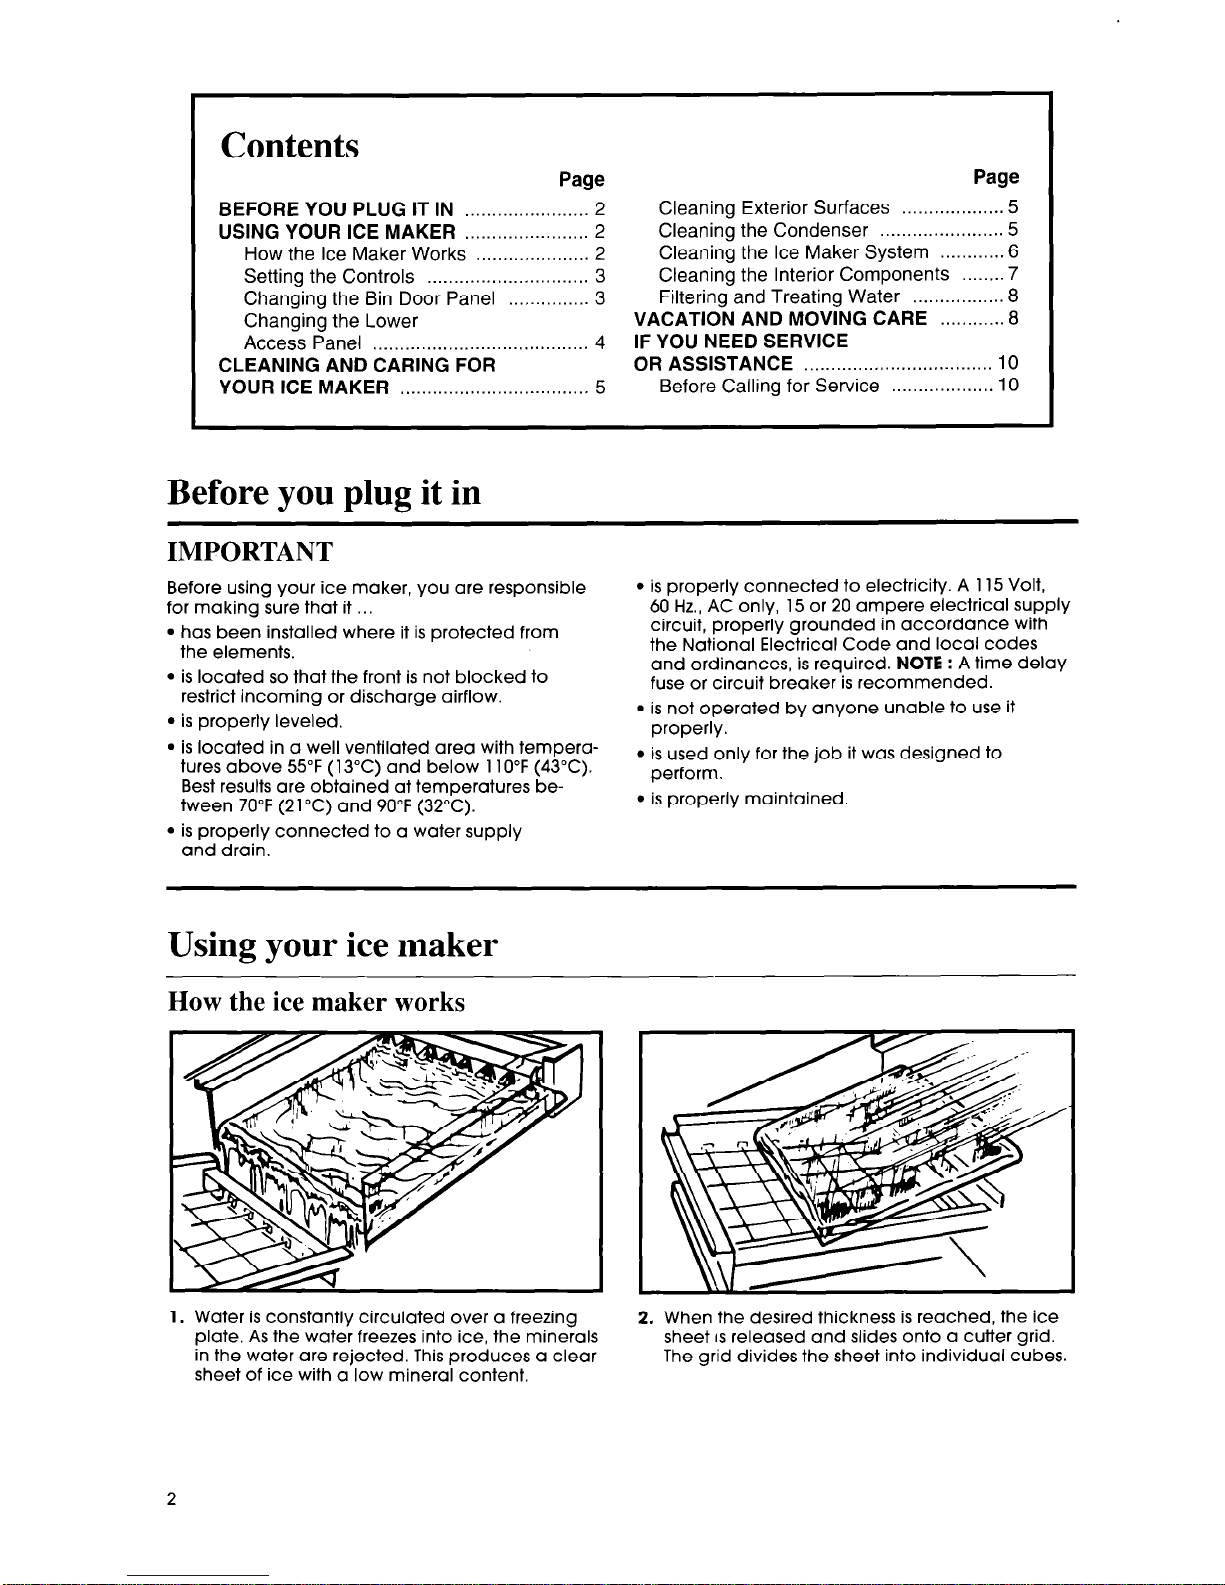
How the ice maker works
1. Water is constantly circulated over a freezing
plate. As the water freezes into ice, the minerals
in the water are rejected. This produces a clear
sheet of ice with a low mineral content.
2. When the desired thickness is reached, the ice
sheet IS released and slides onto a cutter grid.
The grid divides the sheet into individual cubes.

3. The water containing the rejected minerals is
drained after each freezing cycle.
4. Fresh water enters the machine for the next
freezing cycle.
5. Cubes fall into the storage bin. When the bin is
full, the ice maker shuts off automatically and
restarts when more ice is needed.
Setting the controls
NORMAL ON
THIN
THICK OFF - - CLEAN
ICE CYCLE
1. Select an ice thickness. The ice maker has been
preset to produce ice approximately l/z” thick
while operating in a room temperature of 70°F
(21°C).
Operation in different room temperatures may
require readjusting the Ice Thickness Control
Knob toward “THICK” or “THIN.”
Best operation will be obtained with ice I/Z” to 5/~”
thick.
If operating in a warm room temperature
(above 90°F (32°C)) DO NOT set Ice Thickness
Control Knob to maximum thickness. Doing so
could cause the unit to malfunction.
2. To start the normal freezing cycle, turn the Cycle
Control Knob to “ON.”
3. To stop ice maker operation, turn the Cycle
Control Knob to “OFF.”
The “CLEAN” setting is used whenever solutions
are circulated through the ice maker for
cleaning. Only the water pump operates at this
setting.
NORMAL
ON
THIN THICK
OFF -
- CLEAN
ICE
CYCLE
Changing the bin door panel
You can make a decorative wood front to match
existing cabinets.
To change the bin door panel:
1. Open the storage bin door. Remove the two
screws holding the handle to the door frame.
2. Loosen the screws in both side trim pieces.
3. Remove the handle.
4. Carefully slide the panel out and break off the
ribs on the door insulation to allow room for the
wood panel’s thickness.
5. Make the wood panel %” (6 mm) thick and
17” x 13W (433 mm x 335 mm).
6. Replace the handle and tighten the screws in
both side trim pieces. Replace the handle
screws and tighten.
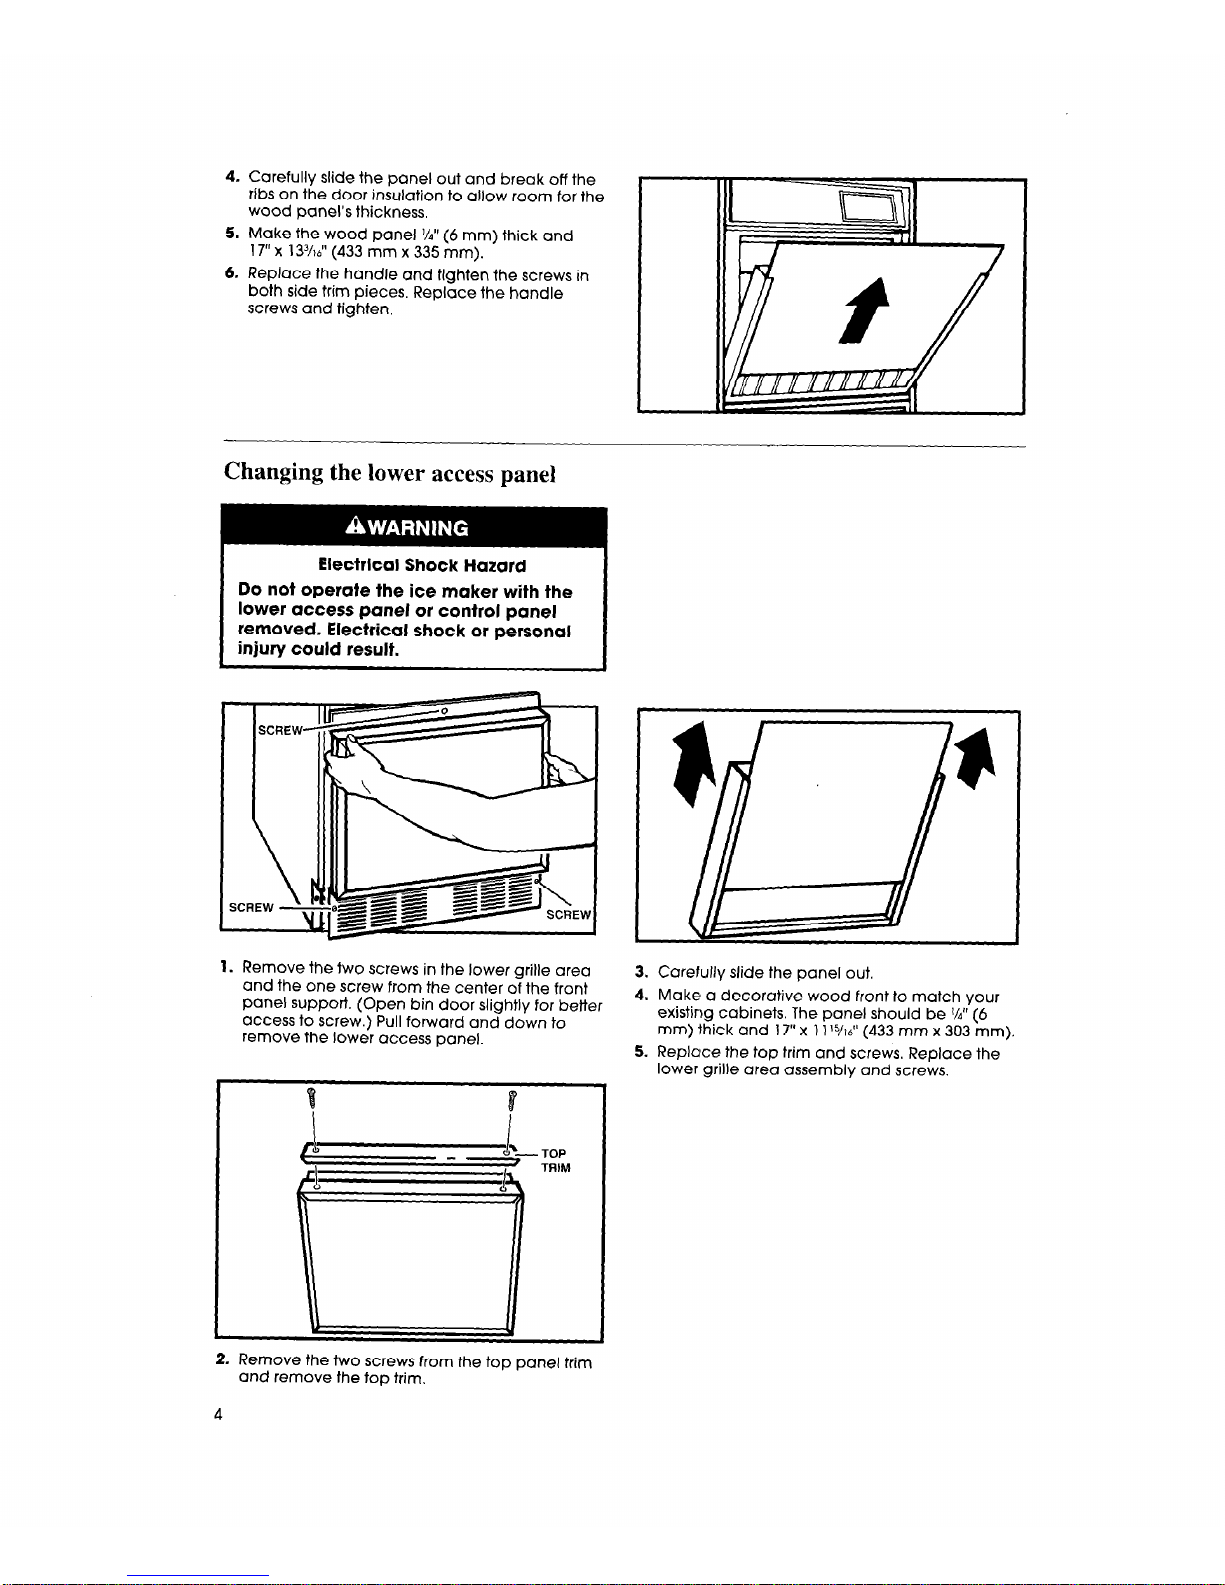
Changing the lower access panel
Electrical Shock Hazard
Do not operate the ice maker with the
lower caccess panel or control panel
removed. Electrical shock or personal
injury could result.
1. Remove the two screws in the lower grille area
and the one screw from the center of the front
panel support. (Open bin door slightly for better
access to screw.) Pull forward and down to
remove the lower access panel.
3. Carefully slide the panel out.
4. Make a decorative wood front to match your
existing cabinets. The panel should be 97 (6
mm) thick and 17” x 11%6” (433 mm x 303 mm).
5. Replace the top trim and screws. Replace the
lower grille area assembly and screws.
2. Remove the two screws from the top panel trim
and remove the top trim.
4
 Loading...