

Page 1

Warranty
Corega International warrants product for two years from date of purchase
against defects in materials and workmanship. This warranty does not cover
any defects caused by accident, misuse, fair wear and tear, neglect, or an
attempt at repair. This warranty is offered as an additional benefit to the
consumer’s statutory rights and does not affect these rights in any way.
Corega International shall not be held responsible for any special, incidental,
or consequential damages resulting from any breach of warranty, or under any
other legal theory, including but not limited to lost profit, downtime, damage to
data stored in or used with Corega International products.
Trademarks
Corega
TM
is a trademark of Corega Holdings KK., Japan.
Other trademarks, brand and product names are acknowledged as trademarks
of their respective holders. Information is subject to change without notice.
All rights reserved.
(GB) Warnings
ELECTRIC SHOCK HAZARD:
Install product in accordance with local and National Electrical Codes.
To de-energise equipment, disconnect the power cord.
(D) Warnhinweise
STROMSCHLAGGEFAHR:
Dieses Produkt muss entsprechend den örtlichen und nationalen
Elektrizitätsvorschriften installiert werden. Zum Abschalten der Ausrüstung
Stromkabel abziehen.
(I) Attenzione
RISCHIO DI SHOCK ELETTRICO:
Installare l'apparecchio in base alle normative elettriche locali e nazionali. Per
togliere l'alimentazione al dispositivo, scollegare il cavo relativo.
(E) Advertencias
PELIGRO DE ELECTROCUCIÓN:
Instale el producto de acuerdo con las recomendaciones de la
normativa sobre instalaciones eléctricas de su país. Para desactivar el equipo,
desconecte el cable de alimentación.
(F) Avertissements
RISQUE D'ÉLECTROCUTION:
Installez le produit conformément aux réglementations électriques nationales et
locales. Pour mettre l'équipement hors tension, débranchez le cordon
d'alimentation.
(FIN) Varoitukset
SÄHKÖISKUN VAARA:
Asenna tuote noudattaen paikallisia ja kansallisia säädöksia. Laitteen saa jännitteettömäksi vain irroittamalla sähköjohdon.
(RUS) Предупреждения
ОПАСНОСТ ПОРАЖЕНИЯ ЛЕКТРИЧЕСКИМ ТОКОМ:
Устанавливайте изделие в соответствии с местн!ми и
национал#н!ми правилами по установке
(лектрооборудования. Для отключения питания
отключите шнур питания.
Предупреждение – (то изделие класса A. В домашних
условиях (то изделие может создават# радиопомехи. В
(том случае пол#зователю, возможно, понадобится
принят# соответствующие мер!.
617-10091/01
Page 2

ADSL WIRELESS
802.11g 54MBPS
ROUTER
HUBS • SWITCHES • ADAPTERS • WIRELESS LAN • USB • KVMs • MEDIA CONVERTERS • ROUTERS • ADSL
COR-BAR-AWLA-54 & COR-BAR-AWLB-54
ALL-IN-ONE-ROUTER
Page 3

1
ENGLISH
Table of Contents
FCC STATEMENT 2
CE DECLARATION OF CONFORMITY 2
MANUFACTURER’S DISCLAIMER STATE 2
CHAPTER 1.0: GETTING TO KNOW YOUR ADSL WIRELESS ROUTER 2
1-1 FEATURES OF THE ADSL WIRELESS ROUTER 2
1-2 CONTENTS OF THE ADSL WIRELESS ROUTER PACKAGE 2
CHAPTER 2.0: HARDWARE INSTALLATION & SETUP 3
2-1 CONNECTORS AND INDICATORS 3
2-2 INSTALLATION 4
CHAPTER 3.0: BASIC INSTALLATION & SETUP 4
3-1 GATEWAY USING PPPoE 7
3-2 GATEWAY USING PPPoA 7
3-3 MODEM USING LLC ENCAPS. 7
3-4 GATEWAY USING LLC ENCAPS. (DYNAMIC IP) 7
3-5 GATEWAY USING LLC ENCAPS. (STATIC IP) 8
3-6 GATEWAY USING CLASSICAL IP 8
3-7 ROUTER USING CLASSICAL IP 8
3-8 MODEM USING LLC ENCAPS. 9
CHAPTER 4.0: ADVANCED CONFIGURATION 9
4-1 FIREWALL 9
4-2 VPN SETTINGS 10
4-3 DHCP CONFIGURATION 14
4-4 WEB CONTROL 15
4-5 TIME OF DAY (ToD) CONTROL 15
4-6 ACCESS CONTROL 16
4-7 VIRTUAL SERVER SETTINGS 17
4-8 SPECIAL APPLICATIONS 19
4-9 DMZ HOST 19
4-10 DYNAMIC ROUTING 20
4-11 STATIC ROUTING 21
4-12 WIRELESS 22
4-13 DDNS 23
CHAPTER 5.0: MANAGEMENT 24
5-1 DEVICE ADMINISTRATION SETTINGS 24
5-2 STATUS MONITOR 25
5-3 LOG 26
5-4 BACKUP & RESTORE 27
5-5 UPGRADE FIRMWARE 27
5-6 DIAGNOSTIC-PING/TRACERT 27
CHAPTER 6.0: MACINTOSH SETUP 28
6-1 HARDWARE CONNECTIONS 28
6-2 COMPUTER NETWORK CONFIGURATION 28
6-3 ADSL WIRELESS ROUTER CONFIGURATION 29
6-4 ADDING ADSL WIRELESS ROUTER TO EXISTING NETWORK 29
CHAPTER 7.0: TROUBLESHOOTING 30
HARDWARE 30
CLIENT SIDE (COMPUTERS) 30
APPENDIX A: FREQUENTLY ASKED QUESTIONS 31
APPENDIX B: TECHNICAL SPECIFICATIONS 32
APPENDIX C: CONFIGURING IPSEC BETWEEN A MICROSOFT WINDOWS 2000 OR XP PC AND BROADBAND VPN ROUTER 32
C-1 ENVIRONMENT 32
C-2 STEPS IN WINDOWS 2000/XP 32
APPENDIX D: GLOSSARY 34
Page 4

ENGLISH
2
FCC Statement
This device complies with Part 15 of FCC rule. Operation is subject to the following two conditions:
This device may not cause harmful interference.
This device must accept any interference received, including interference that may cause undesired operation.
This ADSL Wireless Router has been tested and found to comply with the limits for a Class B digital device, pursuant to Part 15 of the FCC Rules. These limits are designed to
provide reasonable protection against harmful interference in a residential installation. This equipment generates, uses, and can radiate radio frequency energy and, if not
installed and used according to the instructions, may cause harmful interference to radio communications. However, there is no guarantee that interference will not occur in
a particular installation. If this equipment does cause harmful interference to radio or television reception, which is found by turning the equipment off and on, the user is
encouraged to try to correct the interference by one or more of the following measures:
Reorient or relocate the receiving antenna.
Increase the separation between the equipment or device.
Connect the equipment to an outlet other than the receiver’s.
Consult a dealer or an experienced radio/TV technician for assistance.
FCC Radiation Exposure Statement
This equipment complies with FCC radiation exposure limits set forth for an uncontrolled environment. This equipment should be installed and operated with minimum
distance 20cm between the radiator and your body.
CE Declaration of Conformity:
This equipment complies with the specifications relating to electromagnetic compatibility, EN 55022/A1 Class B, and EN 50082-1. This meets the reasonable protection
requirements set out in the European Council Directive on the approximation of the laws of the member states relating to Electromagnetic Compatibility Directive
(89/336/EEC).
Manufacturer’s Disclaimer State
The information in this document is subject to changes without notice and does not represent a commitment on the part of vendor. No warranty or representation, either
expressed or implied, is made with respect to the quality, accuracy or fitness for any particular prupose of this document. The manufacturer reserves the right to make
changes to the content of this document and/or the products associated with it at any time without obligation to notify any person or organization. In no event will the
manufacturer be liable for direct, indirect, special, incidental or consequential damages arising out of the use or inability to use this product or documentation, even if
advised of the possibility of such damages. This document contains materials protected by copyright. All rights are reserved. No part of this manual may be reproduced
or transmitted in any form, by any means or for any purpose without the expressed written consent of its authors. Product names appearing in this document are
mentioned for identification purchases only. All trademarks, product names or brand names appearing in this document are registered property of their respective owners.
1.0 Getting to know your ADSL Wireless Router
1-1 Features of the ADSL Wireless Router
Congratulations on your purchase of this ADSL Wireless Router.
The router provides the following benefits:
•High Speed internet Access over ADSL (Up to internet downstream speed and 832Kbps upstream speed).
• Allows multiple computers to share a single ISP internet account.
•Wireless LAN connection via integrated Wireless Access Point.
•Provides 64bits/128bits key WEP (Wired Equivalent Privacy) wireless data encryption to secure wireless communication.
•4 port 10/100Mbps switch for wired connections to computers and printers.
• DHCP Server providing local IP addresses to local computers.
• Complete data security protecting the network from hackers.
• In-built filters allow denial of access to objectionable websites.
•Virtual Private Network support (VPN) and IPSec support.
1-2 Package Contents
After carefully unpacking the shipping carton, check the contents listed below.
1 x ADSL Wireless Router
1 x Power Adapter
1 x User’s Manual
1 x Telephone Cable
1 x Ethernet Cable
1 x CD
Figure 1. Pack Contents
Page 5

3
2.0 Hardware Installation and Setup
2-1 Connectors and Indicators
The rear panel of the router is shown in Figure 2.
Figure 2. Rear Panel
• Antenna Provides data transmission and reception for wireless devices. Please ensure that the Antenna is facing upwards.
• Reset Pressing this button for 3 seconds will reset the unit back to factory defaults.
• ADSL This is the WAN connection port to the telephone socket.
• LAN 1–4 Four LAN ports for local computers/printers.
• Power Inlet socket for external power adapter.
The front panel of the router is shown in Figure 3.
Figure 3. Front Panel
• Power 0ff - No power applied
Green - Power to the router
• Diag/Transaction Red - Glows when the router performs a self test on power on
Green - On when a link to the ISP is established
• WLAN Enable/Activity Off - Wireless not enabled
Green - Wireless enabled
Flashing - Data activity on the wireless port
• LAN Link/Activity Off - Port not active
Green - Port has valid connection
Flashing - Data activity on the port
• ADSL Link/Activity Off - ADSL line not connected
Green - ADSL connection is established and ready
Flashing - ADSL connection is being established
2-2 Installation
Connect the router as shown.
Figure 4. Hardware Installation
ENGLISH
Page 6

Power on the devices in the following sequence:
• ADSL Router
• Computer(s)
Note! The computer needs to be configured with the following:
• Ethernet Card supporting either;
- 10Base-T
- 100Base-TX
- 802.11b Wireless
• TCP/IP Protocol
•Web browser such as Microsoft Internet Explorer 4.0 or later.
Note! If you are connecting via a wireless connection – the Access Point in the router is programmed with the following default parameters:
SSID - Corega
WEP - disabled
3.0 Basic Installation & Setup
This chapter describes the procedures necessary to configure the basic functions of the router to allow internet access.
The following information should be supplied by your ISP:
Provided by some ISPs Host Name:
Domain Name:
IP address given by ISP • Dynamic
• Static
IP address
Subnet Mask
Default Gateway
DNS Server (Primary)
DNS Server (Secondary)
WAN VPI and VCI Values VPI
VCI
Operating Mode • LLC Encapulation with Dynamic IP
• LLC Encapulation with Static IP
• Gateway Classical IP
• PPPoE
• PPPoA
• Router using Classical IP
PPP Authentication Login Name
Password
Depending on your ISP, some or all of these parameters need to be programmed into the router.
Before attempting to configure the router, Corega suggest that you visit the support site of www.corega-international.com, and download a configuration file which may
help you with your particular installation. This should setup most of the parameters such that you only have to enter your username and password.
To access the router, point your web brower at:
http://192.168.1.1
Note! For most users, a compatible IP address will be automatically allocated to each computer by the router’s internal DHCP server. If you cannot access the
router – check that the computer has been set to receive a dynamic IP address or manually configure a compatible IP address.
From Windows:
Start/Settings/Network & Dial Up Connections/Local Area Connection/Properties/TCP/IP
ENGLISH
4
Page 7

5
The following screen should appear:
Figure 5. Login Screen
The factory default values are:
Username Leave blank
Password admin
Click OK.
The following screen should appear:
Figure 6. One Page Setup
By setting the parameters on this page, users should then be able to access the internet using the router.
• Host Name: This entry is required by certain ISPs. (If not necessary – leave blank).
• Domain Name: This entry is required by certain ISPs. (If not necessary – leave blank).
• Time Zone: Select the relevant time zone from the drop down list. (Setting this is optional)
• Private IP Address: This is the LAN IP address of the router. This is the address that is used to configure the router. The default values are:
192.168.1.1 for IP Address and
255.255.255.0 for Subnet Mask.
(Changing this factory default setting is optional, and is not necessary for most small networks).
• Wireless: Check “Disable” or “Enable” to make the wireless LAN function active. If you select “Disable”, then all of the following wireless parameters can be
ignored.
• SSID: (Service Set Identifier). SSID is the unique name shared among all clients and the router in a wireless network. The SSID must be identical for all wireless devices
and must not exceed 32 characters. The default value for the SSID is ‘corega’.
• SSID Broadcast: The router will broadcast the SSID to let wireless clients easily search and connect to this router. Default value is “allow”.
ENGLISH
Page 8
• Channel: Select the appropriate channel number from the drop-down menu. The permissible channels are different in each country due to local government
regulations. Make sure that all nodes in the same wireless LAN network use the same channel.
• WEP: (Wired Equivalent Privacy), WEP is an encryption mechanism used to protect your wireless data by providing a secure communications method. WEP uses a
combination of either 64 or 128-bit keys to encrypt data that is transmitted between all points in a wireless network to ensure data security. To code/decode the data
transmission, all points must use the identical key. To make the WEP encryption active or inactive, select “Mandatory” or “Disable”.
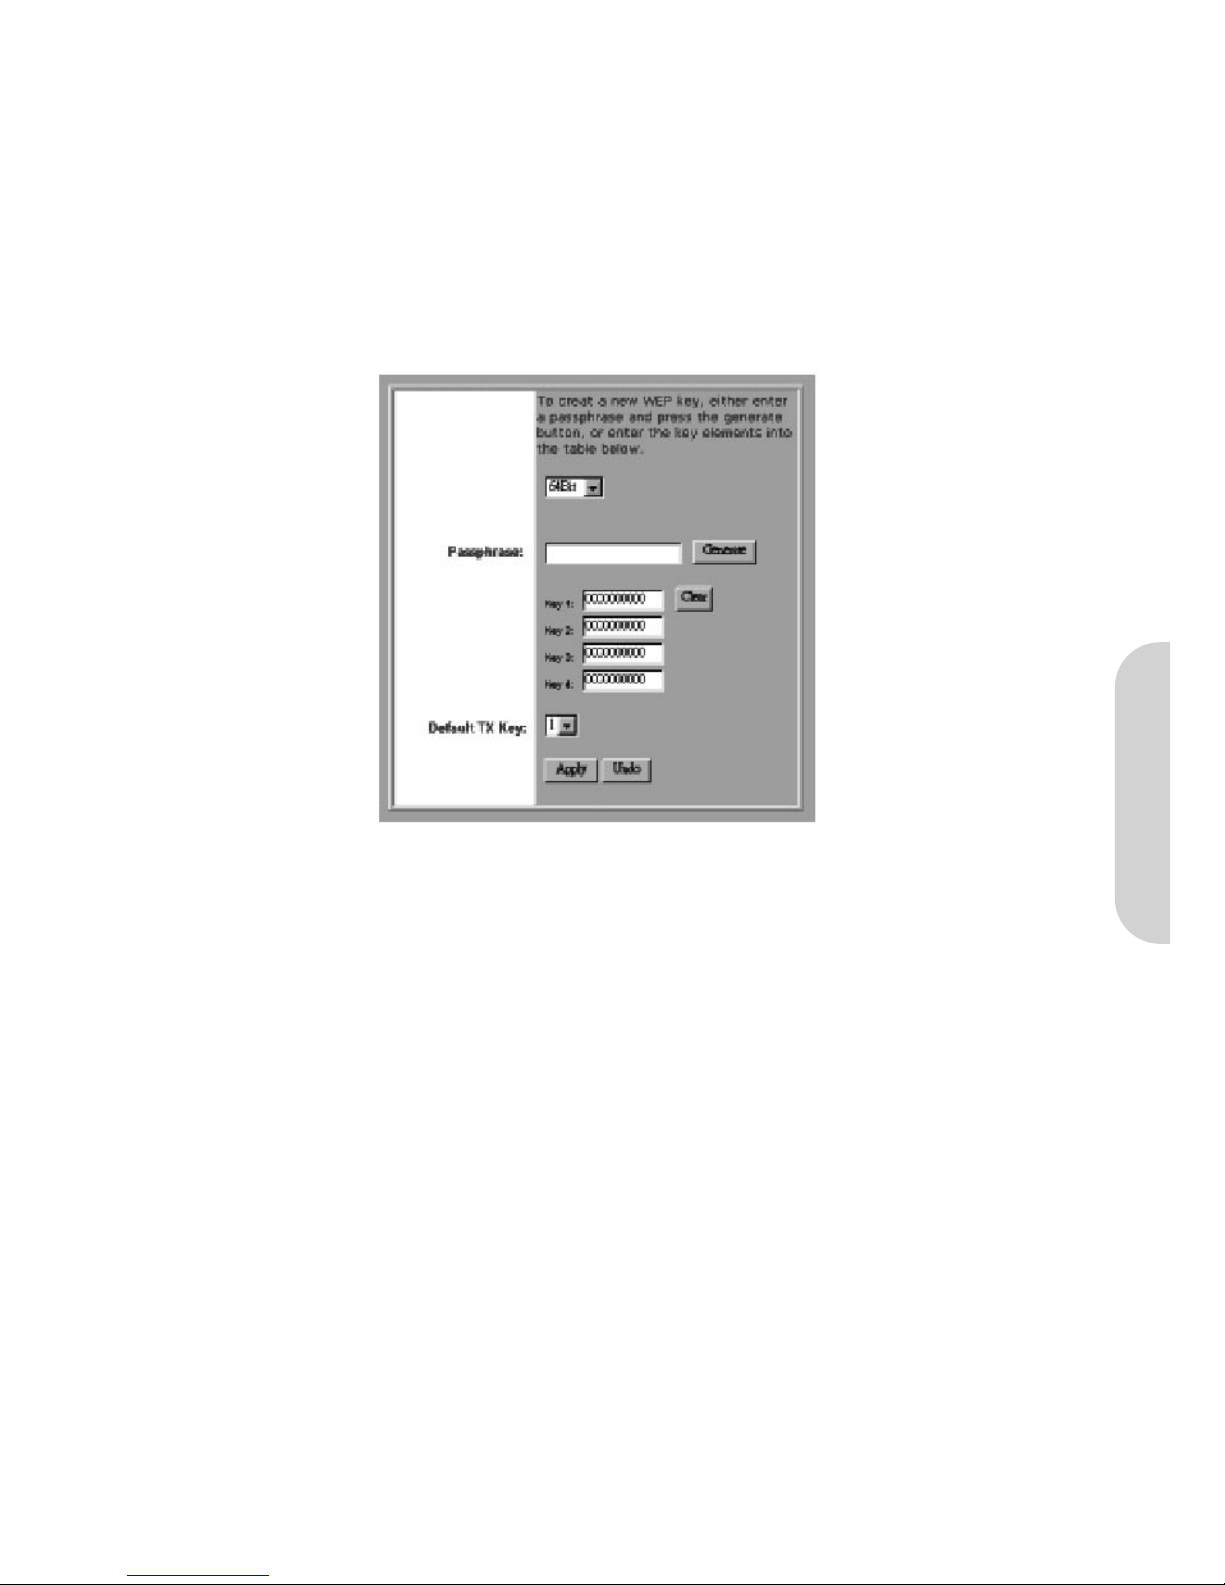
• WEP Key Setting: If WEP is set to mandatory, click the button of “WEP Key Setting” to go to the next setting screen. Select either “64Bit” or “128Bit”
encryption algorithm from the drop-down list. There are two ways to generate WEP key:
Passphrase: Enter an alphanumeric text string in this column then click the “Generate” button. Four 64-bit encryption keys or one 128-bit encryption key will be
created automatically.
You can enter the WEP key manually.
You may need to enter the WEP key manually to join the existing wireless network. If you are not sure which way to use, check with your network administrator.
Figure 7. Wireless Encryption
Default TX Key If using WEP64, then select one of the four encryption keys you are going to use in the wireless network. Ensure that all the points in a same
wireless network have the same encryption key.
Click “Apply” after making any changes.
• VC Setting: Enter the VPI and VCI values provided by your ISP.
• WAN Connection Type: WAN Connection type is the way the router works with DSLAM equipped in your ISP side. This ADSL Wireless router supports seven
connection types listed as below. Different countries, and different operators use different types of connection type. It is important to select the correct type for your
network provider. If you are unsure about which WAN Connection Type, please consult your provider.
- Gateway using PPPoE
- Gateway using PPPoA
- Gateway using LLC Encaps. (Dynamic IP)
- Gateway using LLC Encaps. (Static IP)
- Gateway using Classical IP
- Router using Classical IP
ENGLISH
6
Page 9
7
3-1 Gateway using PPPoE
Figure 8. Gateway using PPPoE
• User Name: Enter your ISP Username.
• Password: Enter your ISP Password.
• Connect-on-demand: Only enable this option if your ISP charges by the megabyte or by minutes (seconds) of line useage. Enabling this option will cause the
router to connect to the ADSL line when there is a packet waiting to be transmitted. Set the Max Idle Time with the length of time the router will remain in an
idle state before reconnecting to collect incoming data.
• Keep Alive: This function keeps your PPPoE connection always active even when there is no data to transmit. However, in some situations, the PPPoE session
cannot be built immediately after disconnection because the system on the ISP site may need a little time to restore. You may need to check with your ISP to find
out how much time is required before the router can start to re-build the PPPoE session and then fill this in the “Redial Period”.
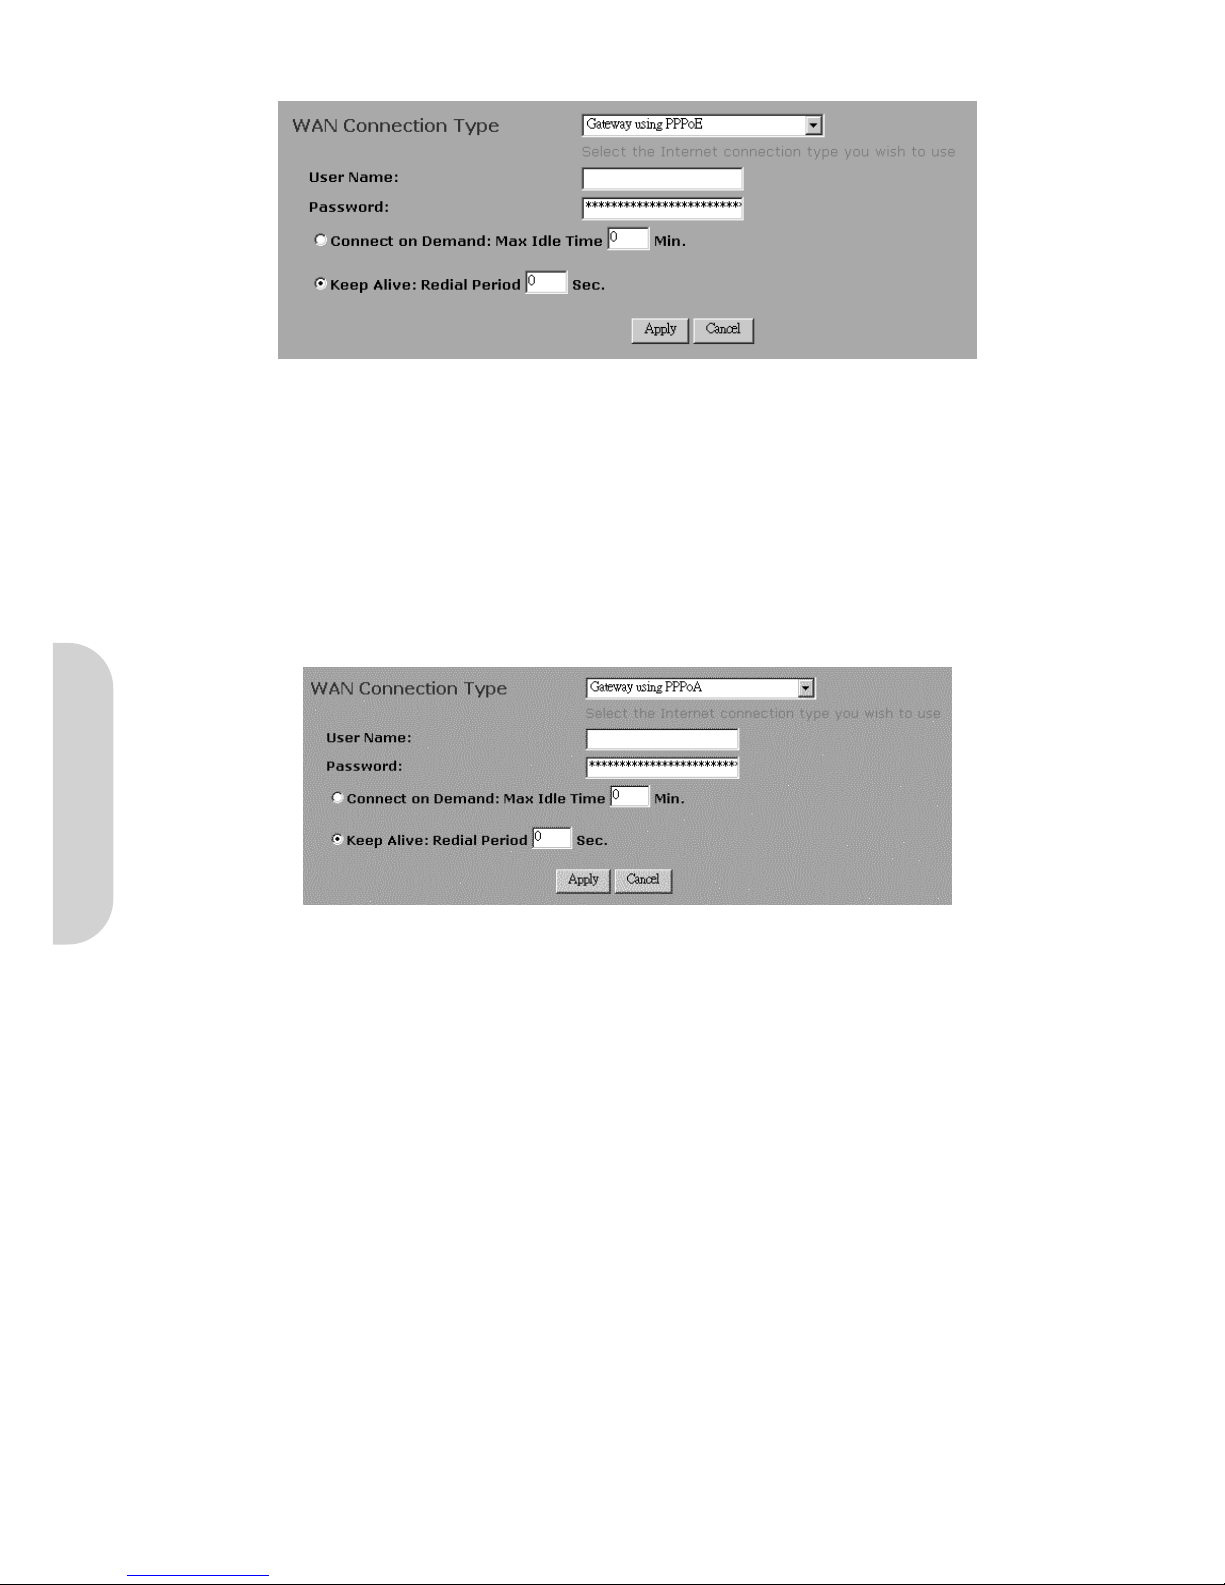
3-2 Gateway using PPPoA
Figure 9. Gateway using PPPoA
• User Name: Enter your ISP Username.
• Password: Enter your ISP Password.
• Connect-on-demand: Only enable this option if your ISP charges by the megabyte or by minutes (seconds) of line useage. Enabling this option will cause the
router to connect to the ADSL line when there is a packet waiting to be transmitted. Set the Max Idle Time with the length of time the router will remain in an
idle state before reconnecting to collect incoming data.
• Keep Alive: This function keeps your PPPoA connection always on even if it sits idle. However, in some situations, the PPPoA session cannot be built immediately
after disconnection because the system on the ISP site may need a little time to restore. You may need to check with your ISP to find out how much time is
required before the router can start to re-build the PPPoE session and then fill this in the “Redial Period”.
3-3 Modem using LLC Encaps
Gateway, Router and Modem are the different working modes of the router. It is highly recommended that you use the Gateway mode, which is NAT enabled. It not only
allows LAN users to share a single IP Address, but also protects your LAN network from outside intruders. If the router is set to the Router mode or the Modem mode, all
the PCs in the LAN will have to be assigned fixed IP Addresses. The Router mode allows users to specify which routing path data packets should take. If setting to the
Modem mode, the Public IP Address setting is not necessary.
LLC Encaps, Classical IP, PPPoE, and PPPoA are different connection modes that are different protocols for making the initial session between your router and the ISP’s
equipment. Your ISP may provide the information regarding the connection mode you should set. If you don’t know which one to choose, you should contact your ISP to
get this information.
3-4 Gateway using LLC Encaps. (Dynamic IP)
This connection type is the default setting of this router. Leave this setting on the column according to the following conditions:
1. You want to employ NAT. NAT allows you to use single IP address as the external one to share internet access from all of your PCs, as well as protect them from
outside intruders.
2. Your ISP uses LLC Encapsulation and uses DHCP to assign an IP address when you connect to your ISP LLC encapsulation allows multiplexing of multiple protocols over a
single ATM virtual connection (VC). You can find more information on RFC 2684.
ENGLISH
Page 10

3-5 Gateway using LLC Encaps. (Static IP)
Figure 10. Gateway using LLC Encaps. (Static IP)
Choose this setting according to the following conditions:
1. You want to employ NAT. NAT allows you to use single IP address as the external one to share internet access for all of your PCs, as well as protect them from outside
intruders.
2. Your ISP uses LLC Encapsulation and provides you with one or more IP addresses when you apply for the service. You can find more information on RFC 2684.
Specify WAN IP Address: Enter one IP address provided by your ISP.
Subnet Mask: Enter the subnet mask values provided by your ISP.
Default Gateway IP Address: Your ISP will provide you with the Default Gateway IP Address.
Domain Name Server (DNS): Your ISP will provide you with at least one DNS IP Address. Multiple DNS IP settings are common. The first available DNS entry is
used in most cases.
3-6 Gateway using Classical IP
Figure 11. Gateway using Classical IP
Choose this setting according to the following conditions:
1. You want to employ NAT. NAT allows you to use a single IP address as the external one to share internet access for all of your PCs, as well as protect them from outside
intruders.
2. Your ISP uses Classical IP connection type (use LLC encapsulation and routing protocol) and provides you with one or more IP addresses when you apply for the
service. You can find more information on RFC 2684.
Specify WAN IP Address: Enter the IP address provided by your ISP.
Subnet Mask: Enter the subnet mask values provided by your ISP.
Default Gateway IP Address: Your ISP will provide you with the Default Gateway IP Address.
Domain Name Server (DNS): Your ISP will provide you with at least one DNS IP Address. Multiple DNS IP settings are common. The first available DNS entry is
used in most cases.
3-7 Router using Classical IP
Figure 12. Router using Classical IP
Choose this setting according to the following conditions:
1. You want this device acting as a router without NAT function.
2. Your ISP uses Classical IP connection type (use LLC encapsulation and routing protocol) and provides you with one or more IP addresses when you apply for the
service. You can find more information on RFC 2684.
ENGLISH
8
Page 11

9
Specify WAN IP Address: Enter the IP address provided by your ISP.
Subnet Mask: Enter the subnet mask values provided by your ISP.
Default Gateway IP Address: Your ISP will provide you with the Default Gateway IP Address.
Domain Name Server (DNS): Your ISP will provide you with at least one DNS IP Address. Multiple DNS IP settings are common. The first available DNS entry is used in
most cases.
Note! You have to set a public IP address for each of your LAN PCs if you select this connection type
3-8 Modem using LLC encaps
Figure 13. Modem using LLC Encaps
Choose this setting according to the following conditions:
1. You want this device acting as an ADSL modem.
2. Your ISP used LLC encapsulation.
Your ISP may use DHCP to provide an IP address or to provide you with one or more IP addresses, as well as asking you to use PPPoA or PPPoE connection modes when
you apply for the service. However, as you have chosen to make this device act as an modem, you have to know how to configure your PCs.
When you have properly configured the Setup page, click “Apply”. You can now test to see if the settings are all correct by successfully connecting to the Internet.
4.0 Advanced Configuration
Most users will not need to change any advanced configuration on this router. This section is intended for users who are familiar with both wireless and routers.
4-1 Firewall
This allows users to configure the Stateful Packet Inspection Firewall to protect the user from external hackers.
From the One Page Setup screen select Firewall Settings from the left hand side.
Figure 14. Firewall
• Advanced Firewall Protection: Enable/Disable: This enables/disables the firewall, and gives protection from ‘Denial of Service’ attackes whilst also enabling
the Stateful Packet Inspection Firewalll.
• Web Filter: Enabling or Disabling the following allows users to perform filtering on various incoming packet types.
Press “Apply” after making any changes.
ENGLISH
Page 12

4-2 Virtual Private Network (VPN) Settings
A Virtual Private Network (VPN) allows users to use the internet to make the equivalent of a direct connection (private network) between two offices. Private networks
should be extremely secure, therefore when using the internet to make a VPN, data encryption must be used to ensure a high level of data security.
Figure 15. VPN Settings
• Select Tunnel Entry: The router allows the user to set up multiple VPN configurations. Each configuration is called a Tunnel. Select any Tunnel from the drop-down
box.
• Check “Enable” to activate the tunnel.
• Tunnel Name: Once the Tunnel is enabled, enter a name of the Tunnel in the “Tunnel Name” field. This allows you to differentiate a new Tunnel from any others you
have created and gives a meaningful name to the Tunnel Entry Number.
Note! The Tunnel name set here does not always have to match the name used at the other end of the Tunnel. However, certain VPN applications require a Tunnel to
have the same name at both ends of the Tunnel. If the other end point with which you want to establish the Tunnel does not use this router, it is important
that you give the other side precise set up instructions and ensure that these are followed.
• Local Secure Group and Remote Secure Group You can choose one of five options:
- Subnet
- IP Address
- IP Range
- Host
- Any
1. Subnet: Select this item to allow all the PCs on the LAN side access to the Tunnel.
Figure 16. Subnet Settings
Refer to the above figure as an example. All Local Secure Group computers with IP Addresses 192.168.1.xxx will be able to access the Tunnel. All Remote Secure
Group computers with IP Addresses 192.168.2.xxx will be able to access the Tunnel. When the Subnet setting is selected, the default values of 0 should remain in the
IP and Mask fields.
ENGLISH
10
Page 13

11
2. IP Address: Selecting this item allows only the specific PC with the IP address you enter in the IP field to the Tunnel.
Figure 17. Restricting IP Access
Refer to the above figure as an example. Only the PC with IP Address 192.168.1.101 will have the access from the local side of Tunnel. Similarly, only the PC with IP
Address 192.168.2.51 can access the Tunnel from the other end.
3. IP Range: Selecting this item allows a specific group of PCs access to theTunnel.
Figure 18. Multiple IP Access
Refer to the above figure as an example. Only the PCs with the IP addresses between 192.168.1.2 and 192.168.1.200 can access the local side of the Tunnel.
Similarly, PCs with IP Address between 192.168.2.2 and 192.168.2.100 can access the Tunnel from the other end.
4. Host: If you select “Host”, the value set here should be the same as the Remote Security Gateway setting.
5. Any: When this option is selected, the router accepts remote requests from any IP address, such as mobile users or telecommunications device using dynamic IP
address. Note that the router cannot initial VPN connection when “Any” is selected as Remote Security Group,
• Remote Security Gateway: Defines the end point of VPN Tunnel at the other side of the internet. The remote VPN Tunnel end point can be either a:
- VPN Router,
- VPN Server,
- Host with VPN software.
For example, if the VPN device at the other end of the Tunnel is a VPN router, enter the WAN IP Address of that VPN router in this section. For more detail, refer to the
description of “Example - establish the VPN connection” on the next few pages.
IP Address: Use IP Address to identify the remote VPN Tunnel end point.
FQDN: Use domain name to identify the remote VPN Tunnel end point.
Any: Accepts remote requests from any IP address. Note that the router cannot initial VPN connection when “Any” is selected.
• Encryption: This gives the VPN connection added security. There are two different types of encryption: “DES” or “3DES”. Both ends of the Tunnel must use the
same encryption type. You may also choose to disable encryption by selecting “Disable”.
• Authentication: This item adds another level of security. There are two types of authentication: “MD5” and “SHA”. Both ends of the Tunnel must use the same
authentication type. You may also choose to disable authentication by selecting “Disable”.
• Key Management: For encryption to work, both ends of the Tunnel need to know the encryption key. By using the Key Management drop down list, you can
choose two of two methods to set the Encryption Key: “key”: Auto (IKE) or Manual. Both ends of the Tunnel must use the key management.
Figure 19. Key Management
With Auto (IKE), users must enter a series of characters in the “Pre-shared Key” field. In the example shown in the figure above, the word Test has been used.
The program will automatically generate the correct codes to be used in the encryption and authentication based on the word you entered. You may use any
combination of up to 23 alphanumeric characters in this field. No special characters or spaces are allowed.
ENGLISH
Page 14

By entering the number of seconds in the Key Lifetime field, you may optionally select to have the key expire at the end of the time you specify.
Leave this field blank for the key to last indefinitely.
Figure 20. Key Timing
Manual Keying: This allows you to manually enter the keys to be used for encryption and authentication. Enter the Keys (code) you wish to use for encryption and
authentication separately in the “Encryption KEY” and “Authentication KEY” fields. Up to 23 alphanumeric characters are allowed in each field. Be aware that
both ends of the VPN Tunnel should use the same key management method in addition to same encryption and authentication keys.
The “Inbound SPI” value set here must match the Outbound SPI value at the other end of the VPN Tunnel. Conversely, the “Outbound SPI” must match the Inbound
SPI value at the other end. Only numeric characters can be used in both these fields.
• Status: After finalizing the settings at both ends of the VPN Tunnel, click the “Connect” button to initiate the VPN Tunnel. Once a connection is established, the word
“Connected” should appear under “Status” if the connection is successful. Should the word “Disconnected” appear, it is an indication that a problem exists, preventing
the successful creation of the Tunnel. In this case, you should firstly ensure that your wiring is securely connected. Next, double-check that correct values have been
entered in the VPN configuration screen. Lastly, ensure that the settings at the other end of the Tunnel are correct.
• Advanced Setting: To establish a VPN Tunnel with another provider’s VPN solution, configuration of the advanced setting is sometimes necessary. Click the
“Advanced Setting” button and the screen shown below will appear.
Figure 21. Advanced Settings for Selected IPSec Tunnel
Operation mode: There are two options in this mode: Main and Aggressive. Main mode is the default and is the more secure method. Aggressive mode is used when
the devices at the remote end of the VPN Tunnel can only use Aggressive mode. Mostly, it is used with dynamic IP addresses. Whenever the Main or Aggressive modes
are selected, the router will accept both modes initialled by the remote VPN devices.
Encryption: Select either DES or 3DES from the drop down list. 3DES is default as it is the more secure option.
Authentication: Select either MD5 or SHA is from the drop down list. SHA default as it is the more secure option.
Group: Two Diffie-Hellman Groups can be selected from the drop down list: 768-bit and 1024-bit. Diffie-Hellman is a technique that uses public and private key for
encryption and decryption.
ENGLISH
12
Page 15

13
Key Lifetime: You may optionally select to have the key expire after a period of time that you specify. Enter the number of seconds you’d like the key to be available
or leave the field blank for the key to last indefinitely.
NetBIOS Broadcast: Check the box to allow NetBIOS traffic pass through the VPN Tunnel.
Anti-replay: Check the box to enable this function. This item will keep track of sequence numbers as data packets arrive and ensure security at the IP packet level.
Keep-Alive: Check the box to re-establish the VPN Tunnel connection whenever it is dropped. After the Tunnel has been created, this function will keep the connection
alive for a period of time.
Unauthorized IP Blocking: Checking the box allows you to block unauthorized IP addresses for a specified period of time after a specific number of IKE failures.
Enter the time period and failure level in the fields indicated.
Example - Establish the VPN connection
Figure 22. Creating a Tunnel between two VPN routers
Figure 23. Creating a Tunnel between a VPN router and a VPN client with a fixed IP Address
ENGLISH
Page 16

Figure 24. Creating a Tunnel between a VPN router and a VPN client with a dynamic IP address
Once you are satisfied that your settings are correct, click the “Apply” button. Click the “Cancel” button to exit the screen without saving any changes.
4-3 DHCP Configuration
A DHCP (Dynamic Host Configuration Protocol) Server can automatically assign IP Addresses to each computer in your network. Unless you already have one in your LAN,
it is highly recommended that you set your router to act as a DHCP server.
Figure 25. DHCP Settings
• Dynamic IP Address: Select “Enable” to use the DHCP server internal to the router. If you already have a DHCP server in your network, set the router's DHCP
option to “Disable”.
• Starting IP Address: Enter a numerical value, from 2 to 254, for the DHCP server to start at when assigning IP Addresses.
• Number of Users: Enter the maximum number of PCs that you want the DHCP server to assign IP Addresses to, with the absolute maximum being 253.
• Client Lease Time: Enter the amount of time that DHCP clients (the PCs on LAN side) can use the IP Addresses assigned by the router’s DHCP server. Before the
time is up, DHCP clients have to request to renew the DHCP information.
• DNS: The IP Address of the Domain Name Server, which is currently used. Multiple DNS IP settings are common. The first DNS entry will be used in most cases.
• DHCP Clients Table: Click the DHCP Clients Table button to show current DHCP client information.
Click the “Apply” button after making any changes, or click the “Cancel” button to exit the screen without saving any changes.
ENGLISH
14
Page 17

15
4-4 Web Control
This feature allows you to restrict LAN users access to specific web sites. To block a site, you can enter either a complete URL (internet address) or keywords included in
the URL.
Figure 26. Web Control
• Control Web Access: Check “Enable” or “Disable” to make this function active or inactive.
• Control Type: Check “Allow” to allow users on the network to access specific websites listed on the location only. In contrast, to restrict users on the network to
access the websites listed on the location, check “Block”in this item.
• Website or Key Words: Enter either a complete URL (internet address) or keywords included in the URL.
• Exception IP Address: Enter the IP Address of any LAN PCs that will not be restricted by this rule.
Click the “Apply” button after making any changes, or click the “Cancel” button to exit the screen without saving any changes.
4-5 Time of Day (ToD) Control
This feature allows you to limit connection availability according to a nominated time of day schedule.
Figure 27. Time of Day (ToD) Control
• Control Type: Select the control type from the drop down list and make this function active.
-“Block Outbound” to restrict the connection from your LAN.
-“Block Inbound” to restrict any external connections from the internet to your LAN.
-“Block Both” to restrict both incoming and outgoing connections.
-“Disable” to turn off this function.
• Define Schedule: Set a period of time with beginning and end from the drop down list.
Click the “Apply” button after making any changes, or click the “Cancel” button to exit the screen without saving any changes.
ENGLISH
Page 18

4-6 Access Control
The Access Control feature allows administrators to set up to 10 access policies to block or allow certain users from accessing the Internet or specific applications. Before
using this function, the network PCs which you want to control the access limitation should be assigned fixed IP Addresses.
Figure 28. Access Control
• Packet Filter: Select the number of policy rules you want to configure. Up to 10 policies can be set. Note that these rules are performed in sequence, Rule 1 has
higher priority than Rule 2 etc.
• Status: Select “Allow” to limit users/computers access to specific applications you set on this rule. Select “Deny” to restrict the users/computers access to
specific applications you set on this rule.
• Name: For each rule, you can enter up to 15 characters to identify it.
• Direction: Choose the initial network data traffic direction you wish to block.
-“LAN” to block/allow LAN side users/PCs set in the following “MAC” and “Source IP” fields to access certain applications on the internet.
-“WAN ” to block/allow WAN side users/PCs set in the following “MAC” and “Source IP” fields to access certain PCs on the LAN side.
• MAC: Define the MAC addresses of PCs that are defined in this policy.
• IP Address: Define the IP address or range of IP addresses of the PCs that are defined in this policy.
Note! That if you set both the “MAC” and the “Source IP” in one rule, the PCs which have the MAC addresses matching in “MAC” field and their IP addresses
matching in the “Source IP” field will be allowed/blocked for certain applications.
• Protocol: Select the protocol type as “TCP” or “UDP” from the drop down list. If you are not sure which one to choose, select “Both”.
• Port Number: Enter the range of port numbers that are used by the applications you wish to be blocked. For example, port 80 is usually used as the destination
port number when you access a web page. Note that if you don’t enter any value in the “MAC” and “Source IP” column but enter the port number, for example
“80”, in “Destination Port”, it means all the users/PCs will be allowed/denied access to certain applications related to this port, for example “web browsing”.
• Summary: Click this button to display a summary page showing all the current rules you have set.
Here is a sample of Access Control Setting. There is a PC you wish to block in your LAN side with a MAC address like 00-01-36-02-B1-4F, and an IP Address
192.168.1.101. Enter the PC’s MAC address in the “MAC” field or the IP address included in the “Source IP” range that covers this PC’s IP address.
Enter the range of 20~80 in the “Destination Port” column, then click the “Apply” button. As a result, this PC with MAC address 00-01-36-02-B1-4F and IP
Address 192.168.1.101 will not be able to use the applications which use port numbers from 20 to 80, such as FTP, Telnet and web browsing.
Click the “Apply” button after making any changes, or click the “Cancel” button to exit the screen without saving any changes.
ENGLISH
16
Page 19

17
4-7 Virtual Server Settings
The Virtual Server Settings application allows up to a maximum of ten public services that can be accessed by external users over the internet. Service can be applications
such as a Web, Email, FTP etc.. Each service is provided by a dedicated network computer (server) configured with a fixed IP Address. Although the internal service addresses are not directly accessible to the external user, the router is capable of identifying the service requested by the service port number. With this information the router redirects the request to the appropriate internal IP Address. To use this application, it is recommended you use a fixed Public IP Address from your ISP. Note that the router supports only one server of any particular type.
This router also supports UPnP Forwarding. You can use either Virtual Server Settings or UPnP Forwarding by clicking the button to change setting page. Do not set the
same function server to different IP Address in different setting pages.
Figure 29. Virtual Server Settings
• Set up individual network computers on the LAN to act as servers and configure each with a fixed IP Address.
• Ensure that the “Private IP Address” of the router is set to the default value of 192.168.1.1.
• Ports: Enter the desired service port numbers in the “Ports” fields. You can specify the protocol type as “TCP” or “UDP” from the drop-down list. If you are not
sure which one to select, choose “Both”. A selection of well-known service port numbers is provided on this screen.
• Redirect IP Address: Enter the appropriate IP Addresses of the service computers in the “Redirect IP Address” locations.
• Passive FTP Virtual Server: When there is firewall filtering in your network, the internet user may not be able to access the FTP server you set in the LAN
side. Setting FTP server at passive mode will be necessary.
- Enable/Disable Click to enable/disable passive FTP function.
- FTP Port Enter the port number (> 1024) that the FTP server will use as data connection port number. The client side should select passive mode and use the
same port number entered here.
- Redirect IP Address. Enter the appropriate IP Addresses of the service computers.
Example: If the service port number 80~80 (representing an HTTP web address) is entered in “Ports” and 192.168.1.100 is entered in “Redirect IP
Address”, then all HTTP requests from external Internet users will be directed to the PC/server with the 192.168.1.100 fixed IP Address. Here is a list of the protocol
and port ranges that are used by some common applications.
Figure 30. Protocol and Port Ranges
ENGLISH
Page 20

UPnP Forwarding
UPnP (Universal Plug and Play) is a standard introduced from Microsoft and UPnP Forum for interoperability. Currently, this function supported by this device allows you to
set virtual server from a Windows OS that supports UPnP, such as Windows XP.
Figure 31. UPnP
• UPnP Function: Check “Enable” will allow LAN side PCs that support UPnP to set virtual server.
• Before enabling the UPnP Forwarding, ensure that the server computers have been configured with fixed IP Addresses.
• Ensure that the “Private IP Address” of the router is set to the default value of 192.168.1.1.
• Application Name: UPnP has ten pre-set forwarding rules, which are for well-known applications. In addition, users can add their own rules.
• Ext. Port: Most applications usually use their individual port number for incoming and outgoing data packets. However, some applications may use
different port numbers for incoming and outgoing data packets. In this case, you have to enter the port number used by the incoming data packets.
• Protocol: Specify the protocol type as “TCP” or “UDP” which is used by specific service.
• Int. Ports: Most applications usually use their individual port number for incoming and outgoing data packets. However, some applications may use
different port numbers for incoming and outgoing data packets. In this case, you have to enter the port number used by the outgoing data packets.
• Enable: Check to make this forwarding setting active.
• IP Address: Enter the appropriate IP Addresses of the service computers in the “Redirect IP Address” locations.
Example: If the service port number 80~80 (representing an HTTP web address) is entered in “Ports” and 192.168.1.100 is entered in “Redirect IP
Address”, then all HTTP requests from external internet users will be directed to the PC/server with the 192.168.1.100 fixed IP Address.
Click the “Apply” button after making any changes, or click the “Cancel” button to exit the screen without saving any changes.
ENGLISH
18
Page 21

19
4-8 Special Applications
Some applications use multiple TCP/UDP ports to transmit data. With NAT enabled, these applications cannot work with the router. Port Triggering allows some of these
applications to work properly. Note that only one PC can use each Port Triggering setting at any time.
Figure 32. Special Applications
• Application name: Enter the name of the application you wish to configure.
• Outgoing Port Range: Enter the port number or range numbers this application uses when it sends outbound packets. The Outgoing Control Port Numbers act as
the trigger. When the router detects the outgoing packets with these port numbers, it will allow the inbound packets with the Incoming Port Numbers that you set in
the next column to pass through the router.
• Incoming Control: Enter the port number or range numbers the inbound packets carry.
Click the “Apply” button after making any changes, or click the “Cancel” button to exit the screen without saving any changes.
The following is a list of port numbers used on some popular applications:
Figure 33. Popular Application Port Numbers
4-9 DMZ Host
The DMZ Host application allows unrestricted 2-way communication between a single LAN PC and other internet users or servers. This application is useful for supporting
special-purpose services such as video-conferencing and gaming, that require proprietary client software and/or 2-way user communication.
To use this application, you must first obtain a fixed Public IP Address from your ISP.
Note that in order to provide unrestricted access, the Firewall provided by the router to protect this port is disabled, thus creating a potentially serious security risk.
It is recommended that this application is disabled when it is not in use by entering “0” in the “DMZ Host” field.
The Multi DMZ allows you to map the public IP addresses to your LAN PCs, should you get more than one public IP address from your ISP. This function is useful to set up
your servers, such as an FTP server, web server, and so on, with public IP addresses, but still keep them within your LAN group.
With the public IP addresses, Internet users will access your servers more easily and those servers can still communicate with other PCs in you LAN by using Network
Neighbourhood.
ENGLISH
Page 22

Figure 34. DMZ Host
DMZ Host
1. Before setting up a LAN PC to act as a DMZ Host, you should configure it using a fixed IP Address.
2. Ensure that the “Private IP Address” of the router is set to the default value of 192.168.1.1.
3. Click the “DMZ Host” option in the Advanced Menu and enter the fixed IP Address of the Exposed Host PC in the “DMZ Host” IP Address location. Entering “0”
will disable this application.
Multi DMZ
1. Enter the valid public IP address in “WAN IP” column. Next, enter the private IP address of the PC that you wish to map to in the “LAN IP” field. Up to five
public IP addresses can be entered.
2. Click the “Apply” button after making any changes, or click the “Cancel” button to exit the screen without saving any changes.
4-10 Dynamic Routing
The Dynamic Routing feature allows the router to exchange routing information with other routers in the network.
Figure 35. Dynamic Routing
• TX From the drop-down list, select one of the routing types:
-“RIP-1” is the protocol used by older routers
-“RIP-1 Compatible”, supports broadcast RIP-1 and multicast RIP-2
-“RIP-2” is the protocol used by newer routers
- Disabled
• RX From the drop-down list, select one of the routing types:
-“RIP-1”
-“RIP-2”
- Disabled
Click the “Apply” button after making any changes, or click the “Cancel” button to exit the screen without saving any changes.
ENGLISH
20
Page 23

21
4-11 Static Routing
Only users with an excellent understanding of router protocols should attempt to change settings in this area.
The Static Routing feature allows PCs that are connected to the LAN side of the router, to communicate with other PCs that are connected to another router. The router
supports up to 20 route table entries.
Figure 36. Static Routing Example
In the above diagram, PC2 in LAN#2 is connected to the router via another router while PC1 in LAN#1 is connected to the router directly. Without configuring the Static
Routing function, the two PCs would not be able to communicate with each other.
Figure 37. Static Routing Setting
• Select Route entry: Select the route entry number from 1 to 20 that you wish to configure.
• Destination LAN IP and Subnet Mask: Enter the IP Address and Subnet Mask of the destination LAN that the immediate LAN is to communicate with. Taking
the above diagram as an example, enter 192.168.2.0 in the “Destination LAN IP” field and 255.255.255.0 in the “Subnet Mask” field.
• Default Gateway: Enter the IP Address of the router that forwards data packets to the destination LAN. For the above example, enter 192.168.1.2 in the
“Default Gateway” field.
• Hop Count: Enter the number of hops required between the LANs to be connected. The Hop Count represents the “cost” of the routing transmission. The default
value is 1.
• Interface: Choose LAN if the Destination LAN is on your router’s LAN side and choose WA N if the Destination LAN is on the router’s WAN side.
Referring back to the above diagram, with the proper settings, PC1 would be able to access LAN 1, LAN 2 and the internet while PC2 can only access LAN 2, LAN1.
Click the “Apply” button after making any changes, or click the “Cancel” button to exit the screen without saving any changes.
ENGLISH
Page 24

4-12 Wireless
This setting page allows you to configure advanced wireless functions. Users wishing to change these values from the defaults should have a thorough understanding of
wireless technology.
Figure 38. Wireless Settings
• Wireless Station Status: The “Active MAC Table” shows the MAC addresses of wireless clients, which have the same SSID and WEP key with router. When
the “MAC Filter” function is disabled, the background color is gray.
Click the “Active MAC Table” button to display all the MAC addresses of wireless nodes on your WLAN.
Figure 39. Wireless Active MAC Table
The background colour indicates the following:
Green MAC Address Filter Enabled
Yellow MAC Address have been blocked (see MAC Filter Table)
Red MAC Address Filter Disabled
• Wireless Station MAC Filter: This function allows you to restrict wireless users access to the internet.
Click “Edit MAC Filter Setting” button to open the edit table.
Figure 40. Wireless MAC Entry Tqable
Wireless MAC Entry: There are 32 sets divided into four groups in this function. You can choose each group by selecting from the pop-down list. Enter the MAC
addresses of the computers you wish to block in the columns and click the Filter field beside the MAC address. That user will then be blocked to link to WLAN and
internet. If the “Filter” field isn’t checked, that MAC address won’t be blocked. The MAC address entered here should be 12 continuous alphanumeric digits without
“-“ in between. Click “Apply” to save these changes.
ENGLISH
22
Page 25

23
• Beacon Interval: This is the signal sent periodically by the wireless access point to provide synchronization among the stations in the wireless LAN.
• RTS Threshold: RTS packet is used to account for potential hidden stations. This feature allows you to set the size of the RTS packet.
• Fragmentation Threshold: If the length of data frame needing transmission exceeds the fragmentation threshold you set in the column, the data frame will
be fragmented. If there is significant interference or high utilization in your wireless network, the smaller fragmentation value can increase the reliability
transmission. However, it is more efficient to set the large fragment size.
• DTIM Interval: DTIM is the acronym of delivery traffic indication message. It determines how often the MAC Layer forwards multicast traffic.
• Basic rate: Leave “Mixed” as default setting to be compatible with different wireless standards or select other rates you wish to use to connect with specific
wireless standard devices.
• Transmission Rates: Leave “Default” setting or select another speed that you wish to use.
• Preamble Type: Leave "Dynamic" as default setting or select another type to be compatible with any special setting your client devices use.
• Authentication Type: Select either Open System or Share Key as authentication type. If you are not sure, select both.
Click Apply after making any changes.
4-13 DDNS
“DDNS” is an acronym for Dynamic Domain Name Service. Whenever you set up the web servers, mail servers, or sometimes ftp servers, you need “Domain Name” to
help internet users reach your servers easily.
The internet actually runs on IP Addresses which are in numerical order, for example “66.37.215.53”. These IP Addresses identify the location of each device connected to
the internet. However, the human brain does not easily remember this numbering system, so a system that allocates domain name such as “www.dyndns.org” provides an
easier method. If you type “66.37.215.53” or “www.dyndns.org” in the web browser’s address bar, the browser will show the same web page. This is because both methods
relate to the same web server. The “Domain Name Servers” used to manage the internet will translate “www.dyndns.org” into the IP Address “66.37.215.53” in order to
allow your browser to find the web server and display the correct web page in your browser. If your “WAN Connection Type”, as shown in One Page Setup section, is
“Obtain IP Address Automatically”, “PPPoE”, or “PPTP” with dynamic IP address assigned by ISP, it will cause an error when you set up the public computer servers in your
LAN side PCs. Internet users may not be able to reach your servers because your WAN side IP address may change each time you initiate the connection to your ISP. The
DDNS function will help to map your IP address to your domain name when your ISP assigns a new dynamic IP Address. Note that this DDNS function acts as the client
appliance of DDNS service and is only able to be used in conjunction with the service provided by DynDNS.org. Before you begin using this function, you will need to apply
to DynDNS.org to be able to use the service. Please visit www.dyndns.org for further information.
Figure 41. DDNS Settings
DDNS Service: Check the “Enable” option if you wish to activate this function.
Username: After you have applied for the DDNS service from DynDNS.org, you will be issued with a Username. Enter this username in the “Username” field.
Password: DynDNS.org, will also issue you with a password. Enter the detail in the “Password” field.
Host Name: DynDNS.org, will provide you with a Host Name. Enter this name in the “Host Name” field.
Your IP Address: This will display the IP Address currently assigned by your ISP.
Status: This displays the current status of the DDNS function. Click the “Apply” button after making any changes, or click the “Cancel” button to exit the screen with
out saving any changes.
ENGLISH
Page 26

Chapter 5.0: Management
5-1 Device Administration Settings
This feature allows the administrator to manage the router by setting certain parameters. For security reasons, it is strongly recommended that you set Passwords so that
only authorized persons are able to manage this router. If the Password is left blank, all users on your network can access this router simply by entering the unit’s IP
Address into their web browser’s location window.
Figure 42. Device Administration Settings
Administrator Password: Enter the password you want to use into the “Password Change” field and re-enter it into the “Password Confirm” field for
confirmation. Be sure that the password is less than 64 characters long and without any special characters or spaces.
SNMP Function: As with the Password, the SNMP community allows authorized persons to access this router through the SNMP Management tool. The router provides
three fields to enter these communities. The default words Public and Private are well-known communities that allow authorized persons who know the IP Address of
this router to access the read-only information about this router or have the authority to change the configuration. Also, the administrator can define any specific
community and configure its limits as Read-Only or Read-Write from the right side drop-down box.
WAN MAC Change: The WAN MAC address can be changed from the original values if necessary. Some ISPs require users to change the WAN MAC address to a
registered one when users change their access equipment.
External Admin: Check “Enable” to allow you to configure the router from the WAN side. To access the setting page from the external side, enter
“http://<WAN IP Address>:8080” into the web browser address bar and press the “Enter” key.
MTU: Check Enable if you want to set a maximum limitation for incoming and outgoing packet size. Enter the maximum packet size you wish to set in the “Size”
column.
Block WAN Request: To prevent a hacker intruding your network, check the Enable option to enable this function to reject all the unauthorized requests from
WAN side.
IPSec Pass Through: Check Enable to allow the IPSec packets to pass through the router if there is LAN PC using IPSec for data communication with another
internet device.
PPTP Pass Through: Check Enable to allow the PPTP packets to pass through the router if there is LAN PC using PPTP for data communication with another
internet device.
ENGLISH
24
Page 27

25
PPoE Pass Through: Check Enable to allow PPoE packets to pass through the router if there is a LAN PC using PPPoE for data communication with another
internet device.
Remote Upgrade: Check Enable if you want to allow the authorized remote users to upgrade firmware from WAN side.
Reset Device: Select “Yes ” if you want to clear a connection, reboot, and re-initialize the unit without affecting any of your configuration setting.
Factory Defaults: Select “Yes ” if you want to return all the router’s current settings to their factory defaults. Note that you should not restore the factory defaults
unless it is absolutely necessary.
Click the “Apply” button after making any changes, or click the “Cancel” button to exit the screen without saving any changes.
5-2 Status Monitor
This screen shows the router’s current status. All of the information provided is read-only.
Figure 43. Status Monitor
Firmware Version: This field shows the installed version of the firmware.
Login: This column shows the login information of PPPoE or PPTP. You can manually initiate the connection or make a disconnection by clicking the appropriate buttons.
Be aware that, if you make a disconnection here, “Connect-on- demand” will not function until the connection button is clicked. Note that “Login” won’t show any
information if you selected “Obtain IP automatically” or “Static IP” on the OnePage Setup page.
Device Status: This section shows the connection information of the router. The “Modem” status shows Up or Down to indicate that the router is connected or
disconnected to the ISP. “VPI” and “VCI” show the respective values entered on the One Page Setup. “Up Rate” and “Down Rate” show the current outgoing
and incoming transmission speeds. “DHCP server” shows whether this function is enabled or disabled.
Internet: This section shows the IP settings status of the router as seen by external users of the internet. The “Domain Name Server” (DNS) IP Address shows the
IP Address of the DNS currently being used. Multiple DNS IP settings are common. The first available DNS entry is used in most cases. “DHCP Leased Time” shows
the duration of time since the router was last dynamically assigned an IP Address from the ISP.
DHCP Release: Click this button to eliminate the IP address obtained from DHCP server.
DHCP Renew: Click this button to refresh the IP address from DHCP server. Note that the “DHCP Release” and “DHCP Renew” button only show up when you select
“Get IP Address Automatically” in the OnePage Setup.
Intranet: This section displays the current “Private IP Address” and “Subnet Mask” of the router, as seen by users of your internal network.
Last Minute Traffic: These fields show the sending “TX” and receiving “RX” traffic logs on both the WAN and LAN sides.
DHCP Clients Table: If the router is setup to act as a DHCP server, the LAN side IP Address distribution table will appear by clicking this button.
ENGLISH
Page 28

5-3 Log
The Log application provides the administrator with the ability to trace internet connection. With viewing the Log information, an administrator can send the record to
specific LAN PCs to have the real time monitor.
Figure 44. Log Settings
Access Log: Check the “Enable” option if you want to activate this function.
Send Log: Enter the IP address of the PC that you wish to use to view the Log information.
View Log: Click this button to view the log on-line.
Send Log via E-mail: The Firewall log can be sent via e-mail.
Denial of Service Thresholds: The threshold is used to determine whether the attempt of establishing connection is a DoS attack.
SMTP Mail Server: The domain name of the IP Address of your ISP’s outgoing e-mail server. You may find this information when you apply for e-mail service from
your ISP.
E-mail Alert to: Enter the e-mail address you wish to send to.
Return Address: Enter the e-mail address you wish to send to if the alert e-mail cannot be sent to the address above.
Log Schedule: Select from the drop down list when you wish the alert e-mail to be sent.
When Log is Full: The alert e-mail will be sent when log space is full. This is typically when there are about 30 entries.
Hourly: The alert e-mail will be sent each hour.
Daily: The alert e-mail will be sent each day at midnight.
Weekly: The alert e-mail will be sent each week.
Day of Sending Alert: When “Weekly” is selected as Log Schedule, you can select which day in a week to send the alert e-mail.
Click the “Apply” button after making any changes, or click the “Cancel” button to exit the screen without saving any changes.
ENGLISH
26
Page 29

27
5-4 Backup & Restore
This function allows you to save the router’s configuration as backup, or retrieve the configuration file you saved before turning the setting back.
Figure 45. Backup & Restore Configuration
Backup: Click the “Backup” button to save the current configuration as a backup file.
Restore: Enter the path of the configuration file you saved on the PC. You can choose “Browsing” to view the folders and select the file. Click “Restore” to
retrieve it.
5-5 Upgrade Firmware
This setting page allows you to upgrade to the latest version of firmware to keep your router up-to-date. Before you upgrade the firmware, you have to get the latest
firmware and save it on the PC you use to configure the router.
Figure 46. Upgrade Firmware Page
Select a file to upgrade: Enter the path of the latest firmware you saved on the PC. You can choose “Browsing” to view the folders and select the firmware.
Upgrade: After you enter or select the path, click “Upgrade” to proceed to the firmware upgrade process. Please note, do not power off the router during the
firmware upgrade.
5-6 Diagnostic-Ping/Tracert
This function allows you to test the connection between the router and LAN or between the router and internet.
Ping
Figure 47. Diagnostic Ping
ENGLISH
Page 30

Source IP: You can chose to issue the ping test from the LAN side by selecting the router’s private IP Address or from the WAN side by selecting the router’s WAN IP
Address.
Destination IP: Enter the IP Address of the destination device you want to ping. If the router’s LAN IP address is selected as Source IP, you can only ping a LAN side
device and vice versa.
Packet Number: Enter the packet numbers you wish to use to ping the destination device. The maximum numbers are four.
Packet Size: Enter packet size you wish to use to ping the destination device. The maximum packet size is 1514.
Time Between: Enter the amount of time between two packets.
Time out: Enter the amount of time to be viewed as no response after starting to ping the destination device.
Ping Result: The result will show the numbers of sending packet, numbers of packet receiving, and the average return time.
Tracert
Figure 48. Diagnostic Tracert
Tracert Host: Enter the IP Address of the destination device for which you wish to trace the route between and the router. Click the "Tracert" button to start this test.
Trace Message: The result shows the routing information between the router and the destination device.
Chapter 6.0: Macintosh Setup
This chapter provides information on using Macintosh computers in your network. The instructions given here are for system software version 8.0 or above, which come
with the TCP/IP Protocol preloaded and supports DHCP Addressing.
6-1 Hardware Connections
Connect your Macintosh computer to your router. If you have a newer computer, there will be a 10Base-T Ethernet port on the back. Older computers will need to have an
Ethernet card installed. See your Computer’s User’s Manual for instructions on Ethernet card installation.
6-2 Computer Network Configuration
It is assumed that your computer’s system software already has TCP/IP installed. You may manually configure your computer with a fixed IP Address or have an IP Address
dynamically assigned to it by the router’s DHCP server.
6-2.1 Dynamic IP Addressing using DHCP Server
1. From the “Apple” menu, select “Control Panel” and click on “TCP/IP”.
2. In the “TCP/IP (A New Name For Your Configuration)” window, select “Ethernet” in the “Connect via” location from the drop-down list.
3. In the “Setup” area:
- Select “Using DHCP Server” in the “Configure” location from the drop-down list.
- No other data needs to be entered.
- Close the window.
4. Click “Save” from the file menu, then “Quit” TCP/IP.
5. Restart the computer.
ENGLISH
28
Page 31

29
6-2.2 Manual Configuration of Fixed IP Addresses
1. From the “Apple” menu, select “Control Panel” and click on “TCP/IP”.
2. In the “TCP/IP (A New Name For Your Configuration)” window, select “Ethernet” in the “Connect via” location from the drop-down list.
3. In the “Setup” area:
- Select “Manually” in the “Configure” location from the drop-down list.
- In the “IP Address” location, enter the IP Address that you want to assign to the computer. (see the notes on Fixed IP Addresses 2-4 ).
- Enter “255.255.255.0” in the “Subnet Mask” location.
- Enter “192.168.1.1” (the router’s default IP Address) in the “Router Address” location.
- Enter the ISP’s IP Address in the “Name Server” location if your ISP has provided the information.
- Close the window.
4. Click “Save” from the file menu then “Quit” TCP/IP.
5. Restart the computer.
6-3 ADSL Wireless Router Configuration
To configure your router, use your Web Browser and follow the instructions given in Chapter 3.0: Internet Access, section 3.3. To configure advanced settings, see
Chapter 4.0: Advanced Configuration.
6-4 Adding router to Existing Network
If the router is to be added to an existing Macintosh computer network, the computers will have to be configured to connect to the internet via the router.
1. From the “Apple” menu, select “Control Panel” and click on “TCP/IP”.
2. From the “File” menu, select “Configurations” and select your existing network configuration. Click “Duplicate”.
3. Rename your existing configuration. Click “OK”, and “Make Active”.
4. In the Setup area:
- Select “Manually” in the “Configure” location from the drop-down list.
- In the “IP Address” location, enter the IP Address that you want to assign to the computer. (see the note on fixed IP Addresses 2-4).
- Enter “255.255.255.0” in the “Subnet Mask” location.
- Enter “192.168.1.1” (the router’s default IP Address) in the “Router Address”location.
- Enter the ISP’s IP Address in the “Name Server” location if your ISP has provided the information.
- Close the window.
5. Click “Confirm”. TCP/IP is now configured for manual IP Addressing.
6. Configure your router (see 5.3 above).
ENGLISH
Page 32

Chapter 7.0: Trouble Shooting
This chapter provides solutions to problems you may encounter during installation and operation of your router.
Hardware
T: The Power LED is off.
- Check the power cable is properly connected to the router, the power adapter and the socket.
T: The LAN Link LED is off.
- Check the computer, hub or switch is properly connected to the router.
- Check the computer’s Ethernet card is properly installed.
- Check the router and the computer are on the same network segment. If you are not sure, initiate the DHCP function (4-1) and set your computer to obtain an IP
address automatically (3-3).
- Check the computer is using an IP address in the range of 192.168.1.2 ~ 192.168.1.254 and is therefore compatible with the router’s default IP address of
192.168.1.1 (3-3). Check also the Subnet Mask is set to 255.255.255.0
T: The DIAG LED stays lit.
- The DIAG LED should light up when the device is first powered up to indicate it is checking for proper operation. After a few seconds, the LED should go off. If it
stays lit, the device is experiencing a problem. Please contact your dealer.
T: Why can’t I configure the router?
- First, check whether the router is properly installed or not, it include the LAN and WAN connections, and all devices’ power.
- Next, check the IP configuration of your PC:
For Windows 95,98 users: run Winipcfg.exe or Winipcfg from Run on the Start menu. If there is no IP address involved, click Release All and then click
Renew All to get IP address.
For Windows NT 4.0 users: run Ipconfig.exe or Ipconfig from Run on the Start menu. Ensure that your PC and the router are on the same network segment.
If you are not sure, initiate the DHCP function, let the PC get the IP address automatically.
Ensure that your PC is using an IP Address within the range 192.168.1.2 to 192.168.1.254 and thus compatible with the router default IP address of 192.168.1.1
Finally, use Ping command in MS-DOS mode to verify the network connection:
Ping 127.0.0.1 to check the TCP/IP stack of your computer
Ping gateway IP (Default: 192.168.1.1) to check the internal link of network.
If you’re not able to get to the web configuration screen for the router, make sure that you remove any proxy setting within your Internet browser, or remove the
dial-up settings within your browser.
T: What can I do if I have forgotten the password for router?
-You have to reset router back to factory default setting by pushing the Reset button over 3 seconds, and refer to the instructions in the user’s manual to
reconfigure the settings.
T: I cannot access my ISP’s home page, why?
- Some ISPs, such as @Home, require their host name be specifically configured into your computer before you can surf their local web pages. If you are unable to
access your ISP’s home page, enter your ISP’s Domain Name into the OnePage Setup (3-3) to enable all computers in your LAN to access it. If you only want to
allow computers to access these home pages, open the TCP/IP Properties window (2-4) on these computers, click open the “DNS Configuration” tab and enter
your ISP’s Domain Name in the “Domain Name Search Suffix” location.
Client Side (Computers)
T: I can’t browse in the internet via the router
- Check the LAN Link/ACT LED on the front panel is lit to indicate proper connection between the computer and the router. Check if both ends of the network cable
are properly connected.
- Check that TCP/IP is setup on your computer (2-4). Run “winipcfg” under Windows 95/98 prompt MS-DOS or run “Ipconfig” under Windows NT prompt DOS.
Check that the computer’s IP Address is in the range of 192.168.1.2 ~ 192.168.1.254 and the Subnet Mask is 255.255.255.0. If you are using a fixed IP address,
check also the Default Gateway IP Address and DNS address in “More”.
- Check the same values as stated above in Status Monitor (4-6).
T: I get a time out error when I enter a URL or IP address.
- Check if other computers work. If they do, ensure the computer’s IP settings are correct (IP Address, Subnet Mask, Gateway IP Address and DNS) (3-3).
- Check the router’s settings are correct (3-3).
ENGLISH
30
Page 33

31
Appendix A: Frequently Asked Questions
Q: What is the maximum number of IP Addresses the router can support?
- The router can support up to 253 IP Addresses in the range of 192.168.1.2~192.168.1.254.
Q: Where should the router be installed on the network?
- In a typical environment, the router should be installed between the ISP and your LAN. Connect the router to the phone jack which supplies the ADSL signal, and
connect your PCs to the RJ45 jack on the LAN side.
Q: Does the router support IPX or AppleTalk?
- No. The router was designed to provide a multiple user LAN with shared internet access and supports only the TCP/IP Protocol. If your Novell or
Apple system is configured with TCP/IP, the router can support them.
Q: Does the router support 100Mb Ethernet?
-Yes, the router supports both 10Mb & 100Mb Ethernet on the LAN side.
Q: What is “NAT” and what is it used for?
- The Network Address Translation (NAT) Protocol translates multiple IP Addresses on a private LAN into a single public IP Address that is accessible to the internet.
NAT not only provides the basis for multiple IP Address sharing but also adds to the LAN’s security since the multiple IP Addresses of LAN computers are never
transmitted directly to the internet.
Q: I cannot access my ISP’s home page, why?
- Some ISPs, such as @Home, require their host name be specifically configured into your computer before you can surf their local web pages. If you are unable to
access your ISP’s home page, enter your ISP’s Domain Name into the OnePage Setup (3-3) to enable all computers in your LAN to access it. If you only want to
allow computers to access these home pages, open the TCP/IP Properties window (2-4) on these computers, click open the “DNS Configuration” tab and enter
your ISP’s Domain Name in the “Domain Name Search Suffix” location.
Q: How can a router share a single user account to multiple users?
- The router combines the following technologies to enable this function. NAT (Network address translation): NAT is a technology which can create a
private network domain behind a public IP. It is usually used as a firewall. It can also be used when there are not enough IP. DHCP (Dynamic host configuration
protocol): DHCP is a protocol to assign IP to internal computers automatically. It can save a lot of IP configuration. This protocol is supported by Windows 95/NT,
Mac OS, and many other popular OS. DNS (Domain name service): DNS is a protocol of translating Domain Name to IP address that internet host can handle.
Addressing system using Domain name, like www.yahoo.com, is easier to use than IP address, 204.71.177.70.
Q: What operating systems does the router series support?
- The router uses standard TCP/IP protocol, it can be operated as long as you have TCP/IP protocol installed in your operating system (For example:
Win9x, Windows NT, Windows 2000 etc.)
Q: Can I use multiple E-mail accounts if I use my router?
-Yes, you can. Some people think having one internet account mean that they can have only one E-mail account. However, E-mail is set by mailbox accounts and
different to the account you use to connect to your ISP. If you want more E-mail accounts, you can contact with your ISP or you can browse the internet to apply
for a free E-mail account.
Q: Can Internet users access LAN computers?
- The router uses NAT to router all in/out packets. All external users can only see the IP of the router but cannot access LAN computers.
The LAN computers are well protected with the router’s natural firewall.
Q: When should I use DMZ host?
- Enable DMZ host when you want to have a unrestricted communication between your PC and the internet, for example, playing an internet game (i.e. Ages of
Empire) or having a multimedia conference (i.e. NetMeeting).
Q: Does the router support PPTP of VPN packets pass through?
-Yes. router supports single session PPTP pass through.
Q: Does the router series support IPsec?
-Yes. router supports single session IPsec pass through.
ENGLISH
Page 34

Appendix B: Technical Specifications
Standards Compliance
ADSL G.dmt for 8Mbps downstream & 640Kbps upstream
ADSL G.lite for 1.5Mbps downstream & 512Kbps upstream
IEEE 802.3 10/100BASE-T/TX
IEEE 802.11g Wireless
Interface
One ADSL interface RJ-11 connector WAN
Four 10/100Mbps auto-sensing Ethernet RJ-45 connectors
Management
Web-based UI Management
LED Display
Power
DIAG / Transaction
Wireless Link/Activity
Link/Activity for both ADSL and LAN port(s)
Environment
Operation Temperature: 0°C ~ 45 °C (32°F ~ 113 °F)
Storage Temperature: -20°C ~ 60 °C (-4°F ~ 140 °F)
Humidity: 0 ~ 90% non-condensing
Dimension
150 (L) x 190 (W) x 39 (H) mm
Power
External, DC 12V, 1A
Mounting
Desktop
Wall-mounting
Appendix C: Configuring IPSec between a Microsoft Windows 2000 or XP PC and router
This appendix illustrates the steps of a Microsoft Windows 2000 (or XP) PC establishing a secure IPsec Tunnel with this router. You can find detailed information on
configuring the Microsoft Windows 2000 server at the Microsoft website:
Microsoft KB Q252735 - How to Configure IPSec Tunneling in Windows 2000
http://support.microsoft.com/support/kb/articles/Q252/7/35.asp
Microsoft KB Q257225 - Basic IPSec Troubleshooting in Windows 2000
http://support.microsoft.com/support/kb/articles/Q257/2/25.asp
C-1 Environment
Windows XP or Windows 2000
IP Address: 140.111.1.2 (Note: ISP provided IP Address; this is only an example.)
Subnet Mask: 255.255.255.0
Router
WAN
IP Address: 140.111.1.1 (Note: ISP provided IP Address, this is only an example.)
Subnet Mask: 255.255.255.0
LAN
IP Address: 192.168.1.1
Subnet Mask: 255.255.255.0
C-2 Steps in Windows 2000/XP
C-2.1 Create IPSec Policy
1. Click Start button, select Run, and type secpol.msc in the open field.
2. Right-click IP Security Policies on Local Computer, and then click Create IP Security Policy.
3. Click Next, and then type a name for your policy (for example, “to_VPNRouter”).
4. Deselect the Activate the default response rule check box, and then click Next button.
5. Click the Finish button, making sure the Edit check box is checked.
ENGLISH
32
Page 35

33
C-2.2 Build 2 Filter Lists: “WinXP Broadband VPN Router” and “Broadband VPN Router WinXP”.
[Filter List 1] WinXP Broadband VPN Router
1. In the to_VPNRouter Properties, deselect the Use Add Wizard check box, and then click Add button to create a new rule.
2. From the IP Filter List tab, click the Add button.
3. Type an appropriate name “XP Broadband VPN Router” for the filter list, deselect the Use Add Wizard check box, and then click Add button.
4. In the Source address area, click My IP Address.
5. In the Destination address field, select A specific IP Subnet, and fill in the IP Address “192.168.1.0” and Subnet mask “255.255.255.0”.
6. If you want to type a description for your filter, click the Description tab.
7. Click OK button. Then click OK (for WinXP) or Close (for Win2000) button on the IP Filter List Window.
[Filter List 2] Broadband VPN Router WinXP
8. On the IP Filter List tab, click the Add button.
9. Type an appropriate name “Broadband VPN Router XP” for the filter list, click to clear the Use Add Wizard check box, and then click Add.
10. In the Source address area, click A specific IP Subnet, and fill in the IP Address “192.168.1.0” and Subnet mask “255.255.255.0”.
11. In the Destination address area, click My IP Address.
12. If you want to type a description for your filter, click the Description tab.
13. Click OK, and then click OK.
C-2.3 Configure Individual Rule of 2 Tunnels
[Tunnel 1] WinXP Broadband VPN Router
1. From the IP Filter List tab, click the filter list “XP Broadband VPN Router”.
2. From the Filter Action tab, click the filter action “Require Security”, and click the Edit button.
3. Check that the Negotiate security option is enabled, and deselect the Accept unsecured communication, but always respond using IPsec check box.
4. Select the Session key Perfect Forward Secrecy (PFS) and remember to check the PFS option on the Broadband VPN Router, and then click the OK button.
5. From the Authentication Methods tab, click the Edit button.
6. Change the authentication method to “Use this string (preshared key)”, enter the string “Test”, and then click the OK button. This new Preshared key will be
displayed in Authentication method preference order. Click the OK button to continue.
7. From the Tunnel Setting tab, click The Tunnel endpoint is specified by this IP Address box, and then type the WAN IP Address “140.111.1.1 ”(Note: ISP
provided IP Address; this is only an example.) of Broadband VPN Router.
8. From the Connection Type tab, select All network connections, and then click the OK or Close button to finish this rule.
[Tunnel 2] Broadband VPN Router WinXP
9. In the to_VPNRouter Properties, deselect the Use Add Wizard check box, and then click the Add button to create the second IP Filter.
10. On the IP Filter List tab, click the filter list “Broadband VPN Router XP”.
11. From the Filter Action tab, click the filter action “Require Security”.
12. From the Authentication Methods tab, click the Edit button.
13. Change the authentication method to “Use this string (preshared key)”, enter the string “Test”, and then click the OK button. This new Preshared key will be
displayed in Authentication method preference order. Click the OK button to continue.
14. From the Tunnel Setting tab, click The Tunnel endpoint is specified by this IP Address box, and then type the Windows 2000/XP IP Address
“140.111.1.2”.
15. From the Connection Type tab, select All network connections, and then click the OK(for WinXP) or Close(for Win2000) button to finish.
16. From the Rules tab, click the OK button to back to the secpol screen.
C-2.4 Assign New IPsec Policy
1. In the IP Security Policies on Local Computer MMC snap-in, right-click policy named “to_VPNRouter”, and then click Assign. A green arrow appears in the
folder icon.
ENGLISH
Page 36

Appendix D: Glossary
10Base-T
An adaptation of the Ethernet standard for Local Area Networks (LANs). 10Base-T uses a twisted pair cable with maximum lengths of 100 meters.
Adapter
A device that makes the connection to a network segment, such as Ethernet and modem cards and adapters.
ADSL
Asymmetric Digital Subscriber Line (ADSL), as it’s name indicates, is an asymmetrical data trasmission technology with higher traffic rate downstream and lower traffic rate
upstream. ADSL technology satifies the bandwidth requirements of applications which demand “asymmetric” traffic, such as web surfing, file downloads and telecommuting.
ATM
(Asynchronous Transfer Mode) A network technology supports real time voice, video, and data transmission. The topology uses switches that establish a logical circuit from
end to end, which guarantees quality of service (QoS). ATM works by transmitting all traffic as fixed-length, 53-byte cells. This fixed unit allows very fast switches to be
built ATM is widely used as a backbone technology in carrier networks and large enterprises. ATM is highly scalable and supports transmission speeds of 1.5, 25, 100, 155,
622, 2488 and 9953 Mbps. ATM is also running as slow as 9.6 Kbps between ships at sea.
Bandwidth
The amount of data that can be transmitted in a fixed amount of time.
Browser
A software application used to locate and display web pages. Examples include Netscape Navigator and Microsoft Internet Explorer.
Communications Protocols
Communications between devices requires they agree on the format in which thedata is to be transmitted, sent and received. The communications protocols are a set of
rules that define the data format.
DHCP
DHCP, short for Dynamic Host Configuration Protocol, is a protocol for assigning dynamic IP Addresses to devices on a network. Dynamic Addressing means that a device
can have a different IP Address each time it connects to the network.
Domain Name
A name that identifies one or more IP Addresses. For example, the domain name microsoft.com represents about a dozen IP Addresses. Domain names are used in URLs to
identify particular web pages. For example, in the URL http://www.pcwebopedia.com/index.html, the domain name is pcwebopedia.com.
DNS
Short for Domain Name Server, translates domain names into IP Addresses. To help us recognize and remember domain names they are alphabetic in form, however, the
Internet actually runs on numbered IP Addresses. DNS servers translate domain names into their respective IP Addresses.
Encapsulation
A method for transmitting multiple protocols within the same network. The frames of one type of protocol are carried within the frames of another.
Ethernet
One of the most common Local Area Network (LAN) protocols. Ether uses a bus topology which supports a data transfer rate of 10 Mbps.
Firewall
A security system used to enforce an access control policy between an organisation’s networks and the internet.
IEEE
Short for Institute of Electrical and Electronics Engineers, an organization best known for developing standards for the computer and electronics industry.
Internet
A global network connecting millions of computers for the exchange of data, news and opinions.
Intranet
A network based on TCP/IP Protocol (an internet) belonging to an organization, and accessible only by that organization's members, employees, or others with authorization.
IP Address
An identifier for a computer or device on a TCP/IP network. Networks using the TCP/IP Protocol route messages based on the IP Address of the destination. The format of
an IP address is a 32-bit numeric address written as four numbers separated by periods. Each number can be from zero to 255.
IPSec
Internet Protocol Security is a security standard for network transmission. It provides authentication and packet encryption over the internet.
ISP
Short for Internet Service Provider, a company that provides access to the internet for a monthly fee. The ISP provides a software package, username, password and access
phone number allowing users to log on to the internet, browse the World Wide Web and send and receive e-mail.
LLC
Logical Link Control is the sublayer of data link layer defined in IEEE 802.2. The LLC provides a common interface point to the MAC layers, which specify the access
ENGLISH
34
Page 37

35
method used.
Local Area Network (LAN)
A computer network that spans a relatively small area. Most LANs are confined to a single building or group of buildings. However, one LAN can be connected to other LANs
over any distance via telephone lines and radio waves. A system of LANs connected in this way is called a wide area network (WAN).
MAC Address
Short for Media Access Control Address, a hardware address that uniquely identifies each node of a network.
NAT
Short for Network Address Translation, a routing protocol that allows global IP Addresses to be translated into multiple private IP Addresses for use on internal LAN
networks. The explosion in the use of the internet has created a critical problem for the internet Assigned Numbers Authority (IANA) which is in charge of assigning IP
Addresses to internet users, ISPs etc. NAT is a technology that has been introduced to help maximize the utilization of assigned IANA and global IP Addresses.
Network Protocol
Network protocols encapsulate and forward data packets from one interface to another.
PAP/CHAP ISP
Short for Password Authentication Protocol and Challenge Handshake Authentication Protocol. Most ISPs use either one for user identification. If your ISP doesn’t support
these two protocols, contact your ISP for an authentication script.
PPP
Short for Point-to-Point Protocol, a communications protocol for transmitting information over standard telephone lines between devices from different manufacturers.
PPPoE
Short for PPP over Ethernet, relying on two widely accepted standards, Ethernet and the Point-to-Point Protocol. It’s a communications protocol for transmitting information
over the Ethernet between devices from different manufacturers.
PPTP
The acronym of Point to Point Tunneling Protocol, PPTP encapsulates the packet for transmission over the internet. It creates a private "tunnel" over the large public
network which has almost equal security to a provate network without actually having to lease a private line.
Protocol
An agreed format for transmitting, sending and receiving data between two devices.
Router
An internet device that routes requests for information to other routers until the information’s location is found and the data can be transmitted back to the origin of the
request.
TCP/IP
Short for Transmission Control Protocol and Internet Protocol, the suite of communications protocols that enable hosts on the internet to connect and exchange streams of
data.
VPN
The acronym of Virtual Private Network. Via access control and encryption, VPN brings the security to the data transmission through the internet as it is transmitted through
a private network. It not only takes advantage of the economies of scale but also gets the high level security while the packet is sent over the large public
network.
Wide Area Network (WAN)
A system of LANs being connected by telephone lines and radio waves. Although some WANs may be privately owned, they are usually considered a means of public access.
ENGLISH
Page 38

ENGLISH
36
THIS PAGE IS INTENTIONALLY LEFT BLANK
Page 39

37
ENGLISH
THIS PAGE IS INTENTIONALLY LEFT BLANK
Page 40

ENGLISH
38
THIS PAGE IS INTENTIONALLY LEFT BLANK
 Loading...