

Page 1
STITCH LINE
10 x 10 INSTANT CANOPY
Two people can easily setup this shelter in minutes.
Contents & Repair Parts:
Center Hub #90682
Apex Joint #90684
Apex Support Pole
#90679
Bracket Pole 40”
#90676
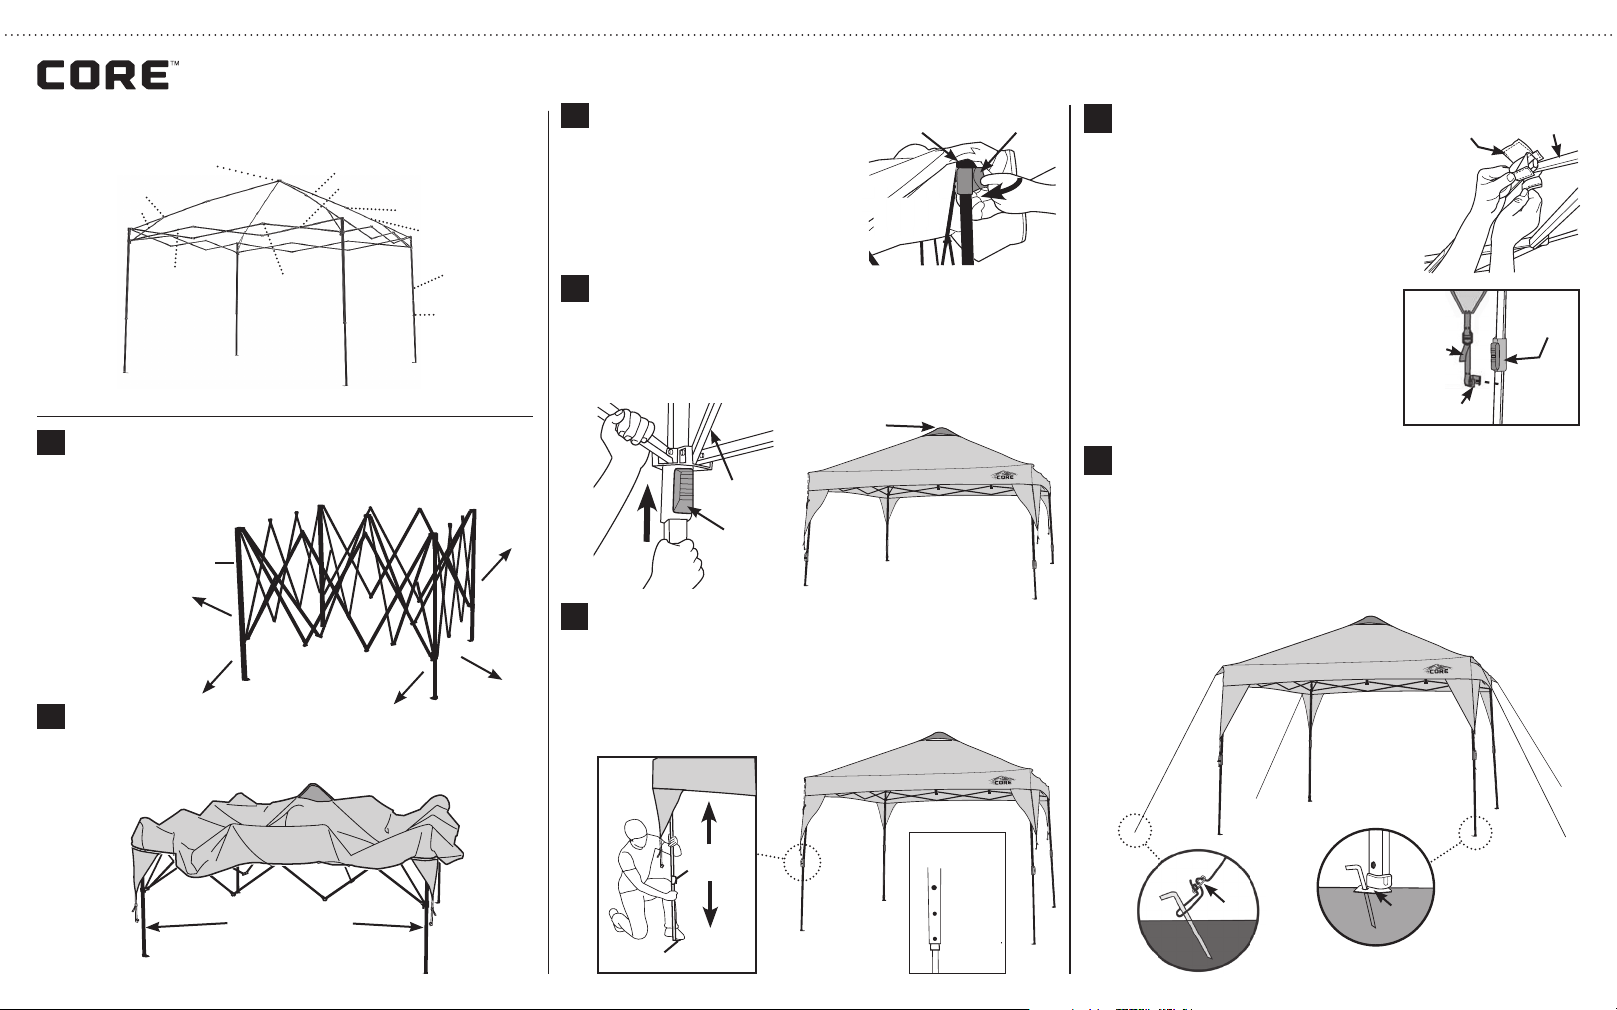
1
Extend Shelter Frame
CAUTION: Avoid pinch points when opening or closing the shelter frame.
• Expand and spread out SHELTER FRAME half way.
STEEL SHELTER FRAME
2
Attach Canopy
• Unfold CANOPY then drape over SHELTER FRAME with corners
positioned over SHELTER LEGS.
Upper Roof Pole #90681
Joint Endcap (2”)
#90685
Bracket Joint (1”) #90678
Roof Joint #90683
Lower Roof Pole
#90680
Shelter Leg
#90675
Gray Locking
Button #90677
Not Pictured:
Canopy Top #90673
Stakes #90674
Attach Canopy (continued)
2
• Locate HOOK & LOOP FASTENER
STEEL
SHELTER LEG
HOOK & LOOP
FASTENERS
on underside of the corner of the
CANOPY; then attach to material
located at the top of the STEEL
SHELTER LEG.
• Repeat for remaining 3 corners of
UNDERSIDE
OF CANOPY
the CANOPY.
3
Raising Roof Support Brackets
• To fi nish expanding the frame, grasp the LEG POLE and push up on
the ROOF SUPPORT BRACKET until the GRAY BUTTON “clicks” into
locked position.
• Repeat for remaining 3 ROOF SUPPORT BRACKETS to fully raise the
ROOF PEAK.
ROOF PEAK
SUPPORT
BRACKET
GRAY
BUTTON
4
Telescoping Steel Frame Legs
• Place foot on the LEG FOOT; then grasp and extend TELESCOPING
LEG POLE until the LOCKING BUTTON “clicks” into locked position.
• Repeat for remaining 3 LEG POLES.
NOTE: When telescoping the legs, the LOCKING BUTTON will lock in the
lowest setting fi rst. Push in the LOCKING BUTTON and extend the leg
further to desired shelter height.
Model No. 40017
Secure Canopy to Frame
5
• Locate HOOK & LOOP FASTENERS along
the seam of the underside of the CANOPY;
then wrap around METAL BRACKET to secure.
• Repeat for remaining 3 sides of the
shelter CANOPY.
• Fasten CLIP on web strap of canopy onto LEG
POLE below LOCKING BUTTON.
• Repeat for remaining 3 legs of the
shelter CANOPY.
NOTE: Pull down on end of the WEB
STRAP to tighten and secure the CANOPY.
• Position the shelter in its fi nal position
before securing with stakes and guylines.
6
To Secure Shelter
• Locate FOOT at the bottom of each SHELTER LEG POLE (4 total).
• Slide STAKE through HOLE at each location.
• Locate GUYLINES attached to the shelter and unroll.
• Slide STAKE through loop at each location, extend out and drive in
to secure.
NOTE: Extend four corner GUYLINES out at a 45º angle from shelter.
• Tighten GUYLINES as needed by adjusting the SLIDER up the cord.
HOOK & LOOP
FASTENER
WEB
STRAP
CLIP
METAL
BRACKET
LOCKING
BUTTON
CANOPY
STEEL SHELTER LEGS
LEG FOOT
LOCKING
BUTTON
3-Stage Height
Adjustability
LOWER
MEDIUM
HIGHEST
SLIDER
FOOT
(continued on other side)
Page 2

TAKE DOWN INSTRUCTIONS:
For long-term storage: Remove the CANOPY & store separately.
NOTE:
For short-term storage (1-2 weeks): It is acceptable to leave the
CANOPY attached to STEEL SHELTER FRAME.
and illustrations on other side of this tag in the reverse order:
Follow the previous steps
• Disconnect canopy CLIPS from 4 LEG POLES.
• Push the LOCKING BUTTONS and telescope down the 4 LEG POLES.
• Push the 4 GRAY BUTTONS to release the ROOF SUPPORT BRACKET.
• Fold CANOPY and put back into the bag.
• Fold up SHELTER FRAME and place into bag.
Storing the Shelter
• Remove stakes and place in their storage bag.
• All stakes must be placed in their own storage bag before placing in
carrying case to prevent damage to the shelter fabric.
• Store in a clean, dry area.
FREQUENTLY ASKED QUESTIONS:
• Are replacement parts available? Yes, please call Customer Service at
1-888-774-5840 for replacement parts. All parts can be replaced.
• Why are my shelter legs not locking into place? Be sure that the large
gray buttons are secure. Extend pole further if it is not locked. It will
“click” into place.
• How do I clean my canopy top? Clean the canopy top with a soft sponge,
a mild soap and tepid water. Be sure to scrub gently and remove all soap.
Let dry in sunlight, which also naturally cleans the canopy.
• Why is it difficult to extend the roof assembly on my frame? Be sure
to stretch the frame out fully, and lock the roof assembly into place
before raising the shelter legs.
• When should I attach the canopy fabric? Attach the canopy fabric
after the frame is expanded, before extending the roof assembly or
shelter legs.
WARNINGS & CAUTIONS:
WARNING: KEEP ALL FLAME AND HEAT SOURCES AWAY FROM THIS
SHELTER FABRIC
This shelter is made of flame-resistant fabric which meets CPAI-84 specifications. IT IS NOT FIRE-PROOF. The fabric will burn if left in continuous
contact with any flame source. The application of any foreign substance to
the product fabric may render the flame-resistant properties ineffective.
DO NOT use fuel burning devices inside or near shelter materials.
DO NOT permit children to light matches, operate burning appliances, or
handle any flame sources in or near the shelter.
• Do not smoke, use matches, candles or open flames of any kind in or near
the shelter.
• Do not refuel lanterns, stoves or heaters inside shelter.
• Do not cook inside shelter.
• Do not store flammable liquids inside shelter.
WARNING: Keep clear of overhead power lines.
• Do not set up your shelter under trees because of potential lightning
strikes or falling tree limbs in inclement weather.
• Secure with all stakes and guylines provided to prevent property damage
or personal injury.
• Never store shelter, even for a short period of time, without drying it
thoroughly and brushing off caked dirt. Do not pack stakes inside your
shelter. Use a separate storage bag.
• STAKES SHOULD BE REMOVED BY PULLING ON THE STAKE ITSELF.
NEVER PULL ON THE SHELTER TO REMOVE STAKE.
• Do not leave your shelter set-up for weeks at a time. Be aware that
exposure to ultraviolet rays from the sun can seriously damage material
and/or cause it to become discolored.
IMPORTANT:
THE ORIGINAL FIRE RETARDENT AND WATER REPELLENT PROTECTIVE
COATINGS MAY BE COMPROMISED IF SPRAYS OR OTHER CHEMICAL
TREATMENTS ARE USED ON THE SHELTER. FABRIC HAS BEEN FACTORY TREATED. IT IS HIGHLY WATER-REPELLANT; HOWEVER, IT IS
NOT WATERPROOF. ALL SHELTERS CAN EXPERIENCE SEAM LEAKAGE
DURING WET WEATHER. IF YOU WANT ADDITIONAL MOISTURE PROTECTION, TRY A SEAM SEALING COMPOUND ONLY; STRICTLY FOLLOW
THE MANUFACTURER’S DIRECTIONS. IT IS RECOMMENDED THAT YOU
SEAL THE SHELTER DURING THE INITIAL SETUP AS WELL AS PRIOR TO
EACH CAMPING SEASON. SEAM SEALER COMPOUNDS CAN BE PURCHASED AT YOUR LOCAL CAMPING PRODUCTS OUTLET. FOR MISSING
PARTS CALL 1-888-774-5840.
PLEASE DO NOT RETURN THIS PRODUCT TO THE RETAIL STORE.
1-YEAR LIMITED WARRANTY:
Elevate LLC warrants for a period of 1 year from the original date of purchase, this
product against any defects in materials or workmanship. At its discretion, Elevate LLC
may provide replacement parts to original purchaser. Original receipt or proof of purchase
as well as proof of defect is required. Elevate LLC will not be responsible for shipping
costs incurred outside the continental USA. Warranty is valid for the original purchaser one
year from the date of purchase and is not transferable. This Warranty does not cover any
product purchased through non authorized dealers and/or online auction websites.
This Warranty Does Not Cover:
This 1-Year Limited Warranty does NOT cover normal wear and tear, abuse or misuse of
this product including damage from inclement weather conditions, such as wind, rain, or
hail. In case of inclement weather remove all valuables and persons and seek appropriate
shelter. Under no circumstances will Elevate LLC be liable or responsible for any incidental
or consequential damages.
This product is designed and intended for recreational use only. Prolonged exposure
to UV rays will cause any fabric to fade and deteriorate and is NOT covered by this 1-Year
Limited Warranty.
All replacement products or parts will assume the remaining warranty of the original
product. This warranty gives you specific legal rights. You may also have other rights
which vary from state to state.
To Obtain Warranty Service
Call Toll Free 1-888-774-5840 for warranty service, repair parts, or product questions.
Mon-Fri, 8:00 a.m. – 5:00 p.m. Central Time.
NOTICE: DO NOT RETURN PRODUCT TO RETAIL STORE.
STITCH LINE
Elevate LLC
Overland Park, KS 66221
Made in China • Printed in China
 Loading...