

Page 1

| FCC Part 15 Notice |
This equipment has been tested and found to comply with
the limits for a Class B digital device, pursuant to part 15 of
the FCC Rules. Operation is subject to the following two
conditions: (1) this device may not cause harmful
interference, and (2) this device must accept any
interference received, including interference that may cause
undesired operation. Class B limi ts are designe d to provide
reasonable protection against harmful interference in a
residential installation. This equipment generates, uses, and
can radiate radi o frequency energy, and, if not installed and
used in accordance with the instructions, may cause
harmful interference to radio communications. However,
there is not guarantee that interference will not occur in a
particular installation. If this equipment does cause harmful
interference to radio or television reception, which c an be
determined by turning the equipment off and on, the user is
encouraged to try to correct the interference by one or
more of the following measures:
Reorient the receiving antenna.
•
• Increase the separate between the equipment and the
receiver.
Connect the equipment into an outlet on a circuit
•
different from that to which the receiver is connected.
• Consult the dealer or an experienced radio/TV
technician for help.
CAUION: Changes or modifications not
expressly approved by the manufacturer
responsible for compliance could void the
user’s to op er ate the equi p me nt.
| Copyright |
Copyrightⓒ Corecess All rights Reserved.
No Part of this book shall be reproduced, stored in a
retrieval system, or transmitted by any means,
electronic, mechanical, photocopying, recording, or
otherwise, without written permission from the
publisher.
The specifications and information regarding the
products in this manual are subject to changed without
notice.
| Trademark Credit |
Corecess 3311 is registered trademar k of Corecess Inc.
Windows is registered trademark of Microsoft Corp.
Corecess Inc.
997-4, Daechi-dong, Kangnam-ku, Seoul, Korea
TEL:82-2-3016-6900 FAX:82-2-3016-6622
http://www.corecess.com
Page 2

Thank you for using the product of Corecess.
This manual helps users to install and configure
the Corecess SHDSL Modem Corecess 3311.
English
Table of Contents
Introduction ························ ················ 4
Unpacking the Box ································ 4
Installing the Corecess 3311 ·················· 5
Configuring the TCP/IP ························ ·· 7
Troubleshooting ·· ································ 10
Technical Specifications ······················· 11
Page 3

Page 4
Introduction
The Corecess 3311 is a Single-pair High-speed Digital Subscriber Line (SHDSL)
modem used for home connectivity to an SHDSL service provider network. The
Corecess 3311 modem supports speeds up to 2.3 Mbps for both upstream and
downstream over ordinary telephone lines.
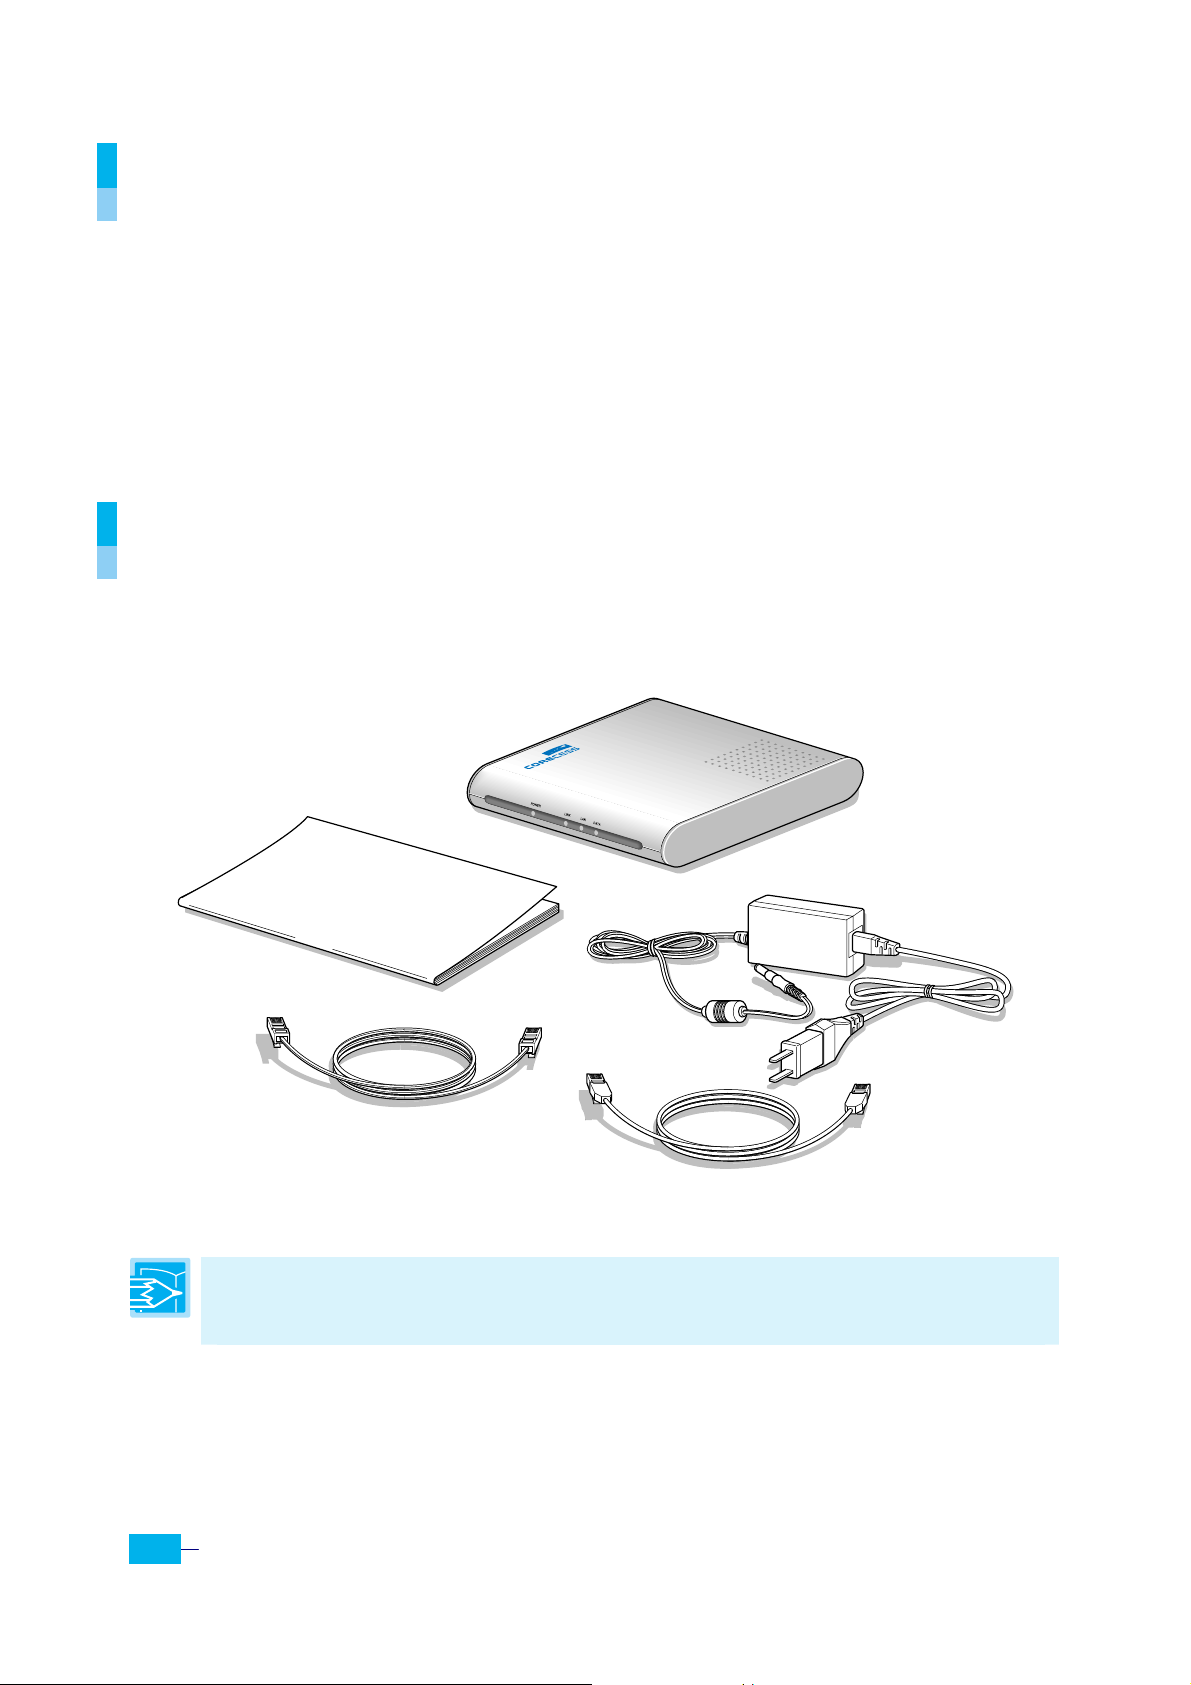
Unpacking the Box
Check the shipping carton carefully to ensure that the contents include the items you
ordered.
Installation Guide
SHDSL Cable
(4-wire Telephone Line)
Note: The PC with Et hernet port or adapter is neccssary to install the Corecess
3311. Before installing the Corecess 3311, prepare a PC with Ethernet port or
adapter.
Corecess 3311
Power Supply and
Power Cord
Ethernet Cable
(Straight-through Category-3)
4
Corecess 3311 Installation Guide
Page 5
Installing the Corecess 3311
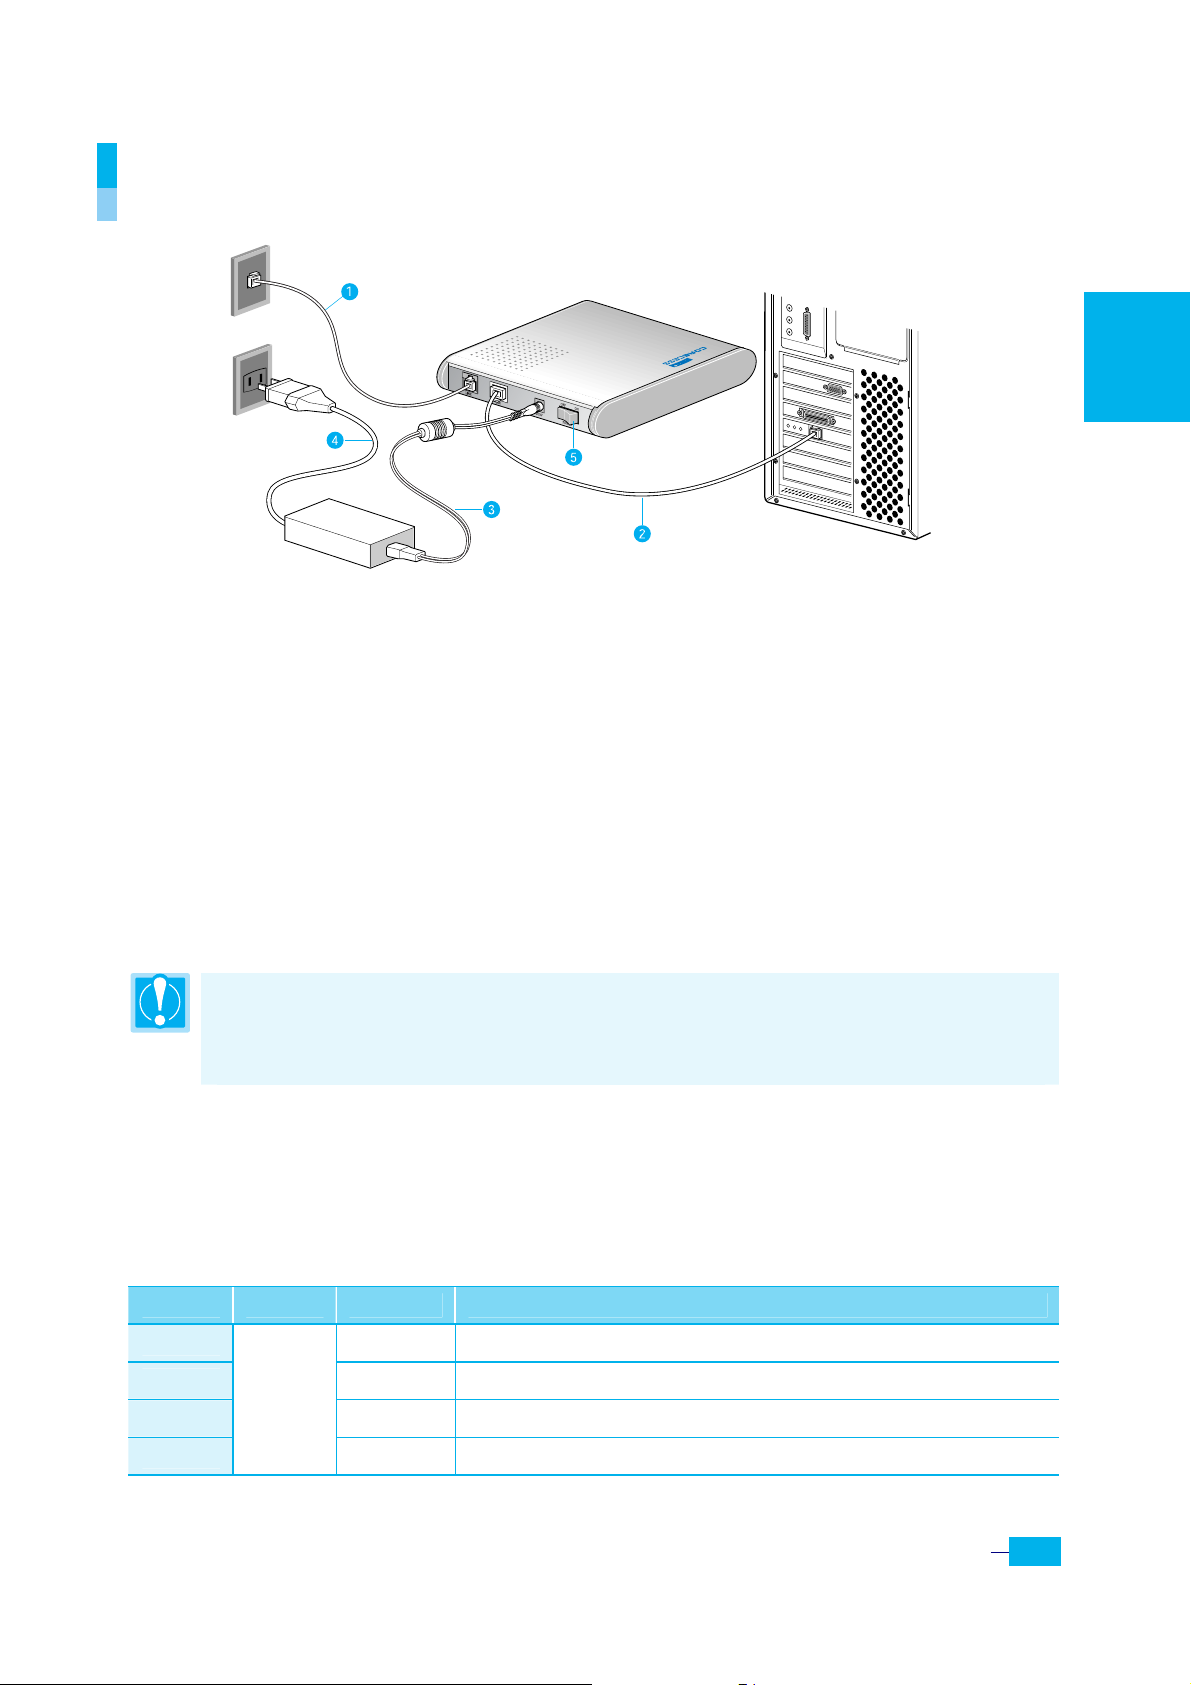
n Connect the provided SHDSL cable to the wall receptacle and connect the other end of
the cable to the LINE port of the Corecess 3311.
o Connect the provided Ethernet cable to the LAN port of the Corecess 3311 and then
connect the other end o f the cable to Ethernet port on the NIC installed to your PC.
p Connect the provided power supply cable into the DC IN port of the Corecess 3311.
q C onnect the provided power cord to the po wer supply and connect the other end of the
cord to an appropriate electrical o utlet.
r Turn on the Corecess 3311 with the power switch on the rear panel of the Corecess 3311.
s Power on your PC.
Caution: You should power on the Corecess 3311 bef ore powering on your PC . If
you power on your PC first, PC’s IP address m ay not be properly assign ed. In this
case, assign new IP address ref erring to ‘Tro ubleshooting’ o n page 9-10 or restart
your PC.
English
LED Operation
When you have powered up the Corecess 3311, check the status of the four LEDs on
the front panel by the following table:
LED Color Status Description
POWER ON DC power is being supplied to the Corecess 3311.
LINK ON The modem is connecting to SHDSL network.
LAN ON The LAN port is connecting to Ethernet port on your PC.
DATA
Green
Blink Data is being sent to or received from Ethernet network.
5
Page 6
Configuring the TCP/IP
After you install the Corecess 3311, next is to configure the TCP/IP network protocol.
Caution: When you configure the TCP/IP, leave the default value of any other
configuration that is not mentioned in the following description.
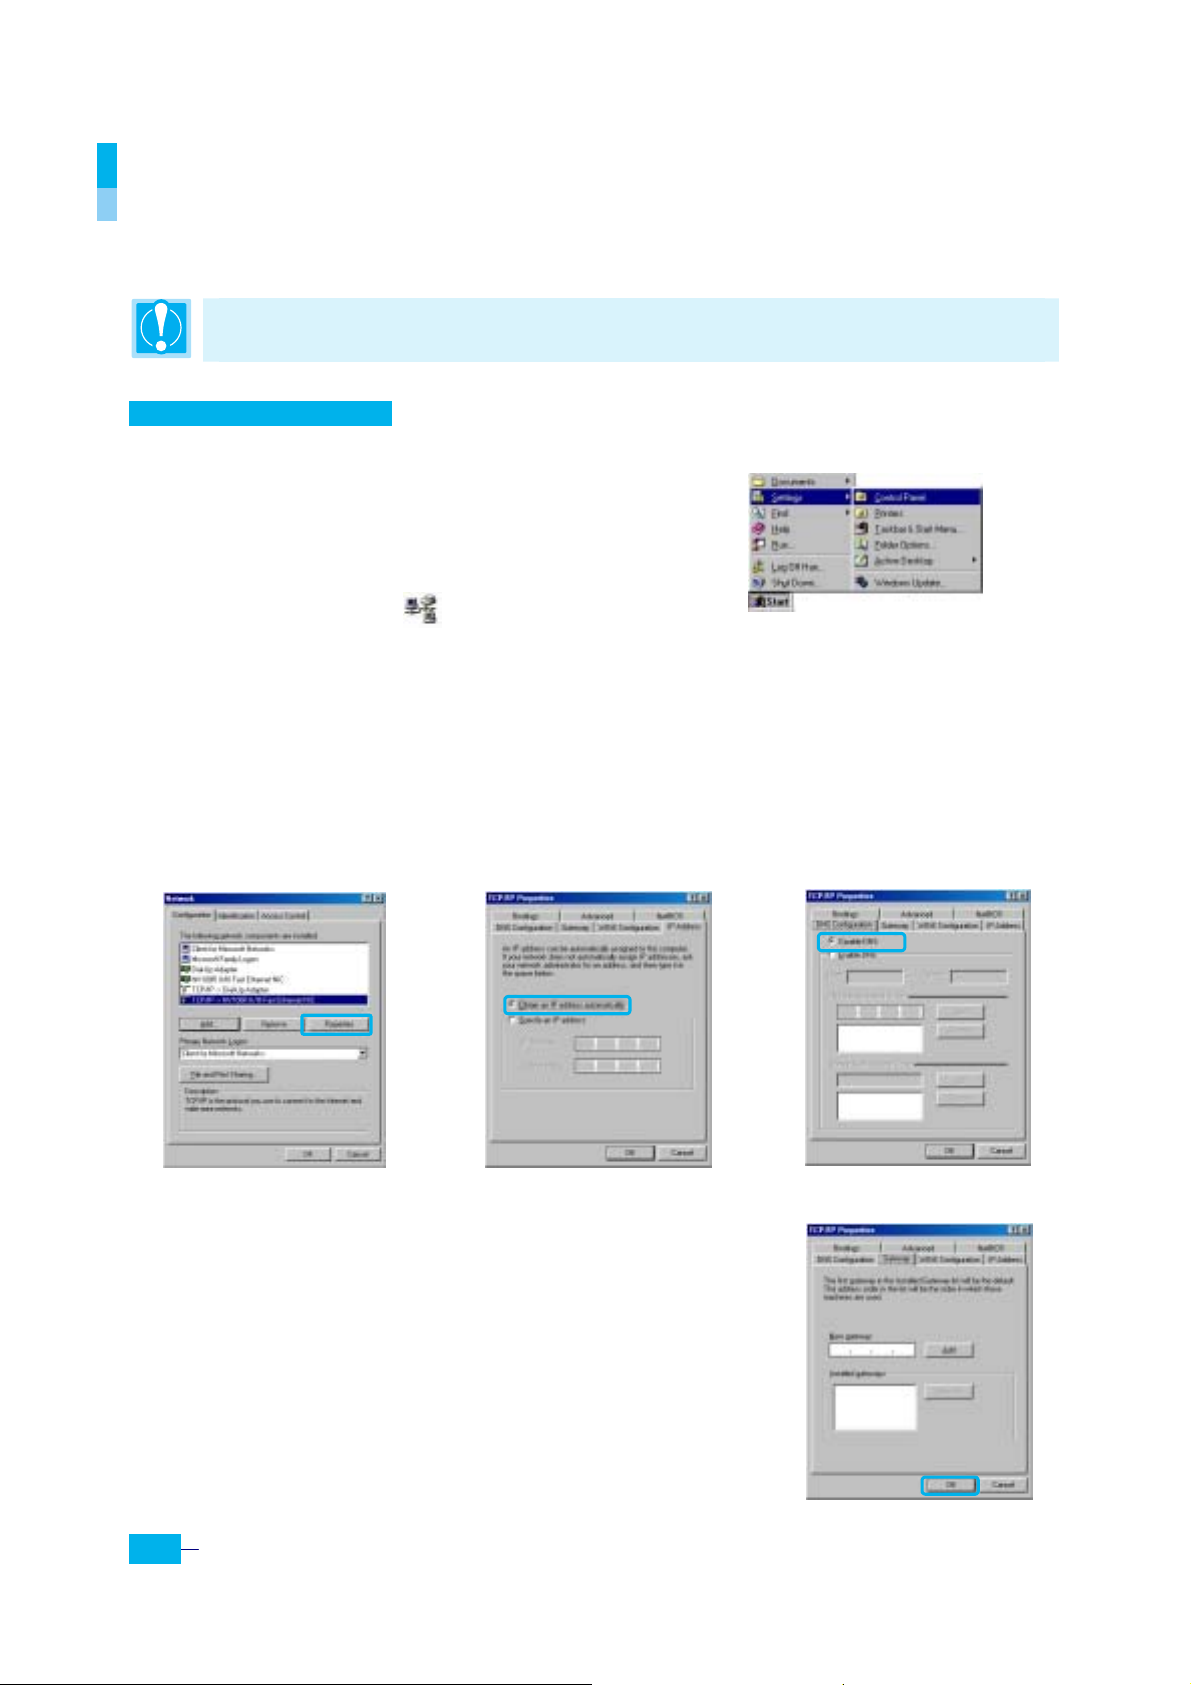
Windows 95/98/ME
1. Click the Start button and select Settings ¼ Control Panel.
(
Figure 1)
2. Double-click the Network icon.
Figure 1
3. Select TCP/IP in the ‘The following network components are installed’ list and click
Properties.
(
Figure 2)
Select the [IP Address] tab and click the Obtain IP address automatically. (
4.
5. Select the [DNS Configuration] tab and click the Disable DNS. (
6. Select the [Gateway] tab and check there is no
gateway installed. If there are installed gateways,
delete them by clicking [Remove]. Click OK. (
7. At the <Network> dialog box, click OK. The
system prompts you to restart. Click Yes.
Figure 2
Figure 3
Figure 5)
Figure 4)
Figure 4
Figure 3
)
6
Corecess 3311 Installation Guide
Figure 5
Page 7
Windows 2000/NT
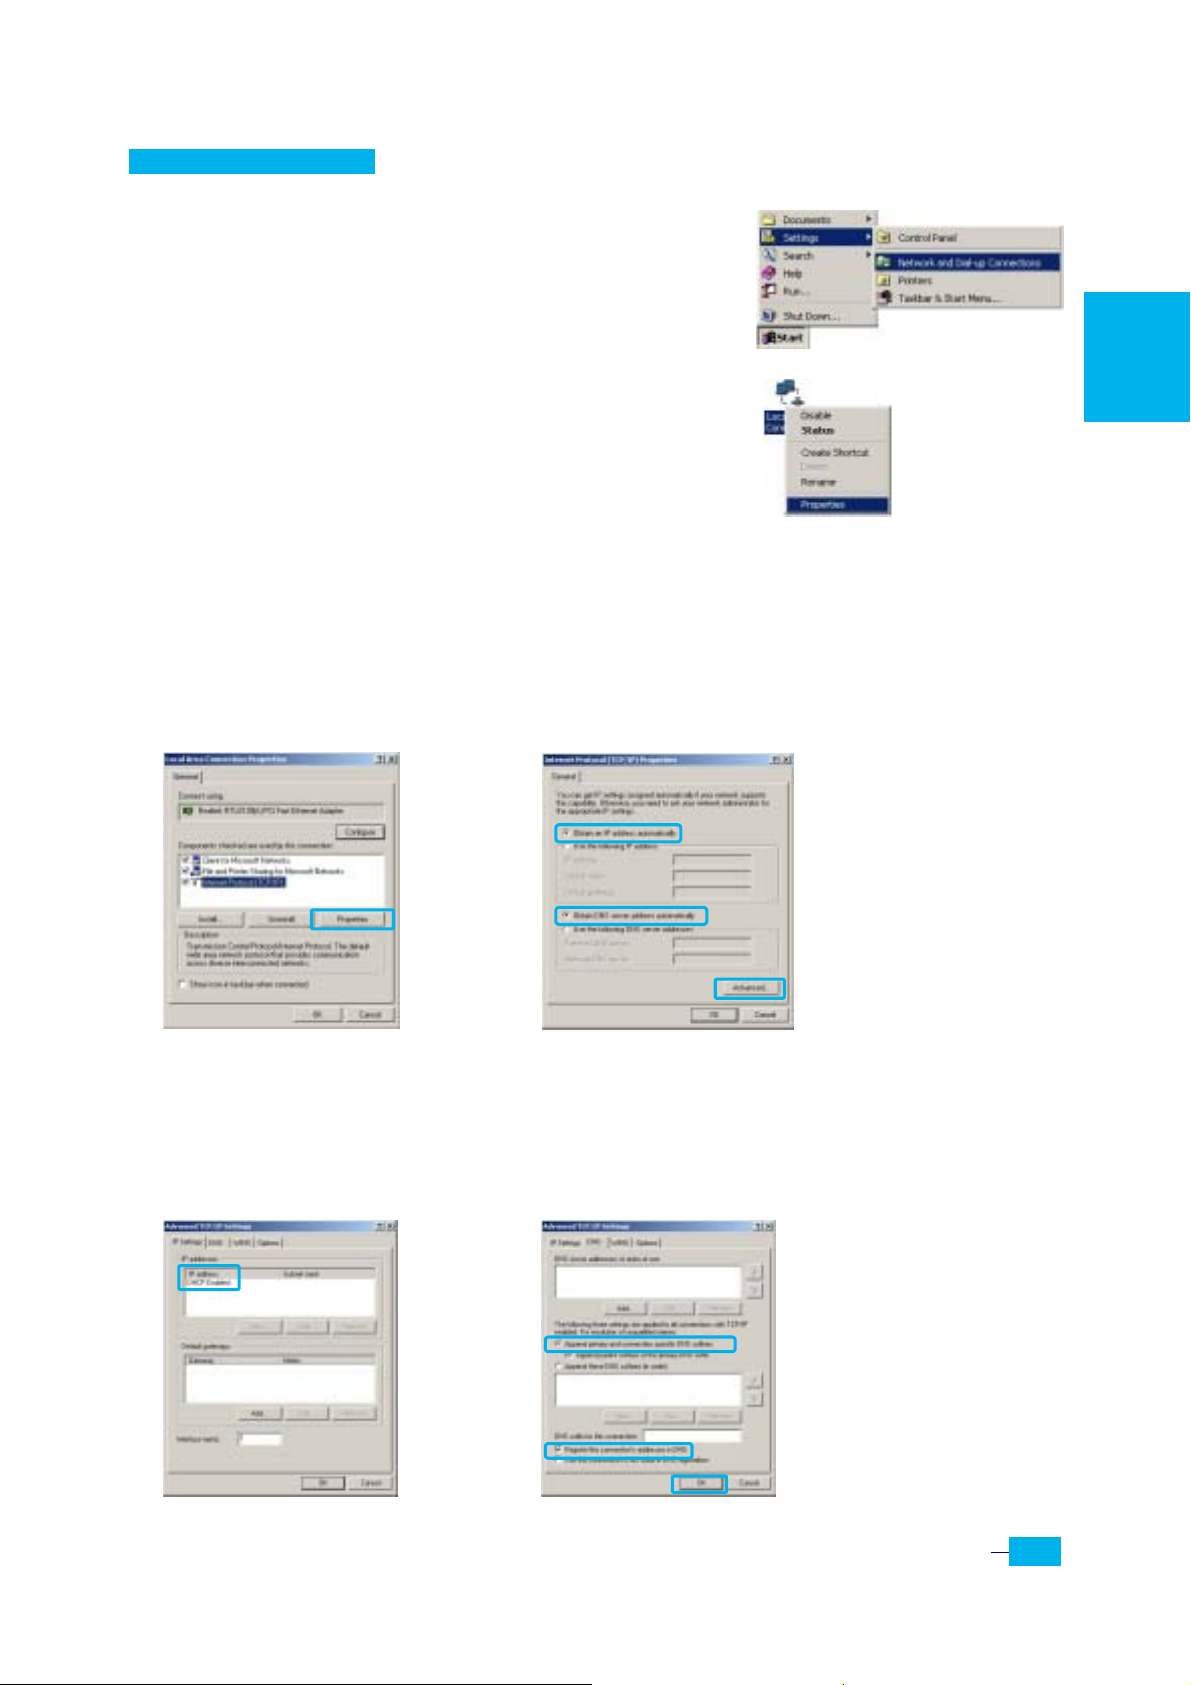
1. Click the Start button and select Settings ¼
Network and Dial-up Connections. (
Figure 1
)
Figure 1
2. Right-click the Local Area Connection icon at the
<Network and Dial-up Connections> windows and
select Properties menu. (
Figure 2)
Figure 2
3. At the <Local Area Connection Properties> dialog box, select the Internet Protocol
(TCP/IP) in the ‘Components checks are used by this connection’ list and click
Properties.
(
)
Figure 3
4. At the <Internet Protocol (TCP/IP Properties)> dialog box, click the Obtain an IP
address automatically and the Obtain DNS server address automatically. Then click
Advanced to check the TCP/IP settings for accuracy. (
Figure 4)
Figure 3
Figure 4
5. The <Advanced TCP/IP Settings> dialog box appears. At the [IP Settings] tab,
check that the IP Address is set to Enable DHCP. (
Figure 5)
6. Select the [DNS] tab and check that the Append primary and connection specific
DNS suffix is selected. Click OK. (
Figure 6
)
Figure 5
Figure 6
English
7
Page 8
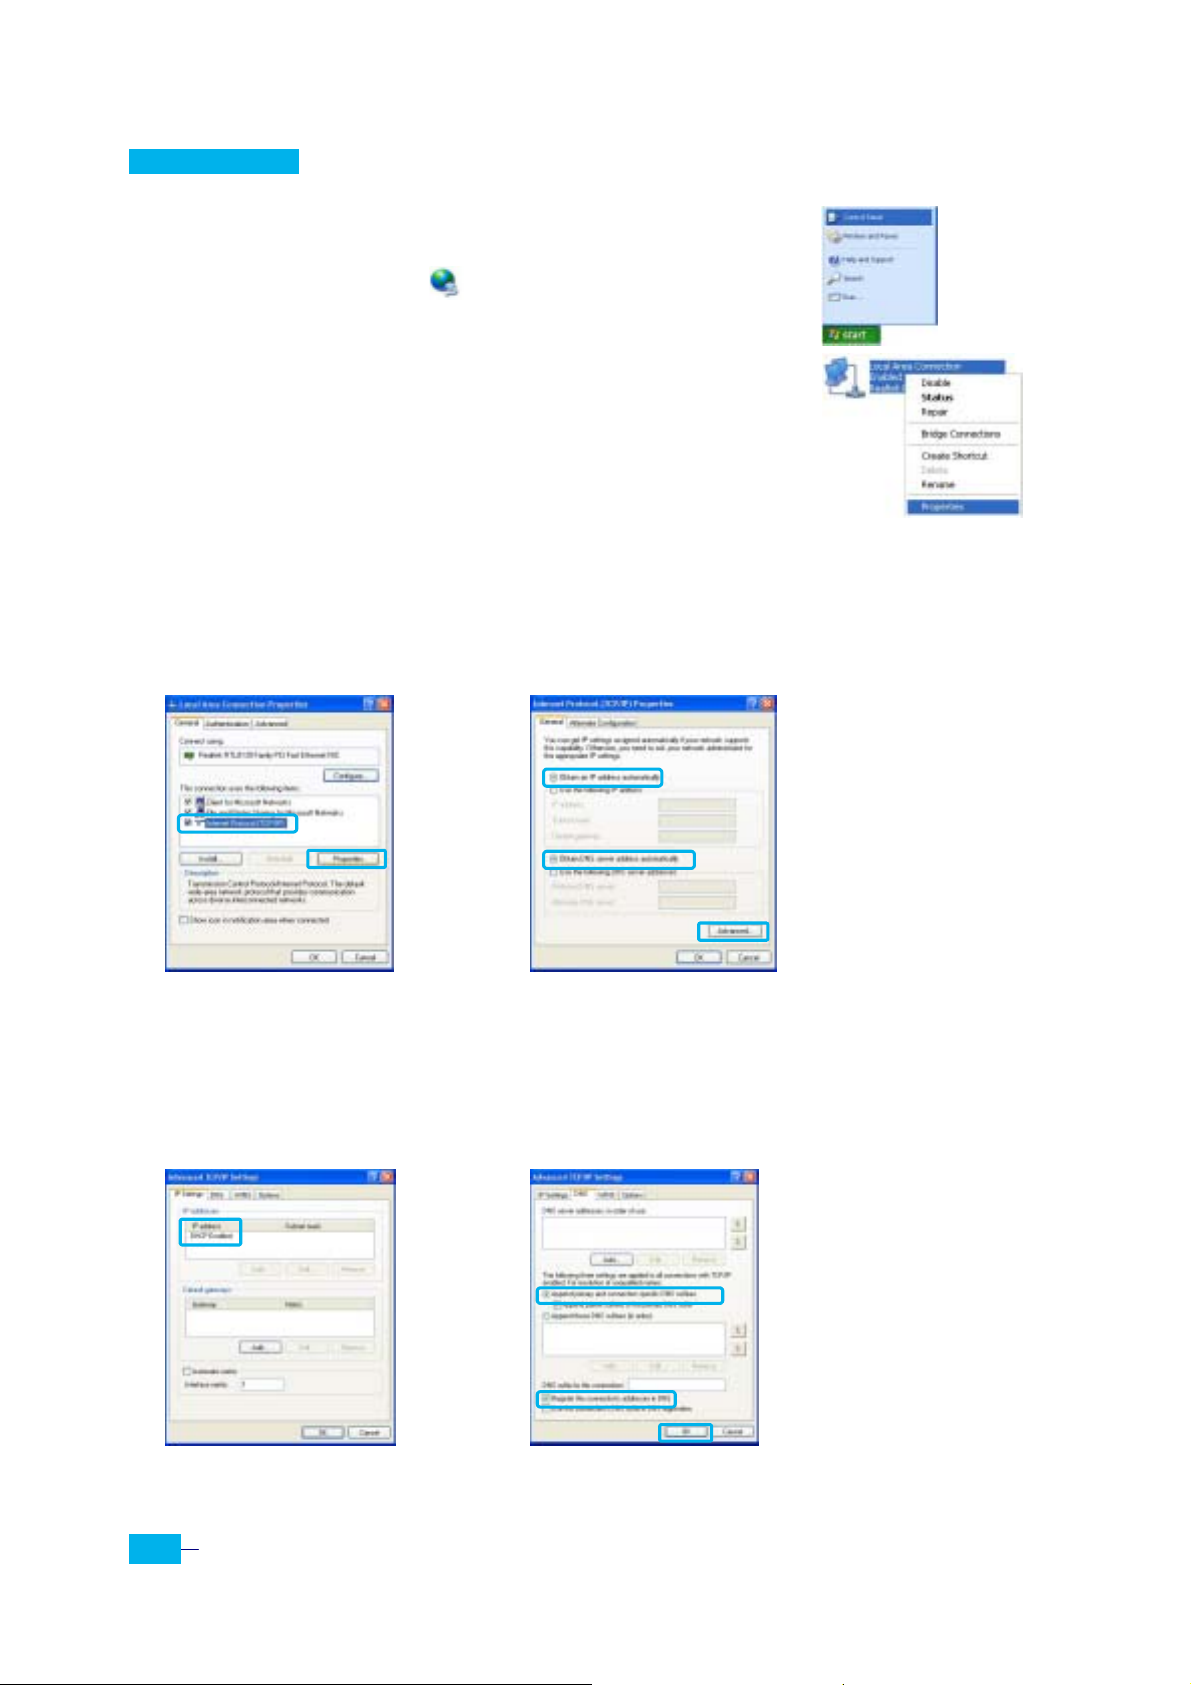
Windows XP
1. Click the Start button and select Settings menu. (Figure 1)
2. Double-click the Network icon at the <Control Panel>
window.
3. Right-click the Lo cal Area Connection icon at the <Network
Connections> windows and select Properties menu.
2)
4. At the <Local Area Connection Properties> dialog box,
select the Internet Protocol (TCP/IP) in the ‘This connection
uses the following items’ list and click Properties. (
5. At the <Internet Protocol (TCP/IP) Properties)> dialog box, click the Obtain an IP address
automatically and the Obtain DNS server address automatically. Then click Advanced to
check the TCP/IP settings for accuracy. (
Figure 4
)
(Figure
Figure 3
)
Figure 1
Figure 2
Figure 3
Figure 4
6. The <Advanced TCP/IP Settings> dialo g box appears. At the [IP Settings] tab, check that
the IP Address is set to Enable DHCP. (
7. Select the [DNS] tab and check that the Append primary and connection specific DNS
suffix is selected. Click OK. (
Figure 6)
Figure 5)
8
Corecess 3311 Installation Guide
Figure 5
Figure 6
Page 9
Troubleshooting
If you cannot connect to SHDSL network, please check the status of the LEDs on the front
panel, and then ensure the following:
1. Check the LAN LED
If the LAN LED goes off, ensure that the Ethernet cable is firmly connected both to the
LAN port on the Corecess 3311 and Ethernet port on your PC.
2. Check the LINK LED
If the LINK LED blinks continuously and never stays solid on, ensure that the SHDSL
cable is firmly connected to the LINE port on the Corecess 3311. If the LINK LED still
blinks, contact your SHDSL service provider.
If the LINK LED goes off, turn off the power of the Corecess 3311 by pressing the power
switch and turn on the power again. If LINK LED still goes off, contact your vendor.
3. Check your PC’s IP address
If all LEDs operate normally and cables are firmly connected to the ports, ensure that
your PC’s IP address is pro perly assigned. Other wise assign a new IP addr ess according
to your operating system.
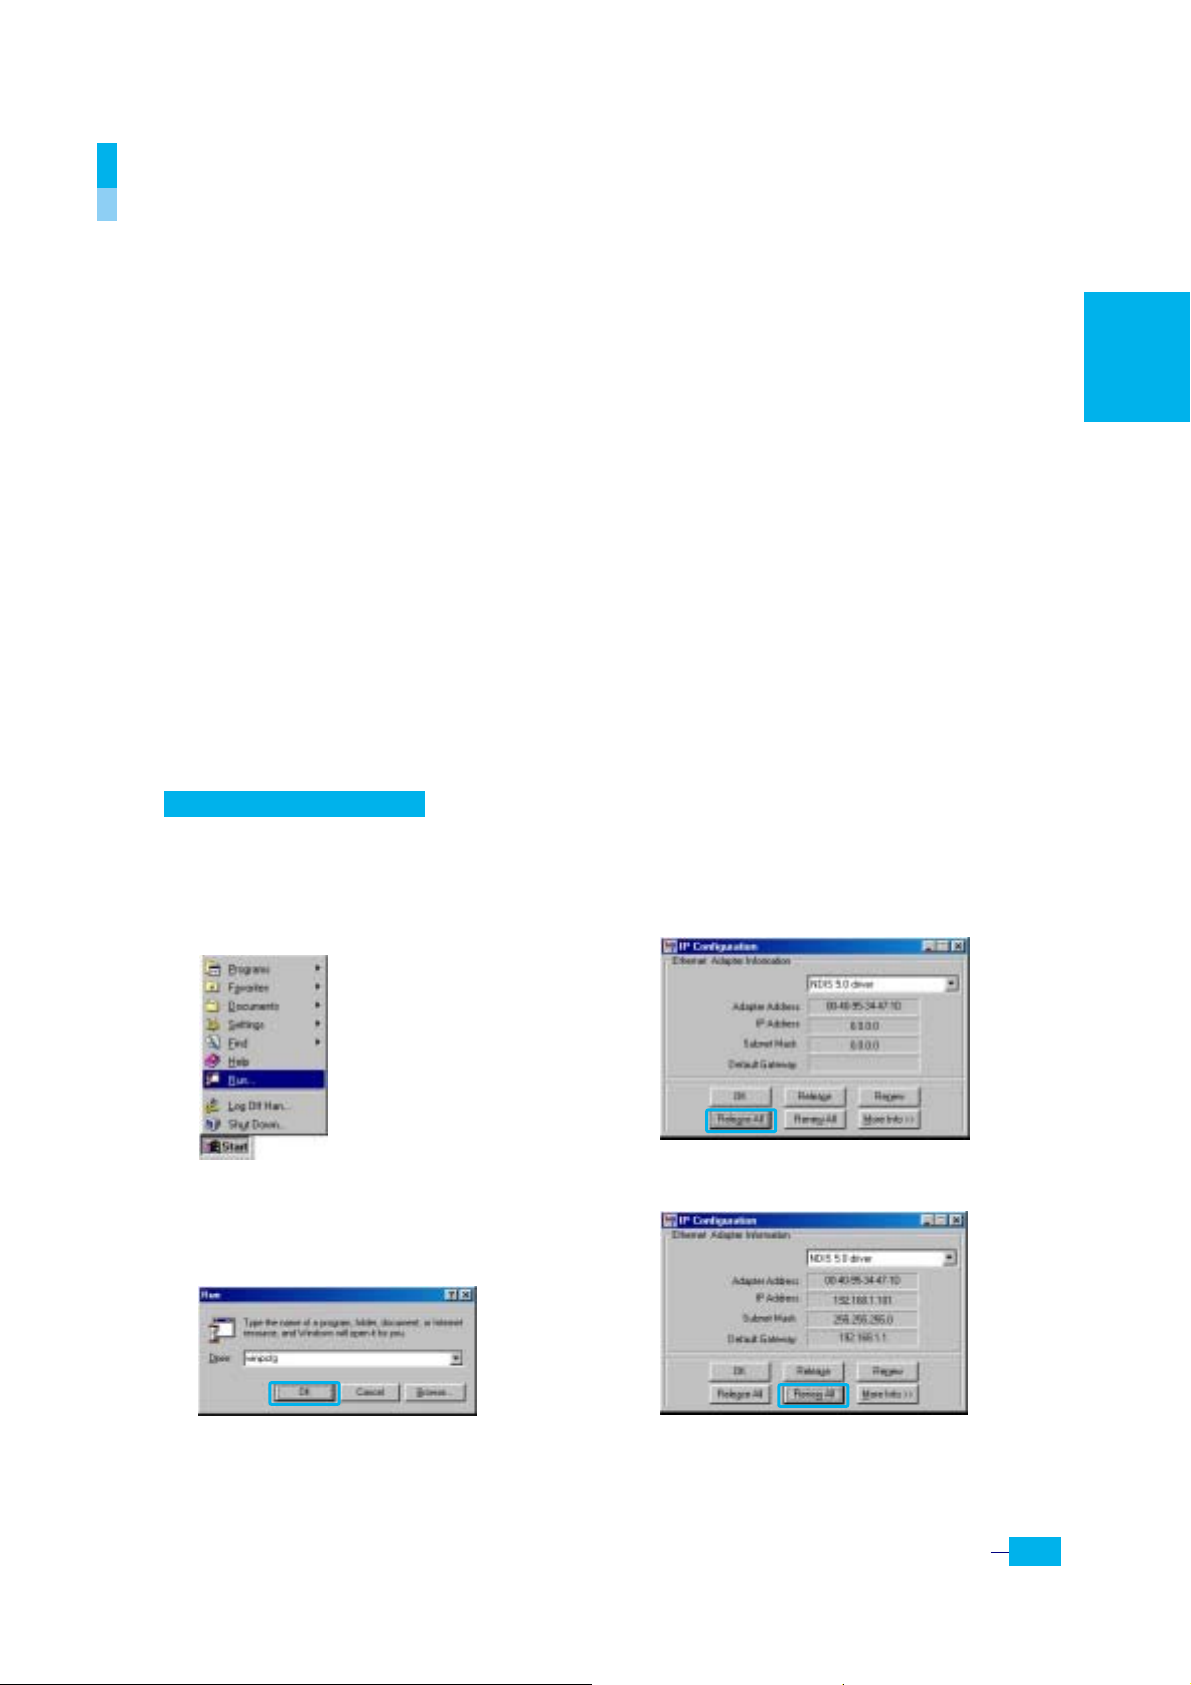
Windows 95/98/ME
n Click the Start
button and select
Run.
o Input Winipcfg and press the
[Enter] key.
p Select Ethernet adapter connected
with the Corecess 3311 and click
Release All.
Click Renew All.
q
English
9
Page 10
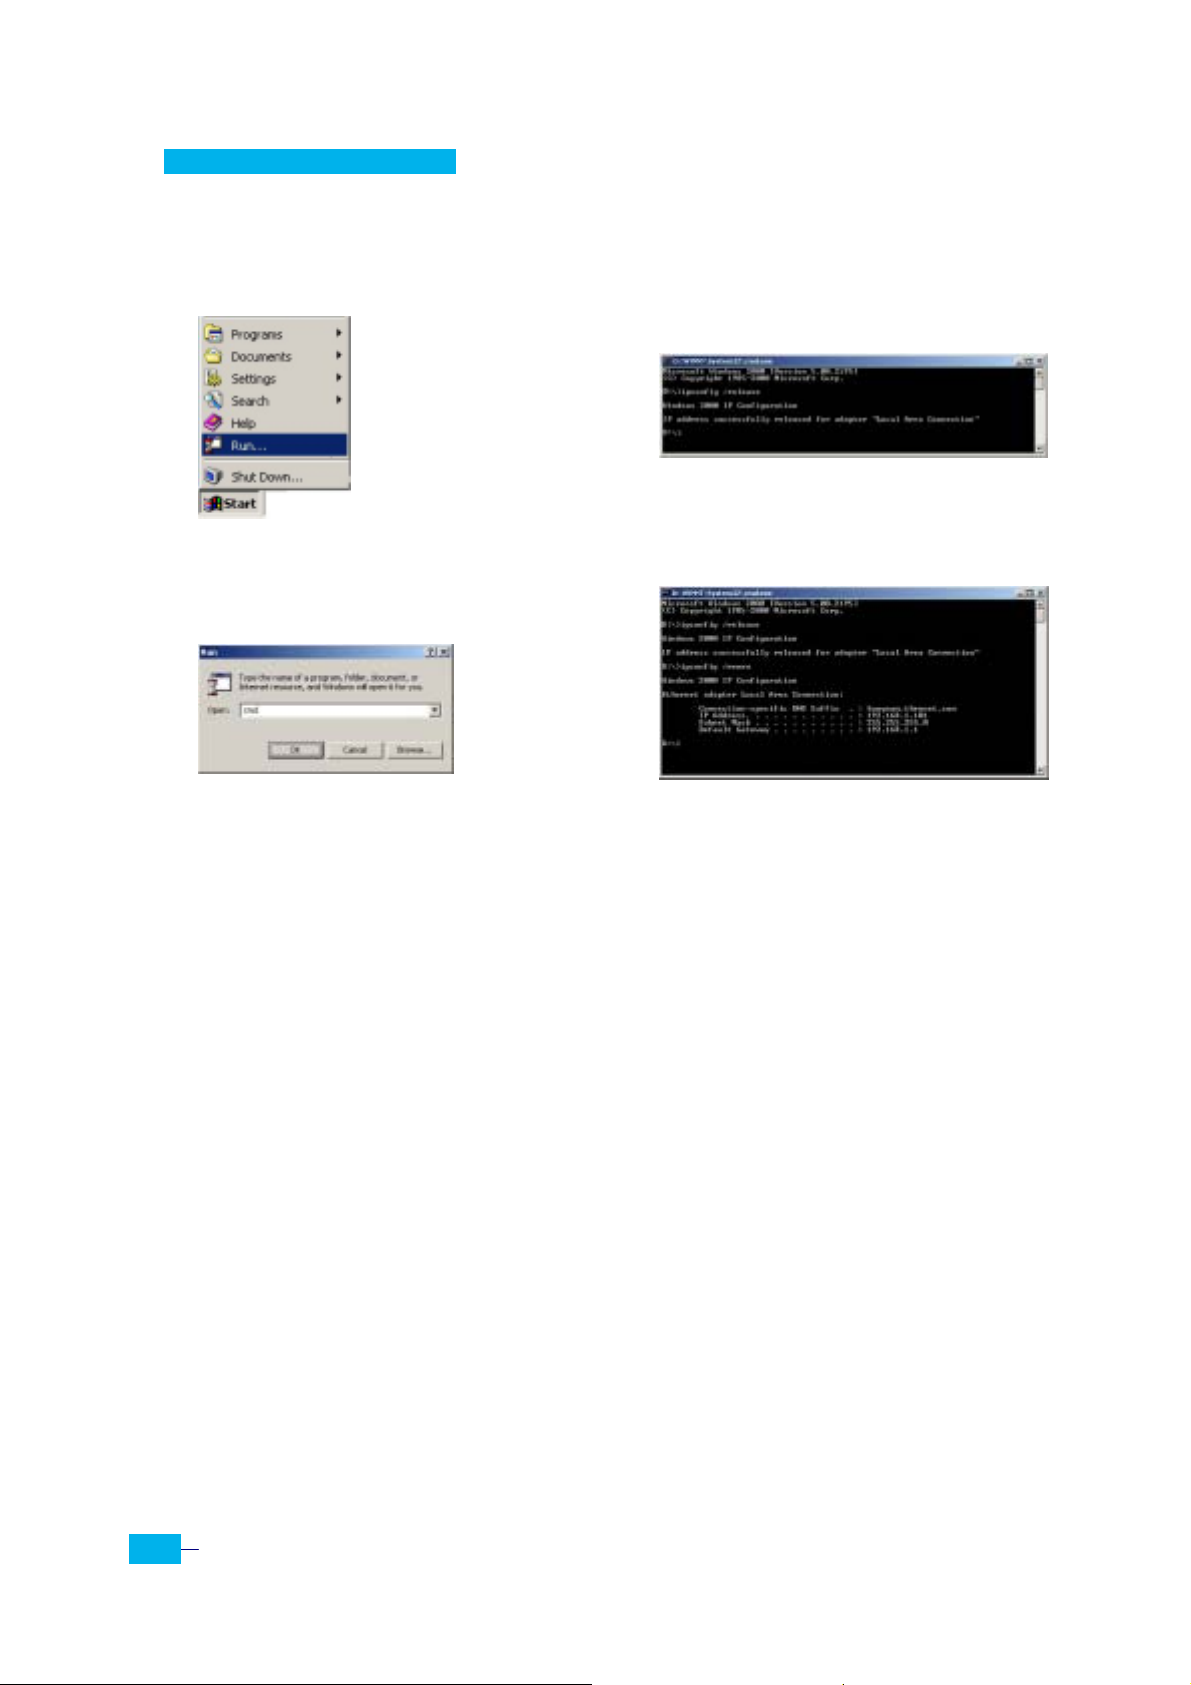
Windows 2000/NT/XP
n Click the Start
button and select
Run.
o
Input cmd and press the [Enter]
key.
4. Restart your PC
If new IP address is not assigned properly or you cannot solve the problem, ensure
that the Corecess 3311 turns on and then restart your PC.
p The DOS-prompt appears. Input
ipconfig /release and press
[Enter]
key.
q Input ipconfig /renew and press
[Enter] key.
10
Corecess 3311 Installation Guide
Page 11
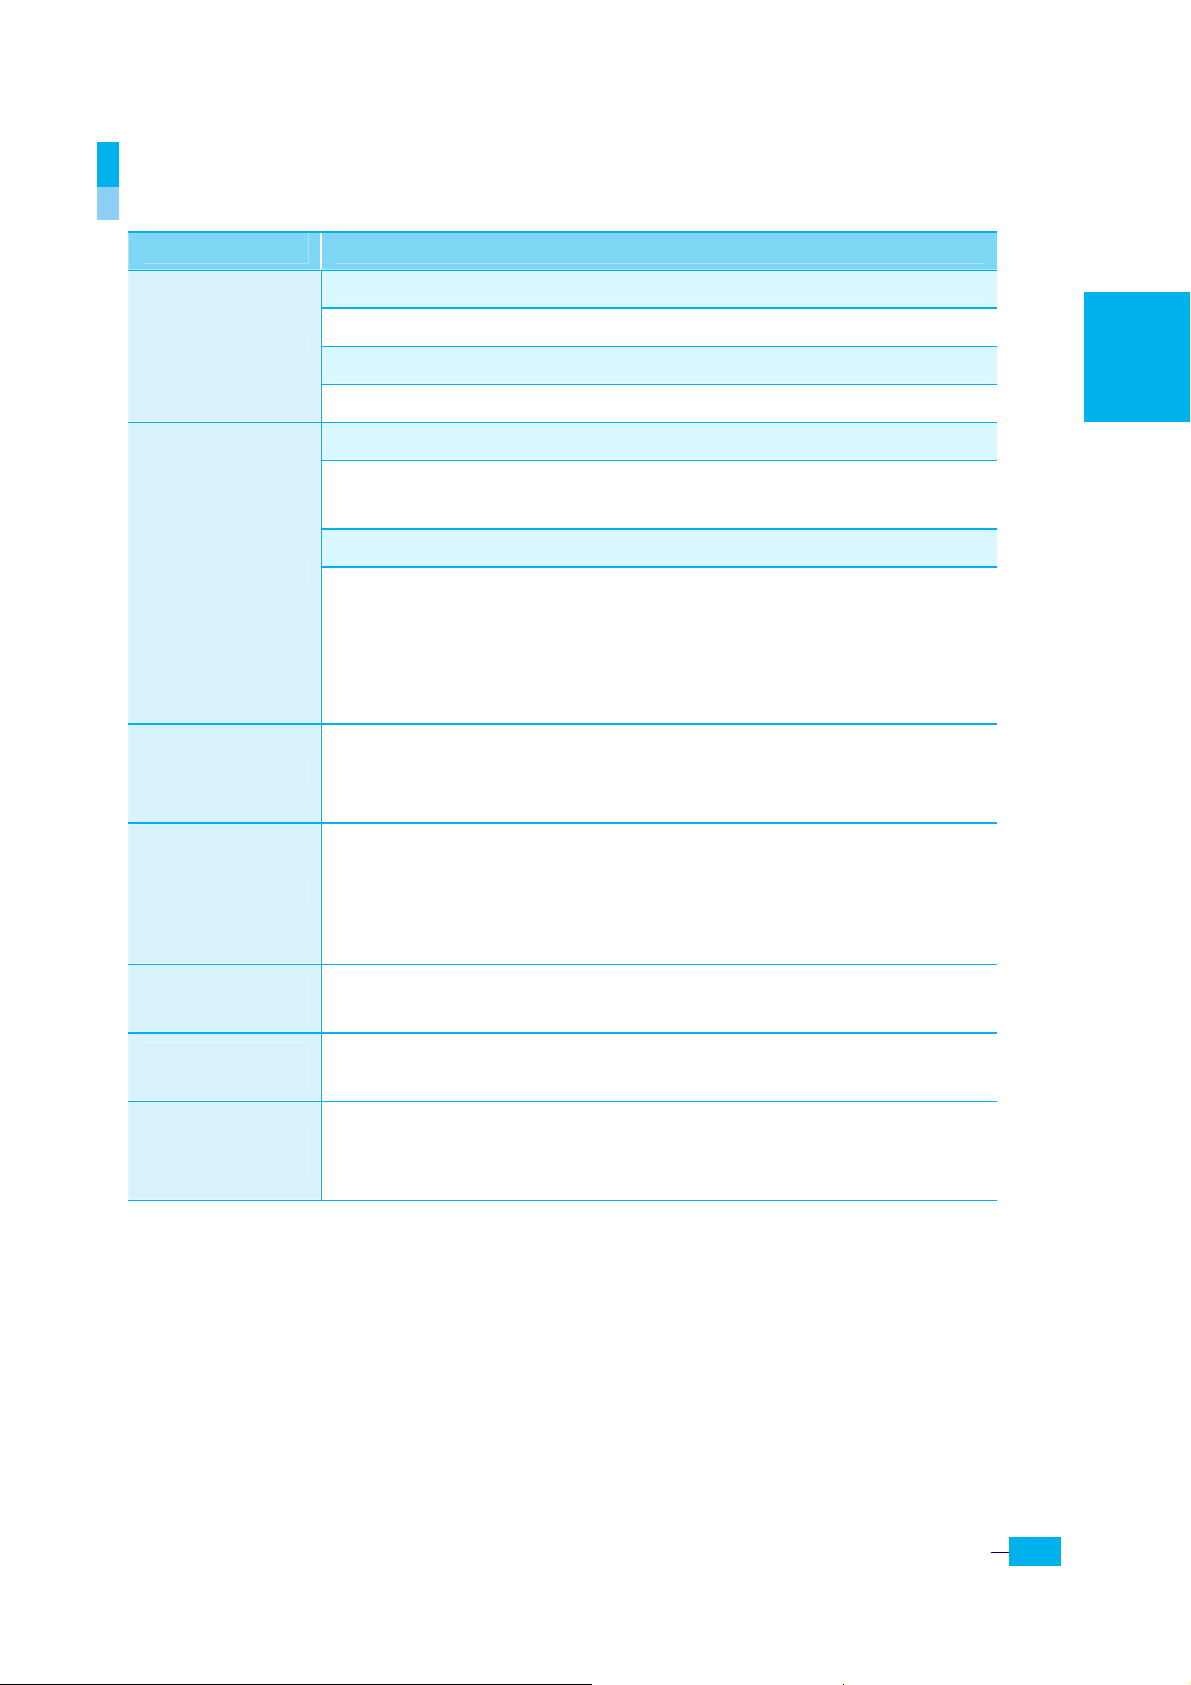
Technical Specifications
Description Specification
Standard
Interface
Connectors
LEDs
Environmental
Conditions
SHDSL Standard
ITU-T G.991.2 Standard
y
IEEE Standard
y IEEE 802.3 10Base-T
Ethernet
10Base-T (IEEE 802.3)
y
y Connector: RJ-45
SHDSL Line
ITU-T G.991.2 (G.SHDSL)
y
y Line Code: TC-PAM
y Up/Downstream: Up to 2. 3Mbps
y Distance: 3Km, up to 8Km @ 26AWG
y Connector: RJ-11
y 1 RJ-11 connectors (LINE)
y 1 RJ-45 connector (LAN)
1 Power socket (DC IN)
y
y POWER: Indicates DC power status
y LINK: Indicates the connection status with SHDSL network
y LAN: Indicates the connection status with Ethernet network
DATA : Indicates data transmit/receive status via Ethernet
y
network
y Temperature: 0°C ~ 50°C
y Humidity: 5% ~ 90%
English
Physical
Conditions
Power
Requirements
y Dimension: 140(W) x 150(D) x 30(H) mm
y Weight: 250g
Free Voltage SMPS Adaptor
y
y Power Input: 100-240 VAC, 50-60Hz, DC 5V/2A
y Power consumption: Max. 4 Watt
11
Page 12

12
Corecess 3311 Installation Guide
 Loading...