

Page 1
WARNING:
To reduce risk of injury, the user must read and understand this instruction manual before using the Lean Cycle Trainer machine
This machine is intended for domestic, indoor use only in accordance with the instructions provided in this manual.
Ideal Sourcing Ltd, Ideal Home House, Newark Road, Peterborough PE1 5WG
Please read these instructions carefully and retain for future use.
Model No: JTB500T
USER MANUAL
CMYK ONLY
Page 2

2 3
CMYK ONLY
GENERAL SAFETY INSTRUCTIONS
• Follow the warm-up exercises before you commence your workout.
• Increase speed, intensity and duration of exercises gradually.
• Make sure the Lean Cycle Trainer is securely assembled as described in this manual before use.
• The Lean Cycle Trainer is NOT suitable for use by children.
• Do not let the Lean Cycle Trainer get wet with any type of liquid.
• In addition, do not use the Lean Cycle Trainer while your hands are wet.
• Do not use outdoors.
• Only use the Lean Cycle Trainer on a surface that will not be dented or damaged by
the weight of the machine.
• Only one person is allowed to use the Lean Cycle Trainer at any time.
• Keep children and pets away from equipment while in use.
• Do not operate where aerosol (spray) products are being used or where
oxygen is being administered.
• Leave yourself 1 metre of space either side of the Lean Cycle Trainer for your safety.
• Always wear the appropriate workout clothes and footwear when exercising.
Avoid wearing loose clothing or jewellery which might get caught in the Lean Cycle Trainer.
NEVER operate the exercise bike with bare feet.
• Never remove your feet from the pedals while still in motion. Prevent your feet from coming out of the
shoe cage by keeping shoe laces tucked in and toe clips pulled snug around your shoe. If your
foot does become disengaged, push down on the resistance dial to stop the ywheel’s motion.
• Do not adjust the seat post over the STOP marker shown on the seat post.
• The Lean Cycle Trainer has been tested and certied to EN20957 class H. Maximum weight of user 120kg.
• Use this exercise bike for its intended purpose as described in this manual.
Congratulations on the purchase of your LEAN Cycle Trainer. Please study the following
instructions carefully before use paying special attention to the following guidelines.
For your safety and the safety of others
the following safeguards are very important.
Failure to read and follow these instructions may lead to serious injury.
WARNING:
Care must be taken when lifting the
Lean Cycle Trainer
as it may be heavy for you to lift.
You may need a friend or family member to help you unpack, assemble and position the unit.
We always recommend that you talk to your Doctor before embarking on any
new exercise regime if you have had any recent surgery, are pregnant, if you
have an injury or if you have concerns about your health or levels of tness
that you think additional exercise may aggravate.
Always discontinue exercising if you experience dizziness or shortness of breath.
Talk your Doctor before resuming exercising if you experienced nausea, pain or other
acute abnormal symptoms, or are simply concerned about continuing.
GENERAL SAFETY INSTRUCTIONS. Continued
Do not use attachments that have not been recommended by the manufacturer.
• Never operate the Lean Cycle Trainer if it is not working properly, or if it has been damaged.
Contact the authorized dealers for examination and repair.
• Keep hands and feet clear at all times from moving parts to avoid injury.
Never turn the pedal cranks by hand.
• Do not dismount the Lean Cycle Trainer until the pedals are at a complete STOP.
• Do not insert any object, hands or feet into any openings, or expose hands, arms or
feet to the drive mechanism or other potentially moving part of the exercise bike.
• Users should ensure they can adequately reach the handlebars and pedals once the
machine has been adjusted in accordance with the instructions contained in this manual.
• If at any time you feel dizzy or have difculty breathing, gradually stop pedalling and
carefully dismount the bike.
• Stay hydrated. Drink water throughout your ride as needed.
• Always keep some resistance on the ywheel.
• Do not attempt to ride the bike in a standing position at a high RPM until you
have practiced at slower speeds.
• Focus on form, posture and making smooth transitions between movements.
• After exercising, turn the resistance dial to increase resistance so the pedals will
not freely rotate and potentially injure someone.
UNPACKING:
• To avoid danger of suffocation, please keep all plastic bags out of the reach of children
• Check that there is no damage to the unit prior to use. In case of visible damage before
or during use, stop using the
Lean Cycle Trainer
and call our Customer Service number
0330 332 1300 with any issues. (Calls cost 9p per minute plus your phone company’s access charges)
Do not attempt to use the
Lean Cycle Trainer.
• The Lean Cycle Trainer is designed for home use only and is not intended for
commercial use. Please do not use outdoors.
• Please retain all packaging and paperwork for future use and store safely away from
children and animals.
Page 3
4 5
CMYK ONLY
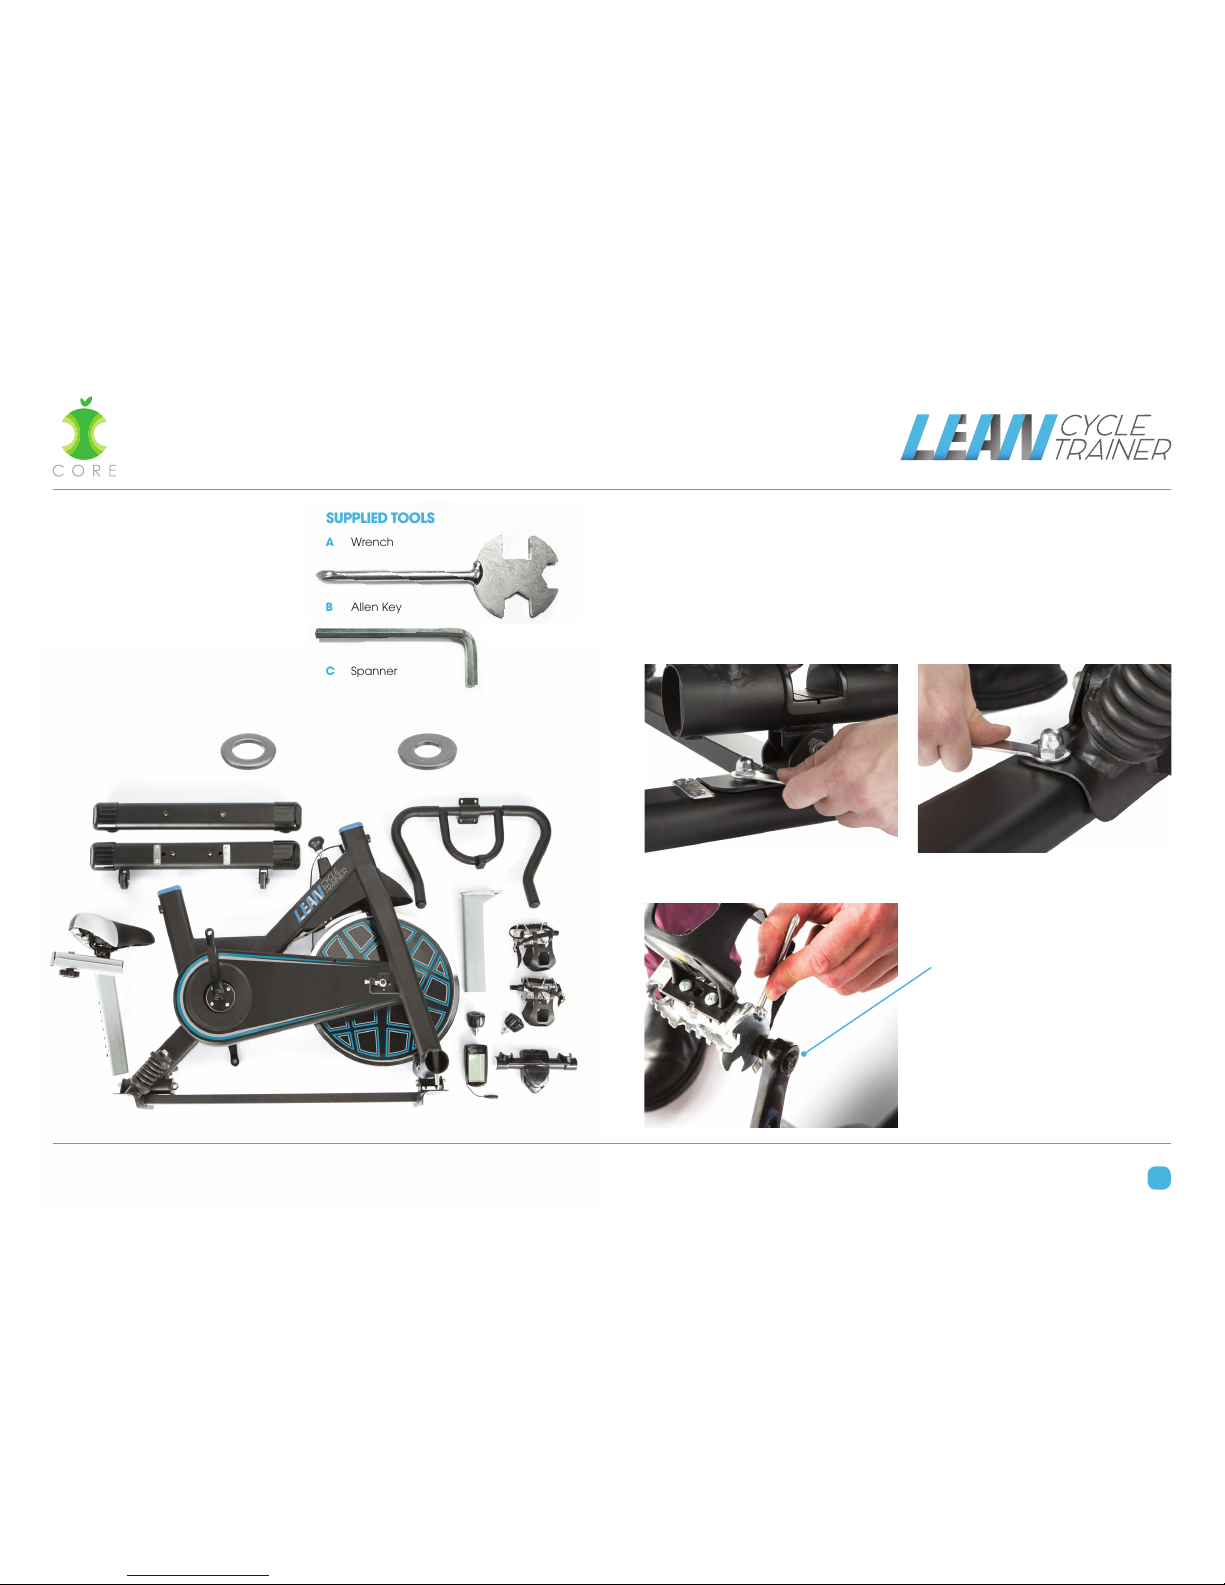
A Wrench
B Allen Key
C Spanner
SUPPLIED TOOLSWHAT’S IN THE BOX?
1 Rear Stabiliser bar
2 Front Stabiliser Bar (with wheels)
3 Bike Frame
4 Handlebar
5 Seat & Seat Post
6 Handlebar stem
7 Pedals
8 Handlebar Adjuster Dial
9 Seat Post Adjuster Dial
10 Monitor
11 Handlebar Cover
12 M8 Screw
13 08 Washer
14 M6 Screw
15 06 Washer
Due to our ongoing improvements programme, the images of the equipment in this manual may differ slightly to the machine you have received.
Assembly Instructions
Before you begin, check to make sure you have all the listed components in the box.
1.
Attach the front stabiliser bar (with wheels) using the 08 washers & M8 screws.
Use the Spanner to tighten them. Attach the rear stabiliser bar in the same manner.
Front Back
Attach the left and right pedals 4 onto
their corresponding crank arm. Use the
spanner provided to tighten them fully.
The end of each pedal axle is marked
with an L or an R to help you know
which pedal goes on which side.
Make sure the toe straps are fastened
rmly into place.
NOTE: Pedals install using an opposite
thread requiring you to tighten them
with an anitclockwise motion.
Installing the Pedals incorrectly will
damage the LEAN CYCLE TRAINER.
2.
1
2
3
4
5
6
7
8 9
10 11
13 15
Page 4

6 7
CMYK ONLY
Screw the handle bar to the support frame using 4 screws, use the allen key to tighten.
The handlebar cover 2 will click into place over the handlebar & handlebar support frame.
Add slide handle bar support frame into the main frame and secure into place using the dial.
3.
Insert 2 x AAA batteries into the monitor,
x the cable to the cable on the bike via
the jack. Then attach the monitor to the
handle bars, unscrew the bracket on the
monitor, slide it over the handle bar and
then tighten the phillips head screw to
secure in place.
4.
Assembly Instructions Assembly Instructions
Insert the seat pole into the bike frame and
secure in place with the dial.
5.
To adjust the height of the seat, turn the
dial anti-clockwise and then pull on the
dial to release the seat, move up or down
accordingly before turning the dial clockwise
to secure in place.
To move the saddle forward or backwards,
loosen the dial directly under the saddle,
by turning it clockwise (if standing directly
behind the saddle). Position it so you’re are
comfortable and then tighten the dial by
turning it anti-clockwise (if standing directly
behind the saddle).
5a.
Page 5

8 9
CMYK ONLY
Assembly Instructions Position Tips
Adjust the height of the saddle by moving
it up or down until the saddle is parallel to
your hip bone.
Adjust the distance from the seat to the
handlebars. You want it so that your knee is
above but not past your toes when sitting on
the LEAN CYCLE TRAINER.
When you want to use the lean function unscrew
the until the bottom of the screw is no longer
protruding out the bottom of the tube.
Keep the allen key in a safe place for future use.
Adjust the handle bars so your spine is in a
neutral position (not hunched or rounded).
There should be a slight bend in the elbows when
resting your hands on the handlebars.
Adjust the toe clips so that your feet feel snug
— but not so tight they cut off your circulation.
Pedalling with toe clips is more comfortable and
more efcient than pedalling without.
Don’t pedal with just your toes, otherwise you
may bring on foot and calf cramps. Instead,
press from the ball of your foot and through your
heel as you pump downward on the pedal, and
pull up with the top of your foot on the upstroke.
A.
B.
Ensure that all adjustment knobs are
properly secured and do not interfere with
range of motion during exercise.
If you wish to use the Lean Cycle Trainer in an
upright only position, take the allen key provided
and turn the screws at the front of the frame
until they contact the metal plate on the front
stabiliser bar.
A.
B.
You should be able to draw a straight line
down from the top of your knee to the
centre of the pedal C. when the pedal is
in the 3 O’clock position.
D.
C.
D.
Page 6

10 11
CMYK ONLY
Monitor
The monitor has an LCD display which shows Speed, Calories, Distance and Time. The display
automatically turns on once pedalling has commenced. Once the pedalling has stopped, the display
will blink and hold the data on the display for approx 45 seconds before turning off automatically.
Speed:
Shows Rotations per Minute.
Calories:
Tracks calories burned when exercising.
This is only a guide and may not be accurate
to calories you are actually burning.
Distance:
Shows distance covered in KM,
Will increase 0.1km at a time.
Time:
Shows length of time exercising in
minutes and seconds.
The readings from this monitor may vary and are only to be used as a guide.
The monitor requires 2 x AAA alkaline batteries (not supplied).
Remove batteries when not in daily use.
WARMING UP AND COOLING DOWN – IMPORTANT
One of the most important parts of your workout is to prepare your body for exercise on the
Lean Cycle Trainer. Warming up and cooling down exercises are identical and easy to
remember.
WARMING UP the muscles substantially decreases the chances of injury and only takes a
few moments to do. Lean Cycle Trainer can also be used for warming up and cooling down
exercise.
COOLING DOWN helps removes the lactic acid build-up in the muscles by oxygenating the
muscles after your exercise routine. Lactic acid is what makes you ache after a workout,
cooling down should be undertaken soon after the last set of exercises you intend to complete.
Both warming up and cooling down should be done slowly and accurately, there is no hurry to
complete these exercises, it is more important to complete them. In addition, it is good practise
to move around after the cool down exercises to further dissipate the lactic acid.
WARMING UP.
Stand close to a wall, chair or other solid
object. Use one hand to assist your balance.
Bend the opposite knee and lift your heel
towards your buttocks. Reach back and grasp
the top of your foot with the same side hand.
Keeping your inner thighs close together,
slowly pull your foot towards your buttocks until
you feel a gentle stretch in the front of your
thigh. You do not have to touch your buttocks
with your heel. Stop pulling when you feel the
stretch. Keep your kneecap pointing straight
down and keep your knees close together.
(Do not let the lifted knee swing outward.)
Hold the stretch for 20 to 30 seconds.
Repeat the exercise for the other leg.
QUADRICEPS STRETCH
TOP TIP:
Use a chair or a wall to help keep
your balance only if you need to.
Resistance Adjustment Dial
To increase the resistance turn the dial on the
main frame anti-clockwise, to decrease turn it
clockwise. It is recommended to start off at a
low resistance and increase gradually.
To stop the Lean Cycle Trainer quickly press
down on the adjustment dial.
Page 7

12 13
CMYK ONLY
Sit on the oor and bend your legs so that the
soles of your feet are together. Place your hands
on your ankles. Lean forward from the waist and
press down lightly on the inside of your knees.
You should feel a stretch in the muscles of your
inner thighs.
INNER THIGH STRETCH
Stand approximately one arm’s length away
from a wall or chair with your feet hip-width
apart. Keeping your toes pointed forward,
move one leg in close to the chair while
extending the other leg behind you. Bending
the leg closest to the chair and keeping the
other leg straight, place your hands on the
chair. Keep the heel of the back leg on the
ground and move your hips forward. Slowly
lean forward from the ankle, keeping your
back leg straight until you feel a stretch in your
calf muscles. Hold for 20 to 30 seconds. Repeat
the exercise for the opposite leg.
CALF AND ACHILLES STRETCH
WARMING UP AND COOLING DOWN – IMPORTANT
Lay at on your back with your hips relaxed against
the oor. Bend one leg at the knee. Keeping
both shoulders at on the oor, gently grasp the
bent knee with your hands and pull it over your
body and towards the ground. You should feel a
stretch in your hips, abdominal and lower back.
Hold for 20 to 30 seconds and release. Repeat the
exercise for the opposite side.
BUTTOCKS, HIPS AND ABDOMINAL STRETCH
Stand with your legs hip width apart. Extend
one leg out in front of you and keep that
foot at against the ground. With your hands
resting lightly on your thighs, bend your back
leg and lean forward slightly from your hips
until you feel a stretch in the back of your
thigh. Be sure to lean forward from the hip joint
rather than bending at your waist. Hold for
20 to 30 seconds. Repeat the exercise for the
opposite leg.
STANDING HAMSTRINGS STRETCH
WARMING UP AND COOLING DOWN – IMPORTANT
Page 8

14 15
CMYK ONLY
Guarantee
This product is guaranteed for a period of 1 year from date of purchase against mechanical and electrical defects.
Guarantee is only valid if the appliance is used solely for domestic purposes in accordance with the
instructions provided, is not connected to an unsuitable power supply. Unauthorised attempts to repair,
and misuse, are not covered by this guarantee.
Under the guarantee we undertake to repair or replace the unit free of charge for the guarantee period.
For product support contact Ideal Shopping Direct on 0330 3321300*
*Calls cost 9p per minute plus your phone company’s access charges (correct at time of printing).
NOTES
STORAGE & CLEANING
• Clean the Lean Cycle Trainer with a
damp cloth and mild detergent only.
• Regularly check the bike for damage
before storing.
• Should you need to store your
Lean Cycle Trainer it is advisable to
seek help with moving it.
Store on its feet at all times.
• Wipe down after every use with a
damp cloth from warm soapy water.
SPECIFICATIONS
Model No.: JTB500T
Size: Diameter 63cm; Height 115cm;
Width 96cm approx
Net Weight: 29kg approx.
Maximum User Weight: 120kg
Made in China
Disposal of Old Electrical & Electronic Equipment
(Applicable in the European Union and other European countries with separate collection systems)
Problem Solution
Base is unstable Make sure that the oor is at and that there are no tiny objects
under the stabilizers. Adjust the rear stabilizer end cap
Handlebar is shaking Ensure that the bolts are tightened securely
Display isn’t working Check that the cable is connected from the monitor to the bike.
Resistance dial doesn’t
alter resistance
The resistance dial may be broken, contact Ideal Shopping
Direct Customer Services.
TROUBLESHOOTING
Appliances bearing the symbol shown here may not be disposed of in domestic rubbish.
You are required to dispose of old electrical and electronic appliances like this separately.
Please visit www.recycle-more.co.uk or www.recyclenow.co.uk for access to information
about the recycling of electrical items. Please visit www.weeeireland.ie for access to
information about the recycling of electrical items purchased in Ireland.
The WEEE directive, introduced in August 2006, states that all electrical items must be
recycled, rather than taken to landll.
Please arrange to take this appliance to your local Civic Amenity site for recycling,
once it has reached the end of its life.
Page 9

© 2017 Ideal Sourcing Ltd Lean Cycle Trainer USER MANUAL
Ideal Shopping Direct Limited, Ideal Home House, Newark Road, Peterborough PE1 5WG
Made in China E&OE 05/17 V1.0
 Loading...